
Owner’s Manual

Write the model and serial numbers here:
Model # _______________________________
Serial # _______________________________
You can find them on a label located on the backside
of the lower drawer front.
49-2000685 Rev. 1 06-20 GEA
Electric Warming Drawer
Model: CTW900M and CTW900P
Contents
Safety Information ...............................3
Using the Warming Drawer
Features ......................................5
Operating Tips .................................6
Care And Cleaning
Cleaning The Warming Drawer ....................9
Installation Instructions .........................10
Troubleshooting Tips ...........................16
Limited Warranty ...............................17
Accessories ...................................19
Consumer Support .............................20
Owner’s Manual & Installation Instructions
Español
Para consultar una version en español de este manual de instrucciones,
visite nuestro sitio de internet cafeappliances.com.
TM

2 49-2000685 Rev. 1
THANK YOU FOR MAKING CAFÉ A PART OF YOUR HOME.
We take pride in the craftsmanship, innovation and design that goes into every Café product, and
we think you will too. Among other things, registration of your appliance ensures that we can deliver
important product information and warranty details when you need them.
Register your Café appliance now online. Helpful websites are available in the Consumer Support
section of this Owner’s Manual. You may also mail in the pre-printed registration card included in the
packing material.
TM

49-2000685 Rev. 1 3
SAFETY INFORMATION
READ AND SAVE THESE INSTRUCTIONS
IMPORTANT SAFETY INFORMATION
READ ALL INSTRUCTIONS BEFORE USING THE APPLIANCE
WARNING
Read all safety instructions before using the product. Failure to follow these instructions may result
in fire, electrical shock, serious injury or death.
WARNING
IMPORTANT SAFETY NOTICE
All warming drawers can tip and injury could result if not properly installed.
To prevent accidental tipping of the warming drawer, attach it to the wall with an anti-tip brace as described in
the Installation Instructions.
WARNING
GENERAL SAFETY INSTRUCTIONS
Ŷ 8VHWKLVDSSOLDQFHRQO\IRULWVLQWHQGHGSXUSRVHDV
described in this Owner’s Manual.
Ŷ %HVXUH\RXUDSSOLDQFHLVSURSHUO\LQVWDOOHGDQG
grounded by a qualified installer in accordance with
the provided installation instructions.
Ŷ 'RQRWDWWHPSWWRUHSDLUUHSODFHRUFOHDQDQ\SDUW
of your warming drawer unless it is specifically
recommended in this manual. All other servicing
should be transferred to a qualified technician.
Ŷ %HIRUHSHUIRUPLQJDQ\VHUYLFHGLVFRQQHFWWKH
power supply at the household distribution panel by
removing the fuse or switching off the circuit breaker.
Ŷ 'RQRWOHDYHFKLOGUHQDORQH²FKLOGUHQVKRXOGQRW
be left alone or unattended in an area where an
appliance is in use. They should never be allowed
to climb, sit or stand on any part of the appliance.
Ŷ
CAUTION
Do not store items of interest
to children in cabinets above a warming drawer -
children climbing on the warming drawer to reach
items could be seriously injured.
Ŷ 8VHRQO\GU\SRWKROGHUV²PRLVWRUGDPSSRW
holders on hot surfaces may result in burns from
steam. Do not let pot holders touch hot heating
elements. Do not use a towel or other bulky cloth in
place of pot holders.
Ŷ 1HYHUXVH\RXUDSSOLDQFHIRUZDUPLQJRUKHDWLQJ
the room.
Ŷ 'RQRWWRXFKWKHKHDWLQJHOHPHQWVRUWKHLQWHULRU
surface of the warming drawer. These surfaces
may be hot enough to burn even though they are
dark in color. During and after use, do not touch,
or let clothing or other flammable materials contact
any interior area of the warming drawer; allow
sufficient time for cooling first. Other surfaces of
the appliance may become hot enough to cause
burns. Potentially hot surfaces include the warming
drawer vent opening, surfaces near the opening
and crevices around the warming drawer door.
Ŷ 'RQRWKHDWXQRSHQHGIRRGFRQWDLQHUV3UHVVXUH
could build up and the container could burst,
causing an injury.
Ŷ 'RQRWXVHDOXPLQXPIRLOWROLQHWKHZDUPLQJGUDZHU
bottom. Foil can trap heat or melt, resulting in
damage to the product and a shock or fire hazard.
Ŷ $YRLGVFUDWFKLQJRULPSDFWLQJJODVVGRRUVRUFRQWURO
panels. Doing so may lead to glass breakage. Do
not cook on a product with broken glass. Shock, fire
or cuts may occur.
Ŷ 7KHSXUSRVHRIWKHZDUPLQJGUDZHULVWRKROG
hot cooked foods at serving temperature (greater
WKDQ)%DFWHULDZLOOJURZLQIRRGZKLOHLW
is below 140°F. Therefore, always start with hot
food; cold food cannot be heated or cooked in the
warming drawer.

4 49-2000685 Rev. 1
SAFETY INFORMATION
READ AND SAVE THESE INSTRUCTIONS
IMPORTANT SAFETY INFORMATION
READ ALL INSTRUCTIONS BEFORE USING THE APPLIANCE
WARNING
KEEP FLAMMABLE MATERIALS AWAY FROM THE WARMING DRAWER
Failure to do so may result in fire or personal injury.
Ŷ 'RQRWVWRUHRUXVHIODPPDEOHPDWHULDOVLQRUQHDU
a warming drawer, including paper, plastic, pot
holders, linens, wall coverings, curtains, drapes and
gasoline or other flammable vapors and liquids.
Ŷ 1HYHUZHDUORRVHILWWLQJRUKDQJLQJJDUPHQWVZKLOH
using the appliance. These garments may ignite if
they contact hot surfaces, causing severe burns.
Ŷ 'RQRWOHWFRRNLQJJUHDVHRURWKHUIODPPDEOH
materials accumulate in or near the warming
drawer. Grease in the warming drawer or near the
warming drawer may ignite.
WARNING
IN THE EVENT OF A FIRE, TAKE THE FOLLOWING
STEPS TO PREVENT INJURY AND FIRE SPREADING
Ŷ 'RQRWXVHZDWHURQJUHDVHILUHV1HYHUSLFNXSD
flaming pan.
Ŷ ,IWKHUHLVDILUHLQWKHZDUPLQJGUDZHUVPRWKHUWKH
fire by closing the warming drawer door and turning
the warming drawer off or by using a multi-purpose
dry chemical or foam-type fire extinguisher.
WARNING
WARMING DRAWER SAFETY INSTRUCTIONS
Ŷ 6WDQGDZD\IURPWKHZDUPLQJGUDZHUZKHQRSHQLQJ
the warming drawer door. Hot air or steam which
escapes can cause burns to hands, face and/or eyes.
Ŷ.HHSWKHZDUPLQJGUDZHUYHQWXQREVWUXFWHG
Ŷ.HHSWKHZDUPLQJGUDZHUIUHHIURPJUHDVHEXLOGXS
Grease in the warming drawer may ignite
Ŷ3ODFHZDUPLQJGUDZHUUDFNVLQGHVLUHGORFDWLRQZKLOH
warming drawer is cool. If rack must be moved while
warming drawer is hot, do not let pot holder contact
hot heating element in warming drawer.
Ŷ'RQRWOHDYHLWHPVVXFKDVSDSHUFRRNLQJXWHQVLOV
or food in the warming drawer when not in use.
Items stored in a warming drawer can ignite.
How to Remove Protective Shipping Film and Packaging Tape
Carefully grasp a corner of the protective shipping film
with your fingers and slowly peel it from the appliance
surface. Do not use any sharp items to remove the film.
Remove all of the film before using the appliance for the
first time.
To assure no damage is done to the finish of the product,
the safest way to remove the adhesive from packaging
tape on new appliances is an application of a household
liquid dishwashing detergent. Apply with a soft cloth and
allow to soak.
NOTE: The adhesive must be removed from all parts. It
cannot be removed if it is baked on.

49-2000685 Rev. 1 5
Features
USING THE WARMING DRAWER: Features
1RWDOOIHDWXUHVDUHRQDOOPRGHOV$SSHDUDQFHPD\YDU\
The warming drawer will keep hot, cooked foods at serving temperature. Always start with hot food. Do not use to
heat cold food other than proofing yeast dough, crisping crackers, chips or dry cereal.
Control Knob
The warming drawer controls are hidden with the drawer
shut. Open the drawer. The controls are on the right side
of the front frame.
To use the warming drawer, press the
ON/OFFVZLWFKWRWKH21SRVLWLRQ
Slide the moisture selector control to
the open or closed setting (See the
Moisture Selector section).
Turn the control knob to the desired setting.
ON Signal Light
7KH21VLJQDOOLJKWLVORFDWHGEHORZWKH212))
VZLWFKDQGJORZVZKHQWKH212))VZLWFKLVLQWKH21
SRVLWLRQ,WVWD\VRQXQWLOWKH212))VZLWFKLVPRYHGWR
the OFF position.
7KH21VLJQDOOLJKWLVYLVLEOHWKURXJKWKHOLJKWYLHZHULQ
the drawer front panel when the drawer is closed. This is
a reminder that the heat is on.
Moisture Selector
The moisture selector is located on the inside front of the
drawer.
To keep foods moist, slide the moisture selector control
away from the control knob. This closes the vent and
seals the moisture inside the drawer. With the vent
closed hot foods stay moist and soft.
In this setting condensation may occur around the inside
edge of the drawer.
To keep foods crisp, slide the
moisture selector control to the
right towards the control knob.
This opens the vents and
allows the moisture to escape.
With the vents open, it is
normal for moisture to collect
on surfaces above the
warming drawer.
PROOF ............ 75–95°F
LOW .............. 140–160°F
MED ............... 160–195°F
HIGH .............. 195–230°F
&RQWURO.QRE
212))6ZLWFK
216LJQDO/LJKW
Rating Plate
216LJQDO/LJKW
9LHZHU/HQV
Warming Drawer
Moisture Selector
(on back of panel)
HIGH
PROOF
MED
LOW
Moist
Closed
Vent
Crisp
Open
Vent

6 49-2000685 Rev. 1
Operating Tips
Rack
Ŷ 5DFNZLOOILWIURPIURQWWREDFN
Ŷ 3UHKHDWZLWKWKHUDFNLQSODFH
Ŷ 8VLQJWKHUDFNDOORZVIRUGRXEOHVWDFNLQJRILWHPV
USING THE WARMING DRAWER: Operating Tips
Double stacking items with the rack in position.
When Using The Warming Drawer
Do not line the warming drawer with aluminum foil.
Ŷ $OORZWLPHIRUWKHGUDZHUWREHSUHKHDWHG
LOW 8 minutes
MED 15 minutes
HIGH 20 minutes
NOTE: It is not necessary to preheat the drawer for
proofing.
Food in heat-safe glass and glass ceramic pans may
need higher thermostat setting as compared to food in
metal pans.
Ŷ 5HSHDWHGRSHQLQJRIWKHGUDZHUDOORZVWKHKRWDLU
to escape and the food to cool. Allow extra time
for temperature inside the drawer to stabilize after
adding items.
Ŷ :LWKODUJHORDGVLWPD\EHQHFHVVDU\WRXVHDKLJKHU
thermostat setting and cover some of the cooked
food items.
Ŷ )RRGVKRXOGEHNHSWKRWLQLWVFRRNLQJFRQWDLQHURU
transferred to a heat-safe serving dish.
Ŷ $OXPLQXPIRLOPD\EHXVHGWRFRYHUIRRGWRSUHYHQWLW
from drying out.
CAUTION
Plastic containers or plastic wrap will
melt if in direct contact with the drawer. Melted plastic
may not be removable and is not covered under your
warranty.
Ŷ 5HPRYHVHUYLQJVSRRQVHWFEHIRUHSODFLQJ
containers in warming drawer.
To Warm Serving Bowl And Plates
7RZDUPVHUYLQJERZOVDQGSODWHVVHWWKHFRQWURORQ/2:
Ŷ 8VHRQO\KHDWVDIHGLVKHV
Ŷ 3ODFHWKHHPSW\GLVKHVRQWKHUDFNWRUDLVHWKHPRIIWKH
bottom of the drawer. If you want hotter dishes or want
to heat fine china, please check with the manufacturer
of the dishes for their maximum heat tolerance.
Ŷ 3UHKHDWHPSW\VHUYLQJGLVKZKLOHSUHKHDWLQJWKHGUDZHU
Ŷ :KHQKROGLQJKRWFRRNHGIRRGVDQGZDUPLQJHPSW\
serving dishes at the same time, place the serving
dishes on the high rack position and the food on the
bottom of the drawer.
CAUTION
'LVKHVPD\EHKRW8VHSRWKROGHUVRU
mitts when removing hot dishes.

49-2000685 Rev. 1 7
Operating Tips
To Proof Yeast Bread Dough
Yeast dough can be proofed in the warming drawer.
Ŷ 3ODFH\RXUGLVKRQWKHZDUPLQJGUDZHUERWWRP
Ŷ <RXPXVWDOZD\VWXUQWKHFRQWURONQREWRLOW then
immediately back to PROOF.
Ŷ &ORVHWKHYHQW
Ŷ /LJKWO\RLOWKHWRSRIWKHGRXJKLQDERZOODUJHHQRXJK
to double the dough size. Cover with a cloth.
Ŷ 3UHKHDWLQJQRWUHTXLUHGIRUSURRILQJ
Ŷ &KHFNWKHGRXJKKHLJKWLQPLQXWHV$GGWLPHDV
needed. The dough should remain in the drawer until
it has doubled in size and a slight depression remains
when the surface is touched gently with a finger.
USING THE WARMING DRAWER: Operating Tips
Cris
p
Open
Vent
To Crisp Stale Items
Ŷ 3ODFHIRRGLQORZVLGHGGLVKHVRUSDQV
Ŷ 3UHKHDWRQ/2:VHWWLQJDQGRSHQWKHYHQW
Ŷ &KHFNFULVSQHVVDIWHUPLQXWHV$GGWLPHDV
needed.
Temperature Selection Chart for Crisp Foods
To keep several different foods hot, set the temperature
to the food needing the highest setting. Place the items
needing the highest setting on the bottom of the drawer
and items needing less heat on the rack.
Tips:
Ŷ /HDYHIRRGXQFRYHUHG
Ŷ 'RQRWXVHSODVWLFFRQWDLQHUVRUSODVWLFZUDS
Ŷ 3UHKHDWSULRUWRXVHDFFRUGLQJWRUHFRPPHQGHGWLPHV
Moist
Closed
Vent
Food Type Control Setting
Moisture
Selector Setting
%DFRQ HIGH 23(1
%UHDGKDUGUROOV MED 23(1
Fried foods HIGH 23(1
Pies, two crusts MED 23(1
Pizza HIGH 23(1
Potatoes, baked HIGH 23(1
Tortilla Chips /2: 23(1

8 49-2000685 Rev. 1
Mois
t
Closed
Vent
Operating Tips
Temperature Selection Chart for Moist Foods
To keep several different foods hot, set the temperature
to the food needing the highest setting. Place the items
needing the highest setting on the bottom of the drawer
and items needing less heat on the rack.
Tips:
Ŷ &RYHUIRRGZLWKOLGRUDOXPLQXPIRLO
Ŷ 'RQRWSXWZDWHULQWKHZDUPLQJGUDZHU
Ŷ 'RQRWXVHSODVWLFFRQWDLQHUVRUSODVWLFZUDS
Ŷ 3UHKHDWSULRUWRXVHDFFRUGLQJWRUHFRPPHQGHGWLPHV
USING THE WARMING DRAWER: Operating Tips
86'$)6,6UHFRPPHQGVDQLQWHUQDOWHPSHUDWXUHRI)DVWKHPLQLPXP
GRQHQHVVIRUEHHI8VHDSRUWDEOHPHDWWKHUPRPHWHUWRFKHFNLQWHUQDO
temperatures.
Food Type Control Setting
Moisture
Selector Setting
%HHIPHGLXPDQG
well done* MED &/26('
%UHDGVRIWUROOV MED &/26('
Casseroles MED &/26('
Cooked cereal MED &/26('
Eggs MED &/26('
Fish, seafood MED &/26('
Fruit MED &/26('
Gravy, cream sauces MED &/26('
Ham MED &/26('
/DPE MED &/26('
Pancakes, waffles HIGH &/26('
Pies, one crust MED &/26('
Pork MED &/26('
Potatoes, mashed MED &/26('
Poultry HIGH &/26('
Vegetables MED &/26('

49-2000685 Rev. 1 9
Cleaning The Warming Drawer
%HVXUHWKHFRQWUROVDUHLQWKH2))SRVLWLRQDQGDOOVXUIDFHVDUHFRROEHIRUHFOHDQLQJDQ\SDUWRIWKHZDUPLQJGUDZHU
Painted Or Enameled Surfaces
8VHVRDSDQGZDUPZDWHUWRWKRURXJKO\FOHDQ
CARE AND CLEANING: Cleaning The Warming Drawer
Stainless Steel
Do not use a steel wool pad; it will scratch the surface.
To clean the stainless steel surface, use warm sudsy
water or a stainless steel cleaner or polish. Always wipe
the surface in the direction of the grain. Follow the cleaner
instructions for cleaning the stainless steel surface.
&OHDQHUVZLWKR[DOLFDFLGVXFKDV%DU.HHSHUV)ULHQG6RIW
Cleanser™ will remove surface rust, tarnish and small
EOHPLVKHV8VHRQO\DOLTXLGFOHDQVHUIUHHRIJULWDQGUXELQ
the direction of the brush lines with a damp, soft sponge.
To inquire about purchasing cleaning products including
stainless steel appliance cleaner or polish, see the
Accessories and Consumer Support sections at the end
of this manual.
Rack
Clean the rack with detergent and water. After cleaning,
rinse the rack with clean water and dry with a clean cloth.
Control Knob
The control knob may be removed for easier cleaning.
Make sure the knob is in the PROOF position and pull it
straight off the stem for cleaning.
The knob should be washed with soap and water. Make
sure the inside of the knob is dry before replacing.
Replace the knob in the PROOF position to ensure
proper placement.

10 49-2000685 Rev. 1
Installation
Instructions
If you have questions visit our website at: cafeappliances.com
BEFORE YOU BEGIN
Read these instructions completely and carefully.
Ŷ
IMPORTANT – Save these instructions
for local inspector’s use.
Ŷ
IMPORTANT – Observe all governing
codes and ordinances.
Ŷ
Note to Installer – %HVXUHWROHDYHWKHVH
instructions with the Consumer.
Ŷ
Note to Consume – .HHSWKHVHLQVWUXFWLRQVIRU
future reference.
Ŷ
Product failure due to improper installation is not
covered under the Warranty.
Ŷ
WARNING
This appliance must be properly
grounded.
Ŷ
WARNING
Insure that the power cord does
not contact the hot surfaces on the bottom of
ovens, cooktops, or any other appliance.
Ŷ $77(17,21,167$//(5 – Proper installation
is the responsibility of the installer and
product failure due to improper installation is
NOT covered under warranty.
MATERIALS YOU WILL NEED
TOOLS REQUIRED
Warming Drawer
CTW900M and CTW900P
INSTALLATION INSTRUCTIONS
Cut Resistant Gloves
Drill and
´%LW
Phillips Screwdriver
Hand Saw
Wood screws and adhesive or other hardware for
installing runners or shelf to support warmer drawer.
Runners must be level, rigidly mounted and capable of
supporting 150 pounds.
2 x 4 or 2 x 2 lumber for runners and brace
Safety Glasses
Measuring Tape
/HYHO

49-2000685 Rev. 1 11
INSTALLATION INSTRUCTIONS
Installation Instructions
IMPORTANT SAFETY INSTRUCTIONS
PRE-INSTALLATION CHECKLIST
GROUNDING INSTRUCTIONS
IMPORTANT—(Please read carefully)
FOR PERSONAL SAFETY, THIS APPLIANCE
MUST BE PROPERLY GROUNDED.
This warming drawer must be supplied with 120V,
60Hz, and connected to an individual, properly
grounded branch circuit, and protected by a 15 or
20 amp circuit breaker or time delay fuse.
Ŷ A properly grounded 3-prong receptacle should
be located within reach of the drawer’s 56" long
power cord.
Ŷ /RFDWHWKHUHFHSWDFOHLQDQDGMDFHQWFDELQHW
² within 42” of the right side or,
² within 16” of the left side or
² A recessed receptacle may be located on
the right side of the cutout, 7” maximum from
the back of the cabinet. In this location, the
excess power cord should be coiled and taped
to the right side of the unit.
IMPORTANT—(Please read carefully)
The power cord of this appliance is equipped with a
3-prong (grounding) plug that mates with a standard
3-prong grounding wall receptacle to minimize the
possibility of electric shock. The customer should
have the wall receptacle and circuit checked by a
qualified electrician to make sure the receptacle is
properly grounded and has the correct polarity.
Ŷ Where a standard 2-prong wall receptacle is
encountered, it is the personal responsibility and
obligation of the customer to have it replaced
with a properly grounded 3-prong wall receptacle.
Do not, under any circumstances, cut or remove the
third (ground) prong from the power cord.
DO NOT USE AN EXTENSION CORD OR
ADAPTER PLUG WITH THIS APPLIANCE.
FOLLOW NATIONAL ELECTRICAL CODES AND
ORDINANCES.
A
When preparing warming drawer cabinet, make
sure the inside of the cabinet and the warming
drawer do not interfere with each other. (see
sections on preparing cabinet)
B
5(029(3$&.$*,1*0$7(5,$/6)DLOXUHWR
remove packaging materials could result in damage
to the appliance. Remove all packing parts from
warming drawer including lifting up the warming
drawer to confirm all packaging is removed.
C
Remove Installation Instructions from literature
pack and read them carefully before you begin.
%HVXUHWRSODFHDOOOLWHUDWXUH2ZQHU¶V0DQXDO
Installations, etc in a safe place for future
reference.
Rating plate
Recessed
receptacle 7"
max. from rear
on right side
Drill 1
1
/2” hole for
power cord for
left or right side
outlet location

12 49-2000685 Rev. 1
Installation Instructions
PREPARING CABINET: BELOW A COUNTERTOP
Ŷ When installed, the front face of the warming
drawer will be nearly flush with cabinetry doors or
drawer fronts.
Ŷ Drawer overlaps will conceal cut edges on all sides
of the opening.
The rough opening for the drawer must be:
²'HSWK´PLQLPXPIURPLQVLGHEDFNWR
front of cabinet frame.
²:LGWK25-1/2" for 27" wide models
28-1/2" for 30" wide models
²+HLJKW
1
/4”
Ŷ ´PLQLPXPDERYHIORRURUDERYHWRHNLFN
1
/4”
from floor to bottom of cutout is recommended for
under countertop installation.
Installation below a cabinet drawer:
The warming drawer may be installed beneath a
cabinet drawer. In this installation, a solid barrier
should be installed above the warming drawer to
EORFNDFFHVV8VHDQ\VROLGPDWHULDOVXFKDV´
thick plywood. Allow at least 1/4” air gap between the
barrier and the top of the warming drawer. Observe
the 5” min. above the floor or 1” above the toekick
min. installation height.
NOTE: If you are installing in frameless cabinets, it
may be necessary to install 1/2” wide cleats to accept
drawer mounting screws. See drawer to find exact
locations of mounting screws.
When installed under a cooktop:
Warming drawers are suitable for installation below
only certain specified cooktop models. See the label
attached to the top of the warming drawer for suitable
models. A solid barrier and air gap between cooktop
DQGZDUPLQJGUDZHULVUHTXLUHG6HH1RWHDERYH
INSTALLATION INSTRUCTIONS
Electrical outlet 42"
max. from right side
1" Min.*
25"
9"
23
1
/2” Min.
36"
Countertop
height
Electrical
outlet 16” max.
from left side
Electrical outlet
flush with side of
cabinet 7" max.
Install 2x4 or
2x2 anti-tip block
against rear cabinet
wall 9” from floor to
bottom of block
7"
1
1
/2” Cabinet top
Install a solid
barrier and a 1/4”
min. air gap above
warming drawer
1/4” Air gap
Solid barrier
Install a solid barrier below
DFRRNWRSVHH1RWH
* NOTE: When installing the warming drawer below a cooktop, a
solid barrier must be installed at least 1"from the lowest point of
WKHERWWRP RI FRRNWRS EXUQHU ER[ WR WKH WRS RI FXWRXW 8VH DQ\
solid material such as 1/4" thick plywood. Allow at least 1/4" air
gap between the barrier and the top of the warming drawer. See
label on top of the warming drawer for approved cooktop models.
9 ¼"
Dimension A
27" Drawer 30" Drawer
25-1/2" 28-1/2"

49-2000685 Rev. 1 13
PREPARING CABINET: BELOW WALL OVENS
INSTALLATION BELOW A SINGLE OVEN
INSTALLATION BELOW A DOUBLE OVEN
Ŷ When installed, the front face of the warming
drawer will be nearly flush with cabinetry doors or
drawer fronts.
Ŷ 'UDZHURYHUODSVZLOOFRQFHDOFXWHGJHVRQDOOVLGHV
of the opening.
The rough opening for the drawer must be:
²'HSWK
1
/2” minimum from inside back to front
of cabinet frame.
²:LGWK25-1/2" for 27" wide models
28-1/2" for 30" wide models
²+HLJKW
1
/4”
²$OORZ´PLQLPXPEHWZHHQRYHQDQGGUDZHU
cutouts for clearance of overlaps
NOTE: If you are installing in frameless cabinets, it
may be necessary to install 1/2” wide cleats to accept
drawer mounting screws. See drawer to find exact
locations of mounting screws.
When installed under a wall oven:
Warming drawers are suitable for installation below
only certain specified wall oven models. See the
label attached to the top of the warming drawer for
suitable models.
NOTE: Electrical receptacle can be installed as shown
for countertop installations. Do not install receptacle
above the top of the warming drawer cutout.
INSTALLATION INSTRUCTIONS
Installation Instructions
23
1
/2”
Min.
2x2 or 2x4
anti-tip block
against rear
wall 9” from
floor to bottom
of block
1" Min. above toekick
or adjust to oven
installation height
A
2" Min.
Allow 5/8”
overlap on
all sides
%
Oven
cutout
NOTE: Additional clearance between cutouts may be
required. Check to be sure that oven supports above
the warming drawer location do not obstruct the
required interior 23
1
/2” depth and 9
1
/4” height.
9"
9
1
/4"
10
1
/2"
23
1
/4"
NOTE: Additional clearance between
cutouts may be required. Check to be sure
that oven supports above the warming
drawer location do not obstruct the required
interior 23
1
/2” depth and 9
1
/4” height.
2" Min
1" Min. above
toekick
2x2 or 2x4
anti-tip block
against rear wall
9” from floor to
bottom of block
23
1
/2”
Min.
Allow 5/8” overlap
on all sides
9"
9
1
/4"
10
1
/2"
23
1
/4"
Oven
cutout
A
%
Dimension A Dimension B
27" Drawer 25-1/2" 26-3/4"
30" Drawer 28-1/2" 29-3/4"
Dimension A Dimension B
27" Drawer 25-1/2" 26-3/4"
30" Drawer 28-1/2" 29-3/4"

14 49-2000685 Rev. 1
Installation Instructions
INSTALLING CABINET SUPPORT
FLUSHMOUNT INSTALLATION PREPARATION
(for CTW900M models only)
IMPORTANT: When installed below a single or double
oven, check to be sure that any oven supports above
the cutout do not obstruct the 22-1/2" or 23-1/2"
required depth of the warming drawer cutout.
Ŷ A 2" minimum clearance between oven and
warming drawer cutouts are required. Additional
clearance may be required if 2 x 4 blocks are used
to support runners or solid floor of the oven above.
Ŷ 7KHZDUPLQJGUDZHUPD\EHVXSSRUWHGE\HLWKHUD
solid bottom, 2 x 4 or 2 x 2 runners.
Ŷ 7KHVXSSRUWPXVWEHOHYHODQGULJLGO\PRXQWHG
flush with the bottom edge of the cutout.
There is no way to level the drawer once it has
been installed. Be sure supports are level.
Ŷ 7KHHQWLUHZHLJKWRIWKHGUDZHULVVXSSRUWHGE\
the runners or solid floor and must be capable of
supporting 150 lbs.
INSTALLATION INSTRUCTIONS
23-1/2"
2" x 4" or equivalent runners
25"
30"
22-1/2"
22"
27"
2" x 4" or equivalent runners
PREPARE THE INTERIOR
Cut and install side cleats:
Ŷ Cut side wood cleats to height of cabinet opening
and approx. 2-1/2” in depth. Install, on each side,
1-3/16” from the front face of the cabinet.
Cut and install bottom cleat:
Ŷ Cut bottom wood cleat to a height of 1-1/8”
minimum, a depth of the cabinet minus 1-3/16” and
a width of the cabinet opening (D).
Install onto the cabinet floor between the side cleats,
push it all the way back against cabinet wall and make
sure its front face aligns with the front faces of the side
cleats (1-3/16” gap from the front cabinet face).
E
C
B
D
A
A
A Side cleats depth 2-1/2” min.
B Bottom cleat height 1-1/8”
C Bottom cleat depth Cabinet depth minus E
D Bottom cleat width 28-1/2” min. – 29” max. (30”
minus 2 side cleat thicknesses of
at least 1/2” each)
E All three cleats inset
from cabinet front
1-3/16”
TOP
VIEW
Front Face of Cabinet
EE
A A
C
D

49-2000685 Rev. 1 15
INSTALLING ANTI-TIP BRACE
1. Slide the left corner into opening and push power
cord into the hole leading to the outlet location.
Thread the cord through as drawer is being pushed
back into the opening.
If the outlet is installed inside the opening, plug
the cord into the outlet. In this location, the excess
power cord should be coiled and taped to the right
side of the unit. Make sure the cord does not get
trapped by the drawer.
NOTE: Insure that the power cord does not contact
the hot surfaces on the bottom of ovens, cooktops,
or any other appliance.
2. Push the drawer back until the front flange is flush
to the cabinet front.
3. Open the drawer fully.
4. Drill pilot holes through the holes in the overlapping
frame, one on each corner.
5. Drive wood screws provided into each corner.
WARNING
ANTI-TIP PRECAUTIONS:
The anti-tip brace must be installed to prevent the
drawer from tipping forward when opened and loaded.
Failure to do so could result in personal injury.
Install 2x4 or 2x2 anti-tip
brace against rear
cabinet wall 9" from floor
to bottom of brace
2x4 or 2x2 runners
or solid bottom
9"
INSTALLING WARMING DRAWER
INSTALLATION INSTRUCTIONS
Installation Instructions

16 49-2000685 Rev. 1
Problem Possible Cause What To Do
Warming drawer will
not work
A fuse in your home may be blown or the circuit
breaker tripped.
Replace the fuse or reset the circuit breaker.
Warming drawer not plugged in. Plug in.
Controls improperly set. 6HHWKH8VLQJWKHZDUPLQJGUDZHUVHFWLRQ
Drawer does not slide
smoothly or drags
%DOOEHDULQJVRXWRIDOLJQPHQW Fully extend the drawer and push it all the way in.
See the Care and cleaning section.
Drawer over-loaded or load unbalanced. Reduce weight to less than 50 pounds.
Redistribute drawer contents.
Excessive
condensation
/LTXLGLQZDUPLQJGUDZHU Remove liquid.
8QFRYHUHGIRRGV Cover food with lid or aluminum foil.
Temperature setting too high. Reduce temperature setting.
Incorrect Moisture Selector setting. Set the Moisture Selector to the open vent setting
to allow venting.
No heat in the PROOF
setting
Room temperature may prevent the thermostat
from tripping on.
7XUQWKHNQREWR/2:WKHQEDFNWR3522)
Food dries out Moisture escaping. Cover food with lid or aluminum foil.
TROUBLESHOOTING TIPS
Save time and money! Review the charts on the following pages first and you may not need to schedule service.
Troubleshooting tips ... %HIRUH\RXVFKHGXOHVHUYLFH

49-2000685 Rev. 1 17
cafeappliances.com
All warranty service is provided by our Factory Service Centers, or an authorized service technician. To schedule service
online, visit us at cafeappliances.com/service. Please have your serial number and your model number available when
scheduling service.
What Café will not cover:
Ŷ Service trips to your home to teach you how to use
the product.
Ŷ ,PSURSHULQVWDOODWLRQGHOLYHU\RUPDLQWHQDQFH
Ŷ )DLOXUHRIWKHSURGXFWLILWLVDEXVHGPLVXVHG
modified or used for other than the intended purpose
or used commercially.
Ŷ 5HSODFHPHQWRIKRXVHIXVHVRUUHVHWWLQJRIFLUFXLW
breakers.
Ŷ 'DPDJHWRWKHSURGXFWFDXVHGE\DFFLGHQWILUH
floods or acts of God.
Ŷ 'DPDJHWRILQLVKVXFKDVVXUIDFHUXVWWDUQLVKRUVPDOO
blemishes not reported within 48 hours of delivery.
Ŷ ,QFLGHQWDORUFRQVHTXHQWLDOGDPDJHFDXVHGE\
possible defects with this appliance.
Ŷ 'DPDJHFDXVHGDIWHUGHOLYHU\
Ŷ 3URGXFWQRWDFFHVVLEOHWRSURYLGHUHTXLUHGVHUYLFH
EXCLUSION OF IMPLIED WARRANTIES
<RXUVROHDQGH[FOXVLYHUHPHG\LVSURGXFWUHSDLUDVSURYLGHGLQWKLV/LPLWHG:DUUDQW\$Q\LPSOLHGZDUUDQWLHV
including the implied warranties of merchantability or fitness for a particular purpose, are limited to one year or
the shortest period allowed by law.
This limited warranty is extended to the original purchaser and any succeeding owner for products purchased for home
XVHZLWKLQWKH86$,IWKHSURGXFWLVORFDWHGLQDQDUHDZKHUHVHUYLFHE\D&DIp$XWKRUL]HG6HUYLFHULVQRWDYDLODEOH\RX
may be responsible for a trip charge or you may be required to bring the product to an Authorized Café Service location
for service. In Alaska, the limited warranty excludes the cost of shipping or service calls to your home.
Some states do not allow the exclusion or limitation of incidental or consequential damages. This limited warranty
gives you specific legal rights, and you may also have other rights which vary from state to state. To know what your
legal rights are, consult your local or state consumer affairs office or your state’s Attorney General.
Warrantor: GE Appliances, a Haier company
/RXLVYLOOH.<
Extended Warranties: Purchase a Café extended warranty and learn about special discounts that are available while
your warranty is still in effect. You can purchase it online anytme at
cafeappliances.com/extended-warranty
Café Service will still be there after your warranty expires.
For the period of Café will replace
One year
From the date
of the original
purchase
Any part of the warming drawer which fails due to a defect in materials or workmanship.
During this limited one-year warranty, Café will provide, free of charge, all labor and
in-home service to replace the defective part.
Café Electric Warming Drawer Limited Warranty
Staple your receipt here. Proof of the original purchase
date is needed to obtain service under the warranty.
LIMITED WARRANTY

18 49-2000685 Rev. 1
Notes

49-2000685 Rev. 1 19
Accessories
´:LGH&XVWRP3DQHO.LW
30” Cafe Pro Custom Handle kits
Parts
Wire Rack
Cleaning Supplies
CitruShine™ Stainless Steel Wipes
Stainless Steel Appliance Cleaner
ACCESSORIES
Looking For Something More?
GE Appliances offers a variety of accessories to
improve your cooking and maintenance experiences!
Refer to the Consumer Support page for phone numbers
and website information.
The following products and more are available:
Accessories

20 49-2000685 Rev. 1
Consumer Support
CONSUMER SUPPORT
Café Website
Have a question or need assistance with your appliance? Try the Café website 24 hours a day, any day of the year!
You can also shop for more great Café products and take advantage of all our on-line support services designed for
\RXUFRQYHQLHQFH,QWKH86cafeappliances.com
Register Your Appliance
Register your new appliance on-line at your convenience! Timely product registration will allow for enhanced
communication and prompt service under the terms of your warranty, should the need arise. You may also mail in the
SUHSULQWHGUHJLVWUDWLRQFDUGLQFOXGHGLQWKHSDFNLQJPDWHULDO,QWKH86cafeappliances.com/register
Schedule Service
Expert Café repair service is only one step away from your door. Get on-line and schedule your service at your
FRQYHQLHQFHDQ\GD\RIWKH\HDU,QWKH86cafeappliances.com/service
Extended Warranties
Purchase a Café extended warranty and learn about special discounts that are available while your warranty is still in
effect. You can purchase it on-line anytime. Café Service will still be there after your warranty expires.
,QWKH86cafeappliances.com/extended-warranty
Remote Connectivity
For assistance with wireless network connectivity (for models with remote enable),
visit our website at cafeappliances.com/connect
Parts and Accessories
Individuals qualified to service their own appliances can have parts or accessories sent directly to their homes
(VISA, MasterCard and Discover cards are accepted). Order on-line today 24 hours every day.
,QWKH86cafeappliances.com/parts
Instructions contained in this manual cover procedures to be performed by any user. Other servicing
generally should be referred to qualified service personnel. Caution must be exercised, since improper
servicing may cause unsafe operation.
Contact Us
If you are not satisfied with the service you receive from Café, contact us on our website with all the details including
your phone number, or write to:
,QWKH86*HQHUDO0DQDJHU&XVWRPHU5HODWLRQV_&DIp$SSOLDQFHV$SSOLDQFH3DUN_/RXLVYLOOH.<
cafeappliances.com/contact

Escriba los números de modelo y de serie aquí:
Nº de Modelo __________________________
Nº de Serie ____________________________
Los podrá encontrar en la etiqueta ubicada en el
lado trasero sobre el frente del cajón inferior.
49-2000685 Rev. 1 06-20 GEA
Cajón para Calentar Eléctrico
Modelos: CTW900M and CTW900P
Contenido
Información de Seguridad ........................3
Uso del Cajón para Calentar
Funciones .....................................5
Consejos de Funcionamiento .....................6
Cuidado y Limpieza
Limpieza del Cajón para Calentar ..................9
Instrucciones de instalación .....................10
Consejos para la Solución de Problemas ..........16
Garantía Limitada ..............................17
Accesorios ....................................19
Soporte para el Consumidor .....................20
Manual del Propietario y Instalación
TM

2 49-2000685 Rev. 1
GRACIAS POR HACER QUE CAFÉ SEA PARTE DE SU HOGAR.
Sentimos orgullo por el nivel de arte, innovación y diseño de cada uno de los electrodomésticos de
Café, y creemos que usted también. Entre otras cosas, el registro de su electrodoméstico asegura que
podamos entregarle información importante del producto y detalles de la garantía cuando los necesite.
Registre su electrodoméstico Café ahora a través de Internet. Sitios Web útiles están disponibles
en la sección de Soporte para el Consumidor de este Manual del Propietario. También puede enviar
una carta en la tarjeta de inscripción preimpresa que se incluye con el material embalado.
TM

49-2000685 Rev. 1 3
INFORMACIÓN DE SEGURIDAD
ADVERTENCIA
Lea todas las instrucciones antes de usar el producto. Si no se siguen estas instrucciones se
podrán producir incendios, descargas eléctricas, lesiones graves o la muerte.
ADVERTENCIA
AVISO IMPORTANTE DE SEGURIDAD
Todos los cajones para calentar se pueden volcar y producirse lesiones si no se instalan de forma
correcta.
Para evitar caídas accidentales del cajón para calentar, adhiera el mismo a la pared con una abrazadera anti
volcaduras, como se describe en las instrucciones de instalación.
ADVERTENCIA
INSTRUCCIONES GENERALES DE SEGURIDAD
Ŷ 8VHHVWHHOHFWURGRPpVWLFRVyORSDUDVXSURSyVLWR
original, como se describe en el Manual del
Propietario.
Ŷ $VHJ~UHVHGHTXHXQLQVWDODGRUFDOLILFDGRLQVWDOH
su electrodoméstico de forma correcta y que esté
adecuadamente conectado a tierra, de acuerdo con
las instrucciones de instalación provistas.
Ŷ 1RLQWHQWHUHSDUDUUHHPSOD]DUROLPSLDUQLQJXQD
parte del cajón para calentar, a menos que se
recomiende específicamente en este manual.
Cualquier otra reparación deberá ser realizada por
un técnico calificado.
Ŷ $QWHVGHUHDOL]DUFXDOTXLHUVHUYLFLRWpFQLFR
desconecte el suministro de corriente desde el
panel de distribución del hogar, retirando el fusible
o desconectando el disyuntor.
Ŷ 1RGHMHDORVQLxRVVRORV±QRVHGHEHUiGHMDUD
los niños solos o fuera de su radio de atención en
el área donde el electrodoméstico se encuentre en
uso. Nunca se les deberá permitir trepar, sentarse o
pararse sobre ninguna parte del electrodoméstico.
Ŷ
PRECAUCIÓN
No coloque artículos de
interés para los niños sobre los gabinetes que
HVWiQVREUHXQFDMyQSDUDFDOHQWDU±VLORVQLxRV
se trepan sobre el cajón para calentar para llegar a
estos artículos podrán sufrir lesiones graves.
Ŷ 8VHVyORPDQJRVGHROODVVHFRV±ORVPDQJRVGH
ollas húmedos sobre superficies calientes podrán
producir quemaduras debido al vapor. No deje
que los mangos de las ollas toquen los elementos
que están calientes. No use una toalla u otra tela
voluminosa para reemplazar el mango de las
cacerolas.
Ŷ 1XQFDXVHHOHOHFWURGRPpVWLFRSDUDFDOHQWDUR
calefaccionar la habitación.
Ŷ 1RWRTXHORVHOHPHQWRVGHFDOHIDFFLyQQLOD
superficie interior del cajón para calentar. Es posible
que estas superficies estén demasiado calientes
como para quemar, aunque su color sea oscuro.
Durante y después del uso, no toque ni permita
que telas u otros materiales inflamables tengan
contacto con cualquier área interior del cajón para
calentar; espere a que haya pasado un tiempo
suficiente para que se enfríen. Otras superficies del
electrodoméstico se podrán calentar lo suficiente
como para ocasionar lesiones. Las superficies
potencialmente calientes incluyen la abertura de
la ventilación del cajón para calentar, superficies
cercanas a la abertura y grietas alrededor de la
puerta del cajón para calentar.
Ŷ 1RFDOLHQWHHQYDVHVGHFRPLGDTXHQRKD\DQVLGR
abiertos. Se podría acumular presión y el envase
podría explotar, ocasionando una lesión.
Ŷ 1RXVHSDSHOGHDOXPLQLRSDUDUHYHVWLUODSDUWH
inferior el cajón para calentar. El papel de aluminio
puede atrapar el calor o derretirse, ocasionando
daños sobre el producto y riesgos de descargas
eléctricas o incendios.
Ŷ (YLWHUD\DGXUDVRLPSDFWRVVREUHODVSXHUWDVGH
vidrio o los paneles de control. Hacer esto podrá
producir la rotura de vidrios. No cocine un producto
con un vidrio roto. Es posible que se produzcan
descargas, incendios o cortes.
Ŷ (OSURSyVLWRGHOFDMyQSDUDFDOHQWDUHVPDQWHQHU
las comidas cocinadas a temperatura para servir
(superior a 140°F). Se generarán bacterias si la
comida se encuentra a menos de 140°F. Por lo
tanto, siempre comience con comida caliente; la
comida fría no se podrá calentar ni cocinar en el
cajón para calentar.
INFORMACIÓN IMPORTANTE DE SEGURIDAD
LEA TODAS LAS INSTRUCCIONES ANTES DE USAR
LEA Y GUARDE ESTAS INSTRUCCIONES

4 49-2000685 Rev. 1
ADVERTENCIA
MANTENGA LOS MATERIALES INFLAMABLES ALEJADOS DEL
CAJÓN PARA CALENTAR
Si esto no se cumple, se podrán sufrir lesiones personales graves o incendios.
Ŷ 1RJXDUGHQLXVHPDWHULDOHVLQIODPDEOHVHQR
cerca de un cajón para calentar, incluyendo papel,
plástico, mangos de ollas, trapos, cobertores de
pared, cortinas, paños y gasolina u otros vapores y
líquidos inflamables.
Ŷ 1XQFDXVHSUHQGDVKROJDGDVRTXHFXHOJXHQ
mientras usa el electrodoméstico. Estas prendas
se podrán incendiar si entran en contacto con
superficies calientes, ocasionando quemaduras
graves.
Ŷ 1RSHUPLWDTXHODJUDVDGHODFRFFLyQXRWURV
materiales inflamables se acumulen en o cerca del
cajón para calentar. La grasa que se encuentre en
el cajón para calentar o cerca del mismo se podrá
incendiar.
ADVERTENCIA
EN CASO DE INCENDIO, SIGA LOS SIGUIENTES PASOS PARA
EVITAR LESIONES Y LA PROPAGACIÓN DEL FUEGO
Ŷ 1RXVHDJXDVREUHHOIXHJRGHODJUDVD1XQFD
tome una olla que se esté incendiando.
Ŷ 6LKD\XQLQFHQGLRHQHOFDMyQSDUDFDOHQWDU
ahogue el fuego cerrando la puerta del cajón para
calentar y apagando el mismo o usando un químico
seco multipropósito o un extintor de incendio con
espuma.
ADVERTENCIA
INSTRUCCIONES DE SEGURIDAD DEL CAJÓN PARA CALENTAR
Ŷ 0DQWpQJDVHDOHMDGRGHOFDMyQSDUDFDOHQWDUDODEULUOD
puerta del mismo. El aire caliente o el vapor que sale
puede causar quemaduras en las manos, rostro y/u
ojos.
Ŷ 0DQWHQJDGHVREVWUXLGDODYHQWLODFLyQGHOFDMyQSDUD
calentar.
Ŷ 0DQWHQJDHOFDMyQSDUDFDOHQWDUOLEUHGHDFXPXODFLyQ
de grasa. La grasa del cajón para calentar se podrá
incendiar.
Ŷ &RORTXHORVHVWDQWHVGHOFDMyQSDUDFDOHQWDUHQ
la ubicación deseada mientras éste se encuentre
frío. Si es necesario mover el estante mientras
el cajón para calentar está caliente, evite que el
mango de la olla tenga contacto con el elemento de
calentamiento que se encuentra caliente en el cajón
para calentar.
Ŷ 1RGHMHSURGXFWRVWDOHVFRPRSDSHOXWHQVLOLRVGH
cocina o comida en el cajón para calentar cuando
no esté en uso. Los ítems guardados en el cajón
para calentar se podrán incendiar.
Cómo Retirar la Película Protectora de Envío y la Cinta de Embalaje
Con cuidado tome un extremo de la película protectora de envío
con los dedos y lentamente retire la misma de la superficie del
electrodoméstico.
No utilice ningún producto filoso para retirar la
película. Retire toda la película antes de usar el electrodoméstico
por primera vez.
Para asegurar que no haya daños sobre el acabado del
producto, la forma más segura de retirar el adhesivo de la cinta
de embalaje en electrodomésticos nuevos es aplicando un
detergente líquido hogareño para lavar platos. Aplique con una
tela suave y deje que se seque.
NOTA: El adhesivo deberá ser eliminado de todas las partes.
No se puede retirar si se hornea con éste dentro.
INFORMACIÓN DE SEGURIDAD
INFORMACIÓN IMPORTANTE DE SEGURIDAD
LEA TODAS LAS INSTRUCCIONES ANTES DE USAR
LEA Y GUARDE ESTAS INSTRUCCIONES

49-2000685 Rev. 1 5
Funciones
USO DEL CAJÓN PARA CALENTAR: Funciones
No todas las funciones corresponden a todos los modelos. El aspecto puede variar.
El cajón para calentar mantendrá las comidas calientes y cocinadas en la temperatura para servir. Siempre comience con comida
caliente. No lo use para calentar comida fría excepto para leudar masa de levadura, galletas crujientes, papas fritas o cereales secos.
Perilla de Control
Los controles del cajó para calentar se encuentran escondidos
en el cierre del cajón. Abra el cajón. Los controles están sobre
el lado derecho del marco frontal.
Para usar el cajón para calentar, presione
el interruptor ON/OFF (Encender/ Apagar)
en la posición ON (Encender).
Deslice el control del selector de humedad
sobre la posición abierta o apagada
(Consulte la sección del Selector de
Humedad).
Gire la perilla de control hasta la posición deseada.
Luz de Señal en ON (Encendida)
La luz de señal ON (Encendida) se encuentra ubicada debajo
del interruptor ON/OFF (Encendido/ Apagado) y brilla cuando
el interruptor ON/OFF (Encendido/ Apagado) está en la
posición ON (Encendido). Permanece encendido hasta que
el interruptor ON/OFF (Encendido/ Apagado) se mueve a la
posición OFF (Apagado).
La luz de señal ON (Encendido) es visible a través del visor de
luz en el panel frontal del cajón cuando se cierra el cajón. Éste
es un recordatorio de que el calor está activado.
Selector de Humedad
El selector de humedad se encuentra ubicado en el frente
interior del cajón.
Para mantener las comidas húmedas, deslice el control del
selector de humedad hacia afuera de la perilla de control.
Esto cierra la ventilación y sella la humedad dentro del cajón.
Con la ventilación cerrada las comidas calientes permanecen
húmedas y suaves.
En esta configuración, se podrá producir condensación
alrededor del extremo interior del cajón.
Para mantener las comidas
crocantes, deslice el control
del selector de humedad hacia
la derecha en dirección a la
perilla de control. Esto abre las
ventilaciones y permite que la
humedad salga.
Con las ventilaciones abiertas, es
normal que se acumule humedad
sobre superficies que están por
encima del cajón para calentar.
PROOF (Leudar) . . . . . . . . . . . . 75 a 95°F
LOW (Bajo) . . . . . . . . . . . . . .140 a 160°F
MED (Medio) . . . . . . . . . . . . . 160 a 195°F
HIGH (Alto) . . . . . . . . . . . . . .195 a 230°F
Perilla de Control
Interruptor
Luz de Señal en
ON (Encendida)
Placa de
Especificaciones
Técnicas
Lentes del Visor de la
Luz de Señal en ON
(Encendida)
Cajón para
Calentar
Selector de
Humedad (en la
parte trasera del
panel)
Moist
Closed
Vent
Crisp
Open
Vent
HIGH
PROOF
MED
LOW

6 49-2000685 Rev. 1
Consejos de Funcionamiento
Estante
Ŷ (OHVWDQWHFDO]DUiGHVGHHOIUHQWHKDVWDODSDUWHWUDVHUD
Ŷ 3UHFDOLHQWHFRQHOHVWDQWHHQVXSRVLFLyQ
Ŷ (OXVRGHOHVWDQWHSHUPLWHXQGREOHDSLODPLHQWRGHORV
ítems.
USO DEL CAJÓN PARA CALENTAR: Consejos de Funcionamiento
Apilamiento doble de los ítems con el estante en su posición.
Al Usar el Cajón para Calentar
No alinee el cajón para calentar con el papel de aluminio.
Ŷ 'HMHWUDQVFXUULUXQWLHPSRKDVWDTXHHOFDMyQVH
precaliente:
LOW (Bajo) 8 minutos
MED (medio) 15 minutos
HIGH (Alto) 20 minutos
NOTA: No es necesario precalentar el cajón para leudar.
Es posible que la comida en recipientes de vidrio con
protección térmica o cacerolas de vidrio cerámico necesiten
una configuración más alta del termostato en comparación con
las comidas en cacerolas metálicas.
Ŷ /DDSHUWXUDUHSHWLGDGHOFDMyQSHUPLWHTXHHODLUHFDOLHQWH
salga y que la comida se enfríe. Deje transcurrir un tiempo
adicional para que la temperatura interior del cajón se
estabilice luego de agregar ítems.
Ŷ &RQFDQWLGDGHVJUDQGHVHVSRVLEOHTXHVHDQHFHVDULR
usar una configuración de termostato más alta y cubrir
algunos de los ítems de comida cocinados.
Ŷ /DFRPLGDVHGHEHUiPDQWHQHUFDOLHQWHHQVXHQYDVHGH
cocción o ser transferida a un plato con protección térmica
para servir.
Ŷ 6HSRGUiXVDUSDSHOGHDOXPLQLRSDUDFXEULUODFRPLGDD
fin de evitar que se seque.
PRECAUCIÓN
Los envases de plástico o envoltorios
de plásticos se derretirán si entran en contacto directo con el
cajón. Es posible que no pueda quitar el plástico derretido y
esto no está cubierto por la garantía.
Ŷ 5HWLUHODVFXFKDUDVSDUDVHUYLUHWFDQWHVGHFRORFDU
envases en el cajón para calentar.
Para Calentar Tazones y Platos para Servir
Para calentar tazones y platos para servir configure el control en
LOW (Bajo).
Ŷ 8VHVyORSODWRVUHVLVWHQWHVDOFDORU
Ŷ &RORTXHORVSODWRVYDFtRVHQHOHVWDQWHSDUDHOHYDUORVGH
la parte inferior del cajón. Si desea platos más calientes o
calentar porcelana fina, consulte al fabricante de los platos
sobre el nivel de tolerancia máxima de calor.
Ŷ 3UHFDOLHQWHHOSODWRSDUDVHUYLUYDFtRPLHQWUDVSUHFDOLHQWDHO
cajón.
Ŷ $OPDQWHQHUFDOLHQWHVFRPLGDV\DFRFLQDGDV\DOFDOHQWDU
platos vacíos para servir al mismo tiempo, coloque los
platos para servir en la posición de estantes alta y la
comida en la parte inferior del cajón.
PRECAUCIÓN
Es posible que los platos estén
FDOLHQWHV8VHVXVSHQVRUHVGHROODVRJXDQWHVDOUHWLUDUSODWRV
calientes.

49-2000685 Rev. 1 7
Consejos de Funcionamiento
La masa con levadura se podrá leudar en el cajón para calentar.
La masa con levadura se podrá leudar en el cajón para calentar.
Ŷ &RORTXHVXSODWRHQODSDUWHLQIHULRUGHOFDMyQSDUDFDOHQWDU
Ŷ 6LHPSUHGHEHUiJLUDUODSHULOODGHFRQWUROKDVWD/2:%DMR
y luego inmediatamente de nuevo a PROOF (Leudar).
Ŷ &LHUUHODYHQWLODFLyQ
Ŷ $FHLWHOHYHPHQWHODSDUWHVXSHULRUGHODPDVDHQXQ
recipiente lo suficientemente grande como para duplicar el
tamaño de la masa. Cubra con una tela.
Ŷ 1RHVQHFHVDULRHOSUHFDOHQWDPLHQWRSDUDOHXGDU
Ŷ &RQWUROHODDOWXUDGHODPDVDHQPLQXWRV$JUHJXH
tiempo según sea necesario. La masa deberá permanecer
en el cajón hasta que haya duplicado su tamaño y se
produzca una leve depresión cuando se toque la superficie
de forma suave con el dedo.
USO DEL CAJÓN PARA CALENTAR: Consejos de Funcionamiento
Crisp
Open
Vent
Para que Ítems Duros queden Crocantes
Ŷ &RORTXHFRPLGDHQSODWRVRFDFHURODVGHODSDUWHLQIHULRU
Ŷ 3UHFDOLHQWHHQODFRQILJXUDFLyQ/2:%DMD\DEUDOD
ventilación.
Ŷ &RQWUROHVLHVWiFURFDQWHOXHJRGHPLQXWRV$JUHJXH
tiempo según sea necesario.
Cuadro de Selección de Temperatura para Comidas Crocantes
Para mantener calientes varios tipos de comidas diferentes,
programe la temperatura en la configuración para comidas que
necesitan el grado más alto. Coloque los ítems que necesiten
la configuración más alta en la parte inferior del cajón, y en el
estante los ítems que necesiten menos calor.
Consejos:
Ŷ 'HMHODFRPLGDGHVFXELHUWD
Ŷ 1RXVHUHFLSLHQWHVQLHQYROWRULRVGHSOiVWLFR
Ŷ 3UHFDOLHQWHDQWHVGHOXVRVLJXLHQGRORVWLHPSRV
recomendados.
Moist
Closed
Vent
Tipo de Comida
Configuración del
Control
Configuración
del Selector de
Humedad
Tocino HIGH (Alto) ABRIR
Pan, panes
crocantes
MED (Medio) ABRIR
Pan, panes
crocantes
HIGH (Alto) ABRIR
Tartas, doble
crocante
MED (Medio) ABRIR
Pizza HIGH (Alto) ABRIR
Papas, horneadas HIGH (Alto) ABRIR
Tortilla Chips LOW (Baja) ABRIR

8 49-2000685 Rev. 1
Mois
t
Closed
Vent
Consejos de Funcionamiento
Cuadro de Selección de Temperatura para Comidas Húmedas
Para mantener calientes varios tipos de comidas diferentes,
programe la temperatura en la configuración para comidas que
necesitan el grado más alto. Coloque los ítems que necesiten
la configuración más alta en la parte inferior del cajón, y en el
estante los ítems que necesiten menos calor.
Consejos:
Ŷ &XEUDODFRPLGDFRQXQDWDSDRSDSHOGHDOXPLQLR
Ŷ 1RFRORTXHDJXDHQHOFDMyQSDUDFDOHQWDU
Ŷ 1RXVHUHFLSLHQWHVQLHQYROWRULRVGHSOiVWLFR
Ŷ 3UHFDOLHQWHDQWHVGHOXVRVLJXLHQGRORVWLHPSRV
recomendados.
USO DEL CAJÓN PARA CALENTAR: Consejos de Funcionamiento
86'$)6,6UHFRPLHQGDXQDWHPSHUDWXUDLQWHULRUGH)&FRPR
PtQLPRSDUDXQELIH8VHXQWHUPyPHWURSDUDFDUQHSRUWiWLOSDUDFRQWURODUODV
temperaturas interiores.
Tipo de
Comida
Configuración
del Control
Configuración
del Selector de
Humedad
Bife, medio o bien
cocido* MED (medio) CERRADO
Pan, panes blandos MED (medio) CERRADO
Cazuelas MED (medio) CERRADO
Cereal cocido MED (medio) CERRADO
Huevos MED (medio) CERRADO
Pescado, mariscos MED (medio) CERRADO
Fruta MED (medio) CERRADO
Salsa para carne,
salsas cremosas MED (medio) CERRADO
Jamón MED (medio) CERRADO
Cordero MED (medio) CERRADO
Panqueques, gofres HIGH (Alto) CERRADO
Tartas, una capa
crocante MED (medio) CERRADO
Cerdo MED (medio) CERRADO
Papas, pisadas MED (medio) CERRADO
Ave HIGH (Alto) CERRADO
Vegetables MED (medio) CERRADO

49-2000685 Rev. 1 9
Limpieza del Cajón para Calentar
Asegúrese que todos los controles estén en la posición OFF (Apagado) y que todas las superficies estén frías antes de limpiar
cualquier parte del cajón para calentar.
Superficies Pintadas o Esmaltadas
8VHDJXDFDOLHQWH\MDEyQSDUDOLPSLDUDIRQGR
CUIDADO Y LIMPIEZA: Limpieza del Cajón para Calentar
Acero Inoxidable
No use una viruta de acero; ésta dañara la superficie.
Para limpiar la superficie de acero inoxidable, use agua tibia
con jabón o un limpiador o pulidor para acero inoxidable.
Siempre limpie la superficie en la dirección del veteado. Siga las
instrucciones del limpiador para limpiar la superficie de acero
inoxidable.
Los limpiadores con ácido oxálico tales como Bar Keepers Friend
Soft Cleanser™ eliminarán el óxido, deslustres y pequeñas
PDQFKDV8VHVyORXQOLPSLDGRUOtTXLGROLEUHGHPDWHULDODEUDVLYR
y frote en la dirección de las líneas del cepillo con una esponja
suave y húmeda.
Para realizar consultas sobre la adquisición de productos
de limpieza, incluyendo limpiadores o pulidores para
electrodomésticos de acero inoxidable, lea las secciones de
Accesorios y Soporte al Consumidor al final de este manual.
Estante
Limpie el estante con detergente y agua. Luego de la limpieza,
enjuague el estante con agua limpia y seque con una tela
limpia.
Perilla de Control
La perilla de control se puede retirar para facilitar la limpieza.
Asegúrese de que la perilla esté en la posición PROOF
(Leudar) y extraiga la misma desde el vástago para su
limpieza.
La perilla se deberá lavar con agua y jabón. Asegúrese que el
interior de la perilla esté seco antes de volver a colocarla.
Vuelva a ubicar la perilla en la posición PROOF (Leudar) para
asegurar una colocación adecuada.

10 49-2000685 Rev. 1
Instrucciones
de instalación
Ante cualquier otra consulta, visite nuestro sitio web en: cafeappliances.com.
ANTES DE COMENZAR
Lea estas instrucciones en su totalidad y
atentamente.
Ŷ
IMPORTANTE – Conserve estas
instrucciones para uso del inspector local.
Ŷ
IMPORTANTE – Cumpla con todos
los códigos y ordenanzas gubernamentales.
Ŷ
Nota para el Instalador – Asegúrese de
entregarle estas instrucciones al Consumidor.
Ŷ
Nota para el Comprador – Guarde estas
instrucciones para referencia futura.
Ŷ
Si se producen fallas en el producto debido a una
instalación inadecuada, la Garantía no cubrirá las
mismas.
Ŷ
ADVERTENCIA
Este electrodoméstico
deberá estar conectado a tierra de forma
adecuada.
Ŷ
ADVERTENCIA
Asegúrese de que el cable
de corriente no tenga contacto con las superficies
calientes en la parte inferior de los hornos,
superficies de cocción, u otros electrodomésticos.
Ŷ $7(1&,Ï1,167$/$'25 – La instalación
correcta es responsabilidad del instalador
y cualquier falla del producto debido a una
instalación inadecuada NO estará cubierta por
la garantía.
MATERIALES NECESARIOS
HERRAMIENTAS REQUERIDAS
Cajón para Calentar
CTW900M and CTW900P
INSTRUCCIONES DE INSTALACIÓN
Guantes Resistentes a
Cortes
Taladro y broca de 1/16”
Destornillador Phillips
Sierra Manual
Tornillos de madera y adhesivos u otros materiales para
la instalación de tirantes o una repisa para sostener el
cajón para calentar.
Los tirantes deberán estar nivelados, montados de forma
rígida y deberán poder soportar 150 libras.
Madera para tirantes y abrazaderas de 2 x 4 o 2 x 2
Gafas de Seguridad
Cinta de Medición
Nivel

49-2000685 Rev. 1 11
INSTRUCCIONES DE INSTALACIÓN
Instrucciones de instalación
INSTRUCCIONES IMPORTANTES DE SEGURIDAD
LISTA DE CONTROL DE PREINSTALACIÓN
INSTRUCCIONES DE CONEXIÓN A
TIERRA
IMPORTANTE – (Lea detenidamente)
PARA SU SEGURIDAD PERSONAL, ESTE
ELECTRODOMÉSTICO DEBERÁ ESTAR
ADECUADAMENTE CONECTADO A TIERRA.
Este cajón para calentar deberá ser provisto con 120V,
60Hz, y estar conectado a un circuito de empalmes
individual correctamente conectado a tierra, y protegido
por un disyuntor o fusible de retardo de 15 o 20 amp.
Ŷ 8QUHFHSWiFXORGHFDEOHVFRUUHFWDPHQWHFRQHFWDGR
a tierra deberá estar ubicado dentro del alcance del
cable de corriente largo de 56" del cajón.
Ŷ 8ELTXHHOUHFHSWiFXORHQXQJDELQHWHDG\DFHQWH
— dentro de las 42” del lado derecho o,
— dentro de las 16” del lado izquierdo o,
— 8QUHFHSWiFXORHPSRWUDGRSRGUiHVWDUXELFDGR
del lado derecho del espacio libre, a un mínimo
de 7” desde la parte trasera del gabinete. En esta
ubicación, el cable de corriente excedente deberá
estar enroscado y encintado sobre el lado derecho
de la unidad.
IMPORTANTE – (Lea detenidamente)
El cable de corriente de este electrodoméstico cuenta
con un enchufe de 3 cables (con cable a tierra) que
se conecta a un tomacorriente de pared estándar de 3
cables con conexión a tierra para minimizar la posibilidad
de descargas eléctricas. El cliente deberá contratar a un
electricista calificado para que controle el receptáculo de
pared y el circuito, a fin de asegurar que el receptáculo
esté correctamente conectado a tierra y que posea la
polaridad adecuada.
Ŷ En caso de contar con un tomacorriente de pared de
2 cables, es la responsabilidad y obligación del cliente
reemplazarlo por un receptáculo de pared de 3 cables
correctamente conectado a tierra.
Nunca, bajo ninguna circunstancia, corte o elimine el
tercer cable (tierra) del cable de corriente.
NO USE PROLONGADORES NI ENCHUFES
ADAPTADORES CON ESTE ELECTRODOMÉSTICO.
CUMPLA CON LOS CÓDIGOS Y ORDENANZAS
NACIONALES DE ELECTRICIDAD.
A
Al preparar el gabinete del cajón para calentar,
asegúrese de que el interior del gabinete y el cajón
para calentar no interfieran uno con otro. (Consulte las
secciones sobre la preparación del gabinete).
B
RETIRE LOS MATERIALES DE EMBALAJE: Si no se
retiran los materiales del embalaje se podrán producir
daños sobre el electrodoméstico. Retire todas las piezas
embaladas del cajón para calentar, incluyendo levantar
el cajón para calentar a fin de configrar que todo el
embalaje fue retirado.
C
Retire las Instrucciones de Instalación del paquete de
instrucciones y lea las mismas de forma detenida antes
de comenzar. Asegúrese de colocar todas las
instrucciones, el Manual del Propietario, las
Instrucciones de Instalación, etc., en un lugar seguro
para referencia futura.
Placa de
Especificaciones
Técnicas
Receptáculo
empotrado de 7”
de máx. desde la
parte trasera del
lado derecho
Perfore un agüero
de 1 ½” para el cable
de corriente para la
ubicación de salida
izquierda o derecha.

12 49-2000685 Rev. 1
Instrucciones de instalación
PREPARACIÓN DEL GABINETE. DEBAJO DE UNA MESADA
Ŷ 8QDYH]LQVWDODGRODFDUDIURQWDOGHOFDMyQSDUDFDOHQWDU
estará correctamente nivelado con las puertas de los
gabinetes y frentes de los cajones.
Ŷ /DVVXSHUSRVLFLRQHVGHORVFDMRQHVHVFRQGHUiQORV
estremos puntiagudos en todos los lados de la abertura.
La apertura aproximada del cajón deberá ser de:
— Profundidad: Mínimo de 23 ½” desde la parte interior
trasera hasta el frente del marco del gabinete.
— Ancho: modelos de 25 ½” por 27” de ancho
modelos de 28 ½” por 30” de ancho
— Alto: 9 ¼
Ŷ 0tQLPRGH´VREUHHOSLVRR]yFDORVREUH6H
recoimendan 23 ¼” desde el piso hasta la parte inferior
del espacio libre para la instalación en bajo mesadas.
Instalación debajo del cajón de un gabinete:
El cajón para calentar se podrá instalar debajo del cajón
de un gabinete. En esta instalación, se deberá instalar
una barrera sólida sobre el cajón para calentar a fin de
EORTXHDUHODFFHVR8VHFXDOTXLHUPDWHULDOVyOLGRWDOFRPR
un contrachapado grueso de ¼”. Deje una brecha de aire
de por lo menos ¼” entre la barrera y la parte superior del
cajón para calentar. Respete el mín. de 5" sobre el piso o 1”
sobre la altura mín. de instalación del zócalo.
NOTA: Si realizará la instalación en gabinetes sin marco,
será necesario instalar ristreles anchos de ½" que acepten
los tornillos de montaje del cajón. Observe el cajón para
encontrar las ubicaciones exactas de los tornillos de
montaje.
Cuando se instale debajo de una superficie de cocción:
Los cajones para calentar se adaptan a instalaciones
sólo debajo de ciertas modelos de superficies de cocción
especificados. Consulte la etiqueta adjunta a la parte
superior del cajón para calentar a fin de conocer los
modelos que se adaptan. Se requiere una barrera sólida y
una brecha de aire entre la superficie de cocción y el cajón
para calentar. Lea la Nota que aparece más arriba.
INSTRUCCIONES DE INSTALACIÓN
Tomacorriente de un
máx. de 42” desde el
lado derecho
Mín. de 1*
25"
9"
Min. de 23 ½”
Altura de la
mesada de
36”
Tomacorriente
de un máx. de
16” desde el
lado izquierdo
Tomacorriente
nivelado con el lateral
del gabinete a un
máx. de 7”
Instale el bloque anti
volcaduras de 2x4 o
2x2 contra la pared del
gabinete trasero, a 9"
del piso hasta la parte
inferior del bloque.
7"
Parte superior del
gabinete a 1 ½”
Instale una barrera
sólida y una brecha
de aire de un mín.
de ¼” sobre el
cajón para calentar
Brecha de
aire de ¼”
Barrera sólida
Instale una barrera sólida
debajo de una superficie
de cocción (lea la Nota)
* NOTA: Al instalar el cajón para calentar debajo de una superficie
de cocción, se deberá instalar una barrera sólida a por lo menos
1” desde el punto más bajo de la parte inferior de la caja de los
quemadores de la superficie de cocción hasta la parte superior
GHO HVSDFLR OLEUH 8VH FXDOTXLHU PDWHULDO VyOLGR WDO FRPR XQ
contrachapado grueso de ¼”. Deje una brecha de aire de por
lo menos ¼” entre la barrera y la parte superior del cajón para
calentar. Consulte la etiqueta en la parte superior del cajón para
calentar para conocer los modelos de superficies de cocción
aprobados.
9 ¼"
Dimensión A
Cajón de 27” Cajón de 30”
25-1/2" 28-1/2"

49-2000685 Rev. 1 13
PREPARACIÓN DEL GABINETE: HORNOS DEBAJO DE LAS PAREDES
INSTALACIÓN DEBAJO DE UN HORNO SIMPLE
INSTALACIÓN DEBAJO DE UN HORNO DOBLE
Ŷ 8QDYH]LQVWDODGRODFDUDIURQWDOGHOFDMyQSDUDFDOHQWDU
estará correctamente nivelada con las puertas de los
gabinetes y frentes de los cajones.
Ŷ /DVVXSHUSRVLFLRQHVGHORVFDMRQHVHVFRQGHUiQORV
extremos puntiagudos en todos los lados de la abertura.
La apertura aproximada del cajón deberá ser de:
— Profundidad: Mínimo de 23 ½” desde la parte interior
trasera hasta el frente del marco del
gabinete.
— Ancho: modelos de 25 ½” por 27” de ancho
modelos de 28 ½” por 30” de ancho
— Alto: 9 ¼”
— Deje un mínimo de 2” entre el horno y los
espacios libres dle cajón para los espacios de las
superposiciones.
NOTA: Si realizará la instalación en gabinetes sin marco,
será necesario instalar ristreles anchos de ½" que acepten
los tornillos de montaje del cajón. Observe el cajón para
encontrar las ubicaciones exactas de los tornillos de
montaje.
Cuando se instale debajo de un horno de pared:
Los cajones para calentar se adaptan a instalaciones
sólo debajo de ciertos modelos de horno de pared
especificados. Consulte la etiqueta adjunta a la parte
superior del cajón para calentar para conocer los modelos
que se adaptan.
NOTA: El receptáculo eléctrico se podrá instalar como se
muestra para las instalaciones sobre mesadas. No instale
el receptáculo sobre la parte superior del espacio libre del
cajón para calentar.
INSTRUCCIONES DE INSTALACIÓN
Instrucciones de instalación
Mín. de
23 ½”
Bloque anti
volcaduras de 2x2 o
2x4 contra la pared
trasera a 9" del piso
hasta la parte inferior
del bloque
Mín. de 1” sobre el zócalo
o realice el ajuste a la
altura de la instalación del
horno
A
Mín. de 2”
Permita una superposición
de 5/8” en todos los costados
B
Espacio
libre del
horno
NOTA: Se podrá requerir aberturas adicionales entre
los espacios libres. Asegúrese de que los soportes
del horno que están por encima de la ubicación del
cajón para calentar no obstruyan la profundidad
interior requerida de 23 ½" y la altura de 9 ¼”.
9"
9
1
/4"
10
1
/2"
23
1
/4"
NOTA: Se podrán requerir aberturas
adicionales entre los espacios libres. Asegúrese
de que los soportes del horno que están por
encima de la ubicación del cajón para calentar
no obstruyan la profundidad interior requerida
de 23 ½" y la altura de 9 ¼”.
Min.
de 2"
Mín. de 1” sobre
el zócalo
Bloque anti
volcaduras
de 2x2 o 2x4
contra la pared
trasera a 9" del
piso hasta la
parte inferior del
bloque.
Min. de
23
1
/2”
Permita una
superposición
de 5/8” en todos
los costados
9"
9
1
/4"
10
1
/2"
23
1
/4"
Espacio
libre del
horno
A
B
Dimensión A Dimensión B
Cajón de 27”
25-1/2" 26-3/4"
Cajón de 30” 28-1/2" 29-3/4"
Dimensión A Dimensión B
Cajón de 27” 25-1/2" 26-3/4"
Cajón de 30” 28-1/2" 29-3/4"

14 49-2000685 Rev. 1
Instrucciones de instalación
INSTALACIÓN DEL SOPORTE DEL GABINETE
IMPORTANTE: Cuando se instalen debajo de un horno
simple o doble, asegúrese de que cualquier soporte del
horno que se encuentre por encima del espacio libre no
obstruya la profundidad requerida de 22 ½” o 23 ½” del
espacio libre del cajón para calentar.
Ŷ Se requiere un espacio libre mínimo de 2” entre el horno
y el cajón para calentar. Se podrá requerir espacio
adicional si se usan bloques de 2 x 4 para sostener los
tirantes o el piso sólido del horno que está encima.
Ŷ (OFDMyQSDUDFDOHQWDUSRGUiHVWDUDSR\DGRSRUWLUDQWHV
inferiores sólidos de 2 x 4 o 2 x 2.
Ŷ (OVRSRUWHGHEHUiHVWDUQLYHODGR\PRQWDGRGHIRUPD
rígida, a nivel con el extremo inferior del espacio libre.
No hay forma de nivelar el cajón una vez que fue
instalado. Asegúrese de que los soportes estén
nivelados.
Ŷ 7RGRHOSHVRGHOFDMyQHVWiDSR\DGRVREUHORVWLUDQWHVR
el piso sólido y deberán poder soportar 150 libras.
INSTRUCCIONES DE INSTALACIÓN
23-1/2"
Tirantes de 2" x 4" o equivalentes
25"
30"
22-1/2"
22"
27"
Tirantes de 2" x 4" o equivalentes
PREPARACIÓN PARA LA INSTALACIÓN CON
MONTAJE NIVELADO (para modelos CTW900M únicamente)
PREPARE EL INTERIOR
Corte e instale los ristreles laterales:
Ŷ&RUWHULVWUHOHVGHPDGHUDODWHUDOHVKDVWDODDOWXUDGHOD
abertura del gabinete, de aproximadamente
2 1/2” de profundidad. Instale, sobre cada lado,
1-3/16” desde la cara frontal del gabinete
Corte e instale los ristreles inferiores:
Ŷ Corte el ristrel inferior de madera hasta una altura mínima
de 1 1/8”, de la profundidad del gabinete menos 1-3/16” y
del ancho de la abertura del gabinete (D).
Ŷ
Realice la instalación sobre el piso del gabinete entre los dos
ristreles laterales, empuje completamente hacia atrás contra
la pared del gabinete y asegúrese de que su cara frontal
se alinee con las caras frontales de los ristreles laterales
(brecha de 1 3/16” desde la cara del gabinete frontal).
E
C
B
D
A
A
A Profundidad de los
ristreles laterales
2-1/2” min.
B Altura del ristrel inferior 1-1/8”
C Profundidad del ristrel
inferior
Profundidad del gabinete menos E
D Ancho del ristrel inferior 0tQGH´±Pi[GH´´PHQRV
el grosor del ristrel en los 2 lados de por lo
menos ½” cada uno)
E Inserción de los tres
ristreles desde el frente
del gabinete
1-3/16”
VISTA
683(5,25
Cara Frontal del Gabinete
EE
A A
C
D

49-2000685 Rev. 1 15
INSTALACIÓN DEL SOPORTE ANTI VOLCADURAS
1. Deslice la esquina izquierda sobre la abertura y empuje
el cable de corriente dentro del agujero que conduce
hasta la ubicación del tomacorriente. Pase el cable a
medida que el cajón se está empujando hacia atrás en la
abertura.
Si se instala la salida dentro de la abertura, enchufe el
cable en el tomacorriente. En esta ubicación, el cable de
corriente excedente deberá estar enroscado y encintado
sobre el lado derecho de la unidad. Asegúrese de que el
cable no quede atrapado por el cajón.
NOTA: Asegúrese de que el cable de corriente no
tenga contacto con las superficies calientes en la parte
inferior de los hornos, superficies de cocción, u otros
electrodomésticos.
2. Empuje el cajón hacia atrás hasta que la brida esté
nivelada con el frente del gabinete.
3. Abra el cajón completamente.
4. Perfore agujeros piloto a través de los agujeros de la
estructura que se superpone, uno en cada esquina.
5. Coloque los tornillos de madera provistos en cada
esquina.
ADVERTENCIA
PRECAUCIONES ANTI
VOLCADURAS:
Se deberá instalar la abrazadera anti volcaduras para evitar
que el cajón se vuelque hacia adelante cuando se abra y
cargue.
Si esto no se cumple, se podrán sufrir lesiones
personales.
Instale la abrazadera anti
volcaduras de 2x4 o 2x2 contra
la pared del gabinete trasero, a
9" desde el piso hasta la parte
inferior de la abrazadera.
Tirantes de 2x4 o
2x2 o parte inferior
sólida
9"
INSTALACIÓN DEL CAJÓN PARA CALENTAR
INSTRUCCIONES DE INSTALACIÓN
Instrucciones de instalación

16 49-2000685 Rev. 1
Problema Causa Posible Qué Hacer
El cajón para calentar
no funciona
Es posible que haya un fusible quemado en su
hogar o que se haya desconectado el disyuntor.
Reemplace el fusible o reinicie el disyuntor.
El cajón para calentar no está enchufado. Enchufe el mismo.
El control está configurado de forma incorrecta. &RQVXOWHODVHFFLyQGH8VRGHOFDMyQSDUD
calentar.
El cajón no se desliza
de forma pareja o se
arrastra.
Las ruedas deslizantes están desalineadas. Extienda totalmente el cajón y empuje el mismo
totalmente hacia adentro. Consulte la sección de
Cuidado y limpieza.
El cajón está sobrecargado o la carga está
desbalanceada.
Reduzca el peso a menos de 50 libras.
Redistribuya los contenidos del cajón.
Condensación
excesiva
Líquido en el cajón para calentar Retire el líquido.
Comidas no cubiertas Cubra la comida con una tapa o papel de
aluminio.
La configuración de temperatura es demasiado
alta.
Reduzca la configuración de temperatura.
Configuración incorrecta del Selector de
Humedad
Ajuste el Selector de Humedad en la
configuración de ventilación abierta para permitir
la ventilación.
No hay calor en la
configuración PROOF
(Leudar).
Es posible que la temperatura de la sala impida
que el termostato se active.
Gire la perilla a LOW (Bajo) y luego nuevamente
a PROOF (Leudar).
La comida se secó. Escape de humedad Cubra la comida con una tapa o papel de
aluminio.
CONSEJOS PARA LA SOLUCIÓN DE PROBLEMAS
¡Ahorre tiempo y dinero! Primero revise los cuadros que aparecen en las siguientes páginas y es posible que no necesite solicitar
reparaciones.
Consejos para la Solución de Problemas... Antes de solicitar el servicio técnico

49-2000685 Rev. 1 17
Garantía Limitada del Cajón para Calentar Eléctrico Café
Qué no cubrirá Café:
Ŷ 9LDMHVGHOWpFQLFRGHOVHUYLFLRDVXKRJDUSDUDHQVHxDUOH
sobre cómo usar el producto.
Ŷ ,QVWDODFLyQHQWUHJDRPDQWHQLPLHQWRLQDGHFXDGRV
Ŷ )DOODVGHOSURGXFWRHQFDVRGHDEXVRPDOXVRPRGLILFDFLyQ
o uso para propósitos diferentes al original o uso comercial.
Ŷ 5HHPSOD]RGHIXVLEOHVGHODFDVDRUHLQLFLRGHGLV\XQWRUHV
Ŷ 'DxRVRFDVLRQDGRVVREUHHOSURGXFWRSRUDFFLGHQWH
incendio, inundaciones o catástrofes naturales.
Ŷ 'DxRVLQFLGHQWDOHVRFRQVHFXHQWHVFDXVDGRVSRUSRVLEOHV
defectos sobre este producto.
Ŷ 'DxRVLQFLGHQWDOHVRFRQVHFXHQWHVFDXVDGRVSRUSRVLEOHV
defectos sobre este producto.
Ŷ 'DxRFDXVDGRGHVSXpVGHODHQWUHJD
Ŷ 3URGXFWRQRDFFHVLEOHSDUDEULQGDUHOVHUYLFLRUHTXHULGR
Por el Período de Café reemplazará
Un Año
Desde la fecha de la
compra original
Cualquier pieza del cajón para calentar que falle debido a un defecto en los materiales o la fabricación.
Durante esta garantía limitada de un año, Café proveerá, sin costo, todo el trabajo y el servicio en el
hogar relacionado con el reemplazo de la pieza que presente defectos.
cafeappliances.com
Todo el servicio de garantía es provisto por nuestros Centros de Servicio de Fabricación, o un técnico de servicio autorizado. Para
programar una visita del servicio técnico a través de Internet, visítenos en cafeappliances.com/service. Tenga listo el número de
serie y número de modelo cuando programe el servicio.
Abroche su recibo aquí. Para acceder al servicio técnico de acuerdo con
la garantía deberá contar con la prueba de la fecha original de compra.
GARANTÍA LIMITADA
EXCLUSIÓN DE GARANTÍAS IMPLÍCITAS
Su única y exclusiva alternativa es la reparación del producto, como se indica en la Garantía Limitada. Las
garantías implícitas, incluyendo garantías implícitas de comerciabilidad o conveniencia sobre un propósito
particular, se limitan a un año o al período más corto permitido por la ley.
Esta garantía limitada se extiende al comprador original y a cualquier propietario posterior de los productos
FRPSUDGRVSDUDXVRGRPpVWLFRGHQWURGH((886LHOSURGXFWRHVWiHQXQiUHDGRQGHQRVHHQFXHQWUDGLVSRQLEOH
un Proveedor Autorizado del Servicio Técnico de Café, usted será responsable por el costo de un viaje o se podrá
requerir que traiga el producto a una ubicación del Servicio Técnico de Café autorizado para recibir el servicio.
En Alaska, la garantía limitada excluye el costo de envío o visitas de servicio a su domicilio. Algunos estados no
permiten la exclusión o limitación de daños fortuitos o consecuentes. Esta garantía limitada le otorga derechos
legales específicos, y usted también podría tener otros derechos que varían de estado a estado. Para conocer cuáles
son sus derechos legales, consulte a la oficina de asuntos del consumidor local o estatal o al Fiscal de su estado.
Garante: GE Appliances, a Haier company
Louisville, KY 40225
Garantías Extendidas: Adquiera una garantía extendida de Café y conozca los descuentos especiales que están
disponibles mientras su garantía aún está vigente. Puede acceder a la misma a través de Internet en cualquier
momento en
cafeappliances.com/extended-warranty
Los Servicios para los Café aún estarán disponibles cuando su garantía caduque.

18 49-2000685 Rev. 1
Notas

49-2000685 Rev. 1 19
Piezas
Kit del Panel a Medida de 30” de Ancho
Kits de Manijas a medida Cafe Pro de 30"
Piezas
Estante con Rejilla
Suministros de Limpieza
Limpiadores de Acero Inoxidable CitriShine
Limpiador para Electrodomésticos de Acero Inoxidable
ACCESORIOS
Accesorios
¿Busca Algo Más?
¡Café ofrece una variedad de accesorios para mejorar sus
experiencias de cocción y mantenimiento!
Consulte la página de Apoyo al Consumidor para información
sobre la página web.
Estos y otros productos están disponibles:

20 49-2000685 Rev. 1
Soporte para el Consumidor
SOPORTE PARA EL CONSUMIDOR
Sitio Web de Café
¿Desea realizar una consulta o necesita ayuda con su electrodoméstico? ¡Intente a través del sitio web de Café las 24 horas
GHOGtDFXDOTXLHUGtDGHODxR8VWHGWDPELpQSXHGHFRPSUDUPiVHOHFWURGRPpVWLFRVPDUDYLOORVRVGH&DIp\DSURYHFKDUWRGRV
QXHVWURVVHUYLFLRVGHVRSRUWHDWUDYpVGH,QWHUQHWGLVHxDGRVSDUDVXFRQYHQLHQFLD(Q((88cafeappliances.com
Registre su Electrodoméstico
£5HJLVWUHVXHOHFWURGRPpVWLFRQXHYRDWUDYpVGH,QWHUQHWVHJ~QVXFRQYHQLHQFLD8QUHJLVWURSXQWXDOGHVXSURGXFWRSHUPLWLUi
una mejor comunicación y un servicio más puntual de acuerdo con los términos de su garantía, en caso de surgir la necesidad.
También puede enviar una carta en la tarjeta de inscripción preimpresa que se incluye con el material embalado.
(Q((88cafeappliances.com/register
Servicio Programado
El servicio de reparación de expertos de Café está a sólo un paso de su puerta. Conéctese a través de Internet y programe su
VHUYLFLRDVXFRQYHQLHQFLDFXDOTXLHUGtDGHODxR(Q((88cafeappliances.com/service
Garantías Extendidas
Adquiera una garantía extendida de Café y conozca los descuentos especiales que están disponibles mientras su garantía aún
está vigente. La puede adquirir en cualquier momento a través de Internet. Los servicios de Café aún estarán allí cuando su
JDUDQWtDFDGXTXH(Q((88cafeappliances.com/extended-warranty
Conectividad Remota
Para solicitar asistencia para la conectividad de red inalámbrica (para modelos con acceso remoto),
visite nuestro sitio web en cafeappliances.com/connect
Piezas y Accesorios
Aquellos individuos calificados para realizar el servicio técnico de sus propios electrodomésticos podrán solicitar el envío de
piezas o accesorios directamente a sus hogares (se aceptan las tarjetas VISA, MasterCard y Discover). Ordene hoy a través de
,QWHUQHWGXUDQWHODVKRUDVWRGRVORVGtDV(Q((88cafeappliances.com/parts
Las instrucciones que figuran en este manual cubren los procedimientos que serán realizados por cualquier usuario.
Otros servicios técnicos generalmente deben ser derivados a personal calificado del servicio. Se deberá tener cuidado,
ya que una reparación indebida podrá hacer que el funcionamiento no sea seguro.
Contáctenos
Si no se encuentra satisfecho con el servicio que recibió de Café, comuníquese con nosotros a través de nuestro sitio web con
todos los detalles, incluyendo su número telefónico, o escriba a:
(Q((88*HQHUDO0DQDJHU&XVWRPHU5HODWLRQV_&DIp$SSOLDQFHV$SSOLDQFH3DUN_/RXLVYLOOH.<
cafeappliances.com/contact
-
 1
1
-
 2
2
-
 3
3
-
 4
4
-
 5
5
-
 6
6
-
 7
7
-
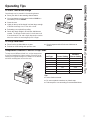 8
8
-
 9
9
-
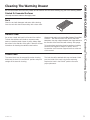 10
10
-
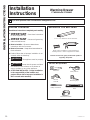 11
11
-
 12
12
-
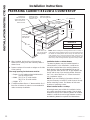 13
13
-
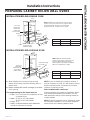 14
14
-
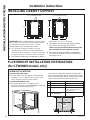 15
15
-
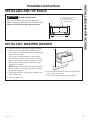 16
16
-
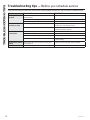 17
17
-
 18
18
-
 19
19
-
 20
20
-
 21
21
-
 22
22
-
 23
23
-
 24
24
-
 25
25
-
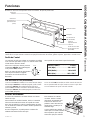 26
26
-
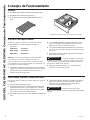 27
27
-
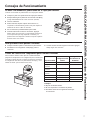 28
28
-
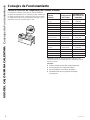 29
29
-
 30
30
-
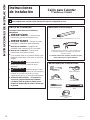 31
31
-
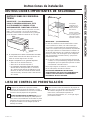 32
32
-
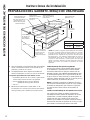 33
33
-
 34
34
-
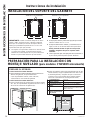 35
35
-
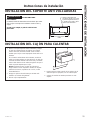 36
36
-
 37
37
-
 38
38
-
 39
39
-
 40
40
-
 41
41


en otros idiomas
- English: GE CTW900P2PS1 Owner's manual
Artículos relacionados
-
GE PTW9000SPSS El manual del propietario
-
GE PTW9000SPSS Manual de usuario
-
-
GE JB755SJSS El manual del propietario
-
GE JS750SFSS El manual del propietario
-
-
GE PGB940SEJSS El manual del propietario
-
-
GE JB755SJSS El manual del propietario
-