
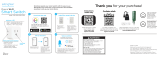
5. Thread screws through holes on bracket.
6. Use a #2 Phillips-head screwdriver to fasten the
bracket with screws. Ensure indent faces light’s
intended direction.
7. Align base screw with the bracket’s indent. Seat base
onto bracket.
8. Fasten base screw with Allen wrench until product is
firmly in place — do not overtighten.
NOTE: The indent on the mounting bracket determines where the
light will point. For example: the light will point towards the floor if
the bracket is installed with the indent facing down.
SCREWS AND ANCHORS
1.
Remove the pre-attached mounting bracket from the base
by loosening the base screw with the included Allen wrench.
2. Hold the bracket against the mounting surface with the
indent facing the light’s intended direction. Mark screw
locations using a pencil.
3. Drill pilot holes on each marking using the 1/8in. drill bit.
4. If installing on a stud, continue to Step 4. If installing on
drywall, plaster or tile, use a 7/32in. drill bit to enlarge the
pilot holes. Insert anchors into pilot holes using a mallet.
Install the toilet paper holder light using the included
screws and anchors. Ensure the mounting surface is
clean, dry and able to support the product. Read all
safety instructions and warnings before installing. Keep
this manual for later use.
NOTE: While it’s possible to mount this product to many dierent
surface types, solid wood, drywall to wood stud, or masonry
mounted installations will yield the best results.
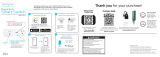
INCLUDED HARDWARE
RECOMMENDED TOOLS
BATTERIES
1. Slide and hold the unlock button. While still holding
the unlock button, twist the post counterclockwise
to separate it from the base. The battery cartridge is
located inside the post.
2. Insert 3 AAA batteries into each compartment,
noting polarity.
3. Reinsert the battery cartridge into the post and twist
clockwise to lock them back into position.
INSTALLATION
Bracket
(x1)
INSTALLATION
MADE IN CHINA
Distributed by Jasco Products Company LLC,
10 E. Memorial Rd., Oklahoma City, OK 73114.
This Jasco product comes with a 1-year limited
warranty. Visit www.byjasco.com for
warranty details.
Questions? Contact our U.S.-based Consumer
Care at 1-800-654-8483 between 7AM-8PM,
M-F, Central Time.
For product patent information, visit
ww.byjasco.com/patents.
77233 v2 01/17/23
OPERATION
Thank you for your purchase!
Instructions
made easy Register your
product
Discover more bathroom
décor lighting solutions at
enbrightenme.com.
Like our product?
Leave a review
on your favorite
retailer website or
amazon.com.
Having Problems?
Let us know how
we can help.
Call
1-800-654-8483
between 7AM-8PM,
M-F, Central Time.
Read instructions or watch
easy-to-follow video.
Scan code or visit
byjasco.com/77233i
Receive exclusive deals and
register your product.
Scan code or visit
byjasco.com/deals
• KEEP BATTERIES AWAY FROM SMALL CHILDREN.
• BATTERIES CAN EXPLODE OR LEAK IF INSTALLED IN REVERSE, DISASSEMBLED,
CHANGED OR EXPOSED TO FIRE OR HIGH TEMPERATURE.
• REMOVE BATTERIES IF THE PRODUCT WILL NOT BE USED FOR EXTENDED PERIODS.
• BATTERIES MAY LEAK HARMFUL LIQUIDS OR IGNITABLE MATERIALS OR EXPLODE
CAUSING INJURY AND PRODUCT DAMAGE.
• DO NOT MIX OLD AND NEW OR OTHER BATTERY TYPES.
• REPLACE ALL BATTERIES AT THE SAME TIME.
• REPLACE FULLY DISCHARGED BATTERIES IMMEDIATELY.
• THE PRODUCT IS NOT DESIGNED TO BE USE AS A GRAB BAR. DO NOT MOUNT IN
LOCATIONS WHERE THIS PRODUCT IS LIKELY TO BE USED AS A GRAB BAR.
• USE CAUTION WHEN DRILLING INTO WALLS TO AVOID DRILLING INTO ELECTRICAL
AND PLUMBING LINES HIDDEN WITHIN THE WALL. IF UNSURE, CONTACT A
PROFESSIONAL INSTALLER FOR INSTALLATION.
WARNING
Motion-Sensing
Toilet Paper Holder Light
User Manual
.
Screws
(x2) Anchors
(x2)
Allen
wrench
(x1)
In low light conditions, the LED will activate when
motion is detected within a 15ft., 120° range. The LED
will turn o 20 seconds after motion stops.
NOTE: The LED only turns on in low light conditions. If the room
is fully lit, the LED may not turn on.
CLEANING
• Clean with mild soap and warm water. Completely
dry the surface with a clean, soft cloth.
• Do not clean with harsh or abrasive cleaners such as
ammonia, chlorine or toilet cleaner. Do not dry with a
coarse cloth.
Level
Mallet
Tape
measure
Pencil
Screwdriver
Drill
1. 2.
3. 4.
5. 6.
7. 8.
1.
x3
2. 3.

5. Atornille los tornillos en los orificios a través del soporte.
6. Use solo un destornillador manual de cabeza Phillips n.° 2
para ajustar el soporte con los tornillos. Asegúrese de que
la muesca esté orientada hacia donde desea dirigir la luz.
7. Alinee el tornillo base con la muesca del soporte. Coloque
la base en el soporte.
8. Ajuste el tornillo base con la llave allen hasta que el
producto esté firmemente en su lugar, no apriete
demasiado.
NOTA: La muesca en el soporte de montaje determina hacia dónde
apuntará la luz. Por ejemplo: la luz apuntará hacia el piso si el
soporte se instala con la muesca orientada hacia abajo.
TORNILLOS Y TACOS
1. Retire el soporte de montaje preinstalado de la base aflojando el
tornillo de la base con la llave Allen incluida.
2. Sostenga el soporte contra la superficie de montaje con la muesca
hacia donde desea dirigir la luz. Marque la ubicación del tornillo con
un lápiz.
3. Perfore orificios piloto en cada marca con una broca de 1/8in. (3mm).
4. Si se instala en un montante, continúe al Paso 4. Si se instala en
placa de yeso, yeso o azulejo, use una broca de 7/32in. (5,6mm)
para agrandar los orificios piloto. Inserte los tacos en los orificios
piloto con un mazo.
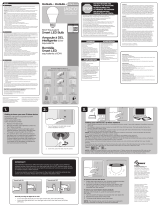
PILAS
1. Deslice y mantenga presionado el botón de desbloqueo. Mientras
mantiene presionado el botón de desbloqueo, gire el poste en
sentido contrario a las agujas del reloj para separarlo de la base.
El cartucho de la batería se encuentra dentro del poste.
2. Coloque 3 pilas AAA en cada compartimiento, teniendo en
cuenta los polos.
3. Vuelva a insertar el cartucho para pilas en el poste y gire hacia la
derecha para fijarlo de vuelta en su lugar.
INSTALACIÓN
INSTALACIÓN
HECHO EN CHINA
Distribuido por Jasco Products Company LLC,
10 E. Memorial Rd., Oklahoma City, OK 73114.
Este producto de Jasco tiene una garantía
limitada de 1año. Para más información sobre
la garantía, visite www.byjasco.com.
¿Tiene preguntas? Póngase en contacto con
nuestro servicio de atención al consumidor de
EE. UU. al 1-800-654-8483, de lunes aviernes,
de 7a.m. a 8p.m. (hora estándar del centro).
Visite www.byjasco.com/patents para
información sobre la patente del producto.
ADVERTENCIA
OPERACIÓN
¡Gracias por su compra!
Instrucciones
fáciles Registre su
producto
Descubra más soluciones de
iluminación decorativa para el
baño en enbrightenme.com.
¿Le gusta nuestro
producto?
Deje una reseña en
amazon.com.
¿Tiene algún problema?
Díganos cómo
podemos ayudar.
Llame al 1-800-654-8483,
entre las 7 a. m. y las 8 p. m.,
hora estándar del centro.
Lea las instrucciones o mire el
video con el paso a paso.
Escanee el código o visite
byjasco.com/77233i
Recibe ofertas exclusivas
y registra tu producto.
Escanee el código o visite
byjasco.com/deals
Manual de usuario
de luz para porta papel higiénico
con detección de movimiento
Instale la luz para porta papel higiénico con los tornillos y
tacos provistos. Asegúrese de que la superficie de montaje
esté limpia, seca y pueda sostener el producto. Lea todas
las instrucciones y advertencias de seguridad antes de
instalar. Conserve este manual para su uso posterior.
NOTA: Aunque se puede instalar este producto en muchos tipos de superficies
diferentes, se obtienen los mejores resultados en instalaciones en madera sólida,
en placa de yeso sobre montante de madera o en mampostería.
PIEZAS DE MONTAJE INCLUIDAS
HERRAMIENTAS RECOMENDADAS
Nivel
Mazo
Cinta de
medir
Lápiz
Destornillador
Taladro
1. 2.
3. 4.
Soporte
(x1)
Tornillos
(x2) Tacos
(x2)
Llave
allen
(x1)
• MANTENGA LAS PILAS LEJOS DEL ALCANCE DE NIÑOS PEQUEÑOS.
• LAS PILAS PUEDEN EXPLOTAR O TENER FUGAS SI SE INSTALAN EN SENTIDO INVERSO,
SE DESARMAN, SE MODIFICAN O SE EXPONEN AL FUEGO O A TEMPERATURA ALTA.
• RETIRE LAS PILAS SI EL PRODUCTO NO SE USARÁ DURANTE PERÍODOS
PROLONGADOS.
• LAS PILAS PODRÍAN DESPRENDER LÍQUIDOS NOCIVOS O MATERIALES INFLAMABLES,
O EXPLOTAR Y CAUSAR LESIONES Y DAÑOS AL PRODUCTO.
• NO COLOQUE PILAS NUEVAS CON PILAS VIEJAS U OTROS TIPOS DE PILAS.
• REEMPLACE TODAS LAS PILAS AL MISMO TIEMPO.
• REEMPLACE LAS PILAS COMPLETAMENTE DESCARGADAS DE INMEDIATO.
• EL PRODUCTO NO SE DISEÑÓ PARA USARSE COMO AGARRADERA. NO LO MONTE EN
LUGARES DONDE ES PROBABLE QUE EL PRODUCTO SE USE COMO AGARRADERA.
• TENGA CUIDADO CUANDO TALADRE EN PAREDES PARA EVITAR PERFORAR CAÑERÍAS
Y CABLES ELÉCTRICOS OCULTOS DENTRO DE LA PARED. SI NO ESTÁ SEGURO,
COMUNÍQUESE CON UN PROFESIONAL PARA QUE HAGA LA INSTALACIÓN.
En condiciones de poca luz, se activará el LED cuando
se detecte movimiento en un alcance de 4,6m (15ft) en
120°. El LED se apagará 20 segundos después de que se
detenga el movimiento.
NOTA: El LED solo se enciende en condiciones de poca luz. Si el
lugar está completamente iluminado, el LED.
LIMPIEZA
• Limpie con un jabón suave y agua tibia. Seque
completamente la superficie con un paño suave limpio.
• No limpie con limpiadores fuertes o abrasivos como
amoníaco, cloro o limpiador para el baño. No seque con
un paño áspero.
5. 6.
7. 8.
1.
x3
2. 3.
-
 1
1
-
 2
2


Enbrighten LED Motion Sensing Bathroom Lighting Bundle, Chrome Manual de usuario
- Tipo
- Manual de usuario
- Este manual también es adecuado para
en otros idiomas
Artículos relacionados
-
 Enbrighten 70333 Galaxy Wave Mini Projector Manual de usuario
-
 Enbrighten Basics LED Color Changing Fairy String Lights, 60 Lights, 20ft., White Manual de usuario
-
 Enbrighten 51253-T1 Manual de usuario
-
 Enbrighten 51511-T1 Manual de usuario
-
Enbrighten 51492 Outdoor Wi-Fi Smart Yard Stake Manual de usuario
-
Enbrighten 51251-T1 Manual de usuario
-
 Enbrighten 52190/ ZW7105 Manual de usuario


