Home Decorators Collection 17017 Guía de instalación
- Tipo
- Guía de instalación

THANK YOU
We appreciate the trust and condence you have placed in Home Decorators Collection through the purchase of this light xture. We strive to
continually create quality products designed to enhance your home. Visit us online to see our full line of products available for your home
improvement needs. Thank you for choosing Home Decorators Collection!
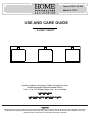
Item # 1002 113 323
Model # 17017
USE AND CARE GUIDE
3-LIGHT VANITY
Questions, problems, missing parts? Before returning to the store,
call Home Decorators Collection Customer Service
8 a.m. - 7 p.m., EST, Monday-Friday, 9 a.m. - 6 p.m. Saturday
1-800-986-3460
H
OMEDEPOT.COM/HOMEDECORATORS

2
Table of Contents
Table of Contents .......................................................... 2
Safety Information ......................................................... 2
Warranty ......................................................................... 2
Five (5) Year Warranty .............................................................2
What is Covered .......................................................................2
What is Not Covered ................................................................2
Pre-Installation .............................................................. 3
Planning Installation ................................................................3
Tools Required .........................................................................3
Hardware Included ...................................................................3
Package Contents ....................................................................4
Installation ..................................................................... 5
Care and Cleaning ........................................................ 7
Troubleshooting ............................................................ 7
Service Parts ................................................................. 8
Model .......................................................................................8
Safety Information
READ AND SAVE THESE INSTRUCTIONS.
ƶ For your protection and safety, carefully read and
understand the information provided in this manual
completely before attempting to assemble, install, or
operate this product. Failure to do so could lead to
electrical shock, re, or other injuries that could be
hazardous or even fatal.
ƶ Before touching any wire, use a voltage tester to make
sure it is not live.
ƶ When replacing fuses, turn off the main power rst. Make
sure your hands and feet are dry, and place one hand
behind your back to prevent electricity from making a
complete circuit through your chest. Touch a plug fuse
only by its insulated rim. Remove cartridge fuses with a
fuse puller.
ƶ Use tools with insulated handles and ladders made of
wood or berglass.
ƶ To protect children, place a safety cover over any unused
outlets.
Warranty
FIVE (5) YEAR WARRANTY
W
HAT IS COVERED
The manufacturer warrants this xture to be free from defects in materials and workmanship for a period of ve (5) years from date of
purchase. This warranty applies only to the original consumer purchaser and only to products used in normal use and service. If this product
is found to be defective, the manufacturer’s only obligation, and your exclusive remedy, is the repair or replacement of the product at the
manufacturer’s discretion, provided that the product has not been damaged through misuse, abuse, accident, modications, alteration,
neglect, or mishandling. This warranty shall not apply to any product that is found to have been improperly installed, set-up, or used in any
way not in accordance with the instructions supplied with the product. This warranty shall not apply to a failure of the product as a result
of
an accident, misuse, abuse, negligence, alteration, faulty installation, or any other failure not relating to faulty material or workmanship.
This warranty shall not apply to the nish on any portion of the product, such as surface and/or weathering, as this is considered normal
wear and tear.
WHAT IS NOT COVERED
The manufacturer does not warrant and specically disclaims any warranty, whether expressed or implied, of tness for a particular
purpose, other than the warranty contained herein. The manufacturer specically disclaims any liability and shall not be liable for any
consequential or incidental loss or damage, including but not limited to any labor/expense costs involved in the replacement or repair of
said product.
Contact the Customer Service Team at 1-800-986-3460 or visit HOMEDEPOT.COM/HOMEDECORATORS.
DANGER: Before starting installation of this xture
or removal of a previous xture, disconnect the power
by turning off the circuit breaker, removing the fuse at
the fuse box, or tripping the breaker that controls that
circuit. Tape a sign to the panel warning others to
leave the circuit alone while you work.
CAUTION: CONSULT A QUALIFIED ELECTRICIAN IF
YOU HAVE ANY ELECTRICAL QUESTIONS. If you have
any non-electrical questions about this xture, please
call our Customer Service Team at 1-800-986-3460 or
visit HOMEDEPOT.COM/HOMEDECORATORS. Please
reference your SKU (1002 113 323) or UPC
(802513170177).

3 HOMEDEPOT.COM/HOMEDECORATORS
Please contact 1-800-986-3460 for further assistance.
Pre-Installation
PLANNING INSTALLATION
Read all instructions before installing.
To avoid damaging this product, place it on a soft, non-abrasive surface, such as carpet or cardboard.
IMPORTANT: Inspect the wire insulation for any
cuts, abrasions, or exposed copper that may have
occurred during shipping. If there is a defect in the
wire, do not attempt installation. Please call the
Customer Service Team at 1-800-986-3460.
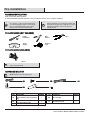
TOOLS REQUIRED (NOT INCLUDED)
Phillips Wire Pliers
Screwdriver Stripper
Safety
Electrical
Goggles Tape
TOOLS REQUIRED (INCLUDED)
Gloves
NOTE: Please wear the gloves before installing in
order to protect the fixture.
HARDWARE INCLUDED
NOTE: Hardware not shown to actual size.
NOTE: You may use three 25 W type G9 xenon
bulbs (included). Do not touch the G9 xenon bulbs with
bare hands at any time. A pair of white gloves has been
included for installation as oil from the skin may
damage the bulb.
Part Description Quantity
Part Description Quantity
AA
Support screw (short)
(Preassembled to mounting bracket
(A))
2 DD Wire connector 3
BB
Green ground screw (Preassembled
to mounting bracket (A))
1 EE 25 W G9 xenon bulb 3
CC Outlet box screw (long) 2

4
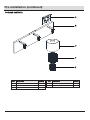
Pre-Installation (continued)
PACKAGE CONTENTS
Part Description Quantity
Part Description Quantity
A Mounting bracket 1 D Inner shade 3
B Fixture body 1 E Small inner shade 3
C Glass shade 3

5 HOMEDEPOT.COM/HOMEDECORATORS
Please contact 1-800-986-3460 for further assistance.
Installation
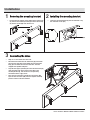
1
Removing the mounting bracket
2
Installing the mounting bracket
Unscrew the two support screws (AA) from the fixture body
(B). Remove the mounting bracket (A) from the fixture body
(B). Set the screws (AA) aside for later use.
Fasten the mounting bracket (A) onto the outlet box using
two outlet box screws (CC).
3
Connecting the wires
Strip 3/4 in. of insulation from wire ends.
Connect the black wire from the fixture body (B) to the black
wire from the outlet box and the white wire from the fixture
body (B) to the white wire from the outlet box. Twist the
stripped ends together with pliers.
Loop the bare copper grounding wire from the fixture body (B)
under the head of the green ground screw (BB) on the
mounting bracket (A), and connect it to the grounding
conductor from the supply circuit.
Cover the wire connections with the wire connectors (DD).
Tape the wire connectors (DD) and wires together. Carefully
position all wires inside the outlet box.

6
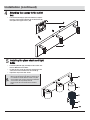
Installation (continued)
4
Attaching the canopy to the outlet
box
Place the fixture body (B) against the outlet box, align the
two holes of the mounting bracket (A) and fixture body (B),
then tighten the support screws (AA).
5
Installing the glass shade and light
bulbs
Install the light bulbs (EE) (included) into the sockets. Use
three 25 W G9 base xenon bulbs.
Position the glass shade (C) and inner shade (D) onto the
socket, then secure with the inner small shade (E).
Repeat this step for the other shades.
NOTE: Use only Max 25W type G9 xenon bulbs. DO
NOT use type G9 halogen bulbs without a shield. Do not
touch the G9 xenon bulbs with bare hands at any time.
A pair of white gloves has been included for installation
as oil from the skin may damage the bulb.
Please remove the protective film before installing
bulbs.

7 HOMEDEPOT.COM/HOMEDECORATORS
Please contact 1-800-986-3460 for further assistance.
Care and Cleaning
Do not use any cleaners with chemicals, solvents, or harsh abrasives. Use only a dry, soft cloth to dust or wipe carefully.
To clean the fixture, disconnect power by turning off the circuit breaker or by removing the fuse at the fuse box, and use a dry or
slightly dampened, clean cloth to wipe the exterior surface of the fixture.
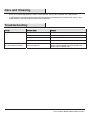
Troubleshooting
Problem Possible Cause Solution
The lights will not turn on. The bulb is burned out. Replace the light bulb.
The power is off. Ensure the power supply is turned on.
There is a faulty switch. Test or replace the switch.
There is a faulty wire connection. Check the wiring.
The fuse blows, or the circuit breaker
trips, when the light is turned on.
There are crossed wires, or the power
wire is grounding out.
Discontinue use of the lamp. Check the wire connections.
Contact a qualified electrician or call the Customer Care
Service Team at 1-800-986-3460.

8
MODEL: 17017
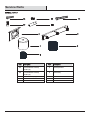
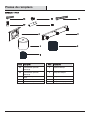
Service Parts
Part Description
Part Description
AA
Support screw (short)
(Preassembled to mounting
bracket (A))
A Mounting bracket
BB
Green ground screw
(Preassembled to mounting
bracket (A))
B Fixture body
CC Outlet box screw (long)
C Glass shade
DD Wire connector
D Inner shade
EE 40 W G9 xenon bulb
E Small inner shade

Questions, problems, missing parts? Before returning to the store,
call Home Decorators Collection Customer Service
8 a.m. - 7 p.m., EST, Monday-Friday, 9 a.m. - 6 p.m. Saturday
1-800-986-3460
HOMEDEPOT.COM/HOMEDECORATORS
Retain this manual for future use.

GRACIAS POR TU COMPRA
Apreciamos la conanza que has depositado en Home Decorators Collection al comprar esta lámpara. Nos esforzamos para continuamente crear
productos de calidad diseñados para mejorar tu hogar. Visítanos por Internet para ver nuestra línea completa de productos disponibles para las
necesidades de mejoras de tu hogar. ¡Gracias por elegir Home Decorators Collection!
Artículo # 1002 113 323
Modelo # 17017
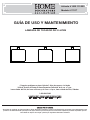
GUÍA DE USO Y MANTENIMIENTO
LÁMPARA DE TOCADOR DE 3 LUCES
¿Preguntas, problemas o piezas faltantes? Antes de regresar a la tienda,
llama al Servicio al Cliente de Home Decorators Collection, de 8 a.m. a 7 p.m.,
hora estándar del Este, de Lunes a Viernes, y de 9 a.m. a 6 p.m., hora estándar del Este, Sábados.
1-800-986-3460
HOMEDEPOT.COM/HOMEDECORATORS

2
Índice
Índice .............................................................................. 2
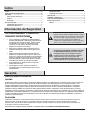
Información de Seguridad ............................................ 2
Garantía .......................................................................... 2
Cinco (5) Años de Garantía .......................................................2
Incluido ....................................................................................2
No Incluido ...............................................................................2
Pre-Instalación .............................................................. 3
Planicación de Instalación .....................................................3
Herramientas Necesarias .........................................................3
Aparillage Incluido ...................................................................3
Contenido del Paquete .............................................................4
Instalación ..................................................................... 5
Cuidado y Limpieza ...................................................... 7
Solución de Problemas ................................................ 7
Partes de Servicio ......................................................... 8
Modelo .....................................................................................8
Información de Seguridad
LEA CUIDADOSAMENTE Y GUARDE LAS
SIGUIENTES INSTRUCCIONES
.
ƶ Para su protección y seguridad, lea cuidadosamente y
entienda completamente la información suministrada en
este manual antes de tratar de armar, instalar u operar
este producto. El no seguir las instrucciones puede
resultar en un corto circuito, incendio u otros daños
peligrosos y en algunos casos fatales.
ƶ Antes de tocar cualquier cable, asegúrese de usar un
medidor de voltage para vericar que el cable no este
activo.
ƶ Apague la fuente de alimentación principal antes de
remplazar los fusibles. Asegúrese que sus manos y pies
esten secos, coloque una mano detrás de la espalda para
prevenir un circuito cerrado a través de su pecho. Solo
sujete el fusible por la parte aislada. Utilize un extractor
de fusibles para remover los cartuchos de fusibles.
ƶ Use herramientas con mango aislado y escaleras de
madera o bra de vidrio.
ƶ Par
a proteger a los niños, coloque un covertor de
seguridaden todas las salidas eléctricas que no están
siendo utilizadas.
Garantía
CINCO (5) AÑOS DE GARANTÍA
Incluido
El fabricante garantiza que esta lámpara no presentará defectos materiales o de fabricación por un período de cinco (5) años a partir de la
fecha de compra. Esta garantía es válida sólo para el comprador original y sólo cubre productos en uso y funciones normales. Si se
descubre algún defecto en este producto, la única obligación y solución exclusiva del fabricante, a criterio del mismo, será reparar o
reemplazar el producto siempre y cuando el defecto no sea resultado de un mal uso, abuso, accidente, modicaciones, alteraciones,
negligencia o manejo indebido. Esta garantía no cubre ningún producto instalado, congurado o usado incorrectamente sin seguir las
instrucciones adjuntas al producto. Esta garantía no cubre fallas del producto a consecuencia de un accidente, mal uso, abuso, negligencia,
modicaciones o instalaciones defectuosas, o cualquier otra fall
a no relacionada con defectos materiales o de fabricación. Esta garantía no
se aplica al acabado de ninguna parte del producto, como el de la supercie, ni al deterioro por condiciones ambientales, ya que eso se
considera un desgaste normal.
No Incluido
El fabricante no garantiza y se exime especialmente de cualquier garantía, explícita o implícita, de la capacidad del producto de asumir una
función especíca, distinta de la indicada en la garantía incluida en la presente. El fabricante se exime especícamente de cualquier
obligación y no es responsable de daños o pérdida directa o indirecta, incluidos cualquier costo de mano de obra o gastos relacionados con
el reemplazo o reparación de dicho producto.
Comunícate con el Equipo de Servicio al Cliente al 1-800-986-3460 o visita HOMEDEPOT.COM/HOMEDECORATORS.
PELIGRO : Antes de comenzar la instalación de esta
lámpara o antes de remover la lámpara existente, apague el
interruptor automático del circuito eléctrico, retire el fusible
de la caja de fusibles, o dispare el interruptor automático
para desconectar la corriente eléctrica. Adhiera una
señalización en el panel indicando a otras personas que no
deben tocar el circuito mientras usted esté trabajando.
CUIDADO : CONSULTE A UN ELECTRICISTA
CALIFICADO SI TIENE ALGUNA PREGUNTA ACERCA DE
LA INSTALACIÓN ELÉCTRICA. Si usted tiene alguna
otra pregunta acerca de esta lámpara, por favor
contacte a nuestro Equipo de Servicio al Cliente al
1-800-986-3460 o visite nuestra página web
HOMEDEPOT.COM/HOMEDECORATORS. Reérase al
numero SKU (1002 113 323) o UPC (802513170177).

3 HOMEDEPOT.COM/HOMEDECORATORS
Por favor llame al 1-800-986-3460 para asistencia adicional.
Pre-Instalación
PLANIFICACIÓN DE LA INSTALACIÓN
Lea todas las instrucciones antes de comenzar la instalación.
Para evitar dañar el producto, colócalo sobre una superficie suave, no abrasiva, como por ejemplo una alfombra o cartón.
IMPORTANTE : Revisa que el aislamiento de
los cables no haya sufrido ningún corte, abrasión
ni tenga filamentos de cobre expuestos debidos
al envío. Si hay un defecto en el cable suspenda
el ensamblaje. Por favor llama a nuestro Equipo
de Servicio al Cliente al 1-800-986-3460.
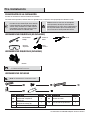
HERRAMIENTAS REQUERIDAS (NO INCLUIDAS)
Destornillador Pelador de Alicate
Phillips
Cables
Gafas de Cinta
Seguridad Eléctrica
HERRAMIENTAS REQUERIDAS (INCLUIDAS)
Guantes
HERRAMIENTAS INCLUIDAS
NOTA: Las herramientas no se muestran a escala.
NOTA: Puede usar tres focos de 25 W tipo G9
xenon (incluidos). No toque los focos G9 xenon
directamente con las manos. Se ha suministrado un
par de guantes blancos para la instalación puesto
que el sudor de las manos puede dañar el foco.
NOTA: Por favor, use guantes durante la instalación
con el fin para proteger el accesorio.
Pieza Descripción Cantidad
Pieza Descripción Cantidad
AA
Tornillo de soporte (corto)
(Preinstalado al soporte de
montaje (A))
2 DD Conector de cables 3
BB
Tornillo verde a tierra (Preinstalado
al soporte de montaje (A))
1 EE Foco de 25 W de tipo G9 xenon 3
CC Tornillo de la caja de salida (largo) 2

4
Pre-Instalación (continuación)
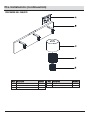
CONTENIDO DEL PAQUETE
Pieza Descripción Cantidad
Pieza Descripción Cantidad
A Soporte de montaje 1 D Campana interior 3
B Cuerpo de la lámpara 1 E Campana interior pequeña 3
C Campana de vidrio 3

5 HOMEDEPOT.COM/HOMEDECORATORS
Por favor llame al 1-800-986-3460 para asistencia adicional.
Instalación
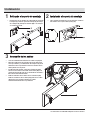
1
Retirando el soporte de montaje
2
Instalando el soporte de montaje
Desenrosque los dos tornillos de soporte (AA) del cuerpo de
la lámpara (B). Retire el soporte de montaje (A) del cuerpo
de la lámpara (B). Coloque los tornillos (AA) a un lado para
ser usados mas tarde.
Fije el soporte de montaje (A) a la caja eléctrica usando los
dos tornillos de la caja de salida (cortos) (CC).
3
Connexión de los cables
Pelar el aislamiento del extremo de los cables 3/4 pulgada.
Conecte el cable negro de la lámpara (B) con el cable negro
de la caja eléctrica, y el cable blanco de la lámpara (B) con el
cable blanco de la caja eléctrica. Tuerza los extremos de los
cables pelados con las pinzas.
El cable desnudo de cobre a tierra de la lámpara (B) debe
enroscarse una vuelta en el tornillo verde a tierra (BB) en el
soporte de montaje (A) antes de ser conectado al conductor a
tierra del circuito de alimentación.
Cubra los extremos de los cables con los conectores (DD).
Cubra los conectores de los cables (DD) junto con los cables
utilizando la cinta aislante. Introduzca los cables
cuidadosamente dentro de la caja eléctrica.

6
Instalación (continuación)
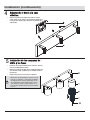
4
Adjuntando el dosel a la caja
eléctrica
Coloque el cuerpo de la lámpara (B) contra la caja de
salida, alinee los dos orificios del soporte de montaje (A) y
el cuerpo de la lámpara (B) y apriete los dos tornillos de
soporte (AA).
5
Instalación de las campanas de
vidrio y los focos
Instale los focos (EE) (incluidos) en los enchufes. Use tres
focos de 25 W G9 de base xenon.
Coloque la campana de vidrio (C) y la campana interior (D)
en el enchufe, luego asegúrelos con la campana interior
pequeña (E).
Repita este paso para el resto de las campanas.
Nota: Solo use máximo focos de 25 W tipo G9 xenon.
NO USE focos de tipo G9 halogenos sin protección. No
toque los focos G9 xenon con las manos descubiertas
en ningún momento. Un par de guantes blancos han
sido suministrados para la instalación puesto que el
sudor natural de las manos podrian dañar los focos,
Favor de retirar la lámina protectora antes de instalar
los focos.

7 HOMEDEPOT.COM/HOMEDECORATORS
Por favor llame al 1-800-986-3460 para asistencia adicional.
Mantenimiento y Limpieza
No use limpiadores con químicos, solventes ni productos abrasivos. Use sólo un paño suave y seco para desempolvar o limpiar con
cuidado.
Para limpiar la lámpara, primero corta el suministro de electricidad, apagando el interruptor automático o retirando el fusible
correspondiente en la caja de fusibles. Seguidamente, usa un paño limpio, seco o ligeramente húmedo (usa sólo agua limpia, nunca
un solvente) para limpiar el exterior de la lámpara.
Solución de problemas
Problema Posible Causa Solución
La lámpara no enciende. La bombilla está fundida. Reemplaze la bombilla.
La electricidad está apagada. Asegúrese de que el suministro de electricidad esté
encendido.
Interruptor defectuoso. Pruebe o reemplaze el interruptor.
Conexión defectuosa del cable. Revise el cableado.
El fusible se funde o el interruptor
automático se activa cuando se
enciende la luz.
Los cables están cruzados o el cable
de alimentación está haciendo tierra.
Deje de usar la lámpara. Revise las conexiones de cables.
Contacte a un electricista calificado o llame al equipo de
Servicio al Cliente al 1-800-986-3460.

8
MODELO: 17017
Piezas de remplazo
Pieza Descripción
Pieza Descripción
AA
Tornillo de soporte (corto)
(Preinstalado al soporte de
montaje (A))
A Soporte de montaje
BB
Tornillo verde a tierra
(Preinstalado al soporte de
montaje (A))
B Cuerpo de la lámpara
CC
Tornillo de la caja de salida
(largo)
C Campana de vidrio
DD Conector de cables
D Campana interior
EE Foco de 25 W de tipo G9 xenon
E Campana interior pequeña

¿Preguntas, problemas o piezas faltantes? Antes de regresar a la tienda,
llama al Servicio al Cliente de Home Decorators Collection, de 8 a.m. a 7 p.m.,
hora estándar del Este, de Lunes a Viernes, y de 9 a.m. a 6 p.m., hora estándar del Este, Sábados.
1-800-986-3460
HOMEDEPOT.COM/HOMEDECORATORS
Conserva este manual para referencias futuras.
-
 1
1
-
 2
2
-
 3
3
-
 4
4
-
 5
5
-
 6
6
-
 7
7
-
 8
8
-
 9
9
-
 10
10
-
 11
11
-
 12
12
-
 13
13
-
 14
14
-
 15
15
-
 16
16
-
 17
17
-
 18
18


Home Decorators Collection 17017 Guía de instalación
- Tipo
- Guía de instalación
en otros idiomas
Artículos relacionados
-
Home Decorators Collection 16649 Instrucciones de operación
-
-
-
-
-
-
-
-
-