LG WT5480CW/00 El manual del propietario
- Categoría
- Lavadoras
- Tipo
- El manual del propietario

OWNER'S MANUAL
WASHING MACHINE
Please read this owner's manual thoroughly before operating and keep if handy
for reference at all times.
WT5480C*
Illllllllmlll]lllIJIlllllll1111111
MFL39760258
ver,080814.00
wwwJg.com

2 TABLE OF CONTENTS
TABLE OF CONTENTS
3 IMPORTANT SAFETY INSTRUCTIONS
3 Basic Safety Precautions
4 Grounding Requirements
5 Safety instructions for installation
6 Safety Instructions for Use, Care, Cleanln 9
and Disposal
7 FEATURES AND BENEFITS
7 Key Parts and Components
7 Included Accessories
8 INSTALLATION INSTRUCTIONS
8 Choose the Proper Location
8 Power Outlet
8 Flooring
9 Unpacking and Removing Shipping Materia{
30 Connecting the Water Lines
1] Connecting the Drain Hose
12 Leveling the Washer
!3 Connect to the Power Supply
i 4 PREPARATION
]4 Setting'Wash Loads
14 Fabric Care Labels
14 Loading the Washer
15 About the Dispensers
15 Detergent and Dispenser Use
17 HOWTOUSE
17 Control Panel Features
18 Time and Status Display
19 Operating the VVasher
20 Cycle Guide
22 Main Cycle
23 Cycle Modifier Buttons
24 Special Use Features
25 Option Buttons
25 -CoM Wash TM
25 -Delay Wash
25 -Custom Program(PGM)
25 -Turbo Wash TM
25 _Fabric Softener
25 =Extra Rinse
26 -Water Plus
26 -Signal Off-Low-High
26 _Child Lock
26 -Add Garments
27 CARE AND CLEANING
27 Regular Cleaning
27 -Cleaning the Exterior
27 _Care and Cieaning e_ the Interior
27 -Tub Clean CycMe
27 =Removing Mineral Buildup
27 Leave the Lid Open
28 Maintenance
29 Cleaning the'Washer
37 WARRANTY
30 SPECIFICATIONS
30 SMART DIAGNOSIS TM SYSTEM
31 TROUBLESHOOTING
31 Normal Sounds You May Hear
31 Before Calling for Service
35 Error Codes

_MPORTANT SAFETY INSTRUCTIONS 3
IMPORTANT SAFETY INSTRUCTIONS
SAFETY MESSAGES
For your safety, the information in this manuat must be followed to minimize the risk of fire, explosion or
e_ectric shock, or to prevent property damage, injury to persons, or death Your safety and the safety of
others is very important. There are many important safety messages in this manuaJ end on ;7our appliance.
AJways read and obey alJ safety messages.
This is the safety alert symbol This symbol alerts you to potential hazards that can result in pr_"
erty damage and/or serious bodily harm or death.
Al! safety messages will follow the safety alert symbol and either the word DANGER, WARNING
or CAUTION These words mean:
You will be killed or seriously iniured if you don't immediately fol!ow instructions.
_4&WARNING You can be killed or seriously injured if you don't foilow instructions,
You may be sJightly injured or cause damage to the product if you do not follow
instructions.
Al! safety messages will tell you what the potential hazard is, tell you how to reduce the chance of iniury.
and tetl you what can happen if the instructions are not followed,
BASIC SAFETY PRECAUTIONS
To reduce the risk of fire, electric shock, or iniury to persons when using this appliance, follow basic pre_
cautions, including the foliowing.
* Use this appliance only for its intended purpose as described in this owner's Manual
. Before use, the washer must be properly installed as described in this manual,
, Do not wash articles that have been previously cleaned in, washed in, soaked in, or spotted with gaso-
line, dry cleaning solvents, or ether flammable or explosive substances, as they give off vapors that
could ignite or explode,
- Do not add gasoline, dry cleaning solvents, or other flammable or explosive substances to the wash
water, These substances give off vapors that could ignite or explode.
- Under certain conditions, hydrogen gas may be produced in a hot water system that has not been used
for 2 weeks or more. HYDROGEN GAS JSEXPLOS!VE. If the hot water system has not been used for
such a period, before using the washer, turn on all hot water faucets and let the water flow from each
for several minutes. This will release any accumulated hydrogen gas, As the gas is flammable, do not
smoke or use an open flame during this time,
- Do not sUow chiidren to play on or in the washer. Close supeP¢ision of children is necessary when the
washer is used near children.
o Before the washer is removed from service or discarded, remove the lid to prevent children from
climbing inside,
- Do not install or store the washer where it will be e_osed to the weather or freezing temperatures.
- Do not tamper with controls,
. Keep the area underneath and around your appliances free of combustiMe materials (lint, paper, rags,
etc,), gasoline, chemicals and other flammable vapors end liquids,
- Service must be performed by a qualified service technician. Do not disassemble the washer.
, See Installation Instructions for grounding requirements,
. _NARNING : This product contains chemicais known to the State of California to cause cancer and birth
defects or other reproductive harm. Wash hands afterha_ling.

4 IMPORTANT SAFETY _NSTRUCT!ONS
• ALWAYS follow the fabric care instru_ons supplied by the garment manufacturer,
• Do not place items exposed to cooking oil in your washer, Items contaminated with cooking oils may
contribute to a chemical reaction that could cause a lead to catch fire,
• Use fabric softeners or products to eliminate static only as recommended by the manufa_rer.
• This washer is not designed for maritime use or for mobile installations such as in RVs, aircraft, etc,
• Turn off _e water faucets and unplug the washer if the machine is to be left for an extended period of
time, such as during vacations,
. Do not use to dry articles containing foam rubber or similarly textured rubber-like materials,
• Packaging material can be dangerous for children, There is a risk of suffocation! Keep all packaging from
children
, AIv._s check the inside of the washer for foreign objects before loading laundry. Keep the lid closed
when not in use,
• Do not reach into the appliance if the tub or agitator is moving,
READ ALL INSTRUCTIONS BEFORE USE
For your safety, the information in this manual must be followed to minimize the risk of fire, explosion or
electric shock, or to prevent property damage, injury to persons, or death.
GROUNDING REQUIREMENTS
This appliance must be grounded_ In the event of malfunction or breakdown, grounding wil_ reduce the risk
of etectric shock by providing a path of least resistance for electric current. This appiiance is equipped with
a cord having an equipment-grounding conductor and grounding plug. The p_ug must be plugged into an
appropriate outle¢ that is properly installed and grounded in accordance with alt local codes and ordinances,
Li::,_WARN ING
_mproper connection of the equipmenbgrounding conductor can result in risk of electric shock_ Check with
a qualified electrician or servicer if you are in doubt as to whether the appliance is properly grounded. Do
not modify the plug provided with the
appliance, if it does not fit the outiet, have a proper outlet installed by a qualified electrician. Failure to fol-
low these warnings can cause serious injury, fire, e}ectric shock, or death.

_MPORTANT SAFETY INSTRUCTIONS 5
For your safety, the information in this manual must be followed to minimize the risk of fire, explosion or
elect_rio shock, or to prevent prope_ damage, injury to persons, or death,
SAFETY INSTRUCTIONS FOR INSTALLATION
i_,WARN ING
To reduce the risk of fire, e[ectdc shock or injury to persons when using this appliance, follow basic precautions,
including the following:
- Refer to INSTALLATION INSTRUCTIONS for detailed grounding procedures. Installation instructions are
packed with the washer for instaIler's reference. If the washer is moved to a new location, have it checked
and reinstalled by a qualified service technician, Fai}ure to follow this warning can cause serious injury, fire,
electric shuck, or death.
• Do not, under any circumstances, cat or remove the third (ground) prong from tl'_ power cord, Failure to
foiiuw this warning can cause serious injury, fire, electric shock, or death.
• For personal safety, this appliance must be properly grounded, Failure to follow this ,warning can cause serf*
ous iniury, fire, electric shuck, or death.
. The power cord of this appliance is equipped with a 3-prong (grounding) plug which mates with a standard
3*prong (grounding) wall:outlet to minimize the possibility of eIectric shock from this appliance.
• This washer must be plugged into a 120 VAC, 60 Hz grounded outlat. Failure to foIIow this warning can cause
serious injury, fire, electric shock, or death_
• Have the wall outlet and circuit checked I_fa qualified electrician to make sure the outlet is proper_ grounded,
Failure to follow this warning can cause serious iniury, fire, electric shock, or death
• Where a standard 2-prong wall outlet is encountered, it is your personal responsibility and obligation to have
it replaced with a properly grounded 3_prong wall outlet Failure to follow this warning can cause serious
iniury, fire, electric shuck, or death_
• Do not install on carpet, Install washer on a solid floor. Faiiure to follow this warning can cause serious leak
damage.
. Do not remove ground prong, Do not use an adapter or extension cord, Plug into a grounded 3-prong outlet,
Faiture to follow these warnings can cause serious injury, fire, electric shock, or death.
- The washer should always be plugged into its own individual elec_ical outlet which has a voltage rating that
matches the rating piste_ This provides the best perfermance and also prevents overloading house wiring
circuits which could cause a fire hazard from overheated wires.
° Never unplug your washer by pulling on the power cord, Always grip plug firmly and pull straight out from the
outlet, Failure to follow this warning can cause serious injury, fire, electric shock, or death.
• Repair or immediately replace nil power cords that have become frayed or otherwise damaged. Do not use
a cord that shows cracks or abrasion damage along its length or at either end. Failure to fo_Iow this warning
can cause serious injury, fire, electric shock or death.
• When installing or rr_oving the washer, be careful not to pinch, crush, or damage the power cord. Failure to
fotiow this warning can cause serious injury, fire, electric shock, or death.
° The washer must be installed and electrically grounded by a qualified service person in accordance with local
codes to prevent shock hazard and assure stability during operation,
• The washer is heavy, Two or more _le may be needed to install and move the appliance, Failure to do so
can result in back or other injury.
• Store and install the w_asher where it will not be exposed to temperatures below freezing or exposed to
outdoor weather conditions, Faffure to follow this warning can cause serious leak damage,
• Do not install the washer in humid spaces to reduce the risk of electric shock. Failure to follow this warning
can cause serious injury, fire, electric shock, or death
• To reducethe riskof injuryto persons, adhereto all industry recommended safaty procedures including the
use of long sleeved gl_ and safety glasses, Failure to foliow a_Iof the safety warnings in this manual could
resuk in property damage, injury to persons or death.
• Never attempt to operate this appliance if it is damaged, malfunctioning, partiaIiy disassembled, or has miss-
ing or broken parts, including a damaged cord or ptug,
• To minimize the possibility of electric shock, unpIug this appliance from the power suppty or disconnect the
washer at the househoId distribution panet by removing the fuse or switching off the circuit breaker before
attempting any maintenance or cleaning.

6 IMPORTANT SAFZTY INSTRUCTIONS
Foryour safety,the informatJon in this manual must be followed to minimize the risk offire, explosion
or electzic shock,orto prevent property damage, injuryto persons, ordeath.
SAFETY INSTRUCTIONS FOR USE, CARE, CLEANING AND DISPOSAL
To reduce the risk of fire, electdc shock or injury to persons when using this appliance, follow basic precau-
tions, including the following:
• Unplug the washer L_fore cleaning to avoid the risk of eiectric shock.
• Never use harsh chemicals, abrasive cleaners, or sol_ents to clean the washer. They will damage the
finish_
• Do not put oily or greasy rags or clothing on top of the washer. These substances give off vapors that
could ignite the materiais.
• Do not wash items that are soiled w_h -vegetable or cooking oil. These items may contain some oii after
laundering, Due to the remaining oit, the fabric may smoke or catch fire by itself,
• Disconnect this appliance from the power supply before attempting any user maintenance Turning the
controls to the OFF pos_on does not disconnect this appliance from the power supply. Failure to follow
this warning can cause serious injury, fire, electric shock, or death,
• Do not combine laundry products for use in one load unless specified on the label.
• Do not mix chlorine bleach with ammonia or acids such as vinegar. Follow package directions when us=
ing laundry produ_, Incorrect usage can produce poisonous gas, resulting in serious injury or death.
• Do not reach into the washer while parts are moving. Before loading, unloading, or adding items, press
the START/PAUSE button and allow the drum to coast to a complete stop before reaching inside. Failure
to follow this warning can cause serious injury, fire, electric shock, or death.
• Do not allow children to play on or in the washer. Close supervision of children is cecessary when the
washer is used near children. As children grow, teach them the proper, safe use of all appliances. FaiF
ure to comply with these warnings could result in serious injury to persons or death
• Destroy the carton, plastic bag, and other packing materials after the washer is unpackJed. Children
might use them for play. Cartons covered with rugs, bedspreads, or plastic sheets can become airtjght
chambers. Failure to comply with these "warnings could result in serious injury to persons or death,
• K:eep laundry products out of children's reach. To prevent injury to persons, observe all warnings on
produ_ label& Failure to comply with these warnings could result in serious injury to persons or death_
• Remove the lid to the washing compartment to avoid the danger of children or small animals getting
trapped inside before your washer is removed from service or discarded. Failure to do so can resuit in
serious injury to persons or death.
• Keep hands and foreign objects clear of the lid and latch area vZnen closing the lid. Failure to keep hands
clear can result in personal injury.
SAVETHESE INSTRUCTIONS

FEATURES AND BENEFITS 7
FEATURESAND BENEFITS
KEY PARTS AND COMPONENTS
A INVERTER DIRECT DRIVE MOTOR
The inverter motor; which is directly con-
nected to the tub, produces Jittie noise
and vibration and offers great durability
and a long lifespan.
B
ULTRA CAPACITY & NEVERUST TM
STAINLESS STEEL TUB
The efficient design provides you with
ultra large capacity but without making the
cabinet larger or the drum any deeper for
easy installation and use,
C
TURBO WASW"
Turbo Wash TM reduces wash time without
compromising performance. The precise
drum movements and powerfut water jets
allow for faster soaking, while the Smart
Rinse TM Jet Spray altows for quicker rins-
ing, saving you up to 20 minutes per load
without sacrificing washing performance
D
OXl SANITIZE TM
This cycle combines the c_eaning perfor_
mance of the LG washer with oxi-cieaning
products, which are released at iust the
right time to deliver sanitary cycle perforo
mance without the excess energy wasted
on hot water in typical sanitary cycles.
E
REAR TOUCH PANEL
The easy to read LED display shows cycle
options, setting, cycle status and esti
mated time remaining, The touch buttons
offer more convenience and a premium
design aesthetic.
F
SLAM PROOF"L|D
The S_am Proof TM lid is a safety device
that closes the lid slowly. The Slam
Proof TM hinges allow the lid to close gently
and quietly, helping prevent injuries
G
SMART DIAGNOSIS TM
if you ever experience an issue with your
LG washer, you don't have to worry. The
SmartDiagnosis TM feature helps the sero
vice center diagnose problems over the
phone, or with a simple app on your smart
phone, helping you minimize costly, incon-
venient service calls.
Dispenser box
(See page 15}
(See page 17)
Power
Cord
Drain
Hose
Leveling feet
HotWater Cold Water
Intetvalve inlet valve
INCLUDED ACCESSORIES
• Tie Strap (for securing drain hose)
NOTE: Contact LG Customer Service at 1_800-243-
0000 (1-888-542o2623 in Canada) if any accessories
are missing or to purchase accessories

8 INSTALLATION INSTRUCTIONS
INSTALLATION INSTRUCTIONS
CHOOSE THE PROPER LOCATION
, The washer is heavy, Two or more people are
rE_luired when moving and unpacking the wash-
er, Failure to follow this warning may result in
damage to property or serious bodily harm_
• Store and install the washer where it will net
be exposed to temperatures below freezing or
expc_ed to outdoor weather conditions, Failure
to follow this warning can cause serious injury,
fire, electric shock, or death_
. Properly ground the washer to conform w_ al_
g{_¢erning codes and ordinances, Failure to fob
low this warning can cause serious injury, fire,
electric shock, or death,
• To reduce the risk of electric shock, do not in-
stall the washer in humid spaces. Failure to fol-
low this warning can cause serious injury; fire,
electric shock, or death,
° To ensure proper air flow, do not block the large
opening on the bottom of the washer with car-
peting or other materia!s,
• Do not remove the ground prong, Do not use an
adapter or extension cord, Plug into a grounded
3_prong outlet, Failure to foiiow this warning
can cause serious fnjury, fire, electric shock, or
death
NOTE: The washer must be instai_ed on firm floor-
ing to minimize vibration during the spin cycte
Concrete flooring is best, but e wood floor is suf-
ficient, provided it is built to FHA standard& The
washer should not be installed on rugs or exposed
to weather,
45 S/8"
{115,3 ¢ t_)
_L
(2,5 cm) H 168,6 cml 12.5 ¢m}
To ensure sufficient clearance for water lines and
airflow; allow minimum clearances of at least 1 in,
(2.5 cm) at the sides and 4 in, (10 cm} behind the
unit, Be sure to allow for wall door, or floor mold-
ings that may increase the required clearances.
32"
POWER OUTLET
- The power outlet must be within 60 in. (1.5 m} of
either side of the washer.
- The appliance and outle{ must be positioned so
that the plug is easiiy accessibIe,
- Do not overioad the outlet with more than one
appliance.
- The outlet must be grounded in accordance with
current e_ectric wiring codes and regulations.
- A time-delay fuse or circuit breaker is recom-
mended
NOTE: It is the personal responsibility and obliga_
tion of the product owner to have a proper outlet
installed by a qualified service technician.
FLOORING
* To minimize noise and vibration, the washer
MUST be installed on a solidiy constructed floor.
, AHowable slope under the entire washer is a
maximum 1 in, difference from side to side or
from front to back,
. Installing on carpeting and soft tile surfaces is not
recommended
- Never instalt the washer on a platform or weakty
supported structure.
6Ssi_,,
{14!,7 cm)
S 1/2_
(9 cm)
2e s/4"
Mnimum vertical space from floor to overhead
she_ves, cabinets, ceilings, etc., is 56 in

_NSTALL_TION INSTRUCTIONS 9
UNPACKING AND REMOVING
SHIPPING MATERIAL
1_After removing the carton and shipping materia!,
lift the washer off the foam base Make sure the
plastic tub support comes off with the base and
is not stuck to the bottom of the washer.
I
If you must _aythe washer down to remove the
base packaging materials, a_ways protect the side
of the washer and lay it carefully on its side. DO
NOT _aythe washer on its front or back
3 Carefully remove the two foam pads which cover
the top sides of the tub guide, making sure not to
leave behind any pieces of the foam
4. Unfasten the power cord from the back of the
washer.
Plastic Tub Support
Carton Base
2 Save the foam b}ock (containing the Owner's
Manual, parts and laundry product samples) for
future use If the washer must be moved in the
future, the foam block wil! he_p prevent damage
to the washer during transportation.
NOTE: To prevent damage, do not remove the
foam b_ock until the washer is at the final Ioca_
tion.
TOOLS YOU WILL NEED
• Adiustable Pliers
* Carpenter's Level

10 INSTALLATION _NSTRUCTIONS
CONNECTING THE WATER LINES
* LG recommends the use ofLG hose& Any leak_
ing, property damage, or damage to the washing
machine caused by an improper instalWa_onor b_,
the use of nomLG hoses is not cov'-_ed under the
terms of the LG warranty and isthe sole respensi-
bi_i_ of the customer and/or an installer,
= Water supply pressure must be between t4_5 psi
and 116 psi (100~800 kPa).If the water supply pressure
is more than 116 ps{, a pressure reducing valve must
be installed.
, Periodical_y check the hose for cracks, leaks, and
wear, and replace the hose if necessary.
o Make sure that the water lines are not stretched,
pinched, crushed, or kinked.
, The washer should never be instalbd or stored in a
location subject to freezing temperatures. Damage to
the water _inesand internal mechanisms of the "washer
can result ff the washer was exposed to freezing tem-
peratures prior to insta{lation, a_low it to stand at room
temperature for severai hours before use and check for
leatcs prior to operation.
Rubber Seal Rubber Seal
Water Hose
(to water in_et
on washer)
Water Hose_
(to tap)
1. tnspect the threaded fitting on each hose and
make sure there is a rubber sea{ in place in both
ends
Water Faucet
2. Connect the water supply hoses to the HOT and
COLD water faucets tightly by hand and then tight-
en another 2/3 turn with pliers
WARNING
Do not ove_ght_en. Damage to the coupling
can result.
3. Always run a gallon or two of water through each
inlet hose to flush dirt, scale and other debris out
of the water _ines. Doing so will he{p prevent future
problems with clogged fiUter screens, and wili a_so
allow you to verify which hose is hot and which
is col&
f_{_WAR NING-- ........................................................................
.nDO not reuse old hoses, Only use new hoses
when you instal_ the washing machine, Old
hoses could leak or burst causing flooding and
I property damage.
4. Attach the hot ,water _ine to the hot water inlet on
the back of the washer, Attach the cold water line
to the cold water inlet on the back of the washer.
Tighten the fittings securely. Turn ON both fau-
cets aH the way and check for leaks at both ends
of the hoses.
NOTE: Be careful not to cross4hread the hose fit°
tings, This will damage the valve and could resutt in
property damage from leaks,

iNSTALL£TION INSTRUCTIONS 11
CONNECTING THE DRAIN HOSE
° The drain hose should always be properly secured.
Faiiure to properly secure the drain hose can result in
flooding and property damage.
• The drain must be installed in accordance with any
applicable local codes and regulations.
• Make sure that the drain hose is not stretched,
pinched, crushed, or kinked.
OPTION 2: LAUNDRY TUB
Bend the end of the drain hose to the desired shape
and support it on the edge of the taundry tub. Use
the tie strap to secure the drain hose in place.
Drain Hose
Drain Hose
OPTION 1: STANDPIPE
Bend the outlet end of the drain hose to form a U
shape, insert the end of the drain hose into the drain,
If the drain is large enough for the flange on the hose
to fit inside do not insert the flange more than 1-2
inches into the drain, Use the tie strap incJuded with
the installation materials (in the foam block in the
tub} to secure the drain hose to the drain.
ff the water valves and drain are buiit into the waiJ,
fasten the drain hose to one of the water hoses with
the tie strap {ribbed side on inside),
If your drain is a standpipe, fasten the drain hose to
the standpipe with the tie strap provide&
Tie Strap Tfe S_t_p
NOTE:
, Normalheightoftheendofthehoseshouldbeap-
pro×imate{y 35"-47" (0,9-1,2 m) from the floor,
- Do not instail the end of the drain hose lower than
29" (73.7 cm) or Mgher than 96 in. (243.8 cm)
above the bottom of the washer or more than 60
in. (15Z4 cm) away from the washer,
• Never create an air-tight seal between the drain
hose and the drain, using tape or other methods. If
no air gap is present, water can be siphoned out of
the tub resulting in poor wash/rinse performance
or clothing damage.

12 INSTALLATION INSTRUCTIONS
LEVELING THE WASHER
The tub of your new washer spins at very high
speeds. To minimize vibration, noise, and unwanted
movement, the floor must be a level, solid surface.
NOTE:
Adjust the leveling feet only as far as necessary
to tevel the washer. Extending the leveting feet
more than necessary can cause the washer to
vibrate.
Before installing the washer, make sure that the
floor is dean, dry and free of dust, dirt, water
and oil so the washer feet cannot slide easily.
Leveling feet that move or siide on the floor can
contribute to excessive vibration and noise due
to poor contact with the floor,
All four leveling feet must rest solidly on the floor,
Attempt to rock the washer from corner to corner
to make sure that all four leveling feet are in firm
contact with the floor.
1 Position the washer in its fina! location, taking spe-
cial care not to pinch, strain, or crush the water
and drain lines. Place a level across the top of the
washer.
b d
Raise Lower
2 Adjust the leveling feet, Turn clockwise to raise
the washer or counterclockwise to lower it,
the cabinet side meets the top cover. Do not place
the level on the top of the lid Using these sup
faces will result in the washer being unleveL
:tlWARN ING ................................................................................
Using the washing machine without leveling
it may result in malfunction caused by the
production of excess vibration and noise.
• Use the leveling feet only for leveling the
washing machine, if you raise the leveling feet
unnecessarily, it may cause abnorma_ vibration
of the washing machine.
3 To make sure that the washer is properly level,
open the _idand look from above to see if the tub
is centered, if the tub is NOT centered (as shown
in the drawing with the X through it), readjust the
front feet. If you have a level, check your washer
with the _evel,
. To check if the washer is ]eveI from side to side,
place a level on the back edge of the lid.
• To check if the washer is level front to back, place
a level at the side of the washer on the edge where

CONNECT TO THE POWER SUPPLY
The washer should be plugged into a 120-VAC, 60-
Hz grounded 3_prong outJet Plug in the washer,
fmproper connection of the equipment-grounding
conductor can result in risk of electric shock Check
with a qua}ified electrician or service technician
if you are in doubt as to whether the appliance is
properly grounded Do not modify the p_ug pro-
vided with the appliance. If it does not fit the outJet,
have a proper outlet installed by a qualified eiectri*
cian. Failure to follow these warnings can cause
serious injury, fire, etectric shock, or death.
• The power outlet must be within 60 inches (1,5
m) of either side of tie washer,
- The appliance and outlet must be positioned so
that the plug is easily accessible.
- Do not overload the outlet _h more than ore
appl_nce,
• The outlet must be grounded in accordance
with current '__4ringcodes and regulations.
- Time4Jelay fuse or circuit breaker is
recommended
• It is the personal responsibility and obligation
of the product owner to have a proper outlet
[nstalJed by a qualified electrician.
• Do not use a worn or damaged power cord or
power plug, Replace or repair it immediately;
Failure to do so may result in death, fire, electric
shock, or product malfunction
• Do not modify the power cord and take care
not to damage it when installing or moving
the washing machine, Failure to do so may
resuJt in death, fire, e_ectdc shock, or product
maifunction.
- Make sure that the washing machine is
ground.
• Connect this washing machine to a grounded
outlet conforming to t_ rating prior to use,
Fai{ure to do so may resutt in fire, electdc
shock, or product malfunction.
• Do not use adaptors or extension cords. The
washing machine should aiways be plugged
into its own individual eIectdcal outlet which has
a voJtage rating that matches the rating plate.
Failure to do so may result in fire, electric shock
or disorder,
° DO_ damage or cut off the ground prong of
the power cord, Doing so may cause death,
fire, eJectric shock, or product malfunction,
INSTALLATION iNSTRUCTiONS 13

14 PREPARATION
SORTING WASH LOADS
• Do not load items higher than the top edge of
the tub. Failure to fo_low this caution can result
in leakage or damage to fabrics.
• Use the BULKY/BEDDING cycle for buoyant or
nonabsorbent items such as pillows or comfort-
er& Failure to foffow this caution can result in
leakage.
• If possible, do not wash any water-resistant
items, ff you must, please select the Bulky/Bed-
ding cycle.
................................................................................. J
GROUPING SIMILAR ITEMS
For the best washing results, and to reduce the pos-
sibility of damage to clothing, care should be taken
to sort the clothing into loads that are made up of
similar item&
Mixing different fabric types and/or soil bveis can
result in poor wash performance, color transfer, dis =
coloration, fabric damage or iinting. Fabrics should
be sorted into groups as described below
COLORS
Sort articles by color Wash dark clothes together
in a separate load from tight colors or whites. Mix-
ing dark clothes with ligh_ clothes can result in dye
transfer or discoloration of the lighter clothes.
SOIL LEVEL
Wash heavily soiled clothing together_ Washing
iightly soiied clothing in the same load with heaw
ity soiled clothing could result in poor wash perfor-
mance for the lightly soiled clothing.
FABRIC TYPE
De_icate articles should not be mixed with heavier
or sturdier fabric types. Washing heavier fabrics in
a delicate ioad can result in poor wash performance
for the heavier fabrics and possible damage to the
delicate fabrics.
LINT TYPE
Some fabrics attract and bind lint to them while oth-
ers give off lint in the laundry process. Avoid mixing
these Hnt collectors and lint producers in the same
load Mixing these fabrics will result in pilting and
linting on the lint collectors (For example, lint collec-
tor - knit sweater; lint producer - terry cloth towels)
SORT LAUNDRY.,.
By_ By Soil By_ ByU_
White Heavy Dedicates LintProducer
Lights Norma_ EasyCare LineCollector
Darks
FABRIC CARE LABELS
Many articles of clothing include a fabric care label
Using the chart betow, adjust the cycle and option
selections to care for your clothing according to the
manufacturer's recommendations.
FabricCareLabels
wash
cycle "_ _ ,_'&r_
Water O0 • O0 •
temperalure _ _ _,,_
Bleach
symbols _
LOADING THE WASHER
• Check BHpockets to make sure that they are empty.
items such as clips, matches, pens, coins, and keys can
damage both yourwasher and ,/our ctethes.
• Close zippers, hooks, and drawstrings to prevent these
items from snagging or tangling on other clothes.
• Pretreat heavily stained areasfor best results.
• Combine large and smaR items in a load. Load large
items first.
• Large items should net be more than half of the total
wash bad.
• The washer can be fully loaded, but the tub should
not be tightly packed with items. The lid of the washer
should close easily,
• To prevent an out-of-balance toad, do not wash single
items. Add one or two simiiar items to the load. Large,
bulky items, such as a blanket, comforter, or bedspread,
should bewashed individualiy,
• Do not wash or spin waterproof items, such as rain
coats, sbeping bags, etc,
• The washer wiil not fill or operate with the lid open.
NOTE: Use the BULKY/BEDDING cycle for Iarge or bulky
items such as poIyfitled jackets, comforters, pillows, etc.
These items may not be as absorbent as other laundry
items and should be sorted into a separate wash load for
optimal results
Bulky items should be placed asfar down inthe tub as pos-
sible for optimal results, Always placebuoyant items at the
bottom of the tub. The washer wiiI automatically detect the
load size. Because of the high-efficiency wash system, the
water bye! may not completely cover the load.

PREPARATION 15
ABOUT THE DISPENSERS
The automatic dispenser consists of two compart-
ments which hold
- Liquid fabric softener.
- Liquid or powdered detergent for main wash
Main Wash Main Wash
Powdered Detergent Liquid De_erger_t
Comp eat
Uquid Fabrir.:
Softener
Compartment
sex
DispeRser Drawer
MAIN WASH DETERGENT COMPARTMENT
This compartment holds laundry detergent for the
main wash cycle, The detergent is added to the load
at the beginning of the cycle. Always use High-Effi-
ciency (HE) detergent with your washing machine,
Either powdered or liquid detergent may be used.
Never exceed the manufactureffs recommenda-
tions when adding detergent, Using too much deter-
gent can result in detergent buildup in clothing and
the washer.
When using liquid detergent, make sure the liquid
detergent cup and insert are in place, Do not exceed
the maximum fill line
When using powdered detergent, remove the liquid
detergent cup from the compartment, Powdered
detergent wil not dispense with the liquid detergent
cup in place
FABRIC SOFTENER COMPARTMENT
This compartment holds liquid fabric softener,
which is automatically dispensed during the final
rinse cycle
Never exceed the manufacturer's recommendations
when adding softener Using too much fabric soft-
ener can result in buildup in c_othing and the washer,
Either powdered or liquid fabric softener may be
used
- Always follow the manufacturer's recommends-
tions when adding fabric softener Do not exceed
the maximum fill/ne. Using too much fabric soft-
ener may stain clothes.
° Dilute concentrated fabric softeners with warm
water. Do not exceed the maximum fill line,
• Never pour fabric softener directly onto the load
or into the tub
LIQUID BLEACH COMPARTMENT
The bleach dispenser is a separate compartment
at the _eft front of the tub opening. This compart-
ment holds liquid bleach, which is dispensed auto°
matically at the proper time during the wash cycle,
The dispenser is activated twice to ensure complete
dispensing of the bleach Any liquid remaining in
the dispenser at the end of the cycle is water, not
breach=
• Do not add powdered b_each to this compartment.
The b]each compartment is designed to dispense
llquid bleach onl% Powdered or liquid color-safe
bleach will not dispense properly.
. A_ways follow the manufacturer's recommenda-
tions when adding bleach, Never add more than
one cup and do not exceed the maximum fili iine
since this can cause the bleach to be dispensed
immediately, resulting in damage to fabrics. Using
too much bleach can damage fabrics.
- Never pour undiluted liquid chlorine bleach di-
rectly onto the load or into the tub Fabric damage
can OCCUr,
• Do not use cotorosafe bleach or Oxi products in
the same cycle with liquid chlorine bleach.
_:t:_DANGER 1
Do NOT mix chlorine bleach with ammonia or ac-
ids, such as vinegar or rust/scale remover. Mix_ |
ing chemicals like these can produce a lethal gas, |
DETERGENT AND DISPENSER USE
A WORD ABOUT DETERGENTS
High Ef ficiency (HE) detergents produce fewer suds,
dissolve more efficiently to improve washing and
rinsing performance, and help to keep the interior of
your washer clean, Using detergent that is not HE may
cause oversudsing and unsatisfactory performance
which could result in error codes, cycle faiiure, and
machine damage
Liquid Powde_
Detergent Detergent

16 PREPARATION
For proper wash performance, always measure the
detergent using the measuring device provided by
the detergent manufacturer:
The norma_ amount of HE detergent needed, for
average Ioads, is less than 1/2of the recommended
maximum, Use Jess detergent for soft water; light
soil or smaller loads. Never use more than the
maximum amount recommended by the detergent
manufacturer.
DESIGNED TO USE ONLY
HIGH-EFFICIENCY (HE)
DETERGENT
IMPORTANT: "Your washing machine is designed for
use with only High-Efficiency (HE) detergents, HE
detergents are formulated specifically for High-Effio
eiency washers and contain suds-reducing agents.
Always }ook for the HE symbol when purchasing
detergent.
IMPORTANT: Not aiI detergents are the same, Pay
careful attention to the amount of detergent used
to avoid oversudsing, poor rinsing and detergent
buildup in clothing, and residue buildup that can
contribute to odors in the machine. NEVER use a
cup or scoop other than the one supplied by the
manufacturer of the detergen¢ you are using Never
use more than the maximum amount of detergent
recommended by the manufacturer. A full scoop or
measure of detergent should only be used for very
large and heaviiy soiled loads. Using too much de-
tergent can result in detergent buildup in the washer
and in your clothes.
Always measure the detergent amount. Wh_le HE
detergents are designed for this type of washing
machine, be careful when measuring the detergent.
For most normal loads, no more than 1/4 to 1/2 of a
cap or scoop of HE detergent should be used.
NOTE:
• Extra care must be exercised when using 2X and 3X
concentrated detergents because even a little bit ex-
tra can contribute to the problems mentioned above,
• Detergents designated as HE-compatible may not
provide optimai resuk&
USING THE SOFTENER AND DETERGENT
DISPENSER
To add detergent, bleach, and fabric softener to the
automatic dispenser:
1_Open the dispenser drawer.
2. Load the laundry products into the appropriate
compartments.
3. Close the drawer before starting the cycle.
4 if using fabric softener on COTTON/NORMAL or
HEAVY DUTY cycles, press the FABRIC SOFT-
ENER button or select the EXTRA RINSE option.
NOTE: It is normal for a small amount of water to
remain in the bleach and softener compartments at
the end of the cycle.
IMPORTANT: Do not place or store laundry prod-
ucts, such as detergent, Meach, or iiquid fabric soft_
ener, on top of your washer or dryer, Wipe up any
spills immediately_ These products can damage the
finish and controls.
USING THE LIQUID BLEACH DISPENSER
The bleach dispenser automatically dilutes and dis-
penses {iquid b_each at the proper time in the wash
cycle.
1. Check clothing care labels for special instructions.
2. Measure liquid bleach carefully, following instruc-
tions on the bott}e. High-efficiency washers use
less water, so less bleach is needed. One half cup is
enough for most _oads
3, Carefully pour the pre-measured amount of bleach
directly into the bleach dispenser, If you are using
powdered bleach of any kind, pour it directly into the
tub before adding the laundry. Never add powdered
bleach to the liquid bleach dispenser,
• Never pour undiluted tiquid chlorine bleach directly
onto clothes or into the tub
- Do not pour powdered bleach into the bleach dis-
penser.
. Do not p_ace laundry items on top of the bleach dis-
penser when _oading and unloading the washer.
- Always measure and pour b_each carefully. Avoid
overfilling or splashing when adding bleach to the
dispenser, The maximum capacity of the bleach dis-
penser is one cup of bleach per wash cycle, Overfi!P
}ng could result in bteach being dispensed immedi-
ately, which can result in damage to the clothes in the
washer,

How To us£ 17
HOW TO USE
CONTROL PANEL FEATURES
A B C E F E
D
A
B
POWER (ON/OFF) BUTTON C
Press to turn the washer ON. Press
again to turn the washer OFF. Pressing
the POWER button during a cycle witl
cancel that cycle and any load settings
wi_ be lost. The lid wiil unlock after a
brief pause.
NOTE: If there is any water remaining in
the tub after the washer shuts off, it wiil
drain following a five_minute delay The
washer can be restarted any time before
the draining begins Hovcever, once the
water begins to drain, all functions will D
be suspended until the water has been
completely drained and the ,washer
shuts off.
CYCLE SELECTOR KNOB
Turn this knob to select the desired cycle
Once the desired cycle has been select_ E
ed, the standard presets will appear in the
disp{ay. These setting can be adjusted
using the cycle modifier buttons any time
before starting the cycle. F
NOTE: To protect your clothing, not all
settings are available for aH cycle se{ec-
tions.
START/PAUSE BUTTON
Press this button to start the selected
cycle, If the washer is running, use this
button to pause the cycle without losing
the current settings,
NOTE: If you do not press the START/
PAUSE button within five minutes of se-
lecting a cycle, the washer automatically
turns OFF and all cycle settings are lost.
Any ,water remaining in the tub will drain
after a five minute delay,
CYCLE MODIFIER BUTTONS
Use these buttons to adjust the settings
for the selected cycle, The setting lights
above the buttons illuminate to show the
current selection.
SPECIAL CYCLE AND OPTION BUTTONS
These buttons allow you to select special
cycles or options,
TIME AND STATUS DISPLAY
The d splay shows the cycle status and
estimated time remaining

18 HOWTO USE
TIME AND STATUS DISPLAY
The time and status display shows the estimated time remaining and the cycle progress.
A B
C
A CYCLE STATUS INDICATOR C
These LEDs will illuminate when a cycle
is selected to indicate which stages will
run When a cycle is running, the LED for
the active stage wilJ blink, and the LEDs
for the remaining stages wiII remain
steady. Once a stage is complete, the
LED will turn off. If a cycle is paused, the
active stage LED will stop blinking.
B
DELAY WASH INDICATOR
The Deiay Wash Indicator wili illuminate
when a delay wash is set, The indica-
tor light will turn off once the cycle has
started,
O
ESTIMATED TIME REMAINING
When a cycle is selected, the default
time for that cycle is displayed. This time
will change as modifiers or options are
selected. Once the START/PAUSE but-
ton is pressed, the washer will measure
the size of the load The estimated time
may change once the load size has been
measured. If Delay Wash is set, the re-
maining delay time counts down until the
cycle begin&
NOTE: The time shown is only an esti
mate. This time is based on normal oper-
ating conditions. Several external factors
(load size, room temperature, incoming
water temperature, etc.) can affect the
actual time.
LID LOCK INDICATOR
The Lid Lock Indicator will iJluminate
once a cycle has started. The indicator
fight wiJl stay on until the cycle is paused,
stopped or has finished.

OPERATING THE WASHER
HOWTO USE 19
2
3
4
5
6
8
SORT LAUNDRY AND LOAD THE WASHER
Sort laundry by fabric type, soi_ level, color and
load size, as needed. Open the Iid and !oad items
into the washer:
CLEANING PRODUCT
Add High-Efficiency (HE) detergent to the deter-
gent dispenser. If bleach or fabric softener is to
be used, add these to the appropriate dispensers.
TURN ON THE WASHER
Press the POWER button to turn ON the washer,
The lights around the cycle selector knob witl iF
luminate and a chime will sound.
SELECT A CYCLE
Turn the cyc{e selector knob in either direction to
select the desired cycle, The preset Wash Temp.,
Spin Speed, Soil Levei, Special Use and option set-
tings for that: cycle wil_ be shown Pressing the Start
Pause button without selecting a cycle will cause
the Cotton/Normal cycle to begin immediately:
ADJUST SETTINGS
Default settings for the selected cycle can now
be changed, if desired, using the cycle modifier
and option buttons
NOTE: Not all modifiers and options are available
on aH cycles A different chime will sound and the
LED witl not come on ffthe selection is not aIIowed.
BEGIN CYCLE
Press the START/PAUSE button to begin the
cyde. The lid will Jack, and the washer wilt agi-
tate briefly without water to measure the weight
of the load if the START/PAUSE button is not
pressed within 5 minutes, the washer wilf shut
off and ati settings will be _ost.
ADD GARMENTS LIGHT
The ADD GARMENTS light will illuminate near
the beginning of the wash cycle to indicate when
it is safe to add items to the toad Press the
START!PAUSE button to pause the cycle and add
garments to the load Press the START/PAUSE
button to resume the cycle
NOTE: It is not recommended to add items un-
less the ADD GARMENTS light is illuminated, as
this could result in poor performance.
END OF CYCLE
When the cycle is finished, a melody will sound.
Immediate!y remove your ctothing from the
'washer to reduce wrinkling,

;_0 HOWTO USE
CYCLE GUIDE
The cycle guide betow shows the default settings, available options
and recommended fabric types for each cycle, Allowable modifier ad-
justments are shown below the default setting for each cycle
= AVAILABLEOPTION
= Default Se_ng
:: Hih:: _i:
Cotton, iinen, Hot
Cotton/ rowels, shirts, Semi-Warm Extra High
Normal sheets, jeans, Medium Heavy _ _ _ _ _ _
mixed bads Cold No Spin Light
Hot Extra High
Heavily soiled Semi_Warm Medium NormaI _ _ _ _ _
Heavy Duty cotton fabrics
Cold Low Light
Tap Coid No Spin
Large items such Hot Extra High
ss Blankets and SemioWarm Medium Heavy _ _ _
comforters Cold Low Light
Buiky/ Tap Cold No Spin
Bedding _ Use the BULKY/BEDDING cycle for items such as piliows, comforters, pet bedding and other articles
which have difficulty absorbing water. DO NOT VVASH EXCESSIVELY LARGE ITEMS tf large/bulky
items do not fit easily into the tub, there may not be enough room for them to move during washing_
Keep Ike items together; do not mix large bulky items with smaller c_othing items. Failure to follow these
washer.
Bright White fabrics
Whites TM
Cotton, under-
Oxi wear, pil!ow coy=
ors, bed sheets,
SanitizeTM _abyclothing.
less than 11Ibs.
Tub C_ean Refer to page
27.
Extra High
Warm High Norma_ _ _ _ _
SemiJWarm Low Light
No Spin
Extra High
Medium Normat _ _ _
Low Light
No Spin

HOWTo usz 21
CYCLE GUIDE
The cycle guide below shows the default settings, available options
and recommended fabric types for each cycie. Allowable modifier ad-
justments are shown below the default sett ng for each cycle.
@ = AVAILABLEOPTION
= Default Setttrt9
Dress shirts/
p._ p_o_t Jpants,wrinkle
c..... I Jfreecloth ng, pc y/
...... cotton blena cloth- Cold
ng,tab ec 9th# TapCold
Towels, shirts, Hot Extra Highi
T0we_s sheets, sans, Semi-Warm Medium Heavy @ _ @ @ @ @ @
m xed oads Cold Low Light
TapCo_d No Spin
Items labeled
machinewashaNe Semi-Warm Medium Heavy _ _ _
Woot woo! (less than Coid
81bsJ NoSpin Normal
Dress shirts/
blouses, nylons, Warm Hgh
Deiicates sheer or lacy gaF Heavy _ _ _
meets (Jessthan Semi-Warm Medium Norma_
8 Ibs.) Cold No Spin
::::::::We
Speed Wash Lightly soiled and Semi°Warm Extra Nighi
smatl )oads Cold Medium Heavy _ _ _
Low Norma_
TapCotd
Power TOwels,shirts, Hot Extra High}
sheets, ieans, ' Heavy _ _ @
Qeaese mixed loads Semi*Warm High
Cold Low Light
High Heavy _@Low _ @ @ I @
No Spin Light
NOTE:
To protect your garments, not every wash/rinse temperature, spin speed, soil level, or option is available with
every cycle. A chime wiJi sound and the LED will net light if the selection is not allowed.
*When a cycle is selected, the default time for that cycle is displayed. This time witl change as modifiers or
options are sefected. Once the START/PAUSE button is pressed, the washer will measure the size of the
load, The estimated time may change once the load size has been measured, The washer automaticaJi,/
adjusts the vvash time for the amount of laundry, water pressure, water and other operating conditions.

22 HOWTOUSE
MAIN CYCLE
Wash cycles are designed for the best wash
performance for each type of !cad. Select the cycle
that best matches the load contents for maximum
wash performance and fabric care. Turn the knob to
the desired cycle When you select a wash cycle, the
iight for the corresponding wash cycle will turn on,
See page 19, OPERATING THE WASHER, for mere
details on operating methods.
COTTON/NORMAL
Use this cycle to ,wash all normal items, except
delicate fabrics such as wool or silk.
NOTE: Pressing the Start Pause button without
selecting a cycle ,wilt cause the COTTON!NORMAL
cycle to begin immediately, using the default
settings.
HEAVY DUTY
This cycle is for washing heavily soiled laundry using
more powerful wash motions,
NOTE: When washing large loads, in order to deliver
the best performance there will be brief periods
of two minutes or more without agitation. These
soak periods are part of the cycle's design, and are
normal.
BULKY/BEDDING
This cycle is for washing blankets or other bulk,/
items.
NOTE: Using the BULKYIBEDDING cycle with a tow
spin speed is recommended when washing water-
proof or water-resistant items, to help protect the
fabric's properties.
BRIGHT WHITES TM
This cycle is for washing white items only.
TUB CLEAN
Use this cycle to clean the tub of your 'washing
machine.
PERM.PRESS
This cycle is for washing items such as wrinkle-free
clothes or tablecloths to minimize wrinkles.
TOWELS
Use this cycle for washing towels, shirts, jeans and
mixed loads.
OXl SANITIZE TM
This wash cycle offers hygienic care for laundry
when used in conjunction with bleach, without high
energy consumption.
NOTE:
• Follow the product manufacturer's instructions
for using Oxi products with this cycle,
• Never load powdered products into the liquid
bleach dispenser. Doing so can result in the
product not being dispensed or being dispensed
incorrectly, Powders can clog the Meach
dispenser, resulting in leaks or damage to the
washer or your clothing,
WOOL
This cycle is for washing shrinkable woolen or hand-
washable items requ dng delicate care, Only wash
woolen items that are labeled machine-washable or
hand-washable.
NOTE:
. Laundry weight should be less than 8 pounds
(3.6 kg) to prevent damage to the fabric.
• Use onty natural or wool-safe detergent safe
for fabrics and toad 1/2 of the normai amount of
detergent.
• The WOOL cycle uses a gentle wash action and
low speed spin for the ultimate fabric care.
DELICATES
This cycle is for washing _ingerie or sheer and lacy
clothes which can easily be damaged.
SPEED WASH
Use the Speed Wash cycle to quickly wash lightly
soiled clothing and smal_ Goads. For high wash and
rinse efficiency, it is recommended to wash small
loads of 2-3 lightly soiled garments.
NOTE: Use very [it_te detergent in this cycle. If you
went additional rinsing, you can add an extra rinse
by using the Extra Rinse button
POWER CLEANSE
Use this cycle for high rinse efficiency through the
increased use of water.

How To use 23
CYCLE MODIFIER BUTTONS
Each cycle has default settings that are selected
automatically. You may also customize these set-
tings using the cycle modifier buttons, Press the
button for the desired modifier until the indicator
light for the desired setting is lit, The washer auto-
matically adjusts the water Ievel for the type and
size of wash !oad for best results and maximum
efficiency Due to the high-efficiency nature of this
product, water leveJs may be much lower than ex-
pected, This is normal and cleaning/rinsing perfor-
mance will not be compromised,
NOTE: To protect your garments, not every wash!
rinse temperature, spin speed, soil love!, or option
is available with every cycle, A chime will sound and
the LED will not light if a selection is not allowed.
Hot Extra High Heavy Add_6
Warm High T Rinse*Spin
Semi Warm Medium Normal Spin0nly
Cold Low T Stain CareTM
Tap Cold No Spin Light Soak
I wo.,i s,i° I so, I
Temp. Level Use
All ColdRin_
WASH TEMP.
WASH TEMP. selects the wash and rinse tempera
ture combination for the selected cycle= Press the
WASH TEMR button until the indicator iight for the
desired setting is lit. All rinses use tap cold water.
The Wash Temp setting cannot be changed once a
cycle has started. If you wish to change the wash
temperature after the cycle has started, press the
Power button to cancel the cycle. Then turn on the
machine, reset the cycle with the changed ,wash
temperature, and press Start to restart the cycle.
NOTE: If you cancel the cycle after the water has
started to ill! the tub, you may need to drain the
tub (to achieve the new water temperature) and
add a small amount of additional detergent to re-
place any lost dudng the draining process.
• Seiect the water temperature suitable for the
type of load you are washing Foiiow the gar-
ment fabric care labeis for best resuits,
• Cold rinses use less energy, The actual cold
rinse temperature depends on the temperature
of the cold water at the faucet
SPIN SPEED
Higher spin speeds extract more water from
clothes, reducing drying time and saving energy.
Press the SPIN SPEED button untii the desired
speed is selected. Some fabrics, such as deiicates,
require a slower spin speed, To protect your c!oth_
ing, not all spin speeds are available for n!l cycies.
SOIL LEVEL
Adjusting the soil level setting will modify the
cycle times and/or wash actions. Press the SOIL
LEVEL button until the desired soil levei is se-
lected,
NOTE: This feature needs more time for heavily
soiled loads or less time for lightly soiled loads.
SPECIAL USE
Pressing the SPECIAL USE button wi!l allow you
to select additional features, such as Soak, Stain
Care rM,Spin Only, and Rinse+Spin. Pressing the
SPECIAL USE button before selecting a cycle will
automatically default to the Cotton/Normal cycle
with the Soak feature selected.

24 HC_WTOUSE
SPECIAL USE FEATURES
After selecting a cycle, press the SPECIAL USE
button to select additional features for your load.
NOTE:
• To protect your garments, not every feature is
available with every cycle.
• If the START/PAUSE button is not pressed within
five minutes to start the cycle, the washer wilt
shut off and aH settings will be lost.
SOAK
This option provides a 30-minute presoak prior to
the start of the selected cycle. Use the SOAK op_
tion to presoak garments to help remove difficult
spots or stains on fabrics At the end of the presoak
time, the selected cycle wil! begin with the same
,water used for the soak.
NOTE: You cannot select the SOAK option in the
TUB CLEAN.
STAIN CARE TM
Use this option for heavily soiied loads that need
improved stain treatment. When Stain Care rMis
selected, the wash cycte will begin with warm
water to help prevent the setting of certain types of
stains. Then, as the eycte progresses, hot water will
be added to gradually increase the water tempera-
ture to help remove stains that require treatment at
higher temperatures
NOTE:
• Best results are obtained with smailer toads (less
than 6 _b.)
• If you select STAIN CARE TM, the COLDWASH TM
option is not available,
SPIN ONLY
Use this option to drain the water from the tub and
spin out the c_othes, This can be used, for example,
if the wash cycle is interrupted by a power failure_
The spin speed can be adjusted by using the SPiN
ONLY button.
1.Press the POWER button to turn on the washer,
2. Press the SPECIAL USE button repeatedly until
Spin Oniy is selected.
3. Press the SPIN SPEED button to select the
desired spin speed. Selecting NO SPiN Ksnot
allowed.
4. Press the START/PAUSE button.
RINSE + SPIN
Select this option to rinse and spin a !oad sepa-
rately from a regular cycle This can be helpfu_ in
preventing fresh stains from setting in fabrics You
can change the spin speed by pressing the SPiN
SPEED button.
1 Press the POWER button to turn on the ,washer.
2. Press the SPECIAL USE button until the
RINSE+SPtN indicator light is lit. (The cycle light wiJl
turn off)
3, Press the START/PAUSE button to start the
cycte.
SPECIAL DRAIN FEATURE
This washer is equipped with a special feature
that is designed to make your washer as safe as
possible. If the washer is paused or shut off while
there is still water in the tub, the water will drain au-
tomatlcally after several minutes of inactivity This
helps keep children safe by reducing the possibility
of water remaining in the tub_
Any water remaining in the tub will automaticaliy
drain five minutes after the washer has shut off. !f
the washer is paused and the START/PAUSE but-
ton is not pressed within 5 minutes, the washer
will shut off and all cycle settings will be lost. Any
water remaining will drain five minutes later.
The washer can be turned on or restarted any time
before the draining begins. However, once the wa-
ter begins to drain, all functions will be suspended
until the water has been completely drained and
the washer shuts off.

HOWTOUSE25
OPTION BUTTONS
Your 'washing machine features several additiona_
cyOe options that customize cycles to meet your indi-
vidual needs. To use these options, select the desired
option AFTER selecting the desired cycle,
After selecting the desired cycle and settings, press
the cycle option button(s) for the option(s} you would
like to add. The button will iight when that option is
selected If the selected option is not allowed for the
selected cycle, the chime will sound twice to alert
you, and the LED will not ifluminate.
NOTE:
• To protect your garments, not every option JsavaiF
able with every cycle
• If the START/PAUSE button is not pressed within
five minutes to start the cycle_ the control will shut
off and a_isettings will be lost.
COLD WASH TM
This option saves energy by using cooler water while
increasing the wash and rinse times to maintain wash
performance.
NOTE:
• The Stain CareTM feature cannot be selected with
the Cold Wash TM option.
• Wash time wilt increase up to 30 minutes with the
Cold Wash TM option,
• For best wash results, only wash smatl loads (less
than 8 pounds) with the Coid Wash TM option.
DELAY WASH
Once you have selected the cycle and other settings,
press this button to delay the start of the wash cyOe,
Each press of the button increases the delay time by
one hour; for up to 19 hours. Once the desired delay
time is set, press the START/PAUSE button to start
the deiay time,
NOTE: If the START/PAUSE button is not pressed to
begin the delay time, the washer will automatically
shut off after five minutes and alt cycle settings will
be }osL
CUSTOM PROGRAM (PGM)
Custom Program allows you to store a customized
wash cycle for future use, It allows you to save your
favorite temperature, spin speed, soil teve_,and other
options for a cycle, and then recall them at the touch
of a button To create a Custom Program:
!, Press the POWER button to turn on the washer.
2. Press the cycle button repeatedly unti_the desired
cycle is selected
3. Press the cycle modifier button to change the de-
sired setting.
4 Press the cycle option button to add the desired
options.
5. Press and hold the CUSTOM PROGRAM button for
three seconds.
TO RECALL A CUSTOM PROGRAM**
1. Press the POWER button to turn on the washer.
2. Briefly press the CUSTOM PGM button. The stored
settings will display
3 Press the START/PAUSE button to start the cycle.
(Pressing an,/other button at this time will cancel
the custom program.)
NOTE: You may only save one custom program at a
time. Pressing and holding the CUSTOM PROGRAM
button witJ overwrite any previously saved custom
program.
TURBO WASH TM
Adding the Turbo Wash TM option reduces the cycle
time while still providing similar wash performance to
the same cycle without Turbo Wash_
NOTE:
• The Turbo Wash TM option cannot be used with all
cycles.
Turbo Wash7_ defauffs to ON for COTTON/NOR-
MAL, HEAVY DUTY, and SPEED VVASH cycle&
FABRIC SOFTENER
The fabric softener is dispensed in the final rinse.
Select the FABRIC SOFTENER button if you are using
fabric softener.
EXTRA RINSE
This option will add an extra rinse to the selected
cycle Use this option to help ensure the removal of
detergent or bleach residue from fabrics. Liquid fabric
softener, if used, is always dispensed in the final rinse.
NOTE: You cannot select the Extra Rinse option with
the Spin Only op¢ion.

26 HOWTOUSE
WATER PLUS
Use this option if you wish to add more water to your
wash _oad_This option is especiaily useful for large or
bulky loads.
NOTE:
• If the washing machine reaches its maximum water
level, the WATER PLUS button will have no effect.
• You cannot select the WATER PLUS option in the
Tub Clean and BULKY/BEDDiNG cycles,
SIGNAL OFF-LOW-HIGH
The washing machine plays a melody when the wash
cycle has finished, The volume of the melody is adjust-
ed using the SIGNAL button Press the button repeat*
edly to adjust the volume of the meiody. When no sig-
nal is heard, the signal is off. The volume settings are
LOW- HIGH - OFF. The signal volume can beadjusted
at any time as long as the washer is turned ON
CHILD LOCK
Use this option to disable the controls. The washer can
onty be _ocked during a cycle_ This feature can prevent
children from changing cycles or opera{iag the ma-
chine. Once the Child Lock is set, it must be deactivat_
ed before any controls, except the POWER button, can
be used Once the washer has shut off, the POWER
button will a_ow the machine to be turned ON, but
the controls wili stiil be locked. When the controls are
locked, CL will display alternately with the estimated
time remaining.
Press and hold the Water Plus button for five seconds
to activate or deactivate Child Lock.
NOTE: Once the controls are locked, they must be
manualty unlocked to restore operation_
ADD GARMENTS
Laundry may ONLY be added to the load at the
proper time in the wash cycle. When the ADD GAR-
MENTS light is illuminated, it is safe to pause the cy-
cle and add more items to the load. If garments are
added when the ADD GARMENTS light is off, the
washer will not adjust for these items which could
result in poor performance and/or fabric damage
1 Press the START!PAUSE button to pause the
washer while the Add Garments light is on.
2 Open the lid after it uniocks.
3 Add your additional items
4. Close the lid.
5, Press the START/PAUSE button, The cycle will
resume after the lid locks.
NOTE:
• The ADD GARMENTS light is an indicator only and is
not selected by pressing the SPECIAL USE button
. tf the washer remains idle for nine minutes after
pausing the cycle, the water in the tub will drain,

CARE AND CLEANING 27
CARE AND CLEANING
,_V_¢ARNING
To reduce the risk of fire, electric shock, or injury to persons, read and follow this entire Owner's
Manual, including the ImpoP_a_ Safety Instructions, _fore operating this washer,
Unplug the washer before cleaning to avoid the risk of electric shock_ Failure to follow this warning
can cause serious injury, fire, electric shock, or death
o Ne_¢er use harsh chemicals, abrasive cieaners, or solvents to clean the washer. They will damage
the finish.
REGULAR CLEANING
CLEANING THE EXTERIOR
Proper care of your washer can extend its life The
outside of the machine can be cleaned with warm
,water and a mild, nonabrasive household detergent.
Immediately wipe off any spiils with a soft, damp
cloth
IMPORTANT: Do not use solvents, cleaning alco-
hols, or similar products. Never use steel wool or
abrasive cleaners because they can damage the
surface_
CARE AND CLEANING OF THE INTERIOR
Use a towe! or soft cloth to wipe around the washer
lid opening and lid glass.
A!ways remove items from the washer as soon as
the cycle is complete. Leaving damp items in the
washer can cause wrinkling, color transfer, and odor.
Run the Tub Clean cycle once a month, or more of-
ten if needed, to remove detergent buiidup and
other residue,
TUB CLEAN CYCLE
Some environmental and usage conditions can
cause a residue to build up in the tub over time and
can lead to a mildewy or musty smell, The Tub Clean
cycle is specially designed to remove this buiidup
using bleach or other c_esners designed specifically
for cleaning washing machines. Run the Tub Clean
cycle once a month, or more often under heavy use
conditions or if odor is present
1. Remove any clothing from the tub.
2 Fill the bleach dispenser to the MAX iine with
liquid chtorine bleach. Do not overfill the bleach
dispenser. Overfilling wilI cause the bleach to dis-
pense immediately,
NOTE: For other tub cleaning products, follow the
cleaner manufacturer's instructions and recommem
dations For powdered cleaning products, add the
cleaner to the main wash compartment of the dis=
penser drawer after removing the liquid detergent
dispenser insert.
3. Close the lid and press the POWER button to turn
the washer ON. Turn the knob to select the TUB
CLEAN cycle then press the START!PAUSE but_
ton to begin the cycle. Selecting any other cycle
after Tub Clean has been selected will cause the
Tub Clean cycle to be cancelled,
4. After the cycle ends, open the lid and allow the
tub interior to dry complete_y_
NOTE:
• Never load laundry while using TUB CLEAN. The
laundry may be damaged or contaminated with
cleaning products. Make sure to run the Tub
Clean cycle ONLY when the tub is empty.
• It is recommended to leave the _idopen after fin-
ishing the laundry to keep the tub clean.
° It is recommended that TUB CLEAN be repeated
monthly.
- If mildew or a musty smell already exists, run
TUB CLEAN once a week for three consecutive
weeks.
REMOVING MINERAL BUILDUP
If you _ive in an area with hard water, mineral scale
can form on internal components of the washer,
Use of a water softener is recommended in areas
with hard water.
Use a descaler, such as Washer Magic @, to remove
visible minerai buildup_ After desca_ing, always run
the Tub Ctean cycle before washing clothing,
Minerai scale and other spots may be removed
from the stainless steel tub using a stainless steel
cleaner. Do NOT use steel wool or abrasive cleam
ers
LEAVE THE LID OPEN
If the washer will not be used for severa_ days, leave
the lid open overnight to aNow the tub to dry

28 CARE AND CLEANING
MAINTENANCE
CLEANING THE WATER INLET FILTERS
If the washer does not fili properly, an error mes-
sage will show on the display The inlet vane fi_ter
screens could be plugged by hard water scale,
sediment in the water supply, or other debds,
NOTE: The inlet screens protect the deticate parts
of the inlet valve from being damaged by particles
that coutd enter the valves with the water supply
Operating the washer with these filters removed
could cause a vane to stick open resulting in flood-
ing and/or property damage.
113
1.Turn OFF both water faucets completely. Um
screw the hot and cold water lines from the back
of the washer,
iMPORTANT: Always use new, high-quality inlet
hoses. Aftermarket hoses are not guaranteed to fit
or function correctly PooFqua#ty hoses may not
tighten correctly and could cause leaks, Subsequent
damage to product or property wiiI not be covered
under the terms of the product warranty.
2 Carefully remove the filters from the water valves
and soak them in white vinegar or a lime scale
remover; following the manufacturer's instruc-
tions Be careful not to damage the filters while
cleaning.
3 Rinse thoroughly before reinstalling. Press the fik
ters back into place
4. Before reattaching the hoses, flush the hoses and
water lines by running several gaIions of water
through them into a bucket or drain, preferably
with the faucets wide open for maximum fle,w.
NOTE: An tEerror message may blink on the display
when the water pressure is weak or an inlet filter is
clogged with dirt Clean the inlet filter.
• Unplug the power cord and turn off the faucets
before cleaning, Failure to do so may cause
electric shock_
• Do not use the washing machine without the
inlet filters, If you use the wash;ng machine
without the inlet filters it will cause leaks and
product malfunction.
• If you use the washing machine in an area with
hard water, the inlet filter may c!og due to lime
buildup.
STORING THE WASHER
If the washer wi!l not be used for an extended period of
time and is in an area that could be exposed to freezing
temperatures, perform the following steps to pro-
tect the washer from damage,
1.Turn OFF the water supply.
2. Disconnect the hoses from the water supply and
drain any water from the hoses,
3. Plug the power cord into a propedy grounded
e_ectdcal outlet.
4Add 1 gallon of nontoxic recreational vehicle (RV)
antifreeze to the empty tub and close the lid_ Nev-
er use automotive antifreeze,
5, Press the POWER button, then select SPiN ONLY.
Press the START/PAUSE button to activate the
drain pump, Al!ow the drain pump to run for one
minute, then press the POWER button to shut off
the washer. This will expel some of the antifreeze,
leaving enough to protect the washer from dam-
age
B. Unplug the power cord, dry the tub interior with a
soft cloth, and close the lid
7 Remove the inserts from the dispenser: Drain any
water in the compartments and let them dry
8, Store the washer in an upright position,
9,To remove the antifreeze from the washer after
storage, run a complete Speed Wash cycle using
detergent Do not add laundry to this cycle.

CARE AND CLEANING 29
CLEANING THE WASHER
PROPER USE OF DETERGENT
Using too much detergent is a common cause of
laundry problems, Today's detergents are formulat-
ed to be effective without visible sudsing. Be sure
to carefuiiy read and follow manufacturer's recom-
mendations for how much detergent to use in your
wash. You can use less detergent if you have soft
water, a smaller load, or a lightly soiled load,
NOTE: Use only low-sudsing, high-efficiency de-
tergent, These detergents can be identified by the
HE logo.
WARNING ...........................................................................
Do not spray water inside the washing
machine, Doing so may cause a fire or electric
shock,
CARE AND CLEANING OF THE WASHER
Lid: Wash with a damp cloth on the outside and in-
side and then dry with a soft c_oth.
Exterior: Immediately wipe off any spills. Wipe with
a damp cloth. Do not touch the surface or the display
with sharp objects,
Mm4ng and Storage: Contact a service technician
to remove water from the drain pump and hose&
Reinstall the foam tub b_ock to protect the washer
from damage while moving. Do not store the wash_
er where it will be exposed to outdoor weather corn
ditions,
Long Vacations: Be sure the water supply is shut off
at the faucets. Follow the instructions in the Storing
the Washer section if the washer will be exposed to
freezing temperatures,
Dispenser Drawer: Detergent and fabric softener
may build up in the dispenser drawer. Remove the
drawer and inserts and check for buildup once or
twice a month.
1 Remove the drawer by pulling it straight out untii
it stops. Lift up on the front of the drawer and pull
it completely out,
2 Remove the inserts from the two compartments.
Rinse the inserts and the drawer with warm wa_
ter to remove buildup of _aundry products.
3. To clean the drawer opening, use a small, nora
metal brush to clean the recess Remove all
residue from the upper and lower parts of the
recess
4. Return the inserts to the proper compartments
and replace the drawer Set the drawer into the
opening at an angle as shown at left, then lower
it and slide it into place.

30 SPECW!CATIONS
SPECIFICATIONS
Description
Electrical requirements
Max. 'water pressure
Dimensions
Net weight
Top-Loading Washer
120 VAC @ 60 Hz
14.5~116 PSi (100-800 kPa)
27"(W) X 28 3/8"(D) X 45 3/8"(H), 55 3/4"(H with lid open)
68.6 cm (W) X 72,1 cm (D) X t 15.3 cm (H), 1417 cm (H wkh lid open)
146.5 Ibs. (66.5 kg)
SMART DIAGNOSIS TM SYSTEM
Should you experience any problems with your
washing machine, it has the capability of transmit-
ting data via your telephone to the Smart Diagno-
sis Team. This gives you the capability of speaking
directly to our specially trained technicians. The
technician records the data transmitted from your
machine and uses it to analyze the issue, providing a
fast and effective diagnosis.
If you experience problems with your washer, call
1-800-243-0000 (1-888-542-2623 in Canada), Only use
the Smart Diagnosis System feature when instructed to
do so by the Smart Diagnosis Team. The transmission
sounds that you will hear are normal and sound similar
to a melody
Smart Diagnosis cannot be activated unless your
washing machine is turned on by pressing the POW*
ER button, If your washing machine is unable to turn
on, then troubleshooting must be done without us-
ing Smart Diagnosis.
USING THE SMART DIAGNOSIS TM SYSTEM
Follow the techniciarYsinstructions andperform the following Steps when requested,
HOLD the mouthpiece of your phone over the POWER button, when instructed to do so by the cal$center, no more
than one inch from (but not touching) the machine.
NOTE: Do not press any other buttons or turn the cycle seiector knob
PUSH and hold the WASH TEMP button while continuing to hold your phone to the POWER button.
USTEN for three beeps. After you hear the three beeps, retease the WASH TEMR button, Keep the phone in place
unti_the tone transmission has finished This takes about 6 seconds, and the display will count down the time Once
the countdown is over and the tones have stopped, resume your conversation with the technician, who will then be
able to assist you in using the information transmitted for anaiysis.
SmartDiagnosis is a troubleshooting feature designed to assist, not replace, the traditional method of trou o
bleshooting through service caHs_The effectiveness of this feature depends upon various factors, including,
but not limited to, the reception of the cellular phone being used for transmission, any external noise that
may be present during the transmission, and the acoustics of the room where the machine is _ocated. Ac-
cordingly, LG does not guarantee that SmartDiagnosis would accurately troubleshoot any given issue_

TROUBLESHOOTING 31
NORMAL SOUNDS YOU MAY HEAR
The following sounds may be heard while the wash-
er is operating, They are norma_
CLICKING_
Lid lock relay when the lid lucks and unlocks
SPRAYING OR HISSING:
Water spraying or circulating during the cycte.
HUMMING OR GURGLING=
Drain pump is pumping water from the washer at
times during a cycle,
WATER SLOSHING SOUND=
A iiquid in the balance ring around the ,wash basket
helps the basket spin smoothly=
WATER ADDED DURING WASH CYCLE
• The washer adapts to the load size and type and
adds more 'water to the cycle as needed
• The wash load may be unbalanced, if the washer
senses that the load is unbalanced, it will stop and
refil_ to redistribute the load,
, The washer may be diluting laundry additives to
add to the wash load,
BEFORE CALLING FOR SERVICE
"Yourwashing machine is equipped with an automatic error=monitoring system to detect and diagnose prob=
lems at an early stage, if your washer does not function properly or does not function at al!, check the for
lowing before you call for service:
iiii!iiiiiii!i!i iiiiiii ii!iiiiiiiii!ii i!iiiiiiii!ii/iii ili ii!iii!iiiiiiiiiiiii!i iii!ii!iiiiiiiiiii iiiiiiiiiiiiiiii}iiiiiiii!iiii! iiiii!iiiiiiiHiii;i iiiiiiiiiiiiiiii i i!i iiii iii iiiiiiiiiiii iii!iii
Rattling and clanking Foreign objects, such as keys, Stop washer, check tub and drain filter for foreign oh-
noise coins, or safety pins may be intub jects. If noise continues after washer is restarted, call
Thumping sound
Vibrating noise
or pump,
Heavy wash loads may produce a
thumping sound.
Wash toad may be out of balance
Packaging materials were not re-
moved.
Wash load may be unevenly dis*
tributed in the tub.
Not all leveling feet are resting
firmiy and eventy on the floor.
Hour not rigid enough.
Inlet hose connection is loose at
faucet or washer_
House drain pipes are cbgge&
Drain hose has come out of drain
or is not inserted far enough,
A large item such as a pillow or
blanket is above the top of the tub
Water leaking
for service,
This is normal If sound continues, washer is probably
out of balance. Stop and redistribute wash load.
Pause the cycle and redistribute the load after the lid
unlocks.
See the Unpacking and Removing Shipping Material
section in the Installation Requirements section.
Pause the cycle and redistribute the load after the lid
unlocks,
See Leveling the Washer in the _nstsllation Instructions
section
Make sure that the floor is solid and does not flex, See
Fioorin£ in the instailation Req_direments section
Check hoses for leaks, cracks and splits.
Check and tighten hose connections,
The washer pumps out water very rapidly. Check for
water backing up out of the drain pipe during drain*
ing. If water is seen coming out of the drain, check for
proper drain hose installation and check for restrictions
in the drain. Contact a plumber to repair the drain pipe.
Tie drain hose to inlet hose or standpipe to prevent
it from coming out during dra ning. For smaller drain
pipes, insert the drain hose into the pipe as far as the
drain hose flange. For larger drain pipes, insert the
drain hose into the pipe t=2 inches past the fiange_
Use the BULKY/BEDDING cycte for large or bulky
items Use extra care and never wash more than haIf a
load of items that float, such as pii_ows.
Step the washer and check the load, Make sure the
}cad does not crest above the top edge of the tub_

32 TROUBLESHOOTING
BEFORE CALLING FOR SERVICE (continued)
Wrinkling
Excessive sudsing
Staining
Washerwill notturn
ON
Wash cycle time is lon-
ger than usual
Musty or mitdewy odor
in washer
Water leaks
Washer not unloaded promptly. Always remove items from the washer as soon as the
cycle is complete,
Washer overloaded. The washer can be fuliy _oaded,but the tub should not be
tightly packed with items. The lid of the 'washer should
close easily.
Hot and cold water inlet hoses are Hot water rinse can set wdnkies in garments. Check the
reversed inlet hose connections
Too much detergent or incorrect HE detergents are formulated specifically for High*Effi-
detergent ciency 'washers and contain suds-redueing agents. Onty
use detergent with the High-Efficiency (HE] logo. For de-
tergent quantit!es refer to the How to Use sect!on
Bleach or softener dispensed too Dispenser compartment is overfilied causing bleach or
soon. softener to dispense immediately, ALVVAYS measure
bleach to prevent overfilling _one cup maximum
Dispenser drawer closed too quickly causing softener to
dispense immediately.
Bieach or softener was added di- Always use the dispensers to ensure that laundry prod-
rectty to the wash bad in the tub ucts are properly dispensed at the right time in the cycle.
Washer was not unloaded prompt- Always remove items from the washer as soon as pos°
ly. slbie after the cycle is complete.
Clothes were not preper_y sorted. Always wash dark colors separately from light colors and
whites to prevent discoloration.
Never wash heavily soiJed items with !ightiy soiled items,
Power cord is not properiy plugged Make sure that the plug is plugged securely into aground-
_n. ed, 3oprong, 120*VAC, 6O-Hz outlet,
House fuse is blown, circuit break- Reset circuit breaker or replace fuse, Do not increase
er has tripped, or power outage fuse capacity, ff the problem [sa circuit overload, have it
has occurred, alified electrician.
NOTE: if the washer stopped during a cycie due to a loss of power, the washer wii{ resume
the cycle where it stopped when the power is restored
The washer automatically adjusts This is normal. The washer adjusts cycle time automati-
the wash time for the amount of cally to provide optimal results for the seiected cycle. The
laundry, water pressure and other time remaining shown in the display is only an estimate.
Actual time ma_
Use only High-Efficiency (HE} detergent in accordance
with the manufacturer's instructions,
Run the Tub Clean cycle regulady.
iOnS.
Incorrect or too much detergent
has been used.
inside of tub was not c_eanedprop-
erly.
Oversudsing of detergent. Oversudsing may create leaks, and may be caused by the
type and amount of detergent used. High-Efficiency de-
tergent is the oniy detergent recommended Make sure
that detergent and any additives are put into the correct
dispenser compartments The normal amount of deteF
gent to use is 1/4 to 1/2 of the maximum amount recom-
mended by the detergent manufacturer. Always reduce
the amount of detergent if the lead is sma_i or lightly
soi}ed, or if your water is very soft. Never use more than
the maximum amount recommended by the detergent
manufacturer.

TROUBLESHOOTING 33
BEFORE CALLING FOR SERVICE (continued)
Washer wilJ not operate
Washer not filling properJy
Control panel has powered off due
to inactivity
Washer is unplugged.
Water suppty is turned off.
Controls are not set properly.
Lid is open
Circuit breaker/fuse fs tripped/
blowm
Control needs to be reset.
START/PAUSE was not pressed
after acycle was set,
Extremely low water pressure,
Washer is too cold,
Fiker clogged.
inlet hoses may be kinked,
Energy efficiency.
Insufficient water supply:
The washer fid is open.
Hot and cold inlet hoses ere
reversed.
Water level is too low
This is normal, Press the POWER button to turn the
washer one
Make sure cord is ptugged securely into a working
outlet.
Turn both hot and cold faucets fuiiy on.
Make sure the cycle was set correctly, close the tid
and press the START/PAUSE button.
The washer will not operate if the lid is open. Close
the iid and make sure that nothing is caught under
the lid preventing it from closing completely.
Check house circuit breakers!fuses Replace fuses
or reset breaker The washer should be on a dedicat-
ed branch circuit The washer wilI resume the cycle
where it stopped once power is restored,
Press the POWER button, then re-select the desired
cycle and press the START!PAUSE buttom
Press the POWER button then re-select the desired
cycle and press the START/PAUSE button, The
washer will shut off if the START/PAUSE button is
not pressed withfn five minutes,
Check another faucet in the house to make sure that
household water pressure is adequate.
if the washer has been exposed to temperatures be_
Iow freezing for an extended period of time, allow
it to ,warm up before pressing the POWER button,
3therwise, the dis_2L_ wilt not come on,
Make sure the inlet filters on the fiil valves are not
clogged, Refer to the filter cleaning instructions,
Check that inlet hoses are not kinked or cfogged
This is a High Efficiency (HE) washer. As a result, the
water leveJsettings for this washer may be different
than for conventional washers.
Make sure that both hot and cold water faucets are
turned on all the way.
The washer wilI not operate if the lid is open. Close
the lid and make sure that nothing is caught under
the lid preventing it from cJosing completely.
Check inlet hose connection& Make sure the hot
water supply is connected to the hot inJet valve, and
the co_dwater supply is connected to the cold inlet
valve.
This is a high efficiency washer The water will not
normally cover the clothes. The fill level is optimized
for the wash motion to achieve the best wash per-
formance,

34 TROUBLESHOOTING
BEFORE CALLING FOR SERVICE (continued)
Kinked drain hose.
Drain tocated higher than 96 in
above the floor,
Washer will not drain water
Poor stain removal
Bleach does not dispense
Premature dispensing of
bleach
IncompIete or no dispensing
of detergent
Water leaks every load
Pioper options not selected,
Previously set stains.
Bleach dispenser cover is not
properly installed.
Bleachdispenserisdirtyor
clogged,
Bleach dispenser filled for future
load
Overfilling the bleach dispenser:
Detergent compartments
clogged from incorrect fi{ling.
Too much detergent used,
Insufficient water supply:
Normal residue,
Hoses not instailed correctly.
Ensure that the drain hose s not kinke&
Make sure that the drain hose is no higher than 8 ft
(2.4 m) above the bottom of the washer and is no
mote than 5 ft. (15 m] away from the washer.
Heavier soils and tougher stains may require extra
cleaning power Select the Soak or Stain Care feature
to boost the cleaning power of the selected cycle.
Articles that have previously been washed may have
stains that have been set, These stains may be dif-
ficult to remove and may require hand 'washing or pro-
treating to aid in stain removaI,
Make sure that the bleach cover is property installed
and snapped into place before the beginning of the
cycle.
Lift out the bleach dispenser cover and clean out the
reservoir. Lint and other foreign debris that collects
inside the dispenser may prevent proper dispensing
of the bleach.
You cannot store bleach in the dispenser for future
use. The bleach will be dispensed every bad,
Overfft_ing the bleach dispenser wilt cause the bleach
to dispense immediately, which wi!l damage items in
the tub ALWAYS measure bieach, but never fill above
the MAX line on the dispenser. One cup of bleach is
normal_ but never add more,thae one cup_
Make sure that detergent and additives are put into
the correct dispenser compartments If liquid deter*
gent is used, make sure that the Iiquid detergent cup
and insert are in the detergent compartment, If pow-
dered detergent is used, make sure that the liquid de-
tergent cup and insert a_enot used. For aI detergent
types, always make sure that the dispenser drawer is
fully closed before the start of the cycle
Make sure that the suggested amount of detergent is
used per the manufacturer's recommendations. You
may also dilute the detergent with water to the maxi-
mum fill line on the compartment to avoid clogging,
Use only HE (High- Efficiency} detergent
NOTE: Always use as little detergent as possible,
High-Efficiency washers need very little detergent to
achieve optimum results, Using too much detergent
will cause poor wash and rinse performance and may
contribute to odors in the washer
Make sure that both hot and cold water faucets are
turned on all the way.
_tis normai for a small amount of detergent to reman
in the dispenser. If this residue builds up it can inter*
fete with norma_dispensing of products. Refer to the
cleanin_qinstructions,
Check nil fill and drain hose connections to ensure
that they are tight and secure:

TROUBLESHOOTING 35
ERROR CODES
The display shows:
The display shows:
The display shows:
The lid is not closed properly
Lid lock switch error,
Make sure that the Jidis closed properly
and press the START!PAUSE button. After
starting a cycie, it may take afew moments
before the tub begins to turn or spin The
washer will not spin unless the lid is locked
If the lid is closed and the Iid lock error mes-
sage is displayed, call for service
Make sure that the tid is dosed properly and
press the START!PAUSE button The washer
will not operate unless the lid is locke&
Make sure that nothing is caught under the
_id, including shipping materia_ or c!othing,
Make sure that the latch mechanism is ful}y
retracted.
if the lid is closed and the tid lock error rues-
............. sage iSdisplayed, call for se[vice_
Speciai Drain Feature, if the washer is paused durfng a cycle for
Water supply faucets are not fully
open
Water line hoses are kinked,
3inched, or crushed,
Water iniet fiiters are clogged,
Water supply pressure to faucet or
house is too low.
Water supply connected with leak
limiting hoses,
Power cord is not properly
plugged in.
House fuse Jsblown, circuit break-
er has tripped, or power outage
has occurred
Washer fills with water slowiy or
not at all, or the display shows:
Washer will not turn on
more than five minutes, the cycJewi_Jbe
cancelled and any water remaining in the tub
will be drained
Make sure that the water faucets arefully
open,
Make sure that the hoses are not kinked or
pinched. Be carefuJ when moving the washer
during cJeaningand maintenance,
Ciean the iniet filters. See Maintenance in
the Care and Cleaning section,
Check another faucet in the house to make
sure that househo!d water pressure is ad-
equate and ftow is not restricted. Disconnect
the inlet hose from the washer and run a few
galions of water through the hose to flush
the water supply lines. If flow is too Jew,
contact e plumber to have the water lines
repaired,
Hoses designed to limit teaks can trip falsely
and prevent the 'washer from fiJiing, The use
of bakdimitin9, hoses is not recommended
Make sure that the plug is plugged securely
into a grounded, 3_prong. 120 VAC, 60_Hz.
outbt
Reset circuit breaker or repbce fuse. Do not
increase fuse capacity. If the problem is a
circuit overload, have it corrected by a quaSi-
fled electrician.

36 TROUBLESHO©_T_NG
ERROR CODES (continued)
The display shows:
or not at all, or the display shows:
Foreign obiects, such as coins,
pins, clips, etc., caught between
the wash plate and the inner
basket
dogged
Drain discharge is more than 96
inches above bottom of washer.
The washer has detected an out of
balance load,
Turn off the ,washer and then press the Power
button, Press the Spin Speed button without
se!ecting a cycle to drain and spin the load.
When the spin is complete, remove the
clothes and then find and remove any objects
caught in the wash piate.
Aiways check pockets, etc. before wash-
ing to prevent error codes or damage to the
kinks, etc,, and is not pinched behind or
under the washer
Adjust or repair drain, Maximum drain height
is 96 Jnches8 ft (2,4 m}
The display shows: if the washer detects a loadthat is tee far
out of balance to spin, it will display this code
while it is attempting to reba_ancethe load, The
washer will add water and try to redistribute
the Ioadautomatically This display is for your
. .!nformat!on on!y, and no action is required
If the ub rebalance (see above) fs
not successful, this error will be
displayed.
The bad is too small.
Heavy articles are mixed with
lighter items.
The load is out of balance
Control error
'Water level is too high due to a
faulty water valve.
The water level sensor is not
working correctly
A motor error has occurred,
The display shows:
The display shows:
The dispfay shows :
The display shows:
The display shows:
The display shows:
The automatic attempt to rebaiance the bad
was not successful The cycle has been
paused to allow the !cad to be manuaily
adjusted,
Small loads may need additional items to be
added to allow the washer to balance the
toads,
The iced may have heavy items _oadedwith
_ighter items, Always try to wash articles of
somewha_ similar weight to allow the washer
to evenly distribute the weight of the !cad for
spinning,
Manually redistribute the load if articles have
become tangled preventing the automatic
Unplug the washe_ end wait 60 seconds.
Reconnect power and try again. If the error
reappears, call for service.
CJoeethe water faucets, unplug the washer;
and call for service.
Ciose the water faucets, unpbg the washer,
and cat[ for service.
Clutch error.
Allow the washer to stand for 30 minutes
and then restart the cycle, If the LE error
code persbts, call for service.
Mechanica! failure.
Unplug the washer end ce_lfor service

WARRANTY 37
LG WASHING MACHINE LIMITED WARRANTY (USA)
WARRANTY:
LG Electronics U.S.A. Inc, ("LG")warrants your LG Washing Machine ("produCt") against defect in materials or
workmanship under normal household use, during the warranty period set forth below, LG will, at its option, repair or
replace the product, This limited warranty is va_idonly to the odginal retail purchaser of the product, is hot assignable
or transferrable to any subsequent purchaser or user, and applies only when the product is purchased through an LG
authorized dealer or distributor and used within the United States CU.S.") including U.S. Territories
Note: Replacement products and repair parts may be new or factorpremanufactured and are warranted for the
remaining portion of the odginel unit's warranty period or ninety (90} days, whichever is longer, Ptease retain dated
receipt or delivery ticket as evidence of the Date of Purchase for proof of warranty, (You may be required to submit
a copy to LGor authorized representative).
WARRANTY PERIOD:
One (1)year from dateof
Period er_!_l fetal! purchase:
_pe of Warranty Any inter_lif_n_l
Parts& Labor
LG will provideparts & laty_
Remark repair orreplacedefectiveparts.
HOW SERVICE ISHANDLED: _n-Home Service
Ten (10) years from date of Lifetime fromdsteof
Drum Motor
(Stator, Rotor, and _11 StainlessSteel Drum
Sensor)
Partsonly. Customer wilt be respon_le for any_ or i_ome
seP_cetorep!_ defectivepare,
Imhome service witt be provided, as available, during the warranty period subject to servicer availability within the
U.S. To receive in-home service, the product most be unobstructed and accesslble to sewice personnel if the in=
home service repair cannot be compieted, it may be necessary to remove, repair and return the produCt If ingnome
service is unavailable, LG may elect, at its option, to provide for transportation of the product to and from an LG
authorized service center,
THIS L!MITED WARRANTY DOES NOT COVER:
, Service trips to deliver, pick up, or install the product or for instruction on product use,
, Replacing house fuses or resetting of circuit breakers, correction of house wiring or plumbing, or correction of
product installation,
3, Damage or failure caused by leaky/brokeW frozen water pipes, restricted drain lines, inadequate or interrupted
"water supp}y or inadequate supply of air.
4, Damage or failure caused by accidents, pests and vermin, lightning, wind, fire, floods or acts of God.
5, Damage or failure resulting from misuse, abuse, improper installation, repair or maintenance, Improper repair
ibciudes use of parts not approved or specified by LG.
6, Damage or failure caused by unauthorized modification or alteration to the product.
7. Damage or failure caused by incorrect electrical current, voltage, or ptumbing codes.
8. Cosmetic damage, including scratches, dents, chips or other damage to the finish of the product, unless such
damage results from defects in materials or workmanship and is reported to LG within seven (7) calendar days
from the date of delivery,
9. Damage or missing items to any display, open box, discounted, or refurbished product,
10, Product vvhere the original factory serial numbers have been removed defaced or changed in any way.
1t, Repairs when product is used in other than normal and usual household use {e_g. rental, commercial use,
offices, or recreational facilities) or COntrary to the instructions outlined in the owner's manual,
12. The removal and reinstatlation of the Product if it is installed in an inaccessible location.
THIS WARRANTY iS IN L!EU OF ANY OTHER WARRANTY, EXPRESS OR IMPLIED, INCLUDING AND WITHOUT
LiMiTATiON TO, ANY WARRANTY OF MERCHANTABiLiTY OR FITNESS FOR A PARTICULAR PURPOSE, TO THE
EXTENT ANY IMPLIED WARRANTY IS REQUIRED BY LAW, THiS WARRANTY iS LIMITED iN DURATION TO THE
TERM PERIOD EXPRESSED ABOVE. REPA}R OR REPLACEMENT AS PROVIDED UNDER THIS WARRANTY IS THE
EXCLUSIVE REMEDY FOR THE CUSTOMER NEITHER THE MANUFACTURER NOR ITS US. DISTRIBUTOR
SHALL BE LIABLE FOR ANY INCIDENTAL, CONSEQUENTIAL, INDIRECT, SPECIAL OR PUNITIVE DAMAGES OF
ANY NATURE, _NCLUDING AND WITHOUT LIMITATION TO, LOST REVENUES OR PROFITS, OR ANY OTHER
DAMAGE, WHETHER BASED IN CONTRACT, TORT_ OR OTHERWISE.
SOME STATES DO NOT ALLOW THE EXCLUSION OR LIMiTATiON OF INCIDENTAL OR CONSEQUENTIAL
DAMAGES OR LIMITATIONS ON HOW LONG AN iMPLiED WARRANTY LASTS, SO THE ABOVE EXCLUSION OR
LIMITATION MAY NOT APPLY TO YOU. THiS WARRANTY GIVES YOU SPECIFIC LEGAL RIGHTS AND YOU MAY
ALSO HAVE OTHER RIGHTS THAT VARY FROM STATE TO STATE.
HOW TO OBTAIN WARRANTY SERVICE & ADDITIONAL INFORMATION:
Write your warranty information below:
Call 1-800-24343000 or visit our webaite at w,¢,_vJg corn,
Mail to: LG Customer hformation Center (ATTN CIC)
201 James Record Road, Huntsviiie, AL 35824
Product Registration Information:
Model:
Serial Number:
Date of Purchase:

38 WARRANTY
LG WASHING MACHINE LIMITED WARRANTY (CANADA)
WARRANTY:
Should your LG Washer (*'Product _')fail due to a defect in material or workmanship under normal home use during
the warranty period set forth below, LG Canada wiUat its option repair or replace the Product upon receipt of proof
of original retail purchase. This warranty is valid only to the originai retail purchaser of the product and applies only
to a Product distributed in Canada by LG Canada or an authorized Canadian distributor thereof. The warranty onty
applies to Products located and used within Canada.
One (1)_r from the date of
Period original Ten (10) years from the date Five(5 )years from the date of
reta!l pU[_ase of original retail purchase origina_r_il purchase
Parts and Labor DD Motor Drum Tub
Definetub,is, stainlesssteel
Scope of Warranty (internal/functional parts only) (S_r, Rotor, Hall Sensor) _sh tub only
E_end_ Component Warranty (PartsOnly)
Remark Washer (Consumer wiii _ charged for Labor after one (1)year
from the da_ of purc,_aso)
ll_Repiacement products and partsare warranted for the remain ng portion of the original warranty period or ninety (90)
days, whichever is greater
I_Replacement products and parts may be new or remanofactured.
I_LG Authorized Service Center warranties their repair work for thirty (30) days
LGCanada'ss_a |iabil_ isBmffedto the Warranty set out_. _pt as expr_ly providedabove,LG _ makesno
andherebydisclaimsallo_.er warrantiesandcondi_onsre_n 9the _oc_ct, whether_e_ress or implied;,_uding, butnot
_im_edto, any_mpl_ warranty or cond_n of merchar_bility or _.ness for a particu_r purpose, andno r_ns sha_l
bebindingonLG Caned& LGCanadado_ not au_or _zeanyparson to create or assumefor ff anyo_er warranty obligatk_nor
_abilityin connectionwith _e produ_oTothe extentthatanywarranty or cond_en is implied byt_w, it is limited to the e_press
warrantyperiod _ve. LGCanada,the manufacturer or d6"tribLrtorshallnot beliablefor any incidanta],consequ_], _l,
director indirectdamages,loss of _II, lostprints, punitjveor exemplary damagesor any otherda_, whether arising
Diracth_"or indir_ from anyor_ breach fundamentalor otherwise, or from any actsor omissions,tort. or other.
Thiswarrant,,,gives you specific legal rights. Youmay haveother rightswhich may van/from province to province depending on
applicableptovincia_law&
Any term of this warranty that negatesor variesany implied condit on or warranty under provincial lawis severablewhere it
conflicts with provincial Iawwithout affecting the remainderof this warranty's terms
1 Service[rips to deliver, pick up, orinstatlthe product; instructing a customer on operation of the product; repairor rep}acement
of fuses or correction of wring, or correction ofunauthorizedrepairMnstallatbn.
2.Failureof the product to perform during power failures and interruptions or inadequate eIectricalservice.
3. Damagecaused by ieakyor broken water pipes,frozen water pipes,restricted drain iines, inadequateor interrupted water
supply or inadequate supply of air.
4. Damageresulting from operating the Product in a corrosive atmosphere orcontrary tothe instructions outlined inthe Product
owner's manual
5.Damage to the Product caused byaccidents, pests andvermin, lightning, wind, fire, floods, or actsof God.
6.Damage resuiting from the misuse, abuse,improper insta{tation,repair, or maintenanceof the Product, improper repair
indodes use of pa_s not approvedor specified by LG Canada.
79Damage or productfailure Causedby unauthorized modification or alteration, or use for other than its intended purpose,or
numbers,a_ongwith origins{retail salesreceipt, are requiredfor warranty validation=
12_}ncreasesin utility coats andadditional utility expenses.
15. Costsassociated with removal ofthe Product from your homefor repairs.
16.The removal andreinsts$1ationofthe Productif it isinstalled in aninaccessibb bcation or is not instalbd in accordancewith
published installation instructions, including the Product owner's andinstallation manuals.
17. Accessoriesto the Product such as lid bins, drawers, handtes,shelves,etc. Aisoexctoded are parts besides those that were
originally includedwith the Product.
All costs associated wlth the above excludedcircumstances shaiibe borneby the consumer
Forcomplete warrantydetails andcustomer assistance, Write your warranty information bebw:
please calior v;sit our website;
Ca!t1_888_542-2623(24 hourssday, 365 daysayear) and select Product Registratbn Information:
the appropriate option from the menu,or visit our website Model:
at http:i/ww_wJg.com SerialNumber:
Date of Purchase:

MANUAL DE PROPIETARIO
LAVADORA
Lea esfe manual de usuario defenidamente antes de la utilizaci6n y gu_rdelo a
mano para futuras consultas.
WT5480C _
MFL39760258

2 INDiCE
INSTRUCCIONES IMPORTANTES DE
SEGURIDAD
3 Precauciones B_sicas de Segurided
4 Requisitos de Conext6n a Tierra
5 Instrucciones de Seuridad Pare le Instalaci6n
6 _strucciones de Seguridaa Pare le Utilizaci6n,
Cuidado y Limpueza, y la Eliminaci6n
7 FUNCIONES Y VENTAJAS
7 Piezas y Componentes C_ave
7 Accesorios Incluidos
8
8
8
8
9
]O
11
12
13
INSTRUCCIONES PARA LA INSTALACI6N
Escoja el Lugar Adecuado
Tome de Corriente
Tipo de Piso
Desempaquetado y Desembaia_e dei Material
de Transporte
Conexi6n de }as Tuberfas de Ague
Conexi6n de ta Manguera de Drenaje
Nivelaci6n de Je Lavadora
Conexi6n del Suministro El6ctrico
14 PREPARACI6N
14 Clasificaci6n de Las Cergas de Lavado
14 Carge De La Lavadara
15 Acerca de Los Dispensadores
15 Uso del Detergente y del Dispensador
17 INSTRUCCIONIES DE USO
17 Funciones del Panel de Control
]8 Pantall8 de Tiempo y Estado
19 Manejo de la Lavadore
20 Gufa de Ciclos
22 Ciclo Principal
23 Botones Modificadores de Cicio
24 Funciones de Uso Especial
25 Botones de Opci6n
25 -Lavado En Fr{o
25 -Lavado Demorado
25 =Programa Personalizado
25 -Lavado Tubo
25 -Suavizante
26 Enjuague Extra
26 -Agregue el Ague
26 _Senat Apagado-Bajo_Alto
26 -B_oqueo hfantil
26 -A_tadir Rope
27 CUIDADO Y LIMPIEZA
27 Limpleza Regular
27 Limpieza dei Exterior
27 -Cuidado y Limpieza del Interior
27 -Cicto de Limpieza de Cuba
27 _Eliminaci6n de la Acumutaci6n de Minera{es
27 -Deje la Tape Abierta
28 Manfenimlento
29 Limpieza de _a Lavadora
30 ESPIECIFICACIONES
30 SISTEMA SMART DIAGNOSIS TM
31 SOLUCI_N DE PROBLEMAS
31 Sonidos NormaJes Que se Pueden Escuchar
31 Antes de Soiicifar Asistencia T6cnica
35 C6digos de Error
37 GARANTJA

iNSTRUCCiONES iMPORTANTES DE SEGUR!DAD 3
INSTRUCCIONES IMPORTANTES DE SEGURIDAD
MENSAJES DE SEGURIDAD
Per su seguridad, debe seguir la informaci6n indicada en este manual pars minimizar e_ riesgo de incendio
o explosi6n, descarga e_ectrica o pars prevenir daf_os a la propiedad, lesiones personales o muerte. Su
seguridad y la de otras personas es muy importante. En este manual yen su electrodomestico figuran
muchos mensejes importantes de seguridad. Lea y cumpJa siempre con todos los mensajes de seguridad
Este es eEsfmbolo de alerts de seguridad. Este sfmbolo Io alerts sebre posibles riesgos que pu_
eden resultar en daSes sobre ta propiedad y/o lesiones flsicas graves o Is muerte_
Todos los mensajes de seguridad estaran a continuacien del simboJo de alerts de seguridad y con
ta paJabra PELIGRO, ADVERTENCJA o PRECAUCION. Estas pa_abras significan:
Corre fiesgo de muerte o de sufdr heddas serias si no sigue Ins instrucciones
inmediatamente.
_&,ADVERTENCIACorre riesge de muerte o de suffir hefidas serias si no sigue Jasinstrucciones
_,PRECAUCI6N De no seguir Ins instrucciones podris sufrir daSos leves o causar defies en el
- producto.
Todos los mensajes de seguridad le indicar_n cu_l es el riesgo potencisi, c6mo reducir ins posibJ_idades
de sufrir heridas y qu6 podr_a suceder si no se siguen Ins instrucciones,
PRECAUCIONES BASICAS DE SEGURIDAD
_&ADVERTENCIA
Pars minim[zar ei riesgo de incendio o explosion, descargs eJectrica, o pars prevenir lesiones personales cuando
use electrodomestieos, se deben seguir precaucienes basicas de seguridad, incluyendo Jsssiguientes:
= Ufilice este electrc_iom6stico solo pars los fines para los que fee disef_ade, segOn !odeserito en este manual
dei usuario. N'utilisez votre laveuse qu'aux fins pre,¢des decrites dens ce manuel du proprietaire.
- Antes de usar, la lavadera debe ester correctamente instalada come se describe en este manual.
* No lava artfculos que han side limplados, invades, remojados o salpicados prevlamente _n gasofina, disol-
vantes de limpieza en seco, u otras substancias inflamabtes o explosivas, ya que emanan vapores que podrian
eneenderse o exp_otar.
* No agregue gasolina, disolvantes de limpieza en seco u otras substancies explosivas al agua de lavado, Estas
substancias emansn vapores que podrian encenderse o exp_otar
, Bajo ciertss condiciones, se puede producir gas hidrogene en un sistema de agua ca_iente que no se hays
usado per un piszo de 2 semanas o mas, EL GAS HIDROGENO ES EXPLOSIVe Si no se hausade el sigma
de agua caliente duraete tal periodo, antes de utirEar la lavadora, abra todas las Ilarves de agua caliente y deje
que el agua fluya durante algun_ minutes, Esto liberate cualquier gas hidrogeno acumulado, Ya que el gas es
nflamable, no fume ni use ninguna Ilarr_ abierte durante este perlodo,
. No deje que los nitfos jueguen ee la I_vadora o dentro de ella. Es nesesario supervisar de cerca a los nines si
utiliza la lavadera cerca de ellos_
- Antes deponerla lavadorafuerade servieioode tirarla,quitela puerteparaprevanirque !_ ninessemetan
dentro.
* No instale ni guarde la lavadora en lugares dende ester6 expueste a la intemperie o a temperaturas de con-
gelamiento.
. No toquetee Icescontroles,
* Mantenga e__rea a_rededor y baio eJdispositivo Hbre de materiales combustibles, come pe_usa, papei, trapos,
productos quimicos, etc
* EI servicio debe set reelizado per un t6cnico cualificsdo, No desmonte la lavador&
• ADVERTENCIA: Este producto contiene quimicos conocidos per e_Estado de California de causar c_nc-
er, L_vese las manes despu_s de manipular,

4 INSTRUCCIONES !MPORTANTES DE SEGURiDAD
• Vea Ins intrucciones de instalaci6n par_ los requis_s de tome a tierra.
• Sign SIEMPRE Ins instrucciones de cuidado de la tale suministradas per el fabricante de Ins prendas.
• No coloque artfculos expuestos a aceite de cocina en su lavadora_ Los articulos contaminados con
aceites de cocina podrian causar una resccion quimica que cause que la carga de lavado se incendie
• Use suavizadores de tela o productos pare eliminar estatioa unicamente del mode recomendado 1>3rel
fabricante.
• Esta lavadora no est_ disefiada para use marine o instalaciones movi]es tales come vehiculos recreati-
yes, aeronaves, etc
• No _lic4_ la Invaders pare secar artfculos que contengan _ucho, foam, o materiales con textures simil-
ares a ceucho,
• Cierre Ins Ilaves de ague y desenchufe la Invaders si no util_r_ la unidad per un periodo prolongado de
tiempo, come durante las vacaciones.
• El materiaI de empaque podria resultar peligroso para los niSos, Existe el peligro de sofocaci6n! Man-
ter,_ta redes los materiales de empaque fuera del alcanoa de los niP#s,
• Antes de cargar Ealava_ra, siempre re_¢ise que no hays objetos extranos en su interior. Mantee_;la la
puerta cerrada c_Jandono se use,
• 1'4ocoloque Ins manes dentro del electrodom6stico si e[ tambor o el agitador est_n en movimiento,
LEATED.S _ INSTRUCClONES ANTES DE USPJ_
Per su seguridad,sedebe seguir la informacionindicadaen este manual para minimizer elriesgo de inoan-
die o explosion, descarga electrica, opara prevenir danes ala propiedad,lesiones personales,o muerte.
REQUISITES DE CONEXION A TIERRA
Este aparato debe ser conectado a tierra_ En el case de descompostura o mal funcionamiento, _aconex_
ion a tierra reduce e} riesgo de recibir una descarga electdca al proveer una via de menor resistencia ala
corriente electdca Este aparate esta equipsdo con un cable que tiene un conductor de equipo a tierra y
una c_avija de tierra. La ciavija debe ser conectada en una tome de cordente adecuada que este apropiada-
mente instalads y conectsda s tierra de scuerdo con los codigos y ordenanzas }ocales.
Una conexion inapropiada del conductor de equipo a tierra puede resultar en desgo de recibir una descarga
electrica, Verifique con un electricista catificado si tiene dudas sobre si eI apareto esta correctamente
sonectsdo s tierra. No modifique la claviia provista con eJ aparato, Si no encaja con la tome de corriente,
Ilame a un etectricista calificado para que instale una tome de corriente adecuada. Si no se cumpIe con
esta advertencia se podran producir heridas graves, incendios, descargas electficas, o muerte.

iNSTRUCCIONES iMPORTANTES DE SEGURiDAD 5
Per su seguridad,se debe seguirlainformacionindicadaeneste manuatpars minimizarel des,gode incen-
clio o explosion,descargaelectdca, o paraprevenir danesala propiedad,lesionespersonaleso muerte.
INSTRUCCIONES DE SEGURIDAD PARA LA INSTALACI_N
Pars minimizar el riesgo de incendio o explosion, descarga electdca, opara p_evenk fesiones personales cuando
use eSectrodomesticos, se deben seguir precauciones basicas de seguridad, incluyendo _assiguientes:
• Con_JlteleaINSTRUCCIONESDEINSTALAC!ONparsunp_im_ detal_ de cor_yJonatierr& Lasiestruccionesde insta_
lacionson incluidascon su Invadersparaset uti izadascomareferenci&Simue#ela Invadersaunaeuevaubicaci6n,contratea _es
personadelservidocaificadaparsqualarevisey reinstae Sino secumplecon estaadvertenciase podranproduckbetidesgraves,
incendios,descargaseleetdcas,omuerte.
. 8ajo niagenacircuestan_deber_carter o eliminarlatercera pants(detoms a_rra) delcablede alimenta_n. Si nose samplecon
estaadverteeciasepadresproduckheridasgraves,ieceedios,descargaselectficas o muerte.
• _ra _ _ur,_dad paf_, este electrodemes4jco_ ester _mente cor4_ade atierra. Si nose c_mpIecon estaa@_erten-
ciase padresproducirheridasgraves,inceedios,descargasebctrica& o m_erte.
• El_ de _riente de _steet_estico contieneanen_hufede3 cabl_ (conexiona tierra)quase conectaaan torr_corrienta
deparede_,ar_r de 3 cables(cone'_ma _rra) psraminimizerI8posibitidadde desgosdedescargase_ectricasperpartedel mismo
• La Invadersdebarsa_r con_ aun tomaceTientecon _nexion a tierra de120VAC,60 Hz;Si noseeumptecon estaadverte_cia
sa podranpro@@heridasgraves,inceedios,descargaselect@as,omuerteo
• Corttratea unelectricista calif_de parsquarev;_ eltomacorr'_ y elclrcuito_ conel fmdeasegurarquaetenchufeeste
¢orrectamentecenser,adsatJerr&Sinose cumpb conestaadvertencJasepodranproducirheridaagraves,incendios,deacargas
electricas,o muerte.
• Enc_sode centerconuntorrmcorrm,_ede p&,_ de2 cabS, es_ re_sponsabil_dyobl_ ree_fle perun tomacor#ente
depare#de3 cablescorrectan_ntecon_ atJerra.Sino secumplecon estaadvertenciase podrsnproducirhe@asgraves,
incendios,descargase;ectdca&omue_te
• No ins_e laImvado._'asobreariaalfombr& Instalsta_ sobre_ pisos61kloB inc_mplJmientodeestaadvertenciapuedecsusar
daSosprovocadosporfuga deague.
• Noelimineel c_le deco_._oa 8tierr&Nouseun _ptador ocablede _si_n. C_'_te taInvadersenun tomacordentecon
coae_oaati_ de3 cables.Sino secumpb conestaadvettenciasepodranproduckheddasgraves,incendios,descargaselectricas.
o muerte.
• LaInvadersdeber_estersiemprecanada aun enchufeir4ividealconunindiesde vottajeequivalentsalq_ figureen suetiqueta
de coracleri_a t_nicas. Estogaran_izaelmeierfuncionamientoy edemaspmvieeetasobrecargade los cirgJitosdelhogar.Ioc_al
podriaocasioearriesgosde incendiodebidoatmeabntamientodecabies.
• N_ncadeser_h_esulaw,.mrstirande_ _ decorrionte.Siomprotomeel enchufefirmaments yjaleelmismohaciafuorapars
retirarlo. Sino secumptecosesta advertenciasepodraeproducirherdesgraves,incendios,descargaselectricas,o muerte
• Roparoe reemp_acadeime_iato tedos losca'_ decorfientepa{adosocon¢_lquiertipo dedan&No use_n cableconcortadures
0 a_ _re SUextermi_ oextreme. Sino se cumpbcos estaadvertenciase podraeproducirheridasgraves,inceedios,desca_-
gas e_ectdcas,o muerto.
• A_instalarocamb_arde I_" _ Invaders,e_e to._ ripedecortes aarras dermaeqel cabledecorriente.Si nose cumplecon esta
adverteeciase padresprod_cirheridasgraves,ieceedios,descargaselectdcas,o muerte
• LaInvadersdebeset in_ y c_ecta_ otterraper enapersonaespacie_ delservicietecnico_iende con los_
_l_s paraprevenirfiesgosde descargasyasegurarlaestabilidadduranteel f_nconamiento.
• La levelerses pa_. Sonec_itan_ o mespersonasparslest=Herytrasladarel electxoderrestjce.Siesto nosecumplese padres
producirdiversasheridas.
• AWmcaneoinstalslaInvadersderideno_ expueslaatemperaturesbajocare oa condicior_seli_cas en_fressexteriores.Sino
se cumplecos estaadverteneiase podr_nproducirda6osperfugasde ages.
• _e_dered_c_re_s_dedescargase_tr_casn_st_e_aiaw`der_e_es_cios_Jrr_Sinose_ump_ec_nestaadverte_-
ciase podranprodudr heddaegraves,inceedios,descargasebctficas, o muerte.
• Parsr_ucir elfiesgode iesionesper_.4rmlee,cumplacontodes _ _dimientos desegaridadrecorner,::lad_sI_,r{aindustfi_,
incl_,-yendeotuse deg_ntes con_ngas largosy gafasdeseg_d. Eecasede noeumpiiFconredesas sdvertendasde seg_ridad
de estemanualsepodr_nproducirdaSossabrala propieda&tesionespersonabso !amuerte.
• Nuncaintentsu_izarestoelect_Jdome_ siestadanade,_ne usa fall_,e_-laparcialmentedecarmade,_e partesdanadeso le
faltan partes,inctuMoi.l_cableo ur_en_b_ d_nad&Parsmeimizartaposibitidadde queoeurraunedesca[gaelectfica,antesdereali-
zereua_quiertareade manten}mientoo timpiezadescoeecteestee ectrodomesticodeisuministroelectdcoo descoeeetelahvadoradel
panelde distdbucionde laeasaqu ta_doelfusibleo deseonectandoe[disyuntor

6 INSTRUCCIONES !MPORTANTES DE SEGURiDAD
Pars minimizar et riesgo de incandio o explosion, descarga electrica, o pars prevenir lesiones person_
ales cuando use electrodomes_cos, se deben seguir precauciones basicas de seguridad, incluyendo las
slguientes:
INSTRUCCIONES DE SEGURIDAD PARA LA UTILIZACION, CUIDADO Y
Pars minimizar el riesgo de incendio o explosion, descarga electrica, o pars prevenir lesiones person-
ales cuando use eleetrodomesticos, se deben seguir precauciones basicas de segaridad, incluyendo tas
siguientes:
• Desenchufa la lavadora antes de limp|at la misma pars evitar el desgo de descargas electricas.
• Nunca utBice qufmicos fuertes, limp|adores abrasives o solventes para limpiar su lavadora. Los mismos
daSaran ei acabado de la unidad.
• No coloque trapos con grase o aseite encima de la la_;adora. Estas sustancias emiten vapores que po-
dfian prender fuego a los matefia_es,
• fie ]ave prendas que esten sucias con aceite vegetal o de cocina. Las mismas pueden quedar con algo
de aceite luego de] tavadoo Debido at aceite que permanece, [a tela puede despedir humo o prenderse
fuego per si sola.
• Desconecte este ela_rodemestico del tomacorriente antes de realizar cualquier ripe de mantenimiento.
Colocar los controles an la posicion OFF (apagado) no desconecta el electrodomestico de la toma de
corriente. No cumplir con esta advertenci& podr_ ocasionar heridas graves, incendios, descargas electri-
cas, o muerte.
• 1'4ocombine diferentes productos de lavanderia en una misma carga a menos que esto se especifique
en la etJqueta.
• No mezcle clero con amonlaco o _cidos come el vinagre Siga las instrucciones del paquete cuando
at|lice produc_os de lacvanderfa. El use incorrecto puede producir gases t6xicos, Io que pedals resultar en
lesiones graves o la muerte.
• No coloque las manes dentro de la I_rcadora cuande sus partes esten an movimiento. Antes de cargar,
descargar o egregar prendas, I_Jlse el boten de INIClO/PAUSA y es_re basts que el tembor se de-
tenga t_.a|mente antes de colocar las manes derrtro, Si no se c_mple con es_a advertencia se podran
producir heridas graves, incendios, descargas electricas, o muerte.
• No permits que los nines jueguen sobre o dentro de la la'cadora. Si hay nines cerca mientras la lavadora
esta en funcionamiento es necesario superviserlos de cerca. A me_dide que los nines crezcan, enseneles
sobre el use adecuado y seguro de redes los electrodomeaticos. Siestas advertencias no se cumpien
se podrian producir heridas graves.
, Destruya la boise plastica y otros mater|ales de embalaje una vez retirada la lavadora. Es posible que
los nines deseen usarlas pars jugar. LOScartones cubiert.os con alfombra, co]chss o laminas de piss'dee
se pueden conve_r en carnaras hermeticas. Siestas advertencias no se cumplen se podrian producir
heridas graves o muerte.
• Mantenga los productos de lavanderia fuera del alcance de los nines. Para evitar heridas, cumpla con to-
das las advertancias que figuran en las etiquetas de los productes. Siestas advertencias no se cump_en
se poddan producir heridas graves,
• Antes de que su lavadora sea quitada de servicio o desec_da, quite Is puerte del compar_miento de
la lavadora para eviter el peligro de que los nif_os o pequeflos animales queden atrapados dentro. El no
hacedo puede ocasionar tesiones personales graves o la muerte
° Mantenga las manes y objetos extraf_os alejados del _irea de la ta_ y el cierre cuande est6 cerrando la
tap& En case contrario, podrfa sufrir lesiones.
GUARDE ESTAS INSTRUCClONES

FUNCIONES Y VENTAJAS 7
FUNCIONES Y VENTAJAS
PIEZAS Y COMPONENTES CLAVE
Le bac
A MOTOR INVERTER DIRECT DRIVE distribution
E! motor inverter, conectado direetamente a ia (votr page 15)
cuba produce pocas vibraciones y ofrece una
excetente durabilidad y una pro ogada vida QtiL
B ULTRA CAPACIDAD Y TUBe DE ACERO Jave_
INOXIDABLE QUE NUNCA SE OXIDE
E_diseho eficaz teofrace una mayor capaeidad
sin qua eJaparato tenga qua set m_s grande
ni que e{tamber tenga que set m_s profundo
para unainstalacibn y un use m_s f_cil.
de
commande
(Voit page 17)
C
D
TURBO _,_/ASNTM
Turbo Wash TM reduce ei tiempo de lavado
sin afectar a su calida& Los movimientos
precisos det tambor y los potentes chorros
de agua partaken un remojado mas r_pi_
do, a la vez que el Spray Jet SmartRinse TM
permite un aclarado m_s rSpido, aho-
rr_ndole hesta 20 minutes sin sacrificar ta
calidad del _avado.
OXl SANITIZE TM
Este clcto combina los resultados de iim*
pieza de ia iavadora LG con productos de
limpieza de acci6n exi que se tibetan en
e! memento correcto para Iograr e{ rendi-
miento de un cicio de limpieza sin malgaso
tar energia en agua caliente, come ocurren
en los cic{os de limpieza tipicos.
PANEL TACTIL TRASERO
La panta}la LED de f_IciIlectura muestra
las opciones de cities, ajustes, estado del
eic_oy tiempo restante aproximado Los
botones t_cti]es ofrecen m_s comodidad y
una excelente est@tJcade disebo.
Piads de
nivellement
V_|va|a de entrada V_lvu_a de enfrada
de agua cailenfe de agua ft{a
Cable
F
G
TAPA SLAM PROOF =
La tapa Siam Prooff Mes un dispositivo de
segundad que cierra la tapa lentamente.
Las bisagras Slam Prooff Mpermiten cerrar
la tapa de forma suave y silenciosa, y
ayuda a evitar accidentes,
SMART DIAGNOSIS TM
Si atguna vez tiene algOn contratiempo con
su lavadora LG, no debe preocuparse. La
caractefistica "Smart Diagnosis _M'' ayuda
al servicio t_cnico a diagnosticar proble-
mas telef6nicamente, o con un simpte app
en su tel6fono inteligente (smart phone),
ayud_ndole a minimizar ilamadas earas o
molestas.
ACCESORIOS INCLUIDOS
• Sujetador de cable (para asegurar la manguera
de drenaje)
NOTA: P6ngase en contacto con el Departamento de
atenci6n al ctiente de LG, en el n_Jmero 1_800_243-
0000 (I_888-542-2623 en Canada) si fa_ta alguno de
ios accesorios.

8 iNSTRUCCIONgS PARA LA (NSTALAC_ON
INSTRUCCIONES PARA LA INSTALACION
ESCOJA EL LUGAR ADECUADO
, La I_adora es pesada. Se necesitan dos o
Padspersonas para instalar y trasladar el elec-
trodom6stico_ Si esto no se cumple se podr_n
sufrir heddas en ta espalda u otras hedda
- A]ma_ne e instale la tavadora en un lugar
no ex4_uesto a temper_uras iNeriores a Iss
de congelaci6n ni a la intemperie_ Si no se
cumpte con esta advertencia se podr_n pro-
ducir heridas graves, incendios, descargas
electdcas o muerte.
• Pars su seguridad personal, este electrodo_
m6stico d_ ser conectado a tierra adecua_
damente.
• Conecte a tierra la lavadora siguiendo todos
los c6digos y ordenanzas legales. Si no se
cumple con esta advertencia se podr_n pro-
ducir heridas graves, incendios, descargas
el6ctfieas o muerte.
- La apertura de la base no debe estar obstruida
por una aifombra cuando la _avadora se instate
en un piso atfombrado
• No elimine el cable de eonexibn a tierra. No
use un adaptsdor o prolongador. Enchufe en
un tomacorriente con conext6n a tierra de 3
cables. Si no se cumple con esta a_ertencis
se podr8n preducir heridas graves, incendios,
descargas eL6ctricas o muerte_
TOMA DE CORR|ENTE
* La toma de corriente debe estar dentro de un _rea
minima de 1,5 m (60 pulgadas) a cua_quiera de los
tados de la iavadora_
, El etectrodom6stico y Ia toma de corriente deben
estar colocados de farina tal que se pueda acced-
er al enchufe f_cilmente.
- No sobrecargar {a toms de cordente con m_s de
un electredom6stico
* La toma de corriente deber_ estar conectada a
tierra de acuerdo con los cSdigos y las regulacio-
nes de cableado actuates,
o Se recomienda uti_izar un fusible de demora de
tiempo o disyuntor
NOTA: Es responsabilidsd y obligaci6n personal del
dueSo de_ producto pedir a una persona del servic[o
t6cnico ca_ificado qua instate la toma de corriente
adecuad&
TIPO DE PISO
o Para minimizar et ruJdo yvibraci6n, se DEBE instalsr Is
- lavadora en un piso s61idamente construido. Ver !s
NOTA a la derech&
, La cuesta penmisible debsjo de toda Is lavadora es
una diferencia mSxima de 2,5 cm (1 pulgada) de lade
a lado o entre taparte deiantera y Is trasera+
• No se recomiendan las superficies alfombradas o
• de baidosas b_andas.
• Nunca instate lalavadora en una plataforms o estruc_
tufa soportads con poca solidez.
NOTA: Se debe instalar la lavadora en un piso firme
pars minimizar la vibraci6n durante el centrifugado. El
piso de concrete es et major, pero un piso de madera
es suficiente, siempre qua se hays construido res-
petando ios est_ndares FHA No se debe instalar la
lavadora sobre alfombras o expuesta a la intemperie.
115,3cm
V
2,5cm _ 68,6 cm .2.5cm
(1pu[g.) (1 pu_g.)
Para asegurar qua se hays dorado de suficiente es_
pacio para tas tuberias de agua y fiujo de sire, deje
espacios minimos de pot !0 menos 2,5 cm (1 pulga-
da) en _os lados y de 10 cm (4 pulgadas) detrSs de
la unidad No oivide tener en cuenta las molduras
de paredes, puertas 0 piso, que podr_an aumentar
la distancia de separaciOn necesaria,
T
141,7cm
(55_/4putgJ
811cm
(32 puig,)
721cm
(283/_ pulg,)
9cm
(3/_ pulg)
I1
El espacio vertical m/nimo desde el piso a Ios es.-
tantes superiores, muebles, techo, etc., es de 1,40
metros (56 pulgadas)

iNSTRUCCiONES PARA LA _NSTALACION 9
DESEMPAQUETADO Y DESEMBALA-
JE DEL MATERIAL DE TRANSPORTE
1. Despu6s de quitar el cartdn y el materia_ de era*
balaie, levante y saque ta lavadora de la base de
espuma Aseg0rese de que el soporte de pl_stico
de la tins sale con _abase y no se queda atascado
en la parte inferior de ia lavador&
t
Si debe asentar la lavadora hacia abajo para quitar
los materia]es de embalaje de la base, siempre pro-
teja el lado de la lavadora y deposlteIa con cuidado
sabre su lado, NUNCA asiente la ]avadora sabre su
parte frontal o posterior,
3. Retire cuidadosamente las dos protecciones de
espuma que eubren los iados superiores de ia
gufa de la cuba, asegur_ndose de no dejar ningQn
resto de espuma,
4, Libere el cable de alimentacidn de _aparte postrior
de la lavadora.
Soporte Basede
la caja
2. Retire el b!oque de espuma que contiene el manu-
al de! propietario, _aspiezas y las muestras de pro-
ducto de iavanded& Guarde et bloque de espuma
para un usa futuro Si eR et futuro debe trasladar
en una mudanza la lavadora, este Moque ayudar_ a
impedir da_os a la lavadora durante el transporte
NOTA: Para evitar cuaiquier daSo, no retire el blo-
que de espuma hasta que la lavadora no est6 en
su ubicaci6n finai.
HERRAMIENTAS QUE NECSITARA
• Pinzas aiustables
• Nivel de carpintero

10 iNSTRUCCiONES PARA LA INSTALACION
CONEXI_N DE LAS TUBERIAS DE
AGUA
• LG recomienda el uso de maaguitos LG. Cualquier
fuga, dafios en la ropa o en _ lavadora causades por
una instalaci6n o uso defectuosos de manguitos que
no seen LG no estar_ cubierta por los t6rmtnos de la
garaatfa LG y serd responsabilidad 6nica del cliente
y/o instalador.
• La presi6n del suministro de agua debe estar entre
14,5 psi y 116 psi (!00~800 kPa), Si la presi6n del
suministro de agua es superior a 116 psi, se deber_ in*
stalar una va}vt_a de reducci6n de la presi6n de_agu&
-Peri6dicamente, compruebe Ins mangueras en
busca de grietas, fugas y desgastes, y reemplace la
mangue_a si es necesario.
• AsegOrese de que _asmangueras no esten estiradas,
pinzadas, aplastadas o retorcidas.
• La lavadora no se deberia insta_ar ni a_macenar en
un tugar sometido a temperaturas de congetaci6n,
Pueden da_arSe ias tuberias de agua y mecanismos
intemos de la lavador& Si talavadora estuvo expuesta
a temperaturas de congelaci6n antes de lainstalaci6n,
permita que permanezca a temperatura ambiente por
varias horas antes de usarla y verifique la presencia de
perdidas antes del funcionamiento.
Se|_o de caucho Sello de caucho
M_ngueta
de agua "_
(entrada de _-J'_tI
agua en la _'_ I
Man _era
g
_vadora) / I I de agua (a
1, fnspeecione el accesorio roscado
de cada
manguera y verifique que haya un sello de goma
en ambos extremos.
r_ADVERTENCIA
* No wJelva a utJlizar mangueras usadas, Utilico
H mangcoras nuevas para la in_laci6n de la
lav_ora, Las mangueras usadas F._dr_n causar
fugas o explotar, _iendo que el sueLo se
inunde con los consiguientes dai_co rr_teriales,
2. Conecte Ins mangueras de suministro de agua a
ins Ilaves de paso de agua catiente y fr[a y apdete
tas conexiones con I:amano A continuaci6n, utilice
unos alicates para apretarlas otros 2/3 de vuelta.
/_.!_ADVERTE NClA
NO tense en excoso. E_acoplamiento puede
_ resultar da_ado.
3 Siempre deje fiuir uno o dos litros de agua a trav6s
de cada manguera de entrada para ayudar a evitar
futuros problemas con pantaIlas de fiitro obstru-
idas al vaciar la suciedad, dep6sitos de minera_es
y otros residuos de ins tubedas de agu& De paso,
al hacedo comprobar_ cu_l es la manguera de agua
caliente y cu_t _ade agua fda,
ADVERTENCIA
No ajuste las mangueras en e_ceso, Hacedo
puede dafiar ins v_lvulas, causando fugas y
da_os a la propieda&
4. Conecte ta tuberia de agua catiente a la entrada
de agua catiente ubicada en la parte trasera de la
lavadora. Conecte la tubeda de agua fria a la em
trada de agua fr[a situada en la parte posterior de la
lavadora, Ajuste Ins uniones con firmezao Abra las
Ilaves de paso del agua y revise si hay fugas.
NOTA: AsegQrese de no enroscar mal los acceso*
dos de ta manguera. Ya que etlo da_ada la v_lvula
y podr[a provoear daSos a ta propiedad debido a Ins
fugas,

_NS'TRUCCJONES PARA LA INSTALAC_0N 11
CONEX16N DE LA MANGUERA DE
DRENAJE
- La manguera de drenaje siempre debe estar asegu-
rada adecuadamente. No asegurar adecuadamente
la manguera de drenaje puede resultar en inun-
daci6n o daf_os a la propiedad
• El drenaie debe instaJarse segOn todos los c6digos y
• regu_aciones toca}es vigentes.
• Aseg0rese de que la manguera de drenaje no est_
estirad& pinzada, aplastada o retorcida.
crearse un efecto sif6n y el agua "verse impelida
fuera de la tina io que ocasionada una reducci6n
del rendimiento dei lavado/enjuague o daSos en
ias prendas.
OPCI6N 2: LAVADERO
Doble el extremo de _a manguera de drenaje hasta
que tenga la forma deseada y engSnchelo al borde
de! lavadero. Use una correa para asegurar _a
manguera de drenaje en su lugar.
MangL_eta de d_enaie
OPCI6N 1: TUBO VERTICAL
Dobte e_extremo de saJida de la manguera de dre-
naie hasta format una U. Ingrese el extremo de la
manguera de drenaie an el desag0e. Si eJ desag(Je
es Io suficientemente ancho como para que eJ re-
borde de la manguera encaje dentro, entonces, no
inserte e! reborde ross de 2°5 cm (1-2 pulgadas) en
e_ desagOe. Use la correa, incluida con los materia-
les de instalaci6n que habia en el bJoque de espuma
de Jatin& para asegurar la manguera de drenaje al
desag0e
Manguera de drenaje
Suietacables Su}etacabtes
Si ]as v_lvu{as de agua y el desag0e est4n instaladas
en la pared, sujete ta mang_era de drenaje a una de
1asmangueras de agua con ]a correa (el lade estriado
hacia el interior). Si el desag0e es una tuberia verti-
caJ, sojete la manguera de drenaje a la tubede verti-
caJ con la correa suministrada.
NOTA:
• La aJtura total dei extremo de la manguera de=
berfa estar aproximadamente a 0,9~1,2 metros
(35"-47") del piso.
• No instalar el extremo de lamanguera a una altura
de m_s de 243,8 cm (96 pulgadas) sobre Japarte
inferior de la Javadora.
• No selle la manguera de drenaje, por ejemp!o,
con cinta. Si no hay ninguna ranura de aire, puede

12 INSTRUCCiONES PARA LA _NSTALAC_ON
NIVELACION DE LA LAVADORA
La tina de su nueva lavadora gira a ve_ocidades muy
elevadas, Para minimizar la vibraci6n, los ruides y _os
movimientos no deseados, el piso deber6 set una
superficie perfectamente nivelada y s61ida.
NOTA:
, Ajuste las paras niveladoras solo en la medida
necesaria para nive_ar la lavadora_ La extensidn de
las patas niveladoras m_s de Io necesado puede
causar vibraci6n de ta iavadora,
• Antes de instaiar ia iavadora, asegQrese de que ei
piso est@ timpie, seco y libre de polvoo suciedad,
agua y aceites, de forma que 1as patas de apoyo
del electrodom6stico no puedan deslizarse con
facilida& Las patas de apoyo poddan moverse o
desiizarse, conllevando una vibraci6n y ruido ex-
cesivos derivados de un contacto deficiente con
el piso,
Las cuatro patas niveladoras deben apoyarse firme_
mente en el piao. Intente mover la lavadora de una
esquina hacia otra para asegurar que las cuatro paras
niveladoras tengan un contacto firme sobre el piso,
!. Co_oque la lavadora en el lugar final,tomando la
precauci6n especial de no apretar, forzar ni apla-
star las tuberias de drenaje y agua. oloque un nivel
sobre la parte superior de la lavadora
• Para comprobar si la tapa est8 nive_ada de adeF
ante hacia atria, coloque un nivel en el lateral de
la tavadora en el horde donde se unen el lateral del
muebie y la tapa superior: No coloque el nivel en la
parte superior ni en la tapa Si utiliza esas referen-
cias, el resukado set8 una lavadora desniveiad&
ADVERTENCIA .................................................................
Si utiliza la iavadora sin niveIarla, pueden
producirse faiios de funcionamiento causados
por el exceso de vibraciones y ruido.
* _li_ las _s de nivelaci6n ,_f_lopara n_vetar
la ta'cador& Si eleva _aspatas de nivelaci6n de
forma innecesaria, puede causar vibraciones
an6malas de la lavadora.
"='-- d
St_bir Baiar
2 Ajuste la pata niveladora. Gire en sentido horatio
para levantar la lavadora yen sentido antihorario
para ha]aria,
3=Para asegurarse de que ta lavadora est,1 correcta..
mente niveladao abra la tapa y mire desde arriba
para vet si la tina est_ centrad& Si la tina NO est_
centrada como muestra el dibujo de la derecha,
vuelva a ajustar la pata_ Si tiene un nivel, com-
pruebe la iavadora con e_nivel.
° Para eomprobar si la lavadora est_ nivelada de
iado a iado, eoloque un nivel en e_ filo posterior
de la tapa

_NSTRUCCION£S PARA LA INSTALACt0N 13,
CONEXION DEL SUMINISTRO ELEC-
TRICO
La lavadora requiere una toma de corriente de 120
V de CA, 60 Hz y tres ciaviias con conexi6n a tierr&
Enchufe la tavadora. Una conexi6n inadecuada del
conductor de conexidn a tierra del equipo puede
ocasionar un riesgo de descarga el6ctrica Consulte
a un el6ctdeo o t6cnico calificado si tiene dudas
sobre si el electrodom6stico est_ correctamente
conectado a tierra No modifique el enchufe que
se entrega con el electrodom6stico. Si no encaja
en la toma de corriente, solicite a un enectricista
adecuadamente formado que le instale una toma
de corriente apropiada Si no se eumple con estas
advertencias se podr_n produck lesiones graves,
incendios, descargas el6ctricas o muerte,
-,_'_ADVERTENCIA
• El tomacorriente debe es*_ar dentro de un _rea
minirr_ de 1,5 m (60 pulgadas) a cualquiers de
los _os de Is lavadera,
• El electrodom6stico y el tomacorriente deben
estar colocados de forms tai que se pueda
acceder sl er_chufe facilmerrte.
- No sobreaargar el torr_corriente con m_s de
un electrodomestico.
, El tomacorriente deber8 estar puesto s tierrs
de acuerdo con los codiges y las regulaciones
de cableado actuales.
• Se recomiende uttlizar un fusible de demora de
tiempo o dis'pantor,
- Es responsabilidad y obligacion persona[ del
dueno de_produeto pedir a un electricista
calfficado que instale el tomacordente
adecuado
, No _lice un cable o enchufe d_astade
o dai_ade. Rep_rel_ o sustit{P/alos
inmediatamente. En caso contrario, podria
haber peligro de incendio, descargas el6ctricas
o falbs del aparato
• No modifique el cable de slimentaci6n y tenga
cuidado de no dafiarlo durante la instalaci6n o
cua_ mue_,_ala Eaw_,',_ra.En caso contrar_
peoria haber peligro de incendio, descargas
el6ctricas o fal_os del aparato,
,, h-seg_rese de que la la'_,,dora est6 conectada s
tierr&
. Cone_e esta I_rvadoraa una toma e_6ctrica
deal[cads y sdecuada a su capackJsd. En caso
contrarlo, podria haber peligro de descargas
el6ctricas, incendio o ratios, del aparato.
, No _lice adaptaderes o _bles de extensi&q,
La lavadora deber_ set conectada siempre en
su propia toma de alimentaci6n, compatible
con Io indicado en is placa de caracteristicas.
En caso contrario, podria haber pe_igro de
descargas electdcas, incendio o faitos del
aparato.
• No da_e ni corte el conductor de tierra
interne del enchufe. En caso contrario, podrfa
haber peligro de muerte, incendio, deecargas
ei6ctricas o faflos del aparato.

14 PREPARACION
CLASIFICACI6NDE LASCARGASDE LAVADO
• No cargue pranks a tr_s de la _na_ Si no se
sigue esta advertencia, poddan producirse fugas o
dafios en los tejidos.
, Use el ciclo BULKY/BEDDING _rendas volumino-
sas y de almohadas o edredone& Si no se sigue
esta advertencia, se pueden producir ragas.
• Si es posibb, no lave la rope resistente al ague, Si
debe hacerlo, seleccione el cido de rope volumi-
noa2/_:o92dec2,pa.:...................................................................................
AGRUPACI6N DE PRENDAS SIMILARES
Pars obtener los mejores resultados a! lavery reducir las
posibiiidades de daSar las prendas, es necesano tenet
cuidado a }a hare de clasificar la rope en coiadas forma-
des par p_endas simiiares. Si se mezclan dife_entea tipos
de teiidos o niveles de suciedad, el rendimiento del la-
veda se ver_ degradado, y podrian produckse transferem
cias de color o deco{oraciones, daSos en bs teiidos o fo_-
macien de pelusas en Las prendas. Los tejidos se deben
ciasificar en grupos ta_coma se describe a continuaciSn.
COLORES
Clasifique Ias prendas par color Las predas oscuras
juntas en una carga separada de las prendas blancas
o de co!ores ciaros. Mezclar prendas oscuras con
prendas claras puede dar come resultado e_ tints o
la decoloracidn de _asprendas m_s claras.
NIVEL DE SUCIEDAD
Lave la rope muy sucia junta. Si se lava rope que no est_
may sucia en la misma colada qua la raps muy sucia, es
may posible que _aropecon poca suciedad no se {ave bien.
TIPO DE TEJIDO
Las prendas delicadas no se deben mezctar con
p_endas m_s pesadas y resJstentes, Si se Iavan prem
das pesadas en una carga de rope delicada, puede
resultar que la ropa pesada no se Iave correctamente
y que se produzcan daSos on las prendas delicadas
TIPO DE PELUSAS
AIgunos tejidos atraen las pelusas mientras que
otros sueltan petusas en el proceso de lavado. Evite
mezclar prendas recotectoras de pelusas con prem
das generadoras de pelusas en la misma canada. Si
mezcla estos dos tipos de tejidos, se formar_n bolas
y pelusas en las prendas recobctoras do petusas_
(Par ejempb, recolector de pelusas: buzo de tejido o
punto; productor de pelusas: toalla de felpa).
SORT LAUNDRY..,
WNte • Hea_ , [ Delicates Lint Producer
Lights Normal EasyCare LineCollector
Dar_ Light S'_J[d¥
ETIQUETASDECUIDADODELASPRENDA$
Muchas prendas de vestir incluyen una etiqueta de cu-
idado de ia prend& Utilice ei siguiente diagrama para
ajustar el ciclo y ias opciones pars cuidar la prenda
e acuerdo con ias recomendaciones deJ fabdcante.
Fabric Care Labels
Machine I_
w_h
Water O0 • O0 •
Bleach
CARGA DE LA LAVADARA
• Compruebe que _odos los bo_siIIosest_n vacios. Ob
jetos coma dips, cerillas, beligrafos, monedas y _taves
pueden da_ar tanto _alavadora coma las p_endas.
• Cierre cremalteras, brochesy cordones para evitar eno
ganches o enredos en otras prendas.
• Ap_ique un tratamiento previo alas _ress muy sucias
pars mejora_ el resukado.
• Mezcle prendas grandes y pequefias en Ia misma
carga Cargue pnmero las p_endas grandes.
• Las prendas grandes no deben ocupar m_s de ta mitad
de lacarga total de/a coiada.
• La tavado_a as puede cargar completament& pare _a
tina no debe ester abarrotada con prendas_ La taps de
la lavadera se deberia cerrar con faciiidad.
• Pars evitar una co_adadesequilibrada, no iave £rendas
_nicas. Ag_egue unao dos prendas similares ala coiada
• Lasprendas g_andesyvoluminosas, coma loscobert0res,
edredones o ceIchas, debedsn lavarsa individualmente
• La la_adera no so IIenar_ de ague ni funcionar_ si _a
taps est_ abierta.
NOTA: Use el ciclo pars prendas vofuminosas y de
cams con rope voluminosa coma chaquetones relish-
as, edredones, almohedas, etc. Es posible que estas
prendas no sean tan absorbentes come otras prendas
y deberian lavarse en una colada independiente pata
Iograr unos resultados 6ptimos
Las prendas vol_minosas se deben cobcar Io m_s
abajo posible dentro de la tins pars ebtener los mejores
resultados. Cotoque siempre los objetos flotantes en la
parte inferior de ta tin& La lavadora detectar_ de forma
automatics eltamaSo de la carg& Debido al sistema de
iavado de aita eficbncia, es posibie queef nivel de ague
no cubra completamente ia carga de rap&

PREPARACION 15
ACERCA DE LOS DISPENSADORES
El dispensador autom_tico est@ compuesto de dos
compartimientos que contienen:
- Suavizante ffquido.
• Detergente en po_vo o l/quido para e_lavado principal
Comp_r_m ei_to Comp,_r timi_mo
_rinc pal de pdncipg_l d_
detergeRte en polvo detergence en po_vo
p_ra _a,¢adota / pare [avadora
de te_a f_
"-. Inserto
COMPARTIM|ENTO DEL DETERGENTE
DEL LAVADO PRINCIPAL
Este compartimiento contiene e[ detergente pare et
c[clo principa! del lavado, El detergente se agrega
a _a carga al principio del ciclo_ Utilice siempre de_
tergente de alta eficiencia (HE) con su lavador& Se
puede user tanto detergente IIquido como en polvo_
AI agregar el detergeate, nunca exceda Ins reco-
mendaciones del febricante Si usa demasiado de o
tergente, puede suceder queen [ugar de di[uirse se
acumule en la ropa yen _alavadora.
Cuando use detergente ffquido, asegOrese de que el
recipiente pare el detergente ffquido y el inserto es-
t_n en su sitio, No exceda la linen de Henade m_ximo.
Cuando use detergente en polvo, retire el recipiente
del detergente I[quido del compartimiento, El deter-
genre en peeve no se dispenser8 si ei recipiente de
detergente ffquido est_ en el compartimiento.
COMPARTIMIENTO DEL SUAVIZANTE
Este compartimiento contiene el suavizante _fquido,
que se dispensar_ de forma autom_tica durante el
cicto de enjuague final.
A! agregar el suavizante, nunca exceda las reco-
mendaciones del fabricante. Si usa demasiado sua=
vlzante, puede suceder queen }ugar de diluirse se
acumule en [a rope yen Ua[avadora,
* A[ agregar el suavizante, respete siempre _as reco-
mendaciones del fabricante. No exceda la _inea de
[lenado m_ximo. El use de demasiado suavizante
puede manchar Ins prendas
* Di[uya e[ suavizante coneentrado con agua temp-
lad& No exceda ia linen de _ienado m_ximo,
* Nunca vierta el suavizante directamente en [a car-
ga o dentro de la tina,
liq_do
COMPARTIMIENTO DEL BLANQUEADOR
LIQUIDO
El dispensador del blanqueador es un compartimiento
independiente situado en ta parte de!enters izquierda de
la aberturs de is tin& Este eompartimiento contiene ei
blanqueador de cbro _fquido, que se dispensara de forma
stJtom_tica en e! memento adecuado dursnte et ciclo de
Invade. Cualquier tlquido que hays en et dispenssdor a[fb
haldel ciclo sere agua, no blanqueador,
* No sgregue blsnqueador con protector de color Hquido
o en polvo a este compartimiento El cempsrtimiento
del blanquesdor est_ diseSado pars dispenser t_nica-
mente blanqueador de cloro iiquido, E[ blanqueador con
protector de color Itquido o en po[vo no se dispensar_
correctamente.
. A_agregsr el b_anqueador, respete siempre _as reco_
mendaciones del fsbricante, Nuncs sgregue m_s de ue
vasito y no exceda _aIInea de llensdo meximo ya que
eso podda provocar que el btanqueador se dispense
inmediatsmente y dafie los tejidos, User demasiado
blsnqueador puede dafter tos tejidos.
, Nuncs vierta el blanqueador de ctoro liquido sin diluir
directsmente en Iscarga o dentro de ia tina Se pueden
prodacir daSos en e[ tejido.
* No utiliee cloro decobrsnte ni productos de Oxi en el
mismo ciclo con el bianquesder liquido de cloro.
USO DEL DETERGENTEY DEL
DISPENSADOR
UNAS PALABRAS SOBRE LOS DETERGENTES
LOSdetergentes de alta eficiencia (HE) generan menos
espuma y se disuelven m_s eficazmente pare mejorsr e}
rendimiento de[ [avsdo y del enjuague, edemas de ayu-
dar s mantener limpio el interior de {a lavadora Usar un
detergente que no es de alta eficiencia puede provocar
un exceso de espuma y un rendimiento poco satisfectorio
que podrfsn dsr como resu_tado c6digos err6neos, errores
de ciclo y daffos ala m_quina.
de carga _orma{

16 PREPARACION
Pare un rendimiento adecuado del lavado, mida siem-
pre el detergente usando las medidas que proporcio_
na et fabricante de! detergente. La cantidad normal
de detergente necesari& para las cargas habituaies,
es menos de la _/_det m_ximo recomendado.
Use menos detergente si el agua es bland& la rope
tiene poca suciedad o _ascargas son peque_as. Nun-
ca use m_s de la eantidad mSxima recomendada per
el fabricante del detergente.
DISENADO PARA USAR SOLO DETER-
GENTE DE ALTA EFIC|ENCIA(HE)
IMPORTANTE: Su iavadora est_ diseSada pare su
use exclusive con detergentes de alta eficiencia
(HE}. Los detergentes HE est_n formulados es-
pecificamente para tavedoras de alta eficiencie y
contienen agentes reductores de espuma. Cuando
compre detergente, busque siempre el simbolo HE,
de alta eficiencia
IMPORTANTE: No todos los detergentes son
iguales, Tenga cuidado con la cantidad de deter-
gente que use para evitar un use excesivo, un real
enjuague y la acumulaci6n de detergente en la rope,
ademSs, la aeumu_aci6n de residues puede contri*
buir ala aparici6n de otores en la mSquine. NUNCA
use un reeipiente o une bo/a distinta de Ia sumim
istrada per e} fabrieante del detergente que est_
usando. Nunca use m_ts de la cantidad m_xima de
detergente recomendade per el fabricante, S6b se
necesite una cucharada o medida corn@eta de de-
tergente pare cargas de rope muy sue& Si utiiiza
demasiado detergente, podrfa acumulerse en la la-
vadore y en la ropa,
Recuerde medir siempre la cantidad de detergente,
come los detergentes de alta efieiencia estSn dise-
5ados pare este tipo de lavadoras, es necesario ten°
er cuidado al medir el detergente. Para la mayoria de
eoladas normales, se debe user entre 1/4 y ia 1/2 del
recipiente o bola del detergente de alta eficiencia.
NOTA:
• Debe tenet un extreme cuidado cuando use deter°
gentes concentrados 2X y 3X, ya que incluso muy
poca cantidad m_s puede contribuir a la aparici6n de
bs probtemas antes mencionados.
• Es posible que los detergentes denominados come
compatibles con alta eficiencia no preporcionen re-
sultados 6primes.
USO DE SUAVIZANTE Y DE DISPENSADOR
DE DETERGENTE
Para agregar detergente, blanqueador y suavizante
a! dispensador autom_tieo
1.Abra la gaveta del dispensador:
2.Cargue los productos de Iavado en el compar-
timiento adecuado.
3. Cierre la gaveta antes de comenzar ei ciclo.
4. Si est8 utilizando los ciclos COTTON/NORMAL o
HEAVY DUTY, pulse el bot6n FABRIC SOFTNER
0 seteceione la opci6n EXTRA RtNCE.
NOTA: Es normal que al finalizar et cicio haya una
pequeSa eantidad de agua en los compartimientos
del bianqueador y del suavizante.
IMPORTANTE: No coloque ni almacene productos
de lavado, come detergent& blanqueador o suavi.-
zante liquido, encima de la tavadora o la secador&
Seque los derrames inmediatamenteo Estos pmduc-
tos pueden daSar la pintura y los controles.
Bleach
USO DEL DISPENSADOR DE BLAN-
QUEADOR LIQUIDO
El dispensador de blanqueador, de forma autom_itica_
dituye y dispensa blanqueador con clom Ifquido en et
memento adecuado del cido de lavado.
1 Compruebe las etiquetas de cuidado de las prendas
en busca de instrucciones especiales.
2, Mida cuidadosamente el bianqueador flqufdo res-
petando !as instrueciones de la botella Las lavadoo
ras de alta eficiencia usan menes ague, asi que se
necesita menos blanqueador: Media taza es sufici-
ente pare la mayor/a de las cargas,
3. Con cuidado, vierta la cantidad de blanqueador me-
dida previamente dkeetamente en e! dispensador
de bianqueador; Si usa btanqueador en peeve de al-
gOn ripe, vi6rtalo directamente en la tina antes de
agregar la carga. Nunce agregue blanqueador en
polvo a/dispensador de blanqueador Ifquido.
Nunca vierta el blanqueador con cloro I_quido sin die
}ufr directamente en la rope o dentto de ta tin&
No vierta blanqueador en poivo en el dispensador de
btanqueador
No coloque prendas encima dei dispensador de
bianqueador al Ilenar o vaciar la lavadom
Siempre mida y vierta el blanqueador con touche
cuidado, Cuando ag_egue el blanqueador at dispeno
sador, evite el sobmlIenado y ias saipicaduras. La ca-
pacidad m_xima del dispensador de bianqueador es
una taza de blanqueador per ciclo de iavado. Un lie-
nado excesivo puede hace_ que la leiia se distribuya
inmediatamente y da_ar la ropa en el interior de la
_avadore.

INSTRUCC_ONES DE USO 17
INSTRUCCIONES DE USO
FUNCIONES DEL PANEL DE CONTROL
DFect Drive
D
A
B
BOTON POWER (ENGENDER/ C
APAGAR)
Presione este bot6n pars prender !a lava-
dor& Presi6nelo de nuevo pars apagad&
AI presionar e_ bot6n POWER durante
un cicloo se cance{ar_ el cJcio y todos Jos
ajustes de carga se perder_n La tapa se
destrabar_ tras uns breve pausa.
NOTA: Si queda agua en Nacuba tras
apagarse Jalavadora, se vaciar_ despues
de cinco minutos, La lavadora se puede
voiver a poner en funcionamiento en cu-
alquier momento antes de comenzar el
vaciado. Sin embargo, una vez que ha co*
menzado el vaciado, se suspenden todas
las funciones hasta que ha finaHzado et D
vaciado y se ha apagado la lavadora
PERILLA DEL SELECTOR DE CICLO
Gire esta perilla pars seleccionar el cicto
que desee, Una vez seleccionado el ciclo
deseado, se mostrar_n en pantaJia los
ajustes est_ndar pars dicho ciclo_ Estos E
ajustes pueden cambiarse uti_izando
!os botones de aiuste del cicto en cuai-
quiet momento antes de queet cicto co-
mience. F
NOTA: Para proteger sus prendas, no
todos {os ajustes est_n disponibles pars
todas las selecciones de cic{os.
BOTON POWER (ENGENDER/
APAGAR)
Presione este bot6n pars prender la lava_
dora. Presi6ne!o de nuevo para apagarla,
AI presionar e_ bot6n POWER durante
un ciclo, se canceiar_ el ciclo y todos los
ajustes de carga se perder_n La taps se
destrabar_ tras una breve paus&
NOTA: Si no pu/sa el bot6n INICIO/PAU-
SA en cinco minutos tras Jasetecci6n de
un ciclo, Is lavadora se apagar_ autom_ti-
camente y se perder_n los ajustes del ci-
clo, Ei agua restante en la cuba se vaciar8
despu#,s de cinco minutes.
8OTONES MODIFICADORES DE CIGLO
Utilice estes botones pars definir los
ajustes dei cicio seleccionado. Las iuces
situadas encima de los botones se ilumio
nan para mostrar Is selecci6n actual
CICLO ESPECIAL Y BOTONES DE OPCION
Estos botones Je permiten seleccionar
ciclos u opciones especiales.
PANTALLA DE TEMPO Y ESTADO
La pantalJa muestra el estado de_ cicJo y
el tiempo restante estimado.

18 INSTRUCC{ONES DE USO
PANTALLA DE TIEMPO Y ESTADO
La pantaNa de tiempo y estado muestra e_tiempo estimado restsnte y el progreso dei ciclo_
D
Processing Est.TimeRemaing
@ i
C
A B
A
B
iNDiCADOR DE ESTADO DEL ClCLO
Estos LED se iiuminan cuando se selec-
ciona un cicto para indicar las fases que
se van a realizar_ Cuando un ciclo est_ en
marcha, parpadear8 el LED de la fase ac-
tiva y permanecer_n iluminados los LED
de 1asfases siguientes Una vez comple=
tada la fase, el LED se apagar_ Si un cio
cto est_ en pausa, el LED de fase activo
deiar_ de parpadear.
LAVADO CON INICIO DEMORADO
El indicador de lavado con inicio demo _
rado se ituminaci6n cuando se selecci-
one un inicio demorado El indicador se
apagar_ cuando se haya iniciado el ciclo,
C
D
TIEMPO ESTIMADO RESTANTE
Cuando se selecciona un cicJo, se mues-
tra el tiempo estimado para dicho ciclo,
Ese tiempo puede cambiar a medida que
se agregan opciones o si se modifican
los ajustes Una vez se pulsa el bot6n
START/PAUSE, la lavadora medir_ el
tama_o de la carga° Et tiempo estimado
q_e se muestra puede cambiar si el con-
trol modifica el cic[o debido al tama5o de
la carg& Si se seleceiona el retardo dei
inicio de lavado, e! tiempo cuenta hasta
que se inicia el cicio
NOTA: Ei tiempo que se muestra es s61o
una estimaci6n. Este tiempo es_8 calcu-
lado en base a condiciones normales de
funcionamiento. Algunos factores exteF
nos (tamaSo de Is carga, temperatura
de la habitaci6n, temperatura del agua
entrante, etc,) pueden afectar al tiempo
real
INDICADOR DE BLOQUEO DE TAPA
El indicador de btoqueo de tapa se itumi-
nat8 cuando se haya iniciado un ciclo, El
indicador permanecer_ iluminado hasta
que haya una pausa, se pare o finatice el
cclo,

MANEJO DE LA LAVADORA
............W_
AddGarments
2
3
4
6
7
8
INSTRUCC_ONE$ DE USO 19
CLASIF_CACIONDELASPRENDASYCARGADELALAVADORA
Clasifique las prendas por tipo de tel& nivel de
suciedad, color y tamafio de la carga, seg_n sea
necesado, Abra la tapa y cargue las prendas se_ec-
cionadas en la tavadora,
PRODUCTO DE LIMPIEZA
Agfegue detergente de a_ta eflciencia (HE) a_dis_
pensador de detergente, Si se va a utilizar lejia o
suaqzante, a_dalos en el dispensador apropiado.
PRENDER LA LAVADORA
Presione el bot6n POWER para prender ia lava-
dora, Las luces alrededo_ de la perilla del setector
se iluminar_n y se emitir_ _n aviso sonoro.
SELECCIONAR UN CICLO
Gire la perilta deI selector de cicto en cualquier di°
reccidn para seleccionar el ciclo que desee, Se
mostrar_n los valores predefinidos de temperatura
de lavado y enjuague, velocidad de centrifugado,
niveI de s_ciedad, uso especial y los ajustes de op-
ci6n para dicho ciclo, S{ polsa el bot6n Inicio Pausa
sin seleccionar un cicb, comenzar_ inmediatamente
el cicto Algod6n/Normal
CONFiGURACION DE AJUSTES
Ahora se pueden cambiar los ajustes para et ciclo
seleccionado, si as{ se desea, utilizando el modi=
ficador de cic[os y los botones de opciones,
NOTA: No todas las opciones est_n disponibles
para todos los ciclos. Sonar_ un aviso sonoro dife-
rente y eILED nose encender_ si no se permite una
determinada seiecci6n.
INICIAR EL CICLO
Presione el bot6n START/PAUSE para que co-
mience el cido, La tapa se bioquear_ y la lavao
dora se agitar8 brevemente sin agua para medir
el peso de la carga. Si no pulsa el bot6n INICIO/
PAUSA en un tiempo de 5 minutos, se apagar_ la
lavadora y se perderSn todos los aiustes.
LUZ PARA AGREGAR UNA PRENDA
La luz ADD A GARMENT se prender_ atprincipio
de! ciclo de lavado para indicar que es seguro
agregar m_s prendas a lacarga, Presione et bot6n
START/PAUSE para pausar et cicb y agregar
prendas a la carga. Pulse et bo_6n H',IiCIO/PAUSA
para reanudar el ciclo.
NOTA: No se recomienda agregar prendas a me-
nos que la luz ADD A GARMENT est6 encendida,
ya que podria reducir el rendimiento del lavado,
FINAL DE CICLO
Cuando el ciclo ha terminado, sonar_ una meio-
d[a, Retire la ropa inmediatamente de la lavadora
para evitar que se formen arrugas.

20 INSTRUCCIONES DE USO
GUiA DE CICLOS
La siguiente gufa de ciclos muestra los ajustes predeterminados, asi
come _as opciones disponiMes '4 los tipos de tejidos recomendados
para cada ciclo. Debajo del ajuste predeterminado pars carla cicb, se
muestran los aiustes modificadores permitidos
= OPCI6N DISPONIBLE
= Ajuste p_Fninado
Cotton! A_god6n iino
Norma_ tea las, camisas,
(Atgod6n / vaqueros, cargas
Normat) mixtas
Heavy Duty Prendas de algo*
Fuerte) d6n muy sucias
Ca_iente _xtta[@pdo Muysucio
Semi-Tibia Media Ligero
Frta _i_ce_rifuga@
FdadeJgfifo
auci8
Caliente _:xtrar_pido Normal
Semi-Tibia Media Ligero
FrFa Lento
Fdadel grifc ;_ce_.ribga®
A_godon, ropa
Oxi interior, fundas
de almohadas,
SanitizeT_ sabanas, ropa de
bebe
Tub Clean
Limpieza de Consulte la
latina) p_gina 27.
Tibia Zxtmr@idoNormal
Semi-Tibia R_pido Ligero _
Lento
_ @trtfifiJgs_®
_x_mr@id0Normal
Media Ligero _
ento
Bright Whi- Prendas blancas
tes_M
Prendas grandes Ca!iente _.xtrar_pido Muysudo
come mantas o Semi-Tibia Media Ligero _ _ _
Bulky/ edredones Frla .ento
Bedd}ng Fdadel gdfe _cen_ifugad,_
(Voluminoso. Utiiice ei cicio BULKY/BEDDING (Vduminoso/Ropa de cams) _araarticuios come aimohadas edreo
/ Ropa de dones, camas pare mascotas '_otros articulos que tengan i!robiemss pars absorber el agua, NO LAVE
cams) ROPAS EXCESb4AMENTE GRANDES Si faropa grandeivoluminosa no puede introducirse correctamen*
te en latin& quiz_s no hayaespacio suficiente pars su mowmiento d_rante el lavado. Mantenga iuntas las
}rendas s{mi_ares,Agrupe los artfculos similares, no mezcle art[cubs voluminosos con peque_as prem
das, No seguir estaa instruceiones puede causar da_os en las prendas o a la lavadora.

INSTRUCCiONES DE USO 21
GUiA DE CtCLOS
La siguiente gufa de ciclos muest_a }as ajustes predeterminados, asf
coma las opciones disponibles y los tipos de teiidos recomendados
para cada ciclo, Debaio de! ajuste predeterminado para cada cicio, se
muestran los ajustes modificadores permitidos,
CiQie N_.
Perm,Press/ Cam}sasdeetiquetai
Casual _antaJ0nes,r0pa Muy sucio
(Planchado a_tiarrugasropade Ligero
_0ii#,steiialgod6n,
Perm,) manteies
Towels
[[oaltas}
WOOl
[Lena)
Deiicates
(Deiicade)
SpeedWash
(Laver
r_pido}
Power
Cleanse
[Poder
Cleanse
Toaltas,camisas,
a_banas,vaque-
ros,cargas mixtas
Prendaetiquetada
soma iana_avable
an lavadora(me-
has de 8 lib_as}
Camisas de
atiqueta/b_usas,
srendas de nyton,
muy finns o de
ancae (menos de
8 ibras)
Cargaspocosu-
maw pequenas
Toallas,camisas,
a_banas,vaque-
ros,cargas mixtas
NOTA:
@ = OPClON DtSPONIBLE
= Aju_ predeterrninado
_|8TT)OS_r8
Semi_Tibia
Fda
Friadeigdfo
Caliente
Semi-Tibia
Fria
Fdadelgrifo
Semi-Tibia
Fda
Tibia
Semi-Tibia
Fda
Semi-Tibia
Fda
Fdadelgrifo
Caiiente
EcoTibia
Fda
FdadelgrifO
V_
RSpido
Lento
Si_¢enlrif_lado
Extra[_pido
Media
Lento
Si_cemfi!_¢a®
R_pido
Media
Si#ce_t#u_®
Extrar_pido
Media
Lento
Extratdpido
R_pida
Lento
Sinc_ritu_®
Muy sucio
Ligero
Norma}
Muy sucio
Normai
Muy sucio
Normal
Muy sucio
Muy sucic
Ligero
W_
i
i ÷
i
i
÷
!
i
L_
i
I
i
i
[
I
i
i
!÷
I
i
I
I
i÷
÷
i÷
i÷
i÷
i÷
i
÷
÷
÷
÷
÷
÷
÷
÷
÷
÷
÷
÷
Pare proteger sus prendas, no todas !as temperatures de lavado/eniuague, velocidades de centdfugado,
niveles de suciedad y opciones estSn disponibles pare todos tos ciclos. Sonar_ un aviso sono[o y e_ LED no
se iluminar8 si no se permite una determinada selecci6n,
*La lavadora ajustar_ de forms autom_tica ei tiempo de iavado pare la cantidad de colada, presi6n del agua,
agua y dern_s condiciones de funcionamiento.

22[ INSTRUCCiONES DE use
CICLO PRINCIPAL
Los ciclos de lavado se han diseSado para lograr los
mejores resukadea pare cada tipo de carg& Select
the cycle that best matches the load contents for
maximum wash performance and fabric care. Gire
el Selector de Ciclos at cicle deseado Cuando
seleccione un ciclo de lavado, se iluminar_ la luz
pare el ciclo de lavado correspondiente, Consulte
la p_gina 19, Funcionamiento b_sico, pare rr_s
informaci6n sobre los m6todos de funcionamiento,
(ALGODON I NORMAL)
Utilice este cic]o para lavar prendaa nermales,
excepto tejidos deticadoa, come lane o sed&
NOTA: Si pulsa el bot6n lnicie Pausa sin seleccionar
un ciclo, comenzar_ automBticamente el ciclo
AIgod6n / Normal con ios ajustes predefinidos.
HEAVY DUTY(CARGA PESADA)
Este ciclo se uti]iza para laver ropa muy sucia con
movimientos de lavado enCargicos.
NOTre AI laver cargss grandes, pare Iograr los
majores resuttados, habr_ perbdos cortes de
dos minutes o m,_s sin agitaci6n, Estos peflodos
de remoio son parte del diseSo del ciclo, y son
normates.
BULKY/BEDDING
(VOLUMINOSO/ROPA DECAMA)
Este cic!o se utilize para el lavado de mantas o ropas
voluminosas.
NOTA: Se recomienda Is utilizaci6n de un cido de
ropa Voluminoso/Ropa decama con una velocidad
de centdfugado lenta cuando se lave ropa
impermeable o resistente al agua, para ayudar a
proteger las propiedades de los productos.
BRIGHT WHITES TM
Este cicto de Iavadoes s61oparala ropeblanca
TUB CLEAN(LIMPIEZA DE LATINA)
Utitice este cic/o cuando quiera limpiar la tina de su
lavadora.
PERM,PRESS(PLANCHADO PERM.)
Este ciclo se utiliza para lavar ropa sin arrugas o
manteles, para reducir taaparicidn de arrugas.
TOWELS(TOALLAS)
Utilice este ciclo para tavar toaHas, camisetas,
pantalenes de mezclilla y cargas mixtas.
OXl SANITIZE TM
Este ciclo de lavado bbnda un higi6nico cuidado de
Ia colada cuando se ut]liza con btanqueador, sin alto
consume de energia el6ctrica.
NOTA:
* Siga las instrucciones del fabricante del
producto para el use de productos Oxi con este
ciclo_
* Nunca cargue productos en polvo en el dep($sito
del blanqueador liquido+ Si Io hace, puede
provocar queet producto no se dispense o sea
dispensade incorrectamente+ Los productos
en polvo pueden obstruir el depOsito de
blanqueador, Io que resulta en p6tdidas o da_os
a la lavadora o la ropa
WOOL(LANA)
Este c}clo se utiliza para tavar ropa de lana que puede
encogerse o ropa deiicada que necesita lavarse con
touche cuidado, Utillcelo s6Io para prendas de lana
que pueden lavarse en lavadora o a man&
NOTA:
• El peso de !a carga debe set inferior a 8
libras(3.6kg) para evitar daSar los tejidos
- Utilice s61o detergentes naturales o para ropa
deiicada y aSada _'_de la cantidad normal de
detergente=
• El cie!o WOOL(_NA) gira suavemente el
tambor y util{za un centrifugado de baja
vetocidad para un meier cuidado de fos tejidos.
DELICATES(DELICADA)
Este cicto se utiliza para lavar lenceda o ropa con
encajes que se pueda daSar f_citmente.
SPEED WASH(LAVADO RAPIDO)
Use ei ciclo de lavado de ve!ocidad para lavado rapido
de ropa levemente sucia y carga pequena. Pare ei
lavado y eniuague de aka eficiencia se recomiendan
cargas pequenas de 2-3 prendas levemente sucias
NOTA: Use poco detergente en este ciclo Si usted
desea mas enjuague, puede agregar suavizante
adicional utilizando ef boron Extra Rinse para esta
funcion.
POWER CLEANSE(PODER CLEANSE)
Utilice este cicio para Iograr una alta eficacia de
actarado con un mayor use de agu&

!NSTRUCC!ON{S DE uso 23
BOTONES MODIFICADORES DE
ClCLO
Cada ciclo dispone de aiustes predeterminados
que se seleccionan autom_ticamente, Tambien
puede persoealizar estos ajustes utilizando los
botones modificadores de ciclo, Presione el botCn
del modificador deseado hasta que se prenda Jatuz
indicadora de! aiuste deseado, La lavadora ajustar_
de forma autom_tica el nivet de ague para eJ tipo y
tamaSo de la carga que lavar para obtener los me-
jores resultados y la m_xima eficieecia. Debide a la
naturaleza de alta eficiencia de este producto, los
niveJes de ague pueden ser touche menores de !o
esperado. Esto es normal y e_ rendimiento de Ja
limpieza y el enjuague no se ver_ afectado,
NOTA: Para proteger sus prendas, no todas {as
temperaturas de {avado/eniuague, vetocidades de
centrifugado, niveles de suciedad y opciones est_n
disponibles para todos {os ciclos. Sonar_ un av{so
sonoro y el LED no se iluminar_ si no se permite
una determinada selecciCn
Hot Extra High Heavy AddBarme_
Warm High v Rinse,Spin
SemiWarm Medium Normal SpinOnly
Cold Low T StainCar#"
Tap Cold NoSpin Light Soak
Wash Spin Soil
Temp.I I
Level Use
WASH TEMP (TEMPERATURA DEL
AGUA)
WASH TEMP seiecciona la combinaciCn de tempe-
returns de lavado y enjuague pare el cic{o seleccio-
nado, Presione el botch WASH TEMP haste que se
prenda JaIuz deJ indicador pare et ajuste deseado.
Todos los ac_arados utilizan ague de{ grifo,
El aiuste Wash Temp (temperature de lavado) no
puede modificarse una vez que el cic!o se ha ini_
ciado Si desea cambiar la temperature de _avado
tuego de qua el cicJo se haya iniciado, presione el
botCn Power (Encendido) pare cancetar ei cicto
Luego, encienda la lavadora, reaiuste e_cic_o con
temperature de tavado modificada, y presione Start
dnicio) pera reiniciar ei cic{o,
NOTA: Si cancela el cicio {uego de qua tina haya
comenzado a f{enarse de ague, podda se[ necesa o
rio drenar la tina (pare Iograr la nueva temperature
del ague) y agregar una pequeSa cantidad de deter-
gente adicional para reemplazar cualquier pCrdida
durante el proceso de drenaie.
• Seleccione la temperature del ague deseable
pare el tipo de carga qua va a lava[. Pare obtener
los mejores resultados, sign ias instrucciones de
Ins etiquetas de cuidado de las prendas.
• Los enjuagues fries usan menos energfe, La
temperatura real de_ enjuague fifo depende de Ja
temperatura de{ ague fda de la Ifave,
SPiN SPEED (VELOCIDAD DE CENTRi-
FUGADO)
Las velocidades de centrifugado m_s aJtas extraen-
m_s agua de la ropa, to que reduce el tiempo de
seeado y ahorran energia, Presione el bot6n SPIN
SPEED hasta que seleccione la ve_ocidad deseada.
A_gunas tetas, come las prendas delicadas, requie-
ren una velocidad de centrifugado mt_s Ient& Para
proteger su ropa, no tedas las veJocidades de cen-
trifugado estEn disponibies para todos los ciclos,
SOIL LEVEL (NIVEL DE SUCIEDAD)
Cuando se ajusta ef nive_ de suciedad, se modifica
el tiempo de[ ciclo yio las acciones de _avade. Pre_
sione el botch SOiL LEVEL haste que seJeccione el
nivel de suciedad deseado.
NOTA: Esta funci6n utiJiza m_s tiempo para ropa
muy sucia o menos tiempo pare ropa menos sucia.
SPECIAL USE(USe ESPECIAL)
AI pu{sar el bot6n SPECIAL USE, podr_ seleccio-
ear funciones adicionales, come SOAK, STAIN
CARE TM, SPIN ONLY y R_NSE+SPIN Si pulsa eJ
botCn SPECIAL USE antes de seteccionar un ciclo,
autom_ticamente se seleccionar_ el cic!o A_god6n/
Normal con la funci6n de remoio.

24 INSTRUCCIONES D{ U$O
FUNCIONES DE USO ESPECIAL
Tras seleccionar un cido, pulse el botdn SPECIAL
USE para seleccionar caracterlsticas de tavado adi-
cionates.
NOTA:
•Para proteger sus prendas, no todas _as opciones
est_n disponibles papa todos los cic_os.
Si no se presiona el bot6n START/PAUSE en cince
minutos pare iniciar el cic_o, el control se apegar_
y se perderen tedos los ajustes,
SOAK (REMOJO)
Esta opci6n proporciona un remojado previo de
30 minutos antes de que comience el cielo selec-
cionado. Use ]e opci6n SOAK pare remojer previa*
mente {as prendas con el fin de eliminar _asmanchas
dificiles de las prendas. At final det tiempo de remo_
jo, el cicio seieeeionado comenzar_ con [a misma
agua usada para el remoio.
NOTA:
• No puede seleccionar la opci6n SOAK en e_ cicio
TUB CLEAN.
STAIN CARET"(CUIDADO DE MANCHAS)
Use esta opci6n para rope muy sucia que necesita
un tratamiento especial pare _as manchas. Cuando
se selecciona STAIN CARE, el ciclo de lavado co*
mienza con ague temp_ada pare ayudar a evitar que
no se desprendan ciertos tipoe de manchas. De este
modo, segQn avance el eiclo, se aumentar8 gradu-
almente la temperature del ague pare eliminar !as
manchas que requieren tratamientos con temper-
aturas mes altas.
NOTA:
• Los mejores resultados se obtienen con cargas
m_s pequeSas (menos de tres kg.)
• Si seiecciona STAIN CARE TM, ia opci6n COLD-
WASH TM no est_ disponible
SPIN ONLY(S6LO CENTRIFUGADO)
Use esta opci6n pare vaciar e_ague de la tina y cem
trifugar la ropa. Se puede user, por ejemplo, si se
interrumpe el ciclo de lavado pot un corte de sumi-
nistro el6ctrico La velocidad de centrifugado se pu-
ede ajustar con el bot6n SPiN ONLY.
t, Presione el bot6n START/PAUSE pare prender la-
lavadora
2. Pulse el bot6n SPECIAL USE repetidamente has
ta que se seleccione S6io Centrifugado.
3, Presione el bot6n SPIN SPEED para seleccionar
lave_ocidad de centrifugsdo deseada, No ee per*
mite se_eccionar la opci6n NO SPIN,
4, Presione el bot6n START/PAUSE.
RINSE + SPIN(ACLARADO +
CENTRIFUGADO)
Utilice eete cic_o para obtener un enjuague intense
seguido de un centrifugado a alta velocidad Puede
cambiar la velocidad de! centrifugado puleando _os
boton SPIN SPEED,
1. Pulse et bot6n de encendido/apagado pare en*
cender la lavadora.
2, Pulse el bot6n SPECIAL USE hssta que is luz de! in-
dicador RINSE + SPIN se encienda
3, Pulse el bot6n START/PAUSEde para iniciar e_ ci-
clo. La lavadora se iniciar_ de forma autom_ttica.
SPECIAL DRAIN FEATURE(FUNCI6N DE
DRENAJE ESPECIAL)
Esta lavadors est_ equipada con un funciSn espe =
cia{ diseSada pare que !a lavadora sea _om_ts segure
posble. Si la lavadora queda en pause o seapaga
con ague en la cuba, se vacisr_ despu_s de varies
minutos. Esto ayuda a mejorar }a seguridad de _os
niSos, reduciendo la posibilidad de que quede ague
en Is cuba,
E_ague restante de la cuba se vaciar_ despu6s de
cinco minutos tras apagarse !e lavadora, Si la lavs_
dora est_ en pause y no se pulse el botdn START/
PAUSE en un tiempo de 5 minutos, se apagar_ la
lavadora y se perder_n todos los aiustes. El ague reso
tante se vaciar8 despu6s de cinco minutos.
La lavadora se puede volver a poner en funcionao
miento en cuslquier momento antes de comenzar el
vaciado, Sin embargo, una vez que ha comenzado
el vaciado, se suspenden todas las funciones hasta
que ha finalizado et vaciado y se ha apagado la le-
vadora.

iNSTRUCC!ONES DE USO 25
BOTONES DE OPClON
La iavadora incluye varies opciones adicionales para
daptar los cicios a sus necesidades particu!ares. Pare
utilizer estas opciones, seleccione la opci6n deseada
DESPUES de seleccionar el ciclo deseado.
Tras seloccionar el cic!o y los ajustes deseados, pulse
el bot6n o botones de opci6n de ciclo pare la opci6n u
opciones que desea aSadir El bot6n se iiuminar_ cuan-
do se ha,la seleccionado osa opci6o, Si la opci6n selec-
cionada no est_ permitida para el oielo seleccionado, ta
seSal ac0stica sonar& dos veces pare alertade, y no se
iluminar_ el LED.
NOTA:
• Pare proteger sus prendas, no todas las opciones es-
t_n disponibies pare todos los oic}os.
, Si no se presiona el bot6n START/PAUSE en cinco
minutos pare iniciar el ciclo, et control se apagar4 y
se perderSn todos los aiustes,
COLD WASH_"(LAVADO EN FRJO)
Esta opci6n ahorra energia utilizando agua m_s fda
y aumentando los tiempos de lavado y actarado pare
mantoner los resukados de! lavado.
NOTA:
• La funci6n Stain CareTM no so puede seleccionar con
la opci6n Lavado en frio,
• El tiempo de lavado aumentar_ haste 30 minutos con
la opoi6n Cold Wash TM,
° Pare Iograr los mejores resultados, lave s61o oargas
pequeSas (menos de 3,6 kg) con el Cold Wash TM.
DELAY WASH (LAVADO DEMORADO)
Despu6s de seleocionar el cioto Y los demos aiustes_
presione oste bot6n pare demo_ar eJ inicio del ciclo de
lavado. Cada presi6n de! botOn aumenta una hora al
tiempo de demora, asi hesta 19 horas. Una vez estab -
lecido el tiempo de demora, presione el bot6n START/
PAUSE pare que eomience a correr el tiempo de de _
more,
NOTA: Si no se presiona et bot6n START/PAUSE pare
quo comience a cotter el tiempo de retraso, la lavadora
se apagar_ de forma automStica al oebo de cinco minu-
tosy se perder_n todos los ajustes de cic!os.
CUSTOM PROGRAM(PROGRAMA
PERSONALIZADO)
E! bot6n CUSTOM PROGRAM le permite guardar un
eic!o de lavado personatizado pare utiiizarto en otro mo_
mento. De esta manere, podr_ guarder sus ajustes fa*
voritos de temperature, velocidad de centrifugado, niv-
et de suciedad y demos opciones pare un ciclo y, m_s
adelante, reouperarlos con s61o presionar un bot6n
1. Presione el bot6n de encendido para aecionar la la-
vadora
2. Presione eI bot6n ciclo haste que se seteccione el
ciclo deseado.
3. Puise los botones de modificaci6n de oiclo pare cam-
bier los ajustes deseados,
4. PuJse ef boron de opci6n de ciclo pare oambiar las
opcionos deseadas,
5. Putse durante apro×. 3 segundos el bot6n de CUS-
TOM PROGRAM,
PARA ACCEDER A UN PROGRAMA
PERSONALIZADO_
1, Prosione el bot6n de encendido pare accionar ia la=
vadora.
2 Pulse brevemente el botdn CUSTOM PROGRAM.
Se mostrar_n los ajustes guardedos
3. Puise el bot6n de INiCIO/PAUSA pare inioiar el cieio.
(Si pulse cuaJquier otto botdn, CUSTOM PROGRAM
se desmarcar_ automSticamente ala vez quo so
apaga la luz Indicadoraj
NOTA: Solo puode guardar un programa peroonalizado
pot vez. Putse durante varios segundos el boton de
CUSTOM PROGRAM pare sobrescdbir cualquier pro-
grama personalizado guardado previamente
TURBO WASH'_"(LAVADO TUBO)
AI e_adirse to opci6n Lavado Turbo se reduce el tiempo
del oiclo, pero se Iogran reoultadoe similares al mismo
cicfo sin Lavado Turbo.
NOTA:
• No se puede usar la opci6n Turbo WasM Mcon todos
los cidos,
• ElTurbo Wash TM se active por defecto pare tos ciolos
COTTON, HEAVY DUTY, y SPEED WASH.
FABRIC SOFTENER(SUAVIZANTE)
E! suavizante se distribuye en et enjuague final Selec_
cione el bot6n FABRIC SOFTENER si va a utilizer sua-
vizante.

_6 iNSTRUCCiONES DE US©
EXTRA RINSE (ENJUAGUE EXTRA)
Esta opcidn agregar_ un eniuague extra al ciclo se_ec*
cionado, Use esta opci6n pare asegurarse de la total
eliminaci6n de los residues de detergente o btan-
queador de las telas. El suavizante IIquido, si se usa,
siempre se dispensa en el enjuague fina!,
NOTA: No se puede selecdonar la opci6n EXTRA
RINSE con el cielo SPIN ONLY.
WATER PLUS (AGREGUE EL AGUA)
Utilice esta opci6n si desea agregar m_,s agua a su
carga de lavado. Ests opci6n es especialmente 0til para
eargas grandes o vo_uminosas,
NOTA:
• Si _a lavadora aicanza eJ nivel maximo de agua,
aunque pulsemos el baton WATER PLUS, 6ste no
funcionar&
• No puede seleccionar la opci6n WATER PLUS du-
rante los cicios TUB CLEAN y BULKY/BEDDiNG,
SIGNAL OFF-LOW-HIGH (SEI_IAL APAGA-
DO-BAJO-ALTO)
La _avadora emite una melodla cuando ha finalizado
el ciclo de lavado. El volumen de la melodia se sjusta
con el bot6n SENAL. Pulse el botdn repetidamente
para sjustar eI voiumen de la melodis. Cuando no oiga
ninguns serial, significa que Is serial est_ apsgads. Los
sjustes de volumen son BAJO - ALTO - APAGADO. Ei
volumen de la se_ai se puede ajustar en cualquier me-
mento con ts [avsdora encendids,
ADD GARMNETS(AI_ADIR ROPA)
SOLO puede a_adirse ropa a la carga en e! memento
adecuado del ciclo de lavado Cuando se iiumina el
indieador ADD GARMENTS (A_adir ropa), se puede
hacer una pauss en eJ cic]o y sEsdir m_s prendss.
Si se afiaden prendas con el indicador ADD GARo
MENTS apagado, la lavadora no se ajustaf_ para
estas prendas y puede reducirse el rendimiento de
iavado o daEarse Jostejidos.
1. Pulse el bot6n de START/PAUSE para pausar Is
lavadora.
2. Abra la tapa cuando se destrabe.
3. Agregue las prendas adicionaies,
4. Cierre Is tops
5. Presione el bot6n START/PAUSE E/ciclo continu-
ar_ uego de que se trabe ta tapa.
NOTA:
• La tuz ADD GARMENT es s61o un indicador y no se
seIecciona cuando se pulsa eI bot6n SPECIAL USE
• Si la puerta permanece abierta durante 9 minutes
tras pausar et ciclo, el agua del tambor so drenar&
CHILD LOCK(BLOQUEO INFANTIL)
Utilice esta opcidn para deshabilitar !os cont_otes.
La lavadora s6!o se puede bloquear durante un ciclo.
Esta funci6n impide qua los niEos cambien los ciclos
o manejen ia maquina, Una vez activado el btoqueo de
los eontroles, es necesario desactivsrlo antes de que
se pueds ussr cuatquiera de los controles, excepto el
bot6n de alimentaci6n. Una vez apagada la lavadora,
e] betdn de alimentaci6n permitir_ prender ]a m_quina,
pero los controles eontinuar_n bloqueados, Cusndo tea
controtes est_n bioqueados, el mensaje CL apsrecer_
attemativamente junto con el tiempo estimado restam
te, Mantenga presionado el bot6n Water P_us dursnte
cir_co segundos pars sctivsr o desactivsr CHILD LOCK.

CUtDADOY UMPIEZA 27
CUIDADO Y LIMPIEZA
LIMPIEZA REGULAR
LIMP|EZA DEL EXTERIOR
Unos cuidados adecuados prolongar_n lavida 0tii de
la Iavador& Puede limpiar el exterior de la m_quina
con agua caiiente y un detergente dom6stico suave
y no abrasivo. Limpie inmediatamente cua}quier der-
rame con un paho suave y hOmedo,
IMPORTANTE: No utilice aicoholes de iimpieza, di-
soiventes ni productos simiiares No utilice nunca
lane met_lJca ni iimpiadores abrasivos; pueden daSar
la superficie,
CUIDADO Y LIMPIEZA DEL INTERIOR
Use una toalta oun trapo suave para _impiar aired=
edor de la abertura y del cristaJ de {a tapa de la Java-
dora, Siempre saque las prendas de ia Javadora en
cuanto se complete el ciclo. Deiar prendas home-
das en la lavadora puede ocasionar la aparici6n de
arrugas, transferencias de co!or y olores, Utilice el
ciclo TUB CLEAN una vez al mes, o mesa menudo
si es necesario, pars eliminar la acumuiaci6n de de=
tergente y demos residuos.
TUB CLEAN CYCLE(CICLO DE LIMPIEZA
DE CUBA)
AIgunas condiciones medieambientates y de uso pu-
eden causer la acumutaci6n de residuos en la cuba
con e! paso del tiempo y producir un olor a moho
o humeda& El ciclo Limpiar Cuba se ha disef]ado
especialmente pars eliminar la citada acumulaci6n
utHizando lejia u otros limpiedores dise_ados espe-
cificamente pars la limpieza de Javadoras Eiecute
eJ cicto Limpiar Cuba una vez al mes, o con mayor
frecuencia, si el clot persiste.
1, Retire toda la rope de {a cuba
2. L{ene el dosificador de leiia haste la lines MAX
con lejla liquid& No I_ene en exceso el dosfficador
de Jeiia De Io contrario, podda hacer que ia leiia se
distribuya inmediatamente=
NOTA: Pars otros productos de limpieza de cubes,
siga las instrucciones y recomendaciones dei fabri-
cante, Para productos de _impieza en potvo, aSada
el limpiador ai caj6n dosificador de {avado principal
tras rotifer los restos de detergente I_quido. Coloque
las pastilles timpiadoras directamente en la cub&
3. Cierre la taps y presione e! bot6n POWER pars
encender la lavador& Gire esta perilJa para se{ec-
cionar los cielo TUB CLEAN, y luego presione e_
bot6n START/PAUSE pars iniciar el cicJo, Si selec_
ciona euaJquier otro ciclo despu6s de seleccionar
4, Cuando finalice ei ciclo, abra la taps y deje que el inte-
rior de la tina se seque compietamente,
NOTA;
• No cargue rope durante la TUB CLEAN. La rope
podria daSarse o contaminarse. AsegOrese de
limpiar det tambor cuando est6 vacio.
• Se recomienda dejar la puerta abierta despues
de fina_izado el iavado pars mantener iimpia ta
cubeta
° Se recomiende user el programs de TUB CLEAN
una vez al mes.
• Si ya se hubiera formado moho o se percibiese
clot a humedad, ejecute el programs de TUB
CLEAN semanalmente durante 3 semanas,
ELIMINACION DE LA ACUMULACI(_N DE
MINERALES
Si vive en una zone donde el ague es dura, se pu -
eden former dep6sitos de minerales en los compo-
nentes intemos de la _avadora, Se recomienda user
un desca_cificador en zones con ague dur&
Use un desincrustante, como Washer Magic@,
pars eliminar la acumulaci6n visible de minera_es,
Despu6s de desincrustar, ejecute siempre un cicio
TUB CLEAN antes de preceder e laver rop&
Los dep6sitos mineraies y demos manchas se pu_
eden etiminar de la tins de acero inoxidable usando
un {impiador pars acero inoxidabie. NO utiJice nunca
lana met_lica ni {impiadores abrasivos.
DEJE LA TAPA ABIERTA
Si no va a usar ta lavadora en varios dies, deie ia
taps abierta durante la noche pars permitir que se
sequela tina

28 CUIDADO Y L!MPIEZA
MANTENIMIENTO
LIMPIEZA DE LOS FILTROS DE ENTRA-
DA DE AGUA
Si la iavadora no se ilena correctamente, en la
psntaila sparecer_ un mensaje de error. Las pantaF
las det f#tro de la v_lvula de entrada podrian ester
tapenadas per dep6sitos de ague dura, sedimentos
en el suministro de agua u otros residues
NOTA: Las pantaHas de entrada protegen las psF
tes deticadas de la v_ivuta de entrada para que no
vean dafiadas per particutas que podrlan ing{esar en
las v_tvu_as con el suministro de aguao Si se quitan
estos filtros y se utilize la lavadora, la v_lvu_a pedals
quedarse atascada 8bierta Io que ocasionada una
inundaci6n y/o da_os en la propiedad
Ftlt
!. Cierre las dos Ilaves de ague completamente De-
satomille las tubedas de ague caliente y fria de la
parte posterior de la lavador&
IMPORTANTE: Las mangueras comercia}es no
tienen garantfa de que se ajusten o funcionen cor-
rectamenteo Otras mangueras puede que no se
aprieten correctamente y ocasionen fugas. Los da-
5os subsiguientes a los productos e la propiedad no
uedar_n cubiertos de acuerdo con los terminos de ia
garant[a del producto.
2. Con cuidado retire los filtros de las v_lvutes de
agua y p6nga_os a remojo con vinagre o con un re-
movedor de sarro, siguiende las instrucciones del
fabricante. Tenga cuidado de no daSar los filtros
durante la Iimpieza,
3, Enjuague abundantemente antes de velvet a in-
stalarlos Presione sobre los fittros para colocar-
los en su sitio,
4.Antes de volver e conectar las mangueres, deje
correr varies litros de agua per las mangueras y
tubedas de agua en un cube o un desag_e.
NOTA: IE es un mensaje que puede parpadear en
la pantalla cuando ia presi6n dei ague es baja o si un
flltro de entrada est6 atascado con suciedad.
• Desconecte et enchufe y cierre las II_r,tes de
paso antes de la limpiez& En caso contrario, pu-
eden preducirse descargas el6ctricas,
• No utilice la lavadora sin los filtros de entrada,
Encaso centrario, poddan producirse fugas y
faltos de funcionamiento
• Si utiliza la lavadora en un _rea con ague dura, el
fittro podrfa obstruirse debido a Is acumulaci6n
de caL
ALMACENAMIENTO DE LA LAVADORA
Si no se va a user !s lavadora durante un perlodo
prolongado y se encuentra en una zona de inviernos
riguresos, realice los siguientes pasos para proteger
is lavadora de cualquier daSo.
1. Cierre el suministre de ague.
2. Desconecte las manguerss de_suministro de ague
y drenaje el agua contenida en las mangueras,
3, Enchufe el cable de alimentaci6n a una tome de
corriente conectada a tierra adeeuadamente
4, Agregue 3,5 litros de antJcongelante no t6xico de
tipo RV en la tina vacia y cierre la tap&
5, Presione el bot6n POWER y luego putse el bot6n
SPIN ONLY. Presione el bot6n START/PAUSE
pare activar Is bomba de desag0e. Deje que Is
bombs de drenaje funcione durante un minute y
luego presione el bot6n POWER pare apagar la
[avsdora. Esto expu_sar8 parte de! anticongetante,
dejando e I suficiente pare proteger la lavadorao
6. Desenchufe el cable de alimentaci6n, seque el im
terior de la tins con un trapo suave y cierre la tape
7. Retire los insertos del dispensador. Dtene el agua
de los compartimientos y d6jelos secar,
8. Aimacene la lavadora en posici6n vertical,
9. Pare extraer el anticongelante de Is lavadora
tras el a_macenamiento, ejecute un ciclo SPEED
WASH complete usando detergente. No agregue
rope a este cicto.

CU!DADO Y UMP_EZA 29
LIMPIEZA DE LA LAVADORA
USO ADECUADO DEL DETERGENTE
Uaar demasiado detergente es una de _as causes
habituates de _os problemas de _avanderia Los
detergentes actuaies est_n formulados pars set
eficaces sin espuma visible, AsegOrese de leer y
cumplir las recomendaciones del fabricante acerca
de cu_nto detergente user en eI lavado. Se puede
usar menos detergente si el agua es blanda, _a
carga de ropaes pequeSa o tiene poca suciedad
NOTA: Use s61o detergentes de alta eficiencia y
poca espuma Podra identificar estos detergentes
-/_ADVERTENCIA
• No rocle ague en el interior de la lavadora.
Podria causer un incendio o descargas et6c-
CUIDADO Y LIMPIEZA DE LA LAVADORA
Taps: Limpie con un trapo h_medo ei exterior y el
interior y, a continuaci6n, seque con un trapo suave,
_rior: Seque los derrames inmediatamente,
Limpie con un trapo h0medo No toque la superficie
de la panta!la con ob_etos punzantes,
Mudanza yAImacenamiento: Solicite aun tecnico de
mantenimiento que saque el ague de !as mangueras
y de la bombs de drenaie. Vue_va a colocar el btoque
de espuma de _atina para proteger la lavadora du-
rante la mudanza, No almacene Ja lavadora donde
pueda ester expuesta ala intemperie,
Vacaciones Largas: AsegQrese de que el suministro
de ague est_ cortado en las tlaves. Siga las instruc-
ciones si la lavadora va a ester expuesta a temper-
aturas de congelaci6n
Gaveta del Dispensador: El detergente y ei suavi_
zante pueden haberse acumuledo en la gaveta del
dispensador, Extraiga _agave{a y los insertos y corn=
pruebe si hay acumulaciones una o dos veces por
rues.
1, Saquela gaveta tirando de eila hasta que se de
tenga. Levante la parte delantera de ta gaveta y
s_queta completamente.
2 Retire los insertos de los dos compartimientos.
Enjuague los insertos y la gaveta con agua tem_
plada pars diluir las acumuiaciones de productos
de _avanderia_
3, Pars limpiar la abertura de la gaveta, use un ce-
pi_Jo pequeflo que no sea met_ico pare limpiar
el hueco Elimine todos los residuos de la parte
superior e inferior dei hueco,
4,Vuelva a instalar los insertos en _os compar-
timientos correspondientes y vue_va a co_ocar la
gaveta. Coloque la gavete en la abertura en _n-
gulo como se muestra en Ia siguiente imagen y
luego b_jela y destlcela en su sitio,

30 ESPECIFICAC!ONES
ESPECIFICACIONES
Descripci6n Lavadora de carga superior
Requisites el6ctricos 120 VAC @ 60 Hz.
Presidn max, de agua 100 _800 kPa (!4.5 _ 116 PSt)
Medidas 27"(An) X 28 3/8"(F} X 45 3/8'°(_J), 55 3/4"(F con puerta abierta)
68,6 cm (An) X 72,1 cm (F) X ! 15,3 cm (AlL 141,7 cm (F con puerta abierta)
Peso neto 146.5 Ibs. (66.5 kg)
]1o0 rpm ".................................................................................................................................................................................................................................................................................................
SISTEMA SMART DIAGNOSIS TM
S{ experimenta atgQn problema con ta [avadora,
podr& transmitir dates a trav6s del telefono con el
equipo Smart Diagnosis. Asf podr_ hablar directa-
mente con nuestros t6cnicos especiatizados. El t6e-
nice graba los dates transmitidos desde la m_quina
y los utiliza para anatizar el problema, ofreciendo un
diagndstico r6pido y eficaz.
USO DEL SISTEMA SMART DIAGNOSIS TM
Si expedmenta probfemas con la lavadora, Ilame al
1-800-243-0000(t_888-542-2623 en Canada). $61o
utilice el s{stema Smart Diagnosis cusndo se Io pida el
equipo de Smart Diagnosis. Los sonidos de transmisi6n
que oira son normales y suenan de forma parecida a una
melodia.
Smart Diagnosis no se puede activar a menos que
la lavadora se encienda pulsado et bot6n POWER.
Si ia Invaders no se puede encender, ta soluci6n de
problemas deber_ flevarse a cabo sin utilizar Smart
Diagnosis.
Sign Ias inst_ucciones del t6cnico y sign estos pasos cuar_do se le soficite.
MANTENGA elmicr0fsns dei tei(,_fons ssbre el bot6n de ENCENDIDO, cuando el centre de Ilamadas se is sslicite, a
no m_s de 2_5cm (pers sin tocsr) la m_quina
NOTA: No pulse ningOn otto bot6n ni gire el mando del selector de cicls.
MANTENGA PULSADO EL BOTON DE WASH TEMP MiENTRAS SIGUE SUJETANDO EL TEL_FONO SOBRE EL
BOTON POWER,
ESPERE A ESCUCHAR tres pitidss. Tras escuchar los tres pitidos, suelte et bot6n de WASH TEMR Mantenga e!
tel6fono en su sitlo hasta que haya terminado la transmisi6n de tonss Este tarda _nos 6 segundos yen la pantalla
aparecer_ efrecuento de tiempo. Una vez finalizada ia cuenta atr_s y cuando los tones se hayan detenido, reanude su
csnversaci6n con el tecnico qua le podr_ ayudar s utilizar la informaci6n transmitlda para el an_lisis.
"SmartDiagnosis (Diagnostico Inteligente} es uns funcion de resolucion de problemas disenada para ssistir,
no reemplazar, al metodo tradicional de resolucion de problemas a traves de _lamadss de servicie tecnlco.
La efectividad de esta funcion depende de diversos factores, entre !os cuales se incluyen, !a recepcion
del telefono celu!ar utilizado psra Is transmision, cualquier ruido extemo que pueda presentarse durante la
transmision, y la acustica de la habitacion donde esta ublcada la lavadora. Per io tanto, LG no garantiza que
SmartDiagnosis resue_va con precision cualquier cuestion dad&"

SOLUCt0N DE PROBLEMAS 31
SONIDOS NORMALES QUE SE
PUEDEN ESCUCHAR
Los siguientes sonidos se pueden oir mientras talavadora
est_ en funcionamient& Son ruidos normales+
CLICS:
Rei6del bJoqueode la taps cuando tatapa se traba y destraba.
ROCIADO O SiBILANTE:
Agua roci4ndose o circulando durante el ciclo.
ZUMB|DO O BORBOTEO=
La bomba de drenaje bombeando agua desde la la._
vadora durante un ciclo.
SONIDO DEL AGUA SALPCANDO:
Un [iquido en el anillo de equilibrado de todo el tam
bor de lavado ayuda a la canasta a girar sin prob-
lemas. (La lavadora se apaga y el tambor gka.)
EL SONIDO DEL AGUA QUE SE ANADE DESQUES
DE QUE LA LAVADORA YA HA ESTADO OPERANDO
• La lavadora se adapts al tamaBo y tipo de carga pars
a_adir m_s agua en et ciclo, seg_n sea necesado_
• La carga de lavado puede estar desequilibrad& Si
la tavadora detects que la carga est8 desequilibra-
da, se parar4 y rellenar_ para redistribuir la carga.
• La lavadora puede diluir los aditivos de lavandeda
pars afiadirlos a la carga de lavsdo.
ANTES DE SOLICITAR ASISTENCIA TECNICA
Su lavadora estc5equipada con un sistema autom_tico de monitorizaci6n de errores pars detectar y diagnosticar
probtemas en una fase tempran& Si tu lavadora no funciona eorreetamente o no funciona en absoluto,
compruebe to siguiente antes de llamar al servicio t6cnico:
queteo
Sonido degotpes
Ruido devibraci6n
Ruido devibraci6n
monedas, oimperdibles, pueden
estar en iatins o en iabomba.
Las cargas de prendas pesadas pu-
edenproducir un sonido de gotpes. I
Es posiNe qua la carga de la lava_
dora est6desbaJanceada,
No se ban retirado todos los mate-
rates deJembalaje.
EsposiNe qualacargadeiavadono es-
t@niformemente distdbuida enh tin&
Notodas_aspatasniveJadorasaeencuen-
tranapoyadasf rmementee_qe_piso.
Et piso no es !osuficientemente
r!gido.
La conexi6n de tas mangueras de
aguano est_ bien encaiada en la
Ilave o en laJavadora.
Las tuberias de drenaje de lacasal
est_ataponada&
La manguera de drenaje se ha sa-
lido deldrenaje o no est4 insertada
io suficiente.
Una prenda grande, come una aF
mohadao un cobertor+ estSn sobre
la parte superiorde la tins.
drenaie enbusca de objetos extraSos. Si despu6s de
reiniciar la lavadora e!ruido continQa, Ilame al servicio.
Esto es normal Si eJsonido contin@, es posible que la
lavadoraest_ desbalanceada,
Det_ngala y redistribuya facarga de lavado.Pause etcido
y redis_ribuyala cargadesp_es deque !ataps sedestrabe_
Censulte Is secci6n Desempaquetado y Desembataje
DeIMateria! de Transporte en los requisites de instalaci6n.
Pause et cicto y redistribuya la carga despues de que
la taps sedestrabe
Consu_te la secci6n Nivelaci6n de la lavadora en lasln-
struCciones.
Aseg@ese de que el piso sea s61idey no ceda Consulte
taseccidn T
Compruebe lasmangueras en buses de ragas, grietas
rupturas_
Compruebe yapriete las eonexiones de Iasmangueras.
La !avadorabombea agua muy r@idamente, Compruebesi
duranteetdrenaie,elaguavuebe haciaat4s yse salede latu-
bedade drenaje,Sive aguasatiendodetdesag0e,compraebe
qua la instalacbn de la manguerade drenaie es corrects !
basque siha,/alg_n taponamientoen etdesag_e.Pdngaseen
contacto con un ptomeropars reparar[atuberiade drenaie.
Amarre Wmanguerade drenaiea la manguerade entradaa
a una tubedafija pars impedir qua se pueda aalirdurante el
drenaje Debertaestar insertadaai feborde en}astubefiasde
drenaje m_s peque_ase el reborde debedaestar insertade
ent[e 3 y 5centimetros an latubeda de @enaie.
Usa el cic]o BULKY/BEDDiNGpars/as prendas grandesovo*
bminosas Tengamacho cuidadoy nuncalavem_s de lami_
tad de la cargacon prendas_ae floras,come lasalmohadas.
Pare la [avadora y compruebe la carga. AsegQrese de
que la carga no sobrepasa Is parte superior de latin&

32 SOLUCION DE PROBLEMAS
ANTES DE SOLICITAR ASISTENCIA TECNICA (continuacibn)
Arrugas
Exceso de espuma
Manches
Lalavadora no se
prende
El ciclo de lavedo tarda
m_s dale normal
Olor e humeded o
moho en lalavadora
La lavedore no eeha descargadoin-
medietementa
La lavadore est,, sobrecarged&
Las mangueras de entrada de agua
fda yealiante est_n invertidas
Demasiado detergente o detargen-
teinedecuado,
Ei b_anqueador o et sua,,dzante se
hen distfibuido demasiedo pronto.
El blanqueador o el suevizente se
hen agregado directamente aia
carga de lavado en la tin&
La lavadora no se descarg6 inmeo
diatamente.
La rope no se agrup6 correcte-
mente,
E! cabie de atimentacibn no se ha
enchufado de forma adecuada
Se#af_nd_elfusib_,has_ltad_ddis_aat0re_ i'a
_0d_cidc_ntorte® a_s_o e[_[# _ !awv_ea_,
Siampresaquelas prendasde talavadoraen cuantose comple-
teal eicto.
Lalavad0rasepuedecargarcompletsmeate,peteretea nodebeesterabar-
rotadaconp_endes.Latapedelalavadorasedeberiecerrarconfac[dad_
Hot water rinse can set wriaktes in garments, Checkthe inlet
hoseconnections.
Elenjuagueconaguecatientepuedehaceraperecarat[agesen !aspre#-
des CamloruebeIssco_exior_esdelasma_guerssdeentreda.
LosdetergentesHEest_nformuladasespedfcamentepa_aiavadorasde
airsef}cienciaycontienenagentesreducto[csdeespums.UtiJices¢Iode-
terge_tescone_Iogot[podeairseficienda(HE1.
Parainformacidnsobrelescaatdadesde detergente,ceesultea sec-
c[6nlnstrucdoees,
EI compartimientodel dispensadorse hasobre_tenadotoqua ha
oeasionadoqua eiNanqaeadoro el suavizantese distribuyanin-
mediatament& SIEMPREm]da eibtanqueadorparaevitar el so-
brallenado- unataza a!m_ximo,
La gavetadet gispensadorse cerr5 demasiader_pidoprovocan-
do quaetsuavizantesad stdbuyerai_mediatamente,
Use siempre los dispensadoraspareasegurarsedequa {aspro-
ductos de lavanderiasedistribuyeneorrectamanta enelmemen-
to edecuadodeI ciclo,
S[empresaquelas prendasde [alavadoraIoantespesibJaenca-
ante se completeel eiclo.
S{emprelavelos cotoresoscurosseparadesde tosceloreselaros
I los b_aneosparee_dtar[adecoloraei6n.
Nueca _aveprendascon touche suc_edadiunto conotras con
_ocasuciedad,
NOTA: Si la lavadora se det[enedurante un ciclo debido e uneinterrupci6n en et suministroei¢c_
trice, la iavadora eontinuer,_ai cielo ene.=e_ljountoderide sedetuvo euando se restaure elsuministro,
La lavadore ajuste do farina au- AsegQresade qua ei enehufe est_ correctamente enchufadea
tom_ttica e! tiempo de [evade en ueatome de corriantede 120Vde CA,60 Hzytree ctavijascon
funci6n de la eantidad de rope pare tome de tierra.Reinicieel dLsyuntorosust[tuyae!fusible, No au*
!ever, ia presi6n dei agua y demos mente Iacapacidaddelfusible.Siei problems esariasobrecarga
condiciones de funcioeam[ento.
Se ha estado usando demasiado
detergente o un detergente in-
adecuado,
Ei intedor de ia tins no se lavOcor-
rectemente,
delcircuito, hagsguetosoiucioneue eiectricista cualificado,
Esto es normal La lavadoraajustael tiempo de cielo deforms
automaticsparebrindar !asresu[tades_ptimoa paree_cielo ee-
teccionade.El t[empo restante quase muestra en[apantatlaes
s6!ounaestimacidn. Eltiempe realpuedevariar,
Use sdio date[genre de alta eficienc}a(HE}de acuerdecon las
instruceionesdelfabricante,EjecuteeIcJciodelimpieza, CLEAN
. .WASHER_co_[egular!da&
Fugas de ague Exeeso de espuma de detergente. Etexcesedeespumapuedeprovoaerfuges,ypuedeesterocasionadopar
el tipoylacantJdaddedate[genreusado,S61ose_ecomiendee[usade
detergentedesitedicienc&Aseg_resedequae}dctergenteyeuelquier
editvose agregaaatoscompartimientosadecuadosdeidispeasador.La
csntidaddedctergeetaeo[ma[quasedebeasarear,entreunaI/4 parte
t tai/2 deiacsntidadm_ximarecomendadaperel fabricantedddeter-
ger_teSiemprereduzcalaca_tidaddedetergentesiIscarpsespeque#a
ete_e pacesuciedad,os elagueesmuyb_and&Naecausem_sde _a
ca_t}dadm#ximarecomeadadaperetfabdcentede!de_rgente,

SOLUCION DE PR©BLEMAS 33
ANTES DE SOLICITAR ASISTENCIA T_CNICA (continuacibn)
La laved.re no funciona
La lavadora nose liana de
aguacorrectamente
EJpanel de control se ha apagado
debido aia inactivida&
La tared.re est,1 desenehufada.
B suministro de ague est_ cerrado.
Los eontroles no est_n
ajustadoscorrectamente.
La tape est_ abierta
El disyuntor ha seltado o e! fusible
se hafundido.
Se debe reiniciar eL control
No se presion6 STAR]TPAUSE
desp_6s deajustar un ciclo.
La presi6n del ague es extremada-
mentebaja.
La iavadora est_ demasJado fria,
El filtro est,1tap.ned..
Las mangueras de entrada pueden
estarretorcidas
Eficiencia energ6tica.
Insuficienle suministro de ague
La tape de Is laved.re est_ abiert&
Las mangueras de entrada de
agua fr[a ycaliente est_n lever
tide&
Et nivet de ague est_ demasiado
bajo.
Est. es normal. Presione el bot6n POWER parapre-
nder la iavadora.
Aseg_rese de que el cable est_ correctamenteen-
chufado en una tome de cordente que funcione.
Ab_acompletamente tasdos ltavesde aguefda yca[iente.
Aseg0rese dequael cielose aiust6eorrectamente, cierre
la tapa y presione e[bot6n START/PAUSE.
La Iavedora no funcJonar8 si la tape est_ abierta Cierre
]a tapa y aseg0rese de qua no hay nadaataseadobajo la
tape que impida que se cierrecompletamente.
Compruebe los disyuntores y fusibles de la cas&Susti-
tuya Ios fusibies o reinicie el disyuntor. La]avadora de-
beria ester enun ramal de circuitodedicado La lavadors
co_)tin#ar_el ciclo en el !ugaren que se detuvo unavez
restaurada laaiimentaci6n_
Presione etbot6n POWER, luego vue_vaa seleccionare]
ciclo deseado y presione el bot6n START/PAUSE.
Presione el bot6_ POWER, tuegovue_vaa seleccionaret
ciclo deseedo y presione el bot6n START/PAUSE, La
lavadora se apagar_ si no se presiona ei bot6nSTARTi
PAUSEdespues decineo minutes.
Comp_uebe otra Ilavede tacase para asegurarsedeque
]apresi6n de_agua es la adecuada.
Si la tared.re ha estado expuesta a tempe[aturaspor
debaio dei p,Jnto de congelacJ6n durante unperiodo
probngado detiempo, permits quaseca_ienteantes de
_resionar el bot6n POWER, En otrocaso, la pantaila no
e prende_,_J
Aseg0rese de que los fi]tros de entrada de _asv_lvuias
de Ilenadono est_n taponados. Consuiteinstrucciones
de limpieza de filtros.
Compruebe qua les maegueras de ens_adano est_nre-
torcidas ni atascada&
Esta es una laved.re de affa eficiencia (HE), Per esta
raz6n, sus niveles de ague pueden veriercon reSpectOa
lee lavadorasconvencionales.
Aseg0rese dequa las Ilavesde aguefda y caHenteest¢n
completamente abiertas.
La lavadora no funcionar_ si Is tape est_ abierta Cierre
la tape y aseg6rese de que no hay nadaatascado bajo la
tape qua impida que se cierrecompletamente.
Compruebe Ias conexiones de }as mangueras deem
trad& AsegQresede que a! suministro de aguacatiente
est_ conectado ala v_tvula de entrada deaguacaliente
y de qua el suministro de ague frfa est_conectado ala
v_Ivulade entrada de aguefda_
Eats iavadora es de aIta eficiencia. Normaimenleagua
no cubrir_ las prendas, E}nivei de Ilenado est_optimi*
zado pare el movimiento de _avadoy, de estamanera,
!ograr e!meier rend!m}ento de tavado_

34 SOLUCION DE PROBLEMAS
ANTES DE SOLICITAR ASISTENCIA TECNICA (continuacibn)
La lavadora nod_ena
Ma_a eliminaci6nde las man*
chasn
El blanqueadorno se dis-
tribuye
Lamangueradd d_enajeest_retorc_da,
Eldesag_eest_ubicadoa u_aaiturasu-
pedoralos 243,8cm(8 pies}porencima
deipiso_
Nose seleccionaronlasopcio#esadec-
uadas.
Manchasaser_tadaspreviamente.
Latapadeldispensadordefbla_queado[
noest_instaladacorrec_mente,
Eldispensadordd btanqueadorest_sucio
utaponado.
AsegOresedequelamanguetadedrer_ajenoest_[etorcda
AsegGresede que_amang_erade _renajeno est6a unaaltutas_-
i_ies)de/a lavador&
Laspren_s muy suciaso conmat_chasrdsiste#tespuedenre-
_uerirur_poderlimpadoradicionaLSeleccbnePRESOAKo STNN
TREATparamejorarelpode{de;imcezadeicicloseleccienad&
Lasprer_das_uesebaniavadoaRteriomlemepuede_ter_ermanchas
queyase#ayar_asentad&Esasmar_chaspuedensermt_ydificilesde
elimina[¥puedenrequed_set{avadasa manoola apicac6nde un
t[atamento#revo_ueayudeaelimiearlasmanchas,
AsegOresedeq_etatapade;dispensadordelNa_queadorest_co_-
rectamentehstaladayben cerradae_ susitio antesdecomef_zar
elddo.
LevanteiatapadeldispensadordeIb_anqueadory_impieetdispensa-
doI:Laspelusasyotrosresduose×trafiosqueseacumula_den# de
dispensaderpuedenmpedirlacorrectadistribucidr_delba%uead_:
Prematuradistribuci6n delb- El dispensad_rdelblanqueadorest_reFNopuedealmace_arelbl_nqueado_e_de/dispensadorparaunfututo
i_anqueador
IncompIetao ningunadistribu-
ci6n dedetergente
le_oparaunac_[gafutur&
Sobreltenadodd dspe_s_dordebian-
q_eado,r.
Compartimie_tosdedeterger_tetapo_a*
dosdebidoaun_el_er_doincorrect&
Seus6demasiadodetergente.
t_sufidentes_minis_odeagua
Insufidentes_ministrodeagua.Resduo
r_ormal,
Las ma_guerasno est_ninstaladascor-
rect_e_te
Fugas de aguaen todas las-
cargas
uso Bbla#queadorsedistdbur_encadacarga,
B sobrd_enadodeIdispensadorde blanqueadorocasionardqueel
biar_ueadorsedistribuyai_mediatament&loqu_a_ar__asprendas
enlariga.SIEMPREmidae bianqueador,peronuecarei_er_}po_em
cmade la i_neaMAXdeldispensado[.Unatazade blanqueadores
np[mat,peronur_caagreguem_sdeu_ata_a
AsegG_esedequed detergeateylosaditivosseagtega_a Ioscom_
partimientosadec_adesdd d spensador.Si usadeterge_tdlqu]do,
asegOresedequela tazaparad detetgenteIfqudoyel i_se[toes-
td_e_ elcompartimientodedetetge_e.Siusadete_genteenpotvo.
aseg_resedeq_eno seusenlarazeparaddetetgenteliqui_o_i el
inserto.Papatodosiestipos de detergente;asegQresesiemprede
quelagavet8dd dispensadorestdtotalrr_ntecerradaar_tesddddo
_eicido.
AsegQ_esede usar;acantidadde detergemesugeddae_ lasrecr._
merdacio_esde fabdcante,Paraevitartap®amientos,puedediluir
el#eterger_teconaguabasra_a_neadeI/enadom#ximoene compa[-
timiem&UsesdtodetergentesHE(altaeficiencia},
NOTA:Siempreuse lamenorcantidadposiblededete_genteLas
levaderasde aliaefidencia[equierenmuypocaca_tidaddedeter°
genreparaIograrresultados6ptimos.La _tiiizacidr_dedemasiado
deterger_tefed_ceelcendimientode_avadoye enjuague,y puede
cont_ibuira[aepadcidnde doteser_lalavado_&
AsegQ_esedequelasayes dea#uafrfaycalienteestencompleta-
menteabieCtas_
Esnormalqueunapequefiacantdaddedetergentepe_ma_ezcaen
el dispeasador.S esteresiduose acumula,puedenteffe[ire# la
distfibuci6_normaideios productos,Consu_telas]nstruccior_esde
l_mpeza
Compr_ebetodaslasconexionesdehsmangue_asdee_t_adaydre-
aaleparaasegurarsedegueestdaaiustadas,/se£uras,

CODIGOS DE ERROR 35
C6DIGOS DE ERROR
La pantaIia muestra:
La pantalla muestra:
La panta}[amuestra:
La lavadora se rellena conagua
lentamente o no se Ilenaen abso-
lute, o ]apantallamuestra:
La tavadora no seenciende
La tape no se cierra correcta_
mente,
Error de[ interrupter de bloqueo
dela tape.
Funci6n de drenaje especia],
Las [1ayesde sumin;stro de_agua
noest_n completamente abiertas.
Las mangueras de las tuberies
deagua est_n retorcidas, pinzadas
utaponadas.
Los filtros de entrada de agua
est_ntaponados.
La presi6n del suministro de ague
aIa t_aveo a ]a case es demasi*
adobaja.
Suministro de ague conectado
amangueras con limitaci6n de
ragas
E!cable de atimentaci6n no est_
conectadocorrectamente
Etfusible est9 fundido, el disyun-
tar se hadesconectado o se ha
producido un cortede energia.
As egOresede qua Fstaps eat_eorrectamentecer*
raday presioneei bot6n START/PAUSE.Despu6s
de iniciarun ciclo, tomardunosmomentossates de
que laflna comienceapirate centdfugar Larave-
dorano comenzar_ecentrifagerhaste quaia tape
no est6 trabeda,
tape est_ cerrsday se muestreel mansejadeerror
de bloqaeo de Istaps, _iameafserviciot6anico.
As egQiesede qua lataps est_ correctamentecer-
raday presioneel bot6n START/PAUSELa lavsdo_
a no funcionar_a manesquatatspseste trsbada,
Aseg5rese de queno haynadsatsscadobajola
tap& come materialde embaladeo ropa
Aseg_rese de queel mecsnismo delpestiHoest6
comptetamente ret[afdo
Si[a tapeest_ cerrsdaVse muestra el mensa-
edeerror de bloqueode lataps,llama alservicio
t_cnico.
Si la lavedoraest_en pausedursnteun oidopo_
mas de cincominutes, se canoelar_elcido yse
drenar_el agueque permanezcaenlatin&
AsegOresede qaetesl_avesde aguaest_ntotal_
mente abiertas,
Aseg_rese de qualas manguerasnoest6nretor-
tides nipinzada&Tengacuidsdo a_desp[azar[a
Isvsdorsdurante tastarees delimp[ezsomanten-
imient&
Utopia los filtros de entrada,Consuite dapartedo
Mantenimientoen [asecci6nCuidsdoy limpiezs.
Compruebeotra _avede ]acaseparaasegurarse
de qua la presi6nde aguees _aadecuada,1qua e]
flujo no est_ restringido,Desooneete{amanguera
de entrsds de ts_avadorsydeje quacorranalgunos
litros deaguaatrav6s de lamanguersparepurgar_
las tubedasde suministrode agu&Si el flu}oes
demasiadod6bil, contacte con un plomeroparaqua
reparelas tubedssde ague
Lasmanguerasdisefiadaspareiimitarlasfugas
)uedenaefivsrseerr6neamenteyevitarque Is
lavsdorsse liens. Nose recomiendaelusode
msnguarss con timitaci6nde fugas,
AsegOresede quaetenchufeest6 corrects-
mentepueste a tierrs,con unatoms de 3 pt_as,120
Vde CAy 60-Hz.
Restablezcael disyuntor ocambieet fusible
NoaumenteIacepaddaddei fusible Sie_prob_ema
radicaenlssobrecargadeicircuito,este deber_set
reparadopo(un e!ectr!c[stacua!!ficado

36 C_DiGOS DE ERROR
C6DIGOS DE ERROR (continuacibn)
La pantalla muestra:
Los objetos extraSos como mone-
das, pasadores, clips, etc. straps-
dos entre !achaps de [avadoy el
cesto interior.
E] ague en la Invaders drenade-
masiado lento o no drena,o la
pantatla muestra:
La pantatia muestra:
La pantalla muestra:
La manguera de drenaje est_retor-
cida, apretada o taponada.
La descarga det desagOe esta
em_s de 243,8 cm (96 pulgedas)
)orencima de la parts infedor de
la_avadora,
La iavadora ha detectado una
cargadesbalancead&
Si el rebalanceo ub (vet ardba)
notiene exito, mostrar_ este error.
La carps es demasiado pequeSa.
Hay articulos pesados mezclados
conartlcutos m_s Iigeros.
La carps est_ desbaianceada.
Apague ]aInvadersy pulseel bot6nde Encendidd
Apagado Pulseel bot6nde vetocidadde cen-
trffugado sin seleccionaruncicb parevaciadoy
centrifugadode tacarps
C_andohaysfinalizadoeIcentrifugado, saqueta
ropeyencuentre y retire losobjetos atrapsdosen
Iachapsde lavado.
Compr_ebesiempre los bolsiHos,etc. antesdel
lavadopareevitar c6digosde erroro da_osen la
!avadorso !aropet
Aseg_rese deque la manguerade drenajeest_
librede tsponamientos, dobtaduras,etc_,yno este
apretadadebajode Is tav_dor&Aiusteo repareeI
drenaje. Laalturam_ximadeidrenajees de 243,8
cm {96 pulgadas}.
Si IsInvadersdetects unacargademasiadodes-
baisnceadacomo psrapodergirac mostrar_este
c6digo mientrasintentarebalencearla carps.La la-
vadorssgregar_aguee intentar_redistribuirtacarga
autom_ticamente.Estapantaitaes9nicamentepare
su informsci6n ynoreq_ rf_auna acci6n.
E]intento autom_ticoparerebaianceartacarps no
tuvo exit& Elciclose poseenpausaparepermitir
qua lacarps seajustemsnustmente
Puedeser quaneeesiteagregararticulosadicio
halesa Inscargaspequefiss parsquetatsvadora
pueda balancesrtascarps&
Puedeset quela carpscontenga artlculospesados
y otrosm&sligeros Siempretrate de[avarartfcutos
quede algunamanerasesndepesossimi]arespare
ayudarsla tavadoraadistribuir el pesode lecarps
_araunsbuensrotaci6n.
RedistdbuyamanualmenteIacarps si Iosartfculos
se henenredadoy no permitenquela distribuci6n
automaticsfuncioneapropiadamente
La pantalla muestra: Error de control. Desenchufela Invadersy espere60 seg_ndos.
Voelvaaconectartay pruebe de nuevo.Si elerror
, :sevotive sproducir, ilameai serviciot6cnico.
La pantalla muestra: El nivei de egua es demesiado Qerre InsItavesde ago&desenchufeialavadoray
altodebido a una vSlvula de ague Ilameatservicio t6cnico,
confal]a.
La pantalla muestra: EI sensor de nive]de ague no CierreIns]lavesde ague,desenchufe!alevadoray
funcionacorrectamente Hameal servicio t6cnico.
La pantalla muestra: Se ha producido un error del Deje quetaIsvsdora descaneedursnte30 minutes
motor, y, acontinu_ci6n,reinicieel cicio.Siel c6digode
error LEpersist& tlamealserviciot#cnico.
La pantalia musette: Error de embrague. Fails mec_nic&Desenchufeiaiavadoray ]lameal
serviciot6cnic&

GARANTiA 37
GARANTiA LIMITADA PARA LAVADORA LG (EE.UU.)
COBERTURA DE LA GARANTtA:
LG E_o_ U&A, I_. i'US ") garantizasu lav_ra LG{"producto"I con_racua/quier_o e_r_te_ia_s on_R_ de ob_aba_ unuso_m6sti_ no_ma_,
_a_/_ el pe[ic_o_ garant_ait_dl_ m_sadelante_y LGpod_'_re_rar o _st_tuir el p_.:uc_[o,bap su exdu_vo cr te_to.Es_.agarart_faliml_ tiene_,_idezs6b
par8elcompr_dor mi_rista originaldei _rod_cto,_1opu_ ce_erseo tr_nsfed_sea cua_quiercomp_do_o usuedoposte40r,y Seap_ _o cuandoel pro_cto
se haya8dqui__ a _avesde un dis+_db_@3¢LGa_._.onza_y sehaya utilizadoen EstadoUni_ (_EE.UU,"),inctudosbs Ter_itoliosde EEUU.
N_: Los productos de sustitucbn o p_zas de re_r_idn p_en set n_es o remanufa_urados en f_brica y lendr_n garant_ pa_ e_tiempo
resOrB del perfodo otigina_de g_rantla o noventa (_) d_as,etque _ n_s largo. G_rde lafac_ra o e_ius_ifioa_e de _pra _o ptueba de a
fecha _ compra para h _rar_t/a (se [e pcx;klapedir que env[e ur_ c_p_aa LG o un representante au_.ori_do).
PER!ODO DE GARANT_A:
Un (1) a_'._a partir de la f_ _ Diez (10) at_s a partir de la Toda la v_Ja_1 desde la fecP_
PeSo compra original; fecha de compra original; de compra original;
Mom_ dei tambor
Aloanoe de la gsrant_ CL_lq_ier pteza inter_n_ (estator; r_or y sensor Hall) Ta_ de #to tnoxMsbte
LG suministrar_ _ pi_ _ pietas. B ciiente ser_ respor_._abt_ de la mano de obra
y la _o de obra para la o la rep_raci6n a dorn_lio para _ s_stJtuc_Snde las plezas
Observao_n reparar_Sn o sus'dtuir_ las piezas defectuosas.
defect_aosa&
C(_MO SE PRESTA EL SER'_IC_O; _o a d_rniciiio
El servicio a domicitio se prestar& seg_n est6 disponib_e, durante e| per[odo de garant_ seg_n la_sponibitidad de_persep_l de
serv_io _Ico en EE,UU. Para reclbtr servtcio _ dom_lio et producto deber_ es_r accesible ¥ sin obstrucc_es para e_personal de
ser_o. Si no se p_ prestar el serv_o de reparec_ a d___tio, puede set necesado retirar, reparar y _ el producto. S}
no est_ disponitc4eel 8e_4cio a dom_lio, LG podr& dec4dir s{facil;tard tra_spc_te para el producto a y desde o_lquier ser,_io tdcn_
de LG, seg6n su elec_bn,
ESTAG/_NTtA LIMR'ADA NO CUBRE:
1._ de se_c_oparae_erich, recogidao_ del
prod_e o_ dar _ sdarelau_ del produc_.
2, S_ de _ _ dela v_nda o _ enfur_ient_ de
fonta_la, o _n de la i&_n delprod_'to.
3 _ e lambs_ per tubes de _guaoce _ o roturas, _
de agua_ tubesde _ atsscae_, su_is_o de ag_
ocon _rr_es o_jminis_ de _r_ _,_o_
4, D_t_s _ productoca_ per accident&s,_ e ir_._os, rayos,
_4ento,_, _,nas o ca_ de _ mayor.
& D_os o fa_ resu_ntes de _ uso in_uado, ab_Jsos,ir.stalaci_,
0 r_rr_n_n_ inoo_, Lasrepar_
k_crectas incluye4_i_ _t_ de piezasno a_ o
espec_ per L&
6. D_it_s o fa_osca_ pot _ _ifi_ u_raci_ no _or_
de_pr_.
7 Dates o f_l_ causado_per _ corr'er_ el_ctricao_ oc0d_
de fontar_r_ lr_rect_.
& DaAos_, incluid_ a_, abolladuras_ otros _fcJs ea el
_o delprod_cto, a menos _ los _S seenr_do de
defectos de _ia_ss _ m_no _ obray se inf_me _ LG en _n _
de _ _1 dtas_mdarios a paYd¢_ _afed_ de _ega.
9, Da_oso _'tade _ementos sn cu_tq_er produ_ de e_, caja
abierta, de descuerr_oo reaco_rado.
10. Pro_ctos en los que se hayab_rado, _j=_o o _ el
n_r_ro de seri_ originalde f_rica.
1t, Reparack_es c_r_o se est_ dando alproducto una u*Jl_
dife_ d_l_ do_ _i _ ei_o, alqu_, u_O
comercfal,of'_inas e i_stala,'._,nesrecreath_s) o o0ntraria a
in_ruc_ion_deln_n_l delpropietariode{pred_cto.
12. L_ret_rada y nuevair_a}aciSn de_prodt_'tos_se ha _lado en
ubi_ i_b_.
ESTA GARANTIA _CLUYE CUALQUIER OTRA GAF_,NT_ EXPRESA O IM PLI'CITA. INCLUYENDO Y SIN UMITAC|0N A
CUALOUIER GA_J,_T_ DE COMERCIABIUDAJ00 ADECUAC|6N A UN FIN PARTICULAR. EN EL GRADO EN QUE CUALQUIER
GhJ_ANT_ IMPL|CffA SEA REQUERIDA POR LEY, ESTA GAJ:IAN_'_ SE UM_TAR_ EN SU DURACI_N AL P_RIODO INDICADO
ANTERIORMENTE. LA REPARACI(_N O SUSTmJCK_N
BAJO ESTA _ ES LA 0NICA SOLUCION PARA EL CLIENTE. Ni EL Fh_RICANTEo NI SUS DISTRIBUIDORES EN EEUU.
SEP_I RBSPON_LES DE CUALQUIER DAt_IO INCIDENTAL, CONSECUENC_.L, INDIRECTO, ESPECIAL O BJNITIVO DE
CUALQUIER TIPO, INCLUIDAS SIN LIMrlrACI(_N, PI_RDIDAS DE INGRESOS O BENEFICiOS, O CUALQUIER OTRO DA_O 8AShJ)OS
EN CONTRATOS, RESPONSABIUDADES EXTRACONTP_ACTUALES O DE OTRO TIPO.
INCLUYENDO Y SIN UMITACI6N A, PERMIAN _ EXCLUSI6N O UMrI'ACI_)N DE LOS DA_OS INCIDENTALES O
CONSECUENC_S O LAS LIMITACIONES SOBRE LA DUBACI(_N DE LINA GARANI_ IMPLICITA_ POR LO QUE F_JEDEN NO SER
APLICA_t_S A SU _O LAS CITADAS EXCLUSIONE& ESTA GAP_4T[A LECONFiERE DERECHOS LEGALES ESPECIFICOS Y
TAMBI_N PUEDE TENER OTROS DERECHOS QUE VhJ_N DE UNOS ESTADOS A OTROS.
C_%;_00BTENER SERVlCtO DE GAPJ_Nq'[A E INFORMACION _ICIONAL:
L_rr_ al nOme_o 14100-243-0000 o v_site nuestro s_o _ en www3g.com.
Si _ _erse en co_ pot correo: Centro de informac_6n al diente LG (ATT:CtC)
20_ Jam&s Record Road, Hunts",4|le,AL

38 MEMO

MEMO 39

40 MEMO

MEMO 41

Life%Good
Ths product q_a_ ties fo_ ENERL:#Y STAR in the
"factory defaL_t (Home Us¢} _' se4tirlg,
Char_gi g the facle_y default seffings o_ _nabl ng ot_"_e_
_ealures may increase p_'_r consumption ff_at couid
exceed 1he tirclit_ necessary to q _lify fo_ E_'_ERG'f STAR.
-
 1
1
-
 2
2
-
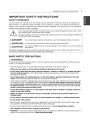 3
3
-
 4
4
-
 5
5
-
 6
6
-
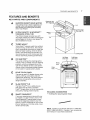 7
7
-
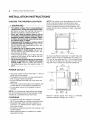 8
8
-
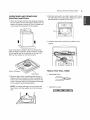 9
9
-
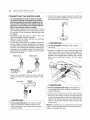 10
10
-
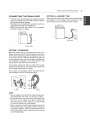 11
11
-
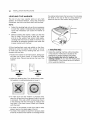 12
12
-
 13
13
-
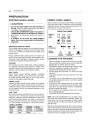 14
14
-
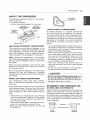 15
15
-
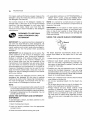 16
16
-
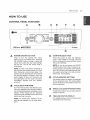 17
17
-
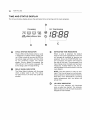 18
18
-
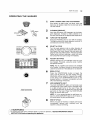 19
19
-
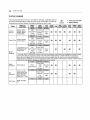 20
20
-
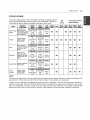 21
21
-
 22
22
-
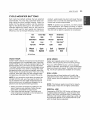 23
23
-
 24
24
-
 25
25
-
 26
26
-
 27
27
-
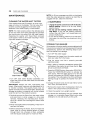 28
28
-
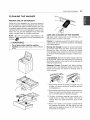 29
29
-
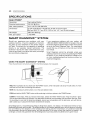 30
30
-
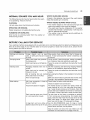 31
31
-
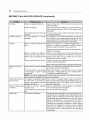 32
32
-
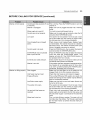 33
33
-
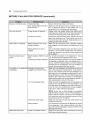 34
34
-
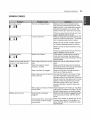 35
35
-
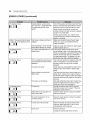 36
36
-
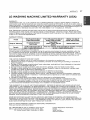 37
37
-
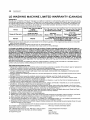 38
38
-
 39
39
-
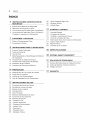 40
40
-
 41
41
-
 42
42
-
 43
43
-
 44
44
-
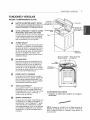 45
45
-
 46
46
-
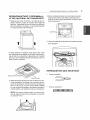 47
47
-
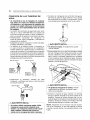 48
48
-
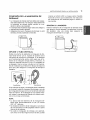 49
49
-
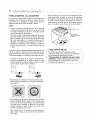 50
50
-
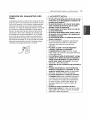 51
51
-
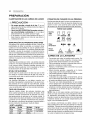 52
52
-
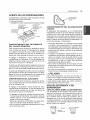 53
53
-
 54
54
-
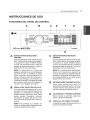 55
55
-
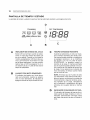 56
56
-
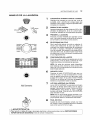 57
57
-
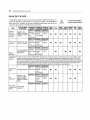 58
58
-
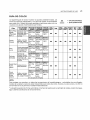 59
59
-
 60
60
-
 61
61
-
 62
62
-
 63
63
-
 64
64
-
 65
65
-
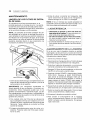 66
66
-
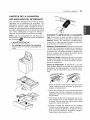 67
67
-
 68
68
-
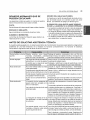 69
69
-
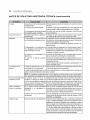 70
70
-
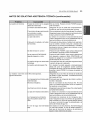 71
71
-
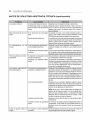 72
72
-
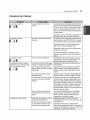 73
73
-
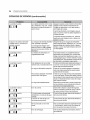 74
74
-
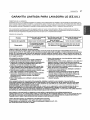 75
75
-
 76
76
-
 77
77
-
 78
78
-
 79
79
-
 80
80


LG WT5480CW/00 El manual del propietario
- Categoría
- Lavadoras
- Tipo
- El manual del propietario
en otros idiomas
- English: LG WT5480CW/00 Owner's manual
Artículos relacionados
-
LG WM4270HVA/00 El manual del propietario
-
LG WT4970CW El manual del propietario
-
-
LG WD100CV El manual del propietario
-
LG Electronics WD100CB El manual del propietario
-
LG 1011964 El manual del propietario
-
-
-
