La página se está cargando...
La página se está cargando...

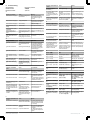
5 Troubleshooting
Störungsbehebung Resolución de problemas
Eliminazione difetti 故障排除
Élimination des défauts 장애 제거
en
Display, error situation Cause Measure
Green LED does not light up No voltage or voltage below
the limit values
Check the power supply,
check all electrical connec‐
tions (cables and plug con‐
nections)
Green LED does not light up Voltage interruptions Ensure there is a stable power
supply without interruptions
Green LED does not light up Sensor is faulty If the power supply is OK,
replace the sensor
Yellow LED flashes (only
briefly)
Teach-in mode Check the teach-in mode
Yellow LED flashes quickly
(only briefly)
Teach-in button lock active Deactivate the button lock
Yellow LED lights up, no
object in the path of the
beam
Distance between the sensor
and the background is too
short
Reduce the sensing range, see
teach-in
Object is in the path of the
beam, yellow LED does not
light up
Distance between the sensor
and the object is too long or
sensing range is set too short
Increase the sensing range,
see teach-in
de
Anzeige, Fehlerbild Ursache Maßnahme
grüne LED leuchtet nicht keine Spannung oder Span‐
nung unterhalb der Grenz‐
werte
Spannungsversorgung prüfen,
den gesamten elektrischen
Anschluss prüfen (Leitungen
und Steckerverbindungen)
grüne LED leuchtet nicht Spannungsunterbrechungen Sicherstellen einer stabilen
Spannungsversorgung ohne
Unterbrechungen
grüne LED leuchtet nicht Sensor ist defekt Wenn Spannungsversorgung
in Ordnung ist, dann Sensor
austauschen
gelbe LED blinkt (nur kurz) Teach-Modus Teach-Modus überprüfen
gelbe LED blinkt schnell (nur
kurz)
Teach-Button-Sperre aktiv Tastensperre deaktivieren
gelbe LED leuchtet, kein
Objekt im Strahlengang
Abstand zwischen Sensor
und Hintergrund ist zu gering
Schaltabstand verringern,
siehe Teach-In.
Objekt ist im Strahlengang,
gelbe LED leuchtet nicht
Abstand zwischen Sensor
und Objekt ist zu groß oder
Schaltabstand ist zu gering
eingestellt
Schaltabstand vergrößern,
siehe Teach-In
it
Indicatore, schermata di
errore
Causa Provvedimento
Il LED verde non si accende nessuna tensione o tensione
al di sotto del valore soglia
Verificare la tensione di ali‐
mentazione e/o il collega‐
mento elettrico
Il LED verde non si accende Interruzioni di tensione Assicurarsi che ci sia un'ali‐
mentazione di tensione sta‐
bile
Il LED verde non si accende Il sensore è guasto Se l'alimentazione di tensione
è regolare, allora chiedere una
sostituzione del sensore
il LED giallo lampeggia (solo
brevemente)
Modalità Teach Verificare la modalità Teach
il LED giallo lampeggia rapi‐
damente (solo brevemente)
Blocco del pulsante teach
attivo
Disattivazione blocco tasti
il LED giallo si accende, nes‐
sun oggetto nella traiettoria
del raggio
La distanza tra sensore e
sfondo è inferiori alle capa‐
cità di funzionamento
Diminuire la distanza di
lavoro, vedi teach-in.
L'oggetto è nella traiettoria
del raggio, il LED giallo non si
accende
La distanza tra sensore e
oggetto è troppo grande o
la distanza di commutazione
ha un'impostazione troppo
bassa
Aumentare la distanza di
lavoro, vedi Teach-in
fr
Affichage, représentation de
l'erreur
Cause Mesure
La LED verte ne s'allume pas Pas de tension ou tension
inférieure aux valeurs limites
Contrôler l'alimentation élec‐
trique, contrôler tous les bran‐
chements électriques (câbles
et connexions)
La LED verte ne s'allume pas Coupures d'alimentation
électrique
S'assurer que l'alimentation
électrique est stable et inin‐
terrompue
La LED verte ne s'allume pas Le capteur est défectueux Si l'alimentation électrique
est en bon état, remplacer le
capteur
Affichage, représentation de
l'erreur
Cause Mesure
La LED jaune clignote
(brièvement)
Mode apprentissage Contrôler le mode apprentis‐
sage
la LED jaune clignote rapide‐
ment (brièvement)
Blocage bouton d’apprentis‐
sage actif
Désactiver le blocage des tou‐
ches
La LED jaune s'allume, pas
d'objet dans la trajectoire du
faisceau
La distance entre le capteur
et l'arrière-plan est trop fai‐
ble
Réduire la distance de com‐
mutation, voir apprentissage.
L'objet est dans la trajectoire
du faisceau, la LED jaune ne
s'allume pas
La distance entre le capteur
et l'objet est trop grande ou
la portée est trop faible
Augmenter la distance de
commutation, voir apprentis‐
sage
es
Indicador, imagen de error Causa Acción
El LED verde no se ilumina Sin tensión o tensión por
debajo de los valores límite
Comprobar la fuente de ali‐
mentación, comprobar toda la
conexión eléctrica (cables y
conectores)
El LED verde no se ilumina Interrupciones de tensión Asegurar una fuente de ali‐
mentación estable sin inter‐
rupciones de tensión
El LED verde no se ilumina El sensor está defectuoso Si la fuente de alimentación
no tiene problemas, cambiar
el sensor
El LED amarillo parpadea
(solo brevemente)
Modo de aprendizaje (Teach) Comprobar el modo de apren‐
dizaje
El LED amarillo parpadea
rápido (solo brevemente)
Bloqueo de la tecla teach
activo
Desactivar el bloqueo de
teclas
El LED amarillo se ilumina,
no hay ningún objeto en la
trayectoria del haz
La distancia entre el sensor y
el fondo es insuficiente
Reducir la distancia de con‐
mutación, véase Aprendizaje.
El objeto se encuentra en la
trayectoria del haz, el LED
amarillo no se ilumina
La distancia entre el sensor y
el objeto es excesiva o la dis‐
tancia de conmutación aju‐
stada es insuficiente
Aumentar la distancia de con‐
mutación, véase Aprendizaje
zh
指示灯,故障图 原因 措施
绿色 LED 未亮起 无电压或电压低于极限值 检查电源,检查整体电气连接
(导线和插头连接)
绿色 LED 未亮起 电压中断 确保电源稳定无中断
绿色 LED 未亮起 传感器损坏 如果电源正常,则更换传感器
黄色 LED 闪烁(非常短暂) 示教模式 检查示教模式
黄色 LED 快速闪烁(非常短
暂)
示教键按键锁已激活 禁用按键锁
黄色 LED 亮起,光路中无物
体
传感器和背景之间的间距过小 降低触发感应距离,参见“示
教”章节
光路中有物体,黄色 LED 未
亮起
传感器和物体之间的间距过大
或开关距离设置的过小
增大触发感应距离,参见“示
教”章节
ko
표시, 오류 증상 원인 조치
초록색 LED가 켜지지 않
음
전압이 없거나 전압이 한
계값을 밑돎
전압 공급 장치 점검, 전체
전기 연결 점검(케이블 및
플러그 연결부)
초록색 LED가 켜지지 않
음
전압 공급 중단 중단 없이 안정적인 전압
공급 확보
초록색 LED가 켜지지 않
음
센서에 결함이 있음 전압 공급 장치에 문제가
없는 경우, 센서 교체
노란색 LED 깜박거림(잠
깐만)
티치인 모드 티치인 모드 점검
노란색 LED가 빠르게 깜
빡임(짧게만)
티치인 버튼 차단 활성 버튼 차단 비활성화하기
노란색 LED가 켜짐, 빔 경
로에 물체가 없음
센서와 배경 간 거리가
너무 가까움
스위칭 거리를 줄이십시
오(티치인 참조).
물체가 빔 경로에 있음,
노란색 LED가 켜지지 않
음
센서와 물체 간 거리가
너무 크거나 스위칭 거리
가 너무 작게 설정됨
스위칭 거리를 늘리십시
오(티치인 참조).
8022571.1AEG / 2021-01-08/de PowerProx WTT4SL | SICK 3
Transcripción de documentos
5 Troubleshooting Störungsbehebung Eliminazione difetti Élimination des défauts Resolución de problemas 故障排除 장애 제거 en Display, error situation Cause Measure Green LED does not light up No voltage or voltage below the limit values Check the power supply, check all electrical connec‐ tions (cables and plug con‐ nections) Green LED does not light up Voltage interruptions Ensure there is a stable power supply without interruptions Green LED does not light up Sensor is faulty If the power supply is OK, replace the sensor Yellow LED flashes (only briefly) Teach-in mode Check the teach-in mode Yellow LED flashes quickly (only briefly) Teach-in button lock active Deactivate the button lock Yellow LED lights up, no object in the path of the beam Distance between the sensor Reduce the sensing range, see and the background is too teach-in short Object is in the path of the beam, yellow LED does not light up Distance between the sensor Increase the sensing range, and the object is too long or see teach-in sensing range is set too short de Anzeige, Fehlerbild Ursache Maßnahme grüne LED leuchtet nicht keine Spannung oder Span‐ nung unterhalb der Grenz‐ werte Spannungsversorgung prüfen, den gesamten elektrischen Anschluss prüfen (Leitungen und Steckerverbindungen) grüne LED leuchtet nicht Spannungsunterbrechungen Sicherstellen einer stabilen Spannungsversorgung ohne Unterbrechungen grüne LED leuchtet nicht Sensor ist defekt Wenn Spannungsversorgung in Ordnung ist, dann Sensor austauschen gelbe LED blinkt (nur kurz) Teach-Modus Teach-Modus überprüfen gelbe LED blinkt schnell (nur kurz) Teach-Button-Sperre aktiv Tastensperre deaktivieren gelbe LED leuchtet, kein Objekt im Strahlengang Abstand zwischen Sensor und Hintergrund ist zu gering Schaltabstand verringern, siehe Teach-In. Objekt ist im Strahlengang, gelbe LED leuchtet nicht Abstand zwischen Sensor und Objekt ist zu groß oder Schaltabstand ist zu gering eingestellt Schaltabstand vergrößern, siehe Teach-In Indicatore, schermata di errore Causa Provvedimento Il LED verde non si accende nessuna tensione o tensione al di sotto del valore soglia Verificare la tensione di ali‐ mentazione e/o il collega‐ mento elettrico Il LED verde non si accende Interruzioni di tensione Assicurarsi che ci sia un'ali‐ mentazione di tensione sta‐ bile Il LED verde non si accende Il sensore è guasto Se l'alimentazione di tensione è regolare, allora chiedere una sostituzione del sensore il LED giallo lampeggia (solo brevemente) Modalità Teach il LED giallo lampeggia rapi‐ damente (solo brevemente) il LED giallo si accende, nes‐ sun oggetto nella traiettoria del raggio Affichage, représentation de Cause l'erreur Mesure La LED jaune clignote (brièvement) Mode apprentissage Contrôler le mode apprentis‐ sage la LED jaune clignote rapide‐ ment (brièvement) Blocage bouton d’apprentis‐ sage actif Désactiver le blocage des tou‐ ches La LED jaune s'allume, pas La distance entre le capteur d'objet dans la trajectoire du et l'arrière-plan est trop fai‐ faisceau ble Réduire la distance de com‐ mutation, voir apprentissage. L'objet est dans la trajectoire La distance entre le capteur du faisceau, la LED jaune ne et l'objet est trop grande ou s'allume pas la portée est trop faible Augmenter la distance de commutation, voir apprentis‐ sage es Indicador, imagen de error Causa Acción El LED verde no se ilumina Sin tensión o tensión por debajo de los valores límite Comprobar la fuente de ali‐ mentación, comprobar toda la conexión eléctrica (cables y conectores) El LED verde no se ilumina Interrupciones de tensión Asegurar una fuente de ali‐ mentación estable sin inter‐ rupciones de tensión El LED verde no se ilumina El sensor está defectuoso Si la fuente de alimentación no tiene problemas, cambiar el sensor El LED amarillo parpadea (solo brevemente) Modo de aprendizaje (Teach) Comprobar el modo de apren‐ dizaje El LED amarillo parpadea rápido (solo brevemente) Bloqueo de la tecla teach activo El LED amarillo se ilumina, no hay ningún objeto en la trayectoria del haz La distancia entre el sensor y Reducir la distancia de con‐ el fondo es insuficiente mutación, véase Aprendizaje. El objeto se encuentra en la trayectoria del haz, el LED amarillo no se ilumina La distancia entre el sensor y Aumentar la distancia de con‐ el objeto es excesiva o la dis‐ mutación, véase Aprendizaje tancia de conmutación aju‐ stada es insuficiente Desactivar el bloqueo de teclas zh 指示灯,故障图 原因 措施 绿色 LED 未亮起 无电压或电压低于极限值 检查电源,检查整体电气连接 (导线和插头连接) 绿色 LED 未亮起 电压中断 确保电源稳定无中断 绿色 LED 未亮起 传感器损坏 如果电源正常,则更换传感器 黄色 LED 闪烁(非常短暂) 示教模式 检查示教模式 黄色 LED 快速闪烁(非常短 暂) 示教键按键锁已激活 禁用按键锁 黄色 LED 亮起,光路中无物 体 传感器和背景之间的间距过小 降低触发感应距离,参见“示 教”章节 光路中有物体,黄色 LED 未 亮起 传感器和物体之间的间距过大 或开关距离设置的过小 增大触发感应距离,参见“示 教”章节 표시, 오류 증상 원인 조치 초록색 LED가 켜지지 않 음 전압이 없거나 전압이 한 전압 공급 장치 점검, 전체 계값을 밑돎 전기 연결 점검(케이블 및 플러그 연결부) 초록색 LED가 켜지지 않 음 전압 공급 중단 중단 없이 안정적인 전압 공급 확보 Verificare la modalità Teach 초록색 LED가 켜지지 않 음 센서에 결함이 있음 전압 공급 장치에 문제가 없는 경우, 센서 교체 Blocco del pulsante teach attivo Disattivazione blocco tasti 노란색 LED 깜박거림(잠 깐만) 티치인 모드 티치인 모드 점검 La distanza tra sensore e sfondo è inferiori alle capa‐ cità di funzionamento Diminuire la distanza di lavoro, vedi teach-in. 노란색 LED가 빠르게 깜 빡임(짧게만) 티치인 버튼 차단 활성 버튼 차단 비활성화하기 노란색 LED가 켜짐, 빔 경 센서와 배경 간 거리가 로에 물체가 없음 너무 가까움 스위칭 거리를 줄이십시 오(티치인 참조). it L'oggetto è nella traiettoria La distanza tra sensore e del raggio, il LED giallo non si oggetto è troppo grande o accende la distanza di commutazione ha un'impostazione troppo bassa Aumentare la distanza di lavoro, vedi Teach-in ko 물체가 빔 경로에 있음, 노란색 LED가 켜지지 않 음 센서와 물체 간 거리가 스위칭 거리를 늘리십시 너무 크거나 스위칭 거리 오(티치인 참조). 가 너무 작게 설정됨 fr Affichage, représentation de Cause l'erreur Mesure La LED verte ne s'allume pas Pas de tension ou tension inférieure aux valeurs limites Contrôler l'alimentation élec‐ trique, contrôler tous les bran‐ chements électriques (câbles et connexions) La LED verte ne s'allume pas Coupures d'alimentation électrique S'assurer que l'alimentation électrique est stable et inin‐ terrompue La LED verte ne s'allume pas Le capteur est défectueux Si l'alimentation électrique est en bon état, remplacer le capteur 8022571.1AEG / 2021-01-08/de PowerProx WTT4SL | SICK 3-
 1
1
-
 2
2
-
 3
3


en otros idiomas
- français: SICK PowerProx WTT4SL
- italiano: SICK PowerProx WTT4SL
- English: SICK PowerProx WTT4SL
- Deutsch: SICK PowerProx WTT4SL
Artículos relacionados
-
SICK PowerProx WTT4SL Quickstart
-
-
-
-
-
-
-
-