EarthQuake E43 Manual de usuario
- Categoría
- Motor
- Tipo
- Manual de usuario
Este manual también es adecuado para

•
Ardisam.corn
OME43
Rev. 3/28/07
© Copyright 2007 Ardisam, Inc.
All Rights Reserved. Printed in USA.
Parts Online
Earthquake®
OPERATOR'S MANUAL &
PARTS EXPLOSIONS
E43 EARTH AUGER POWERHEAD
J/
41
/
4
,7"
ARDISAM

Earthouake
ASSEMBLY INSTRUCTIONS AND PARTS EXPLOSIONS
E43 Model_
WARRANTY
Earthquake, a division of Ardisam Incorporated, offers a
one
year
limited warranty to be free from defects in materials and
workmanship for the service life of the product including the
engine, not to exceed twelve consecutive months from the
date of purchase. This warranty applies to the original owner
with a proof of purchase and is not transferable.This warranty
applies only to products which have not been subjected to
negligent use, misuse, alteration, accident or if repairs have
been made by anyone outside our factory. This warranty
supersedes all other warranties either expressed or implied
and all other obligations or liabilities on our part. Ardisam,
Inc., does not assume, and does not authorize any other
person to assume for us, any liability in connection with the
sale of our products. Warranty work must be sent directly to
Ardisam, Inc. or one of our authorized service centers and
performed by them. To obtain warranty service and replace-
ment instructions, contact our customer service department
at 800-345-6007 or by writing to: Ardisam, Inc., 1690 Elm
Street, Cumberland, WI 54829. All items must be shipped
prepaid. Ardisam, Inc. will at no charge, repair or replace,
at their discretion, any defective part which falls under the
conditions stated above. Ardisam retains the right to change
models, specifications and price without notice.
INTRODUCTION
THANK YOU ...
for purchasing an Earthquake® Powerhead from Ardisam, Inc. We
have worked to ensure that the earth auger meets high standards
for usability and durability. With proper care, your earth auger will
provide many years of service. Please take the time to read this
manual carefully to learn how to correctly operate and maintain
your earth auger. Congratulations on your investment in quality.
CONTENTS
Registration & Warranty
2
Safety
3-4
Operation
5-8
Maintenance & Storage
8-9
Service, Troubleshooting & Repair
10-11
Parts Explosions
12-15
REGISTRATION
Record your model number and serial number in the space provided
for easy reference. Fill out and mail the registration card located in
your parts packet. Warranty is valid only if your completed registration
card is received by Ardisam, Inc., at time of purchase.
Model Number
Serial Number
Date of Purchase
Place of Purchase
Page 2
800-3454007
Ardisam.com

IMPORTANT
INDICATES HELPFUL INFORMATION FOR PROP-
ER ASSEMBLY, OPERATION, OR MAINTENANCE
OF YOUR EQUIPMENT.
A
WARNING
CALIFORNIA PROPOSITION 65 WARNING
ENGINE EXHAUST FROM THIS PRODUCT CON-
TAINS CHEMICALS KNOWN TO THE STATE OF
CALIFORNIA TO CAUSE CANCER, BIRTH DE-
FECTS, OR OTHER REPRODUCTIVE HARM.
A
CAUTION
CAUTION INDICATES YOU CAN CAN BE HURT OR
YOUR EQUIPMENT DAMAGED IF THE SAFETY IN-
STRUCTIONS THAT FOLLOW THIS SIGNAL WORD
ARE NOT OBEYED.
Earths:mice'
ASSEMBLY INSTRUCTIONS AND PARTS EXPLOSIONS
E43 Model
SAFETY
OWNER'S RESPONSIBILITY
Accurate aasembly and safe and effective use of the auger is the
owner's responsibility.
Read and follow all safety instructions.
Carefully follow all assembly instructions.
Maintain the auger according to directions and schedule
included in this Earthquake operator's manual.
Ensure that anyone who uses the auger is familiar with all
controls and safety precautions.
SPECIAL MESSAGES
Your manual contains special messages to bring attention to poten-
tial safety concerns, machine damage as well as helpful operating
and servicing information. Please read all the information carefully
to avoid injury and machine damage.
NOTE: General information is given throughout the manu-
al that may help the operator in the operation or service of
the machine.
IMPORTANT SAFETY PRECAUTIONS
Please read this section carefully.
Operate the auger according
to the safety instructions and recommendations outlined here and
inserted throughout the text. Anyone who uses this auger must
read the instructions and be familiar with the controls.
A
This symbol points out important safety instructions
which if not followed could endanger your personal
safety. Read and follow all instructions in this manual
before attempting to operate this equipment.
Do not carry the auger powerhead between holes with the engine run-
ning.
The auger should not rotate when the engine is idling. If it does rotate
when engine is idling, contact Ardisam,Inc. for instructions.
Always keep hands, feet, hair and loose clothing away from any mov-
ing parts on engine and auger.
Do not allow children to operate this power auger. Do not allow adults
to operate the auger without proper instruction.
Do not operate any power equipment under the influence of alcohol or
drugs.
Keep all screws, nuts and bolts tight.
.
Engine should be turned off and cool, spark plug wire must be re-
moved from spark plug before any repairs are attempted.
Temperature of muffler and nearby areas may exceed 150g F (65
2
C).
Avoid these areas.
Never run engine indoors or in an enclosed area. Engine exhaust
contains carbon monoxide, an odorless and deadly gas.
It the earth auger will not turn in a hole, turn engine off and allow to
cool before attempting to remove it manually.
Use only original equipment parts from Ardisam
including all nuts and bolts.
800-345-6007
Page 3
Arclisam.corn

A
CAUTION
HOT GASES ARE A NORMAL BY-PRODUCT OF A
FUNCTIONING CATALYTIC CONVERTER. FOLLOW
ALL SAFETY INSTRUCTIONSTO PREVENT BURNS
AND FIRES.
Earthauake
ASSEMBLY INSTRUCTIONS AN
v
IPARTS EXPLOSIGNS
E43 Model
ENGINE SAFETY PRECAUTIONS
Warning Carbon Monoxide Poisoning
All engines contain carbon monoxide in their exhaust. Carbon
monoxide iaa deadly, colorless, tasteless, odorless gas Which
may be present
Men
if you do not smell or see any engine
exhaust. Levels of carbon monoxide, which can be deadly,
can be present for days in art enclosed area that has poor
ventilation. Any level of carbon monoxide, if inhaled, can cause
headaches, drowsiness, nausea, dizziness, confusion and.
eventually death. If you experience any of these symptoms,
seekiresh air and medical attention immediately.
Preventing Carbon Monoxide Poisoning
Never run engine indoors.
% Never try to ventilate engine exhaust indoors. Carbon mon-
oxide can reach dangerous levels very quickly.
Never run engine outdoors where exhaust fumes may be
pulled into a building.
Never run-engine outdoors in a poorly ventilated area
where the exhaust fumes may be trapped and not easily
taken away. (Examples include: in a large hole or areas
'
where hills surround your working area.)
Never run engine in an enclosed or partially enclosed area.
(Examples include: buildings that are enclosed on one or
more sides, under tents, car ports or basements.)
Always run the engine with the exhaust and muffler pointed
in the direction away from the operator.
Never point the exhaust muffler towards anyone. People
should always be many feet away from the operation of the -
engine and its attachments.
Gasoline Fires or Handling Fuel Safely
Fuel and fuel vapors are highly flammable. Never use fuel
where a spark or flame may be present. Never use fuel where
a potential source of ignition could occur. (Examples include:
hot water or space heaters, clothes dryer, electric motors, etc.)
Keep flames and sparks away from engine and fuel to prevent
fires. Fuel fires spread very quickly and are highly explosive.
Prevention of Gasoline Fires
Never fill your fuel tank with fuel indoors. (Examples in-
clude: basement, garage, barn, shed, house, porch, etc.)
Always fill fuel tank outside in a well ventilated area.
Never remove the fuel cap or add fuel with the engine run-
ning. Stop engine and allow to cool before filling.
Never drain fuel from engine in an enclosed area.
Always wipe up excess (spilled) fuel from engine before
starting. Clean up spilled fuel immediately.
Allow spilled fuel to dry, after wiping and before starting.
Allow fuel fumes/vapors to escape from the area before
starting engine.
Test the fuel cap for proper installation before starting and
using engine.
Always run the engine with fuel cap properly installed on
the engine and gas cap vent screw unscreWed..
Replace fuel cap that allows gas to spill or leak.
Never smoke while refilling engine fuel tank.
Prevent fire and explosion caused by static electric
discharge. Use only non-metal, portable fuel containers
approved by the Underwriter's Laboratory (U.L.) or the
American Society for Testing & Materials (ASTM).
;
Do not store engine with fuel in fuel tank indoors. Fuel and
fuel vapors are highly explosive.
When storing, screw down gas cap vent screw tightly.
Never pour fuel from engine fuel tank.
Never siphon fuel by mouth to drain fuel tank.
Always have an adult fill the fuel tank.
Never allow an adult or anyone under the influence of
drugs or alcohol to fill engine.
Never allow children to fill the engine.
BURNS AND FIRES
-
The muffler, muffler guard and other parts of the engine be-
come extremely hot during the operation of the engine. These
parts remain extremely hot after the engine has stopped.
Prevention of Burns and Fires
Never remove the muffler guard from the engine.
Never touch the muffler guard because it is extremely hot
and will cause severe burns.
Never touch parts of the engine that become hot after
operation._
Always keep materials and debris away from muffler guard
and other hot parts of the engine to avoid fires.
This engine is designed to operate using a catalytic converter
which contributes to the engine's compliance with the EPA.
Parts Online
Page 4
800-345-6007
Ardisayn.cpi,
-

IMPORTANT
THIS ENGINE USES A GAS/OIL MIXTURE. DO NOT
RUN ON STRAIGHT GAS ONLY, ENGINE DAMAGE
WILL RESULT.
A
CAUTION
po
NOT ALTER/MODIFY ENGINE OR AUGER:
AVOID INJURY! NEVER ALTER OR MODIFY THE
ENGINE FROM THE FACTORY. SERIOUS INJURY
OR DEATH MAY OCCUR IF ENGINE IS MODIFIED
OR ALTERED.
AVOID INJURY! WHEN WORKING ON OR REPLAC-
ING PARTS FOR THE ENGINE OR AUGER YOU
MUST ALWAYS DISCONNECT SPARK PLUG WIRE
FROM THE SPARK PLUG AND KEEP IT AWAY
FROM THE SPARK PLUG.
AVOID INJURY! ALWAYS WEAR HEARING PRO-
TECTION WHILE OPERATING ENGINE.
AVOID INJURY! PLEASE DO NOT START YOUR
EARTH AUGER UNTIL YOU HAVE READ THE PRE-
VIOUS SECTION OF THIS MANUAL. IF YOU HAVE
READ THESE, FOLLOW THE STEPS BELOW TO
START YOUR EARTH AUGER.
AVOID INJURY! NEVER STORE ENGINE WITH GAS
IN THE TANK INDOORS. FUEL AND FUEL VAPORS
ARE HIGHLY FLAMMABLE.
AVOID INJURY! NEVER MIX FUEL AND OIL DIRECT-
LY IN ENGINE GAS TANK. USE ONLY NON-METAL,
PORTABLE FUEL CONTAINERS APPROVED BY
THE UNDERWRITER'S LABORATORY (U.L.) OR
THE AMERICAN SOCIETY FOR TESTING & MATE-
RIALS (ASTM).
AVOID INJURY! AN ADULT MUST ALWAYS HANDLE
AND FILL THE ENGINE WITH FUEL.
AVOID INJURY! ALWAYS HANDLE FUEL IN A WELL
VENTILATED AREA, OUTDOORS, AWAY FROM
FLAMES OR SPARKS.
Earth
-
a
-
ualc
-
ee
ASSEMBLY INSTRUCTIONS AND PARTS EXPLOSIONS r
E43 Model
OPERATION
STEPS FOR WORKING ON ENGINE OR AUGER
Turn off engine switch.
Disconnect the spark plug wire from the spark plug.
Securely place the disconnected spark plug wire away from the
spark.plug and any metal parts. This must always be done or
arcing may occur between spark plug wire and metal parts.
Replace or repair the part on the engine or auger.
Check all parts that were repaired, or removed during repair,
that they are secure and fit correctly.
NOTE: All repair parts must come from the factory. Never
replace parts that are not specifically designed for the
engine or auger.
Replace spark plug wire.
PREPARING ENGINE FOR STARTING
Before starting your powerhead engine, make sure the black throttle
cable housing is seated all the way into the brass ferrule at the
engine side of the cable.
GAS AND OIL
Quality
To operate the engine, we recommend using "VIPER" brand 2 cycle
oil (Pfi( 300400) to ensure that the engine operates correctly
throughout the life of the engine. Use unleaded regular gas only.
Mixture
Run earth auger with a 50:1 ratio.
GAS
OIL
RATIO
1 gallon
2.5 ounces
50:1
2 gallons
5 ounces
50:1
5 gallons
13 ounces
50:1
MIXING FUEL AND FILLING GAS TANK
Mixing Fuel
Fuel must be mixed in a container outside in a well ventilated
area.
Fill certified fuel container 1/4 full of recommended fuel.
Add recommended amount of 2 cycle oil.
Screw container cap on straight and tight.
Shake the container to mix fuel and oil.
Unscrew gas cap slowly to vent, add the remainder of fuel re-
quirements.
Wipe away any spilled fuel or oil and allow to evaporate before
moving or transporting.
800-345-6007
Parts Online
Page
5
S.
Ardisam.com

8003454007 r
Page 6 „.
Parts Online
Earthauakt
ASSEMBLY INSTRUCTIONS AND PARTS EXPLOSIONS
E43 Model
Filling Gas Tank
Shut-off engine and allow engine to completely cool before refill-
ing the gas tank.
Move to a well ventilated area, outdoors, away from flames and
sparks.
Clean debris from area around the gas cap.
Loosen gas cap slowly Place the cap on a clean, dry surface.
Carefully add fuel without spilling.
do not fill gas tank completely full, allow space for fuel to ex-
pand.
Immediately replace gas cap and tighten. Wipe off spilled fuel
and allow to dry before starting engine.
NORMAL OPERATION
I. The clutch will transfer maximum
power after about
two hours
of normal operation. During this break-in period clutch slippage
may occur. The clutch should be kept free of oil or other mois-
ture for efficient operation.
Drill holes without placing excessive body weight on the unit.
The auger operates most efficiently with a shaving action
caused by the weight of the unit itself.
Never run engine indoors. Exhaust fumes are deadly.
Do not use an earth auger in the ice.
To attach auger to powerhead, align hole at top of auger shaft
with the output shaft hole. Insert 3/8-16 x 1
7
1/2" bolt and secure
bolt with provided 3/8" bi-way lock nut using a wrench.
USING THE SCREW TYPE, MANUAL VENTING GAS
CAP
Your power earth auger is equipped with a screw type, manual vent-
ing gas cap.
I. Before starting the engine, turn the screw in the top of the gas
cap all the way open (counterclockwise) to its venting position.
To ensure that gas will not spill during use, check that the gas
cap is screwed on tightly and the gas cap screw is in the venting
position.
2. After using the power earth auger and before putting away or
transporting it in a vehicle, screw the gas cap screw on (clock-
wise) tightly. This will prevent gas from leaking during storage.
The gas cap will not leak gas during storage if the gas cap is
tight and the screw at the top is tight.
NOTE: When storing unit in an upright position for pro-
longed periods of time in warm weather, vent gas cap to
prevent gas from leaking from carburetor.
A
CAUTION
AVOID INJURY! ALWAYS HANDLE FUEL IN A WELL
VENTILATED AREA, OUTDOORS, AWAY FROM
FLAMES OR SPARKS.
1.
AVOID INJURY! DO NOT START ENGINE IF FUEL
IS SPILLED. WIPE OFF EXCESS FUEL AND ALLOW
TO DRY. REMOVE ENGINE FROM AREA TO AVOID
SPARKS.
Ardisam.conv

A
CAUTION
AVOID INJURY! ALWAYS HANDLE FUEL IN A WELL
VENTILATED AREA, OUTDOORS, AWAY FROM
FLAMES OR SPARKS.
AVOID INJURY! DO NOT START ENGINE IF FUEL
IS SPILLED. WIPE OFF EXCESS FUEL AND ALLOW
TO DRY. REMOVE ENGINE FROM AREA TO AVOID
SPARKS.
AVOID INJURY! IF AUGER IS MOUNTED TO EN-
GINE, ALL SAFETY GUARDS MUST BE SECURELY
ON TO AVOID SERIOUS INJURY.
AVOID INJURY! STARTER ROPE CAN CAUSE
AN UNANTICIPATED JERK TOWARDS ENGINE.
PLEASE FOLLOW INSTRUCTIONS TO AVOID IN-
JURY.
AVOID INJURY! IF ENGINE FAILS TO START AFTER
TRYING STARTING PROCEDURES, PLEASE CON-
TACT OUR CUSTOMER SERVICE DEPARTMENT AT
800-345-6007.
AVOID INJURY! NEVER LEAVE ENGINE RUNNING
WHILE UNATTENDED. TURN OFF AFTER EVERY
USE.
AVOID INJURY! NEVER CARRY POWERHEAD AND
AUGER BETWEEN HOLES WHILE ENGINE IS RUN-
NING.
A
WARNING
AVOID INJURY! MAKE SURE THE UNIT IS IN A STA-
BLE POSITION BEFORE PULLING THE STARTER
HANDLE.
AVOID INJURY! WHEN THE UNIT STARTS TO FIRE
OR RUN, RELEASE THE THROTTLE CONTROL
MOMENTARILY WITH YOUR RIGHT HAND AND RE-
TURN YOUR LEFT HAND TO THE HANDLEBAR PO-
SITION TO MAINTAIN CONTROL AND STABILITY
OF THE UNIT WITH BOTH HANDS.
c
_Earthauaice
-
ASSEMBLY INSTRUCTIONS AND PARTS EXPLOSIONS
E43 Model
STARTING AND STOPPING ENGINE
Move engine to a well ventilated area, outdoors, to prevent car-
bon monoxide poisoning.
Move to an area away from flames or sparks, to avoid ignition of
vapors if present.
Remove all debris from air cleaner holes and gas cap to ensure
proper air flow.
COLD ENGINE START:
Starting engine for first time or after engine
has cooled off or after running out of fuel.
.
Open gas cap vent screw all the way (counterclockwise).
Move choke lever to
RUN or OFF
position.
NOTE: Choke must be in the RUN or OFF position when
pushing or using the primer bulb.
Prime unit until primer hose is filled with gas.
NOTE: When using the primer bulb, allow the bulb to return
completely to its original position between pushes.
Move choke lever to
CHOKE or ON
position.
NOTE: CHOKE position is defined by moving the choke
lever as far to the ON position as possible.
Push rocker switch to the
ON
position.
Squeeze throttle control with right hand. Grasp starter handle
with left hand and pull out slowly, until it pulls slightly harder.
Without letting starter handle retract, pull,rope with a rapid full
arm stroke. Let it return to its original position very slowly until
unit fires or runs. Repeat this step every time the starter rope is
pulled.
NOTE: If engine fails to start after 5-6 pulls, push primer I
time and pull starter rope again.
After engine starts running, move choke lever to
HALF CHOKE
position until unit runs smoothly.
NOTE: HALF CHOKE is defined when the choke lever is
between CHOKE and RUN or ON and OFF.
Move choke lever to
RUN or OFF
position and move throttle to
desired speed.
NOTE: Run at full throttle when possible. Do not let unit
idle for extended periods of time.
To stop engine, push rocker switch to
OFF
position.
WARM ENGINE START:
Open gas cap vent screw all the way (counterclockwise).
Move choke lever to
CHOKE or ON
position.
NOTE: CHOKE position is defined by moving the choke
lever as far to the ON position as possible.
Continue with Step 5 of Cold Engine Starting.
Parts Online
Ardisam.com
111.11111
800-345-6007
Page 7

Earthauaice
ASSEMBLY INSTRUCTIONS AND PARTS EXPLOSIONS
E43 Model
HOT ENGINE START:
Open gas cap vent screw all the way (counterclockwise).
Continue with Step 5 of Cold Engine Starting.
If engine does not fire, refer to Step 2 of Warm Engine Starting.
DO NOT attempt to start engine in the following ways'
DO NOT use starting fluid.
DO NOT spray flammable liquids or vapors into air cleaner,
carburetor or spark plug chamber.
•
DO NOT remove spark plug and pull on starter rope. Flam-
mable fuel can spray out & Ignite from a spark from spark
plug.
MAINTENANCE AND STORAGE
AUGER MAINTENANCE
The gear case has 4 oz. of grease installed at the factory. It is
recommended that once a year the gear case be split and the
grease level checked. Add grease only if level of grease is below
top of the gears.
DO NOT OVERFILL.
Keep all screws, nuts, and bolts tight.
For cold weather operation, store the unit in a cool environment.
Transferring the unit from a warm to a cold place can cause the
build up of harmful condensation.
If blade performance decreases, turn unit off and disconnect
spark plug wire. Carefully inspect cutting edge of blade for any .
signs of wear. If blades show any of these signs, they need to be
sharpened or replaced.
ENGINE MAINTENANCE
Cooling Fins
Cooling fins, air inlets and linkages must be free from any debris
before each use. '
Air Filter
Never run engine without air cleaner properly installed. Added wear
and engine failure may occur if air.cleaner is not installed on engine.
Service air cleaner every 3 months or after 20 hours of operation.
Clean fitter daily in extremely dusty conditions.
Steps for Cleanina Air Filter
Wash in warm water with mild soap until dirt and debrie are
removed. Press filter when washing, do not twist.
Rinse in warm water until soap and dirt are removed.
Dry filter by wrapping in a clean cloth and pressing filter until it is
dry.
Apply oil to the entire filter.
Remove excess oil.
Attach the fitter and air cleaner cover to the engine.
A
CAUTION
TO PREVENT ACCIDENTAL STARTING'
AVOID INJURY, ENGINE MUST BE TURNED OFF
AND COOL, AND SPARK PLUG WIRE MUST BE RE-
MOVED FROM SPARK PLUG BEFORE CHECKING
AND ADJUSTING ENGINE OR EQUIPMENT.
AVOID INJURY! TEMPERATURE OF MUFFLER AND
NEARBY AREAS MAY EXCEED 150° F. (65° C).
AVOID THESE AREAS.
AVOID INJURY! CHECK AUGER OFTEN FOR
LOOSE NUTS AND BOLTS. KEEP THESE ITEMS
TIGHTENED.
AVOID INJURY! NEVER STORE ENGINE WITH
FUEL IN THE TANK INSIDE A BUILDING. POTEN-
TIAL SPARKS MAY BE PRESENT FOR IGNITION
OF FUEL AND FUEL VAPORS.
AVOID INJURY! AN ADULT MUST ALWAYS DO
MAINTENANCE AND REPAIR ON ENGINE AND AU-
GER.
AVOID INJURY! ENGINE MUST BE SHUT-OFF,
COOL, AND SPARK PLUG WIRE REMOVED BE-
FORE ANY REPAIR OR MAINTENANCE CAN BE
DONE.
(
N
Z
MINIER
Page 8
Parts Online
800-345-6007
Ardisam.corn

Earthauake
ASSEMBLY INSTRUCTIONS AND PARTS EXPLOSIONS
E43 Model
Spark Plug
The recommended spark plug is a NGK BM6A which cross refer-
ences to a Champion CJ8.
.
Check spark plug every 50 operating hours.
Disconnect the spark plug cap, and clean any debris from
around the spark plug area.
Remove spark plug and replace if any of the following occur; pit-
ted electrodes, burned electrodes, cracked porcelain, or deposits
around electrodes.
After analysis, seat spark plug and tighten with spark plug
wrench.
Reinstall original spark plug, tighten additional 1/2 turn.
Installing new spark plug, adjust spark plug gap to .030" and
tighten additional 1/8 — 1/4 turn .
NOTE: Loose spark plug may overheat and damage engine.
Over tightened spark plug may damage threads in the cylinder
head.
Carburetor
Never tamper with factory setting of the carburetor.
TRANSPORTING YOUR EARTH AUGER
Never transport engine inside an enclosed space or vehicle.
Fuel or fuel vapors may ignite causing serious injury or death.
If fuel is present in the fuel tank, transport in an open vehicle in
an upright position.
If an enclosed vehicle must be used, remove gas into an ap-
proved red fuel container.
DO NOT siphon by mouth.
Run engine to use up the fuel in the carburetor and fuel tank.
Always run engine in a well ventilated area. -
Wipe away any spilled fuel from engine and earth auger. Allow
to dry.
LONG TERM STORAGE
•
If your earth auger will not be used for more than one month, pre-
pare it for long term storage.
Steps for Long Term Storage
Add fuel stabilizer according to manufacturer's instructions.
Run engine for 10-15 minutes to ensure that the stabilizer reach-
es the carburetor.
Remove the remainder of the fuel from the gas tank into an ap-
proved fuel container.
Remove auger from powerhead and apply a thin layer of grease
to the output shaft (8913).
Store auger and powerhead (engine) in a vertical position.
Remove all debris from auger and powerhead (engine).
A
CAUTION
AVOID INJURYITO AVOID INJURY OR DEATH, NEV-
ER SIPHON FUEL BY MOUTH.
AVOID INJURY! NEVER STORE EARTH AUGER
WITH FUEL IN THE GAS TANK INSIDE AN EN-
CLOSED AREA OR BUILDING.
TO PREVENT ACCIDENTAL STARTING
.
AVOID INJURY! ENGINE MUST BE TURNED OFF
AND COOL, AND SPARK PLUG WIRE MUST BE RE-
MOVED FROM SPARK PLUG BEFORE CHECKING
AND ADJUSTING ENGINE OR EQUIPMENT.
AVOID INJURY! AN ADULT MUST ALWAYS DO
MAINTENANCE AND REPAIR ON ENGINE AND AU-
GER.
AVOID INJURY! ENGINE MUST BE SHUT-OFF,
COOL, AND SPARK PLUG WIRE REMOVED BE-
FORE ANY REPAIR OR MAINTENANCE CAN BE
DONE.
800-345-6007
Parts Online
Page 9
Ardisam. corn

Page 10
, •
Ardisam. corn
Earthauake
ASSEMBLY INSTRUCTIONS AND PARTS.EXPLOSIONS
E43 Model
SERVICE, TROUBLESHOOTING AND
REPAIR
SERVICE INFORMATION
At Ardisam, we build quality and durability into the design of our
products; but no amount of careful design by us, and careful main-
tenance by you, can guarantee a repair-free life for your auger. Most
repairs will be minor, and easily fixed by following the suggestions
in the troubleshooting guide in this section.
The guide will help you pinpoint the causes of common problems
and identify remedies.
For more complicated repairs, you may want to rely on your retailer,
an authorized mechanic or Ardisam, Inc. (contact your retailer for
a list Of authorized mechanics in your area). A parts catalog is
•
included in this section.
We will always be glad to answer any questions you have, or help
you find suitable assistance. To order parts or inquire about war-
ranty, call or write us at the address found below, under the section
ordering repair parts.
ORDERING REPAIR PARTS
Parts can be obtained from the store where your auger was pur-
chased or direct from the factory. To order from the factory, call or
write to:
Ardisam, Inc.
1690 Elm Street, Cumberland, Wisconsin 54829
1-800-345-6007 • 1-715-822-2415
E-mail: [email protected]
Please include the following information with your order:
Part numbers
Part description
Quantity
Model number and serial number
A
CAUTION
PRACTICE SAFETY AT ALL TIMES. ENGINE MUST
BE TURNED OFF AND ALLOWED TO COOL, AND
SPARK PLUG WIRE MUST BE DISCONNECTED
BEFORE ATTEMPTING ANY MAINTENANCE OR
REPAIR.
800-345-6007

Parts Online
(C•114
•
Ardisam.corn
Page 11
800-345-6007
Earthauake
ASSEMBLY INSTRUCTIONS AND PARTS EXPLOSIONS
E43 Model
TROUBLESHOOTING
Engine will not start
1. Power switch off
1. Flip switch to
ON
position
2. Spark plug wire disconnected
Connect spark plug wire to spark plug
Out of fuel
3. Refuel
4. Spark plug wet, faulty or improperly
gapped
4. Clean, replace or gap spark plug
5. Throttle control not held open
5. Squeeze throttle control when pulling recoil
handle
6. Fuel line hose not positioned in bat-
torn of gas tank
6. Push fuel line down into fuel in gas tank
Engine runs rough, floods during
operation
1. Dirty air filter
1. Clean or replace air filter
2. Choke partially engaged
Turn off choke
Carburetor out of adjustment
3. Call factory
Engine is hard to start
1. Stale fuel
1. Drain old fuel and replace with fresh.
Use gas stabilizer at end of season
2. Spark plug wire loose
Make sure spark wire is securely attached to
spark plug
Dirty carburetor
3. Clean carburetor, use gas stabilizer, new gas can
4. Throttle control not held open
4. Prime unit 3 more times, squeeze throttle when
pulling recoil handle
Engine misses or lacks power
1.
Clogged gas tank
1. Remove and clean
2. Clogged air filter
Clean or replace
Carburetor out of adjustment or bad
3. Call factory
4. Spark plug wet, faulty or improperly
gapped
4. Clean, replace or gap spark plug
Engine runs, then quits
1. Gas cap not venting
1. Open manual venting gas cap screw all the way
open (counterclockwise)
2. Plugged fuel filter
Clean or replace
Carburetor out of adjustment or bad
3. Call factory
Engine revs too high
1. Carburetor out of adjustment
1.
Call factory
Auger turns at idle
1. Idle speed too high
1.
Adjust idle speed lower
2. Broken clutch spring
2. Replace spring
Auger turns, but has no power
1. Choke on
1. Turn off choke after engine is running
2. Carburetor out of adjustment
Call factory
Broken transmission
3. Call factory
4. Worn clutch shoes
4. Replace clutch shoes and spring
5. Worn engine lower seat
5. Call factory
Auger jumps
1. Blade damaged
_
1. Replace with new blade
Auger cuts slowly
1. Dull blade
1. Buy new blade, or have blade sharpened at fac-
tory
2. Damaged fishtail point
2. Replace fishtail point
Contact service provider If above remedies Mil at 800-345-6007.

Co
47
a
33
39
18
17
16
2
3
4
6 1 a
7

Page 13
800-345-6007
Parts Online
Earthauake
ASSEMBLY INSTRUCTIONS AND P
A
RTS EXPLOSIONS
Ez13 Model
E43 ENGINE PARTS LIST
KEY
NO.
PART
NO.
DESCRIPTION
QTY.
1
300484
FLYWHEEL, MAGNETO
1
2
300337
NUT, FLANGE M8
1
3
300462
WASHER, ROTOR
2
4
300413
CLUTCH ROTOR ASSEMBLY
1
5
300412
SPRING, CLUTCH
1
6
300449
WASHER, SPRING
2
7
300450
BOLT, SHOULDER
2
8
300467
PIN, LOCATING
2
9
3004110
MOUNT RING & SHROUD
1
10
300491
RECOIL CLUTCH
1
11
300429
PLATE, RECOIL
1
12
3004121
HANDLE, RECOIL (STANDARD)
13
300430
RECOIL ASSEMBLY WITH
STANDARD HANDLE
1
14
300472
IGNITION COIL
1
15
300482
SHROUD, ENGINE
1
16
300493
BOLT, STUD M6 X 62MM
2
17
300475
GASKET, MUFFLER
1
18
4813
MUFFLER
1
19
4812
COVER, MUFFLER
1
20
BM6A
SPARK PLUG
1
21
300483
COVER, ENGINE SHROUD
1
22
300476
GASKET, INTAKE
1
23
300478
WINDPIPE, INTAKE 43CC/51CC
1
24
300479
GASKET, CARBURETOR
1
25
300486
CARBURETOR
1
26
300481
0-RING, CARBURETOR
1
27
3004109
PRIMER BULB
28
300329
BASE, INTAKE
1
KEY
NO.
PART
NO.
DESCRIPTION
QTY.
29
300489
LEVER, CHOKE
1
30
300328
CHOKE COVER
1
31
3004132
SCREW, THROTTLE LEVER
1
32
300455
PLATE, INTAKE COVER ADAPTER
1
33
300457
COVER, AIR FILTER
1
34
300435
AIR FILTER
1
35
300330
COVER, INTAKE
1
36
56105
BRACKET, GAS TANK
1
37
300331
GAS TANK
1
38
300401
GAS CAP, MANUAL VENTING
1
39
300332
SHROUD, GAS TANK
1
40
1021
SWITCH, ROCKER
1
41
300494
GROMMET, 2-HOLE GAS TANK
1
42
300497
HOSE, PRIMER LINE
1
43
300498
HOSE, FUEL LINE
1
44
300335
BOLT W/WASHER PHILLIPS HH
4
45
300492
NUT, FLANGE M6
2
46
300471
BOLT W/WASHER M5 X 12MM
5
47
300439
BOLT W/WASHER PH M5 X 18MM
7
48
300336
BOLT HH M6 X 10MM
2
49
300438
BOLT W/WASHER M5 X 25MM
2
50
300456
BOLT M5 X 50MM
2
51
300326
GUARD, SCREW
1
52
300338
KEY, FLYWHEEL
1
53
3004103
FILTER, FUEL
1
54
300351
BOLT HH M6 X 8MM
2
-
300470
FUEL LINE HOSE & FILTER
1
-
3004113
KIT, CARBURETOR
1
Ardisam.com

E43 POWERHEAD & AUGER PARTS EXPLOSION
il
20
10
19
21
Page 14
800-345-6007
a a
a
E;
1
3
7
10
11
22*
29
28"
Includes blade, fishtail point, shock spring, shock top, & hardware.
** Includes mounting hardware.
14
12
10
9
Arctisarpsotn
12
13
Earthauake
ASSEMBLY INSTRUCTIONS Ahl3 PAO'S EXPLOSIONS
E43 Model

Parts Online
•
Ardisam.com
800-345-6007
Earthauake
ASSEMBLY INSTRUCTIONS AND PARTS EXPLOSIONS
E43 Model
E43 POWERHEAD & AUGER PARTS LIST
KEY
NO.
PART
NO.
DESCRIPTION
QTY.
1
E43CC2
GAS ENGINE, 43CC
1
2
1027F
HANDLEBAR, FOAMED
1
3
3004119
TRANSMISSION COMPLETE
1
4
4809
TRIGGER ASSEMBLY
1
5
4814
BOLT 1O-24X 1-1/4 PHILLIPS
TRUSS HD
1
6
4811
THROTTLE CABLE
1
7
8930B
BOLT 1/4-20 X 3/4 HH GR5 BLK
4
8
3004111
GEAR CASE TOP
1
9
3004100
CLUTCH DRUM
1
10
8922
BALL BEARING R12 DOUBLE LIP
3
11
9814
GEAR 7
-
1 PINION THREADED
1
12
8924
SNAP RING
2
13
8915
DOWEL PIN STEEL 1/4" X 1/2"
1
14
8912
GEAR 44T 3/4" HOLE
1
15
8919
GASKET
1
16
8923
BALL BEARING R10
2
17
9214
GEAR 10T/48T ONE-PIECE
CLUSTER
1
18
8939
GEAR CASE BOTTOM
1
19
8913
SHAFT OUTPUT 7/8"
1
20
8929
BOLT 1/4-20 X 1-1/2 SHCS
2
21
8931F
BOLT 1/4-20 X 2 SHCS F-T
4
KEY
NO.
PART
NO.
DESCRIPTION
OTY.
22*
EA2F
EARTH AUGER 2", COMPLETE
1
EA3F
EARTH AUGER 3", COMPLETE
1
EA4F
EARTH AUGER 4", COMPLETE
1
EASE
EARTH AUGER 6", COMPLETE
1
EASE
EARTH AUGER 8", COMPLETE
1
EA1OF
EARTH AUGER 10", COMPLETE
1
23
1423
BOLT 5/16-18 X 2 HHCS GR5
2
24
WF516
WASHER, FLAT 5/16" STANDARD
2
25
60056
NUT 5/16-18 BI-WAY LOCK
2
26
53684
SHOCK TOP 1-PC
1
27
8980
SHOCK SPRING
1
28**
EB4
EARTH BLADE, 4"
1
EB6
EARTH BLADE, 6"
1
EB8
EARTH BLADE, 8"
1
EB10
EARTH BLADE, 10"
1
-
EB4HD
HEAVY DUTY EARTH BLADE, 4"
1
EB6HD
HEAVY DUTY EARTH BLADE, 6"
1
EB8HD
HEAVY DUTY EARTH BLADE, 8"
1
EB1OHD
HEAVY DUTY EARTH BLADE, 10"
1
29
EBOLT
BOLT 1/4-28 X 5/8 HH GR5
2
30
ENUT
NUT 1/4-28 BI-WAY LOCK
2
31
8958HD
FISHTAIL POINT SHARPENED
1
8970
POINT, EARTH 2"
&
3" AUGERS
1
32
1433
BOLT 3/8-16 X 1-1/2 HH
1
33
2104
NUT 3/8-16 HEX LOCK BI-WAY
1
34
.
SM,.,
SHOCK MECHANISM (USED ON
6" OR LARGER EARTH AUGERS
BEFORE 11/05)
1
-
EXT6
DEPTH EXTENSION 6"
1
EXT6
DEPTH EXTENSION 12"
1
EXT6
DEPTH EXTENSION 18"
1
INCLUDES.BLADE, FISHTAIL POINT, SHOCK SPRING, SHOCK
TOP, & HARDWARE
** INCLUDES MOUNTING HARDWARE
Page
15

Earthquake, Division of Ardisam, Inc.
1690 Elm Street; P.O. Box 666
Cumberland, Wisconsin 54829
800-345-6007 • Fax (715) 822-2223
E-mail: [email protected]
Parts Online
S
.
Ardisam.corn
S
A
VN
4
r.
ARDISAM
.com
Russ

;II
Earthquake
INS TRUCCIONES DE ENSAMBLAJE Y
VISTA AUMENTADA DE LAS PIEZAS
E43 CABEZAL DE CONTROL DE LA BA ARENA
DE TIERRA
-
ARDISAM
=CCID
•
A rdisam. corn
OME43
Rev. 3/28/07
© Copyright 2007 Ardisarn. Inc.
Todos los derechos reservados. !mores° en los EE. UU.
C

INSTRUCCIONES DE ENSAMBLAJE Y VISTA
AUMENTADA DE LAS PIEZAS
Model() E43
Earthauake
INTRODUCCION
GRACIAS...
por comprar un cabezal de control Earthquake® de Ardisam, Inc.
Hemos trabajado para asegurar qua la barrena de tierra cumpla
con altos estandares de funcionalidad y durabilidad. Con un cui-
dado adecuado, esta barrena de tierra le brindara muchos
.
ailos de
servicio. Por favor, lea atentamente este manual para aprender a
utilizar y a mantener correctamente su barrena de tierra. Felicitacio-
nes por haber invertido en calidad.
LISTA DE MATERIALES
Registro y garantia
2
Seguridad
3-4
Funcionamiento
5-8
Mantenimiento y almacenamiento
8-9
Servicio, solucien de problemas y reparaciones
10-11
Vista aumentada de las piezas
12-15
REGISTRO
Registre el rulnero de modelo y el nOmero de serie en el espacio
provisto para facilitar la referencia. Complete y envie la tarjeta de
registro que esta en el paquete de piezas de la herramienta. La ga-
rantla tendra validez Unicamente si Ardisam, Inc. recibe su tarjeta de
registro completa en el momento de la compra.
hkimero de modelo
Namero de serie
Fecha de compra
Lugar de compra
GARANTIA
Earthquake, una divisi6n de Ardisam Incorporated, ofrece
una garantfa limitada por un año y garantiza que sus pro-
ductos estaran libres de defectos de los materiales o de
la fabricacit5n durante el tiempo de duracion del producto
incluido el motor, por un period° que no sea superior a los
doce meses a partir de la fecha de compra. Esta garantia
se aplica al comprador original que tenga el comprobante
de compra y no es transferible. Esta garantia se aplica
solamente a los productos que no hayan sido dafiados por
uso negligente, por uso incorrecto, por alteraci6n o por ac-
cidentes, y que no hayan sido reparados fuera de la fabrica.
Esta garantia reemplaza cualquier otra garantia, expresa o
implicita, y cualquier otra obligaci6n o responsabilidad de la
empresa. Ardisam, Inc. no asume ninguna responsabilidad
relacionada con la yenta de sus productos ni autoriza a
que ninguna persona lo haga a su nombre. El trabajo de
garantfa se debe enviar directamente a Ardisam, Inc. o a un
centro de servicio autorizado para que sea realizado. Para
obtener servicio de garantia e instrucciones de reemplazo,
Dame al departamento de servicio al cliente al 800-345-6007
o escriba a: Ardisam, Inc., 1690 Elm Street, Cumberland,
WI 54829. Debe enviar los articulos con todos los gastos
pagos. Ardisam, Inc., a su criterio, reparara o reemplazara
sin costo alguno las piezas defectuosas que cumplan con
las condiciones arriba mencionadas. Ardisam se reserva el
derecho de cambiar los modelos, las especificaciones y los
precios sin previo aviso.
Page 2
C
IMRE
M*,
2=
•
800-345-6007
Ardisam.com

A
ADVERTENCIA
ADVERTENCIA CONFORME A LA PROPUESTA N.°
65 DE CALIFORNIA
LOS GASES DEL ESCAPE DE ESTE PRODUCTO
CONTIENEN OUIMICOS OUE EL ESTADO DE
CALIFORNIA RECONOCE COMO CAUSANTES DE
CANCER Y MALFORMACIONES CONGENITAS U
OTROS Dann REPRODUCTIVOS.
.
.
,
A
PRECAUCION
LA SEFIAL DE PRECAUCION INDICA GUE USTED
0 EL EOUIPO PUEDEN SUFRIR DANOS SI NO
SIGUE LAS INSTRUCCIONES DE SEGURIDAD OUE
APARECEN.
IMPORTANTE
INDICA INFORMACION IMPORTANTE PARA EL
ENSAMBLAJE, EL FUNCIONAMIENTO
0
EL MAN-
, TENIMIENTO DEL EQUIP°.
Earths:wake I
INSTRUCCIONES DE ENSAMBLAJEY VISTA AUMEN-
.
TADA DE LAS PIEZAS
Modelo E43
SEGURIDAD .
RESPONSABILIDAD DEL PROPIETARIO
El ensamblado correcto y la utilizacien segura y elective de la bar-
rena son responsabifidad del propletario.
Lea y siga atentamente todas las Instrucciones de seguridad.
Siga culdadosamente todas las instrucciones de ensamblaje.
Mantenga la barrenaeegfin las indicaciones y el esquema que
se incluyen en el maneal del operador de esta herramienta
Earthquake®.
Asegtirese de que laepersonas que utilicen la barrena
ester) familiarizadas con todos los controles y con todas las
precauciones de seguridad.
AVISOS ESPECIALES
Este manual contiene avisos especiales para dirigir la atencien
hacia asuntos de seguridad y dafios que puedan ocasionarse en la
maquina, como tambien information Otil sobre el funcionamiento y
el mantenimiento de la herramienta. Por favor, lea toda la infor-
macien atentamente para evitar accidentes y darlos en la maquina.
NOTA: En este manual, se Winds Informaclon general que
puede ayudar al operador en la utIllzacion o en el manten-
lmlento de la magulna.
PRECAUCIONES IMPORTANTES DE SEGURIDAD
Por favor, lea atentamente esta secclOn
s
Maga funcionar la bar-
rena segtin las instrucciones de seguridad y las recomendaciones
indlcadas aquf e insertadas a to largo del texto. Cualquier persona
que vaya a trabajar con esta mdquina debe leer las instrucciones y
debe familiarizarse con los controles.
A
Este sfmbolo destaca las Instrucclones Importantes
de segurldad que debe segulr para no poner en poll-
gro su segurldad personal. Antes de Intentar poner
este equip() en funclonamlento, lea y slga todas las
Instrucclones contenldas en este manual.
No mueva el cabezal de control de la barrena entre un agujero y otro
si el motor este encendido.
La barrena no deberla girar cuando el motor funciona con marcha
lenta. Si gira cuando el motor funciona en march° tante, pclingase on
contact° con Ardisam,Inc.
Mantenga siempre las manos, los pies, el cabello y la rope suelta
alejados de las piezas mOviles del motor y de la barrena.
No deje que los nifios hagan funcionar este maquina. No deje qua los
adultos hagan funcionar esta maquina si no han sido instruidos cor-
rectamente.
No haga funcionar ninguna herramIenta electrica si este bajo la infiu-
encia del alcohol o de las drogas.
Mantenga bien ajustados todos los tornillos, las tuercas y los pernos.
Antes de intentar realizar cualquier fipo de reparation, debe apagar el
motor y dejar que se enfrfe, y debe desconectar el cable de la bujfa.
Las temperatures del silenciador y de las dread circundantes pueden
exceder los 150°F (65 °C). Evite el contacto con estas Areas.
Nunca haga funcionar el motor en interiores ni en un area cerrada. Los
gases del escape del motor contienen morroxido detarbono, un gas
Inodoro y letal.
Si la barrena de tierra no gira en un agujero, apague el motor
y deje que este se enfrle antes de intentar extraerla a mano.
Utilice solamente piezas originates fabricadas per Ardisam,
Inc., incluidas todas las tuercas y los pernos.
PRECAUCIONES DE SEGURIDAD DEL MO-
TOR
Advertencla. Envenenamlento nor monoxIdo de
car-
122/16
Los gases de los escapes de todos los motores tienen
Monexido de carbono. El monexido de carbono es un
gas letal, incoloro, insfpido e inodoro, que puede estar
presente en el ambiente, aun cuando usted no sienta
ni
yea ninglin escape de motor. Los niveles de monclofido;
que pueden ser letales, pueden ester presentes durante
dfas en un Area cerrada que no tenga una ventilacien
adecuada. Cualquier nivel de monOxido de carbono, al ser
inhalado, puede causar dolores de cabeza, somnolencia,
nauseas, mareos, confusion y, finalmente, la muerte. Si
. experimenta alguno de estos sfntomas, retfrese a tomer
. aire fresco y busque atencien mificlica de inmediato.
600-345-6007
N=SI
Page 3
Ardisam.com

INSTRUCCIONE§:DE EtISAMBLAJE-y VtSTA
AUMENtADA DE LAS illEtAS
- _ •
—."-Modelo E43
Earthauakt
Prevencian del envenenemlento nor monextdo de carbono
Nunca haga funcionat rirj motoc entriterioree
Nunca Intents ventilar los gales del escape
ael
motor en
interfores. El monexido ble carbono puede alcanzar niveles
muy pelignisaiimuy rapIdarnente.
Nunca haga funcionaran motor en lugares exteriores
donde los gases del escape puedan introdricIrse en un
edificio.
Nunca haga funcionar un motor en areas exterlores con
ventilaci6n inadecuada, donde los gases del escape pu-
edan quedar atrupados (los bjemplos incluyen: un agujero
grande o zonas en donde el area detrabajo esta rodeada
por colinas).
Nunca haga funcionar el motor en un area cerrada o
parcialmente cerrada (los ejemplos incluyen: edificios que
ester, cerrados en uno o en mas lados, debajo de tiendas,
estacionamientos de autos o s6tanos).
Siempre haga funcionar el motor con el escape y el silen-
ciador orientados en la direcci6n opuesta a la del operador.
Nunca didja el silenciador del escape hacia ninguna
persona. Las personas deben mantenerse a varios pies de
distancla del lugar donde Osten funcionando el motor y sus
acoplamlentos.
Incendlos ocasionados por aasollna y manelo seguro de
los combustibles
Los combustibles y sus vapores son muy inflamables. Nunca
utilice combustible en lugares donde pueda haber chispas
o llamas. Nunca utilice gasoline en lugares donde pueda
haber una fuente potencial de ignician (los ejemplos incluyen:
calentadores de agua o de aire, secadoras de ropa, motores
elactricos, etc.).
Para evitar incendlos, mantenga las llamas y las chispas ale-
jadas del motor y del combustible. Los incendios ocasionados
par combustibles se esparcen con mucha rapidez y son muy
explosivos.
Prevenclon de Incendlos ocasionados nor gasoline
Nunca Ilene el tanque de combustible en intedores (los
ejemplos incluyen: satanos, garajes, cobertlzos, casetas,
casas, porches, etc.).
Llano siempre el tanque de combustible en un area bien
ventilada.
Nunca quite la tape del tanque de combustible nI agregue
combustible cuando el Motor este funclonando. Dbtenga el
motor y deje que se enfrfe antes de Ilenar el tanque.
Nunca extraiga el combustible del motor en un area cer-
rada.
Antes de hacer arrancar el motor, quite siempre el exceso
de combustible (que.se
haya derramado). Limpie inmedi-
atamente el combustible que se haya deiramado.
Antes de hacer arrancar el motor, limpie con un pafio el
.
combustible que se haya derramado y deje que se segue
completamente.
.
Antes de hacer arrancar el motor, deje que los vapores/hu-
mos se disipen del area.
• .
Verifique que la tapa del combustible este correctamente
; •
instalada antes de hacer arrancar el motor y de utilizarlo.
Siempre haga funcionar el motor con
ja
tape corcecta-
mente instalada y con el tornillo de I'S ventilacian'aela tapa
sin atomillar.
.
;
Reemplace la tape del combustible que permita las juges o
los derrames de gasoline;
Nunca fume mientras esta lienando el tanqub de combus-
tible.
•
Evite los Incendios y las explosiones ocasionados por
descargas elactricas. Use solamente recipientes portatiles
para combustible que no seen metalicos y que ester) -
aprobados por IJLt o por la ASTM (American Society for
-Testing & Materials [Sociedad Norteamericana de Ensayo
de Materiales]).
Si el motor tiene combustible en el tanque, no lo almacene
en interiores. El combustible y sus vapores son muy explo-
sivos.
Durante el almacenaje, ajuste bien el tornillo de la venti-
lacian de la tapa del tanque de gasoline.
Nunca vierta el combustible desde el tanque de combus-
tible del motor.
Nunca aspire con la boca para vaciar el tanque.
•
El tanque de combustible debe ser Ilenado solamente por
personas adultas.
Nunca deje que una persona adulta Ilene el tanque de
gasoline bajo la intluencia del alcohol ode las drogas.
Nunca deje que los nIfios Ilenen el tanque.
OUEMADURAS E INCENDIOS
El
silenciador, el protector del silenciador y otras piezas del
motor alcanzan temperatures muy altas cuando el motor esta
en funcionamlento. Estas plazas permanecen a altas temper-
atures despuas de que se apaga el motor.
Prevenclen de auemaduras e Incendlos
Nunca extraiga del motor el protector del silenciador.
Nunca toque el protector del silenciador, ya que Oslo esta
a temperaturas muy altas y puede causarle quemaduras
muy-graves.
Nunca toque las piezas del motor que permanecen calien-
tes luogo del funcionamiento.
Para evitar incendios, mantenga siempre los materIales y
los desechos alejados del protector del silenciador y de las
demds plazas calientes del motor.
Este motor esta diseriado para tunclonar con un converti-
dor catalftico que contribuye a que el motor cumpla con las
normas de la Agencia de Proteccion Ambiental (EPA, Environ-
mental Protection Agency).
A
PRECAUCION
LOS GASES A ALTAS TEMPERATURAS SON UN
SUBPRODUCTO NORMAL DE UN CONVERTIDOR
CATALMCO EN FUNCIONAMIENTO. PARA EVITAR
OUEMADURAS E INCENDIOS, SIGA TODAS LAS
INSTRUCCIONES DE SEGURIDAD.
•
. Ardisafmcorn
800-345-6007
Page 4

Earthauakt
INSTRUCCIONES DE ENSAMBLAJEY VISTA AUMEN-
,:. TADA DE LAS plEZAS
Modelo E43
FUNCIONAMIENTO
PASOS PARA TRABAJAR CON EL MOTOR 0 CON
LA BARRENA
Coloque el interruptor del motor en la posiciOn de apagado.
Desconecte el cable de la bujfa. ,
Coloque of cable de la bujfa desconectado en un lugar que este
a una distancia segura de la bujfa
.
Y de las plazas metalicas.
Esto debe realizarse para que no se produzca un arco electric°
entre el cable de la bujfa y las piezas metelicas.
Reemplace o repare la pieza del motor ode la barrena.
Revise todas las piezas que se hayan reparado, o que se hayan
extrafdo durante la reparaci6n, para verificar que ester, asegura-
das y que encajen correctamente.
NOTA:Todas las plazas de reemplazo deben set envladas
desde In fabrica. Nunca coloque plezas que no hayan sido
disefiadas especificamente para el motor o para la bar-
rena.
Vuelva a colocar el cable de la bujia.
PREPARACION DEL MOTOR PARA EL ARRANOUE
Antes empezar su motor de powerhead, la marca segura la en-
voltura negra de cable de valvula de admisiOn se sienta complete-
mente on el regaten de laten en el lado de motor del cable.
COMBUSTIBLE Y ACEITE
Calldad
Pam hacer funcionar el motor, recomendamos utilizer el aceite 'VI-
PER" de 2 tiempos
(PN
300400), a fin de asegurarse de que el mo-
tor funcione siempre correctamente. Utilice combustibles normales
sin plomo solamente.
Mezcla
Raga funcionar la barrena de tierra con una proportion de 50:1.
PROPORCION DE COMBUSTIBLE Y ACEITE
3,8 litros
2.5 ounces
50:1
3,8 litros
5 ounces
50:1
.
19,3 litros
13 ounces
50:1
MEZCLA DEL COMBUSTIBLE Y LLENADO DEL TANQUE DE
COMBUSTIBLE
Mazola del combustible
El combustible debe mezclarse en un recipiente, en un area
exterior que tertga buena ventilacien..
Uene 1/4 del tanque de combustible certificado con el combus-
tible recomendado.
Agregue la cantidad recomendada de aceite para motores de 2
.
, .
tiempos.
Enrosque la tapa del recipiente y verifique que quede recta y
ajustada.
A
PRECAUCION
110
ALTERE NI MODIFIQUE EL MOTOR NI LA BAR-
RENA:
IEVITE LESIONESI NUNCA ALTERE NI MODIFIQUE
LAS CONFIGURACIONES DEL MOTOR QUE VI-
ENEN DESDE LA FABRICA. SI
MODIFICA 0 AL-
TERA EL MOTOR, PUEDEN OCURRIR LESIONES
GRAVES 0 LA MUERTE.
IEVITE LESIONESI CUANDO TRABAJE 0 REEM-
PLACE PIEZAS DEL MOTOR 0 DE LA BARRENA,
DEBE DESCONECTAR SIEMPRE EL CABLE DE LA
BUJIA Y MANTENERLO ALEJADO DEL ENCHUFE
DE LA BUJIA.
IEVITE LESIONES! CUANDO HAGA FUNCIONAR
EL MOTOR, UTILICE SIEMPRE PROTECCION PARA
LOS OIDOS.
LEVITE LESIONES! NO HAGA ARRANCAR LA BAR-
RENA DE TIERRA BASTA QUE HAYA LEIDO LA
SECCION ANTERIOR DE ESTE MANUAL SI LAS
LEYO, SIGA LOS PASOS QUE SE DETALLAN A
CONTINUACION PARA HACER QUE LA BARRENA
DE TIERRA ARRANQUE.
IEVITE LESIONES! NUNCA ALMACENE EN INTE-
RIORES UN MOTOR QUE TENGA COMBUSTIBLE
EN EL TANQUE. LOS COMBUSTIBLES Y SUS VA-
PORES SON MUY INFLAMABLES.
IEVITE LESIONES! NUNCA MEZCLE EL COM-
BUSTIBLE Y EL ACEITE DIRECTAMENTE EN EL
TANQUE DE COMBUSTIBLE. USE SOLAMENTE
RECIPIENTES PORTATILES PARA COMBUSTIBLE
QUE NO SEAN METALICOS Y QUE ESTEN APRO-
BADOS POR UL® 0 POR LA ASTM (AMERICAN
SOCIETY FORTESTING & MATERIALS (SOCIEDAD
NORTEAMERICANA DE ENSAYO DE MATERIA-
LEW
IEVITE LESIONES! SOLO LAS PERSONAS
ADULTAS PUEDEN LLENAR EL TANQUE DEL MO-
TORY MANIPULAR EL COMBUSTIBLE.
IEVITE LESIONES! SIEMPRE MANIPULE EL ACEITE
EN UN AREA BIEN VENTILADA, EN EXTERIORES,
ALEJADA DE LAS LLAMAS 0 DE LAS CHISPAS.
I M PO RTANTE
ESTE MOTOR UTILIZA UNA MEZCLA DE GASOLI-
NA Y DE ACEITE. NO HAGA FUNCIONAR LA HER-
RAMIENTA SOLAMENTE CON GASOLINA, YA QUE
ESTO DASARA EL MOTOR.
Agile el recipiente para mezclar el combustible y el
aceite.
Desenrosque la tapa lentamente para ventilar el recipi-
entey agregue la cantidad de combustible que haga
fafta...
U
.7. repie. con un pan° el combustible o el aceite que se
hayan derrainado y dojo que se evaporen antes
de
mover o transporter el recipiente.
800-345-6007
MEI
Page 5
Ardisam.com

A
PRECAUCION
IEVITE LESIONESI SIEMPRE MANIPULE EL ACEITE
EN UN AREA BIEN VENTILADA, EN EXTERIORES,
ALEJADA DE LAS LLAMAS 0 DE LAS CHISPAS.
IEVITE LESIONESI NO ENCIENDA EL MOTOR SI
SE DERRAMA COMBUSTIBLE. LIMPIE CON UN
PANO EL COMBUSTIBLE OUE SE HAYA DERRA-
MADO Y DEJE OUE SE SEOUE. RETIRE EL MOTOR
DEL AREA PARA EVITAR OUE SE PRODUZCAN
CHISPAS.
durante un perfodo de tiempo prolonged° en un
clime and°, ventlle is tape del tongue de gasoline
pars esker que el combustible gotee del carbura-
dor.
INSTRUCCIONES
DE
ENSAIVIBLAJ.EYyISTA
AUMENTADADEIKS*IEZAS
‘
1
.Y90.
10
..C
43
Earthauake'
Penedo del tanque de combustible
I.
Apague el motor y deje que se enfrfe completamente antes de
volver a Ilenar el tanceie de gasoline.
Retfrese a un area bien ventilada, en exteriores, que este ale-
jade de las Hates y de las
.
chispas.
ympip los desechos que haya en el area de alrededor de la
tapa del tanque de gasoline.
Afloje lenieMente la tapa. Coloque la tapa en une superficie
limpia y seca.
Agregue cuidadosamente el combustible sin derramarlo.
No gene completamente el tanque de gasoline, deje espacio
para quo esta se expanda.
7. Vuelva a colocar inmediatamente la tapa del tanque y ajustela.
Antes de hacer que el motor arranque, limpie con un ph° el
oombustible que se haya derramado y dojo que se segue.
FUNCIONAMIENTO NORMAL
I. El embrague transferid la potencia maxima luego de 2 hams de
funcionamiento normal. Durante este period% puede ocurrir un
desliiamiento del embrague. El embrague debe mantenerse sin
eceitey sin humedad para que funcione correctamente.
Haga los agujeros sin apoyar demasiado el peso del cuerpo en
la unidad. La barrena funciona mas eficazrnente con la mei&
de corte que produce el peso mismo de la unidad.
Nunca haga funcionar un motor en interiores. Los gases del
escape son letales.
No Wince la barrena de form sobre hielo.
Para sujetar la barrena en el cabezal de control, alinee.el agu-
jero de la parte superior del eje de Ia barrena con el agujero del
eje propulsor. lnserte un porno de 3,8 cm, con rosca de 9,5 MM
x 16 MM, y asegurelo con la tuerca de seguridad de dos direc-
clones y una Ilave inglesa.
UTILIZACION DE LA TAPA DE VENTILACIGN MANU-
AL CON TORNILLO DEL TANOUE DE GASOLINA
El tanque de gasoline de su barrena de terra con motor este equi-
pado con una tapa de ventilacien manual con tornillo.
Antes de hacer que &unique el motor, giro completamente (en
el sentido opuesto al de las manecillas del reloj) el tornillo de la
parte superior de la tapa, hada la posicien de ventilacien. Pam
asegurarse de que la gasoline no se derrame durante el uso,
verifique que la tapa del tanque de gasoline este bien enrosca-
da y que el tornillo de la tapa este on la,ppsicion deyentilacien.
Luego de utilizer la barrena de tierra y antes de almacenarla o
de transporterla en un vehfculo, enrosque bien el tornillo de la
tapa (en el sentido de.las manecillas•deLn3loll. Esto evitara que
el combustible gotee durante el almacenaje. La tapa del tanque
de gasc4ina no goteara durante el almaceneje
,
§i
e
gsta
.
ajustada y
si el tornillosle la parte superior esta ajuliado;
eJn9
NOTA: Cuando guarde Ia unidad en posiclonVertIcal
Page 6
800-345-6007
Ardisam.com

A
FRECAUCION
IEVITE LESIONES! SIEMPRE MANIPULE EL COM-
BUSTIBLE EN UN AREA BIEN VENTILADA, EN EX-
TERIORES, ALEJADA DE LAS LLAMAS 0 DE LAS
CHISPAS.
!EVITE LESIONES! NO ENCIENDA EL MOTOR SI
SE DERRAMA COMBUSTIBLE. LIMPIE CON UN
PAR
-
0 EL COMBUSTIBLE QUE SE HAYA DERRA-
MADO Y DEJE QUE SE SEQUE. RETIRE EL MOTOR
DEL AREA PARA EVITAR QUE SE PRODUZCAN
CHISPAS.
IEVITE LESIONES! SI LA BARRENA ESTA INSTA-
LADA SOBRE EL MOTOR, DEBE TENER TODAS
GUARDAS DE SEGURIDAD PARA EVITAR LESIO-
NES GRAVES.
iEVITE LESIONES! LA CUERDA DE ENCENDIDO
PUEDE OCASIONAR UNA SACUDIDA IMPREVISTA
EN DIRECCIoN AL MOTOR. SIGA ESTAS INSTRUC-
CIONES PARA EVITAR LESIONES.
IEVITE LESIONES! SI EL MOTOR NO ARRANCA
DESPUES DE INTENTAR EL PROCEDIMIENTO DE
ENCENDIDO, LLAME A NUESTRO DEPARTAMEN-
TO DE SERVICIO AL CLIENTE AL 800-345-6007.
IEVITE LESIONES! NUNCA DEJE DESATENDIDA
LA HERRAMIENTA CUANDO EL MOTOR ESTE EN-
CENDIDO. APAGUELO LUEGO DE CADA USO.
IEVITE LESIONES! NUNCA MUEVA EL CABEZAL
DE CONTROL Y LA BARRENA ENTRE UN AGUJE-
RO Y OTRO CON EL MOTOR ENCENDIDO.
A
ADVERTENCIA
IEVITE LESIONES! ASEGURESE DE QUE LA UNI-
DAD SE ENCUENTRE EN UNA POSICION ESTABLE
ANTES DE TIRAR DE LA MANIJA DE LA CUERDA
DE ENCENDIDO.
IEVITE LESIONES! CUANDO LA UNIDAD AR-
RANQUE, UBERE EL CONTROL DEL REGULADOR
MOMENTANEAMENTE CON LA MANO DERECHA
Y COLOQUE LA MANO IZQUIERDA EN EL MANGO
PARA MANTENER EL CONTROL Y LA ESTABILI-
DAD DE LA UNIDAD CON LAS DOS MANOS.
9. Para apagar el motor, mueva el interruptor de balancin
hacia la posicien
OFF (APAGADO).
INSTRUCCIONES DE ENSAMBLAJEYVISTA AUMEN-
'
TADA DE LAS PIEZAS
Modelo E43
Earthauake
ENCENDIDOY APAGADO DEL MOTOR
Mueva el motor a un area bien'ventilada, en exteriores, para
evitar el envenenamiento por monoxido de carbono.
Para evitar la ignicien de los vapores que puedan-estar presen-
tes, mueva la herramienta a un area que este alejada de las
llamas o de las chispas.
Para asegurar el flujo adecuado de aire, quite todos los
desechos de los agujeros del filtro de aim y de la tapa del
tanque de gasoline.
ARRANQUE EN FRIO;
Encendido del motor por primera vez o
despues de que este se haya quedado sin gasoline.
Desenrosque completamente el tornillo de la ventilacion de la
tapa del tanque (en el sentido contrario de las manecillas del
reloj).
Mueva la palanca del estrangulador hacia la posicien
RUN
(MARCHA) u OFF (APAGADO).
NOTA: El estrangulador debe ester en la posicion RUN
(MARCHA) u OFF (APAGADO) cuando presione o utilice el
foco cebador.
Cobs la unidad hasta que la manguera del cebador se liens de
gasoline.
NOTA: Cuando utillce el foco cebador, deje que el loco
vuelva a su posickin original entre un empujthn y otro.
Mueva la palanca del estrangulador hacia la posiciOn
CHOKE
(ESTRANGULADOR) u ON (ENCENDIDO).
NOTA: La posicion del estrangulador se alcanza cuando
se mueve la pedants del estrangulador tan cerca de la
posician ON (ENCENDIDO) como sea posible.
Coloque el interruptor de balancin en la posicion
ON (ENCEN-
DIDO).
Apriete el control de valvula de admisi6n con mano derecha.
Tome con la mano izquierda la manija de la cuerda de encen-
dido y tire suavemente, hasta que ofrezca un poco de resis-
tencia. Sin dejar que la cuerda se retraiga, tire de ella con un
tiren rapid°. Deje que vuelva suavemente a su posicion original.
Repita este paso cada vez que tire de la cuerda de encendido.
NOTA: Si el motor no erratica luego de
56
6 tirones,
empuje 1 vez el cebador y vuelva a firer de la cuerda de
encendido.
Cuando el motor arranque, mueva la palanca del estrangulador
hacia la posicion mediana hasta que funcione suavemente.
NOTA: La posiclon mediana del estrangulador se alcanza
cuando se mueve la palanca del estrangulador entre la
posicion CHOKE (ESTRANGULADOR) y RUN (MARCHA), u
OFF (APAGADO) y ON (ENCENDIDO).
Mueva la palanca del estrangulador hacia la posiciOn
RUN
(MARCHA) u OFF (APAGADO)
y mueva el regulador de poten-
cia hacia la posiciOn que desee.
NOTA: Haga funcionar la unidad a toda potencia cuando
sea posible. No deje la unidad funclonando en marcha
lenta de motor durante periodos de tlempo prolongados.
800-345-6007
Its
=It
•
Page 7
Ardisam.corn

A
PRECAUCION
•
PARA EVITAR ARRANQUES
ACCIDENTALES•
IEVITE LESIONESI EL MOTOR DEBE ESTAR
APAGADOY FRIO,Y DEBE EXTRAERSE EL CABLE
DE LA BUJIA ANTES DE REVISAR Y DE AJUSTAR
EL MOTOR 0 EL MINI
IEVITE LESIONESI LAS TEMPERATURAS DEL SI-
LENCIADOR Y DE LAS AREAS CIRCUNDANTES
PUEDEN EXCEDER LOS 150 °F (65 °C). EVITE EL
CONTACTO CON ESTAS AREAS.
IEVITE LESIONESI REVISE FRECUENTEMENTE
LA BARRENA PARA COMPROBAR OUE NO HAYA
TUERCAS NI PERNOS SUELTOS. MANTENGA
AJUSTADOS ESTOS ELEMENTOS.
IEVITE LESIONESI NUNCA ALMACENE EN EL IN-
TERIOR DE UN EDIFICIO UN MOTOR OUE TENGA
COMBUSTIBLE EN EL TANOUE. PUEDE HABER
CHISPAS, OUE PUEDEN CAUSAR LA IGNICION
DEL COMBUSTIBLE 0 DE SUS VAPORES.
IEVITE LESIONESI UNA PERSONA ADULTA DEBE
REALIZAR EL MANTENIMIENTO Y LA REPARA-
C1681 DEL MOTOR Y DE LA BARRERA.
IEVITE LESIONESI ANTES DE REALIZAR CU•
ALOUIERTAREA DE MANTENIMIENTO ODE REPA-
RAcION, DEBE APAGAR EL MOTOR, DEJAR OUE
SE ENFRfE Y GUITAR EL CABLE DE LA BUJfA.
filtro de alre
Nunca haga funclonar el motor si el filtro de aire no este
debidamente Instate& El motor puede faller y puede pro-
ducirse un desgaste adicional si no este instalado el filtro
de aire en el motor.
Flealice el mantenimiento del filtro de aim cadd3 meses o
cada 20 horas de funcionemlento.
En lugares polvorlen-
tos, limple el Vitro dlariamente.
. „
•
Pesos Pori [Imolai los
ultras de aire
1. Levelos con agua tibia y jab6n suave haste quo desa-
parezcan la suciedad y los desechos. Presione el filtro
cuando lo lave, rib lo retuerza.
Enjueguelo con agua tibia haste quo el jaben y la suc-
ledad desaparezcan.
Segue el filtro enyolvienciolo con un pafio suave y
presienelo hasta quo quede seco.
4
:
Aplique aceite en todo el Miro.
.15..:Fletire el exceso de aceite.
6. Sujete el filtro y la cubierta de dste en el motor.
;
INSTRUCCIONES DE ENSAMBLAJEYAIISTA
. _AUMENTADA DE LAS PIEZAS
Modelo E43
"Ci
r
.:•"" " •
t
:
Earthauake
d 'TY
ARRANQUE EN TIBIO
.
•
Desenrosque completamente el tomillo de Is vended& de la
tapa del tanque (en el sentido contrario de la
s manillas del
.:;
..••
reloj).
Mueva la paler= del estrangulador hacia la posicien CHOKE
(ESTRANGULADOR)
u ON (ENCENDIDO).
NOTA: La posIclon del estrangulador se alcanza cuando
,
se mueve Is palanca del estrangulador tan coma de Is
posIclon ON (ENCENDWO)como sea posIble.
Siga con el Paso 5, "Arranque de motor en trio".
ARRANQUE DEL MOTOR EN CALIENTE
.
Desenrosque completamente el tornillo de la ventilacien de la
tapa del tanque (en el sentido contrarlo de las manecillas del
reloj).
• •
Siga con el Paso 5 Arranque de motor en trio.
Si el motor no arranc.e, yea el Paso 2 de Arranque de motor en
tibio.
NO
Intente hacer cue el motor arranaue de las slgulentes
Maneras•
NO utilice fluido de arranque.
NO rode liquidos inflamables n1 vapores en el filtro de sire,
en el carburador o en la camera de la buy&
NO the de la cuerda de encendido cuando haya extraido la
built Oulza salga combustible, que puede encenderse con
una chIspa de la built
MANTENIMIENTO Y ALMACENAJE
MANTENIMIENTO DE LA BARRENA
La caja de engranajes viene desde la Mita con
4
onzas de
grasa. Se recomienda abrir la caja de engranajes una vez por
afio y verificar el nivel de grasa.Agregue grass solamente si el
nivel este debajo de la parts superior de los engranajes. NO LA
SOBRELLENE.
.
,
Mantenga.bien ajustados todos los tomillos, las tuercas y los
pernos.
Pam hacer funcionar la mequina cuando la temperatura es
muy frfa, almacene la unidad on un ambiente trio. Transferir la
mequina de un lugar aid) a un lugar trio puede causer una
acumulacien de condensed& perjudicial.
Si se reduce
el rendimiento de la hoja, apague la unidad y
descoriecte el cable de la bujia. Inspeccione cuidadosamente el
borde con fib de la hoja para detectar.signos de desgaste. De
asi hacedo, debe afilarla o cambiarla.
MANTENIMIENTO DEL MOTOR
.
Aletas de enfrlamlento
Antes de cada uso, asegerese de quo no haya residuos on las
aletas de enfdamiento, los conductos de sire y las uniones.
Pages
800-345-6007
,
Arclisam.com
•

. .41 PRECAUCION
IEVITE LESIONES! PARA EVITAR LESIONS 0 LA
MUERTE, NUNCA EXTRAIGA POR SIFON EL COW
BUSTIEiLE ASPIRANDO CON LA BOCA.
IEVITE LESIONES! NUNCA ALMACENE LA BAPI-
RENA DETIERRA EN UN AREA CERRADA
0
EN
EDIFICIO,
SI
EL TANQUETIENE COMBUSTIBLE.
PARA EVITAR ARRANQUES ACCIDENTALES:
IEVITE LESIONESI EL MOTOR DEBE ESTAR
APAGADOY FR10,1
1
DEBE EXTRAERSE EL CABLE
DE LA BUJ1A ANTES DE REVISAR
Y
DE AJUSTAR
EL MOTOR
0
EL EQUIP°.
IEVITE LESIONES! UNA PERSONA ADULTA DEBE
REALIZAR EL MANTENIMIENTO
Y LA
REPARA-
CION DEL MOTOR Y DE LA BARRERA.
IEVITE LESIONES! ANTES DE REALIZAR
CU-
ALQUIER TAREA DE MANTEMMIENTO
0
DE REPA-
RACIoN, DEBE APAGAR EL MOTOR, DEJAR QUE
SE ENFRIE
Y
QUITAR EL CABLE DE LA BUJiA.
Extraiga la barrena del cabezal de control y aptique
una capa fina de grasa en el eje propulsor (8913).
hr
-
174 )
Almacene la barrena y el cabezal de control (Mater) en
posicien vertical.
Quite todos los residuos de la
r
barrena y del ce&azal de
control (motor).
INSTRUCCIONES DE ENSAMBLAJEY VISTA AUMEN-
_ : TADA DE LAS PIEZAS
Modelo E43
€arthoualce
La bujia recomendada as. NOK BM6A que reemplaza a una built
Champion CJ8.
Revise la bujia cada 50 horas de funcionamiento.
Desconecte la tapa
.
de
a bujia y limpie los desechos qua haya
en el area de alrededor de la tapa de la bujia.
Extraiga fa bujia
.
iaemplasala s! ocurre algunade estas cosae:
los electrodos esfan picad6a'queniados 6 tienen dep6sitos
alrededor, o a porcelana este partida.
Luego de reviser la lea, instalela y ajestela con una Have para
bujfas.
Vuelva a instalar la bujia original y ajustela 1/2 vuelta mas.
Pam instalar una bujra nueva, ajuste la abertura de M bujia a 0,7
MM y ajOstela de 1/8 a 1/4 de vuelta mas.
NOTA: Las buyas sueltas se pueden recalentar
y
dafiar el mo-
tor. Si afusta en exceso las 644 fas puede dariar las roscas de la
cabeza del clundro.
Carburador
Nunca modifique la configuracien del carburador que viene desde
la fabrica.
TRANSPORTE DE LA BARRENA DE TIERRA
Nunca transporte el motor en un espacio cerrado o en el interior
de un vehiculo. El combustible o sus vapores pueden incendi-
arse y causar lesiones graves o la muerte.
Si el tanque tiene combustible, transports la unidad en un vehf-
cuM abierto, en posici6n vertical.
Si debe utilizer un vehfculo cerrado para el transporte, extraiga
M gasoline del tanque y colOquela en un recipients rojo para
combustible que este aprobado. NO extraiga M gasoline por
sifen, aspirando con la boca.
Naga funcionar el motor para que se acabe el combustible del
carburador y del tanque. Siempre haga funcionar el motor en un
area bien ventilada.
Limpie con un patio el combustible que se haya derramado del
motor y
de
la barrena de tierra. Deje que se sequen.
ALMACENAJE DURANTE PERIODOS LARGOS
Si nova a utilizer la barrena durante mas de un mes, preparela
para almacenarla durante un perfodo largo.
Pasos mire preparar el almacenale durante aeriodos lamp
Agregue un estabilizador de combustible, seyin las instruccio-
nes del fabricante.
Naga funcionar el motor entre 10 y 15 minutos para asegurarse
de que el estabilizador Ilegue al carburador.
Quite el combustible restante del tanque y col6quelo en un
recipients aprobado para combustible.
800-345-6007
C
lint
=ID
Ellial
Page 9
Ardisam.com

INSTRUCCIONES DE ENSAMBLAJEY VISTA
AUMENTADADE
,
LASRIEZAS
Modelo E43
Earthouake
9
.
7
SERVICIO, SOLUCION DE PROBLEMAS
Y REPARACION
INFORMACION
.
PARA EL SERVICIO
En Ardisam, incluimos la calidad y la durabilidad en el disefio de
nuestros productos. Sin embargo, nuestros disefios cuidadosos yet
mantenimiento adecuado por parte suya no pueden garantizar que
su barrena tendra una duraci6n completa sin que sea necesario
realizar alguna reparacioh. La mayorla de las
i
reparaciones saran
pequenas y fades de realizar, Si se sigden los consejos de la gufa
para la solution de problemas de esta seccic5n.
Esta gufa lo ayudara a determinar con precisiOn las causas de los
problemas mas comunes y a aplicar las soluciones adecuadas pare
Ostos.
Si es necesario realizar reparaciones mas complejas, seguramente,
usted preferira conflar en su vendedor minorista o en un mecanico
autorizado por Ardisam, Inc. (pOngase en coritacto con su vendedor
minorista para obtener una lista de los mecanicos autorizados de
su zona). En esta seccien, se incluye un catalogo de plazas.
Estaremos gustosos de responder cualquier pregunta que tenga o
de ayudarlo a encontrar la asistencia adecuada. Para pedir piezas
de repuesto o para hacer preguntas sobre la garantfa, Ilamenos o
escrfbanos a la direccian que figura a continuaci6n, en la seccion
de pedido de piezas.
PEDIDO DE PIEZAS DE REEMPLAZO
Puede obtener las piezas en la tienda donde compra la barrena
o puede pedirlas directamente on la fabrica. Para pedir las piezas
directamente en la fabrica, Ilame o escriba
Ardisam, Inc.
1690 Elm Street, Cumberland, Wisconsin 54829
1-800-345-6007 • 1-715-822-2415
Correo electronico: info@ardisam,com
Por favor, incluya la siguiente informaciOn en su pedido:
15/Cameros de las piezas
Descripci6n de las piezas
Cantidad
hitimero de modelo y nemero de serie
A
PRECAUCION
SIEMPRE REALICE PRACTICAS SEGURAS. AN-
TES DE INTENTAR REALIZAR CUALGUIER TAREA
DE MANTENIMIENTO 0 DE REPARACION, DEBE
APAGAR Y DEJAR OUE EL MOTOR SE ENFRIE, Y
DEBE DESCONECTAR EL CABLE DE LA BUJiA.
Page 10
C
ONN =CD
Mel
800-345-6007
Ardisam. corn

tarthauake
INSTRUCCIONES DE ENSAMBLAJEY VISTA AUMEN-
TADA DE LAS PIEZAS
Model° E43
SOLUCION DE PROBLEMAS
kta660i4041tatO
SATtitaill'i
7-
zr
Wweir
3
/
4
,cift'
46166totic '11
-
606M
-
-
WIPP
-
0
-W`
1000
4,
4
aet
El motor
motor no arranca
1. El interruptor está en la posicidn de
apagado
1. Coloque el interruptor en la posicien "on" (encendido)
2. El cable de la bujia este desconectado
Conecte el cable de la bujia en el enchufe de esta
Se qued6 sin combustible
3. Vuelva a cargar combustible
4. La bujia este herneda, fallada o no tiene
suficiente espacio
4. Limpie y reemplace las Wiles o deje el espacio adecuado entre
ellas
5. El control del regulador no este abierto
completamente
5. Deje el control del regulador abierto completamente cuando tire
de la manija de retroceso
6. La manguera de la lines del combustible
no este ubicada en la parte inferior del
tanque de gasoline
6. Coloque la linea de combustible por debajo del combustible en el
tanque de gasoline
El motor funciona incor-
rectamente y se ahoga
durante el funcionamiento
1. El filtro de aire este sucio
1. Limpie o reemplace el filtro de aire
2. El estrangulador este parcialmente
acfivado
Apague el estrangulador
El carburador este fuera de punto
3. Comuniquese con la febrica
Es dificil hacer que el mo-
tor arranque
1. El combustible está en mal estado
1. Quite el combustible viejo y coloque combustible nuevo. Use un
estabilizador de gasoline al final de la temporada
2. El cable de Is bujia este flojo
Asegerese de quo el cable de la bujia este conectado correcta-
mente a la ha
El carburador este sucio
3. Limpie el carburador; use estabilizador de gasoline; use un nuevo
recipiente pars gasoline
4. El control del regulador no este abierto
completamente
4. Cebe la unidad 3 veces mas luego, deje el control del fegulador
abierto cuando fire de la mange de retroceso
El motor pierde potencia o
no tiene potencia
1. El tanque de gasoline este obstruido
1. Extreigalo y limpielo
2. El filtro de alre este obstruido
Limpielo o reemplacelo
El carburador este fuera de punto o en
males condiciones
3. Comuniquese con la febrica
4. La bujia este hOmeda, fallada o no Ilene
suficiente espacio
4. Limpie y reemplace las bujias o deje el espacio adecuado entre
ellas
El motor arranca y luego
se apaga
1. La tape del tanque de gasoline no este
venfilando correctamente
1. Desenrosque completamente el tornillo de la yarded& de la tape
del tanque (en el senfido contrario de las manecillas del reloj)
2. El filtro de aire este enchufado
Limpielo o reemplacelo
El carburador este fuera de punto o en
males condiciones
3. Comuniquese con la felarica
El motor tiene demasia-
das revoluciones
1. El carburador este fuera de punto
1. Comuniquese con la febrica
La barrena gira durante la
marcha lenta del motor
1. La marcha lenta este muy acelerada
1. Ajuste la marcha lenta
2. El resorte del embrague este roto
2. Reemplace el resorte
La barrena gira, pero no
tiene fuerza
1. El estrangulador fist& activado
1. Apague el estrangulador una vez quo se haya encendido el motor
2. El carburador este fuera de punto
Comuniquese con la fabrica
La transmisien este averiada
3. Comuniquese con la febrica
4. Las zapatas del embrague estan gastadas
4. Reemplace las zapatas y los rosaries del embrague
5. El sello inferior del motor este gastado
5. Comuniquese con la febrica
La barrena salta
1. Las cuchillas esten danadas
1. Reemplace las cuchillas
La barrena corta despacio
1. Las cuchillas ester) desafiladas
1. Compre una cuchilla nueva o haga quo la afilen en la febrica
2. La punta de cola de pea este dariada
2. Reemplace la punta de cola de pea
SI (al/an las soluclones "ndicadas, Ilame al pro veedor de servIclos al 800-345-6007.
800-345-6007
111.1
OMNI
Ardisam.corn
Page 11

12
43
33
42
35
28
30
51
32
50
29
49
LI
STA
AUMENT
ADA DE
LAS PIEZA
S DEL
MO
TO
R
24
20
52
14
15
3
2
21
47
47
47
3

INSTRUCCIONES DE ENSAMBLAJEY VISTA AUMEN-
TADA DE LAS PIEZAS
Modeio E43
Earthauake
LISTA DE LAS PIEZAS DEL MOTOR E43
N.° DE
REFERENCIA
N.
2
DE
PIEZA
DESCRIPCION
CANT.
1
300484
VOLANTE DEL MAGNETO
1
2
300337
TUERCA CON REBORDE M8
1
3
300462
ARANDELA DEL ROTOR
2
4
300413
ENSAMBLADO DEL ROTOR DEL
EMBRAGUE
1
5
300412
RESORTE DEL EMBRAGUE
1
6
300449
ARANDELA DE PRESION
2
7
300450
PERNO CON RESALTO
2
8
300467
CLAVIJA UBICADORA
2
9
3004110
ANILLOY CUBIERTA DE MONTAJE
1
10
300491
EMBRAGUE DEL RETROCESO
11
300429
PLACA DEL ENCENDIDO DE
RETROCESO
1
12
3004121
MANIJA DE RETROCESO
13
300430
RETROCESO
14
300472
BOBINA DE ENCENDIDO
1
15
300482
CUBIERTA DEL MOTOR
1
16
300493
PERNO PRISIONERO M6 DE 62 MM
2
17
300475
EMPAQUE DEL SILENCIADOR
1
18
4813
SILENCIADOR
19
4812
CUBIERTA DEL SILENCIADOR
1
20
BM6A
BUJIA
1
21
300483
TAPA DE LA CUBIERTA DEL MOTOR
1
22
300476
EMPAQUE DE LA TOMA DE AIRE
1
23
300478
TUBO DE AIRE DE LA TOMA DE AIRE
1
24 300479
EMPAQUE DEL CARBURADOR
1
25
300486
CARBURADOR
1
26
300481
EMPAQUE 0 DEL CARBURADOR
1
27
3004109
FOCO CEBADOR
1
28
300329
BASE DE LA TOMA DE AIRE
1
N.
2
DE
REFERENCIA
NY DE
PIEZA
DESCRIPCION
CANT.
29
300489
PALANCA DEL ESTRANGULADOR
30
300328
CUBIERTA DEL ESTRANGULADOR
1
31
3004132
TORNILLO DEL REGULADOR DE
POTENCIA
1
32
300455
PLACA ADAPTADORA DE LA
CUBIERTA DE LA TOMA DE AIRE
1
33
300457
CUBIERTA DEL FILTRO DE AIRE
1
34
300435
FILTRO DE AIRE
1
35
300330
CUBIERTA DE LA TOMA DE AIRE
1
36
56105
SOPORTE DEL TANQUE DE GASOLINA
1
37
300331
TANQUE DE GASOLINA
1
38
300401
TAPA DEL TANQUE
.
1
39
300332
CUBIERTA DEL TANQUE DE GASOLINA
1
40
1021
INTERRUPTOR DE BALANCIN
1
41
300494
ARANDELA CON 2 AGUJEROS PARA
EL TANQUE DE GASOLINA
1
42
300497
MANGUERA DE LA LINEA DEL
CEBADOR
1
43
300498
MANGUERA DE LA LINEA DEL
COMBUSTIBLE
1
44
300335
PERNO CON ARANDELA PHILLIPS 1-91
4
45
300492
TUERCA CON REBORDE M6
2
46
300471
PERNO CON ARANDELA M5 DE 12 MM
5
47
300439
PERNO CON ARANDELA M5 DE 18 MM
7
48
300336
PERNO HH M6 DE 10 MM
2
49
300438
PERNO CON ARANDELA M5 DE 25 MM
2
50
300456
PERNO M5 DE 50 MM
2
51
300326
REJILLA PARA TORNILLO
1
52
300338
LLAVE DEL VOLANTE
1
53
3004103
FILTRO DE COMBUSTIBLE
1
54
300351
PERNO HH M6 DE 8 MM
2
300470
MANGUERA DE LA LINEA DEL
COMBUSTIBLE)
/
FILTRO
1
-
3004113
JUEGO DEL CARBURADOR
1
4
800-345-6007
C
lan =
OEM
.•
•
-
Page 13
Arclisam.com

Page 14
800-345-6007
:
•
A ralsairt.com
3
9
- -
34
•
„
29
28"
lncluye cuchIlla, punta de cola de pez, resorte de impacto, punta de impact° y
herrajes.
" lncluye los herrajes necesarios pare el montaje.
10
11
8
16
17
20
12
13
16
14
12
10
— 15
18
10
19
21
INSTRUCC ION ES DEENSAMPLAA Y ViSTA
AUMENTADAPE,LAS
flg4A.Ps?'
Model() E43
Earthoua e
VISTA AUMENTADA DEL CABEZAL DE CONTROL Y DE LA BARRENA DE TIERRA E43

Earthauake
INSTRUCCIONES DE ENSAMBLAJE Y VISTA AUMEN-
TADA DE LAS PIEZAS
Modelo E43
VISTA AUMENTADA DEL CABEZAL DE CONTROL Y DE LA BARRENA DE TIERRA E43
NY DE
REFERENCIA
K
2
DE
PIEZA
DESCRIPCION
N.
0
DE
REFERENCIA
NY DE
PIEZA
DESCRIPCION
1
E430C2
MOTOR A GASOLINA DE 43 CM3
1
23
1423
PERNO HHCS GR5 DE 5/16 18 X 2
2
2
1027F
MANGO CON ESPUMA
1
24
WF516
ARANDELA PLANA ESTANDAR DE 7,9
MM
2
3
3004119
TRANSMISION COMPLETA
1
25
60656
TUERCA DE SEGURIDAD DE DOS
DIRECCIONES, DE 5/16 18
2
4
4809
ENSAMBIADO DEL GATILLO
1
5
4814
PERNO DE 10 24 X 11/4 CON
CABEZA DE CAZOLETA
1
26
53684
PARTE SUPERIOR DEL
AMORTIGUADOR DE 1 PIEZA
1
6
4811
CABLE DEL ESTRANGULADOR
1
27
8980
RESORTE DEL AMORTIGUADOR
1
7
89309
PERNO NEGRO DE 1/420 X 3/4 HH
GAS
4
28
-
EB4
CUCHILLA PARA TIERRA DE 10,1 CM
1
EB6
CUCHILLA PARA TIERRA DE 15,2 CM
1
8
3004111
PARTE SUPERIOR DE LA CAJA DE
ENGRANAJES
1
E88
CUCHILLA PARA TIERRA DE 20,3 CM
1
9
3004100
TAMBOR DEL EMBFtAGUE
1
EB10
CUCHILLA PARA TIERRA DE 25,4 CM
1
10
•
8922
COJINETE DE BOLA CON DOBLE
REBORDE R12
3
-
EB4HD
CUCHILLA PARA TIERRA DE USO
PESADO, DE 10,1 CM
11
9814
ENGRANAJE DE PINON CON ROSCA,
DE 7 DIENTES
1
EB6HD
CUCHILLA PARA TIERRA DE USO
PESADO, DE 15,2 CM
1
12
8924
ANILLO DE SUJECION
2
EB8HD
CUCHILLA PARA TIERRA DE USO
PESADO, DE 20,3 CM
1
13
8915
ESPIGA DE ACERO DE 6,3 MM X 1,27
CM
1
EB1OHD
CUCHILLA PARA TIERRA DE USO
PESADO, DE 25,4 CM
1
14
8912
ENGF1ANAJE DE 44 DIENTES, DE 1,9
CM
1
29
EBOLT
PERNO NEGRO DE 1/4 28 X 5/8 HH GR5
2
15
8919
JUNTA
1
30
ENUT
TUERCA DE SEGURIDAD DE DOS
DIRECCIONES, DE 1/428
2
16
8923
COJINETE DE BOLA RIO
2
31
8958H0
PUNTA DE COLA DE PEZ AFILADA
17
9214
TREN DE ENGRANAJES DE 107/487
DE UNA PIEZA
1
8970
PUNTAS DE LA BARRENA DE TIERRA
DE 5 Y 7,6 CM
1
18
8939
PARTE INFERIOR DE LA CAJA DE
ENGRANAJES
1
32
1433
PERNO 3/8 16 X 1 1/2 HH
1
19
8913
EJE PROPULSOR DE 2,2 CM
1
33
2104
TUERCA DE SEGURIDAD DE DOS
DIRECCIONES DE 3/8 16
1
20
8929
PERNO SHCS, 1/4 20 X 1 1/2
PULGADAS
2
34
SM
MECANISMO DE IMPACTO (PARA
BARRENAS DE TIERRA DE 15,2 CM
0
MAS GRANDES ANTES DE 11/05)
'
1
21
8931F
PERNO SHCS, 1/4-20 X 2 PULGADAS
4
2.2*
EA2F
BARRENA DE TIERRA COMPLETA
DE 5 CM
-
........
1
-
EKT6
EXTENSION DE PROFUNDIDAD 15,2 CM
1
EXT6
EXTENSION DE PROFUNDIDAD 30,4 CM
1
EA3F
BARRENA DE TIERRA COMPLETA DE
7,6 CM
1
EXT6
EXTENSION DE PROFUNDIDAD 45,7 CM
1
EA4F
BARRENA DE TIERRA COMPLETA DE
10,1 CM
1
-. INCLUYE LOS HERRAJES NECESARIOS PARA EL MONTAJE.
EA6F
BARRENA DE TIERRA COMPLETA DE
15,2 CM
1
EA8F
BARRENA DE TIERRA COMPLETA DE
20,3 CM
1
EA1OF
BARRENA DE TERRA COMPLETA DE
25,4 CM
1
INCWYE CUCHILLA, PUNTA DE COLA DE PEZ, RESORTE DE IMPACT°,
PUNTA DE IMPACTOS V HERRAJES.
EMS
=Mr
Araisam.corn
800-345-6007
Page 15

.••:,
.
7
5
2
7n1
1
1
0
`
- _
.
Earthauak
e
Earthquake, Division of Ardisam, Inc.
1690 Elm Street; P.O. Box 666
Cumberland, Wisconsin 54829
800-345-6007• Fax (715) 822-2223
E-mail: [email protected]
•
(ram
UMW
ZEIMID
ARDISAM
6com
Ardisam.corn
*4'1,
'
•
.•
.
-
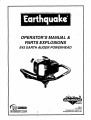 1
1
-
 2
2
-
 3
3
-
 4
4
-
 5
5
-
 6
6
-
 7
7
-
 8
8
-
 9
9
-
 10
10
-
 11
11
-
 12
12
-
 13
13
-
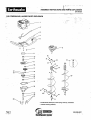 14
14
-
 15
15
-
 16
16
-
 17
17
-
 18
18
-
 19
19
-
 20
20
-
 21
21
-
 22
22
-
 23
23
-
 24
24
-
 25
25
-
 26
26
-
 27
27
-
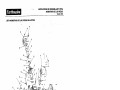 28
28
-
 29
29
-
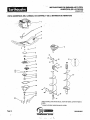 30
30
-
 31
31
-
 32
32


EarthQuake E43 Manual de usuario
- Categoría
- Motor
- Tipo
- Manual de usuario
- Este manual también es adecuado para
En otros idiomas
- English: EarthQuake E43 User manual
Documentos relacionados
-
EarthQuake 22777 E43™ 1-Man Earth Auger Manual de usuario
-
EarthQuake 22777 E43™ 1-Man Earth Auger Manual de usuario
-
-
-
-
EarthQuake 9800K Manual de usuario
-
EarthQuake 9800KC El manual del propietario
-
-
-