Dell Supported Configurations for Oracle Database 10g R2 for Windows Guía del usuario
- Tipo
- Guía del usuario

Dell PowerEdge Systems
Oracle Database on Microsoft
Windows Server x64
Operating System and
Hardware Installation
Guide
Version 4.4

Notes and Cautions
NOTE: A NOTE indicates important information that helps you make better use of
your computer.
CAUTION: A CAUTION indicates potential damage to hardware or loss of data if
instructions are not followed.
____________________
Information in this document is subject to change without notice.
©2009-2010 Dell Inc. All rights reserved.
Reproduction of these materials in any manner whatsoever without the written permission of Dell Inc.
is strictly forbidden.
Trademarks used in this text: Dell™, the DELL logo, PowerEdge™, and PowerVault™ are trademarks
of Dell Inc. Intel
®
, and Xeon
®
are registered trademarks of Intel Corporation in the U.S. and other
countries. AMD
®
, the AMD logo, and combinations thereof, are registered trademarks and AMD
Opteron™ is a trademark of Advanced Micro Devices, Inc. Microsoft
®
, Windows
®
, and Windows
Server
®
are either trademarks or registered trademarks of Microsoft Corporation in the United States
and/or other countries. Oracle
®
is a registered trademark of Oracle Corporation and/or its affiliates.
Other trademarks and trade names may be used in this document to refer to either the entities claiming
the marks and names or their products. Dell Inc. disclaims any proprietary interest in trademarks and
trade names other than its own.
July 2010 Rev. A03

Contents 3
Contents
1 Overview of Oracle Database
Installation on Microsoft
Windows Server x64 . . . . . . . . . . . . . . . . . 5
Required Documentation for Deploying
the Dell|Oracle Database
. . . . . . . . . . . . . . . . . 5
Terminology Used in This Document
. . . . . . . . . . . 6
Getting Help
. . . . . . . . . . . . . . . . . . . . . . . . 6
Dell Support. . . . . . . . . . . . . . . . . . . . . . 6
Oracle Support . . . . . . . . . . . . . . . . . . . . 6
2 Software and Hardware Requirements. . . 7
Minimum Software Requirements . . . . . . . . . . . . 7
Minimum Hardware Requirements . . . . . . . . . . . . 8
3 Installing and Configuring
the Operating System . . . . . . . . . . . . . . . 13
Before You Begin . . . . . . . . . . . . . . . . . . . . 13
Installing the Operating System Using
the Dell Systems Management Tools
and Documentation DVD
. . . . . . . . . . . . . . . . . 14

4 Contents
Continuing With the Operating System Installation . . . 16
Installing Windows Server 2003 . . . . . . . . . . 16
Installing Windows Server 2008 SP2 . . . . . . . . 17
Installing the Resource CD . . . . . . . . . . . . . 18
Installing the Driver for a Qlogic
Fibre Channel HBA . . . . . . . . . . . . . . . . . 19
Verifying the Temporary Directory Paths . . . . . . 20
4 Verifying Cluster Hardware
and Software Configurations . . . . . . . . . 23

Overview of Oracle Database Installation on Microsoft Windows Server x64 5
Overview of Oracle Database
Installation on Microsoft Windows
Server x64
This document applies to:
• Oracle Database 10g R2 Enterprise Edition on Windows Server 2003 R2
SP2 Enterprise/Standard x64 Edition or Windows Server 2008 SP2
Enterprise/Standard x64 Edition.
• Oracle Database 10g R2 Standard Edition on Windows Server 2003 R2
SP2 Standard x64 Edition or Windows Server 2008 SP2 Standard x64
Edition.
Required Documentation for Deploying the
Dell|Oracle Database
The documentation set for the Oracle Database on Microsoft Windows is
organized into a series of modules. These modules cover the following topics:
•
Oracle Database on Microsoft Windows Server x64 Operating System and
Hardware Installation Guide
—Describes the required minimum hardware
and software versions, how to install and configure the operating system,
how to verify the hardware and software configurations, and how to obtain
open source files.
•
Oracle Database on Microsoft Windows Server x64 Storage and Networking
Guide
—Describes how to install and configure the network and the
storage solutions.
•
Oracle Database on Microsoft Windows Server x64 Database Setup and
Installation Guide
—Describes how to install and configure the
Oracle
Database.
•
Oracle Database on Microsoft Windows Server x64 Troubleshooting Guide
—
Describes how to troubleshoot and resolve errors encountered during the
installation procedures described in the previous modules.

6 Overview of Oracle Database Installation on Microsoft Windows Server x64
Terminology Used in This Document
This document uses the terms logical unit number (LUN), virtual disk, and
volumes. These terms are synonymous and can be used interchangeably.
The term LUN is commonly used in a Dell|EMC Fibre Channel storage
system environment, virtual disk is commonly used in a direct-attached
SAS (Dell MD3000/MD3000i and Dell MD3000/MD3000i with MD1000
expansion) storage environment and volume is commonly used in a
Dell EqualLogic iSCSI storage system environment.
Getting Help
Dell Support
For detailed information about using your system, see the documentation
that came with your system components.
For whitepapers, Dell-supported configurations, and general information,
visit dell.com/oracle.
For Dell technical support for your hardware and operating system software
and to download the latest updates for your system, visit support.dell.com.
NOTE: Information about contacting Dell is provided in your system’s Oracle
Database on Microsoft Windows Server x64 Operating System and Hardware
Installation Guide.
Dell Enterprise Training and Certification is now available;
see dell.com/training for more information. The training service may not
be offered in all locations.
Oracle Support
For information about Oracle software, application clusterware training,
and contacting Oracle, see oracle.com or your Oracle documentation that
shipped with the system components. For information on technical support,
downloads, and other technical information, see metalink.oracle.com.
For information on configuring storage and networking, see the
Oracle
Database on Microsoft Windows Server x64
Storage and Networking Guide.

Software and Hardware Requirements 7
Software and Hardware
Requirements
Minimum Software Requirements
Table 2-1 lists the minimum software requirements and supported
configurations for Oracle Database on Microsoft Windows Server x64 Editions.
NOTE: Your Dell configuration includes a 30-day trial license of Oracle software.
If
you do not have a license for this product, contact your Dell sales representative.
Table 2-1. Software Requirements for Oracle Database on Windows Server x64
Editions
Oracle
Database
(x64) Edition
Oracle Configuration Microsoft Windows
(x64) Edition
EMC PowerPath (Fibre
Channel Clusters Only)
Oracle Database 10g R2
10g R2
Enterprise
Edition
Release 10.2.0.1,
including RAC
option + 10.2.0.4
Patch Set
Server 2003 R2 SP2
Enterprise/Standard
Edition
Version 5.3
10g R2
Standard
Edition
Release 10.2.0.1,
including RAC
option + 10.2.0.4
Patch Set
Server 2003 R2 SP2
Standard Edition
Version 5.3
10g R2
Enterprise
Edition
Release 10.2.0.4
including RAC
option
Server 2008 SP2
Enterprise/Standard
Edition
Version 5.3
10g R2
Standard
Edition
Release 10.2.0.4
including RAC
option
Server 2008 SP2
Standard Edition
Version 5.3

8 Software and Hardware Requirements
Minimum Hardware Requirements
Table 2-2 lists the minimum hardware requirements for Oracle Database 10g
Enterprise Edition on Microsoft Windows Server 2003 R2 SP2 or Windows
Server 2008 SP2 Standard/Enterprise x64 Editions. For more information on
specific hardware components, see the documentation included with your
system.
NOTE: To achieve the desired performance, choose a system that exceeds the
minimum hardware requirements based on the number of users, the applications
you use, and batch processes.
NOTE: The hardware configuration of all the cluster nodes should be identical.
Table 2-2. Oracle Database 10g Enterprise Edition on Microsoft Windows Server 2003
R2 SP2 or Windows Server 2008 SP2 Standard/Enterprise x64 Editions
Minimum Hardware Requirements
Hardware Component Configuration
Dell PowerEdge 1950 IIII, 2900 III, 2950 II,
T610, T710, R610, R710, R810,R900,
R910, M600, M610, M710, and M910
systems (up to eight nodes using
Automatic Storage Management (ASM)
or Oracle Cluster File System (OCFS)).
• Intel Xeon processor family.
• 1 GB of RAM.
• PERC for internal hard drives.
• Two 73-GB hard drives connected to
a PERC controller.
NOTE: It is recommended that you use
two 73-GB hard drives (RAID 1) connected
to an internal RAID controller. See your
PowerEdge system documentation for
more details.
• Three Gigabit NICs.
• Two HBAs
(1 QLE2462/QLE2562 [dual port]
HBA for use with PowerEdge
1950/R610.
• One QME2472/QME2572 or
LPe1105-M4/LPe1205 [dual port]
HBA for use with PowerEdge
M600/M610/M710).

Software and Hardware Requirements 9
Dell PowerEdge 6950, 2970, M605, R805,
R815, and R905 systems (up to eight nodes
using ASM or OCFS).
• AMD Opteron processor family.
• 1 GB of RAM.
• Two 73-GB hard drives connected to
an internal RAID controller.
NOTE: It is recommended that you use
two 73-GB hard drives (RAID 1) connected
to an internal RAID controller based on
your system. See your PowerEdge system
documentation for more details.
• Three Gigabit NICs.
• Two HBAs for use with PowerEdge
6950 or 2970.
• One QME2472/QME2572 or
LPe1105-M4/LPe1205 [dual port]
HBA for use with PowerEdge
M605/M805/M905.
Gigabit Ethernet switches (two) See dell.com/oracle for information on
supported configurations.
For Dell|EMC AX4-5F, CX3-10C, CX3-20,
CX3-20F, CX3-40, CX3-40F, CX3-80,
CX4-120, CX4-240, CX4-480, and
CX4-960 Fibre Channel storage systems.
See the Dell|EMC system
documentation for more details.
For direct-attached SAS
Dell PowerVault MD3000 with MD1000
expansion storage system.
See your Dell PowerVault MD3000 and
MD1000 storage system documentation
for more details.
For direct-attached or switched iSCSI
Dell PowerVault MD3000i with MD1000
expansion storage system.
See your Dell PowerVault MD3000i and
MD1000 storage system documentation
for more details.
Dell EqualLogic PS Series Storage. One Dell EqualLogic PS Series array
with sixteen 15,000 RPM SAS disks.
Two Gigabit Ethernet switches for
iSCSI SAN.
Table 2-2. Oracle Database 10g Enterprise Edition on Microsoft Windows Server 2003
R2 SP2 or Windows Server 2008 SP2 Standard/Enterprise x64 Editions
Minimum Hardware Requirements (continued)
Hardware Component Configuration

10 Software and Hardware Requirements
Table 2-3 lists the minimum hardware requirements for Oracle Database 10g
Standard Edition on Microsoft Windows Server 2003 R2 SP2 or Windows
Server 2008 SP2 Standard x64 Editions. For more information on specific
hardware components, see the documentation included with your system.
Table 2-3. Oracle Database 10g Standard Edition on Microsoft Windows Server 2003 R2
SP2 or Windows Server 2008 SP2 Standard x64 Editions Minimum Hardware
Requirements
Hardware Component Configuration
Dell PowerEdge 1950 III, 2950 III,
2900III, T610, T710, R610, and R710
systems (up to two nodes using ASM).
• Intel Xeon processor family.
• 1 GB of RAM.
• PERC for internal hard drives.
• Two 73-GB hard drives connected to a
PERC controller.
NOTE: It is recommended that you use two
73-GB hard drives (RAID 1) connected to
an internal RAID controller based on
your system. See your PowerEdge system
documentation for more details.
• Three Gigabit NICs.
• Two HBAs.
• One QLE2462/QLE2562 [dual port]
HBA for use with PowerEdge
1950/R610.
Dell PowerEdge 2970, R805 systems
(up to two nodes using ASM)
• AMD Opteron processor family.
• 1 GB of RAM.
• Two 73-GB hard drives connected to an
internal RAID controller.
NOTE: It is recommended that you use two
73-GB hard drives (RAID 1) connected to
an internal RAID controller based on
your system. See your PowerEdge system
documentation for more details.
• Three Gigabit NICs.

Software and Hardware Requirements 11
Gigabit Ethernet switches (two). See dell.com/oracle for information on
supported configurations.
For Dell|EMC AX4-5F, CX3-10C, CX3-
20, CX3-20F, CX3-40, CX3-40F, CX3-80,
CX4-120, CX4-240, CX4-480, and CX4-
960 Fibre Channel storage systems.
See the Dell|EMC system
documentation for more details.
For direct-attached SAS Dell PowerVault
MD3000 with MD1000 expansion
storage system.
See your Dell PowerVault MD3000 and
MD1000 storage system documentation
for more details.
For direct-attached or switched Dell
PowerVault MD3000i with MD1000
expansion storage system.
See your Dell PowerVault MD3000i and
MD1000 storage system documentation
for more details.
Table 2-3. Oracle Database 10g Standard Edition on Microsoft Windows Server 2003 R2
SP2 or Windows Server 2008 SP2 Standard x64 Editions Minimum Hardware
Requirements (continued)
Hardware Component Configuration

12 Software and Hardware Requirements

Installing and Configuring the Operating System 13
Installing and Configuring the
Operating System
CAUTION: To ensure that the operating system is installed correctly, disconnect
all external storage from the system before you install the operating system.
This section provides information about installing and configuring the
Microsoft Windows Server 2003 R2 SP2 and Windows Server 2008 SP2
Standard/Enterprise x64 Edition operating system for
Oracle database deployment.
Before You Begin
NOTE: See support.dell.com for the latest BIOS, firmware, and driver updates.
1
Shut down your system.
2
Disconnect all external storage devices from your system.
3
Locate the correct
Microsoft Windows Server 2003 R2 SP2
or
Windows Server 2008 SP2 Standard/Enterprise x64 Edition
media
and the
Dell Systems Management Tools and Documentation
media
for your Dell Server using the information in Table 3-1.
Table 3-1. PowerEdge Server Systems Management Media
Dell PowerEdge System Systems Management Media
6950, 1950, 2900, 2950, 2970, 1950 III,
2900 III, 2950 III, R805, R905, R900,
M600, M605, M610, M710, M805,
M905, T610, T710, R610, and R710.
Dell Systems Management Tools and
Documentation media version 6.2.
R810, R815, R910, and M910. Dell Systems Management Tools and
Documentation media version 6.2.1
NOTE: The Dell Systems Management Tools and Documentation media is packaged with
your Dell server.

14 Installing and Configuring the Operating System
Installing the Operating System Using the
Dell
Systems Management Tools and
Documentation DVD
1
Turn on your system.
2
Insert the
Dell Systems Management
media for your system in your system
drive.
The Dell Systems Build and Update Utility Welcome
window is displayed.
NOTE: If your system does not have a CD/DVD drive, an externally attached
USB CD/DVD drive can be used.
3
In the
Select Language
window, select
English
.
4
From the
Systems Deployment Options
table, click
Configure
from the
same row that contains the
Server OS Installation
option. The
Configure
Server Operating System
Installation
window is displayed.
The Server Operating System Installation (SOI) module in the
Dell
Systems Build and Update Utility enables you to install
Dell-supported operating systems on your Dell systems.
NOTE: For more information on using the specific SOI windows, see the
Dell
Systems Build and Update Utility online help.
5
In the
Set Date and Time
window of the SOI module, set the current date,
time, and the time zone and click
Continue
.
6
In the
Select an Operating System to Install
window:
a
Select
Microsoft Windows Server 2003 SP2 R2 x64 Edition
or
Microsoft Windows Server 2008 x64 (64 bit Edition)
as per the
requirement.
b
Click
Continue.
7
In the
Select RAID Configuration
window, select default selections and
click
Continue
.
NOTE: This menu may not appear depending on the system configuration.
8
If you selected
Microsoft Windows Server 2008 x64 (64 bit Edition)
on
the
Select an Operating System to Install
window, go to step 11.

Installing and Configuring the Operating System 15
9
In the
Configure the Disk Partition
window,
a
Choose to resize the boot partition or leave it at the default selection.
b
Click
Continue
.
10
In the
Enter Operating System Configuration Information
window,
a
Enter the appropriate organization, user name, product ID and
Computer Name.
b
Enter all the other necessary information.
c
Click
Install SNMP
(default).
d
Click
Install Server Administrator
(default) if you want to install the
Dell OpenManage Server Administrator Utility.
NOTE: The Dell Server Administrator can be installed anytime after the
operating system is
installed.
e
Click
Continue.
11
For Windows Server 2008 x64 installation, click
Eject CD/DVD
. In the
Operating System Installation Summary
window, click
Eject CD/DVD
Automatically
(default) and click
Continue
.
NOTE: Once you click Apply Now, the installation begins and you cannot
change the configuration details of your system.
12
Click
Apply Now
.
The Systems Build and Update Utility installation begins.
NOTE: This procedure may take several minutes to complete.
13
If you selected Microsoft Windows Server 2003 Service Pack 2 x64 Edition
when prompted, insert the appropriate Windows Server 2003 SP2
Enterprise or Standard x64 Edition media in the CD drive.
NOTE: This procedure may take several minutes to complete.
14
When the Systems Build and Update Utility installation is complete,
the system automatically reboots.
NOTE: Ensure that you remove all bootable media when the system reboots.
15
On the reboot, the system boots into the operating system install.
NOTE: Do not boot directly to the operating system media in DVD-ROM.

16 Installing and Configuring the Operating System
Continuing With the Operating System
Installation
Installing Windows Server 2003
1
If you chose Microsoft Windows Server 2003 R2 SP2 x64 Edition during
the Dell Systems Build and Update Utility installation process then on the
reboot, the system boots automatically into the Windows Server 2003 R2
SP2 x64 Edition install mode.
2
In the
Personalize Your Software
window in the Name and Organization
fields, enter the appropriate information and click
Next
.
3
When prompted, enter your Product Key for Windows Server 2003 R2 SP2
Standard/Enterprise x64 Edition and click
Next
.
CAUTION: Do not leave the administrator password blank.
4
In the
Computer Name
and
Administrator Password
fields, enter the
appropriate information and click
Next
.
NOTE: To configure the public network properly, the computer name and
public host name must be identical.
NOTE: Record the logon password that you created in this step. You will need
this information in
step 5.
5
When the installation procedure is completed, the
Welcome to Windows
window is displayed.
a
Shut down the system, reconnect all external storage devices, and start
the system.
b
In the
Welcome to Windows
window, press <Ctrl><Alt><Delete>
to continue. The
Log On
window is displayed.
c
In the
Password
field, type the administrator password that you
created in
step 4 in this procedure and click
OK
.
You are prompted to insert the
Microsoft
Windows Server CD2
. You
can insert the Windows Server CD2 or click
Cancel
.
NOTE: If you insert the Windows Server CD2, follow the prompts through the
normal installation process. The following process assumes you are not
inserting the Windows Server CD2.

Installing and Configuring the Operating System 17
d
Click
Cancel
. A message is displayed informing you that media on
Windows Server CD2 is not going to be installed.
e
Click
OK.
You are prompted to configure Windows Server Post-Setup
(optional).
f
Click
Finish
. You are prompted to close the page.
g
Click
Yes
. The
Manage Your Server Windows Management
window is
displayed.
h
Close the window.
NOTE: To use the Broadcom Advanced Control Suite 3 (BACS), install
Microsoft .NET Framework 2.0. The Microsoft .NET Framework 2.0 can be
downloaded from microsoft.com.
Installing Windows Server 2008 SP2
1
If you chose Microsoft Windows Server 2008 x64 (64 bit Edition) during
the Dell Systems Build and Update Utility installation process then on the
reboot the Systems Build and Update Utility installer will prompt to insert
a valid Windows Server 2008 media into DVD drive. Insert the
Windows
Server 2008 SP2
media into DVD drive and click
OK
.
2
Click
OK
on the
Valid Microsoft Windows Server 2008 SP2 media
window to start the installation.
3
In the next window, enter the language and other preferences and
click
Next
to continue.
4
Click
Install now
to start the installation.
5
Key in the product key for activation and click
Next
to continue.
6
In the next window,
a
Select
Windows Server 2008 Enterprise (Full Installation)
.
b
Click
Next
.
7
In the
license term
window,
a
Check the box for
I accept the license terms.
b
Click
Next
.

18 Installing and Configuring the Operating System
8
In the next window,
a
Select
Custom (Advanced) Installation.
b
Select the disk where you want to install Windows.
c
Click
Next.
The installer starts the Windows installation.
NOTE: This procedure may take several minutes to complete.
9
At the end of the installation, change the Administrator password.
CAUTION: Do not leave the administrator password blank.
NOTE: To use the Broadcom Advanced Control Suite (BACS), install Microsoft .NET
Framework 2.0 or higher if not installed already. The
Microsoft .NET Framework can
be downloaded from microsoft.com.
Installing the Resource CD
NOTE: You can download the Windows Resource CD for your configuration from
dell.com/oracle.
1
Insert the media labeled
Dell RCD x64 4.4
.
2
Double-click
My Computer
, and double-click your CD-ROM drive.
3
Run
install_drivers.bat
.
NOTE: This procedure may take several minutes to complete.
4
Press any key to continue.
5
If you need to install the driver for a Qlogic Fibre Channel HBA on your
system:
• For Windows Server 2003, see installing the Driver "For Windows
Server 2003:" on page 19.
• For Windows Server 2008, see installing the Driver "For Windows
Server 2008:" on page 20.

Installing and Configuring the Operating System 19
6
Check the logs to verify that all drivers were installed correctly.
NOTE: Log information can be found at: <Primary
Drive:/>Dell_Resource_CD/logs>.
7
When the installation is complete, remove the media from the CD drive.
8
Reboot your system.
Installing the Driver for a Qlogic Fibre Channel HBA
For Windows Server 2003:
1
Start the Device Manager as follows:
a
Click
Start
, and then click
Run
.
b
In the
Run
box, type
devmgmt.msc
, and then click
OK
.
2
In the
Device Manager
box, scroll down the list of hardware types, and
then double-click
SCSI and RAID controllers
.
3
From the devices list, double-click
QLogic Fibre Channel HBA
.
4
Click the
Driver
tab, and then click
Update Driver
to start the Hardware
Update Wizard.
5
Click
Install from a list or specific location (Advanced)
, and then click
Next
.
6
Click
Don't search I will choose the driver to install
, and then click
Next
.
7
Click
Have Disk
, and then navigate to the
<Primary_Drive:/>Dell_Resource_CD/drivers/R254072
folder.
8
In the
Hardware Update Wizard/Select a Device Driver
box, click
Next
.
9
On the
Hardware Update Wizard/Completing the Hardware Update
Wizard
, click
Finish
.

20 Installing and Configuring the Operating System
For Windows Server 2008:
1
Start the Device Manager as follows:
a
Click
Start
, and then click
Control Panel
.
b
Click
Hardware and Sound
.
c
Click
Device Manager
.
2
Scroll down the list of hardware types, and then double-click
Storage
Controller
.
3
From the devices list, double-click
QLogic Fibre Channel HBA
.
4
Click the
Driver
tab, and then click
Update Driver
to start the
Hardware
Update Wizard
.
5
Navigate to the
<Primary_Drive:/>Dell_Resource_CD/drivers/R254072
folder, and then click
Next
.
6
On the
Windows has successfully updated your software
window, click
Close
.
Verifying the Temporary Directory Paths
Verify that the paths to the Temp and Tmp directories have been set correctly.
Repeat the following steps for all nodes in the cluster.
1
Click
Start
and select
Run
.
2
In the
Open
field, type
cmd
and click
OK
.
3
At the command prompt, type
echo %Temp%
and press <Enter>.
The following path is displayed:
%SystemDrive%\Temp
where,
%SystemDrive%
is the user's local drive.

Installing and Configuring the Operating System 21
If not, follow the procedure given below to change the paths to the Temp
and Tmp directories.
a
Right-click
My Computer
and select
Properties
.
b
Under
Tas ks
, select
Advanced System Settings
.
c
In the
Advanced
tab, click
Environment Variables
.
d
Under
User Variables for Administrator
, edit the
TEMP
variable, and
set the variable value as
%SystemDrive%\Temp
.
e
Execute step 3 to verify if the temp directory is set correctly.
4
At the command prompt, type
echo %Tmp%
,
and press <Enter>.
The following path is displayed:
%SystemDrive%\Temp
where,
%SystemDrive%
is the user's local drive.
If the temp directory is not set, follow the procedure given below to change
the same.
a
Right-click
My Computer
and select
Properties
.
b
Under
Tas ks
, select
Advanced System Settings
.
c
In the
Advanced
tab, click
Environment Variables
.
d
Under
User Variables for Administrator
, edit the
TMP
variable, and
set the variable value as
%SystemDrive%\Tmp
.
e
Execute step 4 to verify if the tmp directory is set correctly.
5
Repeat all steps in this section for all nodes in the cluster.

22 Installing and Configuring the Operating System

Verifying Cluster Hardware and Software Configurations 23
Verifying Cluster Hardware and
Software Configurations
This section provides setup information for hardware and software cluster
configurations.
Before setting up the cluster, ensure that you have the minimum hardware
installed as shown in Table 4-1.
Each node must have the following software installed using:
•
Dell Systems Management Tools and Documentation
DVD (see Ta b le 3-1).
•
Windows Server 2003 SP2 Standard/Enterprise x64 Edition
or
Windows
Server 2008 SP2 Standard/Enterprise x64 Edition
(see Ta bl e 2-1).
•
Dell|Oracle Windows Resource
CD image version 4.3.
NOTE: Ensure that the HBA drivers are installed.
•
PowerVault MD3000 Resource
CD or
PowerVault MD3000i Resource
CD
(when using the PowerVault MD3000/MD3000i as back-end storage).
The storage must be configured with a minimum of four LUNs or virtual
disks (two for the redundant Voting Disk and Oracle Cluster Registry and two
for the database and Flash Recovery area) assigned to cluster nodes.
Table 4-1. Virtual Disk (LUN) Configuration and Sizes
LUNs or
Virtual Disk
Minimum Size Number of Partitions Used for
1 3 GB 5 (3 x 275 MB and
2 x 300 MB)
Voting disk (3 x 275 MB)
Oracle Cluster Registry
(2 x 300 MB)
2 Larger than
the database
1 Database
3 At least twice
the size of the
database
1 Flash Recovery Area

24 Verifying Cluster Hardware and Software Configurations

Dell PowerEdge 系统
Microsoft Windows Server x64
上的 Oracle Database
操作系统和
硬件安装指南
4.4 版

注和小心
注:“注”表示可以帮助您更好地使用计算机的重要信息。
小心:
“小心”表示如果不遵循说明,就有可能损坏硬件或导致数据丢失。
____________________
本说明文件中的信息如有更改,恕不另行通知。
©
2009
–
2010 Dell Inc.
版权所有,翻印必究。
未经
Dell Inc.
书面许可,严禁以任何形式复制这些材料。
本文中使用的商标:
Dell
™
、
DELL
徽标、
PowerEdge
™
以及
PowerVault
™
是
Dell Inc.
的商
标。
Intel
®
和
Xeon
®
是
Intel Corporation
在美国和其它国家
/
地区的注册商标。
AMD
®
、
AMD
徽标及其组合和
AMD Opteron
™
分别是
Advanced Micro Devices, Inc.
的注册商标和商
标。
Microsoft
®
、
Windows
®
和
Windows Server
®
是
Microsoft Corporation
在美国和
/
或其它国
家
/
地区的商标或注册商标。
Oracle
®
是
Oracle Corporation
和
/
或其子公司的注册商标。
.
本说明文件中述及的其它商标和产品名称是指拥有相应商标和产品名称的公司或其制造的产
品。
Dell Inc.
对其它公司的商标和产品名称不拥有任何所有权。
2010
年
7
月
Rev. A03

目录 27
目录
1 Microsoft Windows Server x64
上的 Oracle Database 安装概览 . . . . . . 29
部署
Dell|Oracle Database
所需的说明文件
. . . . . . . . . . . . . . . . . . . . 29
本说明文件中使用的术语
. . . . . . . . . . . . . . . 30
获得帮助. . . . . . . . . . . . . . . . . . . . . . . . . 30
Dell 支持 . . . . . . . . . . . . . . . . . . . . . . 30
Oracle 支持. . . . . . . . . . . . . . . . . . . . . 30
2 软件和硬件要求 . . . . . . . . . . . . . . . . . . . 31
最低软件要求 . . . . . . . . . . . . . . . . . . . . . . 31
最低硬件要求
. . . . . . . . . . . . . . . . . . . . . . 32
3 安装和配置操作系统 . . . . . . . . . . . . . . . 37
开始之前. . . . . . . . . . . . . . . . . . . . . . . . . 37
使用
Dell Systems Management Tools and
Documentation DVD
安装操作系统
. . . . . . . . . . 38

28 目录
继续执行操作系统安装. . . . . . . . . . . . . . . . . 40
安装 Windows Server 2003. . . . . . . . . . . . . 40
安装 Windows Server 2008 SP2 . . . . . . . . . . 41
安装 Resource CD . . . . . . . . . . . . . . . . . 42
安装 Qlogic 光纤信道 HBA 的驱动程序 . . . . . 43
验证临时目录路径. . . . . . . . . . . . . . . . . 44
4 验证群集硬件与软件配置 . . . . . . . . . . . 47

Microsoft Windows Server x64 上的 Oracle Database 安装概览 29
Microsoft Windows Server x64
上
的
Oracle Database
安装概览
本说明文件适用于:
•
Windows Server 2003 R2 SP2 Enterprise/Standard x64 Edition
或
Windows Server 2008 SP2 Enterprise/Standard x64 Edition
上的
Oracle
Database 10g R2 Enterprise Edition
。
•
Windows Server
2003 R2 SP2 Standard x64 Edition
或
Windows Server
2008 SP2 Standard x64 Edition
上的
Oracle Database 10g R2 Standard
Edition
。
部署
Dell|Oracle Database
所需的说明文件
为
Microsoft Windows
上的
Oracle Database
制定的说明文件,已被整理成一
系列模块。这些模块涵盖以下主题:
•
“
Microsoft Windows Server x64
上的
Oracle Database
:操作系统和硬件
安装指南”—
介绍要求的最低硬件和软件版本、如何安装和配置操作
系统、如何验证硬件和软件配置以及如何获取开放源代码文件。
•
“
Microsoft Windows Server x64
上的
Oracle Database
:存储设备和网络
指南
”—
介绍如何安装和配置网络及存储设备解决方案。
•
“
Microsoft Windows Server x64
上的
Oracle Database
:数据库设置和安
装指南
”—
介绍如何安装和配置
Oracle Database
。
•
“
Microsoft Windows Server x64
上的
Oracle Database
:故障排除指南”
—
介绍如何在之前模块介绍的安装过程中进行故障排除并解决遇到的
错误。

30 Microsoft Windows Server x64 上的 Oracle Database 安装概览
本说明文件中使用的术语
本说明文件使用了逻辑单元号码
(LUN)
、虚拟磁盘和卷等术语。这些术语
是同义词并可互换使用。术语
LUN
通常在
Dell|EMC
光纤信道存储系统环
境中使用,虚拟磁盘通常在直接连接的
SAS
(
Dell MD3000/MD3000i
和带
有
MD1000
扩充的
Dell MD3000/MD3000i
)存储环境中使用,而卷通常在
Dell EqualLogic iSCSI
存储系统环境中使用。
获得帮助
Dell
支持
有关使用系统的详情,请参阅随系统组件附带的说明文件。
有关白皮书、
Dell
支持的配置和一般信息,请访问
dell.com/oracle
。
要获得对硬件和操作系统软件的
Dell
技术支持以及下载最新的系统更新,
请访问
support.dell.com
。
注:与 Dell 联络的有关信息包含在系统的 "Microsoft Windows Server x64 上
的 Oracle Database:操作系统和硬件安装指南
" 中。
我们现在还提供
Dell
企业培训与认证服务;有关详情,请访
问
dell.com/training
。培训服务可能并非在所有地区都提供。
Oracle
支持
有关
Oracle
软件、应用程序群集件培训以及与
Oracle
联络的信息,请访问
oracle.com
或参阅随系统组件附带的
Oracle
说明文件。有关技术支持、下载
和其它技术信息的详情,请访问
metalink.oracle.com
。
有关配置存储设备和网络的信息,请参阅
"Microsoft Windows Server x64
上的
Oracle Database
:存储设备和网络指南
"
。

软件和硬件要求 31
软件和硬件要求
最低软件要求
表
2-1
列出了针对
Microsoft Windows Server x64 Edition
上的
Oracle
Database
的最低软件要求和支持的配置。
注:您的 Dell 配置包括 30 天的 Oracle 软件试用许可证。如果您没有此产品
的许可证,请与 Dell 销售代表联系。
表
2-1. Windows Server x64
版本上
Oracle Database
的软件要求
Oracle
Database
(x64)
版本
Oracle
配置
Microsoft Windows
(x64)
版本
EMC PowerPath
(仅限
光纤信道群集)
Oracle Database 10g R2
10g R2
Enterprise
Edition
版本
10.2.0.1
,包括
RAC
选件
+ 10.2.0.4
增补软件集
Server 2003 R2 SP2
Enterprise/Standard
Edition
5.3
版
10g R2
Standard
Edition
版本
10.2.0.1
,包括
RAC
选件
+ 10.2.0.4
增补软件集
Server 2003 R2 SP2
Standard Edition
5.3
版
10g R2
Enterprise
Edition
版本
10.2.0.4
,包括
RAC
选件
Server 2008 SP2
Enterprise/Standard
Edition
5.3
版
10g R2
Standard
Edition
版本
10.2.0.4
,包括
RAC
选件
Server 2008 SP2
Standard Edition
5.3
版

32 软件和硬件要求
最低硬件要求
表
2-2
列出了针对
Microsoft Windows Server 2003 R2 SP2
或
Windows Server
2008 SP2 x64 Standard/Enterprise x64 Edition
上的
Oracle Database 10g
Enterprise Edition
的最低硬件要求。有关特定硬件组件的详情,请参阅随系
统附带的说明文件。
注:为达到所需的性能,请根据用户数量、使用的应用程序和批处理进程
选择超出最低硬件要求的系统。
注:所有群集节点的硬件配置应完全相同。
表
2-2. Microsoft Windows Server 2003 R2 SP2
或
Windows Server 2008 SP2
Standard/Enterprise x64 Edition
上的
Oracle Database 10g Enterprise Edition
的最低硬件要求
硬件组件 配置
Dell PowerEdge 1950 IIII
、
2900 III
、
2950 II
、
T610
、
T710
、
R610
、
R710
、
R810
、
R900
、
R910
、
M600
、
M610
、
M710
和
M910
系统(使用自动存储管
理
[ASM]
或
Oracle
群集文件系统
[OCFS]
时最多为八个节点)。
•
Intel Xeon
处理器系列。
•
1 GB
的
RAM
。
•
内部硬盘驱动器使用的
PERC
。
•
连接至一个
PERC
控制器的两个
73 GB
硬盘驱动器。
注:建议使用两个连接至内部 RAID 控
制器的 73 GB 硬盘驱动器 (RAID 1)。有关
详情,请参阅 PowerEdge 系统的说明文
件。
•
三个千兆位
NIC
。
•
两个
HBA
(一个
QLE2462/QLE2562 [
双端口
]
HBA
,与
PowerEdge 1950/R610
配合
使用。
•
一个
QME2472/QME2572
或
LPe1105-M4/LPe1205 [
双端口
] HBA
,
与
PowerEdge M600/M610/M710
配合
使用)。

软件和硬件要求 33
Dell PowerEdge 6950
、
2970
、
M605
、
R805
、
R815
和
R905
系统(使用
ASM
或
OCFS
时最多为八个节点)。
•
AMD Opteron
处理器系列。
•
1 GB
的
RAM
。
•
两个连接至内部
RAID
控制器的
73 GB
硬盘驱动器。
注:根据您的系统情况,建议使用两个
连接至内部 RAID 控制器的 73 GB 硬盘驱
动器 (RAID 1)。有关详情,请参阅
PowerEdge 系统的说明文件。
•
三个千兆位
NIC
。
•
两个
HBA
,与
PowerEdge 6950
或
2970
配合使用。
•
一个
QME2472/QME2572
或
LPe1105-M4/LPe1205 [
双端口
] HBA
,
与
PowerEdge M605/M805/M905
配合
使用。
千兆位以太网交换机(两个) 有关所支持的配置的信息,请访问
dell.com/oracle
。
对于
Dell|EMC AX4-5F
、
CX3-10C
、
CX3-20
、
CX3-20F
、
CX3-40
、
CX3-
40F
、
CX3-80
、
CX4-120
、
CX4-240
、
CX4-480
和
CX4-960
光纤信道存储系
统。
有关详情,请参阅
Dell|EMC
系统的说
明文件。
对于直接连接的
SAS
带有
MD1000
扩展存储系统的
Dell PowerVault MD3000
。
有关详情,请参阅
Dell PowerVault
MD3000
和
MD1000
存储系统的说明文
件。
对于直接连接的或交换式
Dell
PowerVault MD3000i
(带
MD1000
扩展
存储系统)。
有关详情,请参阅
Dell PowerVault
MD3000i
和
MD1000
存储系统的说明
文件。
Dell EqualLogic PS
系列存储设备。 一个
Dell EqualLogic PS
系列阵列,带
有
16
个
15,000 RPM SAS
磁盘。
两台用于
iSCSI SAN
的千兆位以太网交
换机。
表
2-2. Microsoft Windows Server 2003 R2 SP2
或
Windows Server 2008 SP2
Standard/Enterprise x64 Edition
上的
Oracle Database 10g Enterprise Edition
的最低硬件要求
(续)
硬件组件 配置

34 软件和硬件要求
表
2-3
列出了针对
Microsoft Windows Server 2003 R2 SP2
或
Windows Server
2008 SP2 Standard x64 Edition
上的
Oracle Database 10g Standard Edition
的
最低硬件要求。有关特定硬件组件的详情,请参阅随系统附带的说明文件。
表
2-3. Microsoft Windows Server 2003 R2 SP2
或
Windows Server 2008 SP2 Standard
x64 Edition
上的
Oracle Database 10g Standard Edition
的最低硬件要求
硬件组件 配置
Dell PowerEdge 1950 III
、
2950 III
、
2900III
、
T610
、
T710
、
R610
和
R710
系统(使用
ASM
时最多为两
个节点)。
•
Intel Xeon
处理器系列。
•
1 GB
的
RAM
。
•
内部硬盘驱动器使用的
PERC
。
•
连接至一个
PERC
控制器的两个
73 GB
硬盘驱动器。
注:根据您的系统情况,建议使用两
个连接至内部 RAID 控制器的 73 GB 硬
盘驱动器 (RAID 1)。有关详情,请参阅
PowerEdge 系统的说明文件。
•
三个千兆位
NIC
。
•
两个
HBA
。
•
一个
QLE2462/QLE2562 [
双端口
]
HBA
,与
PowerEdge 1950/R610
配合
使用。
Dell PowerEdge 2970
、
R805
系统(使
用
ASM
时最多为两个节点)。
•
AMD Opteron
处理器系列。
•
1 GB
的
RAM
。
•
两个连接至内部
RAID
控制器的
73 GB
硬盘驱动器。
注:根据您的系统情况,建议使用两
个连接至内部 RAID 控制器的 73 GB 硬
盘驱动器 (RAID 1)。有关详情,请参阅
PowerEdge 系统的说明文件。
•
三个千兆位
NIC
。
千兆位以太网交换机(两个)。 有关所支持的配置的信息,请访问
dell.com/oracle
。

软件和硬件要求 35
对于
Dell|EMC AX4-5F
、
CX3-10C
、
CX3-20
、
CX3-20F
、
CX3-40
、
CX3-40F
、
CX3-80
、
CX4-120
、
CX4-240
、
CX4-480
和
CX4-960
光纤信
道存储系统。
有关详情,请参阅
Dell|EMC
系统的说
明文件。
对于直接连接的
SAS Dell PowerVault
MD3000
(带
MD1000
扩展存储系
统)。
有关详情,请参阅
Dell PowerVault
MD3000
和
MD1000
存储系统的说明文
件。
对于直接连接的或交换式
Dell
PowerVault MD3000i
(带
MD1000
扩展
存储系统)。
有关详情,请参阅
Dell PowerVault
MD3000i
和
MD1000
存储系统的说明
文件。
表
2-3. Microsoft Windows Server 2003 R2 SP2
或
Windows Server 2008 SP2 Standard
x64 Edition
上的
Oracle Database 10g Standard Edition
的最低硬件要求
硬件组件 配置

36 软件和硬件要求

安装和配置操作系统 37
安装和配置操作系统
小心:为确保正确地安装操作系统,在安装操作系统之前,应断开系统与
所有外部存储设备的连接。
本节介绍有关如何安装和配置
Microsoft Windows Server 2003 R2 SP2
和
Windows Server 2008 SP2 Standard/Enterprise x64 Edition
操作系统以部署
Oracle
数据库的信息。
开始之前
注:请访问 support.dell.com 以获得最新的 BIOS、固件和驱动程序更新。
1
关闭系统。
2
从系统中断开所有外部存储设备的连接。
3
通过表
3-1
中的信息,找到正确的
Microsoft Windows Server 2003 R2
SP2
或
Windows Server 2008 SP2 Standard/Enterprise x64 Edition
介质以
及适用于您的
Dell
服务器的
Dell Systems Management Tools and
Documentation
介质。
表
3-1. PowerEdge Server Systems Management
介质
Dell PowerEdge
系统 系统管理介质
6950
、
1950
、
2900
、
2950
、
2970
、
1950 III
、
2900 III
、
2950 III
、
R805
、
R905
、
R900
、
M600
、
M605
、
M610
、
M710
、
M805
、
M905
、
T610
、
T710
、
R610
和
R710
。
Dell Systems Management Tools and
Documentation
介质版本
6.2
。
R810
、
R815
、
R910
和
M910
。
Dell Systems Management Tools and
Documentation
介质版本
6.2.1
注:Dell Systems Management Tools and Documentation 介质随 Dell 服务器打包
附带。

38 安装和配置操作系统
使用
Dell
Systems Management Tools and
Documentation DVD
安装操作系统
1
打开系统。
2
在系统驱动器中插入适用于您系统的
Dell Systems Management
介质。
此时将显示
Dell Systems Build and Update Utility
Wel come
(欢迎)
窗口
。
注:如果您的系统没有 CD/DVD 驱动器,可以使用外部连接的 USB
CD/DVD 驱动器。
3
在
Select Language
(选择语言)窗口中,选择
English
(英语)。
4
从
Systems Deployment Options
(系统部署选项)表中,在包含
Server OS Installation
(服务器
OS
安装)选项的同一行单击
Configure
(配置)。此时将显示
Configure Server Operating System
Installation
(配置服务器操作系统安装)窗口。
Dell Systems Build and Update Utility
中的
Server Operating System
Installation
(服务器操作系统安装,
SOI
)模块可用于在
Dell
系统上
安装
Dell
支持的操作系统。
注:有关使用特定 SOI 窗口的详情,请参阅 Dell Systems Build and
Update Utility 联机帮助。
5
在
SOI
模块的
Set Date and Time
(设置日期和时间)窗口中,设置当
前日期、时间和时区,然后单击
Continue
(继续)。
6
在
Select an Operation System to Install
(选择要安装的操作系统)窗
口中:
a
根据需要选择
Microsoft Windows Server 2003 SP2 R2 x64 Edition
或
Microsoft Windows Server 2008 x64 (64 bit Edition)
。
b
单击
Continue
(继续)。
7
在
Select RAID Configuration
(选择
RAID
配置)窗口中,选择默认
选项,然后单击
Continue
(继续)。
注:根据具体的系统配置,此菜单可能不显示。
8
如果您在
Select an Operating System to Install
(选择要安装的操作系
统)窗口中选择了
Microsoft Windows Server 2008 x64 (64 bit
Edition)
,请转至步骤
11
。

安装和配置操作系统 39
9
在
Configure the Disk Partition
(配置磁盘分区)窗口中,
a
您可以选择调整引导分区的大小或保留其默认选择。
b
单击
Continue
(继续)。
10
在
Enter Operating System Configuration Information
(输入操作系统
配置信息)窗口中,
a
输入相应的组织、用户名、产品
ID
和计算机名。
b
输入所有其它必需的信息。
c
单击
Install SNMP
(安装
SNMP
)(默认)。
d
如果要安装
Dell OpenManage Server Administrator Utility
,请单击
Install Server Administrator
(安装
Server Administrator
)(默
认)。
注:可在安装操作系统后随时安装 Dell Server Administrator。
e
单击
Continue
(继续)。
11
对于
Windows Server 2008 x64
安装,单击
Eject CD/DVD
(弹出
CD/DVD
)。 在
Operating System Installation Summary
(操作系统安
装摘要)窗口中,单击
Eject CD/DVD
Automatically
(自动弹出
CD/DVD
)( 默 认 值),然后单击
Continue
(继续)。
注:一旦单击 Apply Now(立即应用)后,就会开始安装,并且您将无
法更改系统配置的详细信息。
12
单击
Apply Now
(立即应用)。
此时将开始
Systems Build and Update Utility
安装。
注:完成此过程可能需要几分钟。
13
如果您选择
Microsoft Windows Server 2003 Service Pack 2 x64 Edition
,
提示时请在
CD
驱动器中插入相应的
Windows Server 2003 SP2 x64
企
业版或标准版介质。
注:完成此过程可能需要几分钟。
14
Systems Build and Update Utility
安装完成后,系统将自动重新引导。
注:请确保在系统重新引导时已取出所有可引导的介质。
15
重新引导时,系统将引导至操作系统安装。
注:
请勿直接引导至 DVD-ROM 中的操作系统介质。

40 安装和配置操作系统
继续执行操作系统安装
安装
Windows Server 2003
1
如果在
Dell Systems Build and Update Utility
的安装过程中选择了
Microsoft Windows Server 2003 R2 SP2 x64 Edition
,则重新引导时,系
统将自动引导至
Windows Server 2003 R2 SP2 x64 Edition
安装模式。
2
在
Personalize Your Software
(软件个性化设置)窗口的
Name
(名
称)和
Organization
(组织)字段中,输入相应的信息,然后单击
Next
(下一步)。
3
屏幕出现提示时,输入
Windows Server 2003 R2 SP2
Standard/Enterprise x64 Edition
的
Product Key
(产品密钥),然后单
击
Next
(下一步)。
小心:请勿将管理员密码留为空白。
4
在
Computer Name
(计算机名)和
Administrator password
(管理员
密码)字段中,输入相应的信息,然后单击
Next
(下一步)。
注:
要正确配置公用网络,计算机名称和公用主机名称必须完全相同。
注:
记录您在此步骤中创建的登录密码。在步骤
5
中,您将需要此信
息。
5
完成安装过程后,屏幕将显示
Welcome to Windows
(欢迎使用
Windows
)窗口。
a
关闭系统,重新连接所有外部存储设备,然后启动系统。
b
在
Welcome to Windows
(欢迎使用
Windows
)窗口中,按
<Ctrl><Alt><Delete>
组合键以继续。此时将显示
Log On
(登
录)窗口。
c
在
Password
(密码)字段中,键入在此过程的步骤
4
中创建的管
理员密码,然后单击
OK
(确定)。
系统将提示您插入
Microsoft
Windows Server CD2
。您可以插入
Windows Server CD2
或单击
Cancel
(取消)。
注:如果您插入 Windows Server CD2,请遵循屏幕提示完成正常的安装
过程。以下过程假定您没有插入 Windows Server CD2。
d
单击
Cancel
(取消)。此时将显示一条信息,通知您将不安装
Windows Server CD2
上的介质。

安装和配置操作系统 41
e
单击
OK
(确定)。系统将提示您配置
Windows Server Post-Setup
(
Windows Server
安装后任务)(可选)。
f
单击
Finish
(完成)。系统会提示您关闭该页面。
g
单击
Yes
(是)。此时将显示
Manage Your Server
(管理服务器)
Windows
管理窗口。
h
关闭该窗口。
注:要使用 Broadcom Advanced Control Suite 3(Broadcom 高级控制套
件 3)(BACS),请安装 Microsoft .NET Framework 2.0。Microsoft .NET
Framework 2.0 可从 microsoft.com 下载。
安装
Windows Server 2008 SP2
1
如果在
Dell Systems Build and Update Utility
的安装过程中选择了
Microsoft Windows Server 2008 x64 (64 bit Edition)
,则重新引导时,
Systems Build and Update Utility
安装程序将提示在
DVD
驱动器中插入
有效的
Windows Server 2008
介质。将
Windows Server 2008 SP2
介质插
入
DVD
驱动器,然后单击
OK
(确定)。
2
在
Valid Microsoft Windows Server 2008 SP2 media
(有效的
Microsoft
Windows Server 2008 SP2
介质)窗口中单击
OK
(确定)以开始安装。
3
在下一个窗口中,输入语言和其它首选项,然后单击
Next
(下一步)
以继续。
4
单击
Install now
(立即安装)以开始安装。
5
键入用于激活的产品密钥,然后单击
Next
(下一步)以继续。
6
在下一个窗口中,
a
选择
Windows Server 2008 Enterprise (Full Installation)
(
Windows
Server 2008 Enterprise [
完全安装
]
)。
b
单击
Next
(下一步)。
7
在
license term
(许可条款)窗口中,
a
选中
I accept the license terms
(我接受许可条款)框。
b
单击
Next
(下一步)。

42 安装和配置操作系统
8
在下一个窗口中,
a
选择
Custom (Advanced) Installation
(自定义
[
高级
]
安装)。
b
选择您要安装
Windows
的磁盘。
c
单击
Next
(下一步)。
安装程序将开始
Windows
安装。
注:完成此过程可能需要几分钟。
9
安装结束后,请更改管理员密码。
小心:请勿将管理员密码留为空白。
注:要使用 Broadcom Advanced Control Suite (BACS),请安装 Microsoft .NET
Framework 2.0 或更高版本(如果尚未安装)。Microsoft .NET Framework 可从
microsoft.com 下载。
安装
Resource CD
注:您可以从 dell.com/oracle 下载 Windows Resource CD 用于进行配置。
1
插入标有
Dell RCD x64 4.4
的介质。
2
双击
My Computer
(我的电脑),然后双击
CD-ROM
驱动器。
3
运行
install_drivers.bat
。
注:完成此过程可能需要几分钟。
4
按任意键继续。
5
如果您需要在系统中安装
Qlogic
光纤信道
HBA
的驱动程序:
•
对于
Windows Server 2003
,请参阅安装驱动程序第
43
页上的 “对
于
Windows Server 2003
:”。
•
对于
Windows Server 2008
,请参阅安装驱动程序第
43
页上的 “对
于
Windows Server 2008
:”。
6
查看日志以验证是否已正确安装所有驱动程序。
注:可在以下位置找到日志信息:
< 主驱动器 :/>Dell_Resource_CD/logs>。
7
安装完成后,从
CD
驱动器中取出该介质。
8
重新引导系统。

安装和配置操作系统 43
安装
Qlogic
光纤信道
HBA
的驱动程序
对于
Windows Server 2003
:
1
按照以下步骤启动设备管理器:
a
单击
Start
(开始),然后单击
Run
(运行)。
b
在
Run
(运行)对话框中,键入
devmgmt.msc
,然后单击
OK
(确定)。
2
在
Device Manager
(设备管理器)框中,向下滚动硬件类型列表,然
后双击
SCSI and RAID controllers
(
SCSI
和
RAID
控制器)。
3
从设备列表中,双击
QLogic Fibre Channel HBA
(
QLogic
光纤信道
HBA
)。
4
单击
Driver
(驱动程序)选项卡,然后单击
Update Driver
(更新驱动
程序)以启动
Hardware Update Wizard
(硬件更新向导)。
5
单击
Install from a list or specific location (Advanced)
(从列表或指定
位置安装
[
高级
]
),然后单击
Next
(下一步)。
6
单击
Don't search I will choose the driver to install
(不要搜索。我要自
己选择要安装的驱动程序),然后单击
Next
(下一步)。
7
单击
Have Disk
(硬盘),然后导航至
<
主驱动器
:/>Dell_Resource_CD/drivers/R254072
文件夹。
8
在
Hardware Update Wizard/Select a Device Driver
(硬件更新向导
/
选
择设备驱动程序)框中,单击
Next
(下一步)。
9
在
Hardware Update Wizard/Completing the Hardware Update Wizard
(硬件更新向导
/
完成硬件更新向导)中,单击
Finish
(完成)。
对于
Windows Server 2008
:
1
按照以下步骤启动设备管理器:
a
单击
Start
(开始),然后单击
Control Panel
(控制面板)。
b
单击
Hardware and Sound
(硬件和声音)。
c
单击
Device Manager
(设备管理器)。
2
向下滚动硬件类型列表,然后双击
Storage Controller
(存储控制
器)。
3
从设备列表中,双击
QLogic Fibre Channel HBA
(
QLogic
光纤信道
HBA
)。

44 安装和配置操作系统
4
单击
Driver
(驱动程序)选项卡,然后单击
Update Driver
(更新驱动
程序)以启动
Hardware Update Wizard
(硬件更新向导)。
5
导航到
<
主驱动器
:/>Dell_Resource_CD/drivers/R254072
文件夹,然
后单击
Next
(下一步)。
6
在
Windows has successfully updated your software
(
Windows
已成功
更新您的软件)窗口中,单击
Close
(关闭)。
验证临时目录路径
验证是否已正确设置指向
Temp
和
Tmp
目录的路径。在群集中的所有节点
上重复执行以下步骤:
1
单击
Start
(开始),然后选择
Run
(运行)
。
2
在
Open
(打开)字段中,键入
cmd
,然后单击
OK
(确定)
。
3
在命令提示符下,键入
echo %Temp%
,然后按
<Enter>
键。
此时将显示以下路径:
%SystemDrive%\Temp
其中,
%SystemDrive%
是用户的本地驱动器。
如果没有显示,则按照上述步骤更改指向
Temp
目录和
Tmp
目录的路
径。
a
在
My Computer
(我的电脑)上单击鼠标右键并选择
Properties
(属性)。
b
在
Tas ks
(任务)下,选择
Advanced System Settings
(高级系统
设置)。
c
在
Advanced
(高级)选项卡中,单击
Environment Variables
(环
境变量)。
d
在
User Variables for Administrator
(管理员的用户变量)下,编
辑
TEMP
变量,并将变量值设为
%SystemDrive%\Temp
。
e
执行步骤
3
验证
temp
目录是否设置正确。

安装和配置操作系统 45
4
在命令提示符下,键入
echo %Tmp%
,然后按
<Enter>
键。
此时将显示以下路径:
%SystemDrive%\Temp
其中,
%SystemDrive%
是用户的本地驱动器。
如果未设置
temp
目录,则按照上述步骤进行同样的更改。
a
在
My Computer
(我的电脑)上单击鼠标右键并选择
Properties
(属性)。
b
在
Tas ks
(任务)下,选择
Advanced System Settings
(高级系统
设置)。
c
在
Advanced
(高级)选项卡中,单击
Environment Variables
(环
境变量)。
d
在
User Variables for Administrator
(管理员的用户变量)下,编
辑
TMP
变量,并将变量值设为
%SystemDrive%\Temp
。
e
执行步骤
4
验证
tmp
目录是否设置正确。
5
对群集中的所有节点重复执行本节中的所有步骤。

46 安装和配置操作系统

验证群集硬件与软件配置 47
验证群集硬件与软件配置
本节提供用于硬件和软件群集配置的设置信息。
设置群集之前,请确保您已安装如表
4-1
中所示的最低要求的硬件。
每个节点必须使用以下介质安装以下软件:
•
Dell Systems Management Tools and Documentation DVD
(请参阅
表
3-1
)。
•
Windows Server 2003 SP2 Standard/Enterprise x64 Edition
或
Windows
Server 2008 SP2 Standard/Enterprise x64 Edition
(请参阅表
2-1
)。
•
Dell|Oracle Windows Resource
CD
映像版本
4.3
。
注:请确保已安装 HBA 驱动器。
•
PowerVault MD3000 Resource
CD
或
PowerVault MD3000i Resource
CD
(将
PowerVault MD3000/MD3000i
用作后端存储设备时)。
存储设备必须至少配置四个分配给群集节点的
LUN
或虚拟磁盘(两个用
于冗余投票磁盘和
Oracle
群集注册表,两个用于数据库和快擦写恢复区
域)。
表
4-1.
虚拟磁盘
(LUN)
配置和大小
LUN
或虚拟
磁盘
最小容量
分区数
用途
13 GB
5
(
3 x 275 MB
和
2 x 300 MB
)
投票磁盘
(3 x 275 MB)
Oracle
群集注册表
(2 x 300 MB)
2
大于数据库容
量
1
数据库
3
至少为数据库
大小的两倍
1
快擦写恢复区域

48 验证群集硬件与软件配置

Systèmes Dell PowerEdge
Oracle Database on Microsoft
Windows Server x64
Guide d’installation du
système d’exploitation et
du matériel
Version 4.4

Remarques et précautions
REMARQUE : Une REMARQUE indique des informations importantes qui peuvent
vous aider à mieux utiliser votre ordinateur.
PRÉCAUTION : Une PRÉCAUTION vous avertit d’un risque de dommage matériel
ou de perte de données en cas de non-respect des instructions données.
____________________
Les informations de ce document peuvent être sujettes à modification sans avis préalable.
© 2009–2010 Dell Inc. tous droits réservés.
La reproduction de ce document de quelque manière que ce soit sans l’autorisation écrite de Dell Inc.
est strictement interdite.
Marques utilisées dans ce document : Dell™, le logo DELL, PowerEdge™ et PowerVault™ sont des
marques de Dell Inc. Intel
®
et Xeon
®
sont des marques déposées d’Intel Corporation aux Etats-Unis et
dans d’autres pays. AMD
®
, le logo AMD et leur combinaison sont des marques déposées et
AMD Opteron™ est une marque d’Advanced Micro Devices, Inc. Microsoft
®
, Windows
®
, et
Windows Server
®
sont des marques ou des marques déposées de Microsoft Corporation aux Etats-Unis
et dans d’autres pays. Oracle
®
est une marque déposée d’Oracle Corporation et/ou de ses filiales.
D’autres marques commerciales et noms de marque peuvent être utilisés dans ce document pour faire
référence aux entités se réclamant de ces marques et de ces noms ou de leurs produits. Dell Inc. rejette
tout intérêt propriétaire dans les marques et les noms commerciaux autres que les siens.
Juillet 2010 Rév. A03

Table des matières 51
Table des matières
1 Présentation de l’installation
de la base de données Oracle
sous Microsoft Windows Server x64 . . . 53
Documentation requise pour le déploiement
de la base de données Dell|Oracle
. . . . . . . . . . . 53
Terminologie utilisée dans le présent document
. . . . 54
Obtention d’aide
. . . . . . . . . . . . . . . . . . . . . 55
Support Dell. . . . . . . . . . . . . . . . . . . . . 55
Support Oracle . . . . . . . . . . . . . . . . . . . 55
2 Configuration matérielle
et logicielle requise . . . . . . . . . . . . . . . . 57
Configuration logicielle minimale requise . . . . . . . 57
Configuration matérielle minimale requise
. . . . . . . 58
3 Installation et configuration du système
d’exploitation . . . . . . . . . . . . . . . . . . . . . 63
Avant de commencer . . . . . . . . . . . . . . . . . . 63
Installation du système d’exploitation à l’aide
du DVD Dell Systems Management Tools
and Documentation
. . . . . . . . . . . . . . . . . . . 64

52 Table des matières
Poursuite de l’installation du système d’exploitation. . 67
Installation de Windows Server 2003. . . . . . . . 67
Installation de Windows Server 2008 SP2 . . . . . 68
Installation du CD Ressource . . . . . . . . . . . . 69
Installation du pilote de l’adaptateur
HBA Qlogic Fibre Channel . . . . . . . . . . . . . 70
Vérification des chemins de
répertoires temporaires. . . . . . . . . . . . . . . 71
4 Vérification de la configuration
matérielle et logicielle du cluster . . . . . . 73

Présentation de l’installation de la base de données 53
Oracle sous Microsoft Windows Server x64
Présentation de l’installation de la
base de données Oracle sous
Microsoft Windows Server x64
Ce document s’applique aux :
• Base de données Oracle 10g R2 Édition Enterprise exécuté sous
Windows
Server 2003 R2 SP2 Édition Enterprise/Standard x64 ou
Windows Server
2008 SP2, Édition Enterprise/Standard x64.
• Base de données Oracle 10g R2, Édition Standard exécuté sous Windows
Server
2003 R2 SP2, Edition Standard x64 ou Windows Server 2008 SP2,
Édition Standard x64.
Documentation requise pour le déploiement de
la
base de données Dell|Oracle
La documentation relative à la base de données Oracle sous Microsoft
Windows est organisée en une série de modules. Ces modules traitent des
sujets suivants :
•
Oracle Database on Microsoft Windows Server x64 Operating System and
Hardware Installation Guide
(Base de données Oracle sous Microsoft
Windows
Server x64 - Guide d’installation du système d’exploitation et
du
matériel) : ce module présente la configuration matérielle minimale et
les versions logicielles requises, le mode d’installation et de configuration
du système d’exploitation, la procédure de vérification des configurations
matérielles et logicielles et la manière d’obtenir des fichiers
Open Source.
•
Oracle Database on Microsoft Windows Server x64 Storage and Networking
Guide
(Base de données Oracle sous Microsoft Windows Server x64 -
Guide de stockage et de mise en réseau)
: ce module décrit comment
installer et configurer le réseau et les solutions de stockage.

54 Présentation de l’installation de la base de données
Oracle sous Microsoft Windows Server x64
•
Oracle Database on Microsoft Windows Server x64 Database Setup and
Installation Guide
(Base de données Oracle sous Microsoft
Windows
Server x64 - Guide de configuration et d’installation) : ce
module décrit comment installer et configurer la base de données Oracle.
•
Oracle Database on Microsoft Windows Server x64 Troubleshooting Guide
(Base de données Oracle sous Microsoft Windows
Server x64 - Guide de
dépannage)
: ce module explique comment résoudre les erreurs
rencontrées lors des procédures d’installation présentées dans les modules
précédents.
Terminologie utilisée dans le présent document
Les termes LUN (numéro d’unité logique), disque et volumes virtuels sont
synonymes et sont interchangeables. Le terme LUN est généralement utilisé
pour les environnements de système de stockage Dell|EMC Fibre Channel,
tandis que le terme Disque virtuel est plutôt réservé aux environnements
de stockage SAS à connexion directe (Dell MD3000/MD3000i et
Dell MD3000/MD3000i avec châssis d’extension MD1000). Quant au terme
Volume, il est généralement réservé aux environnements de stockage
Dell EqualLogic iSCSI.

Présentation de l’installation de la base de données 55
Oracle sous Microsoft Windows Server x64
Obtention d’aide
Support Dell
Pour plus d’informations sur l’utilisation du système, reportez-vous à la
documentation fournie avec vos composants système.
Pour consulter les livres blancs, vous informer sur les configurations Dell
prises en charge ou obtenir des informations plus générales, consultez le
site dell.com/oracle.
Pour obtenir une assistance technique de Dell concernant votre matériel ou
le système d’exploitation et télécharger les dernières mises à jour pour votre
système, rendez-vous sur le site Web support.dell.com.
REMARQUE : Vous trouverez des informations indiquant comment contacter Dell
dans le document Oracle Database on Microsoft Windows Server x64 Operating
System and Hardware Installation Guide (Base de données Oracle sous
Microsoft
Windows Server x64 - Guide d’installation du système d’exploitation et
du
matériel).
Des formations et certifications Dell Enterprise sont disponibles. Pour plus
d’informations, voir le site Web dell.com/training. Ce service n’est disponible
que dans certains pays.
Support Oracle
Pour obtenir des informations sur les formations concernant le logiciel Oracle
et les clusters ou pour contacter Oracle, visitez le site Web oracle.com ou
consultez votre documentation Oracle fournie avec les composants du
système. Pour obtenir des informations sur l’assistance technique, les
téléchargements et d’autres informations techniques, consultez le site
metalink.oracle.com.
Pour obtenir des informations sur la configuration du stockage et du réseau,
voir le document
Oracle Database on Microsoft Windows Server x64
Storage and
Networking Guide
(Base de données Oracle sous Microsoft Windows Server x64
- Guide de stockage et de mise en réseau).

56 Présentation de l’installation de la base de données
Oracle sous Microsoft Windows Server x64

Configuration matérielle et logicielle requise 57
Configuration matérielle et
logicielle requise
Configuration logicielle minimale requise
Le tableau 2-1 indique la configuration logicielle minimale et les
configurations prises en charge pour la base de données Oracle sous
Microsoft Windows Server Édition x64.
REMARQUE : La licence Oracle fournie avec la configuration Dell est valable
30
jours. Si vous ne possédez pas la licence de ce produit, contactez votre
représentant commercial Dell.
Tableau 2-1. Configuration logicielle pour Oracle Database sous Windows Server
Édition x64
Base de
données
Oracle
Édition x64
Configuration Oracle Microsoft Windows
Édition x64
EMC PowerPath
(clusters Fibre Channel
uniquement)
Base de données Oracle 10g R2
10g R2
Édition
Enterprise
Version 10.2.0.1
avec option RAC +
groupe de
correctifs 10.2.0.4
Server 2003 R2 SP2
Édition
Enterprise/Standard
Version 5.3
10g R2
Édition
Standard
Version 10.2.0.1
avec option RAC +
groupe de
correctifs 10.2.0.4
Server 2003 R2 SP2
Édition Standard
Version 5.3

58 Configuration matérielle et logicielle requise
Configuration matérielle minimale requise
Le tableau 2-2 indique la configuration matérielle minimale pour la base
de données Oracle 10g Édition Enterprise sous Microsoft Windows
Server 2003 R2 SP2 ou Windows Server 2008 SP2 Édition Standard/
Enterprise x64. Pour plus d’informations sur certains composants matériels
spécifiques, voir la documentation fournie avec le système.
REMARQUE : Pour obtenir les performances souhaitées, installez un système
plus
puissant que la configuration matérielle minimale en fonction du nombre
d’utilisateurs, des applications et des processus par lots exécutés.
REMARQUE : La configuration matérielle doit être identique sur tous les nœuds
du cluster.
10g R2
Édition
Enterprise
Version 10.2.0.4
avec option RAC
Server 2008 SP2
Édition
Enterprise/Standard
Version 5.3
10g R2
Édition
Standard
Version 10.2.0.4
avec option RAC
Server 2008 SP2
Édition Standard
Version 5.3
Tableau 2-1. Configuration logicielle pour Oracle Database sous Windows Server
Édition x64 (suite)
Base de
données
Oracle
Édition x64
Configuration Oracle Microsoft Windows
Édition x64
EMC PowerPath
(clusters Fibre Channel
uniquement)

Configuration matérielle et logicielle requise 59
Tableau 2-2. Configuration matérielle minimale pour base de données Oracle 10g
Édition Enterprise sous Microsoft Windows Server 2003 R2 SP2 ou
Windows Server 2008 SP2 Édition Standard/Enterprise x64
Composant matériel Configuration
Systèmes Dell PowerEdge 1950 IIII,
2900 III, 2950 II, T610, T710, R610, R710,
R810, R900, R910, M600, M610, M710,
et M910 (jusqu’à huit nœuds avec ASM
(Automatic Storage Management)
ou OCFS (Oracle Cluster File System)).
• Processeur Intel Xeon.
•1 Go de RAM.
• Contrôleur PERC pour les disques
durs internes.
• Deux disques durs de 73 Go connectés
à un contrôleur PERC.
REMARQUE : Il est recommandé d’utiliser
deux disques durs de 73 Go (RAID 1)
connectés à un contrôleur RAID interne.
Pour plus d’informations, voir la
documentation du système PowerEdge.
• Trois cartes réseau Gigabit.
• Deux adaptateurs HBA
(Un adaptateur HBA à deux ports
QLE2462/QLE2562 pour les systèmes
PowerEdge 1950/R610.
• Un adaptateur HBA à deux ports
QME2472/QME2572 ou
LPe1105-M4/LPe1205 pour les
systèmes PowerEdge
M600/M610/M710).

60 Configuration matérielle et logicielle requise
Systèmes Dell PowerEdge 6950, 2970,
M605, R805, R815 et R905 (jusqu’à huit
nœuds avec ASM et OCFS).
• Processeur AMD Opteron.
• 1 Go de RAM.
• Deux disques durs de 73 Go connectés
à un contrôleur RAID interne.
REMARQUE : Il est recommandé d’utiliser
deux disques durs de 73 Go (RAID 1)
connectés à un contrôleur RAID interne.
Pour plus d’informations, voir la
documentation du système PowerEdge.
• Trois cartes réseau Gigabit.
• Deux adaptateurs HBA pour les
systèmes PowerEdge 6950 ou 2970.
• Un adaptateur HBA à deux
ports QME2472/QME2572 ou
LPe1105-M4/LPe1205 pour les
systèmes PowerEdge
M605/M805/M905.
Commutateurs Ethernet Gigabit (deux) Voir le site dell.com/oracle pour plus
d’informations sur les configurations
prises en charge.
Pour les systèmes de stockage
Fibre Channel Dell|EMC AX4-5F,
CX3-10C, CX3-20, CX3-20F, CX3-40,
CX3-40F, CX3-80, CX4-120, CX4-240,
CX4-480 et CX4-960.
Pour plus d’informations, voir la
documentation du système Dell|EMC.
Pour les configurations SAS à connexion
directe Dell PowerVault MD3000 avec
système de stockage comportant une
extension MD1000.
Pour plus d’informations, voir la
documentation de votre système de
stockage Dell PowerVault MD3000
et MD1000.
Pour les systèmes de stockage
Dell PowerVault MD3000i à connexion
directe ou à commutation avec boîtier
d’extension MD1000.
Pour plus d’informations, voir la
documentation de votre système de
stockage Dell PowerVault MD3000i
et MD1000.
Tableau 2-2. Configuration matérielle minimale pour base de données Oracle 10g
Édition Enterprise sous Microsoft Windows Server 2003 R2 SP2 ou
Windows Server 2008 SP2 Édition Standard/Enterprise x64 (suite)
Composant matériel Configuration

Configuration matérielle et logicielle requise 61
Le tableau 2-3 indique la configuration matérielle minimale pour la base
de données Oracle 10g Édition Standard sous Microsoft Windows
Server 2003 R2 SP2 ou Windows Server 2008 Édition Standard x64. Pour plus
d’informations sur certains composants matériels spécifiques, voir la
documentation fournie avec le système.
Baie de stockage Dell EqualLogic série PS. Une baie de stockage Dell EqualLogic
série PS de 16 disques SAS de
15 000 tr/min.
Deux commutateurs Ethernet Gigabit
pour réseau SAN iSCSI.
Tableau 2-3. Configuration matérielle minimale pour base de données Oracle 10g
Édition Standard sous Microsoft Windows Server 2003 R2 SP2 ou
Windows Server 2008 SP2 Édition Standard x64
Composant matériel Configuration
Systèmes Dell PowerEdge 1950 III,
2950 III, 2900III,T610, T710, R610
et R710 (jusqu’à deux nœuds avec ASM).
• Processeur Intel Xeon.
• 1 Go de RAM.
• Contrôleur PERC pour les disques durs
internes.
• Deux disques durs de 73 Go connectés
à un contrôleur PERC.
REMARQUE : Il est recommandé d’utiliser
deux disques durs de 73 Go (RAID 1)
connectés à un contrôleur RAID interne.
Pour plus d’informations, voir la
documentation du système PowerEdge.
• Trois cartes réseau Gigabit.
• Deux adaptateurs HBA.
• Un adaptateur HBA à deux ports
QLE2462/QLE2562 pour les systèmes
PowerEdge 1950/R610.
Tableau 2-2. Configuration matérielle minimale pour base de données Oracle 10g
Édition Enterprise sous Microsoft Windows Server 2003 R2 SP2 ou
Windows Server 2008 SP2 Édition Standard/Enterprise x64 (suite)
Composant matériel Configuration

62 Configuration matérielle et logicielle requise
Systèmes Dell PowerEdge 2970,
R805 (jusqu’à deux nœuds avec ASM).
• Processeur AMD Opteron.
• 1 Go de RAM.
• Deux disques durs de 73 Go connectés
à un contrôleur RAID interne.
REMARQUE : Il est recommandé d’utiliser
deux disques durs de 73 Go (RAID 1)
connectés à un contrôleur RAID interne.
Pour plus d’informations, voir la
documentation du système PowerEdge.
• Trois cartes réseau Gigabit.
Commutateurs Ethernet Gigabit (deux). Voir le site dell.com/oracle pour plus
d’informations sur les configurations
prises en charge.
Pour les systèmes de stockage
Fibre Channel Dell|EMC AX4-5F,
CX3-10C, CX3-20, CX3-20F, CX3-40,
CX3-40F, CX3-80, CX4-120, CX4-240,
CX4-480 et CX4-960.
Pour plus d’informations, voir la
documentation du système Dell|EMC.
Pour les systèmes
Dell PowerVault MD3000 SAS à
connexion directe avec boîtier
d’extension MD1000.
Pour plus d’informations, voir la
documentation de votre système de
stockage Dell PowerVault MD3000
et MD1000.
Pour les systèmes de stockage
Dell PowerVault MD3000i à connexion
directe ou à commutation avec boîtier
d’extension MD1000.
Pour plus d’informations, voir la
documentation de votre système de
stockage Dell PowerVault MD3000i
et MD1000.
Tableau 2-3. Configuration matérielle minimale pour base de données Oracle 10g
Édition Standard sous Microsoft Windows Server 2003 R2 SP2 ou
Windows Server 2008 SP2 Édition Standard x64 (suite)
Composant matériel Configuration

Installation et configuration du système d’exploitation 63
Installation et configuration du
système d’exploitation
PRÉCAUTION : Déconnectez tous les périphériques de stockage externes avant
d’installer le système d’exploitation, pour vous assurer que ce dernier sera
correctement installé.
Cette section fournit des informations sur l’installation et la configuration
des systèmes d’exploitation Microsoft Windows Server 2003 R2 SP2 et
Windows Server 2008 SP2, Édition Standard/Enterprise x64, pour le
déploiement de la base de données Oracle.
Avant de commencer
REMARQUE : Consultez le site support.dell.com pour obtenir les dernières
mises
à jour du BIOS, du micrologiciel et des pilotes.
1
Mettez le système hors tension.
2
Déconnectez tous les périphériques de stockage externes du système.
3
Localisez les supports de
Microsoft Windows Server 2003 R2 SP2
ou
Windows Server 2008, Édition Standard/Enterprise x64
et
Dell Systems
Management Tools and Documentation
correspondant à votre serveur
Dell en vous reportant au tableau 3-1.
Tableau 3-1. Support de gestion des systèmes de serveurs PowerEdge
Système Dell PowerEdge Support de gestion des systèmes
6950, 1950, 2900, 2950, 2970, 1950 III,
2900 III, 2950 III, R805, R905, R900,
M600, M605, M610, M710, M805,
M905, T610, T710, R610, and R710.
Support Dell Systems Management Tools
and Documentation version 6.2.
R810, R910, R815 et M910. Support Dell Systems Management Tools
and Documentation version 6.2.1
REMARQUE : Le support Dell Systems Management Tools and Documentation est
fourni avec votre serveur Dell.

64 Installation et configuration du système d’exploitation
Installation du système d’exploitation à l’aide
du
DVD Dell Systems Management Tools and
Documentation
1
Mettez le système sous tension.
2
Insérez le support
Dell Systems Management
dans le lecteur correspondant
de votre système.
La fenêtre
Dell Systems Build and Update Utility
Welcome
(Fenêtre de Bienvenue de l’utilitaire Dell Systems Build and
Update Utility)
s’affiche
.
REMARQUE : Si votre système n’est pas équipé d’un lecteur de CD/DVD,
vous pouvez utiliser un lecteur de CD/DVD USB externe.
3
Dans la fenêtre
Select Language
(Sélection de la langue), sélectionnez
English
(Anglais).
4
Dans le tableau
Systems Deployment Options
(Options de déploiement
système), cliquez sur
Configure
(Configurer) sur la ligne où figure l’option
Server OS Installation
(Installation du système d’exploitation du serveur).
La fenêtre
Configure Server Operating System
Installation
(Configurer
l’installation du système d’exploitation du serveur) s’affiche.
Le module d’installation du système d’exploitation du serveur (Server
Operating System Installation, SOI) de l’utilitaire Dell Systems Build
and
Update Utility vous permet d’installer les systèmes d’exploitation
pris
en charge par Dell sur vos systèmes Dell.
REMARQUE : Pour plus d’informations sur les fenêtres du module
d’installation SOI, voir l’aide en ligne de Dell
Systems Build and Update Utility.
5
Dans la fenêtre
Set Date and Time
(Régler la date et l’heure) du module
d’installation SOI, réglez la date, l’heure et le fuseau horaire, puis cliquez
sur
Continue
(Continuer).
6
Dans la fenêtre
Select an Operation System to Install
(Sélectionner le
système d’exploitation à installer) :
a
Sélectionnez
Microsoft Windows Server
2003 Service SP2 R2 x64
Edition
ou
Microsoft Windows Server 2008 x64 (64 bit Edition)
en
fonction de votre configuration.
b
Cliquez sur
Continue
(Continuer).

Installation et configuration du système d’exploitation 65
7
Dans la fenêtre
Select RAID Configuration
(Sélectionner la configuration
RAID), choisissez les sélections par défaut puis cliquez sur
Continue
(Continuer).
REMARQUE : Selon la configuration du système, ce menu peut ne pas
apparaître.
8
Si vous avez sélectionné
Microsoft Windows Server 2008 Edition x64
(64 bit Edition)
dans la fenêtre
Select an Operating System to Install
(Sélectionnez le système d’exploitation que vous voulez installer), passez
directement à l’étape 11.
9
Dans la fenêtre
Configure the Disk Partition
(Configurer la partition
de disque) :
a
Vous pouvez modifier la taille de la partition d’amorçage ou conserver
les paramètres par défaut.
b
Cliquez sur
Continuer
.
10
Dans la fenêtre
Enter Operating System Configuration Information
(Saisie des informations du système d’exploitation) :
a
Entrez le nom de l’organisation, le nom d’utilisateur, l’ID du produit
et le nom de l’ordinateur.
b
Entrez toutes les autres informations nécessaires.
c
Cliquez sur
Install SNMP
(Installer SNMP), qui est le paramètre
par
défaut.
d
Cliquez sur
Install Server Administrator
(Installer Server
Administrator), qui est l’option par défaut, si vous souhaitez installer
Dell OpenManage Server Administrator Utility.
REMARQUE : Server Administrator peut être installé à tout moment une
fois
le système d’exploitation installé.
e
Cliquez sur
Continue
(Continuer).

66 Installation et configuration du système d’exploitation
11
Pour l’installation de Windows Server 2008 x64, cliquez sur
Eject CD/DVD
(Éjection du CD/DVD). Dans la fenêtre
Operating System Installation Summary
(Résumé de l’installation
du système d’exploitation), cliquez sur
Eject CD/DVD
Automatically
(Éjection automatique du CD/DVD) qui est l’option par défaut puis
cliquez sur
Continue
(Continuer).
REMARQUE : Une fois que vous cliquez sur Apply Now (Appliquer
maintenant), l’installation commence et vous ne pouvez plus changer les
options de configuration du système.
12
Cliquez sur
Apply Now
(Appliquer maintenant).
L’installation de l’utilitaire Systems Build and Update Utility démarre.
REMARQUE : Cette procédure peut prendre plusieurs minutes.
13
Si vous avez sélectionné Microsoft Windows Server 2003 Service Pack 2
x64 Édition, à l’invite, insérez le CD Windows Server 2003 SP2 Édition
Enterprise ou Standard x64 dans le lecteur.
REMARQUE : Cette procédure peut prendre plusieurs minutes.
14
À la fin de l’installation de l’utilitaire Systems Build and Update Utility,
le système redémarre automatiquement.
REMARQUE : Avant que le système ne redémarre, veillez à retirer tout
support de démarrage.
15
Lors du redémarrage, le système démarre depuis le programme
d’installation du système d’exploitation.
REMARQUE : Ne redémarrez pas directement depuis le DVD du système
d’exploitation qui se trouve dans le lecteur.

Installation et configuration du système d’exploitation 67
Poursuite de l’installation du système
d’exploitation
Installation de Windows Server 2003
1
Si vous avez choisi Microsoft Windows Server 2003 R2 SP2 x64 Edition
lors de l’installation de l’utilitaire Dell Systems Build and Update Utility,
lors du redémarrage, le système démarre automatiquement en mode
d’installation de Windows Server 2003 R2 SP2 x64 Edition.
2
Dans la fenêtre
Personalize Your Software
(Personnalisez votre logiciel),
entrez les informations appropriées dans les champs Name (Nom) et
Organization (Organisation). Cliquez ensuite sur
Next
(Suivant).
3
Lorsque vous y êtes invité, entrez la clé de produit de Windows
Server 2003 R2 SP2, Édition Standard/Enterprise x64, puis cliquez sur
Next
(Suivant).
PRÉCAUTION : Ne laissez pas le champ du mot de passe d’administrateur vide.
4
Complétez les champs
Computer Name
(Nom de l’ordinateur) et
Administrator Password
(Mot de passe d’administrateur), puis cliquez
sur
Next
(Suivant).
REMARQUE : Pour que le réseau public soit configuré correctement,
le
nom de l’ordinateur et le nom public de l’hôte doivent être identiques.
REMARQUE : Notez le mot de passe d’ouverture de session créé lors de
cette étape. Vous devrez le fournir à l’
étape 5.
5
Une fois l’installation terminée, la fenêtre
Welcome to Windows
(Bienvenue dans Windows) s’affiche.
a
Arrêtez le système, reconnectez tous les périphériques de stockage
externes, puis démarrez le système.
b
Dans la fenêtre
Welcome to Windows
(Bienvenue dans Windows),
appuyez sur <Ctrl><Alt><Suppr> pour continuer. La fenêtre
Log On
(Connexion) s’affiche.
c
Dans le champ
Password
(Mot de passe), entrez le mot de passe
d’administrateur créé à l’
étape 4 de cette procédure, puis cliquez
sur
OK
.
Le système vous demande d’insérer le CD 2 de
Microsoft
Windows
Server
. Insérez le CD 2 de Windows Server ou cliquez sur
Annuler
.

68 Installation et configuration du système d’exploitation
REMARQUE : Si vous insérez le CD 2 de Windows Server, suivez les invites
de l’assistant d’installation. La procédure suivante suppose que vous n’avez
pas inséré le CD
2 de Windows Server.
d
Cliquez sur
Annuler
. Un message vous informe que le CD 2 de
Windows Server ne sera pas installé.
e
Cliquez sur
OK
. Le système vous invite à effectuer les tâches de post-
installation (facultatif).
f
Cliquez sur
Terminer
. Vous êtes invité à fermer la page.
g
Cliquez sur
Oui
. La fenêtre
Manage Your Server Windows
Management
(Gérer la gestion de votre serveur Windows) s’affiche.
h
Fermez la fenêtre.
REMARQUE : Pour utiliser Broadcom Advanced Control Suite 3 (BACS),
installez Microsoft .NET Framework 2.0 que vous pouvez télécharger depuis
le
site microsoft.com
Installation de Windows Server 2008 SP2
1
Si vous avez choisi Microsoft Windows Server 2008 x64 (64 bit Edition)
lors de l’installation de l’utilitaire Dell Systems Build and Update Utility,
lors du redémarrage, vous êtes invité à insérer un support valide
Windows Server 2008 dans le lecteur de DVD. Insérez le disque
Windows Server 2008 SP2
dans le lecteur de DVD, puis cliquez sur
OK
.
2
Cliquez sur
OK
dans la fenêtre
Valid Microsoft Windows Server 2008 SP2
media
(Support Microsoft Windows Server 2008 SP2 valide) pour
démarrer l’installation.
3
Dans la fenêtre suivante, remplissez les champs de préférences
concernant la langue et les autres options, puis cliquez sur
Next
(Suivant)
pour continuer.
4
Cliquez sur
Install now
(Installer maintenant) pour démarrer
l’installation.
5
Entrez la clé d’activation, puis cliquez sur
Next
(Suivant) pour continuer.

Installation et configuration du système d’exploitation 69
6
Dans la fenêtre suivante :
a
Sélectionnez
Windows Server 2008 Enterprise (Full Installation)
(Windows Server
2008 Enterprise - Installation complète).
b
Cliquez sur
Suivant
.
7
Dans la fenêtre
license term
(Termes du contrat de licence) :
a
Cochez la case,
I accept the license terms
(J’accepte les termes du
contrat de licence).
b
Cliquez sur
Suivant
.
8
Dans la fenêtre suivante :
a
Sélectionnez l’option
Custom (Advanced) Installation
(Installation
personnalisée - avancée).
b
Sélectionnez le disque sur lequel installer Windows.
c
Cliquez sur
Suivant
.
Le programme d’installation démarre l’installation de Windows.
REMARQUE : Cette procédure peut prendre plusieurs minutes.
9
À la fin de l’installation, changez le mot de passe d’administrateur.
PRÉCAUTION : Ne laissez pas le champ du mot de passe d’administrateur vide.
REMARQUE : Pour utiliser Broadcom Advanced Control Suite (BACS),
installez
Microsoft .NET Framework 2.0 ou une version ultérieure, s’il n’est pas déjà
installé. Vous pouvez télécharger ce programme depuis le site microsoft.com.
Installation du CD Ressource
REMARQUE : Vous pouvez télécharger le CD Ressource Windows pour votre
configuration depuis le site dell.com/oracle.
1
Insérez le CD libellé
Dell RCD x64 4.4
.
2
Double-cliquez sur
Poste de travail
, puis sur la lettre associée au lecteur
de CD-ROM.
3
Exécutez
install_drivers.bat
REMARQUE : Cette procédure peut prendre plusieurs minutes.
4
Appuyez sur une touche pour continuer.

70 Installation et configuration du système d’exploitation
5
Si vous devez installer le pilote de l’adaptateur HBA Qlogic Fibre Channel
sur le système :
• Pour Windows Server 2003, reportez-vous à l’installation du pilote
«Pour Windows Server 2003 :» à la page 70.
• Pour Windows Server 2008, reportez-vous à l’installation du pilote
«Pour Windows Server 2008 :» à la page 71.
6
Consultez les fichiers journaux pour vérifier que tous les pilotes sont
correctement installés.
REMARQUE : Ces fichiers se trouvent dans le répertoire
<Lecteur
principal:/>Dell_Resource_CD/logs>
7
À la fin de l’installation, retirez le CD du lecteur.
8
Redémarrez le système.
Installation du pilote de l’adaptateur HBA Qlogic Fibre Channel
Pour Windows Server 2003 :
1
Démarrez le Gestionnaire de périphériques comme suit :
a
Cliquez sur
Démarrer
et sur
Exécuter
.
b
Dans la boîte de dialogue
Exécuter
, tapez
devmgmt.msc
,
puis
cliquez sur
OK
.
2
Dans la boîte de dialogue
Gestionnaire de périphériques
, faites défiler
la liste de types de matériel, puis double-cliquez sur
contrôleurs SCSI
et RAID
.
3
Double-cliquez sur
Adaptateur HBA QLogic Fibre Channel
dans la liste
des périphériques.
4
Cliquez sur l’onglet
Pilote
, puis sur
Mise à jour du périphérique
pour
démarrer l’Assistant de mise à jour du matériel.
5
Cliquez sur
Installer à partir d’une liste ou d’un emplacement spécifique
(Avancé)
, puis cliquez sur
Suivant
.
6
Cliquez sur
Ne pas rechercher, je vais choisir le pilote à installer
, puis
cliquez sur
Suivant
.
7
Cliquez sur
Sélectionner le disque
, puis naviguez jusqu’au dossier
<Lecteur_principal:/>Dell_Resource_CD/drivers/R254072
.

Installation et configuration du système d’exploitation 71
8
Dans la boîte de dialogue
Assistant de mise à jour du
matériel/Sélectionner un pilote pour le périphérique
, cliquez sur
Suivant.
9
Dans la fenêtre
Assistant de mise à jour du matériel/Assistant de mise à
jour du matériel terminée
, cliquez sur
Terminer.
Pour Windows Server 2008 :
1
Démarrez le Gestionnaire de périphériques comme suit :
a
Cliquez sur
Démarrer
, puis sur
Panneau de configuration
.
b
Cliquez sur
Matériel et son
.
c
Cliquez sur
Gestionnaire de périphériques
.
2
Faites défiler la liste des types de matériel puis double-cliquez sur
Contrôleur de stockage
.
3
Double-cliquez sur
Adaptateur HBA QLogic Fibre Channel
dans la liste
des périphériques.
4
Cliquez sur l’onglet
Pilote
, puis sur
Mise à jour du périphérique
pour
démarrer l’
Assistant de mise à jour du matériel
.
5
Naviguez jusqu’au dossier
<Lecteur_principal:/>Dell_Resource_CD/drivers/R254072
puis cliquez
sur
Suivant
.
6
Dans la fenêtre
Windows a mis à jour votre logiciel avec succès
, cliquez
sur
Fermer
.
Vérification des chemins de répertoires temporaires
Vérifiez que les chemins des répertoires Temp et Tmp ont été définis
correctement. Recommencez les étapes suivantes pour tous les nœuds
du cluster.
1
Cliquez sur
Démarrer
et sélectionnez
Exécuter
.
2
Dans le champ
Ouvrir
, tapez
cmd
et cliquez sur
OK
.
3
À l’invite de commandes, tapez
echo %Temp%
et appuyez sur
<Entrée>.
L’entrée suivante s’affiche :
%SystemDrive%\Temp
où
%SystemDrive%
est le lecteur local de l’utilisateur.

72 Installation et configuration du système d’exploitation
Sinon, suivez la procédure suivante pour modifier les chemins d’accès
aux
répertoires Temp et Tmp.
a
Cliquez avec le bouton droit de la souris sur
Poste de travail
et
sélectionnez
Propriétés
.
b
Sous
Tâches
, sélectionnez
Paramètres de système avancés
.
c
Dans l’onglet
Avancé
, cliquez sur
Variables d’environnement
.
d
Sous
Variables utilisateur pour l’administrateur
, modifiez la variable
TEMP
et définissez la valeur de la variable sur
%SystemDrive%\Temp
.
e
Exécutez l’étape 3 pour vérifier que le répertoire temp est défini
correctement.
4
À l’invite de commandes, tapez
echo
%Tmp%
, et appuyez sur <Entrée>.
Le chemin d’accès suivant s’affiche :
%SystemDrive%\Temp
où
%SystemDrive%
est le lecteur local de l’utilisateur.
Si le répertoire temp n’est pas défini, suivez la procédure suivante.
a
Cliquez avec le bouton droit de la souris sur
Poste de travail
et
sélectionnez
Propriétés
.
b
Sous
Tâches
, sélectionnez
Paramètres systèmes avancés
.
c
Dans l’onglet
Avancé
, cliquez sur
Variables d’environnement
.
d
Sous
User Variables for Administrator
(Variables utilisateur pour
l’administrateur), modifiez la variable
TMP
et définissez la sur
%SystemDrive%\Tmp
.
e
Exécutez l’étape 4 pour vérifier que le répertoire tmp est
correctement défini.
5
Recommencez les étapes de cette section pour tous les nœuds du cluster.

Vérification de la configuration matérielle et logicielle du cluster 73
Vérification de la configuration
matérielle et logicielle du cluster
Cette section contient des informations sur la configuration matérielle et
logicielle du cluster.
Avant de configurer le cluster, vérifiez que tous les composants matériels
requis pour la configuration minimale sont installés, comme indiqué dans
le tableau 4-1.
Les logiciels suivants doivent être installés sur chaque nœud :
•DVD
Dell Systems Management Tools and Documentation
(Documentation et outils de gestion des systèmes Dell) (voir le
tableau 3-1).
•
Windows Server 2003 SP2, Édition Standard/Enterprise x64
ou
Windows
Server 2008 SP2, Édition Standard/Enterprise x64
(voir le tableau 2-1).
• Image du CD
Dell|Oracle Windows Resource
version 4.3.
REMARQUE : Vérifiez que les pilotes HBA sont installés.
•CD
PowerVault MD3000 Resource
ou
PowerVault MD3000i Resource
(si
vous utilisez PowerVault MD3000/MD3000i comme système de
stockage principal).
Le stockage doit inclure au moins quatre disques virtuels/LUN (deux pour
le disque de vote et le registre OCR (Oracle Cluster Registry) redondants et
deux pour la base de données et la zone de récupération flash) affectés aux
nœuds du cluster.

74 Vérification de la configuration matérielle et logicielle du cluster
Tableau 4-1. Configuration et taille des disques virtuels (LUN)
Unités logiques ou
disques virtuels
Taille
minimale
Nombre de partitions Utilisé pour
1 3 Go 5 (3 x 275 Mo et
2 x 300 Mo)
Disque de vote
(3 x 275 Mo)
Registre du cluster Oracle
(2 x 300 Mo)
2 Supérieure à
la taille de la
base de
données
1 Base de données
3 Au moins
deux fois la
taille de la
base de
données
1 Zone de récupération flash

Dell PowerEdge-Systeme
Oracle Database unter
Microsoft Windows Server x64
Installationshandbuch
für
Betriebssystem
und
Hardware
Version 4.4

Anmerkungen und Vorsichtshinweise
ANMERKUNG: Eine ANMERKUNG macht auf wichtige Informationen
aufmerksam, mit denen Sie den Computer besser einsetzen können.
VORSICHTSHINWEIS: Mit einem VORSICHTSHINWEIS werden Sie auf mögliche
Gefahrenquellen hingewiesen, die Hardwareschäden oder Datenverlust zur Folge
haben können, wenn die Anweisungen nicht befolgt werden.
____________________
Irrtümer und technische Änderungen vorbehalten.
© 2009–2010 Dell Inc. Alle Rechte vorbehalten.
Die Vervielfältigung oder Wiedergabe dieser Materialien in jeglicher Weise ohne vorherige schriftliche
Genehmigung von Dell Inc. ist strengstens untersagt.
In diesem Text verwendete Marken: Dell™, das DELL Logo, PowerEdge™ und PowerVault™ sind
Marken von Dell Inc. Intel
®
und Xeon
®
sind eingetragene Marken der Corporation in den USA und
anderen Ländern. AMD
®
, das AMD Logo und Kombinationen hieraus sind eingetragene Marken und
AMD Opteron™ ist eine Marke von Advanced Micro Devices, Inc. Microsoft
®
, Windows
®
und
Windows Server
®
sind Marken oder eingetragene Marken der Microsoft Corporation in den USA und/
oder anderen Ländern. Oracle
®
ist eine eingetragene Marke der Oracle Corporation und/oder deren
Tochterunternehmen.
Alle anderen in dieser Dokumentation genannten Marken und Handelsbezeichnungen sind Eigentum
der entsprechenden Hersteller und Firmen. Dell Inc. erhebt keinen Anspruch auf Markenzeichen und
Handelsbezeichnungen mit Ausnahme der eigenen.
Juli 2010 Rev. A03

Inhalt 77
Inhalt
1 Übersicht über die Oracle
Database-Installation unter
Microsoft Windows Server x64 . . . . . . . 79
Erforderliche Dokumentation für die
Bereitstellung der Dell|Oracle Database
. . . . . . . . 79
In diesem Dokument verwendete Terminologie
. . . . 80
Wie Sie Hilfe bekommen
. . . . . . . . . . . . . . . . 81
Dell-Support
. . . . . . . . . . . . . . . . . . . . 81
Oracle-Support
. . . . . . . . . . . . . . . . . . . 81
2 Software- und
Hardwareanforderungen . . . . . . . . . . . . 83
Software-Mindestanforderungen . . . . . . . . . . . . 83
Hardware-Mindestanforderungen
. . . . . . . . . . . 84
3 Installation und Konfiguration des
Betriebssystems . . . . . . . . . . . . . . . . . . . 89
Bevor Sie beginnen . . . . . . . . . . . . . . . . . . . 89
Installation des Betriebssystems mit der
Dell Systems Management Tools and
Documentation-DVD
. . . . . . . . . . . . . . . . . . . 90

78 Inhalt
Fortsetzen der Betriebssysteminstallation . . . . . . . 92
Installation von Windows Server 2003
. . . . . . . 92
Installation von Windows Server 2008 SP2
. . . . . 94
Installation der Resource-CD
. . . . . . . . . . . . 95
Installation des Treibers für einen
Qlogic Fibre-Channel-HBA
. . . . . . . . . . . . . 96
Überprüfen der Pfade für
temporäre Verzeichnisse
. . . . . . . . . . . . . . 97
4 Überprüfen der Konfiguration von
Clusterhardware und -software . . . . . . . 99

Übersicht über die Oracle Database-Installation unter 79
Microsoft Windows Server x64
Übersicht über die Oracle
Database-Installation unter
Microsoft Windows Server x64
Dieses Dokument betrifft:
• Oracle Database 10g R2 Enterprise Edition unter Windows Server 2003
R2 SP2 Enterprise/Standard x64 Edition oder Windows Server 2008 SP2
Enterprise/Standard x64 Edition.
• Oracle Database 10g R2 Standard Edition unter Windows Server 2003
R2
SP2 Standard x64 Edition oder Windows Server 2008 SP2 Standard
x64 Edition.
Erforderliche Dokumentation für die
Bereitstellung der Dell|Oracle Database
Der Dokumentationssatz für Oracle Database unter Microsoft Windows
ist als Reihe von Modulen aufgebaut. Diese Module behandeln die folgenden
Themen:
•
Oracle Database unter Microsoft Windows Server x64
Installationshandbuch für Betriebssystem und Hardware
– Beschreibung
der
Mindestanforderungen für Hardware und Softwareversionen,
Informationen zur Installation und Konfiguration des Betriebssystems,
zur
Überprüfung der Hardware- und Softwarekonfigurationen und zum
Bezug von Open-Source-Dateien.
•
Oracle Database unter Microsoft Windows Server x64 Speicher- und
Netzwerkhandbuch
– Beschreibt die Installation und Konfiguration
der
Netzwerk- und Speicherlösungen.

80 Übersicht über die Oracle Database-Installation unter
Microsoft Windows Server x64
•
Oracle Database unter Microsoft Windows Server x64
Datenbankeinrichtungs- und -installationsanleitung
– Enthält
Anweisungen zum Installieren und Konfigurieren der Oracle-Datenbank.
•
Oracle Database unter Microsoft Windows Server
x64
Fehlerbehebungshandbuch
– Beschreibt Maßnahmen zum Lösen von
Problemen, die während der Installationsvorgänge in den
vorangegangenen Modulen auftreten können.
In diesem Dokument verwendete Terminologie
In diesem Dokument werden die Begriffe „logische Gerätenummer” (LUN),
„virtueller Datenträger” und „Volume” verwendet. Diese Begriffe sind
synonym und untereinander ersetzbar. Der Begriff LUN wird üblicherweise im
Zusammenhang mit Dell|EMC Fibre-Channel-Speichersystemumgebungen
und virtueller Datenträger bei Direct-Attached-SAS-Speicherumgebungen
(Dell MD3000/MD3000i und Dell MD3000/MD3000i mit MD1000-
Erweiterung) gebraucht; der Begriff Volume ist üblich bei Dell EqualLogic
iSCSI-Speichersystemumgebungen.

Übersicht über die Oracle Database-Installation unter 81
Microsoft Windows Server x64
Wie Sie Hilfe bekommen
Dell-Support
Ausführliche Informationen zur Verwendung des Systems finden Sie in der
zusammen mit den Systemkomponenten gelieferten Dokumentation.
Verschiedene Whitepaper, von Dell unterstützte Konfigurationen und
allgemeine Informationen finden Sie unter dell.com/oracle.
Technischen Support von Dell für Ihre Hardware und die
Betriebssystemsoftware sowie die aktuellen Updates für das System erhalten
Sie unter support.dell.com.
ANMERKUNG: Informationen zur Kontaktaufnahme mit Dell finden Sie im
Oracle
Database unter Microsoft Windows Server x64 Installationshandbuch
für
Betriebssystem und Hardware für Ihr System.
Unternehmensschulungen und Zertifizierungen sind verfügbar
(Dell Enterprise Training and Certification). Nähere Informationen finden
Sie unter dell.com/training. Die Schulungen werden eventuell nicht an allen
Standorten angeboten.
Oracle-Support
Informationen über Oracle-Software, Schulungen für Anwendungs-Clusterware
sowie Kontaktinformationen von Oracle finden Sie unter
oracle.com
oder in der
Oracle-Dokumentation, die Sie mit den Systemkomponenten erhalten haben.
Informationen über technischen Support, Downloads und andere technische
Informationen erhalten Sie unter
metalink.oracle.com
.
Informationen über das Konfigurieren von Speicher und Netzwerk finden Sie
im
Oracle Database unter Microsoft Windows Server x64
Speicher- und
Netzwerkhandbuch.

82 Übersicht über die Oracle Database-Installation unter
Microsoft Windows Server x64

Software- und Hardwareanforderungen 83
Software- und
Hardwareanforderungen
Software-Mindestanforderungen
In Tabelle 2-1 sind die Software-Mindestanforderungen und unterstützten
Konfigurationen für Oracle Database unter Microsoft Windows Server x64
Editions aufgeführt.
ANMERKUNG: Die Dell-Konfiguration umfasst eine 30-Tage-Testlizenz der Oracle-
Software. Wenn Sie für dieses Produkt keine Lizenz besitzen, wenden Sie sich an
den Dell Verkaufsberater.
Tabelle 2-1. Softwareanforderungen für Oracle Database unter Windows Server x64
Editions
Oracle
Database
(x64) Edition
Oracle-Konfiguration Microsoft Windows
(x64) Edition
EMC PowerPath (nur
Fibre-Channel-Cluster)
Oracle Database 10g R2
10g R2
Enterprise
Edition
Version 10.2.0.1 mit
RAC-Option +
10.2.0.4 Patchset
Server 2003 R2 SP2
Enterprise/Standard
Edition
Version 5.3
10g R2
Standard
Edition
Version 10.2.0.1 mit
RAC-Option +
10.2.0.4 Patchset
Server 2003 R2 SP2
Standard Edition
Version 5.3

84 Software- und Hardwareanforderungen
Hardware-Mindestanforderungen
In Tabelle 2-2 sind die Hardware-Mindestanforderungen für Oracle Database
10g Enterprise Edition unter Microsoft Windows Server 2003 R2 SP2 oder
Windows Server 2008 SP2 Standard/Enterprise x64 Edition aufgeführt.
Weitere Informationen zu spezifischen Hardwarekomponenten finden Sie in
der Dokumentation zum System.
ANMERKUNG: Um die gewünschte Leistung zu erzielen, wählen Sie ein System,
dass die Hardware-Mindestanforderungen hinsichtlich der Anzahl der Benutzer,
der verwendeten Anwendungen und der Batch-Prozesse übersteigt.
ANMERKUNG: Die Hardwarekonfiguration sämtlicher Clusterknoten sollte
identisch sein.
10g R2
Enterprise
Edition
Version 10.2.0.4 mit
RAC-Option
Server 2008 SP2
Enterprise/Standard
Edition
Version 5.3
10g R2
Standard
Edition
Version 10.2.0.4 mit
RAC-Option
Server 2008 SP2
Enterprise/Standard
Edition
Version 5.3
Tabelle 2-1. Softwareanforderungen für Oracle Database unter Windows Server x64
Editions (fortgesetzt)
Oracle
Database
(x64) Edition
Oracle-Konfiguration Microsoft Windows
(x64) Edition
EMC PowerPath (nur
Fibre-Channel-Cluster)

Software- und Hardwareanforderungen 85
Tabelle 2-2. Hardware-Mindestanforderungen für Oracle Database 10g Enterprise Edition
unter Microsoft Windows Server 2003 R2 SP2 oder Windows Server 2008 SP2
Standard/Enterprise x64 Edition
Hardwarekomponente Konfiguration
Dell PowerEdge 1950 IIII, 2900 III,
2950 II, T610, T710, R610, R710, R810,
R900, R910, M600, M610, M710 und
M910 (bis zu acht Knoten mit Automatic
Storage Management [ASM] oder Oracle
Cluster File System [OCFS]).
• Prozessor der Reihe Intel Xeon
• 1 GB RAM
• PERC für interne Festplatten.
• Zwei 73-GB-Festplatten mit Anschluss
an PERC-Controller
ANMERKUNG: Es wird die Verwendung
von zwei 73-GB-Festplatten (RAID 1) mit
Anschluss an einen internen RAID-
Controller empfohlen. Nähere
Informationen finden Sie in der
PowerEdge-Systemdokumentation.
• Drei Gigabit-NICs.
• Zwei HBAs
(1 HBA QLE2462/QLE2562
[zwei Ports] zum Einsatz mit
PowerEdge 1950/R610.
• Ein HBA QME2472/QME2572 oder
LPe1105-M4/LPe1205 [zwei Ports]
zum Einsatz mit PowerEdge
M600/M610/M710.

86 Software- und Hardwareanforderungen
Dell PowerEdge 6950, 2970, M605, R805,
R815 und R905 (bis zu acht Knoten mit
ASM oder OCFS).
• Prozessor der Reihe AMD Opteron
•1 GB RAM
• Zwei 73-GB-Festplatten mit Anschluss
an einen internen RAID-Controller
ANMERKUNG: Es wird die Verwendung
von zwei 73-GB-Festplatten (RAID 1) mit
Anschluss an einen internen RAID-
Controller je nach System empfohlen.
Nähere Informationen finden Sie in der
PowerEdge-Systemdokumentation.
• Drei Gigabit-NICs.
• Zwei HBAs zum Einsatz mit
PowerEdge 6950 oder 2970.
• Ein HBA QME2472/QME2572 oder
LPe1105-M4/LPe1205 [zwei Ports]
zum Einsatz mit PowerEdge
M605/M805/M905.
Gigabit-Ethernet-Switches (zwei). Informationen über unterstützte
Konfigurationen finden Sie unter
dell.com/oracle.
Für Fibre-Channel-Speichersysteme
Dell|EMC AX4-5F, CX3-10C, CX3-20,
CX3-20F, CX3-40, CX3-40F, CX3-80,
CX4-120, CX4-240, CX4-480 und
CX4-960.
Nähere Informationen finden Sie in der
Dokumentation zum Dell|EMC-System.
Bei Direct-Attach-SAS
Dell PowerVault MD3000-Speichersystem
mit MD1000-Erweiterung.
Weitere Informationen finden Sie in der
Dokumentation zum Speichersystem
Dell PowerVault MD3000 und MD1000.
Bei Direct-Attach- oder Switch-iSCSI-Dell
PowerVault MD3000i-Speichersystem mit
MD1000-Erweiterung.
Weitere Informationen finden Sie in der
Dokumentation zum Speichersystem
Dell PowerVault MD3000i und MD1000.
Tabelle 2-2. Hardware-Mindestanforderungen für Oracle Database 10g Enterprise Edition
unter Microsoft Windows Server 2003 R2 SP2 oder Windows Server 2008 SP2
Standard/Enterprise x64 Edition (fortgesetzt)
Hardwarekomponente Konfiguration

Software- und Hardwareanforderungen 87
In Tabelle 2-3 sind die Hardware-Mindestanforderungen für Oracle Database
10g Standard Edition unter Microsoft Windows Server 2003 R2 SP2 oder
Windows Server 2008 SP2 Standard x64 Edition aufgeführt. Weitere
Informationen zu spezifischen Hardwarekomponenten finden Sie in der
Dokumentation zum System.
Dell EqualLogic PS-Speichersystem. Ein Dell EqualLogic PS-Array mit
sechzehn 15 000-RPM-SAS-Laufwerken.
Zwei Gigabit-Ethernet-Switch-Module
für iSCSI SAN.
Tabelle 2-3. Hardware-Mindestanforderungen für Oracle Database 10g Standard
Edition unter Microsoft Windows Server 2003 R2 SP2 oder Windows
Server 2008 SP2 Standard x64 Edition
Hardwarekomponente Konfiguration
Dell PowerEdge 1950 III, 2950 III,
2900III, T610, T710, R610 und R710
(bis zu zwei Knoten mit ASM).
• Prozessor der Reihe Intel Xeon
•1 GB RAM
• PERC für interne Festplatten.
• Zwei 73-GB-Festplatten mit Anschluss
an PERC-Controller
ANMERKUNG: Es wird die Verwendung
von zwei 73-GB-Festplatten (RAID 1) mit
Anschluss an einen internen RAID-
Controller je nach System empfohlen.
Nähere Informationen finden Sie in der
PowerEdge-Systemdokumentation.
• Drei Gigabit-NICs.
• Zwei HBAs.
• Ein HBA QLE2462/QLE2562
[zwei Ports] zum Einsatz mit
PowerEdge 1950/R610.
Tabelle 2-2. Hardware-Mindestanforderungen für Oracle Database 10g Enterprise Edition
unter Microsoft Windows Server 2003 R2 SP2 oder Windows Server 2008 SP2
Standard/Enterprise x64 Edition (fortgesetzt)
Hardwarekomponente Konfiguration

88 Software- und Hardwareanforderungen
Dell PowerEdge 2970, R805 (bis zu zwei
Knoten mit ASM)
• Prozessor der Reihe AMD Opteron
•1 GB RAM
• Zwei 73-GB-Festplatten mit Anschluss
an einen internen RAID-Controller
ANMERKUNG: Es wird die Verwendung
von zwei 73-GB-Festplatten (RAID 1)
mit Anschluss an einen internen RAID-
Controller je nach System empfohlen.
Nähere Informationen finden Sie in der
PowerEdge-Systemdokumentation.
• Drei Gigabit-NICs.
Gigabit-Ethernet-Switches (zwei) Informationen über unterstützte
Konfigurationen finden Sie unter
dell.com/oracle.
Für Fibre-Channel-Speichersysteme
Dell|EMC AX4-5F, CX3-10C, CX3-20,
CX3-20F, CX3-40, CX3-40F, CX3-80,
CX4-120, CX4-240, CX4-480 und
CX4-960.
Nähere Informationen finden Sie in der
Dokumentation zum Dell|EMC-System.
Bei Direct-Attach-SAS-Dell PowerVault
MD3000-Speichersystem mit
MD1000-Erweiterung.
Weitere Informationen finden Sie in der
Dokumentation zum Speichersystem
Dell PowerVault MD3000 und MD1000.
Bei Direct-Attach- oder Switch-Dell
PowerVault MD3000i-Speichersystem
mit MD1000-Erweiterung.
Weitere Informationen finden Sie in der
Dokumentation zum Speichersystem
Dell PowerVault MD3000i und MD1000.
Tabelle 2-3. Hardware-Mindestanforderungen für Oracle Database 10g Standard
Edition unter Microsoft Windows Server 2003 R2 SP2 oder Windows
Server 2008 SP2 Standard x64 Edition (fortgesetzt)
Hardwarekomponente Konfiguration

Installation und Konfiguration des Betriebssystems 89
Installation und Konfiguration des
Betriebssystems
VORSICHTSHINWEIS: Um die korrekte Installation des Betriebssystems zu
gewährleisten, trennen Sie vor der Installation alle externen Speichergeräte
vom System.
In diesem Abschnitt finden Sie Informationen zur Installation und
Konfiguration der Betriebssysteme Microsoft Windows Server 2003 R2 SP2
und Windows Server 2008 Standard/Enterprise x64 Edition für die
Bereitstellung der Oracle-Datenbank.
Bevor Sie beginnen
ANMERKUNG: Unter support.dell.com erhalten Sie die aktuellen Updates
für
BIOS, Firmware und Treiber.
1
Fahren Sie das System herunter.
2
Trennen Sie alle externen Speichergeräte vom System.
3
Suchen Sie mithilfe der Angaben in Tabelle 3-1 das richtige Medium
für
Microsoft Windows Server 2003 R2 SP2
oder
Windows Server 2008 SP2
Standard/Enterprise x64 Edition
sowie das
Dell Systems Management Tools
and Documentation
-Medium für Ihren Dell-Server.
Tabelle 3-1. PowerEdge Server Systems Management-Medium
Dell PowerEdge-System Systems Management-Medium
6950, 1950, 2900, 2950, 2970, 1950 III,
2900 III, 2950 III, R805, R905, R900,
M600, M605, M610, M710, M805,
M905, T610, T710, R610 und R710.
Dell Systems Management Tools and
Documentation-Medium Version 6.2.
R810, R815, R910 und M910. Dell Systems Management Tools and
Documentation-Medium Version 6.2.1
ANMERKUNG: Das Dell Systems Management Tools and Documentation-Medium wird
mit dem Dell Server geliefert.

90 Installation und Konfiguration des Betriebssystems
Installation des Betriebssystems mit der
Dell
Systems Management Tools and
Documentation-DVD
1
Schalten Sie das System ein.
2
Legen Sie das
Dell Systems Management
-Medium für Ihr System in das
Systemlaufwerk ein.
Das
Begrüßungsfenster
des
Dell Systems Build and
Update-Dienstprogramms
wird angezeigt
.
ANMERKUNG: Wenn das System nicht mit einem CD/DVD-Laufwerk
ausgestattet ist, können Sie ein über USB angeschlossenes externes
CD/DVD-Laufwerk verwenden.
3
Wählen Sie im Fenster
Select Language
(Sprache wählen) die Option
English
.
4
Klicken Sie in der Tabelle
Systems Deployment Options
(Systembereitstellungsoptionen) in der Zeile mit der Option
Server OS Installation
(Server-Betriebssysteminstallation) auf
Configure
(Konfigurieren). Das Fenster
Configure Server Operating System
Installation
(Installation des Server-Betriebssystems konfigurieren)
wird angezeigt.
Über das SOI-Modul (Server Operating System Installation)
der
Dell Systems Build and Update Utility können Sie von Dell
unterstützte Betriebssysteme auf Ihren Dell Systemen installieren.
ANMERKUNG: Weitere Informationen zur Bedienung der einzelnen SOI-
Fenster finden Sie in der Onlinehilfe zum Dell Systems Build and Update-
Dienstprogramm.
5
Stellen Sie im Fenster
Set Date and Time
(Datum und Uhrzeit einstellen)
des SOI-Moduls das aktuelle Datum, die Uhrzeit und die Zeitzone ein,
und klicken Sie auf
Continue
(Weiter).
6
Im Fenster
Select an Operating System to Install
(Betriebssystem für
die Installation auswählen):
a
Wählen Sie
Microsoft Windows Server 2003 SP2 R2 x64 Edition
oder
Microsoft Windows Server 2008 x64 (64-Bit Edition)
wie
erforderlich.
b
Klicken Sie auf
Continue
(Weiter).

Installation und Konfiguration des Betriebssystems 91
7
Wählen Sie im Fenster
Select RAID Configuration
(RAID-Konfiguration
auswählen) die Standardvorgaben aus und klicken Sie auf
Continue
(Weiter).
ANMERKUNG: Dieses Menü wird nicht bei allen Systemkonfigurationen
angezeigt.
8
Wenn Sie im Fenster
Select an Operating System to Install
(Betriebssystem für die Installation auswählen) die Option
Microsoft
Windows Server 2008 x64 (64 bit Edition)
gewählt haben, fahren Sie
fort mit Schritt 11.
9
Im Fenster
Configure the Disk Partition
(Datenträgerpartition
konfigurieren):
a
Sie können die Größe der Startpartition ändern oder die
Standardeinstellung übernehmen.
b
Klicken Sie auf
Continue
(Fortsetzen).
10
Im Fenster
Enter Operating System Configuration Information
(Betriebssysteminformationen eingeben):
a
Geben Sie die entsprechenden Informationen für Benutzername,
Produkt-ID und Computername ein.
b
Geben Sie alle anderen erforderlichen Informationen ein.
c
Klicken Sie auf
Install SNMP
(SNMP installieren) (Standard).
d
Klicken Sie auf
Install Server Administrator
(Server Administrator
installieren) (Standard), wenn Sie das Dell OpenManage Server
Administrator-Dienstprogramm installieren möchten.
ANMERKUNG: Der Dell Server Administrator kann auch nach der
Installation des Betriebssystems jederzeit installiert werden.
e
Klicken Sie auf
Continue
(Weiter).
11
Bei einer Windows Server 2008 x64-Installation klicken Sie auf
Eject
CD/DVD
(CD/DVD auswerfen). Wählen Sie im Fenster
Operating
System Installation Summary
(Übersicht zur Betriebssysteminstallation)
auf
Eject CD/DVD
Automatically
(Standardvorgabe) (CD/DVD
automatisch auswerfen) und klicken Sie auf
Continue
(Weiter).
ANMERKUNG: Wenn Sie auf Apply Now (Jetzt übernehmen) klicken,
beginnt die Installation und Sie können die Konfigurationsmerkmale des
Systems nicht mehr ändern.

92 Installation und Konfiguration des Betriebssystems
12
Klicken Sie auf
Apply Now
(Jetzt übernehmen).
Die Installation des Systems Build and Update-Dienstprogramms beginnt.
ANMERKUNG: Dieser Vorgang kann mehrere Minuten dauern.
13
Wenn Sie nach Aufforderung Microsoft Windows Server 2003 Service
Pack 2 x64 Edition ausgewählt haben, legen Sie das entsprechende
Windows Server 2003 SP2 Enterprise oder Standard x64 Edition-Medium
in das CD-Laufwerk ein.
ANMERKUNG: Dieser Vorgang kann mehrere Minuten dauern.
14
Nach Abschluss der Installation des Systems Build and Update-
Dienstprogramms wird das System automatisch neu gestartet.
ANMERKUNG: Nehmen Sie vor dem Neustart des Systems alle startfähigen
Medien aus den Laufwerken.
15
Beim Neustart startet das System mit der Betriebssysteminstallation.
ANMERKUNG:
Starten Sie
nicht
direkt vom Betriebssystemmedium im DVD-ROM-
Laufwerk
.
Fortsetzen der Betriebssysteminstallation
Installation von Windows Server 2003
1
Wenn Sie Microsoft Windows Server 2003 R2 SP2 x64 Edition beim
Installationsvorgang mit dem Dell Systems Build and Update-
Dienstprogramm ausgewählt haben, wird das System beim Neustart
automatisch in den Windows Server 2003 R2 SP2 x64 Edition-
Installationsmodus versetzt.
2
Geben Sie im Fenster
Personalize Your Software
(Software
personalisieren) Ihren eigenen Namen im Feld Name und den Namen
Ihrer Firma im Feld Organization ein, und klicken Sie auf
Next
(Weiter).
3
Geben Sie nach Aufforderung den Product Key für Windows Server 2003
R2 SP2 Standard/Enterprise x64 Edition ein und klicken Sie auf
Next
(Weiter).
VORSICHTSHINWEIS: Lassen Sie das Feld für das Administratorkennwort
nicht leer.

Installation und Konfiguration des Betriebssystems 93
4
Geben Sie die jeweiligen Informationen in die Felder für
Computername
und
Administratorkennwort
ein und klicken Sie auf
Next
(Weiter).
ANMERKUNG: Für die korrekte Konfiguration des öffentlichen Netzwerks
ist
es erforderlich, dass der Computername mit dem Namen des öffentlichen
Hosts übereinstimmt.
ANMERKUNG: Notieren Sie sich das in diesem Schritt erstellte
Anmeldekennwort. Diese Information wird in
Schritt 5 benötigt.
5
Wenn die Installation abgeschlossen ist, wird das
Begrüßungsfenster von
Windows
angezeigt.
a
Fahren Sie das System herunter, schließen Sie alle externen
Speichergeräte wieder an und starten Sie das System.
b
Betätigen Sie im
Begrüßungsfenster von Windows die
Tastenkombination <Strg><Alt><Entf>, um fortzufahren.
Das
Fenster
Log On
(Anmeldung) wird angezeigt.
c
Geben Sie im Feld
Password
das Administratorkennwort ein, das Sie
in
Schritt 4 dieses Vorgangs erstellt haben, und klicken Sie auf
OK
.
Sie werden aufgefordert, die
Microsoft
Windows Server CD2
einzulegen. Sie können entweder die Windows Server-CD2 einlegen
oder auf
Cancel
(Abbrechen) klicken.
ANMERKUNG: Wenn Sie die Windows Server-CD2 einlegen, folgen Sie den
Anweisungen, um den regulären Installationsvorgang fortzusetzen. Wenn Sie
die Windows Server-CD2 nicht einlegen, gehen Sie wie folgt vor:
d
Klicken Sie auf
Cancel
(Abbrechen). Sie werden darauf hingewiesen,
dass der Inhalt der Windows Server-CD2 nicht installiert wird.
e
Klicken Sie auf
OK
. Sie werden aufgefordert, die Konfigurations-
maßnahmen nach dem Setup durchzuführen (optional).
f
Klicken Sie auf
Finish
(Fertigstellen). Sie werden aufgefordert, die
Seite zu schließen.
g
Klicken Sie auf
Yes
(Ja). Das Fenster der
Serververwaltung
von
Windows wird angezeigt.
h
Schließen Sie das Fenster.
ANMERKUNG:
Um die Broadcom Advanced Control Suite 3 (BACS)
zu
verwenden, installieren Sie das Microsoft .NET Framework 2.0. Das
Microsoft .NET Framework 2.0 kann von
microsoft.com
heruntergeladen
werden.

94 Installation und Konfiguration des Betriebssystems
Installation von Windows Server 2008 SP2
1
Wenn Sie während der Installation mit dem Dell Systems Build and
Update-Dienstprogramm die Option „Microsoft Windows Server 2008
x64 (64 bit Edition)” gewählt haben, werden Sie beim Neustart vom
Installationsprogramm des Systems Build and Update-Dienstprogramms
aufgefordert, ein gültiges Windows Server 2008-Medium in das DVD-
Laufwerk einzulegen. Legen Sie das
Windows Server 2008 SP2
-Medium
in das DVD-Laufwerk ein und klicken Sie auf
OK
.
2
Klicken Sie im Fenster
Valid Microsoft Windows Server 2008 SP2 media
(Gültiges Microsoft Windows Server 2008 SP2-Medium) auf
OK
, um mit
der Installation zu beginnen.
3
Geben Sie im nächsten Fenster die Sprache und andere Einstellungen
an und klicken Sie zum Fortfahren auf
Next
(Weiter).
4
Klicken Sie auf
Install now
(Jetzt installieren), um mit der Installation
zu beginnen.
5
Geben Sie den Product Key für die Aktivierung ein und klicken Sie auf
Next
(Weiter), um fortzufahren.
6
Im nächsten Fenster:
a
Select
Windows Server 2008 Enterprise (Full Installation)
[Vollständige Installation].
b
Klicken Sie auf
Next
(Weiter).
7
Im Fenster
license term
(Lizenzbedingungen):
a
Aktivieren Sie das Kontrollkästchen
I accept the license terms.
b
Klicken Sie auf
Next
(Weiter).
8
Im nächsten Fenster:
a
Wählen Sie
Custom (Advanced) Installation
(Benutzerdefinierte
[erweiterte] Installation).
b
Wählen Sie das Laufwerk aus, auf dem Windows installiert
werden soll.
c
Klicken Sie auf
Next
(Weiter).
Das Installationsprogramm beginnt mit der Windows-Installation.
ANMERKUNG: Dieser Vorgang kann mehrere Minuten dauern.

Installation und Konfiguration des Betriebssystems 95
9
Ändern Sie nach Abschluss der Installation das Administratorkennwort.
VORSICHTSHINWEIS: Lassen Sie das Feld für das Administratorkennwort
nicht leer.
ANMERKUNG:
Um die Broadcom Advanced Control Suite (BACS) zu verwenden,
installieren Sie Microsoft .NET Framework 2.0 oder höher, falls noch nicht installiert.
Das Microsoft .NET Framework 2.0 kann von
microsoft.com
heruntergeladen werden.
Installation der Resource-CD
ANMERKUNG: Sie können Sie Windows Resource CD für Ihre Konfiguration
von
dell.com/oracle herunterladen.
1
Legen Sie das Medium mit der Aufschrift
Dell RCD x64 4.4
ein.
2
Doppelklicken Sie auf
Arbeitsplatz
und doppelklicken Sie auf das Symbol
für das CD-ROM-Laufwerk.
3
Führen Sie die Datei
install_drivers.bat
aus.
ANMERKUNG: Dieser Vorgang kann mehrere Minuten dauern.
4
Drücken Sie zum Fortfahren eine beliebige Taste.
5
Wenn Sie den Treiber für einen Qlogic Fibre-Channel-HBA auf dem
System installieren müssen:
• Befolgen Sie für Windows Server 2003 die Anleitung zur
Treiberinstallation
„Bei Microsoft Windows Server 2003:” auf
Seite 96.
• Befolgen Sie für Windows Server 2008 die Anleitung zur
Treiberinstallation
„Bei Microsoft Windows Server 2008:” auf
Seite 97.
6
Vergewissern Sie sich anhand der Protokolle, dass alle Treiber korrekt
installiert wurden.
ANMERKUNG: Protokollinformationen sind abgelegt unter :
<Primärlaufwerk:/>Dell_Resource_CD/logs>.
7
Wenn die Installation abgeschlossen ist, nehmen Sie das Medium aus
dem CD-Laufwerk.
8
Starten Sie das System neu.

96 Installation und Konfiguration des Betriebssystems
Installation des Treibers für einen Qlogic Fibre-Channel-HBA
Bei Microsoft Windows Server 2003:
1
Rufen Sie den Geräte-Manager wie folgt auf:
a
Klicken Sie auf
Start
und anschließend auf
Ausführen
.
b
Geben Sie im Feld
Ausführen
den Befehl
devmgmt.msc
ein
und
klicken Sie dann auf
OK
.
2
Doppelklicken Sie im
Geräte-Manager
in der Hardware-Liste auf
SCSI and RAID controllers
(SCSI- und RAID-Controller).
3
Doppelklicken Sie in der Geräteliste auf
QLogic Fibre Channel HBA
.
4
Wählen Sie die Registerkarte
Driver
(Treiber) und klicken Sie dann
auf
Update Driver
(Treiber aktualisieren), um den Hardware-
Akualisierungsassistenten zu starten.
5
Wählen Sie
Install from a list or specific location (Advanced)
(Software
von einer Liste oder bestimmten Quelle installieren [für fortgeschrittene
Benutzer]) und klicken Sie dann auf
Next
(Weiter).
6
Wählen Sie
Don’t search I will choose the driver to install
(Nicht suchen,
sondern den zu installierenden Treiber selbst wählen) und klicken Sie auf
Next
(Weiter).
7
Klicken Sie auf
Have Disk
(Festplattenlaufwerk) und wechseln Sie dann
zum Ordner
<Primärlaufwerk:/>Dell_Resource_CD/drivers/R254072
.
8
Wenn sich das Fenster
Hardware Update Wizard/Select a Device Driver
zur Auswahl eines Gerätetreibers öffnet, klicken Sie auf
Next
(Weiter).
9
Klicken Sie zum Abschließen des
Hardware-Aktualisierungsassistenten
auf
Finish
(Fertig stellen).

Installation und Konfiguration des Betriebssystems 97
Bei Microsoft Windows Server 2008:
1
Rufen Sie den Geräte-Manager wie folgt auf:
a
Klicken Sie auf
Start
und wählen Sie dann
Systemsteuerung
.
b
Klicken Sie auf
Hardware und Sound
.
c
Klicken Sie auf
Geräte-Manager
.
2
Doppelklicken Sie in der Hardwareliste auf
Storage Controller
(Speichercontroller).
3
Doppelklicken Sie in der Geräteliste auf
QLogic Fibre Channel HBA
.
4
Wählen Sie die Registerkarte
Driver
(Treiber) und klicken Sie dann
auf
Update Driver
(Treiber aktualisieren), um den
Hardware-
Aktualisierungsassistenten
zu starten.
5
Wechseln Sie zm Ordner
<Primärlaufwerk:/>Dell_Resource_CD/drivers/R254072
und klicken Sie
dann auf
Weiter
.
6
Klicken Sie im Fenster
Windows has successfully updated your software
(Die Software wurde erfolgreich aktualisiert) auf
Close
(Schließen).
Überprüfen der Pfade für temporäre Verzeichnisse
Stellen Sie sicher, dass die Pfade zu den Verzeichnissen Temp und Tmp
korrekt gesetzt sind. Führen Sie die nachstehend beschriebenen Schritte
nacheinander für alle Knoten im Cluster durch.
1
Klicken Sie auf
Start
und
wählen Sie
Ausführen
.
2
Geben Sie im Feld
Öffnen
den Befehl
cmd
ein und klicken
Sie auf
OK
.
3
Geben Sie an der Eingabeaufforderung die Zeile
echo %Temp%
ein
und drücken Sie die <Eingabetaste>.
Der folgende Pfad wird angezeigt:
%SystemDrive%\Temp
wobei
%SystemDrive%
das lokale Laufwerk des Benutzers ist.

98 Installation und Konfiguration des Betriebssystems
Andernfalls befolgen Sie die nachstehenden Anweisungen, um die Pfade
zu den Verzeichnissen „Temp” und „Tmp” zu ändern.
a
Klicken Sie mit der rechten Maustaste auf das Symbol
Arbeitsplatz
und wählen Sie
Eigenschaften
.
b
Wählen Sie unter
Ta sk s
die Option
Advanced System Settings
(Erweiterte Systemeinstellungen).
c
Klicken Sie auf der Registerkarte
Advanced
(Erweitert) auf
Environment Variables
(Umgebungsvariablen).
d
Bearbeiten Sie unter
User Variables for Administrator
(Benutzervariablen für Administrator) die Variable
TEMP
und
legen
Sie den Wert
%SystemDrive%\Temp
fest.
e
Führen Sie Schritt 3 aus, um zu überprüfen, ob das Verzeichnis
„temp” richtig eingestellt wurde.
4
Geben Sie an der Eingabeaufforderung die Zeile
echo %Tmp%
ein
und drücken Sie die <Eingabe>.
Der folgende Pfad wird angezeigt:
%SystemDrive%\Temp
wobei
%SystemDrive%
das lokale Laufwerk des Benutzers ist.
Wenn das Verzeichnis „temp” nicht eingerichtet ist, gehen Sie wie
nachstehend beschrieben vor, um es zu ändern.
a
Klicken Sie mit der rechten Maustaste auf das Symbol
Arbeitsplatz
und wählen Sie
Eigenschaften
.
b
Wählen Sie unter
Ta sk s
die Option
Advanced System Settings
(Erweiterte Systemeinstellungen).
c
Klicken Sie auf der Registerkarte
Advanced
(Erweitert) auf
Environment Variables
(Umgebungsvariablen).
d
Bearbeiten Sie unter
User Variables for Administrator
(Benutzervariablen für Administrator) die Variable
TMP
und legen
Sie den Wert
%SystemDrive%\Tmp
fest.
e
Führen Sie Schritt 4 aus, um zu überprüfen, ob das Verzeichnis „tmp”
richtig eingestellt wurde.
5
Wiederholen Sie alle Schritte in diesem Abschnitt für alle Knoten
im Cluster.

Überprüfen der Konfiguration von Clusterhardware und -software 99
Überprüfen der Konfiguration von
Clusterhardware und -software
Dieser Abschnitt enthält Setup-Informationen für die Hardware und
Software von Clusterkonfigurationen.
Bevor Sie mit dem Cluster-Setup beginnen, stellen Sie sicher, dass die
Hardware-Mindestanforderungen aus Tabelle 4-1 erfüllt sind.
Auf jedem Knoten muss die folgende Software installiert sein:
•DVD
Dell Systems Management Tools and Documentation
(siehe
Tabelle 3-1).
•
Windows Server 2003 SP2 Standard/Enterprise x64 Edition
oder
Windows
Server 2008 SP2 Standard/Enterprise x64 Edition
(siehe Ta be l l e 2-1).
•
Dell|Oracle Windows Resource
-CD-Image Version 4.3.
ANMERKUNG: Stellen Sie sicher, dass die HBA-Treiber installiert sind.
•
PowerVault MD3000
- oder
PowerVault MD3000i
-Resource-CD
(bei
Einsatz von PowerVault MD3000/MD3000i als Backend-Speicher).
Der Speicher muss mit mindestens vier LUNs oder virtuellen Laufwerken
(zwei für den redundanten Voting-Datenträger und die Oracle Cluster-
Registry und zwei für die Datenbank und den Wiederherstellungsbereich)
konfiguriert sein, die den Clusterknoten zugewiesen sind.

100 Überprüfen der Konfiguration von Clusterhardware und -software
Tabelle 4-1. Konfiguration und Größe von virtuellen Datenträgern (LUNs)
LUNs oder
virtueller
Datenträger
Mindestgröße Anzahl der
Partitionen
Verwendung für
1 3 GB 5 (3 x 275 MB und
2 x 300 MB)
Voting-Datenträger
(3 x 275 MB)
Oracle Cluster Registry
(2 x 300 MB)
2 Größer als die
Datenbank
1 Database (Datenbank)
3Mindestens
zweimal die Größe
der Datenbank
1 Wiederherstellungsbereich

Dell PowerEdge システム
Microsoft Windows Server x64
で使用する Oracle データ
ベース
OS のインストールと
ハードウェアの取り付
けガイド
バージョン 4.4

メモおよび注意
メモ:
コンピュータを使いやすくするための重要な情報を説明しています。
注意 : 手順に従わないと、ハードウェアの損傷やデータの損失につながる
可能性があることを示しています。
____________________
本書の内容は予告なく変更されることがあります。
© 2009 ~ 2010 すべての著作権は Dell Inc. にあります。
Dell Inc.
の書面による許可のない複製は、いかなる形態においても厳重に禁じられています。
本書に使用されている商標:
Dell
™
、
DELL
ロゴ、
PowerEdge
™
および
PowerVault
™
は
Dell Inc.
の商標です。
Intel
®
および
Xeon
®
は米国その他の国における
Intel Corporation
の
登録商標です。
AMD
®
、
AMD
ロゴ、およびこれらの組み合わせ
は
Advanced Micro
Devices, Inc.
の登録商標です。
AMD Opteron
™
は
Advanced Micro Devices, Inc.
の商標で
す。
Microsoft
®
、
Windows
®
および
Windows Server
®
は米国その他の国における
Microsoft Corporation
の商標または登録商標です。
Oracle
®
は
Oracle Corporation
および
/
またはその関連会社の登録商標です。
商標または製品の権利を主張する事業体を表すためにその他の商標および社名が使用され
ていることがあります。それらの商標や会社名は、一切
Dell Inc.
に帰属するものではあり
ません。
2010 年 7 月 Rev. A03

目次 103
目次
1 Microsoft Windows Server x64
への Oracle データベースのイ
ンストール — 概要 . . . . . . . . . . . . . . . 105
Dell|Oracle データベースの導入に必要な
マニュアル
. . . . . . . . . . . . . . . . . . . . . . . 105
本書で使用されている用語
. . . . . . . . . . . . . . 106
困ったときは
. . . . . . . . . . . . . . . . . . . . . . 106
デルサポート . . . . . . . . . . . . . . . . . . . 106
Oracle のサポート. . . . . . . . . . . . . . . . . 106
2 ソフトウェアおよびハードウェ
アの要件 . . . . . . . . . . . . . . . . . . . . . . . . 107
ソフトウェアの最小要件 . . . . . . . . . . . . . . . 107
ハードウェアの最小要件
. . . . . . . . . . . . . . . 108
3 OS のインストールと設定 . . . . . . . . . . 115
作業を開始する前に . . . . . . . . . . . . . . . . . . 115
『Dell Systems Management Tools and
Documentation DVD』を使用した OS の
インストール
. . . . . . . . . . . . . . . . . . . . . . 116

104 目次
OS のインストールの続行. . . . . . . . . . . . . . 119
Windows Server 2003 のインストール . . . . . 119
Windows Server 2008 SP2 のインストール . . 120
『Resource CD』のインストール . . . . . . . . 121
Qlogic ファイバーチャネル HBA のドラ
イバのインストール . . . . . . . . . . . . . . 122
一時ディレクトリパスの確認 . . . . . . . . . 124
4 クラスタのハードウェアおよびソ
フトウェアの構成の確認 . . . . . . . . . . . 127

Microsoft Windows Server x64 への Oracle データベー 105
スのインストール — 概要
Microsoft Windows Server x64 へ
の Oracle データベースのインス
トール — 概要
本書の説明は次の製品に適用されます。
•
Windows Server 2003 R2 SP2 Enterprise/Standard x64 Edition
また
は
Windows Server 2008 SP2 Enterprise/Standard x64 Edition
で使
用する
Oracle Database 10g R2 Enterprise Edition
•
Windows Server 2003 R2 SP2 Standard x64 Edition
または
Windows Server 2008 SP2 Standard x64 Edition
で使用する
Oracle
Database 10g R2 Standard Edition
Dell|Oracle データベースの導入に必要なマ
ニュアル
Microsoft Windows
で使用する
Oracle
データベースのマニュアルセット
は、分冊の構成になっています。各分冊の内容は次のとおりです。
•
『
Microsoft Windows Server x64
で使用する
Oracle
データベース
—
OS
のインストールとハードウェアの取り付けガイド』
—
最低限必要
なソフトウェアとハードウェアのバージョン、
OS
のインストールと
設定の方法、ハードウェアとソフトウェアの構成を確認する方法、
オープンソースファイルの入手方法について説明しています。
•
『
Microsoft Windows Server x64
で使用する
Oracle
データベース
—
ストレージ
&
ネットワークガイド』
—
ネットワークとストレージソ
リューションの設置と設定の方法について説明しています。
•
『
Microsoft Windows Server x64
で使用する
Oracle
データベース
—
データベースセットアップ
&
インストールガイド』
— Oracle
データ
ベースのインストールと設定の方法について説明しています。
•
『
Microsoft Windows Server x64
で使用する
Oracle
データベース
—
トラブルシューティングガイド』
—
前の分冊で説明されているインス
トール手順中に発生するエラーの解決方法について説明しています。

106 Microsoft Windows Server x64 への Oracle データベー
スのインストール — 概要
本書で使用されている用語
本書では、「
LUN
」、「仮想ディスク」、および「ボリューム」という語が使
われています。これらの用語は同義語であり、どちらを使用しても構いま
せん。「
LUN
」は
Dell|EMC
ファイバーチャネルストレージシステムの環
境で、「仮想ディスク」は直接接続
SAS
(
Dell MD3000/MD3000i
および
Dell MD3000/MD3000i + MD1000
拡張)ストレージの環境で、「ボ
リューム」は
Dell EqualLogic iSCSI
ストレージシステムの環境で、通常
使われる用語です。
困ったときは
デルサポート
システムの使い方の詳細については、システムコンポーネントに付属のマ
ニュアルを参照してください。
各種のホワイトペーパー、デルがサポートする設定、一般情報について
は、
dell.com/oracle
を参照してください。
ハードウェアと
OS
ソフトウェアに対するデルのテクニカルサポート、お
よびアップデートのダウンロードについては、
support.dell.com
を参
照してください。
メモ: デルへのお問い合わせについては、お使いのシステムの
『Microsoft Windows Server x64 で使用する Oracle データベース — OS のイン
ストールとハードウェアの取り付けガイド』を参照してください。
デルでは、企業向けのトレーニングと資格認証を実施しております。詳細
については、
dell.com/training
を参照してください。なお、トレーニ
ングサービスを提供していない地域がありますのでご了承ください。
Oracle のサポート
Oracle
ソフトウェア、アプリケーションクラスタウェアのトレーニング、
および
Oracle
へのお問い合わせの方法については、
oracle.com
または
システムコンポーネントに付属の
Oracle
のマニュアルを参照してくださ
い。テクニカルサポート、ダウンロード、その他の技術情報については、
metalink.oracle.com
を参照してください。
ストレージとネットワークの設定の詳細については、『
Microsoft
Windows Server x64
で使用する
Oracle
データベース
—
ストレージ
&
ネットワークガイド』を参照してください。

ソフトウェアおよびハードウェアの要件 107
ソフトウェアおよびハードウェ
アの要件
ソフトウェアの最小要件
Microsoft Windows Server x64 Edition
で使用する
Oracle
データベース
に関するソフトウェアの最小要件とサポートされている構成を
表
2-1
に
示します。
メモ: お使いの Dell システムには、Oracle ソフトウェアの 30 日間の試用
ライセンスが含まれています。この製品のライセンスをお持ちでない場合
は、デルの営業担当にお問い合わせください。
表 2-1 Windows Server x64 Edition で使用する Oracle データベースのソフトウェ
アの要件
Oracle
Database
(x64) Edition
Oracle の構成
Microsoft Windows
(x64) Edition
EMC PowerPath
(ファイバーチャネル
クラスタの場合のみ)
Oracle Database 10g R2
10g R2
Enterprise
Edition
リリース 10.2.0.1
(RAC オプション +
10.2.0.4 パッチセッ
トを含む)
Server 2003 R2 SP2
Enterprise/Standard
Edition
バージョン 5.3
10g R2
Standard
Edition
リリース 10.2.0.1
(RAC オプション +
10.2.0.4 パッチセッ
トを含む)
Server 2003 R2 SP2
Standard Edition
バージョン 5.3

108 ソフトウェアおよびハードウェアの要件
ハードウェアの最小要件
表
2-2
には、
Microsoft Windows Server 2003 R2 SP2
または
Windows
Server 2008 SP2 Standard/Enterprise x64 Edition
で使用する
Oracle
Database 10g Enterprise Edition
に必要なハードウェアの最小要件を示
します。特定のハードウェアコンポーネントの詳細については、システム
に付属のマニュアルを参照してください。
メモ: 望ましいパフォーマンスを得るには、ユーザー数、使用するアプ
リケーション、バッチプロセスに応じて、ここに示すハードウェアの最小
要件を超えるシステムを選択する必要があります。
メモ: すべてのクラスタノードのハードウェア構成は同一でなければな
りません。
10g R2
Enterprise
Edition
リリース 10.2.0.4
(RAC オプションを
含む)
Server 2008 SP2
Enterprise/Standard
Edition
バージョン 5.3
10g R2
Standard
Edition
リリース 10.2.0.4
(RAC オプションを
含む)
Server 2008 SP2
Standard Edition
バージョン 5.3
表 2-1 Windows Server x64 Edition で使用する Oracle データベースのソフトウェ
アの要件 (続き)
Oracle
Database
(x64) Edition
Oracle の構成
Microsoft Windows
(x64) Edition
EMC PowerPath
(ファイバーチャネル
クラスタの場合のみ)

ソフトウェアおよびハードウェアの要件 109
表 2-2 Microsoft Windows Server 2003 R2 SP2 または Windows Server 2008 SP2
Standard/Enterprise x64 Edition で使用する Oracle Database 10g Enterprise
Edition に必要なハードウェアの最小要件
ハードウェアコンポーネント 構成
Dell PowerEdge 1950 IIII、2900 III、
2950 II、T610、T710、R610、R710、
R810、R900、R910、M600、M610、
M710、M910 システム(ASM
[Automatic Storage Management] ま
たは OCFS [Oracle Cluster File System]
を使用して最大 8 ノード)
•
Intel Xeon
プロセッサシリーズ
•
1 GB
の
RAM
•
内蔵ハードドライブ用の
PERC
•
PERC
コントローラに接続した
73 GB
のハードドライブ
2
台
メモ: 内蔵 RAID コントローラに接続
された 73 GB ハードドライブ(RAID 1)
を 2 台使用することをお勧めします。
詳細については、PowerEdge システム
のマニュアルを参照してください。
•
Gigabit NIC 3
枚
•
HBA 2
枚
(
PowerEdge 1950/R610
用の
QLE2462/QLE2562 [
デュアルポ
ート
] HBA 1
枚
•
PowerEdge M600/M610/M710
用の
QME2472/QME2572
または
LPe1105-M4/LPe1205 [
デュアル
ポート
] HBA 1
枚)

110 ソフトウェアおよびハードウェアの要件
Dell PowerEdge 6950、2970、M605、
R805、R815、R905 システム(ASM ま
たは OCFS を使用して最大 8 ノード)
•
AMD Opteron
プロセッサシリーズ
•
1 GB
の
RAM
•
内蔵
RAID
コントローラに接続され
た
73 GB
ハードドライブ
2
台
メモ: システムに応じて、内蔵 RAID
コントローラに接続された 73 GB ハー
ドドライブ(RAID 1)を 2 台使用する
ことをお勧めします。詳細について
は、PowerEdge システムのマニュアル
を参照してください。
•
Gigabit NIC 3
枚
•
PowerEdge 6950/2970
用の
HBA 2
枚
•
PowerEdge M605/M805/M905
用の
QME2472/QME2572
または
LPe1105-M4/LPe1205 [
デュアル
ポート
] HBA 1
枚
ギガビットイーサネットスイッチ
(2 台)
サポートされる構成については、
dell.com/oracle を参照してくださ
い。
Dell|EMC AX4-5F、CX3-10C、CX3-20、
CX3-20F、CX3-40、CX3-40F、CX3-80、
CX4-120、CX4-240、CX4-480、
CX4-960 ファイバーチャネルストレー
ジシステムの場合
詳細については、Dell|EMC システム
のマニュアルを参照してください。
表 2-2 Microsoft Windows Server 2003 R2 SP2 または Windows Server 2008 SP2
Standard/Enterprise x64 Edition で使用する Oracle Database 10g Enterprise
Edition に必要なハードウェアの最小要件 (続き)
ハードウェアコンポーネント 構成

ソフトウェアおよびハードウェアの要件 111
表
2-3
には、
Microsoft Windows Server 2003 R2 SP2
または
Windows
Server 2008 SP2 Standard x64 Edition
で使用する
Oracle Database 10g
Standard Edition
に必要なハードウェアの最小要件を示します。特定の
ハードウェアコンポーネントの詳細については、システムに付属のマニュ
アルを参照してください。
直接接続 SAS Dell PowerVault
MD3000 + MD1000 拡張ストレージシ
ステムの場合
詳細については、Dell PowerVault
MD3000 および MD1000 ストレージ
システムのマニュアルを参照してくだ
さい。
直接接続またはスイッチ iSCSI Dell
PowerVault MD3000i + MD1000 拡張
ストレージシステムの場合
詳細については、Dell PowerVault
MD3000i および MD1000 ストレージ
システムのマニュアルを参照してくだ
さい。
Dell EqualLogic PS シリーズのス
トレージ
15,000 RPM SAS ディスク 16 台で構
成された Dell EqualLogic PS シリーズ
アレイ 1 つ。
iSCSI SAN 用のギガビットイーサネッ
トスイッチ 2 台。
表 2-2 Microsoft Windows Server 2003 R2 SP2 または Windows Server 2008 SP2
Standard/Enterprise x64 Edition で使用する Oracle Database 10g Enterprise
Edition に必要なハードウェアの最小要件 (続き)
ハードウェアコンポーネント 構成

112 ソフトウェアおよびハードウェアの要件
表 2-3 Microsoft Windows Server 2003 R2 SP2 または Windows Server 2008 SP2
Standard x64 Edition で使用する Oracle Database 10g Standard Edition に必
要なハードウェアの最小要件
ハードウェアコンポーネント 構成
Dell PowerEdge 1950 III、2950 III、
2900III、T610、T710、R610、
R710 システム(ASM を使用し
て最大 2 ノード)
•
Intel Xeon
プロセッサシリーズ
•
1 GB
の
RAM
•
内蔵ハードドライブ用の
PERC
•
PERC
コントローラに接続した
73 GB
のハードドライブ
2
台
メモ: システムに応じて、内蔵 RAID
コントローラに接続された 73 GB ハー
ドドライブ(RAID 1)を 2 台使用する
ことをお勧めします。詳細について
は、PowerEdge システムのマニュアル
を参照してください。
•
Gigabit NIC 3
枚
•
HBA 2
枚
•
PowerEdge 1950/R610
用の
QLE2462/QLE2562 [
デュアルポ
ート
] HBA 1
枚
Dell PowerEdge 2970、R805 システム
(ASM を使用して最大 2 ノード)
•
AMD Opteron
プロセッサシリーズ
•
1 GB
の
RAM
•
内蔵
RAID
コントローラに接続され
た
73 GB
ハードドライブ
2
台
メモ: システムに応じて、内蔵 RAID
コントローラに接続された 73 GB ハー
ドドライブ(RAID 1)を 2 台使用する
ことをお勧めします。詳細について
は、PowerEdge システムのマニュアル
を参照してください。
•
Gigabit NIC 3
枚
ギガビットイーサネットスイッチ
(2 台)
サポートされる構成については、
dell.com/oracle を参照してくださ
い。

ソフトウェアおよびハードウェアの要件 113
Dell|EMC AX4-5F、CX3-10C、CX3-20、
CX3-20F、CX3-40、CX3-40F、
CX3-80、CX4-120、CX4-240、
CX4-480、CX4-960 ファイバーチャネ
ルストレージシステムの場合
詳細については、Dell|EMC システム
のマニュアルを参照してください。
直接接続 SAS Dell PowerVault
MD3000 + MD1000 拡張ストレージシ
ステムの場合
詳細については、Dell PowerVault
MD3000 および MD1000 ストレージ
システムのマニュアルを参照してくだ
さい。
直接接続またはスイッチ Dell
PowerVault MD3000i + MD1000 拡張
ストレージシステムの場合
詳細については、Dell PowerVault
MD3000i および MD1000 ストレージ
システムのマニュアルを参照してくだ
さい。
表 2-3 Microsoft Windows Server 2003 R2 SP2 または Windows Server 2008 SP2
Standard x64 Edition で使用する Oracle Database 10g Standard Edition に必
要なハードウェアの最小要件 (続き)
ハードウェアコンポーネント 構成

114 ソフトウェアおよびハードウェアの要件

OS のインストールと設定 115
OS のインストールと設定
注意: OS を正常にインストールするには、インストールを開始する前に
外付けストレージシステムをすべてシステムから取り外してください。
本項では、
Oracle
データベースの導入に必要な
Microsoft Windows
Server 2003 R2 SP2
および
Windows Server 2008 SP2 Standard/
Enterprise x64 Edition
のインストールと設定について説明します。
作業を開始する前に
メモ: BIOS、ファームウェア、およびドライバのアップデート版につい
ては、support.dell.com を参照してください。
1
システムをシャットダウンします。
2
すべての外付けストレージデバイスをシステムから取り外します。
3
表
3-1
を参照して、お使いの
Dell
サーバーに適した
Microsoft
Windows Server 2003 R2 SP2
または
Windows Server 2008 SP2
Standard/Enterprise x64 Edition
メディア、および
Dell Systems
Management Tools and Documentation
メディアを確認します。
表 3-1 PowerEdge サーバーの Systems Management メディア
Dell PowerEdge システム Systems Management メディア
6950、1950、2900、2950、2970、
1950 III、2900 III、2950 III、R805、
R905、R900、M600、M605、M610、
M710、M805、M905、T610、T710、
R610、R710
Dell Systems Management Tools and
Documentation メディアバージョン
6.2
R810、R815、R910、M910
Dell Systems Management Tools and
Documentation メディアバージョン
6.2.1
メモ: Dell Systems Management Tools and Documentation メディアは、Dell サー
バーに同梱されています。

116 OS のインストールと設定
『Dell Systems Management Tools and
Documentation DVD』を使用した OS のイン
ストール
1
システムの電源を入れます。
2
お使いのシステム用の
Dell Systems Management
メディアをシステ
ムドライブにセットします。
Dell Systems Build and Update
Utility
の
初期
ウィンドウ
が表示されます
。
メモ: お使いのシステムに CD/DVD ドライブがない場合は、外付けの
USB CD/DVD ドライブを使用してください。
3
Select Language
(言語の選択)ウィンドウで、
English
(英語)
を選択します。
4
Systems Deployment Options
(システム導入のオプション)表
で、
Server OS Installation
(サーバー
OS
のインストール)オプ
ションがある行の
Configure
(設定)をクリックします。
Configure Server Operating System
(サーバー
OS
の設定)の
Installation
(インストール)ウィンドウが表示されます。
Dell Systems Build and Update Utility
の
Server Operating System
Installation
(
SOI
)モジュールを使用して、デルでサポートされてい
る
OS
を
Dell
システムにインストールすることができます。
メモ: 特定の SOI ウィンドウの使い方の詳細については、Dell
Systems Build and Update Utility のオンラインヘルプを参照してくださ
い。
5
SOI
モジュールの
Set Date and Time
(日付と時刻の設定)ウィン
ドウで、現在の日付、時刻、およびタイムゾーンを設定し、
Continue
(続行)をクリックします。
6
Select an Operating System to Install
(インストールする
OS
の選択)ウィンドウで、次の手順を実行します。
a
必要条件に応じて、
Microsoft Windows Server 2003 SP2 R2
x64 Edition
または
Microsoft Windows Server 2008 x64
(64 bit Edition)
を選択します。
b
Continue
(続行)をクリックします。

OS のインストールと設定 117
7
Select RAID Configuration
(
RAID
構成の選択)ウィンドウでデ
フォルトの選択をそのまま使用し、
Continue
(続行)をクリックし
ます。
メモ: システム構成によっては、このメニューは表示されません。
8
Select an Operating System to Install
(インストールする
OS
の選択)ウィンドウで
Microsoft Windows Server 2008 x64 (64
bit Edition)
を選択した場合は、手順
11
に進みます。
9
Configure the Disk Partition
(ディスクパーティションの設定)
ウィンドウで、次の手順を実行します。
a
起動パーティションのサイズを変更するか、デフォルトの選択肢
をそのまま使用するかを選択します。
b
Continue
(続行)をクリックします。
10
Enter Operating System Configuration Information
(
OS
の
設定情報の入力)ウィンドウで、次の手順を実行します。
a
適切な
Organization
(組織名)、
User Name
(ユーザー名)、
Product ID
(プロダクト
ID
)、および
Computer Name
(コン
ピュータ名)を入力します。
b
その他の必要な情報をすべて入力します。
c
Install SNMP
(
SNMP
のインストール)(デフォルト)をクリッ
クします。
d
Dell OpenManage Server Administrator Utility
をインストー
ルする場合は、
Install Server Administrator
(
Server
Administrator
のインストール)(デフォルト)をクリックし
ます。
メモ: Dell Server Administrator は OS のインストール後にいつでもイ
ンストールできます。
e
Continue
(続行)をクリックします。

118 OS のインストールと設定
11
Windows Server 2008 x64
をインストールするには、
Eject
CD/DVD
(
CD/DVD
を取り出す)をクリックします。
Operating
System Installation Summary
(
OS
のインストールの概要)ウィ
ンドウで
Eject CD/DVD
Automatically
(
CD/DVD
を自動的に取り
出す)(デフォルト)をクリックし、
Continue
(続行)をクリック
します。
メモ: Apply Now(適用)をクリックすると、インストールが開始さ
れ、システム構成の詳細を変更することはできなくなります。
12
Apply Now
(適用)をクリックします。
Systems Build and Update Utility
のインストールが開始します。
メモ: この処理には数分かかることがあります。
13
Microsoft Windows Server 2003 Service Pack 2 x64 Edition
を選択
した場合は、確認のメッセージが表示されたら、
CD
ドライブに適切
な
Windows Server 2003 SP2 Enterprise/Standard x64 Edition
メ
ディアをセットします。
メモ: この処理には数分かかることがあります。
14
Systems Build and Update Utility
のインストールが完了すると、シ
ステムは自動的に再起動します。
メモ: システムの再起動時には必ず、起動可能なメディアをすべて
取り出しておいてください。
15
再起動すると、
OS
のインストール画面が表示されます。
メモ: DVD-ROM 内の OS メディアから直接起動しないでください。

OS のインストールと設定 119
OS のインストールの続行
Windows Server 2003 のインストール
1
Dell Systems Build and Update Utility
のインストール中に
Microsoft Windows Server 2003 R2 SP2 x64 Edition
を選択した場
合、再起動するとシステムは自動的に、
Windows Server 2003 R2
SP2 x64 Edition
のインストールモードに入ります。
2
名前
フィールドおよび
組織
フィールドの
ソフトウェアの個人用設
定
ウィンドウに適切な情報を入力し、
次へ
をクリックします。
3
確認のメッセージが表示されたら、
Windows Server 2003 R2 SP2
Standard/Enterprise x64 Edition
の
Product Key
(プロダクトキー)
を入力し、
次へ
をクリックします。
注意: Administrator パスワードを空白のままにしないでください。
4
コンピュータ名
と
管理者パスワード
フィールドに適切な情報を入力
し、
次へ
をクリックします。
メモ: パブリックネットワークを正しく設定するには、コンピュー
タ名とパブリックホスト名が同一でなければなりません。
メモ: この手順で設定したログインパスワードを記録しておきます。
パスワードは 手順
5 で必要になります。
5
インストール手順が完了すると、
Windows
へようこそ
ウィンドウ
が表示されます。
a
システムをシャットダウンし、すべての外付けストレージデバイ
スを接続し、システムを起動します。
b
Windows
へようこそ
ウィンドウで、
<Ctrl><Alt><Delete>
を
押して続行します。
ログオン
ウィンドウが表示されます。
c
パスワード
フィールドに、この手順の
手順
4
で設定した
Administrator
パスワードを入力して、
OK
をクリックします。
『
Microsoft Windows Server CD2
』をセットするように指示され
ます。『
Windows Server CD2
』をセットするか、または
キャン
セル
をクリックします。
メモ: 『Windows Server CD2』をセットした場合は、画面の指示に
従って通常のインストールを実行します。以下は、『Windows Server
CD2』をセットしない場合の手順です。

120 OS のインストールと設定
d
キャンセル
をクリックします。『
Windows Server CD2
』の内容
がインストールされないことを示すメッセージが表示されます。
e
OK
をクリックします。セットアップ後のセキュリティ更新(オ
プション)を設定するように指示されます。
f
完了
をクリックします。ページを閉じるように指示されます。
g
はい
をクリックします。
サーバーの役割管理
ウィンドウが表示
されます。
h
ウィンドウを閉じます。
メモ: Broadcom Advanced Control Suite 3(BACS)を使用するには、
Microsoft .NET Framework 2.0 をインストールします。Microsoft .NET
Framework 2.0 は microsoft.com からダウンロードしてください。
Windows Server 2008 SP2 のインストール
1
Dell Systems Build and Update Utility
のインストール中に
Microsoft Windows Server 2008 x64 (64 bit Edition)
を選択した場
合、再起動すると、
DVD
ドライブに有効な
Windows Server 2008
メ
ディアをセットするように
Systems Build and Update Utility
インス
トーラから指示されます。
Windows Server 2008 SP2
メディアを
DVD
ドライブにセットし、
OK
をクリックします。
2
Valid Microsoft Windows Server 2008 SP2 media
(有効な
Microsoft Windows Server 2008 SP2
メディア)ウィンドウで
OK
を
クリックすると、インストールが開始します。
3
次のウィンドウで、言語その他の環境設定を行い、
Next
(次へ)を
クリックして続行します。
4
Install now
(今すぐインストール)をクリックしてインストールを
開始します。
5
ライセンス認証用の
Product Key
(プロダクトキー)を入力し、
Next
(次へ)をクリックして続行します。
6
次のウィンドウで、以下の手順を実行します。
a
Windows Server 2008 Enterprise (Full Installation)
(フル
インストール)を選択します。
b
Next
(次へ)をクリックします。

OS のインストールと設定 121
7
license term
(ライセンス条項)ウィンドウで、次の手順を実行し
ます。
a
I accept the license terms
(ライセンス条項に同意します)
のボックスにチェックを入れます。
b
Next
(次へ)をクリックします。
8
次のウィンドウで、以下の手順を実行します。
a
Custom (Advanced) installation
(カスタム(詳細)インス
トール)を選択します。
b
Windows
のインストール先のディスクを選択します。
c
Next
(次へ)をクリックします。
インストーラが
Windows
のインストールを開始します。
メモ: この処理には数分かかることがあります。
9
インストール手順の最後に、
Administrator
パスワードを変更しま
す。
注意: Administrator パスワードを空白のままにしないでください。
メモ: Broadcom Advanced Control Suite(BACS)を使用するには、まだイ
ンストールしていない場合は Microsoft .NET Framework 2.0 以降をインス
トールします。Microsoft .NET Framework は microsoft.com からダウンロード
してください。
『Resource CD』のインストール
メモ: 使用する設定に必要な『Windows Resource CD』は dell.com/oracle か
らダウンロードします。
1
Dell RCD x64 4.4
とラベル表示されたメディアをセットします。
2
マイコンピュータ
をダブルクリックし、
CD-ROM
ドライブをダブル
クリックします。
3
install_drivers.bat
を実行します。
メモ: この処理には数分かかることがあります。
4
いずれかのキーを押して続行します。

122 OS のインストールと設定
5
お使いのシステムに
Qlogic
ファイバーチャネル
HBA
のドライバを
インストールする必要がある場合は、次の手順に進みます。
•
Windows Server 2003
の場合は、
122
ページの「
Windows
Server 2003
の場合
<?>
」を参照してください。
•
Windows Server 2008
の場合は、
123
ページの「
Windows
Server 2008
の場合
<?>
」を参照してください。
6
すべてのドライバが正しくインストールされたことをログで確認し
ます。
メモ: ログ情報は、< プライマリドライブ :/>Dell_Resource_CD/logs>
にあります。
7
インストールが完了したら、
CD
ドライブからメディアを取り出しま
す。
8
システムを再起動します。
Qlogic ファイバーチャネル HBA のドライバのインストール
Windows Server 2003 の場合
1
次の手順に従ってデバイスマネージャを起動します。
a
スタート
をクリックし、
ファイル名を指定して実行
をクリック
します。
b
ファイル名を指定して実行
ボックスに
devmgmt.msc
と入力
し、
OK
をクリックします。
2
デバイスマネージャ
ボックスでハードウェアの種類のリストをスク
ロールダウンし、
SCSI
と
RAID
コントローラ
をダブルクリックし
ます。
3
デバイスリストから
QLogic Fibre Channel HBA
をダブルクリッ
クします。
4
ドライバ
タブをクリックし、
ドライバの更新
をクリックして、ハー
ドウェアの更新ウィザードを起動します。

OS のインストールと設定 123
5
一覧または特定の場所からインストールする(詳細)
をクリックし、
次へ
をクリックします。
6
検索しないで、インストールするドライバを選択する
をクリックし、
次へ
をクリックします。
7
ディスク使用
をクリックし、
<
プライマリドライブ
:/>Dell_Resource_CD/drivers/R254072
フォルダに移動します。
8
ハードウェアの更新ウィザード
の
デバイスドライバの選択
ボックス
で、
次へ
をクリックします。
9
ハードウェアの更新ウィザード
の
ハードウェアの更新ウィザードの
完了
で、
完了
をクリックします。
Windows Server 2008 の場合
1
次の手順に従ってデバイスマネージャを起動します。
a
スタート
をクリックし、
コントロールパネル
をクリックします。
b
ハードウェアとサウンド
をクリックします。
c
デバイスマネージャ
をクリックします。
2
ハードウェアの種類のリストをスクロールダウンし、
ストレージコ
ントローラ
をダブルクリックします。
3
デバイスリストから
QLogic Fibre Channel HBA
をダブルクリッ
クします。
4
ドライバ
タブをクリックし、
ドライバの更新
をクリックして、
ハー
ドウェアの更新ウィザード
を起動します。
5
<
プライマリドライブ
:/>Dell_Resource_CD/drivers/R254072
フォ
ルダに移動し、
次へ
をクリックします。
6
ソフトウェアを正しく更新しました
ウィンドウで、
閉じる
をクリッ
クします。

124 OS のインストールと設定
一時ディレクトリパスの確認
ディレクトリ
Temp
と
Tmp
へのパスが正しく設定されていることを確認
します。クラスタ内のすべてのノードについて、以下の手順を繰り返しま
す。
1
スタート
をクリックし、
ファイル名を指定して実行
を選択します
。
2
名前
フィールドに
cmd
と入力し、
OK
をクリックします
。
3
コマンドプロンプトで、
echo %Temp%
と入力し、
<Enter>
を押し
ます。
次のパスが表示されます。
%SystemDrive%\Temp
%SystemDrive%
はユーザーのローカルドライブです。
上記のパスが表示されない場合は、下記の手順に従ってパスをディ
レクトリ
Temp
および
Tmp
に変更します。
a
マイコンピュータ
を右クリックし、
プロパティ
を選択します。
b
Tasks
(タスク)の下で、
Advanced System Settings
(詳細
システム設定)を選択します。
c
Advanced
(詳細設定)タブで、
Environment Variables
(環
境変数)をクリックします。
d
User Variables for Administrator
(管理者のユーザー環境変
数)の下で、
TEMP
変数を編集し、変数値を
%SystemDrive%\Temp
に設定します。
e
手順
3
を実行して、
temp
ディレクトリが正しく設定されたかど
うかを確認します。

OS のインストールと設定 125
4
コマンドプロンプトで、
echo %Tmp%
と入力し、
<Enter>
を押しま
す。
次のパスが表示されます。
%SystemDrive%\Temp
%SystemDrive%
はユーザーのローカルドライブです。
temp
ディレクトリが設定されていない場合は、以下の手順に従って
変更します。
a
マイコンピュータ
を右クリックし、
プロパティ
を選択します。
b
Tasks
(タスク)の下で、
Advanced System Settings
(詳細
システム設定)を選択します。
c
Advanced
(詳細設定)タブで、
Environment Variables
(環
境変数)をクリックします。
d
User Variables for Administrator
(管理者のユーザー環境変
数)の下で、
TMP
変数を編集し、変数値を
%
SystemDrive%\Tmp
に設定します。
e
手順
4
を実行して、
tmp
ディレクトリが正しく設定されたかど
うかを確認します。
5
クラスタ内のすべてのノードについて、本項のすべて手順を繰り返
します。

126 OS のインストールと設定

クラスタのハードウェアおよびソフトウェアの構成の確認 127
クラスタのハードウェアおよび
ソフトウェアの構成の確認
本項では、ハードウェアとソフトウェアのクラスタ構成の設定について説
明します。
クラスタのセットアップを行う前に、表
4-1
に示すハードウェアの最小要
件が満たされていることを確認します。
各ノードには、以下のメディアを使用して、以下のソフトウェアをインス
トールする必要があります。
•
『
Dell Systems Management Tools and Documentation DVD
』
(
表
3-1
を参照)
•
Windows Server 2003 SP2 Standard/Enterprise x64 Edition
または
Windows Server 2008 SP2 Standard/Enterprise x64 Edition
(表
2-1
を参照)
•
Dell|Oracle Windows Resource CD
イメージバージョン
4.3
メモ: HBA ドライバがインストールされていることを確認します。
•
『
PowerVault MD3000 Resource CD
』または『
PowerVault
MD3000i Resource CD
』(
PowerVault MD3000/MD3000i
をバック
エンドストレージとして使用する場合)
少なくとも
4
つの
LUN
または仮想ディスク(冗長投票ディスクと
Oracle
Cluster Registry
に
2
つ、およびデータベースとフラッシュリカバリ領域
に
2
つ)をクラスタノードに割り当てるストレージ構成にしてください。

128 クラスタのハードウェアおよびソフトウェアの構成の確認
表 4-1 仮想ディスク(LUN)の構成とサイズ
LUN または
仮想ディスク
最小サイズ パーティションの数 用途
13 GB
5(3 x 275 MB およ
び 2 x 300 MB)
投票ディスク(3 x 275 MB)
Oracle Cluster Registry
(2 x 300 MB)
2
データベース
よりも大きい
こと
1
データベース
3
データベース
のサイズの 2
倍以上
1
フラッシュリカバリ領域

Sistemas Dell PowerEdge
Base de datos Oracle en
Microsoft Windows Server x64
Guía de instalación del
sistema operativo y el
hardware
versión 4.4

Notas y precauciones
NOTA: Una NOTA proporciona información importante que le ayudará a utilizar
mejor el ordenador.
PRECAUCIÓN: Un mensaje de PRECAUCIÓN indica la posibilidad de daños en
el
hardware o la pérdida de datos si no se siguen las instrucciones.
____________________
La información contenida en este documento puede modificarse sin previo aviso.
© 2009-2010 Dell Inc. Todos los derechos reservados.
Queda estrictamente prohibida la reproducción de este material en cualquier forma sin la autorización
por escrito de Dell Inc.
Marcas comerciales utilizadas en este texto: Dell™, el logotipo de DELL, PowerEdge™ y
PowerVault™ son marcas comerciales de Dell Inc. Intel
®
y Xeon
®
son marcas comerciales registradas
de Intel Corporation en los Estados Unidos y en otros países. AMD
®
, el logotipo de AMD y demás
combinaciones son marcas comerciales registradas y AMD Opteron™ es una marca comercial de
Advanced Micro Devices, Inc. Microsoft
®
, Windows
®
y Windows Server
®
son marcas comerciales
o marcas comerciales registradas de Microsoft Corporation en los Estados Unidos o en otros países.
Oracle
®
es una marca comercial registrada de Oracle Corporation o de sus filiales.
Otras marcas y otros nombres comerciales pueden utilizarse en este documento para hacer referencia
a las entidades que los poseen o a sus productos. Dell Inc. renuncia a cualquier interés sobre la
propiedad de marcas y nombres comerciales que no sean los suyos.
Julio de 2010 Rev. A03

Contenido 131
Contenido
1 Información general sobre la
instalación de la base de datos Oracle
en Microsoft Windows Server x64
. . . . 133
Documentación necesaria para implantar
la base de datos Dell|Oracle
. . . . . . . . . . . . . . 133
Terminología utilizada en este documento
. . . . . . . 134
Obtención de ayuda
. . . . . . . . . . . . . . . . . . . 135
Asistencia de Dell
. . . . . . . . . . . . . . . . . 135
Asistencia de Oracle
. . . . . . . . . . . . . . . . 135
2 Requisitos de software y hardware . . . 137
Requisitos mínimos de software . . . . . . . . . . . . 137
Requisitos mínimos de hardware . . . . . . . . . . . . 138
3 Instalación y configuración
del sistema operativo
. . . . . . . . . . . . . . 143
Antes de comenzar. . . . . . . . . . . . . . . . . . . . 143
Instalación del sistema operativo mediante
el DVD Dell Systems Management Tools
and Documentation
. . . . . . . . . . . . . . . . . . . 144

132 Contenido
Continuación de la instalación del
sistema operativo
. . . . . . . . . . . . . . . . . . . 147
Instalación de Windows Server 2003
. . . . . . . 147
Instalación de Windows Server 2008 SP2
. . . . 148
Instalación del CD de recursos
. . . . . . . . . . 150
Instalación del controlador para un
HBA Qlogic Fibre Channel
. . . . . . . . . . . . 151
Verificación de las rutas de
directorios temporales
. . . . . . . . . . . . . . 152
4 Verificación de las configuraciones
de hardware y software del clúster
. . . 155

Información general sobre la instalación de la base de datos 133
Oracle en Microsoft Windows Server x64
Información general sobre la
instalación de la base de datos
Oracle en Microsoft Windows
Server x64
Este documento se aplica a:
• Base de datos Oracle 10g R2 Enterprise Edition en Windows Server 2003
R2 SP2 Enterprise/Standard x64 Edition o Windows Server 2008 SP2
Enterprise/Standard x64 Edition.
• Base de datos Oracle 10g R2 Standard Edition en Windows Server 2003
R2
SP2 Standard x64 Edition o Windows Server 2008 SP2 Standard
x64
Edition.
Documentación necesaria para implantar la
base
de datos Dell|Oracle
El conjunto de documentos sobre la base de datos Oracle en Microsoft
Windows está organizado en una serie de módulos. Estos módulos cubren
los temas siguientes:
•
Base de datos Oracle en Microsoft Windows Server x64 — Guía de
instalación del sistema operativo y el hardware
: en ella se describen las
versiones mínimas de software y hardware necesarias y se explica cómo
instalar y configurar el sistema operativo, cómo verificar las
configuraciones de hardware y software y cómo obtener archivos de
código
fuente abierto.
•
Base de datos Oracle en Microsoft Windows Server x64 — Guía de
almacenamiento y redes
: en ella se describe cómo instalar y configurar las
soluciones de almacenamiento y redes.

134 Información general sobre la instalación de la base de datos
Oracle en Microsoft Windows Server x64
•
Base de datos Oracle en Microsoft Windows Server x64 — Guía de
configuración e instalación de la base de datos
: en ella se describe cómo
instalar y configurar la base de datos Oracle.
•
Base de datos Oracle en Microsoft Windows Server x64 — Guía de solución
de problemas
: en ella se describe cómo solucionar problemas y resolver
errores encontrados durante los procedimientos de instalación descritos
en
los módulos anteriores.
Terminología utilizada en este documento
En este documento se utilizan los términos “número de unidad lógica”
(LUN), “disco virtual” y “volumen”. Dichos términos son sinónimos y pueden
utilizarse indistintamente. El término “LUN” suele utilizarse en un entorno
de sistema de almacenamiento Dell|EMC Fibre Channel; “disco virtual”
suele emplearse en un entorno de almacenamiento SAS de conexión directa
(Dell MD3000/MD3000i y Dell MD3000/MD3000i con alojamiento de
expansión MD1000) y “volumen” se usa normalmente en un entorno
de sistema de almacenamiento iSCSI Dell EqualLogic.

Información general sobre la instalación de la base de datos 135
Oracle en Microsoft Windows Server x64
Obtención de ayuda
Asistencia de Dell
Para obtener información detallada sobre el uso del sistema, consulte
la documentación incluida con los componentes del sistema.
En dell.com/oracle encontrará documentos técnicos, las configuraciones
admitidas por Dell e información general.
Para obtener asistencia técnica de Dell para el hardware y el software
del sistema operativo, y para descargar las últimas actualizaciones del
sistema, visite support.dell.com.
NOTA: Hallará información sobre cómo ponerse en contacto con Dell en el
documento Base de datos Oracle en Microsoft Windows Server x64 — Guía
de
instalación del sistema operativo y el hardware de su sistema.
Ahora tiene a su disposición el servicio de formación y certificación Dell
para empresas. Para obtener más información, visite dell.com/training.
Es posible que este servicio de formación no se ofrezca en todas las regiones.
Asistencia de Oracle
Para obtener información sobre el software Oracle, sobre formación para
el software de clúster de aplicaciones y sobre cómo ponerse en contacto con
Oracle, visite oracle.com o consulte la documentación de Oracle que se
incluye con los componentes del sistema. Para obtener información sobre
asistencia técnica, descargas y otras cuestiones técnicas, vaya a
metalink.oracle.com.
Para obtener información sobre cómo configurar el almacenamiento y las
redes, consulte el documento Base de datos Oracle en Microsoft Windows
Server x64 — Guía de almacenamiento y redes.

136 Información general sobre la instalación de la base de datos
Oracle en Microsoft Windows Server x64

Requisitos de software y hardware 137
Requisitos de software y hardware
Requisitos mínimos de software
En la tabla 2-1 se enumeran los requisitos mínimos de software y las
configuraciones admitidas para la base de datos Oracle en Microsoft Windows
Server x64 Edition.
NOTA: Su configuración de Dell incluye una licencia de prueba de 30 días para
el
software Oracle. Si no tiene licencia para este producto, póngase en contacto
con un representante de ventas de Dell.
Tabla 2-1. Requisitos de software para la base de datos Oracle en Windows Server x64
Edition
Edición de la
base de datos
Oracle (x64)
Configuración de
Oracle
Edición de Microsoft
Windows (x64)
EMC PowerPath (sólo
para clústeres Fibre
Channel)
Base de datos Oracle 10g R2
10g R2
Enterprise
Edition
Versión 10.2.0.1,
incluida la opción
RAC + patchset
10.2.0.4
Server 2003 R2 SP2
Enterprise/Standard
Edition
Versión 5.3
10g R2
Standard
Edition
Versión 10.2.0.1,
incluida la opción
RAC + patchset
10.2.0.4
Server 2003 R2 SP2
Standard Edition
Versión 5.3

138 Requisitos de software y hardware
Requisitos mínimos de hardware
En la tabla 2-2 se detallan los requisitos mínimos de hardware para la base de
datos Oracle 10g Enterprise Edition en
Microsoft Windows Server 2003 R2 SP2
o Windows Server 2008 SP2 Standard/Enterprise x64 Edition. Para obtener
más información sobre componentes de hardware específicos, consulte la
documentación incluida con el sistema.
NOTA: Para obtener el rendimiento deseado, elija un sistema que supere
los
requisitos mínimos de hardware de acuerdo con el número de usuarios,
las
aplicaciones utilizadas y los procesos por lotes.
NOTA: La configuración de hardware de todos los nodos del clúster debe
ser
idéntica.
10g R2
Enterprise
Edition
Versión 10.2.0.4,
incluida la opción
RAC
Server 2008 SP2
Enterprise/Standard
Edition
Versión 5.3
10g R2
Standard
Edition
Versión 10.2.0.4,
incluida la opción
RAC
Server 2008 SP2
Standard Edition
Versión 5.3
Tabla 2-1. Requisitos de software para la base de datos Oracle en Windows Server x64
Edition (continuación)
Edición de la
base de datos
Oracle (x64)
Configuración de
Oracle
Edición de Microsoft
Windows (x64)
EMC PowerPath (sólo
para clústeres Fibre
Channel)

Requisitos de software y hardware 139
Tabla 2-2.
Requisitos mínimos de hardware para la base de datos Oracle 10g Enterprise
Edition en Microsoft Windows Server 2003 R2 SP2 o Windows Server 2008
SP2 Standard/Enterprise x64 Edition
Componente de hardware Configuración
Sistemas Dell PowerEdge 1950 IIII,
2900 III, 2950 II, T610, T710, R610, R710,
R810, R900, R910, M600, M610, M710
y M910 (hasta ocho nodos con
Automatic Storage Management [ASM]
u Oracle Cluster File System [OCFS])
• Familia de procesadores Intel Xeon
• 1 GB de RAM
• PERC para unidades de disco duro
internas
• Dos unidades de disco duro de 73 GB
conectadas a una controladora PERC
NOTA: Se recomienda utilizar dos
unidades de disco duro de 73 GB (RAID 1)
conectadas a una controladora RAID
interna. Consulte la documentación
del sistema PowerEdge para obtener
más información.
• Tres NIC Gigabit
• Dos HBA
Un HBA QLE2462/QLE2562
(dos puertos) para PowerEdge
1950/R610
• Un HBA QME2472/QME2572
o LPe1105-M4/LPe1205 (dos puertos)
para PowerEdge M600/M610/M710

140 Requisitos de software y hardware
Sistemas Dell PowerEdge 6950, 2970,
M605, R805, R815 y R905 (hasta ocho
nodos con ASM u OCFS)
• Familia de procesadores AMD Opteron
• 1 GB de RAM
• Dos unidades de disco duro de 73 GB
conectadas a una controladora RAID
interna
NOTA: Se recomienda utilizar dos
unidades de disco duro de 73 GB (RAID 1)
conectadas a una controladora RAID
interna en función de su sistema. Consulte
la documentación del sistema PowerEdge
para obtener más información.
• Tres NIC Gigabit
• Dos HBA para PowerEdge 6950 o 2970
• Un HBA QME2472/QME2572 o
LPe1105-M4/LPe1205 (dos puertos)
para PowerEdge M605/M805/M905
Conmutadores Ethernet Gigabit (dos) Para obtener información sobre las
configuraciones admitidas, visite
dell.com/oracle.
Para sistemas de almacenamiento
Dell|EMC AX4-5F, CX3-10C, CX3-20,
CX3-20F, CX3-40, CX3-40F, CX3-80,
CX4-120, CX4-240, CX4-480 y CX4-960
Fibre Channel
Consulte la documentación del sistema
Dell|EMC para obtener más
información.
Para sistemas de almacenamiento SAS
Dell PowerVault MD3000 de conexión
directa con alojamiento de expansión
MD1000
Para obtener más información, consulte
la documentación del sistema de
almacenamiento Dell PowerVault
MD3000 y MD1000.
Para sistemas de almacenamiento iSCSI
Dell PowerVault MD3000i de conexión
directa o conmutada con alojamiento de
expansión MD1000
Para obtener más información, consulte
la documentación del sistema de
almacenamiento Dell PowerVault
MD3000i y MD1000.
Tabla 2-2.
Requisitos mínimos de hardware para la base de datos Oracle 10g Enterprise
Edition en Microsoft Windows Server 2003 R2 SP2 o Windows Server 2008
SP2 Standard/Enterprise x64 Edition (continuación)
Componente de hardware Configuración

Requisitos de software y hardware 141
En la Tabla 2-3 se detallan los requisitos mínimos de hardware para la base
de datos Oracle 10g Standard Edition en Microsoft Windows Server 2003 R2
SP2 o Windows Server 2008 SP2 Standard x64 Edition. Para obtener más
información sobre componentes de hardware específicos, consulte la
documentación incluida con el sistema.
Almacenamiento Dell EqualLogic serie PS Una matriz Dell EqualLogic serie PS
con 16 discos SAS de 15 000 RPM.
Dos conmutadores Ethernet Gigabit
para SAN iSCSI.
Tabla 2-3.
Requisitos mínimos de hardware para la base de datos Oracle 10g Standard
Edition en Microsoft Windows Server 2003 R2 SP2 o Windows Server 2008 SP2
Standard x64 Edition
Componente de hardware Configuración
Sistemas Dell PowerEdge 1950 III,
2950 III, 2900III, T610, T710, R610 y
R710 (hasta dos nodos con ASM)
• Familia de procesadores Intel Xeon
• 1 GB de RAM
• PERC para unidades de disco duro
internas
• Dos unidades de disco duro de 73 GB
conectadas a una controladora PERC
NOTA: Se recomienda utilizar dos
unidades de disco duro de 73 GB (RAID 1)
conectadas a una controladora RAID
interna en función de su sistema. Consulte
la documentación del sistema PowerEdge
para obtener más información.
• Tres NIC Gigabit
•Dos HBA
• Un HBA QLE2462/QLE2562 (dos
puertos) para PowerEdge 1950/R610
Tabla 2-2.
Requisitos mínimos de hardware para la base de datos Oracle 10g Enterprise
Edition en Microsoft Windows Server 2003 R2 SP2 o Windows Server 2008
SP2 Standard/Enterprise x64 Edition (continuación)
Componente de hardware Configuración

142 Requisitos de software y hardware
Sistemas Dell PowerEdge 2970 y R805
(hasta dos nodos con ASM)
• Familia de procesadores AMD Opteron
• 1 GB de RAM
• Dos unidades de disco duro de 73 GB
conectadas a una controladora RAID
interna.
NOTA: Se recomienda utilizar dos
unidades de disco duro de 73 GB (RAID 1)
conectadas a una controladora RAID
interna en función de su sistema. Consulte
la documentación del sistema PowerEdge
para obtener más información.
• Tres NIC Gigabit
Conmutador Ethernet Gigabit (dos) Para obtener información sobre las
configuraciones admitidas, visite
dell.com/oracle.
Para sistemas de almacenamiento
Dell|EMC AX4-5F, CX3-10C, CX3-20,
CX3-20F, CX3-40, CX3-40F, CX3-80,
CX4-120, CX4-240, CX4-480 y CX4-960
Fibre Channel
Consulte la documentación del sistema
Dell|EMC para obtener más
información.
Para sistemas de almacenamiento
SAS Dell PowerVault MD3000 de
conexión directa con alojamiento
de expansión MD1000
Para obtener más información,
consulte la documentación del sistema
de almacenamiento Dell PowerVault
MD3000 y MD1000.
Para sistemas de almacenamiento
Dell PowerVault MD3000i de conexión
directa o conmutada con alojamiento
de expansión MD1000
Para obtener más información,
consulte la documentación del sistema
de almacenamiento Dell PowerVault
MD3000i y MD1000.
Tabla 2-3.
Requisitos mínimos de hardware para la base de datos Oracle 10g Standard
Edition en Microsoft Windows Server 2003 R2 SP2 o Windows Server 2008 SP2
Standard x64 Edition (continuación)
Componente de hardware Configuración

Instalación y configuración del sistema operativo 143
Instalación y configuración del
sistema operativo
PRECAUCIÓN: Para asegurarse de que el sistema operativo está instalado
correctamente, desconecte todos los dispositivos de almacenamiento externos
del sistema antes de instalar el sistema operativo.
En esta sección se proporciona información sobre cómo instalar y
configurar el sistema operativo Microsoft Windows Server 2003 R2 SP2
y Windows Server 2008 SP2 Standard/Enterprise x64 Edition para la
implantación de bases de datos Oracle.
Antes de comenzar
NOTA: Para obtener las actualizaciones más recientes del BIOS, el firmware y los
controladores, visite support.dell.com.
1
Apague el sistema.
2
Desconecte todos los dispositivos de almacenamiento externos
del sistema.
3
Localice el soporte multimedia
Microsoft Windows Server 2003 R2 SP2
o
Windows Server 2008 SP2 Standard/Enterprise x64 Edition
y el soporte
multimedia
Dell Systems Management Tools and Documentation
(Documentación y herramientas de administración de sistemas Dell)
correspondientes a su servidor Dell utilizando la información de
la tabla 3-1.

144 Instalación y configuración del sistema operativo
Instalación del sistema operativo mediante
el
DVD Dell Systems Management Tools
and
Documentation
1
Encienda el sistema.
2
Inserte el soporte multimedia
Dell Systems Management
de su sistema
en la unidad del sistema.
Aparece la ventana de bienvenida de
Dell Systems Build and Update
Utility (Utilidad de creación
y actualización de sistemas Dell).
NOTA: Si el sistema no dispone de una unidad de CD/DVD, se puede utilizar
una unidad de CD/DVD USB de conexión externa.
3
En la ventana
Select Language
(Seleccionar idioma), seleccione
English
(Inglés).
4
En la tabla
Systems Deployment Options
(Opciones de implantación
de los sistemas), haga clic en
Configure
(Configurar) en la misma fila
que contiene la opción
Server OS Installation
(Instalación del sistema
operativo del servidor). Se abre la ventana
Configure Server Operating
System
Installation
(Configurar instalación del sistema operativo
del servidor).
Tabla 3-1. Soporte multimedia de administración de sistemas del servidor PowerEdge
Sistema Dell PowerEdge Soporte multimedia de administración de
sistemas
6950, 1950, 2900, 2950, 2970, 1950 III,
2900 III, 2950 III, R805, R905, R900,
M600, M605, M610, M710, M805,
M905, T610, T710, R610 y R710.
Soporte multimedia Dell Systems
Management Tools and Documentation
versión 6.2
R810, R815, R910 y M910 Soporte multimedia Dell Systems
Management Tools and Documentation
versión 6.2.1
NOTA: El soporte multimedia Dell Systems Management Tools and Documentation
se suministra con el servidor Dell.

Instalación y configuración del sistema operativo 145
El módulo de instalación del sistema operativo del servidor (SOI) incluido
en Dell
Systems Build and Update Utility permite instalar en sus sistemas
Dell los sistemas operativos admitidos por Dell.
NOTA: Para obtener más información sobre cómo utilizar las ventanas
de
SOI específicas, consulte la ayuda en línea de Dell Systems Build and
Update
Utility.
5
En la ventana
Set Date and Time
(Configurar fecha y hora) del
módulo SOI, defina la fecha, la hora y la zona horaria actuales, y haga
clic en
Continue
(Continuar).
6
En la ventana
Select an Operating System to Install
(Seleccionar
el sistema operativo para instalar):
a
Seleccione
Microsoft Windows Server 2003 SP2 R2 x64 Edition
o
Microsoft Windows Server 2008 x64 (64 bit Edition)
, según
convenga.
b
Haga clic en
Continue
(Continuar).
7
En la ventana
Select RAID Configuration
(Seleccionar configuración
RAID), seleccione los valores predeterminados y haga clic en
Continue
(Continuar).
NOTA: Este menú puede no aparecer en algunas configuraciones de sistema.
8
Si ha seleccionado
Microsoft Windows Server 2008 x64 (64 bit Edition)
en la ventana
Select an Operating System to Install
(Seleccionar
el sistema operativo para instalar), vaya al paso 11.
9
En la ventana
Configure the Disk Partition
(Configurar la partición
de disco):
a
Elija entre ajustar el tamaño de la partición de inicio o utilizar la
selección predeterminada.
b
Haga clic en
Continue
(Continuar).
10
En la ventana
Enter Operating System Configuration Information
(Introducir la información de configuración del sistema operativo):
a
Introduzca el nombre de usuario, la organización, la ID de producto
y
el nombre de ordenador correspondientes.
b
Introduzca el resto de la información necesaria.
c
Haga clic en
Install SNMP
(Instalar SNMP) (valor predeterminado).

146 Instalación y configuración del sistema operativo
d
Haga clic en
Install Server Administrator
(Instalar Server
Administrator) (valor predeterminado) si desea instalar la utilidad
Dell OpenManage Server Administrator.
NOTA: Dell Server Administrator puede instalarse en cualquier momento
una
vez instalado el sistema operativo.
e
Haga clic en
Continue
(Continuar).
11
Si está instalando Windows Server 2008 x64, haga clic en
Eject CD/DVD
(Expulsar CD/DVD). En la ventana
Operating System Installation
Summary
(Resumen de la instalación del sistema operativo), haga clic en
Eject CD/DVD
Automatically
(Expulsar CD/DVD automáticamente),
que es la opción predeterminada, y haga clic en
Continue
(Continuar).
NOTA: Cuando haga clic en Apply Now (Aplicar ahora), la instalación se
iniciará y no podrá modificar los detalles de configuración del sistema.
12
Haga clic en
Apply Now
(Aplicar ahora).
Comienza la instalación de Systems Build and Update Utility.
NOTA: Este procedimiento puede tardar varios minutos en completarse.
13
Si ha seleccionado Microsoft Windows Server 2003 Service Pack 2 x64
Edition, cuando se le solicite, inserte el soporte multimedia de Windows
Server 2003 SP2 Enterprise x64 Edition o Standard x64 Edition en la
unidad de CD.
NOTA: Este procedimiento puede tardar varios minutos en completarse.
14
Una vez finalizada la instalación de Systems Build and Update Utility,
el sistema se reinicia automáticamente.
NOTA: Asegúrese de retirar todos los medios de inicio al reiniciar el sistema.
15
Al reiniciarse, el sistema se inicia en el modo de instalación del sistema
operativo.
NOTA: No inicie directamente desde el soporte multimedia del sistema operativo
que
se encuentra en la unidad de DVD-ROM.

Instalación y configuración del sistema operativo 147
Continuación de la instalación del sistema
operativo
Instalación de Windows Server 2003
1
Si seleccionó Microsoft Windows Server 2003 R2 SP2 x64 Edition
durante el proceso de instalación de Dell Systems Build and Update
Utility, al reiniciarse, el sistema se inicia automáticamente en el modo
de instalación de Windows Server 2003 R2 SP2 x64 Edition.
2
En la ventana
Personalize Your Software
(Personalice su software),
introduzca la información apropiada en los campos Name (Nombre)
y Organization (Organización) y haga clic en
Next
(Siguiente).
3 Cuando se le solicite, introduzca la clave del producto de
Windows Server 2003 R2 SP2 Standard/Enterprise x64 Edition y haga
clic en Next (Siguiente).
PRECAUCIÓN: No deje en blanco la contraseña de administrador.
4
Introduzca la información apropiada en los campos
Computer Name
(Nombre de equipo) y
Administrator Password
(Contraseña de
administrador) y haga clic en
Next
(Siguiente).
NOTA: Para configurar la red pública correctamente, el nombre
del
ordenador y el nombre de host público deben coincidir.
NOTA: Anote la contraseña de inicio de sesión que ha creado en este paso.
Necesitará esta información en el
paso 5.
5
Al finalizar el proceso de instalación, aparece la ventana de
bienvenida
a Windows.
a
Apague el sistema, vuelva a conectar todos los dispositivos de
almacenamiento externos e inicie el sistema.
b
En la ventana de
bienvenida a Windows, pulse
<Ctrl><Alt><Supr> para continuar. Aparece la ventana
Log On
(Iniciar sesión).

148 Instalación y configuración del sistema operativo
c
En el campo
Password
(Contraseña), escriba la contraseña de
administrador que ha creado en el
paso 4 de este procedimiento
y haga clic en
OK
(Aceptar).
Se le solicitará que inserte el segundo CD de
Microsoft
Windows
Server
. Puede insertar el segundo CD de Windows Server o seleccionar
Cance
l (Cancelar).
NOTA: Si inserta el segundo CD de Windows Server, siga las indicaciones
del
proceso habitual de instalación. En el proceso siguiente se presupone
que
no va a insertar el segundo CD de Windows Server.
d
Haga clic en
Cancel
(Cancelar). Se visualiza un mensaje que le
notifica que no se va a instalar el contenido del segundo CD de
Windows Server.
e
Haga clic en
OK
(Aceptar). Se le solicita que configure la instalación
posterior a Windows Server (opcional).
f
Haga clic en
Finish
(Finalizar). Se le solicita que cierre la página.
g
Haga clic en
Yes
(Sí). Aparece la ventana de administración de
Windows
Manage Your Server
(Administre su servidor).
h
Cierre la ventana.
NOTA: Para utilizar Broadcom Advanced Control Suite 3 (BACS), instale
Microsoft .NET Framework 2.0. Puede descargar Microsoft .NET
Framework
2.0 desde microsoft.com.
Instalación de Windows Server 2008 SP2
1
Si seleccionó Microsoft Windows Server 2008 x64 (64 bit Edition)
durante el proceso de instalación de Dell Systems Build and Update
Utility, al reiniciarse, el programa de instalación de Systems Build and
Update Utility le solicitará que introduzca un soporte multimedia de
Windows Server 2008 válido en la unidad de DVD. Inserte el soporte
multimedia de
Windows Server 2008 SP2
en la unidad de DVD y haga
clic en
OK
(Aceptar).
2
Haga clic en
OK
(Aceptar) en la ventana
Valid Microsoft Windows Server
2008 SP2 media
(Soporte multimedia de Microsoft Windows Server 2008
SP2 válido) para iniciar la instalación.

Instalación y configuración del sistema operativo 149
3
En la ventana siguiente, especifique el idioma y otras preferencias y haga
clic en
Next
(Siguiente) para continuar.
4
Haga clic en
Install now
(Instalar ahora) para comenzar la instalación.
5
Especifique la clave del producto para su activación y haga clic en
Next
(Siguiente) para continuar.
6
En la ventana siguiente:
a
Seleccione
Windows Server 2008 Enterprise (Full Installation)
(Windows Server 2008 Enterprise [Instalación completa]).
b
Haga clic en
Next
(Siguiente).
7
En la ventana de
condiciones de la licencia:
a
Marque la casilla
I accept the license terms
(Acepto los términos
de
licencia).
b
Haga clic en
Next
(Siguiente).
8
En la ventana siguiente:
a
Seleccione
Custom (Advanced) installation
(Instalación
personalizada [avanzada]).
b
Seleccione el disco en el que desea instalar Windows.
c
Haga clic en
Next
(Siguiente).
El programa de instalación inicia la instalación de Windows.
NOTA: Este procedimiento puede tardar varios minutos en completarse.
9
Al finalizar la instalación, cambie la contraseña de administrador.
PRECAUCIÓN: No deje en blanco la contraseña de administrador.
NOTA: Para utilizar Broadcom Advanced Control Suite (BACS), instale
Microsoft .NET Framework 2.0 o superior si no está instalado. Puede descargar
Microsoft .NET Framework desde microsoft.com.

150 Instalación y configuración del sistema operativo
Instalación del CD de recursos
NOTA: Puede descargar el CD de recursos de Windows correspondiente
a
su configuración desde dell.com/oracle.
1
Inserte el soporte multimedia con la etiqueta
Dell RCD x64 4.4
.
2
Haga doble clic en
My Computer
(Mi PC) y haga doble clic en la unidad
de CD-ROM.
3
Ejecute
install_drivers.bat
.
NOTA: Este procedimiento puede tardar varios minutos en completarse.
4
Pulse cualquier tecla para continuar.
5
Si necesita instalar el controlador para un HBA Qlogic Fibre Channel en
el sistema:
• Para Windows Server 2003, consulte el procedimiento de instalación
del controlador descrito en
“Para Windows Server 2003:” en la
página 151.
• Para Windows Server 2008, consulte el procedimiento de instalación
del controlador descrito en
“Para Windows Server 2008:” en la
página 152.
6
Compruebe los registros para verificar que todos los controladores se han
instalado correctamente.
NOTA: Encontrará la información de registro en:
<Unidad
principal:/>Dell_Resource_CD/logs>.
7
Una vez finalizada la instalación, extraiga el soporte multimedia de
la unidad de CD.
8
Reinicie el sistema.

Instalación y configuración del sistema operativo 151
Instalación del controlador para un HBA Qlogic Fibre Channel
Para Windows Server 2003:
1
Inicie Device Manager (Administrador de dispositivos) de este modo:
a
Haga clic en
Start
(Inicio) y seleccione
Run
(Ejecutar).
b
En el cuadro de diálogo
Run
(Ejecutar), escriba
devmgmt.msc
y
haga clic en
OK
(Aceptar).
2
En la ventana
Device Manager
(Administrador de dispositivos),
desplácese por la lista de tipos de hardware y haga doble clic en
SCSI and
RAID controllers
(Controladoras SCSI y RAID).
3
En la lista de dispositivos, haga doble clic en
QLogic Fibre Channel HBA
(HBA QLogic Fibre Channel).
4
Haga clic en la ficha
Driver
(Controlador) y en
Update Driver
(Actualizar
controlador) para iniciar el asistente para actualización de hardware.
5
Haga clic en
Install from a list or specific location (Advanced)
(Instalar
desde una lista o ubicación específica [avanzado]) y, a continuación,
en
Next
(Siguiente).
6
Haga clic en
Don’t search. I will choose the driver to install
(No buscar.
Seleccionaré el controlador que se va a instalar) y, a continuación, en
Next
(Siguiente).
7
Haga clic en
Have Disk
(Utilizar disco) y desplácese hasta la carpeta
<Unidad_principal:/>Dell_Resource_CD/drivers/R254072
.
8
Se abre el asistente para actualización de hardware. En la ventana
Select
a Device Driver
(Seleccione un controlador de dispositivo), haga clic en
Next
(Siguiente).
9
En la ventana
Completing the Hardware Update Wizard
(Finalización
del Asistente para actualización hardware) del asistente para actualización
de hardware, haga clic en
Finish
(Finalizar).

152 Instalación y configuración del sistema operativo
Para Windows Server 2008:
1
Inicie Device Manager (Administrador de dispositivos) de este modo:
a
Haga clic en
Start
(Inicio) y en
Control Panel
(Panel de control).
b
Haga clic en
Hardware and Sound
(Hardware y sonido).
c
Haga clic en
Device Manager
(Administrador de dispositivos).
2
Desplácese por la lista de tipos de hardware y haga doble clic en
Storage Controller
(Controladora de almacenamiento).
3
En la lista de dispositivos, haga doble clic en
QLogic Fibre Channel HBA
(HBA QLogic Fibre Channel).
4
Haga clic en la ficha
Driver
(Controlador) y en
Update Driver
(Actualizar
controlador) para iniciar el
asistente para actualización de hardware.
5
Desplácese hasta la carpeta
<Unidad_principal:/>Dell_Resource_CD/drivers/R254072
y haga clic
en
Next
(Siguiente).
6
En la ventana
Windows has successfully updated your software
(Windows
ha actualizado el software correctamente), haga clic en
Close
(Cerrar).
Verificación de las rutas de directorios temporales
Verifique que las rutas a los directorios Temp y Tmp se hayan establecido
correctamente. Repita los pasos que se indican a continuación para todos
los nodos del clúster.
1
Haga clic en
Start
(Inicio) y seleccione
Run
(Ejecutar).
2
En el campo
Open
(Abrir), escriba
cmd
y haga clic en
OK
(Aceptar).
3
En el indicador de comandos, escriba
echo %Temp%
y pulse <Intro>.
Aparece la ruta siguiente:
%SystemDrive%\Temp
donde
%SystemDrive%
es la unidad local del usuario.
En caso contrario, siga el procedimiento que se explica a continuación
para
cambiar las rutas de los directorios Temp y Tmp.

Instalación y configuración del sistema operativo 153
a
Haga clic con el botón derecho del ratón en
My Computer
(Mi PC)
y
seleccione
Properties
(Propiedades).
b
En
Ta sk s
(Tareas), seleccione
Advanced System Settings
(Configuración avanzada del sistema).
c
En la ficha
Advanced
(Opciones avanzadas), haga clic en
Environment Variables
(Variables de entorno).
d
En
User Variables for Administrator
(Variables de usuario para
Administrador), edite la variable
TEMP
y establezca el valor de la
variable como
%SystemDrive%\Temp
.
e
Ejecute el paso 3 para verificar que el directorio temp se haya
establecido correctamente.
4
En el indicador de comandos, escriba
echo %Tmp%
y pulse <Intro>.
Aparece la ruta siguiente:
%SystemDrive%\Temp
donde
%SystemDrive%
es la unidad local del usuario.
Si el directorio temp no se ha definido, siga el procedimiento que se
explica a continuación para definirlo.
a
Haga clic con el botón derecho del ratón en
My Computer
(Mi PC)
y
seleccione
Properties
(Propiedades).
b
En
Ta sk s
(Tareas), seleccione
Advanced System Settings
(Configuración avanzada del sistema).
c
En la ficha
Advanced
(Opciones avanzadas), haga clic en
Environment Variables
(Variables de entorno).
d
En
User Variables for Administrator
(Variables de usuario para
Administrador), edite la variable
TMP
y establezca el valor de la
variable como
%
SystemDrive%\Tmp
.
e
Ejecute el paso 4 para verificar que el directorio tmp se haya
establecido correctamente.
5
Repita todos los pasos que se indican en esta sección para todos los
nodos del clúster.

154 Instalación y configuración del sistema operativo

Verificación de las configuraciones de hardware y software del clúster 155
Verificación de las configuraciones
de hardware y software del clúster
En esta sección se proporciona información sobre las configuraciones de
hardware y software del clúster.
Antes de configurar el clúster, asegúrese de tener instalados los requisitos
mínimos de hardware que se muestran en la tabla 4-1.
Cada nodo debe tener instalado el software siguiente mediante:
•DVD
Dell Systems Management Tools and Documentation
(Documentación y herramientas de administración de sistemas Dell)
(vea
la tabla 3-1)
•
Windows Server 2003 SP2 Standard/Enterprise x64 Edition
o
Windows
Server 2008 SP2 Standard/Enterprise x64 Edition
(vea la tabla 2-1)
• Imagen del CD de
recursos de Windows de Dell|Oracle versión 4.3
NOTA: Asegúrese de que los controladores HBA estén instalados.
•CD de
recursos de PowerVault MD3000 o CD de recursos de
PowerVault MD3000i (cuando se utiliza PowerVault MD3000/MD3000i
como almacenamiento de backend)
El almacenamiento debe configurarse con un mínimo de cuatro discos
virtuales o LUN (dos para el disco de votación redundante y el registro de
clúster Oracle, y dos para la base de datos y el área de recuperación flash)
asignados a los nodos del clúster.

156 Verificación de las configuraciones de hardware y software del clúster
Tabla 4-1. Tamaños y configuración de los discos virtuales (LUN)
LUN o disco
virtual
Tamaño
mínimo
Número de
particiones
Utilizado para
1 3 GB 5 (3 x 275 MB y
2 x 300 MB)
Disco de votación
(3 x 275 MB)
Registro de clúster Oracle
(2 x 300 MB)
2Más
grande que
la base de
datos
1 Base de datos
3Al menos
dos veces
el tamaño
de la base
de datos
1 Área de recuperación flash
-
 1
1
-
 2
2
-
 3
3
-
 4
4
-
 5
5
-
 6
6
-
 7
7
-
 8
8
-
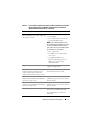 9
9
-
 10
10
-
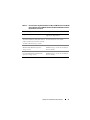 11
11
-
 12
12
-
 13
13
-
 14
14
-
 15
15
-
 16
16
-
 17
17
-
 18
18
-
 19
19
-
 20
20
-
 21
21
-
 22
22
-
 23
23
-
 24
24
-
 25
25
-
 26
26
-
 27
27
-
 28
28
-
 29
29
-
 30
30
-
 31
31
-
 32
32
-
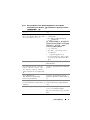 33
33
-
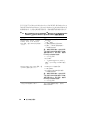 34
34
-
 35
35
-
 36
36
-
 37
37
-
 38
38
-
 39
39
-
 40
40
-
 41
41
-
 42
42
-
 43
43
-
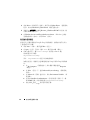 44
44
-
 45
45
-
 46
46
-
 47
47
-
 48
48
-
 49
49
-
 50
50
-
 51
51
-
 52
52
-
 53
53
-
 54
54
-
 55
55
-
 56
56
-
 57
57
-
 58
58
-
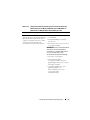 59
59
-
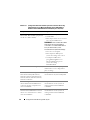 60
60
-
 61
61
-
 62
62
-
 63
63
-
 64
64
-
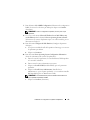 65
65
-
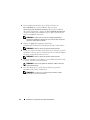 66
66
-
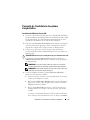 67
67
-
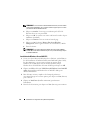 68
68
-
 69
69
-
 70
70
-
 71
71
-
 72
72
-
 73
73
-
 74
74
-
 75
75
-
 76
76
-
 77
77
-
 78
78
-
 79
79
-
 80
80
-
 81
81
-
 82
82
-
 83
83
-
 84
84
-
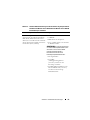 85
85
-
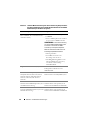 86
86
-
 87
87
-
 88
88
-
 89
89
-
 90
90
-
 91
91
-
 92
92
-
 93
93
-
 94
94
-
 95
95
-
 96
96
-
 97
97
-
 98
98
-
 99
99
-
 100
100
-
 101
101
-
 102
102
-
 103
103
-
 104
104
-
 105
105
-
 106
106
-
 107
107
-
 108
108
-
 109
109
-
 110
110
-
 111
111
-
 112
112
-
 113
113
-
 114
114
-
 115
115
-
 116
116
-
 117
117
-
 118
118
-
 119
119
-
 120
120
-
 121
121
-
 122
122
-
 123
123
-
 124
124
-
 125
125
-
 126
126
-
 127
127
-
 128
128
-
 129
129
-
 130
130
-
 131
131
-
 132
132
-
 133
133
-
 134
134
-
 135
135
-
 136
136
-
 137
137
-
 138
138
-
 139
139
-
 140
140
-
 141
141
-
 142
142
-
 143
143
-
 144
144
-
 145
145
-
 146
146
-
 147
147
-
 148
148
-
 149
149
-
 150
150
-
 151
151
-
 152
152
-
 153
153
-
 154
154
-
 155
155
-
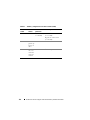 156
156


Dell Supported Configurations for Oracle Database 10g R2 for Windows Guía del usuario
- Tipo
- Guía del usuario
en otros idiomas
- français: Dell Supported Configurations for Oracle Database 10g R2 for Windows Mode d'emploi
- English: Dell Supported Configurations for Oracle Database 10g R2 for Windows User guide
- Deutsch: Dell Supported Configurations for Oracle Database 10g R2 for Windows Benutzerhandbuch
- 日本語: Dell Supported Configurations for Oracle Database 10g R2 for Windows ユーザーガイド
Artículos relacionados
-
Dell Supported Configurations for Oracle Database 10g R2 for Windows Guía del usuario
-
-
-
-
-
-
-
-
-