
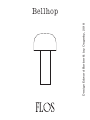
Design Edward Barber & Jay Osgerby, 2018
Bellhop

2 3
IT
ISTRUZIONI DI INSTALLAZIONE ED IMPIEGO
ATTENZIONE!
La sicurezza dell’apparecchio é garantita solo rispettando
queste istruzioni sia in fase di installazione che di
impiego; é pertanto necessario conservarle.
AVVERTENZE:
• All’atto dell’installazione ed ogni volta che si interviene
sull’apparecchio, assicurarsi che sia stata tolta la
tensione di alimentazione.
• L’apparecchio non può essere in alcun modo modificato
o manomesso, ogni modifica ne può compromettere la
sicurezza rendendo lo stesso pericoloso. FLOS declina
ogni responsabilità per i prodotti modificati.
• Se il cavo flessibile si danneggia, deve essere sostituito
da FLOS o da personale qualificato al fine di evitare
pericoli.
• L’apparecchio è esente dal rischio di emissione
fotobiologica.
• Il simbolo riportato sull’apparecchio indica che il
prodotto deve essere smaltito in modo differenziato dai
rifiuti urbani.
• La sorgente luminosa non può essere sostituita dal
cliente. Per informazioni contattare FLOS.
• Il Pacco Batterie non può essere sostituito dal
cliente. Per informazioni contattare FLOS. Non
incenerire.
DATI TECNICI
Nr. 84 LED 2,5W.
ISTRUZIONI PER LA PULIZIA DELL’APPARECCHIO
• Per la pulizia dell’apparecchio utilizzare esclusivamente
un panno morbido eventualmente inumidito con acqua
e sapone.
• Attenzione: non utilizzare alcool o solventi.
EN
INSTRUCTION FOR CORRECT INSTALLATION AND USE
WARNING!
The safety of this fitting can only be guaranteed if these
instructions are observed, during both installation and
use. Please retain these instructions safety.
REMARKS:
• When installing and whenever acting on the appliance,
ensure that the power supply has been switched off.
• The appliance may in no way be modified or tampered
with, any modification may compromise safety causing
the appliance to become dangerous. FLOS declines all
responsibility for products that are modified.
• Should the external trailing cable get damaged,it must
be replaced by FLOS or by qualified personnel in order
to avoid any danger.
• The device carries no risk of photobiological emissions.
• The symbol shown on the device indicates that the
product must be thrown out in a different manner than
with the urban trashes.
• The light source cannot be replaced by the
customer. Contact FLOS for information.
• The Battery Pack cannot be replaced by customer.
Contact FLOS for information. Do not incinerate.
TECHNICAL DATA
Nr. 84 LED 2,5W.
CLEANING INSTRUCTIONS
• Use only a soft cloth to clean the appliance, dampened
with water and soap or mild cleanser if needed for
resistant dirt.
• Warning: do not use alcohol or other solvents.
DE
INSTALLATION - UND GEBRAUCHSANWEISUNGEN
ACHTUNG!
Wir garantieren nur dann für die Sicherheit der Leuchte, wenn
diese Anweisungen sowohl bei der Installation als auch beim
Gebrauch genau beachtet werden. Es ist daher ratsam, sie
aufzubewahren.
BEMERKUNGEN:
• Bei der Installation und bei Eingriffen an der Leuchte ist
sicherzustellen, daß die Anlage vom Netz abgeschaltet ist.
• Der Apparat darf auf keinen Fall veraendert oder unerlaubt
geoeffnet werden, jede Veraenderung desselben kann die
Sicherheit in Frage stellen und somit gefaehrlich werden.
FLOS lehnt jede Verantwortung fuer unsachgemaess
behandelte Produkte ab.
• Falls das flexible äußere Kabel beschädigt wird, muß es von
FLOS oder von qualifiziertem Personal ersetzt werden, um
Gefahren zu vermeiden.
• Das Gerät ist frei von photobiologischen Emissionsgefahren.
• Das auf dem Gerät wiedergegebene Symbol zeigt an,
dass das Produkt getrennt vom Stadtmüll entsorgt werden
muss.
• Die Leuchtquelle kann nicht vom Kunden ausgewechselt
werden. Für Informationen bitte FLOS kontaktieren.
• Die Batteriepack kann nicht vom Kunden ausgewechselt
werden. Für Informationen bitte FLOS kontaktieren.
Verbrennen Sie nicht.
TECHNISCHE DATEN
Nr. 84 LED 2,5W.
REINIGUNGSVORSCHRIFTEN
• Bei der Reinigung der Leuchte darf man ausschließlich
weiche Tücher verwenden. Eventuell kann man diese mit
Wasser und Seife oder mit einem neutralen Reinigungsmittel
anfeuchten.
• Achtung: Weder Alkohol noch Lösungsmittel verwenden.
FR
INSTRUCTIONS D’INSTALLATION ET D’EMPLOI
ATTENTION!
La sûreté de cet appareil est garantie uniquement si l’on
respecte ces instructions soit en phase d’installation soit
pendant l’utilisation; il faut donc les conserver.
NOTICES:
• Au moment de l’installation et chaque fois que l’on
intervient sur l’appareil, s’assurer que la tension
d’alimentation ait été coupée.
• L’appareil ne peut être modifié ou altéré de quelque
manière que ce soit, toute modification peut
compromettre la sécurité de celui-ci en le rendant
dangereux. FLOS décline toute responsabilité pour les
produits modifiés.
• Si le cordon flexible externe est endommagé, il doit être
remplacé par FLOS ou par le personnel qualifié afin
d’éviter des dangers.
• L’appareil ne présente aucun risque photobiologique.
• Le symbole reporté sur l’appareil indique que le
produit doit être éliminé d’une autre façon que celle
avec les déchets urbains.
• La source lumineuse ne peut pas être substituée par
le client. Pour obtenir des informations, contacter la
société FLOS.
• Le batterie pack ne peut pas être substituée par le
client. Pour obtenir des informations, contacter la
société FLOS. Ne pas incinérer.
DONNEES TECHNIQUES
Nr. 84 LED 2,5W.
INSTRUCTIONS POUR LE NETTOYAGE
• Pour le nettoyage de l’appareil utiliser exclusivement un
chiffon doux, humecté si nécessaire, avec de l’eau et du
savon ou avec un détergent neutre pour les salissures
les plus tenaces.
• Attention: ne pas utiliser d’alcool ou solvents.

4 5
ES
INSTRUCCIONES DE INSTALACIÓN Y DE USO
¡ATENCIÓN!
La seguridad del aparato sólo puede garantizarse con la
condición de que se respeten las siguientes instrucciones,
tanto en la fase de instalación como de uso, por lo cual se
recomienda conservarlas.
ADVERTENCIA:
• Para efectuar la instalación, y toda vez que se efectúe
alguna operación en el aparato, asegurarse de haber
cortado la corriente eléctrica.
• El aparato no puede ser en ningùn caso modificado o
forzado, cualquier modificaciòn puede comprometer la
seguridad haciéndolo peligroso. FLOS declina cualquier
responsabilidad por los productos modificados.
• Si el cable externo se estropea, debe ser sustituido
por FLOS o por personal cualificado con el fin de evitar
situaciones peligrosas.
• El aparato no presenta ningún riesgo fotobiológico.
• El símbolo marcado en el aparato indica que el producto
debe ser eliminado en modo diferenciado del resto de los
desechos urbanos.
• La fuente luminosa no puede ser sustituida por el
cliente. Para más informaciones, ponerse en contacto
con FLOS.
• El paquete de baterías no puede ser sustituido por el
cliente. Para más informaciones, ponerse en contacto
con FLOS. No incinerar.
DATOS TECNICOS
Nr. 84 LED 2,5W.
INSTRUCCIONES PARA LIMPIAR EL APARATO
• Para la limpieza del aparato, utilizar exclusivamente un paño
suave. En caso de suciedad más resistente, humedecer el
paño con agua y jabón o un detergente neutro.
• Advertencia: no emplear alcohol ni disolventes.
PT
INSTRUÇÕES INSTALAÇÃO E USO
ATENÇÃO!
A segurança do aparelho é garantida somente se
respeitarmos as instruções tanto na fase de instalação
como na de uso; portanto é necessário conservar tais
instruções.
ADVERTÊNCIA:
• Quando se instala e cada vez que se mexe no
aparelho, ter a certeza que foi desligado da tensão de
alimentação.
• De forma alguma o aparelho deve ser modificado
ou alterado, toda e qualquer modificação
pode comprometer a segurança tornando o
aparelho perigoso. FLOS declina toda e qualquer
responsabilidade pelos produtos modificados.
• Se o cabo flexível está danificado, deve ser substituído
pela FLOS ou por pessoal qualificado para evitar
qualquer perigo.
• O aparelho está livre do risco de emissão fotobiológica.
• O símbolo indicado no aparelho indica que o
produto deve ser eliminado de forma diferenciada em
relação ao lixo urbano.
• A fonte luminosa não pode ser substituída pelo
cliente. Para maiores informações contactar FLOS.
• A bateria não pode ser substituída pelo cliente.
Para maiores informações contactar FLOS. Não
incinere.
DADOS TÉCNICOS
Nr. 84 LED 2,5W.
INSTRUÇÕES PARA A LIMPEZA DO APARELHO
• Para limpeza do aparelho utilizar exclusivamente um
tecido macio eventualmente úmido com água e sabão
ou detergente neutro para a sujeira mais difícil.
• Atenção: não utilizar álcool ou solventes.
RUS
ИНСТРУКЦИИ ПО МОНТАЖУ И
ПРИМЕНЕНИЮ
ВНИМАНИЕ!
Надёжность устройства гарантируется только
при соблюдении данных инструкций, как в фазе
монтажа, так и при применении, поэтому необходимо
обеспечить их сохранность.
ПРЕДУПРЕЖДЕНИЯ:
• В момент установки и каждый раз при проведении
работ с устройством, убедиться в снятии
напряжения питания.
• Устройство не может изменяться или разбираться,
любые изменения могут нарушить надёжность,
делая его опасным. FLOS не несёт ответственность
за измененную продукцию.
• При повреждении гибкого кабеля он должен
заменяться FLOS или квалифицированным
персоналом в целях предотвращения опасности.
• Устройство не обладает риском фотобиологической
эмиссии.
• Символ приведённый на устройстве, указывает
на то, что данная продукция должна быть
переработана отдельно от городских отходов.
• Источник света не может быть заменен
заказчиком. Для получения информации
связаться с компанией FLOS.
• Аккумуляторная батарея не может быть заменен
заказчиком. Для получения информации
связаться с компанией FLOS. Не сжигать.
ТЕХНИЧЕСКИЕ ДАННЫЕ
Nr. 84 LED 2,5Вт.
ИНСТРУКЦИИ ПО ОЧИСТКЕ УСТРОЙСТВА
• Для очистки устройства использовать только
мягкую тряпку, смоченную водой с мылом или
нейтральным моющим средством для наиболее
стойких загрязнений.
• Внимание: Не использовать спирт или другие
растворители.
J

6 7
CN
SA
!
•
•
•
•
•
•
•
•
•
KC
•
•
•
•
•
•
•
•
•

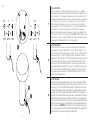
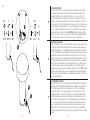
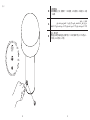
Fig. 2
0-20%
0,5s 0,2s1s
∞
100% 20-1% 0%20-90% 100%
G
F
L
IT
Fig.2 RICARICA BATTERIA
Inserire la presa USB-C (F) nel connettore (G) dell’apparecchio; lo stato di ricarica è segnalato
dalla frequenza di pulsazione del led (L) posizionato sulla base dell’apparecchio: quando il livello di
ricarica è inferiore al 20% il led lampeggia con frequenza alta (ogni 0,5 secondi), dal 20% al 90% il
led lampeggia con frequenza minore (ogni 1 secondo), a ricarica completa il led resta costantemente
acceso. Il tempo di ricarica completo è di 3 ore. Con apparecchio acceso al 100% dell’intensità
luminosa, l’autonomia di funzionamento senza cavo è di 6 ore (riducendo l’intensità luminosa è
possibile raggiungere fino a 24 ore di autonomia); superate le 6 ore, l’intensità luminosa si abbassa
automaticamente al 20% e l’apparecchio segnala la necessità di effettuare la ricarica con un
lampeggio del led (L) di segnalazione ad alta frequenza (ogni 0,2 secondi) fino a quando non verrà
messo in ricarica o la batteria si sarà scaricata completamente. NOTA: il prodotto è dotato di sistema
di autoprotezione: nel caso resti collegato all’alimentatore oltre il tempo di ricarica indicato, questo
non comprometterà il lifetime della batteria (500 cicli di ricarica garantiti).
EN
Pic.2 BATTERY RECHARGE
Insert the USB-C plug (F) into the device’s connector (G); the recharge status is indicated by the
pulse frequency of the led (L) positioned on the base of the device: when the charge level is less
than 20% the led flashes at a high frequency (every 0.5 seconds), from 20% to 90% the led flashes
at a lower frequency (every 1 second), at full charge the led stays on continuously. The complete
charging time is 3 hours. With the device on at 100% light intensity, the wireless operating autonomy
is 6 hours (By reducing the light’s intensity it is possible to maximise the lifespan up to 24 hours
); after 6 hours, the light intensity automatically lowers to 20% and the device signals the need to
recharge with a high frequency flashing of the led (L) (every 0.2 seconds) until it is put on charge or
until the battery runs down completely. NB: the product is equipped with a self-protection system:
if it stays connected to the power adaptor beyond the indicated charging time it won’t affect the
battery life (500 recharges guaranteed).
DE
Abb.2 BATTERIE LADEN
Die USB-C Buchse (F) in die Steckvorrichtung (G) der Leuchte einstecken; der Ladestatus wird durch
die Pulsationsfrequenz der LED (L) angezeigt, die an der Basis der Leuchte positioniert ist: wenn der
Ladestand unter 20% ist, blinkt die LED mit hoher Frequenz (alle 0,5 Sekunden), zwischen 20% und
90% blinkt die LED mit geringerer Frequenz (jede Sekunde), bei vollständiger Ladung bleibt die LED
durchgehend eingeschaltet. Die komplette Ladezeit beträgt 3 Stunden. Bei mit 100%-iger Helligkeit
eingeschalteter Leuchte beträgt die Betriebsautonomie ohne Kabel 6 Stunden (Wenn die Lichtintensität
reduziert wird, kann eine Autonomie von bis zu 24 Stunden erzielt werden ); nach 6 Stunden Betrieb
verringert sich die Helligkeit automatisch auf 20% und die Leuchte zeigt den Ladebedarf mit der Signal-
LED (L) an, die mit hoher Frequenz (alle 0,2 Sekunden) blinkt, bis die Leuchte aufgeladen wird oder die
Batterie vollständig leer ist. ANMERKUNG: das Produkt ist mit einem Selbstschutzsystem ausgestattet:
sollte es über die angegebene Ladezeit hinaus mit dem Netzgerät verbunden bleiben, wird dadurch die
Lebensdauer der Batterie (500 garantierte Ladezyklen) nicht beeinträchtigt.
8 9

Fig. 2
G
F
L
0-20%
0,5s 0,2s1s
∞
100% 20-1% 0%20-90% 100%
FR
Fig.2 CHARGEUR DE BATTERIE
Insérer la prise USB-C (F) dans le connecteur (G) de l’appareil; le niveau de chargement est signalé
par la fréquence des pulsations de la Led (L) position sur la base de l’appareil : quand le niveau
de chargement est inférieur à 20%, la Led clignote vite (toutes les 0,5 secondes), entre 20% et
90%, la Led clignote plus lentement (chaque seconde), à charge complète, la Led reste allumée en
permanence. La durée complète de chargement est de 3 heures. Lorsque l’appareil est allumé à 100%
de l’intensité lumineuse, il peut fonctionner durant 6 heures sans câble; une fois les 6 heures écoulées,
l’intensité lumineuse baisse automatiquement à 20% et l’appareil signale la nécessité de recharger la
batterie par le clignotement rapide de la Led (L), toutes les 0,2 secondes, jusqu’à ce que la batterie
soit à nouveau rechargée ou totalement déchargée. NOTA BENE: le produit est équipé d’un système
d’autoprotection; même s’il reste connecté à l’alimentation au-delà du temps de chargement indiqué,
cela n’a pas d’incidence sur la durée de vie de la batterie (500 cycles de charge garantis).
ES
Imag.2 RECARGA DE LA BATERÍA
Introduzca la toma USB-C (F) en el conector (G) del dispositivo; el estado de recarga viene indicado por
la frecuencia de la señal intermitente del LED (L) colocado en la base del dispositivo: cuando el nivel
de recarga está por debajo del 20 %, el LED parpadea con una frecuencia alta (cada 0,5 segundos),
del 20 al 90 % el LED parpadea con una frecuencia menor (cada segundo), y con la recarga completa
el LED permanece encendido de forma continuada.El tiempo de recarga completo es de 3 horas. Con
el dispositivo encendido al 100 % de la intensidad luminosa, la autonomía de funcionamiento sin cable
es de 6 horas (Reduciendo la intensidad luminosa, es posible obtener hasta 24 horas de autonomia) ;
al cabo de 6 horas, la intensidad luminosa se reduce automáticamente al 20 % y el dispositivo indica
la necesidad de efectuar la recarga con un parpadeo del LED (L) con una alta frecuencia (cada 0,2
segundos) hasta que no se ponga a recargar o la batería se descargue por completo. NOTA: el producto
está dotado de un sistema de autoprotección: en caso de quedarse conectado al alimentador durante
más tiempo que el tiempo de recarga indicado, esto no pondrá en riesgo la vida útil de la batería (500
ciclos de recarga garantizados).
PT
Fig.2 CARREGAMENTO DA BATERIA
Introduzir a ficha USB-C (F) no conector (G) do aparelho. O estado do carregamento é assinalado pela
frequência de intermitência do LED (L) situado na base do aparelho: quando o nível de carga é inferior
a 20% o LED pisca frequentemente (a cada 0,5 segundos), de 20 a 90% pisca a uma frequência
inferior (a cada 1 segundo) e, com a carga completa, permanece constantemente aceso. O tempo
de carregamento completo é de 3 horas. Com o aparelho aceso a 100% da intensidade luminosa, a
autonomia de funcionamento sem cabo é de 6 horas (Ao reduzir a intensidade luminosa é possível
obter até 24 horas de autonomia); Após 6 horas, a intensidade luminosa baixa automaticamente para
os 20%, e o aparelho indica a necessidade de ser carregado por meio da intermitência frequente
(a cada 0,2 segundos) do LED (L) até que o aparelho seja posto a carregar ou a bateria se esgotar.
NOTA: o produto possui um sistema de protecção automática: mantê-lo ligado ao alimentador para
além do tempo de carregamento indicado não comprometerá a vida útil da bateria (500 ciclos de carga
garantidos).
10 11

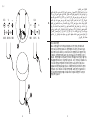
Fig. 2
G
F
L
0-20%
0,5s 0,2s1s
∞
100% 20-1% 0%20-90% 100%
RUS
Рис.2 ЗАРЯДКА БАТАРЕИ
Вставьте разъем USB-C (F) в гнездо (G) устройства; о состоянии зарядки
сигнализирует частота пульсации светодиода (L), размещенного на основании
прибора: если уровень перезарядки меньше 20%, светодиод мигает с высокой
частотой (каждые 0,5 секунды), от 20% до 90% светодиод мигает с более
низкой частотой (каждую секунду), когда зарядка завершена, светодиод
остается постоянно включенным. Полное время зарядки составляет 3 часа. При
интенсивности света 100% срок автономной работы без кабеля составляет 6
часов (Уменьшив интенсивность света, можно достичь 24-часовой автономной
работы); при превышении времени работы 6 часов интенсивность света
автоматически снижается до 20%, а устройство оповещает о необходимости
зарядки вспышками светодиода (L) с высокой частотой (каждые 0,2 секунды),
которые будут повторяться до тех пор, пока не будет произведена зарядка.
ПРИМЕЧАНИЕ: изделие оснащено системой автоматической защиты: в случае,
если оно подключено к блоку питания дольше указанного времени зарядки, это
не повлияет на срок службы батареи (гарантированные 500 циклов зарядки).
J
CN
图2.电池充电
插入 USB-C 插孔(F)插入装置连接插口(G);充电状态通过装置底部的LED灯(L)的闪烁频率
显示;当充电电量低于20%时,LED灯闪烁频率为高频(平均每0.5秒闪烁一次),当充电电量处
于20%到90%时,LED灯的闪烁频率为低频(平均每1秒闪烁一次),当充电完成时,LED灯变为长
亮状态。充电完成时间为3小时。当装置开启到100%亮度时,不连接电源的情况下,可持续工作6
小时 (降低光亮强度可以使得独立工作时间达到24小时),超过6小时后,亮度自动减弱到20%,
同时设备底部LED灯(L)开始高频闪烁(平均每0.2秒闪烁一次),提示电量不足,闪烁直至对其
进行充电或电量消耗完毕。备注:装置配有自我保护功能:当电源连接时间超过规定的充电时
间,也不对电池寿命造成影响(保证500次充电寿命)。
12 13

Fig. 2
G
F
L
0-20%
0,5s 0,2s1s
∞
100% 20-1% 0%20-90% 100%
SA
KC
14 15

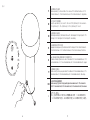
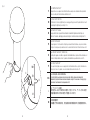
Fig. 3
100%
70%
30%
3%
0%
P
IT
Fig.3 DIMMER A PULSANTE
Agendo sul pulsante (P) si ottiene nell’ordine: 1 - Accensione al 100% dell’intensità luminosa; 2 - 70%
dell’intensità luminosa; 3 - 30% dell’intensità luminosa; 4 - 3% dell’intensità luminosa; 5 - Spegnimento.
EN
Pic.3 PUSH-BUTTON DIMMER
Pressing the push-button (P) sets, in order: 1 - Turn-on at 100% light intensity; 2 - Decrease down to
70% of light intensity; 3 - 30% of light intensity; 4 - 3% of light intensity; 5 - Turn-off.
DE
Abb.3 DIMMER-SCHALTER
Durch Betätigen des Knopfs (P) erhält man der Reihe nach: 1 - Einschaltung bei 100%-iger Helligkeit; 2 - 70%
der Helligkeit; 3 - 30% der Helligkeit; 4 - 3% der Helligkeit; 5 - Ausschaltung.
FR
Fig.3 VARIATEUR A BOUTON POUSSOIR
En appuyant sur le bouton poussoir (P) on obtient, dans l’ordre: 1 - Allumage à 100% de l’intensité lumineuse; 2 -
70% de l’intensité lumineuse; 3 - 30% de l’intensité lumineuse; 4 - 3% de l’intensité lumineuse; 5 - Extinction.
ES
Imag.3 REGULADOR DE LA INTENSIDAD CON INTERRUPTOR
Accionando el interruptor (P) podrá, en este orden: 1 - Encendido al 100 % de la intensidad luminosa, 2 - 70 %
de la intensidad luminosa; 3 - 30 % de la intensidad luminosa; 4 - 3 % de la intensidad luminosa; 5 - Apagado.
PT
Fig.3 DIMMER COM BOTÃO
Premindo o botão (P), obtém-se pela seguinte ordem: 1 - Acendimento a 100% da intensidade luminosa; 2 - 70%
da intensidade luminosa; 3 - 30% da intensidade luminosa; 4 - 3% da intensidade luminosa; 5 - Desactivação.
RUS
Рис.3 КНОПОЧНЫЙ ДИММЕР
Нажатием на кнопку (P) достигается следующий порядок включения/выключения: 1 - 100% интенсивности
света; 2 - 70% интенсивности света; 3 - 30% интенсивности света; 4 - 3% интенсивности света; 5 - Выключение.
J
16 17

CN
SA
KC
Fig. 3
100%
70%
30%
3%
0%
P
18 19

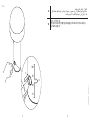
Fig. 4
3s
100%
70%
30%
3%
0%
IT
Fig.4 FUNZIONE “NIGHT SHIFT”
Ad apparecchio acceso a qualsiasi livello d’intensità luminosa, una pressione continua del dito sul pulsante di
almeno 3 secondi porta l’intensità luminosa direttamente al 3%.
EN
Pic.4 “NIGHT SHIFT” FUNCTION
With the device off or on at any light intensity level, keeping your finger pressed on the push button for at least 3
seconds brings the light intensity level directly to 3%.
DE
Abb.4 “NIGHT SHIFT”-Funktion
Bei ausgeschaltetem oder eingeschaltetem Gerät bewirkt ein dauerhafter Fingerdruck auf den Knopfs von
mindestens 3 Sekunden - unabhängig von der aktuellen Helligkeit - das direkte Absinken der Helligkeit auf 3%.
FR
Fig.4 FONCTION “VEILLEUSE”
Lorsque l’appareil est éteint ou allumé à n’importe quel niveau d’intensité lumineuse, une pression continue
du doigt sur le bouton poussoir pendant au moins 3 secondes établit directement l’intensité lumineuse à 3%.
ES
Imag.4 FUNCIÓN “NIGHT SHIFT” (MODO NOCHE)
Con el dispositivo apagado o encendido en cualquier nivel de intensidad luminosa, si presiona de forma continuada con el
dedo sobre el interruptor durante al menos 3 segundos, la intensidad luminosa pasa directamente a ser del 3 %.
PT
Fig.4 FUNÇÃO “NIGNT SHIFT”
Com o aparelho desligado ou aceso a qualquer nível de intensidade luminosa, premir continuamente o
botão por pelo menos 3 segundos coloca a intensidade luminosa directamente a 3%.
RUS
Рис.4 ФУНКЦИЯ «НОЧНОЙ РЕЖИМ»
Когда устройство выключено или включено при любом уровне интенсивности
освещения, продолжительное касание пальцем кнопку в течение мин. 3 секунд сразу
переключает интенсивность освещения на 3%.
J
CN
20 21

Fig. 4
3s
100%
70%
30%
3%
0%
34672 MC - 20/09/2022
SA
KC
22 23

flos.com
-
 1
1
-
 2
2
-
 3
3
-
 4
4
-
 5
5
-
 6
6
-
 7
7
-
 8
8
-
 9
9
-
 10
10
-
 11
11
-
 12
12
-
 13
13


en otros idiomas
- français: FLOS Bellhop Table Guide d'installation
- italiano: FLOS Bellhop Table Guida d'installazione
- English: FLOS Bellhop Table Installation guide
- Deutsch: FLOS Bellhop Table Installationsanleitung
- русский: FLOS Bellhop Table Инструкция по установке
- português: FLOS Bellhop Table Guia de instalação
- 日本語: FLOS Bellhop Table インストールガイド
Artículos relacionados
-
 FLOS Bellhop Table Guía de instalación
-
 FLOS Last Order Clear Guía de instalación
-
 FLOS Captain Flint Guía de instalación
-
 FLOS BON JOUR UNPLUGGED Guía de instalación
-
 FLOS To-Tie T1 Guía de instalación
-
 FLOS Coordinates Floor Guía de instalación
-
 FLOS Bellhop Floor Guía de instalación
-
 FLOS Smithfield Suspension Pro Guía de instalación
-
 FLOS Almendra Arch Suspension Long 2 Guía de instalación
-
 FLOS Noctambule Suspension 2 Low Cylinder Bowl Guía de instalación


