GGM Gastro DS430 El manual del propietario
- Categoría
- Lavaplatos
- Tipo
- El manual del propietario

MANUALE ISTRUZIONE PER LAVABICCHIERI E LAVASTOVIGLIE
PROFESSIONALI
INSTRUCTION MANUAL FOR PROFESSIONAL GLASSWASHERS AND
DISHWASHERS
MANUEL D’INSTRUCTIONS POUR LAVE-VERRES ET LAVE-VAISSELLE A
USAGE COLLECTIF
BEDIENUNGSANLEITUNG FÜR PROFESSIONELLE GLÄSER- UND
GESHIRRSPÜLMASCHINE
MANUAL DE INSTRUCCIONES PARA LAVAVASOS Y LAVAVAVAJILLAS
PROFESIONAL
Istruzioni originali - Original instructions – Instructions originales – Originalbetriebsanleitung - Instrucciones originales
MAN « E » EVO3 REV01 01/01/2018
TECHNISCHE BEZEICHNUNG
E

2
Vi ringraziamo per la scelta del prodotto.
Consigliamo di leggere attentamente tutte le istruzioni contenute nel manuale per conoscere le condizioni più
idonee per un corretto utilizzo della lavastoviglie.
ISTRUZIONI TECNICHE:
Sono destinate al personale qualificato che deve eseguire l’installazione, la messa in servizio, il
collaudo, ed eventuali interventi di assistenza.
Il tecnico installatore dovrà sincerarsi che l’ utente abbia preso conoscenza del manuale di istruzioni,
che abbia compreso il corretto funzionamento della macchina, che sappia correttamente caricare i
cestelli di stoviglie e bicchieri.
ISTRUZIONI PER L’UTENTE:
Indicano i consigli d’uso, la descrizione dei comandi e le corrette operazioni di pulizia e manutenzione
della lavastoviglie.
AVVERTENZE
L’UTENTE È RESPONSABILE DEGLI ADEMPIMENTI LEGALI CORRELATI
ALL’INSTALLAZIONE ED ALL'UTILIZZO DEL PRODOTTO. QUALORA IL PRODOTTO NON
VENGA INSTALLATO OD UTILIZZATO IN MODO CORRETTO, OPPURE NON VENGA
OPERATA UNA ADEGUATA MANUTENZIONE, IL COSTRUTTORE NON POTRÀ ESSERE
CONSIDERATO RESPONSABILE DI EVENTUALI ROTTURE, MALFUNZIONAMENTI, DANNI,
LESIONI A COSE E/O PERSONE.
TOGLIERE SEMPRE IL CAVO DI ALIMENTAZIONE DALLA PRESA DI CORRENTE, PRIMA DI
EFFETTUARE QUALSIASI LAVORO DI MANUTENZIONE. QUALORA NON FOSSE POSSIBILE E
SE L’INTERRUTTORE SULLA LINEA DI ALIMENTAZIONE FOSSE NON VISIBILE O COMUNQUE
LONTANO DA CHI ESEGUE LA MANUTENZIONE, APPORRE IL CARTELLO LAVORI IN CORSO
SULL’INTERRUTTORE ESTERNO DI RETE DOPO AVERLO POSIZIONATO IN OFF.
1 – AVVERTENZE PER LA SICUREZZA E L’ USO
2 – CARATTERISTICHE TECNICHE
3 – POSIZIONAMENTO
4 – ISTRUZIONI PER L’ INSTALLATORE
5 – PRIMA MESSA IN FUNZIONE
6 – ISTRUZIONI DI UTILIZZO
7 – MANUTENZIONE E PULIZIA
8 – ERRORI VISUALIZZATI A DISPLAY/PROBLEMI

3
VOLT
TEMPERATURa MIN. 45°C – MAX 55°C
PRESSIONE MIN. 2 – MAX 4 kPa/Bar
DUREZZA MIN. 7° - MAX 12°F / MIN. 5° - MAX 7°dH
SE TRIFASE
NON INVERTIRE FASE CON NEUTRO (BLU)
TUBO TRASPARENTE DEL BRILLANTANTE
TUBO ROSSO (NON DI SERIE) DEL DETERGENTE
SE LA POMPA DI LAVAGGIO È TRIFASE, VERIFICARE LA ROTAZIONE DEL MOTORE
SE LA DUREZZA DELL’ACQUA È SUPERIORE A 12°F / 7° DH, INSTALLARE UN ADDOLCITORE ESTERNO
H SCARICO: MAX 10 CM – CAPOT MAX 20 CM
LAVASTOVIGLIE SENZA ADDOLCITORE
IL MANCATO RISPETTO DELLE INDICAZIONI PUÒ COMPROMETTERE LA SICUREZZA DEL DISPOSITIVO E LA SUA
GARANZIA.
VERIFICARE
LAVASTOVIGLIE CON ADDOLCITORE
TEMPERATURA MAX 30°C
PRESSIONE MIN. 3 – MAX 4 kPa/Bar
DUREZZA MIN. 7° - MAX 26°F / MIN. 5° - MAX 15°dH
USARE SALE DI RIGENERAZIONE E PERIODICAMENTE RIEMPIRE IL CONTENITORE NELLA VASCA

4
1 – AVVERTENZE PER LA SICUREZZA E L’ USO
LA LAVASTOVIGLIE E’ DESTINATA ESCLUSIVAMENTE AD USO PROFESSIONALE E DEVE ESSERE UTILIZZATA
DA PERSONALE ABILITATO. E’ PREDISPOSTA PER IL LAVAGGIO DI STOVIGLIE (PIATTINI, TAZZE, CIOTOLE,
BICCHIERI, POSATE) E SIMILI NEI SETTORI GASTRONOMICI E NEL RAMO DELLA RISTORAZIONE COLLETTIVA,
ED E’ CONFORME ALLE NORME INTERNAZIONALI DI SICUREZZA ELETTRICA E MECCANICA (CEI-EN-IEC 60335-
2-58/61770) E DI COMPATIBILITA’ ELETTROMAGNETICA
IL COSTRUTTORE DECLINA OGNI RESPONSABILITA’ PER DANNI A PERSONE O COSE CAUSATI
DALL’INOSSERVANZA DELLE ISTRUZIONI PRESENTI NEL MANUALE, DALL’USO NON CORRETTO, DALLA
MANOMISSIONE ANCHE DI UNA SINGOLA PARTE DELL’APPARECCHIO E DALL’UTILIZZO DI RICAMBI NON
ORIGINALI. NEL CASO IN CUI IL CAVO DI ALIMENTAZIONE DOVESSE ESSERE DANNEGGIATO DOVRA’ ESSERE
SOSTITUITO ESCLUSIVAMENTE DAL FABBRICANTE O DA UN CENTRO DI ASSISTENZA AUTORIZZATO E DA
TECNICI QUALIFICATI.
QUESTO APPARECCHIO E’ CONTRASSEGNATO IN CONFORMITA’ ALLA DIRETTIVA EUROPEA 2002/96/EC,
WASTE ELECTRICAL AND ELECTRONIC EQUIPMENT (WEE).
ASSICURANDOSI CHE QUESTO PRODOTTO SIA SMALTITO IN MODO CORRETTO L’UTENTE CONTRIBUISCE A
PREVENIRE LE POTENZIALI CONSEGUENZE NEGATIVE PER L’AMBIENTE E LA SALUTE. SI DICHIARA CHE L'
EMISSIONE DELLA PRESSIONE DI RUMORE LPA È 62 DB/A VARIABILE ENTRO KPA + 1 DB. IL LIVELLO DI
POTENZA ACUSTICA LWA È 48 VARIABILE ENTRO KWA + 1 DB. IL SIMBOLO SUL PRODOTTO O SULLA
DOCUMENTAZIONE DI ACCOMPAGNAMENTO INDICA CHE QUESTO PRODOTTO NON DEVE ESSERE TRATTATO
COME RIFIUTO DOMESTICO MA DEVE ESSERE CONSEGNATO PRESSO L’IDONEO PUNTO DI RACCOLTA PER IL
RICICLAGGIO DI APPARECCHIATURE ELETTRICHE ED ELETTRONICHE.
DISMETTERE L’APPARECCHIO SEGUENDO LE NORMATIVE LOCALI PER LO SMALTIMENTO DEI RIFIUTI.
PER ULTERIORI INFORMAZIONI SUL TRATTAMENTO, RECUPERO E RICICLAGGIO DI QUESTO PRODOTTO,
CONTATTARE IL COMPETENTE UFFICIO LOCALE, IL SERVIZIO DI RACCOLTA DEI RIFIUTI DOMESTICI O IL
NEGOZIO PRESSO IL QUALE IL PRODOTTO E’ STATO ACQUISTATO.
QUESTO MANUALE COSTITUISCE PARTE INTEGRANTE DELLA LAVASTOVIGLIE; OCCORRE
CONSERVARLO SEMPRE INTEGRO UNITAMENTE ALL’APPARECCHIO.
IL POSIZIONAMENTO, GLI ALLACCIAMENTI, LA MESSA IN FUNZIONE E L’ELIMINAZIONE DI
INCONVENIENTI, E LA SOSTITUZIONE DEL CAVO DI ALIMENTAZIONE DEVONO ESSERE ESEGUITI
DA PERSONALE QUALIFICATO.
E’ OBBLIGATORIO IL COLLEGAMENTO DI TERRA SECONDO LE MODALITA’ PREVISTE DALLE
NORME DI SICUREZZA DELL’IMPIANTO ELETTRICO. IN CASO DI DANNI AL CAVO DI ALIMENTAZIONE
DEVE ESSERE SOSTITUITO ESCLUSIVAMENTE DAL PRODUTTORE, DA UN CENTRO DI ASSISTENZA
AUTORIZZATO O DA TECNICI QUALIFICATI PER EVITARE ULTERIORI DANNI.
NON INTRODURRE SOLVENTI COME ALCOL O TREMENTINA CHE POTREBBERO PROVOCARE
UN’ESPLOSIONE. NON INTRODURRE STOVIGLIE SPORCHE DI CENERE, CERA, VERNICI.
NON UTILIZZARE MAI LA LAVASTOVIGLIE O SUE PARTI COME SCALA, SUPPORTO O SOSTEGNO
PER PERSONE, COSE O ANIMALI.
APPOGGIARSI O SEDERSI SULLA PORTA APERTA DELLA LAVASTOVIGLIE POTREBBE CAUSARNE IL
RIBALTAMENTO, CON CONSEGUENTE PERICOLO PER LE PERSONE.
NON LASCIARE LA PORTA DELLA LAVASTOVIGLIE APERTA IN QUANTO VI SI POTREBBE
INCIAMPARE.
NON BERE L’ACQUA RESIDUA EVENTUALMENTE PRESENTE NELLE STOVIGLIE O NELLA
LAVASTOVIGLIE AL TERMINE DEL PROGRAMMA DI LAVAGGIO.
L’APPARECCHIO NON E’ ADATTO PER L’USO DA PARTE DI MINORI E PERSONE CON RIDOTTE
CAPACITA’ FISICHE, SENSORIALI O MENTALI, MANCANTI DI ESPERIENZA E CONOSCENZA.
L’UTILIZZO DELL’APPARECCHIO E’ CONSENTITO A QUESTE PERSONE SOLO SOTTO LA
SUPERVISIONE DI UNA PERSONA RESPONSABILE DELLA LORO SICUREZZA.
Verificare per la pulizia quotidiana che all'interno della lavastoviglie non rimangano corpi estranei metallici
che possono creare ruggine all' interno della macchina. Le tracce di ruggine possono provenire da stoviglie
non inossidabili, da detersivi non idonei, da cestelli in filo di ferro danneggiati, pagliette abrasive o metalliche,
sale da rigenerazione sul fondo vasca.

5
2 – CARATTERISTICHE TECNICHE
Temperatura acqua alimentazione
°C
55
Temperatura acqua alimentazione (versioni con addolcitore)
°C
Max 30
Durezza acqua alimentazione
°f
7 – 12
Pressione acqua alimentazione
kPa
200/400
Pressione acqua alimentazione (versioni con addolcitore)
kPa
300/400
Consumo acqua per ciclo a 200 kPa
l
2,4/2,6
Temperatura acqua lavaggio
°C
50 - 60
Temperatura acqua risciacquo
°C
82 - 85
Peso netto
kg
Min.27
Max 131
Temperatura ambientale massima
°C
40
Tipo di cavo di alimentazione
◄HAR►
H07RN-F
Fare riferimento alla targa dati posta sulla copertina del presente manuale o sul pannello laterale
destro della lavastoviglie per le caratteristiche elettriche e di potenza.
3 – POSIZIONAMENTO
Portare la lavastoviglie sul luogo di installazione, rimuovere l’imballo, verificare l’integrità dell’apparecchio e dei
componenti, in caso di danni questi devono essere notificati per iscritto al trasportatore. Gli elementi di imballaggio
(sacchetti di plastica, polistirolo espanso, chiodi, ecc.) non devono essere lasciati alla portata di bambini ed animali
domestici, in quanto potenziali fonti di pericolo.
Tutti i materiali utilizzati per l’imballo sono compatibili con l’ambiente. Essi possono essere conservati senza pericolo, o
essere smaltiti presso un apposito centro di smaltimento rifiuti.
I componenti in materiale plastico soggetti ad eventuale smaltimento con riciclaggio sono contrassegnati nei seguenti
modi:
PE polietilene: pellicola esterna imballo, sacchetto istruzioni, sacchetti di protezione.
PP polipropilene: reggette.
PS polistirolo espanso: angolari di protezione, coperchio imballo.
I componenti in legno e cartone possono essere smaltiti rispettando le norme vigenti.
Alla dismissione del prodotto evitare di disperderlo nell’ambiente; lo smantellamento deve avvenire nel rispetto delle norme
vigenti. Tutte le parti metalliche sono in acciaio inossidabile e smontabili. Le parti in plastica sono contrassegnate con il
simbolo del relativo materiale.
POSIZIONAMENTO:
Attenzione: l’impianto interno ed i locali in cui vengono installate apparecchiature per comunità, devono
rispondere alle normative vigenti.
Il costruttore declina ogni responsabilità per danni diretti o indiretti a persone o cose derivanti dal mancato rispetto di
dette normative. Prima dell’installazione verificare che nelle adiacenze non vi siano o siano adeguatamente protetti,
oggetti e materiali che potrebbero essere danneggiati dal vapore acqueo o da schizzi di soluzione di lavaggio.
Posizionare la lavastoviglie nel punto desiderato e togliere la pellicola protettiva. Livellare la lavastoviglie (aiutandosi con
una livella) sui quattro piedini regolati in modo da garantirne la stabilità; ogni altra soluzione deve essere approvata dal
costruttore. Al fine di garantire la stabilità della lavastoviglie a capot una volta posizionata e livellata a terra provvedere
a fissare a pavimento i 4 piedini.

6
4 – ISTRUZIONI PER L’ INSTALLATORE
Allacciamento idraulico
I tubi idraulici ed il cavo di alimentazione elettrica fuoriescono dalla zona posteriore. Allacciare il tubo di alimentazione idrica ad
una presa con bocca filettata ¾” gas.
Per il collegamento alla rete idrica utilizzare solamente tubi nuovi; tubi vecchi o usati non devono essere utilizzati.
La pressione dinamica di alimentazione dovrà essere compresa tra 200 e 400 kPa, se superiore è necessario installare un
riduttore di pressione. (versioni con addolcitore incorporato tra 300 e 400 kPa).
Se inferiore si dovrà prevedere una pompa di aumento pressione.
E’ indispensabile installare un rubinetto generale sulla tubazione di arrivo acqua di alimentazione; il rubinetto dovrà essere
accessibile ad installazione terminata, non installare il rubinetto dietro la lavastoviglie.
La durata cicli dichiarata è riferita ad alimentazione con acqua calda 50°C.
In caso di alimentazione ad acqua fredda la durata potrebbe aumentare in relazione alla temperatura dell’acqua in ingresso.
Per le versioni con osmosi integrata prevedere l’ installazione del filtro a carboni o rete in dotazione sul rubinetto di
alimentazione idrica. La durezza dell’ acqua deve essere compresa tra 7 e 12°f e la temperature max. 30°C.
I filtri dovranno essere sostituiti minimo 2 volte l’ anno.
La non osservanza di questi parametri porterà al deterioramento precoce della membrana interna dell’ osmosi.
Accertarsi che la durezza dell’ acqua sia compresa tra 7 e 12°f, oltre questi parametri si dovrà prevecedere all’
installazione di un addolcitore per prevenire danni causati dal calcare che non saranno coperti dalla garanzia.
Scarico:
Ogni lavastoviglie è già dotata di tubo per il collegamento allo scarico; questo sarà da prevedersi a pavimento, con piletta a
sifoide. Nel caso di scarico a muro è necessaria la pompa di scarico.
Attenzione: accertarsi che i tubi di alimentazione e scarico non siano piegati, strozzati o schiacciati dopo
l’installazione.
Allacciamento elettrico
Il collegamento elettrico della lavastoviglie ed eventuali apparecchi supplementari va affidato a personale autorizzato e
qualificato, nel rispetto delle norme vigenti; osservare inoltre le disposizioni tecniche di allacciamento.
La potenza totale installata è riportata sulla targhetta dati tecnici dell’apparecchio.
Insieme alla lavastoviglie non devono essere protetti altri apparecchi.
L’esercente dovrà far provvedere all’installazione, secondo le norme vigenti, di un interruttore generale sulla linea di
alimentazione elettrica e di un interruttore differenziale compatibile con le caratteristiche della macchina.
L’ installazione dell’ interruttore generale sulla linea di alimentazione elettrica e dell’ interruttore differenziale deve essere
eseguito da un tecnico qualificato e specializzato.
Tali interruttori devono essere installati vicino alla lavastoviglie, essere facilmente accessibili dopo l’installazione e garantire la
disconnessione completa della rete elettrica nelle condizioni della categoria di sovratensione III.
Attenzione: Assicurarsi che non vengano invertite la fase con il neutro, sia sulla presa pentapolare del cavo di
alimentazione (non in dotazione) sia sulla presa a muro.
Se la pompa di lavaggio è trifase verificare che il suo senso di rotazione sia quello indicato dalla freccia posta sul
motore. In caso contrario invertire le fasi L1 con L2, oppure L2 con L3 o L3 con L1.
Attenzione!
La lavastoviglie è priva di tensione solamente quando l’interruttore generale è disinserito.
- Collegare l’apparecchio al sistema equipotenziale utenza. Il morsetto per il collegamento è posto nella zona
posteriore inferiore della macchina.
- Il conduttore di protezione (PE) è di colore giallo-verde, il conduttore neutro (N) di colore blu e i conduttori di fase
(L1, L2, L3) di colore nero, grigio e marrone.
LAVASTOVIGLIE CON ADDOLCITORE
REGOLAZIONI
A = durezza acqua in entrata in °F
B = ogni quanti cicli di lavaggio circa deve
attivarsi il ciclo di rigenerazione automatico
A
14 °f
22 °f
32 °f
37 °f
42 °f
52 °f
B
120
80
50
40
30
25

7
SOSTITUZIONE FILTRO CARTUCCIA (modelli con osmosi integrata)
Indica il raggiungimento del limite “vita” del filtro a carboni o rete installato a monte della lavastoviglie.
- Spegnere e togliere tensione alla lavastoviglie
- Chiudere il rubinetto dell’entrata acqua
- Con la chiave in dotazione svitare la ghiera
- Togliere il filtro a carboni o rete e togliere l’acqua dal porta filtro
- Inserire il filtro nuovo
- Ricollocare il porta filtro e serrare la ghiera con la chiave in dotazione
- Riaprire l’acqua, verificare l’assenza di perdite
- Rimettere in tensione e accendere la lavastoviglie
- Entrare nel menù e resettare il conteggio filtro
5 – PRIMA MESSA IN FUNZIONE
Il Sistema di protezione elettrico deve essere sittoposto a test funzionale, prima di mettere in funzione la macchina.
Deve essere installata e/o controllata da un rivenditore autorizzato che la mettera in funzione per la prima volta e fornirà
informazioni su come funziona la lavastoviglie.
PREPARAZIONE ALL’USO
Il dosatore brillantante è sempre installato, ma il dosatore detergente è presente solo su alcuni modelli.
Se entrambi I dosatori sono installati, sistemare i dosatori esterni e inserire I rispettivi tubi di aspirazione (posti sul retro della
macchina)
Tubo rosso: detergente / Tubo trasparente: brillantante
Prima di inserire i tubi nei rispettivi contenitori, sistemare il peso alla fine del tubo in modo da permettere di restare sul fondo del
contenitore così come il filtro, come mostrato nella fidura 2. Per la regolazione, girare le viti, come mostrato in figura 1-3.
Raccomandiamo di far effetuare la regolazione da personale dei fornitori di detergente.
Se il dosatore di detersivo non è pre-montato, può essere installato successivamente, ordinando il relatvo kit (contattare il
servizio tecnico).
Lavastoviglie senza dosatore detergente: mettere il detergente direttamente nella vasca ogni 4-5 cicli circa. Per il tipo e
quantitative da usare, seguire le istruzioni fornite dal fornitre di detergente.
Modello EVO3, dosatori regolabili dal pannello comandi.
Per accedere al menu:
Premere per 2 secondi.
Selezionare la funzione desiderata, premendo i tasti e .
Il pulsante permette di entrare e uscire da vari menu.
per tornare indietro e uscire dalla programmazione.
DC 10,0 ML 13 “ (regolazione detergente durante il riempimento della vasca)
DL 6,1 ML 8” (regolazione detergente durante il lavaggio)
D TEST 0 (test dell’attivazione del dosatore detergente)
BC 4,2 ML 20 “ (regolazione detergente durante il riempimento della vasca)
BR 2,9 ML 14” (regolazione detergente durante il risciacquo)
B TEST 0 (test dell’attivazione del dosatore brillantante)
Utilizzare solamente prodotti detergent e brillantanti per lavastoviglie professionali. Non usare detergent normali per lavare piatti
a mano. Si consiglia vivamente di utilizzare esclusivamente prodotti specifici per queste lavastoviglie.
Assicurarsi di non confondere il contenitore del detergente con quello del brillantante, quando si vanno a riempire,
poichè il prodotto sbagliato nel contenitore sbagliato può causare malfunzionamenti e danneggiare la lavastoviglie.
Non unire diversi detergenti, poichè può danneggiare i dosatori. I detergent per lavastoviglie industriali possono causare
gravi irritazioni. Seguire attentamente le istruzioni fornite sulla confezione.

8
6 – ISTRUZIONI DI UTILIZZO
Aprire il
rubinetto di
rete dell’acqua
(utenza).
Check:
Inserire l’interruttore
generale (utenza)
Il livello di
detergente e
brillantante nei
contenitori.
Il corretto posizionamento dei filtri, la rotazione degli
irroratori, l’assenza di corpi estranei nella lavastoviglie.
MACCHINA SPENTA: SCHERMATA SU OFF
Quando la macchina è spenta, si legge OFF sullo schermo. Solo il pulsante ON/OFF è
acceso.
Dallo stato OFF si può accendere la macchina, premendo il tasto ON/OFF per due secondi.
Si può accedere al menu operatore e tecnico (dopo l’inserimento di una password), tenendo
premuto il pulsante per tre secondi.
ACCENSIONE DELLA MACCHINA.
Dopo aver inserito i filtri e il troppo pieno (se presente) premere il pulsante per 2
secondi.
La lavastoviglie si accende e si visualizza la schermata di funzionamento normale. The
dishwasher will switch on and follow the normal operation screen.
Se la vasca o il boiler sono vuoti, la macchina inizia a caricare e mostra le icone
corrispondenti. Il caricamento continuerà fino al raggiungimento dei livelli corretti. Durante
questa fase si può scegliere un ciclo di lavaggio usando i pulsanti e .
FASE DI RISCALDAMENTO
Una volta effettuato il riempimento inizia il riscaldamento dell’acqua di risciacquo e di
lavaggio.
Il pulsante diventerà giallo: significa che sta riscaldando.
Una volta raggiunte le temperature impostate le icone saranno di colore verde.
Visualizzazione macchina pronta per avviare un ciclo di lavaggio.
CARICO DELLE STOVIGLIE
Asportare dai piatti i residui solidi (ossa, bucce, noccioli, ecc.); lasciare preventivamente in
ammollo in acqua fredda piatti con residui secchi di formaggio, uovo, ecc.
Posizionare i bicchieri rivolti verso il basso.
Per le posate, utilizzare l’apposito cestino. Disporre le posate alla rinfusa preferibilmente con il
manico rivolto verso il basso, facendo attenzione a non ferirsi con i rebbi delle forchette e le
lame dei coltelli.
SCELTA E AVVIO DI UN PROGRAMMA DI LAVAGGIO
Selezionare il programma di lavaggio, usando I tasti e .
I programmi di lavaggio sono:
P1: durata 80" – temperatura di lavaggio 55° - temperatura risciacquo 70°
P2: durata 120” – temperatura di lavaggio 55° - temperatura risciacquo 75°
P3: durata 180” – temperatura di lavaggio 55° - temperatura risciacquo 85°
P4: durata 480” – temperatura di lavaggio 60° - temperatura risciacquo 85°
OPTIONAL: programma dedicato bicchieri birra (risciacquo a freddo) durata 130” -
temperatura risciacquo a freddo stabilita dall’impianto di rete.
Una volta selezionato il programma desiderato la pressione del tasto o la chiusura della
cappotta avvierà il ciclo di lavaggio.

9
Il tasto sarà di colore blu e il display mostrerà un countdown che indicherà la fine del
ciclo di lavaggio completo. Schermata ciclo lavaggio in corso.
Se viene aperto lo sportello/cappotta durante il ciclo di lavaggio, la fase si interrompe per poi
riprendere alla chiusura dello stesso, se avverrà entro 20 secondi. Se viene superato questo
periodo il ciclo si resetta. Il programma P4 si può portare subito a conclusione con la fase di
risciacquo, premendo nuovamente il tasto (colore blu) durante la fase di lavaggio.
PROLUNGAMENTO FASE LAVAGGIO: TERMOSTOP
(ATTIVABILE DA MENU’ TECNICO)
Se viene esaurito il tempo di lavaggio e il risciacquo non ha ancora raggiunto la temperatura
impostata, la fase di lavaggio viene prolungata fino al raggiungimento del valore del
risciacquo impostato.
Visualizzazione thermostop attivo: TS
SCARICO DI FINE GIORNATA (versioni con troppo pieno)
Per spegnere la macchina a fine servizio agire sul tasto .
Aprire la porta e rimuovere il troppo pieno. Si può attivare la funzione AUTOCLEAN,
premendo il tasto (blu) entro 20 secondi.
Se la vasca non è vuota, la funzione AUTOCLEAN non parte.
Per I modelli N1300 doppia, inserire almeno un cestello vuoto per attivare il contatto
Dopo 20” inizia lo svuotamento della vasca e continua fino al completamento mostrando OFF
sul display, tranne per i modelli con ciclo di rigenerazion (vedi sezione relativa).
Se l’acqua non viene comletamente scaricata, verrà visualizzato il messaggio VASCA PIENA
per 30”.
SCARICO DI FINE GIORNATA CON SCARICO AUTOMATICO
Per spegnere la macchina a fine servizio agire sul tasto .
E’ possibile attivare la funzione AUTOCLEAN premendo il pulsante (colore azzurro)
entro 20 secondi.
Se la vasca non è vuota, il ciclo di autopulizia non partirà.
Solo per I modelli N1300 DOPPIA, inserire un cestello vuoto per ttivare il contatto.
Dopo 20” lo scarico della vasca inizia e continuerà fino al suo completamento, mostrando
OFF sullo schermo. Fanno eccezione I modelli con ciclo di rigenerazione (vedi relativa
sezione).
Se dopo lo scarico l’acqua non è stata completamente scaricata, iI messaggio VASCA PIENE
verrà mostrato sullo schermo per 30”.
A scarico concluso la macchina resterà in stand by, modalità OFF.
Dopo aver disinserito l’interruttore a muro e chiuso il rubinetto d’intercettazione acqua, togliere
i filtri, lavare l'interno della vasca ed i filtri con prodotti idonei, ricollocare i filtri ed il troppo
pieno in vasca.
SEGNALATORE SALE ESAURITO (VERSIONI CON ADDOLCITORE):
Il sale per lavastoviglie è fondamentale per il ciclo rigenerativo dell’ addolcitore installato nella
macchina. Il display mostra la carenza del sale all’ interno del contenitore posto nella vasca,
per il riempimento utilizzate l’imbuto in dotazione, pulire la vasca da eventuali residui di sale.
NB: RIMUOVERE IMMEDIATAMENTE L’ EVENTUALE SALE CADUTO IN VASCA, l’
inosservanza potrebbe causare danni alla superficie della vasca, quali macchie di ruggine o
simili.
- SCARICO VASCA
180” OFF
- VASCA PIENA -
- - OFF
- SCARICO VASCA
180” OFF
- VASCA PIENA -
- - OFF
-MANCANZA SALE-

10
Attenzione: usare solamente sale specifico, non utilizzare sale alimentare.
Il serbatoio del sale ha una capacità di circa 1 kg di sale in grani.
Il serbatoio è situato sul fondo della vasca. Dopo avere estratto il cestello svitare il tappo versare il sale utilizzando possibilmente l’
imbuto in dotazione. Prima di avvitare nuovamente il tappo rimuovere gli eventuali residui di sale in prossimità dell’apertura. Eseguire
il rifornimento sale quando non è presente acqua in vasca per evitare che acqua di lavaggio entri nel dispositivo addolcitore acqua;
estrarre sempre la spina di alimentazione dalla presa di rete prima di eseguire l’operazione. Ricordarsi di rimettere la spina di
alimentazione nella presa dopo aver effettuato l’operazione.
Al primo utilizzo dopo aver messo il sale aggiungere dell’ acqua nel contenitore sale.
AUTOMATIC REGENERATION CYCLE
Il ciclo di rigenera è automatico. la lavastoviglie è dotata di un contatore di lavaggi, dove,
raggiunto il numero di cicli impostati, al primo spegnimento e svuotamento vasca inizierà la
rigenerazione, mostrando #.
Quando la macchina è in normale funzionamento e viene raggiunto il numero cicli come
impostato sarà visualizzata l’icona # lampeggiante sul lato destro. Questo indica che la
macchina entrerà in ringenera al primo spegnimento.
Solo per I modelli N1300 DOPPIA, inserire un cestello vuoto per ttivare il contatto.
A rigenerazione conclusa la macchina resterà in OFF.
FUNZIONE ECONOMY
Quando la lavastoviglie non viene utilizzata per 30 minuti (tempo programmabile nel menù
tecnico) entra in stato economy, mantenendo le temperature più basse.
Per uscire da questa funzione premere un tasto o aprire lo sportello.
7 – MANUTENZIONE E PULIZIA
Nonostante non sia richiesta una particolare manutenzione programmata consigliamo di fare controllare la lavastoviglie da un
tecnico specializzato due volte l’anno.
N.B: danneggiamenti intenzionali o derivanti da incuria, negligenza, dal mancato rispetto delle prescrizioni, istruzioni e norme o
da collegamenti errati, non sono da ritenersi responsabilità del costruttore.
La lavastoviglie risponde al grado di protezione IPX1, ed è vietato utilizzare getti d’acqua diretti per la pulizia.
PULIZIA DEI FILTRI DURANTE LA GIORNATA
E’ consigliato, in caso di utilizzo particolarmente gravoso, effettuare ogni 30-40 cicli la pulizia del filtro, mantenendo la macchina
in condizioni operative; per fare questo eseguire lo “scarico vasca”.
Rimuovere il filtro (1) (è sufficiente sollevarlo dalla sua sede come indicato in figura), facendo attenzione che residui grossolani
non cadano in vasca, pulirlo dai residui e risciacquarlo abbondantemente.
Pulire anche il filtro interno (2) liberandolo da eventuali residui.
Reinserire correttamente il filtro (1) nella sua sede. Non intervenire con oggetti appuntiti o taglienti.
Pulire eventuali incrostazioni di calcare per evitare accumuli. Pulire accuratamente e frequentemente le superfici con uno
straccio umido; utilizzare detergenti neutri, non abrasivi, non contenenti sostanze a base di cloro, prodotti che corrodono e
danneggiano l’acciaio inox.
Non utilizzare i prodotti sopra elencati nemmeno per pulire il pavimento sotto la lavastoviglie o nelle vicinanze, per evitare che
vapori o gocce possano produrre danni alle superfici in acciaio.
Per la pulizia della vasca e delle pareti, è consigliabile utilizzare un panno umido o di pelle scamosciata, con acqua saponata e
un detergente blando, mai utilizzare mai pagliette abrasive o spugne ferrose.
RIGENENRAZIONE
IN CORSO 18:00
OFF

11
Controlli periodici
Smontare gli irroratori (inferiore e superiore 2-3), svitando la vite centrale (1). Pulire i fori e gli ugelli sotto un getto d’acqua
corrente pulita, non intervenire con attrezzi che potrebbero provocare danni. Rimontare gli irroratori con cura.
Pulire esternamente la macchina con un panno umido e sapone neutro risciacquando ed asciugando attentamente.
Sosta prolungata
Se si prevede di non utilizzare la lavastoviglie per un periodo di tempo piuttosto lungo, è necessario eseguire lo svuotamento
del dispositivo erogazione di detergente e brillantante per evitare cristallizzazioni e danni alle pompe: togliere i tubi di
pescaggio dai contenitori del detergente e brillantante ed immergerli in un contenitore contenente di acqua pulita, eseguire
alcuni cicli di lavaggio, eseguire scarico completo.
Infine disinserire l’interruttore generale, chiudere il rubinetto d’entrata acqua, I tubi di pescaggio detergente e brillantante
andranno nuovamente inseriti nei contenitori al momento della messa in funzione, facendo attenzione a non invertirli (tubo
rosso = detergente; tubo trasparente = brillantante).
Non lasciare l' apparecchio inattivo acceso ed inutilizzato per periodi di tempo più o meno lunghi senza controllo diretto dell’
operatore.
8 – ERRORI VISUALIZZATI A DISPLAY/PROBLEMI
Prodotti da non utilizzare mai per la pulizia della vasca e delle superfici in acciaio:
- Prodotti contenenti cloruri o acido cloridrico
- Candeggina
- Prodotti per la pulizia dell’ argento
- Pagliette abrasive o metalliche
NB: l’ utilizzo improprio dei sopracitati prodotti sono causa di formazione di macchie di ruggine sulla superficie.
Riempimento boiler/vasca non eseguito nel tempo impostato.
Il pulsante sarà rosso.
Anomalia p rottura della sonda temperatura del boiler/vasca.
Il pulsante sarà rosso.
Livello acqua della vasca troppo alto.
Con questa visualizzazione l’elettrovalvola di carico ed il risciacquo non saranno più eseguiti.
SOLUZIONI:
- Verificare l’assenza di ostruzioni nel tubo di scarico.
- Verificare la funzionalità della pompa di scarico.
- Spegnere e scaricare la vasca. Riaccendere.
- Se dopo aver spento e riacceso la macchina se il problema persiste contattare l' assistenza tecnica comunicando il tipo di errore
a display.
LIVELLO ACQUA ALTO – VERIFICARE POMPA SCARICO
C: 23 °C R: 34 °C P1 :60”

12
PROBLEMA
POSSIBILE CAUSA
POSSIBILE SOLUZIONE
NON SI ACCENDE LA SPIA DI RETE
Manca tensione di rete
Verificare connessione alla rete elettrica.
IL CICLO DI LAVAGGIO NON SI AVVIA
Il riempimento della lavastoviglie
non è ancora terminato.
Attendere l’accensione del led triangolare
RISULTATI DI LAVAGGIO SCADENTI
Fori di lavaggio degli irroratori
intasati o incrostati
Smontare e pulire irroratori
Detergente o brillantante
insufficiente o non adeguato
Verificare tipo e quantità di detergente.
Piatti /bicchieri mal posizionati
Disporre adeguatamente piatti/bicchieri.
Bassa temperatura di lavaggio
Verificare temperatura visualizzata sul display,
se inferiore ai 50° chiamare Assistenza.
Ciclo impostato inadeguato
Aumentare durata ciclo di lavaggio, in
particolare se molto sporco o parzialmente
essiccato.
RISCIACQUO INSUFFICIENTE
Ugelli irroratori intasati
Boiler incrostato di calcare
Verificare pulizia ugelli e se l’addolcitore
eventualmente montato funziona
correttamente.
BICCHIERI E POSATE MACCHIATI
Brillantante inadeguato o non
erogato correttamente.
Durezza acqua superiore a 12°dF
o molti sali disciolti
Verificare contenitore brillantante e se
adeguato al tipo di acqua di rete. Se il
problema permane contattare assistenza.
PRESENZA DI ACQUA IN VASCA DOPO
LO SCARICO
Tubo di scarico mal posizionato o
parzialmente ostruito
Verificare che il tubo e lo scarico della
lavastoviglie non siano ostruiti e che lo scarico
non sia posizionato troppo in alto; vedi schema
di collegamento.

13
We thank you for purchasing our dishwasher.
We recommend you read all the instructions given in this manual very carefully to understand the best and
correct way to use the dishwasher.
TECHNICAL INSTRUCTIONS:
These instructions are for qualified technicians who install, commission, test and possibly
carry out maintenance on the dishwasher.
The installation technician shall make sure the user has understood the contents of the
instruction manual, has understood how the machine works properly and knows how to load
the baskets with crockery and glasses correctly.
USER INSTRUCTIONS:
They give operational advice, descriptions of the controls and how to clean and service the
dishwasher correctly.
WARNINGS:
THE USER IS RESPONSIBLE FOR THE LEGAL FULFILMENTS CORRELATED TO THE
INSTALLATION AND USE OF THE PRODUCT. IF THE PRODUCT IS NOT INSTALLED OR USED
CORRECTLY OR SUITABLE MAINTENANCE IS NOT CARRIED OUT, THE MANUFACTURER
CANNOT BE HELD LIABLE FOR ANY BREAKAGES, MALFUNCTIONS, DAMAGES TO
PROPERTY OR INJURIES TO PEOPLE THAT COULD OCCUR.
ALWAYS UNPLUG THE DISHWASHER FROM THE MAINS SOCKET BEFORE STARTING ANY
MAINTENANCE WORK. IF THIS IS NOT POSSIBLE AND IF THE MAINS SWITCH IS HIDDEN
BEHIND THE MACHINE OR FAR AWAY FROM WHOEVER CARRIES OUT THE WORK, YOU
MUST PUT UP A SIGN ON THE EXTERNAL MAINS SWITCH AFTER TURNING IT OFF TO WARN
OTHERS THAT MAINTENANCE WORK IS IN PROGRESS.
1 – SAFETY AND OPERATIONAL WARNINGS
2 – TECHNICAL SPECIFICATIONS
3 – POSITIONING
4 – INSTRUCTIONS FOR INSTALLERS
5 – FIRST TIME START-UP
6 – OPERATIONAL INSTRUCTIONS
7 – MAINTENANCE AND CLEANING
8 – ERRORS DISPLAYED/PROBLEMS

14
VOLT
TEMPERATURE MIN. 45°C – MAX 55°C
PRESSURE MIN. 2 – MAX 4 kPa/Bar
HARDNESS MIN. 7° - MAX 12°F / MIN. 5° - MAX 7°dH
IF THREE-PHASES
DO NOT REVERSE THE PHASE WITH THE NEUTRE (BLUE)
RINSE AID TRANSPARENT PIPE
DETERGENT (NOT STANDARD-OPTION) RED PIPE
IF WASH PUMP IS THREEPHASE VERIFY THE MOTOR ROTATION
IF WATER HARDNESS IS HIGHER THAN 12°F / 7° dH INSTALL AN EXTERNAL WATER SOFTENER
H DRAIN: MAX 10 CM – HOOD MAX 20 CM
DISHWASHER WITHOUT WATERSOFTENER
FAILURE TO COMPLY WITH THE INDICATIONS MAY COMPROMISE THE SAFETY OF THE DEVICE AND ITS
WARRANTY.
VERIFY
DISHWASHER WITH WATERSOFTENER
TEMPERATURE MAX 30°C
PRESSURE MIN. 3 – MAX 4 kPa/Bar
HARDNESS MIN. 7° - MAX 26°F / MIN. 5° - MAX 15°dH
USE REGENERATING SALT AND PERIODICALLY FILL THE CONTAINER IN THE WASHTANK

15
1 – SAFETY AND OPERATIONAL WARNINGS
THE DISHWASHER IS INTENDED EXCLUSIVELY FOR PROFESSIONAL USE AND MUST BE USED BY AUTHORIZED
PERSONNEL. IT IS DESIGNED TO WASH DISHES (PLATES, CUPS, BOWLS, TRAYS, SILVERWARE) AND SIMILAR
ITEMS USED IN GASTRONOMIC SECTORS AS WELL AS IN THE PUBLIC CATERING BRANCH AND COMPLYING
WITH THE INTERNATIONAL ELECTRICAL AND MECHANICAL SAFETY (CEI-EN-IEC 60335-2-58/61770) AND
ELECTROMAGNETIC COMPATIBILITY (CEI-IEC-EN 55014-1/-2, 61000-3;4, 50366) RULES.
THE MANUFACTUIRER DECLINES ANY RESPONSIBILITY FOR DAMAGES TO PERSONS OR THINGS CAUSED BY
FAILURE TO OBSERVE THE MANUAL INSTRUCTIONS, INCORRECT USE, TAMPERING - EVEN WITH A SINGLE
PART OF THE MACHINE - AND THE USE OF NON-ORIGINAL SPARE PARTS.
THIS MACHINE IS MARKED PURSUANT TO THE EUROPEAN DIRECTIVE 2002/96/EC - WASTE ELECTRICAL AND
ELECTRONIC EQUIPMENT (WEE).
ENSURING THAT THIS PRODUCT BE DISPOSED OF IN A PROPER MANNER CONTRIBUTES TO THE PREVENTION
OF POTENTIAL NEGATIVE HEALTH AND ENVIRONMENTAL CONSEQUENCES. WE DECLARE THAT THE
EMISSION SOUND PRESSURE LEVEL LPA IS 62 DB/A WITH UNCERTAINTY EQUAL TO KPA + 1 DB. THE SOUND
POWER LEVEL IS LWA 73.79 WITH UNCERTAINTY EQUAL TO KWA + 1 DB. THE SYMBOL ON THE PRODUCT
OR ON ITS DOCUMENTATION, INDICATES THAT THIS PRODUCT MUST NOT BE TREATED AS DOMESTIC WASTE
BUT RATHER TAKEN TO A COLLECTION FACILITY WHICH IS SUITABLE FOR THE RECYCLING OF ELECTRIC AND
ELECTRONIC EQUIPMENT.
DISPOSE OF THIS PRODUCT PURSUANT TO LOCAL RULES REGARDING WASTE DISPOSAL. FOR MORE
INFORMATION REGARDING THE TREATMENT, SALVAGE AND RECYCLING OF THIS PRODUCT, CONTACT YOUR
COMPETENT LOCAL OFFICES, YOUR LOCAL WASTE COLLECTION SERVICE PROVIDER OR THE POINT OF SALE
IN WHICH THE PRODUCT WAS PURCHASED.
THIS MANUAL CONSTITUTES AND INTEGRAL PART OF THE DISHWASHER; IT MUST ALWAYS BE
PRESERVED INTACT AND KEPT TOGETHER WITH THE MACHINE.
POSITIONING, CONNECTIONS, ACTIVATION, TROUBLESHOOTING AND THE SUBSTITUTION OF THE
POWER CABLE MUST BE PERFORMED BY QUALIFIED PERSONNEL.
THE GROUNDING CONNECTION IS MANDATORY IN ACCORDANCE WITH THE METHODS
PRESCRIBED BY THE ELECTRICAL SYSTEM SAFETY STANDARDS. IN CASE OF DAMAGE OF THE
POWER SUPPLY CABLE, IT MUST BE REPLACED ONLY BY THE MANUFACTURER, AN AUTHORIZED
CUSTOMER CENTER OR BY QUALIFIED TECNICIANS TO AVOID ANY DANGER.
DO NOT INSERT SOLVENTS SUCH AS ALCOHOL OR TURPENTINE INTO THE MACHINE AS THEY
MAY CAUSE AN EXPLOSION. DO NOT INSERT DISHES WITH ASH, WAX OR VARNISH RESIDUES
INTO THE MACHINE.
NEVER USE THE DISHWASHER OR ITS PARTS AS A STEPLADDER OR SUPPORT FOR PERSONS,
THINGS OR ANIMALS.
LEANING OR SITTING ON THE DISHWASHER OPEN DOOR COULD CAUSE AN OVERTURN WITH
CONSEQUENT DANGER FOR PEOPLE IN ITS PROXIMITY. IN ORDER TO AVOID TRIPPING ON IT, DO
NOT LEAVE THE DISHWASHER DOOR OPEN.
DO NOT DRINK THE RESIDUAL WATER WHICH MAY BE PRESENT ON THE DISHES OR IN THE
DISHWASHER ITSELF AFTER A WASH CYCLE.
THE MACHINE IS NOT SUITABLE TO BE USED BY MINORS AND BY PEOPLE WITH REDUCED
PHYSICAL, SENSORIAL OR MENTAL CAPABILITIES WHO LACK THE NECESSARY EXPERIENCE AND
KNOWLEDGE FOR ITS PROPER OPERATION. THEY MAY USE THE MACHINE EXCLUSIVELY UNDER
THE SUPERVISION OF A PERSON IN CHARGE OF THEIR SAFETY.
After cleaning the appliance at the end of the day, make sure no metal foreign bodies are left inside as they
may cause internal rusting. Traces of rust may also derive from non-stainless cutlery/crockery, unsuitable
detergents, damaged wire baskets, scouring pads, metal sponges or renegeration salt spilled on the bottom
of the tank.

16
2 – TECHNICAL SPECIFICATIONS
Water supply temperature
°C
55
Water supply temperature (model with watersoftener)
°C
Max 30
Water supply hardness
°F
7 – 12
Water supply pressure
kPa
200/400
Water supply pressure (model with watersoftener)
kPa
300/400
Rinse cycle water consumption at 200 kPa
l
2,4/2,6
Wash water temperature
°C
50 - 60
Rinse water temperature
°C
82 - 85
Net weight
kg
Min.27
Max 131
Ambient temperature max
°C
40
Power cable type
◄HAR►
H07RN-F
Refer to the rating label located on the front cover of this manual or on the right side panel of the
dishwasher for the voltage and total power.
3 – POSITIONING
Bring the dishwasher to its installation location, remove its packaging and verify the integrity of the device and its
components. If damaged, written notification must be sent to the transporter.
The packaging elements (plastic bags, polystyrene foam, nails, etc) must not be left within reach of children and domestic
animals as they are a potential source of danger. All packaging materials are compatible with the environment. They may
be safely preserved or disposed of at an appropriate waste disposal facility. Plastic components subject to eventual
disposal through recycling are marked as follows:
PE polyethylene: external wrapping, instructions bag, protection bags.
PP polypropylene: bands.
PS polystyrene foam: protective corners, packaging cover.
Wood and cardboard components must be disposed of in compliance with the existing rules.
When disposing of the product, avoid leaving it in the environment. Its disposal must comply with the existing rules. All
metallic parts are detachable and made of stainless steel.
Plastic parts are marked with the symbol of the relevant material.
POSITIONING:
Warning: The installation in areas with community devices must comply with the existing rules.
The manufacturer declines any responsibility for direct or indirect damages to persons or things deriving from non
complying with the existing rules.
Prior to installation verify the absence of any objects and materials which could be damaged by aqueous vapor or spray
from washing solutions or that they are adequately protected.
Place the dishwasher in the desired position and remove the protective wrapping.
Level the dishwasher (by using a level) on its four feet and regulate them in such a way so as to guarantee its stability.
Any other solution must be approved by the manufacturer. Once leveled, fix the 4 legs to the ground.

17
4 – INSTRUCTIONS FOR INSTALLERS
Hydraulic connections
The plumbing and the electric power cable come out from the back of the dishwasher. Connect the water supply pipe to a tap
with threaded ¾” gas fitting.
Only use new pipes to connect to the water supply. Do not use old or worn ones.
The dynamic supply pressure must range between 200 and 400 kPa. If it is higher, install a pressure reducer (version with built-
in water softener: 300 to 400 kPa).
If it is lower, install a pressure booster pump.
Install a main cock on the supply water inlet piping. This cock must be accessible after the appliance has been installed. Do not
install the cock behind the dishwasher.
The stated cycle time refers to hot supply water at 50°C.
If cold water is supplied, the timing could be longer depending on the temperature of the inlet water.
For versions with built-in osmosis system, install the carbon or mesh filter supplied on the water supply cock. Water hardness
must range between 7 and 12°F and the maximum temperature is 30°C.
The filters must be replaced at least twice a year.
Failure to comply with these parameters will cause the internal osmotic membrane to deteriorate rapidly.
Make sure water hardness ranges between 7 and 12°F, otherwise install a water softener to prevent any damages caused by
scale which are not covered by warranty.
Drainage:
Every dishwasher is supplied with its own drainage connection pipe to be connected to a siphon-type drain on the floor. If
connected to a drain in the wall, a drain pump needs to be installed.
Warning: make sure the supply and drain pipes are not bent, choked or squashed after they have been
installed.
Electrical connection
The electrical connection of the dishwasher and any other further appliances must be performed by authorized and qualified
personnel in compliance with the existing standards. The technical connection instructions must be complied with too.
The total installed power is written on the appliance technical data plate.
The protection system of the dishwasher lines must not include other appliances.
The user shall have a qualified and specialized technician install a main on/off switch on the electrical line and a differential
switch compatible with the machine in compliance with existing standards.
The installation of a general switch and of a differential switch on the power supply line must be made by an authorized and
specialized technician.
These switches must be installed near the dishwasher, must be easy to reach after installation and must guarantee complete
disconnection from the electrical system complying with overvoltage conditions for category III.
Warning: make sure the phase wires are not inverted with the neutral wire, both on the five-pin plug of the power
supply cable (not supplied) and in the wall socket.
If the wash pump is three-phase, check that the rotation direction is the one indicated by the arrow on the motor. If
not, invert the phases L1 and L2 or L3 with L2 or L3 with L1.
REPLACING THE CARTRIDGE FILTER (version with osmosis).
This symbol points out that the carbon or mesh filter installed upstream from the dishwasher has reached the end of
its service life.
- Switch off the dishwasher and disconnect it from the mains.
- Shut off the water inlet cock.
Warning:
The dishwasher is totally free from electricity exclusively when the main switch is off.
- Connect the appliance to the utility equipotential system. The connection terminal is located at the back bottom
part of the machine.
- The earthing protection wire (PE) is yellow and green, the neutral wire (N) is blue and the phase wires (L1, L2, L3)
are black, grey and brown.
DISHWASHER WITH WATERSOFTENER
SETTING
A = inlet water hardness in °F
B = no. of wash cycles after which the
automatic regeneration should go off
A
14 °F
22 °F
32 °F
37 °F
42 °F
52 °F
B
120
80
50
40
30
25

18
- Using the spanner supplied, unscrew the ring nut.
- Remove the carbon or mesh filter and drain the water from the filter holder.
- Fit the new filter in the holder.
- Put the filter holder back in place and tighten the ring nut using the spanner supplied.
- Open the water supply again and make sure there are no leaks.
- Connect to the mains and switch the dishwasher on.
- Access the menu and reset the filter count.
5 – FIRST TIME START-UP
The electrical protection system must be put through a functional test before starting up the appliance.
It must be installed and/or checked by the authorized retailer who will start it up for the first time and provide instructions on
how the dishwasher works.
PREPARING FOR USE
The rinse aid dispenser is always installed, but the detergent dispenser is only on some models.
If both dispensers are installed, put the external detergent and rinse aid containers in place and insert the priming pipes
(situated at the back of the machine) accordingly.
Red pipe: detergent / clear pipe: rinse aid.
Before inserting the pipes into the containers, fit the weight at the ends so that they stay at the bottom of the container as well
as the filter, as stated in pic. 2. To adjust, turn the adjustment screws, as shown in pic. 1-3. We recommend you have the
adjustment done by personnel from detergent suppliers.
If the detergent dispenser is not pre-fitted, it can be installed later by ordering the related KIT (contact the technical service).
Dishwashers without detergent dispenser: put the detergent directly into the tank every 4-5 cycles approximately. For the
type and quantity to use, follow the instructions given by the detergent supplier.
EVO3 model, dispensers adjustable through the display.
To access the menu:
Press the button for 2 seconds.
Select the desired function with the and buttons.
The button allows to enter or exit the parameter.
to go back and exit programming.
DC 10,0 ML 13 “ (detergent adjustment during the tank filling phase)
DL 6,1 ML 8” (detergent adjustment during the wash phase)
D TEST 0 (test the detergent dispenser activation)
BC 4,2 ML 20 “ (rinse aid adjustment during the tank filling phase)
BR 2,9 ML 14” (detergent adjustment during the rinse phase)
B TEST 0 (test the rinse aid dispenser activation)
Only use detergents and rinse aids for industrial dishwashers. Do not use normal detergents for dishwashing by hand. We
recommend you exclusively use products that have been specifically designed for this dishwasher.
Make sure not to mix up the detergent and rinse aid containers when topping them up, as the wrong product in the
wrong container may cause malfunctioning and hence damage the dishwasher.
Do not mix different detergents, as this may damage the dispensing device. Detergents for industrial dishwashers can cause
serious irritations. Carefully follow the detergent supplier’s instructions written on the package.

19
6 – OPERATIONAL INSTRUCTIONS
Open the
mains water
cock (utility).
Check:
Switch the main switch
on (utility)
detergent and rinse
aid levels in the
containers.
that the filters placed correctly, the spray arms rotation
and that there are no foreign bodies in the dishwasher.
MACHINE SWITCHED OFF: SCREEN OFF
Machine off: screen on OFF.
When the machine is off, you will see OFF on the screen. Only the ON/OFF button is lit.
From the OFF status you can switch the machine off by pressing the ON/OFF button for 2
seconds. You can access the user menu and the technical menu (after entering a password)
by pressing the button for 3 seconds.
SWITCHING THE MACHINE ON.
After inserting the filters and the overflow (if provided), press the button for 2 seconds.
The dishwasher will switch on and follow the normal operation screen.
If the tank or the boiler is empty, the machine begins to fill and shows the corresponding icon.
The dishwasher will continue to fill until the correct level is reached. During this phase, you
can choose a wash cycle using the and buttons.
HEATING PHASE
Once full, the rinse and washing water will be heated.
The start icon will be yellow: this means it is heating.
Once the set temperatures have been reached, the icons will turn green.
This means the machine is ready to start a washing cycle.
LOADING THE DISHWASHER
Remove any solid residues from the plates (bones, peel, nuts etc). Leave the plates to soak in
cold water if there are any stubborn residues, such as dried cheese, egg etc.
Put the glasses in the basket with their stem upwards.
Use the cutlery basket for cutlery. Put the loose cutlery in the basket, preferably with the
handle at the bottom. Be careful not to injure yourself with fork prongs and knife blades.
CHOOSING AND STARTING A WASH PROGRAMME
You can select the wash programme using the and buttons.
The wash programmes are the following:
P1: duration 80" – wash temperature 55° - rinse temperature 70°
P2: duration 120” – wash temperature 55° - rinse temperature 75°
P3: duration 180” – wash temperature 55° - rinse temperature 85°
P4: duration 480” – wash temperature 60° - rinse temperature 85°
OPTIONAL: programme for beer glasses (cold rinse) duration 130” – the cold rinse
temperature is established by the mains system.
Once you have selected the required programme, you can press or close the hood to
start the wash cycle.
The button will turn blue and the display will show the countdown to the end of a

20
complete wash cycle. Wash cycle in progress screen page.
If the door/hood is opened while the washing cycle is in progress, it will stop to start again
when the door/hood is closed again if this happens within 20 seconds, otherwise, the cycle
will be reset. Programme P4 can be used straight away and skip to the rinse cycle by pressing
the button again (blue) during the wash phase.
EXTENDING THE WASH PHASE: THERMOSTOP
(CAN BE ACTIVATED FROM THE TECHNICAL MENU)
If the wash time ends and the rinse phase has still not reached the set temperature, the wash
cycle is extended until the set rinse temperature is reached.
Display of the thermostop function enabled: TS
EMPTYING AT THE END OF THE DAY (for versions with overflow)
To switch the machine off at the end of the service, press the button.
Open the door and remove the overflow. You can activate the AUTOCLEAN function by
pressing the button (blue) within 20 seconds.
If the tank is not empty, the self-clean cycle will not start.
Only for models N1300 DOUBLE, insert one empty basket in order to activate the
switch.
After 20” the emptying of the tank starts and continues until completed displaying OFF except
for models with a regeneration cycle (see relevant section).
If after draining the water has not been emptied, a TANK FULL message will be displayed for
30”.
EMPTYING AT THE END OF THE DAY WITH AUTOMATIC DRAINAGE
To switch the machine off at the end of the service, press the button.
You can activate the AUTOCLEAN function by pressing the button (blue) within 20
seconds.
If the tank is not empty, the self-clean cycle will not start.
Only for models N1300 DOUBLE, insert one empty basket in order to activate the
switch.
After 20” the emptying of the tank starts and continues until completed displaying OFF except
for models with a regeneration cycle (see relevant section).
If after draining the water has not been emptied, a TANK FULL message will be displayed for
30”.
Once the machine has been emptied, it will remain in stand-by or OFF mode.
Once you have switched the wall-switch off and shut off the water stop cock, remove the
filters, wash the inside of the tank and the filters with suitable products and put the filter and
the overflow back in the tank.
- TANK DRAIN 180”
OFF
- FULL TANK -
- - OFF
- TANK DRAIN 180”
OFF
- FULL TANK -
- - OFF

21
“NO SALT” INDICATOR (VERSIONS WITH SOFTENER):
Salt for dishwashers is fundamental for the regenerative cycle of the softener installed in the
machine. The display will point out that there is not enough salt in the container inside the
tank. To top it up, use the funnel supplied and clean any spilled salt from inside the tank. “No
Salt” indicator.
PLEASE NOTE: REMOVE ANY SPILLED SALT FROM THE TANK IMMEDIATELY,
otherwise it could damage the surface of the tank with rust or similar marks.
Warning: only use specific salt for dishwashers and not kitchen salt!
The salt compartment can contain approximately 1 kg of grain salt.
The salt compartment is located on the bottom of the tank. Take the basket out, unscrew the cap and pour salt in using the funnel not
supplied with the machine. Before screwing the cap back on, remove any spilled salt near the opening. Top up with salt when there is
no water in the tank so that the washing water cannot get into the water softener. Always unplug the machine from the mains power
supply before doing this. Remember to plug the machine back into the mains socket after completing the operation.
When using the machine for the first time, after filling with salt add some water to the salt container.
AUTOMATIC REGENERATION CYCLE
The regeneration cycle is automatic. The dishwasher is equipped with a wash meter. When
the set number of cycles is reached, the dishwasher will activate the regeneration function the
first time it is switched off and the tank is emptied - displaying #.
When the machine is working normally and the set number of cycles is reached, the blinking
icon # on the right-hand side will appear. This means that the machine will activate the
regeneration function the next time it is switched off.
Only for models N1300 DOUBLE, insert one empty basket in order to activate
the switch.
Once the regeneration cycle has been completed, the machine will remain in OFF mode.
ECONOMY FUNCTION
When the dishwasher is not used for 30 minutes (this time can be programmed from the
technical menu) it will enter the “economy” mode keeping temperatures lower.
To exit the function, press any button or open the door.
7 – MAINTENANCE AND CLEANING
Even though the dishwasher does not require any special programmed maintenance, we still recommend you have it checked
out by a specialized technician twice a year.
PLEASE NOTE: the manufacturer cannot be held liable for intentional damages or damages caused by carelessness,
negligence or failure to comply with the prescriptions, instructions and standards or incorrect connections or plumbing.
The dishwasher complies with the protection rating IPX1 and it is forbidden to use a direct jet of water to clean it.
CLEANING THE FILTER DURING THE DAY
In case of heavy use we recommend you clean the filter every 30-40 cycles while the machine is in working conditions. To do
this, empty the tank.
Remove the filter (1) (simply lift it out of its seat as illustrated), making sure large bits and pieces do not fall into the tank. Clean
the filter and rinse thoroughly.
Also clean the internal filter (2) and remove any residuals.
Put the filter back into its seat (1). Do not use pointed or sharp tools.
Clean away any scale to avoid possible build-up. Clean the surface carefully and frequently using a damp cloth. Use neutral and
non-abrasive detergents that do not contain chlorine-based substances or products that may corrode and damage stainless
steel.
Do not use the aforementioned products to clean the floor under the dishwasher either, or even near it, in order to prevent
vapours or drips from causing damage to the steel surface.
To clean the tank and the walls we recommend you use a damp cloth or a shammy leather cloth, with soapy water and a mild
detergent. Never user scouring pads or metal sponges.
ONGOING
REGENERATION
18:00
OFF
-LACK OF SALT-

22
Periodic checks
Disassemble the spray arms (bottom and top 2-3) by unscrewing the central screw (1).
Clean the holes and the nozzles under clean running water, do not use any pointed or sharp tools that may damage them. Fit
the spray arms back in place.
Clean the machine externally using a damp cloth and neutral detergent then rinse and dry thoroughly.
Long-term stoppage
If the dishwasher is not going to be used for quite some time, the detergent and rinse aid dispensing device must be emptied to
avoid crystallization and damages to the pumps: remove the priming pipes from the detergent and rinse aid containers and soak
them into a clean water container, run some wash cycles and empty the machine completely.
Unplug the main switch and shut off the water inlet tap. Put the detergent and rinse aid priming pipes back into their containers
when restarting the machine and make sure not to invert them (red pipe = detergent; clear pipe = rinse aid).
Do not leave the deactivated dishwasher switched on if it is not to be used for some time or if the operator is not able to monitor
it directly.
8 – ERRORS DISPLAYED/PROBLEMS
Never use the following types of products to clean the tank or steel surfaces:
- Products containing chlorides or hydrochloric acid
- Bleach
- Products to clean silver
- Scouring pads or metal sponges
PLEASE NOTE: the incorrect use of the aforementioned products may cause rust marks on the surfaces.
Boiler/tank not filled within the set time
The button will be red.
Anomaly or breakage of the boiler/tank temperature probes.
The button will be red.
The water level in the tank is too high
When this message is displayed, the filling and rinsing solenoid valve does not activate.
SOLUTIONS:
- Check if there are any obstructions in the drain pipe.
- Check if the drain pump is working correctly.
- Switch off and drain the tank. Switch on again.
If the problem persists after switching off and on again, call the technical assistance service and inform them of the type of error
on the display.
HIGH WATER LEVEL - CHECK DRAIN PUMP - C: 23 °C R: 34 °C P1
:60”

23
PROBLEM
POSSIBLE CAUSE
POSSIBLE SOLUTION
THE MAINS LIGHT FAILS TO SWITCH
ON
Mains not connected
Check the electric mains connection.
THE WASH CYCLE FAILS TO START
The dishwasher has still not been
filled.
Wait for the triangular LED to switch on.
POOR WASHING RESULTS
The holes of the spray arms are
clogged or scale is obstructing
them.
Dismantle and clean the spray arms.
Insufficient or unsuitable detergent
or rinse aid.
Check the type and quantity of detergent.
Plates/glasses not positioned
correctly.
Arrange the plates/glasses correctly.
Wash temperature is too low.
Check the temperature on the display. If it is
below 50°, call the technical assistance
service.
The set cycle is unsuitable.
Increase the wash cycle duration, especially if
the crockery/cutlery is particularly dirty or there
are some stubborn residues to clean.
INSUFFICIENT RINSING
The spray nozzles are clogged.
Scale in boiler.
Check if the nozzles are clean and if the
softener (if installed) works correctly.
THE GLASSES AND CUTLERY ARE
STAINED
The rinse aid is unsuitable or is
not dispensed correctly.
Water hardness above 12°dF or
high dissolved salt content.
Check the rinse aid container and whether it is
suitable for the type of mains water. If the
problem persists, contact the technical
assistance service.
WATER IN TANK AFTER DRAINING
The drain pipe is not positioned
correctly or is partially obstructed.
Check if the pipe and the drain of the
dishwasher are obstructed and if the drain is
positioned too high up. Refer to the
connection diagram.

24
Nous vous remercions pour avoir choisi notre produit.
Veuillez lire attentivement toutes les instructions contenues dans le manuel pour connaitre les conditions les
plus appropriées en vue d'une utilisation correcte du lave-vaisselle.
INSTRUCTIONS TECHNIQUES :
Elles sont destinées au personnel qualifié devant effectuer l'installation, la mise en service,
l'essai et d'éventuelles interventions d'assistance.
Le technicien installateur devra s'assurer que l'utilisateur soit informé du manuel contenant
les instructions, qu'il ait compris le correct fonctionnement de la machine et qu'il sache
remplir correctement les paniers consacrés à la vaisselle et aux verres.
INSTRUCTIONS POUR L'UTILISATEUR :
Elles comprennent les conseils d'utilisation, la description des commandes et les correctes
opérations de nettoyage et d'entretien du lave-vaisselle.
AVERTISSEMENTS
L'UTILISATEUR EST RESPONSABLE DES ACCOMPLISSEMENTS LÉGAUX LIÉS À L'INSTALLATION
ET À L'UTILISATION DU PRODUIT. SI LE PRODUIT N'EST PAS INSTALLÉ OU UTILISÉ D'UNE
MANIÈRE CORRECTE OU SI UN ENTRETIEN APPROPRIÉ N'EST PAS EFFECTUÉ, LE FABRICANT
NE POURRA PAS ÊTRE CONSIDÉRÉ RESPONSABLE D'ÉVENTUELS PANNES, ANOMALIES DE
FONCTIONNEMENT, DOMMAGES, LÉSIONS À CHOSES ET / OU À PERSONNES.
DÉBRANCHER TOUJOURS LE CORDON D'ALIMENTATION DE LA PRISE DE COURANT AVANT
D'EFFECTUER TOUTE OPÉRATION D'ENTRETIEN. SI CELA N'EST PAS POSSIBLE ET SI
L'INTERRUPTEUR SUR LA LIGNE D'ALIMENTATION N'EST PAS VISIBLE OU DE TOUTE FAÇON S'IL
EST LOIN DU PERSONNEL CHARGÉ DE L'ENTRETIEN, APPOSER LE PANNEAU "TRAVAUX EN
COURS" SUR L'INTERRUPTEUR EXTERNE DU RÉSEAU APRÈS L'AVOIR PRÉALABLEMENT
POSITIONNÉ SUR OFF.
1 - AVERTISSEMENTS DE SÉCURITÉ ET D'UTILISATION
2 - CARACTÉRISTIQUES TECHNIQUES
3 – POSITIONNEMENT
4 – INSTRUCTIONS POUR L'INSTALLATEUR
5 – PREMIÈRE MISE EN FONCTION
6 – INSTRUCTIONS D'EMPLOI
7 – ENTRETIEN ET NETTOYAGE
8 – ERREURS AFFICHÉES / PROBLÈMES

25
VOLT
LAVE-VAISSELLE SANS ADOUCISSEUR
LAVE-VAISSELLE AVEC ADOUCISSEUR
TEMPERATURE MIN. 45°C – MAX 55°C
PRESSION MIN. 2 – MAX 4 kPa/Bar
DURETÉ MIN. 7° - MAX 12°F / MIN. 5° - MAX 7°dH
SI TRIPHASE
NE PAS INVERSER LA PHASE AVEC NEUTRE (BLEU)
PRODUIT RINÇAGE TUYAU TRANSPARENT
DÉTERGENT (
NON STANDARD-OPTION) TUYAU ROUGE
SI POMPE DE LAVAGE TRIPHASE CONTROLER LE SENS DE ROTATION
SI LA DURETÉ DE L’ EAU EST SUPERIEURE À 12°F / 7° dH INSTALLER UN ADOUCISSEUR EXTERNE
H VIDANGE: MAX 10 CM – CAPOT MAX 20 CM
LE NON RESPECT DES INDICATIONS COMPROMET LA SÉCURITÉ ET LA GARANTIE DE L’ APPAREIL.
VÉRIFIER
TEMPERATURE MAX 30°C
PRESSION MIN. 3 – MAX 4 kPa/Bar
DURETÉ MIN. 7° - MAX 26°F / MIN. 5° - MAX 15°dH
UTILISER SEL RÉGÉNÉRANT ET LE VERSER DANS LE CONTENEUR DE LA CUVE RÉGULIÈREMENT

26
1 - AVERTISSEMENTS DE SÉCURITÉ ET D'UTILISATION
LA PRÉSENTE NOTICE EST PARTIE INTEGRANTE DU LAVE-VAISSELLE ; IL FAUT TOUJOURS LA
CONSERVER SOIGNEUSEMENT À PROXIMITE DE L’APPAREIL.
LA MISE EN PLACE, LES RACCORDEMENTS, LA MISE EN SERVICE, L’ÉLIMINATION DES
INCONVENIENTS ET LE REMPLACEMENT DU CABLE D’ALIMENTATION DOIVENT ÊTRE EXÉCUTÉS
PAR UN PERSONNEL QUALIFIÉ.
LE LAVE-VAISSELLE EST EXCLUSIVEMENT DESTINÉ À UN USAGE COLLECTIF ET IL DOIT ÊTRE UTILISÉ PAR UN
PERSONNEL AUTORISÉ. IL EST PREVU POUR LE LAVAGE DE LA VAISSELLE (ASSIETTES, TASSES, BOLS, PLATS,
COUVERTS) ET SIMILAIRES DANS LE SECTEUR DE LA GASTRONOMIE ET DE LA RESTAURATION COLLECTIVE. IL
EST CONFORME AUX NORMES INTERNATIONALES DE SÉCURITÉ ÉLECTRIQUE ET MÉCANIQUE (CEI-EN-IEC
60335-2-58/61770) ET DE COMPATIBILITÉ ÉLECTROMAGNÉTIQUE (CEI-IEC-EN 55014-1/-2, 61000-3;4, 50366).
LE FABRICANT DÉCLINE TOUTE RESPONSABILITÉ RELATIVE AUX DOMMAGES CAUSÉS AUX PERSONNES OU
AUX CHOSES ET DUS AU NON RESPECT DES INSTRUCTIONS CONTENUES DANS LA PRÉSENTE NOTICE, À UNE
UTILISATION IMPROPRE, À L’ALTERATION NE SERAIT-CE QUE D’UNE SEULE PARTIE DE L’APPAREIL ET À
L’UTILISATION DE PIÈCES DE RECHANGE NON ORIGINALES.
LA CONNEXION DE TERRE SELON LES MODALITÉS PRÉVUES PAR LES NORMES DE SÉCURITÉ DE
L’INSTALLATION ÉLECTRIQUE EST OBLIGATOIRE. SI LE CABLE D’ALIMENTATION EST ENDOMMAGÉ
IL DOIT ÊTRE REMPLACÉ PAR LE FABRICANT, SON SERVICE APRÈS VENTE OU DES PERSONNES
DE QUALIFICATION SIMILAIRE AFIN D’ EVITER TOUT DANGER
CET APPAREIL EST MARQUÉ CONFORMEMENT À LA DIRECTIVE EUROPÉENNE 2002/96/EC, WASTE ELECTRICAL
AND ELECTRONIC EQUIPMENT (WEE).
EN ASSURANT L’ÉLIMINATION CORRECTE DE CE PRODUIT, L’UTILISATEUR CONTRIBUE À PRÉVENIR LES
CONSÉQUENCES NEGATIVES POTENTIELLES POUR L’ENVIRONNEMENT ET LA SANTÉ. LE FABRICANT
DECLARE QUE L’EMISSION DE LA PRESSION ACOUSTIQUE LPA EST DE 62 DB/A VARIABLE DE KPA + 1 DB. LE
NIVEAU DE PUISSANCE SONORE LWA EST DE 73.79 VARIABLE DE KWA + 1 DB. LE SYMBOLE PRÉSENT SUR
L’APPAREIL OU DANS LA DOCUMENTATION QUI L’ACCOMPAGNE INDIQUE QUE CE PRODUIT NE DOIT PAS ÊTRE
TRAITÉ COMME UNE ORDURE MÉNAGÈRE MAIS QU'IL DOIT ÊTRE REMIS À UN CENTRE DE COLLECTE
APPROPRIÉ POUR LE RECYCLAGE DES APPAREILS ÉLECTRIQUES ET ÉLECTRONIQUES. ÉLIMINER L’APPAREIL
CONFORMEMENT AUX RÉGLEMENTATIONS LOCALES CONCERNANT LE TRAITEMENT DES DÉCHETS. POUR
TOUTE AUTRE INFORMATION CONCERNANT LE TRAITEMENT, LA RÉCUPÉRATION ET LE RECYCLAGE DE CE
PRODUIT, S’ADRESSER AU SERVICE LOCAL COMPÉTENT DE LA COLLECTE DES ORDURES MÉNAGÈRE OU LE
MAGASIN DANS LEQUEL LE PRODUIT A ÉTÉ ACHETÉ.
NE PAS INTRODUIRE DE SOLVANTS TELS QUE L’ALCOOL OU LA TÉRÉBENTHINE QUI
POURRAIENT PROVOQUER UNE EXPLOSION. NE PAS INTRODUIRE DE VAISSELLE SALE DE
CENDRE, CIRE OU VERNIS.
NE JAMAIS UTILISER LE LAVE-VAISSELLE OU SES PARTIES COMME ÉCHELLE, SUPPORT OU
SOUTIEN POUR PERSONNES, CHOSES OU ANIMAUX.
LE FAIT DE S’APPUYER OU DE S’ASSEOIR SUR LA PORTE OUVERTE DU LAVE-VAISSELLE
POURRAIT ENTRAINER LE BASCULEMENT DE CE DERNIER ET DONC UN GRAVE DANGER POUR
LES PERSONNES. NE JAMAIS LAISSER LA PORTE DU LAVE-VAISSELLE OUVERTE CAR ELLE
POURRAIT CAUSER UN RISQUE DE TRÉBUCHEMENT.
NE PAS BOIRE L’EAU RESIDUELLE ÉVENTUELLEMENT PRÉSENTE DANS LA VAISSELLE OU DANS LE
LAVE-VAISSELLE À LA FIN DU PROGRAMME DE LAVAGE.
L’APPAREIL N’EST PAS PRÉVU POUR ÊTRE UTILISÉ PAR DES MINEURS OU DES PERSONNES
AYANT DES CAPACITÉS PHYSIQUES, SENSORIELLES OU MENTALES REDUITES, MANQUANT
D’EXPÉRIENCE ET DE CONNAISSANCE. L’UTILISATION DE L’APPAREIL PAR CES PERSONNES EST
AUTORISÉE EXCLUSIVEMENT SOUS LA SURVEILLANCE D’UNE PERSONNE RESPONSABLE DE LEUR
SÉCURITÉ

27
Après le nettoyage quotidien vérifier que dans le lave-vaisselle ne demeurent pas de corps étrangers
métalliques pouvant créer de la rouille à l'intérieur de la machine. Les traces de rouille peuvent dériver de
vaisselle non inoxydable, produits lessiviels non appropriés, paniers en fil métallique endommagés,
paillettes abrasives ou métalliques où sel pour régénération demeurant sur le fond du bac.
2 - CARACTÉRISTIQUES TECHNIQUES.
Température eau d’alimentation
°C
55
Température eau d’alimentation (modèle avec adoucisseur incorporé)
°C
Max 30
Dureté eau d’alimentation
°F
7 – 12
Pression eau d’alimentation
kPa
200/400
Pression eau d’alimentation (modèle avec adoucisseur incorporé)
kPa
300/400
Consommation d’eau pour cycle de rinçage à 200 kPa
l
2,4/2,6
Température eau de lavage
°C
50 - 60
Température eau de rinçage
°C
82 - 85
Poids net
kg
Min.27
Max 131
Température ambiente max
°C
40
Type de câble d’alimentation
◄HAR►
H07RN-F
Pour l'alimentation électrique et la puissance reportez-vous à la plaque signalétique illustrée sur la
couverture de ce manuel ou sur le panneau latéral droit de la machine.
3 – POSITIONNEMENT
Transporter le lave-vaisselle sur le lieu d’installation, enlever l’emballage, vérifier l’intégralité de l’appareil et de ses
composants. En cas de dommages, ceux-ci doivent être notifiés par écrit au transporteur.
Les éléments d’emballage (sachets en plastiques, mousse de polystyrène, clous, etc.) ne doivent pas être laissés à la
portée des enfants ni des animaux domestiques car ils représentent des sources potentielles de danger.
Tous les matériaux utilisés pour l’emballage sont compatibles avec l’environnement. Ils peuvent être conservés sans
danger ou être éliminés dans un centre spécialisé de collecte des déchets.
Les éléments en plastique sujets à un éventuel recyclage sont regroupés de la façon suivante :
PE polyéthylène : pellicule extérieure emballage, sachet notice d’emploi, sachets de protection.
PP polypropylène : feuillards.
PS mousse de polystyrène : coins de protection, couvercle emballage.
Les éléments en bois et en carton doivent être éliminés conformément aux normes en vigueur.
En cas d’élimination du produit, éviter de le jeter dans la nature ; la démolition doit avoir lieu conformément aux normes en
vigueur. Toutes les parties métalliques sont en acier inoxydable et démontables.
Les parties en plastique reportent le symbole du matériau correspondant.

28
MISE EN PLACE:
Attention : L’installation interne ainsi que les locaux dans lesquels sont installés les appareils pour les
collectivités doivent être conformes aux normes en vigueur.
Le constructeur décline toute responsabilité relative aux dommages directs ou indirects aux personnes ou aux choses
dérivant du non respect desdites normes.
Avant l’installation vérifier l'absence à proximité de l’appareil d’objets ou de matériels susceptibles d’être endommagés
par la vapeur d'eau ou par des éclaboussures de produit de lavage, ou bien d’une protection adéquate. Positionner le
lave-vaisselle à l’endroit souhaité et enlever la pellicule de protection.
Mettre à niveau le lave-vaisselle (à l’aide d’un niveau) sur les quatre pieds réglés de manière à garantir sa stabilité ; toute
autre solution doit être approuvée par le constructeur. Une fois mise à niveau fixer les 4 pieds au sol.
4 – INSTRUCTIONS POUR L'INSTALLATEUR
1.1 Branchement hydraulique
Les tuyaux hydrauliques et le cordon d'alimentation électrique sortent de la zone postérieure. Brancher le tuyau d'alimentation
hydrique à une prise d'eau filetée ¾” gaz.
Pour la connexion au réseau hydrique utiliser uniquement des tuyaux neufs ; de tuyaux vieux ou usagés ne devront pas être
utilisés.
La pression dynamique d'alimentation doit être comprise entre 200 et 400 kPa, si elle est supérieure il faudra installer un
réducteur de pression (versions avec adoucisseur incorporé entre 300 et 400 kPa).
Si la pression est inférieure il faudra veiller à installer une pompe d'augmentation de pression.
Il est indispensable d'installer un robinet général sur le tuyau d'arrivée de l'eau d’alimentation ; après avoir achevé l'installation,
le robinet devra être accessible, ne pas installer le robinet derrière le lave-vaisselle.
La durée des cycles déclarée est rapportée à une alimentation en eau chaude 50°C.
En cas d'alimentation en eau froide, la durée pourrait augmenter en fonction de la température de l'eau en entrée.
Pour les versions avec osmose intégrée veiller à installer un filtre à charbons ou le filtre à grille fourni sur le robinet
d'alimentation hydrique. La dureté de l'eau doit être comprise entre 7 et 12°F et la température max. 30°C.
Les filtres devront être remplacés au moins 2 fois par ans.
La non observance de ces paramètres mènera à une détérioration prématurée de la membrane interne de l'osmose.
S'assurer que la dureté de l'eau soit comprise entre 7 et 12°F, au delà de ces paramètres on devra veiller à installer un
adoucisseur pour prévenir des dommages causés par le calcaire qui ne seront pas couverts par la garantie.
Vidange :
Chaque lave-vaisselle est déjà équipé d’un tuyau pour la connexion à la vidange ; elle sera installée au sol et équipée de
siphon. En cas de vidange murale, une pompe de vidange sera nécessaire.
Attention : s'assurer que les tuyaux d'alimentation et de vidange ne soient pas pliés, étranglés ou écrasés
après l'installation.
1.2 Branchement électrique
Le branchement électrique du lave-vaisselle et d'éventuels appareils supplémentaires doit être confié à du personnel autorisé et
qualifié dans le respect des normes en vigueur ; observer également les consignes techniques de branchement.
La puissance totale installée est indiquée sur la plaque des données techniques de l'appareil.
Hors du lave-vaisselle, il n’y a pas d'autres appareils à être protégés.
L'exploitant devra veiller à installer un interrupteur général sur la ligne d'alimentation électrique et un interrupteur différentiel
compatible avec les caractéristiques de la machine, suivant les normes en vigueur.
L'installation de l'interrupteur général e de l'interrupteur différentiel sur la ligne d'alimentation électrique devra être effectuée par
un technicien autorisé et spécialisé.
Ces interrupteurs devront être installés près du lave-vaisselle, être facilement accessibles après l'installation et garantir le
débranchement complet du réseau électrique suivant les conditions de la catégorie de surtension III.
LAVE-VAISSELLE AVEC ADOUCISSEUR
REGLAGES
A = dureté eau en entrée en °F
B = nombre de cycles de lavage après lequel
le cycle de régénération automatique doit
s'activer
A
14 °F
22 °F
32 °F
37 °F
42 °F
52 °F
B
120
80
50
40
30
25

29
Attention !
Le lave-vaisselle est sans tension uniquement lorsque l'interrupteur général est débranché.
- Connecter l'appareil au système équipotentiel utilisateur. La borne pour la connexion est placée dans la zone
postérieure inférieure de la machine.
- Le conducteur de protection (PE) est jaune-vert, le conducteur neutre (N) est bleu et les conducteurs de phase (L1,
L2, L3) sont noirs, gris et marrons.
Attention : s'assurer que la phase ne soit pas inversée avec le neutre, tant sur la prise pentapolaire du cordon
d'alimentation (pas fourni) que sur la prise murale.
Si la pompe de lavage est triphasée vérifier que le sens de rotation soit celui indiqué par la flèche sur le moteur.
Sinon, inverser les phases L1 et L2 ou L3 avec L2 ou L3 avec L1.
REMPLACEMENT CARTOUCHE FILTRE (modèles avec osmose intégré)
Il indique l'atteinte de la limite de "vie" du filtre à charbon ou du filtre à grille installé en amont du lave-vaisselle.
- Désactiver le lave-vaisselle et débrancher l’alimentation électrique.
- Fermer le robinet de l'eau en entrée.
- Avec la clé fournie dévisser la bague de serrage.
- Enlever le filtre à charbon ou le filtre à grille et enlever l'eau du porte-filtre.
- Insérer le filtre neuf.
- Remonter le porte-filtre et serrer la bague à l'aide de la clé fournie.
- Réouvrir l'eau, vérifier l'absence de pertes.
- Rétablir l'alimentation et mettre en fonction le lave-vaisselle.
- Entrer dans le menu et réinitialiser le comptage filtre.
5 – PREMIÈRE MISE EN FONCTION
Le système électrique de protection devra être soumis à un essai fonctionnel avant la mise en fonction. L'installation devra être
effectuée et/ou vérifiée par le revendeur agréé qui s'occupera de la première mise en fonction et des instructions concernant le
fonctionnement du lave-vaisselle.
PREPARATION À L'UTILISATION
Le doseur du produit de rinçage est toujours présent ; le doseur des produits lessiviels est présent uniquement dans certains
modèles.
En cas de présence des deux doseurs, positionner les conteneurs externes pour les produits lessiviels et de rinçage et y insérer
les respectifs tuyaux de tirage placés sur la partie postérieure de la machine.
tuyau rouge : produits lessiviels / tuyau transparent : produit de rinçage
Avant d'introduire les tuyaux dans les conteneurs appliquer le poids (nécessaire pour maintenir le tuyau de tirage sur le fond du
conteneur) à leurs extrémités et le filtre comme indiqué dans la figure 2. Pour le réglage, agir sur les vis de réglage indiquées
dans la figure 1-3 ; il est recommandé de faire effectuer le réglage par le personnel des sociétés fournissant les produits
lessiviels.
Si le doseur des produits lessiviels n'est pas prémonté, il est possible de l'installer successivement en commandant le kit relatif
(en s'adressant à l'assistance technique).
Lave-vaisselle sans doseur de produits lessiviels : introduire le produit lessiviel directement dans le bac env. tous les 4-5
cycles ; pour ce qui concerne le type et la quantité à utiliser suivre les instructions du fournisseur des produits lessiviels.
Modèle EVO3, doseurs réglables par le display.
Pour accéder au menu :
Appuyer sur le bouton pour 2 secondes.
Choisir la fonction désirée par les boutons et .
Le bouton permet d’entrer ou de sortir du paramètre.
pour retourner jusqu’au but et sortir de la programmation.

30
DC 10,0 ML 13 “ (réglage détergent pendant la phase de remplissage cuve)
DL 6,1 ML 8” (réglage détergent pendant la phase de lavage)
D TEST 0 (testing activation doseur détergent)
BC 4,2 ML 20 “ (réglage produit rinçage pendant le remplissage cuve)
BR 2,9 ML 14” (réglage produit rinçage pendant la phase de rinçage)
B TEST 0 (testing activation doseur produit de rinçage)
Utiliser uniquement des produits lessiviels et de rinçage conçus pour des lave-vaisselle industriels. Ne pas utiliser des produits
lessiviels prévus pour le lavage à la main. Nous conseillons l'utilisation de produits étudiés exprès pour ce lave-vaisselle.
Lors du remplissage des réservoirs, veillez à ne pas échanger les produits; cette erreur pourrait provoquer des
anomalies de fonctionnement et des dommages au lave-vaisselle.
Ne pas mélanger de produits lessiviels différents en vue d'éviter des dommages au dispositif doseur. Les produits lessiviels
industriels peuvent provoquer de graves irritations. Respecter attentivement les instructions du producteur du produit lessiviel
imprimées sur l'emballage.
6 – INSTRUCTIONS D'EMPLOI
Ouvrir le
robinet
d'alimentation
de l'eau
(utilisateur).
Vérifier :
Insérer l'interrupteur
général (utilisateur)
Le niveau des
produits lessiviel et
de rinçage dans les
conteneurs.
Le positionnement correct des filtres, la rotation des
bras de lavage, l'absence de corps étrangers dans le
lave-vaisselle.
MACHINE DÉSACTIVE : PAGE-ÉCRAN OFF
Éteinte machine: écran sur OFF.
Quand la machine est éteinte, le message OFF sera affiché sur l’écran. Seulement le bouton
ON/OFF sera allumé.
À partir de l'état OFF, on peut éteindre la machine en appuyant sur le bouton ON/OFF pour 2
secondes. On peut accéder au menu de l’utilisateur et au menu technique (via mot de passe)
en appuyant pour 3 secondes sur le bouton .
MISE EN MARCHE DE LA MACHINE.
Après avoir inséré les filtres et le trop-plein (si présent), appuyez sur le bouton pour 2
secondes.
Le lave-vaisselle s'allume et suit l'écran de fonctionnement normal.
Si la cuve ou le boiler sont vides, la machine commence à se remplir et affiche l'icône
correspondante. Le remplissage du lave-vaisselle se poursuit jusqu'à quand les niveaux sont
atteints. Pendant cette phase, on peut choisir un cycle de lavage en utilisant les boutons
et .

31
PHASE DE CHAUFFAGE
Après avoir effectué le remplissage, le chauffage de l'eau de rinçage et de lavage commence.
L'icône de mise en marche est jaune: cela indique qu’on est en phase de chauffage.
Après avoir atteint les températures prédéfinies, l’icône sera verte.
Affichage de machine prête à faire démarrer un cycle de lavage.
CHARGEMENT DU LAVE-VAISSELLE
Enlever les résidus solides des assiettes (os, peaux, noyaux, etc.) ; laisser préventivement les
assiettes contenant des résidus secs de fromage, œuf, etc. à se tremper en eau froide.
Positionner les verres tournés vers le bas.
Pour les couverts, utiliser le petit panier spécial. Rangez les couverts en vrac, de préférence
avec le manche vers le bas, en veillant à ne pas se blesser avec les dents des fourchettes et
les lames des couteaux.
CHOIX ET MISE EN MARCHE D'UN PROGRAMME DE LAVAGE
On pourra sélectionner un programme de lavage à l'aide des boutons et .
Les programmes de lavage présents sont :
P1: durée 80'' – température lavage 55° - température rinçage 70°
P1: durée 120'' – température lavage 55° - température rinçage 75°
P1: durée 180'' – température lavage 55° - température rinçage 85°
P1: durée 480'' – température lavage 60° - température rinçage 85°
OPTIONNEL : programme consacré aux verres à bière (rinçage à froid) durée 130” -
température de rinçage à froid établie par le réseau.
Après avoir sélectionné le programme souhaité, le cycle de lavage sera is en marche en
appuyant sur la touche ou en fermant le capot.
La touche sera bleue et l'afficheur affichera un compte à rebours indiquant la fin du cycle
de lavage complet. Page-écran cycle de lavage en cours.
Si la porte / le capot sont ouverts lors du cycle de lavage, la phase s'interrompt et elle
reprendra uniquement après la fermeture de la porte / du capot, si elle aura lieu dans les 20
secondes suivantes. Si cette période est dépassée, le cycle se réinitialisera. Le programme P4
pourra être achevé tout de suite en passant à la phase de rinçage par un second appui sur la
touche (couleur bleu) lors de la phase de lavage.
PROLONGATION DE LA PHASE DE LAVAGE : TERMOSTOP
(ACTIONNABLE À PARTIR DU MENU TECHNIQUE)
Si le temps de lavage est épuisé et le rinçage n'a pas encore atteint la température établie, la
phase de lavage sera prolongée jusqu'à l'atteinte de la valeur de rinçage établie.
Affichage termostop actif: TS
VIDANGE DE FIN JOURNÉE (versions avec trop plein)
Pour désactiver la machine à fin service appuyer sur la touche .
Ouvrir la porte et enlever le trop plein. Il est possible d'activer la fonction AUTOCLEAN en
appuyant sur le bouton (couleur bleu) dans les 20 seconds suivantes.
Si la cuve n’est pas vide, le cycle d’autonettoyage ne démarre pas.
Dans les modèles N1300 Double charger un panier vide pour activer le contact.
Après 20” la vidange de la cuve démarre jusqu'à la conclusion, affichage OFF, sauf pour les
modèles avec cycle de régénération (voir section correspondante).
Si après la vidange l’eau n’a pas été vidée, le message CUVE PLEIN restera affiché pour 30”.

32
VIDANGE DE FIN JOURNÉE AVEC DÉCHARGE AUTOMATIQUE :
Pour désactiver la machine à fin service appuyer sur la touche .
Il est possible d'activer la fonction AUTOCLEAN en appuyant sur le bouton (couleur
bleu) dans les 20 seconds suivantes.
Si la cuve n’est pas vide, le cycle d’autonettoyage ne démarre pas.
Dans les modèles N1300 Double charger un panier vide pour activer le contact.
Après 20” la vidange de la cuve démarre jusqu'à la conclusion, affichage OFF, sauf pour
modèles avec cycle de régénération (voir section correspondante).
Si après la vidange l’eau n’a pas été vidée, le message CUVE PLEIN restera affiché pour 30”.
Après avoir achevé la vidange, la machine demeurera en veille, mode OFF.
Après avoir débranché l'interrupteur mural et fermé le robinet d'alimentation de l'eau, enlever
les filtres ; laver l'intérieur du bac et les filtres à l'aide de produits appropriés et replacer les
filtres et le trop plein dans le bac.
SIGNALISATION DE SEL ÉPUISÉ (VERSIONS AVEC ADOUCISSEUR) :
Le sel pour lave-vaisselle est fondamental pour le cycle de régénération de l'adoucisseur
installé dans la machine. L'afficheur indiquera l'absence de sel dans le conteneur logé dans le
bac ; pour le remplir utiliser l'entonnoir fourni et nettoyer le bac d'éventuels résidus de sel.
Signalisation absence de sel.
NOTE : ENLEVER IMMÉDIATEMENT L'ÉVENTUEL SEL TOMBÉ DANS LE BAC, la non
observance de cette consigne pourrait causer des dommages à la surface du bac, par
exemple des taches de rouille ou pareils.
Attention : utiliser uniquement du sel spécial, ne pas utiliser de sel alimentaire.
Le réservoir du sel a une capacité d'env. 1 kg de sel en grains.
Le réservoir est logé sur le fond du bac. Après avoir enlevé le panier, dévisser le bouchon et verser le sel, possiblement en employant
l'entonnoir fourni. Avant de revisser le bouchon enlever d'éventuels résidus de sel près de l'ouverture. Effectuer la provision de sel
quand il n'y a pas d'eau dans le bac en vue d'éviter que de l'eau de lavage entre dans l’adoucisseur ; toujours débrancher la fiche
d'alimentation de la prise du réseau avant d'effectuer l'opération. Se rappeler de réinsérer la fiche d'alimentation dans la prise après
avoir effectué l'opération.
Lors de la première utilisation, après avoir introduit le sel ajouter de l'eau dans le réservoir du sel.
CYCLE DE RÉGÉNÉRATION AUTOMATIQUE
Le cycle de régénération est automatique. Le lave-vaisselle est équipé d'un compteur de
lavages qui, après avoir atteint le nombre de cycles prédéfinis, à la première désactivation et
vidange du bac mettra en marche la régénération, affichage #.
Si la machine suit le fonctionnement normal et le nombre de cycles prédéfinis est atteint,
l'icône # clignotante sera affichée sur la partie droite de l'écran. Cela indique que la machine
entrera en régénération à la première désactivation.
Dans les modèles N1300 Double charger un panier vide pour activer le contact.
Après avoir achevé la régénération, la machine demeurera en OFF.
FONCTION ECONOMY
Lorsque le lave-vaisselle n'est pas utilisé pendant 30 minutes (temps programmable à partir du
menu technique), il entre en mode "economy", en gardant les températures les plus basses.
Pour sortir de cette fonction appuyer sur une touche ou ouvrir la porte.
-MANQUE DE SEL-

33
7 – ENTRETIEN ET NETTOYAGE
Bien que la programmation d'aucune maintenance particulière ne soit requise, nous conseillons de faire contrôler le lave-
vaisselle par un technicien spécialisé deux fois par an.
NOTE : tout dommage intentionnel ou découlant de l’insouciance, la négligence, le non-respect des consignes, des instructions
et des normes ou de fausses connexions ne doit pas être considéré responsabilité du fabricant.
Le lave-vaisselle respecte le degré de protection IPX1 et il est interdit d'utiliser des jets d'eau directs pour le nettoyage.
NETTOYAGE DES FILTRES PENDANT LA JOURNÉE
En cas d'utilisation particulièrement intense, on conseille d'effectuer le nettoyage du filtre tous les 30-40 cycles, en gardant la
machine en condition d’opérer ; pour faire cette opération, effectuer la "vidange du bac".
Enlever le filtre (1) (il est suffisant de le soulever de son logement comme indiqué dans la figure) ; faire en sorte que les résidus
grossiers ne tombent pas dans le bac, nettoyer le filtre des résidus et le rincer abondamment.
Nettoyer le filtre interne aussi (2) en le libérant d'éventuels résidus.
Réinsérer correctement le filtre (1) dans son logement. Ne pas opérer à l'aide d'objets pointus ou tranchants.
Éliminer d'éventuelles incrustations de calcaire en vue d'éviter des accumulations. Nettoyer fréquemment et soigneusement les
surfaces avec un chiffon humide ; utiliser des détergents neutres, non abrasifs, ne contenant pas de substances à base de
chlore, produits corrosifs ou endommageant l'acier inoxydable.
Également, ne pas utiliser les produits indiqués ci-dessus pour nettoyer le sol sous ou près du lave-vaisselle, en vue d'éviter
que les vapeurs ou des gouttes puissent endommager les surfaces en acier.
Pour nettoyer le bac et les parois, on conseille d'utiliser un chiffon humide ou une peau de chamois avec de l'eau savonneuse
et un détergent doux ; ne jamais utiliser de paille de fer abrasive ou d’éponges en fer.
Contrôles périodiques
Démonter les bras de lavage (inférieure et supérieure 2-3) en dévissant la vis centrale (1).
Nettoyer les trous et les buses sous un jet d'eau courante propre, ne pas utiliser d’outils pouvant provoquer des dommages.
Remonter soigneusement les bras de lavage.
Nettoyer la machine extérieurement avec un chiffon humide et du savon neutre en rinçant et essuyant soigneusement.
Produit à ne jamais utiliser pour le nettoyage du bac et des surfaces en acier :
- Produits contenants du chlorure ou de l'acide chlorhydrique
- Eau de Javel
- Produits destinés au nettoyage de l'argent
- Paillettes abrasives ou métalliques
NOTE : l'utilisation non correcte des produits ci-dessus mentionnés pourrait causer la formation de taches de
rouille sur la surface.
Arrêt prolongé
Si l’on prévoit de ne pas utiliser le lave-vaisselle pendant une période de temps assez longue, il faut effectuer la vidange des
dispositifs de dosage des produits lessiviels et de rinçage en vue d'éviter des cristallisations et des dommages aux pompes :
enlever les tuyaux de tirage des conteneurs des produits lessiviels et de rinçage et les plonger dans un conteneur avec de l'eau
propre ; effectuer des cycles de lavage et la vidange complète.
En fin, débrancher l'interrupteur général et fermer le robinet d'alimentation de l’eau. Les tuyaux de tirage du produit lessiviel et
du produit de rinçage devront être réinsérés dans leurs conteneurs lors de la mise en fonction ; veiller à ne pas les inverser
(tuyau rouge = produit lessiviel ; tuyau transparent = produit de rinçage).
Ne pas laisser l'appareil inactif allumé et inutilisé pendant des périodes de temps plus ou moins longues sans aucun contrôle
direct de l'opérateur.

34
8 – ERREURS AFFICHÉES / PROBLÈMES
Remplissage boiler/bac non effectué dans le temps prédéfini
La touche sera rouge.
Anomalie ou panne des capteurs température boiler / bac
La touche sera rouge.
Niveau de l'eau dans le bac trop haut
Avec cet affichage l'électrovanne de remplissage sera désactivée et le rinçage ne sera pas effectué.
SOLUTIONS :
- Vérifier l'absence d'éventuelles obstructions dans le tuyau de vidange.
- Vérifier le bon fonctionnement de la pompe de vidange.
- Désactiver et vidanger le bac. Activer à nouveau.
- Si après avoir désactivé et réactivé la machine le problème persiste, s'adresser à l'assistance technique en communiquant le type
d'erreur affichée.
NIVEAU D'EAU ÉLEVÉ - CHECK POMPE VIDANGE - C : 23 °C R : 34 °C
P1 : 60”

35
PROBLÈME
CAUSE POSSIBLE
SOLUTION POSSIBLE
LE TÉMOIN DE L'ALIMENTATION
ÉLECTRIQUE NE S'ALLUME PAS
Absence de tension.
Vérifier le branchement au réseau électrique.
LE CYCLE DE LAVAGE NE DÉMARRE
PAS
Le remplissage du lave-vaisselle
n’a pas encore été achevé.
Attendre l'allumage du DEL triangulaire.
MAUVAIS RÉSULTATS DE LAVAGE
Trous des bras de lavage obstrués
ou incrustés.
Démonter et nettoyer les bras de lavage.
Produit lessiviel ou de rinçage
insuffisant ou non approprié.
Vérifier le type et la quantité du produit
lessiviel.
Mauvais positionnement des
assiettes / verres.
Disposer correctement les assiettes / verres.
Basse température de lavage.
Vérifier la température affichée ; s'adresser à
l'assistance si elle est inférieure à 50°.
Le cycle sélectionné n’est pas
approprié.
Augmenter la durée du cycle de lavage, surtout
en présence de vaisselle très sale ou
partiellement séchée.
RINÇAGE INSUFFISANT
Buses des bras de lavage
obstruées.
Boiler incrusté de calcaire.
Vérifier le nettoyage des buses et le bon
fonctionnement de l'adoucisseur (si présent).
VERRES ET COUVERTS TACHÉS
Produit de rinçage non approprié
ou pas correctement dosé.
Dureté de l'eau supérieure à 12°dF
ou beaucoup de sels dissous.
Vérifier le conteneur du produit de rinçage et
s'assurer que le produit de rinçage utilisé soit
approprié au type d'eau de réseau. Si le
problème persiste s'adresser à l'assistance.
PRÉSENCE D'EAU DANS LE BAC APRÈS
LA VIDANGE
Mauvais positionnement du tuyau
de vidange positionné ou
obstruction partielle.
S'assurer que le tuyau et la vidange du lave-
vaisselle ne soient pas obstrués et que le tuyau
de vidange ne soit pas positionné trop en haut ;
voir le schéma de connexion.

36
Wir danken Ihnen für den Kauf unseres Produkts.
Wir bitten darum, die in diesem Handbuch enthaltenen Anweisungen aufmerksam durchzulesen, um den
Geschirrspüler korrekt zu verwenden.
TECHNISCHE ANWEISUNGEN:
Diese sind für das Fachpersonal gemeint, das mit der Installation, Inbetriebnahme,
Abnahme und eventuellen Kundendienstleistungen beauftragt ist.
Der Installateur hat sich zu vergewissern, dass der Benutzer das Bedienungshandbuch zu
Kenntnis genommen hat und die korrekte Funktionsweise der Maschine verstanden wurde,
um in der Lage zu sein, die Körbe korrekt mit Geschirr und Gläsern zu füllen.
ANWEISUNGEN FÜR DEN BENUTZER:
Diese umfassen Tipps zur Benutzung, die Beschreibung der Bedienungselemente und
Anweisungen zur korrekten Reinigung und Pflege bzw. Wartung des Geschirrspülers.
WARNHINWEISE
DER BENUTZER IST FÜR DIE EINHALTUNG DER GESETZLICHEN VORSCHRIFTEN IN BEZUG
AUF DIE INSTALLATION UND BENUTZUNG DES PRODUKTS VERANTWORTLICH. WIRD DAS
PRODUKT NICHT KORREKT INSTALLIERT ODER VERWENDET, ODER WIRD ES NICHT
AUSREICHEND GEPFLEGT BZW. GEWARTET, TRÄGT DER HERSTELLER KEINERLEI
VERANTWORTUNG IN BEZUG AUF EVENTUELLE DEFEKTE, FUNKTIONSFEHLER, SCHÄDEN
AN SACHEN ODER VERLETZUNGEN VON PERSONEN.
BEVOR JEGLICHE ART VON WARTUNG VORGENOMMENT WIRD, MUSS DAS STROMKABEL
IMMER AUS DER STECKDOSE GEZIEHT WERDEN.
SOLLTE DAS NICHT MÖGLICH SEIN, UND SOLLTE DER SCHALTER AN DER
STROMVERSORGUNGSLINIE NICHT SICHTBAR ODER DER WARTUNG AUSÜBENDEN
PERSON NICHT NAH GENUG LIEGEN, MUSS DAS „ARBEIT IN GANG“-SCHILD ANGEBRACHT
WERDEN.
1 – HINWEISE ZU SICHERHEIT UND BENUTZUNG
2 – TECHNISCHE DATEN
3 – AUFSTELLUNG
4 – ANWEISUNGEN FÜR DEN INSTALLATEUR
5 - ERSTE INBETRIEBNAHME
6 – GEBRAUCHSEINWEISUNGEN
7 – WARTUNG UND REINIGUNG
8 – AM DISPLAY ANGEZEIGTE FEHLER/PROBLEME

37
VOLT
TEMPERATUR MIN. 45°C – MAX 55°C
DRUCK MIN. 2 – MAX 4 kPa/Bar
WASSERHÄRTE MIN. 7° - MAX 12°F / MIN. 5° - MAX 7°dH
BEI DREIPHASEN
PHASENLEITER NICHT MIT NULLEITER (BLAU) VERWECHSELN
KLARSPÜLER DURCHSICHTIGER SCHLAUCH
SPÜLMITTEL (NON-STANDARD-OPTION) ROTER SCHLAUCH
BEI DREIPHASENPUMPE DREHRICHTUNG PRÜFEN
LIEGT DIE WASSERHÄRTE ÜBER 7° dH., SO MUSS EIN EXTERNER WASSERENTHÄRTER INSTALLIERT WERDEN
H ABFLUSS: MAX 10 CM – DURCHSCHUB MAX 20 CM
MASCHINE OHNE WASSERENTHÄRTER
EINE NICHTBEACHTUNG DER ANLEITUNGEN KANN DIE SICHERHEIT DES GERÄTS BEEINTRÄCHTIGEN UND DIE
GEWÄHRLEISTUNG NICHTIG MACHEN.
ZU ÜBERPRÜFEN
MASCHINE MIT WASSERENTHÄRTER
TEMPERATUR MAX 30°C
DRUCK MIN. 3 – MAX 4 kPa/Bar
WASSERHÄRTE MIN. 7° - MAX 26°F / MIN. 5° - MAX 15°dH
REGELMÄSSIG REGENERATIONSSALZ BENUTZEN UND IHN IN DEN BEHÄLTER ENTRICHTEN

38
1 – HINWEISE ZU SICHERHEIT UND BENUTZUNG
DER GESCHIRRSPÜLER IST AUSSCHLIESSLICH FÜR DEN PROFESSIONELLEN GEBRAUCH DURCH BEFUGTES
PERSONAL BESTIMMT. DAS GERÄT IST FÜR DAS SPÜLEN VON GESCHIRR (TELLERN, TASSEN, SCHÜSSELN,
BLECHEN, BESTECK) UND ÄHNLICHEM IN DER GASTRONOMIE UND DER GEMEINSCHAFTSVERPFLEGUNG
BESTIMMT UND ENTSPRICHT DEN INTERNATIONALEN NORMEN FÜR ELEKTRISCHE UND MECHANISCHE
SICHERHEIT (CEI-EN-IEC 60335-2-58/61770) UND FÜR ELEKTROMAGNETISCHE KOMPATIBILITÄT (CEI-IEC-EN
55014-1/-2, 61000-3;4, 50366).
DER HERSTELLER ÜBERNIMMT KEINERLEI HAFTUNG FÜR PERSONEN- ODER SACHSCHÄDEN, DIE DURCH
NICHTBEACHTUNG DER IN DIESEM HANDBUCH ENTHALTENEN HINWEISE, UNSACHGEMÄSSEN GEBRAUCH,
UNBEFUGTE EINGRIFFE AM GERÄT ODER AUCH NUR AN EINEM EINZIGEN GERÄTETEIL UND DURCH DIE
VERWENDUNG NICHT ORIGINALER ERSATZTEILE VERURSACHT WERDEN. DAS GERÄT MUSS GEMÄSS DER
SICHERHEITSVORSCHRIFTEN FÜR ELEKTROANLAGEN KORREKT GEERDET WERDEN. SOLLTE DER
ANSCHLUSSKABEL BESCHÄDIGT SEIN, SO DARF DIESER NUR VOM HERSTELLER ODER EINEM
AUTORISIERTEN KUNDENDIENST ERNEUERT WERDEN.
DIESES GERÄT TRÄGT DAS KONFORMITÄTSZEICHEN DER EUROPÄISCHEN RICHTLINIE 2002/96/EC, WASTE
ELECTRICAL AND ELECTRONIC EQUIPMENT (WEE).
ES IST AUFGABE DES BENUTZERS, FÜR EINE KORREKTE ENTSORGUNG DES GERÄTS ZU SORGEN, UM
ETWAIGEN NEGATIVEN UMWELT- UND GESUNDHEITSSCHÄDLICHEN AUSWIRKUNGEN VORZUBEUGEN. ES
WIRD ERKLÄRT, DASS DIE SCHALLDRUCKPEGELEMISSION LPA 62 DB/A BETRÄGT UND ZWISCHEN KPA + 1 DB
SCHWANKT. DIE SCHALLLEISTUNG BETRÄGT LWA 73.79 UND SCHWANKT ZWISCHEN KWA + 1 DB. DAS AUF
DEM GERÄT SELBST ODER AUF DEN BEILIEGENDEN UNTERLAGEN ANGEBRACHTE SYMBOL DRÜCKT AUS,
DASS DIESES GERÄT NICHT ZUM NORMALEN HAUSMÜLL GEHÖRT, SONDERN IN EINEM SPEZIELLEN
RECYCLINGHOF FÜR ELEKTRO- UND ELEKTRONISCHE GERÄTE ENTSORGT WERDEN MUSS. DAS GERÄT MUSS
GEMÄSS DER GELTENDEN ÖRTLICHEN BESTIMMUNGEN ZUR MÜLLENTSORGUNG ZERLEGT WERDEN. FÜR
WEITERE INFORMATIONEN BEZÜGLICH DER BEHANDLUNG, ENTSORGUNG UND WIEDERVERWERTUNG DIESES
GERÄTS WENDEN SIE SICH AN DAS ZUSTÄNDIGE ÖRTLICHE AMT, DEN MÜLLABFUHRVERBAND ODER IHREN
HÄNDLER.
DIESES HANDBUCH IST FESTER BESTANDTEIL DER GESCHIRRSPÜLMASCHINE; STETS
VOLLSTÄNDIG GEMEINSAM MIT DEM GERÄT AUFBEWAHREN.
AUFSTELLUNG, ANSCHLÜSSE, INBETRIEBNAHME UND FEHLERBEHEBUNG SOWIE DAS
AUSWECHSELN DES STROMVERSORGUNGSKABELS DÜRFEN AUSSCHLIESSLICH VON
QUALIFIZIERTEM FACHPERSONAL VORGENOMMEN WERDEN.
NIEMALS LÖSUNGSMITTEL WIE ALKOHOL ODER TERPENTIN EINFÜHREN. DERARTIGE STOFFE
KÖNNEN EXPLOSIONEN VERURSACHEN. NIEMALS GESCHIRR MIT ASCHE-, WACHS- ODER
LACKRESTEN EINFÜHREN.
DEN GESCHIRRSPÜLER ODER TEILE DAVON NIEMALS ALS STUFE, STÜTZE ODER HALTERUNG
FÜR PERSONEN, DINGE ODER TIERE VERWENDEN.
SICH NICHT AUF DIE GEÖFFNETE TÜRKLAPPE DER GESCHIRRSPÜLMASCHINE SETZEN ODER
ANLEHNEN. ES DROHT KIPPGEFAHR MIT ENTSPRECHENDER VERLETZUNGSGEFAHR FÜR
PERSONEN. DIE TÜRKLAPPE DER GESCHIRRSPÜLMASCHINE WEGEN STOLPERGEFAHR NIEMALS
OFFEN LASSEN.
VORHANDENDE WASSERRÜCKSTÄNDE IM GESCHIRR ODER IM GESCHIRRSPÜLER NACH EINEM
SPÜLGANG NIEMALS TRINKEN.
DAS GERÄT IST NICHT FÜR DEN GEBRAUCH DURCH MINDERJÄHRIGE ODER PERSONEN MIT
VERMINDERTEN KÖRPERLICHEN, WARNEHMUNGS- ODER GEISTIGEN FÄHIGKEITEN BZW. DURCH
UNERFAHRENES PERSONAL GEEIGNET. DERARTIGE PERSONEN DÜRFEN DAS GERÄT NUR UNTER
AUFSICHT EINER FÜR IHRE SICHERHEIT VERANTWORTLICHEN PERSON GEBRAUCHEN.
Sich nach der täglichen Reinigung vergewissern, dass im Inneren des Geschirrspülers keine metallischen
Fremdkörper zurückbleiben, die innerhalb der Maschine Rostflecken verursachen könnten. Rostspuren
können auch von Geschirr herrühren, das nicht aus Edelstahl ist, von falschem Reinigungsmittel, von
beschädigten Eisendrahtkörben, von kratzenden oder Metall enthaltenden Topfreibern und Schwämmen
sowie von auf dem Boden des Spülraums zurück gebliebenem Salz.

39
2 – TECHNISCHE DATEN
Wassertemperatur
°C
55
Wassertemperatur (Modell mit eingebautem Wasserenthärter)
°C
Max 30
Wasserhärte
°F
7 – 12
Wasserdruck
kPa
200/400
Wasserdruck (Modell mit eingebautem Wasserenthärter)
kPa
300/400
Wasserverbrauch pro Nachspülgang (200 kPa)
l
2,4/2,6
Wäschetemperatur
°C
50 - 60
Spülentemperatur
°C
82 - 85
Nettogewicht
kg
Min.27
Max 131
Max Umgebungstemperatur
°C
40
Stromversorgungskabel
◄HAR►
H07RN-F
Für Stromversorgung und Leistung siehe Typenschild an der Maschine und auf dem Cover des
Handbuchs oder auf der rechten Seitenwand der Maschine.
3 – AUFSTELLUNG
Den Geschirrspüler an seinen Installationsort bringen, die Verpackung entfernen und das Gerät und seine Bestandteile auf
Unversehrtheit überprüfen. Etwaige Schäden müssen dem Lieferanten schriftlich mitgeteilt werden. Die
Verpackungsbestandteile (Plastiktüte, Styroporschaum, Nägel, etc.) stellen potentielle Gefahrenquellen dar und müssen
deshalb für Kinder und Haustiere unzugänglich sein.
Es werden ausschließlich umweltverträgliche Verpackungsmaterialien verwendet. Sie können bedenkenlos aufbewahrt
oder in einer speziellen Abfallentsorgungszentrale entsorgt werden.
Für eine etwaige Entsorgung mit Recycling sind die verschiedenen Kunststoffmaterialien folgendermaßen gekennzeichnet:
PE Polyethylen: Umverpackungsfolie, Kunststoffhülle für die Gebrauchsanleitung, Schutzhüllen.
PP Polypropylen: Verpackungsbänder.
PS Styropor-Schaumstoff: Schutzecken, Verpackungsdeckel.
Holzbestandteile und Kartons müssen gemäß der geltenden Vorschriften entsorgt werden.
Altgeräte niemals in der Umwelt abladen. Die Demontage muss gemäß der geltenden Vorschriften erfolgen. Alle
Metallbestandteile können ausgebaut werden und sind aus rostfreiem Edelstahl.
Alle Kunststoffbestandteile sind mit dem Symbol des entsprechenden Materials gekennzeichnet.
AUFSTELLUNG:
Achtung: Die Innenanlage und die Räume, in denen die Geräte für Gemeinschaftsverpflegung installiert
werden, müssen den geltenden Vorschriften entsprechen.
Der Hersteller übernimmt für etwaige durch die Nichtbeachtung dieser Vorschriften verursachte Schäden keinerlei
Haftung. Vor der Installation sicherstellen, dass sich in der Nähe des Aufstellorts keine bzw. nur entsprechend
geschützte Gegenstände oder Materialien befinden, die durch den Wasserdampf oder durch Spritzer der
Waschflüssigkeit beschädigt werden könnten.
Den Geschirrspüler am gewünschten Ort aufstellen und die Schutzfolie entfernen.
Den Geschirrspüler (mit einer Wasserwaage) auf den vier Stützfüßen fest und stabil aufstellen. Weitere
Aufstellungslösungen müssen zuerst vom Hersteller genehmigt werden. Die 4 Beinen auf dem Boden befestigen.

40
4 – ANWEISUNGEN FÜR DEN INSTALLATEUR
Wassernetzanschluss
Die Wasserschläuche und das Stromkabel treten auf der Rückseite der Maschine heraus. Den Wasserzulaufschlauch an einen
Wasseranschluss mit ¾” Gewindegasrohrverbindung anschließen.
Zum Anschluss an das Wassernetz ausschließlich neue Schläuche verwenden. Alte oder gebrauchte Schläuche dürfen nicht
zur Anwendung kommen.
Der dynamische Wasserzulaufdruck muss zwischen 200 und 400 kPa liegen. Falls er höher sein sollte, muss ein
Druckreduzierer installiert werden (bei den Ausführungen mit eingebautem Wasserenthärter zwischen 300 und 400 kPa).
Liegt der Druck unter obigem Bereich, ist eine Druckerhöhungspumpe zu installieren.
Am Wasserzuleitungsrohr muss unbedingt ein Wasserhahn angebracht werden, der nach Beendigung der Installationsarbeiten
gut zugänglich sein muss. Nicht hinter dem Geschirrspüler installieren.
Die angegebene Dauer der Spülvorgänge bezieht sich auf einen Wasserzulauf mit Warmwasser zu 50°C.
Wird Kaltwasser zugeführt, könnte sich die Spüldauer je nach der effektiven Temperatur des Wasserzulaufs erhöhen.
Bei den Ausführungen mit eingebauter Umkehrosmose ist der mitgelieferte Netzfilter oder der Aktivkohlefilter am
Wasserzulaufhahn zu installieren. Der Härtewert des Wassers muss zwischen 7 und 12°F liegen und die Temperatur maximal
bei 30°C.
Die Filter sind mindestens zweimal jährlich zu ersetzen.
Werden die obigen Parameter nicht berücksichtigt, so kann dies zu einem vorzeitigen Verschleiß der inneren
Umkehrosmosemembran führen.
Bitte vergewissern Sie sich, dass der Härtewert des Wassers zwischen 7 und 12°F liegt. Wird dieser Wertebereich nicht
eingehalten, so ist ein Wasserenthärter einzubauen, um Schäden durch Kalkablagerungen zu vermeiden, die nicht unter die
Garantie fallen.
Abfluss:
Jeder Geschirrspüler wird mit einem Abflussschlauch zum Anschließen an einen Bodenabfluss mit Siphon geliefert. Befindet
sich der Abfluss in der Wand, muss eine Ablaufpumpe verwendet werden.
Achtung: Bitte vergewissern Sie sich, dass die Wasserzulauf- und Wasserabflussschläuche nach Beendigung
der Installationsarbeiten nicht gebogen, geknickt oder gequetscht sind.
Stromnetzanschluss
Der elektrische Anschluss des Geschirrspülers und eventueller zusätzlicher Geräte ist von ausgebildetem und zugelassenem
Fachpersonal vorzunehmen, und zwar unter Einhaltung der geltenden Vorschriften. Darüber hinaus sind die technischen
Anschlussanweisungen zu berücksichtigen.
Die installierte Gesamtleistung ist auf dem Schild mit den technischen Daten des Geräts angegeben.
Die Schutzvorrichtungen dürfen sich lediglich auf den Geschirrspüler und nicht auf weitere Geräte beziehen.
Der Betreiber muss in Übereinstimmung mit den geltenden Vorschriften einen Hauptschalter an der Stromversorgung sowie
einen den Eigenschaften der Maschine entsprechenden Differentialschalter installieren.
Der Hauptschalter an der Stromversorgung sowie der Differentialschalter müssen von ausgebildetem Fachpersonal installiert
werden. Besagte Schalter müssen sich in der Nähe des Geschirrspülers befinden, nach Abschluss der Installation leicht
zugänglich sein und es ermöglichen, den Anschluss an das Stromnetz bei Auftreten von Überspannungen der Kategorie III
vollständig zu trennen.
Achtung: Darauf achten, dass die Phasenleiter sowohl am fünfpoligen Stecker des Versorgungskabels (nicht
mitgeliefert) als auch in der Steckdose an der Wand nicht mit dem Neutralleiter verwechselt werden.
Wenn die Spülpumpe dreiphasig ist, prüfen Sie, ob die Drehrichtung der durch den Pfeil auf dem Motor angezeigten
Richtung entspricht. Wenn nicht, kehren Sie die Phasen L1 und L2 oder L3 mit L2 oder L3 mit L1 um.
Achtung!
Der Geschirrspüler ist lediglich dann spannungsfrei, wenn der Hauptschalter abgeschaltet ist.
- Das Gerät an die Potentialausgleichsleitung anschließen. Die Anschlussklemme befindet sich im hinteren
unteren Bereich der Maschine.
- Der Schutzleiter (PE) ist gelb-grün, der Neutralleiter (N) blau und die Phasenleiter (L1, L2, L3) schwarz, grau und
braun.
MASCHINE MIT WASSERENTHÄRTER
EINSTELLUNGEN
A = Härte des verwendeten Wassers in °F
B = Anzahl der Waschphasen, nach denen
die automatiche Regenerierungsphase
gestartet werden muss
A
14 °F
22 °F
32 °F
37 °F
42 °F
52 °F
B
120
80
50
40
30
25

41
ERSATZ DER PATRONENFILTER (Modelle mit Osmose)
Das zeigt, dass die „Lebensdauer“ des auf dem Geschirrspüler installierten Aktivkohlefilters oder Netzfilters erreicht
wurde.
- Den Geschirrspüler abschalten und spannungsfrei schalten.
- Den Wasserzulaufhahn zudrehen.
- Den Gewindering mit dem mitgelieferten Schlüssel aufdrehen.
- Den Aktivkohlefilter oder Netzfilter herausnehmen und das Wasser aus der Filteraufnahme entfernen.
- Den neuen Filter einsetzen.
- Die Filteraufnahme wieder anbringen und den Gewindering mit dem mitgelieferten Schlüssel zudrehen.
- Den Wasserhahn erneut öffnen und sich vergewissern, dass keine Leckagen entstehen.
- Den Geschirrspüler wieder mit Spannung versorgen und anschalten.
- Die Filterzählung im entsprechenden Menü rücksetzen.
5 – ERSTE INBETRIEBNAHME
Das elektrische Schutzsystem ist vor der Inbetriebnahme einem Funktionstest zu unterziehen. Die Installation ist durch den
autorisierten Einzelhändler durchzuführen bzw. abzunehmen, der für die erste Inbetriebnahme und die entsprechenden
Anweisungen in Bezug auf den Betrieb des Geschirrspülers verantwortlich ist.
VORBEREITUNG ZUM GEBRAUCH
Die Dosiervorrichtung für den Klarspüler ist immer vorhanden, der Spülmitteldosierer hingegen nur bei einigen Modellen.
Sind beide Dosiervorrichtungen vorhanden, die externen Behälter für Spülmittel und Klarspüler anbringen und die
entsprechenden an der Rückseite der Maschine vorhandenen Ansaugschläuche in die Behälter einführen.
roter Schlauch: Spülmittel / durchsichtiger Schlauch: Klarspüler
Bevor die Schläuche in die Behälter eingeführt werden, sind an ihren Enden die Gewichte (damit die Flüssigkeiten am Boden
der Behälter angesaugt werden) sowie der Filter anzubringen, wie in Abb. 2 dargestellt. Zur Regulierung wird an den in der
Abbildung 1-3 angegebenen Einstellschrauben gedreht. Die Regulierung muss ausschließlich vom Personal des
Spülmittellieferanten vorgenommen werden.
Falls der Spülmitteldosierer nicht bereits im Werk installiert wurde, kann er nachbestellt und nachträglich eingebaut werden
(durch unser Service-Personal).
Geschirrspüler ohne Spülmitteldosierer: Alle 4-5 Waschphasen das Spülmittel direkt in den Spülraum gießen, wobei in
Bezug auf Art und Menge des zu verwendenden Produktes die Angaben des Spülmittelherstellers zu berücksichtigen sind.
EVO3 Modell, Dosiervorrichtungen durch den Display einstellbar
Um das Menü aufzurufen:
Die Taste für 2 Sekunden drücken.
Die gewünschte Funktion durch die Tasten und wählen.
Die Taste ermöglicht, den Parameter aufzurufen oder zu schließen.
um zurückzugehen und die Programmierung zu schließen.
DC 10,0 ML 13 “ (Reinigungsmitteleinstellung bei der Tankfüllungsphase)
DL 6,1 ML 8” (Reinigungsmitteleinstellung beim Waschgang)
D TEST 0 (Spülmitteldosierer-Aktivierungstest)
BC 4,2 ML 20 “ (Klarspülereinstellung bei der Tankfüllungsphase)
BR 2,9 ML 14” (Klarspülereinstellung beim Klarspülgang)
B TEST 0 (Klarspüler-Aktivierungstest)
Ausschließlich Spülmittel und Klarspüler für gewerbliche Geschirrspüler verwenden. Niemals Handspülmittel verwenden. Wir
raten dazu, speziell für diesen Geschirrspüler entwickelte Produkte zu verwenden.
Beim Nachfüllen der Behälter darauf achten, dass die Produkte nicht verwechselt werden, da dies
Funktionsstörungen und Schäden am Geschirrspüler verursachen könnte.

42
6 – GEBRAUCHSEINWEISUNGEN
Den Wasserhahn
der
Versorgungsleitung
öffnen.
Prüfen Sie:
Die Stromversorgung
über den Hauptschalter
(Netztrennschalter)
einschalten
Spülmittel- und
Klarspülerstand in
den jeweiligen
Behältern.
Die korrekte Positionierung der Filter, die freie
Bewegung der Sprüharme, und dass sich im Inneren
des Geschirrspülers keine Fremdkörper befinden.
STILLLEGENDE MASCHINE: OFF- BILDSCHIRM
Maschinenausschaltung: OFF-Bildschirm.
Wenn die Maschine ausgeschaltet ist, wird OFF auf dem Bildschirm aufgezeigt. Nur die
ON/OFF-Taste leuchtet.
Aus dem OFF-Zustand heraus kann die Maschine ausgeschaltet werden, indem die ON/OFF-
Taste 2 Sekunden lang betätigt wird. Das Benutzermenü bzw. Technikermenü (mit Passwort
geschützt) wird geöffnet, indem die Taste 3 Sekunden lang betätigt wird.
MASCHINENEINSCHALTUNG
Nachdem die Siebe und das (eventuell vorhandene) Standrohr eingesetzt worden sind, die
Taste 2 Sekunden lang betätigen.
Der Geschirrspüler schaltet sich auf und folgt dem normalen Betriebsbildschirm.
Wenn der Tank oder Kessel leer ist, beginnt die Maschine zu füllen, und das entsprechende
Symbol wird angezeigt. Der Geschirrspüler wird weiter gefüllt, bis die Stände erreicht werden.
Bei dieser Phase kann ein Waschgang mit den Tasten und ausgewählt werden.
AUFWÄRMPHASE
Nach dem Füllvorgang beginnt das Aufwärmen des Wassers zum Nachspülen und für den
Hauptspülgang.
Das Einschaltungssymbol erscheint in gelb, um anzugeben, dass die Aufwärmphase
läuft.
Sobald die programmierten Temperaturwerte erreicht werden, werden die Symbole grün.
Diese Bildschirmseite gibt an, dass die Maschine dazu bereit ist, eine Spülphase zu beginnen.
GESCHIRRLADUNG
Von den Tellern die festen Rückstände (Knochen, Schalen, Kerne, usw.) entfernen. Die Teller
mit angetrockneten Rückständen, z.B. von Käse, Eiern, usw., im kalten Wasser einweichen.
Die Gläser nach unten umdrehen und sie in den Korb stellen.
Das Besteck in den Besteckbehälter stellen. Das Besteck locker positionieren, und zwar
möglichst mit den Griffen nach unten. Hierbei darauf achten, sich nicht mit den Gabelspitzen
oder den Messerklingen zu verletzen.
Verschiedenartige Spülmittel nicht miteinander vermischen, da dies zu Schäden an der Dosiervorrichtung führen könnte.
Spülmittel für gewerbliche Geschirrspüler können schwere Reizungen verursachen. Die vom Hersteller auf der Packung
angebrachten Anweisungen sind genau zu befolgen.

43
WASCHPROGRAMM WÄHLEN UND STARTEN
Das Waschprogramm kann durch die Tasten und gewählt werden.
Es stehen folgende Waschprogramme zur Verfügung:
P1: Dauer 80'' – Waschtemperatur 55° - Nachspültemperatur 70°
P2: Dauer 120'' – Waschtemperatur 55° - Nachspültemperatur 75°
P3: Dauer 180'' – Waschtemperatur 55° - Nachspültemperatur 85°
P4: Dauer 480'' – Waschtemperatur 60° - Nachspültemperatur 85°
OPTIONAL: Programm für Biergläser (Klarspülgang mit Kaltwasser) mit einer Dauer von 130”
- die Temperatur des Kaltspülgangs hängt vom Wassernetz ab.
Nachdem das gewünschte Programm gewählt wurde und die Taste betätigt oder die
Haube geschlossen wurde, beginnt die Waschphase.
Die Taste wird blau, und am Display erscheint ein Countdown bis zum Ende der
kompletten Waschphase. Bildseite „Waschphase in Gang“.
Ist die Tür/Haube während der Waschphase geöffnet, so wird der Vorgang unterbrochen und
nach dem erneuten Schließen der Tür/Haube fortgeführt, unter der Voraussetzung, dass dies
innerhalb von 20 Sekunden geschieht. Wird diese Dauer überschritten, so wird die Phase
rückgesetzt. Das P4-Programm kann sofort mit einem Klarspülgang beendet werden, indem
während des Waschgangs die Taste (blau) erneut gedrückt wird.
VERLÄNGERUNG DES WASCHGANGS: TERMOSTOP
(ÜBER DAS TECHNIKERMENÜ AKTIVIERBAR)
Geht die Waschzeit zu Ende und hat die Klarspülung die programmierte Temperatur noch
nicht erreicht, so wird der Waschgang so lange verlängert, bis der für die Klarspülung
programmierte Wert erreicht wird.
Anzeige des aktiven Thermostops. TS
ABFLUSS AM ENDE DES ARBEITSTAGS (Versionen mit Standrohr)
Am Ende des Betriebs die Maschine über die Taste abschalten.
Die Tür öffnen und das Standrohr herausnehmen. Die Funktion AUTOCLEAN kann aktiviert
werden, indem die Taste (blau) innerhalb 20 Sekunden betätigt wird.
Wenn der Tank nicht leer ist, wird die Selbstreinigungsphase nicht gestartet.
Bei N1300 Double mindestens einen leeren Korb laden, um den Kontakt zu aktivieren.
Nach 20” wird der Tankabfluss startet und am Ende wird das Symbol OFF (mit Ausnahme der
Modelle mit Regenerationsphase - vgl. Abschnitt) aufgezeigt.
Wenn nach den Abfluss das Wasser nicht abgeflossen ist, wird die „VOLLER TANK“-Meldung
für 30” aufgezeigt.
AUTOMATISCHER ABFLUSS AM ENDE DES ARBEITSTAGS:
Am Ende des Betriebs die Maschine über die Taste abschalten.
Die Funktion AUTOCLEAN kann aktiviert werden, indem die Taste (blau) innerhalb 20
Sekunden betätigt wird.
Wenn der Tank nicht leer ist, wird die Selbstreinigungsphase nicht gestartet.
Bei N1300 Double mindestens einen leeren Korb laden, um den Kontakt zu aktivieren.
Nach 20” wird der Tankabfluss startet und am Ende wird das Symbol OFF (mit Ausnahme der
Modelle mit Regenerationsphase - vgl. Abschnitt) aufgezeigt.
Wenn nach den Abfluss das Wasser nicht abgeflossen ist, wird die „VOLLER TANK“-Meldung
für 30” aufgezeigt.
-TANKABFLUSS -
180” OFF
- VOLLER TANK -
- - OFF
-TANKABFLUSS -
180” OFF
- VOLLER TANK -
- - OFF

44
Nach Beendigung des Abflusses verbleibt die Maschine im Stand-by-Zustand - OFF-Modus.
Schalten Sie nun den Hauptschalter aus und schließen Sie den Wasserhahn. Nach dem
Entfernen der Siebe reinigen Sie sie und den Spülraum mit geeigneten Produkten, und setzen
Sie anschließend die Siebe und das Standrohr wieder ein.
SALZMANGELANZEIGE (BEI MODELLEN MIT WASSERENTHÄRTER):
Das Geschirrspülersalz ist von grundlegender Wichtigkeit für die Regenerierungphase des in
der Maschine eingebauten Wasserenthärters. Wenn Salz im entsprechenden Behälter im
Spülraum nachgefüllt werden muss, wird dies am Display angezeigt. Salz mit dem
mitgelieferten Trichter nachfüllen und hierauf den Spülraum von eventuellen Salzrückständen
reinigen. Salzmangelanzeige.
BITTE BEACHTEN SIE: DAS EVENTUELL IM SPÜLRAUM VERSTREUTE SALZ MUSS
SOFORT ENTFERNT WERDEN. Bei Nichtbeachtung kann die Oberfläche des Spülraums
geschadet werden, z.B. durch das Entstehen von Rostflecken.
Achtung: Nur Spezial-Salz und kein Speisesalz verwenden!
Der Salzbehälter besitzt ein Fassungsvermögen von ca. 1 kg groben Salzes.
Er befindet sich am Boden des Spülraums. Nach Herausziehen des Korbs drehen Sie den Schraubverschluss auf und füllen das Salz
mithilfe des mitgelieferten Trichters ein. Bevor Sie erneut den Schraubverschluss aufsetzen, entfernen Sie evtl. Salzreste von der
Öffnung. Nehmen Sie die Salzbefüllung vor, wenn kein Wasser im Spülraum ist, um zu vermeiden, dass Spülwasser in den
Wasserenthärter eintritt. Vor dem Ausführen dieses Vorgangs immer den Netzstecker aus der Steckdose ziehen. Bitte vergessen Sie
nicht, den Netzstecker wieder in die Steckdose einzustecken, nachdem dieser Vorgang beendet worden ist.
Beim ersten Gebrauch nach der Salzfüllung etwas Wasser in den Salzbehälter gießen.
AUTOMATISCHE REGENERIERUNGPHASE
Die Regenerierung erfolgt automatisch. Der Geschirrspüler verfügt über einen Zähler der
durchgeführten Waschphasen. Sobald die Anzahl der programmierten Phasen erreicht wird,
beginnt die Regenerierung nach dem nächsten Abschalten und Abflussvorgang - Symbol #.
Befindet sich die Maschine im Normalbetrieb und wird die programmierte Anzahl von
Waschphasen erreicht, erscheint das blinkende Symbol # auf der rechten Seite des
Displays. Das bedeutet, dass die Maschine nach dem nächsten Abschalten eine
Regenerierungphase starten wird.
Bei N1300 Double mindestens einen leeren Korb laden, um den Kontakt zu
aktivieren.
Nach Abschluss der Regenerierung geht die Maschine auf OFF.
ECONOMY-FUNKTION
Wird der Geschirrspüler 30 Minuten lang nicht verwendet (diese Zeitdauer kann im Techniker-
Menü programmiert werden), geht er in den Economy-Zustand mit niedrigeren Temperaturen
über.
Um diesen Zustand wieder zu verlassen, einfach eine Taste betätigen oder die Tür öffnen.
-SALZMANGEL-
REGENERATION IN
GANG 18:00
OFF

45
7 – WARTUNG UND REINIGUNG
Obwohl keinerlei besondere regelmäßige Wartung durchzuführen ist, raten wir doch dazu, den Geschirrspüler von einem
Spezialisten zweimal jährlich prüfen zu lassen.
BITTE BEACHTEN SIE: Der Hersteller übernimmt keinerlei Verantwortung für absichtliche Beschädigungen oder Schäden, die
auf Fahrlässigkeit, Vernachlässigung, mangelnde Einhaltung der Anweisungen, Vorschriften und Normen oder auch auf falsche
Anschlüsse zurückzuführen sind.
Die Spülmaschine entspricht der Schutzklasse IPX1 und es ist verboten, einen direkten Wasserstrahl zum Reinigen zu
verwenden.
REINIGUNG DER SIEBE IM LAUFE DES ARBEITSTAGS
Bei besonders intensiver Beanspruchung wird dazu geraten, nach jeweils 30-40 Phasen das Sieb zu reinigen, während sich die
Maschine in betriebsbereitem Zustand befindet. Führen Sie hierzu den Vorgang „Spülraumabfluss“ durch.
Das Sieb herausnehmen (1) (es einfach aus seinem Sitz herausheben, wie in der Abbildung angezeigt) und hierbei darauf
achten, dass keine größere Rückstände in den Spülraum fallen, das Sieb von den Rückständen befreien und reichlich unter
fließendem Wasser abspülen.
Auch das innere Sieb (2) reinigen und von eventuellen Rückständen befreien.
Das Sieb (1) wieder korrekt in seinen Sitz einfügen. Keinerlei spitze oder schneidende Gegenstände verwenden.
Eventuelle Kalkrückstände wegputzen, um deren Ansammlung zu verhindern. Die Oberflächen oft und sorgfältig mit einem
feuchten Lappen reinigen. Hierzu neutrale, nicht kratzende und chlorfreie Reinigungsmittel verwenden, die nicht korrodieren
und für Edelstahl geeignet sind.
Die oben beschriebenen Produkte auch nicht zum Reinigen des Fußbodens unter dem Geschirrspüler oder in dessen Nähe
verwenden, um zu vermeiden, dass entstehende Dämpfe oder Tropfen die Stahloberflächen beschädigen können.
Zum Reinigen des Spülraums und der Wände bitte ein mit Wasser und einem milden Reinigungsmittel angefeuchtetes Tuch
oder Wildleder verwenden. Auf keinen Fall dürfen kratzende Topfreiniger oder Schwämme mit Metallanteilen verwendet
werden.
Regelmäßig durchzuführende Kontrollen
Die zentrale Schraube lösen (1) und die Sprüharme (oben und unten 2-3) demontieren.
Die Öffnungen und Düsen unter sauberem, fließendem Wasser reinigen, keinerlei spitze oder schneidende Gegenstände
verwenden, die Beschädigungen verursachen könnten. Die Sprüharme wieder sorgfältig einbauen.
Die Maschinenaußenseite mit einem feuchten Lappen und neutraler Seife abwischen, dann sorgfältig mit feuchtem Lappen
ohne Seife spülen und abtrocknen.
Längerer Stillstand
Soll ein Geschirrspüler über längere Zeit nicht mehr benutzt werden, so ist unbedingt die Dosiereinrichtung für Spülmittel und
Klarspüler zu entleeren, um für die Pumpen schädliche Kristallbildungen zu vermeiden. Hierzu die Ansaugschläuche aus den
Behältern für Spülmittel und Klarspüler herausnehmen und in einen mit sauberem Wasser gefüllten Behälter einführen, einige
Waschphasen und dann ein vollständiges Abfluss durchführen.
Anschließend den Hauptschalter ausschalten und den Wasserzulaufhahn zudrehen. Die Spülmittel- und
Klarspüleransaugschläuche werden bei der erneuten Inbetriebnahme wieder in ihre Behälter eingesetzt, wobei darauf zu achten
ist, dass sie nicht verwechselt werden (roter Schlauch = Spülmittel; durchsichtiger Schlauch = Klarspüler).
Folgende Produkte dürfen auf keinen Fall für die Reinigung des Spülraums und der Oberflächen aus Stahl
verwendet werden:
- Chloride oder Salzsäure enthaltende Produkte
- Bleichlauge
- Silberreinigungsmittel
- Kratzende oder Metall enthaltende Stahlwollen
BITTE BEACHTEN SIE: Die unkorrekte Verwendung der o.g. Produkte kann Rostflecken an der Oberfläche
verursachen.

46
Darauf achten, dass das Gerät niemals über mehr oder weniger lange Zeit hinweg in eingeschaltetem Zustand ohne direkte
Beaufsichtigung eines Bedieners unbenutzt bleibt.
8 – AM DISPLAY ANGEZEIGTE FEHLER/PROBLEME
Der Boiler/Spülraum wurde nicht innerhalb der programmierten Zeit gefüllt
Die Taste wird rot.
Störungen bzw. Defekte der Boiler-/Spülraumsonden
Die Taste wird rot.
Zu hoher Wasserstand im Spülraum
Wenn diese Bildschirmseite angezeigt wird, wird das Elektroventil zum Füllen ausgeschaltet und das Klarspülen nicht
durchgeführt.
LÖSUNGEN:
- Sich vergewissern, dass der Ablaufschlauch nicht verstopft ist.
- Sich vergewissern, dass die Ablaufpumpe korrekt funktioniert.
- Abschalten und den Spülraum entleeren. Erneut einschalten.
- Die Maschine aus- und wieder einschalten, und falls das Problem weiterhin besteht, den Kundendienst kontaktieren und die Art
der am Display angezeigten Störung angeben.
HOHER WASSERSTAND - CHECK ABFLUSSPUMPE - C: 23 °C R: 34 °C
P1 :60”

47
PROBLEM
MÖGLICHE URSACHE
MÖGLICHE LÖSUNG
DIE KONTROLLAMPE LEUCHTET NICHT
AUF
Stromnetz ausgefallen.
Stromnetzanschluss prüfen.
DIE WASCHPHASE WIRD NICHT
GESTARTET
Das Ausfüllen des
Geschirrspülers ist noch nicht
beendet.
Bitte warten, bis die dreieckige LED
aufleuchtet.
SCHLECHTE WASCHERGEBNISSE
Die Düsenöffnungen an den
Sprüharmen sind verstopft oder
verkrustet.
Die Sprüharme demontieren und reinigen.
Reinigungsmittel oder Klarspüler
ungenügend oder nicht geeignet.
Art und Menge des verwendeten Mittels
prüfen.
Die Teller/Gläser sind nicht korrekt
angebracht.
Die Teller/Gläser korrekt in den Geschirrspüler
stellen.
Niedrige Waschtemperatur.
Die am Display angezeigte Temperatur prüfen.
Sollte sie unter 50° liegen, den Kundendienst
anrufen.
Das gewählte Waschprogramm ist
falsch
Die Waschdauer verlängern, insbesondere
wenn es sich um starken oder teilweise
eingetrockneten Schmutz handelt.
UNGENÜGENDER
KLARSPÜLVORGANG
Die Sprüharmdüsen sind
verstopft.
Der Boiler ist mit
Kalkablagerungen verkrustet.
Überprüfen, ob die Düsen sauber sind, und ob
der eventuell vorhandene Wasserenthärter
korrekt funktioniert.
BEFLECKTE GLÄSER UND BESTECK
Ungeeigneter oder nicht korrekt
dosierter Klarspüler.
Wasserhärte über 12°dF oder viel
aufgelöste Salze.
Den Klarspülbehälter überprüfen und sich
vergewissern, dass er für die Art des
spezifischen Leitungswassers geeignet ist.
Bleibt das Problem weiterhin bestehen, bitte
den Kundendienst rufen.
WASSER IM SPÜLRAUM NACH DEM
ABFLUSS
Das Ablaufrohr ist falsch
angebracht oder teilweise
verstopft.
Sich vergewissern, dass der Schlauch und der
Abfluss des Geschirrspülers nicht verstopft
sind und dass der Abflusspunkt nicht zu hoch
positioniert ist. Siehe hierzu das Anschluss-
Diagramm.

48
Le damos las gracias por haber elegido este lavavajillas.
Aconsejamos leer detenidamente todas las instrucciones contenidas en el manual para saber cuáles son las
condiciones más idóneas para un uso correcto del mismo.
INSTRUCCIONES TÉCNICAS:
Están destinadas al personal cualificado, encargado de la instalación, la puesta en servicio,
el ensayo y las intervenciones de asistencia del lavavajillas.
El técnico instalador ha de asegurarse de que el usuario haya leído el manual de
instrucciones, haya entendido el funcionamiento correcto del producto y sepa cargar
correctamente los cestos con la vajilla y los vasos.
INSTRUCCIONES PARA EL USUARIO:
Contienen los consejos para el uso, la descripción de los mandos y las operaciones
correctas de limpieza y mantenimiento del lavavajillas.
ADVERTENCIAS
EL USUARIO ES RESPONSABLE DE LOS CUMPLIMIENTOS LEGALES DERIVADOS DE LA
INSTALACIÓN Y DEL USO DEL PRODUCTO. CUANDO EL PRODUCTO NO SE INSTALE O USE
CORRECTAMENTE O NO SE REALICE UN MANTENIMIENTO CORRETO, EL FABRICANTE NO
PODRÁ SER CONSIDERADO RESPONSABLE DE POSIBLES ROTURAS, FUNCIONAMIENTOS
INCORRECTOS, DAÑOS, LESIONES A COSAS Y/O A PERSONAS.
DESCONECTAR SIEMPRE EL CABLE DE ALIMENTACIÓN DEL ENCHUFE DE LA CORRIENTE
ANTES DE EFECTUAR OPERACIONES DE MANTENIMIENTO. CUANDO ELLO NO SEA
POSIBLE Y SI EL INTERRUPTOR EN LA LÍNEA DE ALIMENTACIÓN NO RESULTARA VISIBLE
O ESTUVIERA ALEJADO DE QUIEN REALIZA EL MANTENIMIENTO, COLGAR EL CARTEL
«TRABAJO EN CURSO» EN EL INTERRUPTOR EXTERNO DE LA RED TRAS HABERLO
COLOCADO EN OFF.
1 – ADVERTENCIAS PARA LA SEGURIDAD Y EL USO
2 – CARACTERÍSTICAS TÉCNICAS
3 – EMPLAZAMIENTO
4 – INSTRUCCIONES PARA EL INSTALADOR
5 – PRIMERA PUESTA EN MARCHA
6 – INSTRUCCIONES PARA EL USO
7 – MANTENIMIENTO Y LIMPIEZA
8 – ERRORES VISUALIZADOS EN LA PANTALLA/PROBLEMAS

49
VOLT
TEMPERATURA MÍN. 45°C – MÁX. 55°C
PRESIÓN MÍN. 2 – MÁX. 4 kPa/Bar
DUREZA MÍN. 7° - MÁX 12°F / MÍN. 5° - MÁX 7°dH
SI TRIFÁSICO
NO INVIERTA LA FASE CON EL NEUTRO (AZUL)
ABRILLANTADOR TUBO TRASPARENTE
DETERGENTE (NO ESTÁNDAR - OPCIONAL) TUBO ROJO
CON BOMBA LAVADO TRIFÁSICA: REVISE LA ROTACION DEL MOTOR
SI LA DUREZA DEL AGUA ES SUPERIOR A 12°F / 7° dH INSTALAR UN DESCALCIFICADOR EXTERNO
H DESAGÜE: MÁX. 10 CM – CAPOTA MÁX. 20 CM
LAVAVAJILLAS SIN DESCALCIFICADOR
EL INCUMPLIMENTO DE LAS INDICACIONES PUEDE GENERAR RIESGOS PARA EL APARATO E INVALIDAR LA
GARANTIA.
VERIFICAR
LAVAVAJILLAS CON DESCALCIFICADOR
TEMPERATURA MÁX. 30°C
PRESIÓN MÍN. 3 – MÁX. 4 kPa/Bar
DUREZA MÍN. 7° - MÁX 26°F / MÍN. 5° - MÁX 15°dH
USE SOLO SAL PARA REGENERACION Y VERTER CON FRECUENCIA EN EL CONTENEDOR DE LA CUBA

50
1 – ADVERTENCIAS PARA LA SEGURIDAD Y EL USO
EL LAVAVAJILLAS ESTÁ DESTINADO EXCLUSIVAMENTE A UN USO PROFESIONAL Y DEBE SER UTILIZADO POR
PERSONAL AUTORIZADO. ESTÁ DISEÑADO PARA EL LAVADO DE VAJILLAS (VASOS, TAZAS, BOLS, CUBIERTOS)
Y SIMILARES EN LOS SECTORES GASTRONÓMICOS Y EN EL RAMO DE LA RESTAURACIÓN COLECTIVA, Y
CUMPLE CON LAS NORMAS INTERNACIONALES DE SEGURIDAD ELÉCTRICA Y MECÁNICA (CEI-EN-IEC 60335-2-
58/61770) Y DE COMPATIBILIDAD ELECTROMAGNÉTICA (CEI-IEC-EN 55014-1/-2, 61000-3;4, 50366)
EL FABRICANTE DECLINA TODA RESPONSABILIDAD POR DAÑOS A PERSONAS O COSAS CAUSADOS POR LA
INOBSERVANCIA DE LAS INSTRUCCIONES PRESENTES EN EL MANUAL, POR USO INCORRECTO,
MANIPULACIÓN INCLUSO DE UNA SOLA PARTE DEL APARATO Y USO DE REPUESTOS NO ORIGINALES.
ESTE APARATO ESTÁ MARCADO EN CONFORMIDAD CON LA DIRECTIVA EUROPEA 2002/96/EC SOBRE
RESIDUOS DE APARATOS ELÉCTRICOS Y ELECTRÓNICOS (RAEE)
ASEGURÁNDOSE DE QUE ESTE PRODUCTO SE ELIMINE DEL MODO CORRECTO, EL USUARIO CONTRIBUYE A
PREVENIR LAS CONSECUENCIAS POTENCIALES NEGATIVAS PARA EL AMBIENTE Y LA SALUD. SE DECLARA
QUE EL NIVEL DE EMISIÓN DE PRESIÓN DE RUIDO LPA ES 62 DB/A VARIABLE DENTRO DE KPA + 1 DB. EL
NIVEL DE POTENCIA ACÚSTICA ES LWA 73,79 VARIABLE IGUAL A KWA + 1 DB. EL SÍMBOLO PRESENTE EN
EL PRODUCTO O EN LA DOCUMENTACIÓN DE ACOMPAÑAMIENTO INDICA QUE ESTE PRODUCTO NO DEBE SER
TRATADO COMO DESECHO DOMÉSTICO SINO QUE DEBE SER ENTREGADO A LOS PUNTOS DE RECOGIDA
IDÓNEOS PARA EL RECICLADO DE APARATOS ELÉCTRICOS Y ELECTRÓNICOS.
DESECHAR EL APARATO SIGUIENDO LAS NORMAS LOCALES PARA LA ELIMINACIÓN DE LOS RESIDUOS. PARA
MAYORES INFORMACIONES SOBRE EL TRATAMIENTO, RECUPERACIÓN Y RECICLADO DE ESTE PRODUCTO,
CONTACTAR LA OFICINA COMPETENTE LOCAL, EL SERVICIO DE RECOLECCIÓN DE DESECHOS DOMÉSTICOS O
EL PUNTO DE VENTA DONDE HA COMPRADO EL PRODUCTO.
ESTE MANUAL CONSTITUYE PARTE INTEGRANTE DEL LAVAVAJILLAS, POR LO TANTO, ES
NECESARIO CONSERVARLO EN BUEN ESTADO JUNTO CON EL MISMO.
EL POSICIONAMIENTO, LAS CONEXIONES, LA PUESTA EN FUNCIONAMIENTO, LA ELIMINACIÓN DE
INCONVENIENTES Y LA SUSTITUCIÓN DEL CABLE DE ALIMENTACIÓN DEBEN SER EJECUTADOS
POR PERSONAL CALIFICADO.
ES OBLIGATORIA LA CONEXIÓN A TIERRA SEGÚN LAS MODALIDADES PREVISTAS POR LAS
NORMAS DE SEGURIDAD DE LA INSTALACIÓN ELÉCTRICA. EN CASO DE AVERÍA DEL CABLE DE
ALIMENTACIÓN, SÓLO DEBE SER SUSTITUIDO POR EL FABRICANTE, UN CENTRO DE ATENCIÓN AL
CLIENTE AUTORIZADO O POR TÉCNICOS CUALIFICADOS PARA EVITAR CUALQUIER PELIGRO.
NO INTRODUCIR SOLVENTES COMO ALCOHOL O AGUARRÁS QUE PODRÍAN PROVOCAR UNA
EXPLOSIÓN. NO INTRODUCIR VAJILLAS SUCIAS CON CENIZAS, CERA NI PINTURAS.
JAMÁS UTILIZAR EL LAVAVAJILLAS O SUS PARTES COMO ESCALERA, SOPORTE O SOSTÉN DE
PERSONAS, ANIMALES O COSAS.
APOYARSE O SENTARSE EN LA PUERTA ABIERTA DEL LAVAVAJILLAS PODRÍA CAUSAR SU
VUELCO, CON CONSECUENTE PELIGRO PARA LAS PERSONAS. NO DEJAR LA PUERTA DEL
LAVAVAJILLAS ABIERTA YA QUE PODRÍA CONSTITUIR UN RIESGO DE TROPIEZOS.
NO BEBER EL AGUA RESIDUAL PRESENTE EN LA VAJILLA O EN EL LAVAVAJILLAS AL FINAL DEL
PROGRAMA DE LAVADO.
EL APARATO NO ES ADECUADO PARA EL USO POR PARTE DE MENORES Y PERSONAS CON
CAPACIDADES FÍSICAS, SENSORIALES O MENTALES REDUCIDAS, NI CON AUSENCIA DE
EXPERIENCIA Y CONOCIMIENTO. LA UTILIZACIÓN DEL APARATO ESTÁ PERMITIDA A ESTAS
PERSONAS SÓLO BAJO LA SUPERVISIÓN DE UNA PERSONA RESPONSABLE DE SU SEGURIDAD.
Tras la limpieza diaria, verificar la ausencia de cuerpos extraños metálicos en el interior de la cuba que
puedan oxidar internamente la máquina. Los restos de oxidación pueden proceder de vajilla no inoxidable,
detergentes no idóneos, cestos de alambre estropeados, estropajos abrasivos o metálicos y sal de
regeneración en el fondo de la cuba.

51
2 – CARACTERÍSTICAS TÉCNICAS
Temperatura agua de alimentación
°C
55
Temperatura agua de alimentación (modelo con descalcificador)
°C
Máx. 30
Dureza agua de alimentación
°F
7 – 12
Presión agua de alimentación
kPa
200/400
Presión agua de alimentación (modelo con descalcificador)
kPa
300/400
Consumo agua para ciclo de aclarado a 200 kPa
l
2,4/2,6
Temperatura agua de lavado
°C
50 - 60
Temperatura agua de aclarado
°C
82 - 85
Peso neto
kg
Mín. 27
Máx. 131
Máx. temperatura ambiente
°C
40
Tipo de cable de alimentación
◄HAR►
H07RN-F
Consultar la placa de identificación del lavavajillas en la portada de este manual o en el panel lateral
derecho para las características eléctricas y de potencia.
3 – EMPLAZAMIENTO
Llevar el lavavajillas al lugar de instalación, quitarlo del embalaje y comprobar el buen estado del aparato y de sus
componentes, En caso de daños, comunicarlo por escrito al transportista.
Los elementos del embalaje (bolsas de plástico, poliestireno expandido, nylon, etc.) no deben ser dejados al alcance de
niños o animales domésticos, por constituir fuentes potenciales de peligro. Todos los materiales utilizados para el embalaje
son compatibles con el ambiente. Éstos pueden conservarse sin peligro o ser eliminados en un centro de eliminación de
residuos. Los componentes de plástico sujetos a eliminación con reciclaje están marcados en el siguiente modo:
Polietileno PE: película externa del embalaje, bolsa de instrucciones, bolsas de protección.
Polipropileno PP: precintos.
Poliestireno expandido PS: esquineros de protección, tapa de embalaje.
Los componentes de madera y cartón pueden eliminarse respetando las normas vigentes.
Al dejar de usar el producto, evitar dispersarlo en el ambiente. Su eliminación debe realizarse en el respeto de las normas
vigentes. Todas las partes metálicas son de acero inoxidable y desmontables.
Las partes de plástico están marcadas con el símbolo del relativo material.
POSICIONAMIENTO:
Atención: La instalación interna y los locales donde se instalan los aparatos para comunidad deben
responder a las normativas vigentes.
El fabricante declina toda responsabilidad por daños directos o indirectos a personas o cosas que deriven de la
inobservancia de dichas normativas.
Antes de la instalación, comprobar que en las cercanías no haya o que estén adecuadamente protegidos, objetos y
materiales que podrían dañarse por el vapor o por salpicaduras de solución de lavado.
Posicionar el lavavajillas en el punto deseado y quitar la película protectora.
Nivelar el lavavajillas (ayudándose con una burbuja de nivel) en los cuatro pies, regulados de modo tal de garantizar su
estabilidad. Cualquier otra solución debe ser aprobada por el fabricante. Una vez nivelado, fijar los 4 pies al suelo.

52
4 – INSTRUCCIONES PARA EL INSTALADOR
Conexión hidráulica
Los tubos hidráulicos y el cable de alimentación eléctrica sobresalen por la zona trasera. Conectar el tubo de alimentación del
agua a una toma con una boca roscada de 3/4" gas.
Usar solamente tubos de nuevos para la conexión a la red del agua. No usar tubos viejos o usados.
La presión dinámica de alimentación ha de estar comprendida entre 200 y 400 kPa. Si es superior instalar un reductor de
presión (versiones con descalcificador incorporado entre 300 y 400 kPa).
Si fuera inferior, contemplar la instalación de una bomba de aumento de presión.
Es indispensable instalar una llave general en el tubo de llegada del agua de alimentación. Esta llave debe resultar accesible
tras haber completado la instalación. No instalar la llave detrás del lavavajillas.
La duración de ciclos declarada se refiera a la alimentación con agua caliente a 50°C.
Si el agua es fría, la duración podría aumentar según la temperatura del agua en la entrada.
Para versiones con ósmosis integrada, contemplar la instalación del filtro de carbones o de red en dotación con la llave de
alimentación del agua. La dureza del agua ha de estar comprendida entre 7 y 12°F y la temperatura máx. 30°C.
Los filtros se han de sustituir al menos 2 veces por año.
El incumplimiento de estos parámetros comporta el deterioro precoz de la membrana interna de ósmosis.
Asegurarse de que la dureza del agua esté comprendida entre 7 y 12 °F; fuera de estos parámetros se recomienda instalar un
descalcificador para evitar los daños causados por la cal no cubiertos por la garantía.
Desagüe:
Cada lavavajillas tiene un tubo para la conexión al desagüe que ha de estar en el suelo con un sumidero con sifón.
En caso de desagüe mural se requiere la instalación de una bomba de desagüe.
Atención: asegurarse de que los tubos de alimentación y desagüe no queden plegados, estrangulados o
aplastados tras la instalación.
Conexión eléctrica
La conexión eléctrica del lavavajillas y de otros aparatos suplementarios se ha de confiar a personal autorizado y cualificado en
cumplimiento de las normas vigentes. Asimismo, respetar las disposiciones técnicas para la conexión.
La potencia total instalada se encuentra indicada en la placa de datos técnicos del aparato.
No se han de proteger otros aparatos junto al lavavajillas.
El usuario ha de instalar un interruptor general de encendido y apagado en la línea de alimentación eléctrica y un interruptor
diferencial compatible con las características de la máquina, según las normas vigentes.
Un técnico cualificado y especializado debe instalar el interruptor general en la línea de alimentación eléctrica y el interruptor
diferencial.
Dichos interruptores se han de instalar cerca del lavavajillas, deben resultar fácilmente accesibles tras la instalación y deben
asegurar la desconexión completa de la red eléctrica en cumplimiento con las condiciones de la categoría de sobretensión III.
Atención: Asegurarse de no invertir las fases con el neutro en el enchufe pentapolar del cable de alimentación (no
en dotación) ni en el enchufe de la pared.
Si la bomba de lavado es trifásica, comprobar que la dirección de rotación sea la indicada por la flecha en el
motor. De lo contrario invertir las fases L1 y L2 o L3 con L2, o L3 con L1.
SUSTITUIR EL FILTRO CARTUCHO (versión con osmosis)
Este símbolo indica que el filtro de carbones o de red instalado aguas arriba del lavavajillas ha llegado al final de su
vida útil.
- Apagar el lavavajillas y desconectarlo de la corriente.
Atención:
El lavavajillas no está alimentado solamente cuando el interruptor general se encuentra desactivado.
- Conectar el aparato al sistema equipotencial de suministro. El borne para la conexión se encuentra en la zona
trasera inferior del aparato.
- El conductor de protección a tierra (PE) es de color amarillo-verde, el conductor neutro (N) de color azul y los
conductores de fase (L1, L2, L3) de color negro, gris y marrón.
LAVAVAJILLAS CON DESCALCIFICADOR
AJUSTE
A = dureza agua en entrada en °F
B = cada cuántos ciclos de lavado
aproximadamente debe activarse el ciclo de
regeneración automático
A
14 °F
22 °F
32 °F
37 °F
42 °F
52 °F
B
120
80
50
40
30
25

53
- Cerrar la llave de entrada del agua.
- Desenroscar la tuerca utilizando la llave en dotación.
- Quitar el filtro de carbones o de red y eliminar el agua del portafiltro.
- Colocar el filtro nuevo en el portafiltro.
- Volver a colocar el portafiltro en su lugar y apretar la tuerca con la llave en dotación.
- Abrir el agua nuevamente y verificar la ausencia de pérdidas.
- Conectar nuevamente a la corriente y encender el lavavajillas.
- Entrar en el menú y restablecer el recuento del filtro.
5 – PRIMERA PUESTA EN MARCHA
El sistema eléctrico de protección ha de someterse a una prueba funcional antes de la puesta en servicio.
El distribuidor autorizado, encargado de la primera puesta en marcha y de las instrucciones relativas al funcionamiento del
lavavajillas, habrá de efectuar la instalación y/o verificarla.
PREPARACIÓN PARA EL USO
El dosificador de abrillantador se encuentra presente en todos los modelos, mientras que el dosificador de detergente
solamente en algunos de ellos.
En los modelos con ambos dosificadores, situar los depósitos externos de detergente y abrillantador e introducir los relativos
tubos de aspiración, situados en la parte trasera de la máquina.
Tubo rojo: detergente / Tubo transparente: abrillantador
Antes de introducir los tubos en los depósitos, aplicar el peso en los extremos (necesario para mantener el tubo de aspiración
en el fondo del depósito) y el filtro siguiendo las instrucciones de la figura 2. Para la regulación, actuar en los tornillos de
regulación indicados en la figura 1-3. Se recomienda que el personal de los proveedores de los productos detergentes efectúe
dicha regulación.
Si el dosificador de detergente no está premontado, se puede pedir el kit relativo para instalarlo posteriormente (ponerse en
contacto con la asistencia técnica).
Lavavajillas sin dosificador de detergente: introducir el detergente directamente en la cuba cada 4-5 ciclos
aproximadamente. Para el tipo y cantidad usada seguir las instrucciones del fabricante de detergentes.
Modelo EVO3, dosificadores regulables desde la pantalla.
Para acceder al menú:
Presionar el botón durante 2 segundos.
Seleccionar la función deseada con los botones y .
El botón permite entrar y salir del parámetro.
sirce para volver y salir de la programación.
DC 10,0 ML 13” (ajuste del detergente durante la fase de llenado de la cuba)
DL 6,1 ML 8” (ajuste del detergente durante la fase de lavado)
D TEST 0 (prueba la activación del dosificador de detergente)
BC 4,2 ML 20” (ajuste del abrillantador durante la fase de llenado de la cuba)
BR 2,9 ML 14” (ajuste del detergente durante la fase de aclarado)
B TEST 0 (prueba la activación del dosificador de abrillantador)
Usar solamente detergentes y abrillantadores para lavavajillas industriales. No usar detergentes para el lavado a mano. Se
aconseja el uso de productos específicamente estudiados para este lavavajillas.
Durante el relleno de los depósitos prestar atención para no confundir los productos; ello podría provocar un
funcionamiento incorrecto y causar daños al lavavajillas.
No mezclar detergentes distintos porque estropearían el dispositivo dosificador. Los detergentes para lavavajillas
industriales pueden provocar graves irritaciones. Respetar rigurosamente las instrucciones del fabricante del detergente
indicadas en el envase.

54
6 – INSTRUCCIONES PARA EL USO
Abrir la llave
de la red del
agua
(suministro).
Verificar:
La activación del
interruptor general
(suministro).
El nivel de
detergente y
abrillantador en los
depósitos.
El funcionamiento correcto de los filtros, la rotación de
los aspersores y la ausencia de cuerpos extraños en el
lavavajillas.
MÁQUINA APAGADA: PANTALLA EN OFF
Máquina apagada y pantalla en OFF.
Cuando la máquina está apagada, en la pantalla se visualiza OFF. Solamente el botón
ON/OFF está iluminado.
Desde el estado de OFF se puede encender la máquina presionando el botón ON/OFF
durante 2 segundos. Se puede acceder al menú del usuario y al menú del técnico (con
contraseña) al presionar el botón durante 3 segundos.
ENCENDIDO DE LA MÁQUINA.
Tras haber situado los filtros y el rebosadero (si presente), presionar el botón durante 2
segundos.
El lavavajillas se enciende y sigue la pantalla de funcionamiento normal.
Si la cuba o la caldera están vacías, la máquina empieza el llenado y se visualiza el icono
correspondiente. El llenado del lavavajillas continuará hasta alcanzar el nivel correcto.
Durante esta fase se puede seleccionar el ciclo de lavado utilizando los botones y
.
FASE DE CALENTAMIENTO
Una vez llenado, empieza el calentamiento del agua de aclarado y lavado.
El icono de inicio será de color amarillo; esto indica que se encuentran en fase de
calentamiento.
Cuando se alcanzan las temperaturas programadas, los iconos se pondrán de color verde.
Esto significa que la máquina está lista para iniciar el ciclo de lavado.
CARGAR LA VAJILLA
Eliminar los residuos sólidos de los platos (huesos, cáscaras, etc.). Dejar en remojo en agua
fría los platos con residuos de queso, huevo, etc.
Situar los vasos y copas boca abajo.
Usar el cesto específico para los cubiertos. Situar los cubiertos sueltos dentro al cesto
preferentemente con el mango hacia abajo. Tener cuidado de no herirse con las puntas de
tenedores y las hojas de cuchillos.
ELEGIR Y ACTIVAR UN PROGRAMA DE LAVADO
Los botones y permiten seleccionar el programa de lavado.
Los programas de lavado son:
P1: duración 80" – temperatura de lavado 55° - temperatura de aclarado 70°
P2: duración 120" – temperatura de lavado 55° - temperatura de aclarado 75°
P3: duración 180" – temperatura de lavado 55° - temperatura de aclarado 85°
P4: duración 480" – temperatura de lavado 60° - temperatura de aclarado 85°
OPCIONAL: programa para vasos de cerveza (aclarado en frío) duración 130” - temperatura
de aclarado en frío determinada por el sistema de la red.

55
Tras haber seleccionado el programa elegido, presionar o cerrar la capota para activar
el ciclo de lavado.
El botón se pone de color azul y la pantalla muestra la cuenta regresiva que indica el
final del ciclo de lavado completo. Pantalla del ciclo de lavado en curso.
Si se abre la puerta/capota durante el ciclo de lavado, la fase se interrumpe para reanudarse
al volver a cerrar si esto se produce en menos de 20 segundos, de lo contrario el ciclo se
restablece. El programa P4 puede utilizarse inmediatamente y pasar a la fase de aclarado al
presionar de nuevo el botón (azul) durante la fase de lavado.
PROLONGAR LA FASE DE LAVADO: TERMOSTOP
(PUEDE ACTIVARSE DESDE EL MENÚ DEL TÉCNICO)
Cuando se agota el tiempo de lavado y el aclarado no ha alcanzado la temperatura
programada, la fase de lavado se prolonga hasta que se alcanza el valor programado de
aclarado.
Visualización de la función termostop activada: TS
DESAGÜE AL FINAL DE LA JORNADA (versiones con rebosadero)
Para apagar la máquina al final del servicio, presionar el botón .
Abrir la puerta y retirar el rebosadero. Se puede activar la función AUTOCLEAN al presionar
el botón (de color azul) en menos de 20 segundos.
Si la cuba no está vacía, el ciclo de auto-limpieza no comenzará.
Solo para los modelos N1300 DOBLE: introducir un cesto vacío para activar el
contacto.
El vaciado total del lavavajillas comienza tras 20” y sigue hasta ser completado visualizando
OFF, excepto para modelos con ciclo de regeneración (ver la sección relativa).
Si el agua no se ha vaciado tras el desagüe, se visualizará el mensaje TANK FULL (Cuba
llena) durante 30”.
VACIADO AL FINAL DE LA JORNADA CON DESAGÜE AUTOMÁTICO
Para apagar la máquina al final del servicio, presionar el botón .
Se puede activar la función AUTOCLEAN al presionar el botón (de color azul) en
menos de 20 segundos.
Si la cuba no está vacía, el ciclo de auto-limpieza no comenzará.
Solo para los modelos N1300 DOBLE: introducir un cesto vacío para activar el
contacto.
El vaciado total del lavavajillas comienza tras 20” y sigue hasta ser completado visualizando
OFF, excepto para modelos con ciclo de regeneración (ver la sección relativa).
Si el agua no se ha vaciado tras el desagüe, se visualizará el mensaje TANK FULL (Cuba
llena) durante 30”.
La máquina permanecerá en modo OFF o stand-by.
Una vez que haya desconectado el interruptor de pared y cerrado la llave de parada del
agua, retirar los filtros, lavar el interior de la cuba y los filtros con productos adecuados y
colocar nuevamente el filtro y el rebosadero en la cuba.
- DESAGÜE DE LA CUBA
180”
APAGADO
- CUBA LLENA -
- -
APAGADO
- DESAGÜE DE LA CUBA
180”
APAGADO
- CUBA LLENA -
- -
APAGADO

56
INDICADOR DE SAL AGOTADA - “NO SALT” (VERSIONES CON ABLANDADOR):
La sal para el lavavajillas es fundamental para el ciclo regenerador del descalcificador
instalado en la máquina. La pantalla muestra la ausencia de sal en el depósito situado en la
cuba. Para el llenado usar el embudo en dotación y limpiar los restos de sal en la cuba.
Indicación de ausencia de sal.
NOTA: ELIMINAR INMEDIATAMENTE LA SAL DERRAMADA EN LA CUBA; ya que podría
causar daños en la superficie de la cuba, tales como manchas de oxidación o similares.
Atención: usar solamente sal específica, no usar sal de mesa.
En el depósito de la sal cabe aproximadamente 1 kg de sal en gránulos.
El depósito se encuentra en el fondo de la cuba. Tras haber sacado el cesto, desenroscar el tapón, verter la sal utilizando el embudo
en dotación. Antes de enroscar de nuevo el tapón, eliminar los residuos de sal cerca de la apertura. Efectuar el relleno de la sal
cuando no haya agua en la cuba para evitar que el agua de lavado entre en el descalcificador. Desconectar siempre la clavija de
alimentación del enchufe antes de efectuar la operación. No olvidarse de conectar de nuevo la clavija de alimentación al enchufe tras
haber efectuado la operación.
Durante el primer uso, tras haber echado la sal añadir agua en el depósito de la sal.
CICLO DE REGENERACIÓN AUTOMÁTICO
El ciclo de regeneración es automático. El lavavajillas tiene un contador de lavados. Cuando
se alcanza el número programado de ciclos, se activa la regeneración durante el primer
apagado y vaciado de la cuba visualizando #.
Cuando la máquina se encuentra en funcionamiento normal y se alcanza el número
programado de ciclos se visualiza el icono parpadeante # correspondiente en la derecha.
Esto indica que el lavavajillas entrará en regeneración la próxima vez que sea apagado.
Solo para los modelos N1300 DOBLE: introducir un cesto vacío para activar el
contacto.
Una vez completado el ciclo de regeneración, la máquina permanece en OFF.
FUNCIÓN ECONOMY
Cuando no se usa el lavavajillas durante 30 minutos (tiempo programable en el menú del
técnico) entra en el estado «economy» para mantener las temperaturas más bajas.
Presionar cualquier botón o abrir la puerta para salir de esta función.
7 – MANTENIMIENTO Y LIMPIEZA
A pesar de que el lavavajillas no requiera un mantenimiento programado especial, aconsejamos hacer controlar el lavavajillas
por un técnico especializado dos veces por año.
NOTA: los daños intencionados o derivados de descuidos, negligencia, incumplimiento del respeto de las indicaciones,
instrucciones y normas o causados por conexiones incorrectas, no se han de considerar responsabilidad del fabricante.
El lavavajillas se clasifica en el grado de protección IPX1 y se prohíbe usar chorros de agua directos para su limpieza.
LIMPIEZA DE LOS FILTROS DURANTE LA JORNADA
En caso de uso especialmente gravoso, se recomienda efectuar la limpieza del filtro cada 30-40 ciclos, manteniendo la
máquina en condiciones operativas. Para ello se debe vaciar la cuba.
Retirar el filtro (1) (simplemente levantarlo de su alojamiento como ilustra la figura) evitando que caigan residuos en la cuba.
Limpiar y aclarar abundantemente el filtro.
También limpiar y eliminar los posibles residuos del filtro interno (2).
Volver a colocar el filtro (1) en su alojamiento. No usar objetos puntiagudos ni cortantes.
Limpiar las posibles incrustaciones de cal para evitar acumulaciones. Limpiar meticulosamente y con frecuencia las superficies
con un paño húmedo. Usar detergentes neutros, que no sean abrasivos, sin substancias a base de cloro, ni que corroan y
estropeen el acero inoxidable.
No usar los productos anteriormente indicados tampoco para limpiar el suelo bajo el lavavajillas o en sus proximidades en
modo de evitar que vapores o gotas puedan producir daños en las superficies de acero.
Para la limpieza de la cuba y de las paredes se recomienda usar un paño húmedo o de piel agamuzada con agua con jabón y
un detergente suave. Nunca usar estropajos abrasivos ni esponjas de metal.
-AUSENCIA DE SAL-
REGENERACIÓN
CONTINUA 18:00
OFF

57
Controles periódicos
Desenroscar el tornillo central (1) para desmontar los aspersores (inferior y superior 2-3).
Limpiar los orificios y las boquillas bajo un chorro de agua corriente limpia, no intervenir con herramientas puntiagudas o
afiladas que podrían provocar daños. Volver a montar los aspersores.
Limpiar por fuera la máquina con un paño húmedo y jabón neutro; aclarar y secar meticulosamente.
Parada prolongada
Si se contempla no usar el lavavajillas durante un periodo de tiempo más bien largo, vaciar el dispositivo dosificador del
detergente y abrillantador para evitar cristalizaciones y daños en las bombas: desmontar los tubos de aspiración de los
depósitos de detergente y abrillantador y sumergirlos en un depósito con agua limpia, efectuar algunos ciclos de lavado y luego
el vaciado completo del lavavajillas.
Por último, desconectar el interruptor general y cerrar la llave de entrada del agua. Volver a colocar los tubos de aspiración del
detergente y abrillantador en los depósitos durante la puesta en marcha y tener cuidado de no invertirlos (tubo rojo =
detergente; tubo transparente = abrillantador).
No dejar el lavavajillas desactivado encendido e inutilizado durante periodos más o menos largos sin el control directo del
operador.
Nunca se deben usar los siguientes productos para limpiar la cuba y las superficies de acero:
- Productos con cloruros o ácido clorhídrico
- Lejía
- Productos para limpiar la plata
- Estropajos abrasivos o esponjas de metal
NOTA: el uso incorrecto de los productos anteriormente citados causa la formación de manchas de herrumbre en
la superficie.

58
8 – ERRORES VISUALIZADOS EN LA PANTALLA/PROBLEMAS
PROBLEMA
POSIBLE CAUSA
POSIBLE REMEDIO
NO SE ENCIENDE EL PILOTO DE LA
RED
Ausencia de tensión de la red.
Verificar la conexión a la red eléctrica.
EL CICLO DE LAVADO NO SE PONE EN
MARCHA
El llenado del lavavajillas no ha
acabado.
Esperar que se encienda el led triangular.
RESULTADOS DE LAVADO NO
SATISFACTORIOS
Orificios de los aspersores
obstruidos o con incrustaciones.
Desmontar los aspersores y limpiarlos.
Detergente o abrillantador
insuficiente o no adecuado.
Verificar el tipo y la cantidad de detergente.
Plato/vasos no colocados
correctamente.
Colocar los platos/vasos correctamente.
Temperatura de lavado
demasiado baja.
Verificar la temperatura visualizada en la
pantalla. Si es inferior a 50°C, llamar a la
asistencia técnica.
Ciclo programado inadecuado.
Aumentar la duración del ciclo de lavado,
especialmente en presencia de vajilla con
mucha suciedad o residuos.
ACLARADO INSUFICIENTE
Boquillas de los aspersores
obstruidos.
Caldera incrustada con cal.
Verificar la limpieza de las boquillas y que el
descalcificador (si instalado) funcione
correctamente.
VASOS Y CUBIERTOS MANCHADOS
Abrillantador inadecuado o mal
suministrado.
Dureza del agua superior a 12°dF
o contenido de sal disuelta
excesivo.
Verificar el depósito de abrillantador y si es
adecuado para el tipo del agua de la red. Si el
problema persiste, ponerse en contacto con la
asistencia técnica.
PRESENCIA DE AGUA EN LA CUBA
TRAS EL DESAGÜE
Tubo de desagüe posicionado
incorrectamente o parcialmente
obstruido.
Verificar que el tubo y el desagüe del
lavavajillas no estén obstruidos y que el
desagüe no se encuentre demasiado alto.
Consultar el esquema de conexión.
Llenado de caldera/cuba no ejecutado en el tiempo programado
El botón estará encendido de color rojo.
Anomalía o sondas de temperatura caldera/cuba rotas.
El botón estará encendido de color rojo.
Nivel de agua demasiado alto en la cuba
Con la visualización de este mensaje, la electroválvula de llenado y aclarado no se activa.
SOLUCIONES:
- Verificar la ausencia de obstrucciones en el tubo de desagüe.
- Verificar el funcionamiento de la bomba de desagüe.
- Apagar y vaciar la cuba. - Volver a encender.
Si el problema persiste tras haber apagado y encendido nuevamente la máquina, ponerse en contacto con la asistencia técnica y
comunicar el tipo de error visualizado en la pantalla.
NIVEL ALTO DEL AGUA - CONTROLAR BOMBA DE DESAGÜE - C: 23 °C
R: 34 °C P1 :60”
-
 1
1
-
 2
2
-
 3
3
-
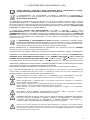 4
4
-
 5
5
-
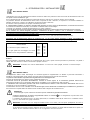 6
6
-
 7
7
-
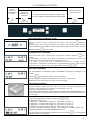 8
8
-
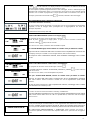 9
9
-
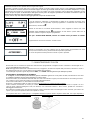 10
10
-
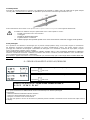 11
11
-
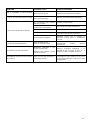 12
12
-
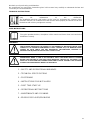 13
13
-
 14
14
-
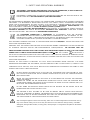 15
15
-
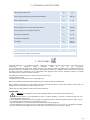 16
16
-
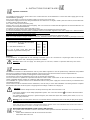 17
17
-
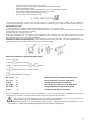 18
18
-
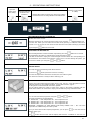 19
19
-
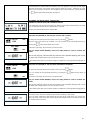 20
20
-
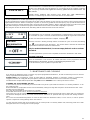 21
21
-
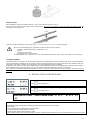 22
22
-
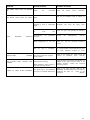 23
23
-
 24
24
-
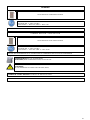 25
25
-
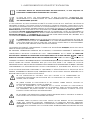 26
26
-
 27
27
-
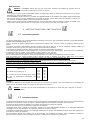 28
28
-
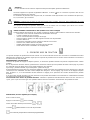 29
29
-
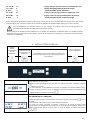 30
30
-
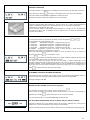 31
31
-
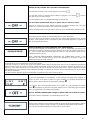 32
32
-
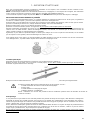 33
33
-
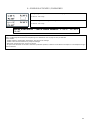 34
34
-
 35
35
-
 36
36
-
 37
37
-
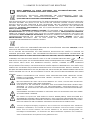 38
38
-
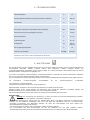 39
39
-
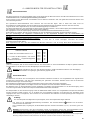 40
40
-
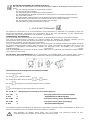 41
41
-
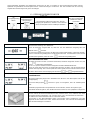 42
42
-
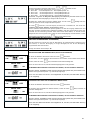 43
43
-
 44
44
-
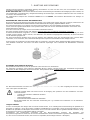 45
45
-
 46
46
-
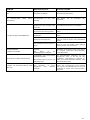 47
47
-
 48
48
-
 49
49
-
 50
50
-
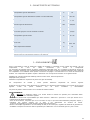 51
51
-
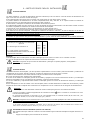 52
52
-
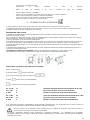 53
53
-
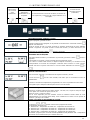 54
54
-
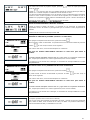 55
55
-
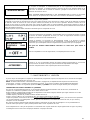 56
56
-
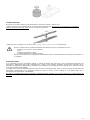 57
57
-
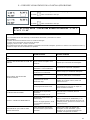 58
58


GGM Gastro DS430 El manual del propietario
- Categoría
- Lavaplatos
- Tipo
- El manual del propietario
en otros idiomas
- français: GGM Gastro DS430 Le manuel du propriétaire
- italiano: GGM Gastro DS430 Manuale del proprietario
- English: GGM Gastro DS430 Owner's manual
- Deutsch: GGM Gastro DS430 Bedienungsanleitung
Artículos relacionados
Otros documentos
-
Adexa ADX10MB Manual de usuario
-
Whirlpool AGB 655/DP El manual del propietario
-
Whirlpool ADI 076 Guía del usuario
-
Progress PVX1557 Manual de usuario
-
Electrolux ESF5545LOX Manual de usuario
-
AEG FSB53907Z Manual de usuario
-
Maxima 09240080 El manual del propietario
-
Whirlpool AGB 644/WP El manual del propietario