Candy CCGG512SW/E Manual de usuario
- Categoría
- Cocina
- Tipo
- Manual de usuario
Este manual también es adecuado para

USER MANUAL
FREE STANDING OVEN
50x55 / 50x60 / 60x60
Gas and electrical oven
ES
GB
H10-20-180-411 Rev 003
MANUAL DEL USUARIO
Hornos a gas y eléctricas

2
Dear user,
Our objective is to make this product provide you with the best output
which is manufactured in our modern facilities in a careful working
environment, in compliance with total quality concept.
Therefore, we suggest you to read the user manual carefully before
using the product and, keep it permanently at your disposal.
Note: This user manual is prepared for more than one model. Some of
the features specified in the manual may not be available in your
appliance.
All our appliances are only for domestic use, not for commercial use.
Products marked with (*) are optional.
“THIS APPLIANCE SHALL BE INSTALLED IN ACCORDANCE WITH THE
REGULATIONS FORCE AND ONLY USED IN A WELL VENTILATED SPACE. READ
THE INSTRUCTIONS BEFORE INSTALLING OR USING THIS APPLIANCE”
“Conforms with the WEEE Regulations."
GB

3
Contents
Important warnings 4
Electrical connection 15
Gas connection 16
Introduction of the appliance 21
Accessories 22
Technical features of your oven 23
Installation of your oven 26
Chain lashing illustration 28
Control panel 28
Using oven section 29
Using the grill 30
Using the chicken roasting 30
Using cooker section 31
Program types 33
Cooking time table 34
Maintenance and cleaning 35
Installation of the oven door 36
Cleaning and maintenance of the
Oven’s front door glass 37
Catalytic walls 37
Rack positions 38
Changing the oven lamp 38
Using the grill deector sheet 39
Troubleshooting 40
Handling rules 42
Recommendations for energy saving 42
Environmentally-friendly disposal 43
Package information 43

4
IMPORTANT WARNINGS
1. Installation and repair should always be performed
by “AUTHORIZED SERVICE”. Manufacturer shall not be
held responsible for operations performed by unauthorized
persons.
2. Please read this operating instructions carefully.
Only by this way you can use the appliance safely and
in a correct manner.
3. The oven should be used according to operating
instructions.
4. Keep children below the age of 8 and pets away
when operating.
5. WARNING: The accessible parts may be hot while using
the grill. Keep away from children.
6. WARNING: Fire hazard; do not store the materials on
the cooking surface.
7. WARNING: The appliance and its accessible parts are
hot during operation.
8. Setting conditions of this device are specied on
the label. (Or on the data plate)
9. The accessible parts may be hot when the grill is
used. Small children should be kept away.
10. WARNING: This appliance is intended for cooking. It
should not be used for other purposes like heating a room.
11. To clean the appliance, do not use steam cleaners.
12. Ensure that the oven door is completely closed
after putting food inside the oven.
GB

5
13. NEVER try to put out the re with water. Only shut
down the device circuit and then cover the ame with
a cover or a re blanket.
14. Children under 8 years of age should be kept away,
if they cannot be monitored continuously.
15. Touching the heating elements should be avoided.
16. CAUTION: Cooking process shall be supervised.
Cooking process shall always be supervised.
17. This device can be used by children over 8 years
of age, people with physical, hearing or mental challenges
or people with lack of experience or knowledge; as long
as control is ensured or information is provided regarding
the dangers.
18. This device has been designed for household use
only.
19. Children must not play with the appliance. Cleaning
or user maintenance of the appliance shall not be
performed by children unless they are older than 8
years and supervised by adults.
20. Keep the appliance and its power cord away from
children less than 8 years old.
21. Put curtains, tulles, paper or any ammable (ignitable)
material away from the appliance before starting to use
the appliance. Do not put ignitable or ammable materials
on or in the appliance.
22. Keep the ventilation channels open.

6
23. The appliance is not suitable for use with an external
timer or a separate remote control system.
24. Do not heat closed cans and glass jars. The pressure
may lead jars to explode.
25. Oven handle is not a towel drier. Do not hang towels,
etc. on the oven handle.
26. Do not place the oven trays, plates or aluminium
foils directly on the oven base. The accumulated heat
may damage the base of the oven.
27. While placing food to or removing food from the
oven, etc., always use heat resistant oven gloves.
28. Do not use the product in states like medicated
and/or under inuence of alcohol which may affect your
ability of judgement.
29. Be careful when using alcohol in your foods. Alcohol
will evaporate at high temperatures and may catch re to
cause a re if it comes in contact with hot surfaces.
30. After each use, check if the unit is turned off.
31. If the appliance is faulty or has a visible damage,
do not operate the appliance.
32. Do not touch the plug with wet hands. Do not pull
the cord to plug off, always hold the plug.
33. Do not use the appliance with its front door glass
removed or broken.
34. Place the baking paper together with the food into
a pre-heated oven by putting it inside a cooker or on an
oven accessory (tray, wire grill etc.).
GB

7
35. Do not put objects that children may reach on the
appliance.
36. It is important to place the wire grill and tray properly
on the wire racks and/or correctly place the tray on the
rack. Place the grill or tray between two rails and make
sure it is balanced before putting food on it.
37. Against the risk of touching the oven heater elements,
remove excess parts of the baking paper that hang over
from the accessory or container.
38. Never use it at higher oven temperatures than the
maximum usage temperature indicated on your baking
paper. Do not place the baking paper on the base of the
oven.
39. When the door is open, do not place any heavy
object on the door or allow children to sit on it. You
may cause the oven to overturn or the door hinges to be
damaged.
40. The packaging materials are dangerous for children.
Keep packaging materials away from the reach of children.
41. Do not use abrasive cleaners or sharp metal scrapers
to clean the glass as the scratches that may occur on
the surface of the door glass may cause the glass to
break.
42. Do not place the appliance on a surface covered
with carpets. Electric parts gets overheated since there
will be no ventilation from below. This will cause failure
of the appliance.

8
43. Do not hit glass surfaces of vitro-ceramic cookers
with a hard metal, resistance can get damaged. It may
cause an electric shock.
44. User should not handle the oven by himself.
45. Use shall be careful when cleaning gas burners.
It may cause personal injuries.
46. Food can spill when foot of oven is dismantled or
gets broken, be careful. It may cause personal injuries.
47. During usage, the internal and external surfaces
of the oven get hot. As you open the oven door, step
back to avoid the hot vapour coming out from the interior.
There is risk of burning.
48. Upper cover of the oven can be closed for a reason,
than cookware can trip over. Step back to avoid the hot
food coming on you. There is risk of burning.
49. Do not place heavy objects when oven door is open,
risk of toppling.
50. User should not dislocate the resistance during
cleaning. It may cause an electric shock.
51. Do not remove ignition switches from the appliance.
Otherwise, live electric cables can be accessed. It may
cause an electric shock.
52. Oven supply can be disconnected during any
construction work at home. After completing the work,
re-connecting the oven shall be done by authorized service.
53. Do not place metal utensils such as knife, fork, spoon
on the surface of the appliance, since they will get hot.
GB

9
54. To prevent overheating, the appliance should not
be installed behind of a decorative cover.
55. Turn off the appliance before removing the
safeguards. After cleaning, install the safeguards
according to instructions.
56. Cable xing point shall be protected.
57. WARNING: Don’t use oven and grill burners at same
time.
58. Please don’t cook the food directly on the tray /
grid. Please put the food into or on appropriate tools
before putting them in the oven.
59. Hot surface, leave for cooling before closing the
cover.
Electrical Safety
1. Plug the appliance in a grounded socket protected by
a fuse conforming to the values specied in the technical
specications chart.
2. Have an authorized electrician set grounding equipment.
Our company shall not be responsible for the damages
that shall be incurred due to using the product without
grounding according to local regulations.
3. The circuit breaker switches of the oven shall be
placed so that end user can reach them when the oven
is installed.
4. The power supply cord (the cord with plug) shall
not contact the hot parts of the appliance.

10
5. If the power supply cord (the cord with plug) is
damaged, this cord shall be replaced by the manufacturer
or its service agent or an equally qualied personnel to
prevent a hazardous situation.
6. Never wash the product by spraying or pouring water
on it! There is a risk of electrocution.
7. WARNING: To avoid electric shock, ensure that the
device circuit is open before changing the lamp.
8. WARNING: Cut off all supply circuit connections before
accessing the terminals.
9. WARNING: If the surface is cracked, turn off the appliance
to avoid risk of electric shock.
10. Do not use cut or damaged cords or extension
cords other than the original cord.
11. Make sure that there is no liquid or humidity in
the outlet where the product plug is installed.
12. The rear surface of the oven also heats up when
the oven is operated. Electrical connections shall not
touch the rear surface, otherwise the connections may
be damaged.
13. Do not tighten the connecting cables to the oven
door and do not run them over hot surfaces. If the cord
melts, this may cause the oven to short circuit and
even a re.
14. Unplug the unit during installation, maintenance,
cleaning and repair.
GB

11
15. If the power supply cable is damaged, it must be
replaced by its manufacturer or authorized technical
service or any other personnel qualied at the same
level, in order to avoid any dangerous situation.
16. Make sure the plug is inserted rmly into wall
socket to avoid sparks.
17. Do not use steam cleaners for cleaning the appliance,
otherwise electric shock may occur.
18. An omnipolar switch capable to disconnect
power supply is required for installation. Disconnection
from power supply shall be provided with a switch or
an integrated fuse installed on xed power supply
according to building code.
19. Appliance is equipped with a type ‘’Y’’ cord cable.
20. Fixed connections shall be connected to a power
supply enabling omnipolar disconnection. For appliances
with over voltage category below III, disconnection device
shall be connected to xed power supply according to
wiring code.

12
Gas Safety
1. This appliance is not connected to burning products
evacuation apparatus.This appliance must be connected
and installed according to the installation regulations in
force. Conditions regarding ventilation must be considered.
2. When a gas cooking appliance is used; humidity,
heat and burning products are generated in the room.
First of all, make sure the kitchen is well ventilated
when operating the appliance and maintain natural
ventilation openings or install a mechanical ventilation
equipment.
3. After using the appliance heavily for en extended
period of time, additional ventilation may be required.
For example open a window or adjust a higher speed for
mechanical ventilation, if any.
4. This appliance must be used only in well ventilated
locations in accordance with the regulations in force.
Please read the manual before installing or using this
product.
5. Before positioning the appliance, make sure local
network conditions (gas type and gas pressure) meets
appliance requirements.
6. The mechanism cannot be run for longer than 15
seconds. If the burner is not on after 15 seconds, stop
the mechanism and wait for at least one minute before
trying to ignite the burner again.
GB

13
7. All kinds of operations to be performed on gas
installation must be performed by authorized and
competent people.
8. This appliance is adjusted for natural gas (NG). If
you have to use your product with a different gas type,
you have to apply to authorized service for the conversion.
9. For proper operation, hood, gas pipe and clamp
should be replaced periodically accordint to manufacturer
recommendations and when required.
10. Gas should burn well in gas products. Well
burning gas can be understood from blue ame and
continuous burning. If gas does not burn sufciently,
carbon monoxide (CO) can be generated. Carbon monoxide
is a colourless, odourless and very toxic gas; even small
amounts have lethal effect.
11. Ask your local gas supplies about the phone numbers
for emergencies related to gas and the measures to be
taken upon gas odour is detected.
What To Do When Gas Odour Is Detected
1. Do not use naked ame, and do not smoke.
2. Do not operate any electrical switch.
(For example: lamp switch or doorbell)
3. Do not use telephone or mobile phone.
4. Open the doors and windows.
5. Close all valves on the appliances that utilize gas
and the gas counters.

14
6. Call re brigade from a telephone outside the home.
7. Check all hoses and their connections against leaks.
If you still smell gas, leave the house and warn your
neighbours.
8. Do not enter into the house until authorities clarify
it is safe.
Intended Use
1. This product is designed for home use. Commercial
use of the appliance is not permitted.
2. This appliance may only be used for cooking purposes.
It shall not be used for other purposes like heating a room.
3. This appliance shall not be used to heat plates under
the grill, drying clothes or towels by hanging them on
the handle or for heating purposes.
4. The manufacturer assumes no responsibility for any
damage due to misuse or mishandling.
5. Oven part of the unit may be used for thawing,
roasting, frying and grilling food.
6. Operational life of the product you have purchased
is 10 years. This is the period for which the spare parts
required for the operation of this product as dened is
provided by the manufacturer.
GB

15
Electrical Connection
1. Your oven requires 16 or 32 Ampere fuse according to the appliance’s
power. If necessary, installation by a qualied electrician is recommended.
2. Your oven is adjusted in compliance with 220-240V AC/380-415V
AC 50/60Hz.electric supply. If the mains are different from this specied
value, contact your authorized service.
3. Electrical connection of the oven should only be made by the sockets
with earth system installed in compliance with the regulations. If there
is no proper socket with earth system in the place where the oven will be
placed, immediately contact a qualed electrician. Manufacturer shall
never be responsible from the damages that will arise because of the
sockets connected to the appliance with no earth system. If the ends of
the electrical connection cable are open, according to the appliance type,
make a proper switch installed in the mains by which all ends can be
disconnected in case of connecting / disconnecting from / to the mains.
4. If your electric supply cable gets defective, it should denitely be
replaced by the authorized service or qualed electricians in order to
avoid from the dangers.
5. Electrical cable should not touch the hot parts of the appliance.
6. Please operate your oven in dry atmosphere.
Electrical connection scheme
220-240V~50/60Hz 220-240V~50/60Hz
400V 3N~50/60Hz 400V 2N~50/60Hz
Earth
Terre
Erdung
Earth
Terre
Erdung
Earth
Terre
Erdung
Earth
Terre
Erdung
L3
L2
L1
L2
L1
L1
Live
Phase
Neutral
Neutre
Neutral
Neutre
Neutral
Neutre
H05 VV-F 3G 4mm² H05 VV-F 5G 1.5mm² H05 VV-F 4G 1.5mm² H05 VV-F 3G 1.5mm²
Neutral
Neutre
380-415V 3N~50/60Hz
380-415V 2N~50/60Hz
220-240V~50/60Hz 220-240V~50/60Hz
H05 VV-F 3G 4 mm² H05 VV-F 5G 1.5 mm²
H05 VV-F 4G 1.5 mm²
H05 VV-F 3G 1.5 mm²

16
Gas Connection
WARNING: Before starting any work related with gas installation, turn off
gas supply. Risk of explosion.
Please operate your oven in dry atmosphere.
1. Fit the clamp to the hose. Push one of the hose until it goes to the
end of the pipe.
2. For the sealing control; ensure that the buttons in the control panel are
closed, but the gas cylinder is open. Apply some soap bubbles to the
connection. If there is gas leakage, there will be foaming in the soaped area.
3. The oven should be using a well ventilation place and should be
install on at ground.
4. Re-inspect the gas connection.
5. When placing your oven to its location, ensure that it is at the counter
level. Bring it to the counter level by adjusting the feet if necessary.
6. Do not make gas hose and electrical cable of your oven go through theheated
areas, especially through the rear side of the oven. Do not move gas connected
oven. Since the forcing shall loosen the hose, gas leakage may occur.
7. Please use exible hose for gas connection.
For LPG connection;
For LPG (cylinder) connection, afx metal
clamp on the hose coming from LPG
cylinder. Afx an edge of the hose on hose
inlet connector behind the appliance by
pushing to end through heating the hose
in boiled water. Afterward, bring the clamp
towards end section of the hose and tighten
it with screwdriver. The gasket and hose inlet
connector required for connection is as the
picture shown below.
NOTE: The regulator to be afxed on LPG cylinder should have 300
mmSS feature.
Main Gas Pipe
Gasket
Hose Inlet Connector
Metal Clamp
Lpg Connection Hose
GB

17
For natural gas connection;
WARNING: Natural gas connection should
be done by authorized service.
For natural gas connection, place gasket
in the nut at the edge of natural gas connection
hose. To install the hose on main gas pipe,
turn the nut. Complete the connection by
making gas leakage control.
Gas hose passage way
Connect the appliance to the gas piping tap
in shortest possible route and in a way that
ensure no gas leakage will occur.
In order to carry on a tightness and sealing
safety check ensure that the knobs on the
control panel are closed and the gas cylindir is
open.
WARNING: While performing a gas leakage
check, never use any kind of lighter, match,
cigarette or similar burning substance.
Apply soap bubble on the connection points.
If there is any kind of leakage then it will
cause bubbling.
While inserting the appliance in place ensure
that it is on the same level with the worktop.
If required adjust the legs inorder the make
level with the worktop.
Use the appliance on a level surface and in a
well ventilated environment.
WARNING: Before placint the appliance, check that the local distribution
conditions (gas type and pressure) conform to the product settings.
Main Gas Pipe
Gasket
Nut
Natural Gas
Connection Hose
Figure 1
Figure 2

18
Nozzle change operation
1. Please use driver with special head for removed and install nozzle as.
(gure 3)
2. Please remove nozzle (gure 4) from burner with special nozzle driver
and install new nozzle. (gure 5)
Ventilation of room
The air needed for burning is received from room air and the gases emitted
are given directly in room. For safe operation of your product, good room
ventilation is a precondition. If no window or room to be utilized for room
ventilation is available, additional ventilation should be installed. However,
room has a door opening outside, it is no needed to vent holes.
Room size Ventilating opening
Smaller than 5 m³ min. 100 cm²
Between 5 m³ - 10 m³ min. 50 cm²
Bigger than 10 m³ no need
In basement or cellar min. 65 cm²
Figure 3
Figure 4
Figure 5
GB

19
Reduced gas ow rate setting for hob taps
1. Ignite the burner that is to be adjustment and turn the knob to the
reduced position.
2. Remove the knob from the gas tap.
3. Use an appropriately sized screwdriver to adjust the ow rate adjustment
screw. For LPG (butane-pro pane) turn the screw clockwise. For the
naturel gas, you should turn the screw counter- clockwise once.
“The normal length of a straight ame in the reduced position should
be 6-7 mm.“
4. If the ame is higher then the desired position, turn the screw clockwise.
If it is smaller turn anticolockwise.
5. For the last control, bring the burner both to higt-ame and reduced
positions and check whether the ame is on or off.
Depending on the type of gas tap used in your appliance the adjustment
screw position may vary.
To adjust your oven acc. to the gas type, make the adjustment for
reduced ame carefully by turning with a small screwdriver as shown
below on the screw in the middle of the gas cocks as well as nozzle
changes. (gure 6 and 7)
Figure 6 Figure 7

20
Removal of the lower and upper burner and installation of the injector to the
gas oven
Removal of the upper burner:
With the help of a screw driver, remove the screw as shown in gure 8.
As shown in gure 9, remove the burner from its place by pulling it to
yourself. As shown in gure 10, remove the injector in the bearing with a
socket wrench. In order to re-place the burner, apply the removal process
reversely.
Removal of the lower burner:
The lower burner door has been xed with two screws. As shown in
gure 11, remove it with the help of a screw driver. Remove the door by
pulling upwards as shown in gure 12. Remove the burner from its place
by pulling it to yourself as shown in gure 13. As shown in gure 14, remove
the injector in the bearing with a socket wrench. In order to replace the
burner, apply the removal process reversely.
Figure 10
Figure 8 Figure 9
Figure 13
Figure 14
Figure 11
Figure 12
GB

21
1. Glass door
(Sheet metal door)
2. Thermostat setting
3. Oven setting
4. Cooker section control
Switches
5. Push button lighter *
6. Door
7. Handle
8. Plastic leg
9. Lower cabinet door
9.1 Drawer *
9.2 Flap door *
10. Lamp
11. Grill
12. Large burner
13. Middle burner
14. Auxiliary burner
15. Wok burner *
16. Hot plate *
(Ø145 mm or Ø185 mm)
10
11
INTRODUCTION OF THE APPLIANCE
9.2
9.1
1
2
3
9
8
7
6
5
4
14
13
12
15
16

22
Accesories
Coffee pot support unit *
Can be used for coffee pot.
Deep tray *
Used for pastry, big roasts, watery foods. It can also be
used as oil collecting container if you roast directly on grill
with cake, frozen foods and meat dishes.
Tray / Glass tray *
Used for pastry (cookie, biscuit etc.), frozen foods.
Circular tray *
Used for pastry frozen foods.
Wire grill
Used for roasting or placing foods to be baked, roasted
and frozen into desired rack.
Telescopic rail *
Trays and wire racks can be removed and installed easily
thanks to telescopic rails.
Tray handle *
It is used to hold hot trays.
In tray wire grill *
Foods to stick while cooking such as steak are placed on
in tray grill. Thus contact of food with tray and sticking
are prevented.
GB

23
Technical Features Of Your Oven
Specications 50x55 50x60 60x60
Outer width 500 mm 500 mm 600 mm
Outer depth 565 mm 630 mm 630 mm
Outer height 855 mm 855 mm 855 mm
Lamp power 15-25 W
Bottom heating element 1000 W 1000 W 1200 W
Top heating element 800 W 800 W 1000 W
Turbo heating element ----- 1800 W 2200 W
Grill heating element 1500 W 1500 W 2000 W
Supply voltage 220-240V AC/380-415V AC 50/60 Hz
Hot plate 145 mm * 1000 W
Hot plate 180 mm * 1500 W
Hot plate rapid 145 mm * 1500 W
Hot plate rapid 180 mm * 2000 W
WARNING: For the modication to be done by authorized service, this
table should be considered. Manufacturer may not be held responsible for
any problems rising because of any faulty modication.
WARNING: In order to increase the product quality, the technical
specications may be changed without prior notice.
WARNING: The values provided with the appliance or its accompanying
documents are laboratory readings in accordance with the respective
standards. These values may differ depending on the use and ambient
conditions.

24
Burner
Specications
G20,20 mbar
G25,25 mbar
G20,25 mbar G20,13 mbar
Gas natural Gas natural Gas natural
Wok
Burner
Injector 1,40 mm 1,28 mm 1,60 mm
Gas ow 0,333 m³/h 0,333 m³/h 0,333 m³/h
Power 3,50 kW 3,50 kW 3,50 kW
Rapid
Burner
Injector 1,15 mm 1,10 mm 1,45 mm
Gas ow 0,276 m³/h 0,276 m³/h 0,276 m³/h
Power 2,90 kW 2,90 kW 2,90 kW
Semi-Rapid
Burner
Injector 0,97 mm 0,92 mm 1,10 mm
Gas ow 0,162 m³/h 0,162 m³/h 0,162 m³/h
Power 1,70 kW 1,70 kW 1,70 kW
Auxiliary
Burner
Injector 0,72 mm 0,70 mm 0,85 mm
Gas ow 0,96 m³/h 0,96 m³/h 0,96 m³/h
Power 0,95 kW 0,95 kW 0,95 kW
Grill
Burner
Injector 1,00 mm 0,92 mm 1,35 mm
Gas ow 0,196 m³/h 0,196 m³/h 0,196 m³/h
Power 2,00 kW 2,00 kW 2,00 kW
Oven
Burner
Injector 1,10 mm 1,00 mm 1,50 mm
Gas ow 0,235 m³/h 0,235 m³/h 0,235 m³/h
Power 2,50 kW 2,50 kW 2,50 kW
GB

25
Burner
Specications
G30,28-30 mbar
G31,37 mbar
G30,50 mbar G30,37 mbar
LPG LPG LPG
Wok
Burner
Injector 0,96 mm 0,76 mm 0,96 mm
Gas ow 254 g/h 254 g/h 254 g/h
Power 3,50 kW 3,50 kW 3,50 kW
Rapid
Burner
Injector 0,85 mm 0,75 mm 0,85 mm
Gas ow 211 g/h 211 g/h 211 g/h
Power 2,90 kW 2,90 kW 2,90 kW
Semi-Rapid
Burner
Injector 0,65 mm 0,60 mm 0,65 mm
Gas ow 124 g/h 124 g/h 124 g/h
Power 1,70 kW 1,70 kW 1,70 kW
Auxiliary
Burner
Injector 0,50 mm 0,43 mm 0,50 mm
Gas ow 69 g/h 69 g/h 69 g/h
Power 0,95 kW 0,95 kW 0,95 kW
Grill
Burner
Injector 0,70 mm 0,60 mm 0,65 mm
Gas ow 145 g/h 145 g/h 145 g/h
Power 2,00 kW 2,00 kW 2,00 kW
Oven
Burner
Injector 0,75 mm 0,65 mm 0,70 mm
Gas ow 182 g/h 182 g/h 182 g/h
Power 2,50 kW 2,50 kW 2,50 kW
WARNING: Diameter values written on the injector are specied without
a comma. For example; The diameter of 1,70 mm is specied as 170 on
the injector.

26
INSTALLATION OF YOUR OVEN
Check if the electrical installation is proper to bring the appliance in
operating condition. If electricity installation is not suitable, call an
electrician and plumber to arrange the utilities as necessary. Manufacturer
shall not be held responsible for damages caused by operations
performed by unauthorized persons.
WARNING: It is customer's responsibility to prepare the location the
product shall be placed on and also to have the electrical installation
prepared.
WARNING: The rules in local standards about electrical installations
shall be followed during product installation.
WARNING: Check for any damage on the appliance before installing it.
Do not have the product installed if it is damaged. Damaged products
cause a risk for your safety.
Right Place For Installation And Important Warnings
Appliance feet should not stay on soft surfaces such as carpets. The
kitchen oor shall be durable to carry the unit weight and any other
kitchenware that may be used on the oven.
Appliance should be used with a clearance of minimum 400 mm over
the upper hob surfaces, and 65 mm from side surfaces inside a kitchen
furniture.
The appliance is suitable for use on both side walls, without any support,
or without being installed in a cabinet. If a hood or aspirator will be
installed above the cooker, follow the instructions of the manufacturer for
height of mounting. (min. 650 mm)
GB

27
WARNING: The kitchen furniture near the appliance must be heat
resistant.
WARNING: Do not install the appliance beside refrigerators or coolers.
Heat radiated by the appliance increases the energy consumption of cooling
devices.
WARNING: Do not use the door and/or handle to carry or move the appliance.
65 mm min. 65 mm min.
650 mm min.
400 mm min.

28
Chain lashing illustration
Before using the appliance, in order to ensure
safe use, be sure to x the appliance to the wall
using thechain and hooked screw supplied.
Ensure that the hook is screwed into the wall
securely.
CONTROL PANEL
WARNING: The control panel above is only for illustration purposes.
Consider the control panel on your device.
1. Thermostat
2. Function selection button
3. Mechanical timer
4. Rear left heater
5. Front left heater
6. Front right heater
7. Rear right heater
1 2 3 4 5 6 7
0
Thermostat: Used for determining the cooking temperature
of the dish to be cooked in the oven. After placing
the food inside the oven, turn the switch to adjust
desired temperature setting between 40-240 °C.
For cooking temperatures of different food, see cooking
table.
GB

29
USING OVEN SECTION
Using Oven Burners
1. If your oven equipped with burners that operates with gas, appropriate
knob should be used in order to ignite the burners. Some models have
automatic ignition from the knob; it is easy to ignite the burner by turning
the knob. Also, burners can be ignited by pressing the ignition button or
they can be ignited with a match.
2. Do not continuously operate the igniter for more than 15 seconds. If
the burner does not ignite, wait minimum one minute before trying again.
If the burner is extinguished for of the any reason, close the gas control
valve and wait a minimum of one minute before trying again.
Using Oven Heating Elements
1. When your oven is operated rst time, an odor will be spread out
which will be sourced from using the heating elements. In order to get rid
of this, operate it at 240 °C for 45-60 minutes while it is empty.
2. Oven control knob should be positioned to desired value; otherwise
oven does not operate.
3. Kinds of meals, cooking times and thermostat positions are given in
cooking table. The values given in the cooking table are characteristic
values and were obtained as a result of the tests performed in our laboratory.
You can nd different avors suitable for your taste depending on your
cooking and using habits.
4. You can make chicken revolving in your oven by means of the
accessories.
5. Cooking times: The results may change according to the area voltage
and material having different quality, amount and temperatures.
Mechanical timer*: Used for determining the period
for cooking in the oven. When adjusted time is
expired, power to heaters is turned off and an audible
warnig signal is emitted. Mechanical timer can be
adjusted to desired period between 0-90 minutes.
For cooking periods, see cooking tables.

30
6. During the time when cooking is being performed in the oven, the lid
of the oven should not be opened frequently. Otherwise circulation of the
heat may be imbalanced and the results may change.
Using The Grill
1. When you place the grill on the top rack, the food on the grill shall
not touch the grill.
2. You can preheat for 5 minutes while grilling. If necessary, you may
turn the food upside down.
3. Food shall be in the center of the grill to provide maximum air ow
through the oven.
To turn on the grill;
1. Place the function button over the grill symbol.
2. Then, set it to the desired grill temperature.
To turn the grill off;
Set the function button to the off position.
WARNING: Keep the oven door closed while grilling. (electrical grill)
WARNING: Keep the oven door opened while grilling. (gas grill)
Using The Chicken Roasting *
Place the spit on the frame. Slide turn spit
frame into the oven at the desired level.
Locate a dripping pan through the bottom
in order to collect the fast. Add some water
in dripping pan for easy cleaning.Do not
forget to remove plastic part from spit.
After grilling, screw the plastik handle to
the skewer and take out the food from oven.
Figure 15
GB

31
Using Cooker Section
Using gas burners
Flame cut-off safety device (FFD) *; operates instantly
when safety mechanism activates due to overown
liquid over upper hobs.
1. The valves controlling the gas cookers have special security mechanism.
In order to light the cooker always press on the switch forward and bring it
to ame symbol by turnin counter clockwise. All of the lighters shall operate
and the cooker you controlled shall light only. Keep the switch pressed
until ignition i performed. Press on the lighter button and turn the knob
counter clockwise.
2. Do not continuously operate the igniter for more than 15 seconds. If
the burner does not ignite, wait minimum one minute before try again.
3. In models with gas security system, when ame of the cooker is
extinguished, control valve cuts off the gas automatically. For operate
the burners with gas security system you must press the knob and turn
counter-clock-wise. After the ignition you must wait nearly 5-10 second
for gas security systems activation. If the burner is extinguished for of the
any reason, close the gas control valve and wait a minimum of one minute
before trying again.
4. Closed Fully open Half open
5. Before operating your hob please make sure that the burner caps are
well positioned. The right placement of the burner caps are shown as
below.
FFD
Figure 16 Figure 17

32
Using Hot Plates
Level 1 Level 2 Level 3 Level 4 Level 5 Level 6
Ø80 mm 200 W 250 W 450 W --- --- ---
Ø145 mm 250 W 750 W 1000 W --- --- ---
Ø180 mm 500 W 750 W 1500 W --- --- ---
Ø145 mm rapid 500 W 1000 W 1500 W --- --- ---
Ø180 mm rapid 850 W 1150 W 2000 W --- --- ---
Ø145 mm 95 W 155 W 250 W 400 W 750 W 1000 W
Ø180 mm 115 W 175 W 250 W 600 W 850 W 1500 W
Ø145 mm rapid 135 W 165 W 250 W 500 W 750 W 1500 W
Ø180 mm rapid 175 W 220 W 300 W 850 W 1150 W 2000 W
Ø220 mm 220 W 350 W 560 W 910 W 1460 W 2000 W
1. Electric hotplates have standard of 6 temperature levels. (as describe
herein above)
2. When using rst time, operate your electric hotplate in position 6 for
5 minutes. This will make the agent on your hotplate which is sensitive to
heat get hardened by burning.
3. Use at bottomed saucepans which fully contact with the heat as
much as you can, so that you can use the energy more productively.
Pot Sizes
50*55 50*60 60*60
Small burner 12-18 cm 12-18 cm 12-18 cm
Normal burner 18-20 cm 18-20 cm 18-20 cm
Big burner 22-24 cm 22-26 cm 22-26 cm
WOK burner 24-28 cm --- 24-26 cm
Incorrect Incorrect Incorrect Correct
GB

33
PROGRAM TYPES
WARNING: All heater types and program types consisting of these heaters
may not be available at all models.
0
Function Button: Used for determining the heaters
to be used for cooking the dish to be cooked in the
oven. Heater program types in this button and their
functions are described below. All heater types and
program types consisting of these heaters may not
be available at all models.
Roast chicken Fan
Lower and upper heating
elements
Turbo heating and fan
Lamp
Lower-upper heating element
and fan
Lower heating element and fan Grill and fan
Grill and roast chicken Grill
Grill and lamp Upper heating element
Electrical timer Lower heating element
Flame Ignition lighter

34
COOKING TIME TABLE
WARNING: Oven must be preheated for 10 minutes before placing the
food in it.
Foods
Cooking
function
Temperature
(°C)
Rack
position
Cooking
duration (min.)
Cake (Tray / Mold) Static / Static+Fan 170-180 2 35-45
Small cakes Static / Turbo+Fan 170-180 2 25-30
Patty Static / Static+Fan 180-200 2 35-45
Pastry Static 180-190 2 25-30
Cookie Static 170-180 3 20-25
Apple pie Static / Turbo+Fan 180-190 2 50-70
Sponge cake Static 200/150 * 2 20-25
Pizza Static+Fan 180-200 3 20-30
Lasagna Static 180-200 2 25-40
Meringue Static 100 2 60
Chicken Static+Fan / Turbo+Fan 180-190 2 45-50
Grilled chicken ** Grill 200-220 4 25-30
Grilled sh ** Grill+Fan 200-220 4 25-30
Sirloin steak ** Grill+Fan Max. 4 15-20
Grilled meat balls ** Grill Max. 4 20-25
* Without pre-heating. Half of the cooking should be 200°C and then
second half should be 150°C.
** During the half of cooking, meal should be turned around.
GB

35
MAINTENANCE AND CLEANING
1. Disconnect the plug supplying electricity for the oven from the socket.
2. While oven is operating or shortly after it starts operating, it is
extremely hot. You must avoid touching from heating elements.
3. Never clean the interior part, panel, lid, trays and all other parts of
the oven by the tools like hard brush, cleaning mesh or knife. Do not use
abrasive, scratching agents and detergents.
4. After cleaning the interior parts of the oven with a soapy cloth, rinse
it and then dry thoroughly with a soft cloth.
5. Clean the glass surfaces with special glass cleaning agents.
6. Do not clean your oven with steam cleaners.
7. Before opening the upper lid of the oven, clean spilled liquid off the
lid. Also, before closing the lid, ensure that the cooker table is cooled
enough.
8. Never use inammable agents like acid, thinner and gasoline when
cleaning your oven.
9. Do not wash any part of your oven in dishwasher.
10. In order to clean the front glass lid of the oven; remove the xing
screws xing the handle by means of a screwdriver and remove the oven
door. Than clean and rinse it thoroughly. After drying, place the oven
glass properly and re-install the handle.
Figure 18 Figure 19
Figure 20

36
Installation Of The Oven Door
Completely open
the oven door
by pulling it to
yourself. After
wards, perform
the unlocking
process by pulling
the hinge lock
upwards with the
help of a screw
driver as shown
in gure 21.1.
Bring the hinge
lock to the widest
angle as shown in
gure 21.2. Bring
both hinges
connecting the
oven door to
the oven to the
same position.
Afterwards, close
the oven door as to
lean on the hinge
lock as shown in
gure 22.1.
In order to re-place the oven door, perform the abovementioned steps in reverse.
To remove the
oven door, pull it
upwards by holding
it with both hands
when close to the
closed position
as shown in
gure 22.2.
Figure 21
Figure 21.1 Figure 21.2 Figure 22.1 Figure 22.2
Figure 22
GB

37
Cleaning And Maintenance Of The Oven’s Front Door Glass
Remove the prole by pressing the plastic latches on both left and right
sides as shown in gure 23 and pulling the prole towards yourself as
shown in gure 24. Then remove the inner-glass as shown in gure 25.
If required, middle glass can be removed in the same way. After cleaning
and maintenance are done, remount the glasses and the prole in reverse
order. Make sure the prole is properly seated in its place.
Catalytic Walls *
Catalytic walls are located on the left
and the right side of cavity under the
guides. Catalytic walls banish the bad
smell and obtain the best performance
from the cooker. Catalytic walls also
absorb oil residue and clean your oven
while it’s operating.
Removing the catalytic walls
In order to remove the catalytic walls; the guides must be pulled out.
As soon as the guides are pulled out, the catalytic walls will be released
automatically. The catalytic walls must be changed after 2-3 years.
Figure 23 Figure 24 Figure 25
1
2
Figure 26

38
Rack Positions
It is important to place the wire grill into
the oven properly. Do not allow wire rack to
touch rear wall of the oven. Rack positions
are shown in the next gure. You may place
a deep tray or a standard tray in the lower
and upper wire racks.
Installing and removing wire racks
To remove wire racks, press the clips shown with arrows in the gure,
rst remove the lower, and than the upper side from installation location.
To install wire racks; reverse the procedure for removing wire rack.
Changing The Oven Lamp
WARNING: To avoid electric shock, ensure that the appliance circuit is
open before changing the lamp. (having circuit open means power is off)
First disconnect the power of appliance and ensure that appliance is cold.
Remove the glass protection by turning as indicated in the gure. If
you have difculty in turning, then using plastic gloves will help you in
turning.
Then remove the lamp by turning, install the new lamp with same
specications.
Reinstall glass protection, plug the power cable of appliance into electrical
socket and complete replacement. Now you can use your oven.
Type G9 Lamp Type E14 Lamp
Rack 4
Rack 3
Rack 2
Rack 1
220-240 V, AC
15-25 W
Figure 27
220-240 V, AC
15 W
Figure 28
GB

39
Using The Grill Deector Sheet *
1. A safety panel is designed to protect control panel and the buttons
when the oven is in grill mode. (gure 29)
2. Please use this safety panel in order to avoid the heat to damage
control panel and the buttons when the oven is grill mode.
WARNING: Accessible parts may be hot when the grill in use. Young
children should be kept away.
3. Place the safety panel under control panel by opening the oven front
cover glass. (gure 30)
4. And then secure the safety panel in between oven and front cover by
gently closing the cover. (gure 31)
5. It is important for cooking to keep the cover open in specified
distance when cooking in grill mode.
6. Safety panel will provide an ideal cooking circumstance while
protecting control panel and buttons.
WARNING: If the cooker has the “closed grill functioned” option with
thermostat, you can keep the oven door closed during operation; in this
case the grill deector sheet will be unnecessary.
Figure 29 Figure 30 Figure 31

40
TROUBLESHOOTING
You may solve the problems you may encounter with your product by
checking the following points before calling the technical service.
Check Points
In case you experience a problem about the oven, rst check the table
below and try out the suggestions.
Problem Possible cause What to do
Oven does not operate.
Power supply not available. Check for power supply.
Gas supply not available.
Check if main gas valve is open.
Check if gas pipe is bent or
kinked.
Make sure gas hose is connected
to the oven.
Check if suitable gas valve is
being used.
Oven stops during cooking.
Plug comes out from the wall
socket.
Re-install the plug into wall
socket.
Turns off during cooking.
Too long continuous operation.
Let the oven cool down after long
cooking cycles.
More than one plugs in a wall
socket.
Use only one plug for each wall
socket.
Oven door is not opening properly.
Food residues jammed between
the door and internal cavity.
Clean the oven well and try to
re-open the door.
Lighter not operating.
Tips or body of ignition plugs are
clogged.
Clean tips or body of ignition
plugs of gas burners.
Gas burner pipes are clogged. Clean gas burner pipes.
Electric shock when touching the
oven.
No proper grounding.
Make sure power supply is
grounded properly.
Ungrounded wall socket is used.
GB

41
Problem Possible cause What to do
Water dripping.
Water or steam may generate under
certain conditions depending on
the food being cooked. This is not
a fault of the appliance.
Let the oven cool down and than
wipe dry with a dishcloth.
Steam coming out from a crack on
oven door.
Water remaining inside the oven.
Oven does not heat.
Oven door is open. Close the door and restart.
Oven controls not correctly
adjusted.
Read the section regarding operation
of the oven and reset the oven.
Fuse tripped or circuit breaker
turned off.
Replace the fuse or reset the
circuit breaker. If this is repeating
frequently, call an electrician.
Smoke coming out during
operation.
When operating the oven for the
rst time.
Smoke comes out from the heaters.
This is not a fault. After 2-3 cycles,
there will be no more smoke.
Food on heater.
Let the oven to cool down and
clean food residues from the
heater.
When operating the oven burnt or
plastic odour coming out.
Plastic or other not heat resistant
accessories are being used inside
the oven.
At high temperatures,
use suitable glassware accessories.
Oven does not cook well.
Oven door is opened
frequently during cooking.
Do not open oven door frequently,
if the food you are cooking does
not require turning. If you open the
door frequently internal temperature
drops and therefore cooking result
will be inuenced.
Internal light is dim or does not
operate.
Foreign object covering the lamp
during cooking.
Clean internal surface of the oven
and check again.
Lamp might be failed.
Replace with a lamp with same
specications.

42
HANDLING RULES
1. Do not use the door and/or handle to carry or move the appliance.
2. Carry out the movement and transportation in the original packaging.
3. Pay maximum attention to the appliance while loading/unloading and
handling.
4. Make sure that the packaging is securely closed during handling and
transportation.
5. Protect from external factors (such as humidity, water, etc.) that may
damage the packaging.
6. Be careful not to damage the appliance due to bumps, crashes, drops,
etc. while handling and transporting and not to break or deform it during
operation.
RECOMMENDATIONS FOR ENERGY SAVING
Following details will help you use your product ecologically and
economically.
1. Use dark coloured and enamel containers that conduct the heat better
in the oven.
2. As you cook your food, if the recipe or the user manual indicates that
pre-heating is required, pre-heat the oven.
3. Do not open the oven door frequently while cooking.
4. Try not to cook multiple dishes simultaneously in the oven. You may
cook at the same time by placing two cookers on the wire rack.
5. Cook multiple dishes successively. The oven will not lose heat.
6. Turn off the oven a few minutes before the expiration time of cooking.
In this case, do not open the oven door.
7. Defrost the frozen food before cooking.
GB

43
ENVIRONMENTALLY-FRIENDLY DISPOSAL
Dispose of packaging in an environmentally-friendly
manner.
This appliance is labelled in accordance with European
Directive 2012/19/EU concerning used electrical and
electronic appliances (waste electrical and electronic
equipment - WEEE). The guideline determines the frame
work for the return and recycling of used appliances as
applicable throughout to the EU.
PACKAGE INFORMATION
Packaging materials of the product are manufactured from recyclable
materials in accordance with our National Environment Regulations.
Do not dispose of the packaging materials together with the domestic
or other wastes. Take them to the packaging material collection points
designated by the local authorities.

44
Estimados Usuarios,
Nuestro objetivo es hacer que este producto le proporcione el mejor
resultado que se fabrica en nuestras instalaciones modernas en un
entorno de trabajo cuidadoso, en conformidad con el concepto de calidad
total.
Por lo tanto, le sugerimos que lea el manual del usuario detenidamente
antes de usar el producto y que lo tenga permanentemente a su disposición.
Nota: Este manual de usuario está preparado para más de un modelo.
Algunas de las características especicadas en el manual pueden no estar
disponibles en su dispositivo.
Todos nuestros electrodomésticos son solo para uso doméstico, no para
uso comercial.
Los productos marcados con (*) son opcionales.
“ESTE APARATO DEBERÁ SER INSTALADO DE ACUERDO CON LAS NORMAS
DE REGLAMENTACIÓN Y SOLO SE UTILIZARÁ EN UN ESPACIO BIEN VENTILADO.
LEA LAS INSTRUCCIONES ANTES DE INSTALAR O UTILIZAR ESTE APARATO”
“Cumple con las Regulaciones WEEE".
ES

45
Contenido
Advertencias importantes 46
Conexión eléctrica 59
Conexión de gas 60
Introducción al uso del aparato 65
Accesorios 66
Características técnicas de su horno 67
Instalación del horno 70
Ilustración de amarre de cadena 72
Panel de mandos 72
Uso del horno 73
Uso de la parrilla 74
Uso del asador de pollo 74
Uso de la sección del horno 75
Tipos de programas 77
Tabla de horneado y asado 78
Mantenimiento y limpieza 79
Montaje de puerta de horno 80
Limpieza y mantenimiento del vidrio
De la puerta frontal del horno 81
Paredes catalíticas 81
Posiciones del estante 82
Cambio de la lámpara del horno 82
Uso de la hoja deectora de la parrilla 83
Solución de problemas 84
Reglas de manipulación 86
Recomendaciones para el ahorro de energía 86
Eliminación respetuosa con el medio ambiente 87
Información sobre el embalaje 87

46
ADVERTENCIAS IMPORTANTES
1. La instalación y la reparación siempre deben ser
realizadas por el “SERVICIO AUTORIZADO”. El fabricante
no se hace responsable de las operaciones realizadas
por personas no autorizadas.
2. Lea atentamente estas instrucciones de funcionamiento.
Solo de esta manera puede usar el dispositivo de forma
segura y correcta.
3. El horno debe usarse de acuerdo con las instrucciones
de funcionamiento.
4. Mantenga a los niños menores de 8 años y a las
mascotas alejados cuando opere.
5. ADVERTENCIA: Las partes accesibles pueden estar
calientes al usar la parrilla. Manténgalos alejados de los
niños.
6. ADVERTENCIA: Peligro de incendio, no guarde los
materiales en la supercie de cocción.
7. ADVERTENCIA: El aparato y sus partes accesibles
están calientes durante la operación.
8. Las condiciones de conguración de este dispositivo
se especican en la etiqueta. (O en la placa de datos)
9. Las partes accesibles pueden estar calientes cuando
se usa la parrilla. Los niños pequeños deberían mantenerse
lejos.
10. ADVERTENCIA: Este aparato está diseñado para
cocinar. No debe utilizarse para otros propósitos, como
para calefacción.
ES

47
11. Para limpiar el aparato, no use limpiadores de
vapor.
12. Asegúrese de que la puerta del horno esté com-
pletamente cerrada después de colocar los alimentos
dentro del horno.
13. NO TRATE NUNCA de apagar el fuego con agua.
Solo apague el circuito del dispositivo y luego cubra la
llama con una cubierta o una manta ignífuga.
14. En caso de no poder vigilar adecuadamente a los
menores de 8 años, deberá mantenerles lejos del aparato.
15. Debe evitarse tocar los elementos calientes.
16. PRECAUCIÓN: El proceso de cocción deberá ser
supervisado. El proceso de cocción siempre deberá ser
supervisado.
17. Este dispositivo puede ser utilizado por niños
mayores de 8 años, personas con problemas físicos,
auditivos o mentales o personas con falta de experiencia
o conocimiento, siempre que se garantice el control o
se les proporcione información sobre los peligros.
18. Este dispositivo ha sido diseñado solo para uso
doméstico.
19. Los niños no deben jugar con el aparato. La limpieza
o el mantenimiento al aparato por parte del usuario no
debe ser realizado por niños a menos que sean mayores
de 8 años y sean supervisados por adultos.
20. Mantenga el aparato y su cable de alimentación
lejos de niños menores de 8 años.

48
21. Coloque cortinas, tul, papel o cualquier material
inamable (inamable) lejos del aparato antes de
comenzar a usarlo. No coloque materiales inamables
encima o dentro del aparato.
22. Mantenga abiertos los canales de ventilación.
23. El aparato no es adecuado para su uso con un
temporizador externo o un sistema de control remoto
por separado.
24. No caliente latas cerradas ni frascos de vidrio. La
presión puede llevar a los tarros a explotar.
25. El asa del horno no es un colgador de toallas. No
cuelgue toallas, etc. en el asa del horno.
26. No coloque las bandejas del horno, platos u hojas
de aluminio directamente sobre la base del horno. El
calor acumulado puede dañar la base del horno.
27. Mientras coloca alimentos o retira alimentos del
horno, etc., siempre use guantes resistentes al calor.
28. No use el producto estando bajo medicación y/o
bajo la inuencia del alcohol, que puede afectar su
capacidad de buen juicio.
29. Tenga cuidado al usar alcohol en sus alimentos.
El alcohol se evaporará a altas temperaturas y puede
prenderse fuego y causar un incendio si entra en contacto
con supercies calientes.
30. Después de cada uso, verique si la unidad está
apagada.
ES

49
31. Si el aparato está defectuoso o tiene un daño
visible, no lo haga funcionar.
32. No toque el enchufe con las manos mojadas. No
tire del cable para desconectarlo, siempre sostenga el
enchufe.
33. No use el aparato con el cristal de la puerta frontal
retirado o roto.
34. Coloque el papel de hornear junto con la comida
en un horno precalentado poniéndolo dentro de una
olla o en un accesorio de horno (bandeja, parrilla de
alambre, etc.).
35. No coloque objetos que puedan alcanzar los niños
en el aparato.
36. Es importante colocar la parrilla de alambre y la
bandeja correctamente en los estantes de alambre y/o
colocar correctamente la bandeja en el estante. Coloque
la parrilla o bandeja entre dos rieles y asegúrese de que
esté equilibrada antes de poner comida sobre ella.
37. Contra el riesgo de tocar los elementos del quemador
del horno, retire las partes sobrantes del papel de hornear
que cuelgan del accesorio o contenedor.
38. Nunca lo use a temperaturas de horno superiores
a la temperatura de uso máxima indicada en su papel
de hornear. No coloque el papel de hornear en la base
del horno.

50
39. Cuando la puerta esté abierta, no coloque ningún
objeto pesado sobre la puerta ni permita que los niños
se sienten en ella. Puede hacer que el horno vuelque o
que las bisagras de la puerta se dañen.
40. Los materiales de embalaje son peligrosos para
los niños. Mantenga los materiales de embalaje lejos
del alcance de los niños.
41. No utilice limpiadores abrasivos ni raspadores
metálicos alados para limpiar el cristal, ya que los
arañazos que pueden ocurrir en la supercie del cristal
de la puerta pueden hacer que el cristal se rompa.
42. No coloque el aparato sobre una supercie cubierta
con alfombras. Las piezas eléctricas se sobrecalientan
ya que no habrá ventilación desde abajo. Esto causará
la falla del dispositivo.
43. No golpee las supercies de vidrio de las hornillas
de vitrocerámica con un metal duro, la resistencia podría
dañarse. Puede causar una descarga eléctrica.
44. El usuario no debe manejar el horno solo.
45. El usuario debe tener cuidado al limpiar los
quemadores de gas. Puede causar lesiones personales.
46. La comida puede derramarse cuando se desmonta
el pie del horno o se rompe, tenga cuidado. Puede causar
lesiones personales.
47. Durante el uso, las supercies internas y externas
del horno se calientan. Cuando abra la puerta del horno,
retroceda para evitar que salga vapor caliente del interior.
Hay riesgo de quemaduras.
ES

51
48. La tapa superior del horno puede cerrarse por una
buena razón, y es que el envase de cocción puede
voltearse. Dé un paso atrás para evitar que le llegue el
calor de la comida. Hay riesgo de quemaduras.
49. No coloque objetos pesados cuando la puerta del
horno esté abierta, existe el riesgo de que se voltee.
50. El usuario no debe dislocar la resistencia durante
la limpieza. Puede causar una descarga eléctrica.
51. No quite los interruptores de encendido del aparato.
De lo contrario, se puede acceder a los cables eléctricos
vivos. Puede causar una descarga eléctrica.
52. El suministro del horno se puede desconectar
durante cualquier trabajo de construcción en el hogar.
Después de completar el trabajo, vuelva a conectar el
horno debe ser hecho por un servicio autorizado.
53. No coloque envases metálicos como cuchillos,
tenedores o cucharas en la supercie del aparato, ya
que se calientan.
54. Para evitar el sobrecalentamiento, el aparato no
debe instalarse detrás de una cubierta decorativa.
55. Apague el aparato antes de quitar las protecciones.
Después de limpiar, instale las protecciones de acuerdo
con las instrucciones.
56. El punto de jación del cable debe estar protegido.
57. ADVERTENCIA: No use los quemadores de horno y la
parrilla al mismo tiempo.

52
58. No cocine la comida directamente en la bandeja/
rejilla. Por favor, ponga la comida en las herramientas
adecuadas antes de ponerlas en el horno.
59. Supercie caliente, deje enfriar antes de cerrar la
tapa.
Seguridad eléctrica
1. Conecte el aparato a un enchufe con conexión a
tierra protegido por un fusible que cumpla con los
valores especicados en el cuadro de especicaciones
técnicas.
2. Haga que un electricista autorizado instale un equipo
de puesta a tierra. Nuestra empresa no será responsable
por los daños que se incurrirán debido al uso del producto
sin conexión a tierra de acuerdo con las reglamentaciones
locales.
3. Los interruptores automáticos del horno deben
colocarse de modo que el usuario nal pueda alcanzarlos
cuando el horno esté instalado.
4. El cable de alimentación (el cable con enchufe) no
debe entrar en contacto con las partes calientes del
dispositivo.
5. Si el cable de suministro de energía (el cable con
enchufe) está dañado, este cable debe ser reemplazado
por el fabricante o su agente de servicio o un personal
igualmente calicado para evitar una situación peligrosa.
ES

53
6. NUNCA lave el producto rociando o vertiendo agua
sobre él! Existe el riesgo de electrocución.
7. ADVERTENCIA: Para evitar descargas eléctricas,
asegúrese de que el circuito del dispositivo esté abierto
antes de cambiar la lámpara.
8. ADVERTENCIA: Corte todas las conexiones del circuito
de suministro antes de acceder a las terminales.
9. ADVERTENCIA: Si la supercie está agrietada, apague
el aparato para evitar el riesgo de descarga eléctrica.
10. No use cables cortados o dañados o cables de
extensión que no sean el cable original.
11. Asegúrese de que no haya líquido o humedad en
el tomacorriente donde está instalado el enchufe del
producto.
12. La supercie posterior del horno también se calienta
cuando se opera el horno. Las conexiones eléctricas no
deben tocar la supercie posterior, de lo contrario, las
conexiones podrían dañarse.
13. No apriete los cables de conexión a la puerta del
horno y no los aplique sobre supercies calientes. Si el
cable se derrite, esto puede provocar un cortocircuito
en el horno e incluso un incendio.
14. Desenchufe la unidad durante la instalación,
mantenimiento, limpieza y reparación.
15. Si el cable de alimentación está dañado, debe ser
reemplazado por su fabricante o servicio técnico autorizado
o cualquier otro personal calicado en el mismo nivel,
para evitar cualquier situación peligrosa.

54
16. Asegúrese de que el enchufe esté insertado
firmemente en el tomacorriente de la pared para evitar
chispas.
17. No use limpiadores a vapor para limpiar el aparato,
de lo contrario puede ocurrir una descarga eléctrica.
18. Se requiere un interruptor omnipolar capaz de
desconectar la fuente de alimentación para la instalación.
La desconexión de la fuente de alimentación debe
proporcionarse con un interruptor o un fusible integrado
instalado en una fuente de alimentación ja de acuerdo
con el código de construcción.
19. El dispositivo está equipado con un cable tipo "Y".
20. Las conexiones jas se deben conectar a una fuente
de alimentación que permita la desconexión omnipolar.
Para dispositivos con categoría de sobretensión por
debajo de III, el dispositivo de desconexión se conectará
a la fuente de alimentación ja de acuerdo con el código
de cableado.
ES

55
Seguridad con gas
1. Este aparato no está conectado a aparatos de
evacuación de productos en combustión. Este aparato
debe estar conectado e instalado de acuerdo con las
normas de instalación vigentes. Se deben considerar
las condiciones con respecto a la ventilación.
2. Cuando se usa un aparato de cocina a gas: humedad,
calor y productos quemados se pueden generan en la
habitación. En primer lugar, asegúrese de que la horno
esté bien ventilada cuando utilice el electrodoméstico
y mantenga aberturas de ventilación naturales o instale
un equipo de ventilación mecánica.
3. Después de usar el artefacto durante un período
prolongado, es posible que se requiera ventilación
adicional. Por ejemplo, abra una ventana o ajuste una
velocidad más alta para la ventilación mecánica, si la
hay.
4. Este electrodoméstico debe usarse solo en lugares
bien ventilados de acuerdo con la normativa vigente.
Lea el manual antes de instalar o usar este producto.
5. Antes de colocar el dispositivo, asegúrese de que
las condiciones de la red local (tipo de gas y presión de
gas) cumplan con los requisitos del dispositivo.
6. El mecanismo no se puede ejecutar por más de 15
segundos. Si el quemador no está encendido después de
15 segundos, detenga el mecanismo y espere al menos
un minuto antes de tratar de encender el quemador de
nuevo.

56
7. Todo tipo de operaciones a realizar en la instalación
de gas debe ser realizado por personas autorizadas y
competentes.
8. Este aparato está ajustado para gas natural (GN). Si
tiene que usar su producto con un tipo de gas diferente,
debe solicitar el servicio autorizado para la conversión.
9. Para una operación adecuada, la campana, el tubo
de gas y la abrazadera deben reemplazarse periódica-
mente de acuerdo con las recomendaciones del fabricante
y cuando sea necesario.
10. El gas debería arder bien en los productos a base
de gas. El gas de combustión bien puede entenderse
a partir de la llama azul y la combustión continua. Si
el gas no se quema lo suficiente, se puede generar
monóxido de carbono (CO). El monóxido de carbono es
un gas incoloro, inodoro y muy tóxico, incluso pequeñas
cantidades tienen un efecto letal.
11. Pregunte a su suministro de gas local sobre los
números de teléfono para emergencias relacionadas
con el gas y las medidas que se tomarán cuando se
detecte el olor a gas.
ES

57
Qué hacer cuando se detecta olor a gas
1. No use llamas abiertas y no fume.
2. No opere ningún interruptor eléctrico. (Por ejemplo;
interruptor de la lámpara o timbre de la puerta)
3. No use el teléfono ni el teléfono móvil.
4. Abra las puertas y ventanas.
5. Cierre todas las válvulas de los aparatos que utilizan
gas y los contadores de gas.
6. Llame a los bomberos desde un teléfono fuera del
hogar.
7. Verique todas las mangueras y sus conexiones en
busca de fugas. Si aún huele a gas, salga de la casa y
advierta a sus vecinos.
8. No ingrese a la casa hasta que las autoridades aclaren
que es seguro.

58
Uso previsto
1. Este aparato está diseñado para uso en el hogar. El
uso comercial del aparato no está permitido.
2. Este aparato solo se puede usar para cocinar.
No debe usarse para otros fines, como calentar una
habitación.
3. Este aparato no debe usarse para calentar placas
debajo de la parrilla, para secar la ropa o las toallas
colgándolas en el asa o con nes de calefacción.
4. El fabricante no asume ninguna responsabilidad
por los daños debidos al mal uso o mal manejo.
5. La parte del horno de la unidad se puede usar para
descongelar, asar, freír y asar alimentos.
6. La vida operativa del producto que ha comprado
es de 10 años. Este es el período durante el cual el
fabricante proporciona los recambios necesarios para
el funcionamiento de este producto según lo denido.
ES

59
Conexión Eléctrica
1. Su horno requiere un fusible de 16 o 32 amperios de acuerdo con la
potencia del dispositivo. Si es necesario, se recomienda la instalación por
un electricista calicado.
2. Su horno se ajusta de acuerdo con el suministro eléctrico de 220-
240V CA / 380-415V CA, 50/60 Hz.. Si la red eléctrica es diferente a
este valor especicado, comuníquese con su servicio autorizado.
3. La conexión eléctrica del horno solo debe realizarse con los enchufes
con el sistema de tierra instalado de acuerdo con las normas. Si no hay
una toma adecuada con el sistema de tierra en el lugar donde se colocará
el horno, comuníquese inmediatamente con un electricista calicado.
El fabricante nunca será responsable de los daños que puedan surgir
debido a los enchufes conectados al aparato sin sistema de tierra. Si los
extremos del cable de conexión eléctrica están abiertos, de acuerdo con
el tipo de aparato, instale un interruptor apropiado en la red eléctrica, con
el cual se pueden desconectar todos los extremos en caso de conexión/
desconexión de la red eléctrica.
4. Si su cable de suministro eléctrico está defectuoso, denitivamente
debe ser reemplazado por el servicio autorizado o electricistas calicados
para evitar los peligros.
5. El cable eléctrico no debe tocar las partes calientes del aparato.
6. Por favor, use su horno en un ambiente seco.
Esquema de conexión eléctrica
220-240V~50/60Hz 220-240V~50/60Hz
400V 3N~50/60Hz 400V 2N~50/60Hz
Earth
Terre
Erdung
Earth
Terre
Erdung
Earth
Terre
Erdung
Earth
Terre
Erdung
L3
L2
L1
L2
L1
L1
Live
Phase
Neutral
Neutre
Neutral
Neutre
Neutral
Neutre
H05 VV-F 3G 4mm² H05 VV-F 5G 1.5mm² H05 VV-F 4G 1.5mm² H05 VV-F 3G 1.5mm²
Neutral
Neutre
380-415V 3N~50/60Hz
380-415V 2N~50/60Hz
220-240V~50/60Hz 220-240V~50/60Hz
H05 VV-F 3G 4 mm² H05 VV-F 5G 1.5 mm²
H05 VV-F 4G 1.5 mm²
H05 VV-F 3G 1.5 mm²

60
Conexión De Gas
ADVERTENCIA: Antes de comenzar cualquier trabajo relacionado con la
instalación de gas, cierre el suministro de gas. Riesgo de explosión.
Por favor, use su horno en un ambiente seco.
1. Coloque la abrazadera en la manguera. Empuje una de las mangueras
hasta que llegue al nal de la tubería.
2. Para el control de sellado; asegúrese de que los botones en el panel
de mandos estén cerrados, pero el cilindro de gas está abierto. Aplique
agua jabonosa a la conexión. Si hay una fuga de gas, se generará espuma
en el área jabonosa.
3. El horno debe estar usando un lugar bien ventilado y debe instalarse
en un piso plano.
4. Vuelva a inspeccionar la conexión de gas.
5. Cuando coloque el horno en su ubicación, asegúrese de que esté en
el nivel del mostrador. Llévelo al nivel del mostrador ajustando las patas
si es necesario.
6. No permita que la manguera de gas y el cable eléctrico de su horno
pasen por las áreas calentadas, especialmente a través del lado posterior
del horno. No mueva el horno conectado a gas. Dado que el forzamiento
debe aojar la manguera, puede producirse una fuga de gas.
7. Utilice una manguera exible para la conexión de gas.
Conexión GLP;
Para la conexión de GLP (cilindro), coloque
la abrazadera de metal en la manguera que
sale del cilindro de GLP. Fije un borde de la
manguera en el conector de entrada de la
manguera detrás del aparato empujando en
el extremo a través del calentamiento de la
manguera en agua hervida. Después, pon-
ga la abrazadera hacia la parte nal de la
manguera y apriete con un destornillador. El
conector de entrada de la junta y la manguera
necesarios para la conexión son como se
muestra en la imagen a continuación.
NOTA: El regulador colocado en el cilindro de GLP debe tener la
característica 300 mmSS.
Tubo De Gas Principal
Junta
Conector De La
Manguera De Entrada
Abrazadera De Metal
Conexión De La
Manguera De GLP
ES

61
Conexión gas natural;
ADVERTENCIA: La conexión de gas natural
solo se debe hacer a través del servicio
autorizado.
Para la conexión de gas natural, coloque
la junta en la tuerca en el extremo de la
manguera de conexión de gas natural. Para
instalar la manguera en la tubería principal
de gas, gire la tuerca. Complete la conexión
al hacer la revisión de fugas de gas.
Lugar de paso de la manguera de gas
Conecte al aparato al grifo de la tubería usando
la ruta más corta posible y de manera que se
asegure de que no habrá ninguna fuga de gas.
Para llevar a cabo una comprobación de
seguridad de tensión y sellado, asegúrese
de que el mando del panel de control estén
cerradas y de que la bombona de gas esté
abierta.
ADVERTENCIA: Mientras realice una comprobación
de fugas de gas, nunca utilice ningún tipo
de mechero, cerilla, cigarrillo o una sustancia
irritante.
Aplique jabón de burbujas en los puntos de
conexión. Si hay cualquier tipo de fuga, esto
causará burbujas.
Cuando coloque el aparato en su sitio,
asegúrese de que esté al mismo nivel que la
encimera. Si es necesario, ajustes las patas
para que queden aniveladas con la encimera.
Utilice el aparato en una supercie llana y en
un ambiente bien ventilado.
ADVERTENCIA: Antes de colocar el aparato, verique que las condiciones
de distribución local (tipo y presión de gas) se ajusten a la conguración
del producto.
Tubo De Gas Principal
Junta
Tuerca
Conexión De La
Manguera De Gas Natural
Figura 1
Figura 2

62
Operación de cambio de boquilla
1. Utilice una herramienta con un cabezal especial para quitar e instalar
la boquilla como se ve en (gura 3)
2. Elimine la boquilla (gura 4) del quemador con una herramienta
especial e instale una nueva boquilla (gura 5)
Ventilacion de la habitación
El aire necesario para la combustión se recibe del aire de la habitación y los
gases emitidos se dan directamente en la habitación. Para un funcion-
amiento seguro de su producto, una buena ventilación de la sala es una
condición previa. Si no hay ninguna ventana o espacio para ser utilizados
para la ventilación de la habitación, se debe instalar una ventilación
adicional. Sin embargo, si la habitación tiene una puerta hacia el exterior,
no es necesario realizar los oricios de ventilación.
Tamaño de la habitación Apertura de ventilación
Menor de 5 m³ mín. 100 cm²
Entre 5 m³ - 10 m³ mín. 100 cm²
Mayor de 10 m³ no necesario
En sótano o bodega mín 65 cm²
Figura 3
Figura 4
Figura 5
ES

63
Disminución del ajuste del caudal de gas para los grifos de la encimera
1. Encienda el quemador que se va a ajustar y gire el mando a la posición
reducida.
2. Retire el mando del grifo de gas.
3. Use un destornillador de tamaño adecuado para ajustar el tornillo de
ajuste de la tasa de ujo. Para GLP (panel de butano-pro) gire el tornillo
en el sentido de las agujas del reloj. Para el gas natural, debe girar el
tornillo hacia la izquierda una vez.
"La longitud normal de una llama recta en la posición reducida debe ser
de 6-7 mm".
4. Si la llama es más alta que la posición deseada, gire el tornillo en
el sentido de las agujas del reloj. Si es más pequeña, gírela en sentido
antihorario.
5. Para el último control, lleve el quemador tanto a llama alta como a
posiciones reducidas y compruebe si la llama está encendida o apagada.
Según el tipo de grifo de gas utilizado en su electrodoméstico, la posición
del tornillo de ajuste puede variar.
Para ajustar su horno según para el tipo de gas, realice el ajuste para la
llama reducida cuidadosamente girando con un destornillador pequeño
como se muestra a continuación en el tornillo en el medio de las llaves de
paso de gas, así como los cambios de la boquilla. (gura 6 y 7)
Figura 6 Figura 7

64
Extracción de los quemadores inferior y superior e instalación del inyector
en el horno de gas
Extracción del quemador superior:
Con la ayuda de un destornillador, quite el tornillo como se muestra
en la gura 8. Como se muestra en la gura 9, retire el quemador de su
lugar tirando de él hacia usted. Como se muestra en la gura 10, quite
el inyector en el cojinete con una llave de vaso. Para volver a colocar el
quemador, aplique el proceso de eliminación de forma inversa.
Extracción del quemador inferior:
La puerta inferior del quemador se ha jado con dos tornillos. Como se
muestra en la gura 11, quítelo con la ayuda de un destornillador. Retire
la puerta tirando hacia arriba como se muestra en la gura 12. Retire el
quemador de su lugar tirando de él hacia usted, como se muestra en la
gura 13. Como se muestra en la gura 14, quite el inyector en el cojinete
con una llave de vaso. Para reemplazar el quemador, aplique el proceso
de eliminación de forma inversa.
Figura 10
Figura 8 Figura 9
Figura 13
Figura 14
Figura 11
Figura 12
ES

65
INTRODUCCIÓN AL USO DEL APARATO
1. Puerta de cristal
(Puerta de hoja de metal)
2. Conguración del termostato
3. Conguración del horno
4. Interruptores de control de
la sección de la estufa
5. Botón del encendedor *
6. Puerta
7. Asa
8. Pata de plástico
9. Puerta inferior del
gabinete
9.1 Cajón*
9.2 Puerta abatible *
10. Lámpara
11. Parrilla
12. Quemador grande
13. Quemador intermedio
14. Quemador auxiliar
15. Quemador para WOK *
16. Placa de quemador *
(Ø145 o Ø185 mm)
10
11
9.2
9.1
1
2
3
9
8
7
6
5
4
14
13
12
15
16

66
Accesorios
Unidad de soporte de cafetera *
Puede ser utilizado para la cafetera.
Bandeja profunda *
Se utiliza para pastelería, fritas y guiso. También puede
utilizarla como recipiente de acumular aceite cuando se
cocina pastel, comidas congeladas y comidas de carne
directamente sobre parrilla.
Bandeja / Bandeja vidrio *
Se utiliza para pastelería (galleta e.t.c) y alimentos
congelados.
Bandeja redonda *
Se utiliza para pastelería congelada.
Parrilla de alambre
Se utiliza para poner en estantería deseada las comidas
congeladas, las comidas para freír o las comidas al horno.
Carril telescópico *
Gracias a reiles telescópicos las bandejas o estantería de
alambre se puede poner y quitar fácilmente.
Asa de la bandeja *
Se usa para sostener bandejas calientes.
Parrilla de alambre dentro de bandeja *
Los alimentos que pueden pegar al cocinar como bistec
se pueden cocinar sobre la parrilla de alambre dentro de
la bandeja. Así se evita que los alimentos se peguen a
la bandeja.
ES

67
Características Técnicas De Su Horno
Propiedades 50x55 50x60 60x60
Ancho exterior 500 mm 500 mm 600 mm
Profundidad externa 565 mm 630 mm 630 mm
Altura exterior 855 mm 855 mm 855 mm
Potencia de la lámpara 15-25 W
Elemento de calefacción inferior 1000 W 1000 W 1200 W
Elemento quemador superior 800 W 800 W 1000 W
Elemento quemador turbo ----- 1800 W 2200 W
Elemento quemador de la parrilla 1500 W 1500 W 2000 W
Tensión de suministro 220-240V AC/380-415V AC 50/60 Hz
Placa caliente 145 mm * 1000 W
Placa caliente 180 mm * 1500 W
Placa caliente rápida 145 mm * 1500 W
Placa caliente rápida 180 mm * 2000 W
ADVERTENCIA: Para que el servicio autorizado realice la modicación, se
debe tomar en consideración esta tabla. El fabricante no se hace responsable
de cualquier problema que surja debido a cualquier modicación defectuosa.
ADVERTENCIA: Para aumentar la calidad del producto, las especicaciones
técnicas pueden modicarse sin previo aviso.
ADVERTENCIA: Los valores indicados en el aparato o en la documentación
que lo acompaña, son lecturas de laboratorio de acuerdo con la correspondiente
normativa. Estos valores pueden variar según el uso y las condiciones
ambientales.

68
Quemador
características
técnicas
G20,20 mbar
G25,25 mbar
G20,25 mbar G20,13 mbar
Gás natural Gás natural Gás natural
Quemador
Wok
Inyector 1,40 mm 1,28 mm 1,60 mm
Flujo de
gas
0,333 m³/h 0,333 m³/h 0,333 m³/h
Potencia 3,50 kW 3,50 kW 3,50 kW
Quemador
Rápido
Inyector 1,15 mm 1,10 mm 1,45 mm
Flujo de
gas
0,276 m³/h 0,276 m³/h 0,276 m³/h
Potencia 2,90 kW 2,90 kW 2,90 kW
Quemador
Semi-Rápido
Inyector 0,97 mm 0,92 mm 1,10 mm
Flujo de
gas
0,162 m³/h 0,162 m³/h 0,162 m³/h
Potencia 1,70 kW 1,70 kW 1,70 kW
Quemador
Pequeño
Inyector 0,72 mm 0,70 mm 0,85 mm
Flujo de
gas
0,96 m³/h 0,96 m³/h 0,96 m³/h
Potencia 0,95 kW 0,95 kW 0,95 kW
Quemador
Parrilla
Inyector 1,00 mm 0,92 mm 1,35 mm
Flujo de
gas
0,196 m³/h 0,196 m³/h 0,196 m³/h
Potencia 2,00 kW 2,00 kW 2,00 kW
Quemador
Horno
Inyector 1,10 mm 1,00 mm 1,50 mm
Flujo de
gas
0,235 m³/h 0,235 m³/h 0,235 m³/h
Potencia 2,50 kW 2,50 kW 2,50 kW
ES

69
Quemador
características
técnicas
G30,28-30 mbar
G31,37 mbar
G30,50 mbar G30,37 mbar
GLP GLP GLP
Quemador
Wok
Inyector 0,96 mm 0,76 mm 0,96 mm
Flujo de
gas
254 g/h 254 g/h 254 g/h
Potencia 3,50 kW 3,50 kW 3,50 kW
Quemador
Rápido
Inyector 0,85 mm 0,75 mm 0,85 mm
Flujo de
gas
211 g/h 211 g/h 211 g/h
Potencia 2,90 kW 2,90 kW 2,90 kW
Quemador
Semi-Rápido
Inyector 0,65 mm 0,60 mm 0,65 mm
Flujo de
gas
124 g/h 124 g/h 124 g/h
Potencia 1,70 kW 1,70 kW 1,70 kW
Quemador
Pequeño
Inyector 0,50 mm 0,43 mm 0,50 mm
Flujo de
gas
69 g/h 69 g/h 69 g/h
Potencia 0,95 kW 0,95 kW 0,95 kW
Quemador
Parrilla
Inyector 0,70 mm 0,60 mm 0,65 mm
Flujo de
gas
145 g/h 145 g/h 145 g/h
Potencia 2,00 kW 2,00 kW 2,00 kW
Quemador
Horno
Inyector 0,75 mm 0,65 mm 0,70 mm
Flujo de
gas
182 g/h 182 g/h 182 g/h
Potencia 2,50 kW 2,50 kW 2,50 kW
ADVERTENCIA: Los valores de diámetro escritos en el inyector se especican
sin una coma. Por ejemplo: el diámetro de 1,70 mm se especica como
170 en el inyector.

70
INSTALACIÓN DEL HORNO
Verique si la instalación eléctrica es adecuada para poner el aparato
en funcionamiento. Si la instalación eléctrica no es adecuada, llame a un
electricista y un técnico cualicado para su instalación. El fabricante no
se hace responsable de los daños causados por las operaciones realizadas
por personas no autorizadas.
ADVERTENCIA: Es responsabilidad del cliente preparar la ubicación donde
se colocará el producto y también tener preparada la instalación eléctrica.
ADVERTENCIA: Se deben seguir las reglas en los estándares locales sobre
instalaciones eléctricas durante la instalación del producto.
ADVERTENCIA: Verique que no haya daños en el aparato antes de instalarlo.
No instale el aparato si está dañado. Los productos dañados causan un
riesgo para su seguridad.
Lugar correcto para la instalación y advertencias importantes
Las patas del aparato no deben permanecer sobre supercies blandas,
como las alfombras. El piso de la cocina debe ser durable para transportar
el peso de la unidad y cualquier otro utensilio de cocina que pueda usarse
en el horno.
El aparato debe utilizarse con un espacio libre de al menos 400 mm
sobre las supercies de la encimera superior, y 65 mm de las supercies
laterales dentro de los muebles de la cocina.
El aparato es adecuado para usarse en ambas paredes laterales, sin
ningún tipo de soporte, o sin instalarlo en un armario. Si se instalará una
campana o extractor encima de la horno, siga las instrucciones del
fabricante para la altura de montaje. (mín. 650 mm)
ES

71
ADVERTENCIA: Los muebles de cocina cerca del electrodoméstico deben
ser resistentes al calor.
ADVERTENCIA: No instale el aparato al lado de refrigeradores o refrige-
radores. El calor irradiado por el aparato aumenta el consumo de energía
de los dispositivos de refrigeración.
ADVERTENCIA: No use la puerta y/o el asa para transportar o mover el
aparato.
65 mm min. 65 mm min.
650 mm min.
400 mm min.

72
Ilustración De Amarre De Cadena
Antes de usar el artefacto, y a n de lograr
un uso seguro, no olvide sujetar el artefacto
al muro utilizando la cadena y el tornillo en
gancho provisto. Verique que el gancho esté
atornillado en el muro rmemente.
PANEL DE MANDOS
ADVERTENCIA: El panel de mandos de arriba es solo para nes ilustrati-
vos. Considere el panel de mandos en su dispositivo.
0
1 2 3 4 5 6 7
1. Termostato
2. Botón de selección de funciones
3. Temporizador mecánico
4. Quemador trasero derecho
5. Quemador delantero izquierdo
6. Quemador delantero derecho
7. Quemador trasero derecho
Termostato: Se usa para determinar la temperatura
de cocción del plato a cocinar en el horno. Después
de colocar la comida dentro del horno, gire el
interruptor para ajustar la temperatura deseada entre
40-240 °C. Para las temperaturas de cocción de
diferentes alimentos, vea la tabla de cocción.
ES

73
USO DEL HORNO
Uso De Los Quemadores Del Horno
1. Si su horno está equipado con quemadores que funcionan con gas,
se debe usar un encendedor apropiado para encender los quemadores.
Algunos modelos tienen ignición automática del mando; es fácil encender el
quemador girando la mando. Además, los quemadores pueden encenderse
presionando el botón de encendido o pueden encenderse con una cerilla.
2. No opere continuamente el encendedor por más de 15 segundos.
Si el quemador no se enciende, espere un minuto como mínimo antes
de volver a intentarlo. Si el quemador se apaga por alguna razón, cierre
la válvula de control de gas y espere un mínimo de un minuto antes de
volver a intentarlo.
Uso De Elementos De Calentamiento Del Horno
1. Cuando el horno se usa por primera vez, se extenderá un olor que se
obtendrá del uso de los elementos de calentamiento. Para deshacerse de
esto, opere a 240 °C durante 45-60 minutos mientras está vacío.
2. La el mando de control del horno debe colocarse al valor deseado, de
lo contrario, el horno no funcionará.
3. El tipo de comidas, los tiempos de cocción y las posiciones del
termostato se dan en la mesa de cocción. Los valores que guran en la
tabla de cocción son valores característicos y se obtuvieron como resultado
de las pruebas realizadas en nuestro laboratorio. Puede encontrar
diferentes sabores adecuados para su gusto dependiendo de sus hábitos
de cocina y uso.
4. Puede cocinar pollo en su horno por medio de los accesorios.
5. Tiempos de cocción: Los resultados pueden cambiar de acuerdo con
el voltaje de área y el material que tiene diferente calidad, cantidad y
temperaturas.
Temporizador mecánico*: Se usa para determinar el
tiempo para cocinar en el horno. Cuando expira el
tiempo ajustado, la energía de los calentadores se
apaga y se emite una señal de advertencia audible.
El temporizador mecánico se puede ajustar al período
deseado entre 0-90 minutos. Para los períodos de
cocción, consulte las tablas de cocción.

74
6. Durante el tiempo en que se cocina en el horno, la tapa del horno
no debe abrirse con frecuencia. De lo contrario, la circulación del calor
puede desequilibrarse y los resultados pueden cambiar.
Uso De La Parrilla
1. Cuando coloque la parrilla en el estante superior, la comida en la
parrilla no tocará la parrilla.
2. Puede precalentar durante 5 minutos mientras asa a la parrilla. Si es
necesario, puede voltear la comida boca abajo.
3. La comida debe estar en el centro de la parrilla para proporcionar el
máximo ujo de aire a través del horno.
Para encender la parrilla:
1. Coloque el botón de función sobre el símbolo de la parrilla.
2. Luego, ajústelo a la temperatura deseada de la parrilla.
Para apagar la parrilla:
Coloque el botón de función en la posición de apagado.
ADVERTENCIA: Mantenga la puerta del horno cerrada mientras cocina a
la parrilla. (parrilla eléctrica)
ADVERTENCIA: Mantenga la puerta del horno abierta mientras cocina a
la parrilla. (parrilla de gas)
Uso Del Asador De Pollo *
Coloque el asador en el marco. Deslice y
gire el marco en el horno al nivel deseado.
Ponga una sartén en la parte inferior para
recoger los restos. Añada un poco de agua
a la sartén para limpiarla más fácilmente.
No olvide quitar la parte de plástico del
asador. Después de terminar con la parrilla,
atornille la asa de plástico a la brocheta y
saque la comida del horno.
Figura 15
ES

75
Uso De La Sección Del Horno
Uso de quemadores de gas
El dispositivo de seguridad de corte de llama (FFD, por
sus siglas en inglés): opera instantáneamente cuando
el mecanismo de seguridad se activa debido al exceso
de líquido sobre las placas superiores.
1. Las válvulas que controlan las hornos de gas tienen un mecanismo
de seguridad especial. Para encender la hornilla siempre presione el
interruptor hacia adelante y llévelo al símbolo de la llama girándola hacia
la izquierda. Todos los encendedores deben operar pero solo la hornilla
que usted controla debe encenderse. Mantenga presionado el interruptor
hasta que realice la ignición. Presione el botón del encendedor y gire la
mando en sentido antihorario.
2. No opere continuamente el encendedor por más de 15 segundos.
Si el quemador no se enciende, espere un minuto como mínimo antes
de volver a intentarlo. Si el quemador se apaga por algún motivo, cierre
la válvula de control de gas y espere un minuto como mínimo antes de
volver a intentarlo.
3. En modelos con sistema de seguridad de gas, cuando la llama de la
cocina se apaga, la válvula de control corta el gas automáticamente. Para
operar los quemadores con sistema de seguridad de gas, debe presionar la
el mando y girar en sentido antihorario. Después del encendido, debe esperar
casi 5-10 segundos para la activación de los sistemas de seguridad del
gas. Si el quemador se apaga por alguna razón, cierre la válvula de control
de gas y espere un mínimo de un minuto antes de volver a intentarlo.
4. Cerrado Completamente abierto Abierto a la mitad
5. Antes de operar su cocina, asegúrese de que las tapas de los quemadores
estén bien posicionadas. Abajo se muestra la colocación correcta de las
tapas de los quemadores.
FFD
Figura 16 Figura 17

76
Uso De Placas De Calentamiento
Nivel 1 Nivel 2 Nivel 3 Nivel 4 Nivel 5 Nivel 6
Ø80 mm 200 W 250 W 450 W --- --- ---
Ø145 mm 250 W 750 W 1000 W --- --- ---
Ø180 mm 500 W 750 W 1500 W --- --- ---
Ø145 mm rápido 500 W 1000 W 1500 W --- --- ---
Ø180 mm rápido 850 W 1150 W 2000 W --- --- ---
Ø145 mm 95 W 155 W 250 W 400 W 750 W 1000 W
Ø180 mm 115 W 175 W 250 W 600 W 850 W 1500 W
Ø145 mm rápido 135 W 165 W 250 W 500 W 750 W 1500 W
Ø180 mm rápido 175 W 220 W 300 W 850 W 1150 W 2000 W
Ø220 mm 220 W 350 W 560 W 910 W 1460 W 2000 W
1. Las placas eléctricas tienen un estándar de 6 niveles de temperatura.
(como se describió antes)
2. Cuando lo use por primera vez, opere su placa de calentamiento eléctrica
en la posición 6 durante 5 minutos. Esto hará que el agente en su placa
de calentamiento sensible al calor se endurezca al quemarlo.
3. Use cazos de fondo plano que entren en contacto con el calor tanto
como sea posible, para que pueda usar la energía de manera más
productiva.
Tamaños De Los Cazos
50*55 50*60 60*60
Quemador
pequeño
12-18 cm 12-18 cm 12-18 cm
Quemador
mediano
18-20 cm 18-20 cm 18-20 cm
Quemador
grande
22-24 cm 22-26 cm 22-26 cm
Quemador
Wok
24-28 cm --- 24-26 cm
Incorrecto Incorrecto Incorrecto Correcto
ES

77
TİPOS DE PROGRAMAS
ADVERTENCIA: Todos los tipos de quemador y tipos de programas que
constan de estos quemador pueden no estar disponibles en todos los
modelos.
Rustidor Ventilador
Elemento quemador superior +
inferior
Quemador turbo + ventilador
Lámpara
Elementos quemador superior +
inferior + ventilador
Elemento quemador inferior +
ventilador
Elemento quemador de la parrilla +
ventilador
Elemento quemador de la parrilla
Quemador de la parrilla / Elemento
quemador de la parrilla
Elemento quemador de la parrilla
+ lámpara
Elemento calentador superior
Temporizador eléctrico
Quemador del horno / Elemento
calentador infeior
Llama Encendedor
0
Botón de función: Se usa para determinar los
quemador a ser utilizados para cocinar el plato en
el horno. Los tipos de programas de calefacción
en este botón y sus funciones se describen a
continuación. Todos los tipos de quemador y tipos
de programas que constan de estos quemador
pueden no estar disponibles en todos los modelos.

78
TABLA DE HORNEADO Y ASADO
ADVERTENCIA: Deberá precalentar el horno durante 10 minutos antes de
colocar alimentos en él.
Alimentos
Función de
Cocción
Temperatura
Cocción (°C)
Parrilla
Cocción
Tiempo de
Cocción (mín.)
Pastel Estático / Estático+Ventilador 170-180 2 35-45
Pequeñas tortas Estático / Turbo+Ventilador 170-180 2 25-30
Empanada Estático / Estático+Ventilador 180-200 2 35-45
Pasteles Estático 180-190 2 25-30
Galletas Estático 170-180 3 20-25
Pie de manzana Estático / Turbo+Ventilador 180-190 2 50-70
Bizcocho esponjoso Estático 200/150 * 2 20-25
Pizza Estático+Ventilador 180-200 3 20-30
Lasaña Estático 180-200 2 25-40
Merengue Estático 100 2 60
Pollo Estático+Ventilador / Turbo+Ventilador 180-190 2 45-50
Pollo a la parrilla ** Parrilla 200-220 4 25-30
Pescado asado ** Parrilla+Ventilador 200-220 4 25-30
Solomillo ** Parrilla+Ventilador Max. 4 15-20
Albóndiga ** Parrilla Max. 4 20-25
* Sin precalentamiento. La mitad de la cocción debe ser de 200 °C y
luego la segunda mitad debe ser 150 °C.
** Durante la mitad de la cocción, la comida debe ser volteada.
ES

79
MANTENIMIENTO Y LIMPIEZA
1. Desconecte el enchufe del horno de la corriente eléctrica.
2. Mientras se está haciendo funcionar el horno o poco después de que
comience a funcionar, alcanzará altísimas temperaturas. Debe evitar
tocarlo en las partes que se calientan.
3. No limpie nunca la parte interior, el panel, la tapa, las bandejas y
todas las otras partes del horno con herramientas como cepillos duros,
esponjas metálicas o cuchillos. No utilice productos ni detergentes que
sean abrasivos o corrosivos.
4. Tras la limpieza de las partes interiores del horno con un paño
jabonoso, enjuáguelo y luego séquelo bien con un paño suave.
5. Limpie las supercies de vidrio con productos limpiadores especícos
para vidrio.
6. No limpie el horno con limpiadores a vapor.
7. Antes de abrir la tapa superior del horno, limpie el líquido derramado
de la tapa. También, antes de cerrar la tapa, asegúrese de que la encimera
de la cocina se haya enfriado lo suciente.
8. No utilice nunca productos inamables como ácido, disolvente y
gasolina para la limpieza del horno.
9. No lave ninguna de las partes del horno en el lavavajillas.
10. Para limpiar la tapa frontal del horno, quite los tornillos jadores
que sostienen la manija por medio de un destornillador y retírelos de la
puerta del horno. Luego, límpiela y lávela cuidadosamente. Una vez seca,
coloque el vidrio del horno con cuidado en su lugar y vuelva a colocar la
manija.
Figura 18 Figura 19
Figura 20

80
Montaje De Puerta De Horno
Abre la puerta del
horno totalmente
tirándola hacia
usted. Después
Como gura 21.1
realiza la apertura
de cerradura tirando
hacia arriba la
cerradura de la
bisagra con ayuda
de un destornillador.
Pon la cerradura
de la bisagra como
gura 21.2 a posición
más ancha. Pon en
misma posición las
dos bisagras que
juntan el horno y la
puerta del horno.
Después cierra la
puerta del hornocomo
gura 22.1 hasta
que llegue a la
cerradura de
bisagra.
Para poner la puerta del horno de nuevo a su lugar, realice el proceso de quitar al revés.
Para quitar la puerta
del horno, cuando la
puerta está cerca a la
posición cerrada
esfuerzala hacia
arriba como se
ve en gura 22.2.
Figura 21
Figura 21.1 Figura 21.2 Figura 22.1 Figura 22.2
Figura 22
ES

81
Limpieza Y Mantenimiento Del Vidrio De La Puerta Frontal Del Horno
Retire el perl presionando los enganches plásticos tanto a la derecha
como a la izquierda según se indica en la gura 23 y traccionando el
perl hacia usted como se indica en la gura 24. Luego retire el vidrio
interno según se indica en la gura 25. Si es necesario, el vidrio del
medio puede retirarse del mismo modo. Una vez realizados la limpieza
y el mantenimiento, vuelva a instalar los vidrios y el perl en el orden
inverso. Asegúrese de que el perl esté correctamente asentado en su lugar.
Paredes catalíticas *
Las paredes catalíticas a la izquierda y
a la derecha debajo de las guías. Las
paredes catalíticas expulsan el mal
olor y ofrecen el mejor rendimiento por
parte de la cocina. Las paredes catalíti-
cas también absorben los residuos de
aceite y limpian el horno mientras está
funcionando.
Retirar las paredes catalíticas
Para retirar las paredes catalíticas, debe extraer las guías Tan pronto
cuando haya extraído las guías, las paredes catalíticas se liberarán
automáticamente. Las paredes catalíticas deben cambiarse cada 2-3
años.
Figura 23 Figura 24 Figura 25
1
2
Figura 26

82
Posiciones Del Estante
Es importante colocar la rejilla de alambre
en el horno adecuadamente. No permita
que el estante de alambre toque la pared
trasera del horno. Las posiciones de los
estantes se muestran en la siguiente gura.
Puede colocar una bandeja profunda o una
bandeja estándar en los estantes de alambre
inferior y superior.
Instalación y eliminación de estantes de alambre
Para quitar los estantes de alambre, presione los clips que se muestran
con las echas en la gura, primero quite la parte inferior y la parte
superior de la ubicación de instalación. Para instalar estantes de alambre,
invierta el procedimiento para quitar el estante de alambre.
Cambio De La Lámpara Del Horno
ADVERTENCIA: Para evitar descargas eléctricas, asegúrese de abrir el
circuito del aparato antes de cambiar la luz. (tener el circuito abierto
significa que el suministro eléctrico está desactivado)
En primer lugar, desconecte el suministro eléctrico del aparato y asegúrese
de que el aparato esté frío.
Retire la protección de cristal girándolo tal como se indica en la imagen
lateral izquierda. Si tiene alguna dificultad para realizar el giro, usar
guantes de plástico le ayudará.
Luego, gire la lámpara para retirarla y coloque la nueva lámpara de la
misma manera.
Vuelve a colocar la protección de cristal del aparato en la toma de
corriente y finalice la sustitución. Ahora podrá usar el horno.
Tipo G9 Lámpara Tipo E14 Lámpara
Estante 4
Estante 3
Estante 2
Estante 1
220-240 V, AC
15-25 W
Figura 27
220-240 V, AC
15 W
Figura 28
ES

83
Uso De La Hoja Deectora De La Parrilla *
1. Un panel de seguridad está diseñado para proteger el panel de mandos y
los botones cuando el horno está en modo de cocinar a la parrilla. (gura 29)
2. Utilice este panel de seguridad para evitar que el calor dañe el panel
de mandos y los botones cuando el horno esté en modo de cocinar a la
parrilla.
ADVERTENCIA: Las partes accesibles pueden estar calientes cuando la
parrilla está en uso. Mantenga a los niños lejos del horno.
3. Coloque el panel de seguridad debajo del panel de mandos abriendo
la tapa frontal del horno de cristal. (gura 30)
4. Y luego asegure el panel de seguridad entre el horno y la cubierta
frontal cerrando suavemente la cubierta. (gura 31)
5. Es importante cocinar para mantener la tapa abierta a una distancia
especíca cuando se cocina en modo de cocinar a la parrilla.
6. El panel de seguridad brindará una circunstancia de cocción ideal
mientras protege el panel de mandos y los botones.
ADVERTENCIA: Si la olla tiene la opción de "parrilla cerrada funcionando"
con termostato, puede mantener la puerta del horno cerrada durante el
funcionamiento; en este caso, la hoja deectora de la parrilla será
innecesaria.
Figura 29 Figura 30 Figura 31

84
SOLUCIÓN DE PROBLEMAS
Puede resolver los problemas que puede encontrar con su producto al
vericar los siguientes puntos antes de llamar al servicio técnico.
Puntos de vericación
En caso de que experimente un problema con el horno, primero revise
la tabla a continuación y pruebe las sugerencias.
Problema Causa posible Qué hacer
El horno no funciona.
Fuente de alimentación no
disponible.
Verique el suministro de energía.
Suministro de gas no disponible.
Verique si la válvula de gas
principal está abierta.
Verique si la tubería de gas está
doblada.
Asegúrese de que la manguera de
gas esté conectada al horno.
Compruebe si se está utilizando
una válvula de gas adecuada.
El horno se detiene durante la
cocción.
El enchufe se sale de la toma de
corriente.
Vuelva a instalar el enchufe en la
toma de corriente.
Se apaga durante la cocción.
Operación continua demasiado
larga.
Deje que el horno se enfríe después
de largos ciclos de cocción.
Más de un enchufe en un enchufe
de corriente.
Use solo un enchufe para cada
enchufe de corriente.
La puerta del horno no se abre
correctamente.
Restos de alimentos atascados
entre la puerta y la cavidad
interna.
Limpia bien el horno y trate de
volver a abrir la puerta.
El encendedor no funciona.
Las puntas o el cuerpo de los
enchufes de encendido están
obstruidos.
Limpie las puntas o el cuerpo de
los tapones de encendido de los
quemadores de gas.
Los tubos del quemador de gas
están obstruidos.
Limpie los tubos del quemador
de gas.
Choque eléctrico al tocar el horno.
Sin una conexión a tierra adecuada.
Asegúrese de que la fuente de
alimentación esté conectada a
tierra correctamente.
Se usa una toma de corriente sin
conexión a tierra.
ES

85
Problema Causa posible Qué hacer
Goteo de agua
El agua o el vapor se pueden generar
bajo ciertas condiciones depen-
diendo de la comida que se cocina.
Esto no es un error del aparato.
Deje que el horno se enfríe y
luego séquelo con un trapo de
cocina.
Sale vapor de una grieta en la
puerta del horno.
Hay agua dentro del horno.
El horno no calienta.
La puerta está abierta. Cierre la puerta y reinicie.
Controles del horno no ajustados
correctamente.
Lea la sección sobre el funcio-
namiento del horno y reinicie el
horno.
Fusible disparado o interruptor
automático apagado.
Sustituya el fusible o reinicie el
interruptor. Si esto se repite con
frecuencia, llame a un electricista.
Salida de humo durante el
funcionamiento.
Cuando utiliza el horno por
primera vez.
El humo sale de los quemador.
Esto no es una falta. Después de
2-3 ciclos, no habrá más humo.
Comida en el quemador.
Deje que el horno se enfríe y
limpie los residuos de comida del
quemador.
Cuando se usa el horno sale un
olor a quemado o plástico.
Se usan accesorios plásticos u
otros accesorios no resistentes al
calor dentro del horno.
A altas temperaturas, use accesorios
adecuados de cristalería.
El horno no cocina bien.
La puerta del horno es abierta
frecuentemente durante la
cocción.
No abra la puerta del horno con
frecuencia, si la comida que está
cocinando no requiere ser volteada.
Si abre la puerta con frecuencia,
la temperatura interna disminuirá
y, por lo tanto esto inuirá en el
resultado de la cocción.
La luz interna es débil o no
funciona.
Objeto extraño que cubre la lám-
para durante la cocción.
Limpie la supercie interna del
horno y revise nuevamente.
La lámpara podría estar fallando.
Reemplace con una lámpara
con las mismas caraterísitcas
técnicas.

86
REGLAS DE MANIPULACIÓN
1. No use la puerta y/o el asa para transportar o mover el aparato.
2. Realice el movimiento y el transporte en el embalaje original.
3. Preste la máxima atención al aparato mientras es cargado / descargado
y manipulado.
4. Asegúrese de que el embalaje esté bien cerrado durante la manipulación
y el transporte.
5. Proteja de factores externos (como humedad, agua, etc.) que puedan
dañar el embalaje.
6. Tenga cuidado de no dañar el aparato debido a golpes, colisiones,
caídas, etc. mientras lo manipula y transporta, y no lo rompa ni lo deforme
durante el funcionamiento.
RECOMENDACIONES PARA EL AHORRO DE ENERGÍA
Los siguientes detalles le ayudarán a usar su producto ecológica y
económicamente.
1. Use envases de color oscuro y esmalte que conducen mejor el calor
en el horno.
2. Mientras cocina su comida, si la receta o el manual del usuario indican
que se requiere precalentar, precaliente el horno.
3. No abra la puerta del horno con frecuencia mientras cocina.
4. Trate de no cocinar múltiples platos simultáneamente en el horno.
Puede cocinar al mismo tiempo colocando dos hornillas en el estante de
rejilla.
5. Cocine múltiples platos sucesivamente. El horno no perderá calor.
6. Apague el horno unos minutos antes del tiempo de caducidad de la
cocción. En este caso, no abra la puerta del horno.
7. Descongele la comida congelada antes de cocinar.
ES

87
ELIMINACIÓN RESPETUOSA CON EL MEDIO AMBIENTE
Deshágase del embalaje de una manera respetuosa con
el medio ambiente.
El aparato está etiquetado según la directiva europea
2012/19/EU sobre aparatos eléctricos y electrónicos usados
(residuos de equipo eléctrico y electrónico - WEE por
sus siglas en inglés). La directiva establece el marco para
la devolución y el reciclaje de aparatos usados como
corresponde en toda la UE.
INFORMACIÓN SOBRE EL EMBALAJE
El embalaje del aparato se fabrica con materiales reciclables, de acuerdo
con nuestro Reglamento Nacional sobre Medio Ambiente. No elimine los
materiales de embalaje junto con los residuos domésticos o de otro tipo.
Llévelos a uno de los puntos de reciclaje designado por las autoridades
locales.
-
 1
1
-
 2
2
-
 3
3
-
 4
4
-
 5
5
-
 6
6
-
 7
7
-
 8
8
-
 9
9
-
 10
10
-
 11
11
-
 12
12
-
 13
13
-
 14
14
-
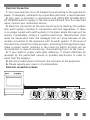 15
15
-
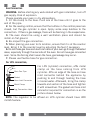 16
16
-
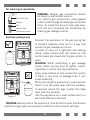 17
17
-
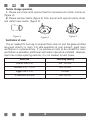 18
18
-
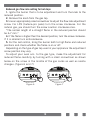 19
19
-
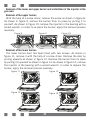 20
20
-
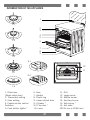 21
21
-
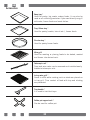 22
22
-
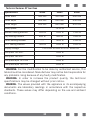 23
23
-
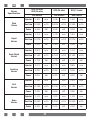 24
24
-
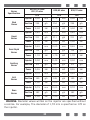 25
25
-
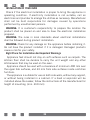 26
26
-
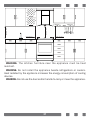 27
27
-
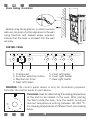 28
28
-
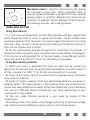 29
29
-
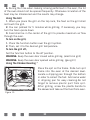 30
30
-
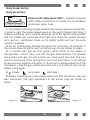 31
31
-
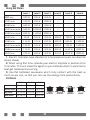 32
32
-
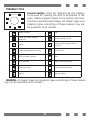 33
33
-
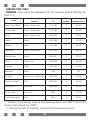 34
34
-
 35
35
-
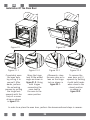 36
36
-
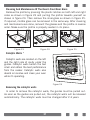 37
37
-
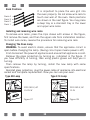 38
38
-
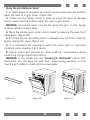 39
39
-
 40
40
-
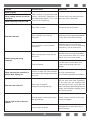 41
41
-
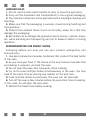 42
42
-
 43
43
-
 44
44
-
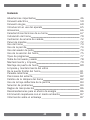 45
45
-
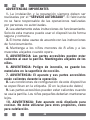 46
46
-
 47
47
-
 48
48
-
 49
49
-
 50
50
-
 51
51
-
 52
52
-
 53
53
-
 54
54
-
 55
55
-
 56
56
-
 57
57
-
 58
58
-
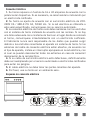 59
59
-
 60
60
-
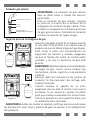 61
61
-
 62
62
-
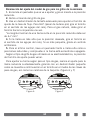 63
63
-
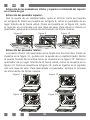 64
64
-
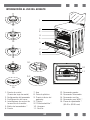 65
65
-
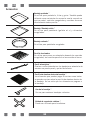 66
66
-
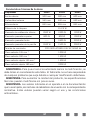 67
67
-
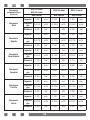 68
68
-
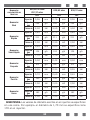 69
69
-
 70
70
-
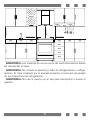 71
71
-
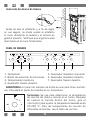 72
72
-
 73
73
-
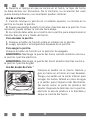 74
74
-
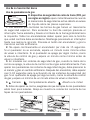 75
75
-
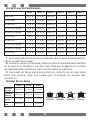 76
76
-
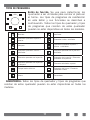 77
77
-
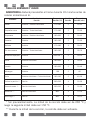 78
78
-
 79
79
-
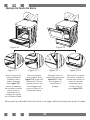 80
80
-
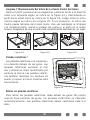 81
81
-
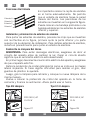 82
82
-
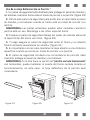 83
83
-
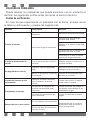 84
84
-
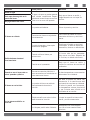 85
85
-
 86
86
-
 87
87


Candy CCGG512SW/E Manual de usuario
- Categoría
- Cocina
- Tipo
- Manual de usuario
- Este manual también es adecuado para
en otros idiomas
- English: Candy CCGG512SW/E User manual
Artículos relacionados
Otros documentos
-
Infiniton CC58BEH El manual del propietario
-
Infiniton CC60BLE El manual del propietario
-
Svan SKG4500X El manual del propietario
-
-
Aspes AKG4500TM El manual del propietario
-
-
-
Infiniton CC62EHX El manual del propietario
-
-
Teka FS 901 5GE Manual de usuario