
SET PARA ATORNILLADO OCULTO EN MADERA /
SET VITI A SCOMPARSA PSVH 56 A1
SET FÜR VERDECKTE
HOLZVERSCHRAUBUNGEN
Bedienungsanleitung
IAN 337010_2001
SET PARA ATORNILLADO
OCULTO EN MADERA
Instrucciones de uso
HIDDEN WOODEN SCREW
JOINTS KIT
Operating instructions
SET VITI A SCOMPARSA
Istruzioni per l'uso

ES Instrucciones de uso Página 1
IT / MT Istruzioni per l'uso Pagina 11
GB / MT Operating instructions Page 21
DE / AT / CH Bedienungsanleitung Seite 31
Antes de empezar a leer abra la página que contiene las imágenes y, en
seguida, familiarícese con todas las funciones del dispositivo.
Prima di leggere aprire la pagina con le immagini e prendere confidenza
con le diverse funzioni dell'apparecchio.
Before reading, unfold the page containing the illustrations and familiarise
yourself with all functions of the device.
Klappen Sie vor dem Lesen die Seite mit den Abbildungen aus und machen
Sie sich anschließend mit allen Funktionen des Gerätes vertraut.

12
19
27
38
A B
12
1
9
27
38
3
1
2
1
9
27
38
C
D E
F
12
19
2
7
3
8
1.
2.
G

PSVH 56 A1
ES
│
1 ■
Índice
Introducción .................................... 2
Información sobre estas instrucciones de uso ................... 2
Uso previsto ............................................. 2
Seguridad ...................................... 2
Volumen de suministro ............................ 4
Utilización ...................................... 5
Medir el grosor de la madera (fig. A) ......................... 5
Ajustar el grosor de la madera (fig. B) ......................... 5
Ajustar la profundidad de taladrado (fig. C) ....................6
Perforar un agujero (fig. D) ................................. 6
Realizar uniones angulares, superficiales y en T (fig. E). . . . . . . . . . . . 7
Realizar uniones a inglete (fig. F) .............................7
Procesar piezas de trabajo de madera premontadas (fig. G) ....... 8
Limpieza ....................................... 8
Conservación ................................... 9
Desecho ........................................ 9
Asistencia técnica ............................... 10
Importador .................................... 10

PSVH 56 A1
■ 2
│
ES
Introducción
Información sobre estas instrucciones de uso
¡Felicidades!
Ha adquirido un producto de alta calidad. Antes de la primera
puesta en funcionamiento, familiarícese con el producto. Para
ello, lea detenidamente las siguientes instrucciones de uso. Utilice el
producto únicamente como se describe y para los ámbitos de aplicación
indicados. Guarde estas instrucciones en un lugar seguro. Entregue
todos los documentos cuando transfiera el producto a terceros.
Uso previsto
Este producto sirve exclusivamente para hacer atornilladuras huecas
cubiertas en la madera. Con este producto puede realizar uniones
angulares, de superficies, uniones en T y uniones a inglete. Además, este
producto es adecuado para piezas de trabajo de madera ya montadas.
No se permite su uso comercial o industrial. No nos hacemos responsables
de una utilización contraria al uso previsto. Tampoco nos hacemos
responsables de los daños derivados de un uso incorrecto o indebido,
del uso de una fuerza excesiva o de las modificaciones no autorizadas.
El riesgo será responsabilidad exclusiva del usuario.
Seguridad
■ Antes de usar el producto, compruebe que esté en perfecto estado.
Si se aprecian daños, no debe seguir utilizándose el producto.
■ Los niños solo deben usar el producto bajo supervisión, ya que no
siempre saben evaluar correctamente el peligro.
Este producto no es un juguete.

PSVH 56 A1
ES
│
3 ■
■ No permita utilizar el producto a personas (incluidos los niños) con
facultades físicas, sensoriales o mentales limitadas o que carezcan
de experiencia o conocimientos a menos que les vigile una persona
responsable de su seguridad o hayan sido instruidas por esta en el
uso del producto.
■ El volumen de suministro incluye piezas pequeñas que pueden ser
ingeridas. Si se ingiere una pieza, busque inmediatamente asistencia
médica.
■ Por su propia seguridad, utilice siempre su equipo
de protección individual (gafas de protección,
máscara de protección respiratoria y protecciones auditivas) cuando
trabaje con el producto.
■
Al manejar el producto, observe también las instrucciones de
uso del taladro o taladro atornillador inalámbrico.
■ Desconecte el enchufe de la red eléctrica antes de montar o cambiar
las piezas.
■ Todas las piezas deben estar montadas correctamente, ya que, de lo
contrario, existe peligro de lesiones.
■ Utilice el taladro o el taladro atornillador inalámbrico exclusivamente
con la marcha hacia la derecha. Debe apagarse el modo de funcio-
namiento percutor.
■ Nunca quite los dispositivos de protección existentes.
■ Fije firmemente la pieza de madera sobre la que va a trabajar.
■ Asegúrese de que tanto usted como la pieza de trabajo de madera
que va a procesar están en una posición segura.
■ Las coloraciones por óxido u otros indicios de alteración mecánica o
química en las piezas pueden provocar un fallo prematuro de dichas
piezas.

PSVH 56 A1
■ 4
│
ES
Volumen de suministro
1 plantilla para taladrar
1 broca escalonada HSS ∅9,5mm (longitud: 180mm)
1 tope de profundidad ∅9,5 mm
1 llave Allen SW 3
1 punta (longitud: 150mm)
1 abrazadera
40 tornillos de madera:
10 tornillos de madera ∅4mm × 25mm
10 tornillos de madera ∅4mm × 30mm
10 tornillos de madera ∅4mm × 40mm
10 tornillos de madera ∅4mm × 60mm
10 tapas para tornillos (madera de haya seca)
Estas instrucciones de uso
12
19
27
38
INDICACIÓN
► Compruebe la integridad del suministro y si hay daños visibles.

PSVH 56 A1
ES
│
5 ■
Utilización
INDICACIÓN
► Además del volumen de suministro, necesitará un taladro o un
taladro atornillador inalámbrico y una abrazadera adicional para
utilizar el producto.
Medir el grosor de la madera (fig. A)
♦ Presione el tope de la plantilla para taladrar hacia abajo.
♦ Coloque la plantilla para taladrar en la pieza de trabajo de
madera y compruebe el grosor de la madera.
Ajustar el grosor de la madera (fig. B)
♦ Ajuste el grosor de la madera medido de acuerdo con la siguiente
tabla a la plantilla para taladrar .
Grosor de la madera Ajuste
12–18 mm 12
19–26 mm 19
27–37 mm 27
≥ 38 mm 38
♦ Mantenga pulsados los botones y deslice la plantilla para taladrar
hasta alcanzar el ajuste deseado.
♦ Suelte los botones cuando la plantilla para taladrar esté encastrada.

PSVH 56 A1
■ 6
│
ES
Ajustar la profundidad de taladrado (fig. C)
♦ Deslice el tope de la plantilla para taladrar hacia arriba y colo-
que la plantilla para taladrar en una superficie plana.
♦ Coloque la broca escalonada
sin distancia en la parte con el
símbolo de la broca escalonado de la plantilla para taladrar.
A continuación, ponga la punta de la broca escalonada en la punta
del símbolo de la broca escalonada.
♦ Deslice el tope de profundidad
en la broca escalonada hasta
el borde de la plantilla para taladrar .
♦ Atornille firmemente el tope de profundidad con la llave Allen .
Perforar un agujero (fig. D)
INDICACIÓN
► Para una fijación estable, perfore dos tornillos de madera
en
cada unión.
♦ Sujete la broca escalonada
con el tope de profundidad atornilla-
do en un taladro o taladro atornillador inalámbrico.
♦ Presione el tope de la plantilla para taladrar hacia abajo.
♦ Coloque el tope de la plantilla para taladrar
en la pieza de
trabajo de madera.
♦ Fije la plantilla para taladrar y la pieza de trabajo de madera con
la abrazadera .
♦ Perfore la pieza de trabajo de madera hasta el tope de profundidad .

PSVH 56 A1
ES
│
7 ■
Realizar uniones angulares, superficiales y en T (fig. E)
♦ Cuando vaya a realizar las uniones indicadas, fije las piezas de
trabajo de madera con una abrazadera (no incluida en el volumen
de suministro).
INDICACIÓN
► Asegúrese de que las piezas de trabajo de madera son las ade-
cuadas y quedan fijadas firmemente.
♦ Seleccione los tornillos de madera adecuados
teniendo en cuenta
la siguiente tabla.
Grosor de la madera
Dimensiones de los tornillos
de madera
≥ 12 mm ∅4mm × 25mm
≥ 19 mm ∅4mm × 30mm
≥ 27 mm ∅4mm × 40mm
≥ 38 mm ∅4mm × 60mm
♦ Atornille con la punta
el tornillo de madera seleccionado .
Realizar uniones a inglete (fig. F)
♦ Proceda como en las uniones anteriores (consulte las figuras A–C).
Mida el grosor de la madera y ajuste la profundidad de perforación.
♦ Coloque la plantilla para taladrar como se muestra en la ilustración.
♦ Perfore los agujeros como se describe en el capítulo "Perforar un
agujero (fig. D)".
♦ Una las piezas de trabajo de madera como se describe en el capítulo
"Realizar uniones angulares, superficiales y en T (fig. E)".

PSVH 56 A1
■ 8
│
ES
Procesar piezas de trabajo de madera premontadas
(fig. G)
♦ Ajuste la profundidad de perforación (consulte las figuras A–C).
♦ Deslice el tope de la plantilla para taladrar
hacia arriba.
♦ Fije la plantilla para taladrar
y la pieza de trabajo de madera con
la abrazadera .
♦ Escoja los tornillos de madera adecuados teniendo en cuenta la
tabla.
INDICACIÓN
► Los tornillos de madera
deben ser 5 mm más largos ya que hay
que añadir la dimensión del tope insertado de 5 mm de ancho.
♦ Atornille con la punta
el tornillo de madera seleccionado
después de la perforación.
♦ Encole las perforaciones e inserte las tapas para tornillos .
Limpieza
ADVERTENCIA
► Antes de la limpieza, retire la broca escalonada o la punta
del taladro o taladro atornillador inalámbrico.
► No utilice productos de limpieza agresivos o abrasivos, ya que
podrían dañar la superficie del producto.
♦ Para eliminar el polvo del producto, utilice un cepillo suave y seco.
♦ Limpie el producto con un paño seco.

PSVH 56 A1
ES
│
9 ■
Conservación
Se deben almacenar todas las piezas en el contenedor en el que fueron
suministradas para que estén protegidas contra influencias externas.
Desecho
Deseche el producto en un centro de residuos autorizado o
a través de las instalaciones municipales de gestión de
residuos. Observe las normas vigentes. En caso de duda,
póngase en contacto con las instalaciones municipales de
desecho de residuos.
Puede informarse acerca de las posibilidades de desecho
de los aparatos usados en su administración municipal o
ayuntamiento.
Deseche el embalaje de forma respetuosa con el medio
ambiente.
Observe las indicaciones de los distintos materiales de
embalaje y, si procede, recíclelos de la manera correspon-
diente. Los materiales de embalaje cuentan con abreviacio-
nes (a) y cifras (b) que significan lo siguiente:
1-7: plásticos;
20-22: papel y cartón;
80-98: materiales compuestos.

PSVH 56 A1
■ 10
│
ES
Asistencia técnica
Servicio España
Tel.: 902 59 99 22
(0,08 EUR/Min. + 0,11 EUR/llamada (tarifa normal))
(0,05 EUR/Min. + 0,11 EUR/llamada (tarifa reducida))
E-Mail: [email protected]
IAN 337010_2001
Importador
Tenga en cuenta que la dirección siguiente no es una dirección de asis-
tencia técnica. Póngase primero en contacto con el centro de asistencia
técnica especificado.
KOMPERNASS HANDELS GMBH
BURGSTRASSE 21
44867 BOCHUM
ALEMANIA
www.kompernass.com

PSVH 56 A1
IT
│
MT
│
11 ■
Indice
Introduzione ................................... 12
Informazioni sul presente manuale di istruzioni .................12
Uso conforme ...........................................12
Sicurezza ...................................... 12
Materiale in dotazione ........................... 14
Impiego ....................................... 15
Misurazione dello spessore del legno (fig. A) ..................15
Regolazione dello spessore del legno (fig. B) ..................15
Regolazione della profondità di perforazione (fig. C) ............16
Esecuzione di un foro (fig. D) ...............................16
Realizzazione di giunti d'angolo, giunti faccia a
faccia e giunti a T (fig. E) ..................................17
Realizzazione di giunti smussati (fig. F) .......................17
Lavorazione di pezzi in legno già montati (fig. G). . . . . . . . . . . . . . . 18
Pulizia ........................................ 18
Conservazione ................................. 19
Smaltimento ................................... 19
Assistenza ..................................... 20
Importatore. . . . . . . . . . . . . . . . . . . . . . . . . . . . . . . . . . . . 20

PSVH 56 A1
■ 12
│
IT
│
MT
Introduzione
Informazioni sul presente manuale di istruzioni
Congratulazioni!
Con questo acquisto è stato scelto un prodotto di alta qualità.
Acquisire dimestichezza con il prodotto prima della prima messa
in funzione. A tale scopo consigliamo di leggere attentamente il seguente
manuale di istruzioni. Utilizzare il prodotto solo come descritto e per i
campi d'impiego indicati. Conservare con cura il presente manuale di
istruzioni. In caso di cessione del prodotto a terzi, consegnare anche
tutta la relativa documentazione.
Uso conforme
Il prodotto serve esclusivamente a realizzare giunti a vite nascosti per
legno. Il prodotto consente di realizzare giunti d'angolo, giunti faccia
a faccia, giunti a T e giunti smussati. Il prodotto è inoltre adatto a pezzi
in legno già montati. Non è ammesso l’uso commerciale o industriale.
Non si assumono responsabilità per l’uso non conforme. Non si assume
inoltre alcuna responsabilità per i danni derivanti dall'abuso e uso non
conforme, dall'uso di violenza o modifiche non autorizzate. Il rischio è
esclusivamente a carico dell'utente.
Sicurezza
■ Prima di ogni utilizzo, verificare che il prodotto sia in perfette condizioni.
Qualora si rilevassero danni, non utilizzare più il prodotto.
■ Consentire l'uso del prodotto ai bambini solo se sotto sorveglianza.
I bambini non riescono sempre a riconoscere correttamente i pericoli.
Il prodotto non è un giocattolo.

PSVH 56 A1
IT
│
MT
│
13 ■
■ Questo prodotto non è indicato per l'uso da parte di persone (inclusi
i bambini) con limitate capacità fisiche, sensoriali o mentali o prive
dell'esperienza e/o della conoscenza necessaria, a meno che tali
persone non vengano sorvegliate da un responsabile per la sicurezza
o non abbiano ricevuto indicazioni sull'impiego dell'apparecchio.
■ La dotazione comprende pezzi di piccole dimensioni che potrebbero
essere ingeriti. In caso di ingestione di un pezzo, consultare immedia-
tamente un medico.
■ Utilizzare dispositivi di protezione. Per la propria
sicurezza, indossare sempre una protezione acustica,
una mascherina respiratoria/antipolvere e occhiali protettivi.
■
Per l'uso del prodotto osservare anche il manuale di istruzioni
del trapano e/o del trapano avvitatore a batteria.
■ Staccare la spina dalla presa di corrente prima di montare o sostituire
i pezzi.
■ Tutti i componenti devono essere montati correttamente prima dell'uso,
altrimenti sussiste il rischio di lesioni!
■ Far funzionare il trapano e/o il trapano avvitatore a batteria solo con
rotazione oraria. La modalità di perforazione a percussione deve
essere disattivata.
■ Non rimuovere mai i dispositivi di protezione presenti.
■ Fissare sempre saldamente il pezzo in legno da lavorare.
■ Assicurarsi di poter mantenere una posizione salda e che anche il
pezzo in legno da lavorare sia saldo.
■ Gli scolorimenti derivanti dalla ruggine o altri segni di modifiche
chimiche o meccaniche sui componenti possono causare una rottura
prematura dei componenti stessi.

PSVH 56 A1
■ 14
│
IT
│
MT
Materiale in dotazione
1 calibro di perforazione
1 punta a gradino in acciaio superrapido ∅9,5mm (lunghezza:
180mm)
1 battuta di profondità ∅9,5mm
1 brugola da3
1 inserto (lunghezza: 150mm)
1 morsetto
40 viti da legno:
10 viti da legno ∅4mm × 25mm
10 viti da legno ∅4mm × 30mm
10 viti da legno ∅4mm × 40mm
10 viti da legno ∅4mm × 60mm
10 coperture per teste di viti (faggio secco)
Il presente manuale di istruzioni
12
19
27
38
NOTA
► Controllare la completezza e l'integrità della fornitura.

PSVH 56 A1
IT
│
MT
│
15 ■
Impiego
NOTA
► Per usare il prodotto, oltre al materiale in dotazione si avrà bisogno
di un trapano o di un trapano avvitatore a batteria e di un ulteriore
morsetto.
Misurazione dello spessore del legno (fig. A)
♦ Premere la battuta del calibro di perforazione verso il basso.
♦ Collocare il calibro di perforazione sul pezzo in legno e leggere
lo spessore del legno.
Regolazione dello spessore del legno (fig. B)
♦ Regolare lo spessore di legno misurato con il calibro di perforazione
in base alla seguente tabella.
Spessore del legno Regolazione
12–18 mm 12
19–26 mm 19
27–37 mm 27
≥ 38 mm 38
♦ Tenere premuti i pulsanti e spostare il calibro di perforazione
fino a raggiungere la regolazione desiderata.
♦ Quando il calibro di perforazione s'innesta in posizione, rilasciare
i pulsanti.

PSVH 56 A1
■ 16
│
IT
│
MT
Regolazione della profondità di perforazione (fig. C)
♦ Spingere la battuta del calibro di perforazione verso l'alto e collo-
care il calibro di perforazione su una superficie piana.
♦ Appoggiare senza distanza la punta a gradino
al lato del calibro
di perforazione con il simbolo della punta a gradino. L'estremità
appuntita della punta a gradino deve coincidere con l'estremità
appuntita del simbolo della punta a gradino.
♦ Spingere la battuta di profondità
sulla punta a gradino fino
al bordo del calibro di perforazione .
♦ Avvitare saldamente la battuta di profondità con la brugola .
Esecuzione di un foro (fig. D)
NOTA
► Per ottenere stabilità avvitare due viti da legno
in ogni giunto.
♦ Fissare la punta a gradino
con la battuta di profondità avvitata
in un trapano o in un trapano avvitatore a batteria.
♦ Premere la battuta del calibro di perforazione verso il basso.
♦ Appoggiare la battuta del calibro di perforazione
al pezzo in
legno.
♦ Bloccare il calibro di perforazione e il pezzo in legno con il
morsetto .
♦ Perforare il pezzo in legno fino alla battuta di profondità .

PSVH 56 A1
IT
│
MT
│
17 ■
Realizzazione di giunti d'angolo, giunti faccia a
faccia e giunti a T (fig. E)
♦ Per realizzare i giunti illustrati fissare i pezzi in legno con un morsetto
(non compreso nel materiale in dotazione).
NOTA
► Assicurarsi che i pezzi in legno siano fissati saldamente e con
precisione.
♦ Scegliere le viti da legno
adatte in base alla tabella che segue.
Spessore del legno Dimensioni delle viti da legno
≥ 12 mm ∅4mm × 25mm
≥ 19 mm ∅4mm × 30mm
≥ 27 mm ∅4mm × 40mm
≥ 38 mm ∅4mm × 60mm
♦ Servendosi dell'inserto
, avvitare le viti da legno scelte.
Realizzazione di giunti smussati (fig. F)
♦ Procedere come per i giunti descritti in precedenza (vedere figg.
A-C). Misurare lo spessore del legno e regolare la profondità di
perforazione.
♦ Appoggiare il calibro di perforazione come illustrato nella figura.
♦ Praticare i fori come descritto al capitolo "Esecuzione di un foro (fig. D)".
♦ Unire i pezzi in legno come descritto al capitolo "Realizzazione di
giunti d'angolo, giunti faccia a faccia e giunti a T (fig. E)".

PSVH 56 A1
■ 18
│
IT
│
MT
Lavorazione di pezzi in legno già montati (fig. G)
♦ Regolare la profondità di perforazione (vedere le figure da A a C).
♦ Spingere la battuta del calibro di perforazione
verso l'alto.
♦ Bloccare il calibro di perforazione
e il pezzo in legno con il
morsetto
.
♦ Scegliere le viti da legno adatte in base alla tabella.
NOTA
► Occorre scegliere viti da legno
con una lunghezza eccedente
di 5 mm, poiché va calcolata anche la misura della battuta inserita,
che è di 5 mm.
♦ Servendosi dell'inserto
, avvitare le viti da legno scelte dopo
aver praticato i fori.
♦ Applicare colla ai fori e inserirvi le coperture per teste di viti .
Pulizia
AVVERTENZA
► Prima della pulizia rimuovere la punta a gradino o l'inserto
dal trapano o dal trapano avvitatore a batteria.
► Per evitare di danneggiare la superficie del prodotto, non utilizzare
detergenti aggressivi o abrasivi.
♦ Per rimuovere la polvere di perforazione dal prodotto, utilizzare una
spazzola morbida e asciutta.
♦ Inoltre pulire il prodotto anche con un panno asciutto.

PSVH 56 A1
IT
│
MT
│
19 ■
Conservazione
Tutti i componenti devono essere conservati nel contenitore con cui sono
stati forniti, in modo da essere protetti dagli influssi esterni.
Smaltimento
Smaltire il prodotto tramite un'azienda di smaltimento
autorizzata o l'ente di smaltimento comunale. Rispettare le
norme attualmente in vigore. In caso di dubbi, mettersi in
contatto con l'ente di smaltimento competente.
Per lo smaltimento del prodotto una volta che ha terminato la
sua funzione, informarsi presso l'amministrazione comunale.
Smaltire l'imballaggio conformemente alle norme di tutela
ambientale.
Tenere conto dei codici presenti sui vari materiali di imballag-
gio ed eventualmente separare i materiali effettuando una
raccolta differenziata. I materiali di imballaggio presentano
codici costituiti da abbreviazioni (a) e numeri (b) con il
seguente significato:
1–7: materie plastiche,
20–22: carta e cartone,
80–98: materiali compositi.

PSVH 56 A1
■ 20
│
IT
│
MT
Assistenza
Assistenza Italia
Tel.: 02 36003201
E-Mail: [email protected]
Service Malta
Tel.: 80062230
E-Mail: [email protected]
IAN 337010_2001
Importatore
Badi che il seguente indirizzo non è quello del servizio di assistenza
clienti. Contatti innanzitutto il servizio di assistenza clienti indicato.
KOMPERNASS HANDELS GMBH
BURGSTRASSE 21
44867 BOCHUM
GERMANIA
www.kompernass.com

PSVH 56 A1
GB
│
MT
│
21 ■
Contents
Introduction .................................... 22
Information about these operating instructions ..................22
Intended use ............................................22
Safety ........................................ 22
Package contents ............................... 24
Use ........................................... 25
Measuring wood thickness (Fig. A) ..........................25
Setting the wood thickness (Fig. B) ...........................25
Setting the drilling depth (Fig. C) ............................26
Drilling holes (Fig. D) .....................................26
Making corner, surface and T-shaped joints (Fig. E) .............27
Making mitred joints (Fig. F) ................................27
Working on pre-assembled wooden workpieces (Fig. G) .........28
Cleaning. . . . . . . . . . . . . . . . . . . . . . . . . . . . . . . . . . . . . . . 28
Storage ....................................... 29
Disposal ....................................... 29
Service ........................................ 30
Importer ...................................... 30

PSVH 56 A1
■ 22
│
GB
│
MT
Introduction
Information about these operating instructions
Congratulations!
You have purchased a high-quality product. Familiarise yourself
with the product before using it for the first time. To do this, read
the following operating instructions thoroughly. Use the product only as
described and for the range of applications specified. Keep these operat-
ing instructions in a safe place. Please also pass these operating
instructions on to any future owner(s).
Intended use
This product is exclusively intended to produce concealed screw joints
in wood. You can use the product to create corner joints, surface joints,
T-shaped joints and mitred joints. The product is also suitable for already
assembled wooden workpieces. Commercial or industrial use is not per-
mitted. No liability will be assumed in cases of improper use. No liability
will be assumed for damage caused by misuse or improper handling, the
use of force or unauthorised modification. The risk is borne solely by the
user.
Safety
■ Check the product before every use to make sure it is in perfect
condition. Do not use the product if it is damaged in any way.
■ Do not allow children to use the product unless they are being super-
vised. Children are not always able to correctly recognise potential
dangers. This product is not a toy.

PSVH 56 A1
GB
│
MT
│
23 ■
■ This product is not intended for use by individuals (including children)
with reduced physical, sensory, or mental capabilities. It may also
not be used by individuals who lack experience and/or knowledge
unless they are supervised by a person responsible for their safety
or have received instructions on how to use the product from such a
person.
■ Some of the supplied parts can be swallowed. If a part is swallowed,
seek medical advice as soon as possible.
■ Use protective equipment. For your own safety,
always wear ear muffs, a breathing mask/dust
mask and safety goggles.
■
Please observe the operating instructions for the drill/the
cordless screwdriver when using the product.
■ Unplug the appliance before fitting or changing parts.
■ All parts must be properly fitted before use otherwise there is a risk
of serious injury!
■ Only operate the drill/the cordless screwdriver in clockwise mode.
The hammer function must be switched off.
■ Never remove the fitted protective devices.
■ Firmly clamp the wooden workpiece you are working on.
■ Ensure that you are standing firmly and the wooden workpiece is
stable.
■ Rust discoloration or other signs of chemical or mechanical change
to the parts can cause premature failure of the parts.

PSVH 56 A1
■ 24
│
GB
│
MT
Package contents
1 × drilling jig
1 × HSS step drill ∅9.5mm (length: 180mm)
1 × depth stop ∅9.5 mm
1 × hex key SW3
1 × bit attachment (length: 150mm)
1 × clamp
40 × woodscrews:
10 × woodscrews ∅4mm × 25mm
10 × woodscrews ∅4mm × 30mm
10 × woodscrews ∅4mm × 40mm
10 × woodscrews ∅4mm × 60mm
10 × screw head covers (dried beechwood)
These operating instructions
12
19
27
38
NOTE
► Check the package for completeness and signs of visible damage.

PSVH 56 A1
GB
│
MT
│
25 ■
Use
NOTE
► In addition to the items supplied, you will require a drill or a cordless
screwdriver and an additional clamp in order to use the product.
Measuring wood thickness (Fig. A)
♦ Press the limit stop on the drilling jig downwards.
♦ Place the drilling jig against the wooden workpiece and read off
the wood thickness.
Setting the wood thickness (Fig. B)
♦ Set the measured wood thickness on the drilling jig using the
following table.
Wood thickness Setting
12–18 mm 12
19–26 mm 19
27–37 mm 27
≥ 38 mm 38
♦ Hold down the knob and push the drilling jig
until the required
setting is reached.
♦ Release the knob once the drilling jig is engaged.

PSVH 56 A1
■ 26
│
GB
│
MT
Setting the drilling depth (Fig. C)
♦ Push the drilling jig limit stop upwards and place the drilling jig
on a flat surface.
♦ Place the step drill
right up against the side of the drilling jig with
the step drill symbol. The tip of the step drill should contact the tip of
the step drill symbol.
♦ Push the depth stop
onto the step drill as far as the edge of the
drilling jig .
♦ Screw the depth stop tight using the hex key .
Drilling holes (Fig. D)
NOTE
► To provide a stable hold, drill two woodscrews
into each joint.
♦ Clamp the step drill
(with the depth stop screwed on) into a drill
or a cordless screwdriver.
♦ Press the limit stop on the drilling jig downwards.
♦ Place the limit stop on the drilling jig
against the wooden work-
piece.
♦ Fix the drilling jig and the wooden workpiece firmly in place with
the clamp .
♦ Drill into the wooden workpiece as far as the depth stop .

PSVH 56 A1
GB
│
MT
│
27 ■
Making corner, surface and T-shaped joints (Fig. E)
♦ When making the joints shown, fix the wooden workpiece in place
with a clamp (not included in delivery).
NOTE
►
Ensure that you clamp the wooden workpiece precisely and tightly.
♦ Select the appropriate woodscrews
with the help of the following
table.
Wood thickness Woodscrew size
≥ 12 mm ∅4mm × 25mm
≥ 19 mm ∅4mm × 30mm
≥ 27 mm ∅4mm × 40mm
≥ 38 mm ∅4mm × 60mm
♦ Screw in the selected woodscrews
using the bit attachment .
Making mitred joints (Fig. F)
♦ Proceed as described for the previous joints (see Figs. A–C).
Measure the wood thickness and set the drilling depth.
♦ Place the drilling jig as shown in the illustration.
♦ Drill holes as described in the section "Drilling holes (Fig. D)".
♦ Connect the wooden workpieces as described in the section "Making
corner, surface and T-shaped joints (Fig. E)".

PSVH 56 A1
■ 28
│
GB
│
MT
Working on pre-assembled wooden workpieces
(Fig. G)
♦ Set the drilling depth (see figures A to C).
♦ Push the limit stop on the drilling jig
upwards.
♦ Fix the drilling jig
and the wooden workpiece firmly in place with
the clamp .
♦ Select the appropriate woodscrews with the help of the table.
NOTE
► The woodscrews
selected must be 5 mm longer since the width
of the inserted limit stop (5 mm) must be added to the length.
♦ Screw the selected woodscrews
in using the bit attachment
after drilling.
♦ Fill the drill holes with glue and push the screw head covers into
the holes.
Cleaning
WARNING
► Before cleaning, always remove the step drill or the bit attach-
ment from the drill or cordless screwdriver.
► Do not use aggressive or abrasive cleaning agents, as these can
damage the surfaces of the product.
♦ Use a soft, dry brush to remove drilling dust from the product.
♦ You can also clean the product using a dry cloth.

PSVH 56 A1
GB
│
MT
│
29 ■
Storage
All parts must be stored in the container in which they were delivered to
protect them from external factors.
Disposal
Dispose of the product via an approved waste disposal
company or your municipal waste disposal facility. Comply
with all applicable regulations. In case of doubt, contact
your disposal facility.
Your local community or municipal authorities can provide
information on how to dispose of the worn-out product.
Dispose of the packaging in an environmentally friendly manner.
Note the labelling on the packaging and separate the
packaging material components for disposal if necessary.
The packaging material is labelled with abbreviations (a)
and numbers (b) with the following meanings:
1–7: plastics,
20–22: paper and cardboard,
80–98: composites.

PSVH 56 A1
■ 30
│
GB
│
MT
Service
Service Great Britain
Tel.: 0800 404 7657
E-Mail: [email protected]
Service Malta
Tel.: 80062230
E-Mail: [email protected]
IAN 337010_2001
Importer
Please note that the following address is not the service address. Please
use the service address provided in the operating instructions.
KOMPERNASS HANDELS GMBH
BURGSTRASSE 21
44867 BOCHUM
GERMANY
www.kompernass.com

PSVH 56 A1
DE
│
AT
│
CH
│
31 ■
Inhaltsverzeichnis
Einführung ..................................... 32
Informationen zu dieser Bedienungsanleitung ..................32
Bestimmungsgemäße Verwendung ..........................32
Sicherheit ...................................... 32
Lieferumfang ................................... 34
Verwendung ................................... 35
Holzstärke messen (Abb. A) ................................35
Holzstärke einstellen (Abb. B) ..............................35
Bohrtiefe einstellen (Abb. C) ...............................36
Loch bohren (Abb. D) .....................................36
Eck-, Flächen- und T-Verbindungen herstellen (Abb. E) ............37
Gehrungsverbindungen herstellen (Abb. F) ....................37
Vormontierte Holzwerkstücke bearbeiten (Abb. G) ..............38
Reinigung ..................................... 38
Aufbewahrung ................................. 39
Entsorgung .................................... 39
Service ........................................ 40
Importeur ..................................... 40

PSVH 56 A1
■ 32
│
DE
│
AT
│
CH
Einführung
Informationen zu dieser Bedienungsanleitung
Herzlichen Glückwunsch!
Mit Ihrem Kauf haben Sie sich für ein hochwertiges Produkt
entschieden. Machen Sie sich vor der ersten Inbetriebnahme mit
dem Produkt vertraut. Lesen Sie hierzu aufmerksam die nachfolgende
Bedienungsanleitung. Benutzen Sie das Produkt nur wie beschrieben und
für die angegebenen Einsatzbereiche. Bewahren Sie diese Bedienungs-
anleitung gut auf. Händigen Sie alle Unterlagen bei Weitergabe des
Produkts an Dritte ebenfalls mit aus.
Bestimmungsgemäße Verwendung
Das Produkt dient ausschließlich dem Herstellen von verdeckten Holzver-
schraubungen. Sie können mit dem Produkt Eckverbindungen, Flächen-
verbindungen, T-Verbindungen und Gehrungsverbindungen herstellen.
Außerdem ist das Produkt für bereits montierte Holzwerkstücke geeignet.
Die gewerbliche oder industrielle Verwendung ist nicht zulässig. Für nicht
bestimmungsgemäße Verwendung wird nicht gehaftet. Für Schäden, die
von missbräuchlicher oder unsachgemäßer Behandlung, von Gewalt-
anwendung oder unautorisierter Modifikation herrühren, wird ebenfalls
keine Haftung übernommen. Das Risiko trägt allein der Benutzer.
Sicherheit
■ Kontrollieren Sie das Produkt vor jedem Gebrauch auf einwandfreien
Zustand. Sollten Schäden festgestellt werden, darf das Produkt nicht
mehr verwendet werden.
■ Gestatten Sie Kindern die Benutzung des Produktes nur unter Aufsicht.
Kinder können mögliche Gefahren nicht immer richtig erkennen.
Das Produkt ist kein Spielzeug.

PSVH 56 A1
DE
│
AT
│
CH
│
33 ■
■ Dieses Produkt ist nicht dafür bestimmt, durch Personen (einschließlich
Kinder) mit eingeschränkten physischen, sensorischen oder geistigen
Fähigkeiten oder an einem Mangel an Erfahrung und/oder Wissen
benutzt zu werden, es sei denn, sie werden durch eine für ihre Sicher-
heit zuständige Person beaufsichtigt oder erhielten von ihr Anweisun-
gen, wie das Produkt zu benutzen ist.
■ Im Lieferumfang befinden sich verschluckbare Kleinteile. Wurde ein
Teil verschluckt, konsultieren Sie sofort einen Arzt.
■ Benutzen Sie Schutzausrüstung.
Tragen Sie zur eigenen Sicherheit immer einen
Gehörschutz, eine Atem-/Staubschutzmaske und eine Schutzbrille.
■
Beachten Sie beim Umgang mit dem Produkt auch die Bedienungs-
anleitung der Bohrmaschine bzw. des Akku-Bohrschraubers.
■ Ziehen Sie den Netzstecker, bevor Sie Teile montieren oder wechseln.
■ Alle Teile müssen sachgerecht vor der Verwendung montiert sein,
ansonsten besteht Verletzungsgefahr!
■ Betreiben Sie die Bohrmaschine bzw. den Akku-Bohrschrauber nur im
Rechtslauf. Der Schlagbohrbetrieb muss ausgeschaltet sein.
■ Entfernen Sie niemals vorhandene Schutzvorrichtungen.
■ Spannen Sie das zu bearbeitende Holzwerkstück fest.
■ Achten Sie darauf, dass Sie selbst und das zu bearbeitende Holz-
werkstück einen sicheren Stand haben.
■ Rostverfärbungen oder andere Anzeichen von chemischer oder mecha-
nischer Veränderung an den Teilen können vorzeitiges Versagen der
Teile verursachen.

PSVH 56 A1
■ 34
│
DE
│
AT
│
CH
Lieferumfang
1 × Bohrlehre
1 × HSS-Stufenbohrer ∅9,5mm (Länge: 180mm)
1 × Tiefenstop ∅9,5 mm
1 × Innensechskantschlüssel SW3
1 × Bitaufsatz (Länge: 150mm)
1 × Zwinge
40 × Holzschrauben:
10 × Holzschrauben ∅4mm × 25mm
10 × Holzschrauben ∅4mm × 30mm
10 × Holzschrauben ∅4mm × 40mm
10 × Holzschrauben ∅4mm × 60mm
10 × Schraubenkopfabdeckungen (getrocknetes Buchenholz)
Diese Bedienungsanleitung
12
19
27
38
HINWEIS
► Prüfen Sie die Lieferung auf Vollständigkeit und auf sichtbare Schäden.

PSVH 56 A1
DE
│
AT
│
CH
│
35 ■
Verwendung
HINWEIS
► Sie benötigen zusätzlich zum Lieferumfang eine Bohrmaschine
bzw. einen Akku-Bohrschrauber und eine zusätzliche Zwinge,
um das Produkt zu verwenden.
Holzstärke messen (Abb. A)
♦ Drücken Sie den Anschlag der Bohrlehre nach unten.
♦ Legen Sie die Bohrlehre am Holzwerkstück an und lesen die
Holzstärke ab.
Holzstärke einstellen (Abb. B)
♦ Stellen Sie die gemessene Holzstärke anhand der folgenden Tabelle
an der Bohrlehre ein.
Holzstärke Einstellung
12–18 mm 12
19–26 mm 19
27–37 mm 27
≥ 38 mm 38
♦ Halten Sie die Knöpfe gedrückt und verschieben die Bohrlehre
,
bis die gewünschte Einstellung erreicht ist.
♦ Lassen Sie die Knöpfe los, wenn die Bohrlehre eingerastet ist.

PSVH 56 A1
■ 36
│
DE
│
AT
│
CH
Bohrtiefe einstellen (Abb. C)
♦ Schieben Sie den Anschlag der Bohrlehre nach oben und legen
die Bohrlehre auf eine flache Oberfläche.
♦ Legen Sie den Stufenbohrer
ohne Abstand an der Seite mit dem
Stufenbohrer-Symbol der Bohrlehre an. Dabei müssen Sie die Spitze
des Stufenbohrers an die Spitze des Stufenboher-Symbols anlegen.
♦ Schieben Sie den Tiefenstop
auf den Stufenbohrer , bis zur
Kante der Bohrlehre .
♦ Schrauben Sie den Tiefenstop mit dem Innensechskantschlüssel
fest.
Loch bohren (Abb. D)
HINWEIS
► Bohren Sie für einen stabilen Halt zwei Holzschrauben
in jede
Verbindung.
♦ Spannen Sie den Stufenbohrer
mit aufgeschraubtem Tiefenstop
in eine Bohrmaschine bzw. einen Akku-Bohrschrauber ein.
♦ Drücken Sie den Anschlag der Bohrlehre nach unten.
♦ Legen Sie den Anschlag der Bohrlehre
ans Holzwerkstück an.
♦ Fixieren Sie die Bohrlehre und das Holzwerkstück mit der Zwinge .
♦ Bohren Sie in das Holzwerkstück bis zum Tiefenstop .

PSVH 56 A1
DE
│
AT
│
CH
│
37 ■
Eck-, Flächen- und T-Verbindungen herstellen (Abb. E)
♦ Fixieren Sie beim herstellen der abgebildeten Verbindungen die Holz-
werkstücke mit einer Zwinge (nicht im Lieferumfang enthalten).
HINWEIS
►
Achten Sie darauf, dass Sie die Holzwerkstücke passgenau und
fest fixieren.
♦ Wählen Sie die passenden Holzschrauben
anhand der folgenden
Tabelle aus.
Holzstärke Holzschraubengröße
≥ 12 mm ∅4mm × 25mm
≥ 19 mm ∅4mm × 30mm
≥ 27 mm ∅4mm × 40mm
≥ 38 mm ∅4mm × 60mm
♦ Schrauben Sie mit dem Bitaufsatz
die ausgewählten Holz-
schrauben ein.
Gehrungsverbindungen herstellen (Abb. F)
♦ Gehen Sie wie bei den vorangegangenen Verbindungen vor
(siehe Abb. A–C). Messen Sie die Holzstärke und stellen Sie die
Bohrtiefe ein.
♦ Legen Sie die Bohrlehre wie in der Abbildung gezeigt an.
♦ Bohren Sie Löcher wie im Kapitel „Loch bohren (Abb. D)“ beschrieben.
♦ Verbinden Sie die Holzwerkstücke wie im Kapitel „Eck-, Flächen- und
T-Verbindungen herstellen (Abb. E)“ beschrieben.

PSVH 56 A1
■ 38
│
DE
│
AT
│
CH
Vormontierte Holzwerkstücke bearbeiten (Abb. G)
♦ Stellen Sie die Bohrtiefe ein (siehe Abbildungen A bis C).
♦ Schieben Sie den Anschlag der Bohrlehre
nach oben.
♦ Fixieren Sie die Bohrlehre
und das Holzwerkstück mit der Zwinge .
♦ Wählen Sie die passenden Holzschrauben entsprechend der
Tabelle aus.
HINWEIS
► Die Holzschrauben
müssen 5 mm länger gewählt werden, da
das Maß des 5 mm breiten eingeschobenen Anschlags hinzuge-
rechnet werden muss.
♦ Schrauben Sie mit dem Bitaufsatz
die ausgewählten Holz-
schrauben nach dem Bohren ein.
♦ Verleimen Sie die Bohrlöcher und stecken die Schraubenkopfab-
deckungen hinein.
Reinigung
WARNUNG
► Entfernen Sie vor der Reinigung den Stufenbohrer oder den
Bitaufsatz aus der Bohrmaschine bzw. dem Akku-Bohrschrauber.
► Verwenden Sie keine aggressiven oder scheuernden Reinigungsmittel,
da diese die Oberfläche des Produkts angreifen können.
♦ Verwenden Sie eine weiche und trockene Bürste, um den Bohrstaub
vom Produkt zu entfernen.
♦ Reinigen Sie das Produkt zusätzlich mit einem trockenen Tuch.

PSVH 56 A1
DE
│
AT
│
CH
│
39 ■
Aufbewahrung
Alle Teile müssen in dem Behälter, in dem sie ausgeliefert wurden, ge lagert
werden, sodass sie gegen äußere Einwirkungen geschützt sind.
Entsorgung
Entsorgen Sie das Produkt über einen zugelassenen
Entsorgungsbetrieb oder über Ihre kommunale Entsorgungs-
einrichtung. Beachten Sie die geltenden Vorschriften. Setzen
Sie sich im Zweifelsfall mit Ihrer Entsorgungseinrichtung in
Verbindung.
Möglichkeiten zur Entsorgung des ausgedienten Produkts
erfahren Sie bei Ihrer Gemeinde- oder Stadtverwaltung.
Entsorgen Sie die Verpackung umweltgerecht.
Beachten Sie die Kennzeichnung auf den verschiedenen
Verpackungsmaterialien und trennen Sie diese gegebenen-
falls gesondert. Die Verpackungsmaterialien sind gekenn-
zeichnet mit Abkürzungen (a) und Ziffern (b) mit folgender
Bedeutung:
1–7: Kunststoffe,
20–22: Papier und Pappe,
80–98: Verbundstoffe.

PSVH 56 A1
■ 40
│
DE
│
AT
│
CH
Service
Service Deutschland
Tel.: 0800 5435 111
(kostenfrei aus dem dt. Festnetz/Mobilfunknetz)
E-Mail: [email protected]
Service Österreich
Tel.: 0820 201 222
(0,15 EUR/Min.)
E-Mail: [email protected]
Service Schweiz
Tel.: 0842 665566
(0,08 CHF/Min., Mobilfunk max. 0,40 CHF/Min.)
E-Mail: [email protected]
IAN 337010_2001
Importeur
Bitte beachten Sie, dass die folgende Anschrift keine Serviceanschrift ist.
Kontaktieren Sie zunächst die benannte Servicestelle.
KOMPERNASS HANDELS GMBH
BURGSTRASSE 21
44867 BOCHUM
DEUTSCHLAND
www.kompernass.com

KOMPERNASS HANDELS GMBH
BURGSTRASSE 21
44867 BOCHUM
GERMANY
www.kompernass.com
Estado de las informaciones · Versione delle informazioni
Last Information Update · Stand der Informationen:
05 / 2020 · Ident.-No.: PSVH56A1-052020-1
IAN 337010_2001
Transcripción de documentos
SET PARA ATORNILLADO OCULTO EN MADERA / SET VITI A SCOMPARSA PSVH 56 A1 SET PARA ATORNILLADO OCULTO EN MADERA SET VITI A SCOMPARSA Istruzioni per l'uso Instrucciones de uso HIDDEN WOODEN SCREW JOINTS KIT Operating instructions SET FÜR VERDECKTE HOLZVERSCHRAUBUNGEN Bedienungsanleitung IAN 337010_2001 Antes de empezar a leer abra la página que contiene las imágenes y, en seguida, familiarícese con todas las funciones del dispositivo. Prima di leggere aprire la pagina con le immagini e prendere confidenza con le diverse funzioni dell'apparecchio. Before reading, unfold the page containing the illustrations and familiarise yourself with all functions of the device. Klappen Sie vor dem Lesen die Seite mit den Abbildungen aus und machen Sie sich anschließend mit allen Funktionen des Gerätes vertraut. ES IT / MT GB / MT DE / AT / CH Instrucciones de uso Istruzioni per l'uso Operating instructions Bedienungsanleitung Página 1 Pagina 11 Page 21 Seite 31 38 2 27 1 9 D 19 1 12 7 3 38 2 19 12 27 38 27 8 19 3 12 A B C E F G 1. 2. Índice Introducción . . . . . . . . . . . . . . . . . . . . . . . . . . . . . . . . . . . . 2 Información sobre estas instrucciones de uso . . . . . . . . . . . . . . . . . . . 2 Uso previsto . . . . . . . . . . . . . . . . . . . . . . . . . . . . . . . . . . . . . . . . . . . . . 2 Seguridad . . . . . . . . . . . . . . . . . . . . . . . . . . . . . . . . . . . . . . 2 Volumen de suministro. . . . . . . . . . . . . . . . . . . . . . . . . . . . 4 Utilización . . . . . . . . . . . . . . . . . . . . . . . . . . . . . . . . . . . . . . Medir el grosor de la madera (fig. A) . . . . . . . . . . . . . . . . . . . . . . . . . Ajustar el grosor de la madera (fig. B) . . . . . . . . . . . . . . . . . . . . . . . . . Ajustar la profundidad de taladrado (fig. C) . . . . . . . . . . . . . . . . . . . . Perforar un agujero (fig. D) . . . . . . . . . . . . . . . . . . . . . . . . . . . . . . . . . Realizar uniones angulares, superficiales y en T (fig. E). . . . . . . . . . . . Realizar uniones a inglete (fig. F) . . . . . . . . . . . . . . . . . . . . . . . . . . . . . Procesar piezas de trabajo de madera premontadas (fig. G) . . . . . . . 5 5 5 6 6 7 7 8 Limpieza . . . . . . . . . . . . . . . . . . . . . . . . . . . . . . . . . . . . . . . 8 Conservación . . . . . . . . . . . . . . . . . . . . . . . . . . . . . . . . . . . 9 Desecho . . . . . . . . . . . . . . . . . . . . . . . . . . . . . . . . . . . . . . . . 9 Asistencia técnica . . . . . . . . . . . . . . . . . . . . . . . . . . . . . . . 10 Importador . . . . . . . . . . . . . . . . . . . . . . . . . . . . . . . . . . . . 10 PSVH 56 A1 ES │ 1 ■ Introducción Información sobre estas instrucciones de uso ¡Felicidades! Ha adquirido un producto de alta calidad. Antes de la primera puesta en funcionamiento, familiarícese con el producto. Para ello, lea detenidamente las siguientes instrucciones de uso. Utilice el producto únicamente como se describe y para los ámbitos de aplicación indicados. Guarde estas instrucciones en un lugar seguro. Entregue todos los documentos cuando transfiera el producto a terceros. Uso previsto Este producto sirve exclusivamente para hacer atornilladuras huecas cubiertas en la madera. Con este producto puede realizar uniones angulares, de superficies, uniones en T y uniones a inglete. Además, este producto es adecuado para piezas de trabajo de madera ya montadas. No se permite su uso comercial o industrial. No nos hacemos responsables de una utilización contraria al uso previsto. Tampoco nos hacemos responsables de los daños derivados de un uso incorrecto o indebido, del uso de una fuerza excesiva o de las modificaciones no autorizadas. El riesgo será responsabilidad exclusiva del usuario. Seguridad ■ Antes de usar el producto, compruebe que esté en perfecto estado. Si se aprecian daños, no debe seguir utilizándose el producto. ■ Los niños solo deben usar el producto bajo supervisión, ya que no siempre saben evaluar correctamente el peligro. Este producto no es un juguete. ■ 2 │ ES PSVH 56 A1 ■ No permita utilizar el producto a personas (incluidos los niños) con facultades físicas, sensoriales o mentales limitadas o que carezcan de experiencia o conocimientos a menos que les vigile una persona responsable de su seguridad o hayan sido instruidas por esta en el uso del producto. ■ El volumen de suministro incluye piezas pequeñas que pueden ser ingeridas. Si se ingiere una pieza, busque inmediatamente asistencia médica. ■ ■ Por su propia seguridad, utilice siempre su equipo de protección individual (gafas de protección, máscara de protección respiratoria y protecciones auditivas) cuando trabaje con el producto. Al manejar el producto, observe también las instrucciones de uso del taladro o taladro atornillador inalámbrico. ■ Desconecte el enchufe de la red eléctrica antes de montar o cambiar las piezas. ■ Todas las piezas deben estar montadas correctamente, ya que, de lo contrario, existe peligro de lesiones. ■ Utilice el taladro o el taladro atornillador inalámbrico exclusivamente con la marcha hacia la derecha. Debe apagarse el modo de funcionamiento percutor. ■ Nunca quite los dispositivos de protección existentes. ■ Fije firmemente la pieza de madera sobre la que va a trabajar. ■ Asegúrese de que tanto usted como la pieza de trabajo de madera que va a procesar están en una posición segura. ■ Las coloraciones por óxido u otros indicios de alteración mecánica o química en las piezas pueden provocar un fallo prematuro de dichas piezas. PSVH 56 A1 ES │ 3 ■ Volumen de suministro 38 27 12 19 1 plantilla para taladrar 1 broca escalonada HSS ∅ 9,5 mm (longitud: 180 mm) 1 tope de profundidad ∅ 9,5 mm 1 llave Allen SW 3 1 punta (longitud: 150 mm) 1 abrazadera 40 tornillos de madera: 10 tornillos de madera ∅ 4 mm × 25 mm 10 tornillos de madera ∅ 4 mm × 30 mm 10 tornillos de madera ∅ 4 mm × 40 mm 10 tornillos de madera ∅ 4 mm × 60 mm 10 tapas para tornillos (madera de haya seca) Estas instrucciones de uso INDICACIÓN ► Compruebe la integridad del suministro y si hay daños visibles. ■ 4 │ ES PSVH 56 A1 Utilización INDICACIÓN ► Además del volumen de suministro, necesitará un taladro o un taladro atornillador inalámbrico y una abrazadera adicional para utilizar el producto. Medir el grosor de la madera (fig. A) ♦ Presione el tope de la plantilla para taladrar hacia abajo. ♦ Coloque la plantilla para taladrar en la pieza de trabajo de madera y compruebe el grosor de la madera. Ajustar el grosor de la madera (fig. B) ♦ Ajuste el grosor de la madera medido de acuerdo con la siguiente tabla a la plantilla para taladrar . Grosor de la madera Ajuste 12–18 mm 19–26 mm 27–37 mm ≥ 38 mm 12 19 27 38 ♦ Mantenga pulsados los botones y deslice la plantilla para taladrar hasta alcanzar el ajuste deseado. ♦ Suelte los botones cuando la plantilla para taladrar PSVH 56 A1 esté encastrada. ES │ 5 ■ Ajustar la profundidad de taladrado (fig. C) ♦ Deslice el tope de la plantilla para taladrar hacia arriba y coloque la plantilla para taladrar en una superficie plana. ♦ Coloque la broca escalonada sin distancia en la parte con el símbolo de la broca escalonado de la plantilla para taladrar. A continuación, ponga la punta de la broca escalonada en la punta del símbolo de la broca escalonada. ♦ Deslice el tope de profundidad en la broca escalonada el borde de la plantilla para taladrar . ♦ Atornille firmemente el tope de profundidad hasta con la llave Allen . Perforar un agujero (fig. D) INDICACIÓN ► Para una fijación estable, perfore dos tornillos de madera cada unión. en ♦ Sujete la broca escalonada con el tope de profundidad atornillado en un taladro o taladro atornillador inalámbrico. ♦ Presione el tope de la plantilla para taladrar hacia abajo. ♦ Coloque el tope de la plantilla para taladrar trabajo de madera. en la pieza de ♦ Fije la plantilla para taladrar la abrazadera . y la pieza de trabajo de madera con ♦ Perfore la pieza de trabajo de madera hasta el tope de profundidad ■ 6 │ ES . PSVH 56 A1 Realizar uniones angulares, superficiales y en T (fig. E) ♦ Cuando vaya a realizar las uniones indicadas, fije las piezas de trabajo de madera con una abrazadera (no incluida en el volumen de suministro). INDICACIÓN ► Asegúrese de que las piezas de trabajo de madera son las adecuadas y quedan fijadas firmemente. ♦ Seleccione los tornillos de madera adecuados la siguiente tabla. Grosor de la madera ≥ 12 mm ≥ 19 mm ≥ 27 mm ≥ 38 mm ♦ Atornille con la punta teniendo en cuenta Dimensiones de los tornillos de madera ∅ 4 mm × 25 mm ∅ 4 mm × 30 mm ∅ 4 mm × 40 mm ∅ 4 mm × 60 mm el tornillo de madera seleccionado . Realizar uniones a inglete (fig. F) ♦ Proceda como en las uniones anteriores (consulte las figuras A–C). Mida el grosor de la madera y ajuste la profundidad de perforación. ♦ Coloque la plantilla para taladrar como se muestra en la ilustración. ♦ Perfore los agujeros como se describe en el capítulo "Perforar un agujero (fig. D)". ♦ Una las piezas de trabajo de madera como se describe en el capítulo "Realizar uniones angulares, superficiales y en T (fig. E)". PSVH 56 A1 ES │ 7 ■ Procesar piezas de trabajo de madera premontadas (fig. G) ♦ Ajuste la profundidad de perforación (consulte las figuras A–C). hacia arriba. ♦ Deslice el tope de la plantilla para taladrar ♦ Fije la plantilla para taladrar la abrazadera . y la pieza de trabajo de madera con ♦ Escoja los tornillos de madera adecuados tabla. teniendo en cuenta la INDICACIÓN ► Los tornillos de madera deben ser 5 mm más largos ya que hay que añadir la dimensión del tope insertado de 5 mm de ancho. ♦ Atornille con la punta el tornillo de madera después de la perforación. seleccionado ♦ Encole las perforaciones e inserte las tapas para tornillos . Limpieza ADVERTENCIA ► Antes de la limpieza, retire la broca escalonada o la punta del taladro o taladro atornillador inalámbrico. ► No utilice productos de limpieza agresivos o abrasivos, ya que podrían dañar la superficie del producto. ♦ Para eliminar el polvo del producto, utilice un cepillo suave y seco. ♦ Limpie el producto con un paño seco. ■ 8 │ ES PSVH 56 A1 Conservación Se deben almacenar todas las piezas en el contenedor en el que fueron suministradas para que estén protegidas contra influencias externas. Desecho Deseche el producto en un centro de residuos autorizado o a través de las instalaciones municipales de gestión de residuos. Observe las normas vigentes. En caso de duda, póngase en contacto con las instalaciones municipales de desecho de residuos. Puede informarse acerca de las posibilidades de desecho de los aparatos usados en su administración municipal o ayuntamiento. Deseche el embalaje de forma respetuosa con el medio ambiente. Observe las indicaciones de los distintos materiales de embalaje y, si procede, recíclelos de la manera correspondiente. Los materiales de embalaje cuentan con abreviaciones (a) y cifras (b) que significan lo siguiente: 1-7: plásticos; 20-22: papel y cartón; 80-98: materiales compuestos. PSVH 56 A1 ES │ 9 ■ Asistencia técnica Servicio España Tel.: 902 59 99 22 (0,08 EUR/Min. + 0,11 EUR/llamada (tarifa normal)) (0,05 EUR/Min. + 0,11 EUR/llamada (tarifa reducida)) E-Mail: [email protected] IAN 337010_2001 Importador Tenga en cuenta que la dirección siguiente no es una dirección de asistencia técnica. Póngase primero en contacto con el centro de asistencia técnica especificado. KOMPERNASS HANDELS GMBH BURGSTRASSE 21 44867 BOCHUM ALEMANIA www.kompernass.com ■ 10 │ ES PSVH 56 A1 Indice Introduzione . . . . . . . . . . . . . . . . . . . . . . . . . . . . . . . . . . . 12 Informazioni sul presente manuale di istruzioni . . . . . . . . . . . . . . . . . 12 Uso conforme . . . . . . . . . . . . . . . . . . . . . . . . . . . . . . . . . . . . . . . . . . . 12 Sicurezza . . . . . . . . . . . . . . . . . . . . . . . . . . . . . . . . . . . . . . 12 Materiale in dotazione . . . . . . . . . . . . . . . . . . . . . . . . . . . 14 Impiego . . . . . . . . . . . . . . . . . . . . . . . . . . . . . . . . . . . . . . . 15 Misurazione dello spessore del legno (fig. A) . . . . . . . . . . . . . . . . . . 15 Regolazione dello spessore del legno (fig. B) . . . . . . . . . . . . . . . . . . 15 Regolazione della profondità di perforazione (fig. C) . . . . . . . . . . . . 16 Esecuzione di un foro (fig. D) . . . . . . . . . . . . . . . . . . . . . . . . . . . . . . . 16 Realizzazione di giunti d'angolo, giunti faccia a faccia e giunti a T (fig. E) . . . . . . . . . . . . . . . . . . . . . . . . . . . . . . . . . . 17 Realizzazione di giunti smussati (fig. F) . . . . . . . . . . . . . . . . . . . . . . . 17 Lavorazione di pezzi in legno già montati (fig. G). . . . . . . . . . . . . . . 18 Pulizia . . . . . . . . . . . . . . . . . . . . . . . . . . . . . . . . . . . . . . . . 18 Conservazione . . . . . . . . . . . . . . . . . . . . . . . . . . . . . . . . . 19 Smaltimento . . . . . . . . . . . . . . . . . . . . . . . . . . . . . . . . . . . 19 Assistenza . . . . . . . . . . . . . . . . . . . . . . . . . . . . . . . . . . . . . 20 Importatore. . . . . . . . . . . . . . . . . . . . . . . . . . . . . . . . . . . . 20 PSVH 56 A1 IT│MT │ 11 ■ Introduzione Informazioni sul presente manuale di istruzioni Congratulazioni! Con questo acquisto è stato scelto un prodotto di alta qualità. Acquisire dimestichezza con il prodotto prima della prima messa in funzione. A tale scopo consigliamo di leggere attentamente il seguente manuale di istruzioni. Utilizzare il prodotto solo come descritto e per i campi d'impiego indicati. Conservare con cura il presente manuale di istruzioni. In caso di cessione del prodotto a terzi, consegnare anche tutta la relativa documentazione. Uso conforme Il prodotto serve esclusivamente a realizzare giunti a vite nascosti per legno. Il prodotto consente di realizzare giunti d'angolo, giunti faccia a faccia, giunti a T e giunti smussati. Il prodotto è inoltre adatto a pezzi in legno già montati. Non è ammesso l’uso commerciale o industriale. Non si assumono responsabilità per l’uso non conforme. Non si assume inoltre alcuna responsabilità per i danni derivanti dall'abuso e uso non conforme, dall'uso di violenza o modifiche non autorizzate. Il rischio è esclusivamente a carico dell'utente. Sicurezza ■ Prima di ogni utilizzo, verificare che il prodotto sia in perfette condizioni. Qualora si rilevassero danni, non utilizzare più il prodotto. ■ Consentire l'uso del prodotto ai bambini solo se sotto sorveglianza. I bambini non riescono sempre a riconoscere correttamente i pericoli. Il prodotto non è un giocattolo. ■ 12 │ IT│MT PSVH 56 A1 ■ Questo prodotto non è indicato per l'uso da parte di persone (inclusi i bambini) con limitate capacità fisiche, sensoriali o mentali o prive dell'esperienza e/o della conoscenza necessaria, a meno che tali persone non vengano sorvegliate da un responsabile per la sicurezza o non abbiano ricevuto indicazioni sull'impiego dell'apparecchio. ■ La dotazione comprende pezzi di piccole dimensioni che potrebbero essere ingeriti. In caso di ingestione di un pezzo, consultare immediatamente un medico. ■ ■ Utilizzare dispositivi di protezione. Per la propria sicurezza, indossare sempre una protezione acustica, una mascherina respiratoria/antipolvere e occhiali protettivi. Per l'uso del prodotto osservare anche il manuale di istruzioni del trapano e/o del trapano avvitatore a batteria. ■ Staccare la spina dalla presa di corrente prima di montare o sostituire i pezzi. ■ Tutti i componenti devono essere montati correttamente prima dell'uso, altrimenti sussiste il rischio di lesioni! ■ Far funzionare il trapano e/o il trapano avvitatore a batteria solo con rotazione oraria. La modalità di perforazione a percussione deve essere disattivata. ■ Non rimuovere mai i dispositivi di protezione presenti. ■ Fissare sempre saldamente il pezzo in legno da lavorare. ■ Assicurarsi di poter mantenere una posizione salda e che anche il pezzo in legno da lavorare sia saldo. ■ Gli scolorimenti derivanti dalla ruggine o altri segni di modifiche chimiche o meccaniche sui componenti possono causare una rottura prematura dei componenti stessi. PSVH 56 A1 IT│MT │ 13 ■ Materiale in dotazione 38 27 12 19 1 calibro di perforazione 1 punta a gradino in acciaio superrapido ∅ 9,5 mm (lunghezza: 180 mm) 1 battuta di profondità ∅ 9,5 mm 1 brugola da 3 1 inserto (lunghezza: 150 mm) 1 morsetto 40 viti da legno: 10 viti da legno ∅ 4 mm × 25 mm 10 viti da legno ∅ 4 mm × 30 mm 10 viti da legno ∅ 4 mm × 40 mm 10 viti da legno ∅ 4 mm × 60 mm 10 coperture per teste di viti (faggio secco) Il presente manuale di istruzioni NOTA ► Controllare la completezza e l'integrità della fornitura. ■ 14 │ IT│MT PSVH 56 A1 Impiego NOTA ► Per usare il prodotto, oltre al materiale in dotazione si avrà bisogno di un trapano o di un trapano avvitatore a batteria e di un ulteriore morsetto. Misurazione dello spessore del legno (fig. A) ♦ Premere la battuta del calibro di perforazione ♦ Collocare il calibro di perforazione lo spessore del legno. verso il basso. sul pezzo in legno e leggere Regolazione dello spessore del legno (fig. B) ♦ Regolare lo spessore di legno misurato con il calibro di perforazione in base alla seguente tabella. Spessore del legno Regolazione 12–18 mm 19–26 mm 27–37 mm ≥ 38 mm 12 19 27 38 ♦ Tenere premuti i pulsanti e spostare il calibro di perforazione fino a raggiungere la regolazione desiderata. ♦ Quando il calibro di perforazione i pulsanti. PSVH 56 A1 s'innesta in posizione, rilasciare IT│MT │ 15 ■ Regolazione della profondità di perforazione (fig. C) ♦ Spingere la battuta del calibro di perforazione verso l'alto e collocare il calibro di perforazione su una superficie piana. ♦ Appoggiare senza distanza la punta a gradino al lato del calibro di perforazione con il simbolo della punta a gradino. L'estremità appuntita della punta a gradino deve coincidere con l'estremità appuntita del simbolo della punta a gradino. ♦ Spingere la battuta di profondità sulla punta a gradino al bordo del calibro di perforazione . ♦ Avvitare saldamente la battuta di profondità fino con la brugola . Esecuzione di un foro (fig. D) NOTA in ogni giunto. ► Per ottenere stabilità avvitare due viti da legno ♦ Fissare la punta a gradino con la battuta di profondità in un trapano o in un trapano avvitatore a batteria. ♦ Premere la battuta del calibro di perforazione verso il basso. ♦ Appoggiare la battuta del calibro di perforazione legno. ♦ Bloccare il calibro di perforazione morsetto . al pezzo in e il pezzo in legno con il ♦ Perforare il pezzo in legno fino alla battuta di profondità ■ 16 │ IT│MT avvitata . PSVH 56 A1 Realizzazione di giunti d'angolo, giunti faccia a faccia e giunti a T (fig. E) ♦ Per realizzare i giunti illustrati fissare i pezzi in legno con un morsetto (non compreso nel materiale in dotazione). NOTA ► Assicurarsi che i pezzi in legno siano fissati saldamente e con precisione. adatte in base alla tabella che segue. ♦ Scegliere le viti da legno Spessore del legno Dimensioni delle viti da legno ≥ 12 mm ≥ 19 mm ≥ 27 mm ≥ 38 mm ∅ 4 mm × 25 mm ∅ 4 mm × 30 mm ∅ 4 mm × 40 mm ∅ 4 mm × 60 mm ♦ Servendosi dell'inserto , avvitare le viti da legno scelte. Realizzazione di giunti smussati (fig. F) ♦ Procedere come per i giunti descritti in precedenza (vedere figg. A-C). Misurare lo spessore del legno e regolare la profondità di perforazione. ♦ Appoggiare il calibro di perforazione come illustrato nella figura. ♦ Praticare i fori come descritto al capitolo "Esecuzione di un foro (fig. D)". ♦ Unire i pezzi in legno come descritto al capitolo "Realizzazione di giunti d'angolo, giunti faccia a faccia e giunti a T (fig. E)". PSVH 56 A1 IT│MT │ 17 ■ Lavorazione di pezzi in legno già montati (fig. G) ♦ Regolare la profondità di perforazione (vedere le figure da A a C). ♦ Spingere la battuta del calibro di perforazione ♦ Bloccare il calibro di perforazione morsetto . ♦ Scegliere le viti da legno verso l'alto. e il pezzo in legno con il adatte in base alla tabella. NOTA ► Occorre scegliere viti da legno con una lunghezza eccedente di 5 mm, poiché va calcolata anche la misura della battuta inserita, che è di 5 mm. ♦ Servendosi dell'inserto aver praticato i fori. , avvitare le viti da legno scelte dopo ♦ Applicare colla ai fori e inserirvi le coperture per teste di viti . Pulizia AVVERTENZA ► Prima della pulizia rimuovere la punta a gradino o l'inserto dal trapano o dal trapano avvitatore a batteria. ► Per evitare di danneggiare la superficie del prodotto, non utilizzare detergenti aggressivi o abrasivi. ♦ Per rimuovere la polvere di perforazione dal prodotto, utilizzare una spazzola morbida e asciutta. ♦ Inoltre pulire il prodotto anche con un panno asciutto. ■ 18 │ IT│MT PSVH 56 A1 Conservazione Tutti i componenti devono essere conservati nel contenitore con cui sono stati forniti, in modo da essere protetti dagli influssi esterni. Smaltimento Smaltire il prodotto tramite un'azienda di smaltimento autorizzata o l'ente di smaltimento comunale. Rispettare le norme attualmente in vigore. In caso di dubbi, mettersi in contatto con l'ente di smaltimento competente. Per lo smaltimento del prodotto una volta che ha terminato la sua funzione, informarsi presso l'amministrazione comunale. Smaltire l'imballaggio conformemente alle norme di tutela ambientale. Tenere conto dei codici presenti sui vari materiali di imballaggio ed eventualmente separare i materiali effettuando una raccolta differenziata. I materiali di imballaggio presentano codici costituiti da abbreviazioni (a) e numeri (b) con il seguente significato: 1–7: materie plastiche, 20–22: carta e cartone, 80–98: materiali compositi. PSVH 56 A1 IT│MT │ 19 ■ Assistenza Assistenza Italia Tel.: 02 36003201 E-Mail: [email protected] Service Malta Tel.: 80062230 E-Mail: [email protected] IAN 337010_2001 Importatore Badi che il seguente indirizzo non è quello del servizio di assistenza clienti. Contatti innanzitutto il servizio di assistenza clienti indicato. KOMPERNASS HANDELS GMBH BURGSTRASSE 21 44867 BOCHUM GERMANIA www.kompernass.com ■ 20 │ IT│MT PSVH 56 A1 Contents Introduction . . . . . . . . . . . . . . . . . . . . . . . . . . . . . . . . . . . . 22 Information about these operating instructions . . . . . . . . . . . . . . . . . . 22 Intended use . . . . . . . . . . . . . . . . . . . . . . . . . . . . . . . . . . . . . . . . . . . . 22 Safety . . . . . . . . . . . . . . . . . . . . . . . . . . . . . . . . . . . . . . . . 22 Package contents . . . . . . . . . . . . . . . . . . . . . . . . . . . . . . . 24 Use . . . . . . . . . . . . . . . . . . . . . . . . . . . . . . . . . . . . . . . . . . . 25 Measuring wood thickness (Fig. A) . . . . . . . . . . . . . . . . . . . . . . . . . . 25 Setting the wood thickness (Fig. B) . . . . . . . . . . . . . . . . . . . . . . . . . . . 25 Setting the drilling depth (Fig. C) . . . . . . . . . . . . . . . . . . . . . . . . . . . . 26 Drilling holes (Fig. D) . . . . . . . . . . . . . . . . . . . . . . . . . . . . . . . . . . . . . 26 Making corner, surface and T-shaped joints (Fig. E) . . . . . . . . . . . . . 27 Making mitred joints (Fig. F) . . . . . . . . . . . . . . . . . . . . . . . . . . . . . . . . 27 Working on pre-assembled wooden workpieces (Fig. G) . . . . . . . . . 28 Cleaning. . . . . . . . . . . . . . . . . . . . . . . . . . . . . . . . . . . . . . . 28 Storage . . . . . . . . . . . . . . . . . . . . . . . . . . . . . . . . . . . . . . . 29 Disposal . . . . . . . . . . . . . . . . . . . . . . . . . . . . . . . . . . . . . . . 29 Service . . . . . . . . . . . . . . . . . . . . . . . . . . . . . . . . . . . . . . . . 30 Importer . . . . . . . . . . . . . . . . . . . . . . . . . . . . . . . . . . . . . . 30 PSVH 56 A1 GB│MT │ 21 ■ Introduction Information about these operating instructions Congratulations! You have purchased a high-quality product. Familiarise yourself with the product before using it for the first time. To do this, read the following operating instructions thoroughly. Use the product only as described and for the range of applications specified. Keep these operating instructions in a safe place. Please also pass these operating instructions on to any future owner(s). Intended use This product is exclusively intended to produce concealed screw joints in wood. You can use the product to create corner joints, surface joints, T-shaped joints and mitred joints. The product is also suitable for already assembled wooden workpieces. Commercial or industrial use is not permitted. No liability will be assumed in cases of improper use. No liability will be assumed for damage caused by misuse or improper handling, the use of force or unauthorised modification. The risk is borne solely by the user. Safety ■ Check the product before every use to make sure it is in perfect condition. Do not use the product if it is damaged in any way. ■ Do not allow children to use the product unless they are being supervised. Children are not always able to correctly recognise potential dangers. This product is not a toy. ■ 22 │ GB│MT PSVH 56 A1 ■ This product is not intended for use by individuals (including children) with reduced physical, sensory, or mental capabilities. It may also not be used by individuals who lack experience and/or knowledge unless they are supervised by a person responsible for their safety or have received instructions on how to use the product from such a person. ■ Some of the supplied parts can be swallowed. If a part is swallowed, seek medical advice as soon as possible. ■ ■ Use protective equipment. For your own safety, always wear ear muffs, a breathing mask/dust mask and safety goggles. Please observe the operating instructions for the drill/the cordless screwdriver when using the product. ■ Unplug the appliance before fitting or changing parts. ■ All parts must be properly fitted before use otherwise there is a risk of serious injury! ■ Only operate the drill/the cordless screwdriver in clockwise mode. The hammer function must be switched off. ■ Never remove the fitted protective devices. ■ Firmly clamp the wooden workpiece you are working on. ■ Ensure that you are standing firmly and the wooden workpiece is stable. ■ Rust discoloration or other signs of chemical or mechanical change to the parts can cause premature failure of the parts. PSVH 56 A1 GB│MT │ 23 ■ Package contents 38 27 12 19 1 × drilling jig 1 × HSS step drill ∅ 9.5 mm (length: 180 mm) 1 × depth stop ∅ 9.5 mm 1 × hex key SW 3 1 × bit attachment (length: 150 mm) 1 × clamp 40 × woodscrews: 10 × woodscrews ∅ 4 mm × 25 mm 10 × woodscrews ∅ 4 mm × 30 mm 10 × woodscrews ∅ 4 mm × 40 mm 10 × woodscrews ∅ 4 mm × 60 mm 10 × screw head covers (dried beechwood) These operating instructions NOTE ► Check the package for completeness and signs of visible damage. ■ 24 │ GB│MT PSVH 56 A1 Use NOTE ► In addition to the items supplied, you will require a drill or a cordless screwdriver and an additional clamp in order to use the product. Measuring wood thickness (Fig. A) ♦ Press the limit stop on the drilling jig ♦ Place the drilling jig the wood thickness. downwards. against the wooden workpiece and read off Setting the wood thickness (Fig. B) ♦ Set the measured wood thickness on the drilling jig following table. using the Wood thickness Setting 12–18 mm 19–26 mm 27–37 mm ≥ 38 mm 12 19 27 38 ♦ Hold down the knob and push the drilling jig setting is reached. ♦ Release the knob once the drilling jig PSVH 56 A1 until the required is engaged. GB│MT │ 25 ■ Setting the drilling depth (Fig. C) ♦ Push the drilling jig on a flat surface. limit stop upwards and place the drilling jig ♦ Place the step drill right up against the side of the drilling jig with the step drill symbol. The tip of the step drill should contact the tip of the step drill symbol. onto the step drill ♦ Push the depth stop drilling jig . ♦ Screw the depth stop as far as the edge of the tight using the hex key . Drilling holes (Fig. D) NOTE ► To provide a stable hold, drill two woodscrews ♦ Clamp the step drill (with the depth stop or a cordless screwdriver. into each joint. screwed on) into a drill ♦ Press the limit stop on the drilling jig downwards. ♦ Place the limit stop on the drilling jig piece. against the wooden work- ♦ Fix the drilling jig the clamp . and the wooden workpiece firmly in place with ♦ Drill into the wooden workpiece as far as the depth stop ■ 26 │ GB│MT . PSVH 56 A1 Making corner, surface and T-shaped joints (Fig. E) ♦ When making the joints shown, fix the wooden workpiece in place with a clamp (not included in delivery). NOTE ► Ensure that you clamp the wooden workpiece precisely and tightly. ♦ Select the appropriate woodscrews table. with the help of the following Wood thickness Woodscrew size ≥ 12 mm ≥ 19 mm ≥ 27 mm ≥ 38 mm ∅ 4 mm × 25 mm ∅ 4 mm × 30 mm ∅ 4 mm × 40 mm ∅ 4 mm × 60 mm ♦ Screw in the selected woodscrews using the bit attachment . Making mitred joints (Fig. F) ♦ Proceed as described for the previous joints (see Figs. A–C). Measure the wood thickness and set the drilling depth. ♦ Place the drilling jig as shown in the illustration. ♦ Drill holes as described in the section "Drilling holes (Fig. D)". ♦ Connect the wooden workpieces as described in the section "Making corner, surface and T-shaped joints (Fig. E)". PSVH 56 A1 GB│MT │ 27 ■ Working on pre-assembled wooden workpieces (Fig. G) ♦ Set the drilling depth (see figures A to C). ♦ Push the limit stop on the drilling jig ♦ Fix the drilling jig the clamp . upwards. and the wooden workpiece firmly in place with ♦ Select the appropriate woodscrews with the help of the table. NOTE ► The woodscrews selected must be 5 mm longer since the width of the inserted limit stop (5 mm) must be added to the length. ♦ Screw the selected woodscrews after drilling. in using the bit attachment ♦ Fill the drill holes with glue and push the screw head covers the holes. into Cleaning WARNING ► Before cleaning, always remove the step drill or the bit attachment from the drill or cordless screwdriver. ► Do not use aggressive or abrasive cleaning agents, as these can damage the surfaces of the product. ♦ Use a soft, dry brush to remove drilling dust from the product. ♦ You can also clean the product using a dry cloth. ■ 28 │ GB│MT PSVH 56 A1 Storage All parts must be stored in the container in which they were delivered to protect them from external factors. Disposal Dispose of the product via an approved waste disposal company or your municipal waste disposal facility. Comply with all applicable regulations. In case of doubt, contact your disposal facility. Your local community or municipal authorities can provide information on how to dispose of the worn-out product. Dispose of the packaging in an environmentally friendly manner. Note the labelling on the packaging and separate the packaging material components for disposal if necessary. The packaging material is labelled with abbreviations (a) and numbers (b) with the following meanings: 1–7: plastics, 20–22: paper and cardboard, 80–98: composites. PSVH 56 A1 GB│MT │ 29 ■ Service Service Great Britain Tel.: 0800 404 7657 E-Mail: [email protected] Service Malta Tel.: 80062230 E-Mail: [email protected] IAN 337010_2001 Importer Please note that the following address is not the service address. Please use the service address provided in the operating instructions. KOMPERNASS HANDELS GMBH BURGSTRASSE 21 44867 BOCHUM GERMANY www.kompernass.com ■ 30 │ GB│MT PSVH 56 A1 Inhaltsverzeichnis Einführung . . . . . . . . . . . . . . . . . . . . . . . . . . . . . . . . . . . . . 32 Informationen zu dieser Bedienungsanleitung . . . . . . . . . . . . . . . . . . 32 Bestimmungsgemäße Verwendung . . . . . . . . . . . . . . . . . . . . . . . . . . 32 Sicherheit . . . . . . . . . . . . . . . . . . . . . . . . . . . . . . . . . . . . . . 32 Lieferumfang. . . . . . . . . . . . . . . . . . . . . . . . . . . . . . . . . . . 34 Verwendung . . . . . . . . . . . . . . . . . . . . . . . . . . . . . . . . . . . 35 Holzstärke messen (Abb. A) . . . . . . . . . . . . . . . . . . . . . . . . . . . . . . . . 35 Holzstärke einstellen (Abb. B) . . . . . . . . . . . . . . . . . . . . . . . . . . . . . . 35 Bohrtiefe einstellen (Abb. C) . . . . . . . . . . . . . . . . . . . . . . . . . . . . . . . 36 Loch bohren (Abb. D). . . . . . . . . . . . . . . . . . . . . . . . . . . . . . . . . . . . . 36 Eck-, Flächen- und T-Verbindungen herstellen (Abb. E) . . . . . . . . . . . . 37 Gehrungsverbindungen herstellen (Abb. F) . . . . . . . . . . . . . . . . . . . . 37 Vormontierte Holzwerkstücke bearbeiten (Abb. G) . . . . . . . . . . . . . . 38 Reinigung . . . . . . . . . . . . . . . . . . . . . . . . . . . . . . . . . . . . . 38 Aufbewahrung . . . . . . . . . . . . . . . . . . . . . . . . . . . . . . . . . 39 Entsorgung . . . . . . . . . . . . . . . . . . . . . . . . . . . . . . . . . . . . 39 Service . . . . . . . . . . . . . . . . . . . . . . . . . . . . . . . . . . . . . . . . 40 Importeur . . . . . . . . . . . . . . . . . . . . . . . . . . . . . . . . . . . . . 40 PSVH 56 A1 DE│AT│CH │ 31 ■ Einführung Informationen zu dieser Bedienungsanleitung Herzlichen Glückwunsch! Mit Ihrem Kauf haben Sie sich für ein hochwertiges Produkt entschieden. Machen Sie sich vor der ersten Inbetriebnahme mit dem Produkt vertraut. Lesen Sie hierzu aufmerksam die nachfolgende Bedienungsanleitung. Benutzen Sie das Produkt nur wie beschrieben und für die angegebenen Einsatzbereiche. Bewahren Sie diese Bedienungsanleitung gut auf. Händigen Sie alle Unterlagen bei Weitergabe des Produkts an Dritte ebenfalls mit aus. Bestimmungsgemäße Verwendung Das Produkt dient ausschließlich dem Herstellen von verdeckten Holzverschraubungen. Sie können mit dem Produkt Eckverbindungen, Flächenverbindungen, T-Verbindungen und Gehrungsverbindungen herstellen. Außerdem ist das Produkt für bereits montierte Holzwerkstücke geeignet. Die gewerbliche oder industrielle Verwendung ist nicht zulässig. Für nicht bestimmungsgemäße Verwendung wird nicht gehaftet. Für Schäden, die von missbräuchlicher oder unsachgemäßer Behandlung, von Gewaltanwendung oder unautorisierter Modifikation herrühren, wird ebenfalls keine Haftung übernommen. Das Risiko trägt allein der Benutzer. Sicherheit ■ Kontrollieren Sie das Produkt vor jedem Gebrauch auf einwandfreien Zustand. Sollten Schäden festgestellt werden, darf das Produkt nicht mehr verwendet werden. ■ Gestatten Sie Kindern die Benutzung des Produktes nur unter Aufsicht. Kinder können mögliche Gefahren nicht immer richtig erkennen. Das Produkt ist kein Spielzeug. ■ 32 │ DE│AT│CH PSVH 56 A1 ■ Dieses Produkt ist nicht dafür bestimmt, durch Personen (einschließlich Kinder) mit eingeschränkten physischen, sensorischen oder geistigen Fähigkeiten oder an einem Mangel an Erfahrung und/oder Wissen benutzt zu werden, es sei denn, sie werden durch eine für ihre Sicherheit zuständige Person beaufsichtigt oder erhielten von ihr Anweisungen, wie das Produkt zu benutzen ist. ■ Im Lieferumfang befinden sich verschluckbare Kleinteile. Wurde ein Teil verschluckt, konsultieren Sie sofort einen Arzt. ■ ■ Benutzen Sie Schutzausrüstung. Tragen Sie zur eigenen Sicherheit immer einen Gehörschutz, eine Atem-/Staubschutzmaske und eine Schutzbrille. Beachten Sie beim Umgang mit dem Produkt auch die Bedienungsanleitung der Bohrmaschine bzw. des Akku-Bohrschraubers. ■ Ziehen Sie den Netzstecker, bevor Sie Teile montieren oder wechseln. ■ Alle Teile müssen sachgerecht vor der Verwendung montiert sein, ansonsten besteht Verletzungsgefahr! ■ Betreiben Sie die Bohrmaschine bzw. den Akku-Bohrschrauber nur im Rechtslauf. Der Schlagbohrbetrieb muss ausgeschaltet sein. ■ Entfernen Sie niemals vorhandene Schutzvorrichtungen. ■ Spannen Sie das zu bearbeitende Holzwerkstück fest. ■ Achten Sie darauf, dass Sie selbst und das zu bearbeitende Holzwerkstück einen sicheren Stand haben. ■ Rostverfärbungen oder andere Anzeichen von chemischer oder mechanischer Veränderung an den Teilen können vorzeitiges Versagen der Teile verursachen. PSVH 56 A1 DE│AT│CH │ 33 ■ Lieferumfang 38 27 12 19 1 × Bohrlehre 1 × HSS-Stufenbohrer ∅ 9,5 mm (Länge: 180 mm) 1 × Tiefenstop ∅ 9,5 mm 1 × Innensechskantschlüssel SW 3 1 × Bitaufsatz (Länge: 150 mm) 1 × Zwinge 40 × Holzschrauben: 10 × Holzschrauben ∅ 4 mm × 25 mm 10 × Holzschrauben ∅ 4 mm × 30 mm 10 × Holzschrauben ∅ 4 mm × 40 mm 10 × Holzschrauben ∅ 4 mm × 60 mm 10 × Schraubenkopfabdeckungen (getrocknetes Buchenholz) Diese Bedienungsanleitung HINWEIS ► Prüfen Sie die Lieferung auf Vollständigkeit und auf sichtbare Schäden. ■ 34 │ DE│AT│CH PSVH 56 A1 Verwendung HINWEIS ► Sie benötigen zusätzlich zum Lieferumfang eine Bohrmaschine bzw. einen Akku-Bohrschrauber und eine zusätzliche Zwinge, um das Produkt zu verwenden. Holzstärke messen (Abb. A) ♦ Drücken Sie den Anschlag der Bohrlehre ♦ Legen Sie die Bohrlehre Holzstärke ab. nach unten. am Holzwerkstück an und lesen die Holzstärke einstellen (Abb. B) ♦ Stellen Sie die gemessene Holzstärke anhand der folgenden Tabelle an der Bohrlehre ein. Holzstärke Einstellung 12–18 mm 19–26 mm 27–37 mm ≥ 38 mm 12 19 27 38 ♦ Halten Sie die Knöpfe gedrückt und verschieben die Bohrlehre bis die gewünschte Einstellung erreicht ist. ♦ Lassen Sie die Knöpfe los, wenn die Bohrlehre PSVH 56 A1 , eingerastet ist. DE│AT│CH │ 35 ■ Bohrtiefe einstellen (Abb. C) ♦ Schieben Sie den Anschlag der Bohrlehre nach oben und legen die Bohrlehre auf eine flache Oberfläche. ♦ Legen Sie den Stufenbohrer ohne Abstand an der Seite mit dem Stufenbohrer-Symbol der Bohrlehre an. Dabei müssen Sie die Spitze des Stufenbohrers an die Spitze des Stufenboher-Symbols anlegen. ♦ Schieben Sie den Tiefenstop Kante der Bohrlehre . ♦ Schrauben Sie den Tiefenstop fest. auf den Stufenbohrer , bis zur mit dem Innensechskantschlüssel Loch bohren (Abb. D) HINWEIS ► Bohren Sie für einen stabilen Halt zwei Holzschrauben Verbindung. in jede ♦ Spannen Sie den Stufenbohrer mit aufgeschraubtem Tiefenstop in eine Bohrmaschine bzw. einen Akku-Bohrschrauber ein. ♦ Drücken Sie den Anschlag der Bohrlehre ♦ Legen Sie den Anschlag der Bohrlehre ♦ Fixieren Sie die Bohrlehre nach unten. ans Holzwerkstück an. und das Holzwerkstück mit der Zwinge . ♦ Bohren Sie in das Holzwerkstück bis zum Tiefenstop . ■ 36 │ DE│AT│CH PSVH 56 A1 Eck-, Flächen- und T-Verbindungen herstellen (Abb. E) ♦ Fixieren Sie beim herstellen der abgebildeten Verbindungen die Holzwerkstücke mit einer Zwinge (nicht im Lieferumfang enthalten). HINWEIS ► Achten Sie darauf, dass Sie die Holzwerkstücke passgenau und fest fixieren. ♦ Wählen Sie die passenden Holzschrauben Tabelle aus. anhand der folgenden Holzstärke Holzschraubengröße ≥ 12 mm ≥ 19 mm ≥ 27 mm ≥ 38 mm ∅ 4 mm × 25 mm ∅ 4 mm × 30 mm ∅ 4 mm × 40 mm ∅ 4 mm × 60 mm ♦ Schrauben Sie mit dem Bitaufsatz schrauben ein. die ausgewählten Holz- Gehrungsverbindungen herstellen (Abb. F) ♦ Gehen Sie wie bei den vorangegangenen Verbindungen vor (siehe Abb. A–C). Messen Sie die Holzstärke und stellen Sie die Bohrtiefe ein. ♦ Legen Sie die Bohrlehre wie in der Abbildung gezeigt an. ♦ Bohren Sie Löcher wie im Kapitel „Loch bohren (Abb. D)“ beschrieben. ♦ Verbinden Sie die Holzwerkstücke wie im Kapitel „Eck-, Flächen- und T-Verbindungen herstellen (Abb. E)“ beschrieben. PSVH 56 A1 DE│AT│CH │ 37 ■ Vormontierte Holzwerkstücke bearbeiten (Abb. G) ♦ Stellen Sie die Bohrtiefe ein (siehe Abbildungen A bis C). ♦ Schieben Sie den Anschlag der Bohrlehre ♦ Fixieren Sie die Bohrlehre nach oben. und das Holzwerkstück mit der Zwinge ♦ Wählen Sie die passenden Holzschrauben Tabelle aus. . entsprechend der HINWEIS ► Die Holzschrauben müssen 5 mm länger gewählt werden, da das Maß des 5 mm breiten eingeschobenen Anschlags hinzugerechnet werden muss. ♦ Schrauben Sie mit dem Bitaufsatz die ausgewählten Holzschrauben nach dem Bohren ein. ♦ Verleimen Sie die Bohrlöcher und stecken die Schraubenkopfabdeckungen hinein. Reinigung WARNUNG ► Entfernen Sie vor der Reinigung den Stufenbohrer oder den Bitaufsatz aus der Bohrmaschine bzw. dem Akku-Bohrschrauber. ► Verwenden Sie keine aggressiven oder scheuernden Reinigungsmittel, da diese die Oberfläche des Produkts angreifen können. ♦ Verwenden Sie eine weiche und trockene Bürste, um den Bohrstaub vom Produkt zu entfernen. ♦ Reinigen Sie das Produkt zusätzlich mit einem trockenen Tuch. ■ 38 │ DE│AT│CH PSVH 56 A1 Aufbewahrung Alle Teile müssen in dem Behälter, in dem sie ausgeliefert wurden, gelagert werden, sodass sie gegen äußere Einwirkungen geschützt sind. Entsorgung Entsorgen Sie das Produkt über einen zugelassenen Entsorgungsbetrieb oder über Ihre kommunale Entsorgungseinrichtung. Beachten Sie die geltenden Vorschriften. Setzen Sie sich im Zweifelsfall mit Ihrer Entsorgungseinrichtung in Verbindung. Möglichkeiten zur Entsorgung des ausgedienten Produkts erfahren Sie bei Ihrer Gemeinde- oder Stadtverwaltung. Entsorgen Sie die Verpackung umweltgerecht. Beachten Sie die Kennzeichnung auf den verschiedenen Verpackungsmaterialien und trennen Sie diese gegebenenfalls gesondert. Die Verpackungsmaterialien sind gekennzeichnet mit Abkürzungen (a) und Ziffern (b) mit folgender Bedeutung: 1–7: Kunststoffe, 20–22: Papier und Pappe, 80–98: Verbundstoffe. PSVH 56 A1 DE│AT│CH │ 39 ■ Service Service Deutschland Tel.: 0800 5435 111 (kostenfrei aus dem dt. Festnetz/Mobilfunknetz) E-Mail: [email protected] Service Österreich Tel.: 0820 201 222 (0,15 EUR/Min.) E-Mail: [email protected] Service Schweiz Tel.: 0842 665566 (0,08 CHF/Min., Mobilfunk max. 0,40 CHF/Min.) E-Mail: [email protected] IAN 337010_2001 Importeur Bitte beachten Sie, dass die folgende Anschrift keine Serviceanschrift ist. Kontaktieren Sie zunächst die benannte Servicestelle. KOMPERNASS HANDELS GMBH BURGSTRASSE 21 44867 BOCHUM DEUTSCHLAND www.kompernass.com ■ 40 │ DE│AT│CH PSVH 56 A1 KOMPERNASS HANDELS GMBH BURGSTRASSE 21 44867 BOCHUM GERMANY www.kompernass.com Estado de las informaciones · Versione delle informazioni Last Information Update · Stand der Informationen: 05 / 2020 · Ident.-No.: PSVH56A1-052020-1 IAN 337010_2001-
 1
1
-
 2
2
-
 3
3
-
 4
4
-
 5
5
-
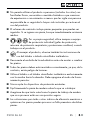 6
6
-
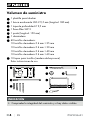 7
7
-
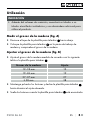 8
8
-
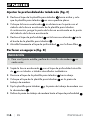 9
9
-
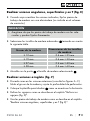 10
10
-
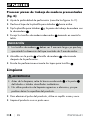 11
11
-
 12
12
-
 13
13
-
 14
14
-
 15
15
-
 16
16
-
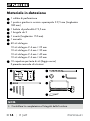 17
17
-
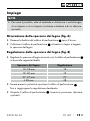 18
18
-
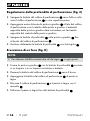 19
19
-
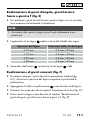 20
20
-
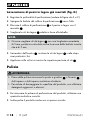 21
21
-
 22
22
-
 23
23
-
 24
24
-
 25
25
-
 26
26
-
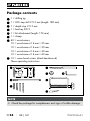 27
27
-
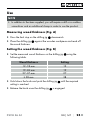 28
28
-
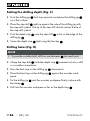 29
29
-
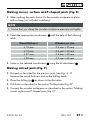 30
30
-
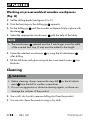 31
31
-
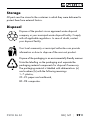 32
32
-
 33
33
-
 34
34
-
 35
35
-
 36
36
-
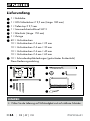 37
37
-
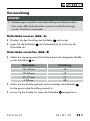 38
38
-
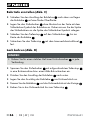 39
39
-
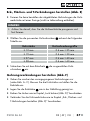 40
40
-
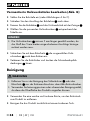 41
41
-
 42
42
-
 43
43
-
 44
44


Parkside PSVH 56 A1 Instrucciones de operación
- Tipo
- Instrucciones de operación
- Este manual también es adecuado para
en otros idiomas
Artículos relacionados
-
Parkside PUD 30 A1 Manual de usuario
-
Parkside PSBSA 18-Li A1 Instrucciones de operación
-
Parkside X18V Operation and Safety Notes
-
Parkside PSBSA 20-LI B2 Instrucciones de operación
-
-
-
Parkside PABS 18 A1 Operation and Safety Notes
-