
ENGLISH
DEUTSCH
FRANÇAIS
ESPAGÑOL
ITALIANO
DANSK
ENGLISH
DEUTSCH
FRANÇAIS
ESPAGÑOL
ITALIANO
DANSK
Photoelectric Switch for Fibres
Fotoelektrische Schalter für Lichtleiter / Détecteur pour fibres optiques /
Fotocélula para Fibras / Fotocellula per fibre / Fotocelle, fiberoptikaftaster
Type PD 60, Teach-in
Typ PD 60, Teach-In / Type PD 60, Fonction d’apprentissage /
Modelo PD 60, Teach-in (autoajuste) /
Modello PD 60 con funzione autoapprendimento / Type PD 60, Indlæring
User Manual / Bedienungsanleitung / Manuel Utilisateur /
Manual del Usuario / Manuale d'istruzione / Brugervejledning
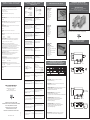
Dimensions / Abmessungen / Dimensions /
Dimensiones / Dimensioni / Dimensioner
SET
t
+
LO-DO
t
30
13
20
M8x1
25.4 Ø 4.1
60
SET
t
+
LO-DO
t
13
20 25.4 Ø 4.1
60
200
30
2
4
3
1
Relief of cable strainTo avoid interference from inductive volt-
age/ current peaks, separate the prox.
switch power cables from any other
power cables, e.g. motor, contactor or
solenoid cables
The cable should not be pulled
Schutz vor Überdehnung des
Kabels
Um Störungen durch induktive Spannungs-
/Stromspitzen zu vermeiden, Kabel der
Näherungsschalter getrennt von anderen
stromführenden Kabeln halten
Nicht am Kabel ziehen
Tension des câbles
Pour éviter les interférences issues des pics de
tension et/ou des courants inductifs, veiller à
toujours faire cheminer séparément les câbles
d'alimentation des détecteurs de proximité et les
câbles d'alimentation des moteurs, contacts ou
solénoïdes
Eviter toute contrainte en trac-
tion du câble
Alivio de la tensión del cablePara evitar interferencias de tensión
inductiva/ picos de intensidad se deben
separar los cables del sensor del resto de
los cables de alimentación tales como
cables de motor, contactores o solenoides
No se debe tirar del cable
Aflastning af kabelFor at undgå støjindflydelse fra induktive
strøm-/spændingsspidser skal aftasterk-
ablet adskilles fra andre kraftkabler, f.eks.
fra motorer, transformatorer og magnet-
ventiler
Der bør ikke trækkes i kablet
Posizione del cavoAl fine di evitare interferenze di tipo elet-
trico, separare i cavi di alimentazione del
sensore di prossimità dai cavi di potenza
Il cavo non deve essere teso
Installation Hints / Installationshinweise / Conseils d’Installation /
Normas de Instalación / Consigli per l’Installazione /
Installationsråd og -vink
Protection of the sensing face Switch mounted on mobile carrier
A proximity switch should not
serve as mechanical stop
Any repetitive flexing of the cable should
be avoided
Schutz der Sensorfläche des Schalters Mobiler Näherungsschalter
Näherungsschalter nicht als mecha-
nischen Anschlag verwenden
Wiederholtes Biegen des Kabels vermeiden
Protection de la face de détection du
détecteur
Détecteur monté sur support mobile
Ne jamais utiliser un détecteur de
proximité en tant que butée
mécanique
Eviter toute répétition de courbure dans le
cheminement du câble
Protección de la cara de detección Conector montado sobre portadora móvil
Un sensor de proximidad nunca
debe funcionar como tope mecánico
Evitar doblar el cable repetidas veces
Beskyttelse af følerens tasteflade Aftaster monteret på bevægeligt underlag
En aftaster bør ikke anvendes
som mekanisk stop
Gentagne bøjninger af kablet bør undgås
Protezione della parte sensibile del
sensore
Sensore installato su pedana mobile
I sensori di prossimità non devono
essere usati per bloccaggi meccanici
Evitare qualsiasi flessione ripetuta del cavo
Rated operational voltage (U
e
) / Nenn-Betriebsspannung / Tension de fonctionnement nominale /
Tensión de alimentación / Tensione di alimentazione / Nominelt spændingsområde
Ripple included / Einschl. Restwellingkeit / Ondulation inclue / Ondulación incluida /
Ripple incluso / Inkl. ripple
10 - 30 VDC (10 - 30 VCC)
Ripple / Restwelligkeit / Ondulation / Ondulación / Ripple / Ripple
≤ 10%
Output current (I
e
) / Nenn-Betriebsstrom / Courant de fonctionnement nominal / Intensidad de salida /
Corrente di carico / Max. strøm
≤ 100 mA
No load supply current (I
o
) / Leerlaufstrom / Courant d’alimentation à vide / Consumo de corriente
sin carga / Corrente di alimentazione a vuoto / Belastningsløst strømforbrug
≤ 40 mA
Operating frequency / Schaltfrequenz / Fréquence de commutation / Frecuencia operativa /
Frequenza di attivazione / Driftsfrekvens
1 kHz
Hysteresis / Hysterese / Hystérésis / Histéresis / Isteresi / Hysterese
≤ 5%
Voltage drop (U
D
) / Spannungsabfall / Chute de tension / Caída de tensión / Caduta di tensione /
Spændingsfald
I
L
= 100 mA: ≤ 2 VDC (VCC)
I
L
= 10 mA: ≤ 1 VDC (VCC)
Remote input ON/OFF/ Steuereingang EIN/AUS / Entrée distance Activée/Désactivée /
Entrada remota ON/OFF / Ingresso remoto ON/OFF / Fjern-indgang, aktiveret/deaktiveret
≤ 1.4 VDC / ≥ 3.0 VDC (≤ 1,4 VCC / ≥ 3,0 VCC)
Protection / Schutz / Protection / Protección / Protezione / Beskyttelse
Reverse polarity, short-circuit, transients / Verpolung, Kurzschluss, Transienten /
Inversion de polarité, court-circuit, transitoires / Inversión de polaridad, cortocircuitos, transitorios /
Inversione di polarità, corto circuito, transitori / Polaritet, kortslutning, transienter
Rated operating distance
(S
n
) /
Nenn-Schaltabstand / Distance nominale de fonctionnement /
Distancia nominal de detección / Distanza di attivazione nominale / Nominel tasteafstand
Fibre dependent / Je nach Lichtleitertyp / Selon la fibre / Dependiendo del tipo de fibra /
Dipendente dalla fibra / Fiberafhængig
Ambient light (incandescent/sunlight) / Umgebungslicht (Glühlicht/Sonnenlicht) /
Lumière ambiante (incandescente/soleil) / Luz ambiente (incandescente/sol) /
Luce ambiente (incandescente/luce solare) / Omgivende lys
10’000 / 20’000 Lux
Operating temperature
/
Umgebungstemperatur, Betrieb / Température en fonctionnement /
Temperatura ambiente, trabajo / Temperatura di funzionamento / Omgivelsestemperatur, drift
0° --> +60°C (32° --> +140°F)
Storage temperature
/
Umgebungstemperatur, Lager / Température stockage /
Temperatura ambiente, almacenamiento / Temperatura di immagazzinaggio / Omgivelsestemperatur, lager
-20° --> +80°C (-4° --> +176°F)
Degree of protection / Schutzart / Indice de protection / Grado de protección / Grado di protezione /
Tæthedsgrad
IP 65
Specifications / Technische Daten / Caractéristiques Techniques /
Especificaciones / Caratteristiche Tecniche / Specifikationer
Fibres / Lichtleiter / Fibres / Fibras / Fibre / Fibre
Fibre optics, glass
Types FGT, FGD
Glas-Lichtleiter
Typen FGT, FGD
Fibre optique, verre
Types FGT, FGD
Fibras ópticas, vidrio
Modelos FGT, FGD
Fibre ottiche, vetro
Modelli FGT, FGD
Glasfibre
Type FGT, FGD
Fibre optics, plastic
Types FPT, FPD
Kunststoff-Lichtleiter
Typen FPT, FPD
Fibre optique, plastique
Types FPT, FPD
Fibras ópticas, plástico
Modelos FPT, FPD
Fibre ottiche, plastica
Modelli FPT, FPD
Plastfibre
Type FPT, FPD
Fibre optics, plastic,
economy line
Types AFET, AFED
Kunststoff-Lichtleiter, preisgünstig
Types AFET, AFED
Fibre optique, plastique, gamme économique
Types AFET, AFED
Accesorios para fibras ópticas de plástico
Modelos AFET, AFED
Fibre ottiche in plastica, serie economica
Modelli AFET, AFED
Plastfibre, economy line
Type AFET, AFED
1. Power supply / Betriebsspannung / Alimentation / Alimentación /
Alimentazione / Strømforsyning
2. Target present / Reflektor erfasst / Présence cible / Referencia presente /
Riferimento presente / Emne til stede
3. Break (NC) Output ON / Öffner (NC), Ausgang EIN / Repos (NF) Sortie activée /
Oscuridad (NC) Salida ON / Uscita attivata per impulso di buio (NC) /
Brydefunktion (NC (normalt lukket)) aktiveret
4. Make (NO) Output ON / Schliesser (NO), Ausgang EIN /
Travail (NO) Sortie activée / Luz (NA) Salida ON /
Uscita attivata per impulso di luce (NA) / Sluttefunktion (NO (normalt åben)) aktiveret
5. ON Delay (NO-output) / EIN-Verzögerung (NO-Ausg.) /
Temporisation travail (sortie NO) / Retardo a la conexión (salida NA) /
Ritardo all'attivazione (uscita attivata per impulso di luce) /
Forsinket aktivering (NO-udgang)
6. OFF Delay (NO-output) / AUS-Verzögerung (NO-Ausg. /
Temporisation repos (sortie NO) / Retardo a la desconexión (salida NA) /
Senza ritardo all'attivazione (uscita attivata per impulso di luce) /
Forsinket deaktivering (NO-udgang)
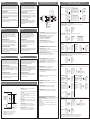
t
v
= Power ON delay / Einschaltverzögerung / Temps de mise sous tension /
Retardo a la conexión / Ritardo all'accensione / Indkoblingsforsinkelse
Operation Diagram / Betriebsdiagramm /
Diagramme de fonctionnement / Diagrama de Funcionamiento /
Diagramma di funzionamento / Funktionsdiagram
t
V
t
V
t
V
t
t
t
t
t
t
V
t
t
t
tt
t
t
1
2
3
4
5
6
CARLO GAVAZZI INDUSTRI A/S
Over Hadstenvej 40, DK-8370 Hadsten
Phone/Telefon: ++45 89 60 61 00
Fax: ++45 86 98 25 22
Internet: http://www.carlogavazzi.com
Certified in accordance with ISO 9001
Gerätehersteller mit dem ISO 9001/EN 29 001 Zertifikat
Une société qualifiée selon ISO 9001
Certificado de acuerdo con ISO 9001
Conformità alle norme ISO 9001
Kvalificeret i overensstemmelse med ISO 9001
MAN PD60TI MUL 10 02.03
15-029-118

Keyboard /Bedientasten / Clavier / Teclado / Tastiera / Tastatur
Unlock / Öffnen / Déverrouillage / Desbloquear / Sbloccaggio / Fjern lås
Press for 4 s and the indicator turns OFF
Taste 4 s halten, bis die Anzeige ausschaltet
Appuyer pendant 4 s jusqu’à l’indicateur s’éteint
Presione durante 4 seg. y el indicador se apagará
Premi per 4 sec. e l’indicatore si spegne
Tryk på i 4 sek., hvorefter indikatoren slukker
Lock / Sperren / Verrouillage / Bloquear / Bloccaggio / Lås
Press for 4 s and the indicator turns ON
Taste 4 s halten, bis die Anzeige ausschaltet
Appuyer pendant 4 s jusqu’à l’indicateur s’allume
Presione durante 4 seg. y el indicador se iluminará
Premi per 4 sec. e l’indicatore si accende
Tryk på i 4 sek., hvorefter indikatoren tænder
Self-Teach operation / Teach-In-Funktion / Fonctionnement en mode apprentissage / Funcionamiento Self-Teach /
Funzionamento con autoapprendimento / Selvindlæringsfunktion
Coarse set-up mode / Grobeinstellung / Mode de réglage grossier / Modo de configuración basta /
Modalità di regolazione grossa / Grovindstilling
Press
one time
Taste
einmal betätigen
Appuyer
une seule fois
Presione
una vez
Premi
una volta
Tryk på
én gang
Fine set-up mode / Feineinstellung / Mode de réglage fin / Modo de configuración fina /
Modalità di regolazione precisa / Finindstilling
Press
two times (similar to remote input)
Taste
zweimal betåtigen (wie beim Steuereingang)
Appuyer
deux fois (semblable à l’entrée distante)
Presione
dos veces (similar a entrada remota)
Premi
due volte (come per l’ingresso remoto)
Tryk på
to gange (samme som ved fjern-indgang)
Sensitivity adjustment / Empfindlichkeitseinstellung / Réglage de sensibilité / Ajuste de sensibilidad /
Regolazione della sensibilità / Justering af følsomhed
Light or dark operation / Hell- oder Dunkelschaltung / Fonctionnement à la lumière ou au noir /
Funcionamiento con luz y oscuridad / Funzionamento a impulso di luce/buio / Lys eller mørk funktion
Timing functions / Zeitfunktionen / Fonctions minuterie / Funciones de temporizador / Funzioni di temporizzazione /
Tidsfunktioner
Set timer / Zeitfunktion einstellen / Réglage de la minuterie / Ajustar temporizador / Imposta temporizzatore / Indstilling af timer
Press for 4 s until flashes
Taste 4 s halten, bis blinkt
Appuyer 4 fois jusqu’à ce que clignote
Presione durante 4 seg. hasta que parpadee
Premere per 4 secondi finché non lampeggia
Tryk på i 4 sek. indtil blinker
Alignment help / Abgleichhilfe / Aide à l’alignement / Ayuda de alineación / Guida per allineamento / Hjælp til justering
Enter / Abgleichhilfe aufrufen / Entrée / Entrar / Invio / Påbegyndelse
Press for 4 s until flashes
1)
Taste 4 s halten, bis blinkt
1)
Appuyer 4 s jusqu’à ce que clignote
1)
Presione durante 4 seg. hasta que parpadee
1)
Premi per 4 secondi finché non lampeggia
1)
Tryk på i 4 sek. indtil blinker
1)
1)
Three frequencies proportional to the signal strength / Drei Frequenzen proportional zur Signalstärke /
Trois fréquences proportionnelles à la force du signal / Tres frecuencias proporcionales a la intensidad de la señal /
Tre frequenze proporzionali all’intensità del segnale / Tre frekvenser, der er proportionale med signalstyrken
Programming
/ Programmierung / Programmation / Funciones de programación /
Programmazione / Programmeringsfunktioner
SET
t
+
LO-DO
t
1
2
3
4
5
6
7
Keyboard and LED
/ Bedientasten und LED / Clavier et LED /
Teclado y LED / Tastiera e LED / Tastatur og lysdioder
1•Sensitivity decrease
/ Empfindlichkeit senken / Diminution de la sensibilité /
Reducción de sensibilidad / Diminuzione della sensibilità / Lavere følsomhed
• ON delay - OFF delay / EIN-Verzögerung - AUS-Verzögerung /
Temps de mise sous tension - Temps de mise hors tension /
Retardo a la conexión – retardo a la desconexión /
Ritardo all’attivazione – Ritardo alla disattivazione /
Forsinket aktivering - forsinket deaktivering
• Decrease timer adjustment / Zeitwert senken /
Réglage de temporisation en moins / Reducción ajuste de temporizador /
Regolazione diminuzione temporizzatore / Lavere timerjustering
2 • Sensitivity increase / Empfindlichkeit erhöhen / Augmentation de la sensibilité /
Incremento de sensibilidad / Aumento della sensibilità / Højere følsomhed
• Light ON - dark ON / Hell EIN - Dunkel EIN /
Commutation fonction claire activée - Commutation fonction sombre activée /
Luz activada – Oscuridad activada /
Impulso di luce attivato – Impulso di buio attivato / Lys aktivering - mørk aktivering
• Increase timer adjustment / Zeitwert erhöhen /
Réglage de temporisation en plus / Incrementar ajuste de temporizador /
Regolazione aumento temporizzatore / Højere timerjustering
3 • Automatic threshold set-up / Automatische Grenzwerteinstellung /
Réglage automatique de seuil / Ajuste automático del umbral /
Regolazione automatica di soglia / Automatisk indstilling af grænseværdi
• Special function key / Taste für Spezialfunktion / Touche de fonction spéciale /
Tecla de función especial / Tasto funzione speciale / Specialtast
4 • Keyboard pressed
1)
/ Bedientaste betätigt
1)
/ Clavier rétracté
1)
/
Teclado activado
1)
/ Tastiera premuta
1)
/ Tastatur aktiveret
1)
• Keyboard locked
1)
(always switched ON)/
Bedientaste gesperrt
1)
(stets eingeschaltet) / Clavier verrouillé
1)
(toujours allumé) /
Teclado bloqueado
1)
(siempre activado) / Tastiera bloccata
1)
(sempre attivato) /
Tastatur låst (altid aktiveret)
5 • Timer ON / Zeitfunktion EIN / Minuterie ACTIVE / Temporizador activado /
Temporizzatore attivato / Timer aktiveret
6•Dirty optics / Optik verschmutzt / Optique encrassée / Lentes sucias /
Componenti ottici sporchi / Snavset optik
•Weak signal / Schwaches Signal / Signal faible / Señal débil / Segnale debole /
Svagt signal
• Alignment indicator / Abgleich-Anzeige / Indicateur d’alignement /
Indicador de ajuste / Indicatore di allineamento / Justeringsindikator
7•Detection indicator
1)
/ Detektions-Anzeige
1)
/ Indicateur de détection
1)
/
Indicador de detección
1)
/ Indicatore di rilevamento
1)
/ Aftastningsindikator
1)
1)
The LED’s flash if a short-circuit occurs on the static output
and emitter is turned off
Die LEDs blinken Kurzschluss am statischen Ausgang und bei ausgeschaltetem Sender /
Lors d’un court circuit de la sortie statique et de l’extinction de l’émetteur, les LED
clignotent /
Si se produce un cortocircuito en la salida estática y se apaga el emisor, los LED
parpadearán /
I LED lampeggiano nel caso in cui si verifichino corto circuiti all’uscita statica e
l’emettitore sia spento /
Lysdioderne blinker, hvis der opstår en kortslutning i den statiske udgang og hvis
senderen er slukket
Installation English
1. Mounting the sensor
Mount the sensor. The sensor is prepared for DIN-rail
mounting or mounting by screws. Prepare the two fibres with
the necessary fittings and fasten them in the sensor. Mount
the fibres so they suit the purpose and detection principle.
2. Supplying the sensor
To supply the sensor connect pin 3 (blue wire) to ground (0
VDC) and pin 1 (brown wire) to + (10 - 30 VDC). To determine
whether the output has to be light or dark switching, connect
pin 2 (white wire) to + (10 - 30 VDC) or ground, respectively.
3. Programming the sensor
To program the unlock/lock feature, sensitivity, light/dark
operation, timing functions and the alignment help please refer
to the chapter “Programming”.
Wiring Diagram / Schaltbild / Schéma de Câblage / Diagrama de Conexiones / Collegamenti Elettrici / Forbindelsesdiagram
+
-
Light ON, connect to +
Dark ON, connect to -
Micro processor
Mikropprozessor
Micro processeur
Microprocesador
Microprocessore
Mikroprocessor
1 BN
4 BK
2 WH
3 BU
BN Brown / Braun / Marron / Morrón / Marrone / Brun
BK Black / Schwarz / Noir / Negro / Nero / Sort
WH White / Weiss / Blanc / Blanco / Bianco / Hvid
BL Blue / Blau / Bleu / Azul / Blu / Blå
Remote input / Steuereingang / Entrée distante / Entrada remota /
Ingresso remoto / Fjern-indgang
When remote input is not used, connect the (2 WH) wire to the
+ input (1 BN).
Wenn der Steuereingang nicht verwendet wird, verbinden Sie den
(2 WH) Draht mit dem + Eingang (1 BN).
En cas de non utilisation de l’entrée distante, raccorder le fil (2 WH) à
l’entrée + (1 BN).
Cuando no se utiliza la entrada remota, conecte el cable (2WH) a la
entrada + (1 BN).
Quando l’ingresso remoto non è impegnato, connettere il cavo (2WH)
all’ingresso + (1BN).
Når fjern-indgangen ikke anvendes, skal (2 WH)-ledningen forbindes til
+indgangen (1 BN).
Light ON, connect to + / Licht EIN, mit + verbinden /
Commutation à la lumière, raccorder au + / Luz activada, conecte a + /
Impulso di luce (NA), connesso a + / Lys aktiveret, forbind til +
Dark ON, connect to - / Dunkel EIN, mit - verbinden /
Commutation au noir, raccorder au - / Oscuridad activada, conecte a - /
Impulso di buio (NC), connesso a - / Mørk aktiveret, forbind til -
Remote input
Installation Deutsch
1. Einbau des Sensors
Den Sensor montieren. Der Sensor ist für die Montage auf
DIN-Schiene oder Schraubbefestigung ausgelegt. Die zwei
Lichtleiter mit den benötigten Steckvorrichtungen vorbereiten
und im Sensor befestigen. Die Lichtleiter nach ihrem Zweck
und der jeweiligen Erfassungsprinzip montieren.
2. Versorgung des Sensors
Um den Sensor zu versorgen, Klemme 3 (blau)) mit Erde (0
VDC) und Klemme 1 (braun) mit + (10 - 30 VDC) verbinden.
Um Hell- oder Dunkelschaltung zu wählen, Klemme 2 (weiß)
mit + (10 - 30 VDC) oder Erde verbinden.
3. Programmierung des Sensor
Um die Bedientaste zu öffnen/sperren, und die Empfindlich-
keit, die Hell-/Dunkelschaltung, die Zeitfunktionen und die
Abgleichhilfe zu programmieren, siehe den Abschnitt
“Programmierung”.
Installation
Français
1. Montage du détecteur
Installer le détecteur. Le détecteur est conçu pour
montage sur rail DIN ou à vis. Préparer les deux fibres
optiques et les accessoires prévus et les fixer sur le
détecteur. Monter les fibres selon l’objectif et le principe
de détection prévus.
2. Alimentation du détecteur
Pour alimenter le détecteur, raccorder la broche 3 (fil
bleu) à la masses (0 VCC) et la broche 1 (fil marron) au +
(10 - 30 VCC). Pour déterminer la sortie de commutation
à la lumière ou au noir, raccorder respectivement la
broche 2 (fil blanc) au + (10 - 30 VCC) ou à la masse.
3. Programmation du détecteur
Les instructions relatives à la programmation de la fonction
verrouillage/déverrouillage, au réglage de sensibilité, aux
fonctions claire ou sombre et à l’aide à l’alignement figurent
au chapitre "Programmation".
Instalación
Espagñol
1. Montaje del sensor
Montaje del sensor. El sensor está preparado para
mon taje en carril DIN o montaje con tornillos. Prepare
las dos fibras con los anclajes necesarios y sujételas en
el sensor. Monte las fibras para que cumplan con su
propósito y el principio de detección.
2. Alimentación del sensor
Para alimentar el sensor, conecte la patilla 3 (hilo azul) a
tierra (0 VCC) y la patilla 1 (hilo marrón) a + (10 a 30 VCC).
Para determinar si la salida ha de ser para luz u oscuridad,
conecte la patilla 2 (hilo blanco) a + (10 a 30 VCC) o a
tierra respectivamente.
3. Programación del sensor
Consulte el capítulo "Programación" para programar las fun
ciones desbloquear/bloquear, sensibilidad, funcionamiento
luz/oscuridad, temporización y ayuda.
Installazione Italiano
1. Montaggio del sensore
Montaggio del sensore. Il sensore è predisposto per il montaggio
su guida DIN o fissaggio con viti. Preparare le due fibre con i
raccordi necessari e fissarli al sensore. Montare le fibre in
modo che siano funzionali e conformi al principio di rilevamento.
2. Alimentazione del sensore
Per alimentare il sensore collegare il pin 3 (filo blu) a terra
(0 VCC) ed il pin 1 (filo marrone) a + (10 - 30 VCC). Per deter-
minare se l’uscita debba essere ad impulso di luce o di buio,
collegare il pin 2 (filo bianco) rispettivamente a + (10 - 30 VCC)
o a terra.
3. Programmazione del sensore
Per programmare la funzione sblocca/blocca e per impostare
la sensibilità, il funzionamento a impulso di luce/buio, le fun-
zioni di temporizzazione e la guida per allineamento, fare riferi-
mento al capitolo "Programmazione".
Installation Dansk
1. Montering af aftasteren
Monter aftasteren. Aftasteren er forberedt for DIN-skinnemon-
tering eller montering med skruer. Færdiggør fibrene med det
nødvendige tilbehør og fastgør dem i aftasteren. Monter
fibrene alt efter formål og detekteringsprincip.
2. Forsyning af aftasteren
For at forsyne aftasteren skal ben 3 (blå ledning) forbindes til
jord (0 VDC) og ben 1 (brun ledning) forbindes til + (10 - 30 VDC).
For at bestemme, om udgangen skal være lys eller mørk
aktiveret, forbindes ben 2 (hvid ledning) til + (10 - 30 VDC) for
lys aktiveret eller til jord for mørk aktiveret.
3. Programmering af aftasteren
For programmering af tastaturlås, følsomhed, lys/mørk funk-
tion, tidsfunktioner samt hjælp til justering, se afsnittet
”Programmeringsfunktioner”.
+
LO-DO
&
+
LO-DO
&
SET
t
SET
t
+
LO-DO
To increase
Press
n times
Empfindl. erhöhen Taste
n-mal betät.
Augmentation Appuyer
n fois
Para incrementar Presione n
veces
Per aumentare Premi
n volte
Højere Tryk på
n gange
To decrease
Press
n times
Empfindl. senken Taste
n-mal betät.
Diminution Appuyer
n fois
Para reducir Presione n
veces
Per diminuire Premi
n volte
Lavere Tryk på
n gange
+
LO-DO
Change output function /Ausgangsfunktion ändern / Modification de la fonction de sortie / Cambiar función de salida /
Cambia funzione di uscita / Ændring af udgangsfunktion
Press
for 4 s
Taste
4 s halten
Appuyer
pendant 4 s
Presione durante 4 seg.
Premi
per 4 sec.
Tryk på
i 4 sek.
+
LO-DO
Increase time (n x 500 ms)
Press
n times
Zeitintervalle erhöhen Taste
n-mal betät.
Augment. du temps Appuyer
n fois
Incrementar tiempo Presione n
veces
Aumenta il tempo Premi
n volte
Længere tid Tryk på
n gange
SET
t
Decrease time (n x 500 ms)
Press
n times
Zeitintervalle senken Taste
n-mal betät.
Diminution du temps Appuyer
n fois
Reducir tiempo Presione n
veces
Diminuisci il tempo Premi
n volte
Kortere tid Tryk på
n gange
ON/OFF delay (toggle)
Press
for 4 s
EIN/AUS Verz. (wechsl.)Taste
4 s halten
Act./désact.(mode bascule) Appuyer
pendant
4 s
Ret. ON/OFF (conmutar)
Presione
dur. 4 seg.
Ritardo ON/OFF (comm.)
Premi
per 4 sec.
Forsinket akt./deakt. Tryk på
i 4 sek.
SET
t
Reset timer
Press
once
Zeitfunktion aussch. Taste
einmal betät.
RAZ minuterie Appuyer
une fois
Puesta a cero Presione
una vez
Reimposta temp. Premi
una volta sola
Nulstilling Tryk på
én gang
SET
t
Exit
Press
for 4 s
Einstellung beenden Taste
4 s halten
QUITTER Appuyer
pendant 4 s
Salir Presione dur. 4 seg.
Esci Premi
per 4 sec.
Afslut Tryk på
i 4 sek.
SET
t
SET
t
Exit
Press
for 4 s
Abgleichhilfe beenden Taste
4 s halten
QUITTER Appuyer
pendant 4 s
Salir Presione durante 4 seg.
Esci Premi per
4 sec.
Afslut Tryk på i
4 sek.
Transcripción de documentos
Installation Hints / Installationshinweise / Conseils d’Installation / Specifications / Technische Daten / Caractéristiques Techniques / Especificaciones / Caratteristiche Tecniche / Specifikationer Photoelectric Switch for Fibres Fibres / Lichtleiter / Fibres / Fibras / Fibre / Fibre Normas de Instalación / Consigli per l’Installazione / Installationsråd og -vink Fotoelektrische Schalter für Lichtleiter / Détecteur pour fibres optiques / Fotocélula para Fibras / Fotocellula per fibre / Fotocelle, fiberoptikaftaster Rated operational voltage (Ue) / Nenn-Betriebsspannung / Tension de fonctionnement nominale / Tensión de alimentación / Tensione di alimentazione / Nominelt spændingsområde Type PD 60, Teach-in Fibre optics, plastic Types FPT, FPD Ripple included / Einschl. Restwellingkeit / Ondulation inclue / Ondulación incluida / Ripple incluso / Inkl. ripple 10 - 30 VDC (10 - 30 VCC) Ripple / Restwelligkeit / Ondulation / Ondulación / Ripple / Ripple ≤ 10% Output current (Ie) / Nenn-Betriebsstrom / Courant de fonctionnement nominal / Intensidad de salida / Corrente di carico / Max. strøm To avoid interference from inductive voltage/ current peaks, separate the prox. switch power cables from any other power cables, e.g. motor, contactor or solenoid cables Relief of cable strain Um Störungen durch induktive Spannungs/Stromspitzen zu vermeiden, Kabel der Näherungsschalter getrennt von anderen stromführenden Kabeln halten Schutz vor Überdehnung des Kabels ENGLISH ≤ 100 mA No load supply current (Io) / Leerlaufstrom / Courant d’alimentation à vide / Consumo de corriente The cable should not be pulled Typ PD 60, Teach-In / Type PD 60, Fonction d’apprentissage / Modelo PD 60, Teach-in (autoajuste) / Modello PD 60 con funzione autoapprendimento / Type PD 60, Indlæring Kunststoff-Lichtleiter Typen FPT, FPD Fibre optique, plastique Types FPT, FPD Fibras ópticas, plástico Modelos FPT, FPD Fibre ottiche, plastica Modelli FPT, FPD Plastfibre Type FPT, FPD sin carga / Corrente di alimentazione a vuoto / Belastningsløst strømforbrug ≤ 40 mA Operating frequency / Schaltfrequenz / Fréquence de commutation / Frecuencia operativa / Frequenza di attivazione / Driftsfrekvens DEUTSCH 1 kHz Nicht am Kabel ziehen Hysteresis / Hysterese / Hystérésis / Histéresis / Isteresi / Hysterese ≤ 5% Voltage drop (UD) / Spannungsabfall / Chute de tension / Caída de tensión / Caduta di tensione / Spændingsfald IL = 100 mA: IL = 10 mA: Pour éviter les interférences issues des pics de tension et/ou des courants inductifs, veiller à toujours faire cheminer séparément les câbles d'alimentation des détecteurs de proximité et les câbles d'alimentation des moteurs, contacts ou solénoïdes Tension des câbles Para evitar interferencias de tensión inductiva/ picos de intensidad se deben separar los cables del sensor del resto de los cables de alimentación tales como cables de motor, contactores o solenoides Alivio de la tensión del cable FRANÇAIS ≤ 2 VDC (VCC) ≤ 1 VDC (VCC) Eviter toute contrainte en traction du câble Fibre optics, glass Types FGT, FGD Glas-Lichtleiter Typen FGT, FGD Fibre optique, verre Types FGT, FGD Fibras ópticas, vidrio Modelos FGT, FGD Fibre ottiche, vetro Modelli FGT, FGD Glasfibre Type FGT, FGD User Manual / Bedienungsanleitung / Manuel Utilisateur / Manual del Usuario / Manuale d'istruzione / Brugervejledning Remote input ON/OFF/ Steuereingang EIN/AUS / Entrée distance Activée/Désactivée / Entrada remota ON/OFF / Ingresso remoto ON/OFF / Fjern-indgang, aktiveret/deaktiveret Protection / Schutz / Protection / Protección / Protezione / Beskyttelse Reverse polarity, short-circuit, transients / Verpolung, Kurzschluss, Transienten / No se debe tirar del cable Inversion de polarité, court-circuit, transitoires / Inversión de polaridad, cortocircuitos, transitorios / Inversione di polarità, corto circuito, transitori / Polaritet, kortslutning, transienter Rated operating distance (Sn) / Nenn-Schaltabstand / Distance nominale de fonctionnement / Distancia nominal de detección / Distanza di attivazione nominale / Nominel tasteafstand Al fine di evitare interferenze di tipo elettrico, separare i cavi di alimentazione del sensore di prossimità dai cavi di potenza Posizione del cavo For at undgå støjindflydelse fra induktive strøm-/spændingsspidser skal aftasterkablet adskilles fra andre kraftkabler, f.eks. fra motorer, transformatorer og magnetventiler Aflastning af kabel ITALIANO Fibre dependent / Je nach Lichtleitertyp / Selon la fibre / Dependiendo del tipo de fibra / Dipendente dalla fibra / Fiberafhængig Il cavo non deve essere teso Ambient light (incandescent/sunlight) / Umgebungslicht (Glühlicht/Sonnenlicht) / Lumière ambiante (incandescente/soleil) / Luz ambiente (incandescente/sol) / Luce ambiente (incandescente/luce solare) / Omgivende lys 10’000 / 20’000 Lux / Abmessungen / Dimensions / Dimensiones / Dimensioni / Dimensioner Fibre optics, plastic, economy line Types AFET, AFED Kunststoff-Lichtleiter, preisgünstig Types AFET, AFED Fibre optique, plastique, gamme économique Types AFET, AFED Accesorios para fibras ópticas de plástico Modelos AFET, AFED Fibre ottiche in plastica, serie economica Modelli AFET, AFED Plastfibre, economy line Type AFET, AFED DANSK Operating temperature / Umgebungstemperatur, Betrieb / Température en fonctionnement / Temperatura ambiente, trabajo / Temperatura di funzionamento / Omgivelsestemperatur, drift Der bør ikke trækkes i kablet (32° --> +140°F) Operation Diagram / Betriebsdiagramm / Diagramme de fonctionnement / Diagrama de Funcionamiento / Diagramma di funzionamento / Funktionsdiagram Storage temperature / Umgebungstemperatur, Lager / Température stockage / Temperatura ambiente, almacenamiento / Temperatura di immagazzinaggio / Omgivelsestemperatur, lager 25.4 Ø 4.1 (-4° --> +176°F) tV 3 4 5 Protection of the sensing face Switch mounted on mobile carrier ENGLISH 1 tV tV tV t t t t t t t t 60 t t t 6 Any repetitive flexing of the cable should be avoided A proximity switch should not serve as mechanical stop Schutz der Sensorfläche des Schalters 1. Power supply / Betriebsspannung / Alimentation / Alimentación / Alimentazione / Strømforsyning 2. Target present / Reflektor erfasst / Présence cible / Referencia presente / Riferimento presente / Emne til stede 3. Break (NC) Output ON / Öffner (NC), Ausgang EIN / Repos (NF) Sortie activée / Oscuridad (NC) Salida ON / Uscita attivata per impulso di buio (NC) / Brydefunktion (NC (normalt lukket)) aktiveret 4. Make (NO) Output ON / Schliesser (NO), Ausgang EIN / Travail (NO) Sortie activée / Luz (NA) Salida ON / Uscita attivata per impulso di luce (NA) / Sluttefunktion (NO (normalt åben)) aktiveret 5. ON Delay (NO-output) / EIN-Verzögerung (NO-Ausg.) / Temporisation travail (sortie NO) / Retardo a la conexión (salida NA) / Ritardo all'attivazione (uscita attivata per impulso di luce) / Forsinket aktivering (NO-udgang) 6. OFF Delay (NO-output) / AUS-Verzögerung (NO-Ausg. / Mobiler Näherungsschalter DEUTSCH CARLO GAVAZZI INDUSTRI A/S 2 + 2 IP 65 LO-DO Tæthedsgrad SET t 1 Degree of protection / Schutzart / Indice de protection / Grado de protección / Grado di protezione / t -20° --> +80°C 20 13 0° --> +60°C Dimensions M8x1 ESPAGÑOL 30 ≤ 1.4 VDC / ≥ 3.0 VDC (≤ 1,4 VCC / ≥ 3,0 VCC) Näherungsschalter nicht als mechanischen Anschlag verwenden Wiederholtes Biegen des Kabels vermeiden Protection de la face de détection du détecteur Détecteur monté sur support mobile Over Hadstenvej 40, DK-8370 Hadsten ITALIANO I sensori di prossimità non devono essere usati per bloccaggi meccanici Beskyttelse af følerens tasteflade En aftaster bør ikke anvendes som mekanisk stop Aftaster monteret på bevægeligt underlag DANSK Gentagne bøjninger af kablet bør undgås Temporisation repos (sortie NO) / Retardo a la desconexión (salida NA) / Senza ritardo all'attivazione (uscita attivata per impulso di luce) / Forsinket deaktivering (NO-udgang) tv = Power ON delay / Einschaltverzögerung / Temps de mise sous tension / Retardo a la conexión / Ritardo all'accensione / Indkoblingsforsinkelse 25.4 60 Ø 4.1 + Sensore installato su pedana mobile 20 LO-DO Protezione della parte sensibile del sensore Evitare qualsiasi flessione ripetuta del cavo 15-029-118 MAN PD60TI MUL 10 02.03 Evitar doblar el cable repetidas veces SET t Conector montado sobre portadora móvil ESPAGÑOL Un sensor de proximidad nunca debe funcionar como tope mecánico t Eviter toute répétition de courbure dans le cheminement du câble Protección de la cara de detección Certified in accordance with ISO 9001 Gerätehersteller mit dem ISO 9001/EN 29 001 Zertifikat Une société qualifiée selon ISO 9001 Certificado de acuerdo con ISO 9001 Conformità alle norme ISO 9001 Kvalificeret i overensstemmelse med ISO 9001 30 FRANÇAIS Ne jamais utiliser un détecteur de proximité en tant que butée mécanique 13 Phone/Telefon: ++45 89 60 61 00 Fax: ++45 86 98 25 22 Internet: http://www.carlogavazzi.com 200 4 3 3. Programming the sensor To program the unlock/lock feature, sensitivity, light/dark operation, timing functions and the alignment help please refer to the chapter “Programming”. Installation Français Keyboard 1. Einbau des Sensors Den Sensor montieren. Der Sensor ist für die Montage auf DIN-Schiene oder Schraubbefestigung ausgelegt. Die zwei Lichtleiter mit den benötigten Steckvorrichtungen vorbereiten und im Sensor befestigen. Die Lichtleiter nach ihrem Zweck und der jeweiligen Erfassungsprinzip montieren. Taste Appuyer Presione Premi Tryk på 2. Alimentation du détecteur Pour alimenter le détecteur, raccorder la broche 3 (fil bleu) à la masses (0 VCC) et la broche 1 (fil marron) au + (10 - 30 VCC). Pour déterminer la sortie de commutation à la lumière ou au noir, raccorder respectivement la broche 2 (fil blanc) au + (10 - 30 VCC) ou à la masse. 2. Alimentación del sensor Para alimentar el sensor, conecte la patilla 3 (hilo azul) a tierra (0 VCC) y la patilla 1 (hilo marrón) a + (10 a 30 VCC). Para determinar si la salida ha de ser para luz u oscuridad, conecte la patilla 2 (hilo blanco) a + (10 a 30 VCC) o a tierra respectivamente. 3. Programmation du détecteur Les instructions relatives à la programmation de la fonction verrouillage/déverrouillage, au réglage de sensibilité, aux fonctions claire ou sombre et à l’aide à l’alignement figurent au chapitre "Programmation". 3. Programación del sensor Consulte el capítulo "Programación" para programar las fun ciones desbloquear/bloquear, sensibilidad, funcionamiento luz/oscuridad, temporización y ayuda. Taste Appuyer Presione Premi Tryk på 4 5 6 7 LO-DO & Press Taste Appuyer Presione Premi Tryk på Press Taste Appuyer Presione Premi Tryk på • Decrease timer adjustment / Zeitwert senken / SET t To decrease Empfindl. erhöhen Augmentation Para incrementar Per aumentare Højere Incremento de sensibilidad / Aumento della sensibilità / Højere følsomhed • Light ON - dark ON / Hell EIN - Dunkel EIN / Commutation fonction claire activée - Commutation fonction sombre activée / Luz activada – Oscuridad activada / Impulso di luce attivato – Impulso di buio attivato / Lys aktivering - mørk aktivering Press n times Taste Appuyer Presione Premi Tryk på n-mal betät. n fois n veces n volte n gange + LO-DO 3 • Automatic threshold set-up / Automatische Grenzwerteinstellung / Taste Appuyer Presione Premi Tryk på Réglage automatique de seuil / Ajuste automático del umbral / Regolazione automatica di soglia / Automatisk indstilling af grænseværdi • Special function key / Taste für Spezialfunktion / Touche de fonction spéciale / for 4 s Timing functions 4 • Keyboard pressed / Bedientaste betätigt / Clavier rétracté / 1) 1) Remote input 2 WH Light ON, connect to + Dark ON, connect to - BN BK WH BL Brown / Braun / Marron / Morrón / Marrone / Brun Black / Schwarz / Noir / Negro / Nero / Sort White / Weiss / Blanc / Blanco / Bianco / Hvid Blue / Blau / Bleu / Azul / Blu / Blå Light ON, connect to + / Licht EIN, mit + verbinden / Commutation à la lumière, raccorder au + / Luz activada, conecte a + / Impulso di luce (NA), connesso a + / Lys aktiveret, forbind til + / Zeitfunktionen / Fonctions minuterie / Funciones de temporizador / Funzioni di temporizzazione / Press Taste Appuyer Presione Premere Tryk på Bedientaste gesperrt1) (stets eingeschaltet) / Clavier verrouillé1) (toujours allumé) / Teclado bloqueado1) (siempre activado) / Tastiera bloccata1) (sempre attivato) / Tastatur låst (altid aktiveret) SET t Increase time (n x 500 ms) Press 5 • Timer ON / Zeitfunktion EIN / Minuterie ACTIVE / Temporizador activado / Temporizzatore attivato / Timer aktiveret Zeitintervalle erhöhen Augment. du temps Incrementar tiempo Aumenta il tempo Længere tid • Weak signal / Schwaches Signal / Signal faible / Señal débil / Segnale debole / Svagt signal 7 • Detection indicator1) / Detektions-Anzeige1) / Indicateur de détection1) / Taste Appuyer Presione Premi Tryk på + LO-DO The LED’s flash if a short-circuit occurs on the static output and emitter is turned off Die LEDs blinken Kurzschluss am statischen Ausgang und bei ausgeschaltetem Sender / Lors d’un court circuit de la sortie statique et de l’extinction de l’émetteur, les LED clignotent / Si se produce un cortocircuito en la salida estática y se apaga el emisor, los LED parpadearán / I LED lampeggiano nel caso in cui si verifichino corto circuiti all’uscita statica e l’emettitore sia spento / Lysdioderne blinker, hvis der opstår en kortslutning i den statiske udgang og hvis senderen er slukket flashes 4 s halten, bis 4 fois jusqu’à ce que durante 4 seg. per 4 secondi i 4 sek. indtil blinkt clignote hasta que parpadee finché non lampeggia blinker n times Decrease time (n x 500 ms) Press n times n-mal betät. n fois n veces n volte n gange Zeitintervalle senken Diminution du temps Reducir tiempo Diminuisci il tempo Kortere tid n-mal betät. n fois n veces n volte n gange ON/OFF delay (toggle) Press for 4 s EIN/AUS Verz. (wechsl.)Taste Act./désact.(mode bascule) Appuyer Ret. ON/OFF (conmutar) Presione Ritardo ON/OFF (comm.) Premi Forsinket akt./deakt. Tryk på 4 s halten pendant 4 s dur. 4 seg. per 4 sec. i 4 sek. Taste Appuyer Presione Premi Tryk på Reset timer once Press Zeitfunktion aussch. RAZ minuterie Puesta a cero Reimposta temp. Nulstilling Taste Appuyer Presione Premi Tryk på SET t einmal betät. une fois una vez una volta sola én gang for 4 s Press 1) for 4 s until Exit Indicador de detección1) / Indicatore di rilevamento1) / Aftastningsindikator1) When remote input is not used, connect the (2 WH) wire to the + input (1 BN). - 4 s halten pendant 4 s durante 4 seg. per 4 sec. i 4 sek. Set timer / Zeitfunktion einstellen / Réglage de la minuterie / Ajustar temporizador / Imposta temporizzatore / Indstilling af timer Teclado activado1) / Tastiera premuta1) / Tastatur aktiveret1) • Keyboard locked1) (always switched ON)/ Indicador de ajuste / Indicatore di allineamento / Justeringsindikator 3 BU + LO-DO Tidsfunktioner 1) • Alignment indicator / Abgleich-Anzeige / Indicateur d’alignement / 4 BK n-mal betät. n fois n veces n volte n gange Tecla de función especial / Tasto funzione speciale / Specialtast Componenti ottici sporchi / Snavset optik Wenn der Steuereingang nicht verwendet wird, verbinden Sie den (2 WH) Draht mit dem + Eingang (1 BN). En cas de non utilisation de l’entrée distante, raccorder le fil (2 WH) à l’entrée + (1 BN). Cuando no se utiliza la entrada remota, conecte el cable (2WH) a la entrada + (1 BN). Quando l’ingresso remoto non è impegnato, connettere il cavo (2WH) all’ingresso + (1BN). Når fjern-indgangen ikke anvendes, skal (2 WH)-ledningen forbindes til +indgangen (1 BN). n times Cambia funzione di uscita / Ændring af udgangsfunktion Wiring Diagram / Schaltbild / Schéma de Câblage / Diagrama de Conexiones / Collegamenti Elettrici / Forbindelsesdiagram Ingresso remoto / Fjern-indgang Press Taste Appuyer Presione Premi Tryk på Change output function /Ausgangsfunktion ändern / Modification de la fonction de sortie / Cambiar función de salida / 6 • Dirty optics / Optik verschmutzt / Optique encrassée / Lentes sucias / Remote input / Steuereingang / Entrée distante / Entrada remota / Empfindl. senken Diminution Para reducir Per diminuire Lavere Light or dark operation / Hell- oder Dunkelschaltung / Fonctionnement à la lumière ou au noir / Funcionamiento con luz y oscuridad / Funzionamento a impulso di luce/buio / Lys eller mørk funktion Dansk 3. Programmering af aftasteren For programmering af tastaturlås, følsomhed, lys/mørk funktion, tidsfunktioner samt hjælp til justering, se afsnittet ”Programmeringsfunktioner”. Mikropprozessor Micro processeur Microprocesador Microprocessore Mikroprocessor (wie beim Steuereingang) (semblable à l’entrée distante) (similar a entrada remota) (come per l’ingresso remoto) (samme som ved fjern-indgang) To increase 3. Programmazione del sensore Per programmare la funzione sblocca/blocca e per impostare la sensibilità, il funzionamento a impulso di luce/buio, le funzioni di temporizzazione e la guida per allineamento, fare riferimento al capitolo "Programmazione". Micro processor (similar to remote input) zweimal betåtigen deux fois dos veces due volte to gange / Empfindlichkeitseinstellung / Réglage de sensibilité / Ajuste de sensibilidad / Regolazione della sensibilità / Justering af følsomhed 2 • Sensitivity increase / Empfindlichkeit erhöhen / Augmentation de la sensibilité / 2. Forsyning af aftasteren For at forsyne aftasteren skal ben 3 (blå ledning) forbindes til jord (0 VDC) og ben 1 (brun ledning) forbindes til + (10 - 30 VDC). For at bestemme, om udgangen skal være lys eller mørk aktiveret, forbindes ben 2 (hvid ledning) til + (10 - 30 VDC) for lys aktiveret eller til jord for mørk aktiveret. + two times Sensitivity adjustment Press 1 BN einmal betätigen une seule fois una vez una volta én gang Modalità di regolazione precisa / Finindstilling Temps de mise sous tension - Temps de mise hors tension / Retardo a la conexión – retardo a la desconexión / Ritardo all’attivazione – Ritardo alla disattivazione / Forsinket aktivering - forsinket deaktivering Réglage de temporisation en moins / Reducción ajuste de temporizador / Regolazione diminuzione temporizzatore / Lavere timerjustering one time SET t Fine set-up mode / Feineinstellung / Mode de réglage fin / Modo de configuración fina / • ON delay - OFF delay / EIN-Verzögerung - AUS-Verzögerung / 2. Alimentazione del sensore Per alimentare il sensore collegare il pin 3 (filo blu) a terra (0 VCC) ed il pin 1 (filo marrone) a + (10 - 30 VCC). Per determinare se l’uscita debba essere ad impulso di luce o di buio, collegare il pin 2 (filo bianco) rispettivamente a + (10 - 30 VCC) o a terra. ausschaltet s’allume se iluminará si accende tænder Modalità di regolazione grossa / Grovindstilling Reducción de sensibilidad / Diminuzione della sensibilità / Lavere følsomhed 1. Montering af aftasteren Monter aftasteren. Aftasteren er forberedt for DIN-skinnemontering eller montering med skruer. Færdiggør fibrene med det nødvendige tilbehør og fastgør dem i aftasteren. Monter fibrene alt efter formål og detekteringsprincip. turns ON 4 s halten, bis die Anzeige pendant 4 s jusqu’à l’indicateur durante 4 seg. y el indicador per 4 sec. e l’indicatore i 4 sek., hvorefter indikatoren Coarse set-up mode / Grobeinstellung / Mode de réglage grossier / Modo de configuración basta / 1 • Sensitivity decrease / Empfindlichkeit senken / Diminution de la sensibilité / 1. Montaggio del sensore Montaggio del sensore. Il sensore è predisposto per il montaggio su guida DIN o fissaggio con viti. Preparare le due fibre con i raccordi necessari e fissarli al sensore. Montare le fibre in modo che siano funzionali e conformi al principio di rilevamento. ausschaltet s’éteint se apagará si spegne slukker / Teach-In-Funktion / Fonctionnement en mode apprentissage / Funcionamiento Self-Teach / Funzionamento con autoapprendimento / Selvindlæringsfunktion Réglage de temporisation en plus / Incrementar ajuste de temporizador / Regolazione aumento temporizzatore / Højere timerjustering Installation & turns OFF 4 s halten, bis die Anzeige pendant 4 s jusqu’à l’indicateur durante 4 seg. y el indicador per 4 sec. e l’indicatore i 4 sek., hvorefter indikatoren Self-Teach operation • Increase timer adjustment / Zeitwert erhöhen / Italiano LO-DO Lock / Sperren / Verrouillage / Bloquear / Bloccaggio / Lås Press for 4 s and the indicator + Espagñol 1. Montaje del sensor Montaje del sensor. El sensor está preparado para mon taje en carril DIN o montaje con tornillos. Prepare las dos fibras con los anclajes necesarios y sujételas en el sensor. Monte las fibras para que cumplan con su propósito y el principio de detección. Installazione /Bedientasten / Clavier / Teclado / Tastiera / Tastatur 1 2 3 3. Programmierung des Sensor Um die Bedientaste zu öffnen/sperren, und die Empfindlichkeit, die Hell-/Dunkelschaltung, die Zeitfunktionen und die Abgleichhilfe zu programmieren, siehe den Abschnitt “Programmierung”. 1. Montage du détecteur Installer le détecteur. Le détecteur est conçu pour montage sur rail DIN ou à vis. Préparer les deux fibres optiques et les accessoires prévus et les fixer sur le détecteur. Monter les fibres selon l’objectif et le principe de détection prévus. / Programmierung / Programmation / Funciones de programación / Programmazione / Programmeringsfunktioner Unlock / Öffnen / Déverrouillage / Desbloquear / Sbloccaggio / Fjern lås Press for 4 s and the indicator + 2. Versorgung des Sensors Um den Sensor zu versorgen, Klemme 3 (blau)) mit Erde (0 VDC) und Klemme 1 (braun) mit + (10 - 30 VDC) verbinden. Um Hell- oder Dunkelschaltung zu wählen, Klemme 2 (weiß) mit + (10 - 30 VDC) oder Erde verbinden. Instalación Programming Teclado y LED / Tastiera e LED / Tastatur og lysdioder + 2. Supplying the sensor To supply the sensor connect pin 3 (blue wire) to ground (0 VDC) and pin 1 (brown wire) to + (10 - 30 VDC). To determine whether the output has to be light or dark switching, connect pin 2 (white wire) to + (10 - 30 VDC) or ground, respectively. Keyboard and LED / Bedientasten und LED / Clavier et LED / Deutsch LO-DO 1. Mounting the sensor Mount the sensor. The sensor is prepared for DIN-rail mounting or mounting by screws. Prepare the two fibres with the necessary fittings and fasten them in the sensor. Mount the fibres so they suit the purpose and detection principle. Installation SET t English t Installation Einstellung beenden Taste QUITTER Appuyer Salir Presione Esci Premi Afslut Tryk på Alignment help SET t 4 s halten pendant 4 s dur. 4 seg. per 4 sec. i 4 sek. / Abgleichhilfe / Aide à l’alignement / Ayuda de alineación / Guida per allineamento / Hjælp til justering Enter / Abgleichhilfe aufrufen / Entrée / Entrar / Invio / Påbegyndelse Press for 4 s until Taste Appuyer Presione Premi Tryk på SET t 4 s halten, bis 4 s jusqu’à ce que durante 4 seg. per 4 secondi i 4 sek. indtil flashes1) blinkt1) clignote1) hasta que parpadee1) finché non lampeggia1) blinker1) Exit Dark ON, connect to - / Dunkel EIN, mit - verbinden / for 4 s Press Commutation au noir, raccorder au - / Oscuridad activada, conecte a - / Impulso di buio (NC), connesso a - / Mørk aktiveret, forbind til - Abgleichhilfe beenden Taste QUITTER Appuyer Salir Presione Esci Premi Afslut Tryk på 1) SET t 4 s halten pendant 4 s durante 4 seg. per 4 sec. i 4 sek. Three frequencies proportional to the signal strength / Drei Frequenzen proportional zur Signalstärke / Trois fréquences proportionnelles à la force du signal / Tres frecuencias proporcionales a la intensidad de la señal / Tre frequenze proporzionali all’intensità del segnale / Tre frekvenser, der er proportionale med signalstyrken-
 1
1
-
 2
2


CARLO GAVAZZI PD60CNG14BPM5T Manual de usuario
- Tipo
- Manual de usuario
- Este manual también es adecuado para
en otros idiomas
Artículos relacionados
-
CARLO GAVAZZI PD60CNX20BPM5 Manual de usuario
-
-
-
-
-
-
-
CARLO GAVAZZI CA18CLL12BPM1 Manual de usuario
-
-