MANUAL DEL USUARIO Y DEL INSTALADOR PARA EL CONTROL AUTOMÁTICO (NO DE PIEZA VAUTOW)
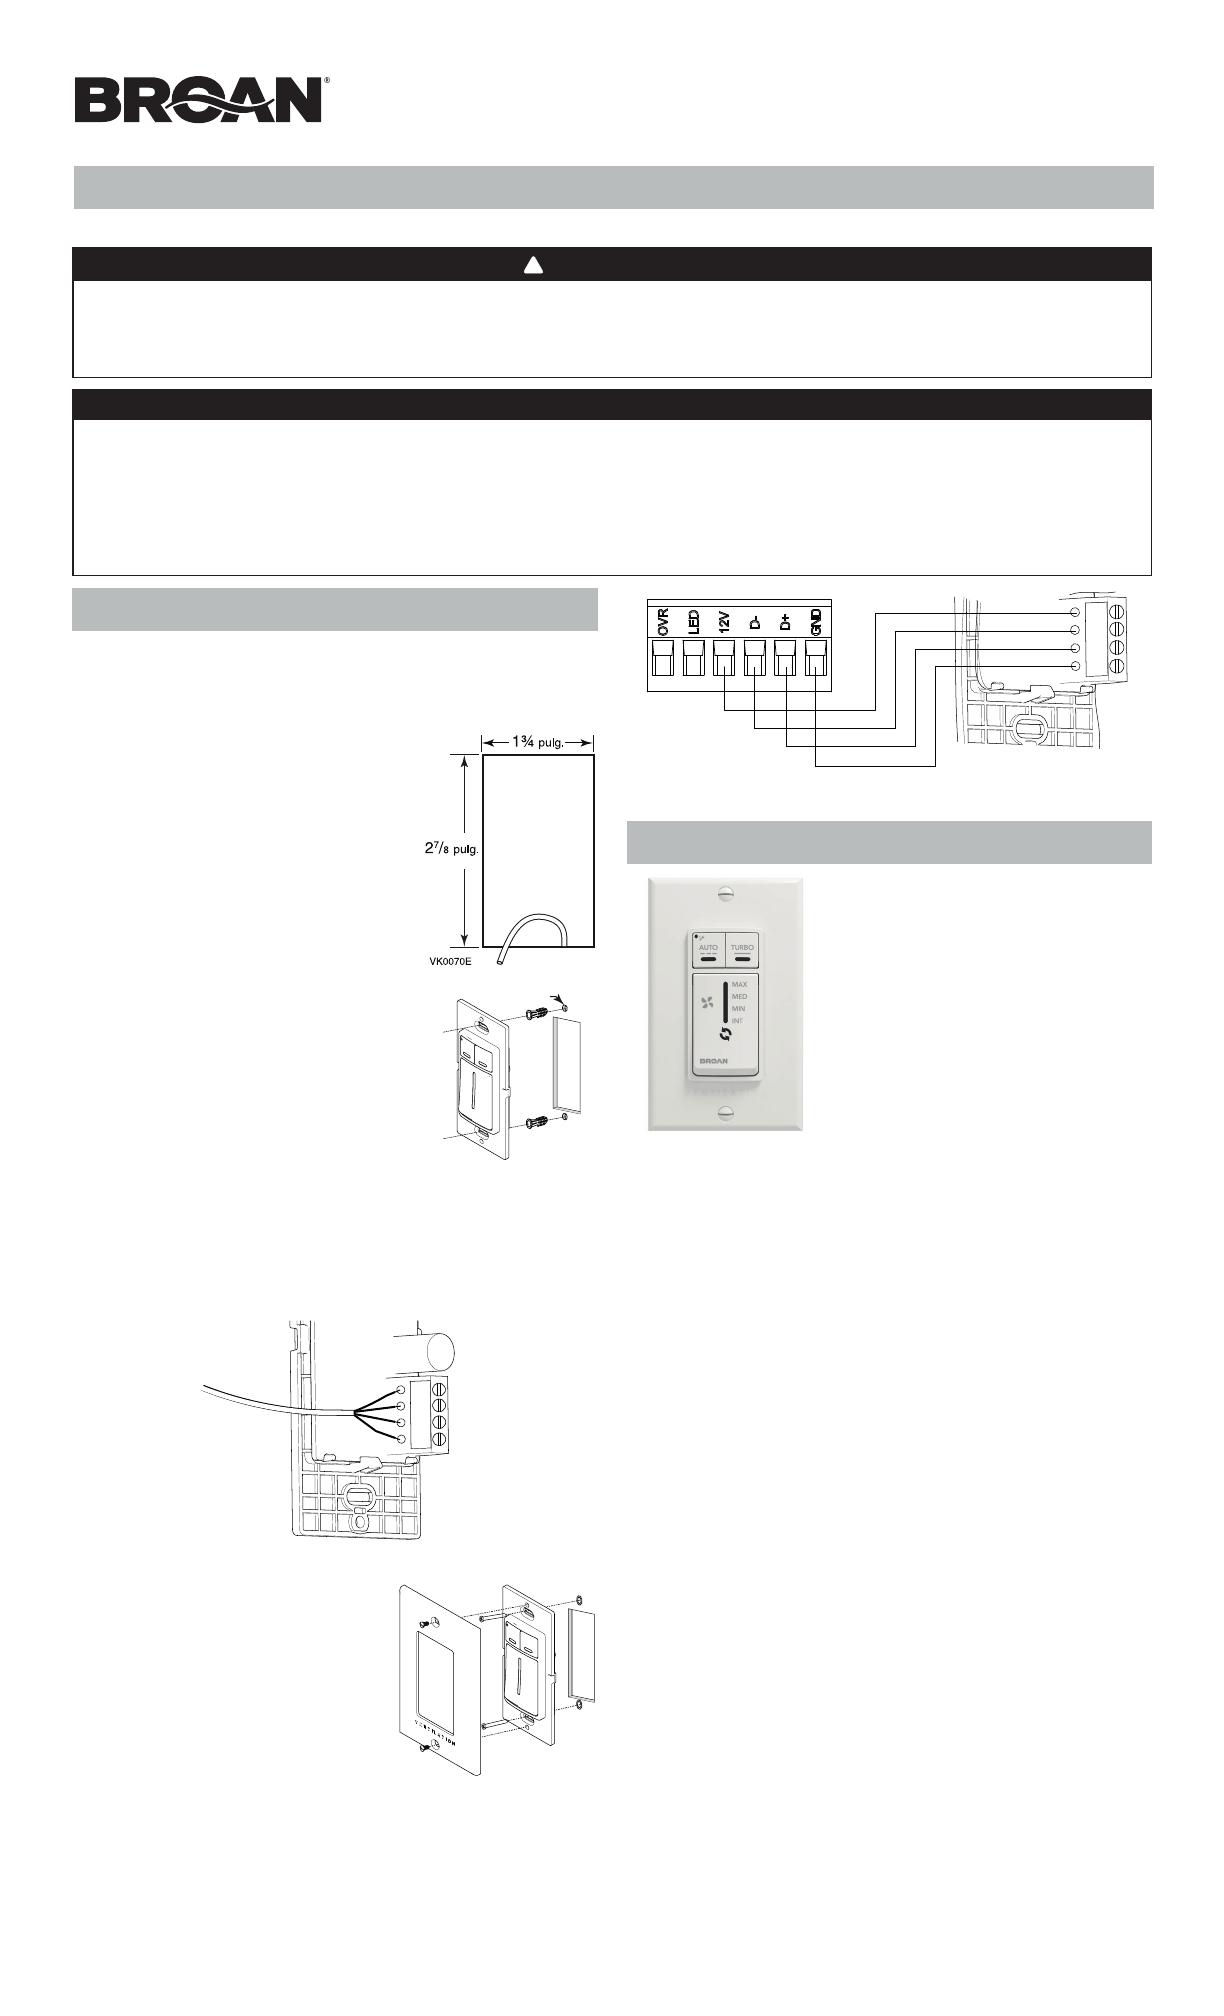
Cortar un agujero de
27/8 pulg. x 1¾ pulg. en un lugar
conveniente de la pared para el control
mural. Llevar un cable (de tipo 22/4)
para el control mural desde el aparato
hasta el agujero. Ver la ilustración a la
derecha.
Colocar temporalmente el control mural
en el agujero y marcar la ubicación de
los orifi cios de los tornillos de montaje.
Retirar el control mural, taladrar dos
orificios (3/16 pulg. de diámetro) en la
pared e introducir los dispositivos de
sujeción para paredes incluidos.
Ø 3/16 pulg., típ.
VC0213E
Desenchufar el aparato.
23841 rev. 02
VC0214
Montar el control mural en la pared.
Realizar la conexión eléctrica con el conector de terminales del
aparato, como se muestra a continuación. Para más detalles,
consultar el manual de instalación del aparato de ventilación.
NOTA: Para evitar un cableado incorrecto, consultar las notas
que tomó en la etapa sobre los colores de los hilos.
Gnd
D+
12V
D-
LEA Y GUARDE ESTAS INSTRUCCIONES
Las ilustraciones en este documento son generales; su control puede tener un aspecto ligeramente diferente.
El cableado eléctrico debe ser realizado por personal cuali cado, de acuerdo con todos los códigos y normas
aplicables. Antes de conectar los hilos, desenchufe el aparato o apague la alimentación en el tablero de servicio y
bloquee los medios de desconexión para evitar que se conecte la corriente accidentalmente. Lleve siempre lentes
y guantes de seguridad al ejecutar estas instrucciones.
ADVERTENCIA
!
INSTALACIÓN
NOTA: Si el control se monta en una caja eléctrica, pasar a la etapa .
Pelar el extremo del cable para acceder a los 4 hilos (cerca
de 3 pulg.). Pelar el extremo de cada hilo (cerca de 1/4 pulg.).
Conectar los hilos a los terminales, independientemente del
color de los hilos. Tomar nota del color del hilo que ha elegido
para cada terminal. Ver la ilustración de abajo.
Enchufar el aparato de ventilación y probar el control mural.
CÓMO FUNCIONA EL CONTROL
El botón principal funciona de la siguiente
manera:
• Clic 1 = RECIRC (si disponible)
• Clic 2 = INT
• Clic 3 = MIN
• Clic 4 = MED
• Clic 5 = MAX
• Clic 6 = OFF
• etcétera
El indicador se enciende según el modo
seleccionado.
RECIRC: Recircula el aire al interior de la casa a velocidad MAX. No
está disponible en todos los aparatos.
INT: En un período de una hora, el sistema funcionará a velocidad
MIN durante 20 minutos.
MIN/MED/MAX: Ventilación en continuo intercambio a la
velocidad seleccionada.
• Presionar el botón TURBO para obtener 4 horas de ventilación
en velocidad MAX. El indicador TURBO se encenderá. Cuando
termina el período de ventilación de 4 horas, el sistema funciona
conforme al ajuste anterior.
• Presionar el botón AUTO para dejar funcionar el sistema según
la temperatura exterior. El indicador AUTO se encenderá y el
sistema funcionará de la siguiente manera:
• Por debajo de -25°C = 10 min/hora
• -25°C a -7°C = 20 min/hora
• 10°C a 25°C = velocidad MIN
• 25°C a 28°C = 30 min/hora
• 28°C a 33°C = 20 min/hora
• Por encima de 33°C = 10 min/hora
• Si el indicador de mantenimiento se enciende, eso significa que
el filtro necesita limpieza o reemplazo. Una vez el filtro limpiado
o reemplazado, presionar el botón AUTO durante cinco
segundos para restablecer el indicador de mantenimiento.
Si el indicador de mantenimiento parpadea, la pantalla LCD
de la unidad indicará el código de error. Consultar la sección
Solución de problemas del manual del usuario de la unidad
para obtener más información.
• Al primer arranque del aparato, los indicadores AUTO y TURBO
parpadearán alternativamente aproximadamente un minuto. Si
los indicadores siguen parpadeando después dicho período,
eso significa que no se puede establecer la comunicación con
el aparato de ventilación. Asegurése de que los cables están
conectados correctamente a los terminales del control mural y
del aparato (consultar la etapa 7).
Si los conductos han de pasar a través de un espacio no acondicionado (p. ej., un desván), use siempre conductos aislados
para evitar la formación de condensación fuera o dentro del conducto, lo que podría provocar roturas de material y/o
la aparición de moho. Además, si aire fresco hacia el edi cio y/o aire viciado del edi cio ha/han de pasar a través de un
espacio no acondicionado, el aparato debe ser ajustado para funcionar de manera continua cuando hace frío (debajo de
10°C/50°F). El movimiento continuo de aire dentro de los conductos prevendrá que se forme condensación. Se puede
detener el aparato temporalmente para fines de reparación y/o de mantenimiento en tales condiciones. (Consulte la
sección 2.2 del manual del usuario y del instalador del aparato para más detalles.)
PRECAUCIÓN

