Mr.Coffee BVMC-ECM-PMPAT Series Manual de usuario
- Categoría
- Accesorios para hacer café
- Tipo
- Manual de usuario

BVMC-ECM-PMPAT Series
ONE-TOUCH COFFEEHOUSE +
USER MANUAL
P.N: NWL0001370467 REV A/
2176898
www.mrcoffee.com
+ One Touch control panel for
easy drink selection
+ 19-bar Italian pump delivers
optimal avor extraction
+ Automatic milk frother easily
creates light, creamy froth
+ Removable milk and water
reservoirs for easy lling and
cleaning

2 3
INTRODUCTION IMPORTANT SAFEGUARDS
Welcome and congratulations on the purchase of your
new MR. COFFEE® One-Touch CoffeeHouse +. This unique
appliance has been designed to help you prepare delicious
espressos, cappuccinos and lattes quickly, conveniently, and
automatically with the touch of a button.
Our number one goal is to give you the best-tasting cup of
coffee every time, so if you have any questions about your
new espresso, cappuccino and latte maker, please contact us
at 1-800-672-6333 or visit us at www.mrcoffee.com
When using electrical appliances, basic safety precautions should always be
followed to reduce the risk of re, electric shock, and/or injury to persons
including the following:
1. Read all instructions before using this appliance.
2. Do not touch hot surfaces. Use handles or knobs.
3. To protect against electric shock, do not place or immerse cord, plugs, or
appliance in water or other liquid.
4. This appliance is not intended for use by children or by persons with
reduced physical, sensory, or mental capabilities, or lack of experience and
knowledge. Close supervision is necessary when any appliance is used near
children. Children should be supervised to ensure that they do not play with
the appliance. Keep the appliance and its cord out of reach of children.
5. Unplug from outlet when either the appliance or display clock (if provided)
is not in use, and before cleaning. Allow to cool before putting on or taking
off parts, and before cleaning the appliance.
6. Do not operate any appliance with a damaged cord or plug or after the
appliance malfunctions, or has been damaged in any manner. Do not
attempt to replace or splice a damaged cord. Return appliance to an
Authorized Service Center for examination, repair or adjustment.
7. The use of an accessory not recommended by the appliance manufacturer
for use with this appliance may result in re, electric shock or injury to
persons.
8. Do not use outdoors or for commercial purposes.
9. Do not let cord hang over edge of table or counter, or touch hot surfaces.
10. Do not place on or near a hot gas or electric burner, or in a heated oven.
11. Always attach plug to appliance rst, then plug cord into the wall outlet (for
appliances with detachable cords). To disconnect, turn any control to the off
position, then remove plug from wall outlet.
12. Do not use appliance for other than intended use. Misuse can cause injuries.
13. WARNING: To avoid the risk of injury, never open or disengage the brew
chamber (portalter) during the brew cycle. Always properly engage the
lter holder to the locking mechanism. Failure to do so may disengage the
lter holder during the brew cycle and cause injuries.
14. Models intended to be used with sealed capsules: Only use capsules
intended for this appliance. If the capsule does not t, do not force the
capsule into the appliance.
15. Models with coffee grinders: Check hopper for presence of foreign objects
before using.

4 5
For appliances with service panels:
16. WARNING: TO REDUCE THE RISK OF FIRE OR ELECTRIC SHOCK, DO NOT
REMOVE THIS COVER. NO USER–SERVICEABLE PARTS INSIDE. REPAIR
SHOULD BE DONE BY AUTHORIZED SERVICE PERSONNEL ONLY.
A short power-supply cord (or detachable power-supply cord) may be provided
to reduce risks resulting from becoming entangled in or tripping over a longer
cord. Longer detachable power-supply cords or extension cords are available
and may be used if care is exercised in their use. If a long detachable power-
supply cord or extension cord is used:
a. The marked electrical rating of the detachable power-supply cord or
extension cord should be at least as great as the electrical rating of the
appliance;
b. If the appliance is of the grounded type, the extension cord should be a
grounding type 3-wire cord; and
c. The longer cord should be arranged so that it will not drape over the
counter top or table where it can be pulled on by children or tripped over
unintentionally.
Do not pull, twist or otherwise abuse the power cord.
PRODUCT NOTICES
Do not use sugar roasted* ground coffee or sugar roasted coffee beans as
these will clog the lter and damage the appliance. If sugar roasted coffee is
accidentally used, stop using the unit and call customer care.
We recommend descaling the machine periodically to keep it in good working
condition. Contact our customer care line to learn about this process.
(*) Ground with sugar
1. Place the appliance on a hard, at, level surface to avoid interruption of
airow underneath the espresso maker.
2. Do not operate the appliance with an empty water tank.
3. Keep the area above the appliance clear during use, as hot steam will
escape the appliance.
IMPORTANT SAFEGUARDS CONT.
SAVE THESE INSTRUCTIONS
HOUSEHOLD USE ONLY
North American models with polarized plugs
This appliance has a polarized plug, (one blade is
wider than the other). As a safety feature to reduce
the risk of electrical shock, this plug is intended to t
in a polarized outlet only one way. If the plug does not
t fully in the outlet, reverse the plug. If it still does not t, contact a qualied
electrician. Do not attempt to defeat this safety feature or modify the plug
in any way. If the plug ts loosely into the AC outlet or if the AC outlet feels
warm do not use that outlet.
POWER CORD INSTRUCTIONS
CORRECT USE OF GROUND COFFEE FOR
ESPRESSO MAKERS

6 7
GET TO KNOW YOUR ESPRESSO,
CAPPUCCINO & LATTE MAKER
18
17
2a
7a 7c
7b 8
1
9
12
2
3
6
4
5
16
15
10
19
14
13
11
9a
9b
9c
9e
9f
9g
9d
1. Brew Head
2. Porta-Filter:
a. Porta-Filter for Ground Coffee and
E.S.E. pods (45mm)
3. Height Adjusting Slot for Small Cups
4. Removable Drip Grid
5. Removable Drip Tray
6. DripTrayOverowFloater
7. Filters For:
a. Single Shot of Espresso and E.S.E.
pods (45mm)
b. Double Shot of Espresso
c. Detachable Bottom Covers of Filters
8. Measuring Scoop/Tamper
9. Control Panel
a. Progress Bar
b. Single (1) & Double (2) Espresso
Button
c. Small (1) & Large (2) Latte Button
d. Small (1) & Large (2) Cappuccino
Button
e. Manual Espresso Brew Button
f. Manual Milk Frothing Button
g. Clean Button
10. Removable/Clear Milk Reservoir
11. Milk Reservoir Lid
12. Milk Reservoir Release Button
13. Milk Froth Level Control Knob
14. Milk Frothing Tube Guide Lever
15. Frothed Milk Dispensing Tube
16. On/Off Switch “I/O”
17. Removable Water Tank
18. Water Tank Lid
19. Milk Hose
INTRODUCTION TO ESPRESSO
Mr. Coffee® One-Touch CoffeeHouse + has been designed to help you
prepare delicious espressos, cappuccinos and lattes quickly, conveniently, and
automatically with the touch of a button.
ESPRESSO
A unique method of coffee brewing in which hot water is forced through nely
ground coffee. Popular in Europe, it is a far richer and more full-bodied brew
than regular drip coffee. Because of its richness, espresso is usually served in
45 to 60 ml (1.5 to 2 oz.) portions, in demitasse cups.
CAPPUCCINO
A drink made with about 1/3 espresso, 1/3 steamed milk, and 1/3 frothed milk.
LATTE
A drink made with about 1/4 espresso and 3/4 steamed milk.
Please read ALL of the instructions, cautions, notes and warnings included in
this instruction manual carefully before you begin to use this appliance. When
this unit is used, some parts and accessories get hot and need to cool down.
Proper care and maintenance will ensure the long life of the Mr. Coffee® One-
Touch CoffeeHouse + and its trouble-free operation. Save these instructions
and refer to them often for cleaning and care tips.
Your Mr. Coffee® One-Touch CoffeeHouse + can be used with ground coffee as
well as E.S.E. pods (45 mm), making it exceptionally practical and versatile to
prepare single shots of espresso, cappuccino and latte.
BEFORE USING YOUR APPLIANCE FOR
THE FIRST TIME
CLEANING THE UNIT PRIOR TO FIRST USE
Please refer to the “Get to know your espresso, cappuccino & latte maker”
section to familiarise yourself with the product and identify all parts.
1. Please make sure the unit is off “O” by pressing the on/off “I/O” switch
located on the right side of the unit. Make sure it is unplugged from the
electrical outlet.
2. Remove stickers and labels from the unit.
3. Remove red plug from the bottom of the water reservoir.
4. First remove and then wash the water reservoir, the milk reservoir, the
porta-lter, the two lters and measuring scoop/tamper in a mixture of mild
detergent and water. Rinse each thoroughly and place them back into the
unit.
5. Refer to the instructions on “PLACING THE PORTA-FILTER” section before
placing or removing the porta-lter and any lter from the unit.

8 9
6. To clean the inside of the appliance, follow the steps listed on the
“PREPARING CAPPUCCINO” section using water in both reservoirs and no
ground coffee in the lter. Do not immerse the main body of the appliance or
power cord and plug in water or attempt to reach any of its internal parts.
IMPORTANT - PRIME THE UNIT
To prime unit, run the steam cycle by following the steps below:
1. Fill water reservoir up to the “MAX” line and make sure to place the water
reservoir tightly back in the unit with its lid closed.
2. Fill the milk reservoir with water up to the MAX level and slide the milk
reservoir back in its place. You should feel the milk reservoir lock in place.
3. Select one of the lters (single or double espresso) and place it in the porta-
lter for ground coffee. Place the porta-lter in the unit ensuring it is properly
locked and place a large cup under it. Also, make sure the tip of the frothed
milk dispensing tube is pointing inside the cup.
4. Plug the appliance into the appropriate outlet.
5. Turn the power button on “I”.
6. The control panel progress bar will illuminate (Espresso heater and Steam
heater “ ”) showing the progress. Once the progress bar is a fully illuminated
and solid light, press the manual espresso button “ ”. The water will ow,
allow to ll a cup, then stop by pressing the button again. The progress bar
illumination will cycle whilst operating.
7. Dispose of the water in the cup and place it back in the unit.
8. Press the manual froth button “ ”. The water will ow, allow to ll a cup, then
stop by pressing the button again. The progress bar illumination will cycle
whilst operating.
9. The control panel progress bar will illuminate (Espresso heater and Steam
heater “ ”) will turn into a solid light. Now your unit has been primed and is
ready to be used.
HOW TO SELECT THE RIGHT CUP
Please make sure to select your cup according to the following chart:
NOTE: The total amount of the beverage can vary depending on the type of milk
and level of froth used.
BEVERAGE SUGGESTED CUP
Espresso Single (1)
Double (2)
40ml/1.25oz
80ml/2.5oz
Cappuccino Small (1)
Large (2)
230ml/7.5oz
460ml/15.5oz
Latte Small (1)
Large (2)
400ml/13.5oz
550ml/18.5oz
SELECTING THE RIGHT COFFEE
THE COFFEE
The coffee should be freshly ground and dark roasted. You may want to try a
French or Italian roast ground for espresso. Pre-ground coffee will only retain
its avour for 7 – 8 days, provided it is stored in an airtight container and in
a cool, dark area. Do not store in a refrigerator or freezer. Whole beans are
recommended to be ground just before use. Coffee beans stored in an airtight
container will preserve avour for up to 4 weeks.
THE GRIND
This is a vital step in the espresso making process if you are grinding your own
coffee. It may require practice. The coffee must be of a ne grind.
• The correct grind should look like table salt.
• If the grind is too ne, the water will not ow through the coffee even
under high pressure. These grinds look like powder and feel like our
when rubbed between ngers.
• If the grind is too coarse, the water ows through the coffee too fast,
preventing a full-avored extraction. Be sure to use a quality grinder for
uniform consistency.
OPERATING INSTRUCTIONS
FILLING THE WATER RESERVOIR
1. Fill the water reservoir with water (see gure 1). You may use either a pitcher
to ll it up or remove it from the unit and then ll it up under the tap. Fill the
reservoir with the desired amount of water below the “MAX” level on the
reservoir. Never use warm or hot water to ll the water reservoir.
2. Close the water reservoir lid. If you removed it from the unit to ll up with
water, please make sure to place it back tightly in its place.
Figure 1

10 11
FILLING THE MILK RESERVOIR
If you plan to prepare a cappuccino or latte, remove the milk reservoir from the
unit by lifting up on the milk reservoir release button, simultaneously sliding
milk reservoir out (see gure 2). Then, pour the desired quantity of cold milk
you estimate you will need, making sure it is below the “MAX” level on the
reservoir (see gure 3). Once nished, slide the milk reservoir back onto the
unit ensuring it ts tightly. You should feel the milk reservoir lock in place.
NOTE: You can use any type of milk you prefer, i.e. whole milk, low fat milk,
organic or soy milk.
USING THE PORTA-FILTER FOR GROUND COFFEE AND E.S.E PODS
CHOOSING THE FILTER
Select the lter to be used as follows:
a. FOR A SINGLE SHOT – use the lter for a single shot of espresso if using
ground coffee, or if using E.S.E. (Easy Serving Espresso) pods.
b. FOR A DOUBLE SHOT OR TWO SINGLE SHOTS – use the lter for a double
shot of espresso. By placing two small cups underneath the porta-lter, you
may prepare two single shots of espresso at once.
Figure 3
Figure 2
POD
PLACING THE FILTER ON THE PORTA-FILTER
1. Insert the lter into the porta-lter, making sure to align the lter dimple to
the porta-lter notch (see gure 4).
2. Turn the lter to the left or right to lock it in place (see gure 5).
NOTE: To remove the lter for cleaning, turn the lter to the left or right to
align the lter dimple to the porta-lter notch and proceed to remove.
WARNING: Make sure the lter has cooled down before attempting to remove
it from the porta-lter.
FILLING WITH COFFEE
FOR GROUND COFFEE:
a. Fill the lter with fresh, ne ground espresso coffee about 3mm from the rim
(DO NOT overll).
b. Using the tamping part of the scoop, push the coffee grounds downwards
as far as the tamper will go to get your espresso grounds compact and
even.
c. Clean any excess coffee from the rim to ensure proper t under brew head.
FOR E.S.E. (EASY SERVING ESPRESSO) PODS
Simply place the pod in the lter for a single shot of espresso. If there is any
loose paper from the pod sticking out from the lter, be sure to fold it inside to
ensure a good seal when brewing.
POD
a. b. c.
Figure 5
Figure 4

12 13
PLACING THE PORTA-FILTER
a. Position porta-lter underneath the brew head.
b. Position handle so that the handle lines up with the open lock icon “ ” on
the unit and ts into the groove.
c. Then, slowly turn it to the right until the handle is aligned with the closed
lock symbol “ ” on the unit.
CAUTION: Ensure you do not accidentally press a drinks button.
PLACING THE CUP(S)
a. Adjust the height by inserting the removable drip grid in the height-
adjusting slot if you are using a small “demitasse” cup(s) to brew espresso.
b. Keep the removable drip grid on top of the removable drip tray if you are
using a larger cup to brew cappuccino or latte.
IMPORTANT: When brewing cappuccino or latte, please make sure to adjust
the frothing tube lever in order to position the frothed milk dispensing tube to
point inside the cup that is being used.
TURNING THE UNIT ON
a. Make sure unit is plugged into the appropriate electrical outlet.
b. Turn unit on “I” using the on/off “I/O” switch located on the right side on the
unit.
a. c.
b.
a. b.
SELECT THE FUNCTION
PREPARING ESPRESSO
a. Press the Espresso Button “ ” once to brew a single shot. The indicator
symbol (1) will illuminate for a single shot of espresso. The progress bar will
indicate a single shot of espresso is brewing.
b. Press the Espresso Button “ ” twice to brew a double shot or two single
shots of espresso. The indicator symbol (2) will illuminate for a double shot
of espresso. the progress bar will indicate a double shot of espresso is
brewing. For both Automatic Espresso functions, the unit will start brewing
the espresso according to your selection. The unit will stop automatically
after the brewing process and the progress bar will fully illuminate in a solid
light, indicating that the cycle has been completed. Your delicious espresso is
ready to be enjoyed!
NOTE: If you would like to brew less coffee than the preset serving, press
the function button at any time during the brewing process to stop when the
desired amount of coffee is reached.
c. For manual espresso, press the Manual Espresso Button “ ” once to begin
brewing. When you have the desired amount of espresso, press the Manual
Espresso button once again to stop the machine.
PREPARING CAPPUCCINO
Prior to preparing your cappuccino, adjust the level of frothed milk according
to your preference by turning the Froth Control Knob to the right for more foam
(cappuccino) and to the left for less foam (latte).
a.
x1
x1
b.
x2
x2
c.
The control panel progress bar will illuminate (Espresso heater and Steam
heater “ ”) during the heating process and until the water and milk (if
preparing cappuccino or latte) reach the perfect temperature. Once the
progress bar is a fully illuminated and a solid light, the unit is ready to use.
MORE FOAM LESS FOAM
c.
b.
a.

14 15
NOTE: The level of foam can also be adjusted during the brewing cycle.
a. Press the Cappuccino Button “ ” once to brew a small cup of cappuccino.
The indicator symbol (1) will illuminate for a small cup of cappuccino. The
progress bar will indicate a small cup of cappuccino is brewing.
b. Press the Cappuccino Button “ ” twice to brew a large cup of cappuccino.
The indicator symbol (2) will illuminate for a large cup of cappuccino. The
progress bar will indicate a large cup of cappuccino is brewing.
The unit will start brewing cappuccino according to your selection. The unit
will stop automatically after the brewing process and the progress bar will
become a solid illuminated light, indicating that the cycle has completed.
Your delicious cappuccino is now ready to be enjoyed!
PREPARING LATTE
Prior to preparing your latte, adjust the level of frothed milk according to
your preference by turning the Froth Control Knob to the right for more foam
(cappuccino) and to the left for less foam (latte).
a.
x1
x1
b.
x2
x2
a. Press the Latte Button “ ” to brew a small cup of latte. The indicator symbol
(1) will illuminate for a small cup of latte. The progress bar will indicate a
small cup of latte is brewing.
b. Press the Latte Button “ ” to brew a large cup of latte. The indicator symbol
(2) will illuminate for a large cup of latte. The progress bar will indicate a
large cup of latte is brewing.
The unit will start brewing latte according to your selection. The unit will stop
automatically after the brewing process and the progress bar will become a
solid illuminated light, indicating that the cycle has completed.
PREPARING FROTHED MILK
The Mr. Coffee® One-Touch CoffeeHouse + also allows you to prepare frothed
milk alone. Press the Manual Foam “Froth” Button “ ” if you wish to add more
foam to your beverage or to prepare frothed milk for any other beverage, e.g.
macchiato, hot chocolate, chai latte, etc. Press the Manual Foam “Froth” Button
“ ” once again to stop the machine.
MORE FOAM LESS FOAM
a.
x1
x1
b.
x2
x2

16 17
AFTER PREPARING YOUR BEVERAGES WITH MILK
Once you are done preparing your beverage with milk, you can either store
the unit’s milk reservoir directly in the refrigerator (ready to be used for the
next time) or dispose of the leftover milk. Either way, always remember to do a
clean cycle as described below to clean the milk frothing tube.
Place a large empty cup (with at least 325 mL/ 11 . oz. capacity) under the
frothed milk dispensing tube. Turn the Froth Control Knob counter clockwise
to the clean position “ ” then press the Clean button “ ” to activate the clean
function. Let the unit dispense the water through the tube until it comes out
clear. The unit will automatically stop when the progress bar stops cycling and
fully illuminates in a solid light, the clean cycle is completed, or you can press
the clean button “ ” to stop the process.
x1
x1
CLEANING YOUR MACHINE
Cleaning light will remain illuminated when your machine is ready for a
cleaning cycle. Always switch off, unplug and allow to cool before removing
parts and cleaning
CLEANING THE DRIP TRAY
Empty the Drip Tray when required. If the red Water Level Indicator appears
through the Grill, empty the Drip Tray immediately. Clean the Drip Tray and
Grid weekly with warm water and a little non-abrasive washing up liquid, rinse
and dry.
CLEANING THE MILK RESERVOIR AND FROTHING TUBE
Although you can store the milk reservoir with leftover milk in the refrigerator,
it is important to clean the reservoir and frothing tube regularly to avoid
clogging and residue build-up. In order to clean the milk reservoir, please
follow the instructions listed below:
1. Remove the milk reservoir from the unit by lifting up the milk reservoir release
button and simultaneously sliding the milk reservoir out.
2. Remove the lid of the reservoir.
3. Dispose of any milk left, then rinse and wash the milk reservoir and its lid
thoroughly with warm soapy water. Make sure to rinse and dry them well. Do
not use abrasive cleaners and scouring pads, as they will scratch the nish.
NOTE: The milk reservoir is also dishwasher safe (top rack). Do not place the
lid of the milk reservoir in the dishwasher.
4. Fill milk reservoir with water, not above the MAX ll line. Place milk reservoir
back onto unit, lifting up on reservoir release button and simultaneously
sliding milk reservoir in, holding reservoir by the lid.
5. Place a large empty cup under the froth dispensing tube.
6. Turn the Froth Control Knob counter clockwise to the clean position
“” then press the Clean “ ” button to activate the clean function. The unit
will start releasing steam through the froth dispensing tube. Let the cleaning
cycle run until you no longer see any water coming out of the tube, or let the
cycle run until it stops automatically.
7. Dispose of any water left in the milk reservoir and place it back in the unit. You
should feel the milk reservoir lock in place.
DEEP CLEANING THE FILTERS
Make sure to deep clean your lter every 90 days for optimal brewing
performance. Follow these disassembly instructions and rinse the pieces in a
large bowl of warm water. Once rinsed thoroughly, wipe dry and reassemble.
1. To remove the detachable bottom covers from under the lters, rotate them
counterclockwise towards the unlock icon “ ”.
2. Wash the detachable bottom covers and lters with warm soapy water. Make
sure to rinse and dry them well.
3. Place the detachable bottom covers back onto the lters by inserting them in
their place and then rotating them clockwise (away from the unlock icon “ ”)
until you hear it click.
FROTH MILK DISPENSING TUBE CLEANING - WITHOUT AFFECTING MILK IN
RESERVOIR
1. Ensure the milk reservoir and lid are properly inserted in the unit.
2. Place a large empty mug under the froth dispensing tube.
3. Turn the Froth Control Knob counter clockwise to the clean position
Unlock
Step1
Step2 Step3
Lift
Push
Remove
Remove
Seal
Remove
Filter
Unlock
Step1
Step2
Step3
Lift
Push
Remove
Remove
Seal
Remove
Filter
Unlock
Step1 Step2
Step3
Lift
Push
Remove
Remove
Seal
Remove
Filter

18 19
“” then press the “ ” button to activate the clean function. The unit will start
releasing steam through the froth dispensing tube. Let the cleaning cycle run
until you no longer see any water coming out of the tube, or let the cycle run
until it stops automatically.
4. Dispose of the water in the mug.
5. You can remove the milk reservoir with the lid and store it in the fridge for
later use.
CLEANING THE BREW HEAD, THE PORTA-FILTER AND FILTERS
1. Press the on/off “I/O” switch located on the right side of the unit to the off
position “O” and unplug the power cord from the electrical outlet.
2. Some of the metal parts may still be hot. Do not touch them with your hands
until they have cooled.
3. Remove the porta-lter and discard the coffee grounds or used pod. Wash
both the porta-lter and lter thoroughly with warm soapy water. Make sure
to rinse and dry them well.
NOTE: Do not wash the porta-lters and lters in the dishwasher.
4. Wipe the lower part of the brew head in the unit with a damp cloth or paper
towel to remove any coffee grounds that might have been left.
5. Place the porta-lter (without any lter) back in the brew head in the unit and
lock it in place.
6. Place a large empty cup under the porta-lter.
7. Plug the power cord into the electrical outlet. Press the on/off “I/O” switch to
the on position “I”. Press the Espresso “ ” button once and let the unit brew
with water until it stops automatically.
CLEANING THE WATER RESERVOIR
1. Dispose of the remaining water by removing the water reservoir and turning
it upside down over the sink. It is recommended to empty the water reservoir
between uses.
2. Wash the water reservoir and its lid thoroughly with warm soapy water. Make
sure to rinse and dry them well.
NOTE: Do not wash the water reservoir or its lid in the dishwasher.
CAUTION: Do not immerse main body of the appliance or power cord and
plug in water or any other liquid.
CLEANING THE UNIT
1. Wipe housing with a soft wet cloth. Do not use abrasive cleaners or scouring
pads, as they will scratch the nish.
2. Do not store any of the porta-lters in the brew head. This can adversely affect
the seal between the brew head and the porta-lter while brewing espresso.
DESCALING
Build-up of mineral deposits in the unit will affect the operation of the
appliance. Your appliance must be descaling when you begin to notice an
increase in the time required to brew espresso, or when there is excessive
steaming. Also, you may notice a build-up of white deposits on the surface of
the brew head.
The frequency of cleaning depends upon the hardness of the water used. The
following table gives the suggested cleaning intervals.
SUGGESTED CLEANING INTERVALS
Type of Water Cleaning Frequency
Soft Water (Filtered Water) Every 80 Brew Cycles
Hard Water (Tap Water) Every 40 Brew Cycles
TO DESCALE WATER RESERVOIR:
1. Fill the reservoir with fresh, undiluted white household vinegar.
2. Allow appliance to sit overnight with the vinegar solution in the water
reservoir.
3. Discard vinegar by removing the reservoir and turning it upside down over
the sink.
4. Rinse the water reservoir thoroughly with tap water by lling the tank half full
with water and then pouring the water back out into the sink, repeating this
step twice.
TO DESCALE INTERNAL PARTS:
1. Make sure you descale the inside of the water reservoir rst by following the
descale steps above.
2. Make sure to switch the on/off button to the off “O” position and the power
cord is disconnected from the electrical outlet. Fill the reservoir with undiluted
white household vinegar.
3. Insert the porta-lter (with lter and no coffee) and place a large empty cup
on top of the drip tray and under the porta-lter.
4. Plug the power cord into the electrical outlet.
5. Press the on/off button to switch the unit on (I), the control panel progress
bar will illuminate (Espresso heater and Steam heater “ ” ) showing the
progress. Once the progress bar is a fully illuminated and a solid light, press
the automatic espresso button “ ” twice (2). The vinegar will start owing,
allow to ll a cup, then stop by pressing the button again. The progress bar
illumination will cycle whilst operating.
6. Place a large empty cup (with at least 325 mL/ 11 . oz. capacity) under the
frothed milk dispensing tube. Fill the milk reservoir with water and place it
back on the unit. Turn the Froth Control Knob counter clockwise to the clean
position “ ” then press the Clean “ ” button to activate the clean function.
Let the cleaning cycle run until you no longer see any milk coming out of the

20 21
tube, or let the cycle run until it stops automatically.
7. Repeat Steps 1 – 6 as necessary using only tap water to rinse any remaining
traces of vinegar out of the machine.
CLEANING NOTIFICATION
After 200 cycles the Cleaning Notication will activate.
1. The Cleaning Indicator Light will remain on as a notication until the cleaning
procedure is completed.
a. If you brew another espresso. latte. or cappuccino. the cleaning light
will turn off momentarily, but will start ashing after completion of the
brew.
b. When the unit is powered off the Cleaning Indicator Light will turn off.
c. When the unit powers down and goes into sleep mode, the cleaning
indicator light will turn off.
CLEANING PROCEDURE
1. Pour a solution of 50% white vinegar and 50% clean water into the water tank.
Stir the solution with a spoon to make sure it is properly mixed.
2. Rotate the milk tank knob to the clean position. Place a large cup under the
frothed milk dispensing tube.
3. Press the clean button for 5 seconds to activate the deep clean mode.
a. The progress bar slowly cycles, same as when the brew cycle is
operating, through the entire cleaning cycle.
b. The pump will turn on and off multiple times for about 7.5 minutes.
The cleaning light will then turn off indicating that the cleaning cycle is
completed.
4. Pour out any remaining solution from the water tank and replace with clean
water. Fill with clean water up to the Max level line.
5. Press the manual Espresso button “ ” and let the water ll a cup, then press
the manual espresso button to stop the machine.
6. Rotate the milk tank knob to the clean position and press the clean button to
run the normal clean mode.
7. Press the espresso button and then the steam function to ush the system out.
PROBLEM CAUSES SOLUTIONS
Coffee does not
come out.
• No water in reservoir.
• Coffeegrindistoone.
• Toomuchcoffeeinthelter.
• Appliance was not turned on
or plugged in.
• Coffee has been tamped/
compressed too much.
• Add water.
• Grind medium ground
coffee.
• Filllterwithlesscoffee.
• Plug unit into electrical
outlet and turn it on.
• Relllterbasketwith
coffee and TAMP GENTLY.
Coffee comes out
around the edge of
theporta-lter.
• Porta-lternotrotatedtofull
lock position.
• Coffee grounds around the
lterbasketrim.
• Toomuchcoffeeinthelter.
• Rotatelterholdertofull
lock position.
• Wipe off rim.
• Fill with less coffee.
Milk is not foamy
after frothing or it is
not coming out of
the frothing tube.
• Check the froth control
position.
• Ran out of steam.
• Milk is not cold enough.
• Frothing tube is blocked.
• Ensure there is enough
water in the water reservoir.
• Chill milk prior to making
cappuccino or latte.
• Follow the instructions to
clean the milk reservoir &
frothing tube.
Coffee comes out
too quickly.
• Ground coffee is too coarse.
• Notenoughcoffeeinlter.
• Useanergrind.
• Filllterwithmorecoffee.
Coffee is too weak. • Usingsinglelterfordouble
shot of espresso.
• Ground coffee is too coarse.
• Usedoublelterfordouble
shot of espresso.
• Useanergrind.
The control panel
lightsareashing.
• Water reservoir is out of
water.
• Brewing function button was
pressed prior to the progress
bar fully illuminating to show
the machine is ready.
• Add water to reservoir.
• Wait until the progress bar
is fully illuminated, and a
solid light, to indicate the
machine is ready.
Cleaning light
remains on.
• Your machine is letting
you know it is ready for
a cleaning cycle to be
performed.
• Perform cleaning cycle (see
page 20).
PROBLEMS, CAUSES AND SOLUTIONS

22 23
WARRANTY INFORMATION
1-YEAR LIMITED WARRANTY
Sunbeam Products, Inc. warrants that for a period of one year from the date of
purchase, this product will be free from defects in material and workmanship.
Sunbeam, at its option, will repair or replace this product or any component of
the product found to be defective during the warranty period.
Replacement will be made with a new or remanufactured product or
component. If the product is no longer available, replacement may be made
with a similar product of equal or greater value. This is your exclusive warranty
from Sunbeam.
This warranty is valid for the original retail purchaser from the date of initial
retail purchase and is not transferable. Keep the original sales receipt. Proof of
purchase is required to obtain warranty performance. Sunbeam dealers, service
centers, or retail stores selling Sunbeam products do not have the right to alter,
modify or any way change the terms and conditions of this warranty.
This warranty does not cover normal wear of parts or damage resulting from
any of the following: negligent use or misuse of the product, use on improper
voltage or current, use contrary to the operating instructions, disassembly, repair
or alteration by anyone other than Sunbeam or an authorized Sunbeam service
center. Further, the warranty does not cover: Acts of God, such as re, ood,
hurricanes and tornadoes.
What are the Limits on Sunbeam’s Liability?
Sunbeam shall not be liable for any incidental or consequential damages
caused by the breach of any express, implied or statutory warranty or condition.
Except to the extent prohibited by applicable law, any implied warranty or
condition of merchantability or tness for a particular purpose is limited in
duration to the duration of the above warranty.
Sunbeam disclaims all other warranties, or conditions or representations,
express, implied, statutory or otherwise.
Sunbeam shall not be liable for any damages of any kind resulting from the
purchase, use or misuse of, or inability to use the product including incidental,
special, consequential or similar damages or loss of prots, or for damages
arising from any tort, including negligence or gross negligence, or fault
committed by Sunbeam, its agents or employees or for any breach of contract,
fundamental or otherwise, or for any claim brought against purchaser by any
other party.
Some states or jurisdictions do not allow the exclusion or limitation of incidental
or consequential damages or limitations on how long an implied warranty lasts,
so the above limitations or exclusions may not apply to you. This warranty gives
you specic legal rights, and you may also have other rights that vary from state
to state or jurisdiction to jurisdiction.
How to Obtain Warranty Service
In the U.S.A.
If you have any question regarding this warranty or would like to obtain
warranty service, please call 1-800-672-6333 and a convenient service center
address will be provided to you.
In the U.S.A., this warranty is offered by Sunbeam Products, Inc. Boca Raton,
Florida 33431. If you have any other problem or claim in connection with this
product, please write to Consumer Service Department.
This appliance has no user serviceable parts. Any servicing beyond that
described in the Cleaning Section should be performed by an Authorized
Service Representative only. See warranty available online.
Service Maintenance and Warranty can be found online at www.mrcoffee.com
or call us toll-free at the Consumer Service Department, 1-800-672-6333
USER MAINTENANCE
SERVICE MAINTENANCE
AND WARRANTY

© 2022 Sunbeam Products, Inc. All rights reserved. Distributed by Sunbeam Products, Inc.,
Boca Raton, Florida 33431. Sunbeam Products, Inc. is a subsidiary of Newell Brands Inc.
(NYSE: NWL).
Printed in China.
For product questions contact:
Sunbeam Consumer Service
1-800-672-6333
www.mrcoffee.com

ONE TOUCH COFFEEHOUSE +
MANUAL DEL USUARIO
www.mrcoffee.com
SERIE BVMC-ECM-PMPAT
+ Tablero de control “Un Toque”
para elegir bebidas fácilmente
+ Bomba italiana con 19 bares
para un sabor más óptimo en
la extracción
+ Espuma la leche
automáticamente
+ Depósitos de leche y agua
desmontables y fácil de
almacenar
P.N: NWL0001370467 REV A/
2176898

2 3
INTRODUCCIÓN
Bienvenido y felicitaciones por la compra de su nueva
Mr. Coffee® One Touch CoffeeHouse +. Esta cafetera
única se ha diseñado para ayudarle a preparar deliciosos
espressos, capuchinos y lattes de forma rápida, sencilla y
cómoda con solo pulsar un botón.
Nuestro objetivo principal es brindarle la mejor taza de
café cada vez, por lo tanto, si tuviera alguna pregunta
acerca de su cafetera, póngase en contacto al
1-800-672-6333 o visítenos en la página
www.mrcoffee.com.
MEDIDAS DE SEGURIDAD IMPORTANTES
Cuando se utilizan aparatos eléctricos, siempre se deben seguir medidas
básicas de seguridad para reducir el riesgo de incendio, descarga eléctrica o
lesiones personales, incluidas las siguientes:
1. Lea todas las instrucciones antes de utilizar el producto.
2. No toque las supercies calientes. Utilice las asas o perillas.
3. A n de protegerse contra una descarga eléctrica, no coloque ni sumerja el
cable, los enchufes o el aparato en agua o ningún otro líquido.
4. Este aparato no está diseñado para ser utilizado por los niños ni por
personas con su capacidad física, sensorial o mental reducida, o con falta
de experiencia o conocimiento. Todo aparato utilizado cerca de los niños,
requiere la supervisión cercana de un adulto. Los niños deben supervisarse
para asegurar que no jueguen con el aparato. Mantenga el aparato y su
cable fuera del alcance de los niños.
5. Desenchufe el aparato del tomacorriente cuando éste o el reloj digital (si es
proporcionado) no esté en uso y antes de limpiarlo. Permita que el aparato
se enfríe antes instalarle o retirarle piezas y antes de limpiarlo.
6. No opere ningún aparato que tenga un cable o enchufe dañado o después
de presentar un fallo en su funcionamiento o si ha sido dañado de manera
alguna. No intente reemplazar o cortar un cable dañado. Devuelva el
aparato a un centro de servicio autorizado para su revisión, reparación o
ajuste.
7. El uso de accesorios no recomendados por el fabricante del aparato podría
ocasionar incendio, descarga eléctrica o lesiones personales.
8. No utilice el aparato a la intemperie ni para propósito comercial.
9. No permita que el cable cuelgue del borde de la mesa o del mostrador ni
que toque supercies calientes.
10. No coloque el aparato sobre o cerca de una hornilla caliente de gas o
eléctrica ni dentro de un horno caliente.
11. Siempre conecte primero el enchufe al aparato y luego enchufe el cable
al tomacorriente (para aparatos con cables separables). Para desconectar,
gire todo control a la posición de apagado y luego retire el enchufe del
tomacorriente.
12. No utilice el aparato para otro n que no sea para el que ha sido diseñado.
13. ADVERTENCIA: Para evitar el riesgo de lesión, nunca abra o desconecte
la cámara de preparación (portaltro) durante el ciclo de preparación.
Siempre conecte adecuadamente el sostenedor del ltro al mecanismo de
cerrado. El no hacerlo, podría desconectar el sostenedor del ltro durante
el ciclo de preparación y ocasionar lesiones.
14. Modelos diseñados para utilizarse con cápsulas selladas: Solo utilice
cápsulas diseñadas para este aparato. Si la cápsula no encaja en posición,
no la fuerce dentro del aparato.

4 5
Un cable de alimentación corto (o cable de alimentación separable) puede
ser provisto para reducir los riesgos de enredarse o tropezar con un cable
más largo. Existen cables de alimentación separables más largos o cables
de extensión disponibles y estos pueden ser utilizados si se toma el cuidado
debido en su uso. Si se utiliza un cable de alimentación separable o cable de
extensión:
a. La clasicación eléctrica marcada del cable de alimentación separable o
cable de extensión debe ser, como mínimo, igual a la clasicación eléctrica
del aparato;
b. Si el aparato es del tipo de conexión a tierra, el cable de extensión debe ser
un cable de tres alambres de conexión a tierra; y
c. El cable más largo debe ser acomodado de manera que no cuelgue del
mostrador o de la mesa para evitar que un niño tire del mismo o que
alguien se tropiece sin darse cuenta.
No tire, tuerza ni maltrate el cable de alimentación.
No utilice café molido tostado con azúcar (*) ni granos de café tostados con
azúcar, ya que estos obstruirán el ltro y dañarán el electrodoméstico.Si se ha
utilizado accidentalmente café molido tostado con azúcar, pare de utilizar la
unidad y llame a servicio al cliente.
Recomendamos descalcicar periódicamente la máquina para mantener en
buenas condiciones su funcionamiento. Comuníquese con nuestra línea de
servicio al cliente para obtener más información sobre este proceso.
(*) Molido Con Azúcar
INSTRUCCIONES PARA EL CABLE DE
ALIMENTACIÓN:
USO DEL CAFÉ MOLIDO ADECUADO PARA
CAFETERAS DE ESPRESSO
MEDIDAS DE SEGURIDAD IMPORTANTES
(CONTINUACIÓN)
CONSERVE ESTAS INSTRUCCIONES
SOLAMENTE PARA USO DOMÉSTICO
Enchufe polarizado
Este aparato tiene un enchufe polarizado (un
contacto es más ancho que el otro). Como una
característica de seguridad para reducir el riesgo de
descarga eléctrica, este enchufe está diseñado para
entrar en un tomacorriente polarizado solo de una
manera. Si el enchufe no entra completamente en el
tomacorriente, invierta el enchufe. Si aún no entra, consulte a un electricista
calicado. No intente ignorar esta característica de seguridad ni modicar
el enchufe de manera alguna. Si el enchufe entra holgadamente en el
tomacorriente de corriente alterna o si el tomacorriente de corriente alterna
se siente caliente, no utilice ese tomacorriente.
15. Modelos con molinillos de café: Revise el depósito de granos para la
presencia de otros artículos antes de usarlo.
Para aparatos con paneles de servicio:
16. ADVERTENCIA: PARA REDUCIR EL RIESGO DE INCENDIO O DESCARGA
ELÉCTRICA, NO RETIRE ESTA TAPA. NO TIENE PIEZAS EN EL INTERIOR
QUE DEBAN SER REPARADAS POR EL USUARIO. CUALQUIER
REPARACIÓN SOLO DEBE SER REALIZADA POR PERSONAL DE SERVICIO
AUTORIZADO.
AVISOS SOBRE EL PRODUCTO
1. Coloque el aparato sobre una supercie dura, plana y nivelada para evitar
interrupciones en el ujo de aire por debajo de la cafetera.
2. No opere el aparato con un tanque de agua vacío.
3. Mantenga el área arriba del aparato despejada durante el uso, ya que vapor
caliente saldrá del aparato.

6 7
CONOZCA SU MÁQUINA DE ESPRESO,
CAPUCHINO Y LATTE
18
17
2a
7a 7c
7b 8
1
9
12
2
3
6
4
5
16
15
10
19
14
13
11
9a
9b
9c
9e
9f
9g
9d
1. Cabezal de preparación
2. Portaltro:
a. Portaltroparacafémolidoycápsulas
E.S.E.(45mm)
3. Ranura de ajuste de la altura para tazas
pequeñas
4. Rejilla de goteo extraíble
5. Bandeja de goteo extraíble
6. Elemento móvil de la bandeja de goteo que
indica el rebose de líquidos
7. Filtros para:
a. Unasoladosisdeespressoycápsulas
E.S.E.(45mm)
b. Dosis doble de espresso
c. Cubiertas inferiores desmontables de los
ltros
8. Dosicador/compactador
9. Panel de control
a. Barra de progreso
b. Botón de espresso sencillo (1) y doble (2)
c. Botón de latte pequeño (1) y grande (2)
d. Botón de capuchino pequeño (1) y
grande (2)
e. Botón de preparación manual de
espresso
f. Botón para espumar la leche de forma
manual
g. Botón de limpieza
10. Depósito de leche desmontable/
transparente
11. Tapa del depósito de leche
12. Botón para desencajar el depósito de leche
13. Botón de control del nivel de espuma de
leche
14. Palanca de guía para espumar leche
15. Tubo espumador
16. Interruptor de encendido/apagado “I/O”
17. Depósito de agua extraíble
18. Tapa del depósito de agua
19. Tubo para leche
PRESENTACIÓN
La cafetera Mr. Coffee® One-Touch CoffeeHouse + se ha diseñado para
ayudarle a preparar deliciosos espressos, capuchinos y lattes de forma rápida,
sencilla y cómoda con solo pulsar un botón.
ESPRESSO
Un método único de preparar café por el que el agua caliente pasa a través
del café namente molido. Es muy popular en Europa, y tiene mucho más
cuerpo que el café preparado por goteo. Debido a su intensidad, el espresso
suele servirse en porciones de entre 45 y 60ml, en tazas especícas de
tamaño reducido.
CAPUCHINO
Una medida compuesta por aproximadamente 1/3 de espresso, 1/3 de leche
caliente y 1/3 leche espumada.
LATTE
Una medida compuesta por 1/4 de espresso y 3/4 de leche caliente.
Lea cuidadosamente TODAS las instrucciones, advertencias y notas, incluido
este manual de instrucciones, antes de usar este aparato. Durante su uso,
se calentarán algunas piezas y accesorios, y debe dejar que se enfríen. Un
cuidado y mantenimiento adecuados garantizarán que la Mr. Coffee® One-
Touch CoffeeHouse + tenga una larga vida útil y funcione sin problemas.
Guarde estas instrucciones y consúltelas a menudo para obtener consejos de
limpieza y cuidado.
Su Mr. Coffee® One-Touch CoffeeHouse + puede usarse con café molido, así
como con cápsulas E.S.E. (45 mm), lo que la hace excepcionalmente práctica y
versátil y permite preparar espressos, capuchinos y lattes.
ANTES DE USAR EL APARATO POR
PRIMERA VEZ
LIMPIEZA DEL APARATO ANTES DEL PRIMER USO
Consulte la sección “Descripción del aparato” para familiarizarse con el
producto e identicar todas sus partes y piezas.
1. Asegúrese de que la unidad está apagada (“O”) pulsando el interruptor de
encendido/apagado “I/O” situado en el lado derecho del aparato. Asegúrese
de que está desenchufada de la corriente eléctrica.
2. Retire las pegatinas y las etiquetas de la unidad.
3. Retire el tapón rojo de la parte inferior del depósito de agua.
4. Retire y luego lave el depósito de agua, el depósito de leche, el portaltro,
los dos ltros y el dosicador/compactador con agua y detergente suave.
Aclárelos con abundante agua y vuelva a colocarlos en la unidad.
5. Consulte las instrucciones de la sección “CÓMO COLOCAR EL
PORTAFILTRO” antes de colocar o retirar el portaltro o cualquier otro ltro
de la unidad.

8 9
6. Para limpiar el interior del aparato, siga los pasos de la sección “CÓMO
PREPARAR UN CAPUCHINO” usando agua en ambos depósitos y sin poner
café molido en el ltro. No sumerja el cuerpo principal del aparato ni el cable/
enchufe de alimentación en agua ni intente llegar hasta las piezas internas.
IMPORTANTE: CEBADO DE LA MÁQUINA
Para cebar la máquina, ejecute el ciclo de vapor siguiendo estos pasos:
1. Llene el depósito de agua hasta la línea “MAX” y asegúrese de colocarlo
bien encajado en la unidad con la tapa cerrada.
2. Llene el depósito de leche con agua hasta el nivel “MAX” y vuelva
a colocarlo en su sitio. Debe notar que el depósito de leche se haya
encajado en su sitio.
3. Seleccione uno de los ltros (espresso sencillo o doble) y colóquelo
en el portaltro para café molido. Coloque el portaltro en la unidad
y asegúrese de que queda correctamente encajado; coloque una taza
grande debajo. Asegúrese que la punta del tubo espumador apunta hacia
dentro de la taza.
4. Conecte el aparato a un enchufe adecuado.
5. Enciéndalo con el botón de encendido “I”.
6. La barra de progreso del panel de control se iluminará (calentador de
espresso y calentador de vapor “ ”) para mostrar el progreso. Cuando la
barra de progreso presente una luz ja y esté iluminada por completo,
pulse el botón de preparación manual de espresso
“”. El agua uirá; permita que se llene una taza y luego vuelva a pulsar
el botón para detener el ujo. La barra de progreso se iluminará en ciclos
mientras esté funcionando.
7. Deseche el agua de la taza y vuelva a colocarla en la unidad.
8. Pulse el botón para espumar la leche de forma manual “ ”. El agua
uirá; permita que se llene una taza y luego vuelva a pulsar el botón para
detener el ujo. La barra de progreso se iluminará en ciclos mientras esté
funcionando.
9. La barra de progreso del panel de control se iluminará (calentador de
espresso y calentador de vapor “ ”) con una luz ja. La unidad ya está
cebada y lista para usarse.
CÓMO SELECCIONAR LA TAZA ADECUADA
Asegúrese de seleccionar una taza de acuerdo con el siguiente cuadro:
NOTA: la cantidad total de bebida puede variar en función del tipo de leche y
del nivel de espuma usado.
BEBIDA SUGERENCIA
DE TAZA
Espresso Sencillo (1)
Doble (2)
40ml/1.25oz
80ml/2.5oz
Capuchino Pequeño (1)
Grande (2)
230ml/7.5oz
460ml/15.5oz
Latte Pequeño (1)
Grande (2)
400ml/13.5oz
550ml/18.5oz
CÓMO SELECCIONAR EL CAFÉ ADECUADO
EL CAFÉ
El café debe estar recién molido y tener un tueste oscuro. Recomendamos
usar un café molido de tueste francés o italiano para los espressos. El café
molido previamente solo conserva su sabor durante 7 u 8 días si se almacena
en un recipiente hermético en un lugar fresco y oscuro. No lo almacene en el
frigoríco ni en el congelador. Se recomienda que los granos enteros se muelan
justo antes usarlos. Los granos de café almacenados en un recipiente hermético
conservarán su sabor hasta 4 semanas.
LA MOLIENDA
Es un paso imprescindible en el proceso de preparación de un espresso y
puede requerir algo de práctica. El café debe molerse no.
• La molienda debe tener el aspecto de la sal de mesa.
• Si la molienda es demasiado na, el agua no uirá a través del café, ni
siquiera con una presión alta. Este tipo de moliendas parecen polvo y
notará que tienen la consistencia de la harina cuando las toque.
• Si la molienda es demasiado gruesa, el agua uye con demasiada rapidez
a través del café y no permite conservar todo el sabor en la extracción.
Asegúrese de usar un molinillo de calidad para conseguir una consistencia
uniforme.
INSTRUCCIONES DE USO
CÓMO LLENAR EL DEPÓSITO DE AGUA
1. Llene el depósito de agua con agua (consulte la gura 1). Puede usar una
jarra para llenarlo, o retirarlo de la unidad y llenarlo directamente bajo el grifo.
Llene el depósito con la cantidad deseada de agua sin sobrepasar el nivel
“MAX”. No use nunca agua tibia o caliente para llenar el depósito de agua.
2. Cierre la tapa del depósito de agua. Si lo ha extraído de la unidad para
llenarlo de agua, vuelva a colocarlo en su sitio y asegúrese de que esté bien
encajado
Figura 1

10 11
CÓMO LLENAR EL DEPÓSITO DE LECHE
Si desea preparar un capuchino o un latte, retire el depósito de leche de la
unidad levantando el botón de liberación y deslizando a la vez el depósito
de leche (consulte la gura 2). A continuación, vierta la cantidad deseada de
leche fría que estime que va a necesitar, y asegúrese que no sobrepasa el
nivel “MAX” (consulte la gura 3). Cuando haya acabado, vuelva a colocar el
depósito de leche en la unidad y asegúrese de que esté bien situado. Debe
notar que el depósito de leche se haya encajado en su sitio.
NOTA: Puede usar el tipo de leche que preera: entera, desnatada, orgánica,
de soja, etc...
CÓMO USAR EL PORTAFILTRO PARA CAFÉ MOLIDO Y CÁPSULAS E.S.E.
CÓMO ELEGIR EL FILTRO
Seleccione el ltro del siguiente modo:
a. PARA UNA SOLA DOSIS: elija el ltro para una sola dosis de espresso si usa
café molido o cápsulas E.S.E. (Easy Serving Espresso).
b. PARA UNA DOSIS DOBLE O DOS DOSIS SENCILLAS: elija el ltro para una
dosis doble de espresso. Si coloca dos tazas pequeñas bajo el portaltro,
podrá preparar dos dosis sencillas de espresso a la vez.
Figura 3
Figura 2
CÁPSULA
CÓMO COLOCAR EL FILTRO EN EL PORTAFILTRO
1. Inserte el ltro en el portaltro y asegúrese de alinear la marca del ltro con
la ranura del portaltro (consulte la gura 4).
2. Gire el ltro a la izquierda o a la derecha para encajarlo en su sitio (consulte
la gura 5).
NOTA: Para retirar el ltro y limpiarlo, gírelo a la izquierda o a la derecha para
alinear la marca del ltro con la muesca del portaltro.
ADVERTENCIA: Asegúrese de que el ltro se ha enfriado antes de intentar
extraerlo del portaltro.
CÓMO LLENAR DE CAFÉ
PARA EL CAFÉ MOLIDO:
a. Llene el ltro con café espresso recién molido con una molienda na hasta
unos 3mm del borde (NO lo llene en exceso).
b. Use la parte compactadora del dosicador para aplastar el café molido para
espresso y conseguir que quede compacto y uniforme.
c. Limpie los restos de café del borde para asegurarse de que encaje a la
perfección bajo el cabezal de preparación.
PARA CÁPSULAS E.S.E. (EASY SERVING ESPRESSO)
Solo tiene que colocar la cápsula en el ltro si desea una dosis sencilla
de espresso. Si queda algún trozo de papel de la cápsula fuera del ltro,
asegúrese de doblarlo hacia dentro para garantizar un sellado correcto
durante la preparación.
CÁPSULA
a. b. c.
Figura 5
Figura 4

12 13
CÓMO COLOCAR EL PORTAFILTRO
a. Coloque el portaltro bajo el cabezal de preparación.
b. Coloque el mango de tal forma que quede alineado con el icono del
candado abierto “ ” de la unidad y encaje en la muesca.
c. A continuación, gírelo lentamente hacia la derecha hasta que el mango
quede alineado con el símbolo del candado cerrado “ ” de la unidad.
ADVERTENCIA Asegúrese de no pulsar accidentalmente uno de los botones
de bebida.
CÓMO COLOCAR LA(S) TAZA(S)
a. Ajuste la altura insertando la rejilla de goteo extraíble en la ranura de ajuste
de altura si usa una taza pequeña de espresso.
b. Mantenga la rejilla de goteo extraíble encima de la bandeja de goteo
extraíble si usa una taza grande para capuchino o latte.
PRECAUCIÓN: Cuando prepare capuchinos o lattes, asegúrese de ajustar la
palanca de guía para espumar leche y colocar el tubo espumador dentro de la
taza.
CÓMO ENCENDER LA UNIDAD
a. Asegúrese de que la unidad esté conectada en el enchufe adecuado.
b. Encienda la unidad (“I”) con el interruptor de encendido/apagado “I/O”
ubicado en el lado derecho.
a. c.
b.
a. b.
SELECCIÓN DE FUNCIONES
PARA PREPARAR ESPRESSOS
a. Pulse el botón de espresso “ ” una vez para preparar una dosis sencilla. El
símbolo indicador (1) se iluminará para una sola dosis de espresso. La barra
de progreso indicará que se está preparado una sola dosis de espresso.
b. Pulse el botón de espresso “ ” dos veces para preparar una dosis doble
o dos dosis sencillas de espresso. El símbolo indicador (2) se iluminará
para una dosis doble de espresso. La barra de progreso indicará que se
está preparando una dosis doble de espresso. En ambas funciones de
preparación automática de espresso, la unidad comenzará a preparar el
espresso en base a su selección. La unidad se detendrá automáticamente
al nalizar el proceso y la barra de progreso se iluminará por completo con
una luz ja que indica que el ciclo se ha completado. Ya puede degustar su
delicioso espresso.
NOTA: Si desea preparar una cantidad de café inferior a la de la dosis
predeterminada, pulse el botón de función en cualquier momento durante la
preparación para detener el proceso cuando se haya alcanzado la cantidad
deseada.
c. Si desea preparar un espresso de forma manual, pulse el botón de
preparación manual de espresso “ ” una vez para comenzar el proceso.
Cuando haya conseguido la cantidad deseada de espresso, pulse otra vez el
botón de preparación manual de espresso para detener la máquina.
PARA PREPARAR CAPUCHINOS
Antes de preparar un capuchino, ajuste el nivel de espuma de leche en base
a sus preferencias girando el botón de control del nivel de espuma de leche a
la derecha para conseguir más espuma (capuchino) o hacia la izquierda para
menos espuma (latte).
a.
x1
x1
b.
x2
x2
c.
La barra de progreso del panel de control se iluminará (calentador de espresso
y calentador de vapor “ ”) durante el proceso de calentamiento y hasta que
el agua y la leche (si prepara un capuchino o un latte) alcancen la temperatura
ideal. Cuando la barra de progreso se ilumine por completo con una luz ja, la
unidad estará lista para usarse.
c.
b.
a.

14 15
NOTA: El nivel de espuma también puede ajustarse durante el ciclo de
preparación.
a. Pulse el botón de capuchino
“ ” una vez para preparar una taza pequeña de capuchino. El símbolo
indicador (1) se iluminará para una taza pequeña de capuchino. La barra de
progreso indicará que se está preparando una taza pequeña de capuchino.
b. Pulse el botón de capuchino
“ ” dos veces para preparar una taza grande de capuchino. El símbolo
indicador (2) se iluminará para una taza grande de capuchino. La barra de
progreso indicará que se está preparando una taza grande de capuchino.
La unidad empezará a preparar un capuchino en base a su selección. La
unidad se detendrá automáticamente al nalizar el proceso y la barra de
progreso se iluminará por completo con una luz ja que indica que el ciclo se
ha completado. ¡Su delicioso capuchino ya está listo para disfrutarse!
PARA PREPARAR LATTES
Antes de preparar un latte, ajuste el nivel de espuma de leche según sus
preferencias girando el botón de control del nivel de espuma de leche a la
derecha para conseguir más espuma (capuchino) o hacia la izquierda para
menos espuma (latte).
a.
x1
x1
b.
x2
x2
MÁS ESPUMA MENOS ESPUMA
a. Pulse el botón de latte “ ” para preparar una taza pequeña de latte. El
símbolo indicador (1) se iluminará para una taza pequeña de latte. La barra
de progreso indicará que se está preparando una taza pequeña de latte.
b. Pulse el botón de latte “ ” para preparar una taza grande de latte. El
símbolo indicador (2) se iluminará para una taza grande de latte. La barra
de progreso indicará que se está preparando una taza grande de latte.
La unidad empezará a preparar un latte en base a su selección. La unidad
se detendrá automáticamente al nalizar el proceso y la barra de progreso
se iluminará por completo con una luz ja que indica que el ciclo se ha
completado.
PARA PREPARAR LECHE ESPUMADA
La cafetera Mr. Coffee® One-Touch CoffeeHouse + también le permite preparar
leche espumada sola. Pulse el botón para espumar la leche de forma manual “
” si desea añadir más espuma a su bebida o preparar leche espumada para
otra bebida, por ejemplo, un macchiato, un chocolate caliente, un chai latte,
etc. Pulse el botón para espumar la leche de forma manual.
a.
x1
x1
b.
x2
x2
MÁS ESPUMA MENOS ESPUMA

16 17
DESPUÉS DE PREPARAR SUS BEBIDAS CON LECHE
Cuando haya terminado de preparar su bebida con leche, puede guardar el
depósito de leche de la unidad directamente en el frigoríco (y tenerlo listo
para un próximo uso) o desechar la leche sobrante.
Coloque una taza grande vacía (con una capacidad de al menos 325 ml) bajo
el tubo espumador. Gire el botón de control del nivel de espuma de leche
en sentido contrario a las agujas del reloj hasta la posición de limpieza “ ” y
pulse el botón de limpieza “ ” para activar esa función. Deje que la unidad
dispense agua por el tubo hasta que salga limpia. La unidad se detendrá
automáticamente cuando la barra de progreso nalice el ciclo y se ilumine por
completo con una luz ja para indicar que el ciclo de limpieza ha nalizado;
también puede pulsar el botón de limpieza “ ” para detener el proceso.
x1
x1
LIMPIEZA DE SU MÁQUINA
La luz de limpieza se quedará iluminada cuando la máquina esté listapara el
ciclo de limpieza. Apague, desenchufe y deje que el aparato se enfríe antes de
ponerle o quitarle piezas y de limpiarlo
LIMPIEZA DE LA BANDEJA DE GOTEO
Vacíe la bandeja de goteo cuando sea necesario. Si el nivel indicador de agua
aparece rojo a través de la rejilla, vacíe la bandeja de goteo inmediatamente.
Limpie la bandeja de goteo y la rejilla semanalmente con agua tibia y un poco
de detergente líquido no abrasivo, enjuague y seque.
CÓMO LIMPIAR EL DEPÓSITO DE LECHE Y EL TUBO ESPUMADOR
Aunque puede guardar el depósito con la leche sobrante en el frigoríco, es
importante limpiar tanto el depósito como el tubo con frecuencia para evitar
que se atasquen y se acumulen los residuos. Siga las siguientes instrucciones
para limpiar el depósito de leche:
1. Retire el depósito de leche de la unidad levantando el botón de liberación y
deslizando a la vez el depósito de leche para sacarlo.
2. Retire la tapa del depósito.
3. Si queda algo de leche, deséchela; a continuación, enjuague y lave el
depósito de leche y la tapa con abundante agua tibia y jabón. Asegúrese
de aclararlos y secarlos bien. No use limpiadores abrasivos ni esponjas que
puedan rayar los elementos.
NOTA: El depósito de leche puede lavarse en el compartimento superior del
lavavajillas, pero la tapa no.
4. Llene el depósito de leche con agua sin sobrepasar la línea “MAX”. Vuelva a
colocar el depósito de leche en la unidad. Para ello, sujete el depósito por la
tapa, levante el botón de liberación y deslice el depósito para encajarlo en la
unidad.
5. Coloque una taza grande vacía bajo el tubo espumador.
6. Gire el botón de control del nivel de espuma de leche en sentido contrario
a las agujas del reloj hasta la posición de limpieza “ ” y pulse el botón de
limpieza “ ” para activar esa función. La unidad comenzará a liberar vapor
a través del tubo espumador. Deje que el ciclo de limpieza se complete hasta
que ya no vea agua salir del tubo o hasta que se detenga automáticamente.
7. Deseche el agua que quede en el depósito de leche y vuelva a colocarlo en la
unidad. Debe notar que el depósito de leche se haya encajado en su sitio.
LIMPIEZA PROFUNDA DE LOS FILTROS
Asegúrese de limpiar los ltros en profundidad cada 90 días para conseguir
un funcionamiento óptimo de la máquina. Siga estas instrucciones para
desmontar y enjuagar las piezas en un bol grande con agua tibia. Una vez que
las haya enjuagado bien, séquelas con un paño y vuelva a montarlas.
1. Para retirar las cubiertas inferiores desmontables de los ltros, gírelas en
sentido contrario a las agujas del reloj hacia el icono de desbloqueo “ ”.
2. Lave las cubiertas inferiores desmontables y los ltros con agua tibia y jabón.
Asegúrese de aclararlos y secarlos bien.
3. Inserte las cubiertas inferiores desmontables en los ltros para volver a
colocarlas y gírelas en el sentido de las agujas del reloj (alejándose del icono
de desbloqueo “ ”) hasta oír un “clic”.
LIMPIEZA DEL TUBO ESPUMADOR SIN AFECTAR A LA LECHE DEL DEPÓSITO
1. Asegúrese de que el depósito de leche y la tapa están correctamente
insertados en la unidad.
2. Coloque una taza grande vacía bajo el tubo espumador.
3. Gire el botón de control del nivel de espuma de leche en sentido contrario
a las agujas del reloj hasta la posición de limpieza “ ” y pulse el botón “
” para activar esa función. La unidad comenzará a liberar vapor a través del
Abrir
Paso 1
Paso 2 Paso 3
Levantar
Presionar
Retirar
Retirar la
junta
Retirar el
filtro
Abrir
Paso 1
Paso 2
Paso 3
Levantar
Presionar
Retirar
Retirar la
junta
Retirar el
filtro
Abrir
Paso 1 Paso 2
Paso 3
Levantar
Presionar
Retirar
Retirar la
junta
Retirar el
filtro

18 19
tubo espumador. Deje que el ciclo de limpieza se complete hasta que ya no
vea agua salir del tubo o hasta que se detenga automáticamente.
4. Deseche el agua de la taza.
5. Puede retirar el depósito de leche y la tapa y guardarlo en el frigoríco para
usar el contenido en otro momento.
LIMPIEZA DEL CABEZAL DE PREPARACIÓN, EL PORTAFILTRO Y LOS
FILTROS
1. Pulse el interruptor de encendido/apagado “I/O” situado a la derecha de
la unidad para que quede en la posición de apagado “O” y desconecte el
enchufe de la corriente.
2. Algunas de las piezas metálicas pueden estar calientes. No las toque con las
manos antes de que se hayan enfriado.
3. Retire el portaltro y deseche el café que quede o la cápsula usada. Lave
tanto el portaltro como el ltro con abundante agua tibia con jabón.
Asegúrese de aclararlos y secarlos bien.
NOTA: No lave el portaltro ni los ltros en el lavavajillas.
4. Limpie la parte inferior del cabezal de preparación de la unidad con un paño
húmedo o con papel de cocina para retirar el café que pueda quedar.
5. Vuelva a colocar el portaltro (sin ningún ltro) en el cabezal de preparación
y fíjelo.
6. Coloque una taza grande vacía bajo el portaltro.
7. Enchufe el aparato a la corriente eléctrica. Pulse el interruptor de encendido/
apagado “I/O” para que quede en la posición de encendido “I”. Pulse una vez
el botón de espresso “ ” y deje que la unidad expulse agua hasta que se
detenga de forma automática.
LIMPIEZA DEL DEPÓSITO DE AGUA
1. Extraiga el depósito de agua y vuélquelo sobre el fregadero para retirar el
agua restante. Se recomienda vaciar el depósito de agua tras cada uso.
2. Lave el depósito de agua y la tapa con abundante agua tibia y jabón.
Asegúrese de aclararlos y secarlos bien.
NOTA: No lave el depósito de agua ni la tapa en el lavavajillas.
PRECAUCIÓN: No sumerja el cuerpo principal del aparato, el cable de
alimentación ni el enchufe en agua ni en ningún otro líquido.
LIMPIEZA DE LA UNIDAD
1. Limpie la estructura con un paño suave húmedo. No use limpiadores
abrasivos ni esponjas que puedan rayar los elementos.
2. No guarde ninguno de los portaltros en el cabezal de preparación. Esto
podría afectar de forma negativa a la junta que se encuentra entre el cabezal
de preparación y el portaltro cuando se preparan los espressos.
PROCESO DE DESCALCIFICACIÓN
La acumulación de depósitos minerales en la unidad afectará al
funcionamiento del aparato. Debe descalcicar el aparato cuando empiece a
notar un aumento en el tiempo requerido para preparar espressos o cuando
salga demasiado vapor. Asimismo, podría observar una acumulación de
depósitos blancos en la supercie del cabezal de preparación.
La frecuencia de limpieza depende de la dureza del agua usada. La siguiente
tabla incluye los intervalos de limpieza sugeridos.
INTERVALOS DE LIMPIEZA SUGERIDOS
Tipo de agua Frecuencia de limpieza
Aguablanda(ltrada)
Cada 80 ciclos de preparación
Agua dura (del grifo)
Cada 40 ciclos de preparación
CÓMO DESCALCIFICAR EL DEPÓSITO DE AGUA:
1. Llene el depósito con vinagre blanco sin diluir.
2. Deje que el vinagre repose en el depósito de agua del aparato durante toda
la noche.
3. Extraiga el depósito y vuélquelo sobre el fregadero para desechar el vinagre.
4. Enjuague el depósito con abundante agua del grifo; para ello, llénelo de
agua hasta la mitad, deseche ese agua y vuelva a repetir este paso.
CÓMO DESCALCIFICAR LAS PIEZAS INTERNAS:
1. Asegúrese de descalcicar antes el interior del depósito de agua. Para ello,
siga los pasos descritos arriba.
2. Coloque el interruptor de encendido/apagado en la posición “O” y
desconecte el cable de la corriente eléctrica. Llene el depósito con vinagre
blanco sin diluir.
3. Inserte el portaltro (con ltro pero sin café) y coloque una taza grande vacía
sobre la bandeja de goteo, bajo el portaltro.
4. Enchufe el aparato a la corriente eléctrica.
5. Pulse el interruptor de encendido/apagado para encender la unidad (“I”); la
barra de progreso del panel de control se iluminará (calentador de espresso
y calentador de vapor “ ”) para mostrar el progreso. Cuando la barra de
progreso presente una luz ja y esté iluminada por completo, pulse dos (2)
veces el botón de preparación automática de espresso “ ”.
El vinagre empezará a uir; permita que se llene una taza y luego vuelva a
pulsar el botón para detener el ujo. La barra de progreso se iluminará en
ciclos mientras esté funcionando.

20 21
6. Coloque una taza grande vacía (con una capacidad de al menos 325 ml)
bajo el tubo espumador. Llene el depósito de leche con agua y vuelva a
colocarlo en la unidad. Gire el botón de control del nivel de espuma de leche
en sentido contrario a las agujas del reloj hasta la posición de limpieza “ ” y
pulse el botón de limpieza
“” para activar esa función. Deje que el ciclo de limpieza se complete hasta
que ya no vea leche salir del tubo o hasta que se detenga automáticamente.
7. Repita los pasos del 1 al 6 tantas veces como sea necesario usando solo agua
del grifo para aclarar los restos de vinagre que queden en la máquina.
NOTIFICACIÓN DE LIMPIEZA
La noticación de limpieza se activa tras 200 ciclos.
1. La luz indicadora de limpieza se mantendrá iluminada hasta que se complete
el proceso de limpieza.
a. Si prepara otro espresso, latte o capuchino, la luz de limpieza se
apagará momentáneamente, pero volverá a parpadear en cuanto
nalice la preparación de la bebida.
b. La luz indicadora de limpieza se apagará cuando se apague la
unidad.
c. La luz indicadora de limpieza se apagará cuando la unidad entre en
modo de reposo.
PROCEDIMIENTO DE LIMPIEZA
1. Vierta en el depósito de agua una solución compuesta por un 50% de
vinagre y un 50% de agua limpia. Remueva la solución con una cuchara para
asegurarse de que se ha mezclado bien.
2. Gire el botón del depósito de leche hasta la posición de limpieza. Coloque
una taza grande vacía bajo el tubo espumador.
3. Pulse el botón de limpieza durante 5 segundos para activar el modo de
limpieza profunda.
a. La barra de progreso mostrará una iluminación cíclica, como durante
la preparación de bebidas, durante el ciclo completo de limpieza.
b. La bomba se encenderá y se apagará varias veces durante unos
7.5 minutos. La luz de limpieza se apagará para indicar que se ha
completado el ciclo de limpieza.
4. Deseche la solución restante en el depósito de agua y sustitúyala por agua
limpia. Llene el depósito con agua limpia hasta la línea “MAX”.
5. Pulse el botón de preparación manual de espresso “ ” y deje que el agua
llene una taza; luego pulse el botón de preparación manual de espresso para
detener la máquina.
6. Gire el botón del depósito de leche hasta la posición de limpieza y pulse el
botón de limpieza para que se ejecute el modo de limpieza estándar.
7. Pulse el botón de espresso y deje que la función de vapor lo elimine todo.
PROBLEMA CAUSAS SOLUCIONES
Elcafénosale. • No hay agua en el depósito.
• Elcafémolidoesdemasiado
no.
• Haydemasiadocaféenelltro.
• El aparato no se ha encendido o
enchufado a la corriente.
• Elcafésehacomprimido
demasiado.
• Añada agua.
• Prepareelcaféconuna
molienda media.
• Echemenoscaféenelltro.
• Enchufe la unidad a la corriente
yenciéndala.
• Vuelvaallenarlacestadelltro
concaféyCOMPÁCTELOCON
DELICADEZA.
Elcafésaleporel
bordedelportaltro.
• Elportaltronosehagirado
hasta la posición de bloqueo
completo.
• Haycafémolidoenelbordede
lacestadelltro.
• Haydemasiadocaféenelltro.
• Gireelportaltrohastala
posición de
bloqueo completo.
• Limpie el borde.
• Pongamenoscafé.
La leche no hace
espuma cuando
debería o no sale del
tubo correspondiente.
• Compruebe la posición del
botón de control del nivel de
espuma de leche.
• No queda vapor.
• Lalechenoestálo
sucientementefría.
• Eltuboespumadorestá
atascado.
• Asegúrese de que hay
sucienteaguaeneldepósito
de agua.
• Enfríe la leche antes de
preparar un capuchino o un
latte.
• Siga las instrucciones para
limpiar el depósito de leche y el
tubo espumador.
Elcafésale
demasiadorápido.
• Elcafémolidoesdemasiado
grueso.
• Nohaysucientecaféenelltro.
• Useunamoliendamásna.
• Pongamáscaféenelltro.
Elcafénotiene
sucientesabor.
• Hausadounltrosencillopara
una dosis doble de espresso.
• Elcafémolidoesdemasiado
grueso.
• Useunltrodobleparauna
dosis doble de espresso.
• Useunamoliendamásna.
Las luces del panel de
control parpadean.
• No queda agua en el depósito
de agua.
• Se ha pulsado el botón de
preparación antes de que la
barra de progreso se haya
iluminado por completo para
mostrarquelamáquinaestá
lista.
• Añada agua en el depósito
correspondiente.
• Espere a que la barra de
progreso se ilumine por
completoconunaluzja,ya
queindicaquelamáquinaestá
lista para usarse.
La luz de limpieza se
queda encendida.
• Lamáquinaleestáinformando
dequeestálistapararealizarun
ciclo de limpieza.
• Realice un ciclo de limpieza
(consultelapágina20).
PROBLEMAS, CAUSAS Y SOLUCIONES

22 23
GARANTÍA LIMITADA POR 1 AÑO
Sunbeam Products, Inc. (“Sunbeam”) garantiza que por un período de uno
año a partir de la fecha de compra, este producto estará libre de defectos de
materiales y mano de obra. Sunbeam, a su elección, reparará o reemplazará este
producto o cualquier componente del mismo que presente defectos durante el
período de garantía.
El reemplazo se realizará por un producto o componente nuevo o reparado.
Si el producto ya no estuviera disponible, se lo reemplazará por un producto
similar de valor igual o superior. Ésta es su garantía exclusiva. No intente reparar
o ajustar ninguna función eléctrica o mecánica de este producto. Al hacerlo
elimínará ésta garantía.
La garantía es válida para el comprador minorista original a partir de la fecha
de compra inicial y la misma no es transferible. Conserve el recibo de compra
original. Para solicitar servicio en garantía satisfactoria se requiere presentar un
recibo de compra. Los agentes y centros de servicio de Sunbeam o las tiendas
minoristas que venden productos de Sunbeam no tienen derecho a alterar,
modicar ni cambiar de ningún otromodo los términos y las condiciones de esta
garantía.
Esta garantía no cubre los daños que se produzcan como resultado de uso
negligente o mal uso del producto, uso de voltaje incorrecto o corriente
inapropiada, uso contrario a las instrucciones operativas, y desarme, reparación
o alteración por parte de un tercero ajeno a Sunbeam o a un Centro de Servicio
Autorizado por Sunbeam. Asimismo, la garantía no cubre actos fortuitos tales
como incendios, inundaciones, huracanes y tornados.
¿Cuál es el límite de responsabilidad de Sunbeam?
Sunbeam no será responsable de daños incidentales o emergentes causados
por el incumplimiento de alguna garantía o condición expresa, implícita o legal.
Excepto en la medida en que lo prohíba la ley aplicable, cualquier garantía
o condición implícita de comerciabilidad o aptitud para un n determinado
se limita, en cuanto a su duración, al plazo de la garantía antes mencionada.
Sunbeam queda exenta de toda otra garantía, condición o manifestación,
expresa, implícita, legal o de cualquier otra naturaleza. Sunbeam no será
responsable de ningún tipo de daño emergente de la compra, uso o mal
uso del producto, ad de usar el producto, incluidos los daños incidentales,
especiales, emergentes o similares, o la pérdida de ganancias, ni de ningún
incumplimiento contractual, sea de una obligación esencial o de otra naturaleza,
ni de ningún reclamo iniciado contra el comprador por un tercero. Algunas
provincias, estados o jurisdicciones no permiten la exclusión o limitación de
INFORMACIONES SOBRE LA GARANTÍA los daños incidentales o emergentes ni las limitaciones a la duración de las
garantías implícitas, de modo que es posible que la exclusión o las limitaciones
antes mencionadas no se apliquen en su caso. Esta garantía le otorga derechos
legales especícos y es posible que usted tenga otros derechos que varían de
un estado, provincia o jurisdicción a otro.
Cómo solicitar el servicio en garantía en los Estados
Unidos
Si tiene alguna pregunta sobre esta garantía o desea obtener el servicio de
garantía, llame al 1-800-672-6333 y podrá obtener la dirección del centro de
servicio que le resulte más conveniente.
POR FAVOR NO DEVUELVA ESTE PRODUCTO A NINGUNA DE ESTAS
DIRECCIONES O AL LUGAR DE COMPRA
Este aparato no contiene piezas que puedan ser reparadas por el usuario.
Cualquier servicio de mantenimiento que no esté descrito en la sección
Limpieza deberá ser realizado solamente por un representante de servicio
autorizado. Consulte la sección de Garantía.
Servicio de mantenimiento y la garantía pueden encontrarse en línea en
www.mrcoffee.com o llamándonos libre de gastos al departamento de servicio al
consumidor al 1-800-MR COFFEE (1-800-672-6333).
MANTENIMIENTO POR EL USUARIO
SERVICIO DE MANTENIMIENTO Y
GARANTÍA

©2022 Sunbeam Products, Inc. Todos los derechos reservados. Distribuido por Sunbeam
Products, Inc. Boca Raton, Florida 33431. Sunbeam Products, Inc. Products, Inc. es una
subsidiaria de Newell Brands Inc. (NYSE: NWL)
Impreso en China.
Para pregutas sobre los productos, contactar:
Centro de servicio Sunbeam
1-800-672-6333
BVMC-ECM-PMPAT_22ESM2 (US)_GCDS-SL
-
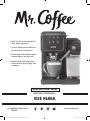 1
1
-
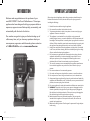 2
2
-
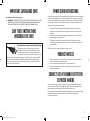 3
3
-
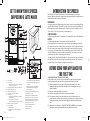 4
4
-
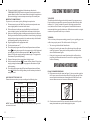 5
5
-
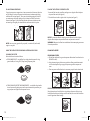 6
6
-
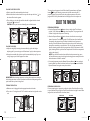 7
7
-
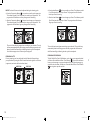 8
8
-
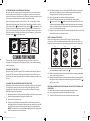 9
9
-
 10
10
-
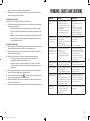 11
11
-
 12
12
-
 13
13
-
 14
14
-
 15
15
-
 16
16
-
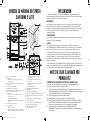 17
17
-
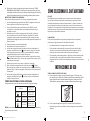 18
18
-
 19
19
-
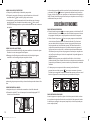 20
20
-
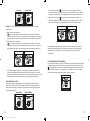 21
21
-
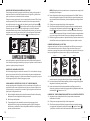 22
22
-
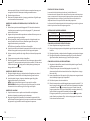 23
23
-
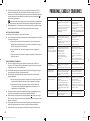 24
24
-
 25
25
-
 26
26


Mr.Coffee BVMC-ECM-PMPAT Series Manual de usuario
- Categoría
- Accesorios para hacer café
- Tipo
- Manual de usuario
en otros idiomas
Otros documentos
-
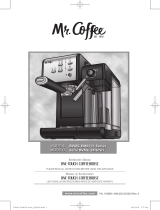 Mr. Coffee BVMC-EM6701SS Manual de usuario
-
 Create THERA MATT RETRO El manual del propietario
-
 Mr. Coffee BVMC-ECMP1000-RB Manual de usuario
-
 Mr. Coffee BVMC-ECMP1000 El manual del propietario
-
 Mr. Coffee cafe barista BVMC-ECMP1000 Serie Manual de usuario
-
Breville VCF146X Manual de usuario
-
 Mr. Coffee BVMC-ECMP1001C Manual de usuario
-
 Mr. Coffee BVMC-ECMP55 Manual de usuario
-
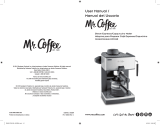 Mr. Coffee BVMC-ECM180 Manual de usuario


