
Powered Subwoofer Subwoofer alimenté Subwoofer autoalimentado
Operating Guide Guide d’utilisation Guía de Operaciones
SW-8MK2
SW-8
(320 mm x 320 mm)
IMPORTANT
The lightning flash with arrowhead
symbol, within an equilateral
triangle, is intended to alert the
user to the presence of uninsulated
“dangerous voltage” within the
product’s enclosure that may be of
sufficient magnitude to constitute a
risk of electric shock to persons.
CAUTION
RISK OF ELECTRIC SHOCK
DO NOT OPEN
CAUTION:
TO PREVENT THE RISK OF
ELECTRIC SHOCK, DO NOT
REMOVE COVER (OR BACK).
NO USER-SERVICEABLE
PARTS INSIDE. REFER
SERVICING TO QUALIFIED
SERVICE PERSONNEL.
The exclamation point within
an equilateral triangle is
intended to alert the user to
the presence of important
operating and maintenance
(servicing) instructions in
the literature accompanying
the appliance.
1. Read these instructions.
2. Keep these instructions.
3. Heed all warnings.
4. Follow all instructions.
5. Do not use this apparatus near water.
6. Clean only with dry cloth.
7. Do not block any ventilation openings.
Install in accordance with the manufacturer’s
instructions.
8. Do not install near any heat sources such
as radiators, heat registers, stoves, or other
apparatus (including amplifiers) that
produce heat.
9. Do not defeat the safety purpose of the
polarized or grounding-type plug. A polarized
plug has two blades with one wider than
the other. A grounding type plug has two
blades and a third grounding prong. The
wide blade or the third prong are provided
for your safety. If the provided plug does not
fit into your outlet, consult an electrician for
replacement of the obsolete outlet.
10. Protect the power cord from being walked on
or pinched particularly at plugs, convenience
receptacles, and the point where they exit
from the apparatus.
11. Only use attachments/accessories specified
by the manufacturer.
12. Use only with the cart, stand, tripod, bracket,
or table specified by the manufacturer, or
sold with the apparatus. When a cart is used,
use caution when moving the cart/apparatus
combination to avoid injury from tip-over.
13. Unplug this apparatus during lightning
storms or when unused for long periods
of time.
14. Refer all servicing to qualified service
personnel. Servicing is required when
the apparatus has been damaged in any
way, such as power-supply cord or plug
is damaged, liquid has been spilled or
objects have fallen into the apparatus,
the apparatus has been exposed to rain or
moisture, does not operate normally, or has
been dropped.
IMPORTANT SAFETY INSTRUCTIONS
IMPORTANT NOTICE
The serial number for the equipment is located
on the rear of the product. Please write this
serial number on the warranty sheet and keep
it in a secure area for future reference.
VENTILATION CAUTION
When installing this unit, make sure to leave
space around the unit for ventilation to improve
heat radiation (at least 25 cm at top, 15 cm at
rear, and 10 cm at each side).
WARNING
Slots and openings in the cabinet are provided
for ventilation to ensure reliable operation of
the product, and to protect it from overheating.
To prevent re hazard, the openings should
never be blocked or covered with items (such
as newspapers, table-cloths, curtains) or by
operating the equipment on thick carpet or
a bed.
WARNING
To prevent a re hazard, do not place any
naked ame sources (such as a lighted candle)
on the equipment.
WARNING
This equipment is not waterproof. To prevent a
re or shock hazard, do not place any container
lled with liquid near this equipment (such as
a vase or ower pot) or expose it to dripping,
splashing, rain or moisture.
POWER-CORD CAUTION
Handle the power cord by the plug. Do not pull
out the plug by tugging the cord and never touch
the power cord when your hands are wet as this
could cause a short circuit or electric shock. Do
not place the unit, a piece of furniture, etc., on the
power cord, or pinch the cord. Never make a knot
in the cord or tie it with other cords. The power
cords should be routed such that they are not
likely to be stepped on. A damaged power cord
can cause a fire or give you an electrical shock.
Check the power cord once in a while. When
you find it damaged, ask your nearest PIONEER
authorized service center or your dealer for a
replacement.
WARNING
Before plugging in for the first time, read the
following section carefully.
The voltage of the available power supply
differs according to country or region. Be
sure that the power supply voltage of the area
where this unit will be used meets the required
voltage (e.g., 230 V or 120 V) written on the
rear panel.
If the AC plug of this unit does not match
the AC outlet you want to use, the plug must
be removed and appropriate one fitted.
Replacement and mounting of an AC plug on
the power supply cord of this unit should be
performed only by qualified service personnel.
If connected to an AC outlet, the cut-off plug
can cause severe electrical shock. Make
sure it is properly disposed of after removal.
The equipment should be disconnected by
removing the mains plug from the wall socket
when left unused for a long period of time (for
example, when on vacation).
CAUTION
The POWER switch on this unit will not completely
shut off all power from the AC outlet. Since the
power cord serves as the main disconnect
device for the unit, you will need to unplug it from
the AC outlet to shut down all power. Therefore,
make sure the unit has been installed so that the
power cord can be easily unplugged from the AC
outlet in case of an accident. To avoid fire hazard,
the power cord should also be unplugged from
the AC outlet when left unused for a long period
of time (for example, when on vacation).
This product is for general household purposes.
Any failure due to use for other than household
purposes (such as long-term use for business
purposes in a restaurant or use in a car or ship)
and which requires repair will be charged for
even during the warranty period.
WARNING: Handling the cord on this product
or cords associated with accessories sold
with the product may expose you to chemicals
listed on proposition 65 known to the State
of California and other governmental entities
to cause cancer and birth defect or other
reproductive harm.
OPERATING ENVIRONMENT
Operating environment temperature and humidity:
+5 °C to +35 °C (+41 °F to +95 °F); less than 85
%RH (cooling vents not blocked) Do not install
this unit in a poorly ventilated area, or in locations
exposed to high humidity or direct sunlight (or
strong artificial light)

www.pioneerelectronics.com
2
PLACEMENT AND FINE TUNING
The placement of your new subwoofer is critical to its performance. The three most common locations
include: A) in the corner of the room (which can result in a boomy or exaggerated low frequency response),
B) placement along one wall but out of the corner (moderate bass performance with increased fidelity
over corner placement), or C) alongside a front speaker (creating a better blend with the front speaker,
but sacrificing overall volume). Experimentation with subwoofer placement is highly encouraged, as slight
adjustments can create large benefits in sound reproduction. To further test subwoofer placement, install
the subwoofer temporarily in your main listening position and while playing a familiar piece of music, walk
around the listening room until you find the best sounding position. This is a possible location for the sub-
woofer to be placed.
INSTALLATION PRECAUTIONS
Do not install this subwoofer near a stove or other heating appliance, or put it in a place exposed to the
sun. Such locations may cause the cabinet to change color and the subwoofer to break down.
Pioneer will not be responsible for any accidents or damage that may result from
improper installation.
If the speaker system is installed too close to the screen of a television set, color distortion may occur.
CABINET MAINTENANCE
Great care and craftsmanship has gone into the construction and finish of the cabinet. Periodically use a
soft, dry cloth to remove dust or fingerprints. Do not use paper towels or other abrasive materials as it may
damage the finish.
NOTE: Please retain the carton and packing material for your Pioneer products, to protect them in the event
of a move or if they need to be shipped to a service center. Product received damaged by a service center
that has been shipped by the end user in other than the original packaging will be repaired, refurbished
and properly packaged for return shipment, at the end user’s expense.
ENGLISH
C
A
B

www.pioneerelectronics.com
3
ENGLISH
TERMINOLOGY AND CONTROLS
➊ STATUS INDICATOR – The LED found on the front panel will illuminate when the subwoofer is functioning.
If the unit is in Auto mode and is not receiving a signal, the light will remain off.
➋ VOLUME – This knob can be adjusted to control the level of output from your subwoofer. The level chosen
should allow the subwoofer to blend its output with that of the rest of your audio system.
➌ FREQ – This control allows for the adjustment of the low-pass filter. Adjustments can infinitely be made
from 40 Hz to 150 Hz. This will determine the highest frequency that the subwoofer will reproduce.
➍ PHASE – This switch allows for the adjustment of the phase of the subwoofer, in relation to the speakers
used in your system, from 0 to 180 degrees.
➎ POWER – This switch can be set to either On, Stand By or Auto. If the switch is in the Stand By position, the
subwoofer will remain off. If the switch is in the On position, it will constantly remain on. If the switch is set
to the AUTO position, when a signal is present the subwoofer will turn on and will automatically turn off
several minutes after a signal is no longer present.
➏ LINE IN – These inputs are an RCA type LFE/stereo/mono input. If you are connecting your subwoofer to
a pre-amp/processor with a LFE or Subwoofer pre-amp output, connect a single RCA cable to the LFE/
Left input. If you are connecting your subwoofer to a stereo pre-amp or processor, such as in a stereo
music system, use stereo RCA cables and connect to both the LFE/Left and Right inputs.
➐ HI LEVEL IN – The Speaker Level inputs are designed to be used on receivers or amplifiers that do not
incorporate any RCA type subwoofer outputs. If your receiver is equipped with an RCA type subwoofer
output, these speaker level inputs should not be utilized.

www.pioneerelectronics.com
4
CONNECTING YOUR SUBWOOFER
CAUTION: All power should be turned off to your system before any connections are made. Careful at-
tention should be taken to ensure that all electronic components are not connected to an AC source. Not
doing so could result in potential damage to the system.
METHOD 1
RCA – SUB IN FOR HOME THEATER OR LFE APPLICATIONS
1. On the rear of the receiver/pre-amp there should be a single RCA type jack marked “Subwoofer/Pre-Amp
Out”. Connect a single RCA cable from that jack to the ➏ LINE IN on the rear of the subwoofer. A standard
male to male RCA cable is needed.
2. After connecting the single ➏ LINE IN connection, plug your subwoofer into an AC outlet. Do not use the
AC outlet on the rear of your receiver. After plugging in the unit, switch the Main Power to On.
3. See Final System Adjustments, below.
METHOD 2
RCA – LINE IN FOR STEREO APPLICATIONS
1. On the rear of the receiver/pre-amp there should be stereo (left and Right) RCA type jacks marked “Left
and Right Pre-Amp Outputs”. Connect a pair of RCA cables from those jacks to the ➏ LINE IN on the rear
of the subwoofer. A standard male to male RCA cable is needed.
2. After connecting the stereo ➏ LINE IN connection, plug your subwoofer into an AC outlet. Do not use the
AC outlet on the rear of your receiver. After plugging in the unit, switch the Main Power to On.
3. See Final System Adjustments, below.
METHOD 3
SPEAKER LEVEL – FOR MUSIC APPLICATIONS
1. The other way to connect your subwoofer to your receiver is using a speaker wire connection, by simply
connecting the speaker wires from the Front Left and Right Speaker Outputs on your receiver to the Left
and Right ➐ HI LEVEL IN on rear of the subwoofer. It is imperative that speaker polarities be maintained,
one must connect the positive and negative wires to the appropriate positive and negative terminals.
Failure to do so will result in an out of phase connection, severely limiting the amount of bass in your
system.
2. After connecting the ➐ HI LEVEL IN (speaker wire) between your receiver and subwoofer, ensure no fray
wires are touching, as this could cause a short circuit and damage your electronics. Plug your subwoofer
into an AC outlet. Do not use the AC outlet on the rear of your receiver.
3. See Final System Adjustments, below.
ENGLISH

www.pioneerelectronics.com
5
ENGLISH
FINAL SYSTEM ADJUSTMENTS
1. After having turned on the main power switch and having broken-in the speaker, select the correct posi-
tion for the ➎ POWER, either On or Auto depending on your system. The Auto selection will leave the unit
in a self-sensing mode, such that should the unit sense an audio signal it will turn itself on and then shut
down after several minutes without signal, while in the On position the subwoofer always remains on.
Should the system not be used for an extensive period of time, it is recommended that the subwoofer be
unplugged from the AC.
2. Adjust the ➋ VOLUME of your subwoofer so that the volume of your subwoofer matches the overall system
volume. This ensures a smooth transition between the low and high frequencies of your system.
3. Adjust the ➌ FREQ on your subwoofer so that the frequency range of the subwoofer blends well with that
of the front speakers. Setting the crossover too low will create a gap between the frequency response of
the front speakers and that of the subwoofer, while setting the crossover frequency too high will create a
doubling of certain frequencies, making the music sound boomy. When using small satellite speakers,
the appropriate crossover frequency should be from 90 Hz to 150 Hz, for the bookshelf speakers 70 Hz
to 90 Hz and for the large floor-standing speakers 40 Hz to 70 Hz.
4. Adjust the ➍ PHASE so that the subwoofer integrates fully with the rest of your audio system. This control
ensures that the subwoofer operates in phase with the rest of the system, as an out of phase subwoofer
will either sound like it is lacking in bass performance or that its timing is off. This setting will be determined
by your listening position, the characteristics of your listening room and its interaction with your subwoofer.
An out of phase speaker means that the speaker cone is moving inwards when it should be moving
outwards, like the other speakers in your system, causing cancellations of certain frequencies. By adjusting
the phase control, one can ensure that all speakers move in the proper direction, at the same time.
5. Steps 2, 3 and 4 might require repeating in order to fine tune your system. Ensuring the proper blending
between the speakers and the subwoofer is critical to the performance of your system, as a whole.

www.pioneerelectronics.com
6
FRENCHENGLISH
Frequency Range
38 Hz - 150 Hz
Dimensions (WxHxD inch)
12-3/16" x 14-3/16" x 12-3/16"
Weight
20 lbs 4 oz
Driver Size
8"
Maximum Output Power
100 W
Power Consumption
1.0 A
Power Requirement
120 V / 60 Hz
SW-8MK2
SPECIFICATIONS

LIMITED WARRANTY
WARRANTY VALID ONLY IN COUNTRY OF PRODUCT PURCHASE
WARRANTY
Pioneer Electronics (USA) Inc. (PUSA), and Pioneer Electronics Of Canada, Inc. (POC), warrant that products distributed by PUSA in the U.S.A., and by POC
in Canada that fail to function properly under normal use due to a manufacturing defect when installed and operated according to the owner’s manual enclosed
with the unit will be repaired or replaced with a unit of comparable value, at the option of PUSA or POC, without charge to you for parts or actual repair work.
Parts supplied under this warranty may be new or rebuilt at the option of PUSA or POC.
THIS LIMITED WARRANTY APPLIES TO THE ORIGINAL OR ANY SUBSEQUENT OWNER OF THIS PIONEER PRODUCT DURING THE WARRANTY PERIOD
PROVIDED THE PRODUCT WAS PURCHASED FROM AN AUTHORIZED PIONEER DISTRIBUTOR/DEALER IN THE U.S.A. OR CANADA. YOU WILL BE
REQUIRED TO PROVIDE A SALES RECEIPT OR OTHER VALID PROOF OF PURCHASE SHOWING THE DATE OF ORIGINAL PURCHASE OR, IF RENTED,
YOUR RENTAL CONTRACT SHOWING THE PLACE AND DATE OF FIRST RENTAL. IN THE EVENT SERVICE IS REQUIRED, THE PRODUCT MUST BE
DELIVERED WITHIN THE WARRANTY PERIOD, TRANSPORTATION PREPAID, ONLY FROM WITHIN THE COUNTRY OF PURCHASE AS EXPLAINED
IN THIS DOCUMENT. YOU WILL BE RESPONSIBLE FOR REMOVAL AND INSTALLATION OF THE PRODUCT. PUSA OR POC, AS APPROPRIATE, WILL
PAY TO RETURN THE REPAIRED OR REPLACEMENT PRODUCT TO YOU WITHIN THE COUNTRY OF PURCHASE.
PRODUCT WARRANTY PERIOD
Parts Labor
Home Audio and Video .................................................................................................................... 1 Year 1 Year
Microphones, Headphones, Phono Cartridges and Styluses ...................................................... 90 Days 90 Days
Shorter limited warranty periods apply to some models. Please refer to the limited warranty document enclosed with the product for a denitive statement of
the warranty period. The warranty period for retail customers who rent the product commences upon the date product is rst put into use (a) during the rental
period or (b) retail sale, whichever occurs rst.
WHAT IS NOT COVERED
IF THIS PRODUCT WAS PURCHASED FROM AN UNAUTHORIZED DISTRIBUTOR, THERE ARE NO WARRANTIES, EXPRESS OR IMPLIED,
INCLUDING THE IMPLIED WARRANTY OF MERCHANTABILITY AND THE IMPLIED WARRANTY OF FITNESS FOR A PARTICULAR PURPOSE AND
THIS PRODUCT IS SOLD STRICTLY AS IS AND WITH ALL FAULTS”.
PIONEER SHALL NOT BE LIABLE FOR ANY CONSEQUENTIAL AND/OR INCIDENTAL DAMAGES.
PIONEER DOES NOT WARRANT ANY PRODUCT LISTED ABOVE WHEN IT IS USED IN A TRADE OR BUSINESS OR IN ANY INDUSTRIAL OR
COMMERCIAL APPLICATION.
THIS WARRANTY DOES NOT APPLY IF THE PRODUCT HAS BEEN SUBJECTED TO POWER IN EXCESS OF ITS PUBLISHED POWER RATING.
THIS WARRANTY DOES NOT COVER TELEVISION OR DISPLAY SCREENS DAMAGED BY STATIC, NON-MOVING, IMAGES APPLIED FOR LENGTHY
PERIODS (BURN-IN).
THIS WARRANTY DOES NOT COVER THE CABINET OR ANY APPEARANCE ITEM, USER ATTACHED ANTENNA, ANY DAMAGE TO RECORDS OR
RECORDING TAPES OR DISCS, ANY DAMAGE TO THE PRODUCT RESULTING FROM ALTERATIONS, MODIFICATIONS NOT AUTHORIZED IN WRITING
BY PIONEER, ACCIDENT, MISUSE OR ABUSE, DAMAGE DUE TO LIGHTNING OR TO POWER SURGES, SUBSEQUENT DAMAGE FROM LEAKING,
DAMAGE FROM INOPERATIVE BATTERIES, OR THE USE OF BATTERIES NOT CONFORMING TO THOSE SPECIFIED IN THE OWNER’S MANUAL.
THIS WARRANTY DOES NOT COVER THE COST OF PARTS OR LABOR WHICH WOULD BE OTHERWISE PROVIDED WITHOUT CHARGE UNDER
THIS WARRANTY OBTAINED FROM ANY SOURCE OTHER THAN A PIONEER AUTHORIZED SERVICE COMPANY OR OTHER DESIGNATED
LOCATION. THIS WARRANTY DOES NOT COVER DEFECTS OR DAMAGE CAUSED BY THE USE OF UNAUTHORIZED PARTS OR LABOR OR FROM
IMPROPER MAINTENANCE.
ALTERED, DEFACED, OR REMOVED SERIAL NUMBERS VOID THIS ENTIRE WARRANTY
NO OTHER WARRANTIES
IN THE U.S.A. - PIONEER LIMITS ITS OBLIGATIONS UNDER ANY IMPLIED WARRANTIES INCLUDING, BUT NOT LIMITED TO, THE IMPLIED
WARRANTIES OF MERCHANTABILITY AND FITNESS FOR A PARTICULAR PURPOSE, TO A PERIOD NOT TO EXCEED THE WARRANTY PERIOD.
NO WARRANTIES SHALL APPLY AFTER THE WARRANTY PERIOD. SOME STATES DO NOT ALLOW LIMITATIONS ON HOW LONG AN IMPLIED
WARRANTY LASTS AND SOME STATES DO NOT ALLOW THE EXCLUSIONS OR LIMITATIONS OF INCIDENTAL OR CONSEQUENTIAL DAMAGES,
SO THE ABOVE LIMITATIONS OR EXCLUSIONS MAY NOT APPLY TO YOU. THIS WARRANTY GIVES YOU SPECIFIC LEGAL RIGHTS AND YOU MAY
HAVE OTHER RIGHTS WHICH MAY VARY FROM STATE TO STATE.
IN CANADA - EXCEPT AS EXPRESSLY PROVIDED HEREIN, THERE ARE NO REPRESENTATIONS, WARRANTIES, OBLIGATIONS OR CONDITIONS,
IMPLIED, STATUTORY OR OTHERWISE, APPLICABLE TO THIS PRODUCT.
TO OBTAIN SERVICE
PUSA and POC have appointed a number of Authorized Service Companies throughout the U.S.A. and Canada should your product require service. To receive
warranty service you need to present your sales receipt or, if rented, your rental contract showing place and date of original owner’s transaction. If shipping
the unit you will need to package it carefully and send it, transportation prepaid by a traceable, insured method, to an Authorized Service Company. Package
the product using adequate padding material to prevent damage in transit. The original container is ideal for this purpose. Include your name, address and
telephone number where you can be reached during business hours.
On all complaints and concerns in the U.S.A. call Customer Support at 1-800-421-1404, or, in Canada, call Customer Satisfaction at 1-877-283-5901.
IN THE U.S.A.
For hook-up and operation of your unit or to locate an
Authorized Service Company, please call or write:
SERVICE SUPPORT DIVISION
PIONEER ELECTRONICS (USA), INC.
P.O. BOX 1760, LONG BEACH, CALIFORNIA 90801
1-800-421-1404 • http://www.pioneerelectronics.com
IN CANADA
For additional information on this warranty,
please call or write:
CUSTOMER SATISFACTION GROUP
PIONEER ELECTRONICS OF CANADA, INC.
300 ALLSTATE PARKWAY, MARKHAM, ON L3R 0P2
(905) 479-4411 • 1-877-283-5901 • http://www.pioneerelectronics.ca
DISPUTE RESOLUTION
IN THE U.S.A. - Following our response to any initial request to Customer Support, should a dispute arise between you and Pioneer, Pioneer makes available
its Complaint Resolution Program to resolve the dispute. The Complaint Resolution Program is available to you without charge. You are required to use the
Complaint Resolution Program before you exercise any rights under, or seek any remedies, created by Title I of the Magnuson-Moss Warranty-Federal Trade
Commission Improvement Act, 15 U.S.C. 2301 et seq. To use the Complaint Resolution Program call 1-800-421-1404 and explain to the customer service
representative the problem you are experiencing, steps you have taken to have the product repaired during the warranty period and the name of the authorized
Distributor/Dealer from whom the Pioneer product was purchased. After the complaint has been explained to the representative, a resolution number will be
issued. Within 40 days of receiving your complaint, Pioneer will investigate the dispute and will either: (1) respond to your complaint in writing informing you what
action Pioneer will take, and in what time period, to resolve the dispute; or (2) respond to your complaint in writing informing you why it will not take any action.
IN CANADA - Call the Customer Satisfaction Manager at (905) 946-7446 to discuss your complaint and to obtain a prompt resolution.
PIONEER ELECTRONICS (USA) INC. PIONEER ELECTRONIQUES DU CANADA, INC.
RECORD THE PLACE AND DATE OF PURCHASE FOR FUTURE REFERENCE
Model No. ____________________________________________ Serial No. ________________________________________ Purchase Date _______________________
Purchased From _______________________________________________________________________________________________________________________________
KEEP THIS INFORMATION AND YOUR SALES RECEIPT IN A SAFE PLACE

www.pioneerelectronics.com
8
Dear Customer,
The Safety of Your Ears is in Your Hands. Get the most out of your
equipment by playing it at a safe level – a level that lets the sound
come through clearly without annoying blaring or distortion and, most
importantly, without affecting your sensitive hearing. Sound can be
deceiving. Over time, your hearing “comfort level” adapts to higher
volumes of sound, so what sounds “normal” can actually be loud and
harmful to your hearing. Guard against this by setting your equipment
at a safe level BEFORE your hearing adapts.
ESTABLISH A SAFE LEVEL:
• Set your volume control at a low setting.
• Slowly increase the sound until you can hear it comfortably and
clearly, without distortion.
• Once you have established a comfortable sound level, set the
dial and leave it there.
BE SURE TO OBSERVE THE FOLLOWING GUIDELINES:
• Do not turn up the volume so high that you can’t hear what’s
around you.
• Use caution or temporarily discontinue use in potentially
hazardous situations.
PIONEER ELECTRONICS [USA] INC. P.O. BOX 1540, Long Beach, California 90801-1540
PIONEER ELECTRONICS OF CANADA, INC. 300 Allstate Parkway Markham, Ontario L3R OP2, Canada
PIONEER ELECTRONICS OF MEXICO S.A. De C.V. Blvd. Manuel Avila Camacho 138 piso 10
Col. Lomas de Chapultepec 11000 Delegacion Miguel Hidalgo Mexico, D.F.
Published by Pioneer Electronics (USA) Inc. Copyright © 2012 Pioneer Electronics (USA) Inc. All rights reserved Printed in China
ENGLISH

www.pioneerelectronics.com
9
INFORMATIONS IMPORTANTES
Le numéro de série de l’appareil se trouve sur
l’arrière de l’unité. Veuillez noter le numéro de
série sur la feuille de garantie et la garder dans
un endroit sûr pour une référence future.
MISE EN GARDE CONCERNANT
LA VENTILATION
Lorsque vous installez cet appareil, assurez-
vous de laisser sufsamment d’espace de
ventilation tout autour pour permettre la
dissipation de chaleur (au moins 25 cm sur le
haut, 15 cm derrière et 10 cm sur chaque côté).
AVERTISSEMENT
Le boîtier contient des fentes et des ouver-
tures de ventilation visant à assurer le bon
fonctionnement du produit et à éviter les
surchauffes. Pour éviter les risques d’incendie,
ces orices ne doivent jamais être obstrués
ou recouverts par des objets (p. ex. journaux,
nappe, rideaux) et l’appareil ne doit jamais
fonctionner en étant posé sur une moquette
épaisse ou sur un lit.
AVERTISSEMENT
Pour éviter les risques d’incendie, ne placez
sur l’appareil aucune source de amme vive
(p. ex. une bougie allumée).
AVERTISSEMENT
Cet équipement n’est pas résistant à l’eau.
Pour éviter de causer un incendie ou un choc
électrique, ne posez aucun récipient rempli
de liquide à proximité de cet équipement
(p. ex. un vase de eurs) et protégez-le de toute
exposition à des égouttements, à des éclabous-
sures, à la pluie et à l’humidité.
MISE EN GARDE CONCERNANT
LE CORDON D’ALIMENTATION
Manipulez le cordon d’alimentation en tenant bien
la fiche de connexion. Il ne faut jamais débrancher
l’appareil en tirant sur le cordon et il ne faut jamais
toucher la fiche de connexion avec les mains
mouillées car vous risqueriez alors de causer un
court-circuit et de recevoir un choc électrique.
Il ne faut jamais poser l’appareil, un meuble ou
un autre objet sur le cordon d’alimentation ni
écraser le cordon de quelque autre manière. Il
ne faut jamais faire un nœud dans le cordon ni
l’attacher avec d’autres cordons. Les cordons
d’alimentation doivent être posés à des endroits
où ils ne risquent pas d’être écrasés par des
objets ou des personnes. Un cordon d’alimentation
endommagé peut causer un incendie ou un choc
électrique. Vérifiez périodiquement l’état du cordon
d’alimentation. Si votre cordon est endommagé,
faites-le remplacer chez votre détaillant ou chez
votre centre de service PIONEER le plus près.
AVERTISSEMENT
Avant de brancher cet appareil pour la pre-
mièrefois, lisez attentivement cette section.
La tensionde l’alimentation électrique disponible
varie selon les pays ou les régions. Assurez-
vous que la tension électrique disponible à
IMPORTANT
L’éclair avec une pointe de flèche dans un
triangle équilatéral avertit l’utilisateur qu’il
existe une « tension électrique dangereuse »
non isolée dans le boîtier du produit pouvant
être suffisamment puissante pour occasionner
un risque de choc électrique.
ATTENTION :
POUR RÉDUIRE LES RISQUES DE CHOC
ÉLECTRIQUE, N’ENLEVEZ PAS LE COUVERCLE
(NI L’ARRIÈRE). IL N’Y A AUCUNE PIÈCE
RÉPARABLE PAR L’UTILISATEUR À L’INTÉRIEUR.
CONFIEZ TOUTES LES RÉPARATIONS À UN
TECHNICIEN QUALIFIÉ.
Le point d’exclamation situé dans un
triangle équilatéral avertit les utilisateurs
de lire des instructions importantes
d’utilisation et d’entretien dans la
documentation accompagnant l’appareil.
1. Lisez ces instructions.
2. Conservez ces instructions.
3. Observez tous les avertissements.
4. Suivez toutes les instructions.
5. N’utilisez pas cet appareil à proximité d’eau.
6. Nettoyez uniquement avec un tissu sec.
7. Faites attention de ne bloquer aucun orifice de
ventilation. Installez ce produit conformément
aux instructions du fabricant.
8. N’installez pas ce produit à proximité d’une
source de chaleur (radiateur, bouche d’air
chaud, cuisinière, amplificateur, etc.).
9. N’altérez pas le dispositif de sécurité d’une fiche
de connexion polarisée ou avec patte de mise
à la terre. Les fiches polarisées possèdent
deux pattes, dont une est plus large que l’autre.
Les fiches avec mise à la terre possèdent une
troisième patte conçue pour la mise à la terre.
La patte plus large ou de mise à la terre est
importante pour votre sécurité. Si la fiche
de connexion accompagnant le produit ne
s’insère pas dans votre prise électrique,
demandez à un électricien de la remplacer
par une prise plus moderne.
10. Faites attention que le cordon d’alimentation
ne soit jamais écrasé ou plicaturé, particu-
lièrement au niveau des prises et à la sortie
du boîtier.
11. Utilisez uniquement des accessoires autori-
sés par le fabricant.
12. Utilisez ce produit uniquement sur une table,
un chariot, un socle, un trépied ou un support
autorisé par le fabricant ou vendu avec le
produit. Si vous utilisez un chariot, soyez
prudent lorsque vous déplacez le chariot avec
le produit pour éviter que le produit tombe et
blesse quelqu’un.
13. Débranchez le produit durant les orages
électriques et durant les longues périodes
de non utilisation.
14. Confiez toutes les réparations à des
techniciens qualifiés. Une réparation est
nécessaire dès que le produit subit quelque
dommage, notamment au niveau du cordon
d’alimentation ou de la fiche de connexion,
de même que si un liquide est renversé sur
le produit, si des objets sont tombés dans le
produit, si le produit a été exposé à la pluie
ou à l’humidité, si le produit ne fonctionne
pas normalement ou si le produit est tombé.
CONSIGNES DE SÉCURITÉ IMPORTANTES
Si la fiche de connexion c.a. de cet appareil
ne correspond pas à la prise c.a. que vous
désirez utiliser, la fiche de connexion doit être
remplacée. Si la fiche de connexion du cordon
d’alimentation doit être remplacée, cette
opération doit être confiée à un technicien
qualifié. Si la vielle fiche de connexion coupée
est branchée sur une prise c.a., elle peut
causer un choc électrique grave. Assurez-vous
que la vielle fiche de connexion est correcte-
ment mise aux rebuts après son enlèvement.
Si l’appareil est laissé inutilisé pendant une
longue période (p. ex. durant des vacances),
la fiche de connexion de l’appareil doit être
débranchée de la prise murale.
ATTENTION
L’interrupteur de cet appareil ne coupe pas
totalement toute alimentation électrique venant
de la prise c.a. Puisque le cordon d’alimentation
est le principal mode de déconnexion de
l’appareil, si vous devez couper toute alimenta-
tion électrique dans l’appareil, le cordon doit
être débranché. Par conséquent, assurez-vous
que l’appareil est installé de telle sorte que le
cordon d’alimentation puisse être facilement
débranché en cas d’accident. Pour éviter les
risques d’incendie, si l’appareil est laissé inutilisé
pendant une longue période (p. ex. durant des
vacances), la fiche de connexion de l’appareil
doit être débranchée de la prise murale.
Ce produit a été conçu pour un usage
domestique général. Si l’appareil n’est pas
utilisé dans un cadre domestique (p. ex. usage
à long terme dans un restaurant ou une autre
entreprise, ou encore dans un véhicule ou une
embarcation) et qu’il a besoin d’une réparation,
cette réparation sera facturée, même durant la
période de garantie.
AVERTISSEMENT : La manipulation du cordon
d’alimentation de ce produit et des câbles
des accessoires vendus avec le produit peut
vous exposer à des substances chimiques
figurant dans le texte de la Proposition 65 de
la Californie, que cet État et d’autres autorités
gouvernementales considèrent capables de
causer le cancer, des malformations congéni-
tales et d’autres désordres de reproduction.
l’endroit où l’appareil sera utilisé correspond
à la tension requise (p. ex. 120 V ou 230 V)
inscrite à l’arrièredu boîtier.
ENVIRONNEMENT D’UTILISATION
Température et humidité relative de
l’environnement d’utilisation : +5 °C à +35 °C
(+41 °F à +95 °F); humidité relative inférieure à
85 % (orifices de refroidissement non obstrués).
N’installez pas cet appareil dans un endroit mal
ventilé, très humide ou exposé directement au
soleil (ou à une lumière artificielle puissante).
FRANÇAIS

www.pioneerelectronics.com
10
www.pioneerelectronics.com
10
EMPLACEMENT ET SYNTONISATION DE PRÉCISION
L’emplacement de votre nouveau subwoofer est essentiel à sa performance. Parmi les trois emplacements les
plus courants, citons : dans le coin d’une pièce (ce qui peut résulter en une réponse de basse fréquence cav-
erneuse ou exagérée), emplacement le long d’un mur mais pas dans le coin (performance de basses modérée
avec une fidélité accrue par rapport à l’emplacement en coin) ou le long d’un haut-parleur avant (créant ainsi une
meilleure harmonie avec l’enceinte avant mais en sacrifiant le volume global). Il est recommandé d’expérimenter
avec divers emplacements du subwoofer étant donné que de légers réglages peuvent être amplement béné-
fiques dans la reproduction des sons. Pour tester l’emplacement du subwoofer de manière plus approfondie,
installez-le provisoirement dans votre position d’écoute principale, faites jouer un morceau de musique familier
et marchez dans la zone d’écoute jusqu’à obtention de la meilleure position sonore. Cet emplacement est un
endroit possible pour le subwoofer.
C
A
B
PRÉCAUTIONS D’INSTALLATION
N’installez pas ce subwoofer à proximité d’une plaque de cuisson ou de tout autre appareil de chauffage,
ou encore dans un endroit exposé au soleil. Lesdits emplacements risquent de provoquer une décoloration
du coffret et une panne du subwoofer.
Pioneer n’assume aucune responsabilité en cas d’accidents ou de dégâts causés par une
installation inadéquate.
ENTRETIEN DU COFFRET
Ce coffret a été construit et fini avec grand soin et savoir-faire. Utilisez régulièrement un chiffon doux et sec
pour éliminer la poussière ou les traces de doigts. N’utilisez ni essuie-tout ni matériau abrasif et ce, pour ne
pas endommager le fini.
REMARQUE : Veuillez conserver le carton et le matériel d’emballage de vos produits Pioneer afin de les
protéger dans le cas d’un déménagement ou s’ils doivent être expédiés à un centre de service. Tout produ-
it endommagé reçu par un centre de service qui aura été expédié par l’utilisateur final dans un emballage
autre que l’emballage original sera réparé, remis à neuf et correctement emballé pour l’expédition de retour
aux frais de l’utilisateur final.
FRANÇAIS

www.pioneerelectronics.com
11
FRENCH FRANÇAIS
TERMINOLOGIE ET COMMANDES
➊ VOYANT D’ÉTAT – La DEL figurant sur le panneau avant s’allume lorsque le subwoofer est en marche. Si
l’unité est en mode Auto et qu’elle ne reçoit pas de signal, le voyant reste éteint.
➋ VOLUME – Ce bouton peut être ajusté pour contrôler le niveau de sortie de votre subwoofer. Le niveau
sélectionné doit permettre au subwoofer d’harmoniser sa sortie avec le reste de votre système audio.
➌ FRÉQ – Cette commande permet d’ajuster le filtre passe-bas. Des réglages peuvent se faire à l’infini de
40 Hz à 150 Hz. Ceci déterminera la fréquence la plus élevée que reproduira le subwoofer.
➍ PHASE – Ce contrôle permet d’ajuster la phase du subwoofer par rapport aux haut-parleurs utilisés dans
votre système, de 0 à 180 degrés.
➎ ALIMENTATION – Ce contrôle peut être réglé sur ON, STAND BY ou AUTO. Si le contrôle se trouve en
position STAND BY, le subwoofer restera éteint. Si le contrôle se trouve en position ON, le subwoofer
restera sous tension en permanence. Si le contrôle est réglé en position AUTO, en présence d’un signal,
le subwoofer s’allumera et s’éteindra automatiquement quelques minutes après la disparition du signal.
➏ ENTRÉE DE LIGNE – Ces entrées sont des entrées de type RCA LFE/stéréo/mono. Si vous connectez
votre subwoofer à un préampli/processeur avec une sortie de préampli LFE ou Subwoofer, connectez
un seul câble RCA à l’entrée LFE/Gauche. Si vous connectez votre subwoofer à un préampli stéréo ou
processeur, tel qu’un système de musique stéréo, utilisez des câbles RCA stéréo et connectez-les aux
entrées LFE/Gauche et droite.
➐ ENTRÉE NIVEAU HAUT – Les entrées de niveau de haut-parleurs sont conçues pour être utilisées sur
des récepteurs ou des amplificateurs qui n’incorporent pas de sortie subwoofer de type RCA. Si votre
récepteur est muni d’une sortie de subwoofer de type RCA, ces entrées de niveau de haut-parleurs ne
doivent pas être utilisées.

www.pioneerelectronics.com
12
CONNEXION DU SUBWOOFER
ATTENTION : Toute l’alimentation doit être coupée à votre système avant d’effectuer toute connexion.
Faites particulièrement attention pour vous assurer que tous les composantes électroniques ne sont pas
connectées à une source secteur. Ne pas le faire pourrait éventuellement endommager le système.
MÉTHODE 1
RCA – SUB IN POUR HOME THEATER OU LFE APPLICATIONS
1. Sur le dos du récepteur/préampli, il doit y avoir une seule prise de type RCA marquée « Subwoofer/
Pre-Amp Out ». Connectez un seul câble RCA de cette prise à la ➏ ENTRÉE DE LIGNE sur le dos du
subwoofer. Un câble RCA standard mâle-mâle est nécessaire.
2. Après avoir connecté la connexion simple ➏ ENTRÉE DE LIGNE, branchez votre subwoofer dans une
prise secteur. N’utilisez pas la prise secteur sur le dos du récepteur. Après avoir branché l’unité, mettez
l’alimentation sur On.
3. Voir Derniers réglages de système, ci-dessous.
MÉTHODE 2
RCA – LINE IN POUR APPLICATIONS STÉRÉO
1. Sur le dos du récepteur/préampli, il doit y avoir des prises de type RCA stéréo (gauche et droite)
marquées « Left and Right Pre-Amp Outputs ». Connectez une paire de câble RCA de ces prises à la
➏ ENTRÉE DE LIGNE sur le dos du subwoofer. Un câble RCA standard mâle-mâle est nécessaire.
2. Après avoir connecté la connexion stéréo ➏ ENTRÉE DE LIGNE, branchez votre subwoofer dans une
prise secteur. N’utilisez pas la prise secteur sur le dos du récepteur. Après avoir branché l’unité, mettez
l’alimentation sur On.
3. Voir Réglages finaux de système, ci-dessous.
MÉTHODE 3
NIVEAU DES ENCEINTES – POUR APPLICATIONS MUSICALES
1. L’autre façon de connecter votre subwoofer à votre récepteur consiste à utiliser une connexion de fil
d’enceinte, en connectant simplement les fils d’enceintes des sorties d’enceintes avant gauche et droite
sur le récepteur vers ➐ ENTRÉE NIVEAU HAUT gauche et droite du subwoofer. Il est impératif de main-
tenir les polarités d’enceintes, il faut connecter les fils positif et négatif aux bornes positive et négative
appropriées. Ne pas le faire résultera en une connexion déphasée, limitant sérieusement le volume de
basses dans votre système.
2. Après avoir connecté le ➐ ENTRÉE NIVEAU HAUT (fil d’enceinte) entre le récepteur et le subwoofer,
assurez-vous qu’aucun fil effiloché ne se touche car ceci pourrait entraîner un court-circuit et endom-
mager vos composants électroniques. Branchez votre subwoofer dans une prise secteur. N’utilisez pas
la prise secteur sur le dos du récepteur.
3. Voir Réglages finaux de système, ci-dessous.
FRANÇAIS

www.pioneerelectronics.com
13
FRENCH FRANÇAIS
RÉGLAGES FINAUX DE SYSTÈME
1. Après avoir mis le commutateur d’alimentation principale et après avoir rôdé l’enceinte, sélectionnez la
position correcte pour le ➎ ALIMENTATION, soit sur On soit sur Auto en fonction de votre système. La
sélection Auto laisse l’unité en mode auto-détecteur de sorte que, si l’unité détecte un signal audio, elle
s’allume automatiquement et s’éteint au bout de quelques minutes sans signal, tandis que dans la position
On, le subwoofer reste toujours allumé. Si le système ne doit pas être utilisé pendant une période prolongée,
il est recommandé de débrancher le subwoofer du secteur.
2. Ajustez le ➋ VOLUME de votre subwoofer de manière que son volume corresponde au volume du système
global. Ceci permet une douce transition entre les fréquences basses et hautes de votre système.
3. Ajustez le ➌ FRÉQ sur votre subwoofer de sorte que la plage de fréquence du subwoofer s’harmonise
bien avec celle des enceintes avant. Un réglage de recouvrement trop bas créera un écart entre la
réponse de fréquence des enceintes avant et celle du subwoofer, tandis qu’un réglage de fréquence
de recouvrement trop élevé créera un doublé de certaines fréquences, rendant les sons musicaux
caverneux. Lors de l’utilisation de petites enceintes satellites, la fréquence de recouvrement appropriée
doit être de 90 Hz à 150 Hz, pour les enceintes étagères de 70 Hz à 90 Hz et pour les grandes enceintes
de sol de 40 Hz à 70 Hz.
4. Ajustez la ➍ PHASE de sorte que le subwoofer s’intègre pleinement avec le reste de votre système
audio. Ce contrôle garantit que le subwoofer opère en phase avec le reste du système tandis qu’un
subwoofer déphasé aurait l’air soit de manquer de performance de basses soit d’être désynchronisé.
Ce réglage sera déterminé par votre position d’écoute, les caractéristiques de votre salle d’écoute et
son interaction avec votre subwoofer. Une enceinte déphasée signifie que le cône d’enceinte se déplace
vers l’intérieur quand il devrait se déplacer vers l’extérieur, comme les autres enceintes dans votre
système entraînant les annulations de certaines fréquences. En ajustant le contrôle de phase, il faut
s’assurer que toutes les enceintes se déplacent dans le bon sens, en même temps.
5. Étapes 2, 3 et 4 peuvent exiger de répéter pour mettre au point votre système. Assurer l’harmonie
appropriée entre les enceintes et le subwoofer est critique pour la performance de votre système
dans l’ensemble.

www.pioneerelectronics.com
14
FRENCHFRANÇAIS
Plage de fréquences
38 Hz -150 Hz
Dimensions (La x H x P) (cm)
310 mm x 361 mm x 310 mm
Poids
9,20 kg
Dimensions des haut-parleurs
20 cm
Puissance de sortie maximale
100 W
Consommation électrique
1,0 A
Alimentation requise
120 V / 60 Hz
SW-8MK2
FICHE TECHNIQUE

GARANTIE LIMITÉE
GARANTIE VALIDE SEULEMENT DANS LE PAYS OU LE PRODUIT A ÉTÉ ACHETÉ
GARANTIE
Pioneer Electronics (USA) Inc. (PUSA) et Pioneer Électronique du Canada, Inc. (POC) garantissent que les produits distribués par PUSA aux États-Unis et par POC au Canada qui,
après avoir été installés et utilisés conformément au manuel de l’utilisateur inclus avec l’unité, ne fonctionnent pas de façon appropriée dans des conditions d’utilisation normales en
raison d’un vice de fabrication, seront réparés ou remplacés par une unité de valeur comparable, au choix de PUSA ou de POC, sans que vous deviez payer pour les pièces ou les
travaux de réparation. Les pièces incluses en vertu de la présente garantie peuvent être neuves ou remises à neuf, au choix de PUSA ou de POC.
LA PRÉSENTE GARANTIE LIMITÉE S’APPLIQUE AU PROPRIÉTAIRE INITIAL AINSI QU’À TOUT PROPRIÉTAIRE SUBSÉQUENT DU PRÉSENT PRODUIT PIONEER PENDANT
LA PÉRIODE DE GARANTIE, À CONDITION QUE LE PRODUIT AIT ÉTÉ ACHETÉ CHEZ UN DISTRIBUTEUR OU DÉTAILLANT PIONEER AUTORISÉ AUX ÉTATS-UNIS OU
AU CANADA. VOUS DEVREZ FOURNIR UN RELEVÉ DE CAISSE OU UNE AUTRE PREUVE D’ACHAT VALIDE INDIQUANT LA DATE DE L’ACHAT INITIAL OU, SI VOUS
LOUEZ LE PRODUIT, VOTRE CONTRAT DE LOCATION INDIQUANT L’ENDROIT ET LA DATE DE LA PREMIÈRE LOCATION. SI JAMAIS UN SERVICE DE RÉPARATION
EST REQUIS, LE PRODUIT DOIT TRE EXPÉDIÉ PENDANT LA PÉRIODE DE GARANTIE, EN PORT PRÉPAYÉ, À L’INTÉRIEUR DU PAYS OÙ L’ACHAT A ÉTÉ EFFECTUÉ
SEULEMENT, TEL QU’IL EST EXPLIQUÉ DANS LE PRÉSENT DOCUMENT. VOUS êTES RESPONSABLE DU DÉMONTAGE ET DE L’INSTALLATION DU PRODUIT. PUSA
OU POC, LE CAS ÉCHÉANT, PAIERA POUR VOUS RETOURNER LE PRODUIT RÉPARÉ OU REMPLACÉ, À L’INTÉRIEUR DU PAYS OÙ L’ACHAT A ÉTÉ EFFECTUÉ.
PÉRIODE DE GARANTIE DES PRODUITS Pièces
Main-d’œuvre
Produits audio et vidéo pour la maison........................................................................................... 1 an 1 an
Microphones, Headphones, Phono Cartridges and Styluses ...................................................... 90 jours 90 jours
Durée des garanties réduites pour certains modèles. Veuillez vous référer au document degarantie limitée inclus avec le produit pour conrmer la durée de la garantie. La période
de garantie pour les clients qui louent le produit commence le jour où le produit est utilisé pour la première fois (a) pendant la période de location ou (b) après la vente au détail,
selon ce qui se produit en premier.
ÉLÉMENTS NON COUVERTS PAR LA GARANTIE
UN PRODUIT ACHETÉ CHEZ UN DISTRIBUTEUR NON AUTORISÉ N’EST COUVERT PAR AUCUNE GARANTIE EXPRESSE OU IMPLICITE, Y COMPRIS QUELQUE
GARANTIE IMPLICITE DE QUALITÉ MARCHANDE OU D’ADAPTATION À UN USAGE PARTICULIER QUE CE SOIT. DE PLUS, CE PRODUIT EST STRICTEMENT VENDU
« TEL QUEL » ET « AVEC TOUS SES DÉFAUTS ÉVENTUELS ».
PIONEER N’EST PAS RESPONSABLE DE QUELQUE DOMMAGE CONSÉCUTIF ET(OU) INDIRECT QUE CE SOIT.
PIONEER NE GARANTIT PAS LES PRODUITS ÉNUMÉRÉS CI-DESSUS LORSQU’ILS SONT UTILISÉS À DES FINS COMMERCIALES OU PROFESSIONNELLES, OU AU
SEIN DE TOUTE APPLICATION INDUSTRIELLE OU COMMERCIALE QUE CE SOIT.
LA PRÉSENTE GARANTIE NE S’APPLIQUE PAS SI LE PRODUIT A ÉTÉ SOUMIS À UNE PUISSANCE NOMINALE EXCÉDANT CELLE QUI A ÉTÉ ÉTABLIE DANS LES
DOCUMENTS S’Y APPLIQUANT.
LA PRÉSENTE GARANTIE NE COUVRE PAS LES TÉLÉVISEURS OU LES ÉCRANS ENDOMMAGÉS EN RAISON DE L’APPLICATION D’IMAGES STATIQUES ET IMMOBILES
PENDANT DE LONGUES PÉRIODES (IMAGES RÉMANENTES).
LA PRÉSENTE GARANTIE NE COUVRE PAS LE COFFRAGE OU LES ÉLÉMENTS ESTHÉTIQUES, LES ANTENNES INSTALLÉES PAR L’UTILISATEUR, LES DOMMAGES
AUX DISQUES OU AUX RUBANS OU DISQUES D’ENREGISTREMENT, LES DOMMAGES AU PRODUIT DÉCOULANT D’UNE RETOUCHE, D’UNE MODIFICATION NON
AUTORISÉE PAR ÉCRIT PAR PIONEER, D’UN ACCIDENT, D’UN USAGE INAPPROPRIÉ OU D’UN USAGE ABUSIF, LES DOMMAGES PRODUITS PAR LA FOUDRE OU LA
SURTENSION, LES DOMMAGES SUBSÉQUENTS DÉCOULANT DE FUITES, LES DOMMAGES DÉCOULANT DE PILES DÉFECTUEUSES OU DE L’UTILISATION DE PILES
NON CONFORMES À CELLES QUI SONT SPÉCIFIÉES DANS LE MANUEL DE L’UTILISATEUR.
LA PRÉSENTE GARANTIE NE COUVRE PAS LE COÛT DES PIÈCES OU DE LA MAIN-D’ŒUVRE QUI SERAIENT AUTREMENT OFFERTES SANS FRAIS EN VERTU DE
LA PRÉSENTE GARANTIE, SI ELLES SONT OBTENUES AUPRÈS D’UNE SOURCE AUTRE QU’UNE SOCIÉTÉ DE SERVICE OU AUTRE AUTORISÉE OU DÉSIGNÉE PAR
PIONEER. LA PRÉSENTE GARANTIE NE COUVRE PAS LES DÉFECTUOSITÉS OU LES DOMMAGES CAUSÉS PAR L’UTILISATION D’UNE MAIN-D’ŒUVRE OU DE PIÈCES
NON AUTORISÉES, NI D’UN ENTRETIEN INADÉQUAT.
LES NUMÉROS DE SÉRIE MODIFIÉS, OBLITÉRÉS OU ENLEVÉS ANNULENT LA PRÉSENTE GARANTIE DANS SA TOTALITÉ.
INVALADITÉ DE TOUTE AUTRE GARANTIE
AUX ÉTATS-UNIS PIONEER LIMITE SES OBLIGATIONS EN VERTU DE TOUTE GARANTIE IMPLICITE QUE CE SOIT, Y COMPRIS ENTRE AUTRES LES GARANTIES
IMPLICITES DE QUALITÉ MARCHANDE OU D’ADAPTATION À UN USAGE PARTICULIER, À UNE PÉRIODE N’EXCÉDANT PAS LA PÉRIODE DE GARANTIE. AUCUNE
GARANTIE NE S’APPLIQUE APRÈS LA PÉRIODE DE GARANTIE. CERTAINS ÉTATS NE PERMETTENT PAS LA LIMITATION DE LA DURÉE D’UNE GARANTIE
IMPLICITE, ET CERTAINS NE PERMETTENT PAS L’EXCLUSION OU LA LIMITATION DES DOMMAGES CONSÉCUTIFS OU INDIRECTS. LES LIMITATIONS ET
EXCLUSIONS ÉTABLIES CI-DESSUS PEUVENT DONC NE PAS S’APPLIQUER À VOUS. LA PRÉSENTE GARANTIE VOUS DONNE DES DROITS LÉGAUX SPÉCIFIQUES.
VOUS POUVEZ JOUIR D’AUTRES DROITS, QUI PEUVENT VARIER D’UN ÉTAT À L’AUTRE.
AU CANADA SOUS RÉSERVE DE CE QUI EST EXPRESSÉMENT STIPULÉ DANS LES PRÉSENTES, AUCUNE REPRÉSENTATION, GARANTIE, OBLIGATION OU
CONDITION, QU’ELLE SOIT IMPLICITE, OBLIGATOIRE OU AUTRE, NE S’APPLIQUE À CE PRODUIT.
SERVICE
PUSA et POC ont désigné un certain nombre de sociétés de service autorisées partout aux États-Unis et au Canada si jamais vous avez besoin de services de réparation pour
votre produit. Pour proter d’un tel service en vertu de la garantie, vous devez présenter votre relevé de caisse ou, si vous louez le produit, votre contrat de location indiquant
l’endroit et la date de la transaction par le premier propriétaire. Si vous expédiez l’unité, vous devez l’emballer soigneusement et l’envoyer à une société de service autorisée, en
port prépayé et selon une méthode de transport pouvant être suivie et assurée. Emballez le produit au moyen de matériaux coussinés adéquats pour éviter les dommages pendant
le transport. La boîte d’origine est idéale à cette n. Incluez votre nom, votre adresse et un numéro de téléphone où nous pouvons vous rejoindre pendant les heures de bureau.
Pour toutes les plaintes et problèmes aux États-Unis, communiquez avec le service de Soutien à la clientèle au 1-800-421-1404. Au Canada, communiquez avec le groupe de
Satisfaction de la clientèle au 1-877-283-5901.
POUR LE RACCORDEMENT OU LE FONCTIONNEMENT DE VOTRE UNITÉ, OU POUR TROUVER UNE SOCIÉTÉ DE SERVICE AUTORISÉE, APPELEZ OU ÉCRIVEZ À :
AUX ÉTATS-UNIS
SERVICE SUPPORT DIVISION
PIONEER ELECTRONICS (USA), INC.
P.O. BOX 1760, LONG BEACH, CALIFORNIA 90801
1-800-421-1404 • http://www.pioneerelectronics.com
AU CANADA
DÉPARTÉMENT DE SERVICE AU CONSOMMATEUR
PIONEER ÉLECTRONIQUES DU CANADA, INC.
300 ALLSTATE PARKWAY, MARKHAM, ON L3R 0P2
(905) 479-4411 • 1-877-283-5901 • http://www.pioneerelectronics.ca
RÈGLEMENT DES CONFLITS
AUX ÉTATS-UNIS - Si un conit se produit entre vous et Pioneer après la réponse à une demande initiale faite au service de Soutien à la clientèle, vous pouvez avoir recours au
Programme de résolution des plaintes de Pioneer pour résoudre le conit. Ce programme vous est offert sans frais. Vous devez avoir recours au Programme de résolution des plaintes
avant de vous prévaloir de vos droits ou de chercher réparation en vertu du Titre I de la loi Magnuson-Moss Warranty-Federal Trade Commission Improvement Act, 15 U.S.C. 2301 et s.s.
Pour avoir recours au Programme de résolution des plaintes, appelez au 1-800-421-1404 et expliquez au représentant du service à la clientèle qui vous répondra le problème
auquel vous faites face et les démarches que vous avez entreprises pour faire réparer le produit pendant la période de garantie, puis donnez-lui le nom du distributeur / détaillant
autorisé auprès duquel vous vous êtes procuré le produit Pioneer. Une fois que votre plainte a été expliquée au représentant, un numéro de résolution vous sera communiqué.
Pioneer étudiera le conit et, dans un délai de quarante (40) jours après la réception de votre plainte, (1) répondra à votre plainte par écrit pour vous aviser des démarches qu’elle
entreprendra pour résoudre le conit, et indiquera combien de temps ces démarches prendront ; ou (2) répondra à votre plainte par écrit pour vous indiquer les raisons pour
lesquelles elle n’entreprendra aucune démarche.
AU CANADA - Communiquez avec le directeur de la Satisfaction de la clientèle au (905) 946-7446 pour discuter de votre plainte et résoudre rapidement le problème.
PIONEER ELECTRONICS (USA) INC. PIONEER ELECTRONIQUES DU CANADA, INC.
ENREGISTREZ LE LIEU ET LA DATE D’ACHAT POUR RÉFÉRENCE ULTÉRIEURE
No. du modèle : ___________________________________________________ No. deSérte : ________________________________________________________________
Date d’achat : ____________________________________________________ Acheté de : __________________________________________________________________
PRENEZ SOIN DE GARDER CETTE INFORMATION ET VOTRE REÇU D’ACHAT DANS UN ENDROIT SÛR POUR RÉFÉRENCE FUTURE

www.pioneerelectronics.com
16
Cher client, chère cliente,
La sécurité de vos oreilles est entre vos mains. Protez au mieux de
votre équipement en le faisant marcher à un niveau sans danger—un
niveau qui laisse le son sortir clairement sans braillement irritant ou
distorsion et, surtout, sans affecter votre ouïe sensible. Le son peut
être trompeur. Au l du temps, le « degré d’aisance » de votre ouïe
s’adapte à des niveaux sonores supérieurs de sorte que ce qui semble
« normal » peut en fait être fort et dangereux pour votre ouïe. Par
mesure de protection, réglez votre équipement à un niveau sans
danger AVANT que votre ouïe ne s’y habitue.
ÉTABLISSEMENT D’UN NIVEAU SANS DANGER :
• Réglez le contrôle du volume sur un réglage bas.
• Augmentez lentement le son jusqu’à ce que vous l’entendiez
confortablement et clairement, et sans distorsion.
• Une fois que vous avez établi un niveau sonore confortable, réglez
le cadran et laissez-le là.
ASSUREZ-VOUS D’OBSERVER LES DIRECTIVES SUIVANTES :
• N’augmentez pas le volume au point que vous ne puissiez pas
entendre ce qui se passe autour de vous.
• Faites preuve de prudence ou interrompez provisoirement
l’utilisation dans des situations potentiellement dangereuses.
PIONEER ELECTRONICS [USA] INC. P.O. BOX 1540, Long Beach, California 90801-1540
PIONEER ELECTRONICS OF CANADA, INC. 300 Allstate Parkway Markham, Ontario L3R OP2, Canada
PIONEER ELECTRONICS OF MEXICO S.A. De C.V. Blvd. Manuel Avila Camacho 138 piso 10
Col. Lomas de Chapultepec 11000 Delegacion Miguel Hidalgo Mexico, D.F.
Publié par Pioneer Electronics (USA) Inc. Copyright © 2012 Pioneer Electronics (USA) Inc. Tous droits réservés Imprimé en Chine
FRANÇAIS

www.pioneerelectronics.com
17
INFORMACIÓN IMPORTANTE
El número de serie del aparato se encuentra en
la parte de atrás de la unidad. Anote el número
de serie en la hoja de garantía y guárdela en un
lugar seguro para referencia en el futuro.
PRECAUCIÓN CON LA VENTILACIÓN
Al instalar esta unidad, cerciórese de dejar
espacio alrededor de la unidad para ventilación
y para mejorar la radiación de calor (al menos
25 cm en la parte superior, 15 cm detrás, y 10
cm a cada lado).
ADVERTENCIA
Las ranuras y aberturas en el gabinete se
suministran para ventilación para asegurar el
funcionamiento able del producto y protegerlo
contra el calentamiento excesivo. Para prevenir
los riesgos de incendio, nunca se debe blo-
quear o cubrir las aberturas con artículo alguno
(como periódicos, manteles, cortinas) ni utilizar
el equipo sobre alfombras de bra larga ni en
camas mullidas.
ADVERTENCIA
Para prevenir riesgos de incendio no
oloque fuentes de llama abierta (como velas
encendidas) sobre el equipo.
ADVERTENCIA
Este equipo no es resistente al agua. Para
evitar incendios o riesgos de descargas
eléctricas, no coloque ningún recipiente lleno
de líquido cerca de este equipo (como un vaso
o orero) ni lo exponga a goteos, salpicaduras,
lluvia o humedad.
PRECAUCIÓN CON EL CORDÓN DE
ALIMENTACIÓN ELÉCTRICA
Sujete el cordón de alimentación eléctrica desde
el enchufe. No tire del cordón de alimentación
eléctrica para desconectar el enchufe y nunca
toque el cordón de alimentación eléctrica con las
manos húmedas ya que esto podría causar un
cortocircuito o una descarga eléctrica. No coloque
la unidad, un mueble, etc. sobre el cordón de
alimentación eléctrica ni aplaste dicho cordón.
Nunca haga nudos en el cordón de alimentación
eléctrica ni lo amarre con otros cordones eléctri-
cos. El cordón de alimentación eléctrica deberá
pasarse por puntos donde quede expuesto a
pisadas. Un cordón de alimentación eléctrica
dañado puede causar un incendio o darle una
descarga eléctrica. Inspeccione periódicamente
el cordón de alimentación eléctrica. Si detecta
daños, solicite al centro de servicio autorizado
PIONEER más cercano o al concesionario que se
lo reemplace.
ADVERTENCIA
Antes de conectarlo la primera vez, lea
cuidadosamente la sección siguiente. El voltaje
de la alimentación eléctrica disponible diere
según el país o la región. Asegúrese de que
el voltaje de la alimentación eléctrica del área
donde se utilizará esta unidad sea compatible
con el voltaje requerido (p.ej.: 230 V o 120 V)
impreso en el panel trasero.
IMPORTANTE
El símbolo de relámpago con cabeza de flecha,
dentro de un triángulo equilátero tiene por objeto
informar al usuario acerca de la presencia de
“voltaje peligroso” sin aislamiento dentro del
envolvente del producto que puede ser de
suficiente magnitud para constituir un riesgo
de descarga eléctrica para las personas.
PRECAUCIÓN:
PARA PREVENIR EL RIESGO DE DESCARGA
ELÉCTRICA, NO RETIRE LA CUBIERTA (NI LA TAPA
TRASERA). EN EL INTERIOR NO HAY PARTES QUE
REQUIERAN MANTENIMIENTO DE PARTE DEL USUARIO.
SOLAMENTE PERSONAL DE SERVICIO CALIFICADO
DEBERÁ ENCARGARSE DEL MANTENIMIENTO.
El signo de exclamación dentro de un
triángulo equilátero tiene como objeto
informar al usuario acerca de la pres-
encia de instrucciones importantes de
operación y mantenimiento (servicio) en
los documentos incluidos con el equipo.
1. Lea estas instrucciones.
2. Conserve estas instrucciones.
3. Atienda todas las advertencias.
4. Siga todas las instrucciones.
5. No use este aparato cerca del agua.
6. Limpie solamente con un paño seco.
7. No bloquee las aberturas de ventilación.
Instálelo de acuerdo con las instrucciones
del fabricante.
8. No lo instale cerca de fuentes de calor como
radiadores, ventilas de calefacción, estufas
u otros aparatos (incluso amplificadores)
que producen calor.
9. No anule los objetivos de seguridad de los
enchufes polarizados o con conexión a tierra.
Un enchufe polarizado tiene dos patillas, y
una es más ancha que la otra. Un enchufe
con conexión a tierra tiene dos patillas planas
y una tercera patilla circular de conexión
a tierra. La patilla ancha o la tercera patilla
circular se suministra para su seguridad. Si el
enchufe suministrado no es compatible con
su tomacorriente, llame a un electricista para
que reemplace el tomacorriente obsoleto.
10. Proteja el cordón de alimentación eléctrica
y no permita que lo pisen ni lo aplasten
principalmente en los enchufes, en los
receptáculos de conveniencia ni en el punto
donde ellos salen del aparato.
11. Use solamente aditamentos/accesorios
especificados por el fabricante.
12. Use el equipo únicamente con el carrito,
base, trípode, escuadra de soporte o mesa
especificados por el fabricante o vendidos
con el aparato. Al usar un carrito, tenga
precaución al mover la combinación carrito/
aparato para evitar lesiones causadas por
volcadura.
13. Desenchufe este aparato durante las
tormentas eléctricas o cuando no se use
durante períodos prolongados.
14. Solamente personal de servicio calificado
deberá encargarse del mantenimiento. Es
necesario dar mantenimiento cuando el
aparato se dañe de cualquier manera, tal
como daños en el cordón o en el enchufe de
alimentación eléctrica, líquidos derramados
sobre el aparato u objetos que caigan sobre
el aparato, exposición a la lluvia o a la
humedad, cuando no funcione normalmente,
o si se ha dejado caer.
IMPORTANT SAFETY INSTRUCTIONS
Si el enchufe de CA de esta unidad no
corresponde con el tomacorriente de CA que
usted desea utilizar, será necesario cambiar
el enchufe e instalar uno apropiado. Solamente
personal de servicio calificado deberá realizar
el reemplazo e instalación de un enchufe
de CA en el cordón de alimentación eléctrica
de esta unidad. Si está conectado a un
tomacorriente de CA, el enchufe cortado
puede causar una descarga eléctrica grave.
Cerciórese de desecharlo debidamente
después de retirarlo. El equipo deberá
desconectarse retirando el enchufe principal
del receptáculo de pared cuando se deje
inactivo durante un período prolongado (por
ejemplo, durante un período de vacaciones).
PRECAUCIÓN
El interruptor principal (POWER) en esta
unidad no desconectará completamente la
alimentación eléctrica del tomacorriente de
CA. Dado que el cordón de alimentación
eléctrica funciona como el dispositivo principal
de desconexión para la unidad, será necesario
desenchufarlo del tomacorriente de CA para
desconectar toda la electricidad. Por lo tanto,
asegúrese de que la unidad se haya instalado
de manera que el cordón de alimentación
eléctrica pueda desenchufarse fácilmente del
tomacorriente de CA en caso de accidente.
Para evitar riesgos de incendio, se recomienda
desenchufar del tomacorriente de CA el cordón
de alimentación eléctrica cuando se deje inac-
tiva la unidad durante un período prolongado
(por ejemplo, en vacaciones).
Este producto es para fines de uso doméstico
en general. Cualquier fallo debido al uso que
no sea doméstico (como el uso de largo plazo
para fines comerciales en un restaurante o
el uso en un automóvil o embarcación) el cual
requiera reparación será cobrado incluso
durante el período de garantía.
ADVERTENCIA: La manipulación del cordón
de alimentación eléctrica en este producto
o de los cordones de alimentación eléctrica
relacionados con accesorios vendidos con
el producto pueden exponerle a productos
químicos incluidos en la propuesta 65 que son
conocidos por el Estado de California como
causantes de cáncer, defectos de nacimiento
u otros daños del aparato reproductor.
ESPAÑOL
ENTORNO DE FUNCIONAMIENTO
Temperatura y humedad del entorno de func-
ionamiento: +5 °C a +35 °C (+41 °F a +95 °F);
menos del 85% de HR (ventilas de enfriamiento
no bloqueadas). No instale esta unidad en un
área con ventilación deficiente, ni en ubicaciones
expuestas a humedad elevada o luz solar directa
(ni luz artificial intensa).

www.pioneerelectronics.com
18
COLOCACIÓN Y AJUSTES FINOS
La colocación de su nuevo subwoofer es esencial para su funcionamiento. Las tres ubicaciones más
comunes incluyen: en la esquina de la habitación (lo cual puede ocasionar un sonido resonante o una
respuesta de bajas frecuencias exagerada), a lo largo de una pared pero no en la esquina (rendimiento
moderado de graves con mayor fidelidad que cuando se coloca en la esquina) o al lado de una bocina
frontal (creando así una mejor amalgama con la bocina frontal, pero sacrificando el volumen general).
Es muy recomendable experimentar con la ubicación del subwoofer, ya que pequeños ajustes pueden
dar grandes beneficios en la reproducción del sonido. Para probar aun más la colocación del subwoofer,
instale temporalmente el subwoofer en su posición principal de escucha y, mientras toca una pieza de
música conocida, camine en la habitación hasta encontrar la mejor posición de escucha. Esta es una
posible ubicación para el subwoofer.
PRECAUCIONES DE INSTALACIÓN
No instale este subwoofer cerca de una estufa u otro artefacto de calefacción, ni lo ponga en un lugar
expuesto al sol. Esas ubicaciones pueden hacer que el gabinete cambie de color y que el subwoofer se
deteriore.
Pioneer no se responsabiliza de accidentes o daños resultantes de una instalación incorrecta.
MANTENIMIENTO DEL GABINETE
La construcción y el acabado del gabinete se han hecho con gran esmero y arte. Use periódicamente un
lienzo suave seco para eliminar el polvo o las huellas dactilares. No use toallas de papel u otros materiales
abrasivos, ya que pueden dañar el acabado.
NOTA: Por favor guarde la caja y los materiales de embalaje de sus productos Pioneer, a fin de prote-
gerlos en caso de mudanza o si es necesario enviarlos a un centro de servicio. Un producto que se recibe
dañado en un centro de servicio, y que el usuario final envía en un embalaje que no es el original, será
reparado, reconstruido y embalado debidamente para su envío de retorno, a costa del usuario.
ESPAÑOL
C
A
B

www.pioneerelectronics.com
19
ESPAÑOL
TERMINOLOGÍA Y CONTROLES
➊ INDICADOR DE ESTADO – El indicador LED ubicado en el panel frontal se ilumina cuando el
subwoofer está funcionando. Si la unidad está en el modo Auto y no está recibiendo señal, la luz
permanecerá apagada.
➋ VOLUMEN – Esta perilla puede ajustarse para controlar el nivel de salida de su subwoofer. El nivel
elegido debe permitir al subwoofer amalgamar su salida con la del resto del sistema de audio.
➌ FREC. – Este control permite el ajuste del filtro de paso bajo. Los ajustes pueden hacerse infinitamente
de 40 Hz a 150 Hz. Esto determina la frecuencia más alta que el subwoofer va a reproducir.
➍ FASE – Este interruptor permite ajustar la fase del subwoofer, en relación con las bocinas usados en su
sistema, de 0 a 180 grados.
➎ INTERRUPTOR PRINCIPAL – Este interruptor puede ponerse en ON, STAND BY o AUTO. Si el interruptor
está en la posición STAND BY, el subwoofer quedará apagado. Si el interruptor está en la posición ON,
permanecerá encendido de forma constante. Si el interruptor está fijado en la posición AUTO, cuando
hay una señal presente el subwoofer se enciende y se apaga automáticamente varios minutos después
de que la señal ya no está presente.
➏ LÍNEA ENT. – Estas entradas son entradas tipo RCA LFE/estéreo/mono. Si está conectando el subwoofer
a un preamplificador/procesador con una salida de preamplificador LFE o de Subwoofer, conecta un
único cable RCA a la entrada LEF/Left (izquierda). Si va a conectar el subwoofer a un preamplificador o
procesador estéreo, por ejemplo un sistema de estéreo para música, use cables RCA estéreo y conéc-
telos a los terminales LFT/Left (izquierda) y Derecha.
➐ NIVEL ALTO ENT. – Las entradas de nivel de bocina están diseñadas para uso en receptores o ampli-
ficadores que no tienen salidas RCA para subwoofer. Si su receptor está equipado con una salida de
subwoofer tipo RCA, estas entradas de nivel de bocinas no se deben utilizar.
ESPAÑOL

www.pioneerelectronics.com
20
ESPAÑOL
CONEXIÓN DE SU SUBWOOFER
PRECAUCIÓN: Antes de hacer conexiones, el sistema debe estar totalmente desconectado de la
corriente. Se debe prestar mucha atención para asegurar que ninguno de los componentes electrónicos
esté conectado a una fuente de corriente alterna. De no hacerse esto, el sistema podría sufrir daños.
MÉTODO 1
RCA – SUB IN PARA APLICACIONES DE HOME THEATER O LFE
1. En la parte posterior del receptor/preamplificador debe haber un conector único RCA marcado
“Subwoofer/Pre-Amp Out”. Conecte un único cable RCA desde ese conector al ➏ LÍNEA ENT. en
la parte posterior del subwoofer. Se necesita un cable RCA macho-macho estándar.
2. Tras conectar la conexión ➏ LÍNEA ENT., enchufe el subwoofer en un tomacorriente. No use el tomacor-
riente en la parte trasera del receptor. Tras enchufar la unidad, ponga el interruptor Main Power en On.
3. Vea los Ajustes finales del sistema, más abajo.
MÉTODO 2
RCA – LINE IN PARA APLICACIONES DE ESTÉREO
1. En la parte posterior del receptor/preamplificador debe haber conectores estéreo tipo RCA (izquierda
y derecha) marcados “Left and Right Pre-Amp Outputs”. Conecte un par de cables RCA desde esos
conectores al ➏ LÍNEA ENT. en la parte posterior del subwoofer. Se necesita dos cables RCA macho-
macho estándar.
2. Tras conectar la conexión estéreo ➏ LÍNEA ENT., enchufe el subwoofer en un tomacorriente. No use el
tomacorriente en la parte trasera del receptor. Tras enchufar la unidad, ponga el interruptor principal de
alimentación en On.
3. Vea los Ajustes finales del sistema, más abajo.
MÉTODO 3
NIVEL DE ALTAVOZ/SPEAKER LEVEL – PARA APLICACIONES MUSICALES
1. La otra manera de conectar el subwoofer al receptor es usar una conexión mediante cable de bocina,
simplemente conectando los cables de bocina de las salidas Front Left y Front Right (frontal izquierda y
derecha) del receptor a los conectores Left y Right (izq. y der.) ➐ NIVEL ALTO ENT. en la parte trasera
del subwoofer. Es imperativo mantener las polaridades de las bocinas: los alambres positivo y negativo
deben conectarse a los respectivos terminales positivo y negativo. De no hacerse esto, la conexión
estará fuera de fase, limitando seriamente el nivel de graves del sistema.
2. Tras conectar el ➐ NIVEL ALTO ENT. (alambre de bocina) entre el receptor y el subwoofer, asegúrese
de que no haya hebras sueltas que se toquen, ya que esto podría causar un cortocircuito y dañar los
componentes electrónicos. Enchufe el subwoofer en un tomacorriente. No use el tomacorriente en la
parte trasera del receptor.
3. Vea los Ajustes finales del sistema, más abajo.
ESPAÑOL

www.pioneerelectronics.com
21
ESPAÑOL
AJUSTES FINALES DEL SISTEMA
1. Una vez que haya encendido el interruptor principal de alimentación y probado la bocina, seleccione
la posición correcta para el ➎ INTERRUPTOR PRINCIPAL, o bien On o Auto, dependiendo del sistema.
La opción Auto dejará la unidad en el modo autosensor, con lo cual, si la unidad detecta una señal de
audio, se encenderá y después se apagará tras varios minutos sin señal, mientras que en la posición
On, el subwoofer siempre está encendido. Si el sistema no se usa durante un período de tiempo largo,
se recomienda desconectar el subwoofer de la corriente.
2. Ajuste el ➋ VOLUMEN de su subwoofer de modo que el volumen del subwoofer se corresponda con el
nivel general del sistema. Esto asegura una transición armoniosa entre las frecuencias altas y bajas del
sistema.
3. Ajuste el ➌ FREC. en el subwoofer de modo que el rango de frecuencias del subwoofer se combine
bien con el de las bocinas frontales. Si se fija el crossover demasiado bajo, se creará una diferencia
entre la respuesta de frecuencia de las bocinas frontales y del subwoofer, mientras que si se fija la
frecuencia de crossover demasiado alta, se redoblarán ciertas frecuencias, con lo que la música sonará
demasiado resonante. Si se usan pequeñas bocinas satélites, la frecuencia de crossover apropiada
debe estar entre 90 Hz y 150 Hz, para las bocinas pequeñas 70 Hz a 90 Hz, y para las bocinas grandes
de piso, 40 Hz a 70 Hz.
4. Ajuste el ➍ FASE de modo que el subwoofer se integre plenamente con el resto del sistema de audio. Este
control asegura que el subwoofer funcione en fase con el resto del sistema, ya que un subwoofer fuera
de fase sonará o bien como si le faltaran graves o como si estuviera desfasado temporalmente. Este
ajuste se determinará en base a la posición de escucha, las características de la sala de escucha y su
interacción con el subwoofer. Una bocina fuera de fase quiere decir que el cono de la bocina se mueve
hacia adentro cuando debería moverse hacia fuera, como las otras bocinas de su sistema, causando
cancelaciones de ciertas frecuencias. Mediante el ajuste del control de fase, uno puede asegurarse de
que todas las bocinas se muevan en la dirección correcta al mismo tiempo.
5 Puede ser necesario repetir los pasos 2, 3 y 4 para hacer un ajuste fino del sistema. El asegurar una
combinación adecuada entre las bocinas y el subwoofer es esencial para el funcionamiento del sistema
en su conjunto.

www.pioneerelectronics.com
22
ESPAÑOL
Gama de frecuencias
38 Hz -150 Hz
Dimensiones (A x Alt. x Prof. pulg.)
310 mm x 361 mm x 310 mm
Peso
9,20 kg
Tamaños de bocinas
20 cm
Potencia máxima de salida
100 W
Consumo de energía
1,0 A
Requisitos de alimentación eléctrica
120 V / 60 Hz
SW-8MK2
ESPECIFICACIONES

GARANTÍA LIMITADA
GARANTÍA VÁLIDA ÚNICAMENTE EN EL PAÍS DONDE SE COMPRA EL PRODUCTO
GARANTÍA
Pioneer Electronics (USA) Inc. (PUSA), garantizan que los productos distribuidos por PUSA en los Estados Unidos que no funcionen debidamente bajo uso
normal debido a un defecto de fabricación cuando son instalados y operados de conformidad con el manual del propietario adjunto a la unidad, serán reparados
o reemplazados por una unidad de valor comparable, a discreción de PUSA, sin cargo para usted en lo referente a piezas o trabajos de reparación. Las piezas
suministradas bajo esta garantía pueden ser nuevas o reconstruidas, a discreción de PUSA.
ESTA GARANTÍA LIMITADA SE APLICA AL PROPIETARIO ORIGINAL O A CUALQUIER PROPIETARIO SUBSIGUIENTE DE ESTE PRODUCTO PIONEER
DURANTE EL PERÍODO DE GARANTÍA, SIEMPRE Y CUANDO EL PRODUCTO HAYA SIDO ADQUIRIDO EN UN DISTRIBUIDOR/VENDEDOR AUTORIZADO
DE PIONEER EN LOS ESTADOS UNIDOS. SE LE PEDIRÁ QUE PRESENTE UN RECIBO DE VENTA U OTRO COMPROBANTE VÁLIDO DE COMPRA,
INDICANDO LA FECHA DE LA COMPRA ORIGINAL O, SI ES ALQUILADO, EL CONTRATO DE ALQUILER QUE INDIQUE EL LUGAR Y FECHA DEL
PRIMER ALQUILER. SI SE REQUIERE SERVICIO, EL PRODUCTO DEBE SER ENVIADO DURANTE EL PERÍODO DE GARANTÍA, CON EL TRANSPORTE
PREPAGADO, SOLAMENTE DENTRO DEL PAÍS DE COMPRA, COMO SE EXPLICA EN ESTE DOCUMENTO. USTED SERÁ RESPONSABLE DEL RETIRO
E INSTALACIÓN DEL PRODUCTO. PUSA, SEGÚN CORRESPONDA, PAGARÁ EL RETORNO DEL PRODUCTO REPARADO O DE REEMPLAZO A
USTED DENTRO DEL PAÍS DE COMPRA.
PERÍODO DE GARANTÍA DEL PRODUCTO
Piezas Mano de obra
Audio y video para el hogar ............................................................................................................ 1 Año 1 Año
Micrófonos, auriculares, cartuchos y púas fonográcos............................................................. 90 días 90 días
Algunos modelos pueden tener períodos de garantía limitada más cortos. Consulte el documento de garantía limitada adjunto al producto para ver una
declaración denitiva sobre el período de garantía. Este período de garantía para los clientes al por menor que alquilan el producto comienza en la fecha en
que el producto se usa por primera vez (a) durante el período de alquiler o (b) la venta al por menor (la más temprana de estas fechas).
QUÉ ES LO QUE NO ESTÁ CUBIERTO
SI ESTE PRODUCTO FUE ADQUIRIDO EN UN DISTRIBUIDOR NO AUTORIZADO, NO HAY GARANTÍAS, EXPRESAS O IMPLÍCITAS, INCLUIDA LA
GARANTÍA IMPLÍCITA DE COMERCIABILIDAD Y LA GARANTÍA IMPLÍCITA DE ADECUACIÓN A UN FIN DETERMINADO, Y ESTE PRODUCTO SE
VENDE ESTRICTAMENTE “TAL CUAL” Y “CON TODOS SUS DEFECTOS”.
PIONEER NO SERÁ RESPONSABLE DE DAÑOS CONSECUENTES Y/O INCIDENTALES.
PIONEER NO GARANTIZA NINGÚN PRODUCTO INDICADO ARRIBA CUANDO EL MISMO SE USA EN UNA PROFESIÓN O NEGOCIO O EN
CUALQUIER APLICACIÓN INDUSTRIAL O COMERCIAL.
ESTA GARANTÍA NO SE APLICA SI EL PRODUCTO HA ESTADO SUJETO A UNA POTENCIA SUPERIOR A LA POTENCIA NOMINAL PUBLICADA.
ESTA GARANTÍA NO CUBRE LAS PANTALLAS DE TELEVISIÓN O MONITORES DAÑADAS POR IMÁGENES ESTÁTICAS NO MÓVILES APLICADAS
DURANTE PERÍODOS PROLONGADOS (QUEMAZÓN O BURN-IN).
ESTA GARANTÍA NO CUBRE EL GABINETE NI NINGÚN ELEMENTO DE APARIENCIA, ANTENA CONECTADA POR EL USUARIO, NINGÚN DAÑO A
GRABACIONES O CINTAS O DISCOS, NINGÚN DAÑO AL PRODUCTO RESULTANTE DE ALTERACIONES, MODIFICACIONES NO AUTORIZADAS POR
PIONEER, ACCIDENTES, USO INDEBIDO O ABUSO, DAÑOS POR RAYOS O SOBRETENSIONES DE CORRIENTE, DAÑOS SUBSIGUIENTES POR FUGAS
DE LÍQUIDOS, DAÑOS DEBIDOS A BATERÍAS NO OPERATIVAS, O EL USO DE BATERÍAS QUE NO CUMPLEN CON LO ESPECIFICADO EN EL MANUAL
DEL PROPIETARIO.
ESTA GARANTÍA NO CUBRE EL COSTO DE PIEZAS O MANO DE OBRA QUE SERÍA PROVISTA SIN CARGO BAJO ESTA GARANTÍA, OBTENIDA
DE CUALQUIER FUENTE EXCEPTO UNA COMPAÑÍA DE SERVICIO AUTORIZADA POR PIONEER U OTRO LUGAR DESIGNADO. ESTA GARANTÍA
NO CUBRE DEFECTOS O DAÑOS CAUSADOS POR EL USO DE PIEZAS O MANO DE OBRA NO AUTORIZADAS O DEBIDO A UN MANTENIMIENTO
INADECUADO.
LOS NÚMEROS DE SERIE ALTERADOS, ESTROPEADOS O RETIRADOS ANULAN ESTA GARANTÍA EN SU TOTALIDAD.
NINGUNA OTRA GARANTÍA
EN LOS ESTADOS UNIDOS - PIONEER LIMITA SUS OBLIGACIONES BAJO CUALQUIER GARANTÍA IMPLÍCITA, INCLUYENDO, EN FORMA NO
EXHAUSTIVA, LAS GARANTÍAS IMPLÍCITAS DE COMERCIABILIDAD Y ADECUACIÓN A UN FIN DETERMINADO, A UN PERÍODO NO SUPERIOR AL
PERÍODO DE GARANTÍA. UNA VEZ TRANSCURRIDO EL PERÍODO DE GARANTÍA, NO SE APLICARÁ NINGUNA GARANTÍA. ALGUNOS ESTADOS
NO PERMITEN LIMITACIONES SOBRE LA DURACIÓN DE UNA GARANTÍA IMPLÍCITA, Y ALGUNOS ESTADOS NO PERMITEN EXCLUSIONES
O LIMITACIONES DE DAÑOS INCIDENTALES O CONSECUENTES, POR LO QUE LAS LIMITACIONES O EXCLUSIONES MENCIONADAS
ANTERIORMENTE PUEDEN NO APLICARSE EN SU CASO. ESTA GARANTÍA LE DA A USTED DERECHOS LEGALES ESPECÍFICOS, Y PUEDE
TENER OTROS DERECHOS QUE PUEDEN VARIAR DE UN ESTADO A OTRO.
PARA OBTENER SERVICIO
PUSA han nombrado a diversas Compañías de Servicio Autorizadas en los Estados Unidos, en caso de que su producto requiera servicio. Para recibir servicio
bajo la garantía, usted tiene que presentar un recibo de venta, o, si ha alquilado el equipo, el contrato de alquiler que indique el lugar y fecha de la transacción
con el propietario original. Si va enviar la unidad, tiene que empacarla cuidadosamente y enviarla, con el transporte pago a través de un método rastreable
y con seguro, a una Compañía de Servicio Autorizada. Empaque el producto usando materiales de empaque adecuados a n de evitar que sufra daños en
tránsito. El contenedor original es ideal para este n. Incluya su nombre, dirección y teléfono donde pueden contactarlo durante el horario normal de trabajo.
Para cualquier queja o inquietud en los Estados Unidos, llame a Apoyo al Cliente, al 1-800-421-1404.
EN LOS ESTADOS UNIDOS
Para la conexión e instalación de su unidad, o para localizar
una Compañía de Servicio Autorizada, llame o escriba a:
SERVICE SUPPORT DIVISION
PIONEER ELECTRONICS (USA), INC.
P.O. BOX 1760, LONG BEACH, CALIFORNIA 90801
1-800-421-1404 • http://www.pioneerelectronics.com
RESOLUCIÓN DE DISPUTAS
EN LOS ESTADOS UNIDOS - Tras nuestra respuesta a cualquier solicitud inicial a Apoyo al Cliente, si surgiera una disputa entre usted y Pioneer, Pioneer
pone a disposición su Programa de Resolución de Quejas a n de resolver la disputa. El Programa de Resolución de Quejas está disponible para usted sin
ningún cargo. Tiene que usar el Programa de Resolución de Quejas antes de ejercer cualquier derecho bajo, o buscar cualquier remedio, creado por el Título
I de la ley Magnuson-Moss Warranty-Federal Trade Commission Improvement Act, 15 U.S.C. 2301 et seq. Para usar el Programa de Resolución de Quejas,
llame al 1-800-421-1404 y explique al representante de servicio al cliente cuál es el problema que tiene, las medidas que ha tomado para hacer reparar el
producto durante el período de garantía, y el nombre del Distribuidor/Vendedor autorizado donde fue comprado el producto Pioneer. Una vez que la queja
haya sido explicada al representante, se emitirá un número de resolución. Dentro de un plazo de 40 días del recibo de su queja, Pioneer investigará la disputa
y hará una de las dos cosas siguientes: (1) responder a su queja por escrito, informándole de las medidas que Pioneer tomará, y en qué plazo, para resolver
la disputa; o (2) responder a su queja por escrito para informarle de por qué no tomará ninguna medida.
PIONEER ELECTRONICS (USA) INC.
ANOTE EL LUGAR Y FECHA DE COMPRA PARA REFERENCIA FUTURA
Modelo No. _______________________________________ No. de serie. ______________________________________ Fecha de compra _______________________
Comprado en _______________________________________________________________________________________________________________________________
GUARDE ESTA INFORMACIÓN Y EL RECIBO DE VENTA EN UN LUGAR SEGURO

www.pioneerelectronics.com
24
Estimado Cliente:
La seguridad de sus oídos está en sus manos. Para sacar el máximo
provecho de sus equipos, utilice un nivel de sonido seguro, un nivel
que permita que el sonido se oiga claramente sin molestos ruidos
ensordecedores o distorsión, y lo más importante: sin afectar a sus
delicados oídos. El sonido puede ser engañoso. Con el paso del
tiempo, su “nivel de comodidad” se adapta a niveles más altos de
sonido, por lo que lo que suena “normal” puede ser demasiado alto
y causar daño a sus oídos. Protéjase contra este peligro, jando su
equipo a un nivel seguro ANTES de que su oído se adapte.
ESTABLEZCA UN NIVEL SEGURO:
• Fije el control de volumen en un valor bajo.
• Aumente lentamente el sonido hasta oír cómoda y claramente,
sin distorsión.
• Una vez que haya establecido un nivel de sonido confortable, je
el dial y déjelo así.
CUMPLA CON LOS SIGUIENTES CRITERIOS:
• No suba el sonido hasta un nivel que no le permita oír lo que
sucede a su alrededor.
• En situaciones potencialmente peligrosas, sea cauto o deje de
usar el sistema temporalmente.
ESPAÑOL
PIONEER ELECTRONICS [USA] INC. P.O. BOX 1540, Long Beach, California 90801-1540
PIONEER ELECTRONICS OF CANADA, INC. 300 Allstate Parkway Markham, Ontario L3R OP2, Canada
PIONEER ELECTRONICS OF MEXICO S.A. De C.V. Blvd. Manuel Ávila Camacho 138 piso 10
Col. Lomas de Chapultepec 11000 Delegación Miguel Hidalgo México, D.F.
Publicado por Pioneer Electronics (USA) Inc. Copyright © 2012 Pioneer Electronics (USA) Inc.
Todos los derechos reservados. Impreso en China
-
 1
1
-
 2
2
-
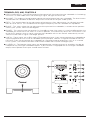 3
3
-
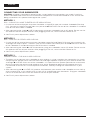 4
4
-
 5
5
-
 6
6
-
 7
7
-
 8
8
-
 9
9
-
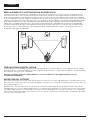 10
10
-
 11
11
-
 12
12
-
 13
13
-
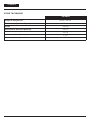 14
14
-
 15
15
-
 16
16
-
 17
17
-
 18
18
-
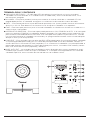 19
19
-
 20
20
-
 21
21
-
 22
22
-
 23
23
-
 24
24


Pioneer Car Speaker SW-8 Manual de usuario
- Categoría
- Juegos de altavoces
- Tipo
- Manual de usuario
en otros idiomas
- français: Pioneer Car Speaker SW-8 Manuel utilisateur
- English: Pioneer Car Speaker SW-8 User manual
Artículos relacionados
-
Pioneer Headphones VSX-324-K-P Manual de usuario
-
Pioneer SP-BS41 Manual de usuario
-
-
-
Pioneer 3D Manual de usuario
-
Pioneer VSX-820 El manual del propietario
-
Pioneer S-HS100 Manual de usuario
-
Pioneer VSX-819H-K Manual de usuario
-
-