Whirlpool SIXL 106 (EU) Guía del usuario
- Categoría
- Lavadoras
- Tipo
- Guía del usuario
Este manual también es adecuado para

GB
GB
1
English, 1
Contents
Installation, 2-3
Unpacking and levelling
Connecting the electricity and water supplies
Technical details
Description of the machine, 4-5
Self-cleaning detergent dispenser drawer
Control panel
Load balancing system
Running a wash cycle, 6
Wash programmes, 7
Detergents and laundry, 8
Preparing the laundry
Washing recommendations
Precautions and advice, 9
General safety
Disposal
Saving energy and respecting the environment
Drip-tray system
Care and maintenance, 10
Cutting off the water or electricity supply
Cleaning the machine
Cleaning the detergent dispenser drawer
Caring for the door and drum of your appliance
Cleaning the pump
Checking the water inlet hose
Troubleshooting, 11
Service, 12
WASHING MACHINE
SIXL 106
Instructions for use
GB
Espanol,13
ES
Türkçe,25
TR
Èeský,37
CZ
Românã,49
RO

2
GB
A
Installation
This instruction manual should be kept in a safe
place for future reference. If the appliance is sold,
transferred or moved, make sure that the instruction
manual remains with the machine so that the new
owner is able to familiarise himself/herself with its
operation and features.
Read these instructions carefully: they contain vital
information relating to the safe installation and
operation of the appliance.
Unpacking and levelling
Unpacking
1. Unpack the washing machine.
2. Make sure that the machine has not been
damaged during the transportation process. If it has
been damaged, contact the retailer and do not
proceed any further with the installation process.
3. Remove the 4
protective screws (used
during transportation)
and the rubber washer
with the corresponding
spacer, located on the
rear part of the appliance
(see figure).
4. Close off the holes using the plastic plugs
provided.
5. Keep all the parts in a safe place: they will be
needed again if the washing machine is moved to
another location.
Packaging materials should not be used as toys for
children.
Levelling
Your machine may make a considerable amount of
noise if the two front feet have not been adjusted
correctly.
1. Install the washing machine on a flat and sturdy
floor, without placing it against walls, cabinets or
other furniture.
2. If the floor is not
perfectly level, compen-
sate for any unevenness
by tightening or loosening
the adjustable front feet
(see figure); the angle of
inclination, measured in
relation to the worktop,
must not exceed 2°.
Levelling the machine correctly will provide it with
stability, help to avoid vibrations and excessive noise
and prevent it from shifting while it is operating. If it is
placed on carpet or a rug, adjust the feet in such a
way as to allow a sufficient ventilation space
underneath the machine.
Connecting the electricity and water
supplies
Connecting the water inlet hose
1. Insert seal A into the
end of the inlet hose and
screw the latter onto a
cold water tap with a 3/4
gas threaded opening
(see figure).
Before performing the
connection, allow the
water to run freely until it
is perfectly clear.
2. Connect the inlet hose
to the machine by
screwing it onto the cold
water inlet of the
appliance, which is
situated on the top right-
hand side of the rear part
of the appliance(see
figure).
3. Make sure that the hose is not folded over or bent.
The water pressure at the tap must fall within the
values indicated in the Technical details table (see
next page).
If the inlet hose is not long enough, contact a
specialised shop or an authorised technician.

GB
GB
3
Technical details
Model
SIXL 106
Dimensions
59.5 cm wide
85 cm high
53.5 cm deep
Capacity
from 1 to 6 kg
Electric
connections
please refer to the technical data plate
fixed to the machine
Water
connections
maximum pressure 1 MPa (10 bar)
minimum pressure 0.05 MPa (0.5 bar)
drum capacity 52 litres
Spin speed
up to 1000 rpm
Control
programmes
according to EN
60456 directive
programme ;
run with a load of 6 kg.
This appliance is compliant with the
following European Community
Directives:
- 73/23/CEE of 19/02/73 (Low
Voltage) and subsequent amendments
- 89/336/CEE of 03/05/89
(Electromagnetic Compatibility) and
subsequent amendments
- 2002/96/CE
65 - 100 cm
Connecting the drain hose
Connect the drain hose,
without bending it, to a
draining duct or a wall
drain situated between
65 and 100 cm from the
floor;
alternatively, place it
over the edge of a
basin, sink or tub,
fastening the duct
supplied to the tap (see
figure). The free end of
the hose should not be
underwater.
We advise against the use of hose extensions; if it
is absolutely necessary, the extension must have the
same diameter as the original hose and must not
exceed 150 cm in length.
Electrical connections
Before plugging the appliance into the electricity
socket, make sure that:
the socket is earthed and complies with all
applicable laws;
the socket is able to withstand the maximum
power load of the appliance as indicated in the
Technical data table (see opposite);
the power supply voltage falls within the values
indicated in the Technical data table(see opposite);
the socket is compatible with the plug of the
appliance. If this is not the case, replace the
socket or the plug.
The machine must not be installed outdoors, even
in covered areas. It is extremely dangerous to leave
the appliance exposed to rain, storms and other
weather conditions.
The mains socket must remain within easy reach
after the washing machine has been installed.
Do not use extension cords or multiple sockets.
The cable should not be bent or compressed.
The power supply cable must only be replaced by
authorised technicians.
Warning! The company shall not be held responsible
in the event that these regulations are not respected.

4
GB
Description of the machine
CONTROL
PANEL
PORTHOLE
DOOR
PORTHOLE
DOOR
HANDLE
ACCESS
PANEL FOR
THE DRAIN
PUMP
Self-cleaning detergent dispenser
drawer
This washing machine is fitted with an innovative self-
cleaning detergent drawer which enhances the
quality of each wash.
The drawer is located inside the porthole door.
1. Open the porthole door to access the detergent
dispenser drawer (see figure A).
2. Pour the detergent or the additive into the
compartments, over the protective grilles, as follows:
Compartment
: detergent and additives in
liquid form.
Compartment
: detergent in powder or tablet
form and powder addititves.
To place the tablets inside, lift up the grille
protecting the drawer.
Compartment
: fabric softener.
Pouring liquid detergent or additives into the central
compartment may cause leakages to occur.
The detergent level can be seen through the corresponding
transparent windows provided on the compartment.
Inside compartments and , there are also
floating indicators (see figure B) . When the
maximum quantity of detergent/fabric softener has
been measured out, the indicators rise until they
touch the grilles protecting the compartments.
We recommend that the maximum levels
indicated on the detergent dispenser drawer are
not exceeded.
We recommend that the dosage instructions on
the detergent packaging are followed carefully. If
using certain particularly thick types of detergent,
we suggest that these are placed directly inside the
drum and not in the detergent dispenser drawer.
Exceeding the maximum levels indicated on the
machine may cause the detergent to leak out of the
bottom part of the drawer.
Exceeding the stated amount of detergent does not
result in a more effective was; it simply pollutes the
environment more.
The water used during the wash cycle will remove
any excess detergent from the drawer. It is, however,
possible to remove the drawer manually (see Care
and Maintenance).
To facilitate the process of measuring out the
detergents, we recommend that the dosing device
supplied with the washing machine is used.
The maximum capacity of the drawer is as follows:
- liquid detergents: 1 1/2 measures
- powder detergents: 2 measures
- fabric softener: 1 measure
M
A
X
M
A
X
STOP
STOP
AB
ADJUSTABLE FEET

GB
GB
5
ON/OFF button
DOOR
LOCKED red
indicator
light
WASHING TIME
INDICATOR
lights
START DAILY
WASH 30
PROGRAMME
button
START DELICATES
PROGRAMME
button
START WHITE
COTTON
PROGRAMME
button
START COLOUR
MIX EASY-IRON
PROGRAMME
button
Control panel
ON/OFF button: press this to switch the machine on or off.
When the machine is switched on, the buttons
used to start various programmes begin to flash,
while the washing time indicator lights illuminate in
a fixed manner.
To cancel the cycle, press and hold the on/off button
for approximately 2 seconds while the wash cycle is
in progress.
The
indicator light will flash for a few seconds
and the machine will automatically drain the water in
the tub.
DOOR LOCKED red indicator light:
when the indicator light is illuminated the door is
locked to prevent it being opened accidentally; to
avoid damaging the appliance, wait for the light to
switch off before opening the door after the cycle
has ended or when the cycle is paused. The light
will remain lit for approximately two minutes after
the washing programme has finished.
Rapid flashing of the DOOR LOCKED indicator light
indicates a fault (see Troubleshooting).
START PROGRAMME buttons:
press one of these to start the selected washing
programme.
- button lit in a fixed manner: programme in progress.
- buttons flashing: awaiting selection.
WASHING TIME INDICATOR lights: these light up
in sequence to indicate the progress of the washing
programme. At the end of the programme all
the indicator lights begin to flash.
For further details, please refer to the chapter entitled
Running a wash cycle.
Load balancing system
To avoid excessive vibrations before every spin, the
machine distributes the load in a uniform manner by
rotating the drum continuously at a speed which is
slightly greater than the washing rotation speed.
When, despite repeated attempts, the load is not
perfectly distributed, the machine spins at a lower
speed than stated for the wash cycle.
If the load is excessively unbalanced, the machine
performs the distribution process instead of spinning.
Balancing attempts may increase the total duration of
the cycle, up to a maximum of 10 minutes.

6
GB
Running a wash cycle
Note: Once the appliance has been installed, and
before you use it for the first time, run a wash cycle
with detergent and no laundry, using the
programme.
1. SWITCH ON THE MACHINE by pressing the ON/
OFF
button. The icons for the START
PROGRAMME buttons begin to flash and the
WASHING TIME INDICATOR lights light up in a
fixed manner, to indicate that the washing machine
is ready to receive instructions.
2. LOAD THE LAUNDRY. Open the door using the
handle. Load the laundry, making sure you do not
exceed the maximum load value indicated in the
table of programmes on the following page.
3. MEASURE OUT THE DETERGENT AND
ADDITIVES.
Pour the detergents into the drawer located inside
the porthole door, taking care not to exceed the
maximum levels indicated on the surface of the
drawer and by the floating indicators. For further
details, please refer to the chapter entitled
Description of the machine.
4. CLOSE THE DOOR.
5. START THE
WASHING
PROGRAMME by
pressing the
corresponding START
PROGRAMME
BUTTON. The icon
corresponding to the
selected programme
illuminates in a fixed
manner, and all the wash time indicator lights
switch off. The DOOR LOCKED indicator light
illuminates in a fixed manner, to signal the
activation of the door safety device.
For a description of the wash programmes
available, please refer to the chapter entitled
Wash programmes.
The procedure used to start the DELICATES
programme is different; see paragraph "Delicates
30°" on the following page.
During the programme the WASH TIME
INDICATOR lights illuminate in sequence, indicating
how much of the programme has already been
completed.
The diagram at the side
refers to a situation in
which approximately
50% of the cycle has
been completed.
At the end of the cycle,
all the WASHING TIME
INDICATOR lights begin
to flash.
6. The WASH PROGRAMME can be SUSPENDED by
pressing the illuminated start programme button
which begins to flash. After approximately two
minutes the DOOR LOCKED indicator light will
switch off to indicate that the door may be
opened.
If you wish to add more detergent, make sure that
the MAX floating indicator is not in a raised
position.
To restart the wash programme, close the door
again and press the corresponding start button
once more.
To guarantee maximum safety, whenever there is a
quantity of water in the drum which could leak out
of the machine, it will not be possible to open the
door (the DOOR LOCKED indicator light will remain
lit even after the two minutes have passed).
The machine, in this case, should be switched off
by pressing for approximately 2 seconds the ON/
OFF
button, then waiting for the water to be
drained automatically.
7. AT THE END OF THE PROGRAMME
At the end of the wash programme, the icon
corresponding to the selected programme remains
lit in a fixed manner, while all the washing time
indicator lights begin to flash.
To start a new wash cycle the machine must be
switched off and switched back on again, by
pressing the ON/OFF
button TWO TIMES.

GB
GB
7
Wash programmes
*Note: for information relating to excluding the spin cycle in the delicates programme, please refer to the
Delicates 30° paragraph further down the page.
**Note: for information relating to rinsing hand-washed clothes in cold water, please refer to the
Daily wash 30 / Cold water rinse paragraph further down the page.
WHITE COTTON 60°
Designed for the washing of all durable white cotton
garments. Higher washing temperatures offer improved
washing results in Class A appliances.
COLOUR MIX 40° / EASY-IRON
This programme can be used to wash all your coloured
garments, whether cotton or synthetic fabric. The spin
cycle is carefully controlled during the entire wash cycle,
so as to reduce the formation of creases in the fabric
and make it easier to iron.
Cotton and synthetic garments can be washed at the
same time.
DELICATES 30°
A cycle designed for the washing of all woollen, silk and
delicate garments. As these garments have different
features, this programme requires an activation
process which is different from the others:
+ DELICATES CYCLE WITH FINAL SPIN (for
woollen garments): press the START DELICATES
PROGRAMME
button. After approximately 3
seconds, the START DELICATES PROGRAMME
and START DAILY WASH PROGRAMME buttons
begin to flash. Press the START DELICATES
PROGRAMME
button to perform the wash, which
ends with a delicate spin cycle. This programme
includes drum movements which have been carefully
researched to remove excess water from the fabric,
thereby reducing friction and helping to protect your
woollen garments.
+ DELICATES CYCLE WITH SPIN PHASE
EXCLUDED (for silk and viscose garments and for
curtains; not to be used for washing wool):
press the START DELICATES PROGRAMME
button. After approximately 3 seconds, the START
DELICATES PROGRAMME
and START DAILY
WASH PROGRAMME
buttons begin to flash. Press
the START DAILY WASH PROGRAMME
button to
perform the wash without the final spin cycle. At the
end of the cycle, the machine will automatically drain
the water contained in the drum. We recommend that
the garments are removed from the washing machine
straight away, in order to limit the formation of creases.
DAILY WASH 30 / COLD WATER RINSE
This programme can be used to wash lightly soiled
cotton or synthetic fabrics, or garments with the "wash
at 30°"
instruction on the label, in just 30 minutes. It
is also possibile to rinse cotton or synthetic garments
which have been washed by hand (this does not include
wool or silk).
Thanks to its special sensors, the washing machine
is able to recognise when the garments placed in the
drum have detergent on them.
- if no detergent is detected on the clothes, the DAILY
WASH 30' cycle will be performed;
- if detergent is detected (cloths which have been
washed by hand), the COLD WATER RINSE cycle will
be performed automatically.
AUTOMATIC RINSE MANAGEMENT
The rinse function is monitored and controlled in every
programme by special sensors. If the garments are
very soapy at the end of the wash, the rinse cycle
will be extended automatically until the detergent is
removed completely. In this case the wash
programme duration may be slightly increased in relation
to the information given in the table of programmes.
The duration of the programmes indicated in the table are for guidance purposes only, and are calculated based on an average load quantity.
Button Fabrics
Max.
load
(kg)
Te m pe ratu r e
Spin
speed
(rpm)
Cycle
duration
(minutes)
Wash cycle description
WHITE COTTON
Durable white cotton
6 60°C 1000 145
Wash cycle, rinse cycles, intermediate
and final spin cycles
COLOR MIX 40° / EASY IRON
Coloured cotton
and synthetics
4,5 40°C 1000 80
Wash cycle, rinse cycles and delicate
spin cycle
DELICATES
Wool (final delicate spin
cycle)
1,5 30°C 600 50
Wash cycle, rinse cycles and delicate
spin cycle
Silk and curtains (without
final spin cycle)
1,5 30°C no* 50
Wash cycle, rinse cycles and drainage
DAILY
WASH /
COLD WATER RINSE
Cotton and synthetics
3
30°/cold
water**
800 30
Wash cycle (only if the "
Rapid
wash"
programme activated), rinse cycles,
delicate spin cycle
+
+

8
GB
Washing recommendations
Bed and bathroom laundry (sheets, towels,
bathrobes, etc.): use the WHITE COTTON
programme which guarantees the most efficient
wash in Class A appliances. The intensive spin
cycle eliminates all excess water efficiently.
White cotton garments (shirts, T-shirts,
tablecloths, etc.): use the WHITE COTTON 60°
programme. If there are any stubborn stains, they
should be pre-treated with solid soap before the
wash cycle is started.
Coloured cotton garments (shirts, T-shirts,
underwear, etc.): use the COLOUR MIX 40°
programme, which maximises the performance of
the wash without damaging the colours. The spin
cycle phase, thanks to the incorporated EASY
IRON function, reduces the formation of creases
at the end of the wash, making the fabric easier
to iron. We recommend the use of liquid
detergent.
White or coloured synthetic garments (shirts,
T-shirts, underwear, etc.): use the COLOUR MIX
40°
programme. We recommend that white
and coloured garments are not washed in the
same wash cycle, to prevent any colour leakage
from seeping into the white clothing. We
recommend the use of liquid detergent.
Coloured synthetic and cotton garments, with
wash at 30°
instruction on the care label: use
the DAILY WASH 30
programme. The low
washing temperature protects the coloured fabrics.
We recommend the use of liquid detergent.
Woollen garments (jumpers, scarves, etc.): use
the DELICATES 30° programme with final spin
+ . The movement of the drum during the
wash and the delicate spin cycle reduces fabric
matting. We recommend the use of detergents
specifically designed for woollen garments. We
recommend that the maximum load level is not
exceeded.
Silk garments (shirts, underwear, etc.): use the
DELICATES 30° programme with the spin excluded
+ . Try not to leave the laundry in the drum for
too long after the wash cycle has finished, to
prevent excessive creasing.
Curtains: use the DELICATES 30° programme
with the spin excluded
+ . We recommend
they are folded and placed inside a pillowcase or a
mesh bag. Wash them separately, making sure
the maximum load level is not exceeded.
How much does your laundry weigh?
1 sheet 400-500 g
1 pillow case 150-200 g
1 tablecloth 400-500 g
1 bathrobe 900-1.200 g
1 towel 150-250 g
1 pair of jeans 400-500 g
1 shirt 150-200 g
Detergents and laundry
Preparing the laundry
Divide the laundry according to:
- the type of fabric/the symbol on the label;
- the colours: separate coloured garments from
whites.
Empty all garment pockets and check the
buttons.
Do not exceed the load values indicated for the
Wash programmes.

GB
GB
9
Precautions and advice
This machine was designed and constructed in
accordance with international safety regulations. The
following information is provided for safety reasons
and must therefore be read carefully.
General safety
This appliance was designed for domestic use only.
The machine must only be used by adults, in
accordance with the instructions given in this manual.
Do not touch the machine when barefoot or with
wet or damp hands or feet.
Do not pull on the power supply cable when
unplugging the appliance from the electricity
socket. Hold the plug and pull.
Do not touch the drained water as it may reach
extremely high temperatures.
Never force the porthole door. this could damage
the safety lock mechanism designed to prevent
accidental opening.
If the appliance breaks down, do not under any
circumstances access the internal mechanisms in
an attempt to repair it yourself.
Always keep children well away from the appliance
while it is operating.
The door can become quite hot during the wash cycle.
If the appliance has to be moved, work in a group
of two or three people and handle it with the
utmost care. Never try to do this alone, because
the appliance is very heavy.
Before loading laundry into the washing machine,
make sure the drum is empty.
Disposal
Disposing of the packaging materials: observe local
regulations so that the packaging may be re-used.
The European Directive 2002/96/EC on Waste
Electrical and Electronic Equipment, requires that
old household electrical appliances must not be
disposed of in the normal unsorted municipal
waste stream. Old appliances must be collected
separately in order to optimise the recovery and
recycling of the materials they contain and reduce
the impact on human health and the
environment. The crossed out "wheeled bin"
symbol on the product reminds you of your
obligation, that when you dispose of the appliance
it must be separately collected.
Consumers should contact their local authority or
retailer for information concerning the correct
disposal of their old appliance.
Saving energy and respecting the
environment
Saving detergents, water, energy and time
To avoid wasting resources, the washing machine
should be used with a full load. One full load instead of
two half loads saves up to 50% of the energy used.
Treating stains with a stain remover, or leaving
them to soak before they are washed, reduces the
need to wash the garments at high temperatures.
Use the correct quantity of detergent, in
accordance with the water hardness, how soiled
the garments are and the amount of laundry you
have, in order to avoid wastage and to protect the
environment: although they are biodegradable,
detergents still contain ingredients which alter the
balance of nature. Avoid using fabric softener
wherever possible.
If you use your washing machine between late
afternoon and the early hours of the morning, you will
help to reduce the peak load of the electricity board.
Drip-tray system
The machine is fitted with a drip-tray system on the
inside of the door, which catches any residual drips of
water at the end of the cycle.
We recommend that the dampness level of the
sponge inside the drip-tray compartment is checked
regularly. If necessary, it may be cleaned or replaced
as follows:
1. Remove the
compartment by applying
a light pressure to the
lower part.
2. Remove the sponge
inside it, rinse it under
running water and wring it
out thoroughly. It may
also be replaced with one
of the spare sponges
provided.
3. Place the sponge back inside the compartment.
4. Replace the compartment in the door, making
sure the springs on the door are correctly
inserted into the corresponding slots on the
compartment.
5. Make sure that the compartment is slotted back
into position correctly.
2
1

10
GB
Care and maintenance
Cutting off the water and electricity
supply
Turn off the water tap after every wash. This will
limit wear on the hydraulic system in the machine
and help to prevent leaks.
Unplug the appliance when cleaning it and during
all maintenance work.
Cleaning the machine
The outer parts and rubber components of the
appliance can be cleaned using a soft cloth soaked in
lukewarm soapy water. Do not use solvents or
abrasives.
Cleaning the detergent dispenser
drawer
We recommend you check that there is no
detergent or water inside the detergent drawer
before removing it. If these substances are present,
proceed with care as they may leak out of the
drawer while it is being removed.
The detergent dispenser drawer in this machine is
cleaned automatically during the wash cycles.
However, residues may form very occasionally after
certain detergents have been used. To clean the
drawer, proceed as follows:
1. Open the door to
access the drawer.
2. Remove the drawer by
pulling upwards, holding it
by the central
compartment as
indicated in the figure. Do
not grip the drawer by
the grille as this may
damage it.
3. Unhook the drawer
cover to access the
compartment, as
indicated in the figure.
4. Clean the drawer
under running water.
5. Re-hook the cover
and replace the drawer,
pushing until it clicks into
place.
Caring for the door and drum of your
appliance
Always leave the porthole door ajar in order to
prevent unpleasant odours from forming.
Cleaning the pump
The washing machine is fitted with a self-cleaning
pump which does not require any maintenance.
Sometimes, small items (such as coins or buttons)
may fall into the pre-chamber which protects the
pump, situated in its bottom part.
Make sure the wash cycle has finished and unplug
the appliance.
To access the pre-chamber:
1. remove the protective
casing on the lower part
of the washing machine,
turning it in an
anticlockwise direction
(see figure);
2. unscrew the lid by
rotating it anti-clockwise
(see figure): a little water
may trickle out. This is
perfectly normal;
3. clean the inside thoroughly;
4. screw the lid back on;
5. screw the protective cap back on by turning it in a
clockwise direction, making sure the arrow on the
inside part of the cap is facing upwards.
Checking the water inlet hose
Check the inlet hose at least once a year. If there are
any cracks, it should be replaced immediately: during
the wash cycles, water pressure is very strong and a
cracked hose could easily split open.
Never use second-hand hoses.

GB
GB
11
Troubleshooting
Problem:
The washing machine does not
switch on.
The wash cycle wont start.
The washing machine does not fill
with water (the door locked LED
flashes rapidly).
The machine continuously fills
with water and drains.
The washing machine does not
drain or spin.
The machine vibrates a lot during
the spin cycle.
The washing machine leaks.
The DOOR LOCKED indicator light
flashes rapidly.
Too much foam.
Your washing machine could occasionally fail to work. Before contacting the Technical Assistance Centre
(see Service), make sure that the problem is not easily solved using the following list.
Possible causes / Solutions:
The appliance is not plugged into the socket fully, or is not making
contact.
There is no power in the house.
The washing machine door is not closed properly.
The ON/OFF button has not been pressed.
The START PROGRAMME buttons have not been pressed (they
are still flashing).
The water tap has not been opened.
The water inlet hose is not connected to the tap.
The hose is bent.
The water tap has not been opened.
There is no water supply in the house.
The pressure is too low.
The START PROGRAMME buttons have not been pressed (they
are still flashing).
The drain hose is not fitted at a height between 65 and 100 cm
from the floor ( see Installation).
The free end of the hose is under water (see Installation).
The wall drainage system is not fitted with a breather pipe.
If the problem persists even after these checks, shut off the water
tap, switch the appliance off and contact the Technical Assistance
Service. If the dwelling is on one of the upper floors of a building,
there may be problems relating to water drainage, causing the
washing machine to fill with water and drain continuously. Special
anti-draining valves are available in shops and help to avoid this
inconvenience.
The drain hose is bent (see Installation).
The drainage duct is clogged.
The protective screws (used during transportation) were not
removed when the appliance was installed. Remove the screws
(see Installation).
The machine is not level (see Installation).
The machine is trapped between cabinets and walls (see
Installation).
The water inlet hose is not screwed on properly (see Installation).
The detergent dispenser is blocked (to clean it, see Care and
maintenance).
The drain hose is not fixed in place properly (see Installation).
The drip-tray system is full. Clean the sponge or replace it (see
"Precautions and advice").
Switch off the machine and unplug it, wait for approximately 1
minute and then switch it back on again. The wash cycle will have
to be started again from the beginning. If the problem persists,
contact the Technical Assistance Service.
The detergent is not suitable for machine washing (it should bear
the description for washing machines or hand and machine
wash, or similar instructions).
Too much detergent was used.

12
GB
Service
Before calling for Assistance:
Check whether you can solve the problem alone (see Troubleshooting);
Restart the programme to check whether the problem has been solved;
If it has not, contact the Authorised Technical Assistance Service.
If the machine has been installed or used incorrectly, you may be charged for the maintenance callout
service.
Always request the assistance of authorised technicians.
Have the following information to hand:
the type of problem;
the appliance model (Mod.);
the serial number (S/N).
The above information can be found on the data plate located on the appliance itself.

ES
13
Español
Sumario
Instalación, 14-15
Desembalaje y nivelación
Conexiones hidráulicas y eléctricas
Datos técnicos
Descripción de la máquina, 16-17
Contenedor de detergentes autolimpiante
Panel de control
Sistema de equilibrado de la carga
Cómo efectuar un ciclo de lavado, 18
Programas de lavado, 19
Detergentes y ropa, 20
Preparar la ropa
Consejos sobre el lavado
Precauciones y consejos, 21
Seguridad general
Reciclado y final del ciclo de vida
Ahorrar y respetar el medio ambiente
Sistema recolector de gotas
Mantenimiento y cuidados, 22
Interrumpir el agua y la corriente eléctrica
Limpiar la máquina
Limpiar el contenedor de detergentes
Cuidar la puerta y el cesto
Limpiar la bomba
Controlar el tubo de alimentación de agua
Anomalías y soluciones, 23
Asistencia Técnica, 24
ES
LAVADORA
SIXL 106
Manual de instrucciones

14
ES
A
Instalación
Es importante conservar este manual para poder
consultarlo en cualquier momento. En caso de venta,
de cesión o de traslado, verifique que permanezca
junto con la máquina para informar al nuevo
propietario sobre el funcionamiento y brindar las
correspondientes advertencias.
Lea atentamente las instrucciones: ellas contienen
importante información sobre la instalación, el uso y la
seguridad.
Desembalaje y nivelación
Desembalaje
1. Desembale la máquina.
2. Controle que la máquina no haya sufrido daños
durante el transporte. Si estuviera dañada no la
conecte y llame al revendedor.
3. Quite los 4 tornillos de
protección para el
transporte y la arandela
de goma con el
correspondiente
distanciador, ubicados en
la parte posterior (ver la
figura).
4. Tape los orificios con los tapones de plástico
suministrados con el aparato.
5. Conserve todas las piezas: cuando la máquina
deba ser transportada nuevamente, deberán volver a
colocarse.
Los embalajes no son juguetes para los niños.
Nivelación
Si las dos patas delanteras de su máquina no están
reguladas correctamente, la misma puede hacer ruido.
1. Instale la máquina sobre un piso plano y rígido, sin
apoyarla en las paredes, muebles ni en ningún otro
aparato.
2. Si el piso no está
perfectamente horizontal,
compense las
irregularidades
desenroscando o
enroscando las patas
delanteras (ver la figura);
el ángulo de inclinación
medido sobre la superfi-
cie de trabajo, no debe
superar los 2º.
Una cuidadosa nivelación brinda estabilidad a la
máquina y evita vibraciones, ruidos y desplazamientos
durante el funcionamiento. Cuando se instala sobre
moquetas o alfombras, regule las patas para conser-
var debajo de la máquina un espacio suficiente para
la ventilación.
Conexiones hidráulicas y eléctricas
Conexión del tubo de alimentación de agua
1. Introduzca la junta A
en el extremo del tubo de
alimentación y enrósquelo
a un grifo de agua fría
con boca roscada de 3/4
gas (ver la figura).
Antes de conectarlo,
haga correr el agua hasta
que esté limpia.
2. Conecte el tubo de
alimentación a la
máquina enroscándolo en
la toma de agua
correspondiente ubicada
en la parte posterior
derecha (arriba) (ver la
figura).
3. Controle que en el tubo no hayan pliegues ni
estrangulaciones.
La presión de agua del grifo debe estar
comprendida dentro de los valores contenidos en la
tabla de Datos técnicos (ver la página al costado).
Si la longitud del tubo de alimentación no es la
suficiente, diríjase a un negocio especializado o a un
técnico autorizado.

ES
15
Datos técnicos
Modelo
SIXL 106
Dimensiones
ancho 59,5 cm.
altura 85 cm.
profundidad 53,5 cm.
Capacidad
de 1 a 6 kg.
Conexiones
eléctricas
ver la placa de características
técnicas aplicada en la máquina
Conexiones
hídricas
presión máxima 1 MPa (10 bar)
presión mínima 0,05 MPa (0,5 bar)
capacidad del cesto 52 litros
Velocidad de
centrifugado
máxima 1000 r.p.m.
Programas de
control según la
norma EN 60456
Programa ;
efectuado con 6 kg. de carga.
Esta máquina cumple con lo
establecido por las siguientes
Directivas de la Comunidad:
- 73/23/CEE del 19/02/73 (Baja
Tensión) y sucesivas modificaciones
- 89/336/CEE del 03/05/89
(Compatibilidad Electromagnética) y
sucesivas modificaciones
- 2002/96/CE
65 - 100 cm
Conexión del tubo de descarga
Conecte el tubo de
descarga, sin plegarlo, a
un conducto de descarga
o a una descarga de
pared ubicados a una
distancia del piso
comprendida entre 65 y
100 cm.;
o apóyelo en el borde de
un lavamanos o de una
bañera, uniendo la guía
suministrada con el
aparato, al grifo (ver la
figura). El extremo libre
del tubo de descarga no
debe permanecer
sumergido en el agua.
No se aconseja utilizar tubos de prolongación, si
fuera indispensable hacerlo, la prolongación debe
tener el mismo diámetro del tubo original y no superar
los 150 cm.
Conexión eléctrica
Antes de enchufar el aparato, verifique que:
la toma tenga la conexión a tierra y haya sido
hecha según las normas legales;
la toma sea capaz de soportar la carga máxima de
potencia de la máquina indicada en la tabla de
Datos técnicos (ver al costado);
la tensión de alimentación esté comprendida
dentro de los valores indicados en la tabla de Datos
técnicos (ver al costado);
la toma sea compatible con el enchufe de la
máquina. Si no es así, sustituya la toma o el
enchufe.
La máquina no debe ser instalada al aire libre, ni
siquiera si el lugar está protegido, ya que es muy
peligroso dejarla expuesta a la lluvia o a las
tormentas.
Una vez instalada la máquina, la toma de corriente
debe ser fácilmente accesible.
No utilice prolongaciones ni conexiones múltiples.
El cable no debe estar plegado ni sufrir
compresiones.
El cable de alimentación debe ser sustituido sólo por
técnicos autorizados.
¡Atención! La empresa fabricante declina toda
responsabilidad en caso de que estas normas no
sean respetadas.

16
ES
PANEL DE
CONTROL
PUERTA
PATAS REGULABLES
MANIJA DE
LA PUERTA
Contenedor de detergentes
autolimpiante
Esta lavadora posee un innovador contenedor de
detergentes autolimpiante capaz de mejorar la calidad
del lavado.
El contenedor está ubicado dentro de la puerta.
1. Abra la puerta para acceder al contenedor de
detergentes (ver la figura A).
2. Vierta el detergente o el aditivo dentro de las
cubetas, sobre la rejilla de protección, de la siguiente
manera:
Cubeta
: detergente líquido y aditivos líquidos.
Cubeta
: detergente en polvo o en pastillas y
aditivos en polvo.
Para colocar las pastillas, levante la rejilla de
protección del contenedor.
Cubeta
: suavizante.
Verter los detergentes o aditivos líquidos en la
cubeta central puede provocar un indeseado derrame
de los mismos.
MAX
M
AX
PUERTA DE
ACCESO A LA
BOMBA DE
DESCARGA
STOP
STOP
Es posible visualizar el nivel de detergente a través de
las aberturas transparentes que posee el contenedor.
Dentro de las cubetas
y también se
encuentran los indicadores flotantes (ver la figura B).
Cuando se ha introducido la cantidad máxima de
detergente/suavizante, los indicadores se elevan
hasta rozar las rejillas de protección de las cubetas.
Se recomienda no superar nunca los niveles
máximos indicados en el contenedor de detergentes.
Se recomienda respetar siempre las
instrucciones de dosificación presentes en los
envases de los detergentes. En el caso de
detergentes particularmente densos, se sugiere
introducirlos directamente en el interior del cesto
y no en el contenedor de detergentes.
Una carga que supere los niveles máximos indicados
en la máquina puede provocar un derrame de deter-
gente por la parte inferior del contenedor.
Si se excede en el uso de detergentes, no lavará de
modo más eficaz, sino que contribuirá a contaminar
más aún el medio ambiente.
El agua utilizada durante el ciclo de lavado elimina el
detergente en exceso del contenedor. De todos
modos, es posible extraer manualmente el
contenedor (ver Mantenimiento y cuidados).
Para facilitar la dosificación de detergente, se aconseja
utilizar el dosificador suministrado con la lavadora.
La capacidad máxima del contenedor corresponde a:
- detergentes líquidos: 1 ½ medidas
- detergentes en polvo: 2 medidas
- suavizante: 1 medida
AB
Descripción de la máquina

ES
17
Botón
ENCENDIDO/
APAGADO
Piloto rojo
PUERTA
BLOQUEADA
Botón ENCENDIDO/APAGADO:
presiónelo para encender o apagar la máquina.
Una vez encendida la máquina, los iconos de los
botones de puesta en marcha del programa
comienzan a centellear, mientras que los pilotos de
indicación del tiempo de lavado permanecen fijos.
Para anular el ciclo, mantenga presionado el botón
encendido/apagado durante 2 segundos
aproximadamente durante el ciclo de lavado.
El piloto
centelleará durante algunos segundos
mientras que la máquina realiza la descarga
automática del agua presente en la cuba.
Piloto rojo PUERTA BLOQUEADA:
el piloto encendido indica que la puerta está
bloqueada para impedir aperturas accidentales; para
evitar daños, después que el ciclo ha finalizado o
cuando está en pausa, es necesario esperar que el
piloto se apague antes de abrir la puerta. El
tiempo de espera después del final del programa
de lavado es de aproximadamente dos minutos.
Si el piloto PUERTA BLOQUEADA centellea de
forma muy veloz, indica una anomalía (ver Anomalías
y soluciones).
Botones PUESTA EN MARCHA DEL PROGRAMA:
presiónelos para poner en marcha el programa de
lavado seleccionado.
- botón iluminado fijo: programa en curso.
- botones centelleantes: a la espera de una
selección.
Pilotos
INDICACIÓN DE
TIEMPO DE
LAVADO
Botón
PUESTA EN
MARCHA DEL
PROGRAMA
DIARIO
Botón
PUESTA EN
MARCHA DEL
PROGRAMA
DELICADOS
Botón
PUESTA EN
MARCHA DEL
PROGRAMA
BLANCOS
ALGODÓN
Botón
PUESTA EN
MARCHA DEL
PROGRAMA COLOR
MIX / FÁCIL PLANCHA
Pilotos INDICACIÓN DE TIEMPO DE LAVADO:
se encienden progresivamente para indicar el
desarrollo del programa de lavado. Al finalizar el
programa todos los pilotos comienzan a
centellear.
Para obtener mayor información, consulte Cómo
efectuar un ciclo de lavado.
Sistema de equilibrado de la carga
Para evitar vibraciones excesivas, antes de cada
centrifugado, la máquina distribuye la carga de modo
uniforme, esto se produce efectuando rotaciones
continuas del cesto a una velocidad ligeramente
superior a la del lavado.
Aún cuando después de repetidos intentos, la carga
no se distribuye perfectamente, la máquina realiza el
centrifugado a una velocidad inferior a la prevista.
Cuando existe un excesivo desequilibrado, la máquina
efectúa la distribución en lugar del centrifugado.
Los intentos de equilibrado pueden aumentar la
duración total del ciclo hasta un máximo de 10
minutos.
Panel de control

18
ES
Nota: Después de la instalación y antes del uso,
realice un ciclo de lavado con detergente y sin ropa,
seleccionando el programa
.
1. ENCENDER LA MÁQUINA presionando el botón
ENCENDIDO/APAGADO
. Los iconos de los
botones de PUESTA EN MARCHA DEL
PROGRAMA comienzan a centellear y los pilotos
de INDICACIÓN DEL TIEMPO DE LAVADO se
iluminan en forma fija indicando que la lavadora
está lista para recibir instrucciones.
2. CARGAR LA ROPA. Abra la puerta utilizando la
manija. Cargue la ropa, cuidando no superar la
cantidad de carga indicada en la tabla de
programas de la página siguiente.
3. DOSIFICAR EL DETERGENTE Y LOS ADITIVOS
Dosifique el detergente dentro del contenedor
ubicado en el interior de la puerta, cuidando no
superar los niveles máximos indicados en la superfi-
cie del contenedor y en los indicadores flotantes.
Para obtener más información, consulte
Descripción de la máquina.
4. CERRAR LA PUERTA.
5. PONER EN
MARCHA EL
PROGRAMA DE
LAVADO presionando el
correspondiente
BOTÓN DE PUESTA
EN MARCHA DEL
PROGRAMA. El icono
correspondiente al
programa seleccionado
se ilumina en forma fija, mientras que todos los
pilotos de indicación del tiempo de lavado se
apagan. El piloto PUERTA BLOQUEADA se ilumina
en forma fija indicando el bloqueo de seguridad de
la puerta.
Para obtener una descripción de los programas de
lavado disponibles, consulte Programas de
lavado.
El procedimiento para poner en marcha el
programa DELICADOS
es diferente, ver el
párrafo Delicados 30º en la siguiente página.
Durante el programa, los pilotos de INDICACIÓN DEL
TIEMPO DE LAVADO se iluminan progresivamente
indicando la parte del programa que ya ha sido
realizada.
El dibujo del costado se
refiere a una situación en
la que se ha ejecutado
aproximadamente el 50%
del ciclo.
Al finalizar el ciclo, todos
los pilotos de
INDICACIÓN DEL
TIEMPO DE LAVADO
están encendidos y
centellean.
6. Se puede SUSPENDER EL PROGRAMA DE
LAVADO presionando el botón de puesta en
marcha de un programa que está iluminado y que
comienza a centellear. Después de
aproximadamente dos minutos, se apagará el piloto
PUERTA BLOQUEADA indicando que se puede
abrir la puerta.
Si desea agregar más detergente, cuide que el
indicador flotante MAX no esté en su posición
elevada.
Para volver a poner en marcha el programa de
lavado, cierre la puerta y presione nuevamente el
botón de puesta en marcha correspondiente.
Cuando en el cesto exista una cantidad de agua
tal que pudiera derramarse, para garantizarle la
máxima seguridad, no se permitirá abrir la puerta
(el piloto PUERTA BLOQUEADA permanecerá
encendido aún después que hayan transcurrido los
dos minutos). En ese caso, es necesario apagar la
máquina presionando el botón ENCENDIDO/
APAGADO
durante aproximadamente 2
segundos y esperar la descarga automática del
agua.
7. FIN DEL PROGRAMA
Al finalizar el programa de lavado, el icono
correspondiente al programa seleccionado continúa
iluminado en forma fija, mientras que todos los
pilotos de indicación del tiempo de lavado,
comienzan a centellear.
Para poner en marcha un nuevo ciclo de lavado,
es necesario apagar y volver a encender la
máquina presionando DOS VECES el botón
ENCENDIDO/APAGADO
.
Cómo efectuar un
ciclo de lavado

ES
19
BLANCOS ALGODÓN 60°
Dedicado al lavado de las prendas blancas de algodón más
resistentes. La temperatura de lavado más alta permite
obtener los mejores resultados de lavado en la clase A.
COLOR MIX 40° / FÁCIL PLANCHA
Con este programa se pueden lavar todas las prendas de
color, tanto de algodón como tejidos sintéticos. El
centrifugado está cuidadosamente controlado durante
todo el ciclo de lavado, para disminuir la formación de
arrugas en los tejidos y facilitar su planchado.
Se pueden lavar prendas de algodón y tejidos sintéticos
simultáneamente.
DELICADOS 30°
Ciclo dedicado al lavado de las prendas de lana, de seda y
de todas las prendas más delicadas. Debido a las
características diferentes de estas prendas, este programa
requiere una activación diferente a la de los otros:
+ CICLO DELICADOS CON CENTRIFUGADO
FINAL (para prendas de lana): presione el botón PUESTA
EN MARCHA DEL PROGRAMA DELICADOS
.
Después de aproximadamente 3 segundos, los botones
PUESTA EN MARCHA DEL PROGRAMA DELICADOS
y PUESTA EN MARCHA DEL PROGRAMA RÁPIDO
comienzan a centellear. Presione nuevamente el botón
PUESTA EN MARCHA DEL PROGRAMA DELICADOS
para realizar el lavado que finaliza con un centrifugado
delicado. Este programa realiza movimientos del cesto
especialmente estudiados para eliminar el agua en exceso
de los tejidos, disminuyendo la frotación y contribuyendo a
proteger las prendas de lana.
+ CICLO DELICADOS CON EXCLUSIÓN DE
CENTRIFUGADO (para prendas de seda, viscosa y para el
lavado de las cortinas; no se utiliza para el lavado de la
lana): presione el botón PUESTA EN MARCHA DEL
PROGRAMA DELICADOS
. Después de
aproximadamente 3 segundos, los botones PUESTA EN
MARCHA DEL PROGRAMA DELICADOS
y PUESTA
EN MARCHA DEL PROGRAMA RÁPIDO
comienzan a
centellear. Presione el botón PUESTA EN MARCHA DEL
PROGRAMA RÁPIDO
para realizar el lavado sin
centrifugado final. Al finalizar el ciclo, la máquina descargará
automáticamente el agua presente en el cesto. Al finalizar el
lavado, se aconseja extraer rápidamente las prendas de la
lavadora para evitar que se formen demasiadas arrugas.
DIARIO / ACLARADO
Con este programa se pueden lavar, en sólo 30 minutos,
las prendas de algodón o sintéticas poco sucias o que
contienen en la etiqueta la indicación lavado a 30°
.
Además, se puede realizar el aclarado de prendas de
algodón o sintéticas lavadas precedentemente a mano
(excluidas la lana y la seda).
Gracias a la presencia de detectores, la lavadora es
capaz de reconocer la presencia de detergente en las
prendas introducidas en el cesto:
- si no existe detergente en las prendas, se realizará el ciclo
DIARIO ;
- si hay detergente (prendas prelavadas a mano) se
realizará automáticamente un ciclo de ACLARADO.
ADMINISTRACIÓN AUTOMÁTICA DE LOS ACLARADOS
En cada programa, la función de aclarado está controlada
por detectores. Al finalizar el lavado y en el caso de
prendas excesivamente enjabonadas, la fase de aclarado
se prolongará automáticamente hasta que se elimine
completamente el detergente. En ese caso, la duración del
programa de lavado podrá ser ligeramente mayor que el
valor indicado en la tabla de programas.
*Nota: para obtener información sobre cómo excluir el centrifugado del programa delicados, ver el párrafo
Delicados 30º más adelante.
**Nota: para obtener información sobre cómo realizar sólo el aclarado con agua fría de prendas precedentemen-
te lavadas a mano, ver el párrafo Diario/Aclarado más adelante.
Las duraciones de los programas indicadas en la tabla son meramente indicativas y han sido calculadas considerando una cantidad de carga media.
Programas de lavado
Botón
Tejidos
Carga
Máx.
(kg)
Temperatura
Centrifu-
gado
(r.p.m.)
Duración
del ciclo
(minutos)
Descripción del ciclo de
lavado
BLANCOS ALGODÓN
Algodón blanco
resistente
6 60°C 1000 145
Lavado, aclarados, centrifugados
intermedios y final
COLOR MIX 40° / FÁCIL PLANCHA
Algodón y sintéticos de
color
4,5 40°C 1000 80
Lavado, aclarados y
centrifugado delicado
DELICADOS
Lana (centrifugado final
delicado)
1,5 30°C 600 50
Lavado, aclarados y
centrifugado delicado
Seda y cortinas (sin
centrifugado final)
1,5 30°C no*
50 Lavado, aclarados, descarga
DIARIO / ACLARADO
Algodón y sintéticos
3
30°/agua
fría**
800 30
Lavado (sólo si el Programa
Rápido está funcionando,
aclarados, centrifugado delicado
+
+

20
ES
Consejos sobre el lavado
Lencería de cama y para baño (sábanas, toallas,
albornoz, etc.): utilice el programa BLANCOS
ALGODÓN 60º
que garantiza las mejores
prestaciones de lavado en la clase A. El centrifugado
intensivo permite eliminar eficazmente el agua en
exceso.
Prendas blancas de algodón (camisas,
camisetas, manteles, etc.): utilice el programa
BLANCOS ALGODÓN 60º. Si existieran manchas
difíciles de eliminar, es importante tratarlas con jabón
sólido antes de realizar el ciclo de lavado.
Prendas de algodón de color (camisas,
camisetas, lencería, etc.): utilice el programa
COLOR MIX 40º
, que permite maximizar las
prestaciones de lavado sin dañar los colores. La fase
de centrifugado, debido a que tiene la función FÁCIL
PLANCHA incorporada, disminuye la formación de
arrugas al final del lavado y facilita su planchado. Se
recomienda el uso de detergente líquido.
Tejidos sintéticos, blancos o de color (camisas,
camisetas, lencería, etc.): utilice el programa
COLOR MIX 40°
. Se recomienda no lavar
prendas blancas y de color en el mismo ciclo de
lavado para evitar que posibles pérdidas de color
puedan manchar las prendas blancas. Se
recomienda el uso de detergente líquido.
Prendas de algodón o tejidos sintéticos de color,
que posean en la etiqueta la indicación lavado a
30°
: utiliza el programa RÁPIDO 30 . La baja
temperatura de lavado permite el máximo cuidado
de los colores. Se recomienda el uso de detergente
líquido.
Prendas de lana (jersey, bufandas, etc): utiliza el
programa DELICADOS 30º con centrifugado final
+ . El movimiento del cesto durante el lavado y
el centrifugado delicado disminuyen el apelmazado
de los tejidos. Es aconsejable el uso de detergentes
específicos para las prendas de lana. Se recomienda
no superar el nivel máximo de carga.
Prendas de seda (camisas, lencería, etc.): utiliza el
programa DELICADOS 30º con exclusión del
centrifugado
+ . Al finalizar el lavado, trate de
no dejar demasiado tiempo las prendas en el cesto
para evitar la formación excesiva de arrugas.
Cortinas: utiliza el programa DELICADOS 30º con
exclusión del centrifugado
+ . Se recomienda
plegarlas y colocarlas dentro de una funda o de una
bolsa de red. Lávelas solas, cuidando no superar el
nivel máximo de carga.
¿Cuánto pesa la ropa?
1 sábana 400/500 g
1 funda 150/200 g
1 mantel 400/500 g
1 albornoz 900/1.200 g
1 toalla 150/250 g
1 jeans 400-500 g
1 camisa 150-200 g
Detergentes y ropa
Preparar la ropa
Subdivida la ropa según:
- el tipo de tejido / el símbolo en la etiqueta.
- los colores: separe las prendas de color y las
blancas.
Vacíe los bolsillos y controle los botones.
No supere los valores de carga máxima indicados
en los Programas de lavado.

ES
21
Precauciones y consejos
2
1
Esta máquina fue diseñada y fabricada en
conformidad con las normas internacionales de
seguridad. Estas advertencias se suministran por
razones de seguridad y deben ser leídas atentamente.
Seguridad general
Este aparato ha sido fabricado para un uso de tipo
doméstico exclusivamente.
La máquina debe ser utilizada sólo por personas
adultas y siguiendo las instrucciones contenidas en
este manual.
No toque la máquina con los pies desnudos ni con
las manos o los pies mojados o húmedos.
No desenchufe la máquina tirando del cable, sino
de la clavija y sujetando la base de la pared.
No toque el agua de descarga ya que puede
alcanzar temperaturas elevadas.
En ningún caso fuerce la puerta: podría dañarse el
mecanismo de seguridad que la protege de
aperturas accidentales.
En caso de avería, no acceda nunca a los
mecanismos internos para intentar una reparación.
Controle siempre que los niños no se acerquen a la
máquina cuando está en funcionamiento.
Durante el lavado, la puerta tiende a calentarse.
Si debe ser trasladada, deberán intervenir dos o
más personas, procediendo con el máximo cuidado.
La máquina no debe ser desplazada nunca por una
sola persona ya que es muy pesada.
Antes de introducir la ropa controle que el cesto
esté vacío.
Reciclado y final del ciclo de vida
Eliminación del material de embalaje:
respete las normas locales, de ese modo, los
embalajes podrán volver a ser utilizados.
La norma Europea 2002/96/CE sobre la eliminación
de aparatos eléctricos y electrónicos, indica que
los electrodomésticos no deben ser eliminados de
la misma manera que los desechos sólidos
urbanos. Los aparatos en desuso se deben
recoger separadamente para optimizar el
porcentaje de recuperación y reciclaje de los
materiales que los componen e impedir potenciales
daños para la salud y el medio ambiente. El
símbolo de la papelera tachada se encuentra en
todos los productos para recordar la obligación de
recolección separada.
Para mayor información sobre la correcta
eliminación de los electrodomésticos, los
poseedores de los mismos podrán dirigirse al
servicio público responsable o a los revendedores.
Ahorrar y respetar el medio ambiente
Ahorrar detergente, agua, energía y tiempo
Para no derrochar recursos, es necesario utilizar la
máquina con la carga máxima. Una carga comple-
ta en lugar de dos medias cargas permite ahorrar
hasta el 50% de energía.
Tratar las manchas con un quitamanchas o dejarlas
en remojo antes del lavado, disminuye la necesidad
de lavar a altas temperaturas.
Dosificar bien el detergente en base a la dureza del
agua, al grado de suciedad y a la cantidad de ropa
evita derroches y protege el ambiente: aún siendo
biodegradables, los detergentes contienen
elementos que alteran el equilibrio de la naturaleza.
Además, evite el uso de suavizante.
Realizando los lavados desde el atardecer hasta las
primeras horas de la mañana se colabora para
reducir la carga de absorción de las empresas
eléctricas.
Sistema recolector de gotas
La máquina está equipada con un sistema recolector
de gotas que se encuentra en la parte interna de la
puerta para capturar las gotas de agua que puedan
quedar al finalizar el ciclo.
Se aconseja controlar periódicamente el nivel de
humedad de la esponja presente en el cajón
recolector de gotas. Si es necesario, es posible
limpiarla o sustituirla de la siguiente manera:
1. extraiga el cajón,
ejerciendo una ligera
presión en la parte inferior
del mismo.
2. quite la esponja que se
encuentra en su interior,
enjuáguela con agua
corriente y estrújela
cuidadosamente. También
es posible sustituirla con
una de las esponjas de repuesto suministradas con el
aparato.
3. vuelva a colocar la esponja en el interior del cajón.
4. vuelva a colocar el cajón en la puerta, cuidando
que los resortes que se encuentran en dicha
puerta se introduzcan correctamente en los
lugares correspondientes del cajón.
5. verifique que el contenedor entre correctamente
en su lugar.

22
ES
Mantenimiento y cuidados
Interrumpir el agua y la corriente
eléctrica
Cierre el grifo de agua después de cada lavado. De
este modo se limita el desgaste de la instalación
hidráulica de la máquina y se elimina el peligro de
pérdidas.
Desenchufe la máquina cuando la debe limpiar y
durante los trabajos de mantenimiento.
Limpiar la máquina
La parte externa y las partes de goma se pueden
limpiar con un paño humedecido en agua tibia y
jabón. No use solventes ni productos abrasivos.
Limpiar el contenedor de detergentes
Se recomienda controlar que no haya detergente ni
agua en el interior del contenedor de detergentes
antes de extraerlo. Si existieran, tenga cuidado
porque podrían derramarse cuando se quita el
contenedor.
El contenedor de detergentes de esta lavadora se
limpia automáticamente durante los ciclos de lavado.
No obstante, es posible que en los casos en que se
utilicen detergentes particulares, puedan formarse
algunos residuos. Para limpiar manualmente el
contenedor, realice las siguientes operaciones:
1. Abra la puerta para
acceder al contenedor.
2. Extraiga el contenedor
hacia arriba, cogiéndolo
por la cubeta central
como se indica en la
figura. No coja el
contenedor por la rejilla
porque podría dañarla.
3. Desenganche la
cobertura del contenedor
para tener acceso a la
cubeta, como se indica
en la figura.
4. Lave el contenedor
bajo el agua corriente.
5. Vuelva a colocar la
cobertura y a introducir el
contenedor en su lugar,
hasta escuchar el golpe.
Cuidar la puerta y el cesto
Deje siempre semicerrada la puerta para evitar que
se formen malos olores.
Limpiar la bomba
La máquina posee una bomba autolimpiante que no
necesita mantenimiento. Pero puede suceder que
objetos pequeños (monedas, botones) caigan en la
precámara que protege la bomba, situada en la parte
inferior de la misma.
Verifique que el ciclo de lavado haya terminado y
desenchufe la máquina.
Para acceder a la precámara:
1. quite la protección
ubicada en la parte
inferior de la lavadora,
girándola en sentido
antihorario (ver la figura);
2. desenrosque la tapa
girándola en sentido
antihorario (ver la figura):
es normal que se
vuelque un poco de
agua;
3. limpie con cuidado el interior;
4. vuelva a enroscar la tapa;
5. vuelva a enroscar la tapa de protección girándola
en sentido horario cuidando que la flecha indicada
en la parte interior de la misma esté dirigida hacia
arriba.
Controlar el tubo de alimentación de
agua
Controle el tubo de alimentación al menos una vez al
año. Si presenta grietas o rajas debe ser sustituido:
durante los lavados, las fuertes presiones podrían
provocar roturas imprevistas.
No utilice nunca tubos ya usados.

ES
23
Anomalías y soluciones
Puede suceder que la máquina no funcione. Antes de llamar al Servicio de Asistencia Técnica (ver Asistencia
Técnica),controle que no se trate de un problema de fácil solución utilizando la siguiente lista.
Posibles causas / Solución:
El enchufe no está introducido en la toma de corriente, o no hace contacto.
En la casa no hay corriente.
La puerta no está correctamente cerrada.
El botón ENCENDIDO/APAGADO no fue presionado.
Los botones PUESTA EN MARCHA DE PROGRAMA no han sido
presionados (todavía están centelleando).
El grifo de agua no está abierto.
El tubo de alimentación de agua no está conectado al grifo.
El tubo está plegado.
El grifo de agua no está abierto.
En la casa no hay agua.
No hay suficiente presión.
Los botones PUESTA EN MARCHA DE PROGRAMA no han sido
presionados (todavía están centelleando).
El tubo de descarga no está instalado entre los 65 y 100 cm. del suelo
(ver Instalación).
El extremo del tubo de descarga está sumergido en el agua (ver Instalación).
La descarga de pared no posee un respiradero.
Si después de estas verificaciones el problema no se resuelve, cierre el grifo de
agua, apague la máquina y llame al Servicio de Asistencia Técnica. Si la
vivienda se encuentra en uno de los últimos pisos de un edificio, es posible que
se verifiquen fenómenos de sifonaje, por ello la máquina carga y descarga
agua de modo continuo. Para eliminar este inconveniente se encuentran
disponibles en el comercio válvulas especiales que permiten evitar el sifonaje.
El tubo de descarga está plegado (ver Instalación).
El conducto de descarga está obstruido.
Los tornillos de protección para el transporte no se han eliminado
cuando se realizó la instalación. Quite los tornillos (ver Instalación).
La máquina no está instalada en un lugar plano (ver Instalación).
Existe muy poco espacio entre la máquina, los muebles y la pared
(ver Instalación).
El tubo de alimentación de agua no está bien enroscado (ver Instalación).
El contenedor de detergentes está obstruido (para limpiarlo ver
Mantenimiento y cuidados).
El tubo de descarga no está bien fijado (ver Instalación).
El sistema recogedor de gotas está lleno. Limpie la esponja y
sustitúyala (ver Precauciones y Consejos).
Apague la máquina y desenchúfela, espere aproximadamente 1 minuto
y luego vuelva a encenderla. Será necesario poner en marcha el ciclo
desde el comienzo.
Si la anomalía persiste, llame al Servicio de Asistencia Técnica.
El detergente no es específico para la máquina (debe contener algunas
de las frases para lavadora, a mano o en lavadora o similares).
La dosificación fue excesiva.
Anomalías:
La máquina no se enciende.
El ciclo de lavado no comienza.
La máquina no carga agua
(el piloto PUERTA BLOQUEADA
centellea rápidamente).
La máquina carga y descarga agua
continuamente.
La máquina no descarga o no
centrífuga.
La máquina vibra mucho durante la
centrifugación.
La máquina pierde agua.
El piloto PUERTA BLOQUEADA
centellea de modo muy veloz.
Se forma demasiada espuma.

24
ES
Asistencia Técnica
Antes de llamar al Servicio de Asistencia Técnica:
Verifique si la anomalía la puede resolver Ud. solo (ver Anomalías y soluciones);
Vuelva a poner en marcha el programa para controlar si el inconveniente fue resuelto;
Si no es así, llame al Servicio de Asistencia Técnica Autorizado.
En el caso de una mala instalación o de un uso incorrecto, se le podrá solicitar el pago de la
intervención.
No recurra nunca a técnicos no autorizados.
Comunique:
el tipo de anomalía;
el modelo de la máquina (Mod.);
el número de serie (S/N ).
Esta última información se encuentra en la placa de características colocada en el aparato.

TR
25
Türkçe
Ýçindekiler
Montaj, 26-27
Ambalajýn çýkartýlmasý ve ayný seviyeye getirilmesi
Su ve elektrik baðlantýlarý
Teknik bilgiler
Çamaþýr makinesinin tanýmý, 28-29
Kendiliðinden temizlenen deterjan çekmecesi
Kontrol paneli
Yük dengeleme sistemi
Yýkama nasýl yapýlýr, 30
Yýkama programlarý, 31
Deterjanlar ve çamaþýr, 32
Çamaþýr hazýrlanmasý
Yýkama tavsiyeleri
Önlemler ve öneriler, 33
Genel güvenlik uyarýlarý
Atýklarýn tasfiye edilmesi
Tasarrufa yöneliniz ve çevreye saygýlý olunuz
Damla toplama sistemi
Bakým ve özen, 34
Su ve elektrik kesilmesi
Cihazýn temizlenmesi
Deterjan haznesinin temizlenmesi
Kapak ve hazne bakýmý
Pompanýn temizlenmesi
Su besleme hortumunun kontrol edilmesi
Arýzalar ve çözümler, 35
Teknik Servis, 36
TR
ÇAMAÞIR MAKÝNESÝ
SIXL 106
Kullaným talimatlarý

26
TR
A
Montaj
Bu kitapçýðý gerektiði her an danýþabilmeniz için
özenle saklayýnýz. Çamaþýr makinesinin satýlmasý,
devri veya nakli durumlarýnda da, yeni sahibinin
faydalanabilmesi için bu kýlavuz makineyle beraber
saklanmalýdýr.
Talimatlarý dikkatlice okuyunuz; montaj, kullaným
ve güvenliðe iliþkin önemli bilgiler içermektedir.
Ambalajýn çýkartýlmasý ve ayný seviyeye
getirilmesi
Ambalajdan çýkartýlmasý
1. Çamaþýr makinesinin ambalajdan çýkartýlmasý.
2. Çamaþýr makinesinin taþýma esnasýnda hasar
görmemiþ olduðunu kontrol ediniz. Hasar görmüþ ise
monte etmeyiniz. Satýcýya baþvurunuz.
3. Taþýma sýrasýnda arka
tarafta bulunan 4 adet
koruyucu vidayý ve ara
parçasýyla birlikte
buradaki lastiði de
çýkartýnýz (bakýnýz þekil).
4. Delikleri ambalajda bulacaðýnýz plastik kapaklarla
kapayýnýz.
5. Tüm parçalarý muhafaza ediniz: makinenin nakli
gerektiði takdirde takýlmalarý gerekmektedir.
Ambalajlar çocuk oyuncaðý deðildir.
Ayný seviyeye getirilmesi
Makine, ön ayaklarý doðru ayarlanmamýþsa gürültü
yapabilir.
1. Çamaþýr makinesini düz ve sert bir zemine
yerleþtiriniz, duvar veya mobilyalara dayamayýnýz.
2. Yerleþtirilecek zemin
tam düz deðilse çamaþýr
makinesinin vidalý ön
ayaklarýný sýkarak veya
gevþeterek dengeyi
saðlayýnýz (bkz. þekil);
eðim açýsý, makinenin
üst tezgahýna göre 2°
den fazla olmamalýdýr.
Saðlýklý bir dengeleme, çamaþýr makinesine saðlam
bir duruþ kazandýracaðý gibi, çalýþmasý esnasýndaki
sarsýntý, gürültü ve hareketlilikleri de önleyecektir.
Zeminde moket veya halý olmasý halinde, ayarý
makinenin altýnda havalandýrma olabilecek þekilde
yapýnýz.
Su ve elektrik baðlantýlarý
Su besleme hortumunun takýlmasý
1. A contasýný besleme
hortumunun ucuna
geçirerek, bunu vidalý 3/4
gaz ölçülü bir soðuk su
musluðuna baðlayýnýz
(bkz. þekil).
Baðlantý öncesinde
berrak su gelene kadar
suyu akýtýnýz.
2. Besleme hortumunu
arka kýsýmda üst sað
köþedeki su giriþine
vidalayarak makineye
takýnýz (bkz. þekil).
3. Hortumda katlanma ve ezilme olmamasýna dikkat
ediniz.
Musluðun su basýncýnýn Teknik özellikler etiketinde
belirtildiði gibi olmasý gerekir (bkz. yan sayfa).
Besleme hortumunun boyu yetersizse Ýndesit
Yetkili servisini arayýnýz.

TR
27
Teknik bilgiler
Model
SIXL 106
Ölçüler
geniþlik 59,5 cm
yükseklik 85 cm
derinlik 53,5 cm
Kapasite
1 - 6 kg
Elektrik baðlantýlarý
cihazýn üzerindeki teknik özellikler
etiketine bakýnýz
Su baðlantýlarý
max. su basýncý 1 MPa (10 bar)
min. su basýncý 0,05 MPa (0,5 bar)
tambur kapasitesi 52 litre
Sýkma hýzý
maksimum
dakikada 1000 devire kadar
EN 60456
standartlarý uyarýnca
kontrol programlarý
program ;
6 kg çamaþýrla.
Bu makina aþaðýda belirtilen AB
normlarýna uygundur:
- 19/02/73 tarihli 73/23/CEE
(Alçak gerilim) ve daha sonra
yapýlan düzenlemeler
- 03/05/89 tarihli 89/336/CEE
(Elektromanyetik Uyum) ve daha
sonra yapýlan düzenlemeler
- 2002/96/CE
TS 2004 EN 60335-2-7
65 - 100 cm
Tahliye hortumunun takýlmasý
Tahliye hortumunu,
katlanmasýný önleyerek,
zeminden 65 ile 100 cm
yükseklik arasýndaki bir
duvar tahliyesine takýnýz;
veyahut, ambalajda
bulacaðýnýz musluða
baðlama ünitesini
kullanarak, bir küvet
veya lavabo kenarýna
asýnýz (bkz. þekil ).
Tahliye hortumunun
serbest ucunun suya
girmemesi gerekir.
Tahliye hortumu için ilave uzatma kullanýlmamasý
tavsiye olunur; aksi mümkün deðilse, uzatma
hortumunun çapýnýn da ayný olmasý ve 150 cm. den
uzun olmamasý gerekir.
Elektrik baðlantýsý
Fiþi prize takmadan evvel aþaðýdaki hususlara dikkat
ediniz:
prizin topraklamasýnýn yürürlükteki normlara
uygun olmasýna;
prizin, makinenin teknik özellikler etiketinde
belirtilen, azami gücünü taþýyabilecek olmasýna
(bkz. yan taraf);
þebeke voltajýnýn, eknik özellikler etiketinde
belirtilen deðerlere uygun olmasýna (bkz. yan
taraf);
prizin makinenin fiþiyle uyumlu olmasýna. Aksi
takdirde fiþi veya prizi deðiþtiriniz.
Çamaþýr makinesi, muhafazalý olsa bile açýk
alanda monte edilemez, çünkü rüzgara ve yaðmura
maruz kalmasý çok tehlikelidir.
Makine monte edildikten sonra fiþin kolaylýkla
eriþilebilir olmasý gerekir.
Uzatma kablosu ile çoklu prizler kullanmayýnýz.
Kablonun ezilmemesi ve katlanmamasý gerekir.
Beslenme kablosunun yalnýzca yetkili teknisyenler
tarafýndan deðiþtirilmelidir.
Dikkat! Bu kurallara uyulmamasý halinde firma hiç bir
sorumluluk kabul etmemektedir.

28
TR
KONTROL
PANELÝ
MAKÝNE
KAPAÐI
AYARLANABÝLÝR AYAKLAR
KAPAK KOLU
Kendiliðinden temizlenen deterjan
çekmecesi
Bu çamaþýr makinesi kendiliðinden temizlenen
deterjan çekmecesine sahiptir. Bunun sayesinde
yýkamada daha kaliteli performanslar saðlanýr.
Deterjan çekmecesi makina kapaðýnýn iç
kýsmýndadýr.
1. Deterjan çekmecesine eriþmek için makine
kapaðýný açýnýz (bkz. þekil A).
2. Aþaðýda açýklandýðý gibi koruma ýzgaralarýnýn
üstünden dökerek çekmecelerin içine deterjan ve
katký maddesini koyunuz.
Hazne
: sývý deterjan ve katkýlar.
Hazne
: toz deterjan veya tablet ve diðer
katkýlar.
Tabletleri yerleþtirmek için çekmece üstündeki
ýzgarayý kaldýrýnýz.
Hazne
: yumuþatýcý.
Ortadaki hazneye sývý deterjan veya katký dökülmesi
durumunda istenmeyen þekilde deterjan taþabilir.
MAX
MAX
TAHLÝYE
POMPASINA
ERÝÞÝM
KAPAÐI
STOP
STOP
Çekmecede bu amaçla tasarlanmýþ olan
pencerelerden bakarak deterjan seviyesi ayarlanabilir.
ve haznelerin içinde yüzen göstergeler
bulunur (bkz. þekil B). En yüksek deterjan/
yumuþatýcý seviyesine kadar doldurulunca
yüzen göstergeler haznelerin üzerindeki
koruma ýzgaralarýna dokuncaya kadar yükselir.
Deterjan çekmecesinde belirtilen maksimum
seviyelerin aþýlmamasý tavsiye edilir.
Deterjan ambalajlarýnda verilen dozaj
talimatlarýna uyulmasý tavsiye edilir. Çok yoðun
deterjanlarýn çekmeceye deðil, direkt olarak
sepetin içine dökülmesi tavsiy e edilir.
Makinede gösterilen maksimum seviyelerin aþýlmasý
çekmecenin alt kýsmýndan deterjan taþmasýna yol
açabilir.
Doðru miktardan fazla deterjan kullanmak yýkama
sonucunun olumsuz etkilemesine ve çevre
kirlenmesine katkýda bulunur.
Yýkama devresinde kullanýlan su çekmeceden
deterjan fazlalýðýný alýr. Çekmecenin manuel
olarak çýkarýlmasý mümkündür (bkz. Bakým ve
özen).
Deterjanlarýn dozajýný kolayca ayarlamak için makine
ile birlikte verilen ölçü kabýnýn kullanýlmasý tavsiye
edilir.
Çekmecenin maksimum kapasitesi þöyle belirtilir:
- sývý deterjan: 1 1/2 ölçü
- toz deterjan: 2 ölçü
- yumuþatýcý: 1 ölçü
A B
Çamaþýr makinesinin tanýmý

TR
29
AÇMA/KAPAMA
tuþu
KAPAK KÝLÝTLÝ
kýrmýzý
göstergesi
AÇMA/KAPAMA tuþu:
makineyi çalýþtýrmak yada kapatmak için basýnýz.
Makine açýkken program baþlatma sembolleri
yanýp sönmeye baþlar, yýkama süresi
göstergeleri ise sabit yanar.
Yýkama programýný iptal etmek için makine
çalýþýrken AÇMA/KAPAMA tuþlarýný en az 2 saniye
basýlý tutunuz.
gösterge birkaç saniye yanýp söner makine
kazan içindeki suyu otomatik olarak boþaltýr.
KAPAK KÝLÝTLÝ kýrmýzý göstergesi:
Iþýklý gösterge devamlý yanýyorsa, kapak istenmeyen
açýlmalara karþý kilitli demektir. Yýkama devresi
tamamlandýktan sonra veya beklemeye alýndýktan
sonra olasý hasarlarý önlemek için kapaðý
açmadan önce göstergenin yanýp sönmesini
bekleyiniz. Yýkama tamamlandýktan sonra
bekleme süresi yaklaþýk 2 dakikadýr.
KAPAK KÝLÝTLÝ göstergesinin hýzlý þekilde yanýp
sönmesi, bir arýza göstergesidir (bkz. Arýzalar ve
çözümler).
PROGRAM ÇALIÞTIRMA tuþlarý:
seçilmiþ olan yýkama programýný baþlatmak için
basýnýz.
- tuþ sabit yanarsa: program yürütülmektedir.
- tuþlar yanýp sönerse: seçim yapýlacaktýr.
YIKAMA SÜRESÝ
göstergesi
HIZLI 30°C
PROGRAMINI
BAÞLATMA
tuþu
NAZÝK
PROGRAMINI
BAÞLATMA
tuþu
PAMUKLU
BEYAZ
PROGRAMINI
BAÞLATMA
tuþu
RENKLÝ KARIÞIK
KOLAY ÜTÜLE
PROGRAMINI
BAÞLATMA
tuþu
YIKAMA SÜRESÝ göstergesi:
yýkama devrinin hangi aþamada olduðunu gösterecek
þekilde sýrayla yanar. Program bitiminde tüm
göstergeler yanýp sönmeye baþlar.
Daha geniþ bilgi almak için Yýkama nasýl yapýlýr
bölümüne bakýnýz.
Yük dengeleme sistemi
Her sýkma devrinden önce aþýrý titremenin
engellenmesi için tamburu normal yýkama hýzýndan
biraz daha hýzlý döndürerek makine yükü dengeli
þekilde daðýtýr.
Birkaç kez denedikten sonra yük dengeli hale
gelmediyse makine normalden daha yavaþ bir sýkma
devrini uygular.
Yük çok dengesiz ise çamaþýr makinesi sýkma
devrini gerçekleþtirmeden çamaþýrlarý daðýtýr.
Dengeleme denemeleri yüzünden toplam devir süresi
10 dakikaya kadar daha uzun olabilir.
Kontrol paneli

30
TR
Not: Montajdan sonra, çamaþýr koymaksýzýn
deterjanla
programý ayarlayarak yýkama yapýnýz.
1. AÇMA/KAPAMA düðmesine basarak makineyi
açýnýz. PROGRAM BAÞLATMA sembolleri yanýp
sönmeye baþlar, YIKAMA SÜRESÝ göstergeleri
ise sabit yanar. Durum böyle olunca makineye
istenen talimatlar verilebilir.
2. MAKINENIN DOLDURULMASI. Mevcut olan açma
tutamaðýndan kapaðý açýnýz. Sonraki sayfada
bulunan program tabelasýnda belirtilen yük
miktarýný geçmeyecek þekilde makineyi
çamaþýrlarýnýzla doldurunuz.
3. DETERJAN VE KATKILAR KONULMASI
Kapaðýn iç kýsmýndaki çekmecenin içinde ve
yüzer göstergenin üzerinde belirtilen limitleri
aþmayacak þekilde deterjan miktarýný ayarlayýnýz.
Daha geniþ bilgi almak için Çamaþýr makinesinin
tanýmý bölümüne bakýnýz.
4. MAKÝNE KAPAÐININ KAPATILMASI.
5. PROGRAM
BAÞLATMA TUÞUNA
basarak YIKAMA
PROGRAMINI
BAÞLATINIZ. Seçilmiþ
olan program ile ilgili
sembol sabit yanmaya
baþlar, tüm yýkama
süresi göstergeleri ise
söner. MAKÝNE
KAPAÐI KÝLÝTLÝ uyarý lambasý güvenlik kilidin
devrede olduðunu belirtmek için yanar.
Mevcut olan yýkama programlarýnýn açýklamasýný
okumak için Yýkama programlarý. bölümüne
bakýnýz.
NAZÝK programýný baþlatmak için
uygulanmasý gereken iþlem farklýdýr. Sonraki
sayfada bulunan Nazik 30° adlý paragrafa
bakýnýz.
Makine devredeyken programýn hangi aþamada
olduðunu göstermek için YIKAMA SÜRESÝ
göstergeleri sýrayla yanar.
Yandaki resim yýkamanýn
%50sinden fazla
tamamlanmýþ olduðunu
belirtir.
Yýkama devri bitiminde
YIKAMA SÜRESÝ
göstergeleri yanýp
sönmeye baþlar.
6. Yanan program baþlatma tuþuna basarak YIKAMA
PROGRAMINI DURDURMAK mümkündür.
Durdurulunca program baþlatma tuþu yanýp
sönmeye baþlar. Ýki dakika geçtikten sonra
MAKÝNE KAPAÐI KÝLÝTLÝ uyarý lambasý kapaðýn
açýlabilir hale geldiðini belirtmek için söner.
Biraz daha deterjan eklemek istendiðinde MAX
yüzen göstergesi kalkmýþ pozisyonda
olmadýðýndan emin olunuz.
Yýkama programýný yeniden çalýþtýrmak için kapaðý
kapatýp baþlatma düðmesine yeniden basýnýz.
En yüksek güvenlik seviyesini saðlamak amacýyla
sepetin içerisinde dýþarýya taþabilecek su
bulunmasý durumunda kapak açýlamaz (MAKÝNE
KAPAÐI KÝLÝTLÝ uyarý lambasý iki dakika geçtikten
sonra da yanýk kalacaktýr). Bu durumda AÇMA/
KAPAMA
tuþunu iki saniye basýlý tutarak,
makine kapatýlmalý ve otomatik olarak suyun
boþaltýlmasý beklenmelidir.
7. PROGRAMIN BÝTMESÝ
Program bitiminde seçilmiþ olan program ile ilgili
sembol sabit yanmaya devam eder, tüm yýkama
süresi göstergeleri ise yanýp sönmeye baþlar.
Yeni bir yýkama devrini baþlatmak için AÇMA/
KAPAMA
düðmesine ÝKÝ KEZ basarak çamaþýr
makinesini kapatýp yeniden açmanýz gerekecektir.
Yýkama nasýl yapýlýr

TR
31
PAMUKLU BEYAZ 60°
Pamuklu beyaz dayanýklý çamaþýrlarý yýkamak için
kullanýlýr. Daha yüksek yýkama sýcaklýðý A sýnýfýnda
daha iyi yýkama sonuçlarýnýn elde edilmesini saðlar.
RENKLÝ KARIÞIK 40° / KOLAY ÜTÜLE
Bu programla tüm renkli çamaþýrlar yýkanabilir (hem
pamuklu hem sentetikler). Çamaþýrlarýn kolay
ütülenmesini saðlamak amacýyla kýrýþýklarýn
oluþmasýný engellemek için sýkma devri tüm yýkama
devri süresince dikkatle kontrol altýnda tutulur.
Pamuklu ve sentetik çamaþýrlar birlikte yýkanabilir.
NAZÝK 30°
Yünlü, ipekli ve en nazik çamaþýrlar için kullanýlýr.
Bu çamaþýrlarýn farklý özelliklerinden dolayý bu
program ötekilerden farklý þekilde çalýþtýrýlýr:
+ SIKMA DEVÝRLÝ NAZÝK PROGRAMI (yünlü
giysiler için): NAZÝK PROGRAMINI BAÞLATMA
tuþuna basýnýz. 3 saniye sonra NAZÝK PROGRAMINI
BAÞLATMA ve HIZLI PROGRAMINI BAÞLATMA
tuþlarý yanýp sönmeye baþlar. Yýkamayý yapmak için
NAZÝK PROGRAMINI BAÞLATMA tuþuna basýnýz.
Yýkama devri sýkma devriyle tamamlanýr. Bu program
tamburu özel tasarlanmýþ olan þekilde hareket ettirerek
kumaþlardan fazla olan suyu giderir. Böylece
kumaþlarýn aþýnmasý engellenir ve yünlülerin
korunmasýna katkýda bulunur.
+ SIKMA DEVÝRSÝZ NAZÝK PROGRAM
(ipekli, viskoz ve perdeler için kullanýlýr. Yünlüler için
kullanmayýnýz): NAZÝK PROGRAMINI BAÞLATMA
tuþuna basýnýz. 3 saniye sonra NAZÝK PROGRAMINI
BAÞLATMA ve HIZLI PROGRAMINI BAÞLATMA
tuþlarý yanýp sönmeye baþlar. Sýkma devrini devre
dýþý býrakarak yýkamayý yapmak için HIZLI
PROGRAMINI BAÞLATMA tuþuna basýnýz. Devir
bitiminde makine kazanýn içindeki suyu otomatik
olarak boþaltacaktýr. Yýkama bitiminde gereksiz
kýrýþýklarýn oluþumunu engellemek amacýyla
çamaþýrlarýn makineden hemen çýkarýlmasý tavsiye
edilir.
HIZLI 30° / SADECE DURULAMA
Bu programla 30 dakikada tüm az kirli çamaþýrlar
veya yýkama 30°etiketi taþýyan çamaþýrlar
yýkanabilir (hem pamuklu hem sentetikler)
.
Ayrýca, elde yýkanan pamuklu veya sentetik
çamaþýrlarý durulamak için (yünlü ve ipekliler hariç)
kullanýlabilir.
Mevcut olan sensörler sayesinde makine
tamburdaki çamaþýrlarda deterjan bulunmasýný
belirtir:
- deterjan yoksa; çamaþýrlar HIZLI 30 programýyla
yýkanacaktýr.
- deterjan varsa (elde yýkanan çamaþýrlar için);
otomatik olarak SADECE DURULAMA programý
devreye girecektir.
DURULAMANIN OTOMATÝK ÝÞLETMESÝERROR
Durulama fonksiyonu otomatik olarak sensörler
tarafýndan kontrol edilir. Yýkama bitiminde
çamaþýrlar çok sabunlanmýþsa kumaþtaki
deterjaný tamamen giderilinceye kadar
durulama safhasý uzatýlacaktýr. Bu durumda
program süresi program tablosunda belirtilen
program süresinden biraz daha uzun olabilir.
*Not: Nazik programýnda sýkma devrini devre dýþý býrakmak konusunda daha geniþ bilgi almak için aþaðýda
bulunan Nazik 30° adlý paragrafa bakýnýz.
**Not: Daha önce elde yýkanmýþ çamaþýrlarýn soðuk suda durulama iþlemine tabii tutmak konusunda daha
geniþ bilgi almak için Hýzlý 30'/Sadece Durulama adlý paragrafa bakýnýz.
Tabelada belirtilen program süreleri ortalama yük miktari dikkate alinarak yaklasik olarak hesaplanmistir.
Yýkama programlarý
Tuº
Kumaº
Maks
yük
(Kg)
Sýcaklýk
Sýkma
(dakikada
devir
sayýsý)
Program
süresi
(dakika)
Yýkama programýnýn
tanýmý
PAMUKLU BEYAZ
Pamuklu beyaz
dayanýklý
6 60°C
1000 145
Yýkama, durulama, ara sýkma
devirleri ve son sýkma devri
RENKLÝ KARIÞIK 40° / KOLAY ÜTÜLE
Renkli Pamuklu ve
sentetik
4,5 40°C
1000 80
Yýkama, durulama, nazik
sýkma
NAZÝK
Yün (son nazik sýkma)
1,5 30°C
600 50
Yýkama, durulama, nazik
sýkma
Ýpek ve perde (sýkma
devirsiz)
1,5 30°C
hayýr*
50
Yýkama, durulama, su
tahliye
HIZLI / SADECE DURULAMA
Pamuklu ve sentetik
3
30°/soðuk
su**
800 30
Yýkama (sadece hýzlý
programý devredeyse),
durulama, nazik sýkma
+
+

32
TR
Yýkama tavsiyeleri
Banyo ve yatak çamaþýrlarý (çarþaf, havlu,
bornoz vs.): A sýnýfýnda en yüksek yýkama
performanslarýný saðlayan PAMUKLU BEYAZ 60°
programýný kullanýnýz. Yoðun sýkma devri fazla
olan suyun giderilmesini saðlar.
Pamuklu beyaz çamaþýrlar (gömlek, tiþört,
masa örtüsü vs.): PAMUKLU BEYAZ 60°
programýný kullanýnýz Ýnatçý lekelerin olmasý
durumunda yýkama yapmadan önce sert sabunla
giderilmesine çalýþýlmasý tavsiye edilir.
Pamuklu renkli çamaþýrlar (gömlek, tiþört, iç
çamaþýr vs.): Renklere zarar vermeden en
yüksek yýkama performanslarýný saðlayan
RENKLÝ KARIÞIK 40°
programýný kullanýnýz.
KOLAY ÜTÜLE fonksiyonu sayesinde
çamaþýrlarda kýrýþýklarýn oluþmasýný engellemek
için sýkma devri tüm yýkama devri süresince
dikkatle kontrol altýnda tutulur. Sývý deterjan
kullanýlmasý tavsiye edilir.
Sentetik beyaz veya renkli çamaþýrlar
(gömlek, tiþört, iç çamaþýr vs.): RENKLÝ
KARIÞIK 40°
programýný kullanýnýz. Renkli
çamaþýrlarýn beyazlarý boyamasýný engellemek
amacýyla beyaz çamaþýrlar ile renklileri ayný
anda yýkamayýnýz. Sývý deterjan kullanýlmasý
tavsiye edilir.
yýkama 30°etiketi taþýyan renkli çamaþýrlar
(hem pamuklu hem sentetikler)
: HIZLI 30

40
CZ
OVLÁDACÍ
PANEL
DVÍØKA
NASTAVITELNÉ NOKY
RUKOJE
DVÍØEK
Samoèisticí dávkovaè pracích prostøedkù
Samoèisticí dávkovaè pracích prostøedkù
Tato praèka je vybavena inovaèním samoèisticím
dávkovaèem pracích prostøedkù, který je schopen
zlepit kvalitu praní.
Dávkovaè se nachází uvnitø dvíøek.
1. Otevøete dvíøka za úèelem pøístupu kdávkovaèi
pracích prostøedkù (viz obrázek A).
2. Naplòte pøihrádky a po ochranné møíky pracími
nebo pøídavnými prostøedky; postupujte
následovnì:
Pøihrádku
: tekutý prací prostøedek a pøídavné
prostøedky.
Pøihrádku : prákový prací prostøedek nebo
tablety a prákové pøídavné prostøedky.
Pøi vkládání tablet nadzvednìte ochrannou møíku
pøihrádky.
Pøihrádku
: naplòte aviváí.
Naplnìní centrální pøihrádky pracími nebo
pøídavnými prostøedky mùe zpùsobit nechtìný únik.
M
A
X
M
A
X
DVÍØKA PRO
PØÍSTUP
KVYPOUTÌCÍMU
ÈERPADLU
STOP
STOP
Úroveò pracího prostøedku je moné zobrazit
vpøísluných prùhledných okénkách na dávkovaèi.
Uvnitø pøihrádek
a se dále nacházejí
plovoucí indikátory (viz obrázek B). Pøi naplnìní
maximálního mnoství pracího prostøedku/aviváe
se indikátory zvednou a po úroveò ochranných
møíek pøihrádek.
Doporuèujeme nikdy nepøekraèovat vyznaèené
maximální úrovnì na dávkovaèi pracích prostøedkù.
Doporuèujeme postupovat dle pokynù pro
dávkování uvedených na obalech pracích
prostøedkù. U nìkterých mimoøádnì hustých
pracích prostøedkù doporuèujeme jejich
aplikaci pøímo dovnitø bubnu a ne do
dávkovaèe pracích prostøedkù.
Naplnìní nad úrovnì vyznaèené na zaøízení mùe
zpùsobit únik pracího prostøedku ze spodní èásti
dávkovaèe.
Pøi nadmìrném mnoství pouitých pracích
prostøedkù se praní nestane úèinnìjím, ale pøispìje
se pouze kvìtímu zneèiování ivotního prostøedí.
Voda pouitá bìhem pracího cyklu zajistí odstranìní
pøípadného nadbyteèného pracího prostøedku
zdávkovaèe. Vkadém pøípadì je vak moné
manuálnì vytáhnout dávkovaè (viz Údrba a péèe).
Za úèelem usnadnìní dávkování pracích prostøedkù
doporuèujeme pouívat pøíslunou odmìrku,
dodanou spolu s praèkou.
Maximální kapacita dávkovaèe je:
- tekuté prací prostøedky: 1 1/2 odmìrky
- prákové prací prostøedky: 2 odmìrky
- avivá: 1 odmìrka
AB
Popis zaøízení

CZ
41
Tlaèítko
ZAPNUTÍ/VYPNUTÍ
Èervená kontrolka
SIGNALIZACE
ZABLOKOVANÝCH
DVÍØEK
Tlaèítko ZAPNUTÍ/VYPNUTÍ:
jeho stisknutí slouí k zapnutí a vypnutí zaøízení.
Pøi zapnutém zaøízení zaènou ikony tlaèítek pro
sputìní programu blikat, zatímco kontrolky
znázoròující dobu praní se rozsvítí stálým svìtlem.
Zruení cyklu je moné provést stisknutím a
pøidrením tlaèítka zapnutí/vypnutí bìhem pracího
cyklu pøiblinì na dobu 2 sekund.
Kontrolka
bude nìkolik sekund blikat, zatímco
zaøízení provede automatické odèerpání vody
nacházející se v bubnu.
Èervená kontrolka SIGNALIZACE
ZABLOKOVANÝCH DVÍØEK:
Rozsvícení této kontrolky poukazuje na to, e jsou
dvíøka zablokována, aby se zamezilo jejich
náhodnému otevøení; ve snaze pøedejít pokození
dvíøek je tøeba po ukonèení cyklu nebo pøi jeho
pøeruení pøed jejich otevøením vyèkat, dokud
nedojde kezhasnutí uvedené kontrolky. Èekací
doba po ukonèení pracího programu je
pøiblinì dvì minuty.
Velmi rychlé blikání kontrolky SIGNALIZACE
ZABLOKOVANÝCH DVÍØEK poukazuje na
pøítomnost poruchy (viz Poruchy a zpùsob jejich
odstranìní).
Tlaèítka SPUTÌNÍ PROGRAMU:
jejich stisknutí slouí kesputìní zvoleného pracího
programu.
- tlaèítko rozsvícené stálým svìtlem: probíhající
prací program.
- blikající tlaèítka: voèekávání volby.
Kontrolky
ZNÁZORNÌNÍ PRACÍ
DOBY
Tlaèítko
SPUTÌNÍ
PROGRAMU
RYCHLÉHO PRANÍ 30
Tlaèítko
SPUTÌNÍ
PROGRAMU PRO
CHOULOSTIVÉ
TKANINY
Tlaèítko
SPUTÌNÍ PROGRAMU
PRO PRANÍ PRÁDLA Z
BÍLÉ BAVLNY
Tlaèítko
SPUTÌNÍ PROGRAMU
COLOR MIX
SNADNÉ EHLENÍ
Kontrolky ZNÁZORNÌNÍ PRACÍ DOBY:
rozsvìcejí se postupnì, èím poukazují na prùbìh
pracího programu. Po ukonèení pracího programu
zaènou vechny kontrolky blikat.
Podrobnìjí informace jsou uvedeny vèásti Jak
provést prací cyklus.
Systém automatického vyváení náplnì
Aby se zabránilo nadmìrným vibracím, zaøízení pøed
kadým odstøeïováním rovnomìrnì rozloí náplò.
Dojde ktomu nepøetritým otáèením bubnu
rychlostí, která mírnì pøevyuje rychlost pouitou
bìhem pracího cyklu.
Kdy se ani po nìkolika pokusech nepodaøí dokonale
rozloit náplò, zaøízení provede odstøeïování nií
rychlostí, ne je pøedpokládaná rychlost.
V pøípadì nadmìrného nevyváení provede zaøízení
rozloení namísto odstøeïování.
Pøípadné pokusy o vyváení mohou prodlouit
celkovou dobu cyklu maximálnì o 10 minut.
Ovládací panel

42
CZ
Poznámka: Po instalaci zaøízení je tøeba jetì
pøed jeho pouitím na praní prádla provést jeden
zkuební cyklus spracím prostøedkem a bez náplnì
prádla nastavením pracího programu
.
1. ZAPNÌTE ZAØÍZENÍ stisknutím tlaèítka ZAPNUTÍ/
VYPNUTÍ
. Ikony tlaèítek SPUTÌNÍ
PROGRAMU zaènou blikat a kontrolky
ZNÁZORNÌNÍ PRACÍ DOBY se rozsvítí stálým
svìtlem, co poukazuje na skuteènost, e je
praèka pøipravena pøijmout ovládací pøíkazy.
2. NAPLÒTE PRAÈKU PRÁDLEM. Otevøete dvíøka
spouitím pøísluné rukojeti. Naplòte praèku
prádlem a dbejte pøitom, aby nedolo kpøekroèení
mnoství náplnì, uvedeného vtabulce programù
na následující stranì.
3. NADÁVKUJTE PRACÍ A PØÍDAVNÉ
PROSTØEDKY
Nadávkujte prací prostøedky dovnitø dávkovaèe
umístìného uvnitø dvíøek a dbejte pøitom, aby
nedolo kpøekroèení maximálních úrovní
vyznaèených na povrchu dávkovaèe a na
pøísluných plovoucích indikátorech. Podrobnìjí
informace najdete vèásti Popis zaøízení.
4. ZAVØETE DVÍØKA.
5. SPUSTE PRACÍ
PROGRAM stisknutím
pøísluného TLAÈÍTKA
SPUTÌNÍ
PROGRAMU. Ikona
zvoleného programu se
rozsvítí stálým svìtlem,
zatímco kontrolky
znázornìní prací doby
zhasnou. Kontrolka
SIGNALIZACE ZABLOKOVÁNÍ DVÍØEK se
rozsvítí stálým svìtlem, èím poukazuje na
bezpeènostní zablokování dvíøek.
Popis pracích programù, které jsou kdispozici,
se nachází vèásti Prací programy.
Postup pøi spoutìní programu
CHOULOSTIVÉ TKANINY
je odliný, viz
odstavec Choulostivé tkaniny 30° na následující
stranì.
Vprùbìhu programu se kontrolky ZNÁZORNÌNÍ
PRACÍ DOBY postupnì rozsvítí, co poukazuje na
to, která èást programu ji byla zrealizována.
Vedle uvedený obrázek
se vztahuje na situaci,
kdy bylo provedeno 50%
pracího cyklu.
Po ukonèení cyklu
budou vechny kontrolky
ZNÁZORNÌNÍ PRACÍ
DOBY rozsvícené a
budou blikat.
6. PRACÍ PROGRAM je moné POZASTAVIT
stisknutím rozsvíceného tlaèítka sputìní
programu, které zaène blikat. Pøiblinì po dvou
minutách dojde kezhasnutí kontrolky
SIGNALIZACE ZABLOKOVANÝCH DVÍØEK, co
poukazuje na monost jejich otevøení.
Vpøípadì, e hodláte pøidat dalí prací
prostøedek, dávejte pozor na to, aby se plovoucí
indikátor MAX nenacházel ve zvednuté poloze.
Opìtovné sputìní programu se provádí zavøením
dvíøek a opìtovným stisknutím pøísluného tlaèítka
sputìní.
Ve snaze o zajitìní maximální bezpeènosti
nebude vpøípadì pøítomnosti takového mnoství
vody, které by mohlo vytéci ven, moné otevøít
dvíøka (kontrolka SIGNALIZACE
ZABLOKOVANÝCH DVÍØEK zùstane rozsvícena i
po uplynutí dvou minut). Vtakovém pøípadì je
tøeba vypnout zaøízení pøiblinì na 2 sekundy
tlaèítkem ZAPNUTÍ/VYPNUTÍ
a vyèkat na
automatické odèerpání vody.
7. UKONÈENÍ PROGRAMU
Po ukonèení pracího programu zùstane pøísluná
ikona, odpovídající zvolenému programu,
rozsvícena stálým svìtlem, zatímco vechny
kontrolky znázoròující prací dobu zaènou
blikat.
Za úèelem sputìní nového pracího programu je
tøeba vypnout a znovu zapnout zaøízení stisknutím
tlaèítka ZAPNUTÍ/VYPNUTÍ
DVAKRÁT PO
SOBÌ.

CZ
43
BÍLÁ BAVLNA 60°
Slouí kpraní vech druhù nejodolnìjího bílého
bavlnìného prádla. Vyí teplota praní umoòuje
dosaení lepích výsledkù praní ve tøídì A.
COLOR MIX 40° / SNADNÉ EHLENÍ
Stímto programem mùete prát vekeré barevné prádlo
zbavlny i ze syntetických tkanin. Odstøeïování je zde
dùkladnì kontrolováno bìhem celého pracího cyklu, aby
se sníila tvorba záhybù na tkaninách a usnadnilo se tak
jejich ehlení. Stímto programem je moné souèasnì
prát bavlnìné prádlo spolu sprádlem ze syntetických
tkanin.
CHOULOSTIVÉ TKANINY 30°
Jedná se o cyklus urèený pro praní prádla zvlny, hedvábí
a vekerého prádla zchoulostivých tkanin. Vzhledem
kodliným vlastnostem tohoto prádla tento program
vyaduje specifickou aktivaci, odlinou od aktivace
jiných programù:
+ CYKLUS CHOULOSTIVÉ TKANINY SE
ZÁVÌREÈNÝM ODSTØEÏOVÁNÍM (pro prádlo zvlny):
stisknìte tlaèítko SPUTÌNÍ PROGRAMU CHOULOSTIVÉ
TKANINY
. Pøiblinì po 3 sekundách zaènou tlaèítka
SPUTÌNÍ PROGRAMU CHOULOSTIVÉ TKANINY
a
SPUTÌNÍ PROGRAMU RYCHLÉ PRANÍ
blikat.
Aktivujte praní opìtovným stisknutím tlaèítka SPUTÌNÍ
PROGRAMU CHOULOSTIVÉ TKANINY
. Praní bude
ukonèeno fází odstøeïování pro choulostivé tkaniny.
Souèástí tohoto programu jsou specificky navrené pohyby
bubnu, které slouí kodstranìní pøebyteèné vody ztkanin pøi
souèasném sníení otìru prádla a zvýení ochrany vaeho
prádla zvlny.
+ CYKLUS CHOULOSTIVÉ TKANINY SVYLOUÈENÍM
ODSTØEÏOVÁNÍ (pro prádlo zhedvábí, viskózy, kpraní
záclon; nesmí se pouívat kpraní vlny):
stisknìte tlaèítko SPUTÌNÍ PROGRAMU CHOULOSTIVÉ
TKANINY
. Pøiblinì po 3 sekundách zaènou tlaèítka
SPUTÌNÍ PROGRAMU CHOULOSTIVÉ TKANINY a
SPUTÌNÍ PROGRAMU RYCHLÉ PRANÍ
blikat.
Aktivujte praní bez závìreèného odstøeïování stisknutím
tlaèítka SPUTÌNÍ PROGRAMU RYCHLÉ PRANÍ
. Po
ukonèení cyklu zaøízení automaticky odèerpá vodu
pøítomnou vbubnu. Doporuèujeme vyjmout prádlo zpraèky
bezprostøednì po ukonèení praní, aby se zabránilo
nadmìrné tvorbì záhybù.
RYCHLÉ PRANÍ 30 / SAMOSTATNÉ MÁCHÁNÍ
Spouitím tohoto programu mùete vprùbìhu pouhých 30
minut vyprat vae mírnì zneèitìné prádlo zbavlny nebo ze
syntetických tkanin nebo prádlo oznaèené visaèkou prát pøi
30°
. Dále mùete provádìt máchání prádla zbavlny nebo
syntetických tkanin, vypraného pøedem ruènì (s výjimkou
prádla zvlny a hedvábí).
Díky pøísluným snímaèùm je praèka schopna rozeznat
pøítomnost pracího prostøedku na prádle vloeném do
bubnu:
- kdy na prádle není pøítomen prací prostøedek, bude
proveden cyklus RYCHLÉ PRANÍ 30°;
- kdy je pøítomen prací prostøedek (ruènì pøedeprané
prádlo), bude automaticky proveden cyklus
SAMOSTATNÉHO MÁCHÁNÍ.
AUTOMATICKÁ SPRÁVA SAMOSTATNÉHO MÁCHÁNÍ
Funkce máchání je kontrolována bìhem vech programù
pøíslunými snímaèi. Vpøípadì nadmìrného mnoství pracího
prostøedku na prádle vzávìru praní bude fáze máchání
automaticky prodlouena a do úplného odstranìní pracího
prostøedku. Vtomto pøípadì se mùe stát, e prací doba bude
mírnì prodlouena vzhledem khodnotì uvedené vtabulce
programù.
*Poznámka: informace týkající se zpùsobu vylouèení odstøeïování zpracího programu pro choulostivé tkaniny jsou uvedeny
vodstavci Choulostivé tkaniny 30° ve spodní èásti strany.
**Poznámka: informace týkající se zpùsobu provedení samostatného máchání prádla, které bylo pøedem ruènì vypráno ve
studené vodì, jsou uvedeny vodstavci Rychlé praní 30/Samostatné máchání ve spodní èástí této strany.
Doby trvání pracích programù uvedené vtabulce jsou pouze orientaèní a jsou vypoèteny sohledem na prùmìrnou náplò.
Prací programy
Tlaèítko Tkaniny
Max.
náplò
(kg)
Teplota
Odstøeïován
í (otáèky za
minutu)
Doba cyklu
(v minutách)
Popis pracího cyklu
BÍLÁ BAVLNA
Odolná bílá bavlna 6 60°C 1000 145
Praní, máchání, prùbìné a
závìreèné odstøeïování
COLOR MIX 40° / SNADNÉ EHLENÍ
Barevná bavlna a
syntetické tkaniny
4,5 40°C 1000 80
Praní, máchání a odstøeïování pro
choulostivé prádlo
CHOULOSTIVÉ TKANINY
Vlna (závìreèné
odstøeïování pro
choulostivé prádlo)
1,5 30°C 600 50
Praní, máchání a odstøeïování pro
choulostivé prádlo
Hedvábí a záclony
(bez závìreèného
odstøeïování)
1,5 30°C
neodstøeïuje
se*
50 Praní, máchání a odèerpání vody
RYCHLÉ PRANÍ / SAMOSTATNÉ MÁCHÁNÍ
Bavlna a
syntetické tkaniny
3
30°/studen
á voda**
800 30
Praní (pouze s aktivním programem
„Rychlé praní“), máchání,
odstøeïování pro choulostivé prádlo
+
+

44
CZ
Rady pro praní
Loní prádlo a koupelnové prádlo
(prostìradla, ruèníky, upany atd.): pouívejte
program BÍLÁ BAVLNA 60°
, který zaruèuje
lepí výsledky praní ve tøídì A. Intenzivní
odstøeïování umoòuje úèinné odstranìní
pøebyteèné vody.
Bílé bavlnìné prádlo (koile, trièka, ubrusy
atd.): pouijte program BÍLÁ BAVLNA 60°.
Vpøípadì pøítomnosti odolných skvrn je vhodné
toto prádlo pøedeprat tuhým mýdlem jetì pøed
pracím cyklem.
Barevné bavlnìné prádlo (koile, trièka,
spodní prádlo atd.): pouijte program COLOR
MIX 40°
, který umoòuje maximalizovat
výsledky praní bez pokození barev. Fáze
odstøeïování sniuje díky funkci SNADNÉ
EHLENÍ, která je souèástí tohoto cyklu, tvorbu
záhybù na prádle na konci cyklu, èím
usnadòuje jeho ehlení. Doporuèuje se pouití
tekutého pracího prostøedku.
Bílé nebo barevné prádlo ze syntetických
tkanin (koile, trièka, spodní prádlo atd.):
pouijte program COLOR MIX 40°
.
Doporuèujeme neprat souèasnì bílé a barevné
prádlo ve stejném pracím cyklu, aby se zabránilo
zabarvení bílého prádla barvou, která pøípadnì
pustí a usadí se na bílém prádle. Doporuèuje se
pouití tekutého pracího prostøedku.
Bavlnìné prádlo nebo barevné prádlo ze
syntetických tkanin, které má na visaèce
oznaèení prát pøi 30°
: pouijte program
RYCHLÉ PRANÍ 30
. Nízká teplota praní
umoòuje maximální péèi o barvy. Doporuèuje se
pouití tekutého pracího prostøedku.
Prádlo zvlny (pletené prádlo, ály atd.):
pouijte program CHOULOSTIVÉ TKANINY 30°
se závìreèným odstøeïováním
+ . Pohyb
bubnu bìhem praní a fáze odstøeïování pro
choulostivé prádlo sniují plstnatìní tkanin.
Doporuèuje se pouití specifických pracích
prostøedkù pro vlnu. Doporuèujeme nepøekroèit
úroveò maximální náplnì.
Hedvábné prádlo (koile, spodní prádlo atd.):
pouijte program CHOULOSTIVÉ TKANINY 30°
svylouèením závìreèného odstøeïování
+ .
Snate se nenechat prádlo po ukonèení praní
vbubnu pøíli dlouho, abyste zabránili nadmìrné
tvorbì záhybù.
Záclony: pouijte program CHOULOSTIVÉ
TKANINY 30° svylouèením závìreèného
odstøeïování
+ . Doporuèuje se pøehnout je a
uloit dovnitø povlaku na poltáø nebo do pytlíku
ze síoviny. Pøi jejich praní vìnujte pozornost
tomu, abyste nepøekroèili maximální úroveò
náplnì.
Kolik váí prádlo?
1 prostìradlo 400-500 g
1 povlak na poltáø 150-200 g
1 ubrus 400-500 g
1 upan 900-1.200 g
1 ruèník 150-250 g
1 díny 400-500 g
1 koile 150-200 g
Prací prostøedky a prádlo
Pøíprava prádla
Roztøiïte prádlo podle:
- druhu tkaniny / symbolu na visaèce.
- barvy: oddìlte barevné prádlo od bílého.
Vyprázdnìte kapsy a zkontrolujte knoflíky.
Nepøekraèujte hodnoty maximální náplnì, uvedené
vèásti Prací programy.

CZ
45
Opatøení a rady
2
1
Praèka byla navrena a vyrobena vsouladu
splatnými mezinárodními bezpeènostním pøedpisy.
Tato upozornìní jsou uvádìna zbezpeènostních
dùvodù a je tøeba si je pozornì pøeèíst.
Základní bezpeènostní pokyny
Toto zaøízení bylo navreno výhradnì pro pouití
v domácnosti.
Zaøízení mohou pouívat pouze dospìlé osoby
podle pokynù uvedených vtomto návodu.
Nedotýkejte se zaøízení bosí, anebo vpøípadì, e
máte mokré ruce èi nohy.
Nevytahujte zástrèku ze zásuvky tahem za
kabel, ale uchopením za zástrèku.
Nedotýkejte se odèerpávané vody, protoe mùe
mít velmi vysokou teplotu.
Nepokouejte se o násilné otevøení dvíøek: mohlo
by dojít kpokození bezpeènostního uzávìru,
který zabraòuje náhodnému otevøení.
Pøi výskytu poruchy se vádném pøípadì
nepokouejte o opravu vnitøních èástí zaøízení.
Vdy mìjte pod kontrolou dìti a zabraòte tomu,
aby se pøibliovaly kzaøízení bìhem pracího cyklu.
Bìhem pracího cyklu mají dvíøka tendenci ohøát se.
Vpøípadì potøeby pøemísujte praèku ve dvou
nebo ve tøech a vìnujte celé operaci maximální
pozornost. Nikdy se nepokouejte zaøízení
pøemísovat sami, je toti velmi tìké.
Pøed zahájením vkládání prádla zkontrolujte, zda
je buben prázdný.
Likvidace
Likvidace obalových materiálù:
pøi jejich odstranìní postupujte vsouladu
smístním pøedpisy a dbejte na monou recyklaci.
Evropská smìrnice 2002/96/ES o odpadu
tvoøeném elektrickými a elektronickými zaøízeními
pøedpokládá, e se elektrospotøebièe nesmí
likvidovat vrámci bìného pevného mìstského
odpadu. Vyøazená zaøízení musí být sesbírána
zvlá, aby se zvýilo mnoství recyklovaných a
znovu pouitých materiálù, ze kterých jsou
sloena, a aby se zabránilo moným ublíením na
zdraví a kodám na ivotním prostøedí. Symbolem
je pøekrtnutý ko, uvedený na vech výrobcích
scílem pøipomenout povinnosti spojené se
separovaným sbìrem.
Podrobnìjí informace týkající se správného
zpùsobu vyøazení elektrospotøebièù zprovozu
mohou jejich dritelé získat tak, e se obrátí na
navrenou veøejnou instituci nebo na prodejce.
Jak uetøit a brát ohled na ivotní prostøedí
etøení pracími prostøedky, vodou, energií a èasem
Aby nedocházelo kplýtvání, je tøeba pouívat zaøízení
splnou náplní. Jedna plná náplò ve srovnání se dvìma
polovièními umoòuje uetøit a 50% energie.
Aplikací pøísluného prostøedku proti skvrnám nebo
namoèením tìchto skvrn pøed zahájením praní je
moné vyhnout se praní pøi vysokých teplotách.
Správné dávkování pracího prostøedku sohledem na
tvrdost vody, stupeò zneèitìní a mnoství praného
prádla zabraòuje plýtvání a chrání ivotní prostøedí: i
kdy se jedná o biodegradabilní látky, prací
prostøedky naruují pøirozenou rovnováhu vpøírodì.
Snate se co nejvíce vyhnout pouití aviváe.
Praní vpodveèer nebo brzy ráno napomáhá nií
zátìi firem zabývajících se výrobou energie.
Systém zachycování kapek
Zaøízení je vybaveno systémem zachycování kapek na
vnitøní stranì dvíøek, slouícím kzachycení pøípadných
zbytkových kapek vody pøi ukonèení cyklu.
Doporuèujeme pravidelnì kontrolovat úroveò vlhkosti
houby, která se nachází vzásuvce pro zachycování
kapek. Dle potøeby je moné ji vyèistit nebo
vymìnit; postupujte následovnì:
1. vytáhnìte zásuvku
mírným zatlaèením na její
spodní stranu.
2. vyjmìte houbu
nacházející se uvnitø,
opláchnìte ji pod tekoucí
vodou a dùkladnì ji
vydímejte. Je také
moné ji vymìnit za
jednu znáhradních hub
tvoøících souèást pøísluenství.
3. vrate houbu na pùvodní místo vzásuvce.
4. namontujte zásuvku zpìt na dvíøka a dbejte
pøitom, aby dolo ke správnému zasunutí pruin
nacházejících se na dvíøkách do pøísluných
uloení na zásuvce.
5. zkontrolujte, zda se dávkovaè správnì vejde do
svého uloení.

46
CZ
Údrba a péèe
Uzavøení pøívodu vody a vypnutí
elektrického napájení
Po kadém praní uzavøete pøívod vody. Tímto
zpùsobem dochází komezení opotøebení rozvodu
vody zaøízení a ke sníení nebezpeèí úniku vody.
Pøed zahájením èitìní zaøízení a bìhem operací
údrby je tøeba vytáhnout zástrèku pøívodního
kabelu ze zásuvky.
Èitìní zaøízení
Vnìjí èásti a èásti se mohou èistit hadrem
navlhèeným ve vlané vodì a saponátu. Nepouívejte
rozpoutìdla ani abrazivní látky.
Èitìní dávkovaèe pracích prostøedkù
Pøed vyjmutím dávkovaèe pracích prostøedkù
doporuèujeme zkontrolovat, zda se uvnitø nenacházejí
prací prostøedky nebo voda. Vpøípadì jejich
pøítomnosti dávejte pozor, aby se nedostaly ven
zdávkovaèe bìhem jeho vytahování.
Dávkovaè pracích prostøedkù této praèky je èitìn
automaticky bìhem pracích cyklù. Navzdory tomu je
vak moné, e se vnìm v ojedinìlých pøípadech
mohou vytvoøit nánosy. Pøi manuálním èitìní
dávkovaèe postupujte následovnì:
1. Otevøete dvíøka za
úèelem pøístupu
kdávkovaèi.
2. Vytáhnìte dávkovaè
smìrem nahoru, a to
tak, e jej uchopíte za
støední pøihrádku
zpùsobem znázornìným
na obrázku. Nechytejte
dávkovaè za møíku,
protoe by mohlo dojít
kjejímu pokození.
3. Odepnìte víko
dávkovaèe zpùsobem
znázornìným na
obrázku, abyste si
zajistili pøístup
kpøihrádce.
4. Umyjte dávkovaè pod
tekoucí vodou.
5. Znovu pøipnìte víko a
vlote dávkovaè a na
doraz do jeho uloení
uslyíte cvaknutí.
Péèe o dvíøka a buben
Dvíøka ponechte pokadé pootevøená, aby se
zabránilo tvorbì nepøíjemných zápachù.
Èitìní èerpadla
Souèástí praèky je samoèisticí èerpadlo, které
nevyaduje údrbu. Mùe se vak stát, e se vjeho
vstupní èásti, urèené kjeho ochranì a nacházející se
vjeho spodní èásti, zachytí drobné pøedmìty (mince,
knoflíky).
Ujistìte se, e prací cyklus byl ukonèen, a vytáhnìte
zástrèku ze zásuvky.
Pøístup ke vstupní èásti èerpadla:
1. odstraòte ochranný
kryt nacházející se ve
spodní èásti praèky jeho
otoèením proti smìru
hodinových ruèièek
(viz obrázek);
2. odroubujte víko jeho
otáèením proti smìru
hodinových ruèièek
(viz obrázek): vyteèení
malého mnoství vody je
zcela bìným jevem;
3. dokonale vyèistìte vnitøek;
4. nasaïte zpìt víko;
5. zaroubujte ochranný uzávìr jeho otáèením ve
smìru hodinových ruèièek a dbejte pøitom na to,
aby byla ipka vyznaèená na vnitøní stranì uzávìru
obrácena smìrem nahoru.
Kontrola pøítokové hadice na vodu
Stav pøítokové hadice je tøeba zkontrolovat alespoò
jednou roènì. Jsou-li na ní viditelné praskliny nebo
trhliny, je tøeba ji vymìnit: silný tlak pùsobící na
hadici bìhem pracího cyklu by mohl zpùsobit její
náhlé roztrení.
Nikdy nepouívejte ji pouité hadice.

CZ
47
Poruchy a zpùsob
jejich odstranìní
Mùe se stát, e zaøízení nebude fungovat. Døíve, ne zatelefonujete na servisní slubu (viz Servisní sluba),
zkontrolujte, zda se nejedná o problém, který lze snadno vyøeit spomocí následujícího seznamu.
Moné pøíèiny / Zpùsob jejich odstranìní:
Zástrèka není zasunuta vzásuvce nebo není zasunuta natolik, aby dolo ke
spojení kontaktù.
Vcelém domì je vypnutý proud.
Dvíøka nejsou øádnì zavøená.
Nebylo stisknuto tlaèítko ZAPNUTÍ/VYPNUTÍ.
Nebylo stlaèeno ádné z tlaèítek SPUTÌNÍ PROGRAMU (jetì stále blikají).
Nebyl otevøen kohout pøívodu vody.
Pøívodní hadice není pøipojena kvodovodnímu kohoutu.
Hadice je pøíli ohnutá.
Nebyl otevøen kohout pøívodu vody.
Vcelém domì je uzavøený pøívod vody.
Vrozvodu vody není dostateèný tlak.
Nebylo stlaèeno ádné z tlaèítek SPUTÌNÍ PROGRAMU (jetì stále blikají).
Vypoutìcí hadice se nachází mimo urèené rozmezí od 65 do 100 cm nad
zemí(viz Instalace).
Koncová èást vypoutìcí hadice je ponoøena ve vodì (viz Instalace).
Odpad ve stìnì není vybaven odvzduòovacím otvorem.
Kdy ani po uvedených kontrolách nedojde kodstranìní problému, zavøete kohout
pøívodu vody, vypnìte zaøízení a pøivolejte servisní slubu. Vpøípadì, e se byt
nachází na jednom znejvyích poschodí, je moné, e dochází ksifonovému
efektu, jeho následkem zaøízení nepøetritì napoutí a odèerpává vodu. Pro
odstranìní uvedeného efektu jsou vprodeji bìnì dostupné speciální protisifonové
ventily.
Vypoutìcí hadice je ohnutá (viz Instalace).
Odpadové potrubí je ucpáno.
Bìhem instalace nebyly odstranìny ochranné rouby slouící pro pøepravu.
Odmontujte rouby (viz Instalace).
Zaøízení není dokonale vyrovnáno do vodorovné polohy (viz Instalace).
Zaøízení je stlaèeno mezi nábytkem a stìnou (viz Instalace).
Pøítoková hadice není správnì pøipojena (viz Instalace).
Dávkovaè pracích prostøedkù je ucpán (zpùsob jeho vyèitìní je uveden v èásti
Údrba a péèe).
Vypoutìcí hadice není upevnìna pøedepsaným zpùsobem (viz Instalace).
Systém zachycování kapek je plný. Vyèistìte houbu nebo ji vymìòte
(viz Opatøení a rady)
Vypnìte zaøízení a vytáhnìte zástrèku ze zásuvky, vyèkejte pøiblinì 1 minutu a
opìtovnì jej zapnìte. Bude tøeba spustit cyklus od zaèátku.
Kdy porucha pøetrvává, obrate se na Servisní slubu.
Pouitý prací prostøedek není vhodný pro pouití vtomto zaøízení (musí
obsahovat oznaèení pro praní vpraèce, pro ruèní praní nebo pro praní v
praèce nebo podobné oznaèení).
Bylo pouito jeho nadmìrné mnoství.
Poruchy:
Praèku nelze zapnout.
Nedochází kzahájení pracího
cyklu.
Zaøízení nenapoutí vodu
(kontrolka SIGNALIZACE
ZABLOKOVÁNÍ DVÍØEK bliká
rychle).
Zaøízení nepøetritì napoutí a
odèerpává vodu.
Zaøízení neodèerpává vodu
nebo neodstøeïuje.
Bìhem odstøeïování je moné
pozorovat silné vibrace
zaøízení.
Ze zaøízení uniká voda.
Kontrolka SIGNALIZACE
ZABLOKOVÁNÍ DVÍØEK bliká
velmi rychle.
Dochází ktvorbì nadmìrného
mnoství pìny.

48
CZ
Servisní sluba
Pøed pøivoláním servisní sluby:
Zkontrolujte, zda nejste schopni poruchu odstranit sami (viz Poruchy a zpùsob jejich odstranìní);
Opìtovnì uveïte do chodu prací program, abyste ovìøili, zda byla porucha odstranìna;
Vpøípadì negativního výsledku se obrate na Servisní slubu nebo na specializovaný technický
personál.
Vpøípadì chybné instalace nebo nesprávného pouití mùete být poádáni o zaplacení servisního
zásahu.
Nikdy se neobracejte s ádostí o pomoc na techniky, kteøí nejsou k výkonu této èinnosti oprávnìni.
Pøi hláení poruchy uveïte:
druh poruchy;
model zaøízení (Mod.);
výrobní èíslo (S/N);
Tyto informace jsou uvedeny na títku súdaji, umístìném na zaøízení.

RO
49
Românã
Sumar
Instalare, 50-51
Dezambalare ºi punere la nivel
Racorduri hidraulice ºi electrice
Date tehnice
Descrierea maºinii de spãlat, 52-53
Sertar detergent cu autocurãþare
Panou de control
Sistem de echilibrare a încãrcãturii
Cum se desfãºoarã un ciclu de spãlare, 54
Programe de spãlare, 55
Detergenþi ºi rufe albe, 56
Pregãtirea rufelor
Recomandãri pentru spãlare
Precauþii ºi sfaturi, 57
Norme de protecþie ºi siguranþã generale
Scoaterea din uz a aparatului
Economisirea energiei ºi protecþia mediului
înconjurãtor
Sistem de colectare a picãturilor
Întreþinere ºi curãþare, 58
Excluderea apei ºi a curentului electric
Curãþarea maºinii de spãlat
Curãþarea sertarului pentru detergenþi
Întreþinerea uºii ºi a cuvei
Curãþarea pompei
Controlarea furtunului de alimentare cu apã
Anomalii ºi remedii, 59
Asistenþã, 60
RO
MAªINÃ DE SPÃLAT RUFE
SIXL 106
Instrucþiuni de folosire

50
RO
A
Instalare
Este important sã pãstraþi acest manual pentru a-l
putea consulta în orice moment. În caz de vânzare,
cesiune sau schimbare a locuinþei, acesta trebuie sã
fie înmânat împreunã cu maºina de spãlat, pentru a
informa noul proprietar cu privire la funcþionare ºi la
respectivele avertismente.
Citiþi cu atenþie instrucþiunile: veþi gãsi informaþii
importante cu privire instalare, folosire ºi la
siguranþã.
Dezambalare ºi punere la nivel
Dezambalare
1. Scoateþi maºina din ambalaj.
2. Controlaþi ca maºina de spãlat sã nu fi fost
deterioratã pe durata transportului. Dacã este
deterioratã, nu o racordaþi ºi luaþi legãtura cu
vânzãtorul.
3. Scoateþi cele 4
ºuruburi de protecþie
pentru transport ºi
cauciucul cu distanþierul
respectiv, situate în
partea posterioarã (a se
vedea figura).
4. Închideþi orificiile cu dopurile din plastic din dotare.
5. Pãstraþi toate piesele: în cazul în care maºina de
spãlat va fi transportatã, aceste piese vor fi montate
din nou.
Ambalajele nu sunt jucãrii pentru copii!
Punere la nivel
Maºina poate sã facã zgomot în timpul spãlãrii dacã
picioarele anterioare nu sunt reglate corect.
1. Instalaþi maºina de spãlat pe un paviment plan ºi
rigid, fãrã a o sprijini de ziduri, mobilã sau altceva.
2. Dacã pavimentul nu
este perfect orizontal,
compensaþi
neregularitãþile
deºurubând sau
înºurubând picioruºele
anterioare (a se vedea
figura); unghiul de
înclinare, mãsurat pe
planul de lucru, nu trebuie
sã depãºeascã 2°.
O nivelare precisã conferã stabilitate maºinii ºi evitã
vibraþiile, zgomotele ºi deplasarea acesteia în timpul
funcþionãrii. În cazul mochetelor sau covoarelor,
reglaþi picioruºele astfel încât sã menþineþi sub
maºina de spãlat un spaþiu suficient pentru ventilare.
Racorduri hidraulice ºi electrice
Racordarea furtunului de alimentare cu apã
1. Introduceþi garnitura A
pe furtunul de alimentare
ºi înºurubaþi-l la un
robinet de apã rece
(a se vedea figura).
Înainte de conectare,
lãsaþi apa sã curgã
pentru a se limpezi.
2. Racordaþi furtunul de
alimentare la maºina de
spãlat, înºurubându-l la
priza de apã, în partea
posterioarã, sus în
dreapta (a se vedea
figura).
3. Fiþi atenþi ca furtunul sã nu fie nici pliat, nici îndoit.
Presiunea apei de la robinet trebuie sã fie cuprinsã
în valorile din tabelul cu Date tehnice (a se vedea
pagina alãturatã).
Dacã lungimea furtunului de alimentare nu este
suficientã, adresaþi-vã unui magazin specializat sau
unui instalator autorizat.

RO
51
65 - 100 cm
Conectarea furtunului de evacuare
Conectaþi furtunul de
evacuare, fãrã a-l îndoi,
la o conductã sau la o
gurã de evacuare în zid,
situate între 65 ºi 100
cm de pãmânt;
sau sprijiniþi-l pe
marginea unei chiuvete
sau a unei cãzi, legând
elementul de ghidare la
robinet (a se vedea
figura). Extremitatea
liberã a furtunului de
evacuare nu trebuie sã
rãmânã cufundatã în
apã.
Nu se recomandã folosirea furtunurilor prelungitoare;
dacã este indispensabil, acestea trebuie sã aibã
acelaºi diametru ca ºi furtunul original ºi nu trebuie
sã depãºeascã 150 cm lungime.
Racordarea electricã
Înainte de a introduce ºtecherul în prizã, asiguraþi-vã ca:
_ priza sã fie cu împãmântare ºi conform
prevederilor legale;
_ priza sã poatã suporta sarcina maximã de putere
a maºinii, indicatã în tabelul cu Date tehnice (a se
vedea alãturi);
_ tensiunea de alimentare sã fie cuprinsã în valorile
indicate în tabelul cu Date tehnice (a se vedea
alãturi);
_ priza sã fie compatibilã cu ºtecãrul maºinii de
spãlat. În caz contrar înlocuiþi priza sau ºtecãrul.
Maºina de spãlat nu trebuie instalatã afarã, nici
chiar în cazul în care spaþiul este adãpostit,
deoarece expunerea maºinii la ploi ºi furtuni este
foarte periculoasã.
Dupã instalarea maºinii de spãlat, priza de curent
trebuie sã fie uºor accesibilã.
Nu folosiþi prelungitoare ºi prize multiple.
Cablul nu trebuie sã fie îndoit sau comprimat.
Cablul de alimentare trebuie sã fie înlocuit doar de
electricieni autorizaþi.
Atenþie! Firma îºi declinã orice responsabilitate în
cazul în care aceste norme nu se respectã.
Date tehnice
Model
SIXL 106
Dimensiuni
lãrgime: 59,5 cm
înãlþime: 85 cm
profunzime: 53,5 cm
Capacitate
de la 1 la 6 kg
Legãturi electrice
vezi eticheta cu caracteristicile tehnice,
aplicatã pe maºinã
Legãturi hidrice
presiune maximã: 1 MPa (10 bari)
presiune minimã: 0,05 MPa (0,5 bari)
capacitatea cuvei: 52 litri
Turaþia de
centrifugare
pânã la 1000 de rotaþii pe minut
Programe de control
în baza normei EN
60456
programul
;
efectuatã cu 6 kg de rufe.
Acest aparat este conform cu
urmãtoarele Directive Comunitare:
- 73/23/CEE din data de 19/02/73
(Tensiuni Joase) ºi modificãri succesive
- 89/336/CEE din data de 03/05/89
(Compatibilitate Electromagneticã) ºi
modificãri succesive
- 2002/96/CE
Zgomot
(dB(A) re 1 pW)
Spãlare: 66
Turaþia de centrifugare: 76

52
RO
PANOUL DE
COMANDÃ
UªÃ
PICIOARE REGLABILE
MÂNERUL
UªII
Sertar detergenþi, cu autocurãþare
Aceastã maºinã de spãlat este dotatã cu un sertar
inovativ de detergent, cu autocurãþare, pentru a
îmbunãtãþi calitatea spãlãrii.
Sertarul este amplasat în interiorul uºii.
1. Deschideþi uºa pentru a accesa sertarul de
detergenþi (a se vedea figura A).
2. Vãrsaþi detergentul sau aditivul în vase, deasupra
grãtarelor de protecþie, dupã cum urmeazã:
Vas
: detergent lichid sau aditiv lichid.
Vas
: detergent praf sau pastile, aditive praf.
Pentru a introduce pastilele, ridicaþi grãtarul de
protecþie de deasupra sertarului.
Vas
: balsam rufe.
Vãrsarea detergenþilor sau aditivilor lichizi în vasul
din mijloc poate cauza scurgerea nedoritã a acestor
produse.
MAX
MAX
UªA DE
ACCES LA
POMPA DE
EVACUARE
STOP
STOP
Puteþi controla nivelul de detergent uitându-vã pe
fereastra transparentã de pe sertar.
În interiorul vaselor
ºi sunt amplasate niºte
indicatoare plutitoare = IA LA@A= BECKH= *. Când
introduceþi cantitatea maximã de detergent/balsam,
indicatoarele se ridicã pânã la grãtarul de protecþie
de deasupra vaselor.
Se recomandã sã nu depãºiþi niciodatã nivelul
maxim indicat pe sertarul detergenþilor.
Se recomandã sã urmaþi întotdeauna
instrucþiunile de dozaj specificate pe cutiile cu
detergent. Anumite tipuri de detergent, mai
dense, trebuie sã fie turnate direct în cuva
maºinii de spãlat ºi nu în sertarul de detergent.
O cantitate excesivã de detergent nu implicã o
spãlare mai eficientã; pe de altã parte, excesul de
detergent cauzeazã poluarea majorã a mediului
înconjurãtor.
Depãºirea nivelului maxim indicat pe maºinã poate
determina scurgerea detergentului prin partea
inferioarã a sertarului.
Apa utilizatã în timpul spãlãrii va elimina eventualul
detergent în exces, din sertar. Totuºi, puteþi extrage
manual sertarul (a se vedea Întreþinere ºi curãþire).
Pentru a facilita dozarea detergentului, vã
recomandãm sã utilizaþi dozatorul special furnizat cu
maºina de spãlat.
Capacitatea maximã a sertarului este de:
- detergent lichid: 1 1/2 dopuri dozatoare
- detergent praf: 2 dopuri dozatoare
- balsam rufe: 1 dop dozator
AB
Descrierea maºinii de spãlat

RO
53
Tasta
PORNIRE/
OPRIRE
Indicator roºu
UªÃ
BLOCATÃ
Tasta PORNIRE/OPRIRE:
apãsaþi-o pentru a porni sau opri maºina.
Cu maºina pornitã, indicatoarele tastelor de
activare a programelor încep sã emitã un
semnal luminos intermitent, în timp ce
indicatoarele privind durata spãlãrii se aprind,
luminând fix.
Pentru a anula ciclul, þineþi apãsatã tasta de
pornire/oprire aproximativ 2 secunde, în timpul
desfãºurãrii ciclului de spãlare.
Indicatorul
va emite un semnal intermitent
câteva secunde în timp ce maºina va evacua
automat apa din cuvã.
Indicator roºu UªÃ BLOCATÃ:
dacã indicatorul este aprins, atunci uºa este
blocatã, în scopul de a împiedica deschiderea
accidentalã; pentru a evita eventuale daune, la
sfârºitul ciclului de spãlare sau în pauzã, aºteptaþi
ca indicatorul sã se stingã, înainte de a
deschide uºa. Durata de asteptare dupã
încheierea programului de spãlare este de
circa 2 minute.
Dacã indicatorul luminos UªÃ BLOCATà emite un
semnal intermitent rapid, înseamnã cã s-a produs o
anomalie (a se vedea Anomalii ºi remedii).
Taste ACTIVARE PROGRAM:
apãsaþi pentru a activa programul de spãlare ales.
- tastã cu semnal luminos stabil: program în curs de
desfãºurare.
- taste cu semnal luminos intermitent: în aºteptarea
unei alegeri.
Indicatoare
DURATA DE
SPÃLARE
Tasta
ACTIVARE
PROGRAM
RAPID 30
Tasta
ACTIVARE
PROGRAM
RUFE DELICATE
Tasta
ACTIVARE
PROGRAM RUFE
BUMBAC ALBE
Tasta
ACTIVARE PROGRAM
RUFE COLORATE
MIX CÃLCARE
UªOARÃ
Indicatoare DURATA DE SPÃLARE:
se aprind progresiv, pentru a vã indica desfãºurarea
programului de spãlare. La încheierea
programului, toate indicatoarele încep sã emitã
un semnal intermitent.
Pentru detalii ulterioare, consultaþi Cum se
desfãºoarã un ciclu de spãlare.
Sistemul de echilibrare a încãrcãturii
Pentru a evita vibrarea excesivã, înainte de
stoarcere, maºina va distribui cantitatea de rufe în
mod uniform, efectuând câteva rotaþii complete la o
turaþie mai mare decât turaþia de spãlare.
Dacã, dupã numeroase încercãri, maºina nu
reuºeºte sã echilibreze greutatea, stoarcerea rufelor
se va face la o turaþie mai micã decât cea prevãzutã
în program.
Dacã dezechilibrul este prea mare, maºina va
distribui greutatea în loc sã efectueze stoarcerea.
Aceste încercãri pot prelungi durata totalã a unui
ciclu cu maxim 10 minute.
Panoul de control

54
RO
Notã: Dupã instalare, înainte de folosire, efectuaþi
un ciclu de spãlare numai cu detergent, fãrã rufe,
selectând programul
.
1. PUNEREA ÎN FUNCÞIUNE A MAªINII se face
apãsând tasta PORNIRE/OPRIRE
. Simbolurile
tastelor ACTIVARE PROGRAM încep sã emitã un
semnal intermitent iar cele privind DURATA
SPÃLÃRII se aprind, luminând fix, ceea ce vã
indicã cã maºina este gata sã primeascã indicaþii/
sã accepte comenzi.
2. INTRODUCEREA RUFELOR. Deschideþi uºa
trãgând de mânerul corespunzãtor. Introduceþi
rufele în maºinã, fiind atenþi sã nu depãºiþi
cantitatea indicatã în tabelul de programe
(a se vedea pagina urmãtoare).
3. DOZAREA DETERGENTULUI ªI ADITIVILOR
Dozaþi detergentul turnându-l în vasul
corespunzãtor din sertarul de detergent, pânã la
nivelul indicat pe suprafaþa sertarului ºi pe
indicatoarele plutitoare; nu depãºiþi nivelul maxim.
Pentru detalii ulterioare, consultaþi Descrierea
maºinii de spãlat.
4. ÎNCHIDEÞI UªA.
5. ACTIVAÞI
PROGRAMUL DE
SPÃLARE apãsând
tasta de ACTIVARE
PROGRAM. Simbolul
corespunzãtor
programului ales se
aprinde (semnal stabil)
în timp ce indicatoarele
luminoase privind
durata de spãlare se sting. Indicatorul UªÃ
BLOCATÃ se aprinde (semnal stabil) ceea ce vã
indicã blocarea de siguranþã a uºii.
Pentru o descriere detaliatã a programelor de
spãlare disponibile, consultaþi Programe de
spãlare.
Procedura pentru activarea programului
pentru rufe DELICATE
este diferitã; consultaþi
indicaþiile referitoare la programul Delicate 30° din
pagina urmãtoare.
Pe durata desfãºurãrii programului, indicatoarele
referitoare la DURATA DE SPÃLARE se aprind
progresiv, pentru a vã indica fazele care s-au
efectuat deja.
Desenul alãturat se
referã la o situaþie în
care s-a efectuat 50%
dintr-un ciclu de spãlare.
La încheierea ciclului,
toate indicatoarele
DURATEI DE SPÃLARE
sunt aprinse, luminând
intermitent.
6. Puteþi SUSPENDA PROGRAMUL DE SPÃLARE
apãsând tasta de activare a programului;
indicatorul luminos va emite un semnal
intermitent. Dupã 2 minute se va stinge ºi
indicatorul UªÃ BLOCATà ceea ce vã aratã cã
puteþi deschide uºa.
Dacã doriþi sã mai adãugaþi detergent, fiþi atenþi ca
indicatorul plutitor care semnaleazã nivelul de
detergent MAX sã nu fie în poziþia de sus (limita
maximã).
Pentru a relua programul, închideþi uºa ºi apãsaþi
din nou tasta de pornire.
Pentru a vã garanta siguranþa maximã ºi a evita
scurgerea apei din maºinã, dacã în cuvã este o
cantitate excesivã de apã, deschiderea uºii este
blocatã (indicatorul UªÃ BLOCATà va rãmâne
aprins ºi dupã douã minute). Este necesar atunci
sã opriþi maºina apãsând 2 secunde tasta
PORNIRE/OPRIRE
ºi sã aºteptaþi evacuarea
automatã a apei.
7. ÎNCHEIEREA PROGRAMULUI
La încheierea programului de spãlare, simbolul
referitor la programul ales se va aprinde (semnal
stabil) în timp ce toate celelalte indicatoare
(pentru durata de spãlare) vor începe sã
emitã un semnal luminos intermitent.
Pentru a activa un ciclu nou de spãlare, trebuie sã
opriþi ºi sã porniþi din nou maºina, apãsând de 2
ori tasta PORNIRE/OPRIRE
.
Cum se desfãºoarã un ciclu
de spãlare

RO
55
ALBE BUMBAC 60°
Programul se referã la spãlarea tuturor rufelor din
bumbac, albe, rezistente. Temperatura de spãlare
ridicatã garanteazã obþinerea unor rezultate mai bune
la spãlare în clasa A.
COLORATE MIX 40° / CÃLCARE UªOARÃ
Acest program este pentru spãlarea rufelor colorate,
atât din bumbac cât ºi sintetice. Centrifuga este
controlatã pe parcursul ciclurilor de spãlare, în scopul
de a reduce formarea pliurilor ºi, în consecinþã, de a
facilita cãlcarea.
Este posibil sã spãlaþi împreunã atât rufele din bumbac
cât ºi cele sintetice.
DELICATE 30°
Cu acest program se pot spãla articolele din lânã sau
mãtase ºi, în general, toate articolele mai pretenþioase.
Având în vederea caracteristicile diferite ale
acestor articole, programul se activeazã diferit
faþã de celelalte programe:
+ CICLUL RUFE DELICATE CU CENTRIFUGÃ
FINALÃ (pentru articole din lânã): apãsaþi tasta
ACTIVARE PROGRAM RUFE DELICATE
. Dupã
circa 3 secunde, tastele ACTIVARE PROGRAM
RUFE DELICATE
ªI ACTIVARE PROGRAM
RAPID
încep sã emitã un semnal intermitent.
Apãsaþi din nou tasta ACTIVARE PROGRAM RUFE
DELICATE
pentru a efectua spãlarea, care se
încheie cu un ciclu de stoarcere delicatã. Acest
program a fost special conceput ºi are la bazã rotaþii
lente ale cuvei, pentru a elimina apa din þesãturã dar ºi
pentru a elimina deteriorãrile acesteia, ceea ce
contribuie la protejarea articolelor dvs din lânã.
+ CICLUL RUFE DELICATE FÃRÃ CENTRIFUGÃ
(pentru articolele din mãtase, vâscozã ºi pentru
spãlarea perdelelor; a nu se utiliza per spãlarea
articolelor din lânã ): apãsaþi tasta ACTIVARE
PROGRAM RUFE DELICATE
. Dupã circa 3
secunde tastele ACTIVARE PROGRAM RUFE
DELICATE
ªI ACTIVARE PROGRAM RAPID
încep sã emitã un semnal intermitent. Apãsaþi
tasta ACTIVARE PROGRAM RAPID
pentru a
efectua spãlarea fãrã ciclul de stoarcere finalã. La
încheierea ciclului, maºina va evacua apa din cuvã în
mod automat. Vã recomandãm sã scoateþi imediat
articolele din maºina de spãlat, pentru a evita formarea
excesivã a pliurilor.
RAPID 30 / NUMAI CLÃTIRE
Cu acest program puteþi spãla în numai 30 de minute
toate articolele din bumbac sau sintetice, puþin
murdare, sau care au pe etichetã indicaþia a se spãla
la 30°
. Tot cu acest program puteþi efectua ºi
clãtirea articolelor din bumbac sau sintetice spãlate cu
mâna (cu excepþia articolelor din lânã sau mãtase).
Graþie senzorilor speciali, maºina de spãlat rufe
este capabilã de a detecta detergentul din rufe:
- dacã rufele nu prezintã detergent se va efectua un
ciclu de spãlare RAPID 30';
- dacã rufele prezintã detergent (articole spãlate separat, cu
mâna) se va efectua un ciclu numai de NUMAI CLÃTIRE.
COMANDAREA AUTOMATÃ A CLÃTIRII
Funcþia de clãtire este controlatã, indiferent de
programul ales, cu ajutorul unor senzori speciali. Dacã
articolele, la încheierea spãlãrii, prezintã prea
mult detergent, faza de clãtire se va prelungi
pânã la eliminarea completã a detergentului. În
acest caz, durata programului de spãlarea poate
depãºi durata indicatã în tabelul de programe.
*Notã: pentru informaþii detaliate privind excluderea centrifugei din programul pentru rufe delicate, consultaþi
instrucþiunile de la paragraful Delicate 30°, de mai jos.
**Notã: pentru informaþii detaliate privind clãtirea cu apã rece a rufelor spãlate cu mâna, consultaþi
instrucþiunile de la paragraful Rapid 30'/Numai Clãtire de mai jos.
Durata programelor, specificatã în tabel, este indicativã; calculul a fost efectuat luând în considerare o cantitate de rufe intermediarã.
Programe de spãlare
Tasta
Þesut/Material
Sarcina
Max.
(Kg)
Temperaturã
Centrifugã
(rotaþii pe
minut)
Durata
ciclului
(minute)
Descrierea ciclului de spãlare
ALBE BUMBAC
Bumbac alb rezistent 6 60°C 1000 145
Spãlare, clãtiri, centrifugã
intermediarã ºi finalã
COLORATE MIX / CÃLCARE UªOARÃ
Bumbac ºi sintetice
colorate
4,5 40°C 1000 80
Spãlare, clãtiri ºi centrifugã
delicatã
DELICATE
Lânã (centrifugã
finalã delicatã)
1,5 30°C 600 50
Spãlare, clãtiri ºi centrifugã
delicatã
Mãtase ºi perdele
(fãrã centrifugãfinalã)
1,5 30°C nu* 50 Spãlare, clãtiri, evacuare apã
RAPID / NUMAI CLÃTIRE
Bumbac ºi sintetice 3
30°/apã
rece**
800 30
Spãlare (dacã este activat
programul de spãlare RAPID),
clãtiri, centrifugã delicatã
+
+

56
RO
Recomandãri pentru spãlare
Pentru lenjeria de pat ºi seturile de baie
(cearceafuri, prosoape, halate, etc): utilizaþi
programul RUFE BUMBAC ALBE 60°
care
garanteazã obþinerea unor rezultate mai
performante la spãlare în clasa A. Centrifuga
intensivã permite eliminarea eficientã a excesului
de apã.
Pentru alte articole de bumbac, albe
(cãmãºi, tricouri, feþe de masã, etc): utilizaþi
programul RUFE ALBE BUMBAC 60°. Dacã
articolele prezintã pete dificile, este
recomandabilã pretratarea rufelor cu sãpun
lichid, înainte de începerea ciclurilor de spãlare.
Pentru articolele colorate, de bumbac
(cãmãºi, tricouri, lenjerii, etc): utilizaþi
programul RUFE COLORATE MIX 40°
, care
permite obþinerea celor mai bune rezultate la
spãlare, fãrã a altera culorile. Centrifuga, graþie
funcþiei CÃLCARE UªOARÃ de care dispune,
reduce formarea pliurilor la încheierea spãlãrii,
facilitând cãlcarea. Se recomandã folosirea unui
detergent lichid.
Pentru articolele sintetice, albe sau colorate
(cãmãºi, tricouri, lenjerii, etc): utilizaþi
programul RUFE COLORATE MIX 40°
. Nu
amestecaþi rufele albe cu cele colorate ci spãlaþi-
le separat, pentru a evita pãtarea. Se recomandã
folosirea unui detergent lichid.
Pentru articolele colorate, din bumbac sau
material sintetic, care au pe etichetã indicaþia
a se spãla la 30°
: utilizaþi programul RAPID
30
. Temperatura redusã de spãlare protejeazã
culorile. Se recomandã folosirea unui detergent
lichid.
Pentru articolele din lânã (pulovere, eºarfe,
etc): utilizaþi programul rufe DELICATE 30° cu
centrifugã finalã
+ . Rotaþia cuvei în timpul
spãlãrii precum ºi centrifuga finalã, delicatã,
reduc întãrirea þesãturii. Se recomandã
detergenþii speciali pentru lânã. Nu se recomandã
depãºirea cantitãþii maxime de rufe.
Pentru articolele din mãtase (cãmãºi,
lenjerie de corp, etc): utilizaþi programul rufe
DELICATE 30° fãrã centrifugã
+ . Încercaþi sã
nu lãsaþi prea mult rufele în maºinã, dupã
spãlare, pentru a evita formarea excesivã a
pliurilor.
Pentru perdele: utilizaþi programul rufe DELICA-
TE 30° fãrã centrifugã
+ . Împãturiþi perdelele
ºi introduceþi-le într-o faþã de pernã sau într-un
sac-plasã. Spãlaþi-le separat, fiind atenþi sã nu
depãºiþi cantitatea maximã admisã.
Cât cântãresc rufele?
1 cearceaf: 400-500 g.
1 faþã de pernã: 150-200 g.
1 faþã de masã: 400-500 g.
1 halat de baie: 900-1.200 g.
1 prosop: 150-250 g.
1 jeans: 400-500 g.
1 cãmaºã: 150-200 g.
Detergenþi ºi rufe albe
Pregãtirea rufelor
_ Subdivizaþi rufele în funcþie de:
- tipul de þesãturã / simbolul de pe etichetã.
- culori: separaþi rufele colorate de cele albe.
_ Goliþi buzunarele ºi controlaþi nasturii.
_ Nu depãºiþi cantitatea maximã admisã, indicatã în
Programe de spãlare.

RO
57
Precauþii ºi sfaturi
2
1
Maºina de spãlat a fost proiectatã ºi construitã
conform normelor internaþionale de siguranþã. Aceste
avertizãri sunt furnizate din motive de siguranþã ºi
trebuie sã fie citite cu atenþie.
Norme de protecþie ºi siguranþã generale
_ Acest aparat a fost conceput exclusiv pentru
utilizarea în locuinþe.
_ Maºina de spãlat trebuie sã fie folositã doar de
persoane adulte, care respectã instrucþiunile din
acest manual.
_ Nu atingeþi maºina când sunteþi desculþi sau cu
mâinile sau picioarele ude sau umede.
_ Nu scoateþi ºtecherul din prizã trãgând de cablu.
_ Nu atingeþi apa provenitã din evacuare: poate
atinge o temperaturã ridicatã.
_ Nu forþaþi în nici un caz uºa: s-ar putea deteriora
mecanismul de siguranþã care protejeazã
împotriva deschiderii accidentale.
_ În cazul defecþiunilor, nu interveniþi în nici un caz
în mecanismele din interior ºi nu încercaþi sã o
reparaþi singuri maºina.
_ Controlaþi mereu ca în apropierea maºinii aflate în
funcþiune sã nu se afle copii.
_ Pe durata spãlãrii, uºa are tendinþa de a se încãlzi.
_ Dacã trebuie sã fie deplasatã, apelaþi la alte douã
sau trei persoane ºi procedaþi cu maximã atenþie.
Niciodatã nu deplasaþi maºina singuri deoarece
aceasta este foarte grea.
_ Înainte de a introduce rufele, controlaþi ca ºi cuva
sã fie goalã.
Scoaterea din uz a aparatului
_ Eliminarea ambalajelor:
respectaþi normele locale, în acest fel ambalajele
vor putea fi utilizate din nou.
_ Directiva Europeanã 2002/96/CE cu privire la
deºeurile care provin de la aparatura electricã sau
electronicã prevede ca aparatele electrocasnice
sã nu fie colectate împreunã cu deºeurile urbane
solide, obiºnuite. Aparatele scoase din uz trebuie
sã fie colectate separat atât pentru a optimiza
rata de recuperare ºi de reciclare a materialelor
componente cât ºi pentru a evita pericolele care
pot duce la dãunarea sãnãtãþii omului sau poluarea
mediului înconjurãtor. Simbolul tomberonului tãiat
care apare pe toate produsele vã aminteºte
tocmai obligaþia de a le colecta separat.
Pentru informaþii suplimentare cu privire la
scoaterea din uz a electrocasnicelor, deþinãtorii
acestora pot apela la centrele de colectare a
deºeurilor sau la vânzãtorii de la care au
achiziþionat produsele respective.
Economisirea energiei ºi protecþia
mediului înconjurãtor
Economisirea de detergent, apã, energie ºi timp
_ Pentru a nu risipi resurse, este necesar sã
încãrcaþi maºina de spãlat la maxim. Acest lucru
vã permite sã economisiþi pânã la 50% din energie.
_ Tratând petele cu o substanþã pentru îndepãrtarea
acestora ºi lãsându-le la înmuiat înainte se
spãlare, se evitã spãlarea la temperaturi mari.
_ Dozaþi bine detergentul în funcþie de duritatea apei,
de gradul de murdãrie ºi de cantitatea de rufe,
pentru a evita risipe ºi pentru a proteja mediul
înconjurãtor: deºi sunt biodegradabili, detergenþii
conþin elemente care altereazã echilibrul naturii.
Evitaþi pe cât posibil balsamul de rufe.
_ Spãlând dupã-amiaza/seara sau dimineaþa
devreme colaboraþi la reducerea consumului
energetic.
Sistem de colectare picãturi
Maºina este dotatã cu un sistem de colectare a
picãturilor amplasat pe interiorul uºii, pentru a
captura eventualele picãturi de apã care rãmân dupã
încheierea unui ciclu.
Vã recomandãm sã verificaþi periodic nivelul de
umiditate/îmbibarea buretelui din sertarul de
colectare a picãturilor. În caz de necesitate, curãþaþi-
l sau înlocuiþi-l astfel:
1. extrageþi sertarul,
apãsând uºor pe partea
de jos a acestuia.
2. extrageþi buretele din
sertar, clãtiþi-l sub un jet
de apã curatã ºi
stoarceþi-l bine. Puteþi
înlocui buretele cu unul
de rezervã, din dotare.
3. introduceþi din nou buretele în sertar.
4. montaþi la loc sertarul pe uºã, având grijã ca
arcurile de pe uºã sã fie introduse în mod
corect în locaºurile prevãzute în sertar.
5. verificaþi ca sertarul sã intre corect în locaº.

58
RO
Întreþinere ºi curãþare
Excluderea apei ºi a curentului electric
_ Închideþi robinetul de apã dupã fiecare spãlare:
Se limiteazã astfel deteriorarea instalaþiei
hidraulice a maºinii de spãlat ºi se eliminã
pericolul scurgerilor.
_ Scoateþi ºtecherul din priza de curent atunci
când curãþaþi maºina de spãlat ºi când se
efectueazã lucrãri de întreþinere.
Curãþarea maºinii de spãlat
Partea externã ºi pãrþile din cauciuc pot fi curãþate
cu o cârpã înmuiatã în apã cãlduþã ºi sãpun. Nu
folosiþi solvenþi sau substanþe abrazive.
Curãþarea sertarului pentru detergenþi
Vã recomandãm ca înainte de extragerea
sertarului de detergent sã verificaþi dacã în acesta
nu existã nici detergent, nici apã. În caz contrar,
fiþi atenþi la manipularea sertarului: apa sau
detergentul se pot scurge pe jos.
Sertarul de detergenþi al acestei maºini de spãlat
se curãþã automat, pe durata desfãºurãrii ciclurilor
de spãlare. Rareori, în funcþie de detergentul
folosit, este posibil sã se depunã, în sertar, câteva
reziduuri. Pentru a curãþa manual sertarul,
procedaþi astfel:
1. Deschideþi uºa
maºinii pentru a avea
acces la sertar.
2. Extrageþi sertarul
ridicându-l uºor;
prindeþi-l de vasul din
mijloc, aºa cum este
indicat în figura. Nu
trageþi de grãtar, pentru
a nu-l deteriora.
3. Îndepãrtaþi capacul
sertarului pentru a avea
acces la vase, aºa cum
vã aratã figura.
4. Spãlaþi sertarul sub
un jet de apã.
5. Aplicaþi capacul ºi
introduceþi sertarul la
loc, împingând pânã
când veþi auzi un
zgomot de prindere.
Întreþinerea uºii ºi a cuvei
_ Lãsaþi mereu uºa întredeschisã pentru a evita
formarea unui miros urât.
Curãþarea pompei
Maºina de spãlat este dotatã cu o pompã de auto-
curãþare, care nu necesitã întreþinere. Se poate
întâmpla însã ca unele obiecte mici (monede,
nasturi) sã cadã în anticamera care protejeazã
pompa, situatã în partea inferioarã a acesteia.
Verificaþi ca ciclul de spãlare sã fie încheiat ºi
scoateþi ºtecherul din prizã.
Pentru a avea acces la anticamerã:
1. îndepãrtaþi protecþia
din partea de jos a
maºinii de spãlat, rotind-
o în sens antiorar (a se
vedea figura);
2. deºurubaþi capacul
rotindu-l în sens antiorar
(a se vedea figura). este
normal sã curgã puþinã
apã;
3. curãþaþi cu grijã interiorul;
4. înºurubaþi la loc capacul;
5. înºurubaþi la loc capacul rotindu-l în sens orar,
având grijã ca sãgeata imprimatã pe partea
interioarã a capacului sã fie îndreptatã în sus.
Controlarea furtunului de alimentare cu
apã
Controlaþi furtunul de alimentare cel puþin o datã pe
an. Dacã prezintã crãpãturi sau fisuri, trebuie
înlocuit: pe parcursul spãlãrilor, presiunea puternicã
ar putea provoca crãpãturi neaºteptate.
Nu folosiþi niciodatã furtunuri uzate.

RO
59
Anomalii ºi remedii
Se poate întâmpla ca maºina de spãlat sã nu funcþioneze. Înainte de a apela serviciul de Asistenþã (a se vedea
Asistenþa), verificaþi dacã existã o problemã uºor de rezolvat:
Cauze posibile / Soluþii:
ªtecherul nu este introdus în prizã, sau nu face contact.
În casã nu este curent electric.
Uºa nu este bine închisã.
Tasta PORNIRE/OPRIRE nu a fost apãsatã.
Tastele ACTIVARE PROGRAM nu au fost apãsate (emit semnale
intermitente).
Robinetul de apã este închis.
Furtunul de alimentare cu apã nu este racordat la robinet.
Furtunul este îndoit.
Robinetul de apã nu este deschis.
Apa la domiciliul dvs. este opritã.
Apa nu are presiune suficientã.
Tastele ACTIVARE PROGRAM nu au fost apãsate (emit semnale intermitente).
Furtunul de evacuare nu a fost instalat la o distanþã cuprinsã între 65 ºi
100 cm de pãmânt (a se vedea Instalare).
Capãtul furtunului de evacuare este cufundat în apã (a se vedea Instalare).
Racordul din perete nu are valvã de suprapresiune pentru evacuarea aerului.
Dacã, dupã aceste verificãri problema nu se rezolvã, închideþi robinetul de
apã, opriþi maºina de spãlat ºi chemaþi Asistenþa. Dacã locuinþa se aflã la
ultimele etaje ale unui edificiu, este posibil sã aibã loc fenomene de
sifonare, motiv pentru care maºina de spãlat încarcã ºi evacueazã apã
continuu. Pentru a elimina acest inconvenient, se gãsesc în comerþ
supape anti-sifonare.
Furtunul de evacuare este îndoit (a se vedea Instalare).
Conducta de evacuare este înfundatã.
ªuruburile de protecþie pe durata transportului nu au fost îndepãrtate, în
momentul instalãrii. Scoateþi ºuruburile (a se vedea Instalare).
Maºina de spãlat este înclinatã (a se vedea Instalare).
Maºina de spãlat este înghesuitã între mobilã ºi zid (a se vedea Instalare).
Furtunul de alimentare cu apã nu este bine înºurubat (a se vedea Instalare).
Sertarul detergenþilor este înfundat (pentru a-l curãþa, a se vedeaÎntreþinere
ºi curãþare).
Furtunul de evacuare nu este bine fixat (a se vedea Instalare).
Bazinul de colectare a picãturilor este plin. Curãþaþi buretele sau
înlocuiþi-l (a se vedea Precauþii ºi sfaturi).
Opriþi maºina ºi scoateþi ºtecherul din prizã; aºteptaþi aprox. 1 minut
înainte de a o reporni. Va fi necesar sã porniþi ciclul de la început.
Dacã anomalia persistã, apelaþi la Centrul de Service pentru asistenþã.
Detergentul nu este compatibil cu maºina de spãlat (trebuie sã fie scris
pentru maºina de spãlat, de mânã sau în maºina de spãlat, sau ceva
asemãnãtor).
Dozajul a fost excesiv.
Anomalii:
Maºina nu porneºte.
Ciclul de spãlare nu porneºte.
Maºina nu se umple cu apã
(Indicatorul UªÃ BLOCATà emite
un semnal rapid, intermitent).
Maºina de spãlat încarcã ºi
descarcã apã în mod continuu.
Maºina de spãlat nu evacueazã
apa sau nu stoarce.
Maºina de spãlat vibreazã foarte
mult pe durata stoarcerii.
Maºina de spãlat pierde apã.
Indicatorul UªÃ BLOCATà emite
un semnal intermitent, rapid.
Se formeazã prea multã spumã.

60
RO
Asistenþã
Înainte de a lua legãtura cu Serviciul de Asistenþã:
Verificaþi dacã puteþi remedia singuri anomalia (a se vedea Anomalii ºi remedii);
Porniþi din nou programul pentru a controla dacã inconvenientul a fost eliminat;
În caz contrar, apelaþi Serviciul de Asistenþã Autorizat.
Dacã instalarea nu a fost fãcutã în mod corespunzãtor sau dacã aþi utilizat maºina în mod
incorect, este posibil ca plata intervenþiei sã cadã în responsabilitatea dvs.
Nu apelaþi niciodatã la persoane neautorizate.
Comunicaþi:
tipul de anomalie;
modelul maºinii (Mod.);
numãrul de serie (S/N);
Aceste informaþii se gãsesc pe eticheta cu caracteristici lipitã pe aparat.
195061572.00
02/2007 - Xerox Business Services
-
 1
1
-
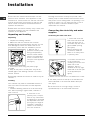 2
2
-
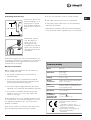 3
3
-
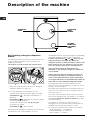 4
4
-
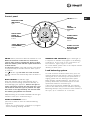 5
5
-
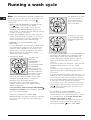 6
6
-
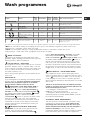 7
7
-
 8
8
-
 9
9
-
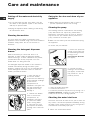 10
10
-
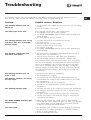 11
11
-
 12
12
-
 13
13
-
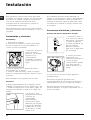 14
14
-
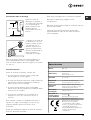 15
15
-
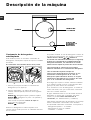 16
16
-
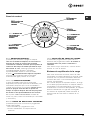 17
17
-
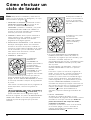 18
18
-
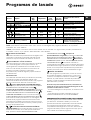 19
19
-
 20
20
-
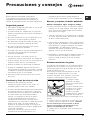 21
21
-
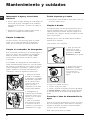 22
22
-
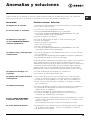 23
23
-
 24
24
-
 25
25
-
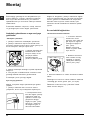 26
26
-
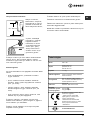 27
27
-
 28
28
-
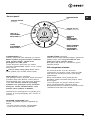 29
29
-
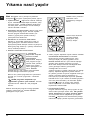 30
30
-
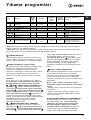 31
31
-
 32
32
-
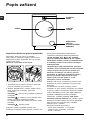 33
33
-
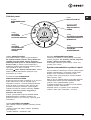 34
34
-
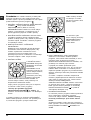 35
35
-
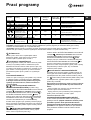 36
36
-
 37
37
-
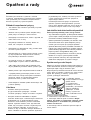 38
38
-
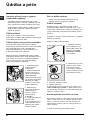 39
39
-
 40
40
-
 41
41
-
 42
42
-
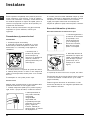 43
43
-
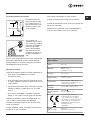 44
44
-
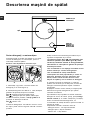 45
45
-
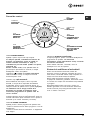 46
46
-
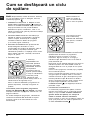 47
47
-
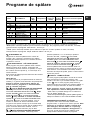 48
48
-
 49
49
-
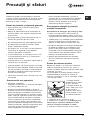 50
50
-
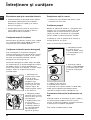 51
51
-
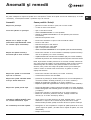 52
52
-
 53
53


Whirlpool SIXL 106 (EU) Guía del usuario
- Categoría
- Lavadoras
- Tipo
- Guía del usuario
- Este manual también es adecuado para