
VANITY COMBO
COMBO DE TOCADOR
USE AND CARE GUIDE
GUÍA DE USO Y CUIDADO
Questions, problems, missing parts? Before returning to the store,
please call Customer Service.
Preguntas, problemas, partes faltantes? Antes de regresar a la tienda,
favor de llamar a Servicio al Cliente.
(USA) 1-855-HDGLACIER
(MX) 01-800-004-6633
HOMEDEPOT.COM/GLACIERBAY
Importado en México por: Wood Crafters México Holding, S. de R.L. de C.V.
Carretera a Matamoros Km. 114 SN 8-A La Paz Tamaulipas 88990
R.F.C. WCM080125835 | Tel. (899) 932-01-70

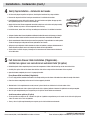
Safety Information - Información de seguridad
HOMEDEPOT.COM/GLACIERBAY
Please contact (USA) 1-855-HDGLACIER for further assistance. Favor de llamar al (MX) 01-800-004-6633 para más asistencia.
2
To ensure that your installation goes smoothly, please read these instructions thoroughly prior to starting.
Para asegurar que la instalación de sus gabinetes se lleve a cabo correctamente, por favor lea estas instrucciones minuciosamente antes
de comenzar.
DANGER: Failure to follow warnings and cautions could result in serious injury. Do not exceed the maximum load capacity. Do not
stand on cabinet. Use cabinet on level ground.
PELIGRO: No seguir las advertencias puede causar lesiones graves. No exceda la capacidad máxima del mueble. No es para
subirse a él. Use un piso nivelado.
WARNING: Base cabinet supports a maximum weight of 200 lbs. Exceeding maximum weight limit will compromise the integrity
of the cabinet structure and could cause the cabinet to fail.
ADVERTENCIA: El gabinete soporta un máximo peso de 90.7 kg, exceder este peso comprometerá la integridad de la estructura
del gabinete y puede causar que el gabinete se desplome.
CAUTION: Do not hang from the cabinet.
PRECAUCIÓN: No se cuelgue del gabinete.
WOOD DUST MAY CAUSE LUNG, UPPER RESPIRATORY TRACT, EYE AND
SKIN IRRITATION. SOME WOOD SPECIES MAY CAUSE DERMATITIS
AND/OR RESPIRATORY ALLERVIC EFFECTS. THE INTERNATIONAL AGENCY
FOR RESEARCH ON CANCER (IARC) HAS CLASSIFIED WOOD DUST AS A
NASAL CARCINOGEN IN HUMANS.
• Avoid dust contact with ignition source.
• Avoid prolonged or repeated breathing of wood dust in air.
• Avoid dust contact with eyes and skin.
• First Aid: If inhaled, remove to fresh air. In case of contact, flush eyes
and skin with water. If irritation persists, call a physician.
WARNING: Modifications to this product can release wood dust, a substance known to the State of California to cause cancer.
ADVERTENCIA:
Las modificaciones a este producto pueden producir aserrín, una sustancia que el estado de California reconoce
como causante de cáncer.
SAWING, SANDING OR MACHINING WOOD PRODUCTS CAN PRODUCE WOOD DUST WHICH CAN CAUSE A FLAMMABLE OR EXPLOSIVE HAZARD.
SERRUCHAR, LIJAR O TRABAJAR PRODUCTOS DE MADERA, PUEDE PRODUCIR ASERRÍN, LO CUAL REPRESENTA UN RIESGO DE INCENDIO
O EXPLOSIÓN.
Wood Dust Caution! - ¡Precaución sobre el aserrín!
EL ASERRÍN EN EL AIRE PUEDE CAUSAR IRRITACIÓN EN LOS PULMONES, EL
TRACTO RESPIRATORIO SUPERIOR, LOS OJOS Y LA PIEL. CIERTOS TIPOS DE
MADERA PUEDEN CAUSAR DERMATITIS Y/O REACCIONES ALÉRGICAS QUE
AFECTEN LA RESPIRACIÓN. LA AGENCIA INTERNACIONAL PARA LA
INVESTIGACIÓN DEL CÁNCER (IARC, EN INGLÉS) HA CLASIFICADO EL
ASERRÍN COMO UN CARCINÓGENO NASAL EN HUMANOS.
• Evita que el aserrín entre en contacto con materiales que puedan
incendiarse.
• Evita la exposición prolongada o repetida a ambientes donde haya aserrín
en el aire.
• Evita el contacto del aserrín con los ojos o la piel.
• Primeros auxilios: En caso de inhalación, busca un lugar con aire fresco.
En caso de contacto con los ojos o la piel, enjuaga con agua. Si la irritación
persiste, busca atención médica.
For California Customers Only - Sólo para clientes de California

Pre-Installation - Preinstalación
Installation - Instalación
HOMEDEPOT.COM/GLACIERBAY
Please contact (USA) 1-855-HDGLACIER for further assistance. Favor de llamar al (MX) 01-800-004-6633 para más asistencia.
3
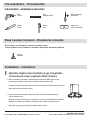
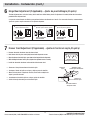
Drill
Taladro
Level
Nivelador de gota
Phillips screwdriver
Desarmador
Wrench
Llave
Silicone
Silicón
TOOLS REQUIRED - HERRAMIENTAS NECESARIAS
Safety glasses
Lentes de seguridad
1
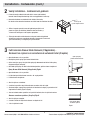
Adjustable Height Levelers Installation (Legs) (If Applicable) -
Instrucción para nivelar el gabinete (Patas) (Si aplica)
¨ Make sure the base of the vanity is leveled by laying a level (not included) across the top.
If adjustment is needed use base levelers located in a plastic bag within vanity.
To lower the cabinet turn levelers clock wise or to rise the cabinet turn levelers counter clock wise.
Adjust until level across the top is leveled.
¨ Coloque el nivelador de gota (no incluido) en el lavabo, si no queda la burbuja centrada
siga los siguientes pasos.
Ajuste los niveladores de tornillo que se encuentran en una bolsa de plastico dentro del gabinete,
girándolos en sentido de las manecillas del reloj para bajar o gírelos en contra para subir.
Ajuste hasta que logre que la burbuja del nivelador quede centrada.
Base Levelers Included - Niveladores incluidos
Levelers
Niveladors
Base levelers are included in a plastic bag within vanity.
Los niveladores están incluidos en una bolsa de plástico dentro del gabinete.

Installation - Instalación (cont.)
HOMEDEPOT.COM/GLACIERBAY
Please contact (USA) 1-855-HDGLACIER for further assistance. Favor de llamar al (MX) 01-800-004-6633 para más asistencia.
4
3
Full Extension Drawer Glide Removal (If Applicable) -
Remover los cajones con correderas de extensión total (Si aplica)
Fig.#1
Fig.#2
left spring clip
pestaña del lado izquierdo
right spring clip
pestaña del lado derecho
epoxy drawer glides
correderas epóxicas
¨ Open the drawer as far as possible.
¨ Identify the plastic spring clips located in both slides.
¨ At the same time, press the right slide spring clip downward and the left slide spring
clip upward (Fig.#1 & Fig.#2).
¨ Once both spring clips are held in the indicated position, pull the drawer straight out.
Epoxy Drawer Glide Removal (If Applicable) Fig.#3
¨ Open the drawer as far as possible.
¨ Lift the front part of the drawer to reach a 30º angle position.
¨ Pull the drawer straight out.
¨ Abrir el cajón en su totalidad.
¨ Localizar las pestañas de plástico ubicadas en ambos rieles del cajón.
¨ Al mismo tiempo, empujar la pestaña del riel derecho hacia abajo y la pestaña del riel
izquierdo hacia arriba (Fig.#1 & Fig.#2).
¨ Una vez teniendo ambas pestañas en la posición indicada, tirar el cajón hacia afuera.
Remover correderas epóxicas (Si aplica) Fig.#3
¨ Abrir el cajón por completo.
¨ Levante el frente del cajón hasta alcanzar un ángulo de 30°.
¨ Jale el cajón hacia usted.
2
back top rail
soporte superior trasero
Vanity Installation - Instalación del gabinete
¨ Fasten the vanity cabinet to the wall with 2 screws (not included)
into wall studs through the back top rail or use toggle bolts if necessary.
¨ Decorative hardware are attached to the inside of the vanity.
Re-attach so the decorative hardware are visible from the outside of the doors.
¨ Utilice el soporte superior trasero del gabinete para fijarlo a la
pared con 2 pijas (no incluídas). Atornille sobre los barrotes y
si fuera necesario haga uso de taquetes apropiados.
¨ El herraje decorativo están colocadas en la parte interior del gabinete
de baño para evitar que se maltraten durante el transporte. Es necesario
que las desatornille y se coloquen por la parte exterior.
Fig.#3

Installation - Instalación (cont.)
4
Vanity Top Installation - Instalación del lavabo
5
Full Extension Drawer Glide Installation (If Applicable) -
Instalar los cajones con correderas de extensión total (Si aplica)
¨ Maintaining both slides completely closed, move the component of slides with ball bearings to the front of the slides.
¨ Carefully line up the slides of the drawer box with the slides in the vanity and close the drawer all the way back.
¨ Open the drawer completely to ensure it is properly installed.
Epoxy Drawer Glide Installation (If Applicable)
¨ In a 30º angle position, introduce the drawer in the vanity making sure the drawer slide wheels are above the vanity slide wheels.
¨ Close the drawer completely and to ensure it has been properly installed.
¨ Manteniendo el riel completamente cerrado, mueva la placa interior con balines hacia el frente ambos rieles.
¨ Cuidadosamente alinear los rieles sujetos al cajón con los rieles sujetos al gabinete e introducir el cajón hasta cerrarlo por completo.
¨ Abrir el cajón completamente para asegurarse que el cajón ha sido instalado correctamente.
Instalar correderas epóxicas (Si aplica)
¨ En una posición con ángulo de 30º, introducir el cajón en el gabinete asegurándose que las ruedas de los rieles del cajón pasen
sobre las ruedas de los rieles del gabinete.
¨ Cierre y abra el cajón completamente para asegurar que ha sido instalado correctamente.
¨ Set the vanity top on top of the vanity base, checking the location of the p-trap and drain.
¨ Remove the top and install the faucet per manufacturer’s installation instructions.
¨ Hand tighten the pop-up drain with a wrench. Be careful not to over-tighten the pop-up drain.
Over tightening may cause cracks on the marble top.
¨ Apply a thin bead of silicone compound around the vanity base and set the vanity top carefully
in place. Remove any excess silicone compound with a wet rag.
¨ Install the faucet, water lines and P-trap according to manufacturer’s installation instructions.
¨ Coloque el lavabo sobre la base del gabinete verificando la ubicación correcta de la trampa y el drenaje.
¨ Remueva el lavabo e instale las llaves de acuerdo con las instrucciones de instalación del fabricante.
¨ Ajuste manualmente el tubo del drenaje con una llave apropiada. Tenga cuidado de no sobre apretar
el tubo del drenaje pues ello puede ocasionar quebraduras en el lavabo.
¨ Aplique una capa delgada de silicón alrededor de la base del gabinete y coloque cuidadosamente el
lavabo. Remueva cualquier exceso del compuesto sellador con un trapo húmedo.
¨ Instale la llave, las líneas de agua y la trampa en P de acuerdo con las instrucciones de instalación
de los fabricantes.
HOMEDEPOT.COM/GLACIERBAY
Please contact (USA) 1-855-HDGLACIER for further assistance. Favor de llamar al (MX) 01-800-004-6633 para más asistencia.
5

Installation - Instalación (cont.)
HOMEDEPOT.COM/GLACIERBAY
Please contact (USA) 1-855-HDGLACIER for further assistance. Favor de llamar al (MX) 01-800-004-6633 para más asistencia.
6
6
Hinge/Door Adjustment (If Applicable) - Ajuste de puerta/Bisagra (Si aplica)
The door alignment was set in the factory, but it could have shifted during transit. If adjustment is needed, follow the instructions
provided in the adjacent chart.
Las puertas estan alineadas de fábrica, pero pudieron haberse desalineado en el envío. Si es necesario alinearlas, recomendamos
ajustar las puertas según se muestra en el siguiente diagrama.
A B C
A B
C
Used to adjust door height
Ajuste de altura de la puerta
Used to adjust gaps between doors
Ajuste de espacios entre las puertas
Used to adjust between door and cabinet
Ajuste entre puerta y gabinete
CABINET FRONT VIEW
VISTA DE FRENTE
CABINET FRONT VIEW
VISTA DE FRENTE
CABINET SIDE VIEW
VISTA LATERAL
7
Drawer Front Adjustment (If Applicable) - Ajuste de frentes de cajón (Si aplica)
alignment screws
tornillos para alineamiento
drawer box
cajón
decorative hardware
herraje decorativo
alignment screws
tornillos para alineamiento
drawer front
frente de cajón
¨ Remove decorative hardware from the drawer front.
¨ Hold drawer front in place and slightly loosen both alignment screws.
¨ Move the drawer front left, right, up or down to desired position for alignment.
¨ While holding the drawer front in place, tighten the alignment screws securely.
¨ Install the decorative hardware to the outside of the drawer front.
¨ Remueva el herraje decorativo del frente del cajón.
¨ Sostenga el frente del cajón en su lugar y afloje un poco los tornillos.
¨ Mueva el frente hacia la izquierda, derecha, hacia arriba o abajo hasta
lograr la posición deseada.
¨ Sosteniendo el frente del cajón en su lugar, apriete los tornillos.
¨ Instale el herraje decorativo por el frente del cajón.

Installation - Instalación (cont.)
8
Mirror Installation (If Included) - Instalación del espejo (Si está incluido)
¨ Determine the desired location of the mirror. Use appropriate screws or wall anchors (not included) to hang mirror.
¨ Be sure the hanging hardware is rated to handle the weight of the mirror. The mirror weight is approximately 20 lbs.
¨ Determine donde desea colocar el espejo. Fijelo usando dos clavos o tornillos y taquetes apropiados (no incluidos) para colgar el espejo.
¨ Asegúrese que el herraje que use para colgar sea recomendado para el peso del espejo. Aproximadamente 9 kilos.
HOMEDEPOT.COM/GLACIERBAY
Please contact (USA) 1-855-HDGLACIER for further assistance. Favor de llamar al (MX) 01-800-004-6633 para más asistencia.
7
Care and Cleaning - Cuidado y limpieza
Vanity
¨ To clean surface of doors or cabinet, use non-abrasive cleaners and or cleaning agents that do not contain solvents.
Vanity Top
¨ Your vanity top will remain in its original state if you maintain and clean it properly. Clean the surface with a glass cleaner or other
household cleansers that are non-abrasive. Using abrasive cleansers will damage the surface.
Mirror
¨ Use non-abrasive cleansers only.
Gabinete
¨ Para limpiar la superficie del gabinete o las puertas, use un trapo limpio y seco y limpie toda la superficie. No usar limpiadores abrasivos.
Lavabo
¨ Su lavabo permanecerá en su estado original si lo mantiene y limpia correctamente. Limpie la superficie con limpiador de vidrios o
cualquier otro limpiador que no sea abrasivo. Usar limpiadores abrasivos pueden dañar la superficie del lavabo.
Espejo
¨ No usar limpiadores abrasivos.

Rev.5 August 2015 | 552104
Retain this manual for future use.
Conserve este manual para futuro uso.
Warranty - Garantía
LIMITED LIFETIME WARRANTY APPLICABLE TO USA
The product has been manufactured by WoodCrafters Home Products, LLC and is warranted under normal use and service, to be free from defects in
material and workmanship for the life of the product from the date purchased. During this warranty period, WoodCrafters Home Products, LLC will repair or
replace at WoodCrafters Home Products, LLC sole option, free of charge, any defective part or parts returned with shipping charges prepaid to the
distribution center listed below. Please include the original receipt with date of purchase and the nature of the problem. Merchandise not returned prepaid
will be refused. Our warranty does not cover damage or failure caused by abuse, misuse, abnormal usage, faulty installation, improper maintenance or any
repair other than those by WoodCrafters Home Products, LLC. There are no obligations or liabilities on the part of WoodCrafters Home Products, LLC for
consequential damage arising out of or in connection with the use or performance of the product or any indirect damages included, but not limited to labor
charges for installation or removal. This warranty gives you specific legal rights, and you may also have other rights that may vary from state to state.
Further information regarding this warranty may be obtained without charge by contacting Customer Service. If any parts are missing or damaged, please
call Customer Service at 1-855-HDGLACIER.
GARANTÍA LIMITADA APLICABLE A E.U.A.
El producto ha sido fabricado por WoodCrafters Home Products, LLC y tiene garantía, bajo uso y servicio normales, lo que garantiza al producto por
defectos de materiales y fabricación. Durante este periodo, WoodCrafters Home Products, LLC reparará o reemplazará, bajo su propio costo, cualquier parte
o partes defectuosas, que sean enviadas con gastos de envío pagados, al centro de distribución que se enlista al final de este párrafo. Favor de incluir el
recibo original de compra, que indique la fecha de compra y la causa del problema. No se recibirá mercancía enviada por cobrar. Nuestra garantía no cubre
daños por el uso inapropiado o abuso que se le dé al producto, así como ningún cargo de instalación. Esta garantía tiene específicos derechos legales, así
como los derechos que lleguen a cambiar de estado a estado. Si faltara alguna parte o estuviera dañada, favor de llamar al Centro de Atención al Cliente, al
número de teléfono sin costo, dentro de los Estado Unidos de América, 1-855-HDGLACIER. Para mayor información relacionada a esta garantía, favor de
comunicarse al Centro de Atención al Cliente.
GARANTÍA LIMITADA APLICABLE A MÉXICO
Wood Crafters México Holding, S. de R.L. de C.V. garantiza este producto a partir de la fecha de compra y durante el tiempo que el comprador original lo
posea. Esta garantía cubre al producto exclusivamente por defectos en los materiales o en su fabricación. Wood Crafters México Holding, S. de R.L. de C.V.
reemplazará bajo su propio costo, el Gabinete Completo. En los casos que el modelo esté descontinuado, se ofrecerá reemplazar el producto poruno de
características similares, que se encuentre disponible en el mercado. Para hacer válida la garantía, deberá acudir a la tienda de Home Depotdonde realizó
su compraincluyendo el artículo a reemplazar,recibo original o factura de compra que indique la fecha parasu reemplazo.Nuestra garantía no cubre
daños por el uso inapropiado o abuso que se le dé al producto, ni por daños realizados durante la instalación, así mismo, excluye los daños causados por
condiciones del ambiente, humedad, limpiadores o substancias abrasivas. Esta garantía no podrá transferirse. Esta garantía es aplicable sólo a los
productos fabricados después del 1 de Diciembre del 2010. Para mayor información, favor de comunicarse al número gratuito 01-800-570 -0319 desde el
interior de la República Mexicana derechos que lleguen a cambiar de estado a estado. Si faltara alguna parte o estuviera dañada, favor de llamar al Centro
de Atención al Cliente, al número de teléfono sin costo, dentro de los Estados Unidos de América, 01-800-570 -0319. Para mayor información relacionada a
esta garantía, favor de comunicarse al Centro de Atención al Cliente.
-
 1
1
-
 2
2
-
 3
3
-
 4
4
-
 5
5
-
 6
6
-
 7
7
-
 8
8


Glacier Bay GF36P2V3-BT Guía de instalación
- Tipo
- Guía de instalación
en otros idiomas
Artículos relacionados
-
Glacier Bay JAWM20-FE Instrucciones de operación
-
Glacier Bay DR54P3V8-PG Guía de instalación
-
-
-
-
-
Glacier Bay DM62P3V15-FG Guía de instalación
Otros documentos
-
Hampton Bay EH0380F-GB Guía de instalación
-
St. Paul AU60P2V10-GP Guía de instalación
-
Home Decorators Collection WT24-CR Guía de instalación
-
Home Decorators Collection SF30P2V11-ST Guía de instalación
-
 Commercial Electric 39700H Guía de instalación
-
 LaToscana OA57OPT4T Guía de instalación
-
 Atleisure FRN-312861 Manual de usuario


