
®
E
THER
L
INK
III
P
ARALLEL
T
ASKING
16-B
IT
ISA A
DAPTER
Q
UICK
S
TART
G
UIDE
A member of the 3Com EtherLink III family of
adapters
Part No. 09-0701-000
Published July 1995
Quick Start FrontMtrBook Page 1 Sunday, December 22, 1996 3:19 PM

3Com Corporation
■
5400 Bayfront Plaza
■
Santa Clara, California
■
95052-8145
© 3Com Corporation, 1995. All rights reserved. No part of this documentation may be reproduced
in any form or by any means or used to make any derivative work (such as translation,
transformation, or adaptation) without permission from 3Com Corporation.
3Com Corporation reserves the right to revise this documentation and to make changes in
content from time to time without obligation on the part of 3Com Corporation to provide
notification of such revision or change.
3Com Corporation provides this documentation without warranty of any kind, either implied or
expressed, including, but not limited to, the implied warranties of merchantability and fitness for a
particular purpose. 3Com may make improvements or changes in the product(s) and/or the
program(s) described in this documentation at any time.
UNITED STATES GOVERNMENT LEGENDS:
If you are a United States government agency, then this documentation and the software
described herein are provided to you subject to the following restricted rights:
For units of the Department of Defense:
Restricted Rights Legend:
Use, duplication or disclosure by the Government is subject to restrictions
as set forth in subparagraph (c) (1) (ii) for restricted Rights in Technical Data and Computer
Software clause at 48 C.F.R. 52.227-7013. 3Com Corporation, 5400 Bayfront Plaza, Santa Clara,
California 95052-8145.
For civilian agencies:
Restricted Rights Legend:
Use, reproduction or disclosure is subject to restrictions set forth in
subparagraph (a) through (d) of the Commercial Computer Software - Restricted Rights Clause at
48 C.F.R. 52.227-19 and the limitations set forth in 3Com Corporation’s standard commercial
agreement for the software. Unpublished rights reserved under the copyright laws of the United
States.
If there is any software on removable media described in this documentation, it is furnished under
a license agreement included with the product as a separate document, in the hard copy
documentation, or on the removable media in a directory file named LICENSE.TXT. If you are
unable to locate a copy, please contact 3Com and a copy will be provided to you.
Unless otherwise indicated, 3Com registered trademarks are registered in the United States and
may or may not be registered in other countries.
3Com, EtherDisk, EtherLink, and Parallel Tasking are registered trademarks of 3Com Corporation.
AutoLink is a trademark of 3Com Corporation.
Novell and NetWare are trademarks of Novell, Inc. Other brand and product names may be
registered trademarks or trademarks of their respective holders.
Guide written by John Jeter. Edited by Nancy Kurahashi. Technical illustrations by Tim Buckreus.
Production by Becky Whitmer.
Quick Start FrontMtrBook Page 2 Sunday, December 22, 1996 3:19 PM

Q
UICK
S
TART
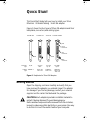
This Quick Start Guide tells you how to install your 3Com
EtherLink
III Parallel Tasking
16-bit ISA adapter.
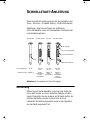
Figure 1 shows the four types of 3Com ISA adapters and their
backplates, connectors, and cabling types.
Figure 1
Backplates for 3Com ISA Adapters
Getting Started
Open the shipping container carefully and verify that you
have received the adapter you ordered. Inspect the adapter
for damage. If you find any damage, contact your network
supplier and the carrier that delivered the package.
CAUTION:
Each adapter is packed in antistatic material to
protect it during shipment. To avoid damaging any
static-sensitive components after removal from the container,
be sure to reduce any static electricity on your person. One way
to do this is to touch the metal chassis of your computer.
3C509B-COMBO
Cabling
type
Connector
type
10BASE-T
Thick coax
Thin coax
AUI, BNC,
RJ-45
3C509B-TPO
10BASE-T
RJ-45
3C509B coax
Thick coax
Thin coax
AUI and
BNC
3C509-TP
10BASE-T
Thick coax
AUI and
RJ-45
LEDLED
LED
RJ-45
connector
BNC
connector
AUI
connector
Quick Start FrontMtrBook Page 1 Sunday, December 22, 1996 3:19 PM

2
Q
UICK
S
TART
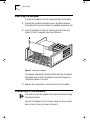
Inserting the Adapter
To insert the adapter into the computer, follow these steps:
1
Unplug the computer and disconnect all cables. Remove
the computer’s cover and select an available expansion slot.
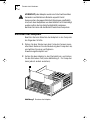
2
Insert the adapter in the slot and secure the screw. See
Figure 2. (Your computer may look different.)
Figure 2
Inserting the Adapter
The adapter’s backplate should be flush with the computer’s
backplane. Be sure that the adapter’s connector fingers are
completely seated in the slot.
3
Replace the computer’s cover and reconnect all cables.
Connecting to the Network
You must connect the adapter to the network before loading
the network drivers.
Connect the adapter to the network, using the proper cable
and connector types, as shown in Figure 1.
Quick Start FrontMtrBook Page 2 Sunday, December 22, 1996 3:19 PM

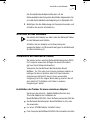
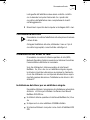
Installing Network Drivers
3
Installing Network Drivers
You must know the network operating system that your
computer runs. (Check with your network administrator if
necessary.)
If you are using the Novell
NetWare
2.x, 3.1x, or 4.x network
operating system with a single adapter, follow the instructions
in the next section. If the environment you are using does not
match the description above, skip to the section “To Install
Drivers in Other Environments.”
To Install the Driver for a Single Adapter
You can use 3Com’s AutoLink
auto installation feature to
install Novell NetWare
DOS ODI client software if you:
■
Use the Novell NetWare 2.x, 3.1x, or 4.x network operating
system
■
Have only one 3C509B adapter installed
■
Intend to use your computer as a NetWare DOS ODI client
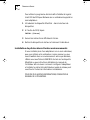
To use the AutoLink program to install NetWare DOS ODI
client software on a PC with a single adapter:
1
Insert the
EtherDisk
diskette in a floppy drive.
2
At the command prompt, type:
INSTALL [Enter]
3
Follow the instructions displayed on the screen.
4
Remove the diskette and reboot the computer.
Quick Start FrontMtrBook Page 3 Sunday, December 22, 1996 3:19 PM

4
Q
UICK
S
TART
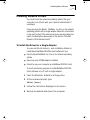
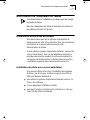
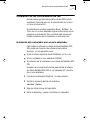
To Install Drivers in Other Environments
If you are installing more than one adapter in a single
computer, using your computer as a server, or working in a
non-NetWare environment, refer to the readme files on the
EtherDisk
diskette or to the detailed instructions in the
User Guide for adapter configuration and driver installation.
Your network supplier may also provide this information.
FOR ADDITIONAL INFORMATION, CONSULT THE USER GUIDE.
Quick Start FrontMtrBook Page 4 Sunday, December 22, 1996 3:19 PM

D
ÉMARRAGE
R
APIDE
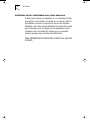
Les informations ci-dessous vous expliquent comment
installer votre adaptateur ISA 16 bits 3Com
EtherLink
III
Parallel Tasking
.
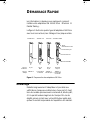
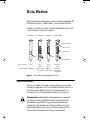
La figure 1 illustre les quatre types d’adaptateur ISA 3Com
avec leurs connecteurs, leur câblage et leur plaque arrière.
Figure 1
Plaques arrière des adaptateurs ISA 3Com
Démarrage
Déballez soigneusement l’adaptateur et procédez aux
vérifications d’usage pour déterminer, d’une part, s’il s’agit
bien du modèle que vous avez commandé et, d’autre part,
s’il n’a pas été endommagé lors du transport. En cas de
dégâts, prenez contact avec votre distributeur agréé ainsi
qu‘avec la société responsable de l’expédition du matériel.
3C509B-COMBO
Type de
câblage
Type de
connecteur
10BASE-T
Coaxial épais
Coaxial fin
AUI, BNC
et RJ45
3C509B-TPO
10BASE-T
RJ-45
3C509B coax
Coaxial épais
Coaxial fin
AUI et
BNC
3C509-TP
10BASE-T
Coaxial épais
AUI et
RJ45
LEDLED
Diode
électroluminescente
Connecteur RJ45
Connecteur BNC
Connecteur AUI
Quick Start FrontMtrBook Page 1 Sunday, December 22, 1996 3:19 PM

2
D
ÉMARRAGE
R
APIDE
ATTENTION :
Tous les adaptateurs sont expédiés dans un
emballage antistatique. Pour éviter d’endommager les
composants sensibles à l’électricité statique lorsque vous aurez
déballé l’appareil, veillez à vous décharger de cette électricité en
touchant par exemple le châssis de votre ordinateur.
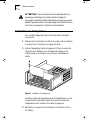
Installation de l’adaptateur
Pour installer l’adaptateur dans votre ordinateur, procédez
comme suit :
1
Débranchez l’ordinateur et retirez tous les cordons. Retirez
le couvercle et choisissez un logement libre.
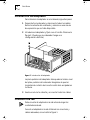
2
Insérez l’adaptateur dans le logement et fixez-le ensuite à
l’aide de la vis. Référez-vous à la figure 2 (même si elle
n’illustre pas un ordinateur en tout point semblable au
vôtre).
Figure 2
Installation de l’adaptateur
La plaque arrière de l’adaptateur doit être parfaitement contre
le panneau de l’ordinateur. Veillez à ce que les contacts de
l’adaptateur soient insérés à fond dans le logement.
3
Remettez le couvercle de l’ordinateur et rebranchez tous
les câbles.
Quick Start FrontMtrBook Page 2 Sunday, December 22, 1996 3:19 PM

Branchement de l’adaptateur au réseau
3
Branchement de l’adaptateur au réseau
Vous devez brancher l’adaptateur au réseau avant de charger
les pilotes de réseau.
Branchez l’adaptateur au réseau à l’aide des connecteurs et
des câbles pertinents (cf.
figure
1).
Installation des pilotes de réseau
Vous devez savoir quel est le système d’exploitation du
réseau auquel est relié votre ordinateur. Pour de plus amples
informations à ce propos, adressez-vous à votre
administrateur de réseau.
Si vous utilisez le système d’exploitation Netware
versions 2.x,
3.1x ou 4.x de Novell
avec un seul adaptateur, respectez la
procédure de la section suivante. Si votre environnement ne
correspond pas à la description ci-dessus, passez à la section
«
Installation de pilotes dans d’autres environnements
».
Installation du pilote pour un seul adaptateur
Vous pouvez utiliser la fonction d’installation automatique
AutoLink
de 3Com pour installer le logiciel client ODI de
DOS pour Netware de Novell si
:
■
vous utilisez le système d’exploitation Netware versions 2.x,
3.1x ou 4.x de Novell
;
■
un seul adaptateur 3C5098 est installé
;
■
vous avez l’intention d’utiliser votre ordinateur en tant que
client ODI de DOS pour Netware.
Quick Start FrontMtrBook Page 3 Sunday, December 22, 1996 3:19 PM

4
D
ÉMARRAGE
R
APIDE
Pour utiliser le programme AutoLink afin d’installer le logiciel
client ODI de DOS pour Netware sur un ordinateur équipé d’un
seul adaptateur :
1
Introduisez la disquette
EtherDisk
dans le lecteur de
disquettes.
2
A l’invite du DOS, tapez
:
INSTALL [Entree]
3
Suivez les instructions affichées à l’écran.
4
Retirez la disquette du lecteur et relancez l’ordinateur.
Installation de pilotes dans d’autres environnements
Si vous installez plus d’un adaptateur sur un seul ordinateur,
que vous utilisez votre ordinateur comme serveur ou que
vous travaillez dans un environnement autre que Netware,
référez-vous aux fichiers LISEZ.MOI stockés sur la disquette
EtherDisk
ou aux instructions détaillées du manuel de
l’utilisateur afin de savoir comment configurer l’adaptateur
et installer le pilote. Votre distributeur agréé de réseau peut
vous fournir toutes les informations nécessaires.
POUR DE PLUS AMPLES INFORMATIONS, CONSULTEZ LE
MANUEL DE L’UTILISATEUR.
Quick Start FrontMtrBook Page 4 Sunday, December 22, 1996 3:19 PM

S
CHNELLSTART
-A
NLEITUNG
Diese Schnellstart-Anleitung beschreibt die Installation des
3Com
-EtherLink
III-Parallel-Tasking
-16-Bit-ISA-Adapters.
Abbildung 1 zeigt die vier Typen der erhältlichen
3Com-ISA-Adapter sowie ihre Grundplatten, Steckverbinder
und Verkabelungstypen.
Abbildung 1 Grundplatten für 3Com-ISA-Adapter
Einführung
Öffnen Sie den Versandbehälter vorsichtig, und stellen Sie
sicher, daß Sie den von Ihnen bestellten Adapter erhalten
haben. Überprüfen Sie den Adapter auf Schäden. Sollten Sie
Schäden feststellen, wenden Sie sich bitte an Ihren
Lieferanten für Netzwerkprodukte sowie an den Spediteur,
der das Paket ausgeliefert hat.
3C509B-COMBO
Verkabelungstyp
Steckverbindertyp
10BASE-T
Dickes
Koaxialkabel
Dünnes
Koaxialkabel
AUI, BNC,
RJ-45
3C509B-TPO
10BASE-T
RJ-45
3C509B koaxial
Dickes
Koaxialkabel
Dünnes
Koaxialkabel
AUI und
BNC
3C509-TP
10BASE-T
Dickes
Koaxialkabel
AUI und
RJ-45
LEDLED
LED-Anzeige
RJ-45-Steckverbinder
BNC-Steckverbinder
AUI-Steckverbinder
Quick Start FrontMtrBook Page 1 Sunday, December 22, 1996 3:19 PM

2 SCHNELLSTART-ANLEITUNG
VORSICHT: Jeder Adapter wurde zum Schutz während des
Versands in antistatischem Material verpackt. Damit
Komponenten, die gegen statische Entladungen empfindlich
sind, nach dem Auspacken aus dem Behälter nicht beschädigt
werden, sollten Sie Ihre statische Elektrizität reduzieren.
Berühren Sie hierzu z.B. das Metall-Chassis Ihres Computers.
Einsetzen des Adapters
Beachten Sie beim Einsetzen des Adapters in den Computer
die folgenden Schritte:
1 Ziehen Sie den Stecker aus dem Computer heraus, sowie
alle Kabel. Nehmen Sie die Abdeckung des Computers ab,
und wählen Sie einen verfügbaren
Erweiterungssteckplatz aus.
2 Setzen Sie den Adapter in den Steckplatz ein, und ziehen
Sie die Schrauben fest (siehe Abbildung 2 - Ihr Computer
kann jedoch anders aussehen).
Abbildung 2 Einsetzen des Adapters
Quick Start FrontMtrBook Page 2 Sunday, December 22, 1996 3:19 PM

Anschluß an das Netzwerk 3
Die Grundplatte des Adapters sollte eben mit der
Rückwandplatine des Computers abschließen. Vergewissern Sie
sich, daß die Kontaktleiste des Adapters gut im Steckplatz sitzt.
3 Befestigen Sie die Abdeckung des Computers wieder, und
schließen Sie erneut alle Kabel an.
Anschluß an das Netzwerk
Sie müssen den Adapter vor dem Laden der Netzwerk-Treiber
an das Netzwerk anschließen.
Schließen Sie den Adapter unter Verwendung der
geeigneten Kabel- und Steckverbindertypen an das Netzwerk
an (siehe Abbildung 1).
Installation der Netzwerk-Treiber
Sie müssen wissen, welches Netzwerk-Betriebssystem (NOS)
Ihr Computer verwendet. (Erfragen Sie diese Information
ggf. von Ihrem Netzwerk-Verwalter.)
Verwenden Sie das Netzwerk-Betriebssystem Novell
NetWare
2.x, 3.1x oder 4.x mit einem einzelnen Adapter, so
befolgen Sie die im nächsten Abschnitt beschriebenen
Anweisungen. Entspricht die von Ihnen verwendete
Umgebung nicht der obigen Beschreibung, machen Sie mit
dem Abschnitt "Installation der Treiber in anderen
Umgebungen" weiter.
Installation der Treiber für einen einzelnen Adapter
Sie können die AutoLink
-Selbstinstallationsfunktion des
3Com-ISA-Adapters zur Installation der
Novell-NetWare-DOS-ODI- Client-Software verwenden, falls Sie:
■ das Netzwerk-Betriebssystem Novell NetWare 2x, 3.1x oder
4.x verwenden
■ nur einen 3C509B-Adapter installiert haben
■ Ihren Computer als NetWare-DOS-ODI-Client einsetzen möchten
Quick Start FrontMtrBook Page 3 Sunday, December 22, 1996 3:19 PM

4 SCHNELLSTART-ANLEITUNG
Zum Installieren der NetWare-DOS-ODI-Client-Software auf
einem PC mit einem einzelnen Adapter unter Verwendung
des AutoLink-Programms:
1 Legen Sie die EtherDisk
-Diskette in ein Diskettenlaufwerk
ein.
2 Tippen Sie an der Eingabeaufforderung:
INSTALL [Enter]
3 Befolgen Sie die auf dem Bildschirm angezeigten
Anweisungen.
4 Nehmen Sie die Diskette heraus, und starten Sie den
Computer neu.
Installation der Treiber in anderen Umgebungen
Falls Sie mehr als einen Adapter in einem einzelnen
Computer installieren, Ihren Computer als Server verwenden
oder in einer anderen Umgebung als NetWare arbeiten,
finden Sie Informationen zur Adapterkonfiguration und
Treiberinstallation in den readme- Dateien auf der
EtherDisk-Diskette oder in den detaillierten Anweisungen
des Benutzerhandbuchs. Sie können diese Informationen
auch über Ihren Lieferanten für Netzwerkprodukte beziehen.
ZUSÄTZLICHE INFORMATIONEN ENTNEHMEN SIE BITTE DEM
BENUTZERHANDBUCH.
Quick Start FrontMtrBook Page 4 Sunday, December 22, 1996 3:19 PM

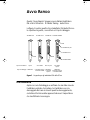
AVVIO RAPIDO
Questo "Avvio Rapido" spiega come installare l'adattatore
ISA a 16 bit EtherLink
III Parallel Tasking
della 3Com
.
La figura 1 mostra i quattro tipi di adattatori ISA della 3Com e
le rispettive linguette, i connettori ed i tipi di cablaggio.
figura 1 Linguette per gli adattatori ISA della 3Com
Introduzione
Aprire con cura l'imballaggio e verificare che sia stato ricevuto
l'adattatore ordinato. Controllare che l'adattatore non sia
danneggiato. Nel caso si riscontri qualche danneggiamento,
contattare il fornitore delle apparecchiature e il trasportatore
che ha effettuato la consegna.
3C509B-COMBO
Tipo di cablaggio
Tipo di connettore
10BASE-T
Coassiale spesso
Coassiale sottile
AUI, BNC,
RJ-45
3C509B-TPO
10BASE-T
RJ-45
3C509B coax
Coassiale spesso
Coassiale sottile
AUI e BNC
3C509B-TP
10BASE-T
Coassiale
spesso
AUI e RJ-45
LEDLED
LED
Connettore RJ-45
Connettore BNC
Connettore AUI
Quick Start FrontMtrBook Page 1 Sunday, December 22, 1996 3:19 PM

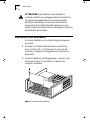
2 AVVIO RAPIDO
ATTENZIONE: Ogni adattatore viene imballato in
materiale antistatico per proteggerlo durante la spedizione.
Per evitare il danneggiamento di componenti sensibili
all'elettricità statica dopo la rimozione dal contenitore,
assicurarsi di ridurre l'elettricità statica del proprio corpo.
Questo risultato può essere ottenuto, ad esempio, toccando la
base metallica del computer.
Inserimento dell'adattatore
Per inserire l'adattatore nel computer, seguire la seguente
procedura:
1 Scollegare il computer dall'alimentazione elettrica e
disconnettere tutti i cavi. Rimuovere il coperchio del
computer e scegliere un alloggiamento di espansione
disponibile.
2 Inserire l'adattatore nell'alloggiamento e serrare la vite.
Osservare la figura 2. È possibile che l'aspetto del
computer sia diverso.
figura 2 Inserimento dell'adattatore
Quick Start FrontMtrBook Page 2 Sunday, December 22, 1996 3:19 PM

Connessione alla rete 3
La linguetta dell'adattatore deve essere a diretto contatto
con la base del computer. Assicurarsi che i piedini del
connettore dell'adattatore siano completamente inseriti
nell'alloggiamento.
3 Rimontare il coperchio del computer e ricollegare tutti i cavi.
Connessione alla rete
È necessario connettere l'adattatore alla rete prima di caricare
i driver di rete.
Collegare l'adattatore alla rete, utilizzando il cavo e i tipi di
connettori appropriati, come illustrato nella figura 1.
Installazione dei driver di rete
È necessario conoscere il sistema operativo di rete (NOS,
Network Operating System) operante sul sistema. Consultare
l'amministratore della rete se necessario.
Se si sta utilizzando il sistema operativo di rete Novell
NetWare
2.x, 3.1x o 4.x con un adattatore singolo, seguire
le istruzioni riportate nella sezione successiva. Se l'ambiente
che si sta utilizzando non corrisponde alla descrizione sopra
riportata, passare alla sezione "Installazione dei driver in altri
ambienti".
Installazione del driver per un adattatore singolo
È possibile utilizzare il programma di installazione automatica
AutoLink
di 3Com per installare il software client Novell
NetWare DOS ODI se:
■ Si utilizza il sistema operativo di rete Novell NetWare 2.x, 3.1x o
4.x
■ Si dispone di un solo adattatore 3C509B installato
■ Si intende utilizzare il computer come client di NetWare DOS
ODI
Quick Start FrontMtrBook Page 3 Sunday, December 22, 1996 3:19 PM

4 AVVIO RAPIDO
Per installare il software client di NetWare DOS ODI su di un
PC con un singolo adattatore, utilizzare il programma
AutoLink:
1 Inserire il dischetto EtherDisk
in un'unità dischetto.
2 Al prompt dei comandi, digitare:
INSTALL [Invio]
3 Seguire le istruzioni riportate sullo schermo.
4 Rimuovere il dischetto e riavviare il computer.
Installazione dei driver in altri ambienti
Se si sta installando più di un adattatore in un solo computer,
si sta utilizzando il computer come server, o si sta operando
in un ambiente diverso da NetWare, fare riferimento ai file
"readme" nel dischetto EtherDisk o alle istruzioni dettagliate
nella Guida per l'Utente per quanto riguarda la
configurazione dell'adattatore e l'installazione del driver.
Anche il fornitore delle apparecchiature dovrebbe essere in
grado di fornire queste informazioni.
PER ULTERIORI INFORMAZIONI, CONSULTARE LA GUIDA PER
L'UTENTE.
Quick Start FrontMtrBook Page 4 Sunday, December 22, 1996 3:19 PM

GUÍA RÁPIDA
Esta guía le ofrece información de cómo instalar el adaptador ISA
de 16 bits EtherLink
Parallel Tasking
de la compañía 3Com
.
La figura 1 ilustra los cuatro tipos de adaptadores 3Com ISA
con sus placas, conectores y cables.
figura 1 Placas para los adaptadores ISA 3Com
Para comenzar
Abra con cuidado el envase y compruebe que se le haya
enviado el adaptador que ha solicitado. Revíselo para ver si
ha sufrido algún daño. De ser así, comuníqueselo a su
proveedor y a la compañía que realizase el transporte.
Precaución: El adaptador se empaqueta con material
antiestático para protegerlo durante el envío. Antes de
desembalar el producto, toque el chasis metálico del
ordenador a fin de eliminar cualquier posible carga de
electricidad estática del cuerpo y evitar así daños en los
componentes sensibles a este tipo de electricidad.
3C509B-COMBO
Tipo de cable
Tipo de conector
10BASE-T
Coaxial grueso
Coaxial fino
AUI, BNC
y RJ-45
3C509B-TPO
10BASE-T
RJ-45
3C509B coax
Coaxial grueso
Coaxial fino
AUI y
BNC
3C509B-TP
10BASE-T
Coaxial grueso
AUI y
RJ-45
LEDLED
Indicador (LED)
Conector RJ-45
Conector BNC
Conector AUI
Quick Start FrontMtrBook Page 1 Sunday, December 22, 1996 3:19 PM

2 GUÍA RÁPIDA
Introducción del adaptador
Para introducir el adaptador en el ordenador, siga estos pasos:
1 Desenchufe el ordenador y desconecte todos los cables.
Retire la cubierta del ordenador y seleccione una ranura
de expansión que se halle disponible.
2 Introduzca el adaptador y fíjelo con el tornillo. Observe la
figura 2. (Puede que su ordenador tenga una
configuración distinta.)
figura 2 Introducción del adaptador
La placa posterior del adaptador debe quedar al mismo nivel
del plano posterior del ordenador. Asegúrese de que las
lengüetas de contacto del conector estén bien encajadas en
la ranura.
3 Vuelva a colocar la cubierta y a conectar todos los cables.
Conexión a la red
Debe conectar el adaptador a la red antes de cargar los
controladores de red.
Conecte el adaptador a la red utilizando los conectores y
cables adecuados, como ilustra la figura 1.
Quick Start FrontMtrBook Page 2 Sunday, December 22, 1996 3:19 PM

Instalación de los controladores de red 3
Instalación de los controladores de red
Necesita saber qué sistema operativo de red (NOS) usa su
ordenador. (Comuníquese con el administrador de la red, si
no tiene la información).
Si está utilizando el sistema operativo Novell
NetWare
2.x,
3.1x o 4.x con un solo adaptador, siga las instrucciones que se
presentan a continuación. De lo contrario, pase a la sección
titulada "Instalación de controladores en otros entornos".
Instalación del controlador para un solo adaptador
Para instalar el software de cliente de Novell NetWare DOS
ODI, podrá usar la opción de instalación automática
AutoLink
en los siguientes casos:
■ Si usa el sistema operativo Novell NetWare 2.x, 3.1x o 4.x.
■ Si tiene instalado un solo adaptador 3C509B.
■ Si pretende usar el ordenador como cliente de NetWare DOS
ODI.
Si desea usar el programa AutoLink para instalar el sofware
de cliente NetWare DOS ODI en un ordenador (PC) provisto
de un solo adaptador:
1 Introduzca el disquete EtherDisk
correspondiente.
2 Escriba lo siguiente detrás del indicativo:
INSTALAR [INTRO]
3 Siga las instrucciones de la pantalla.
4 Retire el disquete y vuelva a inicializar el ordenador.
Quick Start FrontMtrBook Page 3 Sunday, December 22, 1996 3:19 PM

4 GUÍA RÁPIDA
Instalación de los controladores en otros entornos
Si desea usar más de un adaptador en un ordenador, utilizar
este último como servidor o trabajar en un entorno distinto
de NetWare, consulte los archivos de lectura del disquete
EtherDisk o las instrucciones detalladas de la Guía del usuario
para informarse de la configuración del adaptador y de la
instalación del controlador. Es posible que su proveedor
también pueda proporcionarle esta información.
PARA OBTENER MÁS INFORMACIÓN CONSULTE LA GUÍA DEL
USUARIO.
Quick Start FrontMtrBook Page 4 Sunday, December 22, 1996 3:19 PM

CISPR B COMPLIANCE
This device complies with the EMC directive of the European Community and meets or exceeds
the following technical standard:
EN 55022 – Limits and Methods of Measurement of Radio Interference Characteristics of
Information Technology Equipment.
This device complies with the CISPR Class B standard.
CE NOTICE
Marking by the symbol indicates compliance of this equipment to the EMC directive of
the European Community. Such marking is indicative that this equipment meets or exceeds the
following technical standards:
■ EN 55022—“Limits and Methods of Measurement of Radio Interference Characteristics of
Information Technology Equiment.”
■ EN 50082-1—“Electromagnetic compatibility —Generic immunity standard Part 1: Residential,
commercial, and light industry.”
■ IEC 801-2—“Electromagnetic compatibility for industrial-process measurement and control
equipment Part 2: Electrostatic discharge requirements.”—Severity level 3.
■ IEC 801-3—“Electromagnetic compatibility for industrial-process measurement and control
equipment Part 3: Radiated electromagnetic field requirements.”—Severity level 2.
■ IEC 801-4—“Electromagnetic compatibility for industrial-process measurement and control
equipment Part 4: Electrical fast transient/burst requirements.”—Severity level 2.
■ A “Declaration of Conformity” in accordance with the above standards has been made and is
on file at 3Com Corporation.
Quick Start FrontMtrBook Page 1 Sunday, December 22, 1996 3:19 PM
Transcripción de documentos
® ETHERLINK III PARALLEL TASKING 16-BIT ISA ADAPTER QUICK START GUIDE A member of the 3Com EtherLink III family of adapters Part No. 09-0701-000 Published July 1995 3Com Corporation ■ 5400 Bayfront Plaza ■ Santa Clara, California ■ 95052-8145 © 3Com Corporation, 1995. All rights reserved. No part of this documentation may be reproduced in any form or by any means or used to make any derivative work (such as translation, transformation, or adaptation) without permission from 3Com Corporation. 3Com Corporation reserves the right to revise this documentation and to make changes in content from time to time without obligation on the part of 3Com Corporation to provide notification of such revision or change. 3Com Corporation provides this documentation without warranty of any kind, either implied or expressed, including, but not limited to, the implied warranties of merchantability and fitness for a particular purpose. 3Com may make improvements or changes in the product(s) and/or the program(s) described in this documentation at any time. UNITED STATES GOVERNMENT LEGENDS: If you are a United States government agency, then this documentation and the software described herein are provided to you subject to the following restricted rights: For units of the Department of Defense: Restricted Rights Legend: Use, duplication or disclosure by the Government is subject to restrictions as set forth in subparagraph (c) (1) (ii) for restricted Rights in Technical Data and Computer Software clause at 48 C.F.R. 52.227-7013. 3Com Corporation, 5400 Bayfront Plaza, Santa Clara, California 95052-8145. For civilian agencies: Restricted Rights Legend: Use, reproduction or disclosure is subject to restrictions set forth in subparagraph (a) through (d) of the Commercial Computer Software - Restricted Rights Clause at 48 C.F.R. 52.227-19 and the limitations set forth in 3Com Corporation’s standard commercial agreement for the software. Unpublished rights reserved under the copyright laws of the United States. If there is any software on removable media described in this documentation, it is furnished under a license agreement included with the product as a separate document, in the hard copy documentation, or on the removable media in a directory file named LICENSE.TXT. If you are unable to locate a copy, please contact 3Com and a copy will be provided to you. Unless otherwise indicated, 3Com registered trademarks are registered in the United States and may or may not be registered in other countries. 3Com, EtherDisk, EtherLink, and Parallel Tasking are registered trademarks of 3Com Corporation. AutoLink is a trademark of 3Com Corporation. Novell and NetWare are trademarks of Novell, Inc. Other brand and product names may be registered trademarks or trademarks of their respective holders. Guide written by John Jeter. Edited by Nancy Kurahashi. Technical illustrations by Tim Buckreus. Production by Becky Whitmer. QUICK START This Quick Start Guide tells you how to install your 3Com EtherLink III Parallel Tasking 16-bit ISA adapter. Figure 1 shows the four types of 3Com ISA adapters and their backplates, connectors, and cabling types. 3C509B-TPO 3C509B coax 3C509-TP 3C509B-COMBO LED RJ-45 connector AUI connector LED LED BNC connector Connector type RJ-45 Cabling 10BASE-T type AUI and BNC AUI and RJ-45 AUI, BNC, RJ-45 Thick coax Thin coax 10BASE-T Thick coax 10BASE-T Thick coax Thin coax Figure 1 Backplates for 3Com ISA Adapters Getting Started Open the shipping container carefully and verify that you have received the adapter you ordered. Inspect the adapter for damage. If you find any damage, contact your network supplier and the carrier that delivered the package. CAUTION: Each adapter is packed in antistatic material to protect it during shipment. To avoid damaging any static-sensitive components after removal from the container, be sure to reduce any static electricity on your person. One way to do this is to touch the metal chassis of your computer. 2 QUICK START Inserting the Adapter To insert the adapter into the computer, follow these steps: 1 Unplug the computer and disconnect all cables. Remove the computer’s cover and select an available expansion slot. 2 Insert the adapter in the slot and secure the screw. See Figure 2. (Your computer may look different.) Figure 2 Inserting the Adapter The adapter’s backplate should be flush with the computer’s backplane. Be sure that the adapter’s connector fingers are completely seated in the slot. 3 Replace the computer’s cover and reconnect all cables. Connecting to the Network You must connect the adapter to the network before loading the network drivers. Connect the adapter to the network, using the proper cable and connector types, as shown in Figure 1. Installing Network Drivers 3 Installing Network Drivers You must know the network operating system that your computer runs. (Check with your network administrator if necessary.) If you are using the Novell NetWare 2.x, 3.1x, or 4.x network operating system with a single adapter, follow the instructions in the next section. If the environment you are using does not match the description above, skip to the section “To Install Drivers in Other Environments.” To Install the Driver for a Single Adapter You can use 3Com’s AutoLink auto installation feature to install Novell NetWare DOS ODI client software if you: ■ Use the Novell NetWare 2.x, 3.1x, or 4.x network operating system ■ Have only one 3C509B adapter installed ■ Intend to use your computer as a NetWare DOS ODI client To use the AutoLink program to install NetWare DOS ODI client software on a PC with a single adapter: 1 Insert the EtherDisk diskette in a floppy drive. 2 At the command prompt, type: INSTALL [Enter] 3 Follow the instructions displayed on the screen. 4 Remove the diskette and reboot the computer. 4 QUICK START To Install Drivers in Other Environments If you are installing more than one adapter in a single computer, using your computer as a server, or working in a non-NetWare environment, refer to the readme files on the EtherDisk diskette or to the detailed instructions in the User Guide for adapter configuration and driver installation. Your network supplier may also provide this information. FOR ADDITIONAL INFORMATION, CONSULT THE USER GUIDE. DÉMARRAGE RAPIDE Les informations ci-dessous vous expliquent comment installer votre adaptateur ISA 16 bits 3Com EtherLink III Parallel Tasking. La figure 1 illustre les quatre types d’adaptateur ISA 3Com avec leurs connecteurs, leur câblage et leur plaque arrière. 3C509B-TPO 3C509B coax 3C509-TP 3C509B-COMBO Diode électroluminescente Connecteur RJ45 Connecteur AUI LED LED Connecteur BNC Type de connecteur RJ-45 Type de 10BASE-T câblage AUI et BNC AUI et RJ45 Coaxial épais 10BASE-T Coaxial fin Coaxial épais AUI, BNC et RJ45 10BASE-T Coaxial épais Coaxial fin Figure 1 Plaques arrière des adaptateurs ISA 3Com Démarrage Déballez soigneusement l’adaptateur et procédez aux vérifications d’usage pour déterminer, d’une part, s’il s’agit bien du modèle que vous avez commandé et, d’autre part, s’il n’a pas été endommagé lors du transport. En cas de dégâts, prenez contact avec votre distributeur agréé ainsi qu‘avec la société responsable de l’expédition du matériel. 2 DÉMARRAGE RAPIDE ATTENTION : Tous les adaptateurs sont expédiés dans un emballage antistatique. Pour éviter d’endommager les composants sensibles à l’électricité statique lorsque vous aurez déballé l’appareil, veillez à vous décharger de cette électricité en touchant par exemple le châssis de votre ordinateur. Installation de l’adaptateur Pour installer l’adaptateur dans votre ordinateur, procédez comme suit : 1 Débranchez l’ordinateur et retirez tous les cordons. Retirez le couvercle et choisissez un logement libre. 2 Insérez l’adaptateur dans le logement et fixez-le ensuite à l’aide de la vis. Référez-vous à la figure 2 (même si elle n’illustre pas un ordinateur en tout point semblable au vôtre). Figure 2 Installation de l’adaptateur La plaque arrière de l’adaptateur doit être parfaitement contre le panneau de l’ordinateur. Veillez à ce que les contacts de l’adaptateur soient insérés à fond dans le logement. 3 Remettez le couvercle de l’ordinateur et rebranchez tous les câbles. Branchement de l’adaptateur au réseau 3 Branchement de l’adaptateur au réseau Vous devez brancher l’adaptateur au réseau avant de charger les pilotes de réseau. Branchez l’adaptateur au réseau à l’aide des connecteurs et des câbles pertinents (cf. figure 1). Installation des pilotes de réseau Vous devez savoir quel est le système d’exploitation du réseau auquel est relié votre ordinateur. Pour de plus amples informations à ce propos, adressez-vous à votre administrateur de réseau. Si vous utilisez le système d’exploitation Netware versions 2.x, 3.1x ou 4.x de Novell avec un seul adaptateur, respectez la procédure de la section suivante. Si votre environnement ne correspond pas à la description ci-dessus, passez à la section « Installation de pilotes dans d’autres environnements ». Installation du pilote pour un seul adaptateur Vous pouvez utiliser la fonction d’installation automatique AutoLink de 3Com pour installer le logiciel client ODI de DOS pour Netware de Novell si : ■ vous utilisez le système d’exploitation Netware versions 2.x, 3.1x ou 4.x de Novell ; ■ un seul adaptateur 3C5098 est installé ; ■ vous avez l’intention d’utiliser votre ordinateur en tant que client ODI de DOS pour Netware. 4 DÉMARRAGE RAPIDE Pour utiliser le programme AutoLink afin d’installer le logiciel client ODI de DOS pour Netware sur un ordinateur équipé d’un seul adaptateur : 1 Introduisez la disquette EtherDisk dans le lecteur de disquettes. 2 A l’invite du DOS, tapez : INSTALL [Entree] 3 Suivez les instructions affichées à l’écran. 4 Retirez la disquette du lecteur et relancez l’ordinateur. Installation de pilotes dans d’autres environnements Si vous installez plus d’un adaptateur sur un seul ordinateur, que vous utilisez votre ordinateur comme serveur ou que vous travaillez dans un environnement autre que Netware, référez-vous aux fichiers LISEZ.MOI stockés sur la disquette EtherDisk ou aux instructions détaillées du manuel de l’utilisateur afin de savoir comment configurer l’adaptateur et installer le pilote. Votre distributeur agréé de réseau peut vous fournir toutes les informations nécessaires. POUR DE PLUS AMPLES INFORMATIONS, CONSULTEZ LE MANUEL DE L’UTILISATEUR. SCHNELLSTART-ANLEITUNG Diese Schnellstart-Anleitung beschreibt die Installation des 3Com-EtherLink III-Parallel-Tasking-16-Bit-ISA-Adapters. Abbildung 1 zeigt die vier Typen der erhältlichen 3Com-ISA-Adapter sowie ihre Grundplatten, Steckverbinder und Verkabelungstypen. 3C509B-TPO 3C509B koaxial 3C509-TP 3C509B-COMBO LED-Anzeige RJ-45-Steckverbinder AUI-Steckverbinder LED LED BNC-Steckverbinder Steckverbindertyp RJ-45 Verkabelungstyp 10BASE-T AUI und BNC AUI und RJ-45 AUI, BNC, RJ-45 Dickes Koaxialkabel Dünnes Koaxialkabel 10BASE-T Dickes Koaxialkabel 10BASE-T Dickes Koaxialkabel Dünnes Koaxialkabel Abbildung 1 Grundplatten für 3Com-ISA-Adapter Einführung Öffnen Sie den Versandbehälter vorsichtig, und stellen Sie sicher, daß Sie den von Ihnen bestellten Adapter erhalten haben. Überprüfen Sie den Adapter auf Schäden. Sollten Sie Schäden feststellen, wenden Sie sich bitte an Ihren Lieferanten für Netzwerkprodukte sowie an den Spediteur, der das Paket ausgeliefert hat. 2 SCHNELLSTART-ANLEITUNG VORSICHT: Jeder Adapter wurde zum Schutz während des Versands in antistatischem Material verpackt. Damit Komponenten, die gegen statische Entladungen empfindlich sind, nach dem Auspacken aus dem Behälter nicht beschädigt werden, sollten Sie Ihre statische Elektrizität reduzieren. Berühren Sie hierzu z.B. das Metall-Chassis Ihres Computers. Einsetzen des Adapters Beachten Sie beim Einsetzen des Adapters in den Computer die folgenden Schritte: 1 Ziehen Sie den Stecker aus dem Computer heraus, sowie alle Kabel. Nehmen Sie die Abdeckung des Computers ab, und wählen Sie einen verfügbaren Erweiterungssteckplatz aus. 2 Setzen Sie den Adapter in den Steckplatz ein, und ziehen Sie die Schrauben fest (siehe Abbildung 2 - Ihr Computer kann jedoch anders aussehen). Abbildung 2 Einsetzen des Adapters Anschluß an das Netzwerk 3 Die Grundplatte des Adapters sollte eben mit der Rückwandplatine des Computers abschließen. Vergewissern Sie sich, daß die Kontaktleiste des Adapters gut im Steckplatz sitzt. 3 Befestigen Sie die Abdeckung des Computers wieder, und schließen Sie erneut alle Kabel an. Anschluß an das Netzwerk Sie müssen den Adapter vor dem Laden der Netzwerk-Treiber an das Netzwerk anschließen. Schließen Sie den Adapter unter Verwendung der geeigneten Kabel- und Steckverbindertypen an das Netzwerk an (siehe Abbildung 1). Installation der Netzwerk-Treiber Sie müssen wissen, welches Netzwerk-Betriebssystem (NOS) Ihr Computer verwendet. (Erfragen Sie diese Information ggf. von Ihrem Netzwerk-Verwalter.) Verwenden Sie das Netzwerk-Betriebssystem Novell NetWare 2.x, 3.1x oder 4.x mit einem einzelnen Adapter, so befolgen Sie die im nächsten Abschnitt beschriebenen Anweisungen. Entspricht die von Ihnen verwendete Umgebung nicht der obigen Beschreibung, machen Sie mit dem Abschnitt "Installation der Treiber in anderen Umgebungen" weiter. Installation der Treiber für einen einzelnen Adapter Sie können die AutoLink-Selbstinstallationsfunktion des 3Com-ISA-Adapters zur Installation der Novell-NetWare-DOS-ODI- Client-Software verwenden, falls Sie: ■ das Netzwerk-Betriebssystem Novell NetWare 2x, 3.1x oder 4.x verwenden ■ nur einen 3C509B-Adapter installiert haben ■ Ihren Computer als NetWare-DOS-ODI-Client einsetzen möchten 4 SCHNELLSTART-ANLEITUNG Zum Installieren der NetWare-DOS-ODI-Client-Software auf einem PC mit einem einzelnen Adapter unter Verwendung des AutoLink-Programms: 1 Legen Sie die EtherDisk-Diskette in ein Diskettenlaufwerk ein. 2 Tippen Sie an der Eingabeaufforderung: INSTALL [Enter] 3 Befolgen Sie die auf dem Bildschirm angezeigten Anweisungen. 4 Nehmen Sie die Diskette heraus, und starten Sie den Computer neu. Installation der Treiber in anderen Umgebungen Falls Sie mehr als einen Adapter in einem einzelnen Computer installieren, Ihren Computer als Server verwenden oder in einer anderen Umgebung als NetWare arbeiten, finden Sie Informationen zur Adapterkonfiguration und Treiberinstallation in den readme- Dateien auf der EtherDisk-Diskette oder in den detaillierten Anweisungen des Benutzerhandbuchs. Sie können diese Informationen auch über Ihren Lieferanten für Netzwerkprodukte beziehen. ZUSÄTZLICHE INFORMATIONEN ENTNEHMEN SIE BITTE DEM BENUTZERHANDBUCH. AVVIO RAPIDO Questo "Avvio Rapido" spiega come installare l'adattatore ISA a 16 bit EtherLink III Parallel Tasking della 3Com. La figura 1 mostra i quattro tipi di adattatori ISA della 3Com e le rispettive linguette, i connettori ed i tipi di cablaggio. 3C509B-TPO 3C509B coax 3C509B-TP 3C509B-COMBO LED Connettore RJ-45 Connettore AUI LED LED Connettore BNC Tipo di connettore RJ-45 Tipo di cablaggio 10BASE-T AUI e BNC AUI e RJ-45 AUI, BNC, RJ-45 Coassiale spesso 10BASE-T 10BASE-T Coassiale sottile Coassiale Coassiale spesso spesso Coassiale sottile figura 1 Linguette per gli adattatori ISA della 3Com Introduzione Aprire con cura l'imballaggio e verificare che sia stato ricevuto l'adattatore ordinato. Controllare che l'adattatore non sia danneggiato. Nel caso si riscontri qualche danneggiamento, contattare il fornitore delle apparecchiature e il trasportatore che ha effettuato la consegna. 2 AVVIO RAPIDO ATTENZIONE: Ogni adattatore viene imballato in materiale antistatico per proteggerlo durante la spedizione. Per evitare il danneggiamento di componenti sensibili all'elettricità statica dopo la rimozione dal contenitore, assicurarsi di ridurre l'elettricità statica del proprio corpo. Questo risultato può essere ottenuto, ad esempio, toccando la base metallica del computer. Inserimento dell'adattatore Per inserire l'adattatore nel computer, seguire la seguente procedura: 1 Scollegare il computer dall'alimentazione elettrica e disconnettere tutti i cavi. Rimuovere il coperchio del computer e scegliere un alloggiamento di espansione disponibile. 2 Inserire l'adattatore nell'alloggiamento e serrare la vite. Osservare la figura 2. È possibile che l'aspetto del computer sia diverso. figura 2 Inserimento dell'adattatore Connessione alla rete 3 La linguetta dell'adattatore deve essere a diretto contatto con la base del computer. Assicurarsi che i piedini del connettore dell'adattatore siano completamente inseriti nell'alloggiamento. 3 Rimontare il coperchio del computer e ricollegare tutti i cavi. Connessione alla rete È necessario connettere l'adattatore alla rete prima di caricare i driver di rete. Collegare l'adattatore alla rete, utilizzando il cavo e i tipi di connettori appropriati, come illustrato nella figura 1. Installazione dei driver di rete È necessario conoscere il sistema operativo di rete (NOS, Network Operating System) operante sul sistema. Consultare l'amministratore della rete se necessario. Se si sta utilizzando il sistema operativo di rete Novell NetWare 2.x, 3.1x o 4.x con un adattatore singolo, seguire le istruzioni riportate nella sezione successiva. Se l'ambiente che si sta utilizzando non corrisponde alla descrizione sopra riportata, passare alla sezione "Installazione dei driver in altri ambienti". Installazione del driver per un adattatore singolo È possibile utilizzare il programma di installazione automatica AutoLink di 3Com per installare il software client Novell NetWare DOS ODI se: ■ Si utilizza il sistema operativo di rete Novell NetWare 2.x, 3.1x o 4.x ■ Si dispone di un solo adattatore 3C509B installato ■ Si intende utilizzare il computer come client di NetWare DOS ODI 4 AVVIO RAPIDO Per installare il software client di NetWare DOS ODI su di un PC con un singolo adattatore, utilizzare il programma AutoLink: 1 Inserire il dischetto EtherDisk in un'unità dischetto. 2 Al prompt dei comandi, digitare: INSTALL [Invio] 3 Seguire le istruzioni riportate sullo schermo. 4 Rimuovere il dischetto e riavviare il computer. Installazione dei driver in altri ambienti Se si sta installando più di un adattatore in un solo computer, si sta utilizzando il computer come server, o si sta operando in un ambiente diverso da NetWare, fare riferimento ai file "readme" nel dischetto EtherDisk o alle istruzioni dettagliate nella Guida per l'Utente per quanto riguarda la configurazione dell'adattatore e l'installazione del driver. Anche il fornitore delle apparecchiature dovrebbe essere in grado di fornire queste informazioni. PER ULTERIORI INFORMAZIONI, CONSULTARE LA GUIDA PER L'UTENTE. GUÍA RÁPIDA Esta guía le ofrece información de cómo instalar el adaptador ISA de 16 bits EtherLink Parallel Tasking de la compañía 3Com. La figura 1 ilustra los cuatro tipos de adaptadores 3Com ISA con sus placas, conectores y cables. 3C509B-TPO 3C509B coax 3C509B-TP 3C509B-COMBO Indicador (LED) Conector RJ-45 Conector AUI LED LED Conector BNC Tipo de conector RJ-45 Tipo de cable 10BASE-T AUI y BNC AUI y RJ-45 AUI, BNC y RJ-45 Coaxial grueso 10BASE-T 10BASE-T Coaxial fino Coaxial grueso Coaxial grueso Coaxial fino figura 1 Placas para los adaptadores ISA 3Com Para comenzar Abra con cuidado el envase y compruebe que se le haya enviado el adaptador que ha solicitado. Revíselo para ver si ha sufrido algún daño. De ser así, comuníqueselo a su proveedor y a la compañía que realizase el transporte. Precaución: El adaptador se empaqueta con material antiestático para protegerlo durante el envío. Antes de desembalar el producto, toque el chasis metálico del ordenador a fin de eliminar cualquier posible carga de electricidad estática del cuerpo y evitar así daños en los componentes sensibles a este tipo de electricidad. 2 GUÍA RÁPIDA Introducción del adaptador Para introducir el adaptador en el ordenador, siga estos pasos: 1 Desenchufe el ordenador y desconecte todos los cables. Retire la cubierta del ordenador y seleccione una ranura de expansión que se halle disponible. 2 Introduzca el adaptador y fíjelo con el tornillo. Observe la figura 2. (Puede que su ordenador tenga una configuración distinta.) figura 2 Introducción del adaptador La placa posterior del adaptador debe quedar al mismo nivel del plano posterior del ordenador. Asegúrese de que las lengüetas de contacto del conector estén bien encajadas en la ranura. 3 Vuelva a colocar la cubierta y a conectar todos los cables. Conexión a la red Debe conectar el adaptador a la red antes de cargar los controladores de red. Conecte el adaptador a la red utilizando los conectores y cables adecuados, como ilustra la figura 1. Instalación de los controladores de red 3 Instalación de los controladores de red Necesita saber qué sistema operativo de red (NOS) usa su ordenador. (Comuníquese con el administrador de la red, si no tiene la información). Si está utilizando el sistema operativo Novell NetWare 2.x, 3.1x o 4.x con un solo adaptador, siga las instrucciones que se presentan a continuación. De lo contrario, pase a la sección titulada "Instalación de controladores en otros entornos". Instalación del controlador para un solo adaptador Para instalar el software de cliente de Novell NetWare DOS ODI, podrá usar la opción de instalación automática AutoLink en los siguientes casos: ■ Si usa el sistema operativo Novell NetWare 2.x, 3.1x o 4.x. ■ Si tiene instalado un solo adaptador 3C509B. ■ Si pretende usar el ordenador como cliente de NetWare DOS ODI. Si desea usar el programa AutoLink para instalar el sofware de cliente NetWare DOS ODI en un ordenador (PC) provisto de un solo adaptador: 1 Introduzca el disquete EtherDisk correspondiente. 2 Escriba lo siguiente detrás del indicativo: INSTALAR [INTRO] 3 Siga las instrucciones de la pantalla. 4 Retire el disquete y vuelva a inicializar el ordenador. 4 GUÍA RÁPIDA Instalación de los controladores en otros entornos Si desea usar más de un adaptador en un ordenador, utilizar este último como servidor o trabajar en un entorno distinto de NetWare, consulte los archivos de lectura del disquete EtherDisk o las instrucciones detalladas de la Guía del usuario para informarse de la configuración del adaptador y de la instalación del controlador. Es posible que su proveedor también pueda proporcionarle esta información. PARA OBTENER MÁS INFORMACIÓN CONSULTE LA GUÍA DEL USUARIO. CISPR B COMPLIANCE This device complies with the EMC directive of the European Community and meets or exceeds the following technical standard: EN 55022 – Limits and Methods of Measurement of Radio Interference Characteristics of Information Technology Equipment. This device complies with the CISPR Class B standard. CE NOTICE Marking by the symbol indicates compliance of this equipment to the EMC directive of the European Community. Such marking is indicative that this equipment meets or exceeds the following technical standards: ■ EN 55022—“Limits and Methods of Measurement of Radio Interference Characteristics of Information Technology Equiment.” ■ EN 50082-1—“Electromagnetic compatibility —Generic immunity standard Part 1: Residential, commercial, and light industry.” ■ IEC 801-2—“Electromagnetic compatibility for industrial-process measurement and control equipment Part 2: Electrostatic discharge requirements.”—Severity level 3. ■ IEC 801-3—“Electromagnetic compatibility for industrial-process measurement and control equipment Part 3: Radiated electromagnetic field requirements.”—Severity level 2. ■ IEC 801-4—“Electromagnetic compatibility for industrial-process measurement and control equipment Part 4: Electrical fast transient/burst requirements.”—Severity level 2. ■ A “Declaration of Conformity” in accordance with the above standards has been made and is on file at 3Com Corporation.-
 1
1
-
 2
2
-
 3
3
-
 4
4
-
 5
5
-
 6
6
-
 7
7
-
 8
8
-
 9
9
-
 10
10
-
 11
11
-
 12
12
-
 13
13
-
 14
14
-
 15
15
-
 16
16
-
 17
17
-
 18
18
-
 19
19
-
 20
20
-
 21
21
-
 22
22
-
 23
23


