Crosley CRQN2215AS Manual de usuario
- Categoría
- Neveras
- Tipo
- Manual de usuario

English
USER’S OPERATION MANUAL
Before operating this unit, please read this manual
thoroughly, and retain for future reference
CRQN2215AS
CRQN2215AW
For questions about features, operation/performance, parts or
service, call: 1-800-356-5268

..................................................................................................................... 17
Table of Contents
Brief introduction
Important safety instructions
Installing your new appliance
Description of the appliance
Display controls
Using your appliance
Cleaning and care
Helpful hints and tips
Trouble shooting
Disposal of the appliance
..................................................................................................................... 1
........................................................................................... ...... 2
................................................................................................ 4
................................................................................................ 9
...................................................................................................................... 10
............................................................................................................ 12
............................................................................................................... 14
............................................................................................................. 15
.................................................................................................... 19
Brief Introduction
Please ensure that everyone using this
appliance is familiar with its operation
and safety features. It is important that
you install the appliance correctly and
pay careful attention to the safety
instructions.
We recommend that you keep this user’s
manual with the appliance for future
reference.
This appliance is intended to be used
in households and similar applications
such as:
Thank you for your choosing Crosley. We
are sure you will find your new refrigerator
a pleasure to use. Before you use the
appliance, we recommend that you
carefully read through these instructions,
which provide details about installing and
using the product.
This appliance is not intended for use by
persons (including children) with reduced
physical, sensory or mental capabilities, or
lack of experience and knowledge, unless
they have supervision or been given
instruction concerning use of the appliance.
Children should be supervised to ensure
that they do not play with the appliance.
Do not store explosive substances such as
aerosol cans with a flammable propellant
in this appliance.
Kitchen areas in shops, offices and other
working environments.
Hotels, motels and other residential
environments.
Bed and breakfast environments.
Catering and similar non-commericial
applications.
WARNING
Connect to potable water supply only.
Do not use mechanical devices or other
means to accelerate the defrosting
process, other than those
recommended by the manufacturer.
Do not damage the refrigerant circuit.
Do not use electrical appliances inside
the food storage compartments of the
appliance, unless they are of the type
recommended by the manufacturer.
When disposing of the appliance do so
only at an authorized waste disposal
center. Do not expose to flame.
If the power cord is damaged, it must be
replaced by the manufacturer, its
service agent or similarly qualified
persons in order to avoid a hazard.
1

General safety and daily use
It is important to use your appliance
safely. We recommend that you follow the
guidelines below.
Store any food in accordance with the
storage instructions from the manufacturer.
Important Safety Instructions
Safety for children and
other persons
Don't try to repair the appliance yourself.
It is dangerous to alter the
specifications or modify this product in
any way. Any damage to the power
cord may cause a short circuit, fire or
electric shock.
Don’t place too much food directly
against the air outlet on the rear wall
of both the refrigerator and freezer
compartment, as it may affect
important air circulation.
Don’t place hot items near the plastic
components of this appliance.
Frozen food must not be refrozen once it
has been thawed out.
Don’t store bottled or canned drinks
(especially carbonated drinks) in the
freezer compartment. Bottles and cans
may explode.
Use caution consuming popsicles or ice
cubes straight from the freezer as this can
cause freezer burn to the mouth and lips.
Keep all packaging away from children
to avoid risk of suffocation.
Protect children from being scalded by
touching the compressor at the rear
bottom of appliance
Don’t place items on top of the
appliance as this could cause injury
should they fall off.
Never allow children to play with the
appliance by hanging or standing over
or on the doors, racks, shelves and
drawers etc.
Electrical Safety
To avoid the risks that are always present
when using an electric appliance, we
recommend that you pay attention to
the instructions about electricity belo
w.
We recommend that you wait for 4 hours
before connecting the appliance to
allow the refrigerant to flow back into
the compressor.
The power plug must be accessible
when the appliance is installed.
This appliance must be grounded.
This appliance is fitted with a plug,
in accordance with local standard.
The plug should be suitable for use in all
houses fitted with sockets in accordance
with current specifications.
Electrical Safety
To avoid the risks that are always present
when using an electric appliance, we
recommend that you pay attention to
the instructions about electricity below.
Unpack and check through the
appliance. Should any damage be
evident, don’t plug in the appliance
and contact the dealer from which
you purchased it immediately. Keep all
packing materials in this case.
The appliance requires single phase
alternating current of
110~115V/60Hz. If the voltage fluctuates
exceeding the upper limit, an A.C.
automatic voltage regulator of more
than 350W should be applied to the
refrigerator for safe use.
2

If the fitted plug is not suitable for your
socket outlets, it should be cut off and
carefully disposed of. To avoid a
possible shock hazard, do not insert the
discarded plug into a socket. If in doubt
contact a qualified, registered
electrician.
Make sure that the plug is not squashed
or damaged. Otherwise, it may cause
short circuit, electric shock or overheat
and even cause a fire.
Do not insert the power plug if the
socket is loose, there is a risk of electric
shock or fire.
Switch off the appliance and
disconnect it from the main power
before you clean or move it.
Never unplug the appliance by pulling
on the electrical cord. Always grip the
plug firmly and pull straight out from the
socket to prevent damaging the power
cord.
Any electrical component must be
replaced or repaired by a qualified
electrician or authorized service
engineer. Only genuine replacement
parts should be used.
Do not use electrical appliances such
as ice cream makers inside the food
storage compartments of the
appliance unless they are approved
by the manufacturer.
To avoid eye injury, do not look directly
into the LED light located in the refrigerator
compartment. If it is not functioning
correctly, consult a qualified, registered
electrician or replace it in accordance
with the “Cleaning and Care” chapter.
The refrigerant isobutane (R600a) is
contained within the refrigerant circuit of
the appliance. During transportation and
installation of the appliance, ensure that
none of the components of the refrigerant
circuit become damaged.
The refrigerant (R600a) is flammable.
Don't store products which contain
flammable propellants (e.g. spray cans)
or explosive substances in the appliances.
Avoid open flames (candles, lamps etc. )
and other sources of ignition.
Thoroughly ventilate the room in which
the appliance is situated.
Refrigerant
Caution: Risk of Fire
Should the refrigerant circuit
be damaged:
Do not use extension cords or multiple
sockets which could cause overloading
of wiring circuits and could cause a fire.
Always plug your appliance into its own
individual electrical socket with a
voltage rating that matches the
appliance’s rating plate.
Do not operate the appliance without
the cover on the interior lighting.
3

Installing Your New Appliance
WARNING
Before using the appliance for the first time,
you should be informed of the following tips.
For proper installation, this refrigerator
must be placed on a level surface of
hard material that is the same height
as the rest of the flooring. This surface
should be strong enough to support a
fully loaded refrigerator.
The rollers, which are not casters, should
be only used for forward or backward
movement. Moving the refrigerator
sideways may damage your floor and
the rollers.
Suggestion:
In order to improve efficiency of the
cooling system and save energy, it is
necessary to maintain good ventilation
around the appliance for the dissipation
of heat. For this reason, sufficient clear
space should be available around the
refrigerator.
Ventilation of appliance
This appliance performs well within the
climate class from N to T shown in the table
below. It may not work properly if left at a
temperature above or below the
indicated range for a long period.
Stand your appliance in a dry place to
avoid high moisture.
Keep the appliance out of direct sunlight,
rain or frost. Stand the appliance away
from heat sources such as stoves, fires or
heaters.
Climate class
SN
N
SN
T
+50°F to + 90°F
+61°F to + 100°F
+61°F to + 100°F
+61°F to + 109°F
Ambient temperature
4
Note:
It is advisable for there to be at least
2"(50mm) of clearance from the back of
the fridge to the wall, at least 2"(50mm) of
clearance from its top, at least 1/2"(12mm)
from its side to the wall and a clear
space in front to allow the doors to
open 125°, as shown in the following
diagram.
2” Above
2” Behind
1/2” Each Side

The height of a door can be adjusted using the
provided Snap Rings.
Adjusting Door Height and Door Gap
To adjust the Height of Door
1. Check the height difference between the
doors and then lift and hold the lowest door
to be even with the other.
2. Insert a suitably sized Snap Ring between the
Door and the Hinge as shown.
Contains Small Parts, Keep the Snap
Rings Away From Babies and Children.
WARNING!
IMPORTANT !
1. Insert only one Snap Ring. If you insert two
or more Snap Rings, they may slip out or
cause a rubbing noise.
2. Do not raise the door too much. The
door may contact and damage the
top cover.
3. Save rermaining Snap Rings for possible
future use.
Snap Ring (4pcs) Wrench(Not provided)
Tools you will need:
5

For sufficient leveling and air circulating
in the lower rear section of the
appliance, the bottom feet may need
to be adjusted. You can adjust them
manually by hand or by using a suitable
tool.
To allow the doors to self-close, tilt the
top backwards by 0.4" - 0.6".
Leveling of appliance
In case your home access door is too
narrow for the refrigerator to pass
through, remove the refrigerator doors
and drawers. If you do not need to
remove the appliance doors, proceed
to ‘Installing Water Lines’ on page 8.
If you need to remove the doors,
continue below.
Door Removal
Adjustable
bottom feet
Front roller Rear roller
0.4"~0.6"
Adjustable
bottom feet
Allen Wrench (5/32",4mm)
Philips Screwdriver
Wrench (5/16",8mm)
Tools you will need(Not provided)
1.With the door closed, remove the 3 screws
holding the top cover (A) with Philips (+)
screw driver, and then remove the top cover
with the entire-harness atached.
2.Remove the 3 screws (B) fixed on the hinges
with a wrench (5/16”, 8mm) and 1 ground
screw (C) attached to the hinge with Philips (+)
screw driver. Remove the upper left and right
door hinges(D).
6

An automatic ice maker is a very useful
feature in your new refrigerator. Please
follow the below instructions carefully
for correct installation.
In order for the ice maker to operate
properly, a water line is required.
-the maximum inlet water pressure is 700kPa;
-the minimum inlet water pressure is 207kPa.
Installing the water lines
1. Power drill and 1/4’’ drill bit.
2. 1/2’’ or adjustable wrench.
3. Flatblade and Philips head screwdrivers.
1 ferrule
(sleeve)
Saddle-type
Shut offvalve
(1/4” outlet)
one 1/4”
compression
1/4” extension
tubing
1 Coupler 2 Clips
WARNING!
Under normal conditions, a200cc
(5.75 oz.) cup can be filled in about
10 seconds.
If the refrigerator is installed in an area
with low water pressure (below 30psi),
you can install a booster pump to
compensate for the low pressure.
The water connection must be made
by a qualified plumber. Operation
outside the water pressure range
may cause malfunction, or severe
and damaging water leaks.
What you need to have before you begin
4. You may need to purchase several
items to complete this connection.
You may find these items sold as a kit
at a local hardware store.
Connecting to the water supply line
1.
2.
3.
First, shut off the main water supply.
Cold water line
Pipe clamp
Shut off Valve
Using a power drill and a 1/4’’ drill bit
drill into the cold-water line and
connect the saddle-type shutoff valve.
Connect 1/4’’ extension tubing to shutoff
valve outlet.
Outllet Valve
Packing Nut
Saddle-Type
Shutoff Valve Compression Nut
1/4” Extension
tubing
Ferrule(sleeve)
Flush the tubing. Turn the main water
supply on and flush out the tubing until
the water is clear. Then, shut the water
off at the water valve after about a quart
of water has flushed through the tubing.
4.
7

Connect Water Line to Refrigerator
IMPROTANT:
2.
3.
4.
5.
If you turn the refrigerator on
before the water is connected,turn off the
ice maker.
Unplug refrigerator or disconnect power.
Close shutoff value.
Thread a 1/4 " compression nut and ferrule
(sleeve) onto the free end and of 1/4"
Insert the free and of the 1/4" water line
water line.
into the brass fitting attached to the water
inlet on the back of the refrigerator.
a b c Ferrule (Sleeve) -1 pcs
1/4" Compression Nut - 1 pcs
1/4" Water Line - 1 pcs
a
b
c
e
d
c
1/4" Water Line
1/4" Compression
Nut
Ferrule(Sleeve)
Brass Fitting
Water Inlet
Slide the 1/4" compression nut over the
ferrule (sleeve) and screw the 1/4"
compression nut onto the brass ftting.
6.
7. Comfirm 1/4" water line is secure by gently
pulling on it.
8. Turn on water supply and check for leaks.
Correct any leaks
a
b
c
d
e
a
b
Note:
Ensure that the water line does not get
pinched or bent when installing.
This can result in improper water flow
through the line and will affect the
functionality of the fridge.
Clip
Water line Water line
Coupler
5. Connect the extension tubing line with
the line on the back of the fridge via
the coupler. Fully insert the extension
tubing into the coupler, and then insert
the clip onto the coupler to lock in the
tubing. Do the same with the other
end. After both clips are inserted,
check the line to make sure it is held
firmly by the clips.
6. Turn the water on and check
for leakage.
Note:
Use only the new tubing supplied with the
refrigerator. Old tubing should not be used.
After connected to the water supply line,
please open the water valve to flush the
filter for 5 minutes before use.
The initial dark discoloration of water is
normal.
The water line must be connected to the
cold water pipe. If it is connected to the
hot water pipe, it may cause the purifier
to malfunction.
Avoid contamination of pipes during
installation.
Connect to potable water supply only.
WARNING!
1. You may need to purchase below items
to complete this connection. And you
may find these items sold as a kit at a
local hardware store.
8

Due to unceasing modification of our products, your refrigerator may be slightly different
from this instruction manual, but its functions and using methods remain the same.
To get the best energy efficiency of this product,please place all shelves, drawers and
baskets on their original position as per the illustration above.
Mullion
Crisper Cover
Fruit and vegetabers Crisper
Refrigerator LED Light
Refrigerator Door Bin
Glass Shelf
Freezer LED Light
Ice-Maker
Freezer Tray
Freezer Middle Drawer
Freezer Door Bin
Freezer Lower Drawer
Middle Storage Drawer
Convertible Compartment LED light
Convertible Compartment Tray
Convertible Compartment Middle
Drawer
Convertible Compartmente Lower
Drawer
Leveling Leg
9
XXXX
--------
OOOO

Display Controls
Your product has one control panel which is installed on the top of refrigerator
inside. Use your appliance according to the following control guidelines.
My Fresh Choice Compartment: 19°F (-7°C)
2. When Fridge is on, icon is
Freezer Compartment: 0°F (-18°C)
Fridge Compartment: 39°F (4°C)
When you set a temperature, you are
setting an average temperature for the
entire compartment. The actual
compartment temperatures may vary from
the temperatures displayed depending on
the amount and placement of stored food,
and the surrounding room temperature.
To toggle between Celsius and Fahrenheit
on the display, press and hold the “TEMP.”
button for three seconds.
1. Press “ZONE” button repeatedly until
the Fridge icon appears.
illuminated and then press “TEMP.” button
repeatedly to cycle through the available
temperature settings from 46°F to 36°F.
NOTE: Each press of the button decrease
the setting by one degree.
3. Release the “TEMP.” button control
when the desired temperature setting
appears.
the setting by one degree.
NOTE: Each press of the button decrease
the My Fresh Choice icon appears.
1. Press “ZONE” button repeatedly until
(5°C) to -4°F( -20°C).
avaiable temperature settings from 41°F
button repeatedly to cycle through the
is illuminated and then press “TEMP.”
2. When My Fresh Choice is on, icon
3. Release the“TEMP.”button control
when the desired temperature setting
appears.
Freezer Compartment Temperature
1. Press “ZONE” button repeatedly
until the Freezer icon appears.
2. When Freezer is on, icon is
illuminated and then press “TEMP.”
button repeatedly to cycle through
the available temperature settings,
from 7°F(-14°C) to -11°F( -24°C)
NOTE: Each press of the button decrease
the setting by one degree.
3. Release the “TEMP.” button control
when the desired temperature setting
appears.
My Fresh Choice Compartment Temperature
Setting Compartment Temperatures
Recommended Temperature Settings
Fridge Compartment Temperature
10

The Super Cool feature helps to keep food
stored in the refrigerator at the set
temperature during periods of high usage,
large grocery loads, or temporarily warm
room temperatures
The Super Cool feature lowers the
temperature in the fridge compartment.
1. Press the "MODE" button to activate this
function. The "Super Cool" icon will be
illuminated and the fridge temperature
indicator will display 36°F (2°C).
2. Super cool will automatically turn off
after 3 hours.
3. When super cool function is on you can
turn it off by pressing the "MODE" button
or setting fridge temperature. To manually
turn off the Super Cool function, the fridge
temperature setting will revert back to the
previous setting.
Super Freeze will quickly lower the
temperature within the freezer so food will
freeze faster than usual. This feature also
helps to keep vitamins and nutrition of fresh
food and keep for longer period.
1. Press the "MODE" button to activate this
function. The "Super Freeze" icon will be
illuminated and the temperature for the
freezer is set to -11°F(-24°C).
2. Super freezer will automatically turn
off after 52 hours.
3. When Super Freeze function is on you
can turn it off by pressing the "MODE"
button or setting freezer temperature. To
manually turn off the Super freezer
function,the freezer temperature setting
will revert back to the previous setting.
NOTE: When you selecting the Super
Freeze function, ensure there are no
bottled or canned drinks(especially
carbonated drinks) in the freezer
compartment. Bottles and cans may
explode.
The ice maker is located inside the freezer
compartment, near the top of the
compartment. When the ice maker makes
ice, the ice is stored in freezer tray
Press the "ICE" button to turn the ice
maker on or off. When the ice maker is
turned on, the icon lights.
To use ice, open the freezer
compartment door, then pull open
the freezer tray and remove the ice
iby ice scoop from it.
Ice scoop
Tool you will need(provided in package)
Press the "Mode" button to turn on the
energy saving function, the "Energy saving"
icon will be illuminated.
When the energy saving function is on, the
temperature of fridge is automatically
switched to 43°F(6°C)and the temperature
of freezer is automatically switched to
1°F(-17°C), the temperature of My Fresh
Choices is compartment is immovability.
When energy saving function is on, you can
switch it off by pressing the "MODE" button
or adjusting the fridge/freezer temperature,
the refrigerator temperature setting will
revert back to the previous setting.
Press and hold the "POWER" button for 3
seconds to turn the power function on or
off. When the power function is on,
the icon lights and the display panel
will show "OF".
NOTE: When the power function is on,
the refrigerator is stopped cooling.
11

Demo mode is for store display, and it
prevents the refrigerator from generating
cool air. In this of Cooling off Mode,
the refrigerator may seem like it is working
but it will not make cool air. The display
panel will show special segments as
follow.
To switch off demo mode, press and hold
"POWER" and "ICE" buttons at the same
time for three seconds and the buzzer
gave a long sound.
Using your Appliance
Demo mode
The refrigerator compartment is suitable
for storage of vegetables and fruit. Food
inside should be sealed for storage in
order to avoid losing moisture or flavor
permeating into other foods.
Caution!
Never close the refrigerator door while
the shelves, crisper and/or telescopic
slides are extended. It may damage
both them and the refrigerator.
Using your fridge compartment
The four doors can be opened and closed
either separately or together.
•There is a mullion on the left-hand side
refrigerator compartment door.
•When closing the left-hand door , the
mullion folds behind the right-hand door
joining the two doors.
•The temperature of the door frame is
controlled to help prevent moisture from
developing on the mullion. The temperature
of the surface may be warm, which is
normal, and will not affect the
performance of the refrigerator.
Opening and Closing Doors
NOTE: Before closing the left-hand door, make
sure the mullion is folded inward. If the mullion
is pulled outward it may become damaged
when you try to close the door.
Using the Controls·
NOTE: The controls on your model may look
different from this and other images in this
manual, depending on your model’s features.
Door Open Alarm
lf a door is open for longer than 2
minutes, an alarm will sound to alert
you and the control panel will display
"dr". The alarm will sound 3 times
every minute for 8 minutes.
To turn off the alarm, close all doors
completely.
12

d
The height of the shelves can be adjusted
to fit your storage needs.
1. To remove a shelf, gently lift upward
and then pull the shelf forward until the
end of the shelf is past the rail support.
2. To reinstall a shelf, gently slide the
shelf back into the refrigerator
compartment, and the lower the
shelf onto the rail support.
Door Bins
The refrigerator compartment is provided
with six door bins, which are suitable for the
storage of canned liquid, bottled drinks
and packaged food. To remove the door,
simply lift the racks up and pull straight out.
To relocate the door , slide it in above the
desired location and push down until it
stops.
Do not place too many heavy things in
the baskets. Before you liftup the door
shelf vertically, please take the dood out.
WARNING!
Automatic Ice maker
When the ice maker dumps ice into
the ice box, any sounds you hear are
part of normal operation.
lf you do not dispense ice for a long
periods of time, ice may clump in the
ice box. lf this occurs, please remove
all the ice and empty the box.
lf you are going on a long vacation
or business trip and won't be using
ice maker part for period of time,
please close the water supply to
prevent leaks.
Throw out the first several batches
of ice that is made as it will have
contaminants.
Do not store liquids in the ice box,
as it may expand and break.
Do not allow your children to touch
the ice maker. This could cause
injury.
WARNING!
Adjustable Shelves
13

To maintain good appearance of your
appliance, you should clean it regularly.
Clean the doors, handles and cabinet
surfaces with a mild detergent and
then wipe dry with a soft cloth.
Exterior cleaning
Interior cleaning
Cleaning and Care
CAUTION!
1.Don’t use sharp objects to clean
with, as they are likely to scratch
the surface.
2.Don’t use thinner, car cleaner,
bleach, oil, abrasive cleansers or
organic solvent such as benzene
for cleaning. They may damage
the surface of the appliance and
may cause fire.
WARNING!
To avoid electrical shock, the
appliance must not be connected
to the main power supply during
cleaning. Before cleaning, switch
the appliance off and remove the
plug from the main socket.
Although this appliance automatically
defrosts, a layer of frost may occur on
the freezer compartment’s interior walls if
the freezer door is opened frequently or
kept open too long. If the frost is too
thick, choose a time when the freezer is
nearly empty and proceed as follows:
Remove existing food and accessory
baskets, unplug the appliance from
the main power and leave the doors
open. Ventilate the room thoroughly to
accelerate the process.
When defrosting is completed, clean
your freezer as described above.
1.
2.
For hygienic reasons the appliance
(including exterior and interior
accessories) should be cleaned at least
once every two months.
Spray water onto a cleaning cloth
instead of spraying directly onto the
surface of the appliance. This helps
ensure an even distribution of moisture
to the surface.
Clean the appliance interior regularly.
It will be easier to clean when food
stocks are low. Wipe the inside of
the fridge and freezer with a weak
solution of baking soda and water, and
then rinse with warm water using a
wrung-out sponge or cloth. Wipe
completely dry before replacing the
shelves and baskets. Thoroughly dry all
surfaces and removable parts before
putting them back into place.
WARNING!
Do not use sharp objects to remove
frost from the freezer compartment.
Only after the interior is completely
dry should the appliance be
switched back on and plugged
back into the main socket.
14

Replacing the LED light
CAUTION!
Only after the door seals are
completely dry should the
appliance be powered on.
WARNING!
The LED light must be replaced by
a competent person. If the LED
light is damaged, follow the steps
below:
1. Unplug your appliance.
2. Remove the light cover by
lifting up and pulling out.
3. Hold the LED light with one hand
and pull it while pressing the
connector latch with the other
hand.
4. Replace the LED light and snap
it correctly in place and replace
the light cover.
Door seal cleaning
Take care to keep the door seals
clean. Sticky food and drinks can
cause seals to stick to the cabinet
and tear when you open the door.
Wash seal with a mild detergent and
warm water. Rinse and dry it
thoroughly after cleaning.
Helpful Hints and Tips
Energy Saving Tips
We recommend that you follow the tips
below to save energy.
Don’t set the temperature colder than
necessary.
Don’t store warm food or evaporating
liquid in the appliance.
If the diagram shows the correct
combination for the drawers, crisper and
shelves, do not adjust the combination as
this is designed to be the most energy
efficient configuration.
Avoid keeping the door open for long
periods in order to conserve energy.
Ensure the appliance is away from any
sources of heat (direct sunlight, electric
oven or cooker etc.)
Place the appliance in a well
ventilated, humidity freeroom. Please
refer to the Installing your New
Appliance chapter.
Hints for fresh food refrigeration
Do not place hot food directly into the
refrigerator or freezer, the internal
temperature will increase resulting in the
compressor having to work harder and
consume more energy.
Do cover or wrap the food, particularly if it
has a strong flavor.
Place food properly so that air can
circulate freely around it.
15

For Meat: (all types) wrap in cling wrap
and place on the glass shelf above the
vegetable drawer. Always follow food
storage times and use by dates
suggested by manufacturers.
Cooked food, cold dishes, etc.:
They should be covered and placed on
any shelf.
Fruit and vegetables:
They should be stored in the special
drawer provided.
Butter and cheese:
Should be wrapped in airtight foil or
plastic film wrap.
Milk bottles:
Should have a lid and be stored in the
door racks.
Hints for refrigeration
When first starting-up or after a period
out of use, let the appliance run at least
2 hours on the higher settings before
putting food in the compartment.
Prepare food in small portions to enable
it to be rapidly and completely frozen
and to make it possible to subsequently
thaw only the quantity required.
Wrap up the food in aluminum foil or
cling wraps which are airtight.
Do not allow unfrozen food to touch the
food which is already frozen to avoid
temperature rise of the latter.
Hints for freezing
Hints for the storage of frozen food
It is recommended to label and date
each frozen package in order to keep
track of the storage time.
Once defrosted, food will deteriorate
rapidly and should not be re-frozen. Do
not exceed the storage period indicated
by the food manufacturer.
Switching off your appliance
If the appliance needs to be switched off
for an extended period, the following
steps should be taken to prevent mold on
the appliance.
Remove all food.
Remove the power plug from the
main socket.
Clean and dry the interior thoroughly.
Ensure that all the doors are wedged
open slightly to allow air to circulate.
1.
2.
4.
3.
Iced products (ice cubes, popsicles): if
consumed immediately after removal
from the freezer compartment, may
cause frost burns to the skin.
Ensure that frozen food has been stored
properly by the food retailer.
16

Troubleshooting
Problem Possible Cause & Solution
WARNING
•
•
•
•
•
1.Don’t try to repair the appliance yourself. If the problem persists after you have made
the checks mentioned below, contact a qualified electrician, authorized service
technician or the shop where you purchased the product.
2.A child entrapment warning statement is included below.
DANGER
Risk of child entrapment. Before you throw away your old refrigerator or freezer:
- Take off the doors.
- Leave the shelves in place so that children may not easily climb inside.
Appliance is
not working
correctly
Noise from the
appliance
Odors from the
compartments
Check whether the power cord is plugged into the power
outlet properly.
The room temperature may be too low. Try setting the
refrigerator or freezer temperature to a colder level to solve
this problem.
It is normal that the freezer is not operating during the defrost
cycle, or for a short time after the appliance is switched on to
protect the compressor.
The cabinet is not level.
The back of appliance is touching the wall.
Bottles or containers have fallen or are rolling.
The sounds below are quite normal:
Compressor running noises.
Air movement noise from the small fan motor in the freezer
compartment or other compartments.
Gurgling sound similar to water boiling.
Popping noise during automatic defrosting.
Clicking noise before the compressor starts.
The interior may need to be cleaned
Some food, containers or wrapping may cause odors.
Check the fuse or circuit of your power supply, replace
if necessary.
If you experience a problem with your appliance or are concerned that the appliance is
not functioning correctly, you can carry out some easy checks before calling for
service, please see below.
•Clicking noise when dispensing water.
•The motor running noises when dispensing ice.
Other unusual noises may be due to the reasons below and
may need you to check and take action:
17

The motor runs
continuously
A layer of frost
occurs in the
compartment
Temperature
inside is too
warm
Temperature
inside is too cold
Doors can’t
be closed easily
Hear water
bubbling in the
refrigerator
The light is
not working
The LED light may be damaged. Refer to replace LED lights
in“ Cleaning and Care” chapter.
The control system has disabled the lights due to the door
being kept open too long. Close and reopen the door to
reactivate the lights.
You may have left the doors open too long or too frequently;
or the doors are kept open by some obstacle; or the
appliance is located with insufficient clearance at the sides,
back and top.
Increase the temperature by following the “Display
Controls” chapter.
Check whether the top of the refrigerator is tilted back by
0.4"-0.6"(10-15mm) to allow the doors to self-close, or if
something inside is preventing the doors from closing.
This is normal. The bubbling comes from the refrigerant
coolant liquid circulating through the refrigerator.
It is normal to frequently hear the sound of the motor.
It will need to run more in the following circumstances:
The temperature is set colder than necessary.
A large quantity of warm food has recently been
stored within the appliance.
The temperature outside the appliance is high.
Doors are kept open too long or too often.
After first installing the appliance or if it has been
switched off for a long time.
Check that the air outlets are not blocked by food and
ensure food is placed within the appliance to allow
sufficient ventilation. Ensure that the door is closing fully.
o remove the frost, please refer to the Cleaning and
Care chapter.
Ice maker is
not working
Did you wait for 24 hours after installation of the water
supply line before making ice? If it is not sufficiently cool,
it may take longer to make ice, such as when first installed.
Is the water line connected and the water valve open?
Is the water pressure less than 30psi? Install a booster
pump to compensate for the low pressure.
Is the freezer temperature too warm? Try setting the
freezer temperature lower.
Ice maker is not making ice fast enough. Please wait
for at least 90 minutes.
Did you manually stop the ice making function?
Make sure you did not set the “Ice Off” mode.
Is there any ice stuck within the ice maker bucket?
18

Disposal of the Appliance
Correct Disposal of this product
DANGER
WARNING
Packaging materials with the recycle symbol are recyclable.
Dispose of the packaging into a suitable waste collection container to recycle it.
1. Pull out the main plug from the main socket.
2. Cut off the power cord and discard with the main plug.
Refrigerators contain refrigerant and gases in the insulation. Refrigerant and gases
must be disposed of professionally as they may cause eye injuries or ignition.
Ensure that tubing of the refrigerant circuit is not damaged prior to proper disposal.
It is prohibited to dispose of this appliance as household waste.
Packaging materials
Before disposal of the appliance
This symbol on the product or in its packing indicates that
this product may not be treated as household waste.
Instead, it should be taken to the appropriate waste
collection point for the recycling of electrical and electronic
equipment. By ensuring this product is disposed of correctly,
you will help prevent potential negative consequences for
the environment and human health, which could otherwise
be caused by the inappropriate waste handling of this
product. For more detailed information about the recycling
of this product, please contact your local government,
your household waste disposal service, or the shop where
you purchased the product.
19
DISCLAiMER:
Images used throughout this document are or illustrative purposes only and
may differ from the actual product.

Español
MANUAL DE OPERACIÓN
DEL USUARIO
Antes de operar esta unidad, lea completamente este manual
y guárdelo para referencia futura.
CRQN2215AS
Para consultas sobre las características, funcionamiento/
rendimiento, piezas o servicio, llame al: 1-800-356-5268
CRQN2215AW

Tabla de contenidos
Introducción breve........................................................................................................
Instrucciones importantes de seguridad....................................................................
Instalar el aparato nuevo.............................................................................................
Descripción del aparato...............................................................................................
Controles de la pantalla.............................................................................................
Uso del aparato............................................................................................................
Limpieza y mantenimiento..........................................................................................
Sugerencias y consejos útiles.....................................................................................
Solución de problemas...............................................................................................
Eliminación del aparato.............................................................................................
Introducción breve
Asegúrese de que todas las personas que
utilizan el aparato estén familiarizadas con
el funcionamiento y las características de
seguridad. Es importante que instale el
aparato correctamente y preste atención
a las instrucciones de seguridad.
Le recomendamos conservar este manual
del usuario con el aparato para futuras
consultas.
Este aparato está diseñado para ser
utilizado en el hogar y las aplicaciones
similares tales como:
Gracias por elegir Crosley. Estamos seguros
de que cuando utilice su nuevo refrigerador
estará satisfecho. Le recomendamos leer
cuidadosamente todas estas instrucciones
antes de utilizar el aparato ya que las
mismas brindan detalles acerca de la
instalación y uso del producto. Este aparato no ha sido diseñado para que
lo utilicen personas (incluidos niños) con
capacidades físicas, sensoriales o mentales
reducidas, o con falta de experiencia o
conocimientos, a menos que estén
supervisados o reciban instrucciones
acerca del uso del aparato por parte de
una persona responsable de su seguridad..
Los niños deben estar supervisados para
garantizar que no jueguen con el aparato.
No almacene las sustancias explosivas
tales como latas de aerosol con un
propulsor inflamable en este aparato.
Cocinas en tiendas, oficinas y otros
ambientes de trabajo.
Hoteles, moteles y otro tipo residencial.
Posadas. Servicios de hostelería y
aplicaciones similares no comerciales.
ADVERTENCIA
Sólo conéctelo a un suministro de agua
potable.
No utilice dispositivos mecánicos ni otros
medios no recomendados por el
fabricante para acelerar el proceso de
descongelación.
No dañe el circuito del refrigerante.
No utilice aparatos eléctricos dentro de los
compartimentos de almacenamiento de
alimentos del aparato, a menos que sean
del tipo recomendado por el fabricante.
Para desechar el aparato, llévelo a un
centro autorizado de eliminación de
residuos. No lo exponga al fuego.
Si el cable de alimentación está
dañado, deberá ser reemplazado por el
fabricante, su agente de o las personas
similarmente cualificadas con el fin de
evitar un peligro.
1
1
2
4
9
10
12
14
15
17
19

Seguridad general y uso diario
Es importante utilizar el electrodoméstico
de forma segura. Le recomendamos que
siga las siguientes pautas.
Almacene todos los alimentos siguiendo
las instrucciones de almacenamiento
del fabricante.
Instrucciones importantes de seguridad
Seguridad para niños y
otras personas
No intente reparar el aparato usted
mismo. Es peligroso alterar las
especificaciones o modificar el
producto de cualquier modo. Cualquier
daño en el cable de alimentación
puede causar cortocircuitos, incendios
o descargas eléctricas.
No ponga muchos alimentos en la
salida de aire de la pared trasera del
compartimento refrigerador o
congelador, pues puede afectar
notablemente a la circulación de aire.
No coloque objetos calientes cerca
de los componentes de plástico de
este aparato.
La comida congelada no se debe
volver a congelar una vez que se haya
descongelado.
No almacene bebidas embotelladas
o enlatadas (en especial bebidas con
gas) en el compartimento
congelador. Las botellas y las latas
pueden explotar.
Tenga cuidado al consumir las paletas
heladas o los cubos de hielo
directamente del congelador ya que
pueden causar quemaduras de frío en la
boca y en los labios.
Mantenga todo el material de
embalaje lejos del alcance de los niños
para evitar riesgos de asfixia.
Proteja a los niños para que no se
quemen al tocar el compresor de la
parte trasera inferior del aparato.
No coloque objetos sobre el
aparato, ya que podrían provocar
lesiones en caso de caída.
Nunca permita que los niños jueguen
con el aparato colgándose o
subiéndose a las puertas, bandejas,
estantes, cajones, etc.
Seguridad eléctrica
Le recomendamos esperar 4 horas antes
de conectar el aparato para permitir
que el refrigerante fluya hacia el
compresor.
El enchufe eléctrico debe ser accesible
cuando el aparato esté instalado.
Este aparato debe tener conexión a tierra.
El aparato está equipado con un
conector que cumple con las normas
locales. El conector debe ser apto para
el uso hogareño y debe estar equipado
con un tomacorriente que cumpla con
las normas vigentes.
Para evitar los riesgos siempre
presentes al utilizar un aparato
eléctrico, se recomienda prestar
atención a las siguientes
instrucciones acerca de electricidad.
Desempaquete y compruebe
detenidamente el aparato. Si hay algún
daño evidente, no enchufe el aparato y
póngase en contacto con su distribuidor
inmediatamente. En este caso, conserve
todos los materiales de empaque.
El aparato requiere corriente alterna de
una fase de 110~115 V/60 Hz. Para un
uso seguro, si la oscilación de la tensión
excede el límite máximo, se debe
colocar un regulador de tensión
automático de CA de más de 350W en
el refrigerador.
2

Si el conector no es apto para su
tomacorriente, debe cortarlo y
eliminarlo cuidadosamente. Para evitar
posibles descargas eléctricas, no
coloque el conector que ya eliminó en
un tomacorriente. Si tiene dudas,
contacte a un electricista matriculado
y calificado.
Asegúrese de que el conector no esté
aplastado ni dañado. De lo contrario,
puede causar cortocircuitos, descargas
eléctricas o sobrecalentamiento y
causar incendios.
No coloque el conector si el
tomacorriente está flojo, hay riesgo
de descargas eléctricas o incendios.
Apague el aparato y desconéctelo
del interruptor principal antes de
realizar la limpieza o moverlo.
Nunca desconecte el aparato tirando
del cable de alimentación. Agarre
siempre el enchufe con firmeza y
extráigalo de la toma para evitar
dañar el cable eléctrico.
La sustitución o reparación de los
componentes eléctricos las debe
realizar un electricista cualificado o
un ingeniero de servicio autorizado.
Solo se deben utilizar piezas de
repuesto originales.
No utilice aparatos eléctricos como
máquinas de helados dentro de los
compartimentos de
almacenamiento de alimentos del
aparato a menos que hayan sido
aprobados por el fabricante.
Para evitar lesiones en la vista, no mire
directamente a la luz LED ubicada en el
compartimiento del refrigerador. Si no
funciona correctamente, consulte a un
electricista matriculado o reemplácela
siguiendo el capítulo “limpieza y
cuidado”.
El refrigerante isobutano (R600a) se
encuentra dentro del circuito refrigerante
del aparato. Durante el transporte y la
instalación del aparato, asegúrese de
que ninguno de los componentes del
circuito refrigerante se dañe.
El refrigerante (R600a) es inflamable.
No almacene productos que contengan
propelentes inflamables (ej.: latas de
aerosol) ni sustancias explosivas en el
aparato.
Evite llamas (velas, lámparas, etc.) y
otras fuentes de ignición.
Ventile completamente la habitación
donde se encuentra ubicado el aparato.
Refrigerante
Precaución Riesgo de incendio
No utilice cables de extensión ni
múltiples tomacorrientes ya que
podrían causar sobrecargas en el
cableado e incendios. Enchufe el
aparato en un enchufe individual con
un voltaje que corresponda con el de
la placa de características del aparato.
No ponga en funcionamiento el
aparato sin la cubierta de la luz
interior.
3
Si el circuito refrigerante
está dañado:

Instalar el aparato nuevo
ADVERTENCIA
Antes de utilizar el aparato por primera vez,
debe leer los siguientes consejos.
Para realizar una instalación adecuada,
se debe colocar la nevera sobre una
superficie nivelada de material duro
que esté a la misma altura que el resto
del suelo. Esta superficie debe ser lo
suficientemente fuerte para soportar
una nevera completamente cargada.
Los rodillos, que no son ruedas, solo se
deben usar para moverla hacia
delante o hacia atrás. Mover la nevera
hacia los lados podría dañar el suelo y
los rodillos.
Sugerencia:
Para mejorar la eficacia del sistema
refrigerante y ahorrar energía, es
necesario mantener una buena
ventilación alrededor del aparato para
disipar el calor. Por esta razón, se debe
dejar suficiente espacio libre alrededor
del refrigerador.
Ventilación del aparato
Este aparato funciona bien dentro de la
clase climática N a T que se muestra en la
siguiente tabla. Es posible que no funcione
correctamente si se deja a una
temperatura superior o inferior al rango
indicado durante mucho tiempo.
Coloque el aparato en un lugar seco
para evitar daños por la humedad.
Mantenga el aparato lejos de la luz solar,
la lluvia o las heladas. Coloque el
aparato alejado de fuentes de calor,
como estufas, fuegos o calentadores.
Clase climática
SN
N
SN
T
desde +50°F hasta + 90°F
desde +61°F hasta + 100°F
desde +61°F hasta + 100°F
desde +61°F hasta + 109°F
Temperatura ambiente
4
Nota:
Se recomienda dejar un espacio de al
menos 2" (50 mm) entre la parte trasera
del frigorífico y la pared, al menos 2" (50
mm) de espacio en la parte superior, al
menos 1/2" (12 mm) entre el lateral y la
pared, y dejar libre de obstáculos el frente
para que las puertas puedan abrirse 125°,
como muestra el siguiente diagrama.
2" Por encima
2" Por detrás
1/2" Por cada lado

La altura de una puerta se puede ajustar
utilizando las juntas elásticas incluidas.
Ajuste de la altura y el espacio de la
puerta
Para ajustar la altura de la puerta
1. Verifique la diferencia de altura entre las
puertas y luego levante y sostenga la puerta
más baja para que quede nivelada con la otra.
2. Inserte una junta elástica de tamaño
adecuado entre la puerta y la bisagra, tal
como se muestra.
Contiene piezas pequeñas,
mantenga las juntas elásticas lejos del
alcance de bebés y niños.
¡Importante!
1. Inserte una sola junta elástica. Si inserta
dos o más juntas elásticas, es posible que
se salgan o produzcan un ruido de roce.
2. No levante demasiado la puerta. La
puerta puede entrar en contacto
con la cubierta superior y dañarla.
3. Guarde las juntas elásticas sobrantes
para un posible uso futuro.
Anillo de retención (4 uds) Llave (No incluidas)
Herramientas que necesitará:
5
¡ADVERTENCIA!

Para una estabilización y una
circulación de aire suficientes en la
sección trasera inferior del aparato, es
posible que sea necesario ajustar las
patas inferiores. Puede ajustarlas
manualmente o usando una llave
adecuada.
Para permitir que las puertas se
cierren solas, incline la parte superior
hacia atrás unos 0,4" – 0,6".
Estabilización del aparato
Si la puerta de acceso a su hogar es
demasiado estrecha para que pase el
refrigerador, retire las puertas y los
cajones del refrigerador. Si no necesita
retirar las puertas del aparato,
consulte ‘Instalar las tuberías de agua’
en la página 8.
Si necesita retirarlas, siga leyendo.
Retirada de las puertas
Patas inferiores
ajustables
Rueda frontal Rueda trasera
0,4"~0,6"
Patas inferiores
ajustables
Llave Allen (5/32", 4mm)
Destornillador Philips
Llave (5/16", 8mm)
Herramientas que necesitará (No incluidas):
1. Con la puerta cerrada, retire los 3 tornillos
de la cubierta superior (A) con un
destornillador Philips (+) y, a continuación,
retire cuidadosamente la cubierta superior
con el arnés instalado.
2. Retire los 3 tornillos (B) fijados en las bisagras
con una llave (5/16", 8mm) y 1 tornillo de tierra
(C) instalados en la bisagra con un
destornillador Philips (+). Retire las bisagras de
la puerta superior izquierda y derecha (D).
6

Una máquina de hielo automática es
un elemento muy útil de su nuevo
refrigerador. Siga atentamente las
instrucciones siguientes para realizar
una instalación correcta.
Es necesario contar con una línea de
agua para que la máquina de hielo
funcione correctamente.
- la presión de entrada de agua
máxima es 700kPa;
- la presión de entrada de agua
mínima es 207kPa.
Instalar las tuberías de agua
1. Taladro eléctrico y broca de 1/4".
2. Llave de 1/2" o llave inglesa.
3. Destornilladores de punta plana o Philips.
1 Virola
(casquillo)
Válvula de cierre de
tipo montura (salida
de 1/4")
compresión
uno y 1/4"
Tubo de extensión
de 1/4"
1 Acoplador 2 Pinza
¡ADVERTENCIA!
La conexión de agua debe realizarla
un fontanero cualificado. Las
presiones de agua no convencionales
durante el funcionamiento pueden
causar un mal funcionamiento o
daños y fugas de agua severas.
En condiciones normales, se puede
llenar una taza de 200 cc (5,75 oz.) en
aproximadamente 10 segundos.
Si se instala el refrigerador en un área
con baja presión de agua (por
debajo de 30psi), puede instalar una
bomba auxiliar para compensar la
baja presión.
Lo que necesita tener antes de empezar
4.
Puede que tenga que adquirir varios
artículos para completar la conexión.
Puede encontrar estos artículos, que
se venden como un juego, en su
ferretería local.
2.
3.
Conectar la tubería de suministro de agua
Línea de agua fría
Abrazadera
Válvula de cierre
Utilice un taladro eléctrico y una broca
de 1/4" para perforar la línea de agua
fría y conectar la válvula de asiento.
Conecte el tubo de extensión de 1/4" a
la salida de la válvula de cierre.
Válvula de
vaciado
Tuerca de
empaque
Válvula de asiento Tuerca de compresión
Tubo de extensión
de 1/4"
Virola (casquillo)
Purgue la tubería. Abra el suministro de
agua principal y purgue la tubería hasta
que el agua salga limpia. Luego, corte el
agua de la válvula después de drenar
un cuarto de agua por toda la tubería.
4.
7
1. Primero, cierre el suministro de agua principal.

Conexión de la tubería de agua al
refrigerador
2.
3.
4.
5.
IMPORTANTE: Si enciende el refrigerador
antes de conectar el agua, apague la
máquina de hacer hielo.
Desenchufe el refrigerador o desconecte la
alimentación.
Cierre la válvula de cierre.
Es posible que deba comprar los siguientes
elementos para completar esta conexión.
Puede encontrar estos artículos, que se
venden como un juego, en su ferretería local.
Pase la tuerca de compresión de 1/4" y la
virola (casquillo) en el extremo libre de la
tubería de agua de 1/4".
Coloque el extremo libre de la tubería de
agua de 1/4" en el conector de latón
añadido en la entrada de agua en la parte
trasera del refrigerador.
a b c Virola (Casquillo) -1 uds
Tuerca de compresión de 1/4" - 1 uds
Tubería de agua de 1/4" - 1 uds
a
b
c
e
d
c
Tuberías de agua
de 1/4"
Tuerca de
compresión de 1/4"
Conector de latón
Entrada de agua
Deslice la tuerca de compresión de 1/4"
por la virola (casquillo) y enrosque la
tuerca de compresión de 1/4" en el
conector de latón.
6.
7. Compruebe que la tubería de agua de 1/4"
esté asegurada tirando suavemente de ella.
8. Abra el suministro de agua para comprobar
que no haya fugas. Si hay fugas, corríjalo.
a
d
e
a
b
Nota:
Asegúrese de no apretar ni doblar la
línea de agua al momento de realizar
la instalación. Esto puede hacer que
el agua fluya inadecuadamente a
través de la línea y afectar el
funcionamiento del refrigerador.
Pinza
Tubería de agua Tubería de agua
Acoplador
5.
Conecte la tubería de extensión con la
línea detrás del refrigerador a través del
acoplador. Inserte completamente la
tubería de extensión en el acoplador e
inserte el gancho en el acoplador para
asegurar la tubería. Haga lo mismo con
el otro extremo. Luego de insertar
ambos ganchos, compruebe que la
línea esté firme con el gancho.
6. Abra el agua y compruebe si hay fugas.
Nota:
Utilice solamente la tubería nueva suministrada
con el refrigerador. No se debe utilizar la
tubería vieja. Después de conectar la línea de
agua, abra la válvula de agua para purgar el
filtro durante 5 minutos antes del uso.
La descoloración oscura inicial del agua es
normal.
Se debe conectar la línea de agua a la
tubería de agua fría. Si lo conecta a la
tubería de agua caliente, el purificador
podría fallar.
Evite contaminar la tubería durante la
instalación.
Sólo conéctelo a un suministro de agua
potable.
¡ADVERTENCIA!
1.
8
Virola (casquillo)
c
b

Debido a las modificaciones incesantes de nuestros productos, su refrigerador puede diferir un
poco del de este manual de instrucciones pero sus funciones y métodos de uso son los mismos.
Para obtener la mejor eficiencia energética de este producto, coloque los estantes,
cajones y recipientes en su posición original como se muestra en la imagen de arriba.
Luz LED del refrigerador
Recipiente de la puerta del
refrigerador
Parteluz
Estante de vidrio
Cubierta del cajón Crisper
Luz LED del congelador
Máquina de hielo
Bandeja del congelador
Cajón central del congelador
Recipiente chico de la puerta
del congelador
Cajón inferior del congelador
Cajón central
Cajón para frutas y verduras
Luz LED convertible del
compartimento
Bandeja del compartimento
convertible
Cajón central del compartimento
convertible
Cajón inferior del compartimento
convertible
Patas niveladoras
9
Descripción del aparato
Nota!
XXXX
-----
oooo

Controles de la pantalla
Su producto tiene un panel de control que está instalado en la parte superior dentro
del refrigerador. Utilice su aparato de acuerdo con la siguiente guía de control.
Compartimento de la nevera: 39°F (4°C)
Compartimento My Fresh Choice: 19°F (-7°C)
Compartimento del congelador: 0°F (-18°C)
Al ajustar una temperatura, se ajusta la
temperatura media de todo el
compartimento. Las temperaturas reales
del compartimento podrían variar respecto
a las mostradas según la cantidad y
ubicación de los alimentos almacenados, y
de la temperatura ambiente.
Para cambiar entre grados Celsius y
Fahrenheit, mantenga presionado el
botón “TEMP” durante tres segundos.
1. Pulse repetidamente el botón “ZONE”
hasta que aparezca el icono de Fridge .
2. Cuando esté encendido, icono se
iluminará. A continuación, pulse
repetidamente el botón “TEMP.” para
alternar entre los ajustes de temperatura
disponibles, entre 46°F y 36°F.
NOTA: Con cada pulsación del botón el
ajuste se reduce un grado.
3. Suelte el botón de control “TEMP.”
cuando aparece la temperatura
deseada.
2. Cuando My Fresh Choice (Alimentos
frescos) esté encendido, el icono se
iluminará. A continuación, pulse
repetidamente el botón “TEMP.” para
alternar entre los ajustes de temperatura
disponibles, entre 41°F (5°C) y -4°F( -20°C).
NOTA: Con cada pulsación del botón el
ajuste se reduce un grado.
1. Pulse repetidamente el botón
“ZONE” (ZONA) hasta que aparezca el icono
“My Fresh Choice” (Alimentos frescos).
3. Suelte el botón de control “TEMP.”
cuando aparece la temperatura
deseada.
Temperatura del compartimento del
congelador
1. Pulse repetidamente el botón
“ZONE” (ZONA) hasta que aparezca el
icono “Freezer” (Congelador).
2. Cuando “Freezer” (Congelador) esté
encendido, el icono se iluminará. A
continuación, pulse repetidamente el
botón “TEMP.” para alternar entre los
ajustes de temperatura disponibles, entre
7°F (-14°C ) y -11°F (-24°C).
NOTA: Con cada pulsación del botón
el ajuste aumenta un grado.
3. Suelte el control “TEMP.” cuando aparezca
el ajuste de temperatura deseado.
Temperatura del compartimento My Fresh
Choice (Alimentos frescos)
Temperaturas de compartimento de ajuste
Ajustes recomendados de temperatura
Temperatura del compartimento del
nevera
10

La función Super Cool ayuda a mantener
los alimentos almacenados en el
refrigerador a la temperatura ajustada
durante periodos de alto uso, con mucha
carga o temperaturas ambiente
temporalmente cálidas
La función Super Cool reduce la
temperatura del compartimento de la
nevera.
1. Pulse el botón “MODE” para activar
esta función. Se iluminará el icono “Super
Cool” y el indicador de temperatura del
frigorífico marcará 36°F (2°C).
2. Super cool se apagará
automáticamente tras 3 horas.
3. Cuando la función Super Cool esté
encendida, puede apagarla pulsando el
botón “MODE” o ajustando la
temperatura del frigorífico. Al apagar la
función Super Cool de forma manual, los
ajustes de temperatura del frigorífico
volverán a su anterior configuración.
Super Freeze bajará rápidamente la
temperatura del congelador para que los
alimentos se congelen más rápidamente
de lo habitual. Esta función también
ayuda a conservar las vitaminas y los
nutrientes de los alimentos frescos y a
preservarlos por más tiempo.
1. Pulse el botón “MODE” para activar esta
función. Se iluminará el icono “Super
Freeze” y la temperatura del congelador
descenderá hasta los -11°F (-24°C).
2. Super freezer se desactiva
automáticamente después de 52 horas.
3. Cuando la función Super Freeze esté
encendida, puede apagarla pulsando el
botón “MODE” o ajustando la temperatura
del congelador. Al apagar manualmente
la función Super Freezer, la temperatura
del congelador volverá a los valores
anteriores.
NOTA: Cuando seleccione la función
“Super Freeze”, asegúrese de que no haya
bebidas enlatadas o botellas
(especialmente bebidas gasificadas) en el
compartimiento del congelador. Las
botellas y las latas pueden explotar.
La máquina para hacer hielo está
ubicada dentro del congelador, cerca
de la parte superior del compartimiento.
Cuando la máquina de hielo hace hielo,
este se almacena en la bandeja del
congelador.
Presione el botón “ICE” para activar o
desactivar la máquina para hacer hielo.
Al encender la máquina para hacer hielo,
el ícono se ilumina.
Para utilizar el hielo, abra la puerta del
congelador, saque la bandeja y quite el
hielo con la cuchara.
Pala para hielo
Herramienta que necesitará (incluida en el paquete)
Pulse el botón “Modo” para encender la
función de ahorro de Energía, se iluminará
el icono “Ahorro de Energía”.
Cuando la función Ahorro de energía
está activada, la temperatura del
frigorífico se cambia automáticamente a
43°F(6°C) y la temperatura del
congelador se cambia automáticamente
a 1°F(-17°C), la temperatura del
compartimento de “My Fresh
Choice” (Alimentos frescos) es
inamovible. Cuando la función de ahorro
de energía está encendida, usted puede
apagarla al presionar el botón "MODE" o
modificando la temperatura del
congelador/heladera; la temperatura del
refrigerador volverá a su configuración
previa.
Pulse el botón “POWER” durante 3
segundos para activar o desactivar esta
función. Cuando la función power esté
encendida, se iluminará el icono y el
panel mostrará “OF”.
NOTA: Cuando la función power está
encendida, el frigorífico deja de enfriar.
11
Super Cool (Súper Frío)
Super Freeze (Súper Congelar)
Hielo
Ahorro de energía
POWER (ENCENDIDO)

Modo demo
El modo demo es para su exhibición en
la tienda y evita que el refrigerador
genere aire frío. En este modo de
enfriamiento apagado, puede parecer
que el refrigerador está funcionando,
pero no producirá aire frío. El panel de
la pantalla mostrará segmentos
especiales como los siguientes.
Para apagar el modo de demostración,
mantenga presionados los botones
“POWER” y “ICE” al mismo tiempo
durante tres segundos y el zumbador
emitirá un sonido largo.
Uso del aparato
El compartimento de refrigerador es apto
para almacenar carnes, verduras y fruta.
Debe sellar los alimentos para evitar la
pérdida de humedad o para que los
sabores se impregnen en otros alimentos.
¡Precaución!
Nunca cierre la puerta de la nevera con
las estanterías, el cajón para verduras y/
o guías telescópicas extendidas. Podrían
dañarse, así como a la nevera.
Uso del compartimiento del refrigerador
Es posible abrir y cerrar las puertas por
separado o juntas.
•
•
•
Hay un parteluz a la izquierda de la puerta
del compartimento del refrigerador.
Al cerrar las puertas, el parteluz se pliega
tras la puerta derecha uniendo ambas
puertas.
La temperatura del marco de la puerta
está controlada para prevenir que se forme
humedad en el parteluz. La temperatura
de la superficie puede ser caliente, lo cual
es normal y no afecta al rendimiento del
refrigerador.
Abrir y cerrar las puertas
NOTA: Antes de cerrar la puerta izquierda,
compruebe que el parteluz esté plegado
hacia dentro. Si se estira del parteluz hacia
afuera, podría dañarse al intentar cerrar la
puerta.
Utilizar los controles·
NOTA: Los controles de su modelo pueden
ser diferentes a los de esta y otras imágenes
de este manual, dependiendo de las
características de su modelo.
Alarma de puerta abierta
Si la puerta está abierta por más de 2
minutos, sonará una alarma para
alertarlo y el panel de control mostrará
"dr". La alarma sonará 3 veces cada
un minuto durante 8 minutos.
Cierre completamente todas las
puertas para apagar la alarma.
12

d
Es posible ajustar la altura de los
estantes para adaptarse a sus
necesidades de almacenamiento.
1. Para retirar un estante, levántelo
suavemente y estire hacia delante
hasta que el extremo del estante
salga del soporte del raíl.
2. Para volver a insertar un estante,
vuelva a deslizar suavemente el
estante en el compartimento del
refrigerador y bájelo al soporte del raíl.
Compartimentos de la puerta
El compartimento del refrigerador dispone
de seis canastos en la puerta, ideales
para almacenar líquidos en lata, bebidas
embotelladas y alimentos envasados.
Para quitar los compartimentos, levante
los soportes y tire hacia fuera. Para
recolocar los compartimentos, deslícelos
hacia la dirección deseada y empuje
hacia abajo hasta que lleguen al tope.
No coloque demasiados objetos pesados
en los canastos. Antes de levantar el
estante de la puerta en forma vertical,
quite los alimentos.
¡ADVERTENCIA!
Máquina de hielo automática
Cuando la máquina de hielo vierte
hielo en la cubitera, los sonidos que
se escuchan forman parte del
funcionamiento normal.
Si no dispensa hielo durante un
período de tiempo prolongado, es
posible que se acumule hielo en la
caja. Si esto ocurre, retire todo el
hielo y vacíe la caja.
Si se va de vacaciones o en viaje
de negocios durante un largo
periodo y no va a utilizar el
dispensador de agua o la máquina
de hielo, cierre el suministro de
agua para prevenir fugas.
Deseche los primeros lotes de hielo
que se fabriquen, ya que tendrán
elementos contaminantes.
No almacene líquidos en la caja
de hielo, ya que puede
expandirse y romperse.
No permita que sus hijos se
cuelguen del dispensador ni
toquen la máquina de hielo. Podría
provocarles lesiones.
¡ADVERTENCIA!
Estantes ajustables
13

Para mantener la buena apariencia del
aparato, debe limpiarlo regularmente.
Limpie las puertas, las asas y las
superficies del armario con
detergente suave y séquelas con un
paño suave.
Limpieza exterior
Limpieza interior
Limpieza y mantenimiento
¡PRECAUCIÓN!
1. No use objetos afilados ya que
podrían arañar la superficie.
2. No utilice diluyente, detergente
para autos, lavandina, aceite,
limpiadores abrasivos o solventes
orgánicos, como por ejemplo
benceno, para realizar la limpieza.
Podrían dañar la superficie del
aparato y provocar un incendio.
¡ADVERTENCIA!
Para evitar descargas eléctricas,
no conecte el aparato en el
interruptor principal durante la
limpieza. Antes de limpiarlo,
apague el aparato y retire el
enchufe de la toma de corriente.
Aunque este aparato tiene una función
automática de descongelación, podría
haber una capa de escarcha en el
interior del compartimento congelador si
se ha abierto con frecuencia la puerta o
si se ha mantenido abierta mucho rato. Si
la escarcha es demasiado gruesa, elija
un momento en el que las existencias de
alimentos sean bajas y siga estos pasos:
Retire los alimentos y las cestas de
accesorios, desenchufe el aparato de la
corriente y deje las puertas abiertas.
Ventile bien la habitación para acelerar
el proceso de descongelación.
Cuando se haya descongela
completamente, limpie el congelador
siguiendo el proceso antes descrito.
1.
2.
Por razones de higiene, el aparato
(incluyendo los accesorios interiores
y exteriores) debe limpiarse al menos
una vez cada dos meses.
Rocíe agua en el paño de limpieza en
lugar de rociarla directamente sobre
la superficie del aparato. Esto ayuda
a garantizar una distribución uniforme
de la humedad por la superficie.
Limpie el interior del aparato de forma
regular. Es más fácil de limpiar cuando
haya pocos productos almacenados.
Limpie el interior del frigorífico y del
congelador con una solución suave de
bicarbonato de sodio y agua, y
aclárelo todo con agua tibia y una
esponja o trapo bien escurridos. Seque
por completo antes de volver a
colocar las bandejas y los estantes.
Seque bien todas las superficies y las
partes desmontables antes de volver
a colocarlas en su lugar.
¡ADVERTENCIA!
No utilice objetos afilados para
retirar la escarcha del
compartimento congelador. Solo
cuando el interior esté
completamente seco, se puede
volver a encender el aparato y
volver a enchufarlo en la toma
eléctrica.
14

Reemplazo de la luz LED
¡PRECAUCIÓN!
Sólo debe encender el aparato
después de que los sellos de la
puerta estén completamente secos.
¡ADVERTENCIA!
Una persona capacitada debe
reemplazar la luz LED. Si la luz LED
está dañada, siga los pasos que se
indican a continuación
1. Desenchufe el aparat.
2. Quite el cobertor de la luz
levantando hacia arriba y hacia
afuera.
3. Sostenga la luz LED con una mano
y tire de ella mientras presiona el
conector con la otra mano.
4. Reemplace la luz LED y presiónela
correctamente en el lugar y vuelva
a colocar el cobertor de la luz.
Sello de la puerta
Procure mantener limpios los sellos de la
puerta. Los alimentos y bebidas
pegajosas pueden provocar que los
sellos se enganchen al armario y se
desgarren cuando abra la puerta. Lave
el sello con detergente suave y agua
tibia. Aclárelo y séquelo detenidamente
después de limpiarlo.
Sugerencias y consejos útiles
Consejos de ahorro de energía
Se recomienda seguir estos consejos
para ahorrar energía.
No ajuste la temperatura más fría de
lo necesario.
No almacene alimentos calientes ni
líquido evaporado en el aparato.
Si el diagrama muestra la combinación
correcta de los cajones, el cajón para
verduras y los estantes, no la ajuste ya
que está diseñado para ofrecer la mejor
configuración de eficiencia energética.
Evite mantener las puertas abiertas
durante periodos largos de tiempo para
ahorrar energía. Asegúrese de que el
aparato esté alejado de fuentes de
calor (luz solar directa, horno eléctrico o
estufa, etc).
Coloque el aparato en una sala bien
ventilada y libre de humedad. Consulte
el capítulo Instalar el nuevo aparato .
Consejos para refrigerar
alimentos frescos
No coloque alimentos calientes
directamente en el frigorífico o el
congelador, ya que la temperatura
interna aumentará haciendo que el
compresor necesite más potencia y
consuma más energía.
Cubra o envuelva los alimentos, en
especial si tienen un olor fuerte.
Coloque los alimentos
cuidadosamente para que el aire
pueda circular libremente en torno a
ellos.
15

Para carnes: (todos los tipos) envueltas
y colocadas en el estante de vidrio
sobre el cajón de verduras. Siga el
periodo de almacenamiento de los
alimentos y utilice las fechas sugeridas
por los fabricantes.
Alimentos cocinados, platos fríos, etc.:
Se deben cubrir y se pueden colocar
en cualquier estantería.
Frutas y verduras:
Se deben guardar en el cajón
especial incluido.
Mantequilla y queso:
Se deben envolver con plástico
hermético o película plástica.
Botellas de leche:
Deben tener una tapa y se pueden
almacenar en los estantes de la
puerta.
Consejos de refrigeración
Cuando lo encienda por primera vez o
lo utilice después de un periodo largo,
deje que el aparato funcione al menos
2 horas con los ajustes más altos antes
de colocar alimentos en el
compartimento.
Prepare los alimentos en porciones
pequeñas para que se congelen del
todo rápidamente y para que sea
posible después descongelar solo la
cantidad necesaria.
Envuelva los alimentos en papel
aluminio o film hermético.
Evite que los alimentos frescos sin
congelar toquen alimentos ya
congelados para evitar que se
produzca una descongelación parcial.
Consejos de congelación
Consejos para almacenar
alimentos congelados
Se recomienda etiquetar y colocar la
fecha de cada paquete congelado
para mantener un seguimiento del
tiempo de almacenamiento.
Una vez descongelados los alimentos se
deteriorarán rápidamente y no deben
volverse a congelar. No supere el
periodo de almacenamiento indicado
por el fabricante de los alimentos.
Apagar el aparato
Si fuera necesario apagar el aparato
durante un periodo prolongado, debe
seguir estos pasos para prevenir la
aparición de hongos en él.
Retire todos los alimentos.
Retire el enchufe eléctrico de la
corriente.
Limpie y seque completamente el interior.
Asegúrese de que todas las puertas
queden abiertas ligeramente para
permitir que circule el aire.
1.
2.
4.
3.
Productos de hielo (cubitos de
hielo, polos): pueden producir
quemaduras por congelación en la
piel si se consumen
inmediatamente después de
sacarlos del congelador.
Asegúrese de que los alimentos
congelados están bien
almacenados en su compartimento.
16

Resolución de problemas
Problema Causa posible y solución
ADVERTENCIA
•
•
•
•
1.No intente reparar el aparato usted mismo. Si el problema persiste después de haber
realizado las comprobaciones que se mencionan a continuación, póngase en contacto
con un electricista cualificado, con un técnico de servicio autorizado o con la tienda
donde compró el producto.
2.A continuación se incluye la declaración de advertencia sobre atrapamiento para niños.
PELIGRO
Riesgo de atrapamiento para niños. Antes de descartar el refrigerador o congelador viejo:
- Retire las puertas.
- Deje los estantes colocados para que los niños no puedan meterse fácilmente.
El aparato no
funciona
correctamente
Se oye ruido del
aparato
Salen olores de los
compartimentos
Compruebe si el cable eléctrico está enchufado
correctamente en la toma eléctrica.
La temperatura de la habitación puede ser muy baja. Intente
ajustar la temperatura del refrigerador o del congelador a un
nivel más frío para resolver este problema.
Es normal que el congelador no funcione durante el ciclo de
descongelación automática, o durante un breve tiempo
después de encender el aparato para proteger el
compresor.
Otros ruidos pueden deberse a la razones siguientes y puede
que tenga que hacer una revisión para hacer cambios:
El armario no está nivelado.
La parte trasera del aparato toca la pared.
Botellas o recipientes caídos o rodando.
Los sonidos descritos a continuación son normales:
Ruido de funcionamiento del compresor.
Ruido de circulación de aire del motor del ventilador
pequeño ubicado en el compartimento del congelador o en
otros compartimentos.
Sonido de borboteo parecido al del agua en ebullición.
Golpeteos durante la descongelación automática.
Chasquidos antes de que arranque el compresor.
Clics cuando se dispensa agua.
El motor hace ruido cuando se dispensa agua.
•
Es posible que sea necesario limpiar el interior.
Algunos alimentos, recipientes o envoltorios pueden causar olores.
Compruebe el fusible o el circuito del suminsitro
eléctrico y sustitúyalos si fuera necesario.
Si experimenta problemas con el aparato o le preocupa que no funcione
correctamente, puede realizar algunas comprobaciones sencillas antes de llamar
al servicio de mantenimiento, consulte a continuación.
•
•
17

El motor
funciona
continuamente
Hay una capa
de escarcha en
el
compartimento
La temperatura
interior es
demasiado
cálida
La temperatura
interior es
demasiado fría
La puertas no
pueden cerrarse
fácilmente
Se escuchan
burbujas de agua
en el refrigerador
La luz no
funciona
La luz LED podría estar dañada. Consulte cómo sustituir las
luces LED en el capítulo “Limpieza y mantenimiento”.
El sistema de control ha desactivado las luces porque la
puerta ha estado abierta demasiado rato. Cierre y vuelva
a abrir la puerta para reactivar las luces.
Es posible que haya dejado las puertas abiertas demasiado
rato o que las haya abierto con demasiada frecuencia, que
algún obstáculo las haya mantenido abiertas; o que el
aparato tenga poco espacio a los lados, por detrás y por
encima.
Suba la temperatura siguiendo las instrucciones del
capítulo “Controles de la pantalla”.
Compruebe si la parte superior de la nevera está inclinada
hacia atrás 0,4"-0,6" (10-15mm) para permitir que las puertas se
cierren automáticamente, o si dentro hay algo que evite que
las puertas se cierren.
Esto es normal. El burbujeo proviene del líquido
refrigerante que circula por el refrigerador.
Es normal oír con frecuencia el sonido del motor. Puede
producirse por funcionar en las siguientes circunstancias:
La temperatura está más baja de lo necesario.
Se ha guardado recientemente una gran cantidad de
alimentos calientes en el aparato.
La temperatura exterior del aparato es demasiado elevada.
Las puertas han estado abiertas demasiado rato o con
mucha frecuencia.
Después de instalar por primera vez el aparato o si ha
estado desconectado por un largo periodo de tiempo.
Compruebe que las salidas de aire no estén bloqueadas
con alimentos y asegúrese de que la comida esté bien
colocada en el aparato para permitir una ventilación
suficiente. Asegúrese de que la puerta se cierre
completamente. Para eliminar la escarcha, consulte el
capítulo Limpieza y Cuidado.
La máquina de
hielo no
funciona
¿Ha esperado 24 horas después de la instalación de la tubería
de suministro de agua antes de hacer hielo? Si no está
suficientemente fría, podría tardar más tiempo en hacer hielo,
como cuando se instala por primera vez.
¿Está conectada la tubería de agua y la válvula abierta?
¿Ha detenido manualmente la función de la máquina de hielo?
Asegúrese de que no ha activado el modo “Ice Off”.
¿Hay hielo atascado en el cubo de la máquina de hielo?
¿La presión del agua es inferior a 30 psi? Instale una bomba
auxiliar para compensar la baja presión.
¿La temperatura del congelador es demasiado cálida? Intente
ajustar una temperatura más baja del congelador.
La máquina de hielo no hace hielo lo suficientemente rápido.
Espere al menos 90 minutos.
18

Eliminación del aparato
Eliminación correcta del producto
PELIGRO
ADVERTENCIA
Material de embalaje
Los materiales de embalaje con el símbolo de reciclaje son reciclables.
Arroje el embalaje a un contenedor de recogida de residuos adecuado para reciclarlo.
1. Retire el enchufe eléctrico de la toma eléctrica.
2. Corte el cable eléctrico y elimínelo con el enchufe.
Las neveras contienen refrigerante y gases dentro del aislamiento. Se debe
desechar el refrigerante y los gases de forma profesional, ya que podrían
provocar lesiones oculares o ignición. Asegúrese de que la tubería del circuito de
refrigerante no esté dañada antes de su desecho adecuado.
Está prohibido eliminar este aparato con los residuos domésticos.
Antes de eliminar el aparato
Esta marca indica que no se debe eliminar el producto
con otros residuos domésticos en la UE. En su lugar, se
debe llevar al punto de recogida de residuos
adecuados para reciclar el equipo eléctrico y
electrónico. Al asegurarse de que este producto se
elimina correctamente, ayudará a prevenir las
consecuencias negativas potenciales para el entorno y
la salud humana, que de lo contrario podrían ser
causadas por la manipulación inadecuada de los
residuos de este producto. Para obtener más
información sobre el reciclado de este producto,
póngase en contacto con la oficina correspondiente
de su localidad, el servicio de eliminación de residuos
domésticos o la tienda en la que adquirió el producto.
19
Descargo de responsabilidad:
Las imágenes en este documento son solo a modo ilustrativo y
pueden diferir del producto real.
-
 1
1
-
 2
2
-
 3
3
-
 4
4
-
 5
5
-
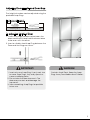 6
6
-
 7
7
-
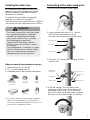 8
8
-
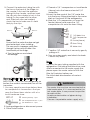 9
9
-
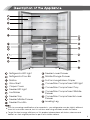 10
10
-
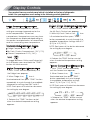 11
11
-
 12
12
-
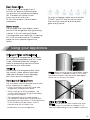 13
13
-
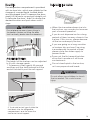 14
14
-
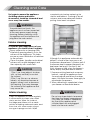 15
15
-
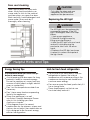 16
16
-
 17
17
-
 18
18
-
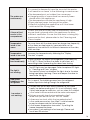 19
19
-
 20
20
-
 21
21
-
 22
22
-
 23
23
-
 24
24
-
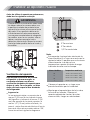 25
25
-
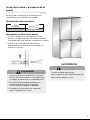 26
26
-
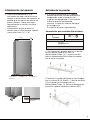 27
27
-
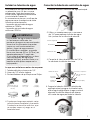 28
28
-
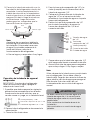 29
29
-
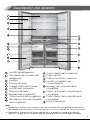 30
30
-
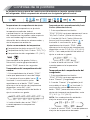 31
31
-
 32
32
-
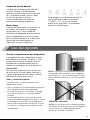 33
33
-
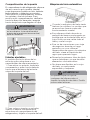 34
34
-
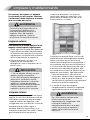 35
35
-
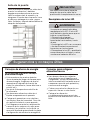 36
36
-
 37
37
-
 38
38
-
 39
39
-
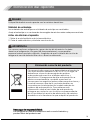 40
40


Crosley CRQN2215AS Manual de usuario
- Categoría
- Neveras
- Tipo
- Manual de usuario
En otros idiomas
- English: Crosley CRQN2215AS User manual
Otros documentos
-
Mora MRF266N6CSE El manual del propietario
-
Hisense HQD20058SV Manual de usuario
-
Hisense HRF266N6CSE El manual del propietario
-
Samsung RF23J9011SR Manual de usuario
-
Samsung RF28HMEDBSR Manual de usuario
-
Samsung RF28JBEDBSG Manual de usuario
-
Samsung RF23J9011SR/AA Manual de usuario
-
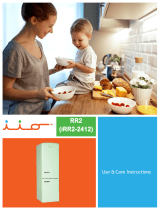 iio iRR2-2412LG-R Manual de usuario
