
UNIVERSAL REMOTE CONTROL
USER’S GUIDE
CONTROL REMOTO UNIVERSAL
GUíA DEL USARIO
M7820BP1.indd 1 3/13/2007 3:53:51 PM

TABLE OF CONTENTS
Introduction ........................... 3
Features And Functions ................. 4
Installing Batteries ..................... 8
Programming Device Control ............. 9
Programming TV/VCR Combo Control .... 10
Searching For Your Code ............... 12
Checking The Codes .................. 13
Programming ID Lock .................. 14
Programming Channel Control Lock. . . . . . 15
Using The Master Power Key ............ 15
Re-Assigning Device Keys ............. 16
Changing Volume Lock ................ 17
Troubleshooting ...................... 18
Additional Information ................. 19
Manufacturer’s Codes .................. 38
TABLA DE CONTENIDOS
Introducción ................................ 21
Características y Funciones .................. 22
Instalación de las Baterías ....................26
Programación de Control de Dispositivos ...... 27
Programación de Control de Combos TV/VCR . . 29
Búsqueda de su Código . . . . . . . . . . . . . . . . . . . . . . 30
Comprobación de los Códigos ................ 31
Programación del Bloqueo de ID ............... 32
Programación del Bloqueo del Control de Canal
....32
Utilización del Botón de Encendido Principal ... 33
Reasignación de Teclas de Dispositivos ........ 34
Cambio del Bloqueo de Volumen .............. 35
Resolución de Problemas ..................... 36
Información Adicional ........................ 37
Códigos del Fabricante .................. 38
2
M7820BP1.indd 2 3/13/2007 3:53:51 PM

INTRODUCTION
The Cox Universal Remote Control by Universal
Electronics is our latest generation universal remote
control. It is designed with sophisticated technology
that will allow you to consolidate the clutter of all of the
original remote controls in your home entertainment
system. Moreover, it’s packed with easy-to-use features
such as:
• Preprogrammed to operate the cable converter
supplied by Cox Communications
• Preprogrammed interactive technology links hot keys
to your interactive service
• Master Power key for master on/off control of all your
equipment with a single keystroke
• Cable ID Lock to lock your remote control for use
only with the cable converter
• Channel Lock to lock channel selection only to the
cable converter
• Code Search to help you program control of older or
discontinued components
• Code library for video and audio devices
• Color-coded keys to quickly locate popular functions
• Dedicated keys to control popular functions on your
DVR (Digital Video Recorder)
Before using the product, you will need to program it
to operate the specific home entertainment devices you
wish to control. Follow the instructions detailed in this
manual to set up your unit, and then start enjoying your
new remote control.
3
M7820BP1.indd 3 3/13/2007 3:53:51 PM

FEATURES AND FUNCTIONS
Use the illustration below to locate features on the Cox
Universal Remote Control and then study the Key Charts (on
the next three pages) to learn how they function.
4
M7820BP1.indd 4 3/13/2007 3:53:53 PM

KEY CHARTS
Use SETUP for all programming
sequences.
Press POWER once to turn on or
off a home entertainment device.
Press and hold MASTER POWER
for 3 seconds to turn on or off all
home entertainment devices
(see Using The Master Power
Key on page 15).
Press AUX, DVD, TV, or CABLE
once to select a home entertainment
device to control. Each key has an
embedded LED (red light) that
blinks upon selection and
indicates that the remote control
is working and is sending signals.
In the DVD and TV modes, use REW,
PLAY, FFWD, STOP, and PAUSE to
control your VCR, DVD player, or
PVR. To record a program in the
DVD or
AUX mode, press RECORD
twice.
In the CABLE mode, use these keys
(except RECORD) to control VOD
(Video On Demand).
Press to replay the last 8 sec
onds of a program or recording
(Insatnt Replay)
Press On DEMAND once to
access Cox Communications On
DEMAND Menu
.
Press DVR LIST once to display a
list of the recorded shows on your
PVR.
Press LIVE to return to watching
live TV.
Use INFO to display the current
channel and program information
Use PAGE+ to page up through
menu screens and program guide)
5
M7820BP1.indd 5 3/13/2007 3:53:55 PM

Press HD ZOOM to change the
aspect ratio on your Scientific
Atlanta or Motorola HD receiver.
(Not available on all receivers.)
Use the Cursor keys to move the
cursor in the program guide and
menu screens, and to navigate
within the interactive service.
Use SELECT to choose options
and PPV events, and to tune pro
grams from the program guide.
Use GUIDE to display the program
guide.
Use PAGE- to page down through
menu screens and program guide.
Use EXIT to exit your cable
converter’s menu and guide.
Use A, B, or C to access additional
cable features (see your cable
converter’s manual).
Use SETTINGS to access addition-
al cable features (see your cable
converter’s manual).
Press MENU once to display the
available interactive services.
Use VOL+ (or VOL–) to raise (or
lower) the sound volume.
Press LAST once to recall the
last channel.
Use FAV to cycle through your
favorite channels stored in your
cable converter.
Press MUTE once to turn the
sound off or on.
6
M7820BP1.indd 6 3/13/2007 3:53:57 PM

Use CH+ (or CH–) to select the
next higher (or lower) channel.
Use INPUT to control the input
select feature on most TVs.
In CABLE mode, use INPUT to view
other video sources (A or B) instead
of cable.
In all othermodes, use INPUT
to watch TV or video programs on a
desired device. For amplifiers/receiv
ers, use INPUT to select an input
source.
Press ENTER once after entering
channel numbers on some televi
sions.
Use the keypad (0 ~ 9) to directly
select channels (e.g., 09 or 31).
Use Picture in Picture
SWAP to
switch images and sound between
the main and window pictures.
Use Picture in Picture
ON-OFF to
switch the Picture-In-Picture fea-
ture on or off (if available on your
TV or cable service).
Use Picture in Picture MOVE to
move the window picture to differ
ent positions in the main picture.
Use Picture in Picture CH+ (or CH-)
to select the next higher (or lower)
PIP channel.
7
M7820BP1.indd 7 3/13/2007 3:53:58 PM

8
INSTALLING BATTERIES
1. On the back of the remote control, push the
tab and lift off the battery cover.
2. Obtain two (2) fully-charged AA alkaline
batteries. Match the + and – marks on the
batteries to the + and – marks in the battery
case, then insert the new batteries.
3. Align the cover’s keys with the case’s holes
and press the cover back into place. The tab
should click when the cover is locked.
4.
Test the unit by pressing POWER and any
mode key (for example, AUX, DVD, TV, or
CABLE). If the batteries are inserted correctly,
the selected mode key will blink once.
NOTE: Whenever batteries need replacement, the
remote control will cease to operate. Simply replace the
batteries and the remote control will be restored to its
full functionality, complete with your favorite settings.
❶
❸
❷
M7820BP1.indd 8 3/13/2007 3:53:59 PM

9
PROGRAMMING DEVICE CONTROL
The Cox Universal Remote Control is preprogrammed to
operate your cable converter, an RCA TV, a SONY DVD,
and a Pioneer audio receiver. To control devices other
than the default brands, perform the following steps;
otherwise skip this section:
NOTES: To control a VCR player, or a PVR, program the
DVD key. To control a stereo amplifier or receiver, program
the AUX key. For TV/VCR Combo control, skip this section
and perform the instructions on the next page.
If you have another brand of cable converter and inter-
active service you would like to control, you’ll first need
to unlock the cable ID Lock before changing the con-
verter code—see Programming ID Lock on page 13.
1. Turn on a device and, if applicable, insert
video media (e.g., cassette or disc).
NOTE: Please read steps 2–4 completely
before proceeding. Highlight or write down
the codes and device you wish to program
before moving on to step 2.
2. On the remote control, press a device key
once (e.g., AUX, DVD, TV, or CABLE). Press
and hold SETUP until the selected mode key
blinks twice, then release SETUP.
3. Use the Manufacturer’s Codes (starting on
page-38) to locate the the type of device and
brand name, then enter the first four-digit
code for your device. If performed correctly,
the selected mode key will blink twice.
NOTE: If the selected mode key emits a
long blink, the code is invalid. Repeat steps
2 through 3 and try entering the same code
again.
4.
Aim the remote control at the device and press
M7820BP1.indd 9 3/13/2007 3:53:59 PM

10
POWER once. The device should turn off. If it
does not, repeat steps 2–3, trying each code for
your brand until you find one that works. If it
still does not work, try searching for the code
(see Searching For Your Code on page 12).
NOTE: If the device does not have a POWER
key, press the
(Play) key.
5. Repeat steps 1–4 for each device you want the
the remote control to control. For future refer-
ence, write down each working device code in
the following boxes:
AUX
AUX Device ____________________
VCR
TV
CABLE
PROGRAMMING TV/VCR COMBO CONTROL
If you own a TV/VCR Combo, perform the following
instructions to control this device:
1. Turn on your TV/VCR Combo and insert a
video cassette.
2. On the remote control, press DVD once.
Press and hold SETUP until the DVD key
blinks twice, then release SETUP.
3. Use the setup codes for TV/VCR combos on
page-56 to locate the brand name and then
enter the first four-digit code for your TV/VCR
Combo. If you perform this procedure correctly,
the DVD key will blink twice.
NOTE: If the DVD key did not blink twice
after entering the code’s last digit, then repeat
steps 2 through 3 and try entering the same
code again.
4.
Aim the remote control at your TV/VCR
M7820BP1.indd 10 3/13/2007 3:54:00 PM

11
Combo and press POWER once. The device
should turn off. If it does not respond, repeat
steps 2-3, trying each code listed for your brand
until you find one that works. If it still does not
work, try searching for the code (see Searching
For Your Code on page 12).
5. If you’ve located a TV/VCR setup code that
works your TV/VCR Combo and a separate
TV code is also listed, you’ll need to program
this code into the remote control to access
volume control (see Programming Device
Control on page 9).
If there is no separate TV code listed, you will
need to perform the following steps to access
volume control:
a. Press and hold SETUP until the DVD key
blinks twice, then release SETUP.
b. Enter 9 - 9 - 3. The DVD key will blink
twice.
c. Press DVD once. The DVD key will blink
twice.
6. For future reference, write down each work-
ing device code in the boxes below:
TV/VCR
TV (if used)
M7820BP1.indd 11 3/13/2007 3:54:00 PM

12
SEARCHING FOR YOUR CODE
IIf your home entertainment device does not respond
to the COX Custom DVR Universal Remote Control
after trying all the codes listed for your brand, or if your
brand is not listed at all, try searching for your code.
For example, to search for a code for your TV:
1. Turn on your TV.
2. On the remote control, press TV once;
Then press and hold SETUP until the
TV key blinks twice, then release SETUP.
3. Enter 9 - 9 - 1. The TV key will blink twice.
4. Aim the remote control at the TV and press
POWER once.
5. Press CH+ (or CH-) one or more times and
stop when the TV turns off.
NOTE: In the search mode, the remote con-
trol will send IR codes from its library to the
selected
device, starting with the most popular code
first.
NOTE: If while pressing
CH+, and you inad-
vertently pass the code, press
CH- one or more
times until the TV turns on.
6. Press SETUP once to lock in the code. The TV
key will blink twice.
7. To search for the codes of your other devices,
repeat steps 1 through 5, but substitute the
appropriate key (e.g., AUX, DVD, AUD, or
CABLE) for the device you are searching for.
CHECKING THE CODES
If you have set up the Cox Universal Remote Control
using the Searching For Your Code procedure you
may need to find out which four-digit code is operating
your equipment. For example, to find out which code is
operating your TV:
1. Turn on your TV.
2.
On the remote control, press TV once.
Then press and hold SETUP until the
TV key blinks twice, then release SETUP.
M7820BP1.indd 12 3/13/2007 3:54:00 PM

13
3. Enter 9 - 9 - 0. The TV key will blink twice.
4.
To view the code for the first digit, press
1 once. Wait 3 seconds and count the number
of times the TV key blinks (for example,
3 blinks =-3) and write down the number in
the leftmost TV Code box (see below).
NOTE: If a code digit is “0”, the selected mode
key will not blink.
5. Repeat step 4 three more times for remaining
digits. Use 2 for the second digit, 3 for the
third digit, and 4 for the fourth digit. Write
down the remaining digits in the boxes below.
6. To check for other device codes, repeat steps
1–5, but substitute the appropriate key (that
is, AUX, DVD, or CABLE) for the (Auxiliary,
DVD, or Cable) device you are checking.
Write down the codes in the appropriate
boxes below.
AUX Code
Aux Device ____________________
DVD Code
TV Code
CABLE
Code
PROGRAMMING ID LOCK
The Cox Universal Remote Control is preprogrammed and
locked at the factory to operate the cable converter and
interactive service given to you by your cable company.
However, if you have another brand or model of cable
converter and interactive service that you would like to
control, then you’ll need to perform the following steps
to unlock the cable ID Lock, enter a new manufacturer’s
code, and lock the ID Lock again.
1. Turn on the Cable Converter.
2.
On the remote control, press CABLE once.
M7820BP1.indd 13 3/13/2007 3:54:00 PM

14
Then press and hold SETUP until the
CABLE key blinks twice, then release SETUP.
3.
Enter 9 - 8 - 2. The CABLE key will blink
four times.
4. Perform the instructions in Programming
Device Control on page 9 to program device
control for the desired cable converter and
interactive service. Upon completion, perform
the remaining steps (5 and 6 on this page) to
again lock the ID lock.
5.
On the remote control, press CABLE once.
Then press and hold SETUP until the
CABLE key blinks twice, then release SETUP.
6.
Enter 9 - 8 - 2. The CABLE key will blink
twice.
PROGRAMMING CHANNEL
CONTROL LOCK
By default, the remote control’s channel-control capabilities
are locked to the cable converter. The affected keys are 0 ~9,
CH+, CH–, ENTER, and LAST. This will guarantee that you
do not inadvertently change a channel on your TV or VCR.
However, you can de-activate this feature to allow full access
to these keys in the TV and VCR modes.
To De-Activate Channel Control Lock:
1.
On the remote control, press CABLE once.
Then press and hold SETUP until the
CABLE key blinks twice, then release SETUP.
2.
Enter 9 - 7 - 3. The CABLE key will blink twice.
3.
Press CH– once. The CABLE key will blink
four times.
4. Now, the remote control will provide TV and
VCR channel-control capabilities while in TV
or VCR mode.
NOTE: This feature does not affect the AUX
mode.
M7820BP1.indd 14 3/13/2007 3:54:00 PM

15
To Re-Activate Channel Control Lock:
1.
On the remote control, press CABLE once.
Then press and hold SETUP until the
CABLE key blinks twice, then release SETUP.
2.
Enter 9 - 7 - 3. The CABLE key will blink
twice.
3.
Press CH+ once. The CABLE key will blink
twice.
4. Now, regardless of what mode you select
(that is, TV, DVD, or CABLE), only the chan-
nel control capability of your cable converter
will be accessible.
NOTE: This feature does not affect the AUX
mode.
USING THE MASTER POWER KEY
The Cox Universal Remote Control is equipped with a
unique feature that allows you to sequentially turn on
or off all your home entertainment devices with a single
key press as follows:
1. Point the remote control at the devices.
2.
Press and hold MASTER POWER for 3 seconds
to sequentially turn on or off all home
entertainment devices.
Depending on what mode is currently
selected, the remote control will send IR com-
mands to the devices in the following order
For example, if TV is selected, pressing and
holding MASTER POWER for 3 seconds will
turn off the DVD, an auxiliary device, and the
cable converter.
Start Mode Device On/Off End Mode
AUX Cable, TV, DVD CABLE
DVD Auxiliary, Cable, TV CABLE
TV DVD, Auxiliary, Cable CABLE
CABLE TV, DVD, Auxiliary CABLE
M7820BP1.indd 15 3/13/2007 3:54:00 PM

16
NOTE: The remote control always defaults to
the CABLE mode after all devices are turned
off. Therefore, the initial power-on sequence
will always be TV, DVD, and an auxiliary
device, if no other device key is pressed first.
RE-ASSIGNING DEVICE KEYS
The Cox Universal Remote Control can be set up to
control a VCR or second TV, or any combination of up to
four home entertainment devices. For example, to have
the unit-control a TV, a Cable Converter, a DVD player
and a VCR, you will need to re-assign the unused AUX
key to operate the VCR as follows:
1.
On the remote control, press AUX once.
Then press and hold SETUP until the AUX
key
blinks twice, then release SETUP.
2.
Enter 9 - 9 - 2. The AUX key will blink twice.
3.
Press AUX once. The AUX key will blink
twice.
4. The AUX key is now ready to be programmed
for your VCR. See Programming Device
Control on page 9.
To re-assign other device keys, repeat steps 1–4 and
substitute the key sequence using the following chart:
To Re-Assign Perform Key Sequence
TV as 2nd DVD key SETUP - 9 - 9 - 2 - DVD - TV
TV as 2nd
Auxiliary key
SETUP - 9 - 9 - 2 - AUX - TV
TV as 2nd Cable key SETUP - 9 - 9 - 2 - CABLE -TV
TV back to TV SETUP - 9 - 9 - 2 - TV - TV
DVD as 2nd TV key SETUP - 9 - 9 - 2 - TV - DVD
DVD as 2nd
Auxiliary key
SETUP - 9 - 9 - 2 - AUX - DVD
DVD as 2nd Cable key SETUP - 9 - 9 - 2 - CBL- DVD
DVD back to DVD SETUP - 9 - 9 - 2 - DVD -DVD
AUX as 2nd TV key SETUP - 9 - 9 - 2 - TV - AUX
AUX as 2nd VCR key SETUP - 9 - 9 - 2 - DVD - AUX
AUX
as 2nd Cable key
SETUP - 9 - 9 - 2 - CBL - AUX
AUX
back to
AUX SETUP - 9 - 9 - 2 - AUX - AUX
Upon completion of a re-assignment, the selected
M7820BP1.indd 16 3/13/2007 3:54:01 PM

17
mode key will blink twice to confirm your selec-
tion. Then you’ll need to program device control (see
Programming Device Control on page 9).
CHANGING VOLUME LOCK
The Cox-Universal Remote Control is set to control volume
of a device through your TV while in TV, DVD, or Cable
mode. However, in the Auxiliary mode, you will still have
separate control of of your auxiliary device’s volume.
If your TV is not remote-controllable, or if you would
like the volume to be controlled by a different device, you
can change the Volume Lock setting to control a volume
through a non-associated mode (for example, through the
cable in the TV mode).
To change Volume Lock to CABLE mode:
1.
On the remote control, press CABLE once.
Then press and hold SETUP until the
CABLE key blinks twice, then release SETUP.
2.
Enter 9 - 9 - 3. The CABLE key will blink twice.
3.
Press CABLE once. It will blink twice.
4. Now, whenever you press VOL+, VOL–, or
MUTE, volume will be controlled by your
Cable Converter.
To change Volume Lock to TV mode:
1.
On the remote control, press TV once.
Then press and hold SETUP until the TV key
blinks twice, then release SETUP.
2.
Enter 9 - 9 - 3. The TV key will blink twice.
3.
Press TV once. It will blink twice.
4. Now, whenever you press VOL+, VOL–, or
MUTE, volume will be controlled by your TV.
To change Volume Lock to AUX mode:
NOTE: Performing these steps will allow you to access
the volume control of your auxiliary device in all modes.
1.
On the remote control, press AUX once.
Then press and hold SETUP until the
AUX key blinks twice, then release SETUP.
2.
Enter 9 - 9 - 3. The AUX key will blink twice.
3.
Press AUX once. It will blink twice.
M7820BP1.indd 17 3/13/2007 3:54:01 PM

18
4. Now, whenever you press VOL+, VOL–, or
MUTE, the volume will be controlled by your
auxiliary device.
TROUBLESHOOTING
PROBLEM:
Mode key does not blink when you press a key.
SOLUTION: Replace the batteries with two (2) new AA
alkaline batteries (see page 8).
PROBLEM: Mode key blinks when you press a key, but
home entertainment device does not respond.
SOLUTION: Make sure you are aiming the remote control
at your home entertainment device and that
you are within 15-feet of the device you are
trying to control.
PROBLEM: The remote control does not control home
entertainment devices or commands are not
performing properly.
SOLUTION: Try all listed codes for the device brand being
set up. Make sure all devices can be operated
with an infrared remote control.
PROBLEM: TV/VCR combo does not respond properly.
SOLUTION: Use the VCR codes for your brand. Some
combo units may require both a TV code and
a VCR code for full operation (see page 10).
PROBLEM: No volume on a second TV.
SOLUTION: Follow instructions in Changing Volume
Lock
(see previous page).
PROBLEM:
CH+ , CH– , and LAST do not work for your
RCA TV.
SOLUTION: Due to RCA design (1983–1987), only the
original remote control will operate these
functions.
PROBLEM: Changing channels does not work properly.
SOLUTION: If original remote control required pressing
ENTER to change channels, press ENTER on
the remote control after entering a channel
number.
PROBLEM: Tried “Search For Your Code” and still could
not find a working code.
SOLUTION: Try the “Search For Your Code” again after
clearing out the device key as follows: Press
and hold
SETUP until mode key blinks twice,
then release. Next enter
9 - 9 - 2. Then press
and release the mode key to be cleared twice.
M7820BP1.indd 18 3/13/2007 3:54:01 PM

19
PROBLEM: Remote control does not turn on Sony or
Sharp TV/VCR Combo.
SOLUTION: For power on, these products require
programming TV codes on the remote con-
trol. For Sony, use TV code 0000 and VCR
code 0032. For Sharp, use TV code 0093 and
VCR code 0048.
ADDITIONAL INFORMATION
This product does not have any user-serviceable parts.
Opening the case, except for the battery cover, may cause
permanent damage to your Cox Universal Remote Control.
Copyright 2007 by Universal Electronics Inc. No part of this
publication may be reproduced, transmitted, transcribed,
stored in any retrieval system, or translated to any lan-
guage, in any form or by any means, electronic, mechani-
cal, magnetic, optical, manual, or otherwise, without prior
written permission of Universal Electronics Inc.
M7820BP1.indd 19 3/13/2007 3:54:01 PM

20
INTRODUCCIÓN
El Control remoto universal Cox de Universal
Electronics es nuestro control remoto universal de
última generación. Está diseñado con una sofisticada
tecnología que le permitirá reunir las funciones de
todos los controles a distancia de su hogar en un solo
aparato. Además, viene incluido con funciones de fácil
uso como:
• Preprogramación para operar el convertidor de cable
suministrado por Cox Communications
• Teclas de vínculos interactivos preprogramados
• Botón de encendido principal para encender o apagar
todos sus equipos con una sola tecla
• Bloqueo de ID de cable para utilizar su control remo-
to únicamente con el convertidor de cable
• Bloqueo de canal para bloquear la selección de canal
sólo en el convertidor de cable
• Búsqueda de códigos para programar controles de
componentes antiguos o descatalogados
• Biblioteca de códigos para dispositivos de audio y
video
• Teclas de colores para ubicar rápidamente los funcio-
nes más utilizadas
• Teclas dedicado at control los funciones populares en
su DVR (Digital Video Recorder)
Antes de comenzar a utilizar el producto, deberá pro-
gramarlo para que funcione con los dispositivos de
entretenimiento doméstico con los que usted desee
utilizar el control. Siga las instrucciones que se detallan
en este manual para configurar su unidad y comenzar a
disfrutar de su nuevo control remoto.
M7820BP1.indd 20 3/13/2007 3:54:01 PM

21
CARACTERÍSTICAS Y FUNCIONES
Refiérase a la ilustración mostrada más adelante para
ubicar las funciones del Control remoto universal Cox
y estudie a continuación los Cuadros de teclas (en las
dos páginas siguientes) para aprender a usar cada una
de ellas
M7820BP1.indd 21 3/13/2007 3:54:02 PM

22
CUADROS DE TECLAS
Use SETUP para todas las secue-
cias
de programación.
Presione POWER una vez para
encender o apagar un dispositivo
de entretenimiento doméstico.
Presione y mantenga presionado
MASTER POWER durante 3
segundos para apagar o encender
todos los dispositivos de entre-
tenimiento doméstico (consulte
Utilización del Botón de encen-
dido principal
en la página 33)
Presione CABLE DVD, TV, o AUX
para seleccionar el dispositivo que
desea controlar. Cada tecla cuenta
con un LED (luz roja) que par-
padea cuando ésta es usada e
indica que el control remoto está
funcionando y enviando señales.
Presione On DEMAND una vez
para tener acceso al menú ONDE-
MAND de COX Communications.
En los modos DVD y TV, use REW,
PLAY, FFWD, STOP y PAUSE para
controlar su reproductor VCR,
DVD o PVR. Para grabar un pro-
grama en los modos DVD o
AUX,
presione RECORD dos veces.
Use estas teclas (excepto
RECORD) en el modo CABLE
para controlar el VOD (Video on
Demand).
Presione DVR LIST una vez para
exhibir una lista de programas
registrados en su PVR.
Presione LIVE para volver a ver
TV en vivo.
M7820BP1.indd 22 3/13/2007 3:54:03 PM

2323
Use INFO para mostrar la infor-
mación sobre el canal y el pro-
grama actual.
Use PAGE+ para desplazarse
por las pantallas de menú y la
guía de programas.
Oprima HD ZOOM para cambiar
la proporción dimensional en su
recpetor Scientific Atlanta or
Motorola HD. (No disponible en
todos los receptores).
Use las Teclas de cursor para mover
el cursor dentro de la guía de pro-
gramas y las pantallas de menú y
para navegar dentro del servicio
interactivo.
Utilice SELECT para elegir opcio-
nes, eventos PPV y para sintonizar
programas de la guía de programas.
Use GUIDE para mostrar la guía
de programas.
Use PAGE- para desplazarse por
las pantallas de menú y la guía de
programas.
Use EXIT para salir del menú y
la guía del convertidor de cable.
Use A, B
o
C para acceder a funciones
adicionales de cable (consulte el man-
ual de su convertidor de cable).
Use SETTINGS para acceder a funcio-
nes adicionales de cable (consulte el
manual de su convertidor de cable).
Pulse MENU una vez para mostrar
los servicios interactivos
disponibles.
Use VOL+ (o VOL–) para subir
(o bajar) el volumen del sonido.
Presione LAST una vez para
volver
al último canal.
M7820BP1.indd 23 3/13/2007 3:54:04 PM

Use FAV para rotar por sus canales
favoritos almacenados en el
convertidor de cable.
Presione MUTE una vez para anu-
lar
o restablecer el sonido.
Use CH+ (o CH–) para seleccionar
el canal siguiente (o anterior).
Use INPUT para operar con la
función de selección de entrada
dela mayoría de TVs.
En la funcion de CABLE, utilice
INPUT para ver otras fuentes de
video (A o B) en vez del cable.
En el resto de las funciones, utilice
INPUT para ver la TV o programas
video sobre el dispositivo deseado.
Para amplificadores/receptores,
utilice
INPUT para seleccionar una
fuente de ingreso.
Presione ENTER después de intro
ducir los números del canal en
algunas marcas de TV.
Use el teclado numérico (0 ~ 9)
para seleccionar directamente los
canales.
Utilice Cuadro-En-Cuadro SWAP
para cambiar imagenes y sonidos
entre el cuadro principal y los
recuadros.
Utilice Cuadro-En-Cuadro ON-OFF
para encender o apagar la funcion
de Cuadro-En-Cuadro encendido
(si esta disponible en su TV o en su
servicio de cable).
Utilice Cuadro-En-Cuadro MOVE
para mover el recuadro a diversas
posiciones en el cuadro principal.
Utilice Cuadro-En-Cuadro CH+ (or
CH -) para seleccionar el siguiente
canal PIP más alto (o mas bajo).
24
M7820BP1.indd 24 3/13/2007 3:54:04 PM

25
INSTALACIÓN DE LAS BATERÍAS
1. En el reverso del control remoto, presione la
pestaña y levante la tapa de las baterías.
2. Adquiera dos (2) baterías alcalinas AA carga-
das.Coloque los polos positivo (+) y negativo
(-) de las baterías con las marcas + y – indica-
das en el compartimiento de las baterías.
3. Alinee las teclas de la cubierta con los orifi-
cios de la carcasa. Coloque de nuevo la tapa.
La pestaña hará clic cuando la cubierta esté
ajustada.
4. Pruebe la unidad presionando la tecla
POWER o la de modo (p. ej. AUX, DVD, TV,
CABLE). Si las baterías han sido introducidas
correctamente, la tecla de modo seleccionada
parpadeará una vez.
NOTA: El control remoto dejará de funcionar cuando
las bater íastengan que ser sustituidas. Sustituya las bat-
erías y el control remoto recuperará todas sus funciones
y su configuración personal.
❶
❸
❷
M7820BP1.indd 25 3/13/2007 3:54:05 PM

26
PROGRAMACIÓN DE CONTROL DE
DISPOSITIVOS
El Control remoto universal Cox está preprogramado
para funcionar con su convertidor de cable, con una TV
RCA, con un DVD SONY y con un receptor de audio
Pioneer. Para controlar dispositivos de marcas diferentes
a las predeterminadas, siga los siguientes pasos; en caso
contrario, ignore esta sección.
NOTAS: Para controlar un reproductor de VCR, pro-
grame la tecla DVD. Para controlar un PVR, programe
la tecla AUX. Para controlar un amplificador o recep-
tor estéreo, programe la tecla AUX. Para controlar un
Combo TV/VCR, ignore esta sección y siga las instruc-
ciones detalladas en la página siguiente.
Si posee otra marca de convertidor de cable o servicio
interactivo con la que desea utilizar el control, deberá
en primer lugar desactivar el Bloqueo de ID de cable
antes de cambiar el código de convertidor. Consulte
Programación del Bloqueo de ID
en la página 31).
1. Encienda un dispositivo e introduzca en su
casoun medio audiovisual (p. ej., cassette o
video).
NOTA: Por favor, lea íntegramente los pasos
del 2 al 4 antes de empezar.Subraye o anote
los códigos y dispositivo que desea programar
antes de seguir con el paso número 2.
2. Presione una tecla de dispositivo cualquiera
dos veces en el control remoto (p. ej. AUX,
DVD, TV o CABLE). Presione y mantenga
presionado SETUP hasta que el modo selec-
cionado parpadee dos veces. A continuación,
suelte el botón.
M7820BP1.indd 26 3/13/2007 3:54:05 PM

27
3. Utilice los códigos del fabricante (a partir de
la página 38) para determinar el tipo de dis-
positivo y marca y a continuación introduzca
el primer dígito del código de cuatro dígitos
de su dispositivo. Si lo ha hecho correcta-
mente, el modo seleccionado parpadeará dos
veces.
NOTA: Si la tecla de modo seleccionada emite
una luz prolongada, elcódigo es inválido.
Repita los pasos 2 y 3 e intenteintroducir el
mismo código de nuevo.
4.
Dirija el control remoto hacia el dispositivo
y presione POWER una vez. El dispositivo
debería apagarse. Si no ocurre así, repita los
pasos 2 y 3, inténtelo con cada código de su
marca hasta encontrar uno que funcione. Si aún
así no funciona, intente buscar el código (con-
sulte Búsqueda de su código en la página 29).
NOTA: Si el dispositivo no tiene botón
POWER,
presione el botón (Play).
5. Repita los pasos del 1–4 para cada uno de
los dispositivos con los que desea utilizar
el control remoto. Anote los códigos correc-
tos de cada dispositivo en los siguientes
AUX
AUX Device _____________________
VCR
TV
CABLE
M7820BP1.indd 27 3/13/2007 3:54:05 PM

28
PROGRAMACIÓN DE CONTRO
COMBOS TV/VCR
Si usted posee un combo TV/VCR, siga las siguientes
instrucciones para utilizar el control con este dispositivo:
1. Encienda su combo TV/VCR e introduzca
una cinta de video.
2. En el control remoto, presione DVD una vez.
Presione y mantenga presionado SETUP hasta
que la tecla DVD parpadee dos veces. A con-
tinuación, suelte el botón SETUP.
3. Utilice los códigos de configuración para
combos TV/VCR (página 38) para ubicar
el nombre de la marca y después introducir
el primer código de cuatro dígitos para su
combo TV/VCR. Si ha seguido este proced-
imiento correctamente, la tecla DVD par-
padeará dos veces.
NOTA: Si la tecla VCR no parpadeó dos veces
tras
introducir el último dígito del código, repita
los pasos del 2 al 3 e intente introducir el
mismo código de nuevo.
4. Dirija el control remoto hacia su combo
TV/VCR y presione POWER una vez. El dis-
positivo debería apagarse. Si no ocurre así,
repita los pasos 2 y 3, inténtelo con cada códi-
go enumerado para su marca hasta encontrar
uno que funcione. Si aún así no funciona,
intente buscar el código (consulte Búsqueda
de su Código en la página 29).
5. Si localiza un código de configuración que
funcione con su combo TV/VCR y encuentra
también un código independiente para TV,
deberá programar este código en el control
remoto para acceder al control de volumen
(consulte Programación de Control de
Dispositivos en la página 26).
Si no existe un código independiente para la
TV, deberá seguir los siguientes pasos para
acceder al control de volumen:
a. Presione y mantenga presionado SETUP
hasta que la tecla DVD parpadee dos veces.
A continuación, suelte el botón SETUP.
M7820BP1.indd 28 3/13/2007 3:54:05 PM

29
b. Presione 9-9-3. La tecla DVD parpadeará
dos veces.
c. Presione DVD una vez. La tecla DVD
parpadeará dos veces.
6. Anote los códigos correctos de cada disposi-
tivo en los siguientes espacios para referencias
futuras:
TV/VCR
TV (if used)
BÚSQUEDA DE SU CÓDIGO
Si el dispositivo de su centro de entretenimiento no
responde al control remoto Universal COX DVR después
de intentar todos los códigos enumerados para su marca
de fábrica, o si su marca de fábrica no se menciona,
intente encontrar su código.
Por ejemplo, para encontrar el código para su TV:
1. Encienda su TV.
2. Presione TV una vez en su control remoto;
va a parpadear una vez. Oprima y sostenga
SETUP hasta que parpadee dos veces.
3. Oprima 9 - 9 - 1. El boton TV parpadeara dos
veces.
4. Apunte el control remoto hacia la TV y pre-
sione PWR una vez
5. Presione CH+ (o el CH -) una o más veces y
pare cuando la TV se apague
NOTA: En la funcion de búsqueda, el control
remoto enviará códigos IR desde su biblioteca
al dispositivo seleccionado, comenzando por el
código más popular.
NOTA: Si mientras usted presiona CH +,
pasa el código inadvertidamente, presione
el CH- una o más veces hasta que la TV se
encienda.
6.
Presione SETUP una vez para asegurar el codigo.
El boton TV parpadeara dos veces.
7. Para buscar los códigos de sus otros disposi-
M7820BP1.indd 29 3/13/2007 3:54:05 PM

30
tivos, repita los pasos 1 a 5, pero substituya el
boton correspondiente (e.g., AUX., DVD, AUD,
o CABLE) al dispositivo que usted necesita.
COMPROBACIÓN DE LOS CÓDIGOS
Si usted ha configurado el control remoto universal Cox
siguiendo el procedimiento Búsqueda de su Código
(página anterior), es probable que deba averiguar qué
código de cuatro dígitos funciona con su dispositivo. Por
ejemplo, para averiguar qué código funciona con su TV:
1. Encienda su TV.
2. En el control remoto, presione TV una vez.
Presione y mantenga presionada SETUP
hasta que la tecla TV parpadee dos veces.
A continuación, suelte el botón SETUP.
3.
Presione 9-9-0. La tecla TV parpadeará dos veces.
4. Para ver el primer dígito del código, presione
1 una vez. Espere 3 segundos y cuente el
número de veces que parpadea la tecla TV
(p. ej., 3 parpadeos = 3) y anote el número en
el primer espacio de los destinados al código
de su TV (ver más adelante).
NOTA: Si el dígito del código es “0”, la tecla
de modo seleccionada no parpadeará.
5.
Repita el paso 4 tres veces más para los dígitos
restantes. Use el 2 para el segundo dígito, el 3
para el tercer dígito y el 4 para el cuarto dígito.
Termine de escribir el código en los espacios
destinados al código de su TV más adelante.
6. Para comprobar los códigos de otros disposi-
tivos, repita los pasos del 1 al 4 sustituyendo
la tecla apropiada (p. ej., AUX, DVD o CABLE)
por la del dispositivo que esté comprobando.
Anote los códigos en los espacios pertinentes,
más adelante.
AUX
AUX Device ____________________
VCR
M7820BP1.indd 30 3/13/2007 3:54:05 PM

31
\ TV
CABLE
PROGRAMACIÓN DEL BLOQUEO DE ID
El Control remoto universal Cox viene preprogramado y
bloqueado de fábrica para funcionar con el convertidor
de cable y el servicio interactivo que le proporciona su
compañía de cable.
Sin embargo, si usted tiene otra marca o modelo de
convertidor de cable y servicio interactivo con los que
le gustaría utilizar su control remoto, deberá entonces
seguir los siguientes pasos para desbloquear el ID de
cable, introducir un nuevo código de fabricante y
bloquear el ID de nuevo.
1. Encienda el Convertidor de cable.
2. En el control remoto, presione CABLE una
vez. Presione y mantenga presionada SETUP
hasta que la tecla TV parpadee dos veces.
A continuación, suelte el botón SETUP.
3. Presione 9-8-2. La tecla CABLE parpadeará
dos veces.
4. Siga las instrucciones detalladas en
Programación del Control de Dispositivo
en la página 27 para programar el control
de dispositivo para el convertidor de cable y
servicio interactivo deseados. Hecho esto, siga
los pasos restantes (5 y 6, en esta página)
para bloquear de nuevo el ID.
5. En el control remoto, presione CABLE una
vez. Presione y mantenga presionada SETUP
hasta que la tecla TV parpadee dos veces.
A continuación, suelte el botón SETUP.
6. Presione 9-8-2. La tecla CABLE parpadeará
dos veces
M7820BP1.indd 31 3/13/2007 3:54:06 PM

32
PROGRAMACIÓN DEL BLOQUEO DEL
CONTROL DE CANAL
Las funciones de control de canal del control remoto
están por defecto bloqueadas en relación al converti-
dor de cable. Las teclas afectadas son 0~9, CH+, CH–,
ENTER y LAST. Esto evitará que usted cambie sin que-
rer el canal de su TV o DVD. No obstante, puede desac-
tivar esta función para permitir un acceso total a estas
teclas en los modos TV y DVD.
Desactivación del Bloqueo del control de
canal:
1. En el control remoto, presione CABLE una
vez. Presione y mantenga presionado SETUP
hasta que CABLE parpadee dos veces. A con-
tinuación, suelte el botón SETUP.
2. Presione 9-7-3. La tecla CABLE parpadeará
dos veces.
3. Presione CH– una vez. La tecla CABLE par-
padeará cuatro veces.
4. Ahora el control remoto proporcionará fun-
ciones de control de canal de TV y VCR siem-
pre que esté en los modos TV o VCR.
NOTA: Esta función no afecta al modo AUX.
Reactivación del Bloqueo del control de
canal:
1. En el control remoto, presione CABLE una
vez. Presione y mantenga presionada SETUP
hasta que la tecla TV parpadee dos veces.
A continuación, suelte el botón SETUP.
2. Presione 9-7-3. La tecla CABLE parpadeará
dos veces.
3. Presione CH+ una vez. La tecla CABLE par-
padeará dos veces.
4. En este momento, sólo estará disponible
la función de control de canal de su converti-
dor de cable, independientemente del modo
que seleccione (p. ej. TV, DVD o CABLE).
NOTA: Esta función no afecta al modo AUX.
M7820BP1.indd 32 3/13/2007 3:54:06 PM

33
UTILIZACIÓN DEL BOTÓN DE
ENCENDIDO PRINCIPAL
El Control remoto universal Cox está equipado con una
función exclusiva que le permite encender o apagar de
manera secuencial todos sus dispositivos de entreten-
imiento doméstico con un único botón:
1. Dirija el control remoto hacia los dispositivos.
2. Presione y mantenga presionado MASTER
POWER durante 3 segundos para apagar o
encender todos los dispositivos de entreten-
imiento doméstico de manera secuencial.
Dependiendo del modo que esté seleccionado,
el control remoto enviará señales infrarrojas
a los dispositivos en el siguiente orden:
Modo de Dispositivo Encendido Modo
inicio Apagado finalización
AUX Cable, TV, DVD CABLE
DVD Auxiliar, Cable, TV CABLE
TV DVD, Auxiliar, Cable CABLE
CABLE TV, DVD, Auxiliar CABLE
Por ejemplo, si está seleccionado TV, al
presionar y mantener presionado MASTER
POWER durante 3 segundos, se apagarán el
DVD, un dispositivo auxiliar y el convertidor
de cable.
NOTA: El control remoto queda por defecto en el
modo CABLE una vez todos los dispositivos hayan
sido apagados. Así pues, la secuencia de encendido
inicial será siempre TV, VCR y dispositivo auxiliar,
siempre que no se presione otra tecla de dispositivo
antes.
REASIGNACIÓN DE TECLAS DE
DISPOSITIVOS
El Control remoto universal Cox puede configurarse
para su utilización con un segundo dispositivo de TV o
VCR, o cualquier otra combinación de cuatro dispositi-
vos de entretenimiento doméstico.
Por ejemplo, para utilizar el control con una TV, un con-
M7820BP1.indd 33 3/13/2007 3:54:06 PM

34
vertidor de cable y dos VCR, deberá reasignar la tecla
AUX fuera de uso para utilizarla con el segundo VCR, de
la siguiente manera:
1. En el control remoto, presione DVD una vez.
Presione y mantenga presionada SETUP
hasta que la tecla TV parpadee dos veces.
A continuación, suelte el botón SETUP.
2. Presione 9-9-2. La tecla DVD parpadeará dos
veces.
3. Presione DVD una vez y, a continuación,
presione AUX también una vez. La tecla VCR
parpadeará dos veces.
4. La tecla AUX podrá ya ser programada para
su VCR. Consulte Programación de Control
de dispositivos en la página 27.
Para reasignar otras teclas de dispositivos,
repita los pasos del 1 al 4 sustituyendo la secuencia de
teclas tal y como se indica en el siguiente cuadro:
Presione la secuencia de teclas indicada para reasignar:
TV como tecla para VCR:
SETUP - 9 - 9 - 2 - DVD - TV
TV como tecla para 2nd Dispositivo auxiliar:
SETUP - 9 - 9 - 2 - AUX - TV
TV como tecla para 2nd Cable:
SETUP - 9 - 9 - 2 - CABLE - TV
TV de nuevo como TV:
SETUP - 9 - 9 - 2 - TV - TV
DVD como tecla para 2nd TV:
SETUP - 9 - 9 - 2 - TV - DVD
DVD como tecla para 2nd Dispositivo auxiliar:
SETUP - 9 - 9 - 2 - AUX - DVD
DVD como tecla para 2nd Cable:
SETUP - 9 - 9 - 2 - CABLE - DVD
DVD de nuevo como DVD:
SETUP - 9 - 9 - 2 - DVD- DVD
AUX como tecla para 2nd TV:
SETUP - 9 - 9 - 2 - TV - AUX
AUX como tecla para 2nd VCR:
SETUP - 9 - 9 - 2 - DVD - AUX
AUX como tecla para 2nd Cable:
M7820BP1.indd 34 3/13/2007 3:54:06 PM

35
SETUP - 9 - 9 - 2 - CABLE - AUX
AUX de nuevo como AUX:
SETUP - 9 - 9 - 2 - AUX - AUX
Una vez completada la reasignación, el modo seleccio-
nado parpadeará dos veces para confirmar su selección.
A continuación, programe el control de dispositivos
(consulte Programación de Control de Dispositivos en
la página 27).
CAMBIO DEL BLOQUEO DE VOLUMEN
El Control remoto universal Cox está configurado para
controlar el volumen de un dispositivo a partir de su TV,
siempre que esté en el modo TV, DVD, o CABLE.
No obstante, en el modo Auxiliar, deberá utilizar un con-
trol diferente para el volumen de su dispositivo auxiliar.
Si su TV no puede recibir señales de un control remoto
o si desea que el volumen esté controlado por un dis-
positivo diferente, puede cambiar la configuración de
bloqueo de volumen para controlar un volumen a través
de un modo no asociado (p. ej., a través del cable en el
modo TV).
Cambio del Bloqueo de volumen a modo
CABLE:
1.
En el control remoto, presione CABLE una vez.
A continuación, presione y mantenga presio-
nado SETUP hasta que la tecla CABLE par-
padee dos veces. A continuación, suelte el botón
SETUP.
2. Presione 9-9-3. La tecla CABLE parpadeará
dos veces.
3. Presione CABLE una vez. Parpadeará dos
veces.
4. Ahora, cuando presione VOL+, Vol– o MUTE,
el volumen estará siendo controlado por su
convertidor de cable.
Cambio del Bloqueo de volumen a modo TV:
1. En el control remoto, presione TV una vez.
Presione y mantenga presionado SETUP
hasta que la tecla TV parpadee dos veces.
A continuación, suelte el botón SETUP.
M7820BP1.indd 35 3/13/2007 3:54:06 PM

36
2. Presione 9-9-3. La tecla TV parpadeará dos
veces.
3. Presione TV una vez. Parpadeará dos veces.
4. Ahora, cuando presione VOL+, Vol– o MUTE,
el volumen estará siendo controlado por su
T V.
Cambio del Bloqueo de volumen a modo
AUX:
NOTA: Estas instrucciones le permitirán acceder al con-
trol de volumen de su dispositivo auxiliar en cualquier
modo.
1. En el control remoto, presione AUX una vez.
Presione y mantenga presionado SETUP
hasta que la tecla AUX parpadee dos veces.
A continuación, suelte el botón SETUP.
2. Presione 9-9-3. La tecla AUX parpadeará dos
veces.
3. Presione AUX una vez. Parpadeará dos veces.
4. Ahora, cuando presione VOL+, Vol– o MUTE,
el volumen estará siendo controlado por su
dispositivo auxiliar.
RESOLUCIÓN DE PROBLEMAS
PROBLEMA: La tecla de modo no parpadea cuando pre-
siona una tecla.
SOLUCIÓN: Sustituya las baterías gastadas por dos (2)
baterías alcalinas nuevas del tipo
AA (consulte la página 8).
PROBLEMA: La tecla de modo parpadea cuando pre-
siona una tecla, pero el dispositivo de
entretenimiento doméstico no responde.
SOLUCIÓN: Asegúrese de que está dirigiendo el
control remoto el dispositivo de entreten-
imiento doméstico y que está usted situa-
do a no más de 5 metros del dispositivo
que desea utilizar.
PROBLEMA: El control remoto no funciona con los
dispositivos de entretenimiento doméstico
o las órdenes no se ejecutan
correctamente.
SOLUCIÓN: Pruebe todos los códigos enumerados
para la marca del dispositivo que está
M7820BP1.indd 36 3/13/2007 3:54:06 PM

37
siendo configurado. Asegúrese de que
todos los dispositivos pueden recibir
señal de un control remoto.
PROBLEMA: El combo TV/VCR no responde correcta-
mente.
SOLUCIÓN: Utilice los códigos de VCR para su
marca. Algunos combos necesitan un
código de TV y otro de VCR para funcio-
nar correctamente (consulte la
página 47).
PROBLEMA: No hay volumen en la segunda TV.
SOLUCIÓN: Siga las instrucciones expuestas en
Cambio del Bloqueo de volumen
(ver página anterior).
PROBLEMA: CH+, CH– y LAST no funcionan en su
TV RCA.
SOLUCIÓN: Debido a los diseños RCA (1983–1987),
solo funciona con estas TVs su control
remoto original.
PROBLEMA: El cambio de canales no funciona correcta-
mente.
SOLUCIÓN: Si en el control original era necesario presion-
ar ENTER para cambiar los canales, presione
ENTER en el control remoto después de
introducir el número de canal.
PROBLEMA: Probó el “Búsqueda de su Codigo” pero aún
así no pudo encontrar un código que funcio-
nara.
SOLUCIÓN: Pruebe el “Búsqueda de su Codigo” de nuevo
tras borrar la tecla de dispositivo de la mane-
ra siguiente: Presione y mantenga presionado
SETUP hasta que la tecla de modo parpadee
dos veces y presione
9-9-2. A continuación
presione y suelte la tecla de modo
dos veces para borrarla.
PROBLEMA: El control remoto no enciende combos TV/
VCR de las marcas Sony o Sharp.
SOLUCIÓN: Para encender estos equipos, es necesario
programar los códigos de TV en el control
remoto. Para Sony, utilice el código de TV
0000 y el código de VCR 0032.Para Sharp,
utilice el código de TV 0093 y el código de
VCR 0048.
M7820BP1.indd 37 3/13/2007 3:54:07 PM

38
INFORMACIÓN ADICIONAL
Este producto no tiene ninguna parte que pueda ser de
otra utilidad para el usuario.
Abrir la carcasa, a excepción del compartimiento de
las baterías, puede ocasionar daños permanentes en el
Control remoto universal Cox.
Copyright 2007 por Universal Electronics Inc. Queda
prohibida la reproducción, transmisión, transcripción,
almacenamiento en cualquier sistema de recuperación
o traducción a cualquier idioma de parte o totalidad
de esta publicación, en ninguna forma o medio, ya sea
electrónico, mecánico, magnético, óptico, manual o de
otro tipo, sin el consentimiento previo por escrito de
Universal Electronics Inc.
MANUFACTURER’S CODES /
CÓDIGOS DEL FABRICANTE
SETUP CODES FOR Audio Amplifiers
Adcom 0577, 1100
Bose 0674
Carver 0892
Durabrand 1561
Elan 0647
GE 0078
Harman/Kardon 0892
JVC 0331
Left Coast 0892
Lenoxx 1561
Luxman 0165
Marantz 0892, 0321
McIntosh 0251
Nakamichi 0321
NEC 0264
Optimus 0395, 0823
Parasound 0246
Philips 0892
Pioneer 0823
Polk Audio 0892
RCA 0823
Realistic 0395
Sansui 0321
Shure 0264
Sony 0689, 0815, 1126
Soundesign 0078, 0211
Victor 0331
Wards 0078, 0211
M7820BP1.indd 38 3/13/2007 3:54:07 PM

39
Yamaha 0354, 0133
SETUP CODES FOR Cable Converters
ABC 0003, 0008, 0014, 0017
Americast 0899
Bell & Howell 0014
Bell South 0899
General Instrument 0476, 0810, 0276, 0003
GoldStar 0144
Hamlin 0009, 0273
i3 Micro 1602
Motorola 1376, 0476, 0810, 0276, 1187, 1254, 11062
Pace 1877, 0237, 0008
Panasonic 0000, 0107
Pioneer 1877, 0877, 0144, 0533
Regal 0279, 0273
Samsung 0144
Scientific Atlanta 1877, 0877, 0477, 0008, 0017
Sony 1006
Starcom 0003
Thomson 1256
Tocom 0012
Torx 0003
Toshiba 0000
Zenith 0000, 0525, 0899
SETUP CODES FOR Audio Amp/Tuners
ADC 0531
Adcom 0616
Aiwa 1405, 0158, 0189, 0121, 0405, 1243, 1388, 1641
Akai 0076, 0224, 1255, 1512
Alco 1390
AMC 1077
Amphion Media 1563, 1615
AMW 1563, 1615
Anam 1609, 1074
Apex Digital 1257, 1430, 1774
Arcam 1120, 1189
Audiotronic 1189
Audiovox 1390, 1627
B & K 0701, 0820, 0840
BK 0702
Bose 1229, 0639, 1253, 1629, 1841, 1933
Brix 1602
Cambridge Sound. 1370
Capetronic 0531
Carver 1189, 0189, 0008, 0042, 0360, ,0121, 1289
Casio 0195
Clarinette 0195
Classic 1352
Coby 1263, 1389
M7820BP1.indd 39 3/13/2007 3:54:07 PM

40
Compaq 1136
Criterion 1420
Curtis Mathes 0080
Daewoo 1250
Dell 1383
Delphi 1414
Denon 1360, 0004, 0273, 0771, 1142, 0121
Emerson 0424
Fisher 0042, 0219, 0360, 1801
Garrard 0424, 0463
Gateway 1517, 1567
Glory Horse 1263
Go Video 1532
Harman/Kardon 0110, 0189, 0891, 1289, 1304, 1306
Hewlett Packard 1181
Hitachi 1273, 1801
Initial 1426
Inkel 0062
Integra 0135, 1298, 1320
JBL 0110, 1306
JVC 0074, 1263, 1374, 1495, 1811, 1871
Kenwood 1313, 1570, 1569, 0027, 0042, 0077, 0186, 0239,
0313
KLH 1390, 1412, 1428
Koss 0424, 1366, 1497
Lasonic 1798
Lenoxx 1437
Lexicon 1076
LG 1293
Linn 0189
Liquid Video 1497
Lloyd’s 0195
LXI 0181
Magnavox 1189, 1269, 0189, 0128, 0195, 0391, 0531, 1514
Marantz 1189, 1269, 0039, 0189, 0128, 1289
McIntosh 1289
MCS 0039, 0346
Micromega 1189
Mitsubishi 1393
Modulaire 0195
Myryad 1189
NAD 0320
Nakamichi 0097, 0347, 1313, 1555
NEC 0235
Norcent 1389
Nova 1389
Onkyo 0135, 0380, 0842, 1298, 1320, 1531
Optimus 1023, 0042, 0080, 0177, 0181, 0186, 0219, 0531,
0670, 0738, 0801, 1074
Oritron 1366, 1497
Panasonic 1308, 1518, 0039, 0309, 0367, 0518, 1288, 1316,
M7820BP1.indd 40 3/13/2007 3:54:07 PM

41
1548, 1633, 1763, 1764
Penney 0195
Philips 1189, 1269, 0189, 0391, 1120, 1266
Pioneer 1023, 0014, 0080, 0150, 0244, 0531, 0630, 1384
0801
Polaroid 1508
Polk Audio 0189, 1289, 1414
Proscan 1254
Quasar 0039
RadioShack 1263
RCA 1023, 1609, 1254, 0054, 0080, 0346, 0360, 0530,
0531, 1074, 1154, 1390, 1511
Realistic 0163, 0181, 0195
Regent 1437
Rio 1383, 1869
Saba 1519
Samsung 1295, 1500, 1304
Sansui 0189, 0193, 0346, 1189
Sanyo 0219, 0801, 1251, 1469, 1801
Scott 0163, 0322
Sharp 0186, 1286
Sharper Image 1263, 1556
Sherwood 0062, 0491, 0502, 1077, 1423, 1517, 1567, 1653,
1905
Shinsonic 1426
Sirius 1602, 1627, 1811, 1987
Sonic Blue 1383, 1532, 1869
Sony 1058, 1441, 1258, 1759, 1622, 0158, 0168, 0474,
1349, 1406, 1442, 1558, 1658, 1758, 1858, 1958
Soundesign 0670
Stereophonics 1023
Sunfire 1313, 0313
Teac 0163, 0463, 1074, 1267, 1390, 1528
Technics 1308, 1518, 0039, 0208, 0309, 0518, 1633
Thorens 1189
Toshiba 1788, 0080, 0135
Venturer 1390
Victor 0074
Wards 0158, 0189, 0014, 0054, 0080
XM 1406, 1414
Yamaha 0176, 0186, 1176, 1276, 1331, 1375
Yorx 0195
Zenith 0857, 1293
SETUP CODES FOR TVs
A-Mark 0003
Abex 0032
Admiral 0093, 0463
Advent 0761, 0783, 0815, 0817, 0842, 1933
Adventura 0046
Aiko 0092
Aiwa 0701
M7820BP1.indd 41 3/13/2007 3:54:07 PM

42
Akai 0812, 0702, 0030, 0098, 0672, 1903, 1935
Alaron 0179, 0183, 0216
Albatron 0700, 0843
Ambassador 0177
America Action 0180
Ampro 0751
Anam 0180, 0004, 0009, 0068
Anam National 0055, 0161
AOC 0030, 0003, 0019, 0052, 0137, 0185
Apex Digital 0748, 0879, 0765, 0767, 1943, 0156
Archer 0003
Audiovox 0451, 0180, 0092, 0003, 0623, 0802, 0875, 1284,
1937, 1951, 1952
Aventura 0171
Axion 1937
Belcor 0019
Bell & Howell 0154, 0016
BenQ 1032, 1315
Boxlight 0893
Bradford 0180
Brockwood 0019
Broksonic 0236, 0463, 0003, 1935, 1938, 0180
Cadia 1283
Candle 0030, 0046, 0056, 0186
Carnivale 0030
Carver 0054, 0170
CCE 0217, 0329
Celebrity 0000
Celera 0765
Champion 1362
Changhong 0765
Cinego 1986
Citizen 0060, 0030, 0092, 0039, 0046, 0056, 0186, 0280
Clairtone 0185
Clarion 0180
Commercial Sol. 1447, 0047
Concerto 0056
Contec 0180, 0157, 0158, 0185
Craig 0180, 0161
Crosley 0054
Crown 0180, 0039
Curtis Mathes 0047, 0054, 0154, 0451, 0093, 0060, 0702, 0030,
0145, 0166, 1347, 1147, 0747, 0466, 0056, 0039,
0016
CXC 0180
Daewoo 0451, 0092, 1661, 0019, 0039, 0066, 0067, 0091,
0623, 0661, 0672
Daytron 0019
Dell 1080, 1178, 1264, 1403, 1454
Denon 0145, 0511
Denstar 0628
M7820BP1.indd 42 3/13/2007 3:54:07 PM

43
Diamond Vision 1996, 1997
DMTech 1338
Dream Vision 1297
Dumont 0017, 0019
Durabrand 0463, 0180, 0178, 0171, 1034, 0003
Dwin 0093, 0720, 0747, 0774
Dynatech 0049
Electroband 0000, 0185
Electrograph 1755
Electrohome 0381, 0389, 0409
Emerson 0154, 0236, 0463, 0180, 0178, 0171, 1963, 1944,
0623, 0282, 0280, 0270, 0185, 0183, 0182, 0181,
0179, 0177, 0158, 0039, 0038, 0019, 0180
Envision 0030, 0813, 1365
Epson 0833, 0840, 1290
ESA 0812, 0171
Fisher 0154, 0159
Fujitsu 0179, 0186, 0683, 0809, 0853
Funai 0180, 0171, 0179
Futuretech 0180
Gateway 1755, 1756
GE 1447, 0047, 0051, 0451, 0178, 1347, 0747, 0282,
0279, 0251, 0174, 0138, 0135, 0055, 0029, 0027,
0021
Gibralter 0017, 0030, 0019
Go Video 0886
GoldStar 0178, 0030, 0001, 0002, 0019, 0032, 0106, 0409
Goodmans 0360
Gradiente 0392
Grundig 0683
Grunpy 0180, 0179
Haier 1034, 0768
Hallmark 0178
Hannspree 1348, 1351, 1352
Hantarex 1338
Harley Davidson 0043, 0179
Harman/Kardon 0054, 0078
Harvard 0180, 0068
Havermy 0093
Helios 0865
Hello Kitty 0451
Hewlett Packard 1088, 1089, 1101, 1494, 1502
Hisense 0748
Hitachi 1145, 0145, 0016, 0032, 0038, 0056, 0095, 0097,
0151, 0173, 0227, 0279, 0409, 0413, 1960
HP 1088, 1089, 1101, 1494, 1502
Hyundai 0849
iLo 1286, 1990
Infinity 0054
Initial 1990
Inteq 0017
M7820BP1.indd 43 3/13/2007 3:54:07 PM

44
Janeil 0046
JBL 0054
JCB 0000
Jensen 0761, 0050, 0815, 0817, 1299, 1933
JVC 0053, 0036, 0069, 0160, 0169, 0182, 0731, 1253
1352
Kamp 0216
Kawasho 0158, 0216, 0308
Kaypani 0052
KEC 0180
Kenwood 0030, 0019
KLH 0765, 0767, 1962
Kloss 0024, 0046, 0078
KMC 0106
Konka 0628, 0632, 0638, 0703, 0707
KTV 0180, 0030, 0039, 0183, 0185, 0217, 0280
LG 1265, 0178, 0442, 0700, 0856, 1178, 1325, 1993
Loewe 0136
Logik 0016
Luxman 0056
LXI 0047, 0054, 0154, 0156, 0178, 0148, 0747
Magnavox 1454, 0054, 0030, 0706, 1963, 1944, 1254, 0802,
0386, 0230, 0187, 0186, 0179, 0096, 0036, 0028,
0024, 0020
Majestic 0015, 0016
Marantz 0054, 0030, 0444, 0704, 0854, 0855, 1154, 1454
Matsushita 0250, 0650
Maxent 1755
Megapower 0700
Megatron 0178, 0145, 0003
MEI 0185
Memorex 0154, 0463, 0150, 0178, 0016, 0106, 0179
MGA 0150, 0178, 0030, 0019, 0155
Midland 0047, 0017, 0051, 0032, 0039, 0135, 0747
Mintek 1990
Minutz 0021
Mitsubishi 0093, 1250, 0150, 0178, 0014, 0019, 0098, 0155,
0331, 0358, 0836, 0868, 1550
Monivision 0700, 0843
Motorola 0093, 0055
MTC 0060, 0030, 0019, 0049, 0056, 0091, 0185, 0216
Multitech 0180, 0049, 0217
NAD 0156, 0178, 0866
NEC 0030, 0019, 0036, 0056, 0170, 0434, 0497, 0882,
1704
NetTV 1755
Nikko 0178, 0030, 0092, 0317
Noblex 0430
Norcent 0748, 0824, 1365
Norwood Micro 1286, 1296, 1303
Noshi 0018
M7820BP1.indd 44 3/13/2007 3:54:07 PM

45
NTC 0092
Olevia 1144, 1240, 1331
Onwa 0180
Optimus 0154, 0250, 0166, 0650
Optoma 0887, 1348
Optonica 0093, 0165
Orion 0236, 0463, 1463, 0179
Panasonic 0250, 0051, 0055, 0162, 0226, 0338, 0375, 0650,
1410, 1941, 1946, 1947, 0047, 0156, 0051, 0060, 0178,
0030, 1347, 0747, 0309, 0149, 0138, 0135, 0110, 0039,
0032, 0027, 0021, 0019, 0018, 0003, 0002
Philco 0054, 0030, 0019, 0020, 0028, 0096, 0302
Philips 1454, 0054, 0690, 1154
Pilot 0030, 0019, 0039
Pioneer 0166, 0038, 0172, 0679, 0866, 1260
Polaroid 0765, 0865, 1276, 1314, 1316, 1326, 1327, 1328,
1991, 1992
Portland 0092, 0019, 0039
Prima 0761, 0783, 0815, 0817, 1933
Princeton 0700, 0717
Prism 0051
Proscan 1447, 0047, 0747, 1347, 0466
Proton 0178, 0003, 0031, 0052, 0466
Protron 1320, 1323
Proview 1498
Pulsar 0017, 0019
Quasar 0250, 0051, 0055, 0165, 0219, 0650
RadioShack 0047, 0154, 0180, 0178, 0030, 0019, 0032, 0039, 0056,
0165, 0409, 0747
RCA 1447, 0047, 1958, 1953, 1948, 1547, 1347, 1247,
1147, 1047, 0747, 0679, 0278, 0174, 0135, 0090,
0038, 0029, 0019, 0018
Realistic 0154, 0180, 0178, 0030, 0019, 0032, 0039, 0056,
0165
Rhapsody 0183, 0185, 0216
Runco 0017, 0030, 0251, 0497, 0603
Sampo 0030, 0032, 0039, 0052, 0100, 0110, 1755
Samsung 0060, 0812, 0702, 0178, 0030, 1903, 1395, 1312,
1060, 0814, 0766, 0427, 0408, 0329, 0056, 0032,
0019, 0217, 0587
Samsux 0039
Sansui 0463, 1935
Sanyo 0154, 0088, 0107, 0146, 0159, 0232, 0484, 0799,
0893, 1142
Sceptre 1360
Scimitsu 0019
Scotch 0178
Scott 0236, 0180, 0178, 0019, 0179, 0309
Sears 0047, 0054, 0154, 0156, 0178, 0171, 0015, 0056, 0146,
0148, 0149, 0159, 0168, 0179, 0281, 0747
Seleco 1297, 1351
Sharp 0093, 0039, 0153, 0157, 0165, 0220, 0281, 0386,
M7820BP1.indd 45 3/13/2007 3:54:07 PM

46
0398, 0491, 0688, 0689, 0818, 0851
Sheng Chia 0093
Shogun 0019
Signature 0016
SIM2 Multimedia 1297
Simpson 0186, 0187
Sole 0813
Sony 1100, 0000, 0011, 0080, 0111, 0273, 0353, 0810,
0834, 1317
Soundesign 0180, 0178, 0179, 0186
Sova 1320, 1952
Spectricon 0003, 0137
Squareview 0171
SSS 0180, 0019
Starlite 0180
Studio Experience 0843
Superscan 0093, 0864
Supre-Macy 0046
Supreme 0000
SVA 0748, 0587, 0768, 0865, 0870, 0871, 0872
Sylvania 0054, 0030, 0171, 0020, 0028, 0065, 0096, 0381,
1944, 1963
Symphonic 0180, 0171
Syntax 1144, 1240, 1331
Tandy 0093
Tatung 0003, 0049, 0055, 0396, 1101, 1285, 1286, 1287,
1288, 1361, 1756
Technics 0250, 0051
Technol Ace 0179
Technovox 0007
Techview 0847
Techwood 0051, 0003, 0056
Teknika 0054, 0180, 0150, 0060, 0092, 0016, 0019, 0039,
0056, 0175, 0179, 0186, 0312, 0322
Telefunken 0702, 0056, 0074
Tera 0031
Thomson 0209, 0210
TMK 0178, 0056, 0177
TNCi 0017
Toshiba 0154, 1256, 0156, 1265, 0060, 1945, 1935, 1704,
1656, 1356, 1343, 1325, 1156, 0845, 0832, 0650,
0149, 0036, 1945, 1971
Tosonic 0185
Totevision 0039
Trical 0157
TVS 0463
Ultra 0391
Universal 0027
Universum 1337
US Logic 1286, 1303
Vector Research 0030
M7820BP1.indd 46 3/13/2007 3:54:08 PM

47
Victor 0053
Video Concepts 0098
Vidikron 0054, 0242
Vidtech 0178, 0019, 0036
Viewsonic 0857, 0864, 0885, 1330, 1342, 1755
Viking 0046, 0312
Visart 1336
Vizio 0864, 0885, 1756
Wards 0054, 0178, 0030, 1156, 0866, 0202, 0179, 0174,
0165, 0111, 0096, 0080, 0056, 0029, 0028, 0027,
0021, 0020, 0019, 0016
Waycon 0156
Westinghouse 0885, 0889, 1282, 0000, 0451
White Westing. 0463, 0623
Yamaha 0030, 0019, 0769, 0833, 0839
Zenith 0017, 0463, 1265, 0178, 0092, 0016
Zonda 0003
SETUP CODES FOR VCRs
ABS 1972
Action 0317
Admiral 0048, 0209, 0479
Advantz 0356
Adventura 0000
Aiko 0278
Aiwa 0037, 0000, 0124, 0307, 0406, 0436, 0468
Akai 0041, 0049, 0053, 0061, 0106, 0156, 0175, 0242
Alienware 1972
America Action 0278
American High 0035
Asha 0240
Audiovox 0037, 0278
Beaumark 0240
Bell & Howell 0104
Broksonic 0184, 0121, 0209, 0002, 0211, 0295, 0361, 0479,
1479, 1815
Calix 0037
Canon 0035, 0102
CapeharT 0020
Carver 0081, 0146
CCE 0072, 0278
Citizen 0037, 0278, 1278
Colt 0072
Craig 0037, 0047, 0240, 0072, 0271
Curtis MatheS 0060, 0035, 0162, 0041, 0760, 1035
Cybernex 0240, 0051
CyberPower 1972
Daewoo 0045, 0278, 0017, 0020, 0087, 0561, 0637, 1278
Daytron 0020
Dell 1972
Denon 0042
M7820BP1.indd 47 3/13/2007 3:54:08 PM

48
DirecTV 0739
Durabrand 0039, 0038
Dynatech 0000
Electrohome 0037, 0043
Electrophonic 0037
Emerex 0032
Emerson 0037, 0184, 0000, 0121, 0043, 0209, 0002, 0278,
1479, 1278, 0637, 1593, 0593, 0561, 0510, 0479,
0361, 0295, 0294, 0212, 0211, 0208, 0088, 0068,
0061, 0036
Fisher 0047, 0104, 0054, 0066
Fuji 0035, 0033
Funai 0000, 0593, 1593
Garrard 0000
Gateway 1972
GE 0060, 0035, 0240, 0065, 0202, 0760, 0761, 0807,
1035, 1060
Go Video 0232, 0240, 0279, 0350, 0432, 0526, 0643
GoldStar 0037, 0038, 0018, 0471, 0480, 1237
Gradiente 0000, 0408
Grundig 0195
Harley Davidson 0000
Harman/Kardon 0081, 0038, 0075, 0146, 0161
Harwood 0072, 0068
Headquarter 0046
Hewlett Packard 1972
HI-Q 0047
Hitachi 0000, 0042, 0041, 0065, 0082, 0089, 0105, 0166,
0235, 0292
Howard Computers 1972
HP 1972
HNS 0042, 0739
Humax 0739
Hush 1972
iBUYPOWER 1972
Jensen 0041
JVC 0067, 0041, 0008, 0206, 0207, 0384, 1707
KEC 0037, 0278
Keen 0693
Kenwood 0067, 0041, 0038, 0384
KLH 0072
Kodak 0035, 0037
LG 0480, 1037
Linksys 1972
Lloyd’s 0000, 0208
Logik 0072
LXI 0037
Magnasonic 0593, 1278
Magnavox 0035, 0039, 0081, 0000, 0149, 0103, 0110, 0563,
0593, 1781
Magnin 0240
Marantz 0035, 0081, 0146, 0161
M7820BP1.indd 48 3/13/2007 3:54:08 PM

49
Marta 0037
Matsushita 0035, 0162, 1162
Media Center PC 1972
MEI 0035
Memorex 0035, 0162, 0037, 0048, 0039, 0047, 0240, 0000,
0104, 0209, 0046, 0268, 0299, 0307, 0454, 0479,
1037, 1162, 1237, 1262
MGA 0240, 0043, 0061
MGN Technology 0240
Microsoft 1972
Mind 1972
Minolta 0042, 0105
Mitsubishi 0067, 0043, 0061, 0075, 0173, 0214, 0242, 0443,
Motorola 0035, 0048
MTC 0240, 0000
Multitech 0000, 0072
NAD 0058
NEC 0104, 0067, 0041, 0038, 0040, 0050, 0082, 0457
Nikko 0037
Nikon 0034
Niveus Media 1972
Noblex 0240
Northgate 1972
Olympus 0035, 0226
Onkyo 0222
Optimus 1062, 0162, 0037, 0048, 0104, 0058, 0432, 0454,
0593, 1048, 1162, 1262
Optonica 0062
Orion 0184, 0209, 0002, 0295, 0479, 1479
Panasonic 1062, 0035, 0162, 0077, 0102, 0225, 0226, 0227,
0246, 0378, 0454, 0616, 1035, 1162, 1262
Penney 0035, 0037, 0240, 0042, 0038, 0040, 0054, 1035,
1237
Pentax 0042, 0065, 0105
Philco 0035
Philips 0035, 0081, 0062, 0110, 0146, 0403, 0618, 0739,
1081, 1181
Pilot 0037
Pioneer 0067, 0058, 0168
Polk Audio 0081, 0146
Portland 0020
Profitronic 0240
Proscan 0060, 0202, 0760, 0761, 1060
Protec 0072
Pulsar 0039, 0051
Quarter 0046
Quartz 0046, 0155
Quasar 0035, 0162, 0077, 0454, 1035, 1162
RadioShack 0000, 1037
Radix 0037
Randex 0037
M7820BP1.indd 49 3/13/2007 3:54:08 PM

5050
RCA 0060, 0240, 0042, 0149, 1060, 1035, 0880, 0807,
0761, 0760, 0277, 0202, 0106, 0105, 0077, 0065,
0058
Realistic 0035, 0037, 0048, 0047, 0000, 0104, 0046, 0062,
0066
ReplayTV 0614, 0616
Ricavision 1972
Ricoh 0034
Runco 0039
Salora 0075
Samsung 0240, 0045, 0051, 0053, 0739, 1014
Samtron 0643
Sanky 0048, 0039
Sansui 0000, 0067, 0209, 0041, 0082, 0271, 0479, 1479
Sanyo 0047, 0240, 0104, 0046, 0159, 0268, 0372
Scott 0184, 0045, 0121, 0043, 0210, 0211, 0212
Sears 0035, 0037, 0047, 0000, 0042, 0104, 0046, 0054
0057, 0066, 0105, 1237
Sharp 0048, 0062, 0807, 0848
Shintom 0072
Shogun 0240, 0051
Singer 0072
Sonic Blue 0614, 0616
Sony 0035, 0032, 0033, 0000, 0011, 0022, 0034, 0275,
0636, 1032, 1232, 1972
Stack 9 1972
STS 0042
Sylvania 0035, 0081, 0000, 0043, 0103, 0110, 0593, 1593, 1781
Symphonic 0000, 0593, 1593
Systemax 1972
Tagar Systems 1972
Tatung 0041
Teac 0000, 0041
Technics 0035, 0162, 0246
Teknika 0035, 0037, 0000, 0052
Thomas 0000
Tivo 0618, 0636, 0739, 1996
TMK 0240, 0036, 0208
Toshiba 0045, 0043, 0057, 0066, 0209, 0210, 0212, 0366
0845, 1008, 1145, 1972, 1996
Totevision 0037, 0240
Touch 1972
Unitech 0240
Vector 0045
Vector Research 0038, 0040
Video Concepts 0045, 0040, 0061, 0221
Videomagic 0037
Videosonic 0240
Viewsonic 1972
Villain 0000
Voodoo 1972
M7820BP1.indd 50 3/13/2007 3:54:08 PM

51
Wards 0060, 0035, 0048, 0047, 0081, 0240, 0000, 0042,
0072, 0149, 0062, 0161, 0212, 0760
White Westing. 0209, 0072, 0637
XR-1000 0035, 0000, 0072
Yamaha 0038
Zenith 0039, 0033, 0000, 0209, 0034, 0479, 0637, 1139 , 1479
ZT Group 1972
SETUP CODES FOR HDTV
Advent 0842
Hitachi 1960
Marantz 0854
Mitsubishi 0150
Panasonic 0250, 0650
Pioneer 0679
Princeton 0717
RCA 1447
Samsung 0702, 0812
Sharp 0688, 0689
Toshiba 1256
SETUP CODES FOR LCD TV
Akai 1935
Audiovox 0180, 0802, 0875, 1284, 1937, 1951, 1952
BenQ 1315
Cadia 1283
Dell 1080, 1178, 1264
Envision 0813, 1365
Funai 0171
Go Video 0886
Hewlett Packard 1088
HP 1088
Hyundai 0849
iLo 1286, 1990
Initial 1990
Jensen 1299
LG 0856, 1178, 1993
Magnavox 0802
Marantz 0855
Mintek 1990
Mitsubishi 1250
Norcent 1365
Norwood Micro 1286, 1296
Olevia 1144, 1240, 1331
Panasonic 0650, 1941
Philips 1454
Polaroid 1276, 1316
Protron 1320, 1323
RCA 0047, 1958
Samsung 0766, 0812, 0814, 1395
Sanyo 1142
M7820BP1.indd 51 3/13/2007 3:54:08 PM

52
Sceptre 1360
Sharp 0093, 0818
Sony 0810
Sova 1320
Superscan 0864
SVA 0587, 0870, 0871
Sylvania 0171
Symphonic 0171
Syntax 1144, 1240, 1331
Tatung 1286
Techview 0847
Toshiba 0845, 1343, 1656
US Logic 1286
Viewsonic 0857, 0864, 0885, 1330
Visart 1336
Vizio 0864, 0885, 1756
Westinghouse 0885, 0889, 1282
Wyse 1365
Zenith 1265
SETUP CODES FOR DVD Players
Adcom 1094
Advent 1016
Aiwa 0641
Akai 0695, 0770, 0899, 1089
Alco 0790
Allegro 0869
Amphion 0872, 1245
AMW 0872, 1245
Apex Digital 0672, 0717, 0755, 0794, 0796, 0797, 0830, 1004,
1020, 1056, 1061, 1100
Aspire Digital 1168, 1407
Audiologic 0736
Audiovox 0790, 1041, 1071, 1072, 1121, 1122
Axion 1071, 1072
B & K 0655, 0662
BBK 1224
Bel Canto Design 1571
Blaupunkt 0717
Blue Parade 0571
Broksonic 0695, 0868, 1419
Buffalo 1882
Cal. Audio Labs 0490
Cary Audio Design 1477
CAVS 1057
Centrios 1577
Cinea 0831
Cinego 1399
CineVision 0876, 0833, 0869
Citizen 1277
Coby 0778, 0852, 1086, 1107, 1165, 1177, 1351
Craig 0831
M7820BP1.indd 52 3/13/2007 3:54:08 PM

53
Curtis Mathes 1087
CyberHome 0816, 0874, 1023, 1024, 1117, 1129, 1502, 1537
D-Link 1881
Daewoo 0784, 0705, 0833, 0869, 1169, 1172, 1234, 1242,
1441, 1443
Daytek 0872
Denon 0490, 0634
Desay 1407, 1455
Diamond Vision 1316, 1609, 1610
Disney 0675, 1270
Dual 1068, 1085
Durabrand 1127
DVD2000 0521
Emerson 0591, 0675, 0821, 1268
Enterprise 0591
ESA 1443
Fisher 0670, 1919
Funai 0675, 1268, 1334
Gateway 1073, 1077, 1158
GE 0522, 0815, 0717
Go Video 0744, 0715, 0741, 0783, 0833, 0869, 1044, 1075,
1099, 1144, 1158, 1304, 1443, 1730
Go Vision 1071, 1072
GoldStar 0741
GPX 0699, 0769
Gradiente 0490
Greenhill 0717
Grundig 0539
Harman/Kardon 0582, 0702
Hitachi 0573, 0664, 1247, 1919
Hiteker 0672
iLo 1348, 1472
Initial 0717, 1472
Innovative Tech 1542
Integra 0571, 0627
Jaton 1078
JBL 0702
Jensen 1016
JSI 1423
JVC 0558, 0623, 0867, 1164, 1275, 1602, 1863
jWin 1049, 1051
Kawasaki 0790
Kenwood 0490, 0534, 0682, 0737
KLH 0717, 0790, 1020, 1149, 1261
Konka 0711, 0719, 0720, 0721
Koss 0651, 0896, 1423
Kreisen 1421
Landel 0826
Lasonic 0798, 1173
Lecson 1533
Lenoxx 1127
M7820BP1.indd 53 3/13/2007 3:54:08 PM

54
LG 0591, 0741, 0801, 0869, 1526
LiteOn 1058, 1158, 1416, 1440
Loewe 0511
Magnavox 0503, 0539, 0646, 0675, 0821, 1268, 1506
Malata 0782, 1159
Marantz 0539
McIntosh 1273, 1533
Memorex 0695, 0831, 1270
Microsoft 0522, 1708
Mintek 0839, 0717, 1472
Mitsubishi 1521, 0521
Momitsu 1082
Myryad 0894
NAD 0591, 0692, 0741
Nakamichi 1222
NEC 0785
Nesa 0717
Nesa Vision 1603
NeuNeo 1454
Next Base 0826
NexxTech 1402
Norcent 1003, 0872, 1107, 1265, 1457
Onkyo 0503, 0627, 0792
Oppo 1224, 1525
OptoMedia Elect. 0896
Oritron 0651
Panasonic 0490, 0503, 0632, 0703, 1362, 1462, 1490, 1762
Philips 0503, 0539, 0646, 0675, 0854, 1260, 1267, 1354
PianoDisc 1024
Pioneer 0525, 0571, 0631, 0632, 1571
Polaroid 1020, 1061, 1086, 1245, 1316, 1478, 1480, 1482
Polk Audio 0539
Portland 0770
Presidian 0675
Prima 1016
Primare 1467
Princeton 0674
Proceed 0672
Proscan 0522
ProVision 0778
Qwestar 0651
RCA 0522, 0571, 0717, 0790, 0822, 1022, 1132, 1193
Rio 0869
RJTech 1360
Rotel 0623, 1178
Rowa 0823
Sampo 0698, 0752, 1501
Samsung 0490, 0573, 0744, 0820, 0899, 1044, 1075
Sansui 0695
Sanyo 0670, 0695, 0873, 1919
Sensory Science 1158
Sharp 0630, 0675, 0752, 1256
M7820BP1.indd 54 3/13/2007 3:54:08 PM

55
Sharper Image 1117
Sherwood 0633, 0770, 1043, 1077, 1889
Shinsonic 0533, 0839
Sigma Designs 0674
Sonic Blue 0869, 1099
Sony 0533, 1533, 0864, 1033, 1431, 1432, 1433, 1548, 1892
Sound Mobile 1298
Sova 1122
Sungale 1074, 1532
Superscan 0821
SVA 0860, 1105
Sylvania 0675, 0821, 1268
Symphonic 0675, 1268
TAG McLaren 0894
Teac 0790, 0809
Technics 0490, 0703
Technosonic 0730
Techwood 0692
Terapin 1031
Theta Digital 0571
Toshiba 0503, 0695, 1045, 1154, 1854
Tredex 0799, 0800, 0803, 0804
Urban Concepts 0503
US Logic 0839
Valor 1298
Venturer 0790
Vialta 1509
Vizio 1064, 1226
Vocopro 1027
Xbox 0522, 1708
Xwave 1001
Yamaha 0490, 0539, 0545
Yamakawa 0872
Zenith 0503, 0591, 0741, 0869
Zoece 1265
SETUP CODES FOR DVD-R Players
Apex Digital 1056
Aspire Digital 1168
Coby 1086
CyberHome 1129, 1502
Funai 0675, 1334
Gateway 1073, 1158
Go Video 0741, 1158, 1304, 1730
iLo 1348
JVC 1164, 1275
Kreisen 1421
LG 0741
LiteOn 1158, 1416, 1440
Magnavox 0646, 1506
Panasonic 0490
Philips 0646
Pioneer 0631
M7820BP1.indd 55 3/13/2007 3:54:09 PM

SETUP CODES FOR DVD-R Players
Polaroid 1086
RCA 0522
Samsung 0490
Sharp 0675
Sony 1033, 1431, 1432, 1433
Sylvania 0675
Zenith 0741
SETUP CODES FOR TV/DVD Combos
Advent 1933
Apex Digital 1943
Audiovox 1937, 1951, 1952
Axion 1937
Broksonic 1935
Cinego 1986
Diamond Vision 1997
Emerson 1963
Hitachi 1960
iLo 1990
Initial 1990
Jensen 1933
KLH 1962
LG 1993
Magnavox 1963
Mintek 1990
Panasonic 1941
Polaroid 1991
Prima 1933
RCA 1948, 1958
Samsung 1903
Sansui 1935
Sova 1952
Sylvania 1963
Toshiba 1935
SETUP CODES FOR TV/VCR Combos
Audiovox 0278
Broksonic 0002, 0479, 1479
Citizen 1278
Daewoo 0637, 1278
Emerson 0002, 0294, 0479, 0593, 1278, 1479
Funai 0000
GE 0240, 0807, 1035, 1060
GoldStar 1237
Hitachi 0000
LG 0480, 1037
Magnavox 0000, 0593, 1781
Memorex 0162, 0454, 1037, 1162, 1237, 1262
Mitsubishi 0807
Optimus 0162, 0454, 0593, 1162, 1262
Orion 0002, 0479, 1479
56
M7820BP1.indd 56 3/13/2007 3:54:09 PM

Panasonic 0162, 1035, 1162, 1262
Penney 0240, 1035, 1237
Quasar 0162, 1035, 1162
RadioShack 0000, 1037
RCA 0240, 0807, 1035, 1060
Samsung 1014
Sansui 0000, 0479, 1479
Sanyo 0240
Sears 0000, 1237
Sony 0000, 1232
Sylvania 1781
Symphonic 0000, 0593
Thomas 0000
Toshiba 0845, 1145
White Westing. 0637
Zenith 0000, 0479, 0637, 1479
M7280P01 03/07
M7820BP1.indd 57 3/13/2007 3:54:09 PM
Transcripción de documentos
UNIVERSAL REMOTE CONTROL USER’S GUIDE M7820BP1.indd 1 CONTROL REMOTO UNIVERSAL GUíA DEL USARIO 3/13/2007 3:53:51 PM TABLE OF CONTENTS Introduction . . . . . . . . . . . . . . . . . . . . . . . . . . . 3 Features And Functions . . . . . . . . . . . . . . . . . 4 Installing Batteries . . . . . . . . . . . . . . . . . . . . . 8 Programming Device Control. . . . . . . . . . . . . 9 Programming TV/VCR Combo Control . . . . 10 Searching For Your Code . . . . . . . . . . . . . . . 12 Checking The Codes . . . . . . . . . . . . . . . . . . 13 Programming ID Lock . . . . . . . . . . . . . . . . . . 14 Programming Channel Control Lock. . . . . . 15 Using The Master Power Key . . . . . . . . . . . . 15 Re-Assigning Device Keys . . . . . . . . . . . . . 16 Changing Volume Lock . . . . . . . . . . . . . . . . 17 Troubleshooting . . . . . . . . . . . . . . . . . . . . . . 18 Additional Information . . . . . . . . . . . . . . . . . 19 Manufacturer’s Codes . . . . . . . . . . . . . . . . . . 38 TABLA DE CONTENIDOS Introducción . . . . . . . . . . . . . . . . . . . . . . . . . . . . . . . . 21 Características y Funciones . . . . . . . . . . . . . . . . . . 22 Instalación de las Baterías . . . . . . . . . . . . . . . . . . . . 26 Programación de Control de Dispositivos . . . . . . 27 Programación de Control de Combos TV/VCR . . 29 Búsqueda de su Código . . . . . . . . . . . . . . . . . . . . . . 30 Comprobación de los Códigos . . . . . . . . . . . . . . . . 31 Programación del Bloqueo de ID . . . . . . . . . . . . . . . 32 Programación del Bloqueo del Control de Canal . . . . 32 Utilización del Botón de Encendido Principal . . . 33 Reasignación de Teclas de Dispositivos . . . . . . . . 34 Cambio del Bloqueo de Volumen . . . . . . . . . . . . . . 35 Resolución de Problemas . . . . . . . . . . . . . . . . . . . . . 36 Información Adicional . . . . . . . . . . . . . . . . . . . . . . . . 37 Códigos del Fabricante . . . . . . . . . . . . . . . . . . 38 M7820BP1.indd 2 2 3/13/2007 3:53:51 PM INTRODUCTION The Cox Universal Remote Control by Universal Electronics is our latest generation universal remote control. It is designed with sophisticated technology that will allow you to consolidate the clutter of all of the original remote controls in your home entertainment system. Moreover, it’s packed with easy-to-use features such as: • Preprogrammed to operate the cable converter supplied by Cox Communications • Preprogrammed interactive technology links hot keys to your interactive service • Master Power key for master on/off control of all your equipment with a single keystroke • Cable ID Lock to lock your remote control for use only with the cable converter • Channel Lock to lock channel selection only to the cable converter • Code Search to help you program control of older or discontinued components • Code library for video and audio devices • Color-coded keys to quickly locate popular functions • Dedicated keys to control popular functions on your DVR (Digital Video Recorder) Before using the product, you will need to program it to operate the specific home entertainment devices you wish to control. Follow the instructions detailed in this manual to set up your unit, and then start enjoying your new remote control. M7820BP1.indd 3 3 3/13/2007 3:53:51 PM FEATURES AND FUNCTIONS Use the illustration below to locate features on the Cox Universal Remote Control and then study the Key Charts (on the next three pages) to learn how they function. M7820BP1.indd 4 4 3/13/2007 3:53:53 PM KEY CHARTS M7820BP1.indd 5 Use SETUP for all programming sequences. Press POWER once to turn on or off a home entertainment device. Press and hold MASTER POWER for 3 seconds to turn on or off all home entertainment devices (see Using The Master Power Key on page 15). Press AUX, DVD, TV, or CABLE once to select a home entertainment device to control. Each key has an embedded LED (red light) that blinks upon selection and indicates that the remote control is working and is sending signals. In the DVD and TV modes, use REW, PLAY, FFWD, STOP, and PAUSE to control your VCR, DVD player, or PVR. To record a program in the DVD or AUX mode, press RECORD twice. In the CABLE mode, use these keys (except RECORD) to control VOD (Video On Demand). Press to replay the last 8 sec onds of a program or recording (Insatnt Replay) Press On DEMAND once to access Cox Communications On DEMAND Menu. Press DVR LIST once to display a list of the recorded shows on your PVR. Press LIVE to return to watching live TV. Use INFO to display the current channel and program information Use PAGE+ to page up through menu screens and program guide) 5 3/13/2007 3:53:55 PM M7820BP1.indd 6 Press HD ZOOM to change the aspect ratio on your Scientific Atlanta or Motorola HD receiver. (Not available on all receivers.) Use the Cursor keys to move the cursor in the program guide and menu screens, and to navigate within the interactive service. Use SELECT to choose options and PPV events, and to tune pro grams from the program guide. Use GUIDE to display the program guide. Use PAGE- to page down through menu screens and program guide. Use EXIT to exit your cable converter’s menu and guide. Use A, B, or C to access additional cable features (see your cable converter’s manual). Use SETTINGS to access additional cable features (see your cable converter’s manual). Press MENU once to display the available interactive services. Use VOL+ (or VOL–) to raise (or lower) the sound volume. Press LAST once to recall the last channel. Use FAV to cycle through your favorite channels stored in your cable converter. Press MUTE once to turn the sound off or on. 6 3/13/2007 3:53:57 PM M7820BP1.indd 7 Use CH+ (or CH–) to select the next higher (or lower) channel. Use INPUT to control the input select feature on most TVs. In CABLE mode, use INPUT to view other video sources (A or B) instead of cable. In all othermodes, use INPUT to watch TV or video programs on a desired device. For amplifiers/receiv ers, use INPUT to select an input source. Press ENTER once after entering channel numbers on some televi sions. Use the keypad (0 ~ 9) to directly select channels (e.g., 09 or 31). Use Picture in Picture SWAP to switch images and sound between the main and window pictures. Use Picture in Picture ON-OFF to switch the Picture-In-Picture feature on or off (if available on your TV or cable service). Use Picture in Picture MOVE to move the window picture to differ ent positions in the main picture. Use Picture in Picture CH+ (or CH-) to select the next higher (or lower) PIP channel. 7 3/13/2007 3:53:58 PM INSTALLING BATTERIES ❶ ❷ ❸ 1. On the back of the remote control, push the tab and lift off the battery cover. 2. Obtain two (2) fully-charged AA alkaline batteries. Match the + and – marks on the batteries to the + and – marks in the battery case, then insert the new batteries. 3. Align the cover’s keys with the case’s holes and press the cover back into place. The tab should click when the cover is locked. 4. Test the unit by pressing POWER and any mode key (for example, AUX, DVD, TV, or CABLE). If the batteries are inserted correctly, the selected mode key will blink once. NOTE: Whenever batteries need replacement, the remote control will cease to operate. Simply replace the batteries and the remote control will be restored to its full functionality, complete with your favorite settings. M7820BP1.indd 8 8 3/13/2007 3:53:59 PM PROGRAMMING DEVICE CONTROL The Cox Universal Remote Control is preprogrammed to operate your cable converter, an RCA TV, a SONY DVD, and a Pioneer audio receiver. To control devices other than the default brands, perform the following steps; otherwise skip this section: NOTES: To control a VCR player, or a PVR, program the DVD key. To control a stereo amplifier or receiver, program the AUX key. For TV/VCR Combo control, skip this section and perform the instructions on the next page. If you have another brand of cable converter and interactive service you would like to control, you’ll first need to unlock the cable ID Lock before changing the converter code—see Programming ID Lock on page 13. 1. Turn on a device and, if applicable, insert video media (e.g., cassette or disc). NOTE: Please read steps 2–4 completely before proceeding. Highlight or write down the codes and device you wish to program before moving on to step 2. 2. 3. On the remote control, press a device key once (e.g., AUX, DVD, TV, or CABLE). Press and hold SETUP until the selected mode key blinks twice, then release SETUP. Use the Manufacturer’s Codes (starting on page-38) to locate the the type of device and brand name, then enter the first four-digit code for your device. If performed correctly, the selected mode key will blink twice. NOTE: If the selected mode key emits a long blink, the code is invalid. Repeat steps 2 through 3 and try entering the same code again. 4. M7820BP1.indd 9 Aim the remote control at the device and press 9 3/13/2007 3:53:59 PM POWER once. The device should turn off. If it does not, repeat steps 2–3, trying each code for your brand until you find one that works. If it still does not work, try searching for the code (see Searching For Your Code on page 12). NOTE: If the device does not have a POWER key, press the (Play) key. 5. Repeat steps 1–4 for each device you want the the remote control to control. For future reference, write down each working device code in the following boxes: AUX AUX Device ____________________ VCR TV CABLE PROGRAMMING TV/VCR COMBO CONTROL If you own a TV/VCR Combo, perform the following instructions to control this device: 1. Turn on your TV/VCR Combo and insert a video cassette. 2. On the remote control, press DVD once. Press and hold SETUP until the DVD key blinks twice, then release SETUP. 3. Use the setup codes for TV/VCR combos on page-56 to locate the brand name and then enter the first four-digit code for your TV/VCR Combo. If you perform this procedure correctly, the DVD key will blink twice. NOTE: If the DVD key did not blink twice after entering the code’s last digit, then repeat steps 2 through 3 and try entering the same code again. 4. M7820BP1.indd 10 Aim the remote control at your TV/VCR 10 3/13/2007 3:54:00 PM Combo and press POWER once. The device should turn off. If it does not respond, repeat steps 2-3, trying each code listed for your brand until you find one that works. If it still does not work, try searching for the code (see Searching For Your Code on page 12). 5. If you’ve located a TV/VCR setup code that works your TV/VCR Combo and a separate TV code is also listed, you’ll need to program this code into the remote control to access volume control (see Programming Device Control on page 9). If there is no separate TV code listed, you will need to perform the following steps to access volume control: a. Press and hold SETUP until the DVD key blinks twice, then release SETUP. b. Enter 9 - 9 - 3. The DVD key will blink twice. c. Press DVD once. The DVD key will blink twice. 6. M7820BP1.indd 11 For future reference, write down each working device code in the boxes below: TV/VCR TV (if used) 11 3/13/2007 3:54:00 PM SEARCHING FOR YOUR CODE IIf your home entertainment device does not respond to the COX Custom DVR Universal Remote Control after trying all the codes listed for your brand, or if your brand is not listed at all, try searching for your code. For example, to search for a code for your TV: 1. Turn on your TV. 2. On the remote control, press TV once; Then press and hold SETUP until the TV key blinks twice, then release SETUP. 3. Enter 9 - 9 - 1. The TV key will blink twice. 4. Aim the remote control at the TV and press POWER once. 5. Press CH+ (or CH-) one or more times and stop when the TV turns off. NOTE: In the search mode, the remote control will send IR codes from its library to the selected device, starting with the most popular code first. NOTE: If while pressing CH+, and you inadvertently pass the code, press CH- one or more times until the TV turns on. 6. Press SETUP once to lock in the code. The TV key will blink twice. 7. To search for the codes of your other devices, repeat steps 1 through 5, but substitute the appropriate key (e.g., AUX, DVD, AUD, or CABLE) for the device you are searching for. CHECKING THE CODES If you have set up the Cox Universal Remote Control using the Searching For Your Code procedure you may need to find out which four-digit code is operating your equipment. For example, to find out which code is operating your TV: 1. Turn on your TV. 2. On the remote control, press TV once. Then press and hold SETUP until the TV key blinks twice, then release SETUP. M7820BP1.indd 12 12 3/13/2007 3:54:00 PM 3. Enter 9 - 9 - 0. The TV key will blink twice. 4. To view the code for the first digit, press 1 once. Wait 3 seconds and count the number of times the TV key blinks (for example, 3 blinks =-3) and write down the number in the leftmost TV Code box (see below). NOTE: If a code digit is “0”, the selected mode key will not blink. 5. Repeat step 4 three more times for remaining digits. Use 2 for the second digit, 3 for the third digit, and 4 for the fourth digit. Write down the remaining digits in the boxes below. 6. To check for other device codes, repeat steps 1–5, but substitute the appropriate key (that is, AUX, DVD, or CABLE) for the (Auxiliary, DVD, or Cable) device you are checking. Write down the codes in the appropriate boxes below. AUX Code Aux Device ____________________ DVD Code TV Code CABLE Code PROGRAMMING ID LOCK The Cox Universal Remote Control is preprogrammed and locked at the factory to operate the cable converter and interactive service given to you by your cable company. However, if you have another brand or model of cable converter and interactive service that you would like to control, then you’ll need to perform the following steps to unlock the cable ID Lock, enter a new manufacturer’s code, and lock the ID Lock again. 1. Turn on the Cable Converter. 2. On the remote control, press CABLE once. M7820BP1.indd 13 13 3/13/2007 3:54:00 PM Then press and hold SETUP until the CABLE key blinks twice, then release SETUP. 3. Enter 9 - 8 - 2. The CABLE key will blink four times. 4. Perform the instructions in Programming Device Control on page 9 to program device control for the desired cable converter and interactive service. Upon completion, perform the remaining steps (5 and 6 on this page) to again lock the ID lock. 5. On the remote control, press CABLE once. Then press and hold SETUP until the CABLE key blinks twice, then release SETUP. 6. Enter 9 - 8 - 2. The CABLE key will blink twice. PROGRAMMING CHANNEL CONTROL LOCK By default, the remote control’s channel-control capabilities are locked to the cable converter. The affected keys are 0 ~9, CH+, CH–, ENTER, and LAST. This will guarantee that you do not inadvertently change a channel on your TV or VCR. However, you can de-activate this feature to allow full access to these keys in the TV and VCR modes. To De-Activate Channel Control Lock: 1. On the remote control, press CABLE once. Then press and hold SETUP until the CABLE key blinks twice, then release SETUP. 2. Enter 9 - 7 - 3. The CABLE key will blink twice. 3. Press CH– once. The CABLE key will blink four times. 4. Now, the remote control will provide TV and VCR channel-control capabilities while in TV or VCR mode. M7820BP1.indd 14 NOTE: This feature does not affect the AUX mode. 14 3/13/2007 3:54:00 PM To Re-Activate Channel Control Lock: 1. On the remote control, press CABLE once. Then press and hold SETUP until the CABLE key blinks twice, then release SETUP. 2. Enter 9 - 7 - 3. The CABLE key will blink twice. 3. Press CH+ once. The CABLE key will blink twice. 4. Now, regardless of what mode you select (that is, TV, DVD, or CABLE), only the channel control capability of your cable converter will be accessible. NOTE: This feature does not affect the AUX mode. USING THE MASTER POWER KEY The Cox Universal Remote Control is equipped with a unique feature that allows you to sequentially turn on or off all your home entertainment devices with a single key press as follows: 1. Point the remote control at the devices. 2. Press and hold MASTER POWER for 3 seconds to sequentially turn on or off all home entertainment devices. M7820BP1.indd 15 Depending on what mode is currently selected, the remote control will send IR commands to the devices in the following order Start Mode Device On/Off End Mode AUX Cable, TV, DVD CABLE DVD Auxiliary, Cable, TV CABLE TV DVD, Auxiliary, Cable CABLE CABLE TV, DVD, Auxiliary CABLE For example, if TV is selected, pressing and holding MASTER POWER for 3 seconds will turn off the DVD, an auxiliary device, and the cable converter. 15 3/13/2007 3:54:00 PM NOTE: The remote control always defaults to the CABLE mode after all devices are turned off. Therefore, the initial power-on sequence will always be TV, DVD, and an auxiliary device, if no other device key is pressed first. RE-ASSIGNING DEVICE KEYS The Cox Universal Remote Control can be set up to control a VCR or second TV, or any combination of up to four home entertainment devices. For example, to have the unit-control a TV, a Cable Converter, a DVD player and a VCR, you will need to re-assign the unused AUX key to operate the VCR as follows: 1. 2. On the remote control, press AUX once. Then press and hold SETUP until the AUX key blinks twice, then release SETUP. Enter 9 - 9 - 2. The AUX key will blink twice. 3. Press AUX once. The AUX key will blink twice. 4. The AUX key is now ready to be programmed for your VCR. See Programming Device Control on page 9. To re-assign other device keys, repeat steps 1–4 and substitute the key sequence using the following chart: To Re-Assign Perform Key Sequence TV as 2nd DVD key SETUP - 9 - 9 - 2 - DVD - TV TV as 2nd Auxiliary key SETUP - 9 - 9 - 2 - AUX - TV TV as 2nd Cable key SETUP - 9 - 9 - 2 - CABLE -TV TV back to TV SETUP - 9 - 9 - 2 - TV - TV DVD as 2nd TV key SETUP - 9 - 9 - 2 - TV - DVD DVD as 2nd Auxiliary key SETUP - 9 - 9 - 2 - AUX - DVD DVD as 2nd Cable key SETUP - 9 - 9 - 2 - CBL- DVD DVD back to DVD SETUP - 9 - 9 - 2 - DVD -DVD AUX as 2nd TV key SETUP - 9 - 9 - 2 - TV - AUX AUX as 2nd VCR key SETUP - 9 - 9 - 2 - DVD - AUX AUX as 2nd Cable key SETUP - 9 - 9 - 2 - CBL - AUX AUX back to AUX SETUP - 9 - 9 - 2 - AUX - AUX Upon completion of a re-assignment, the selected M7820BP1.indd 16 16 3/13/2007 3:54:01 PM mode key will blink twice to confirm your selection. Then you’ll need to program device control (see Programming Device Control on page 9). CHANGING VOLUME LOCK The Cox-Universal Remote Control is set to control volume of a device through your TV while in TV, DVD, or Cable mode. However, in the Auxiliary mode, you will still have separate control of of your auxiliary device’s volume. If your TV is not remote-controllable, or if you would like the volume to be controlled by a different device, you can change the Volume Lock setting to control a volume through a non-associated mode (for example, through the cable in the TV mode). To change Volume Lock to CABLE mode: 2. On the remote control, press CABLE once. Then press and hold SETUP until the CABLE key blinks twice, then release SETUP. Enter 9 - 9 - 3. The CABLE key will blink twice. 3. Press CABLE once. It will blink twice. 4. Now, whenever you press VOL+, VOL–, or MUTE, volume will be controlled by your Cable Converter. 1. To change Volume Lock to TV mode: 2. On the remote control, press TV once. Then press and hold SETUP until the TV key blinks twice, then release SETUP. Enter 9 - 9 - 3. The TV key will blink twice. 3. Press TV once. It will blink twice. 4. Now, whenever you press VOL+, VOL–, or MUTE, volume will be controlled by your TV. 1. To change Volume Lock to AUX mode: NOTE: Performing these steps will allow you to access the volume control of your auxiliary device in all modes. 2. On the remote control, press AUX once. Then press and hold SETUP until the AUX key blinks twice, then release SETUP. Enter 9 - 9 - 3. The AUX key will blink twice. 3. Press AUX once. It will blink twice. 1. M7820BP1.indd 17 17 3/13/2007 3:54:01 PM 4. Now, whenever you press VOL+, VOL–, or MUTE, the volume will be controlled by your auxiliary device. TROUBLESHOOTING PROBLEM: Mode key does not blink when you press a key. SOLUTION: Replace the batteries with two (2) new AA alkaline batteries (see page 8). PROBLEM: Mode key blinks when you press a key, but home entertainment device does not respond. SOLUTION: Make sure you are aiming the remote control at your home entertainment device and that you are within 15-feet of the device you are trying to control. PROBLEM: The remote control does not control home entertainment devices or commands are not performing properly. SOLUTION: Try all listed codes for the device brand being set up. Make sure all devices can be operated with an infrared remote control. PROBLEM: TV/VCR combo does not respond properly. SOLUTION: Use the VCR codes for your brand. Some combo units may require both a TV code and a VCR code for full operation (see page 10). PROBLEM: No volume on a second TV. SOLUTION: Follow instructions in Changing Volume Lock (see previous page). PROBLEM: CH+ , CH – , and LAST do not work for your RCA TV. SOLUTION: Due to RCA design (1983–1987), only the original remote control will operate these functions. PROBLEM: Changing channels does not work properly. SOLUTION: If original remote control required pressing ENTER to change channels, press ENTER on the remote control after entering a channel number. PROBLEM: Tried “Search For Your Code” and still could not find a working code. SOLUTION: Try the “Search For Your Code” again after clearing out the device key as follows: Press and hold SETUP until mode key blinks twice, then release. Next enter 9 - 9 - 2. Then press and release the mode key to be cleared twice. M7820BP1.indd 18 18 3/13/2007 3:54:01 PM PROBLEM: Remote control does not turn on Sony or Sharp TV/VCR Combo. SOLUTION: For power on, these products require programming TV codes on the remote control. For Sony, use TV code 0000 and VCR code 0032. For Sharp, use TV code 0093 and VCR code 0048. ADDITIONAL INFORMATION This product does not have any user-serviceable parts. Opening the case, except for the battery cover, may cause permanent damage to your Cox Universal Remote Control. Copyright 2007 by Universal Electronics Inc. No part of this publication may be reproduced, transmitted, transcribed, stored in any retrieval system, or translated to any language, in any form or by any means, electronic, mechanical, magnetic, optical, manual, or otherwise, without prior written permission of Universal Electronics Inc. M7820BP1.indd 19 19 3/13/2007 3:54:01 PM INTRODUCCIÓN El Control remoto universal Cox de Universal Electronics es nuestro control remoto universal de última generación. Está diseñado con una sofisticada tecnología que le permitirá reunir las funciones de todos los controles a distancia de su hogar en un solo aparato. Además, viene incluido con funciones de fácil uso como: • Preprogramación para operar el convertidor de cable suministrado por Cox Communications • Teclas de vínculos interactivos preprogramados • Botón de encendido principal para encender o apagar todos sus equipos con una sola tecla • Bloqueo de ID de cable para utilizar su control remoto únicamente con el convertidor de cable • Bloqueo de canal para bloquear la selección de canal sólo en el convertidor de cable • Búsqueda de códigos para programar controles de componentes antiguos o descatalogados • Biblioteca de códigos para dispositivos de audio y video • Teclas de colores para ubicar rápidamente los funciones más utilizadas • Teclas dedicado at control los funciones populares en su DVR (Digital Video Recorder) Antes de comenzar a utilizar el producto, deberá programarlo para que funcione con los dispositivos de entretenimiento doméstico con los que usted desee utilizar el control. Siga las instrucciones que se detallan en este manual para configurar su unidad y comenzar a disfrutar de su nuevo control remoto. M7820BP1.indd 20 20 3/13/2007 3:54:01 PM CARACTERÍSTICAS Y FUNCIONES Refiérase a la ilustración mostrada más adelante para ubicar las funciones del Control remoto universal Cox y estudie a continuación los Cuadros de teclas (en las dos páginas siguientes) para aprender a usar cada una de ellas M7820BP1.indd 21 21 3/13/2007 3:54:02 PM CUADROS DE TECLAS M7820BP1.indd 22 Use SETUP para todas las secueciasde programación. Presione POWER una vez para encender o apagar un dispositivo de entretenimiento doméstico. Presione y mantenga presionado MASTER POWER durante 3 segundos para apagar o encender todos los dispositivos de entretenimiento doméstico (consulte Utilización del Botón de encendido principal en la página 33) Presione CABLE DVD, TV, o AUX para seleccionar el dispositivo que desea controlar. Cada tecla cuenta con un LED (luz roja) que parpadea cuando ésta es usada e indica que el control remoto está funcionando y enviando señales. Presione On DEMAND una vez para tener acceso al menú ONDEMAND de COX Communications. En los modos DVD y TV, use REW, PLAY, FFWD, STOP y PAUSE para controlar su reproductor VCR, DVD o PVR. Para grabar un programa en los modos DVD o AUX, presione RECORD dos veces. Use estas teclas (excepto RECORD) en el modo CABLE para controlar el VOD (Video on Demand). Presione DVR LIST una vez para exhibir una lista de programas registrados en su PVR. Presione LIVE para volver a ver TV en vivo. 22 3/13/2007 3:54:03 PM M7820BP1.indd 23 Use INFO para mostrar la información sobre el canal y el programa actual. Use PAGE+ para desplazarse por las pantallas de menú y la guía de programas. Oprima HD ZOOM para cambiar la proporción dimensional en su recpetor Scientific Atlanta or Motorola HD. (No disponible en todos los receptores). Use las Teclas de cursor para mover el cursor dentro de la guía de programas y las pantallas de menú y para navegar dentro del servicio interactivo. Utilice SELECT para elegir opciones, eventos PPV y para sintonizar programas de la guía de programas. Use GUIDE para mostrar la guía de programas. Use PAGE- para desplazarse por las pantallas de menú y la guía de programas. Use EXIT para salir del menú y la guía del convertidor de cable. Use A, B o C para acceder a funciones adicionales de cable (consulte el manual de su convertidor de cable). Use SETTINGS para acceder a funciones adicionales de cable (consulte el manual de su convertidor de cable). Pulse MENU una vez para mostrar los servicios interactivos disponibles. Use VOL+ (o VOL–) para subir (o bajar) el volumen del sonido. Presione LAST una vez para volver al último canal. 23 3/13/2007 3:54:04 PM M7820BP1.indd 24 Use FAV para rotar por sus canales favoritos almacenados en el convertidor de cable. Presione MUTE una vez para anular o restablecer el sonido. Use CH+ (o CH–) para seleccionar el canal siguiente (o anterior). Use INPUT para operar con la función de selección de entrada dela mayoría de TVs. En la funcion de CABLE, utilice INPUT para ver otras fuentes de video (A o B) en vez del cable. En el resto de las funciones, utilice INPUT para ver la TV o programas video sobre el dispositivo deseado. Para amplificadores/receptores, utilice INPUT para seleccionar una fuente de ingreso. Presione ENTER después de intro ducir los números del canal en algunas marcas de TV. Use el teclado numérico (0 ~ 9) para seleccionar directamente los canales. Utilice Cuadro-En-Cuadro SWAP para cambiar imagenes y sonidos entre el cuadro principal y los recuadros. Utilice Cuadro-En-Cuadro ON-OFF para encender o apagar la funcion de Cuadro-En-Cuadro encendido (si esta disponible en su TV o en su servicio de cable). Utilice Cuadro-En-Cuadro MOVE para mover el recuadro a diversas posiciones en el cuadro principal. Utilice Cuadro-En-Cuadro CH+ (or CH -) para seleccionar el siguiente canal PIP más alto (o mas bajo). 24 3/13/2007 3:54:04 PM ❶ ❷ ❸ INSTALACIÓN DE LAS BATERÍAS 1. En el reverso del control remoto, presione la pestaña y levante la tapa de las baterías. 2. Adquiera dos (2) baterías alcalinas AA cargadas.Coloque los polos positivo (+) y negativo (-) de las baterías con las marcas + y – indicadas en el compartimiento de las baterías. 3. Alinee las teclas de la cubierta con los orificios de la carcasa. Coloque de nuevo la tapa. La pestaña hará clic cuando la cubierta esté ajustada. 4. Pruebe la unidad presionando la tecla POWER o la de modo (p. ej. AUX, DVD, TV, CABLE). Si las baterías han sido introducidas correctamente, la tecla de modo seleccionada parpadeará una vez. NOTA: El control remoto dejará de funcionar cuando las bater íastengan que ser sustituidas. Sustituya las baterías y el control remoto recuperará todas sus funciones y su configuración personal. M7820BP1.indd 25 25 3/13/2007 3:54:05 PM PROGRAMACIÓN DE CONTROL DE DISPOSITIVOS El Control remoto universal Cox está preprogramado para funcionar con su convertidor de cable, con una TV RCA, con un DVD SONY y con un receptor de audio Pioneer. Para controlar dispositivos de marcas diferentes a las predeterminadas, siga los siguientes pasos; en caso contrario, ignore esta sección. NOTAS: Para controlar un reproductor de VCR, programe la tecla DVD. Para controlar un PVR, programe la tecla AUX. Para controlar un amplificador o receptor estéreo, programe la tecla AUX. Para controlar un Combo TV/VCR, ignore esta sección y siga las instrucciones detalladas en la página siguiente. Si posee otra marca de convertidor de cable o servicio interactivo con la que desea utilizar el control, deberá en primer lugar desactivar el Bloqueo de ID de cable antes de cambiar el código de convertidor. Consulte Programación del Bloqueo de ID en la página 31). 1. Encienda un dispositivo e introduzca en su casoun medio audiovisual (p. ej., cassette o video). NOTA: Por favor, lea íntegramente los pasos del 2 al 4 antes de empezar.Subraye o anote los códigos y dispositivo que desea programar antes de seguir con el paso número 2. 2. M7820BP1.indd 26 Presione una tecla de dispositivo cualquiera dos veces en el control remoto (p. ej. AUX, DVD, TV o CABLE). Presione y mantenga presionado SETUP hasta que el modo seleccionado parpadee dos veces. A continuación, suelte el botón. 26 3/13/2007 3:54:05 PM 3. Utilice los códigos del fabricante (a partir de la página 38) para determinar el tipo de dispositivo y marca y a continuación introduzca el primer dígito del código de cuatro dígitos de su dispositivo. Si lo ha hecho correctamente, el modo seleccionado parpadeará dos veces. NOTA: Si la tecla de modo seleccionada emite una luz prolongada, elcódigo es inválido. Repita los pasos 2 y 3 e intenteintroducir el mismo código de nuevo. 4. Dirija el control remoto hacia el dispositivo y presione POWER una vez. El dispositivo debería apagarse. Si no ocurre así, repita los pasos 2 y 3, inténtelo con cada código de su marca hasta encontrar uno que funcione. Si aún así no funciona, intente buscar el código (consulte Búsqueda de su código en la página 29). NOTA: Si el dispositivo no tiene botón POWER, presione el botón (Play). 5. M7820BP1.indd 27 Repita los pasos del 1–4 para cada uno de los dispositivos con los que desea utilizar el control remoto. Anote los códigos correctos de cada dispositivo en los siguientes AUX AUX Device _____________________ VCR TV CABLE 27 3/13/2007 3:54:05 PM PROGRAMACIÓN DE CONTRO COMBOS TV/VCR Si usted posee un combo TV/VCR, siga las siguientes instrucciones para utilizar el control con este dispositivo: 1. Encienda su combo TV/VCR e introduzca una cinta de video. 2. En el control remoto, presione DVD una vez. Presione y mantenga presionado SETUP hasta que la tecla DVD parpadee dos veces. A continuación, suelte el botón SETUP. 3. Utilice los códigos de configuración para combos TV/VCR (página 38) para ubicar el nombre de la marca y después introducir el primer código de cuatro dígitos para su combo TV/VCR. Si ha seguido este procedimiento correctamente, la tecla DVD parpadeará dos veces. NOTA: Si la tecla VCR no parpadeó dos veces tras introducir el último dígito del código, repita los pasos del 2 al 3 e intente introducir el mismo código de nuevo. 4. Dirija el control remoto hacia su combo TV/VCR y presione POWER una vez. El dispositivo debería apagarse. Si no ocurre así, repita los pasos 2 y 3, inténtelo con cada código enumerado para su marca hasta encontrar uno que funcione. Si aún así no funciona, intente buscar el código (consulte Búsqueda de su Código en la página 29). 5. Si localiza un código de configuración que funcione con su combo TV/VCR y encuentra también un código independiente para TV, deberá programar este código en el control remoto para acceder al control de volumen (consulte Programación de Control de Dispositivos en la página 26). M7820BP1.indd 28 Si no existe un código independiente para la TV, deberá seguir los siguientes pasos para acceder al control de volumen: a. Presione y mantenga presionado SETUP hasta que la tecla DVD parpadee dos veces. A continuación, suelte el botón SETUP. 28 3/13/2007 3:54:05 PM b. Presione 9-9-3. La tecla DVD parpadeará dos veces. c. Presione DVD una vez. La tecla DVD parpadeará dos veces. 6. Anote los códigos correctos de cada dispositivo en los siguientes espacios para referencias futuras: TV/VCR TV (if used) BÚSQUEDA DE SU CÓDIGO Si el dispositivo de su centro de entretenimiento no responde al control remoto Universal COX DVR después de intentar todos los códigos enumerados para su marca de fábrica, o si su marca de fábrica no se menciona, intente encontrar su código. Por ejemplo, para encontrar el código para su TV: 1. Encienda su TV. 2. Presione TV una vez en su control remoto; va a parpadear una vez. Oprima y sostenga SETUP hasta que parpadee dos veces. 3. Oprima 9 - 9 - 1. El boton TV parpadeara dos veces. 4. Apunte el control remoto hacia la TV y presione PWR una vez 5. Presione CH+ (o el CH -) una o más veces y pare cuando la TV se apague NOTA: En la funcion de búsqueda, el control remoto enviará códigos IR desde su biblioteca al dispositivo seleccionado, comenzando por el código más popular. NOTA: Si mientras usted presiona CH +, pasa el código inadvertidamente, presione el CH- una o más veces hasta que la TV se encienda. 6. Presione SETUP una vez para asegurar el codigo. El boton TV parpadeara dos veces. 7. Para buscar los códigos de sus otros disposi- M7820BP1.indd 29 29 3/13/2007 3:54:05 PM tivos, repita los pasos 1 a 5, pero substituya el boton correspondiente (e.g., AUX., DVD, AUD, o CABLE) al dispositivo que usted necesita. COMPROBACIÓN DE LOS CÓDIGOS Si usted ha configurado el control remoto universal Cox siguiendo el procedimiento Búsqueda de su Código (página anterior), es probable que deba averiguar qué código de cuatro dígitos funciona con su dispositivo. Por ejemplo, para averiguar qué código funciona con su TV: 1. Encienda su TV. 2. En el control remoto, presione TV una vez. Presione y mantenga presionada SETUP hasta que la tecla TV parpadee dos veces. A continuación, suelte el botón SETUP. 3. Presione 9-9-0. La tecla TV parpadeará dos veces. 4. Para ver el primer dígito del código, presione 1 una vez. Espere 3 segundos y cuente el número de veces que parpadea la tecla TV (p. ej., 3 parpadeos = 3) y anote el número en el primer espacio de los destinados al código de su TV (ver más adelante). NOTA: Si el dígito del código es “0”, la tecla de modo seleccionada no parpadeará. 5. Repita el paso 4 tres veces más para los dígitos restantes. Use el 2 para el segundo dígito, el 3 para el tercer dígito y el 4 para el cuarto dígito. Termine de escribir el código en los espacios destinados al código de su TV más adelante. 6. Para comprobar los códigos de otros dispositivos, repita los pasos del 1 al 4 sustituyendo la tecla apropiada (p. ej., AUX, DVD o CABLE) por la del dispositivo que esté comprobando. Anote los códigos en los espacios pertinentes, más adelante. M7820BP1.indd 30 AUX AUX Device ____________________ VCR 30 3/13/2007 3:54:05 PM \ TV CABLE PROGRAMACIÓN DEL BLOQUEO DE ID El Control remoto universal Cox viene preprogramado y bloqueado de fábrica para funcionar con el convertidor de cable y el servicio interactivo que le proporciona su compañía de cable. Sin embargo, si usted tiene otra marca o modelo de convertidor de cable y servicio interactivo con los que le gustaría utilizar su control remoto, deberá entonces seguir los siguientes pasos para desbloquear el ID de cable, introducir un nuevo código de fabricante y bloquear el ID de nuevo. 1. Encienda el Convertidor de cable. 2. En el control remoto, presione CABLE una vez. Presione y mantenga presionada SETUP hasta que la tecla TV parpadee dos veces. A continuación, suelte el botón SETUP. 3. Presione 9-8-2. La tecla CABLE parpadeará dos veces. 4. Siga las instrucciones detalladas en Programación del Control de Dispositivo en la página 27 para programar el control de dispositivo para el convertidor de cable y servicio interactivo deseados. Hecho esto, siga los pasos restantes (5 y 6, en esta página) para bloquear de nuevo el ID. 5. En el control remoto, presione CABLE una vez. Presione y mantenga presionada SETUP hasta que la tecla TV parpadee dos veces. A continuación, suelte el botón SETUP. 6. Presione 9-8-2. La tecla CABLE parpadeará dos veces M7820BP1.indd 31 31 3/13/2007 3:54:06 PM PROGRAMACIÓN DEL BLOQUEO DEL CONTROL DE CANAL Las funciones de control de canal del control remoto están por defecto bloqueadas en relación al convertidor de cable. Las teclas afectadas son 0~9, CH+, CH–, ENTER y LAST. Esto evitará que usted cambie sin querer el canal de su TV o DVD. No obstante, puede desactivar esta función para permitir un acceso total a estas teclas en los modos TV y DVD. Desactivación del Bloqueo del control de canal: 1. En el control remoto, presione CABLE una vez. Presione y mantenga presionado SETUP hasta que CABLE parpadee dos veces. A continuación, suelte el botón SETUP. 2. Presione 9-7-3. La tecla CABLE parpadeará dos veces. 3. Presione CH– una vez. La tecla CABLE parpadeará cuatro veces. 4. Ahora el control remoto proporcionará funciones de control de canal de TV y VCR siempre que esté en los modos TV o VCR. NOTA: Esta función no afecta al modo AUX. Reactivación del Bloqueo del control de canal: 1. En el control remoto, presione CABLE una vez. Presione y mantenga presionada SETUP hasta que la tecla TV parpadee dos veces. A continuación, suelte el botón SETUP. 2. Presione 9-7-3. La tecla CABLE parpadeará dos veces. 3. Presione CH+ una vez. La tecla CABLE parpadeará dos veces. 4. En este momento, sólo estará disponible la función de control de canal de su convertidor de cable, independientemente del modo que seleccione (p. ej. TV, DVD o CABLE). NOTA: Esta función no afecta al modo AUX. M7820BP1.indd 32 32 3/13/2007 3:54:06 PM UTILIZACIÓN DEL BOTÓN DE ENCENDIDO PRINCIPAL El Control remoto universal Cox está equipado con una función exclusiva que le permite encender o apagar de manera secuencial todos sus dispositivos de entretenimiento doméstico con un único botón: 1. Dirija el control remoto hacia los dispositivos. 2. Presione y mantenga presionado MASTER POWER durante 3 segundos para apagar o encender todos los dispositivos de entretenimiento doméstico de manera secuencial. Dependiendo del modo que esté seleccionado, el control remoto enviará señales infrarrojas a los dispositivos en el siguiente orden: Modo de inicio Dispositivo Encendido Modo Apagado finalización AUX Cable, TV, DVD CABLE DVD Auxiliar, Cable, TV CABLE TV CABLE DVD, Auxiliar, Cable CABLE TV, DVD, Auxiliar CABLE Por ejemplo, si está seleccionado TV, al presionar y mantener presionado MASTER POWER durante 3 segundos, se apagarán el DVD, un dispositivo auxiliar y el convertidor de cable. NOTA: El control remoto queda por defecto en el modo CABLE una vez todos los dispositivos hayan sido apagados. Así pues, la secuencia de encendido inicial será siempre TV, VCR y dispositivo auxiliar, siempre que no se presione otra tecla de dispositivo antes. REASIGNACIÓN DE TECLAS DE DISPOSITIVOS El Control remoto universal Cox puede configurarse para su utilización con un segundo dispositivo de TV o VCR, o cualquier otra combinación de cuatro dispositivos de entretenimiento doméstico. Por ejemplo, para utilizar el control con una TV, un con- M7820BP1.indd 33 33 3/13/2007 3:54:06 PM vertidor de cable y dos VCR, deberá reasignar la tecla AUX fuera de uso para utilizarla con el segundo VCR, de la siguiente manera: 1. En el control remoto, presione DVD una vez. Presione y mantenga presionada SETUP hasta que la tecla TV parpadee dos veces. A continuación, suelte el botón SETUP. 2. Presione 9-9-2. La tecla DVD parpadeará dos veces. 3. Presione DVD una vez y, a continuación, presione AUX también una vez. La tecla VCR parpadeará dos veces. 4. La tecla AUX podrá ya ser programada para su VCR. Consulte Programación de Control de dispositivos en la página 27. Para reasignar otras teclas de dispositivos, repita los pasos del 1 al 4 sustituyendo la secuencia de teclas tal y como se indica en el siguiente cuadro: Presione la secuencia de teclas indicada para reasignar: TV como tecla para VCR: SETUP - 9 - 9 - 2 - DVD - TV TV como tecla para 2nd Dispositivo auxiliar: SETUP - 9 - 9 - 2 - AUX - TV TV como tecla para 2nd Cable: SETUP - 9 - 9 - 2 - CABLE - TV TV de nuevo como TV: SETUP - 9 - 9 - 2 - TV - TV DVD como tecla para 2nd TV: SETUP - 9 - 9 - 2 - TV - DVD DVD como tecla para 2nd Dispositivo auxiliar: SETUP - 9 - 9 - 2 - AUX - DVD DVD como tecla para 2nd Cable: SETUP - 9 - 9 - 2 - CABLE - DVD DVD de nuevo como DVD: SETUP - 9 - 9 - 2 - DVD- DVD AUX como tecla para 2nd TV: SETUP - 9 - 9 - 2 - TV - AUX AUX como tecla para 2nd VCR: SETUP - 9 - 9 - 2 - DVD - AUX AUX como tecla para 2nd Cable: M7820BP1.indd 34 34 3/13/2007 3:54:06 PM SETUP - 9 - 9 - 2 - CABLE - AUX AUX de nuevo como AUX: SETUP - 9 - 9 - 2 - AUX - AUX Una vez completada la reasignación, el modo seleccionado parpadeará dos veces para confirmar su selección. A continuación, programe el control de dispositivos (consulte Programación de Control de Dispositivos en la página 27). CAMBIO DEL BLOQUEO DE VOLUMEN El Control remoto universal Cox está configurado para controlar el volumen de un dispositivo a partir de su TV, siempre que esté en el modo TV, DVD, o CABLE. No obstante, en el modo Auxiliar, deberá utilizar un control diferente para el volumen de su dispositivo auxiliar. Si su TV no puede recibir señales de un control remoto o si desea que el volumen esté controlado por un dispositivo diferente, puede cambiar la configuración de bloqueo de volumen para controlar un volumen a través de un modo no asociado (p. ej., a través del cable en el modo TV). Cambio del Bloqueo de volumen a modo CABLE: 1. En el control remoto, presione CABLE una vez. A continuación, presione y mantenga presionado SETUP hasta que la tecla CABLE parpadee dos veces. A continuación, suelte el botón SETUP. 2. Presione 9-9-3. La tecla CABLE parpadeará dos veces. 3. Presione CABLE una vez. Parpadeará dos veces. 4. Ahora, cuando presione VOL+, Vol– o MUTE, el volumen estará siendo controlado por su convertidor de cable. Cambio del Bloqueo de volumen a modo TV: 1. M7820BP1.indd 35 En el control remoto, presione TV una vez. Presione y mantenga presionado SETUP hasta que la tecla TV parpadee dos veces. A continuación, suelte el botón SETUP. 35 3/13/2007 3:54:06 PM 2. Presione 9-9-3. La tecla TV parpadeará dos veces. 3. Presione TV una vez. Parpadeará dos veces. 4. Ahora, cuando presione VOL+, Vol– o MUTE, el volumen estará siendo controlado por su TV. Cambio del Bloqueo de volumen a modo AUX: NOTA: Estas instrucciones le permitirán acceder al control de volumen de su dispositivo auxiliar en cualquier modo. 1. En el control remoto, presione AUX una vez. Presione y mantenga presionado SETUP hasta que la tecla AUX parpadee dos veces. A continuación, suelte el botón SETUP. 2. Presione 9-9-3. La tecla AUX parpadeará dos veces. 3. Presione AUX una vez. Parpadeará dos veces. 4. Ahora, cuando presione VOL+, Vol– o MUTE, el volumen estará siendo controlado por su dispositivo auxiliar. RESOLUCIÓN DE PROBLEMAS PROBLEMA: La tecla de modo no parpadea cuando pre- siona una tecla. SOLUCIÓN: Sustituya las baterías gastadas por dos (2) baterías alcalinas nuevas del tipo AA (consulte la página 8). PROBLEMA: La tecla de modo parpadea cuando pre- siona una tecla, pero el dispositivo de entretenimiento doméstico no responde. SOLUCIÓN: Asegúrese de que está dirigiendo el control remoto el dispositivo de entretenimiento doméstico y que está usted situado a no más de 5 metros del dispositivo que desea utilizar. PROBLEMA: El control remoto no funciona con los dispositivos de entretenimiento doméstico o las órdenes no se ejecutan correctamente. SOLUCIÓN: M7820BP1.indd 36 Pruebe todos los códigos enumerados para la marca del dispositivo que está 36 3/13/2007 3:54:06 PM siendo configurado. Asegúrese de que todos los dispositivos pueden recibir señal de un control remoto. PROBLEMA: El combo TV/VCR no responde correcta- mente. SOLUCIÓN: Utilice los códigos de VCR para su marca. Algunos combos necesitan un código de TV y otro de VCR para funcionar correctamente (consulte la página 47). PROBLEMA: No hay volumen en la segunda TV. SOLUCIÓN: Siga las instrucciones expuestas en Cambio del Bloqueo de volumen (ver página anterior). PROBLEMA: CH+, CH– y LAST no funcionan en su TV RCA. SOLUCIÓN: Debido a los diseños RCA (1983–1987), solo funciona con estas TVs su control remoto original. PROBLEMA: El cambio de canales no funciona correcta- mente. SOLUCIÓN: Si en el control original era necesario presionar ENTER para cambiar los canales, presione ENTER en el control remoto después de introducir el número de canal. PROBLEMA: Probó el “Búsqueda de su Codigo” pero aún así no pudo encontrar un código que funcionara. SOLUCIÓN: Pruebe el “Búsqueda de su Codigo” de nuevo tras borrar la tecla de dispositivo de la manera siguiente: Presione y mantenga presionado SETUP hasta que la tecla de modo parpadee dos veces y presione 9-9-2. A continuación presione y suelte la tecla de modo dos veces para borrarla. PROBLEMA: El control remoto no enciende combos TV/ VCR de las marcas Sony o Sharp. SOLUCIÓN: M7820BP1.indd 37 Para encender estos equipos, es necesario programar los códigos de TV en el control remoto. Para Sony, utilice el código de TV 0000 y el código de VCR 0032.Para Sharp, utilice el código de TV 0093 y el código de VCR 0048. 37 3/13/2007 3:54:07 PM INFORMACIÓN ADICIONAL Este producto no tiene ninguna parte que pueda ser de otra utilidad para el usuario. Abrir la carcasa, a excepción del compartimiento de las baterías, puede ocasionar daños permanentes en el Control remoto universal Cox. Copyright 2007 por Universal Electronics Inc. Queda prohibida la reproducción, transmisión, transcripción, almacenamiento en cualquier sistema de recuperación o traducción a cualquier idioma de parte o totalidad de esta publicación, en ninguna forma o medio, ya sea electrónico, mecánico, magnético, óptico, manual o de otro tipo, sin el consentimiento previo por escrito de Universal Electronics Inc. MANUFACTURER’S CODES / CÓDIGOS DEL FABRICANTE SETUP CODES FOR Audio Amplifiers Adcom Bose Carver Durabrand Elan GE Harman/Kardon JVC Left Coast Lenoxx Luxman Marantz McIntosh Nakamichi NEC Optimus Parasound Philips Pioneer Polk Audio RCA Realistic Sansui Shure Sony Soundesign Victor Wards M7820BP1.indd 38 0577, 1100 0674 0892 1561 0647 0078 0892 0331 0892 1561 0165 0892, 0321 0251 0321 0264 0395, 0823 0246 0892 0823 0892 0823 0395 0321 0264 0689, 0815, 1126 0078, 0211 0331 0078, 0211 38 3/13/2007 3:54:07 PM Yamaha 0354, 0133 SETUP CODES FOR Cable Converters ABC 0003, 0008, 0014, 0017 Americast 0899 Bell & Howell 0014 Bell South 0899 General Instrument 0476, 0810, 0276, 0003 GoldStar 0144 Hamlin 0009, 0273 i3 Micro 1602 Motorola 1376, 0476, 0810, 0276, 1187, 1254, 11062 Pace 1877, 0237, 0008 Panasonic 0000, 0107 Pioneer 1877, 0877, 0144, 0533 Regal 0279, 0273 Samsung 0144 Scientific Atlanta 1877, 0877, 0477, 0008, 0017 Sony 1006 Starcom 0003 Thomson 1256 Tocom 0012 Torx 0003 Toshiba 0000 Zenith 0000, 0525, 0899 SETUP CODES FOR Audio Amp/Tuners ADC Adcom Aiwa Akai Alco AMC Amphion Media AMW Anam Apex Digital Arcam Audiotronic Audiovox B&K BK Bose Brix Cambridge Sound. Capetronic Carver Casio Clarinette Classic Coby M7820BP1.indd 39 0531 0616 1405, 0158, 0189, 0121, 0405, 1243, 1388, 1641 0076, 0224, 1255, 1512 1390 1077 1563, 1615 1563, 1615 1609, 1074 1257, 1430, 1774 1120, 1189 1189 1390, 1627 0701, 0820, 0840 0702 1229, 0639, 1253, 1629, 1841, 1933 1602 1370 0531 1189, 0189, 0008, 0042, 0360, ,0121, 1289 0195 0195 1352 1263, 1389 39 3/13/2007 3:54:07 PM Compaq Criterion Curtis Mathes Daewoo Dell Delphi Denon Emerson Fisher Garrard Gateway Glory Horse Go Video Harman/Kardon Hewlett Packard Hitachi Initial Inkel Integra JBL JVC Kenwood KLH Koss Lasonic Lenoxx Lexicon LG Linn Liquid Video Lloyd’s LXI Magnavox Marantz McIntosh MCS Micromega Mitsubishi Modulaire Myryad NAD Nakamichi NEC Norcent Nova Onkyo Optimus Oritron Panasonic M7820BP1.indd 40 1136 1420 0080 1250 1383 1414 1360, 0004, 0273, 0771, 1142, 0121 0424 0042, 0219, 0360, 1801 0424, 0463 1517, 1567 1263 1532 0110, 0189, 0891, 1289, 1304, 1306 1181 1273, 1801 1426 0062 0135, 1298, 1320 0110, 1306 0074, 1263, 1374, 1495, 1811, 1871 1313, 1570, 1569, 0027, 0042, 0077, 0186, 0239, 0313 1390, 1412, 1428 0424, 1366, 1497 1798 1437 1076 1293 0189 1497 0195 0181 1189, 1269, 0189, 0128, 0195, 0391, 0531, 1514 1189, 1269, 0039, 0189, 0128, 1289 1289 0039, 0346 1189 1393 0195 1189 0320 0097, 0347, 1313, 1555 0235 1389 1389 0135, 0380, 0842, 1298, 1320, 1531 1023, 0042, 0080, 0177, 0181, 0186, 0219, 0531, 0670, 0738, 0801, 1074 1366, 1497 1308, 1518, 0039, 0309, 0367, 0518, 1288, 1316, 40 3/13/2007 3:54:07 PM Penney Philips Pioneer Polaroid Polk Audio Proscan Quasar RadioShack RCA Realistic Regent Rio Saba Samsung Sansui Sanyo Scott Sharp Sharper Image Sherwood Shinsonic Sirius Sonic Blue Sony Soundesign Stereophonics Sunfire Teac Technics Thorens Toshiba Venturer Victor Wards XM Yamaha Yorx Zenith 1548, 1633, 1763, 1764 0195 1189, 1269, 0189, 0391, 1120, 1266 1023, 0014, 0080, 0150, 0244, 0531, 0630, 1384 0801 1508 0189, 1289, 1414 1254 0039 1263 1023, 1609, 1254, 0054, 0080, 0346, 0360, 0530, 0531, 1074, 1154, 1390, 1511 0163, 0181, 0195 1437 1383, 1869 1519 1295, 1500, 1304 0189, 0193, 0346, 1189 0219, 0801, 1251, 1469, 1801 0163, 0322 0186, 1286 1263, 1556 0062, 0491, 0502, 1077, 1423, 1517, 1567, 1653, 1905 1426 1602, 1627, 1811, 1987 1383, 1532, 1869 1058, 1441, 1258, 1759, 1622, 0158, 0168, 0474, 1349, 1406, 1442, 1558, 1658, 1758, 1858, 1958 0670 1023 1313, 0313 0163, 0463, 1074, 1267, 1390, 1528 1308, 1518, 0039, 0208, 0309, 0518, 1633 1189 1788, 0080, 0135 1390 0074 0158, 0189, 0014, 0054, 0080 1406, 1414 0176, 0186, 1176, 1276, 1331, 1375 0195 0857, 1293 SETUP CODES FOR TVs A-Mark Abex Admiral Advent Adventura Aiko Aiwa M7820BP1.indd 41 0003 0032 0093, 0463 0761, 0783, 0815, 0817, 0842, 1933 0046 0092 0701 41 3/13/2007 3:54:07 PM Akai Alaron Albatron Ambassador America Action Ampro Anam Anam National AOC Apex Digital Archer Audiovox Aventura Axion Belcor Bell & Howell BenQ Boxlight Bradford Brockwood Broksonic Cadia Candle Carnivale Carver CCE Celebrity Celera Champion Changhong Cinego Citizen Clairtone Clarion Commercial Sol. Concerto Contec Craig Crosley Crown Curtis Mathes CXC Daewoo Daytron Dell Denon Denstar M7820BP1.indd 42 0812, 0702, 0030, 0098, 0672, 1903, 1935 0179, 0183, 0216 0700, 0843 0177 0180 0751 0180, 0004, 0009, 0068 0055, 0161 0030, 0003, 0019, 0052, 0137, 0185 0748, 0879, 0765, 0767, 1943, 0156 0003 0451, 0180, 0092, 0003, 0623, 0802, 0875, 1284, 1937, 1951, 1952 0171 1937 0019 0154, 0016 1032, 1315 0893 0180 0019 0236, 0463, 0003, 1935, 1938, 0180 1283 0030, 0046, 0056, 0186 0030 0054, 0170 0217, 0329 0000 0765 1362 0765 1986 0060, 0030, 0092, 0039, 0046, 0056, 0186, 0280 0185 0180 1447, 0047 0056 0180, 0157, 0158, 0185 0180, 0161 0054 0180, 0039 0047, 0054, 0154, 0451, 0093, 0060, 0702, 0030, 0145, 0166, 1347, 1147, 0747, 0466, 0056, 0039, 0016 0180 0451, 0092, 1661, 0019, 0039, 0066, 0067, 0091, 0623, 0661, 0672 0019 1080, 1178, 1264, 1403, 1454 0145, 0511 0628 42 3/13/2007 3:54:07 PM Diamond Vision DMTech Dream Vision Dumont Durabrand Dwin Dynatech Electroband Electrograph Electrohome Emerson Envision Epson ESA Fisher Fujitsu Funai Futuretech Gateway GE Gibralter Go Video GoldStar Goodmans Gradiente Grundig Grunpy Haier Hallmark Hannspree Hantarex Harley Davidson Harman/Kardon Harvard Havermy Helios Hello Kitty Hewlett Packard Hisense Hitachi HP Hyundai iLo Infinity Initial Inteq M7820BP1.indd 43 1996, 1997 1338 1297 0017, 0019 0463, 0180, 0178, 0171, 1034, 0003 0093, 0720, 0747, 0774 0049 0000, 0185 1755 0381, 0389, 0409 0154, 0236, 0463, 0180, 0178, 0171, 1963, 1944, 0623, 0282, 0280, 0270, 0185, 0183, 0182, 0181, 0179, 0177, 0158, 0039, 0038, 0019, 0180 0030, 0813, 1365 0833, 0840, 1290 0812, 0171 0154, 0159 0179, 0186, 0683, 0809, 0853 0180, 0171, 0179 0180 1755, 1756 1447, 0047, 0051, 0451, 0178, 1347, 0747, 0282, 0279, 0251, 0174, 0138, 0135, 0055, 0029, 0027, 0021 0017, 0030, 0019 0886 0178, 0030, 0001, 0002, 0019, 0032, 0106, 0409 0360 0392 0683 0180, 0179 1034, 0768 0178 1348, 1351, 1352 1338 0043, 0179 0054, 0078 0180, 0068 0093 0865 0451 1088, 1089, 1101, 1494, 1502 0748 1145, 0145, 0016, 0032, 0038, 0056, 0095, 0097, 0151, 0173, 0227, 0279, 0409, 0413, 1960 1088, 1089, 1101, 1494, 1502 0849 1286, 1990 0054 1990 0017 43 3/13/2007 3:54:07 PM Janeil JBL JCB Jensen JVC Kamp Kawasho Kaypani KEC Kenwood KLH Kloss KMC Konka KTV LG Loewe Logik Luxman LXI Magnavox Majestic Marantz Matsushita Maxent Megapower Megatron MEI Memorex MGA Midland Mintek Minutz Mitsubishi Monivision Motorola MTC Multitech NAD NEC NetTV Nikko Noblex Norcent Norwood Micro Noshi M7820BP1.indd 44 0046 0054 0000 0761, 0050, 0815, 0817, 1299, 1933 0053, 0036, 0069, 0160, 0169, 0182, 0731, 1253 1352 0216 0158, 0216, 0308 0052 0180 0030, 0019 0765, 0767, 1962 0024, 0046, 0078 0106 0628, 0632, 0638, 0703, 0707 0180, 0030, 0039, 0183, 0185, 0217, 0280 1265, 0178, 0442, 0700, 0856, 1178, 1325, 1993 0136 0016 0056 0047, 0054, 0154, 0156, 0178, 0148, 0747 1454, 0054, 0030, 0706, 1963, 1944, 1254, 0802, 0386, 0230, 0187, 0186, 0179, 0096, 0036, 0028, 0024, 0020 0015, 0016 0054, 0030, 0444, 0704, 0854, 0855, 1154, 1454 0250, 0650 1755 0700 0178, 0145, 0003 0185 0154, 0463, 0150, 0178, 0016, 0106, 0179 0150, 0178, 0030, 0019, 0155 0047, 0017, 0051, 0032, 0039, 0135, 0747 1990 0021 0093, 1250, 0150, 0178, 0014, 0019, 0098, 0155, 0331, 0358, 0836, 0868, 1550 0700, 0843 0093, 0055 0060, 0030, 0019, 0049, 0056, 0091, 0185, 0216 0180, 0049, 0217 0156, 0178, 0866 0030, 0019, 0036, 0056, 0170, 0434, 0497, 0882, 1704 1755 0178, 0030, 0092, 0317 0430 0748, 0824, 1365 1286, 1296, 1303 0018 44 3/13/2007 3:54:07 PM NTC Olevia Onwa Optimus Optoma Optonica Orion Panasonic Philco Philips Pilot Pioneer Polaroid Portland Prima Princeton Prism Proscan Proton Protron Proview Pulsar Quasar RadioShack RCA Realistic Rhapsody Runco Sampo Samsung Samsux Sansui Sanyo Sceptre Scimitsu Scotch Scott Sears Seleco Sharp M7820BP1.indd 45 0092 1144, 1240, 1331 0180 0154, 0250, 0166, 0650 0887, 1348 0093, 0165 0236, 0463, 1463, 0179 0250, 0051, 0055, 0162, 0226, 0338, 0375, 0650, 1410, 1941, 1946, 1947, 0047, 0156, 0051, 0060, 0178, 0030, 1347, 0747, 0309, 0149, 0138, 0135, 0110, 0039, 0032, 0027, 0021, 0019, 0018, 0003, 0002 0054, 0030, 0019, 0020, 0028, 0096, 0302 1454, 0054, 0690, 1154 0030, 0019, 0039 0166, 0038, 0172, 0679, 0866, 1260 0765, 0865, 1276, 1314, 1316, 1326, 1327, 1328, 1991, 1992 0092, 0019, 0039 0761, 0783, 0815, 0817, 1933 0700, 0717 0051 1447, 0047, 0747, 1347, 0466 0178, 0003, 0031, 0052, 0466 1320, 1323 1498 0017, 0019 0250, 0051, 0055, 0165, 0219, 0650 0047, 0154, 0180, 0178, 0030, 0019, 0032, 0039, 0056, 0165, 0409, 0747 1447, 0047, 1958, 1953, 1948, 1547, 1347, 1247, 1147, 1047, 0747, 0679, 0278, 0174, 0135, 0090, 0038, 0029, 0019, 0018 0154, 0180, 0178, 0030, 0019, 0032, 0039, 0056, 0165 0183, 0185, 0216 0017, 0030, 0251, 0497, 0603 0030, 0032, 0039, 0052, 0100, 0110, 1755 0060, 0812, 0702, 0178, 0030, 1903, 1395, 1312, 1060, 0814, 0766, 0427, 0408, 0329, 0056, 0032, 0019, 0217, 0587 0039 0463, 1935 0154, 0088, 0107, 0146, 0159, 0232, 0484, 0799, 0893, 1142 1360 0019 0178 0236, 0180, 0178, 0019, 0179, 0309 0047, 0054, 0154, 0156, 0178, 0171, 0015, 0056, 0146, 0148, 0149, 0159, 0168, 0179, 0281, 0747 1297, 1351 0093, 0039, 0153, 0157, 0165, 0220, 0281, 0386, 45 3/13/2007 3:54:07 PM 0398, 0491, 0688, 0689, 0818, 0851 0093 0019 0016 1297 0186, 0187 0813 1100, 0000, 0011, 0080, 0111, 0273, 0353, 0810, 0834, 1317 Soundesign 0180, 0178, 0179, 0186 Sova 1320, 1952 Spectricon 0003, 0137 Squareview 0171 SSS 0180, 0019 Starlite 0180 Studio Experience 0843 Superscan 0093, 0864 Supre-Macy 0046 Supreme 0000 SVA 0748, 0587, 0768, 0865, 0870, 0871, 0872 Sylvania 0054, 0030, 0171, 0020, 0028, 0065, 0096, 0381, 1944, 1963 Symphonic 0180, 0171 Syntax 1144, 1240, 1331 Tandy 0093 Tatung 0003, 0049, 0055, 0396, 1101, 1285, 1286, 1287, 1288, 1361, 1756 Technics 0250, 0051 Technol Ace 0179 Technovox 0007 Techview 0847 Techwood 0051, 0003, 0056 Teknika 0054, 0180, 0150, 0060, 0092, 0016, 0019, 0039, 0056, 0175, 0179, 0186, 0312, 0322 Telefunken 0702, 0056, 0074 Tera 0031 Thomson 0209, 0210 TMK 0178, 0056, 0177 TNCi 0017 Toshiba 0154, 1256, 0156, 1265, 0060, 1945, 1935, 1704, 1656, 1356, 1343, 1325, 1156, 0845, 0832, 0650, 0149, 0036, 1945, 1971 Tosonic 0185 Totevision 0039 Trical 0157 TVS 0463 Ultra 0391 Universal 0027 Universum 1337 US Logic 1286, 1303 Vector Research 0030 Sheng Chia Shogun Signature SIM2 Multimedia Simpson Sole Sony M7820BP1.indd 46 46 3/13/2007 3:54:08 PM Victor Video Concepts Vidikron Vidtech Viewsonic Viking Visart Vizio Wards Waycon Westinghouse White Westing. Yamaha Zenith 0053 0098 0054, 0242 0178, 0019, 0036 0857, 0864, 0885, 1330, 1342, 1755 0046, 0312 1336 0864, 0885, 1756 0054, 0178, 0030, 1156, 0866, 0202, 0179, 0174, 0165, 0111, 0096, 0080, 0056, 0029, 0028, 0027, 0021, 0020, 0019, 0016 0156 0885, 0889, 1282, 0000, 0451 0463, 0623 0030, 0019, 0769, 0833, 0839 0017, 0463, 1265, 0178, 0092, 0016 Zonda 0003 SETUP CODES FOR VCRs ABS Action Admiral Advantz Adventura Aiko Aiwa Akai Alienware America Action American High Asha Audiovox Beaumark Bell & Howell Broksonic Calix Canon CapeharT Carver CCE Citizen Colt Craig Curtis MatheS Cybernex CyberPower Daewoo Daytron Dell Denon M7820BP1.indd 47 1972 0317 0048, 0209, 0479 0356 0000 0278 0037, 0000, 0124, 0307, 0406, 0436, 0468 0041, 0049, 0053, 0061, 0106, 0156, 0175, 0242 1972 0278 0035 0240 0037, 0278 0240 0104 0184, 0121, 0209, 0002, 0211, 0295, 0361, 0479, 1479, 1815 0037 0035, 0102 0020 0081, 0146 0072, 0278 0037, 0278, 1278 0072 0037, 0047, 0240, 0072, 0271 0060, 0035, 0162, 0041, 0760, 1035 0240, 0051 1972 0045, 0278, 0017, 0020, 0087, 0561, 0637, 1278 0020 1972 0042 47 3/13/2007 3:54:08 PM DirecTV Durabrand Dynatech Electrohome Electrophonic Emerex Emerson 0739 0039, 0038 0000 0037, 0043 0037 0032 0037, 0184, 0000, 0121, 0043, 0209, 0002, 0278, 1479, 1278, 0637, 1593, 0593, 0561, 0510, 0479, 0361, 0295, 0294, 0212, 0211, 0208, 0088, 0068, 0061, 0036 Fisher 0047, 0104, 0054, 0066 Fuji 0035, 0033 Funai 0000, 0593, 1593 Garrard 0000 Gateway 1972 GE 0060, 0035, 0240, 0065, 0202, 0760, 0761, 0807, 1035, 1060 Go Video 0232, 0240, 0279, 0350, 0432, 0526, 0643 GoldStar 0037, 0038, 0018, 0471, 0480, 1237 Gradiente 0000, 0408 Grundig 0195 Harley Davidson 0000 Harman/Kardon 0081, 0038, 0075, 0146, 0161 Harwood 0072, 0068 Headquarter 0046 Hewlett Packard 1972 HI-Q 0047 Hitachi 0000, 0042, 0041, 0065, 0082, 0089, 0105, 0166, 0235, 0292 Howard Computers 1972 HP 1972 HNS 0042, 0739 Humax 0739 Hush 1972 iBUYPOWER 1972 Jensen 0041 JVC 0067, 0041, 0008, 0206, 0207, 0384, 1707 KEC 0037, 0278 Keen 0693 Kenwood 0067, 0041, 0038, 0384 KLH 0072 Kodak 0035, 0037 LG 0480, 1037 Linksys 1972 Lloyd’s 0000, 0208 Logik 0072 LXI 0037 Magnasonic 0593, 1278 Magnavox 0035, 0039, 0081, 0000, 0149, 0103, 0110, 0563, 0593, 1781 Magnin 0240 Marantz 0035, 0081, 0146, 0161 M7820BP1.indd 48 48 3/13/2007 3:54:08 PM Marta Matsushita Media Center PC MEI Memorex 0037 0035, 0162, 1162 1972 0035 0035, 0162, 0037, 0048, 0039, 0047, 0240, 0000, 0104, 0209, 0046, 0268, 0299, 0307, 0454, 0479, 1037, 1162, 1237, 1262 MGA 0240, 0043, 0061 MGN Technology 0240 Microsoft 1972 Mind 1972 Minolta 0042, 0105 Mitsubishi 0067, 0043, 0061, 0075, 0173, 0214, 0242, 0443, Motorola 0035, 0048 MTC 0240, 0000 Multitech 0000, 0072 NAD 0058 NEC 0104, 0067, 0041, 0038, 0040, 0050, 0082, 0457 Nikko 0037 Nikon 0034 Niveus Media 1972 Noblex 0240 Northgate 1972 Olympus 0035, 0226 Onkyo 0222 Optimus 1062, 0162, 0037, 0048, 0104, 0058, 0432, 0454, 0593, 1048, 1162, 1262 Optonica 0062 Orion 0184, 0209, 0002, 0295, 0479, 1479 Panasonic 1062, 0035, 0162, 0077, 0102, 0225, 0226, 0227, 0246, 0378, 0454, 0616, 1035, 1162, 1262 Penney 0035, 0037, 0240, 0042, 0038, 0040, 0054, 1035, 1237 Pentax 0042, 0065, 0105 Philco 0035 Philips 0035, 0081, 0062, 0110, 0146, 0403, 0618, 0739, 1081, 1181 Pilot 0037 Pioneer 0067, 0058, 0168 Polk Audio 0081, 0146 Portland 0020 Profitronic 0240 Proscan 0060, 0202, 0760, 0761, 1060 Protec 0072 Pulsar 0039, 0051 Quarter 0046 Quartz 0046, 0155 Quasar 0035, 0162, 0077, 0454, 1035, 1162 RadioShack 0000, 1037 Radix 0037 Randex 0037 M7820BP1.indd 49 49 3/13/2007 3:54:08 PM RCA Realistic ReplayTV Ricavision Ricoh Runco Salora Samsung Samtron Sanky Sansui Sanyo Scott Sears Sharp Shintom Shogun Singer Sonic Blue Sony Stack 9 STS Sylvania Symphonic Systemax Tagar Systems Tatung Teac Technics Teknika Thomas Tivo TMK Toshiba Totevision Touch Unitech Vector Vector Research Video Concepts Videomagic Videosonic Viewsonic Villain Voodoo M7820BP1.indd 50 0060, 0240, 0042, 0149, 1060, 1035, 0880, 0807, 0761, 0760, 0277, 0202, 0106, 0105, 0077, 0065, 0058 0035, 0037, 0048, 0047, 0000, 0104, 0046, 0062, 0066 0614, 0616 1972 0034 0039 0075 0240, 0045, 0051, 0053, 0739, 1014 0643 0048, 0039 0000, 0067, 0209, 0041, 0082, 0271, 0479, 1479 0047, 0240, 0104, 0046, 0159, 0268, 0372 0184, 0045, 0121, 0043, 0210, 0211, 0212 0035, 0037, 0047, 0000, 0042, 0104, 0046, 0054 0057, 0066, 0105, 1237 0048, 0062, 0807, 0848 0072 0240, 0051 0072 0614, 0616 0035, 0032, 0033, 0000, 0011, 0022, 0034, 0275, 0636, 1032, 1232, 1972 1972 0042 0035, 0081, 0000, 0043, 0103, 0110, 0593, 1593, 1781 0000, 0593, 1593 1972 1972 0041 0000, 0041 0035, 0162, 0246 0035, 0037, 0000, 0052 0000 0618, 0636, 0739, 1996 0240, 0036, 0208 0045, 0043, 0057, 0066, 0209, 0210, 0212, 0366 0845, 1008, 1145, 1972, 1996 0037, 0240 1972 0240 0045 0038, 0040 0045, 0040, 0061, 0221 0037 0240 1972 0000 1972 50 3/13/2007 3:54:08 PM Wards White Westing. XR-1000 Yamaha Zenith ZT Group 0060, 0035, 0048, 0047, 0081, 0240, 0000, 0042, 0072, 0149, 0062, 0161, 0212, 0760 0209, 0072, 0637 0035, 0000, 0072 0038 0039, 0033, 0000, 0209, 0034, 0479, 0637, 1139 , 1479 1972 SETUP CODES FOR HDTV Advent Hitachi Marantz Mitsubishi Panasonic Pioneer Princeton RCA Samsung Sharp Toshiba 0842 1960 0854 0150 0250, 0650 0679 0717 1447 0702, 0812 0688, 0689 1256 SETUP CODES FOR LCD TV Akai Audiovox BenQ Cadia Dell Envision Funai Go Video Hewlett Packard HP Hyundai iLo Initial Jensen LG Magnavox Marantz Mintek Mitsubishi Norcent Norwood Micro Olevia Panasonic Philips Polaroid Protron RCA Samsung Sanyo M7820BP1.indd 51 1935 0180, 0802, 0875, 1284, 1937, 1951, 1952 1315 1283 1080, 1178, 1264 0813, 1365 0171 0886 1088 1088 0849 1286, 1990 1990 1299 0856, 1178, 1993 0802 0855 1990 1250 1365 1286, 1296 1144, 1240, 1331 0650, 1941 1454 1276, 1316 1320, 1323 0047, 1958 0766, 0812, 0814, 1395 1142 51 3/13/2007 3:54:08 PM Sceptre Sharp Sony Sova Superscan SVA Sylvania Symphonic Syntax Tatung Techview Toshiba US Logic Viewsonic Visart Vizio Westinghouse Wyse Zenith 1360 0093, 0818 0810 1320 0864 0587, 0870, 0871 0171 0171 1144, 1240, 1331 1286 0847 0845, 1343, 1656 1286 0857, 0864, 0885, 1330 1336 0864, 0885, 1756 0885, 0889, 1282 1365 1265 SETUP CODES FOR DVD Players Adcom Advent Aiwa Akai Alco Allegro Amphion AMW Apex Digital 1094 1016 0641 0695, 0770, 0899, 1089 0790 0869 0872, 1245 0872, 1245 0672, 0717, 0755, 0794, 0796, 0797, 0830, 1004, 1020, 1056, 1061, 1100 Aspire Digital 1168, 1407 Audiologic 0736 Audiovox 0790, 1041, 1071, 1072, 1121, 1122 Axion 1071, 1072 B&K 0655, 0662 BBK 1224 Bel Canto Design 1571 Blaupunkt 0717 Blue Parade 0571 Broksonic 0695, 0868, 1419 Buffalo 1882 Cal. Audio Labs 0490 Cary Audio Design 1477 CAVS 1057 Centrios 1577 Cinea 0831 Cinego 1399 CineVision 0876, 0833, 0869 Citizen 1277 Coby 0778, 0852, 1086, 1107, 1165, 1177, 1351 Craig 0831 M7820BP1.indd 52 52 3/13/2007 3:54:08 PM Curtis Mathes CyberHome D-Link Daewoo Daytek Denon Desay Diamond Vision Disney Dual Durabrand DVD2000 Emerson Enterprise ESA Fisher Funai Gateway GE Go Video Go Vision GoldStar GPX Gradiente Greenhill Grundig Harman/Kardon Hitachi Hiteker iLo Initial Innovative Tech Integra Jaton JBL Jensen JSI JVC jWin Kawasaki Kenwood KLH Konka Koss Kreisen Landel Lasonic Lecson Lenoxx M7820BP1.indd 53 1087 0816, 0874, 1023, 1024, 1117, 1129, 1502, 1537 1881 0784, 0705, 0833, 0869, 1169, 1172, 1234, 1242, 1441, 1443 0872 0490, 0634 1407, 1455 1316, 1609, 1610 0675, 1270 1068, 1085 1127 0521 0591, 0675, 0821, 1268 0591 1443 0670, 1919 0675, 1268, 1334 1073, 1077, 1158 0522, 0815, 0717 0744, 0715, 0741, 0783, 0833, 0869, 1044, 1075, 1099, 1144, 1158, 1304, 1443, 1730 1071, 1072 0741 0699, 0769 0490 0717 0539 0582, 0702 0573, 0664, 1247, 1919 0672 1348, 1472 0717, 1472 1542 0571, 0627 1078 0702 1016 1423 0558, 0623, 0867, 1164, 1275, 1602, 1863 1049, 1051 0790 0490, 0534, 0682, 0737 0717, 0790, 1020, 1149, 1261 0711, 0719, 0720, 0721 0651, 0896, 1423 1421 0826 0798, 1173 1533 1127 53 3/13/2007 3:54:08 PM LG LiteOn Loewe Magnavox Malata Marantz McIntosh Memorex Microsoft Mintek Mitsubishi Momitsu Myryad NAD Nakamichi NEC Nesa Nesa Vision NeuNeo Next Base NexxTech Norcent Onkyo Oppo OptoMedia Elect. Oritron Panasonic Philips PianoDisc Pioneer Polaroid Polk Audio Portland Presidian Prima Primare Princeton Proceed Proscan ProVision Qwestar RCA Rio RJTech Rotel Rowa Sampo Samsung Sansui Sanyo Sensory Science Sharp M7820BP1.indd 54 0591, 0741, 0801, 0869, 1526 1058, 1158, 1416, 1440 0511 0503, 0539, 0646, 0675, 0821, 1268, 1506 0782, 1159 0539 1273, 1533 0695, 0831, 1270 0522, 1708 0839, 0717, 1472 1521, 0521 1082 0894 0591, 0692, 0741 1222 0785 0717 1603 1454 0826 1402 1003, 0872, 1107, 1265, 1457 0503, 0627, 0792 1224, 1525 0896 0651 0490, 0503, 0632, 0703, 1362, 1462, 1490, 1762 0503, 0539, 0646, 0675, 0854, 1260, 1267, 1354 1024 0525, 0571, 0631, 0632, 1571 1020, 1061, 1086, 1245, 1316, 1478, 1480, 1482 0539 0770 0675 1016 1467 0674 0672 0522 0778 0651 0522, 0571, 0717, 0790, 0822, 1022, 1132, 1193 0869 1360 0623, 1178 0823 0698, 0752, 1501 0490, 0573, 0744, 0820, 0899, 1044, 1075 0695 0670, 0695, 0873, 1919 1158 0630, 0675, 0752, 1256 54 3/13/2007 3:54:08 PM Sharper Image Sherwood Shinsonic Sigma Designs Sonic Blue Sony Sound Mobile Sova Sungale Superscan SVA Sylvania Symphonic TAG McLaren Teac Technics Technosonic Techwood Terapin Theta Digital Toshiba Tredex Urban Concepts US Logic Valor Venturer Vialta Vizio Vocopro Xbox Xwave Yamaha Yamakawa Zenith Zoece 1117 0633, 0770, 1043, 1077, 1889 0533, 0839 0674 0869, 1099 0533, 1533, 0864, 1033, 1431, 1432, 1433, 1548, 1892 1298 1122 1074, 1532 0821 0860, 1105 0675, 0821, 1268 0675, 1268 0894 0790, 0809 0490, 0703 0730 0692 1031 0571 0503, 0695, 1045, 1154, 1854 0799, 0800, 0803, 0804 0503 0839 1298 0790 1509 1064, 1226 1027 0522, 1708 1001 0490, 0539, 0545 0872 0503, 0591, 0741, 0869 1265 SETUP CODES FOR DVD-R Players Apex Digital Aspire Digital Coby CyberHome Funai Gateway Go Video iLo JVC Kreisen LG LiteOn Magnavox Panasonic Philips Pioneer M7820BP1.indd 55 1056 1168 1086 1129, 1502 0675, 1334 1073, 1158 0741, 1158, 1304, 1730 1348 1164, 1275 1421 0741 1158, 1416, 1440 0646, 1506 0490 0646 0631 55 3/13/2007 3:54:09 PM SETUP CODES FOR DVD-R Players Polaroid RCA Samsung Sharp Sony Sylvania Zenith 1086 0522 0490 0675 1033, 1431, 1432, 1433 0675 0741 SETUP CODES FOR TV/DVD Combos Advent Apex Digital Audiovox Axion Broksonic Cinego Diamond Vision Emerson Hitachi iLo Initial Jensen KLH LG Magnavox Mintek Panasonic Polaroid Prima RCA Samsung Sansui Sova Sylvania Toshiba 1933 1943 1937, 1951, 1952 1937 1935 1986 1997 1963 1960 1990 1990 1933 1962 1993 1963 1990 1941 1991 1933 1948, 1958 1903 1935 1952 1963 1935 SETUP CODES FOR TV/VCR Combos Audiovox Broksonic Citizen Daewoo Emerson Funai GE GoldStar Hitachi LG Magnavox Memorex Mitsubishi Optimus Orion M7820BP1.indd 56 0278 0002, 0479, 1479 1278 0637, 1278 0002, 0294, 0479, 0593, 1278, 1479 0000 0240, 0807, 1035, 1060 1237 0000 0480, 1037 0000, 0593, 1781 0162, 0454, 1037, 1162, 1237, 1262 0807 0162, 0454, 0593, 1162, 1262 0002, 0479, 1479 56 3/13/2007 3:54:09 PM Panasonic Penney Quasar RadioShack RCA Samsung Sansui Sanyo Sears Sony Sylvania Symphonic Thomas Toshiba White Westing. Zenith M7280P01 M7820BP1.indd 57 0162, 1035, 1162, 1262 0240, 1035, 1237 0162, 1035, 1162 0000, 1037 0240, 0807, 1035, 1060 1014 0000, 0479, 1479 0240 0000, 1237 0000, 1232 1781 0000, 0593 0000 0845, 1145 0637 0000, 0479, 0637, 1479 03/07 3/13/2007 3:54:09 PM-
 1
1
-
 2
2
-
 3
3
-
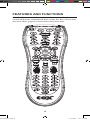 4
4
-
 5
5
-
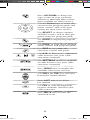 6
6
-
 7
7
-
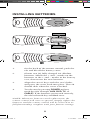 8
8
-
 9
9
-
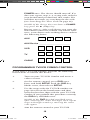 10
10
-
 11
11
-
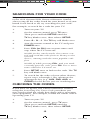 12
12
-
 13
13
-
 14
14
-
 15
15
-
 16
16
-
 17
17
-
 18
18
-
 19
19
-
 20
20
-
 21
21
-
 22
22
-
 23
23
-
 24
24
-
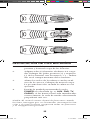 25
25
-
 26
26
-
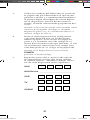 27
27
-
 28
28
-
 29
29
-
 30
30
-
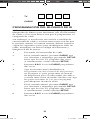 31
31
-
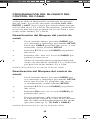 32
32
-
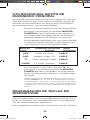 33
33
-
 34
34
-
 35
35
-
 36
36
-
 37
37
-
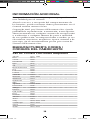 38
38
-
 39
39
-
 40
40
-
 41
41
-
 42
42
-
 43
43
-
 44
44
-
 45
45
-
 46
46
-
 47
47
-
 48
48
-
 49
49
-
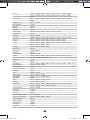 50
50
-
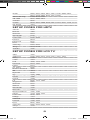 51
51
-
 52
52
-
 53
53
-
 54
54
-
 55
55
-
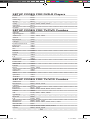 56
56
-
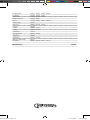 57
57


Venturer M7280P1 Manual de usuario
- Tipo
- Manual de usuario
Otros documentos
-
Radio Shack 2-in-1 Remote Control Guía del usuario
-
Universal Electronics Cox Universal Remote Control Manual de usuario
-
COX URC-300 Manual de usuario
-
Universal Electronics COX Manual de usuario
-
 One For All OARH01B Manual de usuario
-
-
Arris MXV4 RF Manual de usuario
-
Motorola URC62440 Instrucciones de operación
-
-
