ZANKER ZBB2294L Manual de usuario
- Categoría
- Frigoríficos-congeladores
- Tipo
- Manual de usuario
Este manual también es adecuado para

EN
User manual 2
EL
Οδηγίες Χρήσης 13
ES
Manual de instrucciones 27
Fridge-Freezer
Ψυγειοκαταψύκτης
Frigorífico-congelador
ZBB2294R
ZBB2294L

Contents
Safety information _ _ _ _ _ _ _ _ _ _ _ _ _ _ _ _ 2
Operation _ _ _ _ _ _ _ _ _ _ _ _ _ _ _ _ _ _ _ _ _ 4
First use _ _ _ _ _ _ _ _ _ _ _ _ _ _ _ _ _ _ _ _ _ 4
Daily use _ _ _ _ _ _ _ _ _ _ _ _ _ _ _ _ _ _ _ _ _ 4
Helpful hints and tips _ _ _ _ _ _ _ _ _ _ _ _ _ _ _ 5
Care and cleaning _ _ _ _ _ _ _ _ _ _ _ _ _ _ _ _ _ 6
What to do if… _ _ _ _ _ _ _ _ _ _ _ _ _ _ _ _ _ _ 7
Technical data _ _ _ _ _ _ _ _ _ _ _ _ _ _ _ _ _ _ 9
Installation _ _ _ _ _ _ _ _ _ _ _ _ _ _ _ _ _ _ _ _ 9
Environmental concerns _ _ _ _ _ _ _ _ _ _ _ _ _ 12
Subject to change without notice
Safety information
In the interest of your safety and to ensure the correct use,
before installing and first using the appliance, read this
user manual carefully, including its hints and warnings.
To avoid unnecessary mistakes and accidents, it is im-
portant to ensure that all people using the appliance are
thoroughly familiar with its operation and safety features.
Save these instructions and make sure that they remain
with the appliance if it is moved or sold, so that everyone
using it through its life will be properly informed on ap-
pliance use and safety.
For the safety of life and property keep the precautions of
these user's instructions as the manufacturer is not re-
sponsible for damages caused by omission.
Children and vulnerable people safety
• This appliance is not intended for use by persons (in-
cluding children) with reduced physical, sensory or
mental capabilities, or lack of experience and knowl-
edge, unless they have been given supervision or in-
struction concerning use of the appliance by a person
responsible for their safety.
Children should be supervised to ensure that they do
not play with the appliance.
• Keep all packaging well away from children. There is
risk of suffocation.
• If you are discarding the appliance pull the plug out of
the socket, cut the connection cable (as close to the
appliance as you can) and remove the door to prevent
playing children to suffer electric shock or to close
themselves into it.
• If this appliance featuring magnetic door seals is to
replace an older appliance having a spring lock (latch)
on the door or lid, be sure to make that spring lock
unusable before you discard the old appliance. This
will prevent it from becoming a death trap for a child.
General safety
Caution! Keep ventilation openings clear of
obstruction.
• The appliance is intended for keeping foodstuff and/or
beverages in a normal household as explained in this
instruction booklet.
• Do not use a mechanical device or any artificial means
to speed up the thawing process.
• Do not use other electrical appliances (such as ice
cream makers) inside of refrigerating appliances, un-
less they are approved for this purpose by the manu-
facturer.
• Do not damage the refrigerant circuit.
• The refrigerant isobutane (R600a) is contained within
the refrigerant circuit of the appliance, a natural gas
with a high level of environmental compatibility, which
is nevertheless flammable.
During transportation and installation of the appliance,
be certain that none of the components of the refrig-
erant circuit become damaged.
If the refrigerant circuit should become damaged:
– avoid open flames and sources of ignition
– thoroughly ventilate the room in which the appli-
ance is situated
2

• It is dangerous to alter the specifications or modify this
product in any way. Any damage to the cord may cause
a short-circuit, fire and/or electric shock.
Warning! Any electrical component (power cord,
plug, compressor) must be replaced by a certified
service agent or qualified service personnel.
1. Power cord must not be lengthened.
2. Make sure that the power plug is not squashed or
damaged by the back of the appliance. A squashed
or damaged power plug may overheat and cause
a fire.
3. Make sure that you can come to the mains plug of
the appliance.
4. Do not pull the mains cable.
5. If the power plug socket is loose, do not insert the
power plug. There is a risk of electric shock or fire.
6. You must not operate the appliance without the
lamp cover
1)
of interior lighting.
• This appliance is heavy. Care should be taken when
moving it.
• Do not remove nor touch items from the freezer com-
partment if your hands are damp/wet, as this could
cause skin abrasions or frost/freezer burns.
• Avoid prolonged exposure of the appliance to direct
sunlight.
Daily Use
• Do not put hot pot on the plastic parts in the appliance.
• Do not store flammable gas and liquid in the appliance,
because they may explode.
• Do not place food products directly against the air
outlet on the rear wall.
2)
• Frozen food must not be re-frozen once it has been
thawed out.
• Store pre-packed frozen food in accordance with the
frozen food manufacturer's instructions.
• Appliance's manufacturers storage recommendations
should be strictly adhered to. Refer to relevant instruc-
tions.
• Do not place carbonated or fizzy drinks in the freezer
compartment as it creates pressure on the container,
which may cause it to explode, resulting in damage to
the appliance.
• Ice lollies can cause frost burns if consumed straight
from the appliance.
Care and cleaning
• Before maintenance, switch off the appliance and dis-
connect the mains plug from the mains socket.
• Do not clean the appliance with metal objects.
• Do not use sharp objects to remove frost from the ap-
pliance. Use a plastic scraper.
• Regularly examine the drain in the refrigerator for de-
frosted water. If necessary, clean the drain. If the drain
is blocked, water will collect in the bottom of the ap-
pliance.
Installation
Important! For electrical connection carefully follow the
instructions given in specific paragraphs.
• Unpack the appliance and check if there are damages
on it. Do not connect the appliance if it is damaged.
Report possible damages immediately to the place you
bought it. In that case retain packing.
• It is advisable to wait at least four hours before con-
necting the appliance to allow the oil to flow back in
the compressor.
• Adequate air circulation should be around the appli-
ance, lacking this leads to overheating. To achieve
sufficient ventilation follow the instructions relevant to
installation.
• Wherever possible the back of the product should be
against a wall to avoid touching or catching warm parts
(compressor, condenser) to prevent possible burn.
• The appliance must not be located close to radiators
or cookers.
• Make sure that the mains plug is accessible after the
installation of the appliance.
•
Connect to potable water supply only.
3)
Service
• Any electrical work required to do the servicing of the
appliance should be carried out by a qualified electri-
cian or competent person.
• This product must be serviced by an authorized Service
Centre, and only genuine spare parts must be used.
1) If the lamp cover is foreseen
2) If the appliance is Frost Free
3) If a water connection is foreseen
3

Environment Protection
This appliance does not contain gasses which could
damage the ozone layer, in either its refrigerant cir-
cuit or insulation materials. The appliance shall not be
discarded together with the urban refuse and rubbish. The
insulation foam contains flammable gases: the appliance
shall be disposed according to the applicable regulations
to obtain from your local authorities. Avoid damaging the
cooling unit, especially at the rear near the heat exchang-
er. The materials used on this appliance marked by the
symbol
are recyclable.
Operation
Switching on
Insert the plug into the wall socket.
Turn the Temperature regulator clockwise to a medium
setting.
Switching off
To turn off the appliance, turn the Temperature regulator
to the "O" position.
Temperature regulation
The temperature is automatically regulated.
To operate the appliance, proceed as follows:
• turn the Temperature regulator toward lower settings
to obtain the minimum coldness.
• turn the Temperature regulator toward higher settings
to obtain the maximum coldness.
A medium setting is generally the most suitable.
However, the exact setting should be chosen keeping in
mind that the temperature inside the appliance depends
on:
• room temperature
• how often the door is opened
• the quantity of food stored
• the location of the appliance.
Important! If the ambient temperature is high or the
appliance is fully loaded, and the appliance is set to the
lowest temperatures, it may run continuously causing
frost to form on the rear wall. In this case the dial must be
set to a higher temperature to allow automatic defrosting
and therefore reduced energy consumption.
First use
Cleaning the interior
Before using the appliance for the first time, wash the
interior and all internal accessories with lukewarm water
and some neutral soap so as to remove the typical smell
of a brand-new product, then dry thoroughly.
Important! Do not use detergents or abrasive powders,
as these will damage the finish.
Daily use
Freezing fresh food
The freezer compartment is suitable for freezing fresh food
and storing frozen and deep-frozen food for a long time.
To freeze fresh foods it is not necessary to change the
medium setting.
However, for a faster freezing operation, turn the temper-
ature regulator toward higher settings to obtain the max-
imum coldness.
Important! In this condition, the refrigerator compartment
temperature might drop below 0°C. If this occurs reset
the temperature regulator to a warmer setting.
Storage of frozen food
When first starting-up or after a period out of use, before
putting the products in the compartment let the appliance
run at least 2 hours on the higher settings.
If large quantities of food are to be stored, remove all
drawers and baskets from appliance and place food on
cooling shelves to obtain the best performance.
Warning! Make sure that foods do not exceed the
load limit stated on the side of the upper section
(where applicable)
4

Important! In the event of accidental defrosting, for
example due to a power failure, if the power has been off
for longer that the value shown in the technical
characteristics chart under "rising time", the defrosted
food must be consumed quickly or cooked immediately
and then re-frozen (after cooling).
Freezing Calendar
The symbols show different types of frozen goods.
The numbers indicate storage times in months for the
appropriate types of frozen goods. Whether the upper or
lower value of the indicated storage time is valid depends
on the quality of the foods and treating before freezing.
Thawing
Deep-frozen or frozen food, prior to being used, can be
thawed in the refrigerator compartment or at room tem-
perature, depending on the time available for this opera-
tion.
Small pieces may even be cooked still frozen, directly
from the freezer: in this case, cooking will take longer.
Ice-cube production
This appliance is equipped with one or more trays for the
production of ice-cubes. Fill these trays with water, then
put them in the freezer compartment.
Important! Do not use metallic instruments to remove the
trays from the freezer.
Movable shelves
The walls of the refrigera-
tor are equipped with a
series of runners so that
the shelves can be posi-
tioned as desired.
Important! Do not move
the glass shelf above the
vegetable drawer to en-
sure correct air circula-
tion.
Positioning the door shelves
To permit storage of food
packages of various sizes,
the door shelves can be
placed at different heights.
Gradually pull the shelf in
the direction of the arrows
until it comes free, then
reposition as required.
Helpful hints and tips
Hints for energy saving
• Do not open the door frequently or leave it open longer
than absolutely necessary.
• If the ambient temperature is high and the Temperature
Regulator is set to low temperature and the appliance
is fully loaded, the compressor may run continuously,
causing frost or ice on the evaporator. If this happens,
set the Temperature Regulator toward warmer settings
to allow automatic defrosting and so a saving in elec-
tricity consumption.
Hints for fresh food refrigeration
To obtain the best performance:
• do not store warm food or evaporating liquids in the
refrigerator
• do cover or wrap the food, particularly if it has a strong
flavour
• position food so that air can circulate freely around it
Hints for refrigeration
Useful hints:
Meat (all types) : wrap in polythene bags and place on the
glass shelf above the vegetable drawer.
5

For safety, store in this way only one or two days at the
most.
Cooked foods, cold dishes, etc..: these should be covered
and may be placed on any shelf.
Fruit and vegetables: these should be thoroughly cleaned
and placed in the special drawer(s) provided.
Butter and cheese: these should be placed in special air-
tight containers or wrapped in aluminium foil or polythene
bags to exclude as much air as possible.
Milk bottles: these should have a cap and should be stored
in the bottle rack on the door.
Bananas, potatoes, onions and garlic, if not packed, must
not be kept in the refrigerator.
Hints for freezing
To help you make the most of the freezing process, here
are some important hints:
• the maximum quantity of food which can be frozen in
24 hrs. is shown on the rating plate;
• the freezing process takes 24 hours. No further food to
be frozen should be added during this period;
• only freeze top quality, fresh and thoroughly cleaned,
foodstuffs;
• prepare food in small portions to enable it to be rapidly
and completely frozen and to make it possible subse-
quently to thaw only the quantity required;
• wrap up the food in aluminium foil or polythene and
make sure that the packages are airtight;
• do not allow fresh, unfrozen food to touch food which
is already frozen, thus avoiding a rise in temperature
of the latter;
• lean foods store better and longer than fatty ones; salt
reduces the storage life of food;
• water ices, if consumed immediately after removal from
the freezer compartment, can possibly cause the skin
to be freeze burnt;
• it is advisable to show the freezing in date on each
individual pack to enable you to keep tab of the storage
time.
Hints for storage of frozen food
To obtain the best performance from this appliance, you
should:
• make sure that the commercially frozen foodstuffs were
adequately stored by the retailer;
• be sure that frozen foodstuffs are transferred from the
foodstore to the freezer in the shortest possible time;
• not open the door frequently or leave it open longer
than absolutely necessary.
• Once defrosted, food deteriorates rapidly and cannot
be refrozen.
• Do not exceed the storage period indicated by the food
manufacturer.
Care and cleaning
Caution! Unplug the appliance before carrying out
any maintenance operation.
This appliance contains hydrocarbons in its cooling
unit; maintenance and recharging must therefore
only be carried out by authorized technicians.
Periodic cleaning
The equipment has to be cleaned regularly:
• clean the inside and accessories with lukewarm water
and some neutral soap.
• regularly check the door seals and wipe clean to ensure
they are clean and free from debris.
• rinse and dry thoroughly.
Important! Do not pull, move or damage any pipes and/
or cables inside the cabinet.
Never use detergents, abrasive powders, highly perfumed
cleaning products or wax polishes to clean the interior as
this will damage the surface and leave a strong odour.
Clean the condenser (black grill) and the compressor at
the back of the appliance with a brush or a vacuum cleaner.
This operation will improve the performance of the ap-
pliance and save electricity consumption.
Important! Take care of not to damage the cooling system.
Many proprietary kitchen surface cleaners contain chem-
icals that can attack/damage the plastics used in this ap-
pliance. For this reason it is recommended that the outer
casing of this appliance is only cleaned with warm water
with a little washing-up liquid added.
After cleaning, reconnect the equipment to the mains
supply.
6

Defrosting of the refrigerator
Frost is automatically eliminated from the evaporator of
the refrigerator compartment every time the motor com-
pressor stops, during normal use. The defrost water
drains out through a trough into a special container at the
back of the appliance, over the motor compressor, where
it evaporates.
It is important to periodically clean the defrost water drain
hole in the middle of the refrigerator compartment channel
to prevent the water overflowing and dripping onto the
food inside. Use the special cleaner provided, which you
will find already inserted into the drain hole.
Defrosting the freezer
A certain amount of frost will always form on the freezer
shelves and around the top compartment.
Defrost the freezer when the frost layer reaches a thickness
of about 3-5 mm.
Important! About 12 hours prior to defrosting, set the
Temperature regulator toward higher settings , in order to
build up sufficient chill reserve for the interruption in
operation.
To remove the frost, follow the instructions below:
1. Switch off the appliance.
2. Remove any stored food, wrap it in several layers of
newspaper and put it in a cool place.
Caution! Do not touch frozen goods with wet hands.
Hands can freeze to the goods.
3. Leave the door
open and insert the
plastic scraper in
the appropriate
seating at the bot-
tom centre, placing
a basin underneath
to collect the de-
frost water
In order to speed up the defrosting process, place
a pot of warm water in the freezer compartment. In
addition, remove pieces of ice that break away before de-
frosting is complete.
4. When defrosting is completed, dry the interior thor-
oughly and keep the scraper for future use.
5. Switch on the appliance.
6. After two or three hours, reload the previously re-
moved food into the compartment.
Warning! Never use sharp metal tools to scrape off
frost from the evaporator as you could damage it.
Do not use a mechanical device or any artificial means to
speed up the thawing process other than those
recommended by the manufacturer.
A temperature rise of the frozen food packs, during
defrosting, may shorten their safe storage life.
Periods of non-operation
When the appliance is not in use for long periods, take
the following precautions:
• disconnect the appliance from electricity supply
• remove all food
•
defrost
4)
and clean the appliance and all accessories
• leave the door/doors ajar to prevent unpleasant smells.
If the cabinet will be kept on, ask somebody to check it
once in a while to prevent the food inside from spoiling
in case of a power failure.
What to do if…
Warning! Before troubleshooting, disconnect the
mains plug from the mains socket.
Only a qualified electrician or competent person must do
the troubleshooting that is not in this manual.
Important! There are some sounds during normal use
(compressor, refrigerant circulation).
4) If foreseen.
7

Problem Possible cause Solution
The appliance does not operate.
The lamp does not operate.
The appliance is switched off. Switch on the appliance.
The mains plug is not connected to the
mains socket correctly.
Connect the mains plug to the mains
socket correctly.
The appliance has no power. There is
no voltage in the mains socket.
Connect a different electrical appliance
to the mains socket.
Contact a qualified electrician.
The lamp does not work. The lamp is in stand-by. Close and open the door.
The lamp is defective. Refer to "Replacing the lamp".
The compressor operates con-
tinually.
The temperature is not set correctly. Set a higher temperature.
The door is not closed correctly. Refer to "Closing the door".
The door has been opened too fre-
quently.
Do not keep the door open longer than
necessary.
The product temperature is too high. Let the product temperature decrease to
room temperature before storage.
The room temperature is too high. Decrease the room temperature.
Water flows on the rear plate of
the refrigerator.
During the automatic defrosting proc-
ess, frost defrosts on the rear plate.
This is correct.
Water flows into the refrigerator. The water outlet is clogged. Clean the water outlet.
Products prevent that water flows into
the water collector.
Make sure that products do not touch
the rear plate.
Water flows on the ground. The melting water outlet does not flow
in the evaporative tray above the com-
pressor.
Attach the melting water outlet to the
evaporative tray.
The temperature in the appliance
is too low.
The temperature regulator is not set
correctly.
Set a higher temperature.
The temperature in the appliance
is too high.
The temperature regulator is not set
correctly.
Set a lower temperature.
The door is not closed correctly. Refer to "Closing the door".
The product temperature is too high. Let the product temperature decrease to
room temperature before storage.
Many products are stored at the same
time.
Store less products at the same time.
There is no cold air circulation in the
appliance.
Make sure that there is cold air circula-
tion in the appliance.
8

Replacing the lamp
Caution! Disconnect the plug from the mains
socket.
1. Remove the screw
from the lamp cov-
er.
2. Remove the lamp
cover (refer to the
illustration).
3. Replace the used
lamp with a new
lamp of the same
power (the maximum power is shown on the lamp
cover).
4. Install the lamp cover.
5. Tighten the screw to the lamp cover.
6. Connect the plug to the mains socket.
7. Open the door. Make sure that the light comes on.
Closing the door
1. Clean the door gaskets.
2. If necessary, adjust the door. Refer to "Installation".
3. If necessary, replace the defective door gaskets. Con-
tact the Service Center.
Technical data
Dimension of the recess
Height 1780 mm
Width 560 mm
Depth 550 mm
Rising Time 20 h
The technical information are situated in the rating plate
on the internal left side of the appliance and in the energy
label.
Installation
Caution! Read the "Safety Information" carefully for
your safety and correct operation of the appliance
before installing the appliance.
Positioning
Install this appliance at a location where the ambient tem-
perature corresponds to the climate class indicated on the
rating plate of the appliance:
Climate
class
Ambient temperature
SN +10°C to + 32°C
N +16°C to + 32°C
ST +16°C to + 38°C
T +16°C to + 43°C
Electrical connection
Before plugging in, ensure that the voltage and frequency
shown on the rating plate correspond to your domestic
power supply.
The appliance must be earthed. The power supply cable
plug is provided with a contact for this purpose. If the
domestic power supply socket is not earthed, connect the
appliance to a separate earth in compliance with current
regulations, consulting a qualified electrician.
The manufacturer declines all responsibility if the above
safety precautions are not observed.
This appliance complies with the E.E.C. Directives.
Door reversibility
The door of the appliance opens to the right. If you want
to open the door to the left, do these steps before you
install the appliance:
9

• Loosen the upper pin
and remove the spacer.
• Remove the upper pin
and the upper door.
• Loosen the middle
hinge.
• Remove the lower door.
• Loosen the lower pin.
On the opposite side:
• Install the lower pin.
• Install the lower door.
• Tighten the middle
hinge.
• Install the upper door.
• Tighten the spacer and
tighten the upper pin.
Ventilation requirements
The airflow behind the ap-
pliance must be sufficient.
50 mm
min.
200 cm
2
min.
200 cm
2
Installing the appliance
Caution! Make sure that the mains cable can move
freely.
Do the following steps:
10

1
2
Install the appliance in the
niche.
Push the appliance in the
direction of the arrows (1)
until the upper gap cover
stops against the kitchen
furniture. Make sure that
the distance between the
appliance and the cup-
board front-edge is 44 mm.
Push the appliance in the
direction of the arrows (2)
against the cupboard on the
opposite side of the hinge.
Make sure that the clear-
ance between the appliance
and the cupboard is 4 mm.
44mm
4mm
Adjust the appliance in the
niche.
The lower hinge cover (in
the accessories bag) makes
sure that the distance be-
tween the appliance and the
kitchen furniture is correct.
Open the door. Put the low-
er hinge cover in position.
I
I
Attach the appliance to the
niche with 4 screws.
Push the sealing strip be-
tween the appliance and the
adjacent cabinet.
Remove the correct part
from the hinge cover (E).
Make sure to remove the
part DX, in the case of right
hinge, SX in opposite case.
B
E
E
C
D
Attach the covers (C, D) to
the lugs and the hinge
holes.
Install the vent grille (B).
Attach the hinge covers (E)
to the hinge.
G
H
Connect the appliance lat-
erally to the kitchen furni-
ture sidewall:
1. Loosen the screws of
the part (G) and move
the part (G) till the fur-
niture sidewall.
2. Tighten the screws of
the part (G) again.
3. Attach the part (H) to
the part (G).
Ha
Hb
Hc
Hd
Disconnect the parts (Ha),
(Hb), (Hc) and (Hd).
11

ca. 50 mm
ca. 50 mm
21 mm
90°
21 mm
90°
Install the part (Ha) on the
inner side of the kitchen
furniture.
Ha
Hc
Push the part (Hc) on the
part (Ha).
Ha
Hb
8 mm
Open the appliance door
and the kitchen furniture
door at an angle of 90°.
Insert the small square (Hb)
into guide (Ha).
Put together the appliance
door and the furniture door
and mark the holes.
Ha
K
8 mm
Remove the brackets and
mark a distance of 8 mm
from the outer edge of the
door where the nail must be
fitted (K).
Hb
Place the small square on
the guide again and fix it
with the screws supplied.
Align the kitchen furniture
door and the appliance
door by adjusting the part
Hb.
Hb
Hd
Press the part (Hd) on the
part (Hb).
Do a final check to make sure that:
• All screws are tightened.
• The magnetic sealing strip is attached tightly to the
cabinet.
Important! If the ambient temperature is low (for example,
in the Winter), the size of the gasket decreases. The size
of the gasket increases when the ambient temperature
increases.
Environmental concerns
The symbol on the product or on its packaging
indicates that this product may not be treated as
household waste. Instead it should be taken to the
appropriate collection point for the recycling of electrical
and electronic equipment. By ensuring this product is
disposed of correctly, you will help prevent potential
negative consequences for the environment and human
health, which could otherwise be caused by inappropriate
waste handling of this product. For more detailed
information about recycling of this product, please
contact your local council, your household waste disposal
service or the shop where you purchased the product.
12

Περιεχόμενα
Πληροφορίες ασφαλείας _ _ _ _ _ _ _ _ _ 13
Λειτουργία _ _ _ _ _ _ _ _ _ _ _ _ _ _ _ _ 15
Πρώτη χρήση _ _ _ _ _ _ _ _ _ _ _ _ _ _ _ 16
Καθημερινή χρήση _ _ _ _ _ _ _ _ _ _ _ _ 16
Χρήσιμες συμβουλές _ _ _ _ _ _ _ _ _ _ _ 17
Φροντίδα και καθάρισμα _ _ _ _ _ _ _ _ _ 19
Τι να κάνετε αν... _ _ _ _ _ _ _ _ _ _ _ _ _ 20
Τεχνικά χαρακτηριστικά _ _ _ _ _ _ _ _ _ 22
Εγκατάσταση _ _ _ _ _ _ _ _ _ _ _ _ _ _ _ 23
Περιβαλλοντικά θέματα _ _ _ _ _ _ _ _ _ 26
Υπόκειται αε αλλαγές χωρίς προειδποίηση
Πληροφορίες ασφαλείας
Χάρη της ασφάλειάς σας και για να εξασφα‐
λιστεί η σωστή χρήση, πριν την εγκατάσταση
και την πρώτη χρήση της συσκευής, διαβά‐
στε προσεκτικά αυτό το εγχειρίδιο χρήστη,
συμπεριλαμβανομένων των συμβουλών και
των προειδοποιήσεών του. Για την αποφυγή
περιττών λαθών και ατυχημάτων, είναι σημα‐
ντικό να εξασφαλίσετε ότι όλα τα άτομα που
χρησιμοποιούν τη συσκευή γνωρίζουν καλά
τη λειτουργία της και τα χαρακτηριστικά
ασφαλείας της. Φυλάξτε τις οδηγίες αυτές και
βεβαιωθείτε ότι παραμένουν με τη συσκευή
εάν μετακινηθεί ή πωληθεί, έτσι ώστε οποιο‐
σδήποτε τη χρησιμοποιήσει κατά τη διάρκεια
της ζωής της να είναι σωστά ενημερωμένος
για τη συσκευή και την ασφάλεια.
Για την ασφάλεια της ζωής και της περιου‐
σίας, φυλάξτε τις προφυλάξεις αυτών των
οδηγιών χρήσης επειδή ο κατασκευαστής
δεν φέρει ευθύνη για ζημιές που θα προκλη‐
θούν από παραλείψεις.
Ασφάλεια παιδιών και ευπαθών ατόμων
• Η συσκευή αυτή δεν προορίζεται για χρή‐
ση από άτομα (συμπεριλαμβανομένων
των παιδιών) με μειωμένη σωματική ή
πνευματική ικανότητα ή έλλειψη εμπειρίας
και γνώσης, εκτός και εάν επιβλέπονται ή
έχουν λάβει οδηγίες σχετικά με τη χρήση
της συσκευής από άτομο υπεύθυνο για την
ασφάλειά τους.
Τα παιδιά πρέπει να εποπτεύονται ώστε να
εξασφαλίζεται ότι δεν παίζουν με τη συ‐
σκευή.
• Κρατήστε όλα τα υλικά της συσκευασίας
μακριά από τα παιδιά. Υπάρχει κίνδυνος
ασφυξίας.
• Εάν απορρίψετε τη συσκευή, βγάλτε το φις
του ηλεκτρικού καλωδίου από την πρίζα,
κόψτε το καλώδιο σύνδεσης (όσο μπορείτε
πιο κοντά στη συσκευή) και αφαιρέστε την
πόρτα για να την αποφυγή ηλεκτροπληξίας
ή παγίδευσης μέσα στη συσκευή παιδιών
που παίζουν.
• Εάν η συσκευή, η οποία διαθέτει μαγνητικά
λάστιχα πόρτας, θα αντικαταστήσει μια πα‐
λαιότερη συσκευή με μάνδαλο στην πόρτα
ή το καπάκι, μην παραλείψετε να κατα‐
στρέψετε το μάνδαλο προτού απορρίψετε
την παλαιά συσκευή. Με αυτό τον τρόπο
θα αποτρέψετε τη μετατροπή του ψυγείου
σε θανάσιμη παγίδα για παιδιά.
Γενική ασφάλεια
ΠΡΟΣΟΧΗ Μη φράζετε τα ανοίγματα
εξαερισμού.
• Η συσκευή προορίζεται για τη φύλαξη τρο‐
φίμων ή/και αναψυκτικών σε ένα συνηθι‐
σμένο νοικοκυριό όπως εξηγείται σε αυτό
το εγχειρίδιο οδηγιών.
• Μη χρησιμοποιείτε μηχανικές συσκευές ή
άλλα τεχνητά μέσα για την επιτάχυνση της
διαδικασίας ξεπαγώματος.
• Μη χρησιμοποιείτε άλλες ηλεκτρικές συ‐
σκευές (όπως παγωτομηχανές) στο εσω‐
τερικό ψυκτικών συσκευών, εκτός αν είναι
εγκεκριμένες για το σκοπό αυτό από τον
κατασκευαστή.
• Μην προκαλείτε ζημιά στο ψυκτικό υγρό.
13

• Το ψυκτικό ισοβουτάνιο (R600a) που πε‐
ριέχεται στο κύκλωμα του ψυκτικού υγρού
της συσκευής, είναι ένα φυσικό αέριο με
υψηλό επίπεδο περιβαλλοντικής συμβατό‐
τητας, το οποίο ωστόσο είναι εύφλεκτο.
Κα τά τη μεταφορά και εγκα τάστ αση της συ‐
σκευής, βεβαιωθείτε ότι δεν προκαλείται
ζημιά σε κανένα εξάρτημα του κυκλώματος
του ψυκτικού υγρού.
Εάν προκληθεί ζημιά στο κύκλωμα του ψυ‐
κτικού υγρού:
– αποφύγετε τις γυμνές φλόγες και τις πη‐
γές ανάφλεξης
– εξαερίστε καλά το χώρο στον οποίο βρί‐
σκεται η συσκευή
•Η οποιαδήποτε αλλαγή των τεχνικών χα‐
ρακτηριστικών ή τροποποίηση αυτού του
προϊόντος είναι επικίνδυνη. Εάν το καλώ‐
διο υποστεί οποιαδήποτε ζημιά, μπορεί να
προκληθεί βραχυκύκλωμα, πυρκαγιά ή/και
ηλεκτροπληξία.
ΠΡΟΕΙΔΟΠΟΙΗΣΗ Κάθε ηλεκτρικό
εξάρτημα (ηλεκτρικό καλώδιο, φις, συ‐
μπιεστής) πρέπει να αντικατασταθεί από πι‐
στοποιημένο αντιπρόσωπο σέρβις ή από κα‐
ταρτισμένο προσωπικό σέρβις.
1. Το ηλεκτρικό καλώδιο δεν είναι δυνατό
να επιμηκυνθεί.
2. Προσέξτε να μη συνθλιφτεί ή να μην
υποστεί ζημιά το φις τροφοδοσίας από
την πλάτη της συσκευής. Το φις του
ηλεκτρικού καλωδίου που έχει συνθλι‐
φτεί ή υποστεί ζημιά ενδέχεται να υπερ‐
θερμανθεί και να προκαλέσει πυρκα‐
γιά.
3. Βεβαιωθείτε ότι μπορείτε να φθάσετε το
φις τροφοδοσίας της συσκευής.
4. Μην τραβάτε το φις τροφοδοσίας.
5. Εάν η ηλεκτρική πρίζα είναι χαλαρή,
μην εισαγάγετε το φις. Υπάρχει κίνδυ‐
νος ηλεκτροπληξίας ή πρόκλησης πυρ‐
καγιάς.
6. Η συσκευή δεν πρέπει να χρησιμο‐
ποιείται χωρίς το κάλυμμα του λαμπτή‐
ρα
5)
του εσωτερικού φωτός.
• Η συσκευή είναι βαριά. Θα πρέπει να δίνε‐
τε προσοχή κατά τη μεταφορά της.
• Μην αφαιρείτε και μην αγγίζετε αντικείμενα
στο θάλαμο της κατάψυξης αν τα χέρια σας
είναι νωπά/βρεγμένα επειδή μπορεί να
προκληθούν εκδορές στο δέρμα ή κρυο‐
παγήματα.
• Αποφύγετε την παρατεταμένη έκθεση της
συσκευής στο απευθείας ηλιακό φως.
Καθημερινή χρήση
• Μην τοποθετείτε ζεστές κατσαρόλες στα
πλαστικά μέρη της συσκευής.
• Μην φυλάσσετε εύφλεκτα αέρια και υγρά
στη συσκευή επειδή μπορεί να εκραγούν.
• Μην τοποθετείτε τρόφιμα απευθείας πάνω
στην έξοδο αέρα στο πίσω τοίχωμα.
6)
• Τα κατεψυγμένα τρόφιμα δεν πρέπει να
καταψύχονται και πάλι αφού αποψυχθούν.
• Αποθηκεύετε τα προσυσκευασμένα κατε‐
ψυγμένα τρόφιμα σύμφωνα με τις οδηγίες
του κατασκευαστή για κατεψυγμένα τρόφι‐
μα.
• Θα πρέπει να τηρούνται αυστηρά οι συ‐
στάσεις αποθήκευσης των παρασκευα‐
στών της συσκευής. Ανατρέξτε στις σχετι‐
κές οδηγίες.
• Μην τοποθετείτε ανθρακούχα ποτά στον
καταψύκτη εφόσον δημιουργείται πίεση
στο δοχείο, το οποίο μπορεί να εκραγεί,
προκαλώντας ζημιές στη συσκευή.
• Τα παγωτά τύπου ξυλάκι γρανίτα μπορεί
να προκαλέσουν εγκαύματα από πάγο εάν
καταναλωθούν απευθείας από τη συ‐
σκευή.
Φροντίδα και καθαρισμός
• Πριν από τη συντήρηση, απενεργοποιήστε
τη συσκευή και αποσυνδέστε το φις τρο‐
φοδοσίας από την πρίζα. Εάν δεν μπορείτε
να πλησιάσετε την πρίζα, διακόψτε την πα‐
ροχή ρεύματος.
• Μην καθαρίζετε τη συσκευή με μεταλλικά
αντικείμενα.
5) Εάν προβλέπεται κάλυμμα λαμπτήρα
6) Αν η συσκευή δεν συγκεντρώνει πάγο
14

• Μη χρησιμοποιείτε αιχμηρά αντικείμενα για
να αφαιρείτε τον πάγο από τη συσκευή.
Χρησιμοποιείτε πλαστική ξύστρα.
• Ελέγχετε τακτικά την αποστράγγιση του
ψυγείου για νερό απόψυξης. Εάν χρεια‐
στεί, καθαρίστε την αποστράγγιση. Εάν η
αποστράγγιση είναι φραγμένη, θα συσσω‐
ρεύεται νερό στο κάτω μέρος της συ‐
σκευής.
Εγκατάσταση
ΣΗΜΑΝΤΙΚΟ Για τη σύνδεση του ηλεκτρικού
ακολουθήστε προσεκτικά τις οδηγίες που
δίνονται στις αντίστοιχες παραγράφους.
• Αποσυσκευάστε τη συσκευή και ελέγξτε αν
έχει υποστεί ζημιές. Μη συνδέετε τη συ‐
σκευή εάν έχει υποστεί ζημιά. Αναφέρετε
αμέσως ενδεχόμενες ζημιές στο μέρος
όπου αγοράσατε τη συσκευή. Σε αυτή την
περίπτωση, φυλάξτε τη συσκευασία.
• Είναι σκόπιμο να περιμένετε τουλάχιστον
δύο ώρες προτού συνδέσετε τη συσκευή,
ώστε το έλαιο να επιστρέψει και πάλι στο
συμπιεστή.
• Θα πρέπει να υπάρχει επαρκή κυκλοφορία
του αέρα γύρω από τη συσκευή. Διαφορε‐
τικά θα προκληθεί υπερθέρμανση. Για την
επίτευξη επαρκούς κυκλοφορίας αέρα
ακολουθήστε τις σχετικές οδηγίες της εγκα‐
τάστασης.
• Όποτε είναι δυνατό, η πλάτη της συσκευής
πρέπει να βρίσκεται κοντά σε τοίχο για την
αποφυγή επαφής ή πιασίματος με ζεστά
μέρη (συμπιεστής, συμπυκνωτής) και της
πιθανότητας εγκαύματος.
• Η συσκευή δεν πρέπει να τοποθετείται κο‐
ντά σε σώματα καλοριφέρ ή φούρνους.
• Βεβαιωθείτε ότι υπάρχει εύκολη πρόσβα‐
ση στο φις τροφοδοσίας μετά την εγκατά‐
σταση της συσκευής.
• Συνδέετε τη συσκευή μόνο με την παροχή
πόσιμου νερού.
7)
Σέρβις
• Οι ηλεκτρολογικές εργασίες που απαιτού‐
νται για το σέρβις της συσκευής θα πρέπει
να εκτελούνται από επαγγελματία ηλεκτρο‐
λόγο ή άλλο κατάλληλα καταρτισμένο άτο‐
μο.
• Το προϊόν αυτό θα πρέπει να επισκευάζε‐
ται από εξουσιοδοτημένα Κέντρα Σέρβις,
ενώ θα πρέπει να χρησιμοποιούνται μόνο
γνήσια ανταλλακτικά.
Προστασία του περιβάλλοντος
Η συσκευή αυτή δεν περιέχει αέρια τα
οποία μπορούν να προκαλέσουν ζημιά
στο στρώμα του όζοντος, είτε στο κύκλωμα
ψυκτικού υγρού ή στα μονωτικά υλικά της. Η
συσκευή δε θα πρέπει να απορρίπτεται μαζί
με τα οικιακά απορρίμματα. Ο αφρός μόνω‐
σης περιέχει εύφλεκτα αέρια: Η συσκευή θα
πρέπει να απορρίπτεται σύμφωνα με τους
ισχύοντες κανονισμούς που θα λάβετε από
τις τοπικές αρχές. Αποφύγετε να προκαλέσε‐
τε ζημιά στην ψυκτική μονάδα, ειδικά στο πί‐
σω μέρος κοντά στον εναλλάκτη θερμότητας.
Τα υλικά που χρησιμοποιούνται σε αυτή τη
συσκευή και σημειώνονται με το σύμβολο
είναι ανακυκλώσιμα.
Λειτουργία
Ενεργοποίηση
Συνδέστε το φις στην πρίζα.
Περιστρέψτε το ρυθμιστή θερμοκρασίας δε‐
ξιόστροφα σε μια μέτρια ρύθμιση.
Απενεργοποίηση
Για να απενεργοποιηθεί η συσκευή, περι‐
στρέψτε το ρυθμιστή θερμοκρασίας στη θέ‐
ση "O".
Ρύθμιση θερμοκρασίας
Η θερμοκρασία ρυθμίζεται αυτόματα.
Για να χρησιμοποιήσετε τη συσκευή, κάντε τα
εξής:
• Περιστρέψτε το ρυθμιστή θερμοκρασίας
στις χαμηλότερες ρυθμίσεις για την επίτευ‐
ξη των μικρότερων θερμοκρασιών.
7) Εάν προβλέπεται σύνδεση νερού
15

• Περιστρέψτε το ρυθμιστή θερμοκρασίας
στις υψηλότερες ρυθμίσεις για την επίτευξη
των μεγαλύτερων θερμοκρασιών.
Μια μεσαία ρύθμιση είναι σε γενικές
γραμμές η πλέον κατάλληλη.
Ωστόσο, η ακριβής ρύθμιση πρέπει να επι‐
λεγεί έχοντας υπόψη ότι η θερμοκρασία στο
εσωτερικό του ψυγείου εξαρτάται από:
• τη θερμοκρασία του δωματίου
• πόσο συχνά ανοίγει η πόρτα
• την ποσότητα των τροφίμων που αποθη‐
κεύονται
• τη θέση της συσκευής.
ΣΗΜΑΝΤΙΚΟ Εάν η θερμοκρασία
περιβάλλοντος είναι υψηλή ή η συσκευή είναι
εντελώς φορτωμένη και έχει ρυθμιστεί στις
χαμηλότερες θερμοκρασίες, ίσως λειτουργεί
συνεχώς δημιουργώντας πάγο στο πίσω
τοίχωμα. Σε αυτή την περίπτωση πρέπει να
επιλέγεται υψηλότερη θερμοκρασία ώστε να
είναι δυνατή η αυτόματη απόψυξη κι
επομένως η μειωμένη κατανάλωση
ενέργειας.
Πρώτη χρήση
Καθάρισμα του εσωτερικού
Προτού χρησιμοποιήσετε τη συσκευή για
πρώτη φορά, πλύντε το εσωτερικό και όλα τα
εσωτερικά εξαρτήματα με χλιαρό νερό και λί‐
γο ουδέτερο σαπούνι για να αφαιρέσετε την
τυπική μυρωδιά των καινούριων προϊόντων
και στη συνέχεια στεγνώστε καλά.
ΣΗΜΑΝΤΙΚΟ Μη χρησιμοποιείτε απορρυ‐
παντικά ή σκόνες που χαράζουν διότι κατα‐
στρέφουν το φινίρισμα.
Καθημερινή χρήση
Κατάψυξη φρέσκων τροφίμων
Ο θάλαμος του καταψύκτη είναι κατάλληλος
για την κατάψυξη φρέσκων τροφίμων και τη
μακροχρόνια αποθήκευση κατεψυγμένων
και βαθιά κατεψυγμένων τροφίμων.
Για την κατάψυξη φρέσκων τροφίμων δεν εί‐
ναι απαραίτητο να αλλάξετε τη μέτρια ρύθμι‐
ση.
Ωστόσο, για λειτουργία πιο γρήγορης κατά‐
ψυξης, περιστρέψτε το ρυθμιστή θερμοκρα‐
σίας στις υψηλότερες ρυθμίσεις για την επί‐
τευξη των μεγαλύτερων θερμοκρασιών.
ΣΗΜΑΝΤΙΚΟ Σε αυτή την περίπτωση, η
θερμοκρασία στο θάλαμο ψύξης μπορεί να
μειωθεί κάτω από τους 0°C. Εάν συμβεί κάτι
τέτοιο, γυρίστε και πάλι το ρυθμιστή
θερμοκρασίας σε μια πιο θερμή ρύθμιση.
Αποθήκευση κατεψυγμένων τροφίμων
Κατά την αρχική ενεργοποίηση ή μετά από
μια περίοδο μη λειτουργίας, προτού τοποθε‐
τήσετε τα προϊόντα στο θάλαμο, η συσκευή
πρέπει να λειτουργήσει για τουλάχιστον 2
ώρες σε υψηλότερες ρυθμίσεις.
Εάν πρόκειται να αποθηκευτούν μεγάλες πο‐
σότητες τροφίμων, αφαιρέστε όλα τα συρτά‐
ρια και τα καλάθια από τη συσκευή και τοπο‐
θετήστε τα τρόφιμα επάνω στα ράφια ψύξης
για την επίτευξη της βέλτιστης απόδοσης.
ΠΡΟΕΙΔΟΠΟΙΗΣΗ Βεβαιωθείτε ότι τα
τρόφιμα δεν υπερβαίνουν το όριο
φορτίου που αναγράφεται στην πλευρά του
άνω τμήματος (όπου ισχύει)
ΣΗΜΑΝΤΙΚΟ Σε περίπτωση κατά λάθος
απόψυξης, για παράδειγμα σε περίπτωση
διακοπής ρεύματος, εάν το ρεύμα ήταν
κομμένο για περισσότερο από την τιμή που
αναγράφεται στον πίνακα τεχνικών
χαρακτηριστικών στην ενότητα "χρόνος
ανόδου", τα αποψυγμένα τρόφιμα πρέπει να
καταναλωθούν σύντομα ή να μαγειρευτούν
αμέσως και στη συνέχεια να καταψυχθούν
και πάλι (μετά την ψύξη).
16

Ημερολόγιο κατάψυξης
Τα σύμβολα αναπαριστούν διαφορετικούς
τύπους κατεψυγμένων τροφίμων.
Οι αριθμοί υποδηλώνουν τους χρόνους απο‐
θήκευσης σε μήνες για τους ανάλογους τύ‐
πους κατεψυγμένων τροφίμων. Κατά πόσο
ισχύει η ανώτερη ή η κατώτερη τιμή του εμ‐
φανιζόμενου χρόνου αποθήκευσης εξαρτά‐
ται από την ποιότητα των τροφίμων και την
επεξεργασία τους πριν την κατάψυξή τους.
Ξεπάγωμα
Τα τρόφιμα βαθιάς ή μη κατάψυξης, πριν τη
χρήση τους, μπορούν να ξεπαγώνονται στο
θάλαμο ψύξης ή σε θερμοκρασία δωματίου,
ανάλογα το διαθέσιμο χρόνο ξεπαγώματος.
Τα μικρά τεμάχια μπορούν να μαγειρεύονται
ακόμη και κατεψυγμένα, απευθείας από τον
καταψύκτη: σε αυτή την περίπτωση, το μα‐
γείρεμα διαρκεί περισσότερο.
Παγάκια
Αυτή η συσκευή είναι εφοδιασμένη με έναν ή
περισσότερους δίσκους για να παρασκευά‐
ζετε παγάκια. Γεμίστε αυτούς τους δίσκους με
νερό και στη συνέχεια βάλτε τους στον κατα‐
ψύκτη.
ΣΗΜΑΝΤΙΚΟ Μη χρησιμοποιείτε μεταλλικά
αντικείμενα για την αφαίρεση των δίσκων
από τον καταψύκτη.
Μετακινούμενα ράφια
Τα τοιχώματα του
ψυγείου είναι εφο‐
διασμένα με μια σει‐
ρά αυλακώσεων
ώστε να είναι δυνατή
η κατ' επιλογή τοπο‐
θέτηση των ραφιών.
ΣΗΜΑΝΤΙΚΟ Για να
εξασφαλίσετε τη σω‐
στή κυκλοφορία του
αέρα, μη μετακινή‐
σετε το γυάλινο ράφι
πάνω από το συρτά‐
ρι λαχανικών.
Τοποθέτηση των ραφιών της πόρτας
Για να είναι δυνατή η
αποθήκευση συ‐
σκευασιών τροφί‐
μων διαφόρων μεγε‐
θών, τα ράφια της
πόρτας μπορούν να
τοποθετούνται σε
διαφορετικό ύψος.
Τραβήξτε σταδιακά
το ράφι προς την κα‐
τεύθυνση των βελών
μέχρι να απελευθε‐
ρωθεί και στη συν‐
έχεια τοποθετήστε
το και πάλι όπως θέ‐
λετε.
Χρήσιμες συμβουλές
Συμβουλές εξοικονόμησης ενέργειας
• Μην ανοίγετε την πόρτα συχνά και μην την
αφήνετε ανοικτή για περισσότερο από ότι
είναι απολύτως απαραίτητο.
• Εάν η θερμοκρασία περιβάλλοντος είναι
υψηλή, ο ρυθμιστής θερμοκρασίας βρίσκε‐
τα ι στην υψηλότερη ρ ύθ μιση και η συσ κε υή
είναι εντελώς φορτωμένη, ο συμπιεστής
ίσως λειτουργεί συνεχώς δημιουργώντας
πάγο στον εξατμιστήρα. Εάν προκύψει αυ‐
τό, περιστρέψτε το ρυθμιστή θερμοκρα‐
σίας προς τις χαμηλότερες ρυθμίσεις ώστε
να είναι δυνατή η αυτόματη απόψυξη κι
17

επομένως η εξοικονόμηση ηλεκτρικής
ενέργειας.
Συμβουλές ψύξης φρέσκων τροφίμων
Για να έχετε τα καλύτερα αποτελέσματα:
• μην αποθηκεύετε στο ψυγείο ζεστά τρόφι‐
μα ή υγρά που εξατμίζονται
• μην καλύπτετε ή τυλίγετε τα τρόφιμα, ιδιαί‐
τερα εάν μυρίζουν έντονα
• τοποθετείτε τα τρόφιμα με τέτοιο τρόπο
ώστε ο αέρας να κυκλοφορεί ελεύθερα γύ‐
ρω τους
Συμβουλές ψύξης
Χρήσιμες συμβουλές:
Κρέας (όλοι οι τύποι) τυλίξτε σε πλαστικές
σακούλες και τοποθετήστε το στο γυάλινο
ράφι επάνω από το συρτάρι των λαχανικών.
Για λόγους ασφαλείας, αποθηκεύστε με αυτό
τον τρόπο μόνο για μια ή δύο ημέρες τ ο πο λύ.
Μαγειρεμένα τρόφιμα, κρύα πιάτα, κλπ: αυτά
θα πρέπει να καλύπτονται και μπορούν να
τοποθετούνται σε οποιοδήποτε ράφι.
Φρούτα και λαχανικά: αυτά θα πρέπει να
πλένονται καλά και να τοποθετούνται στο(α)
ειδικό(ά) συρτάρι(α) που παρέχεται(ονται).
Βούτυρο και τυρί: αυτά θα πρέπει να τοπο‐
θετούνται σε ειδικά αεροστεγή δοχεία ή να
τυλίγονται με αλουμινόχαρτο ή σε πλαστικές
σακούλες αφαιρώντας όσο το δυνατόν πε‐
ρισσότερο τον αέρα.
Μπουκάλια γάλακτος: αυτά θα πρέπει να εί‐
ναι ταπωμένα και θα πρέπει να αποθηκεύο‐
νται στη σχάρα μπουκαλιών στην πόρτα.
Οι μπανάνες, οι πατάτες, τα κρεμμύδια και το
σκόρδο, εάν δεν είναι συσκευασμένα, πρέπει
να διατηρούνται στο ψυγείο.
Συμβουλές κατάψυξης
Για να σας βοηθήσουμε να εκμεταλλεύεστε
στο έπακρο τη διαδικασία κατάψυξης, ακο‐
λουθούν ορισμένες σημαντικές συμβουλές:
• η μέγιστη ποσότητα τροφίμων που μπορεί
να καταψυχθεί σε 24 ώρες. αναγράφεται
στην πινακίδα τεχνικών στοιχείων;
• η διαδικασία κατάψυξης διαρκεί 24 ώρες.
Κατά τη διάρκεια αυτής της περιόδου δε θα
πρέπει να προστίθενται άλλα τρόφιμα για
κατάψυξη;
• καταψύχετε μόνο πρώτης ποιότητας, φρέ‐
σκα και καλά καθαρισμένα τρόφιμα;
• αποθηκεύετε τα τρόφιμα σε μικρές μερίδες
ώστε να είναι δυνατή η γρήγορη και πλή‐
ρης κατάψυξή του και το μεταγενέστερο ξε‐
πάγωμα μόνο της απαιτούμενης ποσότη‐
τας;
• τυλίγετε τα τρόφιμα σε αλουμινόχαρτο ή
πλαστικές σακούλες και εξασφαλίζετε ότι οι
συσκευασίες είναι αεροστεγείς;
• μην αφήνετε φρέσκα, μη κατεψυγμένα τρό‐
φιμα να έρχονται σε επαφή με ήδη κατε‐
ψυγμένα τρόφιμα, ώστε να αποτρέπεται η
αύξηση της θερμοκρασίας των δεύτερων;
• τα άπαχα τρόφιμα αποθηκεύονται καλύτε‐
ρα και για μεγαλύτερο διάστημα από τα λι‐
παρά; το αλάτι μειώνει τη δυνατή διάρκεια
αποθήκευσης των τροφίμων;
• οι γρανίτες, εάν καταναλωθούν αμέσως με‐
τά την έξοδό τους από την κατάψυξη, μπο‐
ρούν να προκαλέσουν στο δέρμα εγκαύ‐
ματα από πάγο;
• είναι σκόπιμο να γράφετε την ημερομηνία
κατάψυξης σε κάθε συσκευασία ώστε να
μπορείτε να συνάγετε το χρόνο αποθήκευ‐
σης;
Συμβουλές για την αποθήκευση
κατεψυγμένων τροφίμων
Για να πετύχετε την καλύτερη απόδοση από
αυτή τη συσκευή, θα πρέπει:
• να είστε σίγουροι ότι οι συνθήκες διατήρη‐
σης των κατεψυγμένων τροφίμων του
εμπορίου ήταν κατάλληλες στο κατάστημα
αγοράς;
• να εξασφαλίζετε την ταχύτερη δυνατή με‐
ταφορά των κατεψυγμένων τροφίμων από
το κατάστημα αγοράς τους στον καταψύ‐
κτη;
• μην ανοίγετε την πόρτα συχνά και μην την
αφήνετε ανοικτή για περισσότερο από ότι
είναι απολύτως απαραίτητο.
• Μετά το ξεπάγωμα, τα τρόφιμα χαλάνε
γρήγορα και δεν μπορούν να καταψυ‐
χθούν και πάλι.
18

• Μην υπερβαίνετε τους χρόνους αποθήκευ‐
σης που υποδεικνύονται από τους παρα‐
σκευαστές των τροφίμων.
Φροντίδα και καθάρισμα
ΠΡΟΣΟΧΗ Πριν από οποιαδήποτε
εργασία συντήρησης αποσυνδέετε τη
συσκευή από την πρίζα.
Η συσκευή αυτή περιέχει υδρογονάν‐
θρακες στην ψυκτική μονάδα της; Οι ερ‐
γασίες συντήρησης και επαναφόρτισης θα
πρέπει επομένως να πραγματοποιούνται μό‐
νο από εξουσιοδοτημένους τεχνικούς.
Τακτικό καθάρισμα
Η συσκευή πρέπει να καθαρίζεται τακτικά:
• Καθαρίστε το εσωτερικό και τα εξαρτήματα
με χλιαρό νερό και λίγο φυσικό σαπούνι.
• Ελέγχετε τακτικά τα λάστιχα της πόρτας και
σκουπίστε τα για να εξασφαλίσετε ότι είναι
καθαρά και δεν φέρουν ακαθαρσίες.
• Ξεπλύντε και στεγνώστε καλά.
ΣΗΜΑΝΤΙΚΟ Μην τραβάτε, μετακινείτε ή
προκαλείτε ζημιά σε σωλήνες ή/και καλώδια
που βρίσκονται στο εσωτερικό του θαλάμου.
Ποτέ μη χρησιμοποιείτε απορρυπαντικά,
σκόνες που χαράζουν, καθαριστικά με πολύ
άρωμα ή γυαλιστικό κερί για να καθαρίσετε το
εσωτερικό, διότι αυτά τα υλικά φθείρουν την
επιφάνεια και αφήνουν έντονη οσμή.
Καθαρίστε το συμπυκνωτή (μαύρη γρίλια) και
το συμπιεστή στο πίσω μέρος της συσκευής
με μια βούρτσα ή μια ηλεκτρική σκούπα. Κάτι
τέτοιο βελτιώνει την απόδοση της συσκευής
και εξοικονομεί ηλεκτρική ενέργεια.
ΣΗΜΑΝΤΙΚΟ Προσέχετε ώστε να μην
προκληθεί ζημιά στο ψυκτικό σύστημα.
Πολλά ιδιοσκευάσματα καθαρισμού για την
κουζίνα περιέχουν χημικά που μπορούν να
προσβάλλουν/ καταστρέψουν τα πλαστικά
που χρησιμοποιούνται σε αυτή τη συσκευή.
Για το λόγο αυτό συστήνεται το εξωτερικό πε‐
ρίβλημα της συσκευής να καθαρίζεται μόνο
με χλιαρό νερό αφού προσθέσετε και λίγο
υγρό για τα πιάτα.
Μετά τον καθαρισμό, συνδέστε ξανά τον εξο‐
πλισμό στην κεντρική παροχή.
Απόψυξη του ψυγείου
Ο πάγος εξαλείφεται αυτόματα από τον εξα‐
τμιστήρα του θαλάμου ψύξης κάθε φορά που
σταματά ο συμπιεστής κινητήρα κατά τη διάρ‐
κεια της κανονικής χρήσης. Το νερό από τον
πάγο αποστραγγίζεται μέσω μιας σκάφης σε
ένα ειδικό δοχείο στο πίσω μέρος της συ‐
σκευής, επάνω από το συμπιεστή κινητήρα,
όπου και εξατμίζεται.
Είναι σημαντικό να καθαρίζεται τακτικά η οπή
αποστράγγισης του νερού από τον πάγο στη
μέση του καναλιού του θαλάμου ψύξης ώστε
να αποτρέπεται η υπερχείλιση και το στάξιμο
νερού στα τρόφιμα στο εσωτερικό του. Χρη‐
σιμοποιείτε τον ειδικό καθαριστήρα που πα‐
ρέχεται, τον οποίο θα βρείτε ήδη τοποθετη‐
μένο μέσα στην οπή αποστράγγισης.
Απόψυξη του καταψύκτη
Θα δημιουργείται πάντα μικρή ποσότητα πά‐
γου στα ράφια του καταψύκτη και γύρω από
τον πάνω θάλαμο.
Κάντε απόψυξη του καταψύκτη όταν το
στρώμα πάγου έχει πάχος περίπου 3-5 mm.
ΣΗΜΑΝΤΙΚΟ Περίπου 12 ώρ ες πριν από την
απόψυξη, στρέψτε το ρυθμιστή
θερμοκρασίας προς υψηλότερες ρυθμίσεις,
για την επίτευξη επαρκούς ψύξης για τη
διακοπή της λειτουργίας.
Για να αφαιρέσετε τον πάγο, ακολουθήστε
την παρακάτω διαδικασία:
19

1. Απενεργοποιήστε τη συσκευή.
2. Αφαιρέστε τα αποθηκευμένα τρόφιμα, τυ‐
λίξτε τα με πολλές εφημερίδες και τοπο‐
θετήστε τα σε δροσερό μέρος.
ΠΡΟΣΟΧΗ Μην αγγίζετε τα
κατεψυγμένα τρόφιμα με βρεγμένα
χέρια. Τα χέρια σας μπορεί να παγώσουν
πάνω στα τρόφιμα.
3. Αφήστε την
πόρτα ανοικτή
και εισάγετε
την πλαστική
ξύστρα στην
κατάλληλη
υποδοχή στο
κέντρο κάτω,
τοποθετώντας
μια λεκάνη από κάτω για να συλλέξετε το
νερό από τον πάγο
Για να επιταχύνετε τη διαδικασία από‐
ψυξης, τοποθετήστε μια κατσαρόλα με
ζεστό νερό στο θάλαμο κατάψυξης. Επι‐
πλέον, απομακρύνετε τα κομμάτια πάγου
που σπάνε και πέφτουν πριν την ολοκλήρω‐
ση της απόψυξης.
4. όταν ολοκληρωθεί η απόψυξη, στεγνώ‐
στε καλά το εσωτερικό και φυλάξτε την
ξύστρα για μελλοντική χρήση.
5. Ενεργοποιήστε τη συσκευή.
6. Μετά από δύο ή τρεις ώρες, τοποθετήστε
και πάλι στο θάλαμο τα τρόφιμα που εί‐
χατε βγάλει προηγουμένως.
ΠΡΟΕΙΔΟΠΟΙΗΣΗ Μη χρησιμοποιείτε
ποτέ αιχμηρά μεταλλικά εργαλεία για την
απόξεση του πάγου από τον εξατμιστήρα,
επειδή μπορεί να προκαλέσουν ζημιά.
Μη χρησιμοποιείτε μηχανικές συσκευές ή
διαφορετικά τεχνητά μέσα για την επιτάχυνση
της διαδικασίας ξεπαγώματος από εκείνα
που συνιστά ο κατασκευαστής.
Η αύξηση της θερμοκρασίας των
συσκευασιών κατεψυγμένων τροφίμων κατά
τη διάρκεια της απόψυξης μπορεί να
οδηγήσει σε μείωση της διάρκειας
αποθήκευσης των τροφίμων με ασφάλεια.
Περίοδοι εκτός λειτουργίας
Όταν η συσκευή δε χρησιμοποιείται για με‐
γάλα χρονικά διαστήματα, παίρνετε τις ακό‐
λουθες προφυλάξεις:
• αποσυνδέστε τη συσκευή από την ηλεκτρι‐
κή τροφοδοσία
• αφαιρέστε όλα τα τρόφιμα
•
κάντε απόψυξη
8)
και καθαρίστε τη συ‐
σκευή και όλα τα εξαρτήματα
• αφήστε τις πόρτες ελαφρώς ανοικτές για να
αποτρέψετε τις δυσάρεστες οσμές.
Εάν ο θάλαμος επρόκειτο να παραμείνει
ενεργοποιημένος, ζητήστε από κάποιον να
τον ελέγχει αν τακτά διαστήματα για να μην
χαλάσουν τα τρόφιμα στο εσωτερικό στην
περίπτωση διακοπής ρεύματος.
Τι να κάνετε αν...
ΠΡΟΕΙΔΟΠΟΙΗΣΗ Πριν από την
αντιμετώπιση προβλημάτων,
αποσυνδέστε το φις τροφοδοσίας από την
πρίζα.
Η αντιμετώπιση των προβλημάτων που δεν
αναφέρονται στο παρόν εγχειρίδιο θα πρέπει
να διεξάγεται μόνο από επαγγελματία
ηλεκτρολόγο ή άλλο κατάλληλα
καταρτισμένο άτομο.
ΣΗΜΑΝΤΙΚΟ Ακούγονται κάποιοι ήχοι κατά
τη διάρκεια της κανονικής χρήσης
(συμπιεστής, κυκλοφορία ψυκτικού).
8) Εάν προβλέπεται.
20

Πρόβλημα Πιθανή αιτία Επίλυση
Η συσκευή δεν λειτουρ‐
γεί. Ο λαμπτήρας δεν λει‐
τουργεί.
Η συσκευή είναι απενεργο‐
ποιημένη.
Ενεργοποιήστε τη συσκευή.
Το φις δεν έχει συνδεθεί σω‐
στά στην πρίζα.
Συνδέστε σωστά το φις στην
πρίζα.
Η συσκευή δεν έχει ρεύμα.
Δεν υπάρχει τάση στην πρίζα.
Συνδέστε μια άλλη ηλεκτρική
συσκευή στην πρίζα.
Επικοινωνήστε με επαγγελμα‐
τία ηλεκτρολόγο.
Ο λαμπτήρας δεν λει‐
τουργεί.
Ο λαμπτήρας βρίσκεται σε κα‐
τάσταση αναμονής.
Κλείστε και ανοίξτε την πόρτα.
Ο λαμπτήρας είναι ελαττωμα‐
τικός.
Ανατρέξτε στην ενότητα "Αντι‐
κατάσταση του λαμπτήρα".
Ο συμπιεστής λειτουργεί
συνεχώς.
Δεν έχει ρυθμιστεί σωστά η
θερμοκρασία.
Ρυθμίστε υψηλότερη θερμο‐
κρασία.
Η πόρτα δεν έχει κλείσει σω‐
στά.
Ανατρέξτε στην ενότητα "Κλεί‐
σιμο της πόρτας".
Η πόρτα ανοίγει πολύ συχνά. Μην αφήνετε την πόρτα ανοι‐
κτή για μεγαλύτερο διάστημα
από ό,τι είναι απολύτως απα‐
ραίτητο.
Η θερμοκρασία των προϊό‐
ντων είναι πολύ υψηλή.
Περιμένετε μέχρι τα προϊόντα
να αποκτήσουν θερμοκρασία
περιβάλλοντος πριν από την
αποθήκευση.
Η θερμοκρασία περιβάλλο‐
ντος είναι πολύ υψηλή.
Μειώστε τη θερμοκρασία περι‐
βάλλοντος.
Υπάρχει διαρροή νερού
στην πίσω πλάκα του ψυ‐
γείου.
Κατά τη διάρκεια της αυτόμα‐
της διαδικασίας απόψυξης, ο
πάγος στην πίσω πλάκα απο‐
ψύχεται.
Αυτό είναι φυσιολογικό.
Υπάρχει διαρροή νερού
στο εσωτερικό του ψυ‐
γείου.
Η έξοδος νερού είναι φραγμέ‐
νη.
Καθαρίστε την έξοδο νερού.
Η ροή νερού στο συλλέκτη νε‐
ρού παρεμποδίζεται από
προϊόντα.
Βεβαιωθείτε ότι τα προϊόντα
δεν έρχονται σε επαφή με την
πίσω πλάκα.
Υπάρχει διαρροή νερού
στο δάπεδο.
Το νερό απόψυξης δεν διοχε‐
τεύεται στο δίσκο εξάτμισης
πάνω από το συμπιεστή.
Συνδέστε την έξοδο του νερού
απόψυξης στο δίσκο εξάτμι‐
σης.
21

Πρόβλημα Πιθανή αιτία Επίλυση
Η θερμοκρασία στη συ‐
σκευή είναι πολύ χαμηλή.
Δεν έχει ρυθμιστεί σωστά ο
ρυθμιστής θερμοκρασίας.
Ρυθμίστε υψηλότερη θερμο‐
κρασία.
Η θερμοκρασία στη συ‐
σκευή είναι πολύ υψηλή.
Δεν έχει ρυθμιστεί σωστά ο
ρυθμιστής θερμοκρασίας.
Ρυθμίστε χαμηλότερη θερμο‐
κρασία.
Η πόρτα δεν έχει κλείσει σω‐
στά.
Ανατρέξτε στην ενότητα "Κλεί‐
σιμο της πόρτας".
Η θερμοκρασία των προϊό‐
ντων είναι πολύ υψηλή.
Περιμένετε μέχρι τα προϊόντα
να αποκτήσουν θερμοκρασία
περιβάλλοντος πριν από την
αποθήκευση.
Έχουν αποθηκευτεί ταυτό‐
χρονα πολλά προϊόντα.
Αποθηκεύστε λιγότερα προϊό‐
ντα.
Δεν υπάρχει κυκλοφορία
κρύου αέρα στη συσκευή.
Βεβαιωθείτε ότι υπάρχει κυκλο‐
φορία κρύου αέρα στη συ‐
σκευή.
Αντικατάσταση του λαμπτήρα
ΠΡΟΣΟΧΗ Αποσυνδέστε το φις από
την πρίζα.
1. Αφαιρέστε τη
βίδα από το κά‐
λυμμα του λαμ‐
πτήρα.
2. Αφαιρέστε το
κάλυμμα του
λαμπτήρα
(ανατρέξτε
στην εικόνα).
3. Αντικαταστήστε το χρησιμοποιημένο λαμ‐
πτήρα με ένα νέο λαμπτήρα ίδιας ισχύος
(η μέγιστη ισχύς αναγράφεται στο κάλυμ‐
μα του λαμπτήρα).
4. Τοποθετήστε το κάλυμμα του λαμπτήρα.
5. Σφίξτε τη βίδα στο κάλυμμα του λαμπτή‐
ρα.
6. Συνδέστε το φις στην πρίζα.
7. Ανοίξτε την πόρτα. Βεβαιωθείτε ότι ο λαμ‐
πτήρας ανάβει.
Κλείσιμο της πόρτας
1. Καθαρίστε τα στεγανοποιητικά λάστιχα
της πόρτας.
2. Εάν χρειαστεί, προσαρμόστε την πόρτα.
Ανατρέξτε στο "Εγκατάσταση".
3. Εάν χρειαστεί, αντικαταστήστε τα ελαττω‐
ματικά λάστιχα της πόρτας. Επικοινωνή‐
στε με το κέντρο σέρβις.
Τεχνικά χαρακτηριστικά
Διαστάσεις εσοχής
Ύψος 1780 mm
Πλάτος 560 mm
Βάθος 550 mm
Χρόνος ανόδου 20 h
22

Τα τεχνικά στοιχεία βρίσκονται στην πινακίδα
τεχνικών στοιχείων στην εσωτερική αριστερή
πλευρά της συσκευής και στην ετικέτα ενέρ‐
γειας.
Εγκατάσταση
ΠΡΟΣΟΧΗ Πριν την εγκατάσταση της
συσκευής διαβάστε προσεκτικά τις
"Πληροφορίες ασφάλειας" για την ασφάλειά
σας και τη σωστή λειτουργία της συσκευής.
Τοποθέτηση
Εγκαταστήστε τη συσκευή αυτή σε χώρο
όπου η θερμοκρασία περιβάλλοντος αντι‐
στοιχεί στην κλιματική κατηγορία που υπο‐
δεικνύεται στην πινακίδα χαρακτηριστικών
της συσκευής:
Κλιματι‐
κή κατη‐
γορία
Θερμοκρασία περιβάλλοντος
SN +10°C έως + 32°C
N +16°C έως + 32°C
ST +16°C έως + 38°C
T +16°C έως + 43°C
Ηλεκτρική σύνδεση
Πριν από τη σύνδεση, επαληθεύστε ότι η τά‐
ση και η συχνότητα που αναγράφονται στην
πινακίδα τεχνικών χαρακτηριστικών αντιστοι‐
χούν στα χαρακτηριστικά της παροχής σας.
Η συσκευή πρέπει να γειώνεται. Το φις του
καλωδίου τροφοδοσίας διαθέτει μια επαφή γι'
αυτό το σκοπό. Εάν η πρίζα δεν είναι γειω‐
μένη, συνδέστε τη συσκευή σε μια μεμονω‐
μένη γείωση σύμφωνα με τους τρέχοντες κα‐
νονισμούς, αφού συμβουλευθείτε έναν επαγ‐
γελματία ηλεκτρολόγο.
Σε περίπτωση μη τήρησης των παραπάνω
προφυλάξεων ασφαλείας, ο Κατασκευαστής
δε φέρει καμία ευθύνη.
Αυτή η συσκευή είναι σύμφωνη με τις ακό‐
λουθες Οδηγίες της. ΕΟΚ.
Δυνατότητα αντιστροφής της πόρτας
Η πόρτα της συσκευής ανοίγει προς τα δεξιά.
Εάν θέλετε η πόρτα να ανοίγει προς τα αρι‐
στερά, ακολουθήστε τα εξής βήματα πριν την
εγκατάσταση της συσκευής:
• Χαλαρώστε τον
επάνω πείρο και
αφαιρέστε τον
αποστάτη.
• Αφαιρέστε τον
επάνω πείρο και
την επάνω πόρτα.
• Χαλαρώστε το με‐
σαίο μεντεσέ.
• Αφαιρέστε την κά‐
τω πόρτα.
• Χαλαρώστε τον κά‐
τω πείρο.
Στην αντίθετη πλευ‐
ρά:
• Τοποθετήστε τον
κάτω πείρο.
• Τοποθετήστε την
κάτω πόρτα.
• Σφίξτε το μεσαίο
μεντεσέ.
• Τοποθετήστε την
επάνω πόρτα.
• Σφίξτε τον αποστά‐
τη και τον επάνω
πείρο.
23

Απαιτήσεις εξαερισμού
Η ροή αέρα πίσω
από τη συσκευή
πρέπει να είναι
επαρκής.
50 mm
min.
200 cm
2
min.
200 cm
2
Εγκατάσταση της συσκευής
ΠΡΟΣΟΧΗ Βεβαιωθείτε ότι το καλώδιο
παροχής μπορεί να κινηθεί ελεύθερα.
Ακολουθήστε τα παρακάτω βήματα:
1
2
Τοποθετήστε τη συ‐
σκευή στη θέση.
Σπρώξτε τη συσκευή
προς την κατε ύθ υνση
που δείχνουν τα βέλη
(1) μέχρι το κάλυμμα
του άνω διάκενου να
σταματήσει στα ντου‐
λάπια της κουζίνας.
Βεβαιωθείτε ότι η
απόσταση ανάμεσα
στη συσκευή και το
μπροστινό άκρο του
ντουλαπιού είναι 44
mm.
Σπρώξτε τη συσκευή
προς την κατε ύθ υνση
που δείχνουν τα βέλη
(2) πάνω στο ντουλά‐
πι στην αντίθετη
πλευρά του μεντεσέ.
Βεβαιωθείτε ότι η
απόσταση ανάμεσα
στη συσκευή και το
ντουλάπι είναι 4 mm.
44mm
4mm
Προσαρμόστε τη συ‐
σκευή στη θέση.
Το κάλυμμα του κάτω
μεντεσέ (παρέχεται
στη σακούλα με τα
εξαρτήματα) χρησι‐
μοποιείται για να δια‐
σφαλιστεί ότι η από‐
σταση ανάμεσα στη
συσκευή και το έπι‐
πλο της κουζίνας εί‐
ναι σωστή.
Ανοίξτε την πόρτα.
Τοποθετήστε το κά‐
λυμμα του κάτω με‐
ντεσέ στη θέση του.
I
I
Συνδέστε τη συσκευή
στη θέση με τις 4 βί‐
δες.
Τοποθετήστε τη στε‐
γανοποιητική λωρίδα
ανάμεσα στη συ‐
σκευή και το διπλανό
ντουλάπι.
24

Αφαιρέστε το σωστό
τμήμα από το κάλυμ‐
μα του μεντεσέ (E).
Βεβαιωθείτε ότι έχετε
αφαιρέσει το τμήμα
DX για το δεξιό μεντε‐
σέ και το τμήμα SX
για τον αριστερό με‐
ντεσέ.
B
E
E
C
D
Συνδέστε τα καλύμ‐
ματα (C, D) στις
γλωττίδες και στις
οπές του μεντεσέ.
Τοποθετήστε τη γρί‐
λια εξαερισμού (B).
Συνδέστε τα καλύμ‐
ματα του μεντεσέ (E)
στο μεντεσέ.
G
H
Συνδέστε τη συσκευή
πλευρικά στο πλευρι‐
κό τοίχωμα των ντου‐
λαπιών της κουζίνας:
1. Χαλαρώστε τις βί‐
δες του μέρους
(G) και μετακινή‐
στε το μέρος (G)
μέχρι το πλευρικό
τοίχωμα του ντου‐
λαπιού της κουζί‐
νας.
2. Σφίξτε ξανά τις βί‐
δες του μέρους
(G).
3. Συνδέστε το μέ‐
ρος (H) στο μέρος
(G).
Ha
Hb
Hc
Hd
Αποσυνδέστε τα τμή‐
ματα (Ha), (Hb), (Hc)
και (Hd).
ca. 50 mm
ca. 50 mm
21 mm
90°
21 mm
90°
Τοποθετήστε το τμή‐
μα Ha στην εσωτερι‐
κή πλευρά της πόρ‐
τας των ντουλαπιών
της κουζίνας.
Ha
Hc
Σπρώξτε το τμήμα
(Hc) στο τμήμα (Ha).
Ha
Hb
8 mm
Ανοίξτε την πόρτα
της συσκευής και την
πόρτα του επίπλου
της κουζίνας υπό γω‐
νία 90°.
Εισαγάγετε το μικρό
τετράγωνο (Hb) στον
οδηγό (Ha).
Βάλτε δίπλα-δίπλα
την πόρτα της συ‐
σκευής και την πόρτα
του επίπλου και ση‐
μειώστε τις οπές.
Ha
K
8 mm
Αφαιρέστε τα στηρίγ‐
ματα και σημειώστε
σε απόσταση 8 mm
από το εξωτερικό
άκρο της πόρτας το
σημείο όπου πρέπει
να τοποθετηθεί το
καρφί (Κ).
25

Hb
Τοποθετήστε ξανά το
μικρό τετράγωνο
στον οδηγό και στε‐
ρεώστε το με τις βίδες
που παρέχονται.
Προσαρμόστε το τμή‐
μα Hb για να ευθυ‐
γραμμίσετε την πόρ‐
τα των ντουλαπιών
της κουζίνας με την
πόρτα της συσκευής.
Hb
Hd
Σπρώξτε το τμήμα
(Hd) στο τμήμα (Hb).
Κάντε ένα τελικό έλεγχο για να βεβαιωθείτε
ότι:
• Όλες οι βίδες είναι σφιγμένες.
• Η μαγνητική στεγανοποιητική λωρίδα είναι
σωστά στερεωμένη στο ντουλάπι.
ΣΗΜΑΝΤΙΚΟ Αν η θερμοκρασία
περιβάλλοντος είναι χαμηλή (για
παράδειγμα, το χειμώνα), το μέγεθος του
λάστιχου μειώνεται. Το μέγεθος του λάστιχου
αυξάνεται όταν αυξάνεται και η θερμοκρασία
περιβάλλοντος.
Περιβαλλοντικά θέματα
Το σύµβολο στο προϊόν ή επάνω στη
συσκευασία του υποδεικνύει ότι δεν πρέπει
να µ εταχειρίζεστε το προϊόν αυτό ως οικιακό
απόρριµµα . Αντιθέτως θα πρέπει να
παραδίδεται στο κατάλληλο σηµείο συλλογής
για την ανακύκλωση ηλεκτρικού και
ηλεκτρονικού εξοπλισµού. Εξασφαλίζοντας
ότι το προϊόν αυτό διατίθεται σωστά,
συµβάλλετε στην αποτροπή ενδεχόµενων
αρνητικών συνεπειών για το περιβάλλον και
την ανθρώπινη υγεία, οι οποίες θα
µπορούσαν διαφορετικά να προκληθούν
από ακατάλληλο χειρισµό απόρριψης του
προϊόντος αυτού. Για λεπτοµερέστερες
πληροφορίες σχετικά µε την ανακύκλωση του
προϊόντος αυτού, επικοινωνήστε µε το
δηµαρχείο της περιοχής σας, την τοπική σας
υπηρεσία αποκοµιδής οικιακών
απορριµµάτων ή µε το κατάστηµα όπου
αγοράσατε το προϊόν.
26

Índice de materias
Información sobre seguridad _ _ _ _ _ _ _ _ _ _ _ 27
Funcionamiento _ _ _ _ _ _ _ _ _ _ _ _ _ _ _ _ _ 29
Primer uso _ _ _ _ _ _ _ _ _ _ _ _ _ _ _ _ _ _ _ 29
Uso diario _ _ _ _ _ _ _ _ _ _ _ _ _ _ _ _ _ _ _ _ 29
Consejos útiles _ _ _ _ _ _ _ _ _ _ _ _ _ _ _ _ _ 31
Mantenimiento y limpieza _ _ _ _ _ _ _ _ _ _ _ _ 32
Qué hacer si… _ _ _ _ _ _ _ _ _ _ _ _ _ _ _ _ _ 33
Datos técnicos _ _ _ _ _ _ _ _ _ _ _ _ _ _ _ _ _ _ 35
Instalación _ _ _ _ _ _ _ _ _ _ _ _ _ _ _ _ _ _ _ 35
Aspectos medioambientales _ _ _ _ _ _ _ _ _ _ _ 38
Salvo modificaciones
Información sobre seguridad
Por su seguridad y para garantizar el funcionamiento co-
rrecto del aparato, antes de instalarlo y utilizarlo por pri-
mera vez lea atentamente este manual del usuario, in-
cluidos los consejos y advertencias. Para evitar errores y
accidentes, es importante que todas las personas que
utilicen el aparato estén perfectamente al tanto de su fun-
cionamiento y de las características de seguridad. Con-
serve estas instrucciones y no olvide mantenerlas junto
al aparato en caso de su desplazamiento o venta para que
quienes lo utilicen a lo largo de su vida útil dispongan
siempre de la información adecuada sobre el uso y la
seguridad.
Por la seguridad de personas y bienes, siga las normas
de seguridad indicadas en estas instrucciones, ya que el
fabricante no se hace responsable de daños provocados
por omisiones.
Seguridad de niños y personas vulnerables
• Este electrodoméstico no está diseñado para que lo
usen personas (incluidos niños) con discapacidad fí-
sica, sensorial o mental, o con experiencia y conoci-
miento insuficientes, a menos que una persona res-
ponsable de su seguridad les supervise o instruya en
el uso del electrodoméstico.
No permita que los niños jueguen con el electrodo-
méstico.
• Mantenga los materiales de embalaje alejados de los
niños. Existe riesgo de asfixia.
• Si va a desechar el aparato, extraiga el enchufe de la
toma, corte el cable de conexión (tan cerca del aparato
como pueda) y retire la puerta para impedir que los
niños al jugar puedan sufrir descargas eléctricas o
quedar atrapados en su interior.
• Si este aparato, que cuenta con juntas de puerta mag-
néticas, sustituirá a un aparato más antiguo con cierre
de muelle (pestillo) en la puerta, cerciórese de inutilizar
el cierre de muelle antes de desechar el aparato anti-
guo. Evitará así que se convierta en una trampa mortal
para niños.
Instrucciones generales de seguridad
Precaución Mantenga las aberturas de ventilación
sin obstrucciones.
• El aparato está diseñado para conservar los alimentos
y bebidas de una vivienda normal, como se explica en
este folleto de instrucciones.
• No utilice dispositivos mecánicos ni medios artificia-
les para acelerar el proceso de descongelación.
• No utilice otros aparatos eléctricos (como máquinas
de hacer helados) dentro de aparatos de refrigeración,
a menos que el fabricante haya autorizado su utiliza-
ción.
• No dañe el circuito refrigerante.
• El circuito refrigerante del aparato contiene isobutano
(R600a). Es un gas natural con un gran nivel de com-
patibilidad medioambiental, aunque es inflamable.
Durante el transporte y la instalación del aparato, cer-
ciórese de no provocar daños al circuito de refrige-
rante.
Si el circuito de refrigerante se daña:
– evite fuegos al descubierto y fuentes de encendido
– ventile bien la habitación en la que se encuentra el
aparato
27

• Es peligroso alterar las especificaciones o intentar
modificar este producto en modo alguno. Cualquier
daño en el cable de alimentación puede provocar cor-
tocircuito, incendio o descarga eléctrica.
Advertencia Los componentes eléctricos (cable de
alimentación, enchufe, compresor) debe sustituir-
los un técnico autorizado o personal de reparaciones
profesional.
1. El cable de alimentación no se debe prolongar.
2. Compruebe que el enchufe no está aplastado ni
dañado por la parte trasera del aparato. Un enchufe
aplastado o dañado puede recalentarse y provocar
un incendio.
3. Cerciórese de que tiene acceso al enchufe del
aparato.
4. No tire del cable de alimentación.
5. Si la toma de red está floja, no introduzca el en-
chufe. Existe riesgo de descarga eléctrica o in-
cendio.
6. No debe utilizar el aparato sin la cubierta de la
bombilla
9)
de la iluminación interior.
• Este aparato es pesado. Debe tener precauciones du-
rante su desplazamiento.
• No retire ni toque elementos del compartimento con-
gelador con las manos húmedas o mojadas, ya que
podría sufrir abrasión de la piel o quemaduras por
congelación.
• Evite la exposición prolongada del aparato a la luz solar
directa.
Uso diario
• No coloque recipientes calientes sobre las piezas plás-
ticas del aparato.
• No almacene gas ni líquido inflamable en el aparato,
ya que podrían estallar.
• No coloque alimentos directamente contra la salida de
aire de la pared posterior.
10)
• Los alimentos que se descongelen no deben volver a
congelarse.
• Guarde los alimentos congelados, que se adquieren
ya envasados, siguiendo las instrucciones del fabri-
cante.
• Se deben seguir estrictamente las recomendaciones
del fabricante del aparato sobre el almacenamiento.
Consulte las instrucciones correspondientes.
• No coloque bebidas carbonatadas o con gas en el
congelador, ya que se genera presión en el recipiente,
que podría estallar y dañar el aparato.
• Si se consumen polos helados retirados directamente
del aparato, se pueden sufrir quemaduras causadas
por el hielo.
Cuidado y limpieza
• Antes de realizar tareas de mantenimiento, apague el
aparato y desconecte el enchufe de la toma de red. Si
no puede acceder a la toma de red, corte el suministro
eléctrico.
• No limpie el aparato con objetos metálicos.
• No utilice objetos afilados para eliminar el hielo del
aparato. Utilice un raspador plástico.
• Inspeccione habitualmente el desagüe del agua des-
congelada del frigorífico. Si es necesario, limpie el
desagüe. Si el desagüe se bloquea, el agua se acu-
mulará en la base del aparato.
Instalación
Importante Para realizar la conexión eléctrica, siga
atentamente las instrucciones de los párrafos
correspondientes.
• Desembale el aparato y compruebe que no tiene daños.
No conecte el aparato si está dañado. Informe de los
posibles daños de inmediato a la tienda donde lo ad-
quirió. En ese caso, conserve el material de embalaje.
• Es recomendable esperar al menos dos horas antes de
conectar el aparato, para permitir que el aceite regrese
al compresor.
• El aparato debe contar con circulación de aire ade-
cuada alrededor, ya que de lo contrario se produce
recalentamiento. Para conseguir una ventilación sufi-
ciente, siga las instrucciones correspondientes a la
instalación.
• Siempre que sea posible, la parte posterior del pro-
ducto debe estar contra una pared, para evitar que se
toquen las partes calientes (compresor, condensador)
y se produzcan quemaduras.
• El aparato no debe colocarse cerca de radiadores ni de
hornillas de cocina.
9) Si está previsto el uso de cubierta para la bombilla
10) Si el aparato no acumula escarcha (Frost Free)
28

• Asegúrese de que es posible acceder al enchufe des-
pués de instalar el electrodoméstico.
• Realice la conexión sólo con el suministro de agua
potable.
11)
Servicio técnico
• Un electricista homologado deberá realizar las tareas
que se requieran para ejecutar el servicio o manteni-
miento de este electrodoméstico.
• Las reparaciones de este aparato debe realizarlas un
centro de servicio técnico autorizado y sólo se deben
utilizar recambios originales.
Protección del medio ambiente
Este aparato no contiene gases perjudiciales para
la capa de ozono, ni en el circuito de refrigerante ni
en los materiales aislantes. El aparato no se debe dese-
char junto con los residuos urbanos. La espuma aislante
contiene gases inflamables: el aparato se debe desechar
de acuerdo con la normativa vigente, que puede solicitar
a las autoridades locales. No dañe la unidad de refrige-
ración, en especial la parte trasera, cerca del intercam-
biador de calor. Los materiales de este aparato marcados
con el símbolo
son reciclables.
Funcionamiento
Encendido
Introduzca el enchufe en la toma.
Gire el regulador de temperatura hacia la derecha, a un
ajuste intermedio.
Apagado
Para apagar el aparato, gire el regulador de temperatura
hasta la posición "O".
Regulación de la temperatura
La temperatura se regula automáticamente.
Para utilizar el aparato, proceda de la manera siguiente:
• Gire el regulador de temperatura hacia ajustes más
bajos para obtener el frío mínimo.
• Gire el regulador de temperatura hacia ajustes más
altos para obtener el frío máximo.
Lo más conveniente es ajustar la temperatura en una
posición intermedia.
Sin embargo, el ajuste exacto debe elegirse teniendo en
cuenta que la temperatura interior del aparato depende
de:
• la temperatura ambiente
• la frecuencia con que se abre la puerta
• la cantidad de alimentos guardados
• la ubicación del aparato.
Importante Si la temperatura ambiente es elevada o el
aparato está totalmente lleno y se ha ajustado a las
temperaturas más bajas, puede mantenerse en marcha de
manera continua provocando la formación de escarcha
en la pared posterior. En tal caso, el mando debe
colocarse a temperatura más elevada para permitir la
descongelación automática y reducir así el consumo
energético.
Primer uso
Limpieza de las partes internas
Antes del empleo limpiar todas las partes internas con
agua tibia y jabón neutro, a fin de eliminar el característico
olor de nuevo y secarlas luego cuidadosamente.
Importante No emplear detergentes o polvos abrasivos
que podrían dañar las superficies.
Uso diario
Congelación de alimentos frescos
El compartimento congelador está ideado para la conge-
lación de alimentos frescos y para la conservación a largo
plazo de alimentos congelados y ultracongelados.
Para congelar alimentos frescos no es necesario cambiar
el ajuste intermedio.
Sin embargo, para lograr una congelación más rápida,
gire el regulador de temperatura a un ajuste más alto para
obtener el frío máximo.
11) Si está prevista una conexión de agua
29

Importante En esa situación, la temperatura del
compartimento frigorífico puede descender por debajo de
0 °C. En ese caso, sitúe el regulador de temperatura en
un ajuste menos frío.
Almacenamiento de alimentos congelados
Al poner en marcha el aparato por primera vez o después
de un periodo sin uso, déjelo en marcha al menos durante
2 horas con un ajuste alto antes de colocar los productos
en el compartimento.
Si se va a guardar una gran cantidad de alimentos, retire
todos los cajones y cestos del aparato y coloque los ali-
mentos en los estantes de enfriamiento para obtener el
mejor rendimiento.
Advertencia Compruebe que los alimentos no
superen el límite de carga indicado en un lado de
la sección superior (cuando corresponda)
.
Importante En caso de producirse una descongelación
accidental, por ejemplo, por un corte del suministro
eléctrico, si la interrupción ha sido más prolongada que
el valor indicado en la tabla de características técnicas
bajo "tiempo de elevación", los alimentos descongelados
deben consumirse cuanto antes o cocinarlos de
inmediato y volverlos a congelar (después de que se
hayan enfriado).
Calendario de congelación
Los símbolos muestran los distintos tipos de alimentos
congelados.
Los números indican los tiempos de almacenamiento en
meses de cada tipo de alimento congelado. Que el valor
superior o inferior del tiempo de almacenamiento indi-
cado sea válido dependerá de la calidad de los alimentos
y del tratamiento aplicado antes de la congelación.
Descongelación
Los alimentos ultracongelados o congelados, antes de
utilizarlos, se pueden descongelar en el compartimento
frigorífico o a temperatura ambiente, dependiendo del
tiempo de que se disponga.
Es posible incluso cocinar piezas pequeñas congeladas,
tomadas directamente del congelador; en tal caso, el
tiempo de cocción será más prolongado.
Producción de cubitos de hielo
Este aparato cuenta con una o varias bandejas para la
producción de cubitos de hielo. Llene las bandejas con
agua y colóquelas en el compartimento congelador.
Importante No utilice instrumentos metálicos para retirar
las bandejas del congelador.
Estantes móviles
Las paredes del frigorífico
cuentan con guías para
colocar los estantes del
modo que se prefiera.
Importante No coloque el
estante de vidrio por enci-
ma del cajón de verduras
para no impedir la circu-
lación correcta del aire.
Colocación de los estantes de la puerta
Para poder guardar ali-
mentos de distintos tama-
ños, los estantes de la
puerta se pueden colocar
a diferentes alturas.
eleve paulatinamente el
estante en la dirección de
las flechas hasta retirarlo
del soporte y colóquelo en
la posición que desee.
30

Consejos útiles
Consejos para ahorrar energía
• No abra la puerta con frecuencia ni la deje abierta más
tiempo del estrictamente necesario.
• Si la temperatura ambiente es elevada, la temperatura
del aparato se ha ajustado en los valores más altos y
está totalmente lleno, el compresor podría funcionar
de manera continua, provocando la formación de es-
carcha o hielo en el evaporador. Si esto sucede, gire
el regulador de temperatura a valores inferiores para
permitir la descongelación automática y ahorrar en el
consumo eléctrico.
Consejos para la refrigeración de alimentos frescos
Para obtener los mejores resultados:
• no guarde en el frigorífico alimentos calientes ni lí-
quidos en evaporación;
• cubra o envuelva los alimentos, en especial si tienen
sabores fuertes;
• coloque los alimentos de modo que el aire pueda cir-
cular libremente entre ellos.
Consejos para la refrigeración
Consejos útiles:
Carne (de todo tipo): guárdela en bolsas de plástico y
colóquela en el estante de vidrio, sobre el cajón de las
verduras.
Por razones de seguridad, guárdela de ese modo durante
uno o dos días, como máximo.
Alimentos cocinados, platos fríos, etc..: los debe cubrir y
puede colocarlos en cualquiera de los estantes.
Frutas y verduras: se deben limpiar a conciencia y colocar
en los cajones especiales suministrados a tal efecto.
Mantequilla y queso: colóquelos en recipientes herméti-
cos especiales o envueltos en papel de aluminio o en
bolsas de plástico, para excluir tanto aire como sea po-
sible.
Botellas de leche: deben tener tapa y se colocarán en el
estante para botellas de la puerta.
Los plátanos, las patatas, las cebollas y los ajos, si no
están empaquetados, no deben guardarse en el frigorífico.
Consejos sobre la congelación
Estos consejos son importantes para poder aprovechar al
máximo el proceso de congelación:
• la cantidad máxima de alimentos que puede conge-
larse en 24 horas se muestra en la placa de datos téc-
nicos;
• el proceso de congelación requiere 24 horas. Durante
ese periodo no deben añadirse otros alimentos para
congelación;
• congele sólo productos alimenticios de máxima cali-
dad, frescos y perfectamente limpios;
• prepare los alimentos en porciones pequeñas para que
se congelen de manera rápida y total, así como para
poder descongelar posteriormente sólo las cantidades
necesarias;
• envuelva los alimentos en papel de aluminio o polie-
tileno y compruebe que los envoltorios quedan her-
méticamente cerrados;
• no permita que alimentos frescos y sin congelar entren
en contacto con alimentos ya congelados, para evitar
el aumento de temperatura de los segundos;
• los alimentos magros se congelan mejor que los gra-
sos; la sal reduce el tiempo de almacenamiento de los
alimentos;
• el hielo, si se consume inmediatamente después de
retirarlo del compartimento congelador, puede provo-
car quemaduras por congelación en la piel;
• es recomendable etiquetar cada paquete con la fecha
de congelación para controlar el tiempo que perma-
necen almacenados.
Consejos para el almacenamiento de alimentos
congelados
Para obtener el máximo rendimiento de este aparato, de-
berá:
• comprobar que el comerciante ha mantenido los pro-
ductos congelados correctamente almacenados;
• procurar que los alimentos congelados pasen de la
tienda al congelador en el menor tiempo posible;
• evitar la apertura frecuente de la puerta o dejarla abierta
más del tiempo estrictamente necesario.
• Una vez descongelados, los alimentos se deterioran
con rapidez y no pueden congelarse otra vez.
• No supere el tiempo de almacenamiento indicado por
el fabricante de los alimentos.
31

Mantenimiento y limpieza
Precaución Antes de realizar tareas de
mantenimiento, desenchufe el aparato.
Este equipo contiene hidrocarburos en la unidad de
refrigeración; por tanto, el mantenimiento y la re-
carga deben estar a cargo exclusivamente de técnicos
autorizados.
Limpieza periódica
El equipo debe limpiarse de manera habitual:
• limpie el interior y los accesorios con agua templada
y un jabón neutro.
• revise periódicamente las juntas de la puerta y límpie-
las para mantenerlas limpias y sin restos.
• aclare y seque a fondo.
Importante No mueva, dañe ni tire de los conductos o
cables del interior del armario.
No utilice detergentes, polvos abrasivos, productos de
limpieza perfumados ni cera para limpiar el interior, ya
que dañarán la superficie y dejarán un fuerte olor.
Limpie el condensador (rejilla negra) y el compresor de
la parte posterior del aparato con un cepillo o un aspira-
dor. Esa operación mejorará el rendimiento del aparato y
reducirá el consumo eléctrico.
Importante Tenga cuidado de no dañar el sistema de
refrigeración.
Muchas marcas de limpiadores de superficies de cocina
contienen químicos que pueden atacar o dañar los plás-
ticos del aparato. Por tal razón, se recomienda que el
exterior del aparato se limpie sólo con agua templada a
la que se añadirá un poco de líquido lavavajillas.
Después de la limpieza, vuelva a conectar el aparato a la
toma de red.
Descongelación del frigorífico
La escarcha se elimina automáticamente del evaporador
del frigorífico cada vez que se detiene el compresor, du-
rante el funcionamiento normal. El agua de la desconge-
lación se descarga hacia un recipiente especial situado
en la parte posterior del aparato, sobre el motor compre-
sor, donde se evapora.
Es importante limpiar periódicamente el orificio de salida
del agua de descongelación situado en la mitad del canal
del compartimento frigorífico para evitar que el agua des-
borde y caiga sobre los alimentos del interior. Utilice el
limpiador especial suministrado, que hallará ya colocado
en el orificio de desagüe.
Descongelación del congelador
Siempre se forma un poco de escarcha en los estantes
del congelador y en torno al compartimento superior.
Descongele el congelador sólo cuando la capa de escar-
cha alcance un grosor de unos 3 a 5 mm.
Importante Unas 12 horas antes de realizar la
descongelación, coloque el regulador de temperatura en
los niveles más elevados, con el fin de acumular frío
suficiente para la interrupción del funcionamiento.
Para eliminar la escarcha, siga estos pasos:
1. Apague el aparato.
2. Retire los alimentos congelados, envuélvalos en va-
rias hojas de papel periódico y colóquelos en un sitio
fresco.
Precaución No toque los alimentos congelados con
las manos mojadas. Podrían congelarse al contacto
con los alimentos.
3. Deje la puerta
abierta e introduzca
el raspador plástico
en el centro de la
base, después de
colocar un reci-
piente debajo para
recoger el agua de
la descongelación
Para acelerar el proceso de descongelación, colo-
que un recipiente con agua tibia en el comparti-
mento congelador. Además, retire los trozos de hielo que
se desprendan antes de que finalice la descongelación.
4. Finalmente, seque bien el interior y conserve el ras-
pador para su uso futuro.
32

5. Encienda el aparato.
6. Al cabo de dos o tres horas, vuelva a introducir los
alimentos que retiró previamente.
Advertencia No utilice herramientas metálicas
afiladas para raspar la escarcha del evaporador, ya
que podría daarlo.
No utilice dispositivos mecánicos ni medios artificiales
para acelerar el proceso de descongelación, excepto los
recomendados por el fabricante.
La elevación de la temperatura de los paquetes de
alimentos congelados, durante la descongelación, puede
acortar su tiempo de almacenamiento.
Periodos sin funcionamiento
Si el aparato no se utiliza durante un tiempo prolongado,
tome las siguientes precauciones:
• desconecte el aparato de la red eléctrica;
• extraiga todos los alimentos;
•
descongele
12)
y limpie el aparato y todos los acceso-
rios;
• deje la puerta(s) entreabierta para prevenir olores de-
sagradables.
Si va a mantener el armario en marcha, solicite a alguien
que lo inspeccione de vez en cuando para evitar que los
alimentos se echen a perder en caso de un corte de ener-
gía.
Qué hacer si…
Advertencia Antes de realizar cualquier reparación,
desconecte el enchufe del aparato de la toma de red.
Sólo un electricista o un técnico profesional debe llevar
a cabo cualquier reparación que no figure en este manual.
Importante Se producen ruidos durante el
funcionamiento normal (compresor, circulación del
refrigerante).
Problema Causa posible Solución
El aparato no funciona. La bom-
billa no funciona.
El aparato está apagado. Encienda el aparato.
El aparato no está bien enchufado a la
toma de corriente.
Enchufe el aparato correctamente a la
toma de corriente.
El aparato no recibe corriente. No hay
voltaje en la toma de corriente.
Enchufe otro aparato eléctrico a la toma
de corriente.
Llame a un electricista homologado.
La bombilla no funciona. La bombilla está en modo de espera. Cierre y abra la puerta.
La bombilla está defectuosa. Consulte "Cambio de la bombilla".
El compresor funciona continua-
mente.
El ajuste de temperatura no es correc-
to.
Seleccione una temperatura más alta.
La puerta no está bien cerrada. Consulte "Cierre de la puerta".
La puerta se ha abierto con excesiva
frecuencia.
No mantenga la puerta abierta más tiem-
po del necesario.
La temperatura del producto es dema-
siado alta.
Deje que la temperatura del producto
descienda a la temperatura ambiente
antes de guardarlo.
12) Si está previsto.
33

Problema Causa posible Solución
La temperatura ambiente es demasia-
do alta.
Reduzca la temperatura ambiente.
El agua fluye por la placa poste-
rior del frigorífico.
Durante el proceso de descongelación
automática, la escarcha se derrite en
la placa posterior.
Esto es correcto.
El agua fluye por el interior del
frigorífico.
La salida de agua está obstruida. Limpie la salida de agua.
Los productos impiden que el agua
fluya al colector de agua.
Compruebe que los productos no tocan
la placa posterior.
El agua fluye hacia el suelo. El agua de la descongelación no fluye
hacia la bandeja de evaporación si-
tuada sobre el compresor.
Fije la salida de agua de descongelación
a la bandeja de evaporación.
La temperatura del aparato es
muy baja.
El ajuste de temperatura no es correc-
to.
Seleccione una temperatura más alta.
La temperatura del aparato es de-
masiado alta.
El ajuste de temperatura no es correc-
to.
Seleccione una temperatura más baja.
La puerta no está bien cerrada. Consulte "Cierre de la puerta".
La temperatura del producto es dema-
siado alta.
Deje que la temperatura del producto
descienda a la temperatura ambiente
antes de guardarlo.
Se han almacenado muchos produc-
tos a la vez.
Guarde menos productos al mismo
tiempo.
No hay circulación de aire frío en el
aparato.
Compruebe que el aire frío puede cir-
cular libremente en el aparato.
Cambio de la bombilla
Precaución Desenchufe el aparato de la toma de
corriente.
1. Retire el tornillo de
la tapa de la bom-
billa.
2. Extraiga la tapa de
la bombilla (con-
sulte la ilustra-
ción).
3. Cambie la bombilla
por una nueva de la
misma potencia (la potencia máxima se indica en la
cubierta de la bombilla).
4. Instale la tapa de la bombilla.
5. Apriete el tornillo de la tapa de la bombilla.
6. Enchufe el aparato a la toma de corriente.
7. Abra la puerta. Compruebe que la bombilla se en-
ciende.
Cierre de la puerta
1. Limpie las juntas de la puerta.
2. Si es necesario, ajuste la puerta. Consulte "Instala-
ción".
3. Si es necesario, cambie las juntas de puerta defec-
tuosas. Contacte al Centro de servicio técnico.
34

Datos técnicos
Medidas de la cavidad
Altura 1780 mm
Anchura 560 mm
Fondo 550 mm
Tiempo de elevación 20 h
La información técnica se encuentra en la placa de datos
técnicos en el lado interior izquierdo del aparato y en la
etiqueta de energía.
Instalación
Precaución Lea atentamente la "información de
seguridad" para garantizar su propia seguridad y el
correcto funcionamiento del electrodoméstico antes de
instalar el electrodoméstico.
Colocación
Instale el aparato en un punto en el que la temperatura
ambiente se corresponda con la clase climática indicada
en la placa de datos técnicos del aparato:
Clase cli-
mática
Temperatura ambiente
SN +10°C a + 32°C
N +16°C a + 32°C
ST +16°C a + 38°C
T +16°C a + 43°C
Conexión eléctrica
Antes de conectar el aparato, compruebe que el voltaje y
la frecuencia que aparecen en la placa de datos técnicos
se corresponden con el suministro de la vivienda.
El aparato debe tener conexión a tierra. El enchufe del
cable de alimentación se suministra con un contacto para
tal fin. Si la toma de red de la vivienda carece de conexión
a tierra, conecte el aparato a una toma de tierra conforme
con la normativa, después de consultar a un electricista
profesional.
El fabricante rechaza toda responsabilidad si no se toman
las precauciones antes indicadas.
Este aparato es conforme con las directivas de la CEE.
Cambio del sentido de apertura de las puertas
La puerta del aparato se abre hacia la derecha. Si desea
abrir la puerta hacia la izquierda, siga estas instrucciones
antes de instalar el aparato:
35

• Afloje y extraiga el se-
parador superior.
• Retire el pasador supe-
rior y la puerta superior.
• Afloje la bisagra inter-
media.
• Retire la puerta inferior.
• Afloje el pasador infe-
rior.
En el lado opuesto:
• Instale el pasador infe-
rior.
• Instale la puerta inferior.
• Apriete la bisagra inter-
media.
• Instale la puerta supe-
rior.
• Apriete el espaciador y
el pasador superior.
Requisitos de ventilación
El aire debe poder circular
libremente por la parte
posterior del aparato.
50 mm
min.
200 cm
2
min.
200 cm
2
Instalación del aparato
Precaución Compruebe que el cable de
alimentación puede moverse con facilidad.
Ejecute los pasos siguientes:
36

1
2
Instale el aparato en el hue-
co.
Empuje el aparato en el
sentido de las flechas (1)
hasta que la cubierta de se-
paración superior tope
contra el mueble de cocina.
Asegúrese de que entre el
aparato y el borde delantero
del mueble haya una dis-
tancia de 44 mm.
Empuje el aparato en el
sentido de las flechas (2)
contra el mueble en el lado
opuesto de la bisagra. Ase-
gúrese de que entre el apa-
rato y el mueble quede un
espacio de 4 mm.
44mm
4mm
Ajuste el aparato en el hue-
co.
La tapa de la bisagra infe-
rior (incluida en la bolsa de
accesorios) garantiza la co-
rrecta separación entre el
aparato y el mueble.
Abra la puerta. Coloque la
tapa de la bisagra inferior
en su lugar.
I
I
Fije el aparato al hueco con
4 tornillos.
Encaje la cinta selladora
entre el aparato y el armario
adyacente.
Retire la parte correcta de la
tapa de la bisagra (E). No
olvide extraer la pieza DX,
en el caso de la bisagra de-
recha, y la pieza SX en el
otro caso.
B
E
E
C
D
Fije las tapas (C, D) a las
lengüetas y a los orificios
de bisagra.
Instale la rejilla de ventila-
ción (B).
Fije las tapas de bisagra (E)
a la bisagra.
G
H
Conecte el aparato lateral-
mente con la puerta del
mueble de cocina:
1. Afloje los tornillos de
la pieza (G) y desplace
la pieza (G) hasta el
mueble lateralmente.
2. Vuelva a apretar los
tornillos de la pieza
(G).
3. Fije la pieza (H) a la
pieza (G).
Ha
Hb
Hc
Hd
Desconecte las piezas (Ha),
(Hb), (Hc) y (Hd).
37

ca. 50 mm
ca. 50 mm
21 mm
90°
21 mm
90°
Instale la pieza (Ha) en el
lado interno del mueble de
cocina.
Ha
Hc
Empuje la pieza (Hc) contra
la pieza (Ha).
Ha
Hb
8 mm
Abra la puerta del aparato y
la del mueble de cocina en
un ángulo de 90°.
Introduzca el cuadrado pe-
queo (Hb) en la guía (Ha).
Coloque juntas las puertas
del aparato y del mueble y
marque los orificios.
Ha
K
8 mm
Quite las escuadras y pon-
ga una marca a una distan-
cia de 8 mm desde el borde
exterior de la puerta en la
que se debe colocar el cla-
vo (K).
Hb
Vuelva a colocar el cuadra-
do pequeo en la guía y fí-
jelo con los tornillos sumi-
nistrados.
Alinee las puertas del mue-
ble de cocina y del aparato
mediante el ajuste de la pie-
za Hb.
Hb
Hd
Presione la pieza (Hd) con-
tra la pieza (Hb).
Finalmente, compruebe que:
• Todos los tornillos están apretados.
• La cinta selladora magnética está firmemente sujeta al
armario.
Importante Si la temperatura ambiente es baja (por
ejemplo, en invierno), el tamao de la junta disminuye. El
tamao de la junta aumenta cuando sube la temperatura
ambiente.
Aspectos medioambientales
El símbolo que aparece en el aparato o en su
embalaje, indica que este producto no se puede tratar
como un residuo normal del hogar. Se deberá entregar,
sin coste para el poseedor, bien al distribuidor, en el acto
de la compra de un nuevo producto similar al que se
deshecha, bien a un punto municipal de recolección
selectiva de equipos eléctricos y electrónicos para su
reciclaje. Al asegurarse de que este producto se desecha
correctamente, usted ayudará a evitar posibles
consecuencias negativas para el medio ambiente y la
salud pública, lo cual podría ocurrir si este producto no
se gestionara de forma adecuada. Para obtener
información más detallada sobre el reciclaje de este
38

producto, póngase en contacto con el Ayuntamiento de
su Municipio, ó con la tienda donde lo compró.
39

www.zanussi.com
212332201-00-082009
-
 1
1
-
 2
2
-
 3
3
-
 4
4
-
 5
5
-
 6
6
-
 7
7
-
 8
8
-
 9
9
-
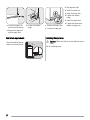 10
10
-
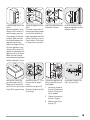 11
11
-
 12
12
-
 13
13
-
 14
14
-
 15
15
-
 16
16
-
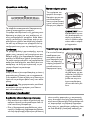 17
17
-
 18
18
-
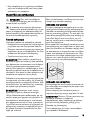 19
19
-
 20
20
-
 21
21
-
 22
22
-
 23
23
-
 24
24
-
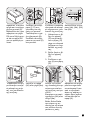 25
25
-
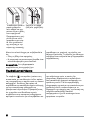 26
26
-
 27
27
-
 28
28
-
 29
29
-
 30
30
-
 31
31
-
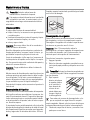 32
32
-
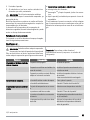 33
33
-
 34
34
-
 35
35
-
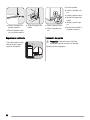 36
36
-
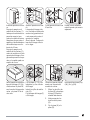 37
37
-
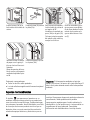 38
38
-
 39
39
-
 40
40


ZANKER ZBB2294L Manual de usuario
- Categoría
- Frigoríficos-congeladores
- Tipo
- Manual de usuario
- Este manual también es adecuado para
en otros idiomas
- English: ZANKER ZBB2294L User manual
Otros documentos
-
Zanussi ZBT2234R Manual de usuario
-
-
Zanussi ZBB28465SA Manual de usuario
-
-
-
-
-
-
Zanussi ZFC103 Guía del usuario
-
Zanussi ZRG714SW Manual de usuario