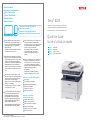
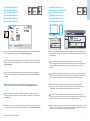
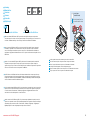
Xerox B205 Guía del usuario
- Categoría
- Impresoras láser / LED
- Tipo
- Guía del usuario

Xerox
®
B205
Multifunction Printer
•
Imprimante multifonction
•
Stampante multifunzione
•
Multifunktionsdrucker
•
Equipo multifunción
•
Impressora multifuncional
•
Quick Use Guide
Guide d'utilisation rapide
Italiano
Deutsch
Español
Português
Guida rapida
Kurzübersicht
Guía de uso rápido
Guia de utilização rápida
IT
DE
ES
PT
607E31840 Rev A
© 2019 Xerox Corporation. All Rights Reserved.
Xerox
®
is a trademark of Xerox Corporation in the United States and/or other countries. BR27273
www.xerox.com/office/B205support
www.xerox.com/msds
www.xerox.com/office/B205supplies
www.xerox.com/office/businessresourcecenter
More Information
Informations supplémentaires
Ulteriori informazioni
Weitere Informationen
Más información
Mais informações
EN
FR
IT
DE
ES
PT
www.xerox.com/office/
businessresourcecenter
Templates, tips, and tutorials
Modèles, conseils et didacticiels
Modelli, suggerimenti ed esercitazioni
Profile, Tipps und Lehrgänge
Plantillas, consejos y lecciones prácticas
Modelos, dicas e tutoriais
EN
FR
IT
DE
ES
PT
ES
Antes de utilizar la impresora, lea los capítulos sobre
seguridad y normativas en la Guía del usuario
disponible en Xerox.com, o bien, la Guía de referencia
de seguridad, normativa, reciclaje y eliminación de
productos en el disco de Software and
Documentation (Software y documentación).
Encontrará Fichas de datos de seguridad e
información medioambiental en el disco y en
Internet.
FR
Avant d’utiliser votre imprimante, lisez les chapitres
relatifs à la sécurité et aux réglementations du Guide
de l'utilisateur disponible sur Xerox.com ou le Guide
de référence sur la sécurité, la réglementation, le
recyclage et la mise au rebut sur le CD-ROM Software
and Documentation (Logiciel et documentation).
Les fiches de données de sécurité et les informations
environnementales sont disponibles sur le disque et
en ligne.
PT
Antes de operar a impressora, leia os capítulos sobre
segurança e regulamentação no Guia do Usuário
disponível em Xerox.com ou no Guia de referência
sobre segurança, regulamentação, reciclagem e
descarte no Software and Documentation disc (CD de
software e documentação). (Software e
Documentação).
Folhas de dados de segurança e informações
ambientais estão disponíveis no disco e on-line.
IT
Prima di utilizzare la stampante, leggere i capitoli
relativi alla normativa e alla sicurezza nella Guida per
l'utente disponibile su Xerox.com oppure la Guida
relativa a sicurezza, normative, riciclaggio e
smaltimento sul disco Software and Documentation
(Software e documentazione).
Le schede di sicurezza e le informazioni ambientali
sono disponibili sul disco e online.
EN
Before operating your printer, read the safety and
regulatory chapters in the User Guide available on
Xerox.com, or the Safety, Regulatory, Recycling, and
Disposal Reference Guide on the Software and
Documentation disc.
Safety Data Sheets and environmental information
are available on the disc and online.
DE
Vor der Inbetriebnahme des Druckers die Kapitel zu
Sicherheit und gesetzlichen Bestimmungen im
Benutzerhandbuch unter Xerox.com bzw. im
Referenzhandbuch zu Sicherheit, gesetzlichen
Bestimmungen, Recycling und Entsorgung auf der
Software and Documentation (Datenträger mit
Software und Dokumentation) lesen.
Sicherheitsdatenblätter und Umweltinformationen
sind auf dem Datenträger und online verfügbar.
Printer supplies
Consommables pour l'imprimante
Materiali di consumo della stampante
Druckerverbrauchsmaterial
Suministros de la impresora
Suprimentos da impressora
EN
FR
IT
DE
ES
PT
www.xerox.com/office/B205supplies

2
www.xerox.com/office/B205support
FR
IT
DE
ES
PT
EN
FR
IT
DE
ES
PT
EN
Contents
Sommaire
Indice generale
Inhalt
Índice
Conteúdo
Printer Basics ............................................................... 3
Présentation de l'imprimante
Nozioni di base sulla stampante
Grundlagen
Aspectos básicos de la impresión
Noções básicas da impressora
Copying.........................................................................9
Copie
Copia
Kopieren
Copia
Cópia
Printing......................................................................... 6
Impression
Stampa
Drucken
Impresión
Impressão
Printer Tour...................................................................3
Découverte de l'imprimante
Presentazione della stampante
Druckerübersicht
Recorrido por la impresora
Roteiro da impressora
Control Panel................................................................4
Panneau de commande
Pannello di controllo
Bedienfeld
Panel de control
Painel de controle
Supported Papers........................................................6
Papiers pris en charge
Carta supportata
Geeignetes Druckmaterial
Papeles admitidos
Papéis suportados
Basic Printing .............................................................. 7
Impression de base
Stampa di base
Einfaches Drucken
Impresión básica
Impressão básica
Basic Copying.............................................................. 9
Copie de base
Nozioni di base sulla copiatura
Einfaches Kopieren
Copia básica
Cópia básica
Scanning.................................................................... 10
Numérisation
Scansione
Scannen
Escaneado
Digitalização
Troubleshooting ........................................................14
Dépannage
Risoluzione dei problemi
Problembehandlung
Solución de problemas
Solução de problemas
Paper Jams.................................................................14
Bourrages papier
Inceppamenti della carta
Papierstaus
Atascos de papel
Atolamentos de papel
Scanning from a Computer.................................... 13
Numérisation à partir d’un ordinateur
Scansione da un computer
Scannen vom Computer aus
Escaneado desde un ordenador
Digitalização a partir de um computador
Scanning to a Computer......................................... 12
Numérisation vers un ordinateur
Scansione su un computer
Scanausgabe an einen Computer
Escaneado a PC
Digitalização para um computador
FR
IT
DE
ES
PT
EN
FR
IT
DE
ES
PT
EN
FR
IT
DE
ES
PT
EN
FR
IT
DE
ES
PT
EN
FR
IT
DE
ES
PT
EN
FR
IT
DE
ES
PT
EN
FR
IT
DE
ES
PT
EN
FR
IT
DE
ES
PT
EN
FR
IT
DE
ES
PT
EN
FR
IT
DE
ES
PT
EN
FR
IT
DE
ES
PT
EN
FR
IT
DE
ES
PT
EN
Xerox
®
Easy Printer Manager...................................5
Xerox
®
Easy Printer Manager
Xerox
®
Easy Printer Manager
Xerox
®
Easy Printer Manager
Xerox
®
Easy Printer Manager
Xerox
®
Easy Printer Manager
FR
IT
DE
ES
PT
EN
Xerox
®
CentreWare
®
Internet Services..................5
Services Internet CentreWare
®
Xerox
®
Xerox
®
CentreWare
®
Internet Services
Xerox
®
CentreWare
®
Internet Services
Xerox
®
CentreWare
®
Internet Services
Xerox
®
CentreWare
®
Internet Services
FR
IT
DE
ES
PT
EN
Printing from USB Flash Drive ................................. 8
Impression à partir d'un lecteur Flash USB
Stampa da un'unità flash USB
Drucken von einem USB-Flashlaufwerk
Impresión desde unidad Flash USB
Impressão de uma unidade flash USB
FR
IT
DE
ES
PT
EN
FR
IT
DE
ES
PT
EN
Scanning to a USB Flash Drive...............................11
Numérisation vers une clé USB
Scansione su un'unità flash USB
Scanausgabe: USB
Escaneado a una unidad Flash USB
Digitalização para uma unidade flash USB

3
www.xerox.com/office/B205support
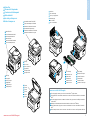
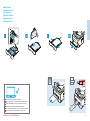
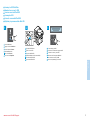
Printer Basics
Généralités
Jam Access
Accès aux bourrages
Accesso per inceppamento
Staubeseitigung
Acceso al atasco
Acesso ao atolamento
Printer Tour
Découverte de l'imprimante
Presentazione della stampante
Druckerübersicht
Recorrido por la impresora
Roteiro da impressora
For ordering supplies, contact your local reseller, or visit the Xerox
®
Supplies website.
Pour commander des consommables, contactez votre revendeur local ou visitez le site Web des consommables
Xerox
®
.
Per ordinare materiali di consumo, contattare il rivenditore locale oppure visitare il sito Web per i materiali di
consumo Xerox
®
.
Bestellung von Verbrauchsmaterial beim örtlichen Händler oder über die Xerox
®
-Website.
Para solicitar suministros, póngase en contacto con su distribuidor local o visite el sitio Web de Consumibles
Xerox
®
.
Para solicitar suprimentos, entre em contato com o revendedor local ou visite o site de Suprimentos da Xerox
®
.
Main Tray
Bac principal
Vassoio principale
Hauptbehälter
Bandeja principal
Bandeja principal
Manual Feed Slot
Fente d'alimentation manuelle
Slot alimentazione manuale
Manueller Einzug
Ranura de alimentación manual
Slot de alimentação manual
Scanner
Scanner
Scanner
Scanner
Escáner
Scanner
Automatic Document Feeder (ADF)
Chargeur automatique de documents
Alimentatore automatico documenti
Automatischer Vorlageneinzug
Alimentador automático de documentos
Alimentador automático de originais
Exit Tray
Bac de sortie
Vassoio di ricezione
Ausgabefach
Bandeja de salida
Bandeja de saída
Toner Cartridge
Cartouche de toner
Cartuccia toner
Tonerkartusche
Cartucho de tóner
Cartucho de toner
Drum Cartridge
Module photorécepteur
Cartuccia fotoricettore
Trommeleinheit
Cartucho del tambor
Cartucho do fotorreceptor
FR
IT
DE
ES
PT
EN
FR
IT
DE
ES
PT
EN
FR
IT
DE
ES
PT
EN
FR
IT
DE
ES
PT
EN
FR
IT
DE
ES
PT
EN
FR
IT
DE
ES
PT
EN
FR
IT
DE
ES
PT
EN
FR
IT
DE
ES
PT
EN
FR
IT
DE
ES
PT
EN
FR
IT
DE
ES
PT
EN
www.xerox.com/office/B205supplies

4
www.xerox.com/office/B205support
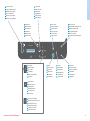
Printer Basics
Généralités
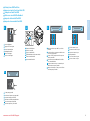
Xerox B205
System menus
Menus de systèmes
Menu di sistema
Systemmenüs
Menús de sistema
Menus do sistema
Feature menus
Menus de fonctions
Menu funzione
Funktionsmenüs
Menús de función
Menus de funções
Clear or delete
Corriger ou supprimer
Cancella o elimina
Leeren oder Löschen
Borrar o eliminar
Limpar ou excluir
Cancel job
Annuler le travail
Annulla il lavoro
Auftrag abbrechen
Cancelar trabajo
Cancelar trabalho
Start job
Démarrer le travail
Avvia il lavoro
Auftrag starten
Iniciar trabajo
Iniciar trabalho
Scroll menus
Menus déroulants
Scorri i menu
Scroll-Menüs
Menús de desplazamiento
Rolar menus
Accept selection
Accepter la sélection
Accetta selezione
Auswahl übernehmen
Aceptar la selección
Aceitar seleção
Go up one level in the menu
Remonter d’un niveau dans le menu
Sali di un livello nel menu
Eine Menüebene nach oben
Subir un nivel en el menú
Subir um nível no menu
Copy and scan modes
Copier et numériser des modes
Modalità di copia e scansione
Kopier- und Scanmodus
Modos de copia y escaneado
Modos de cópia e digitalização
Power Saver on, off
Activer/Désactiver Economie d'énergie
Risparmio energetico (Sì/No)
Energiesparbetrieb Ein/Aus
Ahorro de energía sí/no
Economia de energia ligado/desligado
Power On, Off
Mise sous/hors tension
Accensione/spegnimento
Betrieb Ein/Aus
Encender/Apagar
Ligar/Desligar
FR
IT
DE
ES
PT
EN
FR
IT
DE
ES
PT
EN
FR
IT
DE
ES
PT
EN
FR
IT
DE
ES
PT
EN
FR
IT
DE
ES
PT
EN
FR
IT
DE
ES
PT
EN
FR
IT
DE
ES
PT
EN
FR
IT
DE
ES
PT
EN
FR
IT
DE
ES
PT
EN
FR
IT
DE
ES
PT
EN
FR
IT
DE
ES
PT
EN

5
www.xerox.com/office/B205support
Printer Basics
Généralités
Ethernet
Wi-Fi
EthernetUSB
Wi-Fi
http://xxx.xxx.xxx.xxx
??
KWWS[[[[[[[[[[[[
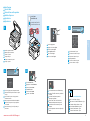
Xerox Easy Printer Manager
Xerox Easy Printer Manager
Xerox Easy Printer Manager
Xerox Easy Printer Manager
Xerox Easy Printer Manager
Xerox Easy Printer Manager
CentreWare Internet Services
Services Internet Xerox CentreWare
CentreWare Internet Services
CentreWare Internet Services
CentreWare Internet Services
CentreWare Internet Services
EN
FR
IT
DE
ES
PT
FR
IT
DE
ES
PT
EN
FR
Pour accéder aux paramètres de l’imprimante, aux informations de diagnostic et d’entretien, ainsi qu’au Guide de
l’utilisateur : Dans le menu Démarrer de Windows ou dans le dossier Applications Macintosh, sélectionnez Xerox
®
Easy Printer Manager.
IT
Accesso alle impostazioni della stampante, alle informazioni di diagnostica e manutenzione e alla Guida per
l'utente: Dal menu Start di Windows o dalla cartella Applicazioni Macintosh, selezionare Xerox
®
Easy Printer
Manager.
DE
Zugang zu Druckereinstellungen, Diagnose- und Wartungsinformationen sowie Benutzerhandbuch: Im
Windows-Startmenü bzw. im Macintosh-Ordner „Anwendungen“ Xerox
®
Easy Printer Manager auswählen.
ES
Para acceder a información sobre configuración, diagnóstico y mantenimiento de la impresora y a la Guía del
usuario: Desde el menú Inicio de Windows o desde la carpeta Aplicaciones de Macintosh, seleccione Xerox
®
Easy
Printer Manager.
PT
Para acessar as informações sobre configurações, diagnóstico e manutenção da impressora, e o Guia do Usuário: A
partir do menu Iniciar do Windows, ou da pasta Aplicações do Macintosh, selecione Xerox
®
Easy Printer Manager.
EN
To access printer settings, diagnostic and maintenance information, and the User Guide: From the Windows Start
menu, or from the Macintosh Applications folder, select Xerox
®
Easy Printer Manager.
To access printer configuration details, tray defaults, paper and supplies status, job status, and diagnostic functions,
use CentreWare Internet Services over a TCP/IP network. In a Web browser, type the printer IP address that is on the
Configuration page.
EN
Pour accéder aux détails de configuration de l’imprimante, aux défauts du bac, à l’état du papier et des
consommables, à l’état des travaux et aux fonctions de diagnostic, utilisez les Services Internet CentreWare à partir
d’un réseau TCP/IP. Dans un navigateur Web, saisissez l’adresse IP de l’imprimante qui se trouve sur la page
Configuration.
FR
Per accedere ai dettagli di configurazione della stampante, ai valori predefiniti dei vassoi, allo stato della carta e dei
materiali di consumo, allo stato dei lavori e alle funzioni di diagnostica, usare CentreWare Internet Services tramite
una rete TCP/IP. In un browser Web, digitare l'indirizzo IP della stampante nella Pagina di configurazione.
IT
Para acceder a los detalles de la configuración, valores predeterminados de las bandejas, estado de papel y
consumibles, estado del trabajo y funciones de diagnóstico, utilice CentreWare Internet Services a través de una red
TCP/IP. En un navegador web, escriba la dirección IP de la impresora en la página de configuración.
ES
Para acessar os detalhes de configuração da impressora, padrões da bandeja, status de papéis e suprimentos, status
do trabalho e funções de diagnóstico, use o CentreWare Internet Services através da rede TCP/IP. Em um navegador
da Web, digite o endereço IP da impressora que está na Página de configuração.
PT
Für den Zugriff auf die Druckerkonfiguration, die Standardwerte, Papier- und Verbrauchsmaterialstatus,
Auftragsstatus und Diagnosefunktionen CentreWare Internet Services über ein TCP/IP-Netzwerk verwenden. In
einem Webbrowser die auf der Konfigurationsseite angegebene IP-Adresse des Druckers eingeben.
DE

6
www.xerox.com/office/B205support
Printing
Impression
1
60–163 g/m
2
(16 lb. Bond–60 lb. Cover)
1
60–220 g/m
2
(16 lb. Bond–80 lb. Cover)
Letter............................8.5 x 11 in.
Legal.............................8.5 x 14 in.
Executive.....................7.25 x 10.5 in.
Folio..............................8.5 x 13 in.
Oficio............................8.5 x 13.5 in.
Postcard.......................4.0 x 6.0 in.
A4..................................210 x 297 mm
A5..................................148 x 210 mm
A6..................................105 x 148 mm
B5 ISO..........................176 x 250 mm
B5 JIS ...........................182 x 257 mm
Monarch......................3.9 x 7.5 in.
Commercial No. 10...4.1 x 9.5 in.
DL ..................................110 x 220 mm
C5 ..................................162 x 229 mm
C6 ..................................114 x 162 mm
WW
LL
W: 105–216 mm (4.1–8.5 in.)
L: 148.5–355.5 mm (5.8–14 in.)
WW
LL
W: 76–216 mm (3–8.5 in.)
L: 127–356 mm (5–14 in.)
Letter............................8.5 x 11 in.
Legal.............................8.5 x 14 in.
Executive.....................7.25 x 10.5 in.
Folio..............................8.5 x 13 in.
Oficio............................8.5 x 13.5 in.
A4..................................210 x 297 mm
A5..................................148 x 210 mm
A6..................................105 x 148 mm
B5 ISO..........................176 x 250 mm
B5 JIS ...........................182 x 257 mm
70–90 g/m
2
(20–24 lb. Bond)
164–220 g/m
2
(60–80 lb. Cover)
91–105 g/m
2
(24–28 lb. Bond)
60–69 g/m
2
(16–20 lb. Bond)
106–163 g/m
2
(28 lb. Bond–60 lb. cover)
1
Supported Papers
Papiers pris en charge
Carta supportata
Geeignetes Druckmaterial
Papeles admitidos
Papéis suportados
When loading paper, from the control panel, select the correct paper type and size.
Lors du chargement du papier à partir du panneau de contrôle, sélectionnez le type et le format de papier corrects.
Quando si carica la carta, selezionare il formato e il tipo di carta corretti dal pannello comandi.
Beim Einlegen von Druckmaterial am Steuerpult die richtige Druckmaterialart und das richtige Format auswählen.
Al cargar papel, seleccione el tipo y tamaño adecuados desde el panel de control.
Ao colocar papel, selecione no painel de controle o tipo e o tamanho corretos do papel.
FR
IT
DE
ES
PT
EN
FR
IT
DE
ES
PT
EN
In the print driver, select the paper size and type.
Dans le pilote d’impression, sélectionnez le format et le type de papier.
Nel driver della stampante, selezionare il formato e il tipo di carta.
Im Druckertreiber Druckmaterialart und -format auswählen.
En el controlador de la impresora, seleccione el tamaño y tipo de papel.
No driver de impressão, selecione o tamanho e o tipo do papel.
EN
FR
IT
DE
ES
PT
Plain
Standard
Normale
Normalpapier
Normal
Comum
Heavyweight
Épais
Carta pesante
Schwer
Cartulina
Alta gramatura
Cardstock
Papier cartonné
Cartoncino
Karton
Tarjetas
Cartão
Lightweight
Léger
Carta leggera
Dünnes Papier
Papel ligero
Baixa gramatura
Thicker
Plus épais
Più spessa
Dicker
Más grueso
Mais grosso
FR
IT
DE
ES
PT
EN
FR
IT
DE
ES
PT
EN
FR
IT
DE
ES
PT
EN
FR
IT
DE
ES
PT
EN
FR
IT
DE
ES
PT
EN
Custom
Personnalisé
Personalizzato
Benutzerdefiniert
Personalizado
Personalizado
Custom
Personnalisé
Personalizzato
Benutzerdefiniert
Personalizado
Personalizado
FR
IT
DE
ES
PT
EN
FR
IT
DE
ES
PT
EN

7
www.xerox.com/office/B205support
Printing
Impression
1
43
2
Basic Printing
Impression de base
Stampa di base
Einfaches Drucken
Impresión básica
Impressão básica
FR
IT
DE
ES
PT
EN
EN
FR
IT
DE
ES
PT
In the print driver, select the paper size and type.
Dans le pilote d’impression, sélectionnez le format et le type de papier.
Nel driver della stampante, selezionare il formato e il tipo di carta.
Im Druckertreiber Druckmaterialart und -format auswählen.
En el controlador de la impresora, seleccione el tamaño y tipo de papel.
No driver de impressão, selecione o tamanho e o tipo do papel.

8
www.xerox.com/office/B205support
Printing
Impression
1 2
3
5
4
Printing from a USB Flash Drive
Impression à partir d'un lecteur Flash USB
Stampa da un'unità flash USB
Drucken von einem USB-Flashlaufwerk
Impresión desde unidad Flash USB
Impressão de uma unidade flash USB
Navigate to a file, then press OK. To open a folder,
press OK.
Accédez à un fichier, puis appuyez sur OK. Pour ouvrir
un dossier, appuyez sur OK.
Passare a un file, quindi premere OK. Per aprire una
cartella, premere OK.
Eine Datei ansteuern und OK drücken. Zum Öffnen
eines Ordners OK drücken.
Desplácese hasta un archivo y a continuación pulse
OK. Para abrir una carpeta, pulse OK.
Navegue até um arquivo, e então pressione OK. Para
abrir uma pasta, pressione OK.
Select the number of copies.
Sélectionnez le nombre de copies.
Selezionare il numero di copie.
Auflage auswählen.
Seleccione el número de copias.
Selecione o número de cópias.
To start printing, press OK.
Pour démarrer l’impression, appuyez sur OK.
Per avviare la stampa, premere OK.
Zum Starten des Druckvorgangs OK drücken.
Para comenzar a imprimir, pulse OK.
Para iniciar a impressão, pressione OK.
FR
IT
DE
ES
PT
EN
FR
IT
DE
ES
PT
EN
FR
IT
DE
ES
PT
EN
FR
IT
DE
ES
PT
EN
Press the Copy button.
Appuyez sur le bouton Copier.
Premere il pulsante Copia.
Taste Kopieren drücken.
Pulse el botón Copiar.
Pressione o botão Copiar.
FR
IT
DE
ES
PT
EN
Insert the USB Flash Drive.
Insérez le lecteur USB.
Inserire l'unità flash USB.
USB-Flashlaufwerk an das Gerät anschließen.
Inserte la unidad Flash USB.
Insira a unidade flash USB.
FR
IT
DE
ES
PT
EN

9
www.xerox.com/office/B205support
Copying
Copie
1
2 3
4
5
60–105 g/m
2
(16–28 lb. Bond)
X: 148–216 mm (5.8–8.5 in.)
Y: 148–356 mm (5.8–14.0 in.)
Y
X
www.xerox.com/office/B205docs
Load the original document.
Mettez en place le document.
Caricare l'originale.
Vorlagen einlegen.
Coloque el documento original.
Coloque o original.
Press the Copy button.
Appuyez sur le bouton Copier.
Premere il pulsante Copia.
Taste Kopieren drücken.
Pulse el botón Copiar.
Pressione o botão Copiar.
Select the number of copies.
Sélectionnez le nombre de copies.
Selezionare il numero di copie.
Auflage auswählen.
Seleccione el número de copias.
Selecione o número de cópias.
To select copying options, navigate the menus.
Accédez aux menus pour sélectionner les options
de copie.
Per selezionare le opzioni di copia, spostarsi
all'interno dei menu.
Die Kopieroptionen über die Menüs auswählen.
Para seleccionar opciones de copia, desplácese
por los menús.
Para selecionar as opções de cópia, navegue
pelos menus.
Refer to: User Guide > Copying
Reportez-vous à : Guide de l’utilisateur > Copie
Consultare: Guida per l'utente > Copia
Siehe: Benutzerhandbuch > Kopieren
Consulte: Guía del usuario > Copia
Consulte: Guia do Usuário > Cópia
Basic Copying
Copie de base
Nozioni di base sulla copiatura
Einfaches Kopieren
Copia básica
Cópia básica
The Clear All button restores default settings.
Le bouton Tout effacer restaure les paramètres
par défaut.
Il pulsante Cancella tutto ripristina le
impostazioni predefinite.
Über die Taste "Alles löschen" werden die
Standardeinstellungen wiederhergestellt.
El botón Borrar todos restaura las opciones
prefijadas.
O botão Limpar tudo restaura as configurações
padrão.
Press the Start button.
Appuyez sur le bouton Démarrer.
Premere il pulsante Avvio.
Taste Start drücken.
Pulse el botón Comenzar.
Pressione o botão Iniciar.
FR
IT
DE
ES
PT
EN
FR
IT
DE
ES
PT
EN
FR
IT
DE
ES
PT
EN
FR
IT
DE
ES
PT
EN
FR
IT
DE
ES
PT
EN
FR
IT
DE
ES
PT
EN
FR
IT
DE
ES
PT
EN
FR
IT
DE
ES
PT
EN

10
www.xerox.com/office/B205support
Scanning
Numérisation
Ethernet
USB
Wi-Fi
60–105 g/m
2
(16–28 lb. Bond)
X: 142–216 mm (5.8–8.5 in.)
Y: 148–356 mm (5.8–14.0 in.)
Y
X
www.xerox.com/office/B205docs
www.xerox.com/office/B205driver
Scanning
Numérisation
Scansione
Scannen
Escaneado
Digitalização
Quando si è connessi tramite USB, Ethernet o Wi-Fi è possibile inviare i file scansiti dal pannello comandi della
stampante a un computer collegato. È anche possibile eseguire la scansione da un computer collegato. Per
impostare la scansione per la connessione, vedere Guida per l'utente > Installazione e impostazione > Impostazione
Scansione su PC. I driver di scansione sono disponibili nel sito Web Xerox.
IT
Avec une connexion USB, Ethernet ou Wi-Fi, vous pouvez envoyer des fichiers numérisés depuis le panneau de
commande de l'imprimante vers un ordinateur connecté. Vous pouvez aussi numériser depuis un ordinateur
connecté. Pour configurer la numérisation pour votre connexion, voir le Guide de l'utilisateur > Installation et
configuration > Configuration de la numérisation vers un PC. Les pilotes de numérisation sont disponibles sur le site
Web de Xerox.
FR
When connected with USB, Ethernet, or Wi-Fi you can send scanned files from the printer control panel to a
connected computer. You can also scan from a connected computer. To set up scanning for your connection, see the
User Guide > Installation and Setup > Scan to PC Setup. Scan drivers are available the Xerox Website.
EN
Bei USB-, Ethernet- oder WiFi-Anschluss können die Scandateien direkt vom Drucker an einen angeschlossenen
Computer gesendet werden. Die Scansteuerung kann auch über einen angeschlossenen Computer erfolgen. Zum
Einrichten der Scanfunktion siehe Benutzerhandbuch > Installation und Einrichtung > Einrichten der Scanausgabe
an PC. Die Scantreiber sind auf der Xerox-Website verfügbar.
DE
Si está conectado mediante USB, Ethernet o Wi-Fi, puede enviar archivos escaneados desde el panel de control de la
impresora a un PC conectado. También puede escanear desde un PC conectado. Para configurar el escaneado para
su conexión, consulte la Guía de usuario > Instalación y configuración >Configuración de Escanear a PC. Los
controladores de escáner están disponibles en el sitio web de Xerox.
ES
Quando conectado com USB, Ethernet ou Wi-Fi, você pode enviar arquivos digitalizados do painel de controle da
impressora ao computador conectado. É possível também digitalizar de um computador conectado. Para configurar
a digitalização para a sua conexão, consulte o Guia do Usuário > Instalação e Configuração > Configuração de
Digitalização para PC. Os drivers de digitalização estão disponíveis no site da Xerox.
PT
FR
IT
DE
ES
PT
EN
Load the original document on the document glass or in the document feeder.
Placez le document sur la glace d’exposition ou dans le chargeur de documents.
Caricare l'originale sulla lastra di esposizione o nell'alimentatore di documenti.
Die Vorlage auf das Vorlagenglas oder in den Vorlageneinzug legen.
Cargue el documento original en el cristal de exposición o en el alimentador de documentos.
Coloque o original sobre o vidro de originais ou no alimentador de originais.
EN
FR
IT
DE
ES
PT

11
www.xerox.com/office/B205support
Scanning
Numérisation
2
3
1
Scanning to a USB Flash Drive
Numérisation vers une clé USB
Scansione su un'unità flash USB
Scanausgabe: USB
Escaneado a una unidad flash USB
Digitalização para uma unidade flash USB
FR
IT
DE
ES
PT
EN
To start scanning, press OK.
Pour démarrer la numérisation, appuyez sur OK.
Per avviare la scansione, premere OK.
Zum Starten des Scanvorgangs OK drücken.
Para comenzar a escanear, pulse OK.
Para iniciar a digitalização, pressione OK.
FR
IT
DE
ES
PT
EN
Insert the USB Flash Drive.
Insérez le lecteur USB.
Inserire l'unità flash USB.
USB-Flashlaufwerk an das Gerät anschließen.
Inserte la unidad Flash USB.
Insira a unidade flash USB.
FR
IT
DE
ES
PT
EN
Press the Scan button.
Appuyez sur le bouton Numériser.
Premere il pulsante Scansione.
Taste Scannen drücken.
Pulse el botón Escanear.
Pressione o botão Digitalizar.
FR
IT
DE
ES
PT
EN

12
www.xerox.com/office/B205support
Scanning
Numérisation
2
6
Wi-Fi
Ethernet
3
5
4
USB
1
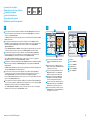
Scanning to a Computer
Numérisation vers un ordinateur
Scansione su un computer
Scanausgabe an einen Computer
Escaneado a PC
Digitalização para um computador
Select Scan to PC, then press OK.
Sélectionnez Numérisation vers un PC, puis appuyez
sur OK.
Selezionare Digit. su PC, quindi premere OK.
An PC scannen auswählen, dann OK drücken.
Seleccione Escanear a PC y pulse OK.
Selecione Digitalizar para PC e pressione OK.
Scroll to select a destination, then press OK.
Faites défiler pour sélectionner une destination,
puis appuyez sur OK.
Scorrere per selezionare una destinazione, quindi
premere OK.
Ausgabeziel ansteuern, dann OK drücken.
Desplácese para seleccionar un destino y pulse OK.
Role para selecionar um destino e pressione OK.
Scroll to select a profile if needed, then press OK.
Faites défiler pour sélectionner un profil si
nécessaire, puis appuyez sur OK.
Se necessario, scorrere per selezionare un profilo,
quindi premere OK.
Falls gewünscht, ein Profil auswählen, dann OK
drücken.
Desplácese para seleccionar un perfil si lo necesita
y pulse OK.
Role para selecionar um perfil, se necessário, e
pressione OK.
To select scanning options, navigate the menus.
Accédez aux menus pour sélectionner les options de
numérisation.
Per selezionare le opzioni di scansione, spostarsi
all'interno dei menu.
Die Scanoptionen über die Menüs auswählen.
Para seleccionar opciones de escaneado, desplácese
por los menús.
Para selecionar as opções de digitalização, navegue
pelos menus.
Press the Start button.
Appuyez sur le bouton Démarrer.
Premere il pulsante Avvio.
Taste Start drücken.
Pulse el botón Comenzar.
Pressione o botão Iniciar
The Clear All button restores default settings.
Le bouton Tout effacer restaure les paramètres
par défaut.
Il pulsante Cancella tutto ripristina le
impostazioni predefinite.
Über die Taste "Alles löschen" werden die
Standardeinstellungen wiederhergestellt.
El botón Borrar todos restaura las opciones
prefijadas.
O botão Limpar tudo restaura as configurações
padrão.
FR
IT
DE
ES
PT
EN
FR
IT
DE
ES
PT
EN
FR
IT
DE
ES
PT
EN
FR
IT
DE
ES
PT
EN
FR
IT
DE
ES
PT
EN
FR
IT
DE
ES
PT
EN
FR
IT
DE
ES
PT
EN
Press the Scan button.
Appuyez sur le bouton Numériser.
Premere il pulsante Scansione.
Taste Scannen drücken.
Pulse el botón Escanear.
Pressione o botão Digitalizar.
FR
IT
DE
ES
PT
EN

13
www.xerox.com/office/B205support
Scanning
Numérisation
1 2 3
2.1
2.2
Ethernet
USB
Wi-Fi
Scanning from a Computer
Numérisation à partir d’un ordinateur
Scansione da un computer
Scannen vom Computer aus
Escaneado desde un ordenador
Digitalização a partir de um computador
On your computer, launch the scan application. From Windows: Select Start > All Programs, then select the scan
application. From Macintosh: Open the Applications folder, then select the Image Capture app, or from System
Preferences, select Printers and Scanners.
Click New Scan or Scan, and confirm the appropriate scanner if required. If detailed settings are hidden, click Show
Details button or similar.
Lancer l’application de numérisation sur votre ordinateur. Sous Windows : Sélectionnez Démarrer > Tous les
programmes, puis sélectionnez l’application de numérisation. Sous Macintosh : Ouvrez le dossier Applications, puis
sélectionnez l’application Capture d’image, ou dans les préférences système, sélectionnez Imprimantes et
appareils de numérisation.
Cliquez sur Nouvelle numérisation ou Numériser, et confirmez l’appareil de numérisation approprié si nécessaire. Si
les détails des paramètres sont masqués, cliquez sur le bouton Afficher les détails ou un bouton semblable.
Dal computer, avviare l'applicazione di scansione. Da Windows: selezionare Start > Tutti i programmi, quindi
selezionare l'applicazione di scansione. Da Macintosh: Aprire la cartella Applicazioni, quindi selezionare l'app
Acquisizione immagini oppure, dalle Preferenze di sistema, selezionare Stampanti e scanner.
Fare clic su Nuova scansione o Scansione e confermare lo scanner da usare, se necessario. Se le impostazioni
dettagliate sono nascoste, fare clic sul pulsante Mostra dettagli o equivalente.
Am Computer die Scananwendung starten. Windows: Start > Programme und dann die Scananwendung auswählen.
Macintosh: Im Ordner „Anwendungen“ die Bilderfassungs-App oder in den Systemeinstellungen Drucker und
Scanner auswählen.
Auf Neuer Scan oder Scannen klicken und ggf. den Scanner bestätigen. Werden die detaillierten Einstellungen nicht
angezeigt, auf Details anzeigen (oder ähnlich lautend) klicken.
En el ordenador, inicie la aplicación de escaneado. En Windows: Seleccione Inicio > Todos los programas y a
continuación seleccione la aplicación de escaneado. En Macintosh: Abra la carpeta Aplicaciones y seleccione la
aplicación Digitalizar imagen, o bien en Preferencias del sistema, seleccione Impresoras y escáneres.
Haga clic en Nuevo escaneado o Escanear y confirme el escáner si es preciso. Si los ajustes detallados están ocultos,
haga clic en el botón Mostrar detalles o similar.
No seu computador, abra o aplicativo de digitalização. No Windows: Selecione Iniciar > Todos os programas, depois
selecione o aplicativo de digitalização. No Macintosh: Abra a pasta Aplicações, depois selecione a aplicação Captura
de Imagem, ou em Preferências do Sistema, selecione Impressoras e Scanners.
Clique em Nova digitalização ou Digitalizar, e confirme o scanner apropriado, se necessário. Se as configurações
detalhadas estiverem ocultas, clique no botão Exibir detalhes ou similar.
Click Scan.
Cliquez sur Numériser.
Fare clic su Digitalizza.
Auf Scannen klicken.
Haga clic en Digitalizar.
Clique em Digitalizar.
FR
IT
DE
ES
PT
EN
FR
IT
DE
PT
ES
To create a preview, from Windows, click Preview.
From a Mac, click Overview. Change settings as
needed.
Pour générer un aperçu sous Windows, cliquez sur
Aperçu. Sous Mac, cliquez sur Présentation. Modifiez
les paramètres selon vos besoins.
Per generare un'anteprima da Windows, fare clic su
Anteprima. Da un Mac, fare clic su Panoramica.
Modificare le impostazioni in base alla necessità.
Zum Erstellen einer Vorschau unter Windows auf
Vorschau klicken. Auf einem Mac auf Übersicht
klicken. Die Einstellungen nach Bedarf ändern.
Para crear una vista previa, en Windows haga clic en
Vista previa. En un Mac, haga clic en Información
general. Cambie la configuración según precise.
Para criar uma visualização, no Windows, clique em
Visualização. No Mac, clique em Visão geral. Altere
as configurações, como necessário.
FR
IT
DE
ES
PT
EN
FR
IT
DE
ES
PT
EN
EN

14
www.xerox.com/office/B205support
Troubleshooting
Dépannage
21 3
21 4 53
21
4
3
5.1
5.2
www.xerox.com/office/B205docs
Paper Jams
Bourrages papier
Inceppamenti della carta
Papierstaus
Atascos de papel
Atolamentos de papel
Refer to: User Guide > Troubleshooting
Reportez-vous à : Guide de l’utilisateur >
Dépannage
Consultare: Guida per l'utente > Risoluzione dei
problemi
Siehe: Benutzerhandbuch > Problembehandlung
Consulte: Guía del usuario > Solución de
problemas
Consulte: Guia do Usuário > Solução de
problemas
FR
IT
DE
ES
PT
EN
FR
IT
DE
ES
PT
EN
-
 1
1
-
 2
2
-
 3
3
-
 4
4
-
 5
5
-
 6
6
-
 7
7
-
 8
8
-
 9
9
-
 10
10
-
 11
11
-
 12
12
-
 13
13
-
 14
14


Xerox B205 Guía del usuario
- Categoría
- Impresoras láser / LED
- Tipo
- Guía del usuario
en otros idiomas
- français: Xerox B205 Mode d'emploi
- italiano: Xerox B205 Guida utente
- português: Xerox B205 Guia de usuario
Artículos relacionados
-
Xerox 3215 El manual del propietario
-
Xerox 3330 Guía de instalación
-
Xerox WorkCentre 3345 Guía de instalación
-
-
Xerox WORKCENTRE 3615 El manual del propietario
-
Xerox 6605 El manual del propietario
-
-
Xerox WorkCentre 3315/3325 El manual del propietario
-
Xerox 4265 El manual del propietario
-
Xerox B215 Guía del usuario