Xerox WorkCentre 3315/3325 El manual del propietario
- Tipo
- El manual del propietario

700N00227 Rev A
© 2012 Xerox Corporation. All Rights Reserved. XEROX® and XEROX and Design®
are trademarks of Xerox Corporation in the United States and/or other countries.
www.xerox.com/msds (U.S./Canada)
www.xerox.com/environment_europe
www.xerox.com/office/businessresourcecenter
www.xerox.com/office/
WC3315_WC3325support
www.xerox.com/office/
WC3315_WC3325support
• Printer drivers and utilities
• User manuals and instructions
• Online Support Assistant
• Safety specifications (in User Guide)
EN
www.xerox.com/msds (U.S./Canada)
www.xerox.com/environment_europe
More Information
Plus d'informations
Ulteriori informazioni
Weitere Informationen
Más información
Mais informações
Meer informatie
FR
IT
DE
ES
PT
NL
EN
ES
PT
FR
IT
DE
• Pilotes d'imprimantes et utilitaires
• Manuels de l'utilisateur et instructions
• Assistant de support en ligne
• Spécifications relatives à la sécurité (dans le Guide
de l'utilisateur)
• Driver e utilità di stampa
• Manuali dell'utente e istruzioni
• Supporto in linea
• Specifiche di sicurezza (nella Guida per l'utente)
• Druckertreiber und -dienstprogramme
• Benutzerhandbücher und Anleitungen
• Online-Support-Assistent
• Sicherheitshinweise (im Benutzerhandbuch)
• Controladores y utilidades de la impresora
• Manuales de usuario e instrucciones
• Asistente de ayuda en línea
• Especificaciones de seguridad (en la Guía del
usuario)
• Drivers da impressora e utilitários
• Manuais do usuário e instruções
• Assistente de suporte on-line
• Especificações de segurança (no Guia do Usuário)
• Printerdrivers en hulpprogramma's
• Gebruikershandleidingen en instructies
• Online Support Assistant (Online Support-assistent)
• Veiligheidsspecificaties (in de Handleiding voor de
gebruiker)
NL
Material Safety Data Sheets
Fiches de données de sécurité
Schede sulla sicurezza dei materiali
Material-Sicherheitsdatenblätter
Fichas de datos de seguridad
Fichas de informações de segurança de produtos
químicos
Veiligheidsinformatiebladen
www.xerox.com/office/
businessresourcecenter
Templates, tips, and tutorials
Modèles, conseils et didacticiels
Modelli, suggerimenti ed esercitazioni
Profile, Tipps und Lehrgänge
Plantillas, consejos y lecciones prácticas
Modelos, dicas e tutoriais
Sjablonen, tips en zelfstudies
EN
FR
IT
DE
ES
PT
NL
EN
FR
IT
DE
ES
PT
NL
Xerox
®
WorkCentre
®
3315/3325
Quick Use Guide
Petit guide d'utilisation
Italiano
Deutsch
Español
Português
Nederlands
Guida rapida per l'uso
Kurzübersicht
Guía de uso rápido
Guia de utilização rápida
Beknopte gebruikshandleiding
IT
DE
ES
PT
Xerox WorkCentre 3315/3325
Black and White Multifunction Printer
Imprimante multifonctions noir et blanc
NL
La página se está cargando...

3
www.xerox.com/office/WC3315_WC3325support
Printer Basics
Généralités
Printer Basics
Généralités
Document Feeder
Chargeur de documents
Alimentatore documenti
Vorlageneinzug
Alimentador de documentos
Alimentador de documentos
AOD
EN
FR
IT
DE
ES
PT
NL
Main Tray
Magasin principal
Vassoio principale
Hauptpapierbehälter
Bandeja principal
Bandeja principal
Hoofdpapierlade
EN
FR
IT
DE
ES
PT
NL
Scanner
Scanner
Scanner
Scanner
Escáner
Scanner
Scanner
EN
FR
IT
DE
ES
PT
NL
Exit Tray
Bac récepteur
Vassoio di uscita
Ausgabefach
Bandeja de salida
Bandeja de saída
Opvangbak
EN
FR
IT
DE
ES
PT
NL
Bypass Tray
Départ manuel
Vassoio bypass
Zusatzzufuhr
Bandeja especial
Bandeja manual
Handmatige invoer
EN
FR
IT
DE
ES
PT
NL
Print Cartridge
Cartouche d'imprimante
Cartuccia di stampa
Tonerbehälter
Cartucho de impresión
Cartucho de impressão
Tonercassette
EN
FR
IT
DE
ES
PT
NL
USB Port
Port USB
Porta USB
USB-Port
Puerto USB
Porta USB
USB-poort
EN
FR
IT
DE
ES
PT
NL
Tray 2
Magasin 2
Vassoio 2
Papierbehälter 2
Bandeja 2
Bandeja 2
Lade 2
EN
FR
IT
DE
ES
PT
NL
Printer Tour
Découverte de l'imprimante
Presentazione della stampante
Übersicht über den Drucker
Recorrido por la impresora
Roteiro da impressora
Kennismaking met de printer
FR
IT
DE
ES
PT
NL
EN
Faxing..........................................................................15
Télécopie
Fax
Fax
Envío de fax
Envio de fax
Faxen
Troubleshooting ........................................................17
Dépannage
Risoluzione dei problemi
Fehlerbehebung
Solución de problemas
Solução de problemas
Problemen oplossen
Paper Jams.................................................................17
Bourrages papier
Inceppamenti della carta
Papierstaus
Atascos de papel
Atolamentos de papel
Papierstoringen
More Information.....................................................18
Plus d'informations
Ulteriori informazioni
Weitere Informationen
Más información
Mais informações
Meer informatie
Basic Faxing............................................................... 16
Télécopie de base
Nozioni di base sul fax
Einfaches Faxen
Envío de fax básico
Envio de fax básico
Eenvoudige faxopdrachten
EN
FR
IT
DE
ES
PT
NL
EN
FR
IT
DE
ES
PT
NL
EN
FR
IT
DE
ES
PT
NL
EN
FR
IT
DE
ES
PT
NL
CentreWare Internet Services................................ 18
Services Internet CentreWare
CentreWare Internet Services
CentreWare Internet Services
Servicios de Internet de CentreWare
Serviços de Internet do CentreWare
CentreWare Internet Services
EN
FR
IT
DE
ES
PT
NL
EN
FR
IT
DE
ES
PT
NL

4
www.xerox.com/office/WC3315_WC3325support
Printer Basics
Généralités
OK
1 2 3
4 5 6
7 8 9
*
0 # C
ABC
@ / . ’
& + - _ ,
DEF
JKLGHI MNO
TUVPQRS WXYZ
CA
OK
Arrow buttons scroll up, down, forward, and back through the menus
Les touches fléchées vers le haut, le bas, la gauche ou la droite, permettent de naviguer dans
les menus
Le frecce di scorrimento consentono di spostarsi tra le opzioni dei menu
Pfeiltasten zur Navigation durch die Menüs nach oben, unten, vorwärts und zurück
Botones de flecha para desplazarse hacia arriba, abajo, adelante y atrás en los menús
Botões de seta para subir, descer, avançar ou retornar pelos menus
Pijltoetsen voor omhoog, omlaag, vooruit en achteruit door de menu's bladeren
EN
FR
IT
DE
ES
PT
OK button accepts the menu selection
Appuyer sur OK pour accepter la sélection du menu
Il pulsante OK consente di accettare la selezione di menu
Taste "OK" zur Bestätigung der Menüauswahl
Botón OK para aceptar la selección del menú
O botão OK aceita a seleção do menu
Met knop OK accepteert u de menuselectie
EN
FR
IT
DE
ES
PT
NL
NL
Goes up one level in the menu
Remonte d'un niveau dans le menu
Passa al livello superiore nel menu
Im Menü eine Ebene nach oben gehen
Subir un nivel en el menú
Sobe um nível no menu
Hiermee gaat u een niveau in het menu omhoog
EN
FR
IT
DE
ES
PT
NL
Select paper tray
Sélectionner un magasin
Seleziona il vassoio carta
Papierbehälterwahl
Seleccionar la bandeja de papel
Selecionar a bandeja de papel
Selecteer de papierlade
EN
FR
IT
DE
ES
PT
NL
Job layout
Disposition du travail
Layout lavoro
Auftragslayout
Formato del trabajo
Layout do trabalho
Opdrachtopmaak
EN
FR
IT
DE
ES
PT
NL
Active and saved jobs
Travaux actifs et travaux enregistrés
Lavori attivi e salvati
Aktive und gespeicherte Druckaufträge
Trabajos activos y guardados
Trabalhos ativos e salvos
Actieve en opgeslagen opdrachten
EN
FR
IT
DE
ES
PT
NL
Settings and information
Paramètres et informations
Impostazioni e informazioni
Einstellungen und Informationen
Configuración e información
Configurações e Informações
Instellingen en informatie
EN
FR
IT
DE
ES
PT
NL
Enter the system menus
Entrer les menus système
Accede ai menu del sistema
Systemmenüs aufrufen
Acceder a los menús del sistema
Inserir os menus do sistema
Open de systeemmenu's
EN
FR
IT
DE
ES
PT
NL
Access address book
Accéder au carnet d'adresses
Accede alla rubrica
Adressbuch aufrufen
Acceder a la libreta de direcciones
Acessar o catálogo de endereços
Open het adresboek
EN
FR
IT
DE
ES
PT
NL
Redial a fax, or enter a pause
Recomposer un numéro de fax ou Insérer une pause
Riseleziona un numero fax oppure inserisce una pausa
Faxverbindung wiederholen oder Pause
Volver a marcar el número de fax o introducir una
pausa
Rediscar um fax ou inserir uma pausa
Een fax opnieuw verzenden of een pauze invoeren
EN
FR
IT
DE
ES
PT
NL
Power Saver on, off
Économiseur d'énergie activé, désactivé
Attiva/Disattiva Risparmio energia
Energiesparbetrieb ein, aus
Ahorro de energía activado, desactivado
Ligar, desligar Economia de Energia
Energiespaarstand aan, uit
EN
FR
IT
DE
ES
PT
NL
Clear all changed settings
Annuler toutes les modifications des
paramètres
Cancella tutte le impostazioni
modificate
Alle geänderten Einstellungen
löschen
Borrar la configuración modificada
Apagar todas as configurações
alteradas
Wis alle gewijzigde instellingen
EN
FR
IT
DE
ES
PT
NL
Cancel the current job
Annuler le travail en cours
Annulla il lavoro corrente
Aktuellen Auftrag abbrechen
Cancelar el trabajo actual
Cancelar o trabalho atual
Annuleer de huidige opdracht
EN
FR
IT
DE
ES
PT
NL
Clear a character
Effacer un caractère
Cancella un carattere
Zeichen löschen
Borrar un carácter
Apagar um caractere
Wis een teken
EN
FR
IT
DE
ES
PT
NL
Interrupts or resumes the current job
Interrompre ou reprendre le travail en cours
Interrompe o riprende il lavoro corrente
Aktuellen Auftrag unterbrechen oder wieder
aufnehmen
Interrumpir o reanudar el trabajo actual
Interromper ou retomar o trabalho atual
Onderbreek of hervat de huidige opdracht
*
EN
FR
IT
DE
ES
PT
NL
Manual dial
Numérotation manuelle
Selezione manuale
Manuell wählen
Marcado manual
Discagem manual
Handmatig kiezen
EN
FR
IT
DE
ES
PT
NL
*3325DN/ 3325 DNI

5
www.xerox.com/office/WC3315_WC3325support
Printing
Impression
www.xerox.com/paper (U.S./Canada)
www.xerox.com/europaper
60–70 g/m
2
(16 lb.–18 lb. Bond)
1 2 3
Thin
Fin
Sottile
Dünn
Fino
Fino
Dun
EN
FR
IT
DE
ES
PT
NL
70–90 g/m
2
(18 lb.–24 lb. Bond)
Plain
Standard
Normale
Normalpapier
Normal
Comum
Gewoon
EN
FR
IT
DE
ES
PT
NL
105–120 g/m
2
(28 lb.–32 lb. Bond)
Bond
Papier Bond
Standard
Postpapier
Papel Bond
Encorpado
Bankpost
EN
FR
IT
DE
ES
PT
NL
120–163 g/m
2
(32 lb. Bond–60 lb. Cover)
Cardstock
Support cartonné
Cartoncino
Karton
Cartulina
Cartão
Karton
EN
FR
IT
DE
ES
PT
NL
90–105 g/m
2
(24 lb.–28 lb. Bond)
Thick
Épais
Spessa
Dick
Grueso
Grosso
Dik
EN
FR
IT
DE
ES
PT
NL
www.xerox.com/office/
WC3315_WC3325docs
3
60–163 g/m
2
(16 lb. Bond – 60 lb. Cover)
Executive..................7.25 x 10.5 in.
Letter.........................8.5 x 11.0 in.
US Folio.....................8.5 x 13.0 in.
Oficio.........................8.5 x 13.5 in.
Legal..........................8.5 x 14.0 in.
A6...............................105 x 148 mm
A5...............................148 x 210 mm
ISO B5.......................176 x 250 mm
JIS B5 ........................182 x 257 mm
A4...............................210 x 297 mm
1 2
1
60–220 g/m
2
(16 lb. Bond–80 lb. Cover)
Postcard....................4.0 x 6.0 in.
Executive..................7.25 x 10.5 in.
Letter.........................8.5 x 11.0 in.
US Folio.....................8.5 x 13.0 in.
Oficio.........................8.5 x 13.5 in.
Legal..........................8.5 x 14.0 in.
A6...............................105 x 148 mm
A5...............................148 x 210 mm
ISO B5.......................176 x 250 mm
JIS B5 ........................182 x 257 mm
A4...............................210 x 297 mm
Monarch...................3.9 x 7.5 in.
#10.............................4.12 x 9.5 in.
DL ...............................110 x 220 mm
C6 ...............................114 x 162 mm
C5 ...............................162 x 229 mm
3
WW
LL
3
WW
LL
163–220 g/m
2
(60 lb.–80 lb. Cover)
3
Thicker
Plus épais
Più spessa
Dicker
Más grueso
Mais grosso
Dikker
EN
FR
IT
DE
ES
PT
NL
OK
1
2
Supported Papers
Supports pris en charge
Carta supportata
Zulässiges Papier
Papel admitido
Papéis compatíveis
Ondersteunde papiervarianten
FR
IT
DE
ES
PT
NL
EN
When loading paper: Confirm or select the correct type and size on the control panel.
Quand vous chargez le papier, confirmez ou sélectionnez le type et le format requis sur le panneau de commande
Quando si carica carta: confermare oppure selezionare il tipo di carta corretto sul pannello comandi
Beim Einlegen von Papier: Einstellung von Papierformat/-art am Steuerpult prüfen und ggf. ändern
Cuando coloque papel: confirme o seleccione el tipo y el tamaño correctos del papel en el panel de control
Ao colocar o papel: confirmar ou selecionar tipo e tamanho corretos no painel de controle
Bij het plaatsen van papier: bevestig of selecteer de juiste papiersoort en het juiste formaat op het
bedieningspaneel
EN
FR
IT
DE
ES
PT
NL
W: 104.6–215.9 mm (4.12–8.5 in.)
L: 148.3–355.6 mm (5.84–14 in.)
W: 76.2–215.9 mm (3–8.5 in.)
L: 127–355.6 mm (5–14 in.)
See: User Guide > Media Specifications
Voir : Guide de l'utilisateur > Spécifications des supports
Vedere: Guida per l'utente > Specifiche della carta
Siehe: Benutzerhandbuch > Materialspezifikationen
Consulte: Guía del usuario > Especificaciones de soportes de
impresión
Consulte: Guia do Usuário > Especificações do material
Zie: Handleiding voor de gebruiker > Papierspecificaties
EN
FR
IT
DE
ES
PT
NL

6
www.xerox.com/office/WC3315_WC3325support
Printing
Impression
1 2
1 2
OK
3
Windows
Mac
www.xerox.com/office/WC3315_WC3325docs
LGL / A4 / LTR
Basic Printing
Impression de base
Nozioni di base sulla stampa
Einfaches Drucken
Impresión básica
Impressão Básica
Eenvoudige afdrukopdrachten
FR
IT
DE
ES
PT
NL
EN
See: User Guide > Getting Started >
Loading Paper
Voir : Guide de l'utilisateur > Pour
commencer > Chargement du papier
Vedere: Guida per l'utente > Introduzione
> Caricamento della carta
Siehe: Benutzerhandbuch > Erste Schritte
> Papier einlegen
Consulte: Guía del usuario > Introducción
> Colocación del papel
Consulte: Guia do Usuário > Instruções de
operação > Abastecimento de papel
Zie: Handleiding voor de gebruiker > Aan
de slag > Papier plaatsen
EN
FR
IT
DE
ES
PT
NL
EN
FR
IT
DE
ES
PT
NL
Confirm or change size and type settings. When printing,
select printing options in the print driver.
Confirmez ou modifiez les paramètres relatifs au format
et au type. Lors de l'impression, sélectionnez les options
d'impression dans le pilote d'imprimante.
Confermare o modificare le impostazioni di formato e
tipo. Durante la stampa, selezionare le opzioni di stampa
nel driver di stampa.
Einstellung von Papierformat/-art prüfen und ggf.
ändern. Für den Druckbetrieb die Druckoptionen im
Druckertreiber auswählen.
Confirme o modifique la configuración de tamaño y de
tipo. Al imprimir, seleccione las opciones de impresión en
el controlador de impresión.
Confirme ou altere as configurações de tamanho e tipo.
Ao imprimir, selecione as opções de impressão no driver
de impressão.
Bevestig of wijzig de instellingen voor papierformaat en
-soort. Selecteer voor het afdrukken speciale
afdrukopties in de printerdriver.

7
www.xerox.com/office/WC3315_WC3325support
Copying
Copie
60–120 g/m
2
(16–32 lb. Bond)
X: 210–216 mm (8.25–8.5 in.)
Y: 279.4–355.6 mm (11.0–14.0 in.)
Y
X
1
2
4
5
3
1 2 3
4 5 6
7 8 9
0 #
ABC
@ / . ’
& + - _ ,
DEF
JKLGHI MNO
TUVPQRS WXYZ
OK
CA
www.xerox.com/office/WC3315_WC3325docs
OK
Basic Copying
Copie de base
Nozioni di base sulla copia
Einfaches Kopieren
Copia básica
Cópia básica
Eenvoudige kopieertaken
FR
IT
DE
ES
PT
NL
EN
Load the original
Placez le papier
Caricare l'originale
Vorlage einlegen
Coloque el original
Coloque o original
Plaats het origineel
EN
FR
IT
DE
ES
PT
NL
IT
DE
FR
ES
PT
NL
EN
Navigate the menus to select copying options
Sélectionnez les options de copie en navigant dans les
menus
Esplorare i menu per selezionare le opzioni di copia
Im Menü die Kopieroptionen aufrufen
Desplácese por los menús para seleccionar las
opciones de copia
Navegue pelos menus para selecionar as opções de
cópia
Navigeer door de menu's om de kopieeropties te
selecteren
Press Back, then the Start button
Appuyez sur le bouton Retour, puis sur Démarrer
Premere il pulsante Indietro e poi il pulsante Avvio
Zunächst Zurück und dann Start drücken
Pulse el botón Atrás y, a continuación, el botón
Comenzar
Pressione Voltar e, então, o botão Iniciar
Druk op Terug en vervolgens op de knop Start
EN
FR
IT
DE
ES
PT
NL
See: User Guide > Copying
Voir : Guide de l'utilisateur > Copie
Vedere: Guida per l'utente > Copia
Siehe: Benutzerhandbuch > Kopieren
Consulte: Guía del usuario > Copia
Consulte: Guia do Usuário > Cópia
Zie: Handleiding voor de gebruiker > Kopiëren
EN
FR
IT
DE
ES
PT
NL
Press the Copy button
Appuyez sur le bouton Copie
Premere il pulsante Copia
Taste Kopieren drücken
Pulse el botón Copiar
Pressione o botão Cópia
Druk op de knop Kopiëren
EN
FR
IT
DE
ES
PT
NL
Select the number of copies
Sélectionnez le nombre de copies
Selezionare il numero di copie
Auflage auswählen
Seleccione el número de copias
Selecione o número de cópias
Selecteer het aantal kopieën
EN
FR
IT
DE
ES
PT
NL
IT
DE
FR
ES
PT
NL
EN
The Clear All button restores default settings.
Le bouton Annuler tout rétablit les paramètres
par défaut
Il pulsante Cancella tutto consente di
ripristinare le impostazioni predefinite
Die Taste Alles löschen stellt die
Standardeinstellungen wieder her
El botón Borrar todos restaura la configuración
prefijada
O botão Apagar Tudo restaura as
configurações padrão
Met de knop Alles wissen herstelt u de
standaardinstellingen

8
www.xerox.com/office/WC3315_WC3325support
Scanning
Numérisation
Ethernet
USB
WiFi
www.xerox.com/office/WC3315_WC3325docs
60–120 g/m
2
(16–32 lb. Bond)
X: 210–216 mm (8.25–8.5 in.)
Y: 279.4–355.6 mm (11.0–14.0 in.)
Y
X
You can scan images with a USB connection or over a network. The WorkCentre 3325 DNI also supports a
wireless connection. You can start the scan at your computer or at the printer control panel. To set up
scanning see the System Administrator Guide.
EN
Scanning
Numérisation
Scansione
Scannen
Escaneado
Digitalização
Scannen
FR
IT
DE
ES
PT
NL
EN
Loading the original
Placer le papier
Caricamento dell'originale
Vorlage einlegen
Colocación del original
Colocação do original
Het origineel plaatsen
EN
FR
IT
DE
ES
PT
NL
IT
FR
DE
Vous pouvez numériser des images via une connexion USB ou sur un réseau. Le WorkCentre 3325 DNI prend
aussi en charge une connexion sans fil. Vous pouvez commencer la numérisation depuis votre ordinateur ou le
panneau de commande de l'imprimante. Pour configurer la numérisation, voir le Guide de l'administrateur
système.
È possibile scansire le immagini utilizzando una connessione USB oppure una connessione di rete. WorkCentre
3325 DNI supporta anche una connessione wireless. È possibile avviare la scansione dal computer oppure dal
pannello comandi della stampante. Per impostare la funzionalità di scansione, vedere System Administrator
Guide (Guida per l'amministratore del sistema).
Bilder können mit einer USB-Verbindung oder über ein Netzwerk gescannt werden. Das WorkCentre 3325 DNI
unterstützt auch Drahtlosnetzwerke. Der Scanvorgang kann am Computer oder am Steuerpult des Druckers
gestartet werden. Zur Einrichtung des Scanvorgangs siehe System Administrator Guide
(Systemadministratorhandbuch).
PT
ES
NL
Puede escanear imágenes mediante una conexión USB o a través de una red. La impresora WorkCentre 3325
DNI también admite conexiones inalámbricas. Puede iniciar el escaneado desde su equipo, o mediante el
panel de control de la impresora. Para configurar el escaneado, consulte la Guía del administrador del
sistema.
U kunt beelden scannen met een USB-verbinding of via een netwerk. De WorkCentre 3325 DNI ondersteunt
ook een draadloze verbinding. U kunt het scannen starten op de computer of op het bedieningspaneel van de
printer. Zie de System Administrator Guide (Handleiding voor de systeembeheerder) voor het maken van
scaninstellingen.
La página se está cargando...

10
www.xerox.com/office/WC3315_WC3325support
Scanning
Numérisation
USB
1 2 3 4
3.1
3.2
Scanning from a Computer using Windows 7
Numérisation à partir d'un ordinateur sous Windows 7
Scansione da un computer con Windows 7
Von einem Computer mit Windows 7 aus scannen
Escaneado desde un equipo mediante Windows 7
Digitalização a partir de um computador usando Windows 7
Scannen vanaf een computer met Windows 7
FR
IT
DE
ES
PT
NL
EN
IT
DE
FR
ES
PT
NL
EN
Launch Windows Fax and Scan application, click
New Scan
Pour lancer l'application Windows télécopie et
numérisation, cliquez sur Nouvelle numérisation
Avviare l'applicazione Fax e scanner di Windows e
poi fare clic su Nuova digitalizzazione
Die Anwendung "Windows-Fax und -Scan" starten
und auf Neuer Scan klicken
Inicie la aplicación Fax y Escáner de Windows, haga
clic en Nueva digitalización
Inicie o aplicativo Windows Fax and Scan, clique em
Nova Digitalização
Start de toepassing Windows Faxen en scannen en
klik op Nieuwe scan
Confirm the scanner
Confirmez le scanner
Confermare lo scanner
Scanner bestätigen
Confirme el escáner
Confirme o scanner
Bevestig de scanner
EN
FR
IT
DE
ES
PT
NL
IT
DE
FR
ES
PT
NL
EN
Click Preview, and confirm or change settings
Cliquez sur Aperçu, et confirmez ou changez les
paramètres
Fare clic su Anteprima, quindi confermare oppure
modificare le impostazioni
Auf Vorschau klicken und Einstellungen prüfen und
ggf. ändern
Haga clic en Vista previa y confirme o modifique la
configuración
Clique em Visualizar e confirme ou altere as
configurações
Klik op Voorbeeld en bevestig of wijzig de
instellingen
Click Scan
Cliquez sur Numérisation
Fare clic su Scansiona
Auf Scannen klicken
Haga clic en Escanear
Clique em Digitalizar
Klik op Scannen
EN
FR
IT
DE
ES
PT
NL
EN
FR
IT
DE
ES
PT
NL
The document feeder cannot preview
Le chargeur de documents ne prend pas en charge les aperçus
L'alimentatore automatico non consente di visualizzare un'anteprima
Eine Vorschau ist mit dem Vorlageneinzug nicht möglich
El alimentador de documentos no puede mostrar la vista previa
O alimentador de documentos não pode visualizar
De AOD kan geen afdrukvoorbeeld laten zien

Scanning
Numérisation
11
www.xerox.com/office/WC3315_WC3325support
USB
1 2
3 4
3.1
3.2
Scanning from a Computer using Windows XP
Numérisation à partir d'un ordinateur sous Windows XP
Scansione da un computer con Windows XP
Von einem Computer mit Windows XP aus scannen
Escaneado desde un equipo mediante Windows XP
Digitalização a partir de um computador usando Windows XP
Scannen vanaf een computer met Windows XP
FR
IT
DE
ES
PT
NL
EN
IT
DE
FR
ES
PT
NL
EN
Launch the scan application (import method
may vary)
Lancez l'application de numérisation (la méthode
d'importation peut varier)
Avviare l'applicazione di scansione (il metodo di
importazione può variare)
Scananwendung starten (Importierungsmethode ist
ggf. anders)
Inicie la aplicación de escaneado (el método de
importación puede variar)
Inicie o aplicativo de digitalização (o método de
importação pode variar)
Start de scantoepassing (de importeermethode kan
variëren)
Select the scan settings
Sélectionnez les paramètres de numérisation
Selezionare le impostazioni di scansione
Scaneinstellungen wählen
Seleccione la configuración de escaneado
Selecione as configurações de digitalização
Selecteer de scaninstellingen
EN
FR
IT
DE
ES
PT
NL
Click Preview and select the scan area
Cliquez sur Aperçu, et sélectionnez la zone à
numériser
Fare clic su Anteprima, quindi selezionare l'area di
scansione
Auf Vorschau klicken und Scanbereich auswählen
Haga clic en Vista previa y seleccione el área de
escaneado
Clique em Visualizar e selecione a área de
digitalização
Klik op Voorbeeld en selecteer het scangebied
EN
FR
IT
DE
ES
PT
NL
Click Scan
Cliquez sur Numérisation
Fare clic su Scansiona
Auf Scannen klicken
Haga clic en Escanear
Clique em Digitalizar
Klik op Scannen
EN
FR
IT
DE
ES
PT
NL
EN
FR
IT
DE
ES
PT
NL
The document feeder cannot preview
Le chargeur de documents ne prend pas en charge les aperçus
L'alimentatore automatico non consente di visualizzare un'anteprima
Eine Vorschau ist mit dem Vorlageneinzug nicht möglich
El alimentador de documentos no puede mostrar la vista previa
O alimentador de documentos não pode visualizar
De AOD kan geen afdrukvoorbeeld laten zien

12
www.xerox.com/office/WC3315_WC3325support
Scanning
Numérisation
USB
1 2
2.1
2.2
3 4
Scanning from a Computer using Macintosh 10.3 and later
Numérisation à partir d'un ordinateur Macintosh fonctionnant sous
Mac OS X 10.3 ou version ultérieure
Scansione da un computer con Macintosh 10.3 e versioni successive
Von einem Computer mit Macintosh (ab 10.3 ) aus scannen
Escaneado desde un equipo mediante Macintosh 10.3 o posterior
Digitalização a partir de um computador usando Macintosh 10.3 ou superior
Scannen vanaf een computer met Macintosh OS X 10.3 en hoger
FR
IT
DE
ES
PT
NL
EN
Launch Image Capture application
Lancez l'application Capture d'image
Avviare l'applicazione Acquisizione Immagine
Anwendung "Digitale Bilder" starten
Inicie la aplicación Captura de imagen
Inicie o aplicativo Image Capture (Captura da
Imagem)
Start het programma Fotolader
EN
FR
IT
DE
ES
PT
NL
Click Overview, and select the scan area
Cliquez sur Présentation, et sélectionnez la zone à
numériser
Fare clic su Panoramica, quindi selezionare l'area di
scansione
Auf Übersicht klicken und Scanbereich auswählen
Haga clic en Visión general y seleccione el área de
escaneado
Clique em Visão geral e selecione a área de
digitalização
Klik op Overzicht en selecteer het scangebied
EN
FR
IT
DE
ES
PT
NL
Confirm or change other scan settings
Confirmez ou changez les autres paramètres de
numérisation
Confermare o modificare le impostazioni di scansione
Übrige Scaneinstellungen prüfen und ggf. ändern
Confirme o modifique las otras opciones de
escaneado
Confirme ou altere outras configurações de
digitalização
Bevestig of wijzig de andere scaninstellingen
EN
FR
IT
DE
ES
PT
NL
Click Scan
Cliquez sur Numérisation
Fare clic su Scansiona
Auf Scannen klicken
Haga clic en Escanear
Clique em Digitalizar
Klik op Scannen
EN
FR
IT
DE
ES
PT
NL
EN
FR
IT
DE
ES
PT
NL
The document feeder cannot preview
Le chargeur de documents ne prend pas en charge les aperçus
L'alimentatore automatico non consente di visualizzare un'anteprima
Eine Vorschau ist mit dem Vorlageneinzug nicht möglich
El alimentador de documentos no puede mostrar la vista previa
O alimentador de documentos não pode visualizar
De AOD kan geen afdrukvoorbeeld laten zien

Scanning
Numérisation
13
www.xerox.com/office/WC3315_WC3325support
1
5
2
1 2 3
4 5 6
7 8 9
0 #
ABC
@ / . ’
& + - _ ,
DEF
JKLGHI MNO
TUVPQRS WXYZ
OK
3
1 2 3
4 5 6
7 8 9
0 #
ABC
@ / . ’
& + - _ ,
DEF
JKLGHI MNO
TUVPQRS WXYZ
OK
4
1 2 3
4 5 6
7 8 9
0 #
ABC
@ / . ’
& + - _ ,
DEF
JKLGHI MNO
TUVPQRS WXYZ
OK
OK
OK
Scanning to Email
Numérisation vers courrier électronique
Scansione su e-mail
Scan per E-Mail versenden
Escaneado a e-mail
Digitalização para e-mail
Scannen naar e-mail
FR
IT
DE
ES
PT
NL
EN
Press the E-mail button
Appuyez sur le bouton Courrier électronique
Premere il pulsante E-mail
Taste E-Mail drücken
Pulse el botón E-mail
Pressione o botão E-mail
Druk op de knop E-mail
EN
FR
IT
DE
ES
PT
NL
Choose the file format and press the OK button
Choisissez le format du fichier et appuyez sur OK
Scegliere il formato del file e premere il pulsante OK
Dateiformat auswählen und Taste OK drücken
Seleccione el formato del archivo y pulse el botón OK
Escolha o formato do arquivo e pressione o botão OK
Kies de bestandsindeling en druk op OK
EN
FR
IT
DE
ES
PT
NL
Enter the sender's email address and press the OK
button
Saisissez l'adresse électronique de l'expéditeur et
appuyez sur OK
Inserire l'indirizzo e-mail del mittente e premere il
pulsante OK
E-Mail-Adresse des Absenders eingeben und mit Taste
OK bestätigen
Introduzca la dirección de e-mail del remitente y
pulse el botón OK
Insira o endereço de e-mail do remetente e pressione
o botão OK
Voer het e-mailadres van de afzender in en druk op
OK
EN
FR
IT
DE
ES
PT
NL
Enter the recipient's email address and press the OK
button
Saisissez l'adresse électronique du destinataire et
appuyez sur OK
Inserire l'indirizzo e-mail del destinatario e premere il
pulsante OK
E-Mail-Adresse des Empfängers eingeben und mit
Taste OK bestätigen
Introduzca la dirección de e-mail del destinatario y
pulse el botón OK
Insira o endereço de e-mail do destinatário e
pressione o botão OK
Voer het e-mailadres van de ontvanger in en druk op
OK
EN
FR
IT
DE
ES
PT
NL
Enter the email subject and press the OK button
Saisissez l'objet du courrier et appuyez sur OK
Inserire l'oggetto e-mail e premere il pulsante OK
E-Mail-Betreff eingeben und Taste OK drücken
Introduzca el asunto del e-mail y pulse el botón OK
Insira o assunto do e-mail e pressione o botão OK
Voer het onderwerp van de e-mail in en druk op OK
EN
FR
IT
DE
ES
PT
NL
The Left Arrow button clears characters
La touche fléchée vers la gauche efface les
caractères
La freccia di scorrimento sinistra consente di
cancellare caratteri
Mit der Pfeiltaste nach links können Zeichen
gelöscht werden
El botón de flecha izquierda permite borrar
caracteres
O botão de seta para esquerda apaga
caracteres
Met de pijl naar links kunt u tekens wissen
EN
FR
IT
DE
ES
PT
NL

14
www.xerox.com/office/WC3315_WC3325support
Scanning
Numérisation
1
2
OK
1
2
OK
OK
3 4
OK
Scanning to a USB Flash Drive
Numérisation vers une clé USB
Scansione su unità flash USB
Scanablage auf USB-Flashdatenträger
Escaneado a una unidad flash USB
Digitalização para uma unidade flash USB
Scannen naar USB-flashdrive
FR
IT
DE
ES
PT
NL
EN
Select Scan to USB and press the OK button
Sélectionnez Numérisation vers USB et appuyez
sur OK
Selezionare Scansione su USB e premere il
pulsante OK
Scanausgabe: USB wählen und dann die Taste
OK drücken
Seleccione Escanear a USB y pulse el botón OK
Selecione Digitalizar para USB e pressione o
botão OK
Selecteer Scannen naar USB en druk op OK
EN
FR
IT
DE
ES
PT
NL
To change the scanning settings, press the Scan
button, then Menu button
Pour changer les paramètres de numérisation,
appuyez sur Numérisation, puis sur Menu
Per modificare le impostazioni di scansione,
premere prima il pulsante Scansione e poi Menu
Zum Ändern der Scan-Einstellungen zunächst die
Taste Scan und dann die Taste Menü drücken
Para cambiar la configuración de escaneado, pulse
el botón Escanear y, a continuación, el botón
Menú
Para alterar as configurações de digitalização,
pressione o botão Digitalizar e, então, o botão
Menu
Als u de scaninstellingen wilt wijzigen, drukt u op
Scannen en vervolgens op Menu
EN
FR
IT
DE
ES
PT
NL
Select USB Features, press the OK button
Sélectionnez Fonctions USB , puis appuyez sur OK
Selezionare Funzioni USB e premere il pulsante
OK
USB-Funktionen wählen und die Taste OK
drücken
Seleccione Funciones de USB y pulse el botón OK
Selecione Recursos USB e pressione o botão OK
Selecteer USB-toepassingen en druk op OK
EN
FR
IT
DE
ES
PT
NL
Change the settings and press the OK button.
Press the Back button twice.
Changez les paramètres avant d'appuyer sur OK.
Appuyez deux fois sur Retour.
Modificare le impostazioni e premere il pulsante
OK. Premere il pulsante Indietro due volte.
Einstellungen ändern und die Taste OK drücken.
Taste Zurück zweimal drücken.
Cambie la configuración y pulse el botón OK. Pulse
el botón Atrás dos veces.
Altere as configurações e pressione o botão OK.
Pressione o botão Voltar duas vezes.
Wijzig de instellingen en druk op OK. Druk
tweemaal op Terug.
EN
FR
IT
DE
ES
PT
NL
Select USB and press the OK button to start
scanning
Sélectionnez USB, puis appuyez sur OK pour
commencer la numérisation
Selezionare USB e premere il pulsante OK per
avviare la scansione
USB wählen und dann die Taste OK drücken, um
den Scanvorgang zu starten
Seleccione USB y pulse el botón OK para empezar
a escanear
Selecione USB e pressione o botão OK para iniciar
a digitalização
Selecteer USB en druk op OK om het scannen te
starten
EN
FR
IT
DE
ES
PT
NL

15
www.xerox.com/office/WC3315_WC3325support
Faxing
Télécopie
www.xerox.com/office/WC3315_WC3325docs
60–120 g/m
2
(16–32 lb. Bond)
X: 210–216 mm (8.25–8.5 in.)
Y: 279.4–355.6 mm (11.0–14.0 in.)
Y
X
EN
You can enter fax numbers manually or store them in an address book. To set up an address book see the User
Guide > Fax > Address Book.
You can send a fax directly from a computer. See the User Guide > Fax > Fax from PC.
To set up fax, see the System Administrator Guide.
Faxing
Télécopie
Fax
Fax
Envío de fax
Envio de fax
Faxen
FR
IT
DE
ES
PT
NL
EN
FR
IT
DE
ES
PT
NL
EN
FR
IT
DE
ES
PT
NL
Loading the original
Placer le papier
Caricamento dell'originale
Vorlage einlegen
Colocación del original
Colocação do original
Het origineel plaatsen
Vous pouvez entrer les numéros de télécopie manuellement, ou les enregistrer dans un carnet d'adresses. Pour
définir un carnet d'adresses, voir le Guide de l'administrateur système.
Vous pouvez envoyer une télécopie directement depuis un ordinateur. Voir le Guide de l'utilisateur > Télécopie
> Télécopie depuis PC.
Pour configurer la télécopie, voir le Guide de l'administrateur système.
I numeri fax possono essere inseriti manualmente o memorizzati in una rubrica. Per impostare la rubrica,
vedere System Administrator Guide (Guida per l'amministratore del sistema).
È possibile inviare un fax direttamente dal computer. Vedere Guida per l'utente > Fax > Fax dal PC.
Per impostare la funzionalità fax, vedere System Administrator Guide (Guida per l'amministratore del sistema).
Faxnummern können manuell eingegeben und in einem Adressbuch gespeichert werden. Zur Einrichtung des
Adressbuchs siehe System Administrator Guide (Systemadministratorhandbuch).
Ein Fax kann direkt vom Computer verschickt werden. Siehe Benutzerhandbuch > Fax > Fax vom PC.
Zur Einrichtung des Fax siehe System Administrator Guide (Systemadministratorhandbuch).
Puede introducir los números de fax manualmente o almacenarlos en la libreta de direcciones. Para configurar
una libreta de direcciones, consulte la Guía del administrador del sistema.
Puede enviar un fax directamente desde un equipo. Consulte la Guía del usuario > Fax > Fax desde PC.
Para configurar el fax, consulte la Guía del administrador del sistema.
Você pode inserir os números de fax manualmente ou armazená-los em um catálogo de endereços. Para
configurar um catálogo de endereços consulte o Guia do Administrador do Sistema.
Você pode enviar um fax diretamente de um computador. Consulte o Guia do Usuário > Fax > Fax de um PC.
Para configurar um fax, consulte o Guia do Administrador do Sistema.
U kunt faxnummers handmatig invoeren of in een adresboek opslaan. Zie de System Administrator Guide
(Handleiding voor de systeembeheerder) voor het aanleggen van een adresboek.
U kunt een fax rechtstreeks van een computer verzenden. Zie de Handleiding voor de gebruiker > Faxen >
Faxen vanaf PC.
Zie de System Administrator Guide (Handleiding voor de systeembeheerder) voor het maken van
faxinstellingen.

16
www.xerox.com/office/WC3315_WC3325support
Faxing
Télécopie
1
3
2
OK
OK
4
1 2 3
4 5 6
7 8 9
0 #
ABC
@ / . ’
& + - _ ,
DEF
JKLGHI MNO
TUVPQRS WXYZ
5
OK
Basic Faxing
Télécopie de base
Nozioni di base sul fax
Einfaches Faxen
Envío de fax básico
Envio de fax básico
Eenvoudige faxopdrachten
FR
IT
DE
ES
PT
NL
EN
Press the Fax button
Appuyez sur le bouton Télécopie
Premere il pulsante Fax
Taste Fax drücken
Pulse el botón Fax
Pressione o botão Fax
Druk op de knop Faxen
EN
FR
IT
DE
ES
PT
NL
Press the Back button
Appuyez sur le bouton Retour
Premere il pulsante Indietro
Taste Zurück drücken
Pulse el botón Atrás
Pressione o botão Voltar
Druk op de knop Terug
EN
FR
IT
DE
ES
PT
NL
IT
DE
FR
ES
PT
NL
EN
Navigate the menus to select faxing options
Sélectionnez les options de télécopie en navigant
dans les menus
Esplorare i menu per selezionare le opzioni fax
Die Faxoptionen über die Menüs einstellen
Desplácese por los menús para seleccionar las
opciones de fax
Navegue pelos menus para selecionar as opções de
fax
Navigeer door de menu's om de faxopties te
selecteren
Enter a Fax number
Entrez un numéro de télécopie
Inserire un numero fax
Faxnummer eingeben
Introduzca un número de fax
Insira um número de fax
Voer een faxnummer in
EN
FR
IT
DE
ES
PT
NL
Press the Start button
Appuyez sur le bouton Démarrer
Premere il pulsante Avvio
Taste Start drücken
Pulse el botón Comenzar
Pressione o botão Iniciar
Druk op de knop Start
EN
FR
IT
DE
ES
PT
NL
The Left Arrow button clears characters
La touche fléchée vers la gauche efface les
caractères
La freccia di scorrimento sinistra consente di
cancellare caratteri
Mit der Pfeiltaste nach links können Zeichen
gelöscht werden
El botón de flecha izquierda permite borrar
caracteres
O botão de seta para esquerda apaga
caracteres
Met de pijl naar links kunt u tekens wissen
EN
FR
IT
DE
ES
PT
NL


18
www.xerox.com/office/WC3315_WC3325support
Troubleshooting
Résolution des incidents
1 2
21
http://xxx.xxx.xxx.xxx
www.xerox.com/office/
WC3315_WC3325docs
CentreWare Internet Services
Services Internet CentreWare
CentreWare Internet Services
CentreWare Internet Services
Servicios de Internet de CentreWare
Serviços de Internet no CentreWare
CentreWare Internet Services
FR
IT
DE
ES
PT
NL
EN
EN
You can configure and administer the printer using CentreWare Internet Services. Type the printer URL shown
on the Configuration Report into your web browser. See the User Guide > CentreWare Internet Services.
FR
Vous pouvez configurer et gérer l'imprimante à l'aide des Services Internet CentreWare. Saisissez dans votre
navigateur web l'URL qui apparaît sur le Relevé de configuration. Voir le : Guide de l'utilisateur > Services
Internet CentreWare.
IT
È possibile configurare e gestire la stampante utilizzando CentreWare Internet Services. Digitare nel proprio
Web browser l'URL disponibile nel rapporto di configurazione. Vedere Guida per l'utente > CentreWare
Internet Services.
DE
Der Drucker kann über CentreWare Internet Services konfiguriert und verwaltet werden. Die URL aus dem
Konfigurationsbericht im Browserfenster eingeben. Siehe Benutzerhandbuch > CentreWare Internet Services.
ES
Servicios de Internet de CentreWare le permite configurar y administrar la impresora. Escriba la dirección URL
que se muestra en el informe de configuración en su navegador web. Consulte Guía del usuario > Servicios de
Internet de CentreWare.
PT
Você pode configurar e administrar a impressora usando os Serviços de Internet do CentreWare. Digite a URL
exibida no Relatório de Configuração no seu navegador web. Consulte o Guia do Usuário > Serviços de
Internet do CentreWare.
NL
U kunt de printer configureren en beheren met CentreWare Internet Services. Typ de URL uit het
configuratie-overzicht in uw webbrowser. Zie de Handleiding voor de gebruiker > CentreWare Internet Services.
English
Français
Italiano
Deutsch
Español
Português
Русский
See: User Guide > Troubleshooting
Voir : Guide de l'utilisateur > Dépannage
Vedere: Guida per l'utente > Risoluzione dei problemi
Siehe: Benutzerhandbuch > Fehlerbehebung
Consulte: Guía del usuario > Solución de problemas
Consulte: Guia do Usuário > Solução de Problemas
Zie: Handleiding voor de gebruiker > Problemen oplossen
EN
FR
IT
DE
ES
PT
NL
Transcripción de documentos
EN FR IT DE ES PT NL More Information Plus d'informations Ulteriori informazioni Weitere Informationen Más información Mais informações Meer informatie Xerox WorkCentre 3315/3325 Black and White Multifunction Printer Imprimante multifonctions noir et blanc www.xerox.com/office/ WC3315_WC3325support www.xerox.com/msds (U.S./Canada) www.xerox.com/environment_europe www.xerox.com/office/businessresourcecenter www.xerox.com/office/ WC3315_WC3325support EN • Printer drivers and utilities • User manuals and instructions • Online Support Assistant • Safety specifications (in User Guide) FR • Pilotes d'imprimantes et utilitaires • Manuels de l'utilisateur et instructions • Assistant de support en ligne • Spécifications relatives à la sécurité (dans le Guide de l'utilisateur) IT • Driver e utilità di stampa • Manuali dell'utente e istruzioni • Supporto in linea • Specifiche di sicurezza (nella Guida per l'utente) NL www.xerox.com/msds (U.S./Canada) www.xerox.com/environment_europe EN FR IT DE ES PT DE ES PT • Druckertreiber und -dienstprogramme • Benutzerhandbücher und Anleitungen • Online-Support-Assistent • Sicherheitshinweise (im Benutzerhandbuch) • Controladores y utilidades de la impresora • Manuales de usuario e instrucciones • Asistente de ayuda en línea • Especificaciones de seguridad (en la Guía del usuario) • Drivers da impressora e utilitários • Manuais do usuário e instruções • Assistente de suporte on-line • Especificações de segurança (no Guia do Usuário) • Printerdrivers en hulpprogramma's • Gebruikershandleidingen en instructies • Online Support Assistant (Online Support-assistent) • Veiligheidsspecificaties (in de Handleiding voor de gebruiker) NL Material Safety Data Sheets Fiches de données de sécurité Schede sulla sicurezza dei materiali Material-Sicherheitsdatenblätter Fichas de datos de seguridad Fichas de informações de segurança de produtos químicos Veiligheidsinformatiebladen www.xerox.com/office/ businessresourcecenter EN FR IT DE ES PT NL Templates, tips, and tutorials Modèles, conseils et didacticiels Modelli, suggerimenti ed esercitazioni Profile, Tipps und Lehrgänge Plantillas, consejos y lecciones prácticas Modelos, dicas e tutoriais Sjablonen, tips en zelfstudies Xerox WorkCentre 3315/3325 Quick Use Guide Petit guide d'utilisation ® IT DE ES PT NL Italiano Deutsch Español Português Nederlands Guida rapida per l'uso Kurzübersicht Guía de uso rápido Guia de utilização rápida Beknopte gebruikshandleiding 700N00227 Rev A © 2012 Xerox Corporation. All Rights Reserved. XEROX® and XEROX and Design® are trademarks of Xerox Corporation in the United States and/or other countries. ® FR IT DE ES PT NL EN FR IT DE ES PT NL Faxing..........................................................................15 Télécopie Fax Fax Envío de fax Envio de fax Faxen EN FR IT DE ES PT NL EN FR IT DE ES PT NL Basic Faxing............................................................... 16 Télécopie de base Nozioni di base sul fax Einfaches Faxen Envío de fax básico Envio de fax básico Eenvoudige faxopdrachten Troubleshooting ........................................................17 Dépannage Risoluzione dei problemi Fehlerbehebung Solución de problemas Solução de problemas Problemen oplossen EN FR IT DE ES PT NL Paper Jams................................................................. 17 Bourrages papier Inceppamenti della carta Papierstaus Atascos de papel Atolamentos de papel Papierstoringen EN FR IT DE ES PT NL EN More Information .....................................................18 Plus d'informations Ulteriori informazioni Weitere Informationen Más información Mais informações Meer informatie EN FR IT DE ES PT NL CentreWare Internet Services................................ 18 Services Internet CentreWare CentreWare Internet Services CentreWare Internet Services Servicios de Internet de CentreWare Serviços de Internet do CentreWare CentreWare Internet Services Printer Tour Découverte de l'imprimante Presentazione della stampante Übersicht über den Drucker Recorrido por la impresora Roteiro da impressora Kennismaking met de printer FR IT DE ES PT NL EN FR IT DE ES PT NL EN FR IT DE ES PT NL FR IT DE ES PT NL Document Feeder Chargeur de documents Alimentatore documenti Vorlageneinzug Alimentador de documentos Alimentador de documentos AOD Main Tray Magasin principal Vassoio principale Hauptpapierbehälter Bandeja principal Bandeja principal Hoofdpapierlade Tray 2 Magasin 2 Vassoio 2 Papierbehälter 2 Bandeja 2 Bandeja 2 Lade 2 EN FR Exit Tray Bac récepteur Vassoio di uscita Ausgabefach Bandeja de salida Bandeja de saída Opvangbak IT DE ES PT NL EN FR IT EN FR IT DE ES PT NL Bypass Tray Départ manuel Vassoio bypass Zusatzzufuhr Bandeja especial Bandeja manual Handmatige invoer EN FR IT DE ES PT NL www.xerox.com/office/WC3315_WC3325support EN Printer Basics Généralités EN DE ES PT NL Scanner Scanner Scanner Scanner Escáner Scanner Scanner USB Port Port USB Porta USB USB-Port Puerto USB Porta USB USB-poort Print Cartridge Cartouche d'imprimante Cartuccia di stampa Tonerbehälter Cartucho de impresión Cartucho de impressão Tonercassette 3 FR IT DE ES PT NL EN FR IT DE ES PT NL EN Active and saved jobs Travaux actifs et travaux enregistrés Lavori attivi e salvati Aktive und gespeicherte Druckaufträge Trabajos activos y guardados Trabalhos ativos e salvos Actieve en opgeslagen opdrachten Settings and information Paramètres et informations Impostazioni e informazioni Einstellungen und Informationen Configuración e información Configurações e Informações Instellingen en informatie EN FR IT DE ES PT NL FR IT DE ES PT NL Access address book Accéder au carnet d'adresses Accede alla rubrica Adressbuch aufrufen Acceder a la libreta de direcciones Acessar o catálogo de endereços Open het adresboek EN Enter the system menus Entrer les menus système Accede ai menu del sistema Systemmenüs aufrufen Acceder a los menús del sistema Inserir os menus do sistema Open de systeemmenu's FR IT DE ES PT NL Manual dial Numérotation manuelle Selezione manuale Manuell wählen Marcado manual Discagem manual Handmatig kiezen Printer Basics Généralités EN EN FR IT DE ES PT NL Redial a fax, or enter a pause Recomposer un numéro de fax ou Insérer une pause Riseleziona un numero fax oppure inserisce una pausa Faxverbindung wiederholen oder Pause Volver a marcar el número de fax o introducir una pausa Rediscar um fax ou inserir uma pausa Een fax opnieuw verzenden of een pauze invoeren EN FR IT DE ES EN FR IT DE ES PT NL Select paper tray Sélectionner un magasin Seleziona il vassoio carta Papierbehälterwahl Seleccionar la bandeja de papel Selecionar a bandeja de papel Selecteer de papierlade OK IT DE ES PT NL IT DE ES PT NL EN FR OK IT DE ES PT NL 2 3 GHI JKL MNO 4 5 6 TUV WXYZ 8 9 EN FR IT DE ES PT NL Arrow buttons scroll up, down, forward, and back through the menus Les touches fléchées vers le haut, le bas, la gauche ou la droite, permettent de naviguer dans les menus Le frecce di scorrimento consentono di spostarsi tra le opzioni dei menu Pfeiltasten zur Navigation durch die Menüs nach oben, unten, vorwärts und zurück Botones de flecha para desplazarse hacia arriba, abajo, adelante y atrás en los menús Botões de seta para subir, descer, avançar ou retornar pelos menus Pijltoetsen voor omhoog, omlaag, vooruit en achteruit door de menu's bladeren EN FR &+-_, 0 # C Clear a character Effacer un caractère Cancella un carattere Zeichen löschen Borrar un carácter Apagar um caractere Wis een teken * Interrupts or resumes the current job EN FR IT DE ES PT NL EN FR IT DE ES PT NL www.xerox.com/office/WC3315_WC3325support NL CA IT DE Job layout Disposition du travail Layout lavoro Auftragslayout Formato del trabajo Layout do trabalho Opdrachtopmaak OK button accepts the menu selection Appuyer sur OK pour accepter la sélection du menu Il pulsante OK consente di accettare la selezione di menu Taste "OK" zur Bestätigung der Menüauswahl Botón OK para aceptar la selección del menú O botão OK aceita a seleção do menu Met knop OK accepteert u de menuselectie DEF PQRS * FR FR ABC 1 7 EN EN @/.’ PT Power Saver on, off Économiseur d'énergie activé, désactivé Attiva/Disattiva Risparmio energia Energiesparbetrieb ein, aus Ahorro de energía activado, desactivado Ligar, desligar Economia de Energia Energiespaarstand aan, uit Interrompre ou reprendre le travail en cours Interrompe o riprende il lavoro corrente Aktuellen Auftrag unterbrechen oder wieder aufnehmen Interrumpir o reanudar el trabajo actual Interromper ou retomar o trabalho atual Onderbreek of hervat de huidige opdracht Goes up one level in the menu Remonte d'un niveau dans le menu Passa al livello superiore nel menu Im Menü eine Ebene nach oben gehen Subir un nivel en el menú Sobe um nível no menu Hiermee gaat u een niveau in het menu omhoog ES PT NL EN FR IT DE ES PT NL Clear all changed settings Annuler toutes les modifications des paramètres Cancella tutte le impostazioni modificate Alle geänderten Einstellungen löschen Borrar la configuración modificada Apagar todas as configurações alteradas Wis alle gewijzigde instellingen Cancel the current job Annuler le travail en cours Annulla il lavoro corrente Aktuellen Auftrag abbrechen Cancelar el trabajo actual Cancelar o trabalho atual Annuleer de huidige opdracht *3325DN/ 3325 DNI 4 EN FR IT DE ES NL OK EN FR IT DE ES PT 1 NL 2 1 2 3 3 1 2 3 60–163 g/m2 (16 lb. Bond – 60 lb. Cover) 60–220 g/m2 (16 lb. Bond–80 lb. Cover) Executive .................. 7.25 x 10.5 in. Letter......................... 8.5 x 11.0 in. US Folio..................... 8.5 x 13.0 in. Oficio ......................... 8.5 x 13.5 in. Legal .......................... 8.5 x 14.0 in. Postcard....................4.0 x 6.0 in. Executive ..................7.25 x 10.5 in. Letter.........................8.5 x 11.0 in. US Folio.....................8.5 x 13.0 in. Oficio ......................... 8.5 x 13.5 in. Legal ..........................8.5 x 14.0 in. A6 ............................... 105 x 148 mm A5 ............................... 148 x 210 mm ISO B5 ....................... 176 x 250 mm JIS B5 ........................ 182 x 257 mm A4 ............................... 210 x 297 mm A6 ...............................105 x 148 mm A5 ...............................148 x 210 mm ISO B5 ....................... 176 x 250 mm JIS B5 ........................182 x 257 mm A4 ...............................210 x 297 mm 1 L W When loading paper: Confirm or select the correct type and size on the control panel. Quand vous chargez le papier, confirmez ou sélectionnez le type et le format requis sur le panneau de commande Quando si carica carta: confermare oppure selezionare il tipo di carta corretto sul pannello comandi Beim Einlegen von Papier: Einstellung von Papierformat/-art am Steuerpult prüfen und ggf. ändern Cuando coloque papel: confirme o seleccione el tipo y el tamaño correctos del papel en el panel de control Ao colocar o papel: confirmar ou selecionar tipo e tamanho corretos no painel de controle Bij het plaatsen van papier: bevestig of selecteer de juiste papiersoort en het juiste formaat op het bedieningspaneel 60–70 g/m2 (16 lb.–18 lb. Bond) EN Thin FR Fin IT Sottile DE Dünn ES Fino PT Fino NL Dun 70–90 g/m2 (18 lb.–24 lb. Bond) EN Plain FR Standard IT Normale DE Normalpapier ES Normal PT Comum NL Gewoon 105–120 g/m2 (28 lb.–32 lb. Bond) EN Bond FR Papier Bond IT Standard DE Postpapier ES Papel Bond PT Encorpado NL Bankpost 120–163 g/m2 (32 lb. Bond–60 lb. Cover) EN Cardstock FR Support cartonné IT Cartoncino DE Karton ES Cartulina PT Cartão NL Karton Monarch ...................3.9 x 7.5 in. #10.............................4.12 x 9.5 in. W: 104.6–215.9 mm (4.12–8.5 in.) L: 148.3–355.6 mm (5.84–14 in.) DL ...............................110 x 220 mm C6 ...............................114 x 162 mm C5 ...............................162 x 229 mm EN FR 3 IT DE www.xerox.com/paper (U.S./Canada) www.xerox.com/europaper www.xerox.com/office/WC3315_WC3325support L W Printing Impression PT Supported Papers Supports pris en charge Carta supportata Zulässiges Papier Papel admitido Papéis compatíveis Ondersteunde papiervarianten W: 76.2–215.9 mm (3–8.5 in.) L: 127–355.6 mm (5–14 in.) www.xerox.com/office/ WC3315_WC3325docs ES PT NL 90–105 g/m2 (24 lb.–28 lb. Bond) EN Thick FR Épais IT Spessa DE Dick ES Grueso PT Grosso NL Dik 3 163–220 g/m2 (60 lb.–80 lb. Cover) EN Thicker FR Plus épais IT Più spessa DE Dicker ES Más grueso PT Mais grosso NL Dikker See: User Guide > Media Specifications Voir : Guide de l'utilisateur > Spécifications des supports Vedere: Guida per l'utente > Specifiche della carta Siehe: Benutzerhandbuch > Materialspezifikationen Consulte: Guía del usuario > Especificaciones de soportes de impresión Consulte: Guia do Usuário > Especificações do material Zie: Handleiding voor de gebruiker > Papierspecificaties 5 EN FR IT DE ES NL 1 Printing Impression PT Basic Printing Impression de base Nozioni di base sulla stampa Einfaches Drucken Impresión básica Impressão Básica Eenvoudige afdrukopdrachten 2 OK 3 Windows Mac 1 2 EN LGL / A4 / LTR FR IT DE ES PT NL www.xerox.com/office/WC3315_WC3325support Confirm or change size and type settings. When printing, select printing options in the print driver. Confirmez ou modifiez les paramètres relatifs au format et au type. Lors de l'impression, sélectionnez les options d'impression dans le pilote d'imprimante. Confermare o modificare le impostazioni di formato e tipo. Durante la stampa, selezionare le opzioni di stampa nel driver di stampa. Einstellung von Papierformat/-art prüfen und ggf. ändern. Für den Druckbetrieb die Druckoptionen im Druckertreiber auswählen. Confirme o modifique la configuración de tamaño y de tipo. Al imprimir, seleccione las opciones de impresión en el controlador de impresión. Confirme ou altere as configurações de tamanho e tipo. Ao imprimir, selecione as opções de impressão no driver de impressão. Bevestig of wijzig de instellingen voor papierformaat en -soort. Selecteer voor het afdrukken speciale afdrukopties in de printerdriver. www.xerox.com/office/WC3315_WC3325docs EN FR IT DE ES PT NL See: User Guide > Getting Started > Loading Paper Voir : Guide de l'utilisateur > Pour commencer > Chargement du papier Vedere: Guida per l'utente > Introduzione > Caricamento della carta Siehe: Benutzerhandbuch > Erste Schritte > Papier einlegen Consulte: Guía del usuario > Introducción > Colocación del papel Consulte: Guia do Usuário > Instruções de operação > Abastecimento de papel Zie: Handleiding voor de gebruiker > Aan de slag > Papier plaatsen 6 EN FR IT DE ES PT NL Basic Copying Copie de base Nozioni di base sulla copia Einfaches Kopieren Copia básica Cópia básica Eenvoudige kopieertaken 60–120 g/m2 (16–32 lb. Bond) 1 X Y FR IT DE ES PT NL EN Load the original Placez le papier Caricare l'originale Vorlage einlegen Coloque el original Coloque o original Plaats het origineel FR IT DE ES PT NL 3 Press the Copy button Appuyez sur le bouton Copie Premere il pulsante Copia Taste Kopieren drücken Pulse el botón Copiar Pressione o botão Cópia Druk op de knop Kopiëren 5 2 3 GHI JKL MNO DEF 4 5 6 PQRS TUV WXYZ 8 9 &+-_, 0 EN FR IT DE PT NL OK ABC 1 7 ES 4 @/.’ Copying Copie EN 2 X: 210–216 mm (8.25–8.5 in.) Y: 279.4–355.6 mm (11.0–14.0 in.) # Select the number of copies Sélectionnez le nombre de copies Selezionare il numero di copie Auflage auswählen Seleccione el número de copias Selecione o número de cópias Selecteer het aantal kopieën CA OK www.xerox.com/office/WC3315_WC3325docs EN FR IT DE ES PT NL Navigate the menus to select copying options Sélectionnez les options de copie en navigant dans les menus Esplorare i menu per selezionare le opzioni di copia Im Menü die Kopieroptionen aufrufen Desplácese por los menús para seleccionar las opciones de copia Navegue pelos menus para selecionar as opções de cópia Navigeer door de menu's om de kopieeropties te selecteren www.xerox.com/office/WC3315_WC3325support EN EN FR IT DE ES PT NL Press Back, then the Start button Appuyez sur le bouton Retour, puis sur Démarrer Premere il pulsante Indietro e poi il pulsante Avvio Zunächst Zurück und dann Start drücken Pulse el botón Atrás y, a continuación, el botón Comenzar Pressione Voltar e, então, o botão Iniciar Druk op Terug en vervolgens op de knop Start FR IT DE ES PT NL See: User Guide > Copying Voir : Guide de l'utilisateur > Copie Vedere: Guida per l'utente > Copia Siehe: Benutzerhandbuch > Kopieren Consulte: Guía del usuario > Copia Consulte: Guia do Usuário > Cópia Zie: Handleiding voor de gebruiker > Kopiëren EN FR IT DE ES PT NL The Clear All button restores default settings. Le bouton Annuler tout rétablit les paramètres par défaut Il pulsante Cancella tutto consente di ripristinare le impostazioni predefinite Die Taste Alles löschen stellt die Standardeinstellungen wieder her El botón Borrar todos restaura la configuración prefijada O botão Apagar Tudo restaura as configurações padrão Met de knop Alles wissen herstelt u de standaardinstellingen 7 EN FR IT DE ES PT NL Scanning Numérisation Scansione Scannen Escaneado Digitalização Scannen USB Ethernet WiFi EN FR IT DE ES PT NL Loading the original Placer le papier Caricamento dell'originale Vorlage einlegen Colocación del original Colocação do original Het origineel plaatsen 60–120 g/m2 (16–32 lb. Bond) X Y X: 210–216 mm (8.25–8.5 in.) Y: 279.4–355.6 mm (11.0–14.0 in.) www.xerox.com/office/WC3315_WC3325docs You can scan images with a USB connection or over a network. The WorkCentre 3325 DNI also supports a wireless connection. You can start the scan at your computer or at the printer control panel. To set up scanning see the System Administrator Guide. FR Vous pouvez numériser des images via une connexion USB ou sur un réseau. Le WorkCentre 3325 DNI prend aussi en charge une connexion sans fil. Vous pouvez commencer la numérisation depuis votre ordinateur ou le panneau de commande de l'imprimante. Pour configurer la numérisation, voir le Guide de l'administrateur système. ES È possibile scansire le immagini utilizzando una connessione USB oppure una connessione di rete. WorkCentre 3325 DNI supporta anche una connessione wireless. È possibile avviare la scansione dal computer oppure dal pannello comandi della stampante. Per impostare la funzionalità di scansione, vedere System Administrator Guide (Guida per l'amministratore del sistema). PT Bilder können mit einer USB-Verbindung oder über ein Netzwerk gescannt werden. Das WorkCentre 3325 DNI unterstützt auch Drahtlosnetzwerke. Der Scanvorgang kann am Computer oder am Steuerpult des Druckers gestartet werden. Zur Einrichtung des Scanvorgangs siehe System Administrator Guide (Systemadministratorhandbuch). NL IT DE www.xerox.com/office/WC3315_WC3325support Scanning Numérisation EN Puede escanear imágenes mediante una conexión USB o a través de una red. La impresora WorkCentre 3325 DNI también admite conexiones inalámbricas. Puede iniciar el escaneado desde su equipo, o mediante el panel de control de la impresora. Para configurar el escaneado, consulte la Guía del administrador del sistema. Puede escanear imágenes mediante una conexión USB o a través de una red. La impresora WorkCentre 3325 DNI también admite conexiones inalámbricas. Puede iniciar el escaneado desde su equipo, o mediante el panel de control de la impresora. Para configurar el escaneado, consulte la Guía del administrador del sistema. U kunt beelden scannen met een USB-verbinding of via een netwerk. De WorkCentre 3325 DNI ondersteunt ook een draadloze verbinding. U kunt het scannen starten op de computer of op het bedieningspaneel van de printer. Zie de System Administrator Guide (Handleiding voor de systeembeheerder) voor het maken van scaninstellingen. 8 EN FR IT DE ES PT NL Scanning from a Computer using Windows 7 Numérisation à partir d'un ordinateur sous Windows 7 Scansione da un computer con Windows 7 Von einem Computer mit Windows 7 aus scannen Escaneado desde un equipo mediante Windows 7 Digitalização a partir de um computador usando Windows 7 Scannen vanaf een computer met Windows 7 1 USB 2 3 4 3.2 EN FR DE ES PT NL 3.1 EN FR IT DE ES PT NL Confirm the scanner Confirmez le scanner Confermare lo scanner Scanner bestätigen Confirme el escáner Confirme o scanner Bevestig de scanner EN FR IT DE ES PT NL Click Preview, and confirm or change settings Cliquez sur Aperçu, et confirmez ou changez les paramètres Fare clic su Anteprima, quindi confermare oppure modificare le impostazioni Auf Vorschau klicken und Einstellungen prüfen und ggf. ändern Haga clic en Vista previa y confirme o modifique la configuración Clique em Visualizar e confirme ou altere as configurações Klik op Voorbeeld en bevestig of wijzig de instellingen EN FR IT DE ES PT NL www.xerox.com/office/WC3315_WC3325support EN FR IT DE ES PT NL Click Scan Cliquez sur Numérisation Fare clic su Scansiona Auf Scannen klicken Haga clic en Escanear Clique em Digitalizar Klik op Scannen Scanning Numérisation IT Launch Windows Fax and Scan application, click New Scan Pour lancer l'application Windows télécopie et numérisation, cliquez sur Nouvelle numérisation Avviare l'applicazione Fax e scanner di Windows e poi fare clic su Nuova digitalizzazione Die Anwendung "Windows-Fax und -Scan" starten und auf Neuer Scan klicken Inicie la aplicación Fax y Escáner de Windows, haga clic en Nueva digitalización Inicie o aplicativo Windows Fax and Scan, clique em Nova Digitalização Start de toepassing Windows Faxen en scannen en klik op Nieuwe scan The document feeder cannot preview Le chargeur de documents ne prend pas en charge les aperçus L'alimentatore automatico non consente di visualizzare un'anteprima Eine Vorschau ist mit dem Vorlageneinzug nicht möglich El alimentador de documentos no puede mostrar la vista previa O alimentador de documentos não pode visualizar De AOD kan geen afdrukvoorbeeld laten zien 10 EN FR IT DE ES PT NL Scanning from a Computer using Windows XP Numérisation à partir d'un ordinateur sous Windows XP Scansione da un computer con Windows XP Von einem Computer mit Windows XP aus scannen Escaneado desde un equipo mediante Windows XP Digitalização a partir de um computador usando Windows XP Scannen vanaf een computer met Windows XP 1 USB 2 3 4 3.2 EN FR IT ES PT NL 3.1 EN FR IT DE ES PT NL Select the scan settings Sélectionnez les paramètres de numérisation Selezionare le impostazioni di scansione Scaneinstellungen wählen Seleccione la configuración de escaneado Selecione as configurações de digitalização Selecteer de scaninstellingen EN FR IT DE ES PT NL Click Preview and select the scan area Cliquez sur Aperçu, et sélectionnez la zone à numériser Fare clic su Anteprima, quindi selezionare l'area di scansione Auf Vorschau klicken und Scanbereich auswählen Haga clic en Vista previa y seleccione el área de escaneado Clique em Visualizar e selecione a área de digitalização Klik op Voorbeeld en selecteer het scangebied EN FR IT DE ES PT NL www.xerox.com/office/WC3315_WC3325support EN FR IT DE ES PT NL Click Scan Cliquez sur Numérisation Fare clic su Scansiona Auf Scannen klicken Haga clic en Escanear Clique em Digitalizar Klik op Scannen Scanning Numérisation DE Launch the scan application (import method may vary) Lancez l'application de numérisation (la méthode d'importation peut varier) Avviare l'applicazione di scansione (il metodo di importazione può variare) Scananwendung starten (Importierungsmethode ist ggf. anders) Inicie la aplicación de escaneado (el método de importación puede variar) Inicie o aplicativo de digitalização (o método de importação pode variar) Start de scantoepassing (de importeermethode kan variëren) The document feeder cannot preview Le chargeur de documents ne prend pas en charge les aperçus L'alimentatore automatico non consente di visualizzare un'anteprima Eine Vorschau ist mit dem Vorlageneinzug nicht möglich El alimentador de documentos no puede mostrar la vista previa O alimentador de documentos não pode visualizar De AOD kan geen afdrukvoorbeeld laten zien 11 Scanning from a Computer using Macintosh 10.3 and later Numérisation à partir d'un ordinateur Macintosh fonctionnant sous Mac OS X 10.3 ou version ultérieure Scansione da un computer con Macintosh 10.3 e versioni successive Von einem Computer mit Macintosh (ab 10.3 ) aus scannen Escaneado desde un equipo mediante Macintosh 10.3 o posterior Digitalização a partir de um computador usando Macintosh 10.3 ou superior Scannen vanaf een computer met Macintosh OS X 10.3 en hoger EN FR IT DE ES PT NL 1 USB 3 2 4 Scanning Numérisation 2.2 2.1 EN FR IT DE ES PT NL Launch Image Capture application Lancez l'application Capture d'image Avviare l'applicazione Acquisizione Immagine Anwendung "Digitale Bilder" starten Inicie la aplicación Captura de imagen Inicie o aplicativo Image Capture (Captura da Imagem) Start het programma Fotolader EN FR IT DE ES PT NL Click Overview, and select the scan area Cliquez sur Présentation, et sélectionnez la zone à numériser Fare clic su Panoramica, quindi selezionare l'area di scansione Auf Übersicht klicken und Scanbereich auswählen Haga clic en Visión general y seleccione el área de escaneado Clique em Visão geral e selecione a área de digitalização Klik op Overzicht en selecteer het scangebied EN FR IT DE ES PT NL Confirm or change other scan settings Confirmez ou changez les autres paramètres de numérisation Confermare o modificare le impostazioni di scansione Übrige Scaneinstellungen prüfen und ggf. ändern Confirme o modifique las otras opciones de escaneado Confirme ou altere outras configurações de digitalização Bevestig of wijzig de andere scaninstellingen EN FR IT DE ES PT NL www.xerox.com/office/WC3315_WC3325support EN FR IT DE ES PT NL Click Scan Cliquez sur Numérisation Fare clic su Scansiona Auf Scannen klicken Haga clic en Escanear Clique em Digitalizar Klik op Scannen The document feeder cannot preview Le chargeur de documents ne prend pas en charge les aperçus L'alimentatore automatico non consente di visualizzare un'anteprima Eine Vorschau ist mit dem Vorlageneinzug nicht möglich El alimentador de documentos no puede mostrar la vista previa O alimentador de documentos não pode visualizar De AOD kan geen afdrukvoorbeeld laten zien 12 EN FR IT DE ES PT NL Scanning to Email Numérisation vers courrier électronique Scansione su e-mail Scan per E-Mail versenden Escaneado a e-mail Digitalização para e-mail Scannen naar e-mail 1 2 @/.’ ABC DEF 1 2 3 GHI JKL MNO IT DE ES NL FR IT DE ES PT NL 5 3 GHI JKL MNO 4 @/.’ ABC 1 2 3 GHI JKL MNO DEF 5 6 4 5 6 4 5 6 WXYZ PQRS TUV WXYZ PQRS TUV WXYZ 8 9 8 9 8 9 7 OK &+-_, # Enter the sender's email address and press the OK button Saisissez l'adresse électronique de l'expéditeur et appuyez sur OK Inserire l'indirizzo e-mail del mittente e premere il pulsante OK E-Mail-Adresse des Absenders eingeben und mit Taste OK bestätigen Introduzca la dirección de e-mail del remitente y pulse el botón OK Insira o endereço de e-mail do remetente e pressione o botão OK Voer het e-mailadres van de afzender in en druk op OK 0 EN FR IT DE ES PT NL 7 OK &+-_, # Enter the recipient's email address and press the OK button Saisissez l'adresse électronique du destinataire et appuyez sur OK Inserire l'indirizzo e-mail del destinatario e premere il pulsante OK E-Mail-Adresse des Empfängers eingeben und mit Taste OK bestätigen Introduzca la dirección de e-mail del destinatario y pulse el botón OK Insira o endereço de e-mail do destinatário e pressione o botão OK Voer het e-mailadres van de ontvanger in en druk op OK 0 EN FR IT DE ES PT NL OK # Enter the email subject and press the OK button Saisissez l'objet du courrier et appuyez sur OK Inserire l'oggetto e-mail e premere il pulsante OK E-Mail-Betreff eingeben und Taste OK drücken Introduzca el asunto del e-mail y pulse el botón OK Insira o assunto do e-mail e pressione o botão OK Voer het onderwerp van de e-mail in en druk op OK OK OK EN FR IT DE ES PT NL Choose the file format and press the OK button Choisissez le format du fichier et appuyez sur OK Scegliere il formato del file e premere il pulsante OK Dateiformat auswählen und Taste OK drücken Seleccione el formato del archivo y pulse el botón OK Escolha o formato do arquivo e pressione o botão OK Kies de bestandsindeling en druk op OK EN FR IT DE ES PT NL www.xerox.com/office/WC3315_WC3325support The Left Arrow button clears characters La touche fléchée vers la gauche efface les caractères La freccia di scorrimento sinistra consente di cancellare caratteri Mit der Pfeiltaste nach links können Zeichen gelöscht werden El botón de flecha izquierda permite borrar caracteres O botão de seta para esquerda apaga caracteres Met de pijl naar links kunt u tekens wissen 13 Scanning Numérisation PT Press the E-mail button Appuyez sur le bouton Courrier électronique Premere il pulsante E-mail Taste E-Mail drücken Pulse el botón E-mail Pressione o botão E-mail Druk op de knop E-mail DEF 2 TUV 0 FR ABC 1 4 &+-_, EN @/.’ PQRS 7 EN 3 EN FR IT DE ES PT NL Scanning to a USB Flash Drive Numérisation vers une clé USB Scansione su unità flash USB Scanablage auf USB-Flashdatenträger Escaneado a una unidad flash USB Digitalização para uma unidade flash USB Scannen naar USB-flashdrive 2 1 OK EN 1 2 FR OK IT EN FR EN FR IT DE ES PT NL Select Scan to USB and press the OK button Sélectionnez Numérisation vers USB et appuyez sur OK Selezionare Scansione su USB e premere il pulsante OK Scanausgabe: USB wählen und dann die Taste OK drücken Seleccione Escanear a USB y pulse el botón OK Selecione Digitalizar para USB e pressione o botão OK Selecteer Scannen naar USB en druk op OK IT DE ES PT NL 3 DE ES PT NL Scanning Numérisation To change the scanning settings, press the Scan button, then Menu button Pour changer les paramètres de numérisation, appuyez sur Numérisation, puis sur Menu Per modificare le impostazioni di scansione, premere prima il pulsante Scansione e poi Menu Zum Ändern der Scan-Einstellungen zunächst die Taste Scan und dann die Taste Menü drücken Para cambiar la configuración de escaneado, pulse el botón Escanear y, a continuación, el botón Menú Para alterar as configurações de digitalização, pressione o botão Digitalizar e, então, o botão Menu Als u de scaninstellingen wilt wijzigen, drukt u op Scannen en vervolgens op Menu Select USB Features, press the OK button Sélectionnez Fonctions USB , puis appuyez sur OK Selezionare Funzioni USB e premere il pulsante OK USB-Funktionen wählen und die Taste OK drücken Seleccione Funciones de USB y pulse el botón OK Selecione Recursos USB e pressione o botão OK Selecteer USB-toepassingen en druk op OK 4 OK OK EN EN FR IT DE ES PT NL www.xerox.com/office/WC3315_WC3325support Change the settings and press the OK button. Press the Back button twice. Changez les paramètres avant d'appuyer sur OK. Appuyez deux fois sur Retour. Modificare le impostazioni e premere il pulsante OK. Premere il pulsante Indietro due volte. Einstellungen ändern und die Taste OK drücken. Taste Zurück zweimal drücken. Cambie la configuración y pulse el botón OK. Pulse el botón Atrás dos veces. Altere as configurações e pressione o botão OK. Pressione o botão Voltar duas vezes. Wijzig de instellingen en druk op OK. Druk tweemaal op Terug. FR IT DE ES PT NL Select USB and press the OK button to start scanning Sélectionnez USB, puis appuyez sur OK pour commencer la numérisation Selezionare USB e premere il pulsante OK per avviare la scansione USB wählen und dann die Taste OK drücken, um den Scanvorgang zu starten Seleccione USB y pulse el botón OK para empezar a escanear Selecione USB e pressione o botão OK para iniciar a digitalização Selecteer USB en druk op OK om het scannen te starten 14 EN FR IT DE ES PT NL Faxing Télécopie Fax Fax Envío de fax Envio de fax Faxen EN FR IT DE ES PT NL Loading the original Placer le papier Caricamento dell'originale Vorlage einlegen Colocación del original Colocação do original Het origineel plaatsen 60–120 g/m2 (16–32 lb. Bond) X Y X: 210–216 mm (8.25–8.5 in.) Y: 279.4–355.6 mm (11.0–14.0 in.) www.xerox.com/office/WC3315_WC3325docs EN You can enter fax numbers manually or store them in an address book. To set up an address book see the User Guide > Fax > Address Book. You can send a fax directly from a computer. See the User Guide > Fax > Fax from PC. To set up fax, see the System Administrator Guide. FR Vous pouvez entrer les numéros de télécopie manuellement, ou les enregistrer dans un carnet d'adresses. Pour définir un carnet d'adresses, voir le Guide de l'administrateur système. Vous pouvez envoyer une télécopie directement depuis un ordinateur. Voir le Guide de l'utilisateur > Télécopie > Télécopie depuis PC. Pour configurer la télécopie, voir le Guide de l'administrateur système. IT I numeri fax possono essere inseriti manualmente o memorizzati in una rubrica. Per impostare la rubrica, vedere System Administrator Guide (Guida per l'amministratore del sistema). È possibile inviare un fax direttamente dal computer. Vedere Guida per l'utente > Fax > Fax dal PC. Per impostare la funzionalità fax, vedere System Administrator Guide (Guida per l'amministratore del sistema). ES Faxnummern können manuell eingegeben und in einem Adressbuch gespeichert werden. Zur Einrichtung des Adressbuchs siehe System Administrator Guide (Systemadministratorhandbuch). Ein Fax kann direkt vom Computer verschickt werden. Siehe Benutzerhandbuch > Fax > Fax vom PC. Zur Einrichtung des Fax siehe System Administrator Guide (Systemadministratorhandbuch). Puede introducir los números de fax manualmente o almacenarlos en la libreta de direcciones. Para configurar una libreta de direcciones, consulte la Guía del administrador del sistema. Puede enviar un fax directamente desde un equipo. Consulte la Guía del usuario > Fax > Fax desde PC. Para configurar el fax, consulte la Guía del administrador del sistema. www.xerox.com/office/WC3315_WC3325support Você pode inserir os números de fax manualmente ou armazená-los em um catálogo de endereços. Para configurar um catálogo de endereços consulte o Guia do Administrador do Sistema. Você pode enviar um fax diretamente de um computador. Consulte o Guia do Usuário > Fax > Fax de um PC. Para configurar um fax, consulte o Guia do Administrador do Sistema. NL U kunt faxnummers handmatig invoeren of in een adresboek opslaan. Zie de System Administrator Guide (Handleiding voor de systeembeheerder) voor het aanleggen van een adresboek. U kunt een fax rechtstreeks van een computer verzenden. Zie de Handleiding voor de gebruiker > Faxen > Faxen vanaf PC. Zie de System Administrator Guide (Handleiding voor de systeembeheerder) voor het maken van faxinstellingen. 15 Faxing Télécopie DE PT EN FR IT DE ES PT NL Basic Faxing Télécopie de base Nozioni di base sul fax Einfaches Faxen Envío de fax básico Envio de fax básico Eenvoudige faxopdrachten 1 2 4 3 OK OK @/.’ ABC 1 2 3 GHI JKL MNO DEF 4 5 6 PQRS TUV WXYZ 8 9 7 &+-_, 0 Press the Fax button Appuyez sur le bouton Télécopie Premere il pulsante Fax Taste Fax drücken Pulse el botón Fax Pressione o botão Fax Druk op de knop Faxen EN FR IT DE ES PT NL EN FR IT DE ES PT 5 NL Navigate the menus to select faxing options Sélectionnez les options de télécopie en navigant dans les menus Esplorare i menu per selezionare le opzioni fax Die Faxoptionen über die Menüs einstellen Desplácese por los menús para seleccionar las opciones de fax Navegue pelos menus para selecionar as opções de fax Navigeer door de menu's om de faxopties te selecteren EN FR IT DE ES PT NL Press the Back button Appuyez sur le bouton Retour Premere il pulsante Indietro Taste Zurück drücken Pulse el botón Atrás Pressione o botão Voltar Druk op de knop Terug EN FR IT DE ES PT NL # Enter a Fax number Entrez un numéro de télécopie Inserire un numero fax Faxnummer eingeben Introduzca un número de fax Insira um número de fax Voer een faxnummer in EN FR IT DE ES PT NL Press the Start button Appuyez sur le bouton Démarrer Premere il pulsante Avvio Taste Start drücken Pulse el botón Comenzar Pressione o botão Iniciar Druk op de knop Start EN FR IT DE ES PT NL www.xerox.com/office/WC3315_WC3325support Faxing Télécopie OK The Left Arrow button clears characters La touche fléchée vers la gauche efface les caractères La freccia di scorrimento sinistra consente di cancellare caratteri Mit der Pfeiltaste nach links können Zeichen gelöscht werden El botón de flecha izquierda permite borrar caracteres O botão de seta para esquerda apaga caracteres Met de pijl naar links kunt u tekens wissen 16 EN FR IT DE ES PT NL Paper Jams Bourrages papier Inceppamenti della carta Papierstaus Atascos de papel Atolamentos de papel Papierstoringen 1 2 1 2 3 1 2 1 2 17 Troubleshooting Résolution des incidents www.xerox.com/office/WC3315_WC3325support 4 EN 1 2 FR IT DE ES PT NL CentreWare Internet Services Services Internet CentreWare CentreWare Internet Services CentreWare Internet Services Servicios de Internet de CentreWare Serviços de Internet no CentreWare CentreWare Internet Services http://xxx.xxx.xxx.xxx 1 English Français Italiano Deutsch Español Português Русский 2 EN FR IT www.xerox.com/office/ WC3315_WC3325docs ES PT NL www.xerox.com/office/WC3315_WC3325support You can configure and administer the printer using CentreWare Internet Services. Type the printer URL shown on the Configuration Report into your web browser. See the User Guide > CentreWare Internet Services. FR Vous pouvez configurer et gérer l'imprimante à l'aide des Services Internet CentreWare. Saisissez dans votre navigateur web l'URL qui apparaît sur le Relevé de configuration. Voir le : Guide de l'utilisateur > Services Internet CentreWare. IT È possibile configurare e gestire la stampante utilizzando CentreWare Internet Services. Digitare nel proprio Web browser l'URL disponibile nel rapporto di configurazione. Vedere Guida per l'utente > CentreWare Internet Services. DE Der Drucker kann über CentreWare Internet Services konfiguriert und verwaltet werden. Die URL aus dem Konfigurationsbericht im Browserfenster eingeben. Siehe Benutzerhandbuch > CentreWare Internet Services. ES Servicios de Internet de CentreWare le permite configurar y administrar la impresora. Escriba la dirección URL que se muestra en el informe de configuración en su navegador web. Consulte Guía del usuario > Servicios de Internet de CentreWare. PT Você pode configurar e administrar a impressora usando os Serviços de Internet do CentreWare. Digite a URL exibida no Relatório de Configuração no seu navegador web. Consulte o Guia do Usuário > Serviços de Internet do CentreWare. NL U kunt de printer configureren en beheren met CentreWare Internet Services. Typ de URL uit het configuratie-overzicht in uw webbrowser. Zie de Handleiding voor de gebruiker > CentreWare Internet Services. 18 Troubleshooting Résolution des incidents DE See: User Guide > Troubleshooting Voir : Guide de l'utilisateur > Dépannage Vedere: Guida per l'utente > Risoluzione dei problemi Siehe: Benutzerhandbuch > Fehlerbehebung Consulte: Guía del usuario > Solución de problemas Consulte: Guia do Usuário > Solução de Problemas Zie: Handleiding voor de gebruiker > Problemen oplossen EN-
 1
1
-
 2
2
-
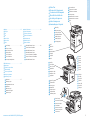 3
3
-
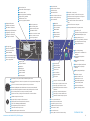 4
4
-
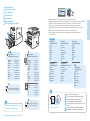 5
5
-
 6
6
-
 7
7
-
 8
8
-
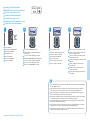 9
9
-
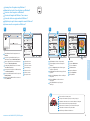 10
10
-
 11
11
-
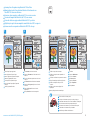 12
12
-
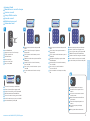 13
13
-
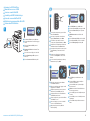 14
14
-
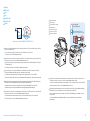 15
15
-
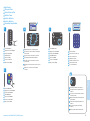 16
16
-
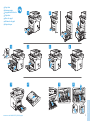 17
17
-
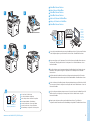 18
18


Xerox WorkCentre 3315/3325 El manual del propietario
- Tipo
- El manual del propietario
en otros idiomas
Artículos relacionados
-
Xerox Phaser 6700 El manual del propietario
-
Xerox 3025 El manual del propietario
-
-
-
-
Xerox WORKCENTRE 3615 El manual del propietario
-
Xerox 6605 El manual del propietario
-
Xerox WorkCentre 6015 El manual del propietario
-
Xerox ColorQube 8900 El manual del propietario
-