Brigmton BPhone 553-QC El manual del propietario
- Categoría
- Smartphones
- Tipo
- El manual del propietario

MANUAL DE INSTRUCCIONES
SMARTPHONE 5,5” IPS HD-QUAD CORE
BPHONE-553QC

1
CONTENIDO
1. PRECAUCIONES DE SEGURIDAD
2. DESCRIPCIONES GENERALES
3. INSTALACIÓN DE LA TARJETA SIM
4. INSTALACIÓN DE LA TARJETA DE ALMACENAMIENTO
5. CARGA
6. ENCENDIDO / APAGADO
7. DESCRIPCIÓN DEL MENÚ
8. CAMBIO DE IDIOMA Y HORA
9. CONEXION A UNA RED WI-FI
10. CONEXIÓN AL PC
11. SOLUCIÓN DE PROBLEMAS
1. PRECAUCIONES DE SEGURIDAD
Nunca intente desmontar el teléfono. Usted es el único responsable de la forma
de utilizar el teléfono y las consecuencias derivadas de su uso.
Como regla general, apague el teléfono siempre que se prohíba el uso del
teléfono. El uso del teléfono está sujeto a medidas de seguridad diseñadas para
proteger a los usuarios y su entorno.
No utilice el teléfono en lugares húmedos (baños, piscina, actividades deportivas,
etc). Protegerlo de líquidos, humedad y sudor.
No exponga el teléfono a temperaturas extremas inferiores (-10 ° C/+ 55 ° C)
Los procesos fisicoquímicos que se producen en las baterías imponen límites de
temperatura al cargar la batería. Su teléfono protege automáticamente las
baterías a temperaturas extremas.
No deje el teléfono al alcance de los niños pequeños, las partes desmontables
pueden ser ingeridas accidentalmente.
Seguridad eléctrica: utilice únicamente los cargadores indicados en el catálogo
del fabricante.
Seguridad de las aeronaves: Al viajar en avión, tendrá que apagar el teléfono
cuando así lo indique la tripulación de cabina o las señales de advertencia.
Seguridad personal: Para evitar posibles daños al oído, no escuche a volúmenes
altos durante períodos largos.
Materiales explosivos: Por favor, cumpla con las señales de advertencia en las
estaciones de gasolina. Respete las restricciones de uso en lugares como plantas
químicas, depósitos de combustible, etc.
Equipos electrónicos: Para evitar el riesgo de desmagnetización, no deje
dispositivos electrónicos cerca del teléfono por un largo tiempo.
Equipo médico electrónico: Su teléfono es un transmisor de radio que puede
interferir con los equipos médicos electrónicos o implantes, tales como
audífonos, marcapasos, bombas de insulina, etc. Se recomienda mantener una
distancia mínima de 15 cm entre el teléfono y el implante. Su médico o los
fabricantes de estos equipos serán capaces de darle algún consejo que pueda
necesitar sobre este tema.
Hospitales: Asegúrese siempre de que el teléfono esté apagado en hospitales
cuando así lo prescriban señales de advertencia o por el personal médico.
Seguridad vial: No utilice el teléfono mientras conduce. Con el fin de dar toda
su atención a la conducción, deténgase y estacione con seguridad antes de hacer
una llamada. Debe cumplir con cualquier legislación vigente.

2
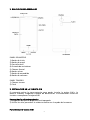
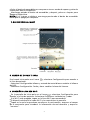
2. DESCRIPCIONES GENERALES
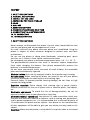
PANEL DELANTERO
1) Botón de inicio
2) Botón de menú
3) Pantalla táctil
4) Entrada de auriculares
5) Cámara frontal
6) Botón volver
7) Botón de encendido
8) Botón de volumen
PANEL TRASERO
1) Cámara trasera
2) Flash
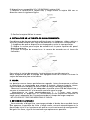
3. INSTALACIÓN DE LA TARJETA SIM
Es necesario quitar la tapa posterior para poder instalar la tarjeta SIM y la
batería. Además, asegúrese siempre de desconectar la alimentación antes de
instalar o reemplazar la tarjeta SIM.
Para quitar la cubierta posterior
1) Asegúrese de que su dispositivo está apagado.
2) Utilice las uñas para abrir la cubierta trasera con la ayuda de la muesca.
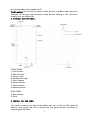
Para instalar la tarjeta SIM

3
El dispositivo es compatible 2G y 3G (WCDMA) tarjetas SIM.
1) Localice la ranura de la tarjeta SIM, y luego inserte la tarjeta SIM con su
dirección como la siguiente figura.
2) Deslice la tarjeta SIM en la ranura
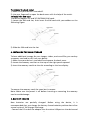
4. INSTALACIÓN DE LA TARJETA DE ALMACENAMIENTO
Para disponer de almacenamiento adicional para sus imágenes, vídeos, música y
archivos, puede comprar una tarjeta de memoria e instalarla en su dispositivo.
1) Asegúrese de que su dispositivo está apagado y retire la tapa posterior.
2) Ubique la ranura para tarjeta de memoria en la parte superior del panel
derecho expuesto.
3) Inserte la tarjeta de memoria en la ranura de acuerdo con el icono de
indicación.
Para retirar la tarjeta de memoria, lo mismo pero en sentido contrario.
Nota: asegúrese de que el equipo está apagado antes de insertar o extraer la
tarjeta de memoria para evitar daños.
5. CARGA
Las baterías nuevas vienen parcialmente cargadas. Antes de comenzar a utilizar
el dispositivo, se recomienda que cargue la batería. Algunas baterías tienen
mejor rendimiento después de varios ciclos de carga / descarga completas.
- Conecte el extremo de DC del adaptador al puerto micro USB del dispositivo y
conecte el extremo de AC a la toma de corriente para la carga.
- Normalmente se tarda aproximadamente 2 ~ 5 horas para cargar
completamente el dispositivo. El Funcionamiento del dispositivo durante la
carga con el adaptador de CA puede extender el tiempo de carga completa.
- NO UTILIZAR EL TELEFONO MIENTRAS SE CARGA.
6. ENCENDIDO / APAGADO
- Para encender el dispositivo, mantenga pulsado el botón de encendido hasta
que aparezca la pantalla de inicio y luego suelte, entrará automáticamente la
pantalla de inicio. Si es la primera vez que se usa, entrará menú de configuración
del guía. Por favor, siga las instrucciones que aparecen en pantalla.

4
- Pulse el botón de encendido una vez para entrar en modo de reposo y pulse de
nuevo para abrir el dispositivo.
- Mantenga pulsado el botón de encendido y después, pulse en Aceptar para
apagar el dispositivo.
NOTA: Si el sistema se detiene, mantenga presionado el botón de encendido
hasta que se apaga por completo.
7. DESCRIPCIÓN DEL MENÚ
8. CAMBIO DE IDIOMA Y HORA
En el menú Inicio pulse en el icono y seleccione Configuración para acceder a
la lista de opciones.
- Seleccione Configuración-Idioma y entrada de texto-Idioma: cambiar el idioma
de OSD.
- Seleccione Configuración- Fecha y hora: cambiar la hora del sistema.
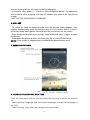
9. CONEXIÓN A UNA RED WI-FI
- En la pantalla de inicio pulse en el icono y seleccione Configuración para
acceder a la lista de opciones. Seleccione Conexiones inalámbricas y redes.
- Si el Wi-Fi está apagado, toque en la línea Wi-Fi para encenderlo.
- El dispositivo buscará las redes Wi-Fi y los mostrará en la pantalla.
- Toque en la red a la que desea conectarse. A continuación, toque en el campo
de la contraseña para introducir la información de red necesaria y toque en
“conectar”.

5
- El dispositivo intentará establecer una conexión con el punto de acceso Wi-Fi
con los parámetros de la red que ha introducido
10. CONEXIÓN AL PC
- Conecte el dispositivo a su PC a través del cable USB.
- Se instalará automáticamente el controlador necesario y luego pulse "Activar
almacenamiento USB" en la pantalla del teléfono para activar la función de
almacenamiento USB.
- Seleccione el contenido que desea transferir desde su PC.
- Arrastre el contenido desde el PC al dispositivo.
- No desconecte el cable USB durante la carga, puede causar un mal
funcionamiento del dispositivo y archivos.
- Use su PC para desconectar el dispositivo
11. SOLUCIÓN DE PROBLEMAS
1: ¿Qué pasa si el agua entra en el dispositivo?
- NO encienda el dispositivo.
- Desconecte el cable de salida con el fin de desactivarlo en lugar de pulsar el
botón de encendido. Desconecte todos los dispositivos externos y luego enviarlo
al centro de servicio para pedirle consejo.
2: ¿Cómo comprobar el dispositivo si no se enciende?
- Si la energía es baja, conecte el adaptador para cargar.
- Retire la tarjeta micro-SD y cualquier otro dispositivo externo.
3: ¿Cómo restaurar la configuración predeterminada de fábrica?
- Ir a Ajustes --- copias de seguridad & restablecer --- Restablecer datos de fábrica
para recuperar el sistema al estado predeterminado.
4: ¿Cómo prolongar el tiempo de uso de la batería
- Ajuste el brillo de la pantalla táctil hasta el nivel adecuado en Configuración
Pantalla
- Baje el volumen.
- Ajuste el tiempo de suspensión hasta el nivel adecuado en Configuración
/pantalla/ tiempo de suspensión
5: ¿Qué hacer si el micro SD o la tarjeta SIM no se puede leer?
- Por favor, apague el dispositivo y vuelva a insertar la tarjeta.
6: ¿Por qué se desactivará la función Bluetooth y 3G? (Aplicable sólo para el
modelo con función Bluetooth y 3G)
- Cuando el "modo avión" está habilitado, la función Bluetooth y 3G no se
puede activar.

6
“Las especificaciones pueden cambiar sin previo aviso”
IMPORTADO
FERSON ELECTRÓNICA, S.A.
CIF: A-41111881
SANTA CLARA DE CUBA 12
SEVILLA
ESPAÑA
DECLARACIÓN DE CONFORMIDAD
Ferson Electrónica, S.A. declara bajo su responsabilidad que el aparato
indicado cumple los requisitos de las siguientes directivas:
DIRECTIVAS EMC
EN60950-1:2006/A11:2009/A1:2010
EN 62311: 2088
EN 301 489-1 V1.9.2:2011-09
EN 301 489-17 V2.1.1:2009-05
EN 300 328 V1.7.1: 2006-10
ETSI EN 301 489-1 V1.9.2(2011-09)
ETSI EN 301 489-17 V2.1.1(2009-05)
Descripción del aparato:
Modelo BRIGMTON BPHONE-553QC
Dispositivo de conexión a internet

7

8
INSTRUCTION MANUAL
SMARTPHONE 5,5” IPS HD-QUAD CORE
BPHONE-553QC

9
CONTENT
1. SAFETY PRECAUTIONS
2. GENERAL DESCRIPTIONS
3. INSTALL THE SIM CARD
4. INSTALLING THE CARD STORAGE
5. LOAD
6. ON / OFF
7. MENU DESCRIPTION
8. CHANGE OF LANGUAGE AND TIME
9. CONNECTING TO A NETWORK WI-FI
10. PC CONNECTION
11. TROUBLESHOOTING
1. SAFETY PRECAUTIONS
Never attempt to disassemble the phone. You are solely responsible for how
you use your phone and any consequences of its use.
As a rule, switch off your phone whenever phone use is prohibited. Using the
phone is subject to safety measures designed to protect users and their
environment.
Do not use the phone in damp areas (bathroom, swimming pool, sports
activities, etc.). Protect it from liquids, moisture and sweat.
Do not expose your phone to extreme temperatures lower (-10 ° C / + 55 ° C)
The physicochemical processes that occur in batteries impose temperature
limits when charging the battery. Your phone automatically protects the
batteries in extreme temperatures.
Do not leave your phone within the reach of small children, the removable
parts may be accidentally ingested.
Electrical safety: Only use the chargers listed in the manufacturer's catalog.
Aircraft safety: When traveling by plane, you need to turn off your phone
whenever directed by the cabin crew or the warning signs.
Personal Safety: To prevent possible hearing damage, do not listen at high
volumes for long periods.
Explosive materials: Please comply with warning signs at petrol stations.
Observe restrictions on the use in places such as chemical plants, fuel depots,
etc.
Electronic equipment: To avoid the risk of demagnetization, do not let
electronic devices close to your phone for a long time.
Electronic medical equipment: Your phone is a radio transmitter which may
interfere with electronic medical or implants, such as hearing aids, pacemakers,
insulin pumps equipment, etc. It is recommended that a minimum distance of
15 cm between the phone and an implant. Your doctor or the manufacturers
of such equipment will be able to give you any advice you may need on this
subject.
Hospitals: Make sure the phone is switched off in hospitals when so instructed

10
by warning signs or by medical staff.
Traffic safety: Do not use the phone while driving. In order to give your full
attention to driving, stop and park safely before making a call. You must
comply with any legislation.
2. GENERAL DESCRIPTIONS
FRONT PANEL
1) Start button
2) Menu button
3) Touch screen
4) Headphone input
5) Front camera
6) Return button
7) Power button
8) Volume button
REAR PANEL
1) Rear camera
2) Flash
3. INSTALL THE SIM CARD
You need to remove the back cover before you can install the SIM card and
battery. Also, always be sure to disconnect the power before installing or
replacing the SIM card.

11
To remove the back cover
1) Make sure your device is turned off.
2) Use your fingernail to open the back cover with the help of the notch.
To install the SIM card
The device supports 2G and 3G (WCDMA) SIM cards.
1) Locate the SIM card slot, then insert the SIM card with your address as the
following figure.
2) Slide the SIM card into the slot
4. INSTALLING THE CARD STORAGE
To have additional storage for your images, videos, music and files, you can buy
a memory card and install it on your device.
1) Make sure your device is turned off and remove the back cover.
2) Locate the memory card slot on the top of the right panel exposed.
3) Insert the memory card into the slot according to the icon display.
To remove the memory card, the same but in reverse.
Note: Make sure the power is off before inserting or removing the memory
card to avoid damage.
5. BATTERY CHARGE
New batteries are partially charged. Before using the device, it is
recommended that you charge the battery. Some batteries perform best after
several cycles of full charge / discharge.
- Connect the DC end of the adapter into the micro USB port on the device and

12
connect the end of the AC power outlet for charging.
- It normally takes about 2 ~ 5 hours to fully charge the device. The operation
of the device while charging with the AC adapter may extend the time of full
charge.
- NOT USE THE PHONE WHILE CHARGING.
6. ON / OFF
- To switch on, hold the power button until the startup screen appears, then
release, automatically enter the Home screen. If this is the first time it is used, it
will enter setup menu guide. Please follow the instructions on the screen.
- Press the power button once to enter sleep mode and press it again to open
the device.
- Hold down the power button and then click OK to turn off the device.
NOTE: If the system is stopped, press and hold the power button until
7. MENU DESCRIPTION
8. CHANGE OF LANGUAGE AND TIME
From the Start menu click on the icon and select Settings to access the options
list.
- Select Settings-Language and Text Input-Language: change the language of
the OSD.
- Select Settings- Date and time: change the system time.

13
9. CONNECTING TO A WI-FI NETWORK
- In the home screen click on the icon and select Settings to access the options
list. Select Wireless & networks.
- If the WiFi is off, tap the Wi-Fi line to turn it on.
- The device scans for Wi-Fi networks and displays them on the screen.
- Tap the network you want to connect. Then tap the password field to enter
the required network information and tap "connect".
- The device will attempt to connect to the access point with the Wi-Fi network
settings you entered
10. PC CONNECTION
- Connect the device to your PC via the USB cable.
- The required driver is automatically installed and then click "Turn on USB
storage" in the phone screen to activate the USB storage.
- Select the content you want to transfer from your PC.
- Drag the content from the PC to the device.
- Do not disconnect the USB cable during charging can cause a malfunction of
the device and files.
- Use your PC to disconnect the device
11. TROUBLESHOOTING
1: What if water enters the device?
- DO NOT turn on the device.
- Disconnect the power outlet in order to deactivate instead of pressing the
power button. Disconnect all external devices and then send it to the service
center for advice.
2: How to check if the device does not turn?
- If the power is low, connect the adapter to charge.
- Remove the micro-SD card and any other external device.
3: How to restore the factory settings?
- Go to Settings --- backup & restore --- Factory data reset to restore the system
to the default state.
4: How to prolong battery usage
- Adjust the brightness of the touch screen to proper level Display Settings
- Lower the volume.
- Set the time of suspension to the proper level Settings / Display / suspension
time
5: What if the micro SD or SIM card can not be read?
- Please turn off the device and reinsert the card.

14
6: Why Bluetooth and 3G function is disabled? (Applicable only for model with
Bluetooth and 3G)
- When the "airplane mode" is enabled, Bluetooth and 3G function can not be
activated.

15

16
“Features can change without notice”
IMPORTED
FERSON ELECTRÓNICA, S.A.
CIF: A-41111881
SANTA CLARA DE CUBA 12
SEVILLA
ESPAÑA
DECLARATION OF CONFORMITY
Ferson Electrónica, S.A. declares under our responsibility that the equipment
meets the requirements indicated in the following directives:
EMC DIRECTIVES
EN60950-1:2006/A11:2009/A1:2010
EN 62311: 2088
EN 301 489-1 V1.9.2:2011-09
EN 301 489-17 V2.1.1:2009-05
EN 300 328 V1.7.1: 2006-10
ETSI EN 301 489-1 V1.9.2(2011-09)
ETSI EN 301 489-17 V2.1.1(2009-05)
Description of apparatus:
BRIGMTON Model BPHONE-553QC
Mobile Internet Device
-
 1
1
-
 2
2
-
 3
3
-
 4
4
-
 5
5
-
 6
6
-
 7
7
-
 8
8
-
 9
9
-
 10
10
-
 11
11
-
 12
12
-
 13
13
-
 14
14
-
 15
15
-
 16
16
-
 17
17


Brigmton BPhone 553-QC El manual del propietario
- Categoría
- Smartphones
- Tipo
- El manual del propietario