Kenmore 116.35725 El manual del propietario
- Categoría
- Aspiradoras
- Tipo
- El manual del propietario
Este manual también es adecuado para

Owner'sManual
ManualDelPropietario
VacuumCleaner
Aspiradora
Model, Modelo
116.35725
116.35726
CAUTION:
Read and follow all
safety and operating
instructions before first
use of this product.
CUIDADO:
Lea y sigue todas las
instrucciones de operaciSn
y seguridad antes del uso de
este producto.
Sears, Roebuck and Co., Hoffman Estates, IL 60179 U.S.A.
www,sears.com
Impreso en M_xioo
Part No. C01ZCKVQOU_Q-KCQ1ZCKVZOUO Printed in Mexico

BeforeUsing Your New Vacuum ........ 2
KenmoreVacuum Cleaner Warranty .... 2
ImportantSafety Instructions ........... 3
Parts and Features ................... 4
AssemblyIn_ons ............... 5-6
Operating Instructions ................. 6
Pile HeightSelection and Setting ........ 7
Carpet/Bare FloorSelector ............ 7
Releasingthe Handle ................. 8
ON/OFF Switch ..................... 8
Attachments ..................... 8-10
Attachment Use Chart ............... _,1
Vacuuming Tips .................... 11
Performance Features ............... 12
Vacuum Cleaner Care ............... 13
Vacuum Storage ................... 13
Cleaning Exteriorand Attachments ..... 13
Dust Bin Cleaning ................ 14-15
Secondary Filter Cleaning ............ 15
FilterChanging/Cleaning ............. 16
Belt Changingand AgitatorCleaning.. 17-19
Clog Removal ..................... 20
Light BulbChanging ................. 21
AgitatorServicing................... 22
Troubleshooting ..................... 23
Requesting Assistance
Or Service Back Page
Please read this guide. It will help you assemble and operate your new Kenmore vacuum in
the safest and most effective way.
For more information about vacuum cleaner care and operation, call your nearest Sears store.
You will need the complete model and serial numbers when requesting information. Your vacu-
um's model and serial numbers are located on the Model and Serial Number Plate.
Use the space below to record the model number and serial number of your new Kenmore
vacuum.
Model No.
Serial No.
Date of Purchase
Keep this book and your sales check (receipt) in a safe place for future reference.
LIMITED ONE YEAR WARRANTY ON KENMORE VACUUM CLEANER
This warranty is for one year from the date of purchase, and includes only private household
vacuum cleaner use. During the warranty year, when this vacuum cleaner is operated and
maintained according to the owner's manual instructions, Sears will repair any defects in
material or workmanship free of charge.
This warranty excludes vacuum bags, belts, light bulbs, and filters, which are expendable parts
and become worn during normal use.
Forwarranty service, returnthis vacuum cleaner to the nearest Sears Service Center in the
UnitedStates,
This warranty applies only while this product is in use in the United States. This warranty gives
you specific legal rights, and you may also have other rights which vary from state to state.
Seam, Roebuck and Co., D/817 WA, Hoffman Estates, IL 60179

YoursafetyisImportant to us. To reduce the risk of fire, electrical shock, injury to
persons or damage when using your vacuum cleaner, follow basic sarety precau-
tions Including the following:
Read all instructions in this manual before
assembling or usingyour vacuum cleaner.
Use your cleaneronly as described in this
manual, Use onlywith Sears recommend-
ed attachments.
Disconnect electrical supply before servic-
ing or cleaning out the brush area. Failure
to do so could result in electrical shock or
the brush suddenly starting.
Do not leave cleaner when plugged in.
Unplug from outlet when not in use and
before servicing.
To reduce the risk of electrical shock - Do
not use outdoors or on wet surfaces.
Do not allow to be used as a toy. Close
attention is necessary when used by or
near children.
Do not use with a damaged cord or plug.
If cleaner is not working as it should, has
been dropped, damaged, left outdoors, or
dropped onwater, return it to a Sears
Service Center.
Do not pull or carry by cord, use cord as
a handle, close a door on cord, or pull
cord around sharp edges or corners. Do
not run cleaner over cord. Keep cord
away from heated surfaces.
Do not unplug by pulling on cord. To
unplug, grasp the plug, not the cord.
Do not handle plug or cleaner with wet hands.
Do not put any objects into openings.
Do not use with any opening blocked;
I keep free of dust, lint, hair, and anything
that may reduce air flow.
Keep hair, loose clothing, fingers, and all
parts of body away from openings and
moving parts,
"rum off all controlsbefore unplugging.
Use extra care when cleaningon stairs.
Do not put on chairs,tables, etc. Keep
on floor.
Do not use cleaner to pick up flammable
or combustibleliquids (gasoline, cleaning
fluid, perfumes, etc.), or use in areas
where they may be present. The fumes
from these substances can create a fire
hazard or explosion.
Do not pick up anything that is burning or
smoking, such as cigarettes, matches, or
hot ashes.
Do not use cleaner without dust bag
and/or filters in place.
Always change the dust bag after vacu-
uming carpet cleaners or freshener, pow-
ders, and fine dust. These productsclog
the bag, reduce airflowand can causethe
bag to burst. Failure to change the bag
could cause permanent damage to the
cleaner.
Do not use the cleaner to pick up sharp
hard objects, small toys, pins, paper clips,
etc. They may damage the cleaner or
dust bag.
Do notoperate cleaner withoutthe belt
access door properly installed(if applicable).
Unplug before connecting Handi-mate Jr.
(if applicable).
You are responsible for making sure that
your vacuum cleaner is not used by any-
one unable to operate it properly.
SAVE THESE INSTRUCTIONS
Proper assembly and safe use of your vacuum cleaner are your responsibilities. Your
cleaner is intended for Household use. Read this Owner's Manual carefully for important
!use and safety information. This guide contains safety statements under warning and cau-
tion symbols. Please pay special attention to these boxes, and follow any instructions
given. WARNING statements alert you to such dangers as fire, electric shock, burns and
personal injury. CAUTION statements alert you to such dangerous personal injury and/or
property damage.

It is importantto know your vacuum cleaner's parts and features to assure its proper and safe
use. Review these before using your cleaner.
Item Part No. Part No.
In U.S. In Canada
Exhaust Filter 20-86889 20-86889C
Primary Filter 20-82720 20-82720C
Headlight Bulb 20-5240 20.40600
Belt 20-5275 20-40096
Quick Release
HandI.Male Jr.®
Caddy
Handi.Mato ,
Lower
Carry
Crevice
Tool
Telescoping
Dusting
Brush
Combination
Brush
Handle
Release
Pedal
Model/Serial
Numbers
Height
Adjustment
- Ready-to-Use
Ill.,.,.o.
,Stretch Hose
- Motor
Protector
Agitator
(Underneath)
Dust
Headlight
Handi-Mate Jr.®
4

WARNING I
Electrical Shock Hazard
Do not plug Intothe electrlcaisupply
untilthe assemblyiscomplete. Failure
to do so could resultIn electricalshock
or Injury,
Before assembling vacuum, checkthe
PACKING LIST onthe cover of the separate
Repair Parts List. Use this list to verify that
you have received all the components of
your new Kenmore vacuum.
Remove the tape located below the dust
cover/filter cover on the motor case.
Tape
Attach
stretch
hose end to
nozzle as
shown.
HANDLE ASSEMBLY
Remove the screw located just below the
top edge of the back of the vacuum.
Position the handle as shown in the illustra-
tion below.
Slide the handle intothe opening at the top
of the vacuum.
Handle
Screw
Hole
Insert the screw so it passes through the
handle into the vacuum.
5
Begin to tighten the screw with your fingers.
It may be necessary to adjust the handle
slightly.
Using a screwdriver, tighten the screw.
Do not overtighten.
Overtighteningcould stripthe screw
holes.
Do not operate the cleaner withoutthe
screw inplace.

CORD ASSEMBLY
Make sure the quick release upper cord
hook is in the upright position. Remove the
wire tie from the power cord.
Lock the cord into
place by forcing it
into the locking notch
on the body of the
quick release upper
cord hook as shown.
This helps keep the Powor
power cord out from
under the vacuum
cleaner agitator.
Quick Release
Upper Cord Hook-
Lower
Cord Hooks' II1_
Wrap the power cord around the upper and
lower cord hooks and lock the power cord
plug onto the power cord.
HANDI-MATE JR.®
For operation of Handi-Mate Jr.® see
seperate owners manual.
Latch
,Caddy
HandloMate Jr.®
TO INSERT HANDI-MATE JR ®
Place the rear of the Handi-Mate Jr.®into
the caddy.
Rotate the Handi-Mate Jr.®back until it
snaps into place.
TO REMOVE HANDI-MATE JR."
Rotate Handi-Mate Jr.= out of the caddy.
HOW TO START
Release
Upper Cord
Hook
Turn the quick
release upper
cord hook to
either side
and down to
release the
power cord.
Release the power cord plug from the
power cord and pull the cord off the quick
release upper cord hook. Check to be sure
the power cord is still locked into the lock in
the quick release upper cord hook.
Note: To reduce the risk of electric shock,
this vacuum cleaner has a polarized plug,
one blade is wider than the other.
This plug will fit in a polarized outlet only
one way. If the plug does not fit fully in the
outlet, reverse the plug. If it still does not fit,
contact a qualified technician to install the
proper outlet. Do not change the plug in any
way.
Plug the polarized power cord into a 120
Volt outlet located near the floor.
WARNING
PersonalInjuryand ProductDamage
Hazard
DO NOT plug in if switchisIn the ON
Personalinjuryor damage
result.
• DO NOT useoutletsabove counters.
Damage from cord to itemsin surround-
Ing area could occur.
6

To select a pileheight setting:
Turn off cleaner. Select a pile height setting
by tilting the cleaner back until front wheels
are lifted slightly off the floor as illustrated.
Slide the adjustment lever to the correct
setting.
SUGGESTED PILE HEIGHT SE'n'INGS
You may need to raise the height to make
some jobs easier, such as scatter rugs and
longer pile carpets. Suggested settings are:
HIGH: shag carpet, long pile, plush, scatter
rugs.
MED: medium to long pile.
LOW: short to medium pile.
EX LOW"very low pile.
Bare floorsetting:Slide the carpet/bare floor
WARNING
PersonalInjury Hazard
DO NOT place hands orfeet under-
neath the unitwhen changingfrom
the bare floorto the carpet pile
height setting.The agitatorbeginsto
revolve rapidlywhen the vacuum Is
tumed on and Is inthe carpet set-
ting.
selector all the way back and down toward
the bottom of the nozzle until it locks into
place.
In this position the brush assembly does not
revolve. This setting should be used for
cleaning hardwood and tile floors and when
any attachments (tools) are used,
Carpet setting: Slide the selector all the way
forward and up to the carpet
position.
In this position the brush assembly will turn.
When carpets are being cleaned the selec-
tor should be in this position.
Attention: Refer to your carpet manufactur-
ers cleaning recommendations. Some more
delicate carpets may require that they be
vacuumed with the agitator turned off, to
_revent carpet damage.
CAUTION
Do not allowvacuum cleanerto remain
in one spot for any length oftime when
the agitatoris turning.Damage to car-
pet may occur.
Note: For longer belt life, turn vacuum off
before moving selector. Failure to do so can
cause the belt to rub on the selector shaft
and may result in the belt becoming hot and
creating a burning rubber smell.
Carpet/Bare
Floor Selector
To Bare Floor
Position
To Carpet
Position
7

Release the handle by pressing down on
the handle release pedal with your foot and
pullingback and down onthe handle with
yourhand.
HANDLEMOUNTED
Release
Pedal
Tostart the vacuum cleaner, slide the
On/Off switchfrom the OFF positionto the
ON position.Tostop the vacuum cleaner,
slidethe On/Off switchto the OFF position.
Crevice
Dusting •Stretch
Hose
Combination
Hose
Identify each ofthe attachments shown
above.
TO USE ATTACHMENTS
Place the carpet/bare floor selector in the
bare floor setting by rotating the selector
back and down to the bare floor setting.
See CARPET/BARE FLOOR SELECTOR
section.
When returning the bare floor selector to
the carpet setting, use caution as the selec-
tor can move quickly to that setting due to
tension created by the belt.
Remove the lower end of the stretch hose
from the cleaner by grasping the hose col-
lar, twisting and pulling straight out. The
attachments can now be added to the hose.
Note: The motor protector may open
when using attachments or when cleaning
new carpet, due to reduced airflow by the
attachments themselves or by new carpet
fuzz filling the dust bin quickly. See the
TROUBLESHOOTING section.
Electrical Shock And Personal Injury
Hazard
Disconnectelectricalsupplybefore
servicingor cleaning the unit. Failure
to do so could resultin electricalshock
or personalinjuryfrom cleaner sud-
denlystarting.
8

The attached
hose swivels to
make cleaning
easier in every
direction, swivel.
Remove the
hose from the
hose clip by
pulling
straight out.
TELESCOPINGWANDWITH
SUCTION CONTROL SLIDE
SOME MODELS
||l till
Remove the
Crevice telescoping
Tool
wand from
its storage
Telescoping position.
Wand
Remove the crevice tool from its storage
position in the wand, Turn the locking ring to
the UNLOCK position.
Extend the wand to its full length. Turn the
locking ring to the LOCK position. Attach the
extension wand onto the open end of the
hose.
Lower_ Suction
! _.
_ LOC.mg Hlng I
Align the tabs on the extension wand with
the "J" slots in the hose, Push the wand into
the hose and twist to the right to lock.
To achieve maximum reach
with the attachments, add Hose.
the crevice tool to the
end of the wand by suction
inserting and twist- control
Slide
ing slightly. ",_
Wandx
The dusting
brushor the
combinaUon
brush maybe
attached
direcUy to the
wand or
placed on the
end of the crevice tool.
OPERATE SUCTION
NTROL SLIDE
Telescoping Wand
When using attachments for cleaning
draperies, small rugs with low pile and other
delicate items, twist the suction control slide
to the open position, This will reduce suction
for ease of cleaning. SucUon
Control
The slide is Slide
located on the
telescoping wand,
close to the hose.
Note: Return suction control slide to the
closed position for normal cleaning.
When usingattachments, be careful not
to overextendthe stretchhosewhen
reaching.Trying to reach beyondthe
hose stretchcapability couldcause the
cleanerto tip over. Make sure the car-
pet/bare floorselector is inthe bare floor
position. Damage to the floor surface
may occurifthe carpet setting isused.

TO STORE ATrACHMENTS
Remove dusting brush or combination
brush. Snap into appropriate storage loca-
tion.
Remove crevice tool from the wand bytwist-
ing. Lay aside.
Remove the extension wand from the hose.
Twist the wand to the left and pull it away
from the hose end.
Unlock
Lock
Upper
Wand
Ring
CAUTION
Unlockthe wand byturningthe wand lock-
ing ring tothe UNLOCK position.
Slide the lower wand into the upper wand.
Turn the wand locking ring to the LOCK
position.
Place the crevice tool down into the corm
pressed wand. Snap into the appropriate
,, storage location.
Reinsert the hose fully into the opening on
the nozzle base from which it was removed.
Press firmly to assure connection.
10

A'I-FACHMENT
DUSTING BRUSH <_
CREVICE TOOL
COMBINATION BRUSH _,
HandI-Mate Jr.° (_
*Alwayscleanattachmentsbeforeusingonfabrics.
Fumiture*
x
x
X
x
CLEANINGAREA
Between
Cushions*
Drapes*
X
Stairs
x x
X x
X
Walls
X
Carpetedges
Guide either side or the front of the nozzle
along a baseboard. The full width agitator
brushes help remove dirt at carpet edges.
Stairs
Put handle in full upright position. Place the
carpet/bare floor selector in the bare floor
position. Use the crevice tool or fabric
brush. Set the On/Off switch to ON.
Personal Injury Hazard
Use care ifvacuum cleaner is placed
on stairs. If itfalls, personalinjuryor
propertydamage could result.
For best clean-
ing results, keep
the airflow pas-
sage clear.
Occasionally,
check each of
the areas indi-
cated for clogs.
Unplug the
cleaner from the
ouUet before
checking.
11

MOTOR PROTECTION
SYSTEM
Thermal Protector
This vacuum has a thermal protectorwhich
automaticallytripsto protectthe vacuumfrom
overheating. If a clog preventsthe normal
flow ofair to the motor,the thermal protector
turns the motoroff automaticallyto allowthe
motorto coolin order to preventpossible
damage tothe vacuum. Duringthis time the
headlightremainson.
To con'ectproblem: If thisoccurs,turnthe"
vacuumoffand unplugthe powercordfrom
the outletto allow the vacuum to cooland the
thermalprotectorto reset. Check for and
removeclogs, ffnecessary. Also check and
clean/replaceany cloggedfilters.Wait
approximatelythirty (30) minutesand plug
the vacuumin and turnback onto see ifthe
motorprotectorhas reset.The motor
protectorwill not reset if the vacuum isnot
turnedoffeven ifthe vacuum hascooled
down.
Motor Protector
This vacuum has a motor
protector by-pass valve
which automatically
opens to provide cooling
air to the motor when a
clog prevents the
normal flow of air to the
motor. If the by-pass
valve opens to prevent Protector
motor overheating and possible damage to
the vacuum, you will notice a change of
sound as air rushes through the valve
opening.
Note: Do not block motor protector.
To correct problem: See theTROUBLE-
SHOOTING chart.
Note: The motor protector may open when
using attachments or when cleaning new
carpet, due to reduced airflow by the
attachments themselves or by new carpet
fuzz filling the dust bin quickly. See the
TROUBLESHOOTING section.
12

Alwaysfollow all safety precautions when
cleaningand servicing the vacuum
cleaner.
Gatherthe cord and wrap it loosely around
EleotrlcalShockAnd PersonalInjury
Hazard
Disconnectelectricalsupplybefore
servicingor cleaningthe unit.Failure
to do so could resultin eloctdcalshock
or personalInjuryfrom cleanersud-
denlystarling.
the upperand lower cord hooks.
Store the cleaner
in a dry, indoor
area, on the floor
with the handle
locked in the
upright
position.
WARNING
ElectricalShock And Personal Injury
Hazard
Wrappingthe cordtoo tightlyputs
stresson the cord and can cause cord
damage. A damaged cord is an electd-
cal shock hazard and could cause per-
sonalinjury or damage.
Unplugcord from wall outlet.
Clean exterior using a clean, soft cloth that
has been dipped in a solution of mild liquid
detergent and water, then wrung dry. Wipe
dry after cleaning. DO NOT drip water on
cleaner.
Wash attachments in warm soapywater,
rinse and air dry. Do not clean in dishwash-
el',
CAUTION
Do notuse attachments if they wet,
Attachmentsused in dirtyareas, such
as under a refrigerator,shouldnotbe
used onother surfacesuntilthey are
washed.They could leave marks.
13

Always emptythe dustbinwhen dirtlevel
reaches the "MAX FILL" line.
TO REMOVE DUST BIN
!'I, 1WARNING
Alwaysunplugpower cord fromelectd-
cal outlet before performingany ear-
viceon vacuum.
Lift dust bin han- Dust Bin
Release
die located at the
top of the dust
bin. Dust
Pull the handle for-
ward and lift dust bin
up and out of the
vacuum cleaner.
Remove any
clogs that Dust Bin
might be locat-
ed in the dust
bin port or the
secondary fil-
ter.
Secondary
TO EMPTYDUST BIN
Turn This Direct/on Closed
To Open For Emptying (For Use)
(For Emptying)
Rotate dust bin lid assembly counterclock-
wise as indicated on the lid and lift off.
Pour dust bin contents
into a trash container.
TO CLEAN FILTER
The filter may
be cleaned by
tapping it on a
firm surface or
by rinsing it
under a faucet.
Rinse with
water only, do
not use any
detergent or
soap. Allow the
filter to dry for
24 hours before
putting it back
into the vacuum.
Cover
14

TO REPLACE DUST BIN
Turn This Direction Open
To Close For Use (For Emptying)
(For Use)
Replace dust bin lid assembly by placing
back on dust bin with the marks on the lid
aligned as shown under Open (For
F__rnp_ing)on the back of the dust bin.
Rotate lid clockwise while pressing down-
ward so marks align as shown above C/ose
(For Use) as above.
Place dust bin
back into vacuum
cleaner by insert-
ing the bottom first_
and tilt back with
the dust bin han-
dle raised.
o.,B,n
Release
Handle-- _
Lower the dust
bin handle to
lock dust bin in
place.
Check secondary filter frequently and clean
when dirty.
Remove the dust bin as outlined in the
DUST BIN CLEANING section.
To clean filter screen wipe screen with a dry
cloth.
NOTE: Filter screen is not removable.
Replace the dust bin as outined in the
DUST BIN CLEANING section,
Filter
15

BectricalShockHazard
Unplugpowercord from electricalout-
let. Do not operate the deanar without
the primaryor exhaust filters. Be sure
the filtersare properlyinstalledto pre-
vent motorfailure and/or electrical
shock.
PRIMARY FILTER
Check primary filter frequentlyand clean
when dirty.
TO REMOVE PRIMARY FILTER
Remove the dust bin and dust bin lid
assemblyas outlined in the DUST BIN
CLEANING section.
Grasp filter, rotate and lift
off.
Locking
\
Slot
Cover
Clean primary filter by gently tapping over a
trash container. Tap on several sides to
ensure best cleaning. Rinse,as needed,
with water only. (see page 15).
When cleaning the filter no longer restores
vacuumsuction to full poweryou need to
replace the filter.
TO REPLACE PRIMARY FILTER
Replace filter and rotate filter until
slots lock onto tabs in
cover,
Slot
Cover
Tab
NOTE: Under normal use and care, your fil-
ter can be expected to last up to 3 years.
EXHAUST FILTER
HEPA
The exhaust filter must be replaced when
dirty. Itshould be replaced regularly
depending on use conditions.
ThefilterCANNOTbewashedasitwilllose
itsdusttrappingability.
NOTE: See PARTS AND FEATURES
for the exhaust filter number.
Press inwardon each side of
exhaust filter cover and pull
out to remove from vacuum Press
cleaner. Inward
Exhaust
Remove the
exhaust filter
cartridge.
Push only on filter car-
tridge frame, not on filter
material itself.
The grey edge ofthe filtershould be facing
away from the operator.
Replace the exhaust filter cover by placing
tabs in slots and pushing in until cover
snaps into place.
16

ElectricalShock Or Personal Injury
Hazard
Disconnectelectricalsupplybefore
servicingor cleaningthe unit. Failure
to do so could resultin electricalshock
or personal injuryfromcleaner sud-
donly starting.
Frequentlycheckand remove hair, string
and lintbuild-upin thebrush area. If build-
up becomes excessive,followthe steps
below.
TO REMOVE BELT
Disconnect power cord from electrical outlet.
Carpet/Bare
Roor Selector
Place the
carpet/bare
floor selec-
tor in the
carpet posi-
tion and
To Carpet lower han-
Position die to lay
vacuum flat.
Slide latches
outwardand
remove noz-
zle cover.
Nozzle
Latches
Agitator
Cover
Furniture
Guard
Retainer
Unfasten the
furniture
guard retain-
ers from the
posts on both
sides of the
agitator
cover.
Depress tabs on
rear of agitator
cover and rotate
forward to
release from the
nozzle body,
The light bulb socket assembly does not
have to be removed, Laythe agitator
cover overto the side outof the way.
Be/t
Position hands on the agitator. If the belt is
still attached to the agitator, there will be
tension on the agitator. Carefully lift the right
end of the agitator and then the left end.
Note: It may be necessary to pull the edge
of the furniture guard out of the way to allow
the ends of the agitator to be removed easily.
Remove the belt from the motor drive shaft.
Personal InjuryHazard
Be careful when removingthe agitator
as the belt tension Is high. Failureto
do so could resultin personalinjury
fromthe agitator releasingquicklyand
snappingaway.
17

TO CLEANAGITATOR
Note: In orderto keep cleaning efficiency
highand to prevent damage to your vacu-
um, the agitator must be cleaned every time
the belt is changed.
The agitator must be cleaned according to
the following schedule:
Vacuum Use ._
HEAVY every week
(used daily)
MODERATE
(used 2-3 times/week)
every month
LIGHT
(used I time/week)
every 2 months
Remove any dirt or debris in the belt path
area or in the agitator area.
AgitatorAssembly
Agitator
Unit
Remove any string or debris located on the
agitator assembly or agitator shaft.
TO REPLACE BELT
Make sure that the carpel/bare floor selec-
tor is in the carpet position.
Loop the new belt on the motor shaft.
Motor
Shaft
Carpet/BareRoor
Be_ New SelectorShaft
Pufley Be_
BELT ROUTING
Correct Routing of Belt
(Selector In Carpet_on)
_tBe_lt _l , Carpet/Bare
;I__j_..Z.::.--_j: _;T._ FloorP_dal
Agitator J Motor
Carpet/Bare Floor Shaft
Selector Shaft
Incorrect Routing of Belt
(Belt on Selector Shaft)
_, Carpet/Bare
IJ)Floor Pedal
Agitator Motor
Carpet/Bare Floor Shaft
Selector Shaft
Incorrect Routing of Belt
(Selector in Bare Roor Position)
/ ",\ Carpet/Bare
i ,,,._} Floor Pedal
18

Note: See PARTS AND FEATURES for belt
number.
Loop the other end of the belt on the belt
pulley on the agitator.
insert the agitator by placing the rounded
portion of the end cap down into the slot in
the nozzle base.
Note: It may be necessary to hold the furni-
ture guard out of the way in order to allow
proper insertion of the agitator into the noz-
zle base.
Nozzle
Agitato_ Base
Furniture End Base
Guard Cap Slot
Note: Care must be taken due to the belt
tension during reassembly.
Press firmly,
checking to
see that
each end is
completely
inserted.
Check to see that the belt is centered on
the belt pulley, Turn the agitator with your
fingers to see that it turns freely.
To re-attach
the agitator
cover, insert
the six (6)
tabs into the
six slots
along the
front edge of
the nozzle
base. Tabs/
Slots
Lowerthe agitator coverto its originalposi-
tion. After positioning the agitatorcover,
push forward on the two (2) locking tabs in
order to ensure that they are securely in
place.
Re-fasten the
furniture
guard retain-
ers to the
posts on both
sides of the
agitator
cover.
Ag/tator
Cover
Furniture
Guard
Retainer
Note: If the agitatorcover is notinstalled
correctly,you may experience a loss of
performanceand possibleagitatorvibra-
tion, etc.
Headlight
Wire
/
Lock Tabs
Securely In
Place
Make sure the headlight wires are tucked
securely in place.
Replace
the nozzle
cover and
secure the
latches.
Latches
19

Alwaysfollow all safety precautions when
cleaning and servicingthe vacuum cleaner.
ElecldcalShock Or Personal Injury
Hazard
Disconnectelectrical supplybefore
servicingor cleaning the unit. Failure
to do so could resultin electricalshock
or personalInjuryfrom cleaner sud-
donly starting.
If the cleaner does not seem to have ade-
quate suction, first check if the dust bin is
full or if a filter is clogged. See DUST BIN
CLEANING and FILTER CHANGING.
If the dust bin and filter areas are free of
clogs, check the hose area. Remove the
lower end of the stretch hose from the
cleaner by grasping the hose collar, twisting,
and pulling straight out.
Hose In
and Out
Plug in the
vacuum and
turn it on.
Stretch the
hose to max-
imum length
and then
allow the
hose to
return to its
storage
length.
Turn the unit off and unplug the unit.
Visually inspect the hose and the base area
into which the hose is inserted.
Remove any visible clog.
Re-insert the hose intothe openingon the
lower body from whichit was removed.
Pressfirmly to assure connection.
Hose
Hose
Collar
If the dust bin and filter areas and the hose
areas are free of clogs, check the nozzle
area. To check this area, see the section on
BELT CHANGING AND AGITATOR CLEAN-
ING.
PersonalInjury Hazard
DO NOT place handsorfeet under-
neath the unitat any time. The agitator
willbe revoMng rapidlywhen the vacu-
um is turned on and is in the carpet
setting.
Return the cleaner to the uprightposition
before plugging into an electrical outlet.
20

ElectricalShock Or Personal Injury
Hazard
Disconnectelectricalsupplybefore
servicingor cleaningthe unlL Failure
to doso couldresult In electricalshock
or personal Injuryfrom cleaner sod-
donly starting.
TO REMOVE LIGHT BULB
Disconnect power cord from electrical out-
let. Place the carpet/bare floorselector in
the carpet position and lower handle to lay
vacuum flat.
Inll
Latches
Slide latches
outward and
remove nozzle
cover
Nozzle
CAUTION
Do not usea bulb rated over 15W
(130V). Duringextended use, heat from
the bulb could overheat surrounding
plestJ¢parts.
Remove the
light bulb by
pushing the
bulb in while
turning coun-
terclockwise to
release from
the slot.Then
pull the light
bulb straight
out.
To replace
the light bulb
carefully
insert and
turn clockwise
to securely fit
into slot.
NOTE: See PARTS AND FEATURES for
bulb number.
n tCAUTION I
plug in or tum on untilthe vacu-
completely reassembled.
Replace the
nozzle cover
and secure
the latches.
IJl I
Latches
Nozzle
21

TO REPLACEAGITATOR
ElectricalShock Or Personal Injury
Hazard
Disconnectelectricalsupplybefore
servicingor cleaning the unit. Failure
to do so could resultIn electricalshock
or personal injuryfrom cleaner sud-
denlystarling.
TO CHECK AGITATOR
Base Plate Belt Guard
Turn the vacuum
over to check for
worn brushes,
When brushes
are worn to the
level of the base
belt guard,
replace the agita-
tor.
Remove the nozzle cover, agitator cover
and agitator. See BELT CHANGING AND
AGITATOR CLEANING.
Remove the end caps.
Replace the agitator with a new one.
Replace the bearing covers and end caps.
Reassemble the belt, agitator, agitator cover
and nozzle cover. See "To replace belt" in
BELT CHANGING AND
AGITATOR CLEANING section.
22

Review this chart to find do-it-yourself solutions for minor performance problems. Any service
needed, other than those described in this owner's manual, should be performed by a Sears
authorized service representative.
WARNING ElectricalShockHazard
Disconnectelectricalsupplybefore servicingorcleaning the unit.Falure to do
so could resultin electricalshock or personal Injury,
._ • . •.
Cleaner won'trun.
PoorJobotdirtpick-up.
1, Unpluggedat wall _Jlet.
2. Trippedcircuitbreakerfolown fuse
at household servicepanel.
3, On/off swttch not turnedon.
4. Thermal protector tripped.
2.
3.
4,
5.
6,
7,
&
9.
f0.
1. Pluglofirmly,pushon/offswitchtoon.
2. Resetcimuitbreakerorreplacefuse.
3. Push onloff switchto on.
4. Resetthermalprotector.
1. Clean dust_n.
2. Adjustsetting.
Replaceagitator.
CheckCLOG REMOVAL
Check forclogs.
Replacehose.
Replace/fix bert.
Inserthose tully.
Checkfor clogs.
CteaNchange fitters.
Ful or clnggeddustbin.
Wrong pileheight setting.
Worn agitator. 3.
Ctogged nozzteor dustbin port. 4.
Clogged hose. 5.
Hole in hose• 8.
Broken/misptaced belt. 7.
Hose not insertedlully. 8.
Motor protectionsystemactivated• 9.
Dirtyfitters. 10.
Wrong pile height setting. I.
Burned out light bulb• 1.
Brokenbelt• 1,
Bare floorselectorin bare 2.
floor setting.
Bett instaled _ncorrecly, 3.
Attachmentuse restrictsairflow. 1.
New carpetfuzz cloggedair path. 2.
Belt rubbing on carpet/barefloor 1,
selector shaft.
Cleaner picksup f. Adjustsetting.
moveal_e rugs or
xlshe6 too hard,
Ught won'twork, 1. Change light bulb,
Agitatordoesnotturn. 1. Rep|acsbelt.
2. Move selector to the carpet setting.
3. Check BELTCHANGING AND
AGITATORCLEANING.
Airflow rastdoted 1, CheckATTACHMENTS.
wi_ attachmentuse. 2. Check CLOG REMOVAL andclean
Soundch_u_gss, hose.
_e noiseas 1. Push selectorall the wayforward.
vacuum lashut off.
23

24

Antesde usarsu aspiradoranueva ....... 1
GaranUade la asplradorade Kenmore..... 1
Instrucclonesimportantesde
seguridad ............................. 2
Piezasy caracterfsticas................. 3
Instrucdonesde ensamblamiento ....... 4-5
Instrucciones de operaci6n............... 5
Ajustey selecci6nde nivelde pelode la
alfombra ............................ 6
Selectorde pisosconalfombray .......... 6
sinalfombra
Desprendimientodelmango .............. 7
Interruptorde encendido/apagado......... 7
Accesorios......................... 7-9
Cuadrode usode losaccesorios......... 10
$ugerenciaspara aspirar............... 10
Caracterfsticasde rendimiento........... 11
Culdado de la asptradora ............... 12
AJmacenamientode laaspiradora ........ 12
Limpiezadel exteriory de losaccesorios... 12
Limpiando elcubode la basura........ 13-14
Limpieza del filtm secundario ........... 14
Carobio,'limpiedel filtros ............... 15
Carobiode lacorreay liropiezadel
agitador ......................... 16-18
C6rooeliroinarlosresiduosde basura
en losconductos..................... 19
Carobiode laborobilla................. 20
Cuidadodel agitador .................. 21
Reconocimientode problemas........... 22
Informad6nde asslstanda
0 serv'lcto................. PosteriorCubierta
Porfavor lea estaguiaque le ayudaraa assemblary operarsuaspiradora nuevade Kenrooreenunamanera
m_s seguray effectiva.
Para mas informaci6nacerca del cuidadoy operaci6n de esta aspirador,Ilamea su UendaSears mascercana.
Cuando prequnte por informaci6nusted necisitar&el n_roero completo de serie y modelode la aspiradoraque
estb Iocado en ta placa de los n_meros de roodelo y serie.
Useel espacio de abajo para registrar el neroero de modelo y serie para su nueva aspiradorade Kenmore.
N_mero de Modelo
N_mero de Serie
Fecha de Coropra
Matenga este tibroy su reciboen ulugar seguro para referenciasfuturas.
GARANT[AUMITADA DEUN AI_IODE LAASPIRADORAKENMORE
Esta garantla es potun afio desde la fechade coropra, e incluyesolamente el usodelaaspiradoraen
hogares privados.Duranteel aSode garantfa, cuando la aspiradora es operada y mantenida de acuerdoal
manualde instruccionesdel duefio, Sears reparar_ cuatquier defecto en materiales o fabdcaci6ntibrede cargo.
Estagarantfa excluye lasbolsas de colecci6n, correas, lamparillas,y filtros, lascualesson partesgastablesque
se deterioran conet uso normal.
Paraelestvido degarantfa,retoroeestaaspiradoraaJCentrodeServlcioSearsrods cercanoan los Estados
Unidos.
Esta garantfa seaplica solamentemientras esteproductoest_en usoen losEstados Unidos.Estagarantfa le
da a usted derechos legalesespecificos, y usted puede tener tambi_n otros derechos loscuales varian de
estado a estado.
Sears, Roebuckand Co., D/817WA, HoffroanEstates,IL 60179

! ADVERTENCIA
Su seguridedes mw Importantepare noeolro6. Pareredudt el risegode Incendlo,choqueel_Vlco,
lesk_ corporalo deflos el ul]ltzar8u seplradora, actQede acuerdoconprecaudonesb_u_ca8de
seguddad,entre elias:
Lea estemanual antes de armaro uUlizarsu
aspiradora.
Use suaspiradoraiJnicamente enla lorma
descritaen este manuel.Use0nicamentecon
accesedesrecomendadosper Seers. ,
Parereducirel riesgodechoqueel6ctrico, nouse
suaspiraderaal elre librani sobresuperficies
mojadas.
Desconectelafuentede electricdadantesde dar
servicioo limpiar.De Iocontrariopodrl'acauser
unchoqueel_trico olesi6ncorporal.
Slempredebeapagarsuaspiradora antesde
desconectada.
Nodesconectelaaspiradoratirandodel cordbn
el_trico. Paredesconectarla,hale el enchufe,no
elcord6n.
No usela uspiradora sielcord6no elenchufe
estddai_ado.Si laaspiraderano es_
funcionando adecuadamenteo sise ha dejade
caer,estddaSada,se ha dejadoexpuestaala
intemperieose hadejadoeaerenagua, devu_l-
valaa unCentre/Departamentode serviciode
Sears.
Nohale nitransportela aspiradorapotel cord6n;
nouseel cord6n comomango;nocierrepuertas
sobreelcord6n;nohale elcord6nsobretabor-
desagudosni esquinas.No pasela aspiradora
sobreelcord6n.Mantengael cord6nalejadode
superficiesca!ientes.
Noabandonelaaspiradoracuandoestdconec-
tada.DesconL,ctelacuandono laestdosando y
antesdedarleservicio.
No permitaque sea utilizadacomojuguete.Se
requiemtenermayorcuidadocuandosea
utilizada enla proximidaddenifioso por nifios.
Notoquelaaspiradorani elenchufecon las
manos mojadas.
No coloqueobJet_ enlasaberturas.
No utitlcelaasplradorasielguna aberturaest_
bloqueada;mantOngelafibredepolvo, pelusa,
cabellosy cuelquleracosaque podrladisminuir
et gujodeelre.
Mantengael cabello,ropasuelta,dedosytodas
laspartesdelcuetpoalejadosdelas aberturasy
piezasmec_icas.
No uselaaspiradorasintenetinstaladalacubo
dela basuray/o losfiltros.
Llmpleelempreel cubode la basuradespu6s de
aspitarde laalfombra limpiadoresorefrescant-
es, polvos y dep6sitosfinos.Estosproductos
tapanlosliltrus,reducenet flujodeaire y pueden
causardeSoala limpiadora.
NOusela aspimdoraparalevantarobjetosagu-
dos,juguetes pequeSos,alfileres,sujetapapeles,
etc.Podrfanda_arlaaspiradorao lacubodela
basura.
NOlevanteningunacosaqua seest_ quemando
oemitiendo humo, comocigarrillos,cerilloso
cenizascalientes.
No use laaspiradorapareaspirar Ifquidus
inflamablesocombustibles(gasolina,llquidos
pare limpieza, perfumes,etc.)nila use en
lugares donde estospodden estar presentes.Los
vapores de estas sustanciaspueden crear un
peligro de incendioo explosi6n.
Tangaculdadeespedalalutilizar laaspiradora
en escalones.No lacoloquesobresillas, mesas,
etc.Mant_ngalaen el piso.
Ustedes responsablede asegurarquasuaspira-
doranosea utilizadaporningunapersonaqua no
puedamanejarlacorrectamente.
GUARDE ESTAS INSTRUCCIONES
El armado y uso segurode su aspiradorasonsu responsabilidad.Estaaspiracloraha side disefiada
exclusivamente pare use dom_stico.La aspiradoradeberd almacenarseen un lugarseco yen el inte-
rior.Lea este Manual delpropietario detenidamente, puescontiene informaci6n importantesobre segu-
ridad y use. Esta quia contiene informaci6nsobre seguridad debajo de simbolos de advertiencia
cuidado. Por favor pongaatenci6n especial a estas instruocionesdadas. Advertancla:Este informaci6n
le alertard con el poligro de fuego, choques electricos,quemadas y lesiones. Culdede: Este
informaci6n Is alertara a peligros como lesiones ydar_osde propiedad.
2

Es importanteconcerlaspiezasy caracterfsticasde suaspiradoraparaasegurarsu us,:)adecuadoy seguro.
Exam='nelasantesdeusarsuaspiradora.
Objeto Pleza _ PlezaI_
en EUA en Canadd
Filtrode escape 20-86889 20-86889C
Primaryfiltro 20-82720 20-82720C
Bombillade farol 20-5240 20-40600
Correa 20-5275 20-40096
° Mango
de encendido/
apagado
Man_ de
so_arol
cubo dela
Filtrede
del motor
Cubo dela
basura
Sujetador superior Liberaci6n ,Filtro de
de la cubierta
del cord6n escape
Cord6n_ (dentro)
Palanca Selector depisos
HandI.Mate Jr._ para ajustar con alfombra y
y bandeja la altura .. sin alfombra
Sujetadors
del cord6n
inferior
Mango
transportar Cublerta de
Herramlentas la boquilla
para
hendiduras
Tube
Cepillo para _
sacudir
comblnaci6n
Manguera
_ usar
Manguet_
Ill--
Protector
de motor
la cubietta de
boquilla
ode
boquilla
Correa
(abajo)
Pedal de
del mango
Ndmeros de series
del modelo
Agltador
(AbaJo)
Handi-Mate Jr.®
3

__/=_/=/_l=_'=__ 1 CoIoque el mango comoseve enel diagrama
abajo.
Pellgrodechoqueel_trico
No conectelaaspimdorahastaqua termine
dearma_ De Io cordrarlopodrfacausarun
choque_-'_ ole_ corporal.
AntAntesde armarla aspiradora,chequeela LISTA
DE EMBALAJEen lacubiertaseparadade laLista
de Partespara Reparaci6n. Use esta listaparaveri-
flcar qua harecibidotodeslascomponentesdes_
nuevaaspiradoraKenmore,
Retrarla bandaadhesivaubicadadebajode la
cubiertade polvoenla cajadel motor.
Fijeel cabode
la manguera
expansiblea la
boquillacomo
se muestra,
MONTAJEDEL MANGO
'_- Tornillo
Quiteel tornillodel mango Iocalizadojustodebajo
del borde superior de la parte posterior de la aspi-
radora,ver ilustraci6n de arriba.
AI mantener Jamanguerade manera que no inter-
fera, muevael mangoa la aberturaen laparte
superiorde la aspiradom.
tornlllo en
Inserte el tornillopara que paseper elmango de la
aspiradora.
Empiecea apretar el tornilloconlosdedos. Quiz&
sea necesarioajustarun pocoel mango.
Apriete el tornillocon undestornillador,
No apdetedemasladoeltomlllo.
SI Ioapdetademasladopoddaanuinarlosod-
fldospareel tomillo,
No operalaaspiradorasintarterInstaladoel
torni_.

COLOCACI6N DEL
CORD6N
Aseg0resede que el sujetadorsuperiordelcord6n
deliberaci6nrdpidase encuentre enposici6nverti-
cal.Quiteel alambreconelque est,_atado elcord6n
el_ctrico.
Fijeelcord6nen
posici6n,forz&ndoloen
la ranuradebtoqueo
ubicadaenelcuerpo
del sujetadorsuperior
del cord6n,comose
muestra.Estoayudaa Cordon
queelcord6nno se
enrededebajodel
agitadordela
aspiradora.
de Ilberacl6n r6plda
de#cord6n
el_ctHco
Sujetadors
inferior
Enrolleel cord6n el_ctricoalrededor de los sujeta-
dotes superior y inferiory presionela ranura del
enchufe sobre el cord6n.
HANDI-MATE JR.@
Para operar el Handi-Mate Jr.® ver man-
ual del duefio separado.
_ one
HandI-MateJr.®
PARA INSERTAR EL
HANDI-MATE JR.®
Coloque la parte de atr&s del Handi-Mate
Jr.® adentro de la caja.
Rote el Handi-Mate Jr,® hacia atr_s hasta
que calce en su lugar.
PAPA SACAR EL
HANDI-MATE JR,®
Levanteen el picaportey roteel Handi-
MateJr,® fuera de lacaja.
PAPACOMENZAR
Gire el sujetador
delcord6nde
liberacl6n lado a lads y
hacia abajo para
cord6n liberarel cordSn
electrieo.
Desprendael enchufedel cord6n el6ctrico y quite et
cord6n del sujetador superior.Compruebe que el
cord6nel_ctrico sigue fijado en la ranura de bloqueo
del sujetador superior.
NOT'A:Para reducirelriesgo de choque el_ctrioo,
esta aspiradoracuenta con una clavija polarizada,
uno de loscontactos es m_,sanchoque el otto.
La clavija s61opuedeintroducirsede unamaneraen
el enchufe.Si laclavijanocabe bien en elenchufe,
invi_rtala.Si aSn no cabe, Ilamea un electricista
paraque instale un enchufecorrecto. Noaltere la
clavija de ninguna manera.
Conecte el cord6nel_ctrico polarizadoen un
enchufe de 120 voltios que se encuentre cerca
del piso.
1
ADVERTENCIA
Peligro de lesi6npersonaly dafioal producto
• NO conectelaaspiradora siel interruptorest_
en la posici6n ON. Podrfaresultar enlesi6n
personaJo d_o,
• NO use losenchufesIoosli_ sobre los
muebles.Losobjetoscercanospodrfanresultar
da_ado_.
I
5

ParaselecclonatunaJustedenlveldepelodela
alfombra:
Apaguela aspiradora.Seleccioneun nivel deajuste
inclinandolaaspiradora haciaarras hastque las
ruedasdelanterasestdn un posodespegadas del
piso.
Deslicela palancade ajustede nivel de pelode la
alfombraa laposicibn deseada.
SUGERENCIASDE AJUSTEDE NIVEL DE PELO
ALFOMBRA
Paraquese le feciliten algunastareas de limpieza,
comopot ejemplo tapetes aueltosy alfombras de
pelo large,puede que sea necesario elevar ajuste"
de nivelde pelode la alfombra. Los aiustes sugeri-
dos sonlos suguientes.
HIGH:pelo_tspemy lanudo, pelo largo,felpa, alfom-
brasotapetesirregulares.
MED:pelomediano o pocolargo.
LOW: pelocortoo mediano.
EX LOW: pelomuy oorto.
, ADVERTENCIA
Pellg:ode le_ personal
NO PONE lasmanosolospiesdebaJode la
astdra:loracuandocambledelasel_ de
pisossin alfombmhastalaselecdd_denJvel
dep¢odel=a_br_ B=_¢taderCmra_-
demente cuandola_piradom _ encendlda
y est_ _ la selecci6n de plso6 con alfombra.
ALGUNOSMODELOS
Para desecclonarel ajustedeplsodescublerto:
Oprima elbotOnde selecci6nhasta atras y debajo
de la boquilla hasta que se sienta asegurado.
En estaposici0n el agitador no da vuiltas.Esta posi-
cidn clebeestar usada para limplamientode piso de
maderay mesaicoy cuandose usan algunos
atachamientos(herramlentas).
Seleccl6nde pisoscon affombra:Oprime elboton
completamentahastael frentey per arribahastala
posicidndepisosconalfombra.
Enesta posicidn elagitador da vueltas.Cuandose
limpiaalfombras,el selector tieneque estar en esta
posicidn.
Atenci_n:Refidrasealas recomendacionesdel fab-
ricantepara limpiar sualfombra. Algunas alfombras
m_s delicadespueden requerir el uso de la aspi-
radoracon el agitador desconectado para prevenir
que la alfombra sea daSada.
E' , CUIDADO
No deJepermanecerla aspiradomen un solo
lugar duranteningdntiempocuandoel agita-
dorest_ mtando.,% puededa6ar laalfombra.
Nora: Parala vidarodslarga de la correa,apaguela
aspiradora antes de moverel selector.Si usted no Io
hace de esta manera, puede causarque tacorrea
frota el eje del selectory puede calentar y causer
quese quemela correaqua causeria un olor que-
mado.
Selector de plsos
con alfombra y
sin alfombra
Hastala
posici6n de
pisossin
alfombra
\
Hasta la
posicidn de
pisos con
alfombra

Desprendael mango pisandoel pedalde liberaci6n
y tirandadel mangohaciaabajocon lamano.
liberacl(_n
del mango
MONTADOENELMANGO
Paraarrancarlaaspiradora,desliceelinterruptorde
encendido/apagadode laposici6nOFF a la posici6n
ON. Paradetenerla,coloqueel interruptoren laposi-
ci6nOFF.
Herramlenta
Tube
te/esc6pico .
Cepiflo
Cepfllo para
.Manguera
expansible
Co/lar de
Identifiquecada unode losaccesorios mostradosa
contJnuaci6n.
C6MO UTILIZAR LOS
ACCESORIOS
Para selectionarla selecci6nde pisossin alfombra,
gira el selectoraltr_s y abajo hasta la selecci6n de
pisos sin alfombra. Vetsecci6nde PISOSCON
ALFOMBRAY SIN ALFOMBRA.
Cuando regresehastala selecci6nde pisos con
alfombra,cuidaque el selectorpuede moverserdpi-
damente basralaselecci6n a causade latensi6n
de lacorrea.
Saca la parte inferiorde la mangueraexpansiblede
la aspiradora y tirandopor atr_s. Ahora se puede
conectar la manguera.
Nora: La v_.lvulade desviaci6n puede estar
abierta mientras se usan los accesorios o
para limpiar una alfombra nueva a causa de
un flujo reducido de aire por los accesorios
mismos o
pot la pelusa de la alfombra que Ilene el
cubo de la basura rapidamente. Consulte el
cuadro RECONOClMIENTO DE PROBLE-
MAS.
Peligrodechoqueek_ctdcoo lesi6ncorporal
Desconectela unldadantesde limplarlao
dadeservido,De Io contrariopodrfaprodu-
drse un choqueel6ctrlcoo causarlesl6ncor-
poralella asplradoraarrancademanera
Imprevista.

La manguera
incorporadagira
parafacilitarla
limplezaen coal-
quiet direcci6n. GIratorla
Paraquitar la
rnanguera,tire
dela manguera
delcollar.
TUBOTELESC6PICO CON
CONTROLDEASPIRACI6N
ALGUNOS MODELOS
Saque eltubo
- Herramlenta telescbpicode
para su lugarde
hendlduras almacena-
miento.
Tubo
telesc6plco
Retire laherramientaparahendidurasdesulugar de
almacenamientodentrodel tubo.Gireelaro de blo-
queohastala posici6nUNLOCK.
Despliegueeltubocompletamente.Gireel arode
bloqueodel tubohastala posici6nLOCK,
Instaleeltubodeextensi6nenel extmmoabierto de
lamanguera.
Tubo Deslizador
de control
Tubo
superior
AlineelaspestaSasdel tubede extensi6nconlas
ranurasen formade =J"de lamanguera. Empujeel
tubodentrode lamangueraygirehacialaderecha
parabloquearlo.
Paraobtenerla m_ima Iongitud
conlosacoesorios,ins- Manguera.
talela
herramientapara Desllzador
hendtdurasenel
extremodeltubo.
Parahacerlo,
introd0zcalaen
el tuboy gfrela
unpoco. Tubo
telesc6plcl
"Bot6n
destacado
para hendlduras
Cuandouseel
cepillopara
sacud_ro elcepillo
paracombinacf6n,
puedeinstalarlos
directamenteen el
tuboo enextreme
dela herramienta
parahendiduras.
PARAOPERARELDESLIZADOR
DECONTROLDEASPIRACI6N
Tubo telesc6pico
Cuando useaccesorios paralimpiarcortinas,
tapetespequefiosdepelo cortoyotrosartfculos
delicados,gireel deslizadordecontrolde aspiraci6n
a laposici6nabierta. Esto ....
reducir_,la ues.zaoor
potenciade de control
aspirack_npara
facilitar la
limpieza.
Este selectorse
encuentraenel
tubotelesc6pico,cercadelamanguera.
Nota:Coloqueel deslizadordecontrolde aspiracion
a la posicibncerradaparala limpieza normal.
CUIDADO
8

ALMACENAJEDE LOS
ACCESORIOS
Retireel cepilloparasacudir o elcepillopara
combinaci_n.Col_luelosfirmemente en sulugar de
almacenamtentocorrespondiente.
Retire laherramientapara hendidurasdel tubo
gir_ndola.P6ngalaa un lado.
Retire eltubo deextensi6ndela manguera.Gireel
tubohaciala izquierday tiredelextremo de la
manguera.
Abrlr
Tubo
superior
E CUIDADO
NOtire de laa,splmdomporla mangueraen
lahabltac_. Poddanocurdrda_osa susper-
tenenclas.
Desbloqueeel tubogirando el arc)debtoqueohasta
la posici6nUNLOCK.
Desliceel tuboinferiordentro deltubosuperior.Gire
elam de bloqueo del tubOa la posici6nLOCK.
Introduzca la herramientapara hendidurasdentro
deltubo compfimido.Instalebien ensuposici6nde
almaCenamiento.
AsegOresedeque la unidadestdapagada. Inserte
nuevamentela mangueracompletamentedentrode
la aberturaubicadaen laparteinferiordela
aspiradora,dedondela sac5inicialmente.
9

ACCESORIO
Muebles"
X
X
CEPILLOPAPA _l_
SACUDIR
HERRAMIENTA PARA
HENDIDURAS
CEPILLOPApA _ X
COMBINACION
HandI-MateJr." _ X
*Siemprelimpielosaccesoriosantesdeusersobretelas.
AREAA LIMPIAR
_jJne6*
X
X
EscaJ0ne6
X
X
X
Odllas dealfombras
Gufeunode los costadoso la parte anteriorde la
boquilla a lo largodel hordede la pared.Loscepi-
Ilos largos ayudana aspirar latierraen lasorillasde
lasalfombras.
Escalones
Coloque el mango en la posici6n vertical. Mueva et
selectorde pisocon alfombrasy sin alfombras a la
posici6n sin alfombras. Use la herramienta para
hendiduraso el cepillo para telas. Coloque el inter-
ruptorde encendido/apagado en ON.
Paltgrode Iosl6npersonal
Actdeconprecauci_ sicolocalaaspiradora
sobreescalones. Si se cae, podrfacausar
lesiSnpersonaloda_ a lapropledad.
Paraobtener los
mejores resultados
de limpieza,man-
tengadesbloquea-
doslos conductos
de flujede aim.
Examine de vez en
cuandocada una
de las zonas que
se indica podrfan
causar bloqueo.
Desconectela
aspiradora del
enchufe antes de examinarla.
10

SISTEMADE PROTECTION
DE MOTOR
PmteotorTerrnel
Estaaspiradoratieneun protectortermalque se
ajustaautomdticarnenteparaprotegera laaspiradora
del sobrecalentamiento.Siunaobstrucci6nimpideel
flujonormalde aimalmotor,elprotectortermal
apaga elmotorautomdticamenteparapermitirqueel
motorse enfrfea findeevitarposiblesda_osa la
aspiradora.Duranteestetiempolaluzdelanterase
mantlene prendida.
Paracorreglrelproblerna:Si estoocurre,apaguela
aspiradoray desenchufeelcord6ndel tomacorriente
para permitir que laaspiradorase enfrie yque el
protectortermal se reajuste. Busquey 8aquelas
obs'cucdnoes,siesne_Lrlo. Examinetambl_y
reemplace/nmptecuelqulertlltrool_truldo.Espero
apro_drnadamentetrelota(30) minutosy enchufela
aspiradoray v_la pareverel elprotectorde{motor
se ha reajustado.[] protectordelmotor nose
reajustar_el nose ha apagadola asplradoraaun
cuandolaasplrodorase hayaenfdado.
Protectorde motor
Esta aspiradora tiene una
v._lvulade desviacibn que
sirve como protector de
motorque se abre
automaticamente para
proveer un flujo de aire al
motor cuando un zueo
impida que circule el
motor. Si se abre la v:_lvula
bypass para impedirque demotor
se recalente el motor y que no haga da_o a la
aspiradora, se notari_ un cambio de
sonidomientras el aire pot la abertura d la
v_lvula.
Nota:No obstruye el protector de motor.
Para correglr el problema: Consulte el cuadro
RECONOCIMIENTO DE PROBLEMAS.
Nora: La v&lvula de desviaciSn puede estar
abierta mientras se usan los accesorios o para
limpiar una alfombra nueva a causa de un flujo
reducido de alre por los accesorios mismos o
por la pelusa de la alfombra que Ilene la cubo de
la basura rapidamente. Consulte el ¢uadro
RECONOCIMIENTO DE PROBLEMAS.
11

Siga siempretodaslasinstruccionosdeseguridad
al limpiary dade servicloa suaspiradora.
Poagmdechoqueel6_dcoo lesl_ corporal
Desmnectelaunidedantesdeltmpla_o
dadesen4c_.DeIocontmdopodrlaprodu-
drseunchoqueeldctdcoocausarles_ cor-
poralsllaasplmdoraarrancademanera
Imprevlsta.
Recojaelcord6ny enrr611eloen lossujetadomssu-
periore inferior,sinque quedemuy apretado.
Guardelaaspiradora
bajotechoen un lugar
seco,con elmango
enposici6nvertical.
Pellgrode ch0queel6ctdcoo ]esibncorporal
SI enmllael cord6nrnuyapretadopuedeten-
sadomuchoy causadedarios.Dedeflarse, el
cord6n podrt'acauserdecoargasel_trlcas y le-
slonoso _ personafes.
Oesconecteelcord6nel_ctdcode la clavija de ta
pared.
Limpieel exterior conun trapo suave y limpio, que
hasido exprimido despu_s de remojar en una solu-
ciSnde ague y detergente fiquidoligero.Seque el
exterior conun tmpo secodespuds de limpiar. NO
choree_a sobrela asplmdom.
Lavelosaccesoriosen agua tibiajabonosa,
enjueguey dejesecar alaire.No loslaveenlava-
doradeplatos.
CUIDADO
No uselose_cesodos=
accesorlo6quese utillcenent_eas sudas,
debajodel mfrlgemdor,nodebenusarseen
otmssuperfidessinantesset lavado_
Podrfandajarmamas.
12

Sim'nprevacfeelcubode labasura ¢uandoel nlvel
de basuraalcanzalaIfnea'MAX RLL'
PAPA SACARELCUBODE LA BASURA:
ADVERTENCIA
Sieml_e desconecteet¢ord6n6k_ldco antes
de repatarelguna partede laasplradora.
Levantela mani- de
ja delcubode la
basuraubicada
al topedelcubo
de la basura. Cubode
Tirede la manija
hacia adelantey lev-
ante el cubo de la
basura hacia arriba y
afuera de la aspi-
radora.
Remueva Portillo del
cualquier cubodela
obstdculo que basura
puedaestar
]ocalizadoen
laentradadel
cubode la
basura o en FiRro
elfiltro secun-
dario.
PARAVACIAR ELCUBO DE LABASURA
Torneenesta Abierto
direcclbnpar_brir y vaciar(Para vaclar)
1
Cerrado
(Parausar)
Rote et rnontajede la tapadel canasto debasura
contra las agujas del reloj comeest_ indicadoen la
tapa y lev&ntelahacia afuera.
PAPA LIMPIAR EL PRE-FILTRO
Vacie eleontenidodel
cubode ]a basuraadentro
del tarro de basura.
El filtro puedelimpiarsegolpeandolosoloreuna
superficie firme o enjuagandolobajouna Ilarede
agua.Enjuagar con agua solamente, no utilizar
detergente o jab6n. DeW que el filtro se seque
por 24 horas antes de ponerde regresoen la
aspirdora.
.Cubierta
del filtro
13

PARAREEMPLAZAREL CUBODE LA BASURA
Tome en esta Ablerto
direccl6n pare cerrary user (Pare racier)
Cerrado
(Pareuser)
Reemplaceel montajede latapadel canastode
basuraponk_ndolode vueltasobreelcanastode
basuraconlasmamasen latapa alineadascomo
se muestrabajoAbierto (PareVaciar)en la parte
dearrasdelcanastode basura.Roteta tapacomo
lasagujasdel reloj mientrasaprieta haciaabajode
modequa lasmamas se alineancome se muestra
afribade Cerrado (PareUsar).
Pongael cubode la
basuradevueltaaden-
trode la aspimdora
insertandoel fondo
prlmeroe inclinando
atr:_sconla manijadel
cubodela basuralev-
antada.
soltar el
Bajela manija
delcubode la
basurapara
ajustarel cubo
de labasuraen
sulagar
Reviser frecuentemente el filtrosecundarioy
limpiarlo cuando est_ sucio.
Remueva el cubopare basuraeomo en la ilus-
traci6nen la secci6nde UMPIEZA DEL CUBO
PARABASURA.
Para limpiarla cubierta del filtro,limpielacon un
traposeco.
NOTA: La cublertadel flltro es removible.
Reemplac.eel cube de basura como en la ilus-
traci6n en la secci6nde LIMPIEZA DEL CUBO
PARA BASURA,
Filtre
secondaire--
14

Pellgrode choqueel6ctdco
Desenchufeel cabledepoderdel tomacord-
ente. No operela limpladorasin el_bo pd-
madoo e_flltrode escape.Estdseguroque el
flltroaesM inst_dadopropiamenteparepre-
venirfalladel motory/osacudldael6ctdca.
FILTROPRIMARIO
Examineel flltroprimariodevez encuandoy limpte
cuandoestesucio,
PAPA SACAREL FILTROPRIMARIO
Remuevael cubodela basura y el ensemble de la
tapa del cubo de la basuracome se describe en la
secci6n LIMPIANDOEL CUBO DE LA BASURA.
Agarre elfiltro,
rotey levdn-
tese.
Tabulaci6n
El Bloquear
Filtro-._
Ranura
Cubierta
Del Filtro
Limpie el filtro primariogolpe_ndolo suavemente
con sus manos sobreun contenedor de basura.
Golpe_lo suavemente en diferentes ladospara
botener mejor limpieza.SI nocesarlo, enJuagu6con
agua dnicamente,(Verpagina 14).
Una vez que hayalimpiado elfiltro,la aspiradora
perderalapotenciamaxima de succi6n, nesecitara
reemplazar el filtro,
PARAREEMPLAZARELFILTROPRIMARIO
Substituyael filtroy r6telo
hasta que tastabulaciones Filtr,
btoqueanen ranuras.
Chequee correde_asy remueva
cualquier obslrucciSn.
Ranura
"abulacibn
Del Filtro E1Bloquear
FILTRODE ESCAPE
HEPA
Estecartuchodel flltroescapese Ueneque cambiar
estb sucio.Debe cambiarseperi6dicamenteseg0n
las condicionesde uso.
[] filltonosepuedelavarpuesperderldsucal_ct-
dadpara_ a_raparpok'o,
Aprietehaciaaden-
fro de cadalado de
la cubiertadelfiltro
de escape y tire
haciaaluera para
remover de la aspi-
radora de polvo.
Remuevael cartucho del filtro de escape.
Reemplace el filtrode
escape,posicionandolo
cuidadosamentepara
que quepa dentro del
marco.
Empujet_nicamenteel cartucho
de filtro,no el fiitro mismo.
Reemplaceta cubiertadel filtm
de escapeponiendolas
leng0etas en las ranurasy
empujando adentrohasta que
la cubierta calza en su lugar.
NOTA: Bajo uso y cuidado normal, su filtropuede
Ilegara durar hasta 3 aSos.
15

Pellgrode choque_ o leel_ coq:)oral
Desconectelaunldadantesdeltrnpladao
dedeservlclo.De IocontrA_opodrfaprodu-
drse und'_lue el(_lco o causarlesl_ ¢or-
poraJel Isaspiradom _Tanca de manem
impmvfsta.
Frecuentementereviseeldrea del cepilloyquite
todopelo,cord6no pelusaquese hayaacumulad_,
Silaacumulaci6nes excesiva,sigalasinstrucciones
a conUnuaci6n.
PARAQUITARLACORREA
Desconecteelcord6nel_ctrico del enchufe+
Selectordepiso_
conalfombray
sin affombra
Deslicelas
liberaciones
hacia afueray
quite la
cubiertade la
boquilla.
1
Has_
posici6nde
plsoscon
alfombra
Cublerta
Muevael
selectorde
pisoscon
alfombray sin
alfombra a la
posici6na la
posici6ncon
alfombra y
bajela manija
paraque la
aspiradora
descanse
plana.
Pestlllos
Cublerta
del agitador
Sujetador
de meub/es
Sueltelos
sujetadores
del protector
de muebles
de las pes-
ta,fiasen
ambos lados
de la cubier-
ta del agita-
dor.
LengOetas
Cubietla
del agltador
Tire haciaabajo de
laslengOetasen la
parte atrasera del
agitatory ruede
hacia adelantepara
liberar de la unidad
de boquilla.
Noes necesarioquitarel ensamblede portaldm-
paras. Coloqueal lado la cubiertadel agitador.
Coloque lasmanos en elagitator.Si la correaya
est,1instalada en el agitador, habr&tensionen el
agitator. Tengacutdado cuando levanta el agitator
de la boquitla.
Nora:puedeser necesario tirardetborde del protec-
tor de muebles para qua los extremos del rotor se
puedan sacar con/acilidad.
Quite lacorreao rota del ejede transmisibn del
motor.
Unacorreade repuestaest&disponible,V_a a ta
ilustrackYlparala Iocaci6nde lacorreade repuesta.
Lacorreade repuestase puedeguardaren el
mismositio.
Pellgrode leel6npersonal
Tengaculdadoal quit="elcepllloclllnddco,
latensl6ndela correaes gmnde.Sinotie-
neprecauci6npodrfasufrirunalesi6nper-
sonalsielcepillose liberar_tpidamentey
saledisparado.
16

NOTA: Paremantenerunaalia eficienciade
limpiezay evitarelda_o ala aspiradora,hayque
limplarelagitadorcadavez quese cambialacor-
rea.
Tambi_nhayque limpiarel agitadorseg0nelsigu-
iente horario:
Elusodela Limpieel
aspimdora agitador
Frecuente -
(usadedirariamente)
Model'ado-
(usada2 o3 veces
persemana)
Li_ro -
(usada1 vezporsemana)
cadasemana
cadames
cede2 meses
Retire todo indicio de basurao suciedadde la zona
de la correay del agitador.
Agitador
Agitador
Con cuidadoquitelastapas y quite el hilo o los
testes ubicadosen el agitador, en los soportes del
cepillo, o enel eje del agitador.
PARACAMBIARLACORREA
Aseguraseque el selectordepisoscony sinalfom-
bra este en la posicibn deplsosconalfombra.Co-
Ioquela nuevacorreaalrededor del ejedetransmF
skindel motor.
Mo_r
Sha_
Carpe_BareRoor
Belt New Selec_rSha_
Pufley Be#
CORREA SOBRE LA RANURAGUIA
Correa Estd Centrada
Sobre la Ranura Guia
(Selectordeplso$cony sin affombra
esteen laposlcl6n depisos conalfombra)
A itador _-Selector
g _ _ __._ depisos
._ _ _'_ '_, con alfom-
" ) A /" . /_, } bray sin
EJedel selectorde Eje de
pisoscon y sin transmislSn
alfombra del motor
Correa No Estd Centrada
Sobre la Ranura Guia
(Correa aldrededor del eje del selector
deplsoscony sln alfombra)
Ejede
Eje del selector transmisi6n
de plsos con y del motor
sin alfombra
Correa No Est_ Centrada
Sobre la Ranura Guia
(El selector de pisos con y sin alfombra
este on la posici6n de pisos sin alfombra)
Selector de
pisos con
Agitador Correa / _._ a.lfombra y
i i , \ r_ sin alfombra
Eje de Eje del selector
transmisl(Jn de plsos con
del motor y sin alfombra
17

Not_ConsultelasPIEZASAND
CARACTERfSTICASparadeterminarelN9,de cor-
tea.
Ensartela correa nuevasobreelagitador.
Inser_eel agitadorpor insertar la parte redondade
la tapaen la ranura de la base de la boquilla.
Nota:Puedosernecesario sacaroarrimar elpro-
rectorde mueblespara poderinsertarconfacilidad
elagitador on la basedela boquilla,
Agitador
Protector Ranura de la
de meubles Tapo del base de boquflla
extremo
Nota:Debido a la tensibnde lacorrea,debe actuar
con cuidadoal instalarla.
Empujefirmo-
mentepara
reviserque
cada extremo
est(_instalado
bien.
Reviseque la correaest_en el centrode la polea.
Gireel agitador con susdedos hastaque girelibre-
mente el agitador.
Paracolocarla
cubiertadel
agitador,
inserte lasseis
(6) leng0etas
en las ranuras
en la parte
adelantede la
basede la
boquilla.
Leng{ietes/
Ranuras
/I
Bajelacubiertadel agitadora la posici6noriginal,
Despu_sde colocar la cubiertadelagitador.
Empujehaciaadelanteen lasdos(2) leng0etasde
cierrepara asegurarque est_n ensucolocaci6n
apropiada,
Abrochelos
sujotadores
delprotector
de mueblesa
laspestaSas
enambos
ladosde la
cubiertadel
agitador,
Cubierta
del agltador
Sujetador
demeubles
Nora:Si la cubiertadelagitador, empujehaciaade-
lanteen lasdos (2) leng0etas de cierrepara asegu-
rar qua est(_.nen su colocaci6n apropiada.
Assgdrese qua los cables de la luz est6 bien instal-
ada.
El cable
dela luz
7 Asegurarlas _I:
i_r- lengiJetasest6n _
I _ ensu colocaci6n
Reemplazca la cubierta
de boquillay asegure
las pestillos.
18

Procedasiempre conprecaucionesde seguridadal
limpiary darserviciola aspi_adora.
NCIA
Pallgrodechoqueeldctrlcoo lesi6ncorporal
Desconec_launldedantesdelimplarlao
dede servldo.DeIocontradopoddaprodu-
drse unchoquaelddrlcoocausarted6n cor-
petal al Isasplradoraan'ancade manera
Improvlsta.
Siconsideraquelaaspiradorano aspirabien
aseg,',reseprimerodequela bolsa noeste Ilenay
de que etfiltronoest_ atascado.Consultelasins-
truccionessobreCAMBIODELABOLSAPARA
POLVOy LIMPIEZADES FILTROS.
Si laszonasdel filtroy lacubo dela basurano estdn
atascadas, examineta zonade la manguera.Retire
el extremoinferiorde la mangueraexpansible de la
aspiradora tomdndolapor el collary tirando de hacia
arriba.
Enchufela
aspiradora y
enciendala.
Estireal m_ximo
la mangueray
luego permita
que seencoja
hasta su tamafio
normal de alma-
:eena-miento.
Apaguela unidady descon_ctela.
Examinevisualmente tazona de la base donde se
inserta la manguera.
Retirecualquier material bloqueante.
Insertenuevamentelamangueraenlaaberturade
laparteinferiorde dondelareUr6.Empujeconfir-
meza paraasegurarse dequequedebienconec-
tada.
expansible
Collar
dela
manguera
Si las zonasdel littroy la cubodelabasuray las
zonasde lamanguefa noest_natascadas,examine
lazonade laboquilla.Paraexaminardichazona,
consultela secci6nsobreCAMBIODELACORREA
Y LIMPIEZADELAGITADOR.
Pellgrode _ personal
NOcokxluenuncalasrnanosnllospies
debajodela unlded. [] agltadorderd vueltas
r_tpldementecuandalaasplradoraest6encen-
dlday est6en la poslck_n"carpetsetting"(con
alfombra).
Coloquela aspiradoraenla posici6nvertical
antes de conectarlaenelenchufe.
19

PeUgrode choqueel_--trlcoo lesl6ncorporal
Desconectelaunldsdantes de llmplarlao
darleservldo. De 1o¢onkado podrfaprodu-
cirseun choqueel_rlco ocau_r lesldn
corporalslla asplradomarrancade manem
imprevLsta.
PAPAQUITARLABOMBILLA
Desconectela aspiradora.Muevaelselectorde
pisosconalfombray sinalfombraala posici6nala
posici6nconalfombray bajela manijaparaque la
aspiradoradescanseplana.
/a
/
Deslicelas
libera-
ciones
hacia
afueray
quite la
cubierta
de la
boquilla.
CUIDADO
Nouseuna bombillade rndsde 15 va_os
(13ovolts).Cuandoseuselaasplradorapor
un largoperlodode tiempo,e_calorde la
bombillapuedecalentarlaspartesde plasUco
terCeL
Remuevale
bombillaempu-
jandolay valla
dandolavuelta
pare la izquierde
pare sacariade
la abertura.
Despu_ssaque
la bombiUapard
afuera.
_'_-.U Parremplacarla
bombilla,cuida-
dosamente
insertey de
vueltahaciala
derechahaste
asegurarlaen la
abertura.
Note:MirePIEZASY CARACTERISTICASpareel
numerode labombilla.
CUIDADO I
o ence_ 18asplradomantesde
completamente.
Reemplazcalacubiertade JmJ
boquillay asegurelas Pestillos
pestillos.
Cublerta
de la
boquilla
2O

Pellgrodechoqueek_tricoolesk_corporal
I_:onecte la _k_ad a_s de limpta_a o
dade seri,do. De Iocontrarlopodr[aprodu-
drae unchoqueel6ctrlcoo causarlesk_ cor-
pondsllaasplradomarrancade manera
Imprevfsta.
PARAEXAMINARELAGITADOR
Protector de la correa
de la placa dela base
Coloquelaaspiradora
conlabasehaciaarriba
pararevisarsilos
cepillosest_nen malas
condiciones.Cuando
loscepillosesten
gastadosal niveldel
protectorde laplacade
base,reemplazcael
agitador.
PAPAQUITARELAGITADOR
Quite la cubiertadela boquilla,la cubiertadel
agitadory elagitador. V_ase CAMBIODE LA
CORREAY LIMPIEZA DELAGITADOR.
Reemplazcaelagitadorconunnuevo.
Reemplazcalascubiertasdeloscojinetesy las
tapasdel extremo.
Rearme lacorrea,el agitador,la cubiertadel
agitador y la cubiertade la boquilla. Vdase CAMBIO
DELA CORREAY LIMPIEZA DELCEPILLO.
21

Consulteestecuadropara encontrarsolucionesque ustedmismopuederealizarcuandotenga problemas
menores de rendimiento.Cualquierservicioque necesiteapartede otrosdescritoseneste manualtienenque
serhechosporun represetantede servicioautonzadoSears.
ADVERTENCIAe iQ c uo
De_conectela asplradoraantesde darlesePAdoo IlmpladmDe Iocontrmiopodrfaprodu-
clrseunchoqueatdc',zlcoo ¢ausarlesklncorporal.
La asplradomno fur,aloha.
NosslY,rasa_facmdwm_te.
1. Est_desconectede.
2. Cortackct_tosbotado o fusiblequernadoe.l
el_ desefviciode lareslde_
8. Intsrruplor de e_cendide/apagadeno
estsents poslci_ ON.
4. Ptotsclo_termalactivado.
1. Cubode ts basuraflenoo atascade,
2, Ajuste k_correctode niveldepelodelaelfuml_a,
3. Agitsdordesgastado.
4. Boquilla,o portillodela cubode labasura
atascade.
5. Mar_ueraatascado.
6. Manguerarota.
7. Cotrearots.
6. La mangueranoe_& bleninsertede.
9. Activaci6ndelsistemadeprotecti6ndelmotor.
10. Filtrosde seguridad.
1. Cot_ bien,optimaselectorde
encsndido/apagadoa laposick_ON.
2. Resteblezcael cortadrcuitoso
cambieelfb'elble.
3, _ el inter_upt_deem_,er_o/ap,_ado
en laposicideON.
4. ReajusleelproteclortermaL
1. Cubode labasuralimpin.
2. Ajustee_ni_lel.
3. Cambieel agitsdor.
4. ReviseCGM(_EUMINARLOSRESIDUOSDE
BASURAENLOSCONDUCTOS.
5, Limptsrluboparaelmugte.
6. Cambielamanguera.
7. Cambiela cor(ea.
8. Insertsbienlamanguera.
9. Determinesiexistenbfuqueos.
10, Limpielcambieetflltfos.
La ssp_ _ _ 1. Ajusteincon'ectode niveldepelodela elfombra, f. Ajusteelnivel.
o = c_xll empuJar.
Lllk=nofu_ 1. Bombi_fundida. 1. CambielabombiPa.
B =_ambledel agltador 1. Correatotal 1, Cambielacorrea.
rlog_l. 2. Selectordepisoconalfombraypisosin 2, Cambleelselectolen_asetecci6n
affombraen tese_ depisosinalfombra, conalfombra.
3, Con'eainststsdairm-,ortectsmente, 3, Re._seCAMBIODiELACORP__J_.YUMPIEZA
DELCEPILLO.
Restdcd_delflu_o deet 1. Elusodelosaccesoriosl_itaelflujodeaJre. 1. ReviseUSODELOSACCESORJOS,(pdg_a8).
L_OdelO6aO_aorloIL 2. Lapelusadeunaalfombranueva 2. ReviseC6MOELIMINARLOSRESIDUOS
Csmblode sobldo, obstruyeelPasodeaire. DEBASURAEN LOSCONDUCTOS
y limpiets manguera,
Ru_doexceblvooJando_ 1, Selectordepiso/alfombrano estb 1. Oprimeelbotonconlpietamente
apaga_ ssplrador_ empujandocompletsmenteal frents, haslaeiIrente.
22

2'3

© Sears, Roebuck and Co.
® Registered Trademark / _MTrademark / sMService Mark of Sears, Roebuck and Co.
® Marca Registrada / TM Marca de F&brica / SMMarca de Servicio de Sears. Roebuck and Co.
McMarque de commerce / MDMarque dbpos_e de Sears, Roebuckand Co.
-
 1
1
-
 2
2
-
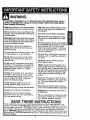 3
3
-
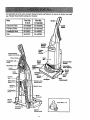 4
4
-
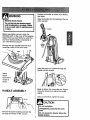 5
5
-
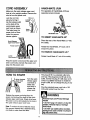 6
6
-
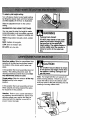 7
7
-
 8
8
-
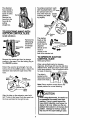 9
9
-
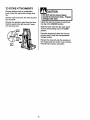 10
10
-
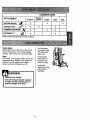 11
11
-
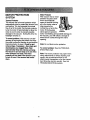 12
12
-
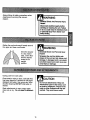 13
13
-
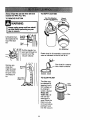 14
14
-
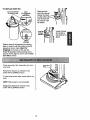 15
15
-
 16
16
-
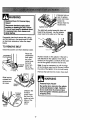 17
17
-
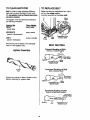 18
18
-
 19
19
-
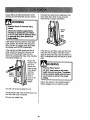 20
20
-
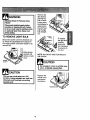 21
21
-
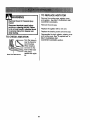 22
22
-
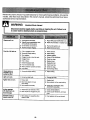 23
23
-
 24
24
-
 25
25
-
 26
26
-
 27
27
-
 28
28
-
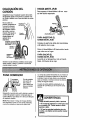 29
29
-
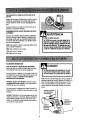 30
30
-
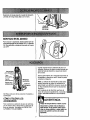 31
31
-
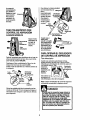 32
32
-
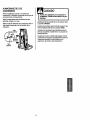 33
33
-
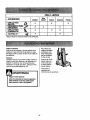 34
34
-
 35
35
-
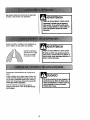 36
36
-
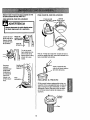 37
37
-
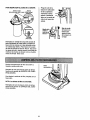 38
38
-
 39
39
-
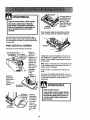 40
40
-
 41
41
-
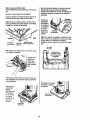 42
42
-
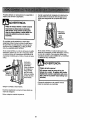 43
43
-
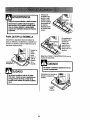 44
44
-
 45
45
-
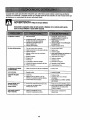 46
46
-
 47
47
-
 48
48


Kenmore 116.35725 El manual del propietario
- Categoría
- Aspiradoras
- Tipo
- El manual del propietario
- Este manual también es adecuado para
en otros idiomas
- English: Kenmore 116.35725 Owner's manual
Artículos relacionados
-
Kenmore 116.32720 El manual del propietario
-
-
Kenmore 116.32720 El manual del propietario
-
-
-
-
-
-
 Kenmore Elite 11610335510 El manual del propietario
-
