La página se está cargando...
La página se está cargando...

3
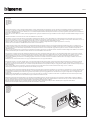
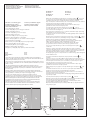
1. Display touch-screen
2. Visualizzazione temperatura/umidità
3. Indicatore funzionamento in modalità
“Boost”
4. Tasto connessione WiFi
5. Tasti per impostazione temperatura
6. Attivazione modalità Boost
7. Tasto Reset (tenere premuto 10”,
riporta alle condizioni di fabbrica)
8. Indicatore modalità manuale
9. Indicatore riscaldamento acceso
10. Indicatore raffrescamento acceso
11. Indicatore “Termostato spento”;
temperatura di 7°C (antigelo) in
funzionamento riscaldamento;
temperatura di 35°C (protezione
termica) in funzionamento
raffrescamento.
12. Indicatore connesione Wi-Fi
13. Morsetti di collegamento (vedi schemi)
1. Touch screen display
2. Temperature/humidity display
3. “Boost” mode indicator
4. Wi-Fi connection key
5. Keys for temperature setting
6. Boost mode activation
7. Reset key (keep pressed for 10”, it restores
the factory settings)
8. Manual mode indicator
9. ON heating indicator
10. ON cooling indicator
11. “OFF thermostat” indicator;
7 °C temperature (antifrost) in heating
function; 35 °C temperature (heat
protection) in cooling function.
12. Wi-Fi connection indicator
13. Connection clamps (see diagrams)
1. Écran tactile
2. Visualisation température/humidité
3. Indicateur de fonctionnement en
modalité «Boost»
4. Touche connexion Wi-Fi
5. Touches de réglages température
6. Activation modalité Boost
7. Touche Reset (maintenir enfoncée pendant
10”; rétablit les réglages par défaut)
8. Indicateur modalité manuelle
9. Indicateur chauffage allumé
10. Indicateur climatisation allumée
11. Indicateur «Thermostat éteint»;
température de 7°C (antigel)
en fonctionnement chauffage;
température de 35°C (protection
thermique) en fonctionnement
climatisation.
12. Indicateur connexion Wi-Fi
13. Bornes de branchement (voir schémas)
1. Display Touchscreen
2. Anzeige der Temperatur/Feuchtigkeit
3. Anzeige des Betriebsmodus "Boost"
4. Taste für die WiFi-Verbindung
5. Tasten zur Temperatureinstellung
6. Aktivieren des Boost-Modus
7. Resettaste (10" gedrückt halten, um auf
die werkseitigen Einstellungen wieder
herzustellen)
8. Anzeige des manuellen Modus
9. Anzeige Heizung ON
10. Anzeige Kühlung ON
11. Anzeige "Thermostat OFF"; Temperatur
7°C (Frostschutz) wenn auf Heizen;
Temperatur 35°C (Wärmeschutz) wenn
auf Kühlen.
12. Anzeige WiFi-Verbindung
13. Anschlussklemmen (siehe Pläne)
1. Display touchscreen
2. Weergave temperatuur/vochtigheid
3. Indicator werking in “boost”-modus
4. Toets WiFi-verbinding
5. Toetsen voor temperatuurinstelling
6. Activering boost-modus
7. Resettoets (10” ingedrukt houden,
herstelt de fabrieksinstellingen)
8. Indicator handbediende modus
9. Indicator verwarming ingeschakeld
10. Indicator koeling ingeschakeld
11. Indicator “Thermostaat uit”; temperatuur
van 7 °C (antivriesbeveiliging) bij
verwarming; temperatuur van 35 °C
(thermische beveiliging) bij koeling.
12. Indicator WiFi-verbinding
13. Aansluitklemmen (zie schema's)
1. Displej s dotykovou obrazovkou
2. Zobrazování teploty/vlhkosti
3. Indikátor fungování v módu „Boost“
4. Tlačítko připojení Wifi
5. Tlačítka pro nastavení teploty
6. Aktivace módu Boost
7. Tlačítko Reset (držte stisknuté 10”,
navrátí se na tovární nastavení)
8. Indikátor ručního módu
9. Indikátor zapnutého ohřívání
10. Indikátor zapnutého chlazení
11. Indikátor „Termostat vypnutý”; teplota
7 °C (proti mrazu) při chodu ohřívání;
teplota 35 °C (tepelná ochrana) při
chodu chlazení.
12. Indikátor připojení Wi-Fi
13. Připojovací svorky (viz schémata)
1. Pantalla táctil
2. Visualización temperatura/humedad
3. Indicador de funcionamiento en el
modo "Boost"
4. Tecla conexión WiFi
5. Teclas para el ajuste de la temperatura
6. Activación del modo Boos
7. Tecla Reset (presionada 10" restablece
las condiciones de la fábrica)
8. Indicador de modo manual
9. Indicador de calefacción encendida
10. Indicador de refrigeración encendida
11. Indicador de "Termostato apagado";
temperatura de 7 °C (antihielo) en
funcionamiento calefacción;
temperatura de 35 °C (protección
térmica) en funcionamiento
refrigeración.
12. Indicador de conexión Wi-Fi
13. Bornes de conexión (véase los
esquemas)
C
NC
NO
L
N
5(2) A
110 - 240 V 50/60 Hz
2 W max.
BTICINO
V.le Borri, 231
21100 (VA) ITALY
4
5
5
6
7
1389101112
2 31

4
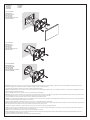
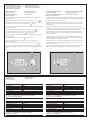
• Schemi di collegamento
• Wiring diagrams
• Schémas de branchement
• Anschlussschema
• Esquemas de conexión
• Aansluitschema's
• Schémata zapojení
C
NC
NO
L
N
5(2) A
110 - 240 V 50/60 Hz
2 W max.
110 – 240 Vac, 50/60 HZ
ALL 'IMPIANTO DI RISCALDAMENTO (CONTATTO PULITO) (ON/OFF)
TO THE HEATING SYSTEM (CLEAN CONTACT) (ON/OFF)
A L’INSTALLATION DE CHAUFFAGE (CONTACT LIBRE) (ON/OFF)
ZUR HEIZANLAGE (REINER KONTAKT) (ON/OFF)
A LA INSTALACIÓN DE CALEFACCIÓN (CONTACTO LIMPIO) (ON/OFF)
NAAR DE VERWARMINGSINSTALLATIE (POLTENTIAALVRIJ CONTACT) (ON/OFF)
K ZAŘÍZENÍ OHŘÍVÁNÍ (ČISTÝ KONTAKT) (ON/OFF)
BTICINO
V.le Borri, 231
21100 (VA) ITALY
Impianto per solo riscaldamento con contatto pulito (es. consenso caldaia)
System only for heating with clean contact (e.g. boiler agreement)
Installation pour chauffage uniquement avec contact libre (ex. signal de validation chaudière)
Anlage nur für Heizen mit reinem Kontakt (z.B. Freigabe des Heizkessels)
Instalación para solamente calefacción con contacto limpio (ej. consenso caldera)
Installatie enkel verwarming met potentiaalvrij contact (bijv. consensus ketel)
Zařízení pouze pro ohřívání s čistým kontaktem (např. povolení kotle)
C
NC
NO
L
N
5(2) A
110 - 240 V 50/60 Hz
2 W max.
110 – 240 Vac, 50/60 HZ
ALL 'IMPIANTO DI RISCALDAMENTO (CARICO DA COMANDARE ALLA TENSIONE DI RETE)
TO THE HEATING SYSTEM (LOAD TO BE CONTROLLED TO THE NETWORK VOLTAGE)
A L’INSTALLATION DE CHAUFFAGE (CHARGE A COMMANDER A LA TENSION DE SECTEUR)
ZUR HEIZANLAGE (DURCH DIE NETZSPANNUNG ZU STEUERNDE STROMLAST)
A LA INSTALACIÓN DE CALEFACCIÓN (CARGA QUE ACCIONAR A LA TENSIÓN DE RED)
NAAR DE VERWARMINGSINSTALLATIE (DOOR NETSPANNING AANGESTUURDE LADING)
K ZAŘÍZENÍ OHŘÍVÁNÍ (ZATÍŽENÍ ODESÍLANÉ PŘÍKAZEM SÍŤOVÉMU NAPĚTÍ)
BTICINO
V.le Borri, 231
21100 (VA) ITALY
Impianto per solo riscaldamento con carico da comandare alla tensione di rete (es. elettrovalvola 230Vac)
System only for heating with load to be controlled to the network voltage (e.g. 230Vac solenoid valve)
Installation pour chauffage uniquement avec charge à commander à la tension de secteur (ex. électrovanne 230V)
Anlage nur für Heizen mit durch die Netzspannung zu steuernde Stromlast (z.B. Magnetventil 230Vac)
Instalación para solamente refrigeración con carga que accionar a la tensión de red (ej. electroválvula 230 Vca)
Installatie enkel verwarming met door netspanning aangestuurde lading (bijv. magneetklep 230Vac)
Zařízení pouze pro ohřívání se zatížením odesílaným příkazem síťovému napětí (např. elektromagnetický ventil 230Vac)
C
NC
NO
L
N
5(2) A
110 - 240 V 50/60 Hz
2 W max.
110 – 240 Vac, 50/60 HZ
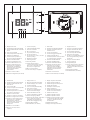
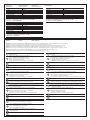
ALL'IMPIANTO DI RISCALDAMENTO E RAFFRESCAMENTO CON SISTEMA A PAVIMENTO
TO THE HEATING AND COOLING SYSTEM WITH FLOOR SYSTEM
A L’INSTALLATION DE CHAUFFAGE ET CLIMATISATION AVEC SYSTÈME AU SOL
ZUR HEIZ- UN KÜHLANLAGE IN DER BODENAUSFÜHRUNG
A LA INSTALACIÓN DE CALEFACCIÓN Y REFRIGERACIÓN CON SISTEMA DE SUELO RADIAL
NAAR DE VERWARMINGS- EN KOELINSTALLATIE MET VLOERINSTALLATIE
K ZAŘÍZENÍ OHŘÍVÁNÍ A CHLAZENÍ SE SYSTÉMEM V PODLAZE
BTICINO
V.le Borri, 231
21100 (VA) ITALY
Riscaldamento e raffrescamento con sistema a pavimento
Heating and cooling with floor system
Chauffage et climatisation avec système au sol
Heizen und Kühlen mit Bodenanlage
Calefacción y refrigeración con sistema de suelo radial
Verwarming en koeling met vloerinstallatie
Ohřívání a chlazení se systémem v podlaze
C
NC
NO
L
N
5(2) A
110 - 240 V 50/60 Hz
2 W max.
110 – 240 Vac, 50/60 HZ
ALL 'IMPIANTO DI RISCALDAMENTO
TO THE HEATING SYSTEM
A L’INSTALLATION DE CHAUFFAGE
ZUR HEIZANLAGE
A LA INSTALACIÓN DE CALEFACCIÓN
NAAR DE VERWARMINGSINSTALLATIE
K ZAŘÍZENÍ OHŘÍVÁNÍ
ALL 'IMPIANTO DI RAFFRESCAMENTO
TO THE COOLING SYSTEM
A L’INSTALLATION DE CLIMATISATION
ZUR KÜHLANLAGE
A LA INSTALACIÓN DE REFRIGERACIÓN
NAAR DE KOELINSTALLATIE
K ZAŘÍZENÍ CHLAZENÍ
*
BTICINO
V.le Borri, 231
21100 (VA) ITALY
Riscaldamento e raffrescamento con sistemi differenti
Heating and cooling with different systems
Chauffage et climatisation avec systèmes différents
Heizen und Kühlen mit anderen Systemen
Calefacción y refrigeración con sistemas diferentes
Verwarming en koeling met verschillende installaties
Ohřívání a chlazení s jinými systémy
*
Il commutatore esterno deve essere
correttamente attivato quando
la funzione del sistema passa da
riscaldamento a raffreddamento e
viceversa.
External changeover switch must
be properly switched when system
function is changed from heating to
cooling and vice versa.
Le commutateur externe doit
être correctement activé quand
la fonction du système passe du
chauffage à la climatisation et
inversement.
Der externe Schalter muss richtig
betätigt werden, wenn die Funktion
des Systems von Heizen auf Kühlen und
umgekehrt umschaltet.
El conmutador externo ha de estar
correctamente activado cuando
la función del sistema pasa de
calefacción a refrigeración y viceversa.
De externe schakelaar moet correct
geactiveerd worden wanneer de
functie van het systeem overschakelt
van verwarming naar koeling en
omgekeerd.
Externí spínač musí být správně
aktivován, když funkce systému
přechází z ohřívání na chlazení a
naopak.

5
D
E
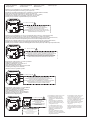
Modalità Boost
Boost mode
Modalité Boost
Boost-Modus
Modo Boost
Boost-modus
Mód Boost
Questa azione riporta Smarther alla condizione di fabbrica, tutte le programmazioni
verranno cancellate. Tieni premuto il pulsante di reset presente sul lato di Smarther (C) sino
ad udire il beep di conferma (circa 10 secondi).
This operation restores the Smarther factory settings and all the programming will be cancelled.
Keep pressed the reset pushbutton on the side of Smarther (C) until a confirmation beep is heard
(about 10 seconds).
Cette action rétablit les réglages par défaut du thermostat Smarther: toutes les
programmations sont effacées. Maintenir enfoncé le bouton Reset présent sur le côté du
thermostat Smarther (C) jusqu’à ce qu’un bip de confirmation soit émis (au bout de 10
secondes environ).
Durch diese Aktion schaltet Smarther auf die werkseitigen Einstellungen zurück und alle
Programmierungen werden gelöscht. Halten Sie die Reset-Taste an der Seite des Smarther (C)
solange gedrückt (ca. 10 Sekunden), bis ein Piepton den Vorgang bestätigt.
Con esta acción, Smarther regresa a las condiciones de la fábrica y todas las
programaciones se cancelan. Mantenga presionado el pulsador de reset en el lado de
Smarther (C) hasta que oiga un beep de confirmación (10 segundos aproximadamente).
Met deze handeling kunnen de fabrieksinstellinge van Smarther worden hersteld. Alle
programmeringen worden gewist. Houd de resetknop aan de zijkant van Smarther (C)
ingedrukt tot u een pieptoon hoort (na ongeveer 10 seconden).
Tato akce nastaví Smarther do továrního nastavení, všechna programování budou
smazána. Stiskněte resetovací tlačítko umístěné na straně Smartheru (C) a držte ho
stisknuté, dokud neuslyšíte potvrzující pípnutí (zhruba 10 sekund).
Reset
Reset
Réinitialisation
Reset
Reset
Reset
Reset
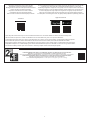
Tocca il display (A) per attivarlo.
Scorri sul display (B) per passare alla pagina desiderata
Touch the display (A) to activate it.
Scroll on the display (B) to go to the desired page.
Toucher l’écran (A) pour l’activer.
Glisser sur l’écran (B) pour passer à la page voulue.
Berühren Sie das Display (A), um es einzuschalten.
Rollen Sie am Display (B) die Seite ab, um auf die nächste überzugehen.
Toque la pantalla para activarla (A).
Deslice el dedo por la pantalla (B) para pasar a la página elegida.
Activeer het display (A) door het aan te raken.
Scroll het display (B) tot de gewenste pagina is bereikt.
Dotkněte se displeje (A) pro jeho aktivaci.
Pohybujte se po displeji (B), abyste přešli na požadovanou stránku.
Attivazione e scorrimento pagine
Activation and page scrolling
Activation et défilement des pages
Seiten abrufen und abrollen
Activación y deslizamiento páginas
Activering en bladeren pagina’s
Aktivace a procházení stránek
• Funzioni attivabili localmente
• Functions that can be locally activated
• Fonctions activables localement
• Örtlich aktivierbare Funktionen
• Funciones con activación local
• Plaatselijk activeerbare functies
• Funkce, které lze aktivovat místně
Dalla pagina di visualizzazione temperatura tocca il display, il simbolo
si accende.
Tocca una o più volte il simbolo (D) per impostare la durata della funzione; il display
visualizza il tempo impostato, contemporaneamente l’indicatore si illumina.
Dopo aver impostato la durata voluta (30, 60 o 90 minuti) attendi che le cifre smettano
di lampeggiare dopodichè la modalità Boost sarà attivata.
Il display mostra la temperatura misurata; l’indicatore luminoso (E) si spegne
gradualmente al trascorrere del tempo impostato.
Touch the display on the temperature display page, the symbol
comes on.
Touch the symbol (D) once or more to set the function duration; the display shows the set
time, at the same time the LED lights up.
After setting the desired duration (30, 60 or 90 minutes) wait until the digits stop flashing
after which the Boost mode will be activated.
The display shows the measured temperature; the LED (E) gradually switches off while the
set time passes by.
Depuis la page de visualisation de la température, toucher l’écran: le symbole s’allume.
Toucher une ou plusieurs fois le symbole (D) pour régler la durée de la fonction: l’écran
affiche la durée programmée et simultanément l’indicateur s’allume.
Après avoir programmé la durée voulue (30, 60 ou 90 minutes), attendre que les
chiffres cessent de clignoter; ensuite la modalité Boost est active.
L’écran affiche la température mesurée; l’indicateur lumineux (E) s’éteint
progressivement au fur et à mesure que la durée programmée s’écoule.
In der Seite der Temperaturanzeige, berühren Sie das Display und das Symbol
leuchtet auf.
Berühren Sie ein Mal oder mehrmals das Symbol (D), um die Dauer der Funktion
einzustellen. Am Display wird die eingestellte Zeit angezeigt und die Anzeige leuchtet auf.
Nachdem die gewünschte Dauer (30, 60 oder 90 Minuten) eingestellt worden ist, warten Sie
bis die Zahlen zu blinken aufhören. Danach ist die Boost-Funktion aktiv.
Das Display zeigt die gemessene Temperatur an. Die leuchtende Anzeige (E) erlischt langsam
mit der ablaufenden Zeit.
En la página de visualización temperatura, toque la pantalla, el símbolo
se
enciende.
Toque una o varias veces el símbolo (D) para ajustar la duración de la función; en la
pantalla se visualiza el tiempo ajustado y, contemporáneamente, el indicador se ilumina.
Tras haber ajustado la duración (30, 60 o 90 minutos), espere hasta que los dígitos
dejen de parpadear ya que luego el modo Boost se activa.
La pantalla muestra la temperatura medida; el indicador luminoso (E) se apaga
gradualmente al transcurrir el tiempo ajustado.
Raak het display aan op de pagina voor de temperatuurweergave. Het symbool
gaat
branden.
Stel de duur van de functie in door een of meer keer op het symbool (D) te drukken. Het
display toont de ingestelde tijd en tegelijkertijd knippert de indicator.
Wacht tot de cijfers niet langer knipperen als de gewenste duur (30, 60 of 90 minuten) is
ingesteld. De Boost-functie is nu geactiveerd.
Het display toont de gemeten temperatuur. Het lampje (E) gaat langzaam uit naarmate de
ingestelde tijd verstrijkt.
Ze stránky zobrazování teploty se dotkněte displeje, symbol se rozsvítí.
Dotkněte se jednou nebo víckrát symbolu (D) pro nastavení délky trvání funkce; displej
bude zobrazovat nastavenou dobu a indikátor se zároveň rozsvítí.
Po nastavení požadované délky trvání (30, 60 nebo 90 minut) počkejte, až čísla
přestanou blikat, poté bude mód Boost aktivován.
Displej zobrazuje naměřenou teplotu; světelný indikátor (E) se po uplynutí nastavené
doby postupně vypne.
B
10”...
beep
C
A
La página se está cargando...

7
• Avvertenze
• Warning
• Avertissement
• Hinweise
• Advertencias
• Waarschuwingen
• Upozornění
Leggere attentamente questo documento prima dell’uso e conservarlo per un
riferimento futuro
Divieto di toccare le unità con le mani bagnate
Divieto di utilizzo di pulitori liquidi o aerosol
Divieto di occludere le aperture di ventilazione
Divieto di modicare i dispositivi
Divieto di rimuovere parti di protezione dai dispositivi
Pericolo di shock elettrico
Togliere l’alimentazione prima di ogni intervento sull’impianto
Read carefully this document before use and keep it for future reference
Touching the units with wet hands is forbidden
Using liquid cleaners or aerosols is forbidden
Blocking the ventilation openings is forbidden
Modifying the devices is forbidden
Removing protective parts from the devices is forbidden
Danger of electrical shock
Switch the power supply OFF before any work on the system
Lire attentivement le présent document avant toute utilisation et le conserver
pour le consulter au besoin.
Interdiction de toucher les unités avec les mains mouillées.
Interdiction d’utiliser des produits de nettoyage liquides ou des aérosols.
Interdiction de boucher les ouvertures de ventilation.
Interdiction de modier les dispositifs.
Interdiction des retirer les parties de protection des dispositifs.
Risque d’électrocution
Couper l’alimentation avant toute intervention sur l’installation.
Přečtěte si pozorně tento dokument před použitím termostatu a uchovejte
ho pro budoucí použití
Je zakázáno se dotýkat jednotek s vlhkýma rukama
Je zakázáno používat kapalné čisticí prostředky nebo aerosol
Je zakázáno blokovat větrací otvory
Je zakázáno modikovat zařízení
Je zakázáno odstraňovat ochranné kryty ze zařízení
Nebezpečí elektrického šoku
Před jakýmkoliv zásahem na zařízení odpojte napájení
Vor Gebrauch, dieses Dokument aufmerksam durchlese und sorgfältig auf-
bewahren, um es jederzeit nachschlagen zu können.
Verbot, die Einheiten mit nassen Händen zu berühren
Verbot, Flüssigreiniger oder Aerosol zu benutzen
Verbot, die Belüftungsschlitze abzudecken
Verbot, die Vorrichtungen zu ändern
Verbot, die Schutzbleche von den Vorrichtungen abzunehmen
Stromschlaggefahr
Die Stromversorgung abtrennen, bevor an der Anlage gearbeitet wird.
• Attenzione: le operazioni di installazione, configurazione, messa in servizio e manutenzione devono essere effettuate da personale qualificato.
• Caution: installation, configuration, starting-up and maintenance must be performed by qualified personnel.
• Attention: les opérations d’installation, de configuration, de mise en service et d’entretien doivent être confiées à un personnel qualifié.
• Achtung: die Installation, Konfiguration, Inbetriebnahme und Wartung dürfen nur von qualifizierten Fachleuten vorgenommen werden.
• Atención: las operaciones de instalación, configuración, puesta en servicio y mantenimiento han de ser efectuadas por personal cualificado.
• Opgelet: laat de installatie, de configuratie, de inbedrijfstelling en het onderhoud verrichten door gekwalificeerd personeel.
• Pozor: úkony instalace, konfigurace, zprovoznění a údržby musí provádět kvalifikovaný personál.
Alimentación 110 – 240 Vac , 50/60Hz
Consumo 2 W max
Máxima sección de los cables 1 x 1,5mm2
Temperatura de funcionamiento 5 – 40 °C
Punto de ajuste temperaturas 5 – 40 °C; incrementos de 0,5 °C
Tipo de activación 1BU
Grado de contaminación 2
Tensión nominal de impulsos 4 kV
Dispositivo inalámbrico en cumplimiento de la norma 802.11b/g/n,
frecuencia 2.4 – 2.4835 GHz, potencia de transmisión < 20 dBm.
Protocolo de seguridad WPA/WPA2.
Napájení 110 – 240 Vac , 50/60Hz
Absorpce 2 W max
Maximální průřez kabelů 1 x 1,5mm2
Provozní teploty 5 – 40 °C
Setpoint teplot 5 – 40 °C; nárůsty o 0,5 °C
Typ pohonu 1BU
Stupeň znečištění 2
Jmenovité impulzní napětí 4 kV
Bezdrátové zařízení vyhovující standardu 802.11b/g/n,
kmitočtu 2.4 – 2.4835 GHz, přenosovému výkonu < 20 dBm.
Bezpečnostní protokol WPA/WPA2.
• Dati tecnici
• Technical data
• Données techniques
• Technische Daten
• Datos técnicos
• Technische gegevens
• Technické údaje
Voeding 110 – 240 Vac , 50/60Hz
Stroomopname 2 W max
Maximum doorsnede van de kabels 1 x 1,5mm2
Bedrijfstemperatuur 5 – 40 °C
Temperatuur setpoint 5 – 40 °C; met stappen van 0,5 °C
Soort aansturing 1BU
Vervuilingsgraad 2
Nominale pulsspanning 4 kV
Draadloos apparaat overeenkomstig de norm 802.11b/g/n,
frequentie 2.4 – 2.4835 GHz, zendvermogen < 20 dBm.
Veiligheidsprotocol WPA/WPA2.
Lea detenidamente este documento antes del uso y consérvelo para consul-
tas futuras
Se prohíbe tocar las unidades con las manos mojadas
Se prohíbe el uso de limpiadores líquidos o aerosoles
Se prohíbe tapar las aperturas de ventilación
Se prohíbe modicar los dispositivos
Se prohíbe desmontar las partes de protección de los dispositivos
Peligro de choque eléctrico
Corte la alimentación antes de intervenir en el sistema
Dit document vóór het gebruik doorlezen en voor naslag bewaren
Het is verboden het apparaat met natte handen aan te raken
Het is verboden vloeibare reinigers of verstuivers te gebruiken
Het is verboden de ventilatie-openingen af te sluiten
Het is verboden het apparaat te wijzigen
Het is verboden om beschermende onderdelen van het apparaat te verwijderen
Elektrocutiegevaar
Verwijder de spanning alvorens werkzaamheden aan de installatie te verrichten
La página se está cargando...
Transcripción de documentos
1 2 3 4 5 BTICINO V.le Borri, 231 21100 (VA) ITALY 110 - 240 V 2 W max. 50/60 Hz L N 6 NO 5(2) A NC C 5 7 12 11 10 9 8 13 1. Display touch-screen 1. Touch screen display 1. Écran tactile 1. Display Touchscreen 2. Visualizzazione temperatura/umidità 2. Temperature/humidity display 2. Visualisation température/humidité 2. Anzeige der Temperatur/Feuchtigkeit 3. Indicatore funzionamento in modalità “Boost” 3. “Boost” mode indicator 3. Indicateur de fonctionnement en modalité « Boost » 3. Anzeige des Betriebsmodus "Boost" 4. Tasto connessione WiFi 5. Keys for temperature setting 4. Touche connexion Wi-Fi 5. Tasten zur Temperatureinstellung 5. Tasti per impostazione temperatura 6. Attivazione modalità Boost 7. Tasto Reset (tenere premuto 10”, riporta alle condizioni di fabbrica) 8. Indicatore modalità manuale 9. Indicatore riscaldamento acceso 10. Indicatore raffrescamento acceso 11. Indicatore “Termostato spento”; temperatura di 7 °C (antigelo) in funzionamento riscaldamento; temperatura di 35 °C (protezione termica) in funzionamento raffrescamento. 4. Wi-Fi connection key 5. Touches de réglages température 6. Boost mode activation 6. Activation modalité Boost 7. Reset key (keep pressed for 10”, it restores the factory settings) 8. Manual mode indicator 9. ON heating indicator 10. ON cooling indicator 11. “OFF thermostat” indicator; 7 °C temperature (antifrost) in heating function; 35 °C temperature (heat protection) in cooling function. 12. Wi-Fi connection indicator 13. Connection clamps (see diagrams) 7. Resettaste (10" gedrückt halten, um auf die werkseitigen Einstellungen wieder herzustellen) 8. Indicateur modalité manuelle 8. Anzeige des manuellen Modus 9. Indicateur chauffage allumé 9. Anzeige Heizung ON 10. Indicateur climatisation allumée 10. Anzeige Kühlung ON 11. Indicateur « Thermostat éteint » ; température de 7°C (antigel) en fonctionnement chauffage ; température de 35°C (protection thermique) en fonctionnement climatisation. 11. Anzeige "Thermostat OFF"; Temperatur 7°C (Frostschutz) wenn auf Heizen; Temperatur 35°C (Wärmeschutz) wenn auf Kühlen. 12. Indicateur connexion Wi-Fi 13. Morsetti di collegamento (vedi schemi) 13. Bornes de branchement (voir schémas) 1. Pantalla táctil 1. Display touchscreen 1. Displej s dotykovou obrazovkou 2. Visualización temperatura/humedad 2. Weergave temperatuur/vochtigheid 2. Zobrazování teploty/vlhkosti 3. Indicador de funcionamiento en el modo "Boost" 3. Indicator werking in “boost”-modus 3. Indikátor fungování v módu „Boost“ 4. Tecla conexión WiFi 4. Toets WiFi-verbinding 4. Tlačítko připojení Wifi 5. Toetsen voor temperatuurinstelling 5. Tlačítka pro nastavení teploty 6. Activering boost-modus 6. Aktivace módu Boost 7. Resettoets (10” ingedrukt houden, herstelt de fabrieksinstellingen) 7. Tlačítko Reset (držte stisknuté 10”, navrátí se na tovární nastavení) 8. Indicator handbediende modus 8. Indikátor ručního módu 9. Indicator verwarming ingeschakeld 9. Indikátor zapnutého ohřívání 10. Indicator koeling ingeschakeld 10. Indikátor zapnutého chlazení 11. Indicator “Thermostaat uit”; temperatuur van 7 °C (antivriesbeveiliging) bij verwarming; temperatuur van 35 °C (thermische beveiliging) bij koeling. 11. Indikátor „Termostat vypnutý”; teplota 7 °C (proti mrazu) při chodu ohřívání; teplota 35 °C (tepelná ochrana) při chodu chlazení. 12. Indicator WiFi-verbinding 12. Indikátor připojení Wi-Fi 13. Aansluitklemmen (zie schema's) 13. Připojovací svorky (viz schémata) 6. Activación del modo Boos 7. Tecla Reset (presionada 10" restablece las condiciones de la fábrica) 8. Indicador de modo manual 9. Indicador de calefacción encendida 10. Indicador de refrigeración encendida 11. Indicador de "Termostato apagado"; temperatura de 7 °C (antihielo) en funcionamiento calefacción; temperatura de 35 °C (protección térmica) en funcionamiento refrigeración. 12. Indicador de conexión Wi-Fi 13. Bornes de conexión (véase los esquemas) 3 6. Aktivieren des Boost-Modus 7. Touche Reset (maintenir enfoncée pendant 10” ; rétablit les réglages par défaut) 12. Indicatore connesione Wi-Fi 5. Teclas para el ajuste de la temperatura 4. Taste für die WiFi-Verbindung 12. Anzeige WiFi-Verbindung 13. Anschlussklemmen (siehe Pläne) • Schemi di collegamento • Wiring diagrams • Schémas de branchement • Anschlussschema • Esquemas de conexión • Aansluitschema's • Schémata zapojení Impianto per solo riscaldamento con contatto pulito (es. consenso caldaia) System only for heating with clean contact (e.g. boiler agreement) Installation pour chauffage uniquement avec contact libre (ex. signal de validation chaudière) Anlage nur für Heizen mit reinem Kontakt (z.B. Freigabe des Heizkessels) Instalación para solamente calefacción con contacto limpio (ej. consenso caldera) Installatie enkel verwarming met potentiaalvrij contact (bijv. consensus ketel) Zařízení pouze pro ohřívání s čistým kontaktem (např. povolení kotle) BTICINO V.le Borri, 231 21100 (VA) ITALY 110 - 240 V 2 W max. 50/60 Hz L N NO 5(2) A NC C 110 – 240 Vac, 50/60 HZ ALL 'IMPIANTO DI RISCALDAMENTO (CONTATTO PULITO) (ON/OFF) TO THE HEATING SYSTEM (CLEAN CONTACT) (ON/OFF) A L’INSTALLATION DE CHAUFFAGE (CONTACT LIBRE) (ON/OFF) ZUR HEIZANLAGE (REINER KONTAKT) (ON/OFF) A LA INSTALACIÓN DE CALEFACCIÓN (CONTACTO LIMPIO) (ON/OFF) NAAR DE VERWARMINGSINSTALLATIE (POLTENTIAALVRIJ CONTACT) (ON/OFF) K ZAŘÍZENÍ OHŘÍVÁNÍ (ČISTÝ KONTAKT) (ON/OFF) Impianto per solo riscaldamento con carico da comandare alla tensione di rete (es. elettrovalvola 230Vac) System only for heating with load to be controlled to the network voltage (e.g. 230Vac solenoid valve) Installation pour chauffage uniquement avec charge à commander à la tension de secteur (ex. électrovanne 230 V) Anlage nur für Heizen mit durch die Netzspannung zu steuernde Stromlast (z.B. Magnetventil 230Vac) Instalación para solamente refrigeración con carga que accionar a la tensión de red (ej. electroválvula 230 Vca) Installatie enkel verwarming met door netspanning aangestuurde lading (bijv. magneetklep 230Vac) Zařízení pouze pro ohřívání se zatížením odesílaným příkazem síťovému napětí (např. elektromagnetický ventil 230Vac) BTICINO V.le Borri, 231 21100 (VA) ITALY 110 - 240 V 2 W max. 50/60 Hz L N NO 5(2) A NC C 110 – 240 Vac, 50/60 HZ ALL 'IMPIANTO DI RISCALDAMENTO (CARICO DA COMANDARE ALLA TENSIONE DI RETE) TO THE HEATING SYSTEM (LOAD TO BE CONTROLLED TO THE NETWORK VOLTAGE) A L’INSTALLATION DE CHAUFFAGE (CHARGE A COMMANDER A LA TENSION DE SECTEUR) ZUR HEIZANLAGE (DURCH DIE NETZSPANNUNG ZU STEUERNDE STROMLAST) A LA INSTALACIÓN DE CALEFACCIÓN (CARGA QUE ACCIONAR A LA TENSIÓN DE RED) NAAR DE VERWARMINGSINSTALLATIE (DOOR NETSPANNING AANGESTUURDE LADING) K ZAŘÍZENÍ OHŘÍVÁNÍ (ZATÍŽENÍ ODESÍLANÉ PŘÍKAZEM SÍŤOVÉMU NAPĚTÍ) Riscaldamento e raffrescamento con sistema a pavimento Heating and cooling with floor system Chauffage et climatisation avec système au sol Heizen und Kühlen mit Bodenanlage Calefacción y refrigeración con sistema de suelo radial Verwarming en koeling met vloerinstallatie Ohřívání a chlazení se systémem v podlaze BTICINO V.le Borri, 231 21100 (VA) ITALY 110 - 240 V 2 W max. 50/60 Hz L N NO 5(2) A NC C 110 – 240 Vac, 50/60 HZ ALL'IMPIANTO DI RISCALDAMENTO E RAFFRESCAMENTO CON SISTEMA A PAVIMENTO TO THE HEATING AND COOLING SYSTEM WITH FLOOR SYSTEM A L’INSTALLATION DE CHAUFFAGE ET CLIMATISATION AVEC SYSTÈME AU SOL ZUR HEIZ- UN KÜHLANLAGE IN DER BODENAUSFÜHRUNG A LA INSTALACIÓN DE CALEFACCIÓN Y REFRIGERACIÓN CON SISTEMA DE SUELO RADIAL NAAR DE VERWARMINGS- EN KOELINSTALLATIE MET VLOERINSTALLATIE K ZAŘÍZENÍ OHŘÍVÁNÍ A CHLAZENÍ SE SYSTÉMEM V PODLAZE Riscaldamento e raffrescamento con sistemi differenti Heating and cooling with different systems Chauffage et climatisation avec systèmes différents Heizen und Kühlen mit anderen Systemen Calefacción y refrigeración con sistemas diferentes Verwarming en koeling met verschillende installaties Ohřívání a chlazení s jinými systémy 110 - 240 V 2 W max. 50/60 Hz L N NO 5(2) A commutatore esterno deve essere * Ilcorrettamente attivato quando 110 – 240 Vac, 50/60 HZ BTICINO V.le Borri, 231 21100 (VA) ITALY NC C * la funzione del sistema passa da riscaldamento a raffreddamento e viceversa. External changeover switch must be properly switched when system function is changed from heating to cooling and vice versa. Le commutateur externe doit être correctement activé quand la fonction du système passe du chauffage à la climatisation et inversement. Der externe Schalter muss richtig betätigt werden, wenn die Funktion des Systems von Heizen auf Kühlen und umgekehrt umschaltet. ALL 'IMPIANTO DI RISCALDAMENTO TO THE HEATING SYSTEM A L’INSTALLATION DE CHAUFFAGE ZUR HEIZANLAGE A LA INSTALACIÓN DE CALEFACCIÓN NAAR DE VERWARMINGSINSTALLATIE K ZAŘÍZENÍ OHŘÍVÁNÍ ALL 'IMPIANTO DI RAFFRESCAMENTO TO THE COOLING SYSTEM A L’INSTALLATION DE CLIMATISATION ZUR KÜHLANLAGE A LA INSTALACIÓN DE REFRIGERACIÓN NAAR DE KOELINSTALLATIE K ZAŘÍZENÍ CHLAZENÍ 4 El conmutador externo ha de estar correctamente activado cuando la función del sistema pasa de calefacción a refrigeración y viceversa. De externe schakelaar moet correct geactiveerd worden wanneer de functie van het systeem overschakelt van verwarming naar koeling en omgekeerd. Externí spínač musí být správně aktivován, když funkce systému přechází z ohřívání na chlazení a naopak. • Funzioni attivabili localmente • Functions that can be locally activated • Fonctions activables localement • Örtlich aktivierbare Funktionen • Funciones con activación local • Plaatselijk activeerbare functies • Funkce, které lze aktivovat místně Modalità Boost Boost mode Modalité Boost Boost-Modus Attivazione e scorrimento pagine Activation and page scrolling Activation et défilement des pages Seiten abrufen und abrollen si accende. Dalla pagina di visualizzazione temperatura tocca il display, il simbolo Tocca una o più volte il simbolo (D) per impostare la durata della funzione; il display visualizza il tempo impostato, contemporaneamente l’indicatore si illumina. Dopo aver impostato la durata voluta (30, 60 o 90 minuti) attendi che le cifre smettano di lampeggiare dopodichè la modalità Boost sarà attivata. Il display mostra la temperatura misurata; l’indicatore luminoso (E) si spegne gradualmente al trascorrere del tempo impostato. Activación y deslizamiento páginas Activering en bladeren pagina’s Aktivace a procházení stránek Touch the display on the temperature display page, the symbol comes on. Touch the symbol (D) once or more to set the function duration; the display shows the set time, at the same time the LED lights up. After setting the desired duration (30, 60 or 90 minutes) wait until the digits stop flashing after which the Boost mode will be activated. The display shows the measured temperature; the LED (E) gradually switches off while the set time passes by. Tocca il display (A) per attivarlo. Scorri sul display (B) per passare alla pagina desiderata Touch the display (A) to activate it. Scroll on the display (B) to go to the desired page. Toucher l’écran (A) pour l’activer. Glisser sur l’écran (B) pour passer à la page voulue. Depuis la page de visualisation de la température, toucher l’écran : le symbole s’allume. Toucher une ou plusieurs fois le symbole (D) pour régler la durée de la fonction : l’écran affiche la durée programmée et simultanément l’indicateur s’allume. Après avoir programmé la durée voulue (30, 60 ou 90 minutes), attendre que les chiffres cessent de clignoter ; ensuite la modalité Boost est active. L’écran affiche la température mesurée ; l’indicateur lumineux (E) s’éteint progressivement au fur et à mesure que la durée programmée s’écoule. Berühren Sie das Display (A), um es einzuschalten. Rollen Sie am Display (B) die Seite ab, um auf die nächste überzugehen. Toque la pantalla para activarla (A). Deslice el dedo por la pantalla (B) para pasar a la página elegida. Activeer het display (A) door het aan te raken. Scroll het display (B) tot de gewenste pagina is bereikt. In der Seite der Temperaturanzeige, berühren Sie das Display und das Symbol leuchtet auf. Berühren Sie ein Mal oder mehrmals das Symbol (D), um die Dauer der Funktion einzustellen. Am Display wird die eingestellte Zeit angezeigt und die Anzeige leuchtet auf. Nachdem die gewünschte Dauer (30, 60 oder 90 Minuten) eingestellt worden ist, warten Sie bis die Zahlen zu blinken aufhören. Danach ist die Boost-Funktion aktiv. Das Display zeigt die gemessene Temperatur an. Die leuchtende Anzeige (E) erlischt langsam mit der ablaufenden Zeit. Dotkněte se displeje (A) pro jeho aktivaci. Pohybujte se po displeji (B), abyste přešli na požadovanou stránku. Reset Reset Réinitialisation Reset Modo Boost Boost-modus Mód Boost Reset Reset Reset En la página de visualización temperatura, toque la pantalla, el símbolo se enciende. Toque una o varias veces el símbolo (D) para ajustar la duración de la función; en la pantalla se visualiza el tiempo ajustado y, contemporáneamente, el indicador se ilumina. Tras haber ajustado la duración (30, 60 o 90 minutos), espere hasta que los dígitos dejen de parpadear ya que luego el modo Boost se activa. La pantalla muestra la temperatura medida; el indicador luminoso (E) se apaga gradualmente al transcurrir el tiempo ajustado. Questa azione riporta Smarther alla condizione di fabbrica, tutte le programmazioni verranno cancellate. Tieni premuto il pulsante di reset presente sul lato di Smarther (C) sino ad udire il beep di conferma (circa 10 secondi). This operation restores the Smarther factory settings and all the programming will be cancelled. Keep pressed the reset pushbutton on the side of Smarther (C) until a confirmation beep is heard (about 10 seconds). Cette action rétablit les réglages par défaut du thermostat Smarther : toutes les programmations sont effacées. Maintenir enfoncé le bouton Reset présent sur le côté du thermostat Smarther (C) jusqu’à ce qu’un bip de confirmation soit émis (au bout de 10 secondes environ). Raak het display aan op de pagina voor de temperatuurweergave. Het symbool gaat branden. Stel de duur van de functie in door een of meer keer op het symbool (D) te drukken. Het display toont de ingestelde tijd en tegelijkertijd knippert de indicator. Wacht tot de cijfers niet langer knipperen als de gewenste duur (30, 60 of 90 minuten) is ingesteld. De Boost-functie is nu geactiveerd. Het display toont de gemeten temperatuur. Het lampje (E) gaat langzaam uit naarmate de ingestelde tijd verstrijkt. Durch diese Aktion schaltet Smarther auf die werkseitigen Einstellungen zurück und alle Programmierungen werden gelöscht. Halten Sie die Reset-Taste an der Seite des Smarther (C) solange gedrückt (ca. 10 Sekunden), bis ein Piepton den Vorgang bestätigt. Con esta acción, Smarther regresa a las condiciones de la fábrica y todas las programaciones se cancelan. Mantenga presionado el pulsador de reset en el lado de Smarther (C) hasta que oiga un beep de confirmación (10 segundos aproximadamente). Ze stránky zobrazování teploty se dotkněte displeje, symbol se rozsvítí. Dotkněte se jednou nebo víckrát symbolu (D) pro nastavení délky trvání funkce; displej bude zobrazovat nastavenou dobu a indikátor se zároveň rozsvítí. Po nastavení požadované délky trvání (30, 60 nebo 90 minut) počkejte, až čísla přestanou blikat, poté bude mód Boost aktivován. Displej zobrazuje naměřenou teplotu; světelný indikátor (E) se po uplynutí nastavené doby postupně vypne. Met deze handeling kunnen de fabrieksinstellinge van Smarther worden hersteld. Alle programmeringen worden gewist. Houd de resetknop aan de zijkant van Smarther (C) ingedrukt tot u een pieptoon hoort (na ongeveer 10 seconden). Tato akce nastaví Smarther do továrního nastavení, všechna programování budou smazána. Stiskněte resetovací tlačítko umístěné na straně Smartheru (C) a držte ho stisknuté, dokud neuslyšíte potvrzující pípnutí (zhruba 10 sekund). E 10”... beep A D B C 5 • Dati tecnici • Technical data • Données techniques • Technische Daten • Datos técnicos • Technische gegevens • Technické údaje Alimentación 110 – 240 Vac , 50/60Hz Consumo 2 W max Máxima sección de los cables 1 x 1,5mm2 Temperatura de funcionamiento 5 – 40 °C Punto de ajuste temperaturas 5 – 40 °C; incrementos de 0,5 °C Tipo de activación 1BU Grado de contaminación 2 Tensión nominal de impulsos 4 kV Dispositivo inalámbrico en cumplimiento de la norma 802.11b/g/n, frecuencia 2.4 – 2.4835 GHz, potencia de transmisión < 20 dBm. Protocolo de seguridad WPA/WPA2. Napájení 110 – 240 Vac , 50/60Hz Absorpce 2 W max Maximální průřez kabelů 1 x 1,5mm2 Provozní teploty 5 – 40 °C Setpoint teplot 5 – 40 °C; nárůsty o 0,5 °C Typ pohonu 1BU Stupeň znečištění 2 Jmenovité impulzní napětí 4 kV Bezdrátové zařízení vyhovující standardu 802.11b/g/n, kmitočtu 2.4 – 2.4835 GHz, přenosovému výkonu < 20 dBm. Bezpečnostní protokol WPA/WPA2. Voeding 110 – 240 Vac , 50/60Hz Stroomopname 2 W max Maximum doorsnede van de kabels 1 x 1,5mm2 Bedrijfstemperatuur 5 – 40 °C Temperatuur setpoint 5 – 40 °C; met stappen van 0,5 °C Soort aansturing 1BU Vervuilingsgraad 2 Nominale pulsspanning 4 kV Draadloos apparaat overeenkomstig de norm 802.11b/g/n, frequentie 2.4 – 2.4835 GHz, zendvermogen < 20 dBm. Veiligheidsprotocol WPA/WPA2. • Avvertenze • Warning • Avertissement • Hinweise • Advertencias • Waarschuwingen • Upozornění • Attenzione: le operazioni di installazione, configurazione, messa in servizio e manutenzione devono essere effettuate da personale qualificato. • Caution: installation, configuration, starting-up and maintenance must be performed by qualified personnel. • Attention: les opérations d’installation, de configuration, de mise en service et d’entretien doivent être confiées à un personnel qualifié. • Achtung: die Installation, Konfiguration, Inbetriebnahme und Wartung dürfen nur von qualifizierten Fachleuten vorgenommen werden. • Atención: las operaciones de instalación, configuración, puesta en servicio y mantenimiento han de ser efectuadas por personal cualificado. • Opgelet: laat de installatie, de configuratie, de inbedrijfstelling en het onderhoud verrichten door gekwalificeerd personeel. • Pozor: úkony instalace, konfigurace, zprovoznění a údržby musí provádět kvalifikovaný personál. Leggere attentamente questo documento prima dell’uso e conservarlo per un riferimento futuro Lea detenidamente este documento antes del uso y consérvelo para consultas futuras Divieto di toccare le unità con le mani bagnate Divieto di utilizzo di pulitori liquidi o aerosol Divieto di occludere le aperture di ventilazione Divieto di modificare i dispositivi Divieto di rimuovere parti di protezione dai dispositivi Se prohíbe tocar las unidades con las manos mojadas Se prohíbe el uso de limpiadores líquidos o aerosoles Se prohíbe tapar las aperturas de ventilación Se prohíbe modificar los dispositivos Se prohíbe desmontar las partes de protección de los dispositivos Pericolo di shock elettrico Peligro de choque eléctrico Togliere l’alimentazione prima di ogni intervento sull’impianto Corte la alimentación antes de intervenir en el sistema Read carefully this document before use and keep it for future reference Dit document vóór het gebruik doorlezen en voor naslag bewaren Touching the units with wet hands is forbidden Using liquid cleaners or aerosols is forbidden Blocking the ventilation openings is forbidden Modifying the devices is forbidden Removing protective parts from the devices is forbidden Het is verboden het apparaat met natte handen aan te raken Het is verboden vloeibare reinigers of verstuivers te gebruiken Het is verboden de ventilatie-openingen af te sluiten Het is verboden het apparaat te wijzigen Het is verboden om beschermende onderdelen van het apparaat te verwijderen Danger of electrical shock Elektrocutiegevaar Switch the power supply OFF before any work on the system Verwijder de spanning alvorens werkzaamheden aan de installatie te verrichten Lire attentivement le présent document avant toute utilisation et le conserver pour le consulter au besoin. Přečtěte si pozorně tento dokument před použitím termostatu a uchovejte ho pro budoucí použití Interdiction de toucher les unités avec les mains mouillées. Interdiction d’utiliser des produits de nettoyage liquides ou des aérosols. Interdiction de boucher les ouvertures de ventilation. Interdiction de modifier les dispositifs. Interdiction des retirer les parties de protection des dispositifs. Je zakázáno se dotýkat jednotek s vlhkýma rukama Je zakázáno používat kapalné čisticí prostředky nebo aerosol Je zakázáno blokovat větrací otvory Je zakázáno modifikovat zařízení Je zakázáno odstraňovat ochranné kryty ze zařízení Risque d’électrocution Nebezpečí elektrického šoku Couper l’alimentation avant toute intervention sur l’installation. Před jakýmkoliv zásahem na zařízení odpojte napájení Vor Gebrauch, dieses Dokument aufmerksam durchlese und sorgfältig aufbewahren, um es jederzeit nachschlagen zu können. Verbot, die Einheiten mit nassen Händen zu berühren Verbot, Flüssigreiniger oder Aerosol zu benutzen Verbot, die Belüftungsschlitze abzudecken Verbot, die Vorrichtungen zu ändern Verbot, die Schutzbleche von den Vorrichtungen abzunehmen Stromschlaggefahr Die Stromversorgung abtrennen, bevor an der Anlage gearbeitet wird. 7-
 1
1
-
 2
2
-
 3
3
-
 4
4
-
 5
5
-
 6
6
-
 7
7
-
 8
8


en otros idiomas
- français: Bticino X8000 Mode d'emploi
- italiano: Bticino X8000 Istruzioni per l'uso
- English: Bticino X8000 Operating instructions
- Deutsch: Bticino X8000 Bedienungsanleitung
- Nederlands: Bticino X8000 Handleiding
Artículos relacionados
-
Bticino X8000 Manual de usuario
-
-
-
-
-
-
-
-
-