Aeg-Electrolux SC71440-6I Manual de usuario
- Categoría
- Enfriadores de bebidas
- Tipo
- Manual de usuario

SANTO C 7 14 40-6 i
Benutzerinformation
Libretto d’istruzione
User Manual
Instrucciones de uso
Kühl-Gefriergerät
Frigo-congelatore
Fridge-Freezer
Frigorífico-congelador

2
Folgende Symbolen werden im Text verwendet:
wichtige Hinweise für Ihre Sicherheit oder für die Funktionsfähigkeit des Gerätes
Hinweise und praktische Tipps
Umweltinformationen
Verehrter Kunde!
Vielen Dank, dass Sie sich für eines unserer Qualitätsprodukte entschieden
haben.
Dieses Gerät bietet Ihnen eine perfekte Synthese aus funktionellem Design
und wegweisender Spitzentechnologie.
Überzeugen Sie sich selbst von dem Entwicklungsvorsprung unserer Produk-
te, die bei Leistungsfähigkeit und Bedienung eine absolute Spitzenposition
einnehmen.
Besonderer Wert wurde zudem auf so wichtige Aspekte wie Umweltfreund-
lichkeit und Energieersparnis gelegt, die integraler Bestandteil aller unserer
Produkte sind.
Lesen Sie dieses Bedienhandbuch aufmerksam durch, um Ihr Gerät optimal
und über lange Zeit zuverlässig nutzen und alle Bedienvorgänge korrekt und
Zeit sparend ausführen zu können.
Bewahren Sie das Handbuch zur späteren Bezugnahme an einem sicheren Ort
auf und händigen Sie es im Verkaufsfall dem zukünftigen Besitzer aus.
Wir wünschen Ihnen viel Freude mit Ihrem neuen Gerät.

Inhalt
Sicherheit . . . . . . . . . . . . . . . . . . . . . . . . . . . . . . . . . . . . . . . . . . . . . . .4
Entsorgung . . . . . . . . . . . . . . . . . . . . . . . . . . . . . . . . . . . . . . . . . . . . .6
Information zur Geräteverpackung . . . . . . . . . . . . . . . . . . . . . . . . . . . . .6
Entsorgung von Altgeräten . . . . . . . . . . . . . . . . . . . . . . . . . . . . . . . . . . . .6
Transportschutz entfernen . . . . . . . . . . . . . . . . . . . . . . . . . . . . . . . . .6
Transportsicherungen . . . . . . . . . . . . . . . . . . . . . . . . . . . . . . . . . . . . . . . .7
Aufstellen . . . . . . . . . . . . . . . . . . . . . . . . . . . . . . . . . . . . . . . . . . . . . . .7
Aufstellort . . . . . . . . . . . . . . . . . . . . . . . . . . . . . . . . . . . . . . . . . . . . . . . . . .7
Ihr Kühlgerät braucht Luft . . . . . . . . . . . . . . . . . . . . . . . . . . . . . . . . . . . .8
Türanschlag wechseln . . . . . . . . . . . . . . . . . . . . . . . . . . . . . . . . . . . . . . . . .8
Nischenmaße . . . . . . . . . . . . . . . . . . . . . . . . . . . . . . . . . . . . . . . . . . . . . . . .9
Anweisungen für den integrierten Einbau . . . . . . . . . . . . . . . . . . . . . . .9
Elektrischer Anschluß . . . . . . . . . . . . . . . . . . . . . . . . . . . . . . . . . . . .13
Vor Inbetriebnahme . . . . . . . . . . . . . . . . . . . . . . . . . . . . . . . . . . . . . .13
Inbetriebnahme und Temperaturregelung . . . . . . . . . . . . . . . . . . . .13
Zusatzschalter . . . . . . . . . . . . . . . . . . . . . . . . . . . . . . . . . . . . . . . . . . . . . .14
Innenausstattung . . . . . . . . . . . . . . . . . . . . . . . . . . . . . . . . . . . . . . .14
Abstellflächen . . . . . . . . . . . . . . . . . . . . . . . . . . . . . . . . . . . . . . . . . . . . . .14
Variable Innentür . . . . . . . . . . . . . . . . . . . . . . . . . . . . . . . . . . . . . . . . . . . .15
Richtig lagern . . . . . . . . . . . . . . . . . . . . . . . . . . . . . . . . . . . . . . . . . .15
Einfrieren und Tiefkühllagern . . . . . . . . . . . . . . . . . . . . . . . . . . . . . .16
Eiswürfel bereiten . . . . . . . . . . . . . . . . . . . . . . . . . . . . . . . . . . . . . . .17
Lagergutsymbole/Gefrierkalender . . . . . . . . . . . . . . . . . . . . . . . . . . .17
Kälteakku . . . . . . . . . . . . . . . . . . . . . . . . . . . . . . . . . . . . . . . . . . . . . .18
Abtauen . . . . . . . . . . . . . . . . . . . . . . . . . . . . . . . . . . . . . . . . . . . . . . .18
Gerät abschalten . . . . . . . . . . . . . . . . . . . . . . . . . . . . . . . . . . . . . . . .19
Reinigung und Pflege . . . . . . . . . . . . . . . . . . . . . . . . . . . . . . . . . . . .19
Tips zur Energie-Einsparung . . . . . . . . . . . . . . . . . . . . . . . . . . . . . . .20
Was tun, wenn . . . . . . . . . . . . . . . . . . . . . . . . . . . . . . . . . . . . . . . . . .21
Abhilfe bei Störungen . . . . . . . . . . . . . . . . . . . . . . . . . . . . . . . . . . . . . . .21
Lampe auswechseln . . . . . . . . . . . . . . . . . . . . . . . . . . . . . . . . . . . . . .22
Bestimmungen, Normen, Richtlinien . . . . . . . . . . . . . . . . . . . . . . . .23
3

4
Sicherheit
Die Sicherheit unserer Kältegeräte entspricht den anerkannten Regeln der
Technik und dem Gerätesicherheitsgesetz. Dennoch sehen wir uns veran-
laßt, Sie mit folgenden Sicherheitshinweisen vertraut zu machen:
Bestimmungsgemäße Verwendung
• Das Kältegerät ist für die Verwendung im Haushalt bestimmt. Es eignet
sich zum Kühlen, Einfrieren und Tiefkühllagern von Lebensmitteln sowie
zur Eisbereitung. Wird das Gerät zweckentfremdet oder falsch bedient,
kann vom Hersteller keine Haftung für eventuelle Schäden übernommen
werden.
• Umbauten oder Veränderungen am Kältegerät sind aus Sicherheitsgrün-
den nicht zulässig.
• Sollten Sie das Kältegerät gewerblich oder für andere Zwecke als zum
Kühlen, Tiefkühllagern und Einfrieren von Lebensmitteln benutzen,
beachten Sie bitte die für Ihren Bereich gültigen gesetzlichen Bestim-
mungen.
Vor der ersten Inbetriebnahme
• Überprüfen Sie das Kältegerät auf Transportschäden. Ein beschädigtes
Gerät auf keinen Fall anschließen! Wenden Sie sich im Schadensfall bitte
an den Lieferanten.
Kältemittel
Das Gerät enthält im Kältemittelkreislauf das Kältemittel Isobutan (R600a),
ein Naturgas mit hoher Umweltverträglichkeit, das jedoch brennbar ist.
• Achten Sie beim Transportieren und Aufstellen des Gerätes darauf, daß
keine Teile des Kältemittelkreislaufs beschädigt werden.
• Bei Beschädigung des Kältemittelkreislaufs:
– offenes Feuer und Zündquellen unbedingt vermeiden;
– den Raum, in dem das Gerät steht, gut durchlüften.
Sicherheit von Kindern
• Verpackungsteile (z. B. Folien, Styropor) können für Kinder gefährlich
sein. Erstickungsgefahr! Verpackungsmaterial von Kindern fernhalten!
• Ausgediente Altgeräte bitte vor der Entsorgung unbrauchbar machen.
Netzstecker ziehen, Netzkabel durchtrennen, eventuell vorhandene
Schnapp- oder Riegelschlösser entfernen oder zerstören. Dadurch ver-
hindern Sie, daß sich spielende Kinder im Gerät einsperren (Erstickungs-
gefahr!) oder in andere lebensgefährliche Situationen geraten.

5
• Das Gerät darf von Kindern und Personen, deren physische, sensorische
oder geistige Fähigkeiten sowie Mangel an Erfahrung und Kenntnissen
einen sicheren Gebrauch des Gerätes ausschließen, nur unter Aufsicht
oder nach entsprechender Einweisung durch eine Person benutzt werden,
die sicherstellt, dass sie sich den Gefahren des Gebrauchs bewusst sind.
Kinder sind zu beaufsichtigen, sodass sie nicht am Gerät spielen können.!
Im Alltagsbetrieb
• Behälter mit brennbaren Gasen oder Flüssigkeiten können durch Kälte-
einwirkung undicht werden. Explosionsgefahr! Lagern Sie keine Behälter
mit brennbaren Stoffen, wie z.B. Spraydosen, Feuerzeug-Nachfüllkartu-
schen etc. im Kältegerät.
• Flaschen und Dosen dürfen nicht in den Gefrierraum. Sie können sprin-
gen, wenn der Inhalt gefriert - bei kohlensäurehaltigem Inhalt sogar
explodieren! Legen Sie nie Limonaden, Säfte, Bier, Wein, Sekt usw. in den
Gefrierraum. Ausnahme: Hochprozentige Spirituosen können im Gefrier-
raum gelagert werden.
• Speiseeis und Eiswürfel nicht unmittelbar aus dem Gefrierraum in den
Mund nehmen. Sehr kaltes Eis kann an Lippen oder Zunge festfrieren und
Verletzungen verursachen.
• Tiefkühlgut nicht mit nassen Händen berühren. Die Hände könnten dar-
an festfrieren.
• Keine Elektrogeräte (z. B. elektrische Eismaschinen, Rührgeräte etc.) im
Kältegerät betreiben.
• Vor Reinigungsarbeiten das Gerät grundsätzlich abschalten und den
Netzstecker ziehen oder Sicherung in der Wohnung abschalten bzw. her-
ausdrehen.
• Netzstecker immer am Stecker aus der Steckdose ziehen, nie am Kabel.
Im Störungsfall
• Sollte einmal eine Störung am Gerät auftreten, sehen Sie bitte zuerst in
dieser Gebrauchsanweisung unter "Was tun, wenn ..." nach. Falls die dort
aufgeführten Hinweise nicht weiterhelfen, führen Sie bitte keine weite-
ren Arbeiten selbst aus.
• Kältegeräte dürfen nur von Fachkräften repariert werden. Durch unsach-
gemäße Reparaturen können erhebliche Gefahren entstehen. Wenden
Sie sich im Reparaturfall bitte an Ihren Fachhändler oder an unseren
Kundendienst.

Transportschutz entfernen
Das Gerät sowie Teile der Innenausstattung sind für den Transport
geschützt.
• Klebebänder links und rechts an den Türaußenseiten abziehen.
• Alle Klebebänder sowie Polsterteile aus dem Geräteinnenraum entfernen
6
Entsorgung
Information zur Geräteverpackung
Alle verwendeten Werkstoffe sind umweltverträglich! Sie können gefahrlos
deponiert oder in der Müllverbrennungsanlage verbrannt werden!
Zu den Werkstoffen: Die Kunststoffe können auch wiederverwertet werden
und sind folgendermaßen gekennzeichnet:
>PE< für Polyäthylen, z. B. bei der äußeren Hülle und den Beuteln im Innern.
>PS< für geschäumtes Polystyrol, z. B. bei den Polsterteilen, grundsätzlich
FCKW-frei.
Die Kartonteile werden aus Altpapier hergestellt und sollten auch wieder zur
Altpapiersammlung gegeben werden.
Entsorgung von Altgeräten
Aus Umweltschutzgründen müssen Kältegeräte fachgerecht entsorgt wer-
den. Dies gilt für Ihr bisheriges Gerät und - nachdem es eines Tages ausge-
dient hat - auch für Ihr neues Gerät.
Warnung! Ausgediente Altgeräte bitte vor der Entsorgung unbrauchbar
machen. Netzstecker ziehen, Netzkabel durchtrennen, eventuell vorhande-
ne Schnapp- oder Riegelschlösser entfernen oder zerstören. Dadurch ver-
hindern Sie, daß sich spielende Kinder im Gerät einsperren (Erstickungsge-
fahr!) oder in andere lebensgefährliche Situationen geraten.
Entsorgungshinweise:
• Das Gerät darf nicht mit dem Haus- oder Sperrmüll entsorgt werden.
• Der Kältemittelkreislauf, insbesondere der Wärmetauscher an der Gerä-
terückseite, darf nicht beschädigt werden.
• Das Symbol auf dem Produkt oder seiner Verpackung weist darauf
hin, dass dieses Produkt nicht als normaler Haushaltsabfall zu behandeln
ist, sondern an einem Sammelpunkt für das Recycling von elektrischen
und elektronischen Geräten abgegeben werden muss. Durch Ihren Bei-
trag zum korrekten Entsorgen dieses Produkts schützen Sie die Umwelt
und die Gesundheit Ihrer Mitmenschen. Umwelt und Gesundheit werden
durch falsches Entsorgen gefährdet. Weitere Informationen über das
Recycling dieses Produkts erhalten Sie von Ihrem Rathaus, Ihrer Müllab-
fuhr oder dem Geschäft, in dem Sie das Produkt gekauft haben.

7
Aufstellen
Aufstellort
Das Gerät soll in einem gut belüfteten und trockenen Raum stehen.
Die Umgebungstemperatur wirkt sich auf den Stromverbrauch und die ein-
wandfreie Funktion des Geräts aus. Daher sollte das Gerät
– nicht direkter Sonneneinstrahlung ausgesetzt sein;
– nicht an Heizkörpern, neben einem Herd oder sonstigen Wärmequellen
stehen;
– nur an einem Ort stehen, dessen Umgebungstemperatur der Klima-klasse
entspricht, für die das Gerät ausgelegt ist.
Die Klimaklasse finden Sie auf dem Typschild, das sich links im Innenraum
des Kühlraumes befindet.
Nachstehende Tabelle zeigt, welche Umgebungstemperatur welcher Klima-
klasse zugeordnet ist:
Klimaklasse für Umgebungstemperatur von
SN +10 bis +32 °C
N +16 bis +32 °C
ST +18 bis +38 °C
T +18 bis +43 °C
Ist die Aufstellung neben einer Wärmequelle unvermeidbar, sind folgende
seitliche Mindestabstände einzuhalten:
– zu Elektroherden 3 cm;
– zu Öl- und Kohleherden 30 cm.
Können diese Abstände nicht eingehalten werden, ist eine Wärmeschutz-
platte zwischen Herd und Kältegerät erforderlich.
Steht das Kältegerät neben einem anderen Kühl- oder Gefriergerät, ist ein
seitlicher Abstand von 5 cm erforderlich, damit sich an den Geräte-Außen-
seiten kein Schwitzwasser bildet.
Transportsicherungen
Ihr Gerät ist mit Transportsicherung
versehen, die die Ablage während des
Transportes sichern. Entfernen Sie
diese wie folgt:
Ablagen hinten hochheben, in Pfeil-
richtung ziehen bis sich die Ablage
löst und die Sicherungen entfernen.
B
A

Türanschlag wechseln
Der Türanschlag kann von rechts (Lie-
ferzustand) nach links gewechselt wer-
den, falls der Aufstellort dies erfordert.
Warnung! Während des Türanschlag-
wechsels darf das Gerät nicht am
Stromnetz angeschlossen sein. Vorher
Netzstecker ziehen.
1. Oberen Scharnierstift abschrauben und
Kunstoffteil entfernen.
2. Oberen Scharnierstift und obere Tür
abnehmen.
3. Mittleres Scharnier abschrauben und die
Abdeckungen auf gegenüberliegende
Seite entfernen.
4. Untere Tür abnehmen.
5. Unteren Scharnierstift abschrauben
und auf gegenüberliegender Seite
wieder anmontieren.
6. Untere Tür wieder einsetzen.
7. Mittleres Scharniere wieder
einschrauben und die Abdeckungen
auf gegen-überliegende Seite wieder
anmontieren.
8. Obere Tür wieder anmontieren, den
Scharnierstift und Kunststoffteil auf
gegenüberliegender Seite wieder
anmontieren
Ihr Kühlgerät braucht Luft
Aus Gründen der Betriebssicherheit
muß eine Mindestbelüftung gewähr-
leistet sein, wie aus der Abb. hervor-
geht:
Achtung: Die Lüftungs-Öffnungen
müssen immer saubergehalten wer-
den. Damit die Luft zirkulieren kann,
die Lüftungsöffnungen niemals
abdecken oder verstellen.
50 mm
min.
200 cm
2
200 cm
2
min.
D567
8

9
Nischenmaße
Höhe 1446 mm
Tiefe 550 mm
Breite 560 mm
1
2
44m
m
Vergewissern Sie sich, dass unten
zwischen dem Küchenmöbel und
dem Rand des Geräts ein Abstand
von 44 mm besteht..
Die untere Scharnierabdeckung
(im Zubehörbeutel) dient zur
genauen Ausrichtung zwischen
Küchenmöbel und Gerät.
Darüber hinaus darf das Gerät
das Netzkabel nicht quetschen.
D765
Anweisungen für den inte-
grierten Einbau
Fugenabdeckprofil am Gerät, wie in
Abbildung gezeigt ankleben.
I
P
Gerät mit den 4 beiliegenden
Schrauben befestigen.
(I = kurz) (P = lang)

10
B
E
E
D
C
PR266
Ha
Hb
Hc
Hd
In die Befestigungs- und
Scharnierlöcher beiliegende
Abdeckkappen (C-D) einsetzen.
Belüftungsgitter (B) und
Scharnierabdeckungen (E) auf-
stecken.
Die Teile Ha, Hb, Hc, Hd abtren-
nen, wie in der Abb. gezeigt wird.
Brechen Sie aus der
Plastikabdeckung (E), die das
Scharnier mit Stift bedeckt, die in der
Abbildung gekennzeichneten Teile
heraus.
Dies wird durch die vorgestanzten
Ausbruchlinien erleichtert.
"Entfernen Sie das mit DX
gekennzeichnete Teil, wenn der Stift
am rechten Scharnier angebracht
werden soll, andernfalls das mit SX
gekennzeichnete Teil."

11
Die Schiene (Ha) auf der Innen-
seite der Möbeltür oben und
unten auflegen (siehe Abb.) und
die Position der Bohrlöcher an-
zeichnen. Nachdem die Löcher
gebohrt wurden, die Schiene mit
den mitgelieferten Schrauben
befestigen.
2
1
m
m
2
1
m
m
ca. 50 mm
90°
90°
ca. 50 mm
Die Abdeckung (Hc) in die Schie-
ne (Ha) eindrücken, bis sie einra-
stet.
PR33
Hc
Ha
Gerätetür und Möbeltür auf ca.
90° öffnen. Den Winkel (Hb) in
der Schiene (Ha) einsetzen. Gerä-
tetür und Möbeltür zusammen-
halten und die Bohrlöcher
anzeichnen (siehe Abb.).
PR167
Ha
Hb
8mm

12
Die Abdeckung (Hd) in die Schie-
ne (Hb) eindrücken, bis sie einra-
stet.
Den Winkel wieder auf der
Schiene anbringen und mit den
mitgelieferten Schrauben befe-
stigen
Für eine allfällig notwendige
Ausrichtung der Möbeltür, den
Spielraum der Langlöcher nut-
zen.
Nach Beendigung der Arbeiten
das einwandfreie Schließen der
Gerätetür überprüfen.
PR168
Hb
PR167/1
Hd
Hb
Die Winkeleisen entfernen und
8 mm vom äusseren Rand der
Tür mit dem Nagel (K) kenn-
zeichnen.
Ha
8mm
K

13
Elektrischer Anschluß
Für den elektrischen Anschluß ist eine vorschriftsmäßig installierte Schutz-
kontakt-Steckdose erforderlich. Sie sollte so gesetzt sein, daß ein Ziehen des
Netzsteckers möglich ist.
Die elektrische Absicherung muß mindestens 10/16 Ampere betragen.
Ist die Steckdose bei eingebautem Gerät nicht mehr zugänglich, muß eine
geeignete Maßnahme in der Elektroinstallation sicherstellen, daß das Gerät
vom Netz getrennt werden kann (z. B. Sicherung, LS-Schalter, Fehlerstrom-
Schutzschalter oder dergleichen mit einer Kontaktöffnungsweite von min-
destens 3 mm).
• Vor Inbetriebnahme am Typschild des Gerätes überprüfen, ob
Anschlußspannung und Stromart mit den Werten des Stromnetzes am
Aufstellort übereinstimmen.
Z. B.: AC 220 ... 240 V 50 Hz oder
220 ... 240 V~ 50 Hz
(d. h. 220 bis 240 Volt Wechselstrom, 50 Hertz)
Das Typschild befindet sich links im Innenraum des Kühlraumes.
Inbetriebnahme und Temperaturregelung
• Netzstecker in die Steckdose stecken. Die Innenbeleuchtung leuchtet bei
geöffneter Tür. Der Drehknopf für die Temperaturwahl ist im Kühlraum
rechts.
Stellung „0“ bedeutet: aus.
Stellung „1“ bedeutet: Höchste Innentemperatur (wärmste Einstellung).
Stellung „6“ (Endanschlag) bedeutet: Tiefste Innentemperatur (käl-
teste Einstellung).
Folgende Einflüsse sind ausschlaggebend für die Innentemperatur:
– Umgebungstemperatur;
– Menge und Temperatur der eingelagerten Lebensmittel;
– Häufiges oder langes Öffnen der Tür.
Die Temperaturen im Kühlraum und im Gefrierfach lassen sich nicht
getrennt regeln.
Vor Inbetriebnahme
• Das Geräteinnere und alle Ausstattungsteile bitte vor Erstinbetriebnahme
reinigen (siehe Abschnitt "Reinigung und Pflege").

14
Innenausstattung
Abstellflächen
Die Abstellfläche über den Obst- und
Gemüseschalen muß immer in dieser
Stellung verbleiben, damit Obst und
Gemüse länger frisch bleiben.
Die übrigen Abstellflächen sind
höhenverstellbar:
Dazu die Abstellfläche soweit nach
vorne ziehen, bis sie sich nach oben
oder unten abschwenken und her-
ausnehmen läßt.
Das Einsetzen in eine andere Höhe
bitte in umgekehrter Reihenfolge
vornehmen.
Zusatzschalter
Steht das Gerät in einem Raum, in
dem die Temperatur weniger als 16°C
beträgt, müssen sie den Zusatzschal-
ter (A) betätigen. Die eingebaute
Kontrollanzeige leuchtet auf.
D338
Sollten frische Lebensmittel schnell eingefroren werden, kann Stellung „6“
gewählt werden. Achten Sie darauf, daß die Temperatur im Kühlraum nicht
unter 0°C absinkt und stellen Sie den Temperaturregler rechtzeitig auf Stel-
lung „3“ oder „4“ zurück.
Wichtig!
Hohe Umgebungstemperatur (z. B. an heißen Sommertagen) und kalte Ein-
stellung des Temperaturreglers (Stellung „5“ bis „6“) kann zu Dauerbetrieb
des Kompressors führen.
In diesem Fall den Temperaturregler
auf eine wärmere Einstellung
zurückdrehen (Stellung „3“ bis „4“).
Bei dieser Einstellung wird der Kom-
pressor geregelt und der Abtauvor-
gang wieder automatisch eingeleitet.
D710
A

15
PR270/1
Richtig lagern
Um die Lebensmittel möglichst lange frisch zu halten, beachten Sie bitte
folgendes:
• Keine warmen Speisen oder Flüssigkeiten in den Kühlschrank einstellen.
• Die Lebensmittel sollten abgedeckt oder eingewickelt werden.
• Die Lebensmittel müssen so eingelagert werden, daß die Luft frei zirkulie-
ren kann.
Nachstehend einige praktische Ratschläge:
Fleisch (alle Sorten) in Plastikfolie einpacken und auf die Glasplatte, die
sich über der Gemüseschale (über den Gemüseschalen) befindet, legen.
In dieser Lage kann das Fleisch längstens 1-2 Tage aufbewahrt werden.
Gekochte Nahrungsmittel, kalte Platten, usw. zugedeckt aufbewahren.
Sie können auf jede beliebige Ablage gelegt werden.
Obst und Gemüse: nach vorherigem Säubern und Waschen in der Gemü-
seschale aufbewahren
Butter und Käse: in speziellen Behältern aufbewahren oder in Alu-bzw.
Plastikfolie einpacken, um den Kontakt mit der Luft zu vermeiden.
Milch in Flaschen: gut verschlossen in das Flaschenfach an der Innentür
stellen
Banane, Kartoffeln, Zwiebeln und Knoblauch sollten nicht unverpackt
im Kühlschrank aufbewahrt werden.
Hohes Kühlgut einstellen:
Die vordere Hälfte der zweiteiligen
Glasabstellfläche herausnehmen und
in eine andere Ebene einschieben.
Dadurch gewinnen Sie Raum, um auf
der darunterliegenden Abstellfläche
hohes Kühlgut abzustellen
Variable Innentür
Je nach Erfordernis können die
Abstellfächer der Kühlraumtür nach
oben herausgenommen und in ande-
re Aufnahmen umgesetzt werden.

16
Einfrieren und Tiefkühllagern
Im Gefrierfach können Sie Tiefkühlkost lagern und frische Lebensmittel ein-
frieren.
Achtung!
• Vor dem Einfrieren von Lebensmitteln muß die Temperatur im Gefrierfach
-18 °C oder kälter sein.
• Bitte das auf dem Typschild angegebene Gefriervermögen beachten. Das
Gefriervermögen ist die maximale Menge an frischer Ware, die innerhalb
von 24 Stunden eingefroren werden kann. Wenn Sie an mehreren Tagen
hintereinander einfrieren, nehmen Sie bitte nur 2/3 bis 3/4 der auf dem
Typschild angegebenen Menge. Sie erreichen eine bessere Qualität, wenn
die Lebensmittel schnell bis zum Kern durchgefroren werden.
• Warme Lebensmittel vor dem Einfrieren abkühlen lassen. Die Wärme führt
zu verstärkter Eisbildung und erhöht den Energieverbrauch.
• Auf die Lagerzeit bzw. auf das Haltbarkeitsdatum von gekauften Tiefkühl-
produkten achten
• Einmal aufgetaute Lebensmittel ohne weitere Verarbeitung (garen zu Fer-
tiggerichten) auf keinen Fall ein zweites Mal einfrieren.
• Behälter mit brennbaren Gasen oder Flüssigkeiten können durch Kälte-
einwirkung undicht werden. Explosionsgefahr! Lagern Sie keine Behälter
mit brennbaren Stoffen, wie z.B. Spraydosen, Feuerzeug-Nachfüllkartu-
schen etc. im Kältegerät.
• Flaschen und Dosen dürfen nicht in das Gefrierfach. Sie können springen,
wenn der Inhalt gefriert - bei kohlensäurehaltigem Inhalt sogar explodie-
ren! Legen Sie nie Limonaden, Säfte, Bier, Wein, Sekt usw. in das Gefrier-
fach. Ausnahme: Hochprozentige Spirituosen können im Gefrierfach
gelagert werden.
• Alle Lebensmittel vor dem Einfrieren luftdicht verpacken, damit sie nicht
austrocknen, nicht den Geschmack verlieren und keine Geschmacksüber-
tragung auf anderes Tiefkühlgut erfolgen kann.
Vorsicht! Tiefkühlgut nicht mit nassen Händen berühren. Die Hände könn-
ten daran festfrieren.
1. Wenn Sie schnelles Einfrieren von Gefriergut wünschen, oder wenn Sie das
max. Gefriervermögen ausnutzen wollen, muß der Thermostatregler auf die
höchste Stellung gedreht werden.
2. Legen Sie die verpackten Lebensmittel zum Einfrieren in die oberste Schub-
lade. Nicht gefrorene Ware darf bereits gefrorene Ware nicht berühren, die
gefrorene Ware kann sonst antauen.

17
Eiswürfel bereiten
1. Eiswürfelschale zu 3/4 mit kaltem Wasser füllen, in das Gefrierfach stellen
und gefrieren lassen.
2. Zum Herauslösen der fertigen Eiswürfel die Eiswürfelschale verwinden oder
kurz unter fließendes Wasser halten.
Achtung! Eine eventuell angefrorene Eiswürfelschale keinesfalls mit spitzen
oder scharfkantigen Gegenständen ablösen, sonst besteht die Gefahr, daß
der Kältekreislauf beschädigt wird.
3. Tür so wenig wie möglich öffnen und nicht offen lassen.
4. Tiefkühlgut möglichst nach Art getrennt in die Schubladen legen.
Lagergutsymbole/Gefrierkalender
• Die Symbole auf den Schubladen zeigen unterschiedliche Arten von Tief-
kühlgut.
• Die Zahlen geben für die jeweilige
Art von Tiefkühlgut die Lagerzeit in
Monaten an. Ob der obere oder der
untere Wert der angegebenen
Lagerzeiten gültig ist, hängt von
der Qualität der Lebensmittel und
deren Vorbehandlung vor dem Ein-
frieren ab. Für Lebensmittel mit
hohem Fettanteil gilt immer der
untere Wert.

Abtauen
Kühlraum
Die Rückwand des Kühlraums bereift, während der Kompressor läuft, und
taut vollautomatisch ab, während der Kompressor stillsteht.
Das Tauwasser wird in der Ablaufrinne an der Rückwand des Kühlraumes
aufgefangen, durch das Ablaufloch in die Auffangschale am Kompressor
geleitet und dort verdunstet.
Gefrierfach
Im Gefrierfach schlägt sich während des Betriebs und beim Öffnen der Tür
Feuchtigkeit als Reif nieder. Entfernen Sie diesen Reif von Zeit zu Zeit mit
einem Kunststoffschaber.
Starke Reifbildung im Gefrierfach erhöht den Energieverbrauch. Deshalb
soll abgetaut werden, wenn die Reifsicht eine Dicke von ca. 4 Millimeter
erreicht hat; mindestens jedoch einmal im Jahr. Ein geeigneter Zeitpunkt
zum Abtauen ist auch immer dann, wenn das Gerät leer oder nur wenig
beladen ist Um ein vollständiges Abtauen durchzuführen, geht man wie
folgt vor:
1. Tiefkühlgut herausnehmen, in mehrere Lagen Zeitungspapier einpacken und
abgedeckt an einem kühlen Ort lagern.
2. Gerät abschalten und den Netz-
stecker ziehen oder Sicherung
abschalten bzw. herausdrehen.
3. Gefrierfachtür geöffnet lassen.
4. Kunststoffschaber als Tauwassera-
blauf in den Schlitz unterhalb der
Tauwasserablaufrinne stecken und
Auffangschale unterstellen.
18
Kälteakku
Das Gerät ist mit einem Kälteakku ausgestattet.
Bei Stromausfall oder einer Störung am Gerät verlängert der Kälteakku die
Zeit bis zur unzulässigen Erwärmung des Gefrierguts um mehrere Stunden.
Diese Aufgabe erfüllt der Kälteakku nur dann optimal, wenn er in der ober-
sten Schublade vorne oben auf dem Gefriergut eingelegt wird. Den Kälte-
akku können Sie auch als Kühlelement für Kühltaschen verwenden.
D068

19
Reinigung und Pflege
Aus hygienischen Gründen sollte das Geräteinnere, einschließlich Innenaus-
stattung, regelmäßig gereinigt werden.
Warnung!
• Das Gerät darf während der Reinigung nicht am Stromnetz angeschlos-
sen sein. Stromschlaggefahr! Vor Reinigungsarbeiten Gerät abschalten
und Netzstecker ziehen oder Sicherung abschalten bzw. herausdrehen.
• Das Gerät nie mit Dampfreinigungsgeräten reinigen. Feuchtigkeit könnte
in elektrische Bauteile gelangen, Stromschlaggefahr! Heißer Dampf kann
zu Schäden an Kunststoffteilen führen.
• Das Gerät muß trocken sein, bevor Sie es wieder in Betrieb nehmen.
Achtung!
• Ätherische Öle und organische Lösungsmittel können Kunststoffteile
angreifen, z. B.
5. Nach beendetem Abtauprozeß das Gefrierfach gut nachtrocknen und den
Stöpsel wieder hineingeben.
6. Nach Beendigung des Abtauvorganges Netzstecker wieder einstecken und
Temperaturregler auf die gewünschte Position einstellen.
Achtung:
Keinesfalls harte oder spitze Metallgegenstände zum Entfernen von Reif
oder Eis benutzen.
Verwenden Sie keine elektrischen Heiz-oder Wärmegeräte und keine ande-
ren mechanischen oder künstlichen Hilfsmittel, um den Abtauvorgang zu
beschleunigen, mit Ausnahme der in dieser Gebrauchsanweisung empfoh-
lenen.
Ein Temperaturanstieg der Tiefkühlkost während des Abtauens könnte die
Aufbewahrungsdauer verkürzen.
Gerät abschalten
Zum Abschalten der Kühlung Temperaturregler auf Stellung „0“ drehen.
Soll das Gerät für längere Zeit außer Betrieb genommen werden:
1. Kühl- und Gefriergut sowie Eisschalen herausnehmen.
2. Gerät abschalten, dazu Temperaturregler auf Stellung „0“ drehen.
3. Netzstecker ziehen oder Sicherung abschalten bzw. herausdrehen.
4. Geräteräume gründlich reinigen (siehe Abschnitt "Reinigung und Pflege").
5. Türen anschließend geöffnet lassen, um Geruchsbildung zu vermeiden.

20
Tips zur Energie-Einsparung
• Das Gerät nicht in der Nähe von Herden, Heizkörpern oder anderen Wär-
mequellen aufstellen. Bei hoher Umgebungstemperatur läuft der Kom-
pressor häufiger und länger.
• Ausreichende Be- und Entlüftung des Gerätes gewährleisten. Lüftungs-
öffnungen niemals abdecken.
• Keine warmen Speisen in das Gerät stellen. Warme Speisen erst abkühlen
lassen.
– Saft von Zitronen- oder Apfelsinenschalen;
– Buttersäure;
– Reinigungsmittel, die Essigsäure enthalten.
Solche Substanzen nicht mit den Geräteteilen in Kontakt bringen.
• Keine scheuernden Reinigungsmittel verwenden.
1. Kühl- und Tiefkühlgut herausnehmen. Tiefkühlgut in mehrere Lagen Zei-
tungspapier einpacken. Alles abgedeckt an einem kühlen Ort lagern.
2. Gefrierfach vor dem Reinigen abtauen (siehe Abschnitt "Abtauen").
3. Gerät abschalten und den Netzstecker ziehen oder Sicherung abschalten
bzw. herausdrehen.
4. Gerät einschließlich Innenausstattung mit einem Lappen und lauwarmem
Wasser reinigen. Eventuell etwas handelsübliches Geschirrspülmittel beige-
ben.
5. Anschließend mit klarem Wasser nachwischen und trockenreiben.
Staubablagerungen am Verflüssiger erhöhen den Energieverbrauch. Deshalb
einmal im Jahr den Verflüssiger an der Geräterückseite mit einer weichen
Bürste oder mit dem Staubsauger vorsichtig reinigen.
6. Die Ablauföffnung der Tropfrinne an
der Rückwand des Kühlraumes kon-
trollieren. Bei Verstopfung diese mit
Hilfe des grünen Stöpsels frei
machen.
7. Nachdem alles trocken ist, Lebens-
mittel wieder einlagern und Gerät
wieder in Betrieb nehmen.
D037

21
Was tun, wenn ...
Abhilfe bei Störungen
Möglicherweise handelt es sich bei einer Störung nur um einen kleinen Feh-
ler, den Sie anhand nachfolgender Hinweise selbst beheben können. Führen
Sie keine weiteren Arbeiten selbst aus, wenn nachstehende Informationen
im konkreten Fall nicht weiterhelfen.
Warnung! Reparaturen am Kältegerät dürfen nur von Fachkräften durch-
geführt werden. Durch unsachgemäße Reparaturen können erhebliche
Gefahren für den Benutzer entstehen. Wenden Sie sich im Reparaturfall an
Ihren Fachhändler oder an unseren Kundendienst.
Störung Mögliche Ursache Abhilfe
Gerät arbeitet nicht
Gerät ist nicht eingeschaltet Gerät einschalten.
Die Lebensmittel sind zu
warm.
Netzstecker ist nicht einge-
steckt oder lose.
Netzstecker einstecken.
Sicherung hat ausgelöst oder
ist defekt.
Sicherung überprüfen, gege-
benenfalls erneuern.
Steckdose ist defekt.
Störungen am Stromnetz
behebt Ihr Elektrofachmann.
Gerät kühlt zu stark.
Temperatur ist zu kalt einge-
stellt.
Temperaturregler vorüber-
gehend auf wärmere Einstel-
lung drehen.
Das Gerät steht neben einer
Wärmequelle.
Temperatur ist nicht richtig
eingestellt.
Bitte im Abschnitt "Inbe-
triebnahme" nachsehen.
Temperaturregler vorüber-
gehend auf kältere Einstel-
lung drehen.
Tür war längere Zeit geöff-
net.
Bitte im Abschnitt "Aufstell-
ort" nachsehen.
Innerhalb der letzten 24
Stunden wurden größere
Mengen warmer Lebensmittel
eingelagert.
Tür nur so lange wie nötig
geöffnet lassen.
• Tür nur so lange wie nötig geöffnet lassen.
• Die Temperatur nicht kälter als nötig einstellen.
• Den Verflüssiger, das Metallgitter an der Geräterückseite, immer sauber
halten.

22
Der Kompressor läuft nach
einiger Zeit selbsttätig an.
Siehe Abschnitt „Reinigung
und Pflege“
Dies ist normal, es liegt keine
Störung vor.
Nach Änderung der Tem-
peratureinstellung läuf der
Kompressor nicht sofort an.
Wasser am Kühlraumboden
oder auf Abstellflächen.
Tauwasser-Ablaufloch ist ver-
stopft.
Lampe auswechseln
Warnung! Stromschlaggefahr! Vor dem Lampenwechsel Gerät abschalten
und den Netzstecker ziehen oder Sicherung abschalten bzw. herausdrehen.
Lampendaten: 220-240 V, max. 15
W, Fassung: E 14
1. Zum Abschalten des Gerätes Tempe-
raturregler auf Stellung „0“ drehen.
2. Netzstecker ziehen.
3. Zum Auswechseln der Lampe Befe-
stigungsschraube herausdrehen.
4. Gemäß Abbildung auf die Lampen-
abdeckung drücken und diese nach
hinten abschieben.
Ungewöhnliche Geräusche.
Gerät hat Kontakt mit der
Wand oder mit anderen
Gegenständen.
Gerät steht nicht gerade.
Ein Teil, z. B. ein Rohr, an der
Geräterückseite berührt ein
anderes Geräteteil oder die
Wand.
Gegebenenfalls dieses Teil
vorsichtig wegbiegen.
Gerät etwas wegrücken.
Verstellfüße nachjustieren.
Starke Reifbildung im Gerät,
evtl. auch an der Türdichtung.
Türdichtung ist undicht (evtl.
nach Türanschlag-wechsel).
An den undichten Stellen Tür-
dichtung vorsichtig mit einem
Haartrockner erwärmen (nicht
wärmer als ca. 50 °C). Gleich-
zeitig die erwärmte Türdich-
tung von Hand so in Form
ziehen, daß sie wieder
einwandfrei anliegt.
AEG65
Innenbeleuchtung funktio-
niert nicht
Lampe ist defekt.
Bitte im Abschnitt "Lampe
auswechseln" nachsehen.
Störung Mögliche Ursache Abhilfe

23
5. Defekte Lampe auswechseln.
6. Lampenabdeckung wieder einsetzen und Befestigungsschraube eindrehen.
7. Gerät wieder in Betrieb nehmen.
Bestimmungen, Normen, Richtlinien
Das Kältegerät ist für den Haushalt bestimmt und wurde unter Beachtung
der für diese Geräte geltenden Normen hergestellt.
Bei der Fertigung wurden insbesondere die nach dem Gerätesicherheitsge-
setz (GSG), der Unfallverhütungsvorschrift für Kälteanlagen (VBG 20) und
den Bestimmungen des Verbandes Deutscher Elektrotechniker (VDE) not-
wendigen Maßnahmen getroffen. Der Kältekreislauf wurde auf Dichtheit
geprüft.
Dieses Gerät entspricht den folgenden EG-Richtlinien:
– 73/23/EWG vom 19.2.1973 - Niederspannungsrichtlinie
– 89/336/EWG vom 3.5.1989
(einschließlich Änderungsrichtlinie 92/31/EWG) - EMV-Richtlinie

24
Gentile Cliente,
Grazie per aver scelto i nostri prodotti di alta qualità.
Con questa apparecchiatura sperimenterete la perfetta combinazione fra il
design funzionale e la tecnologia d'avanguardia.
Le nostre apparecchiature sono state progettate per avere le migliori pre-
stazioni e il massimo controllo raggiungendo i più alti standard di eccellen-
za.
Inoltre, e' parte integrante dei nostri prodotti l'attenzione per gli aspetti
ambientali e per il risparmio energetico.
Per assicurare prestazioni ottimali e un corretto utilizzo della vostra appa-
recchiatura, Vi invitiamo a leggere attentamente questo libretto istruzioni.
Vi permetterà di seguire tutte le fasi di utilizzo perfettamente e nel modo
più efficace.
Per consultare questo libretto ogni volta che lo desiderate, Vi consigliamo di
tenerlo in un luogo a portata di mano. Ricordatevi di consegnarlo ad even-
tuali futuri proprietari dell'apparecchiatura.
I seguenti simboli sono utilizzati nel presente manuale
Informazioni importanti relative alla sicurezza personale e alla prevenzione di
danni e all'apparecchiatura
Informazioni e suggerimenti generali
Informazioni ambientali

25
Indice
Sicurezza . . . . . . . . . . . . . . . . . . . . . . . . . . . . . . . . . . . . . . . . . . . . . . . . . .26
Smaltimento . . . . . . . . . . . . . . . . . . . . . . . . . . . . . . . . . . . . . . . . . . . . . . .28
Informazione sull’imballaggio dell’apparecchio . . . . . . . . . . . . . . . . . .28
Smaltimento di apparecchi vecchi . . . . . . . . . . . . . . . . . . . . . . . . . . . . .28
Rimuovere la sicura del trasporto . . . . . . . . . . . . . . . . . . . . . . . . . . . .28
Installazione . . . . . . . . . . . . . . . . . . . . . . . . . . . . . . . . . . . . . . . . . . . . . . .29
Luogo di installazione . . . . . . . . . . . . . . . . . . . . . . . . . . . . . . . . . . . . . . . .29
L’apparecchio necessita d’aria . . . . . . . . . . . . . . . . . . . . . . . . . . . . . . . . .30
Reversibilità della porta . . . . . . . . . . . . . . . . . . . . . . . . . . . . . . . . . . . . . .30
Dimensioni della nicchia . . . . . . . . . . . . . . . . . . . . . . . . . . . . . . . . . . . . . .31
Istruzioni per l’incasso . . . . . . . . . . . . . . . . . . . . . . . . . . . . . . . . . . . . . . .31
Collegamento elettrico . . . . . . . . . . . . . . . . . . . . . . . . . . . . . . . . . . .35
Prima della messa in servizio . . . . . . . . . . . . . . . . . . . . . . . . . . . . . . . . .35
Messa in servizio e regolazione della temperatura . . . . . . . . . . . . . .36
Interruttore climatico . . . . . . . . . . . . . . . . . . . . . . . . . . . . . . . . . . . . . . . .36
Accessori interni . . . . . . . . . . . . . . . . . . . . . . . . . . . . . . . . . . . . . . . . . . . .37
Refrigerazione dei cibi e delle bevande. . . . . . . . . . . . . . . . . . . . . . . .38
Congelazione e conservazione . . . . . . . . . . . . . . . . . . . . . . . . . . . . . . .38
Cubetti ghiaccio . . . . . . . . . . . . . . . . . . . . . . . . . . . . . . . . . . . . . . . . . . .39
Calendario di congelamento . . . . . . . . . . . . . . . . . . . . . . . . . . . . . . . . .39
Massa eutettica . . . . . . . . . . . . . . . . . . . . . . . . . . . . . . . . . . . . . . . . . . . . .39
Sbrinamento . . . . . . . . . . . . . . . . . . . . . . . . . . . . . . . . . . . . . . . . . . . . . . .40
Spegnimento dell’apparecchio . . . . . . . . . . . . . . . . . . . . . . . . . . . . . . . .41
Pulizia e cura . . . . . . . . . . . . . . . . . . . . . . . . . . . . . . . . . . . . . . . . . . . . . .41
Consigli per il risparmio energetico . . . . . . . . . . . . . . . . . . . . . . . . . .42
Che cosa fare, se... . . . . . . . . . . . . . . . . . . . . . . . . . . . . . . . . . . . . . . . . .42
Intervento in caso di anomalie . . . . . . . . . . . . . . . . . . . . . . . . . . . . . . . .42
Sostituzione della lampadina . . . . . . . . . . . . . . . . . . . . . . . . . . . . . . . . . .44
Disposizioni, Norme, Direttive . . . . . . . . . . . . . . . . . . . . . . . . . . . . . . . .44

26
Sicurezza
La sicurezza dei nostri apparecchi é conforme alla legislazione sui elettro-
domestici. Nonostante ciò, riteniamo di doverVi facilitare la presa di confi-
denza con le seguenti avvertenze:
Impiego conforme alla scopo previsto
• L’apparecchio refrigerante é concepito per l’uso domestico. È adatto per
raffreddare, congelare e conservare prodotti alimentari surgelati nonché
per la preparazione di gelati.
• Per motivi si sicurezza non é consentito in nessun caso apportare delle
modifiche o trasformazioni.
• Nel caso si voglia impiegare l’apparecchio refrigerante nell’ambito impren-
ditoriale oppure per scopi differenti dal raffreddamento, congelamento di
prodotti alimentari, si prega di osservare le disposizioni de legge vigenti
per il Vostro settore.
Prima della prima messa in servizio
• Verificare che l’apparecchio sia senza eventuali danni causati dal traspor-
to. Non collegare in nessun caso un apparecchio danneggiato! In caso di
danni rivolgersi al fornitore..
Sostanza refrigerante
L’apparecchio contiene nel circuito refrigerante un gas naturale denomina-
to Isobutano (R600a), avente una elevata tolleranza per l’ambiente, il quale
é tuttavia infiammabile.
• Osservare durante il trasporto e l’installazione dell’apparecchio che non
venga danneggiato alcun elemento del circuito refrigerante.
• In caso di danneggiamenti al circuito refrigerante:
– evitare assolutamente fiamme libere e fonti incendianti;
– provvedere ad una buona aerazione del locale in cui si trova l’apparecchio.
Sicurezza dei bambini
• I pezzi di imballaggio (p.es. polistirolo) possono essere pericolosi per i bam-
bini. Pericolo di soffocamento! Mantenere il matriale di imballaggio al di
fuori della portata dei bambini!
• Gli apparecchi che non vengono più utilizzati devono essere resi inutiliz-
zabili prima dello smaltimento. Estrarre la spina di rete, spezzare il cavo di
rete, rimuovere oppure distruggere le eventuali chiusure di bloccaggio.
Con ciò si evita che si possano chiudere dentro dei bambini che giocano

27
(pericolo di soffocamento!) oppure che possano trovarsi in altre situazio-
ni pericolose per la vita.
• Questo apparecchio non deve essere utilizzato da persone (e bambini) con
ridotte capacità fisiche, sensoriali o mentali o prive dell'esperienza e delle
nozioni necessarie, salvo i casi in cui agiscano sotto sorveglianza o siano
stati opportunamente istruiti sull'uso di tale apparecchio da persone
responsabili per la loro sicurezza. Evitare che i bambini utilizzino l'appa-
recchio in modo improprio !!
Nel servizio quotidiano
• I contentitori di gas infiammabili oppure liquidi mediante l’effetto del
freddo possono perdere la propria ermeticità. Pericolo di espolsione! Non
immagazzinare mai dei contenitori con sostanze infiammabili, come p.es.
bombole spray, accendini e cartucce di rifornimento, ecc. nell’apparecchio
refrigerante.
• Le bottiglie e le lattine non devono essere collocate nella cella congelan-
te. Queste possono scoppiare non appena si congela il contenuto, mentre
i liquidi contenenti anidride carbonica possono addirittura esplodere! Non
collocare mai della limonata, succhi, birra,vino, spumante, ecc. Ad ecce-
zione: I superalcoolici possono essere immagazzinati nella cella di conge-
lamento.
• Non ingoiare i gelati oppure i cubetti di ghiaccio appena estratti dalla cel-
la di congelamento. Il gelato oppure ghiaccio molto freddo si può incol-
lare alla lingua o alle labbra e causare quindi delle ustioni.
• Non toccare i prodotti congelati con le mani bagnate. Le mani si potreb-
bero congelare sul prodotto.
• Non impiegare mai dei piccoli elettrodomestici (p.es. macchine elettriche
da gelato, mescolatori, ecc.) nell’apparecchio refrigerante.
• Prima di eseguire i lavori di pulizia, é necessario disinserire l’apparecchio,
estrarre la spina oppure disinserire rispett. svitare il fusibile.
• Estrarre la spina di rete dalla presa tirando sempre dalla parte della spina,
mai dal cavo.
Nel caso di un disturbo
• Se dovessero verificarsi delle anomalie, si prega di leggere in queste istru-
zioni per l’uso sotto “ Che cosa fare, se...”. Nel caso non siano sufficienti le
avvertenze riportate, si prega di non eseguire ulteriori lavori autonomi di
riparazione
• Gli apparecchi refrigeranti devono essere riparati esclusivamente da perso-
ne specializzate. Nel caso della necessità di una riparazione, si prega di rivol-
gersi al proprio fornitore oppure presso il nostro servizio di assistenza.

28
Smaltimento
Informazione sull’imballaggio dell’apparecchio
Tutti i materiali di produzione impiegati sono tollerabili per l’ambiente! Que-
sti possono essere depositati senza pericoli oppure smaltiti nell’impianto
bruciatore di rifiuti urbani!
Riguardo i materiali di produzione: I materiali sintetici possono essere anche
riciclati e sono contrassegnati nella seguente maniera:
>PE< per politilene, p. es. nell’involucro esterno e nei sacchetti all’interno.
>PS< per polistirolo schiumoso, p.es. nei pezzi di imbottitura, in linea di
massima privi di propellenti.
I pezzi di cartone vengono realizzati con carta riciclata e devono essere
rimessi nella raccolta della carta vecchia.
Smaltimento di apparecchi vecchi
Per motivi di protezione dell’ambiente é necessario smaltire conformemen-
te gli apparecchi vecchi. Ciò vale sia per il Vostro apparecchio finora usato
per il Vostro apparecchio nuovo.
Attenzione! Gli apparecchi vecchi che non servono più, devono essere resi
inutilizzabili prima dello smaltimento. Estrarre la spina di rete, spezzare il
cavo di rete, rimuovere oppure distruggere le eventuali chiusure di bloccag-
gio. Con ciò si evita che si possano chiudere dentro dei bambini che gioca-
no (pericolo di soffocamento!) oppure che possano trovarsi in altre situa-
zioni pericolose per la vita.
Avvertenze sullo smaltimento :
• L’apparecchio non deve essere smaltito insieme ai rifiuti urbani o ingom-
branti.
• Il circuito refrigerante, in particolare lo scambiatore di calore situato nel-
la parte inferiore dell’apparecchio, non deve essere danneggiato.
• Il simbolo sul prodotto o sulla confezione indica che il prodotto non
deve essere considerato come un normale rifiuto domestico, ma deve
essere portato nel punto di raccolta appropriato per il riciclaggio di appa-
recchiature elettriche ed elettroniche. Provvedendo a smaltire questo pro-
dotto in modo appropriato, si contribuisce a evitare potenziali conse-
guenze negative per l'ambiente e per la salute, che potrebbero derivare da
uno smaltimento inadeguato del prodotto. Per informazioni più detta-
gliate sul riciclaggio di questo prodotto, contattare l'ufficio comunale, il
servizio locale di smaltimento rifiuti o il negozio in cui è stato acquistato
il prodotto.
Rimuovere la sicura del trasporto
L’apparecchio nonché gli accessori interni sono protetti per il trasporto
• Rimuovere i nastri adesivi situati ai lati porta
• Rimuovere dall’interno dell’apparecchio tutti i nastri adesivi nonchè i pez-
zi di imbottitura.

29
Nel caso sia inevitabile effettuare l’installazione accanto ad un fonte di calo-
re, é necessario mantenere le seguenti distanze minime:
– dai forni elettrici 3 cm;
– dai forni a nafta e carbone 30 cm.
Nel caso non possano essere mantenute queste distanze, é necessario inse-
rire una piastra di protezione contro il calore tra il forno e l’apparecchio
refrigerante.
Installazione
Luogo d’installazione
L’apparecchio deve essere collocato in un luogo ben aerato ed asciutto.
La temperatura ambientale ha un notevole effetto sul consumo di corren-
te.
Pertano l’apparecchio dovrebbe
– non essere esposto direttamente ai raggi solari;
– non essere messo accanto ad elementi di calore oppure ad un forno o altre
simili fonti di calore;
– essere messo in un luogo la cui temperatura ambientale corrisponda alla
classe climatica per la quale é stato concepito.
La classe climatica é riportata sulla targhetta matricola situata a sinistra nel-
l’interno della cella refrigerante.
La seguente tabella mostra quali temperature ambiente sono state asse-
gnate alle classi climatiche:
Classe climatica per temperature ambientali di
SN +10 fino +32 °C
N +16 fino +32 °C
ST +18 fino +38 °C
T +18 fino +43 °C
Fermi-ripiani
La vostra apparecchiatura é dotata di
fermi-ripiani che consentono di
bloccare i ripiani durante il trasporto.
Per rimuoverli operare come segue :
rialzare posteriormente la griglia,
spingerla nel senso della freccia fino
a quando non si libera e togliere i
fermi.
B
A

30
L’apparecchio necessita di aria
Per motivi di sicurezza la ventila-
zione deve essere come indicato
in figura.
Attenzione! mantenere le aper-
ture per la ventilazione libere da
ogni ostruzione.
50 mm
min.
200 cm
2
200 cm
2
min.
D567
Reversibilità della porta
La reversibilità della porta può essere
cambiata da destra (condizioni di
consegna) verso sinistra, nel caso il
luogo di installazione ne richiedesse
la necessità.
Avvertimento! Durante la reversibi-
lità, l’aparecchio non deve essere col-
legato alla rete elettrica. Estrarre
innanzitutto la spina dalla rete.
1. Svitare il perno superiore e togliere il
distanziale.
2. Togliere il perno superiore e togliere
la porta supriore.
3. Svitare la cerniera intermedia e i
coperchietti sul lato opposto.
4. Togliere la porta inferiore.
5. Svitare il perno inferiore e riavvitarlo
sul lato opposto.
6. Reinserire la porta inferiore
.
7 Riavvitare la cerniera intermedia e i
coperchietti sul lato parte opposta.
Se l’apparecchio refrigerante è posto accanto ad un altro apparecchio refri-
gerante oppure congelante é necessario mantenere una distanza laterale di
5 cm, allo scopo di evitare che si possa formare della condensa sui lati ester-
ni degli apparecchi.

31
Istruzioni per l’incasso
Assicurarsi che nella parte inferiore
venga mantenuta una distanza di 44
mm tra il bordo del mobile ed il bor-
do dell’apparecchiatura.
Il coperchio della cerniera inferiore
inserito nel sacchetto accessori, e’
utile per stabilire l’esatta posizione
del bordo del mobile e della appa-
recchiatura.
Assicurarsi che l’apparecchiatura non
copra il cavo alimentazione.
D765
Incollare il coprifuga come indi-
cato in figura.
1
2
44m
m
Dimensioni della nicchia
altezza 1446 mm
profondità 550 mm
larghezza 560 mm
8 Reinserire la porta superiore e riavvi-
tare il perno cerniera e il distanziale
nella parte opposta.

32
Applicare i coperchietti (C-D) sul-
le alette dei coprifuga e nei fori
per le cerniere.
Applicare la griglia di aerazione
(B) e i coperchi copricerniera (E)
inserendoli a scatto.
B
E
E
D
C
I
P
Fissare l’apparecchiatura con le 4
viti in dotazione.
(I = corta) (P = lunga)
Dal coperchio in plastica E, che viene
utilizzato per coprire la cerniera con
perno, deve essere tolta la parte,
secondo il disegno.
Questa operazione e’ facilitata dalla
presenza sulla parte interna del
coperchio copricerniera di scanalatu-
re che facilitano l’asportazione della
stessa.
"Togliere la parte contrassegnata con
DX, se il perno e’ inserito sulla cernie-
ra destra, SX nel caso contrario."

33
Inserire a scatto il coperchietto
(Hc) sulla guida (Ha)
PR33
Hc
Ha
Appoggiare la guida (Ha) sulla
parte interna della porta del
mobile sopra e sotto come indi-
cato in figura e segnare la posi-
zione dei fori esterni. Dopo aver
preparato i fori fissare la guida
con le viti in dotazione.
2
1
m
m
2
1
m
m
ca. 50 mm
90°
90°
ca. 50 mm
Separare i pezzi Ha, Hb, Hc, Hd
come da figura
PR266
Ha
Hb
Hc
Hd

34
Togliere le squadrette e segnare a
8 mm dal bordo esterno della
porta con il chiodo (K).
Aprire la porta dell’apparecchia-
tura e quella del mobile a 90° ca.
Inserire la squadretta (Hb) nella
guida (Ha). Tenere insieme la
porta dell’apparecchiatura e
quella del mobile e segnare i fori
come indicato in figura.
PR167
Ha
Hb
8mm
Ha
8mm
K
Posizionare nuovamente la squa-
dretta sopra le guida e fissare con
le viti in dotazione.
Per l’eventuale operazione di alli-
neamento della porta del mobile,
utilizzare il gioco dei fori asolati.
Al termine delle operazioni è
necessario controllare l’esatta
chiusura della porta dell’appa-
recchiatura.
PR168
Hb

35
Collegamento elettrico
Per effettuare il collegamento eletrrico é necessario impiegare la spina
con contatto di protezionz installata conformemente alle prescrizioni
vigenti. Il fusibile elettrico deve corrispondere ad almeno 10 Ampère. Nel
caso non sia possibile accedere alla presa dopo l’installazione, é necessa-
rio prender un idoneo provvedimento per garantire nell’installazione
elettrica la separazione dalla rete dell’apparecchio (p.es. fusibile, inter-
ruttore LS, interruttore di protezione contro correnti errate oppure simi-
li con una ampiezza di apertura del contatto di almeno 3mm.
• Prima della messa in servizio, verificare che la tensione di collegamento ed
il tipo di corrente riportati sulla targa matricola corrispondono ai valori
della rete elettrica del luogo di installazione.
p.es..: AC 220 ... 240 V 50 Hz oppure
220 ... 240 V~ 50 Hz
(pertanto da 220 fino 240 Volt corrente alternata, 50 Hertz)
La targa matricola si trova a sinistra nell’interno della cella refrigerante.
Inserire a scatto il coperchietto
(Hd) sulla guida (Hb).
PR167/1
Hd
Hb
Prima della messa in servizio
• Pulire l’interno dell’apparecchio e tutti gli accessori prima di effettuare la
messa in servizio (vedi capitolo “Pulizia e cura”).

36
Messa in servizio e regolazione della temperatura
• Inserire la spina nella presa di corrente. La luce interna si accende con la
porta aperta. La manopola termostato si trova nel compartimento refri-
gerante a destra.
Posizione „0“ significa: stop.
Posizione „1“ significa: Massima temperatura interna (minor freddo).
Posizione „6“ significa: Minima temperatura interna (massimo freddo).
La temperatura interna dipende dai seguenti fattori:
– Temperatura d’ambiente;
– Quantità e temperatura dei alimenti conservati;
– frequenza e durata di apertura delle porte.
Le temperature del frigorifero e del congelatore non vengono regolate sepa-
ratamente. Se si vuole congelare velocemente gli alimenti si può seleziona-
re la posizione “6”. Attenzione: in questo caso la temperatura nel comparti-
mento refrigerante può scendere a 0°C. Rimettere la manopola sulla posi-
zione intermedia se ciò si verificasse.
Importante!
Con temperatura ambiente elevata (ad es. calde giornate estive) o con
manopola posizionata sulle posizioni di massimo freddo , il compressore può
funzionare in continuo.
In tal caso é necessario ruotare la manopola su una posizione di minor fred-
do (posizione”3” o”4”). In questo modo si regola il funzionamento del com-
pressore e lo sbrinamento nello scompartimento refrigerante avviene di
nuovo automaticamente.
Importante!
Con temperatura ambiente elevata (ad es. calde giornate estive) o con
manopola posizionata sulle posizioni di massimo freddo , il compressore può
funzionare in continuo.
In tal caso é necessario ruotare la
manopola su una posizione di minor
freddo (posizione”3” o”4”). In questo
modo si regooa il funzionamento del
compressore e lo sbrinamento nello
scompartimento refrigerante avviene
di nuovo automaticamente.
Interruttore climatico
Con temperatura ambiente inferiore
a +16°C premere l’interruttore clima-
tico (A). La luce spia incorporata si
accende.
D710
A

37
D338
Accessori interni
Posizionamento dei ripiani
• Il ripiano intero sopra i cassetti
verdura/frutta deve rimanere
sempre in questa posizione per
mantenere più fresco nel tempo
la verdura e frutta.
I rimanenti ripiani sono regolabili
in altezza:
• Per far ciò tirare il ripiano in avanti finchè questo non si lascia tirare ver-
so il basso o l’alto.
• L’inserimento in un’altra altezza avviene in senso contrario.
• Estrarre il semi-ripiano e spingerlo in un altro livello . In tal modo si gua-
dagna dello spazio per poter collocare sulla superficie sottostante del pro-
dotto da refrigerare piuttosto alto
Posizionamento delle mensole
• A secondo delle esigenze, gli scom-
partimenti di ripiano sulla porta pos-
sono essere estratti verso l’alto ed
essere quindi inseriti in altri sostegni.
PR270/1

38
Refrigerazione dei cibi e delle bevande
Per utilizzare nel modo migliore lo scomparto refrigerante è necessario:
• non introdurre nella cella vivande calde o liquidi in evaporazione;
• coprire o avvolgere gli alimenti, specie se contengono aromi;
• disporre gli alimenti in modo che l’aria possa circolare liberamente attor-
no ad essi.
Carne (di tutti i tipi): va avvolta in sacchetti di plastica e posta sul vetro
sopra il cassetto verdura.
In questa posizione si potrà conservare per uno o due giorni al massimo.
Cibi cotti piatti freddi, ecc. devono essere ben coperti e possono essere
disposti su qualsiasi griglia.
Frutta e verdura: saranno messe, previa pulitura, nel/ nei cassetto/i previ-
sto/i a tale scopo.
Burro e formaggio devono essere conservati negli appositi contenitori o
avvolti in fogli di plastica o alluminio per evitare il contatto con l’aria.
Latte in bottiglia: ben chiuse poste nel portabottiglie.
Banane, patate, cipolla ed aglio, se non sono confezionati, non vanno
messi in frigorifero.
Congelazione e conservare
Il vostro congelatore é adatto sia per la conservazione dei surgelati che per
la congelazione di cibi freschi.
Attenzione
• La temperatura nello scomparto congelatore dev’essere di -18°C o infe-
riore prima di introdurre i cibi per la congelazione.
• Attenersi per la congelazione ai quantitativi indicati sulla targa matrico-
la.Il quantitativo per la congelazione é la quantità massima di cibi freschi
che possono essere congelati in 24 ore. Volendo effettuare la congelazio-
ne di cibi freschi per più giorni consecutivi, ridurre il quantitativo riporta-
to sulla targa a 2/3 o 3/4.
• Lasciare raffreddare eventuali cibi caldi prima di congelarli. Il calore por-
ta a una forte formazione di brina ed un elevato consumo energetico.
• Rispettare le date di scadenza indicato sulle confezioni dal produttore dei
surgelati.
• I cibi una volta scongelati non possono venir ricongelati previa cottura.
• I contentitori di gas infiammabili oppure liquidi mediante l’effetto del
freddo possono perdere la propria ermeticità. Pericolo di espolsione! Non
immagazzinare mai dei contenitori con sostanze infiammabili, come p.es.
bombole spray, accendini e cartucce di rifornimento, ecc. nell’apparecchio
refrigerante.

39
• Le bottiglie e le lattine non devono essere collocatenella cella di congela-
mento. Queste possono scoppiare non appena si congela il contenuto,
mentre i liquidi contenenti anidride carbonica possono addirittura esplo-
dere! Non collocare mai della limonata, succhi, birra,vino, spumante, ecc.
Ad eccezione: I superalcoolici possono essere immagazzinati nella cella di
congelamento.
• Avvolgere ermeticamente gli alimenti prima della congelazione in modo
da evitare che si asciughino, perdano gli aromi o che i sapori si trasmet-
tano agli altri cibi congelati.
Attenzione! Mai toccare i cibi congelati con le mani bagnate. La pelle
potrebbe rimanere attaccata.
1. Porre gli alimenti freschi da congelare nel compartimento superiore. I cibi
non congelati non devono venire in contatto con la merce già congela-
ta, altrimenti la merce congelata potrebbe scongelarsi inalcuni punti.
2. Se si vuole una congelazione rapida dei cibi posizionare la manopola ter-
mostato sulla posizione più fredda.
Cubetti di ghiaccio
1. Riempire a 3/4 la bacinella ghiaccio con acqua fredda e riporla nel cassetto
congelatore.
2. Per togliere i cubetti pronti é sufficiente torcere la bacinella o metterla bre-
vemente sotto l’acqua corrente.
Attenzione! Si raccomanda di non usare utensili appuntiti o a spigoli per
staccare la bacinella eventualmente rimasta attaccata. Utilizzare la paletta
raschiabrina in dotazione.
Calendario di congelamento
• I simboli indicano diversi tipi di prodotti da congelare.
• Le cifre indicano il periodo di onservazione in mesi per ciascun tipo di pro-
dotto da congelare.
Il periodo di conservazione dell’alimento congelato varia tra il minimo ed il
massimo indicato (es. 2-6 mesi) ed e’ in funzione del cibo congelato. Per gli
alimenti notevolmente grassi vale sempre la durata inferiore.
Massa eutettica
L’apparecchio ha all’interno una massa eutettica.
In caso di interruzione della corrente o di mal funzionamento dell’apparec-
chiatura la massa eutettica aumenterà di qualche ora la conservzione dei
cibi congelati. La massa euttetica può essere usata anche come elemento
raffreddante per la borse termiche.

40
Sbrinamento
Frigorifero
Sulla parete posteriore dello scomparto refrigerante, si forma uno strato di
brina durante il funzionamento del compressore, che viene eliminato auto-
maticamente durante le pause di funzionamento dello stesso.
L’acqua derivante dallo sbrinamento, tramite un apposito convogliatore
posto nella parte posteriore dello scomparto refrigerante, attraverso un foro
di scarico, viene raccolta in una bacinella posta sopra il compressore, da
dove evapora.
Congelatore
Nello scomparto congelatore si forma uno strato di brina, a causa dell’umi-
dità che si sviluppa durante il funzionamento. Questo deve essere eliminato
periodicamente, utilizzando una paletta raschiabrina.
Uno strato molto spesso di brina nello scomparto congelatore comporta un
consumo maggiore di energia. Perciò é necessario eseguire lo sbrinamento
completo ogniqualvolta si é formato uno strato di 4 mm circa o almeno una
volta l’anno. Inoltre é sempre consigliabile effettuare lo sbrinamento quan-
do l’apparecchio é vuoto o quando il carico é minimo.
Per effettuare un sbrinamento completo procedere come segue:
1. Togliere i cibi congelati, riporli in un luogo fresco.
2. Spegnere l’apparecchiatura o stacca-
re la spina dalla presa di corrente .
3. Lasciare aperta la porta dello scom-
parto congelatore.
4. Inserire la paletta raschiabrina nel
foro per la raccolta dell’acqua di sbri-
namentento e porre al di sotto una
bacinella.
5. Riportare la manopola del termosta-
to nella posizione desiderata e rein-
serire la spina nella presa.
Avvertenza:
Non impiegare mai utensili metallici per asportare la brina.
Si raccomanda di non utilizzare riscaldatori elettrici o altri mezzi meccanici
o artificiali per accelerare il processo di sbrinamento, tranne quelli racco-
mandati in questo libretto.
Un innalzamento della temperatura dei surgelati durante lo sbrinamento
potrebbe ridurne il tempo di conservazione.
D068

41
Spegnimento dell’apparecchio
Se l’apparecchiatura dovesse essere spenta per un lungo periodo:
1. Svuotare lo scomparto refrigerante e congelante cosi come le bacinelle
ghiaccio.
2. Spegnere l’apparecchio mettendo la manopola termostato sul”0”.
3. Togliere la spina dalla presa di corrente oppure disinserire la valvola di sicurezza.
4. Sbrinare lo scomparto congelante e pulire (vedi paragrafo “Pulizia e
cura”)gung und Pflege").
5. Lasciare aperte le porte per evitare la formazione di odori sgradevoli.
Pulizia e cura
Per motivi d’igiene si dovrebbe.sempre pulire accuratamente e regolarmen-
te l’interno dell’apparecchio, compresi gli accessori.
Avvertimento!
• Durante la pulizia, l’apparecchio non deve essere collegato alla rete elet-
trica. Pericolo di scosse di corrente! Prima di eseguire i lavori di pulizia, é
necessario disinserire l’apparecchio, estrarre la spina oppure disinserire
rispett. svitare il fusibile.
• Non pulire mai l’apparecchio con delle idropulitrici a vapore. L’umidità
potrebbe penetrare negli elementi di costruzione elettrici, pericolo di scos-
se di corrente! Il vapore bollente può causare dei dannii ai pezzi in mate-
riale sintetico.
• L’apparecchio deve essere asciutto, ancor prima della nuova messa in ser-
vizio.
Attenzione!
• Oli essenziali e sostanze solventi organiche possono intaccare gli elemen-
ti in materiale sintetico, p.es.
– succhi di limone oppure bucce di arancia;
– burro acido;
– sostanze detergenti contenenti acido di aceto.
Evitare il contatto degli elementi dell’apparecchio con simili sostanze.
• Non impiegare mai sostanze detergenti graffianti.
1. Togliere i cibi. Avvolgere con più fogli di giornali i surgelati. Riporre il tutto
in un luogo fresco.
2. Spegnere l’apparecchio ed estrarre la spina oppure disinsrire rispett. svitare
il fusibile.
3. Sbrinare il congelatore
4. Pulire l’apparecchio e gli accessori interni con un panno morbido imbevuto
di acqua calda. Aggiungere eventualmente del comune detergente per il
lavaggio dei piatti.
5. Risciaquare e asciugare strofinando.

42
I depositi di polvere sul condensatore situato sul lato posteriore dell’ap-
parecchio, riducono notevolmente la potenza di raffreddamento ed
aumentano quindi il consumo energetico. Pertanto é necessario pulirlo
accuratamente una volta l’anno con una spazzola oppure un aspirapol-
vere.
6. Controllare il foro di scarico del-
l’acqua di sbrinamento, posto
nella parte posteriore della cella
refrigerante. Il foro intasato può
essere liberato utilizzando il puli-
tore verde.
7. Una volta che il tutto si é asciu-
gato bene si può rimettere in ser-
vizio l’apparecchio.
D037
Consigli per il risparmio energetico
• Non installare l’apparecchio vicino a forni, elementi riscaldanti o altre fon-
ti di calor. Con temperature ambientali elevate il compressore entra in
funzione più spesso e più a lungo.
• Garantire una sufficiente aerazione in entrata e uscita. Non coprire mai le
aperture d’aerazione.
• Non collocare dei cibi caldi nell’apparecchio, lasciarli prima raffreddare.
• Aprire la porta solamente per quanto sia necessario.
• Non regolare una temperatura più fredda di quanto sia necessario..
• Mettere i cibi da scongelare nel comparto refrigerante. Il freddo derivan-
te dal scongelamento aiuta il raffreddamento del comparto refrigerante.
• Mantenere costantemente pulito il condensatore posto sul lato posterio-
re dell’apparecchio.
Che cosa fare, se ...
Rimedio in caso di disturbi
Probabilmente si tratta di un guasto di lieve entità che potrete eliminare da
soli seguendo le seguenti istruzioni. Non effettuare nessun’altra operazione
qualore le informazioni qui riportate non fossero di alcun aiuto per il caso
concreto.

43
Forte formazione di brina nel-
l’apparecchio o sulla guarni-
zione della controporta
La guarnizione della contro-
porta non è più ermetica
(eventualmente dopo aver
effettuato la reversibilità della
porta)
Riscaldare con cautela ipunti
non ermetici della guarnizio-
ne con un asciugacapelli (non
superare i 50°C) rimettendo in
forma tirando la guarnizione
in modo che poggi perfetta-
mente
Cibi troppo caldi
L’illuminazione interna non
funziona
L’apparecchio é installato
accanto a una fonte di calore
La temperatura non é corret-
tamente regolata
Vedi paragrafo “Messa in fun-
zione”
La lampadina é difettosa
Vedi paragrafo “Sostituzione
della lampadina”
Regolare il termostato su una
posizione più fredda
La porta é rimasta aperta a
lungo
Vedi paragrafo “Installazione”
Nell’arco dell 24 ore sono sta-
te introdotte grandi quantità
di cibo
Aprire la porta solo per lo
stretto necessario
L’apparecchio fa troppo freddo.
La temperatura é regolata su
La temperatura e’ regolata su
un valore troppo freddo
Regolare la manopola su una
posizione più calda
Rumorosità insolita
L’apparecchio é a contatto
con la parete oppure con
altri oggetti
L’apparecchio non é livellato
Un componente installato sul
retro dell’apparecchio p.es. un
tubo, tocca un altro compo-
nente oppure la parete
Piegare eventualmente con
cautela
Allontanare leggermente l’ap-
parecchio
Correggere con i piedini rego-
labili
Disturbo Possibile cause Rimedio
L’apparecchio non funziona
L’apparecchio non é collegato Collegare l’apparecchio
La spina non é inserta o allen-
tata.
Inserie la spina nella presa
L’interruttore generale é disin-
serito oppure difettoso
Controllare l’interruttore
eventualmente sostituirlo
La presa di corrente é difetto-
sa.
Difetti alla rete elettrica ven-
gono ripristinati dal elettrici-
sta autorizzato.
Avvertenza! Le riparazioni del frigorifero devono essere eseguite unicamen-
te da personale specializzato. Riparazioni improprie possono essere fonte di
gravi pericoli per l’utente. Qualora fosse necessaria una riparazione, siete
pregati di rivolgerVi al Vostro rivenditore autorizzato oppure al nostro ser-
vizio assistenza clienti

44
Dopo un certo periodo il
compressore si aziona auto-
maticamente
vedi paragrafo “Pulizia e cura”
Ciò é normale, non sussite
alcun distrubo
Dopo aver modificato la
regolazione della temperatu-
ra il compressore non inter-
viene subito
Tracce d’acqua sul fondo dello
scmparto refrigerante
Il foro scarico d’acqua di sbri-
namento é ostruito
Anomalia Possibile causa Intervento
Sostituzione della lampadina
Avvertimento! Pericolo di scosse elettriche! Prima di effettuare la sostitu-
zione della lampadina, é necessario disinserire l’apparecchio ed estrarre la
spina oppure disinserire rispett. svitare il fusibile.
Dati della lampadina: 220-240 V, max. 15 W, presa: E 14
1. Spegnere l’apparecchio mettendo la
manopola sul ”0”.
2. Estrarre la spina dalla presa.
3. Svitare la vite di fissaggio della plafonie-
ra.
4. sfilare la parte mobile come indicato in
figura.
5. Sostituire la lampadina difettosa.
6. Inserire la plafoniera e fissarla con la vite.
7. Accendere l’apparecchio.
AEG65
Disposizioni, Norme, Direttive.
L’apparecchiatura é stata concepita per l’impiego domestico ed é stata pro-
dotta sotto l’osservanza delle norme vigenti per questi tipi di apparecchia-
ture. Nella produzione sono stati inoltre presi i particolari provvedimenti
necessari in conformità alla legge sulla sicurezza degli apparecchi (GSG), le
prescrizione sulla prevenzione degli infortuni per impiianti refrigeranti (VBG
20) e le disposizioni della cooperativa tedesca elettricisti (VDE).Il circuito
refrigerante é stata verificata sull’ermeticità.
Questo apparecchio è conforme alle seguenti direttive CEE:
– 73/23/CEE del 19.2.1973 - Direttiva sulle basse tensioni
– 89/336/CEE del 3.5.1989
(compresa successive modifiche del 92/31/CEE) - Direttiva EMV

45
Dear Customer
Thank you for choosing one of our high-quality products.
With this appliance you will experience the perfect combination of functional desi-
gn and cutting edge technology.
Convince yourself that our appliances are engineered to deliver the best perfor-
mance and control - indeed we are setting the highest standards of excellence.
In addition to this you find environmental and energy saving aspects as an integral
part of our products.
To ensure optimal and regular performance of your appliance please read this
instruction manual carefully. It will enable you to navigate all processes perfectly
and most efficiently.
To refer to this manual any time you need to, we recommend you to keep it in a
safe place. And please pass it to any future owner of the appliance.
We wish you much joy with your new appliance.
The following symbols are used in this manual
Important information concerning your personal safety and information on
how to avoid damaging the appliance
General information and tips
Environmental information

46
Contents
Safety . . . . . . . . . . . . . . . . . . . . . . . . . . . . . . . . . . . . . . . . . . . . . . . . .47
Disposal . . . . . . . . . . . . . . . . . . . . . . . . . . . . . . . . . . . . . . . . . . . . . . .49
Appliance Packaging Information . . . . . . . . . . . . . . . . . . . . . . . . . . . . . .49
Disposal of old Appliances . . . . . . . . . . . . . . . . . . . . . . . . . . . . . . . . . . . .49
Remove transport safeguard . . . . . . . . . . . . . . . . . . . . . . . . . . . . . . .49
Shelf holders . . . . . . . . . . . . . . . . . . . . . . . . . . . . . . . . . . . . . . . . . . . . . . .50
Installation . . . . . . . . . . . . . . . . . . . . . . . . . . . . . . . . . . . . . . . . . . . . .50
Installation Location . . . . . . . . . . . . . . . . . . . . . . . . . . . . . . . . . . . . . . . . .50
Your appliance needs air . . . . . . . . . . . . . . . . . . . . . . . . . . . . . . . . . . . . .51
Rehingeing the door . . . . . . . . . . . . . . . . . . . . . . . . . . . . . . . . . . . . . . . . .51
Housing dimension . . . . . . . . . . . . . . . . . . . . . . . . . . . . . . . . . . . . . . . . . .52
Instructions for total built-in . . . . . . . . . . . . . . . . . . . . . . . . . . . . . . . . .52
Electrical Connection . . . . . . . . . . . . . . . . . . . . . . . . . . . . . . . . . . . . .56
Prior to Initial Start–Up . . . . . . . . . . . . . . . . . . . . . . . . . . . . . . . . . .57
Starting up and temperature regulation . . . . . . . . . . . . . . . . . . . . .57
Low Room Temperature Switch . . . . . . . . . . . . . . . . . . . . . . . . . . . .57
Interior Accessories . . . . . . . . . . . . . . . . . . . . . . . . . . . . . . . . . . . . . .58
Storage shelves . . . . . . . . . . . . . . . . . . . . . . . . . . . . . . . . . . . . . . . . . . . . .58
Variable Inner Door . . . . . . . . . . . . . . . . . . . . . . . . . . . . . . . . . . . . . . . . . .58
Fresh food refrigeration . . . . . . . . . . . . . . . . . . . . . . . . . . . . . . . . . .59
Freezing and storing frozen food . . . . . . . . . . . . . . . . . . . . . . . . . . .60
Ice pack . . . . . . . . . . . . . . . . . . . . . . . . . . . . . . . . . . . . . . . . . . . . . . .61
Preparation of Ice Cubes . . . . . . . . . . . . . . . . . . . . . . . . . . . . . . . . .61
Storge Goods Symbols/ Freezing Calendar . . . . . . . . . . . . . . . . . . .61
Defrosting . . . . . . . . . . . . . . . . . . . . . . . . . . . . . . . . . . . . . . . . . . . . .62
Switching off the appliance . . . . . . . . . . . . . . . . . . . . . . . . . . . . . . .63
Cleaning and Care . . . . . . . . . . . . . . . . . . . . . . . . . . . . . . . . . . . . . . .63
Energy Saving Tips . . . . . . . . . . . . . . . . . . . . . . . . . . . . . . . . . . . . . . .64
What to do if . . . . . . . . . . . . . . . . . . . . . . . . . . . . . . . . . . . . . . . . . . .64
Correcting Malfunctions . . . . . . . . . . . . . . . . . . . . . . . . . . . . . . . . . . . . .64
Changing the light bulb . . . . . . . . . . . . . . . . . . . . . . . . . . . . . . . . . .66
Regulations, Standards, Guidelines . . . . . . . . . . . . . . . . . . . . . . . . .66

47
Safety
The safety aspects of our refrigerators/freezers comply with accepted tech-
nical standards and the German Appliance Safety Law. Nevertheless, we
consider it our obligation to make you aware of the following safety infor-
mation:
Intended use
• The refrigerator is intended for use in the home. It is suitable for the coo-
ling, freezing and storing of frozen food, as well as for making ice. If the
appliance is used for purposes other than those intended or used incor-
rectly, no liability can be accepted by the manufacturer for any damage
that may be caused.
• Alterations or changes to the freezer are not permitted for reasons of
safety.
• If you use the refrigerator in a commercial application or forpurposes
other than the cooling, freezing or frozen storage of foods,please obser-
ve all valid legal regulations for your application.
Prior to initial start–up
• Check the refrigerator for transport damage. Under no circumstance
should a damaged appliance be plugged in! In the event of damage, please
contact the vendor.
Refrigerant
The refrigerant isobutane (R600a) is contained within the refrigerant circuit
of the appliance, a natural gas with a high level of environmental compa-
tibility, which is nevertheless flammable.
• During transportation and installation of the appliance, be certain that
none of the components of the refrigerant circuit become damaged.
• If the refrigerant circuit should become damaged:
– avoid open flames and sources of ignition;
– thoroughly ventilate the room in which the appliance is situated.
Safety of children
• Packaging (e.g. wraps, polystyrene) can be dangerous for children. There is
a risk of suffocation! Keep packaging material away from children!
• Please make old appliances unusable prior to disposal. Pull out the mains
plug, cut off the mains cable, break or remove spring or boltcatches, if fit-
ted. By doing this you ensure that children cannot lock themselves in the

48
fridge when playing (there is risk of suffocation!)or get themselves into
other dangerous situations.
• Often children cannot recognise the hazards present in household
appliances. It is therefore important that you ensure adequate supervision
and never let children play with the appliance!
Daily Operation
• Containers with flammable gases or liquids can leak at low temperatures.
There is a risk of an explosion! Do not store any containers with flamma-
ble materials such as, for example, spray cans, fire extinguisher refill car-
tridges etc in the refrigerator/freezer.
• Bottles and cans must not be placed in the freezer compartment. They can
burst when the contents freeze, high carbonate content drinks can even
explode! Never store lemonade, juices, beer, wine, sparkling wine etc. in
the freezer compartment. Exception: high alcohol content spirits can be
stored in the freezer compartment.
• Do not put ice creams or ice cubes in the mouth immediately after remo-
val from the freezer compartment. Very cold ice can freeze to the lips or
tongue and cause injury.
• Do not touch frozen food with wet hands. Your hands could freeze to the
food.
• Do not operate any electrical appliances in the refrigerator/freezer (e.g.
electric ice cream makers, mixers etc.).
• Before cleaning the appliance, always switch off the appliance and unplug
it, or pull the house fuse or switch off the circuit breaker.
• When unplugging always pull the plug from the mains socket, do not pull
on the cable.
In case of malfunction
• If the a malfunction occurs on the appliance, please look first in the "What
to do if ..." section of these instructions. If the information given there
does not help, please do not perform any further repairs yourself.
• Refrigerators/freezers may only be repaired by qualified service engineers.
Improper repairs can give rise to significant hazards. If your appliance
needs repairing, please contact your specialist dealer or our Customer Ser-
vice.

49
Remove transport safeguard
The appliance and the interior fittings are protected for transport.
• Pull off the adhesive tape on the left and right side of the door.
• Remove all adhesive tape and packing pieces from the interior of the
appliance.
Disposal
Appliance Packaging Information
All materials are environmentally sound! They can be dumped or burned at
an incinerating plant without danger!
About the materials: The plastics can be recycled and are identified as fol-
lows:
>PE< for polyethylene, e.g. the outer covering and the bags in the interior.
>PS< for polystyrene foam, e.g. the pads, which are all free of chlorofluo-
rocarbon.
The carton parts are made from recycled paper and should be disposed of
at a waste-paper recycling collection location.
Disposal of old Appliances
For environmental reasons, refrigeration appliances must be disposed of
properly. This applies to your old appliance, and - at the end of its service
life - for your new appliance as well.
Warning! Before disposing of old appliances make them inoperable. Remo-
ve plug from mains, sever the power cable, remove or destroy any snap or
latch closures. This eliminates the danger that playing children lock them-
selves into the appliance (danger of suffocation!) or place themselves into
other life-endangering situations.
Disposal:
• The appliance may not be disposed of with domestic waste or bulky refu-
se.
• The refrigerant circuit, especially the heat exchanger at the back of the
appliance, may not be damaged.
• The symbol on the product or on its packaging indicates that this
product may not be treated as household waste. Instead it shall be han-
ded over to the applicable collection point for the recycling of electrical
and electronic equipment. By ensuring this product is disposed of cor-
rectly, you will help prevent potential negative consequences for the
environment and human health, which could otherwise be caused by
inappropriate waste handling of this product. For more detailed infor-
mation about recycling of this product, please contact your local city
office, your household waste disposal service or the shop where you pur-
chased the product.

50
Installation
Installation Location
The appliance should be set up in a well ventilated, dry room.
Energy use is affected by the ambient temperature. The appliance should
therefore
– not be exposed to direct sunlight;
– not be installed next to radiators, cookers or other sources of heat;
– only be installed at a location whose ambient temperature corresponds to
the climate classification, for which the appliance is designed.
The climate classification can be found on the serial plate, which is located
at the left on the inside of the appliance.
The following table shows which ambient temperature is correct for each
climate classification: each climate classification:
Climate classification
for an ambient temperature of
SN +10 bis +32 °C
N +16 bis +32 °C
ST +18 bis +38 °C
T +18 bis +43 °C
If installation next to a source of heat is unavoidable, the following mini-
mum clearances must be maintained at the sides of the appliance:
– for electric cookers 3 cm;
– for oil and coal fired ranges 30 cm.
If these clearances cannot be maintained a heat insulating pad is required
between the cooker and the refrigeration appliance.
If the refrigeration appliance is installed next to another refrigerator or free-
zer a clearance of 5 cm at the sides is required, in order to prevent the for-
mation of condensation on the outside of the appliance.
B
A
Shelf holders
Your appliance is equipped with shelf
retainers that make it possible to
secure the shelves during transporta-
tion.
To remove them proceed as follows:
Raise the shelf from the back, push it
in the direction of the arrow until it
is freed and remove the retainers.

51
Your appliance needs air
For safety reasons, minimum
ventilationmust be as shown Fig.
Attention: keep ventilation ope-
nings clear of obstruction;
50 mm
min.
200 cm
2
200 cm
2
min.
D567
Rehingeing the door
The side at which the door opens
can be changed from the right
side (factory adjustment) to the
left side, if the installation site
requires.
Warning! When changing the
side at which the door opens, the
appliance may not be connected
to the mains. Remove plug from
the mains beforehand.
1. Unscrew the upper pin and remove
the spacer.
2. Remove the upper pin and the upper
door.
3. Unscrew the middle hinge und the
covers on the opposite side.
4. Remove the lower door.
5. Unscrew the lower pin and refit it on
the opposite side
6. Refit the lower door.

52
Housing dimensions
Height 1446 mm
Depth 550 mm
Width 560 mm
Instructions for total built-in
Apply joint the sealing strip as
shown in figure.
7. Rescrew the middle hinge und the
covers on the opposite side.
8. Refit the upper door and rescrew the
hinge pin and the spacer on the
opposite side.
Make sure that a distance of 44 mm
is maintained in the lower part bet-
ween the kitchen furniture and the
border of the appliance.
The lower hinge cover inserted in the
accessories bag, is useful to guarantee
the exact position of the kitchen fur-
niture and the appliance.
Also make sure that the appliance
does not clamp the mains cable ).
D765
1
2
44m
m

53
Apply covers (C-D) on joint cover
lugs and into hinge holes.
Snap vent grille (B) and hinge covers
(E) into position.
B
E
E
D
C
Fasten the appliance with 4
screws provided in the kit
included with the appliance.
(I = short) (P = long)
I
P
From the plastic cover (E), which is
used to cover the hinge with the
pivot pin, you must take away the
part as indicated in the drawing.
This operation is made easer since
there is, in the internal part of the
cover hinge lid a groove that facila-
tes the removal of this coomponent.
“Remove the part marked with DX, if
the pivot pin is inserted in the right
hinge, SX in opposite case.”

54
Place guide (Ha) on the inside part of
the furniture door, up and down as
shown in the figure and mark the
position of external holes. After
having drilled holes, fix the guide
with the screws supplied.
2
1
m
m
2
1
m
m
ca. 50 mm
90°
90°
ca. 50 mm
PR266
Ha
Hb
Hc
Hd
Separate parts Ha, Hb, Hc, Hd as
shown in the figure

55
Fix cover (Hc) on guide (Ha) until it
clips into place.
PR33
Hc
Ha
PR167
Ha
Hb
8mm
Open the appliance door and the fur-
niture door at 90°. Insert the small
square (Hb) into guide (Ha). Put
together the appliance door and the
furniture door and mark the holes as
indicated in the figure.
Ha
8mm
K
Remove the brackets and mark a
distance of 8 mm from the outer
edge of the door where the nail
must be fitted (K).

Electrical connection
Before initial start-up, refer to the appliance rating plate to ascertain if sup-
ply voltage and current values correspond with those of the mains at the
installation location.
e.g.: AC 220 ... 240 V 50 Hz or
220 ... 240 V~ 50 Hz
(i.e. 220 to 240 volts alternating current, 50 Hertz)
The rating plate is inside the appliance on the left.
A correctly installed, earthed socket is required for the electrical supply. The
supply must have a fuse rating of at least 10 Amps.
If the socket is not accessible once the appliance is built in, the electrical
installation must include suitable means of isolating the appliance from the
mains (e.g. fuse, cut-out, current trip or similar with a minimum contact
separation of 3 mm).
Attention: The mains connection cable may only be replaced by a skilled
electrician. Please contact your dealer or our customer service department
for repairs.
56
PR168
Hb
Place the small square on the guide
again and fix it with the screws sup-
plied.
Should the lining up of the furniture
door be necessary, use the clearance
of slots.
At the end of operations, it is neces-
sary to check if the door of the fur-
niture closes properly.
PR167/1
Hd
Hb
Fix cover (Hd) on guide (Hb) until it
clips into place.

57
Prior to Initial Start–Up
• Please clean the appliance interior and all accessories prior to initial start-
up (see section: “Cleaning and Care”).
Starting up and temperature regulation
• Insert the plug into the plug socket. With the refrigerator compartment
door open, the internal lighting is switched on. The temperature selector
knob is located on the RH side of the refrigerator compartment.
Setting „0“ means: Off.
Setting „1“ means: Hightest temperature, (warmest setting).
Setting „6“ (end-stop) means: Lowest temperature, (coldest setting).
However, the exact setting should be chosen keeping in the mind that the
temperature inside the refrigerator depends on:
-the quantity of food stored
-how often the door is opened
The temperatures in the refrigerator compartment and freezer co partment
cannot be independently regulated.
If you want the freeze fresh food rapidly, select setting „6“, ensuring that the
temperature in the refrigerator compartment does not drop blow 0°C. You
should also promptly reset the temperature regulator to setting „3“ or „4“.
Important!
High ambient temperatures (e.g. on hot summer days) and a cold setting on
the temperature regulator (position"5" to "6") can cause the compressor to
run continuously.
If this happens, turn the temperature regulator back to a warmer setting
(position "3" to "4"). At this setting the compressor will be switched on and
off as usual and automatic defrosting recommenced.
Low Room Temperature Switch
When the room temperature is +
16° C or less push the the Low
Room Temperature Switch A.
Please note that in this setting the
interior light will remain on, even
if the door is closed.
D710
A

58
Interior Accessories
Storage Shelves
The glass shelf above the fruit and
vegetable compartment should
always remain in position, to ensure
fruit and vegetables stay fresh lon-
ger.
The remaining storage shelves can be
adjusted to various heights:
Pull the storage shelf forward until it
can be tipped up or down and remo-
ved.
To insert at a different height use the same procedure in reverse.
Adjustment for tall goods:
Remove the front half of the two-part vario glass storage shelf and insert it
at a different level. Space is thus gained for storage of tall goods on the
underlying storage shelf.
Variable Inner Door
The door compartments can be pul-
led up and removed, and inserted at
other positions as needed.
D338
PR270/1

59
Fresh food refrigeration
To obtain the best performance:
• do not store warm food or evaporating liquide in the refrigeator
• do cover or wrap the food, particularly if it has a strong flavour.
• Position food so that air can circuiate freely round it.
Useful hints:
Meat (all types): wrap in polythene bags and place on the glass shelf above
the vegetable drawer(s)For safety, store in this way only one or two days
at the most.
Cooked foods, cold dishes, etc: these should be covered and may be placed
on any shelf.
Fruit and vegetables: these should be thoroughly cleaned and placed in the
special drawer(s) provided.
Butter and cheese: these should be placed in special airtight containers or
wapped in aluminium foil or polythene bags to exclude as much air as pos-
sible.
Milk bootles: these should have a cap and should be stored in the bottle
rack on the door.
Bananas, potatoes, onions and garlic, if not packed, must not be kept in
the refrigerator.

60
Freezing and storing frozen food
You can use your freezer for freezing fresh food yourself.
Important!
• The temperature in the freezer compartment must be –18 °C or colder
before freezing food.
• Please observe the freezing capacity given on the rating plate. The free-
zing capacity is the maximum quantity of fresh food that can be frozen
within a period of 24 hours. If you wish to freeze food several days in a
row, please observe a maximum capacity of only 2/3 to 3/4 of that on the
rating plate. The quality of the food is best preserved when it is frozen
right through to the core as quickly as possible.
• Allow warm food to cool down before freezing. The warmth will cause
increased ice formation and increase the power consumption.
• Please note the maximum storage times specified by the manufacturer.
• Thawed foods which have not been processed further (cooked into meals)
may not under any circumstances be frozen a second time.
• Containers with flammable gases or liquids can leak at low temperatures.
There is a risk of an explosion! Do not store any containers with flamma-
ble materials such as, for example, spray cans, fire extinguisher refill car-
tridges etc in the refrigerator/freezer.
• Bottles and cans must not be placed in the freezer. They can burst when
the contents freeze, high carbonate content drinks can even explode!
Never store lemonade, juices, beer, wine, sparkling wine etc. in the free-
zer. Exception: high alcohol content spirits can be stored in the freezer.
• All foods must be packed air tight prior to freezing, so that they do not
dry out or lose their flavour, and so that no flavour contamination of
other frozen goods occurs.
Caution! Do not touch frozen food with wet hands. Your hands could free-
ze to the food.
1. Place the packed food in the drawers. Place food to be frozen in the upper
drawer equipped with its own refrigerating unit. Unfrozen food must not
touch items already frozen, otherwise the frozen food could begin to defro-
st.
2. Place frozen foods in the drawers sorted by type, as far as possible.

61
Preparation of Ice Cubes
1. Fill the ice cube tray 3/4 full with cold water, place it in the freezer com-
partment and leave to freeze.
2. To loosen the frozen cubes, either bend the ice cube tray or hold it under
running water for a few seconds.
Important! Never try to free an ice tray that is frozen to the freezer com-
partment using pointed or sharp edged objects.
Freezing Calendar
• The symbols on the drawers show different types of frozen goods.
• The numbers indicate storage times
in months for the appropriate
types of frozen goods. Whether
the upper or lower value of the
indicated storage time is valid
depends on the quality of the
foods and pre-treating before
freezing. The lower value applies to
foods with high fat content.
Ice pack
There is one ice pack in one drawer of the freezer.
In the event of a power failure or malfunction, the ice pack will lengthen
the amount of time it takes for the frozen food to become too warm by
several hours. The ice pack can only fulfil this task optimally if it is placed in
the uppermost drawer, at the front, above the frozen food. You can use the
ice pack for cooling cold bags.

62
Defrosting
Refrigerator
Frost is automatically eliminated from the evaporator of the refrigerator
compartment every time the motor compressor stops, during normal use.
The defrost water drains out through a trough into a special container at
the back of the appliance, over the motor compressor, where it evaporates.
Freezer
The freezer compartment, however, will become progrssively covered with
frost. This should be removed with al plastic scraper, whenever the tickness
of the frost exceeds 4 mm. During this operation it is not necessary to swit-
ch off the power supply or to remove the foodstuffs.
However when the ice becomes very thick on the inner liner, complete
defrosting should be carried out as follows:
1. Remove the frozen food from the freezer, wrap it in several layers of new-
spaper and put it in a very cool place.
2. Switch off the appliance and pull out the plug, or remove or unscrew the
safety fuses.
3. Leave the freezer compartment
door open.
4. Insert the plastic scraper into the
recess provided under the defrost
water channel and place a collecting
basin under it.
5. Turn the thermostat knob to the
required setting or replace the plug
in the power socket.
Warning!
Never use metal tools to scrape off
the frost
Do not use a mechanical device or any artificial means to speed up the
thawing process other than those recommended by the manufacturer.
A temperature rise of the frozen food packs, during defrosting , may shor-
ten their safe storage life.
D068

63
Cleaning and Care
For hygienic reasons the appliance interior, including interior accessories,
should be cleaned regularly.
Warning!
• The appliance may not be connected to the mains during cleaning. Dan-
ger of electrical shock! Before cleaning switch the appliance offand rem
ve the plug from the mains, or switch off or turn out the circuit breaker
or fuse.
• Never clean the appliance with a steam cleaner. Moisture could accumu-
late in electrical components, danger of electrical shock! Hot vapours can
lead to the damage of plastic parts.
• The appliance must be dry before it is placed back into service.
Attention!
• Ethereal oils and organic solvents can attack plastic parts, e.g.
– lemon juice or the juice from orange peals;
– butyric acid;
– cleansers which contain acetic acid.
Do not allow such substances to come into contact with appliance parts.
• Do not use any abrasive cleansers.
1. Remove frozen food and the food from the refrigerator. Wrap frozen food
in several layers of newspaper. Store it in a cool place, well covered.
2. Defrost the freezer compartment prior to cleaning (see "Defrosting" sec-
tion).
3. Switch the appliance off and remove the plug from the mains, or switch off
Switching off the appliance
To switch off the appliance, turn the temperature regulator to position "0".
If the appliance is not going to be used for an extended period:
1. Remove all refrigerated and deep-frozen packages as well as ice trays.
2. Switch off the appliance by turning the temperature regulator to position
"0".
3. Remove the mains plug or switch off or turn out the circuit breaker or fuse.
4. Defrost freezer compartment and clean thoroughly (see section: “Cleaning
and Care”).
5. Leave the door open to avoid the build up of odours.

Energy Saving Tips
• Do not install the appliance near cookers, radiators or other sources of
warmth. High ambient temperatures cause longer, more frequent opera-
tion of the compressor.
• Ensure sufficient air circulation and exhaust at the appliance base and at
the back wall of the appliance. Never cover air vent openings.
• Do not place warm foods into the appliance. Allow warm foods to cool
first.
• Only leave door open as long as necessary.
• Do not set temperature any colder than necessary.
• Keep the heat emitting condenser, the metall grille on the rear wall of
your appliance, always clean.
What to do if ...
Correcting Malfunctions
A malfunction may be caused by only a minor fault that you can rectify
yourself using the following instructions. Do not perform any other work on
the appliance if the following information does not provide assistance in
your specific case.
Warning! Repairs to refrigerators/freezers may only be performed by qua-
lified service engineers. Improper repairs can give rise to significant hazards
for the user. If your appliance needs repairing, please contact your speciali-
st dealer or our Customer Service.
64
or turn out the circuit breaker or fuse.
4. Clean the appliance and the interior accessories with a cloth and lukewarm
water. Commercially available dish washing detergents may also be used.
5. After cleaning wipe with fresh water and rub dry.
Accumulation of dust at the condenser increases energy consumption. For
this reason carefully clean the condenser at the back of the appliance once
a year with a soft brush or a vacuum cleaner.
6. Check the water drain hole on
the rear wall of the fridge. Clear a
blocked drain hole with the aid of
the green peg in the pack of
accessories included with the
appliance.
7. After everything is dry place
appliance back into service.
D037

65
The food is too warm.
Interior lighting does not
work.
The appliance is near a heat
source.
Temperature is not properly
adjusted.
Please look in the "Initial Start
Up" section.
Light bulb is defective.
Please look in the "Changing
the Light Bulb" section.
Turn the temperature regula-
tor to a colder setting tempo-
rarily.
Door was open for an exten-
ded period.
Please look in the "Installation
location" section.
A large quantity of warm
food was placed in the
appliance within the last 24
hours.
Open the door only as long as
necessary.
Heavy build up of frost, possi-
bly also on the door seal.
Door seal is not air tight (pos-
sibly after changing over the
hinges).
Carefully warm the leaking
sections of the door seal with
a hair dryer (not hotter than
approx. 50 °C). At the same
time shape the warmed door
seal by hand such that it sits
correctly.
Malfunction Possible Cause Remedy
Appliance does not work.
Appliance is not switched on Switch on the appliance.
Mains plug is not plugged in
or is loose.
Insert mains plug.
Fuse has blown or is defective.
Check fuse, replace if neces-
sary.
Socket is defective.
Mains malfunctions are to be
corrected by an electrician.
Appliance cools too much. Temperature is set too cold.
Turn the temperature regula-
tor to a warmer setting tem-
porarily..
Unusual noises.
The appliance is touching the
wall or other objects.
Appliance is not level.
A component, e.g. a pipe, on
the rear of the appliance is
touching another part of the
appliance or the wall.
If necessary, carefully bend
the component out of the
way.
Move the appliance slightly.
Readjust the feet.

66
Regulations, Standards, Guidelines
This appliance was designed for household use and was manufactured in
accordance with the appropriate standards. The necessary measures in
accordance with appliance safety legislation regulations (GSG), accident
prevention regulations for refrigeration appliances (VBG 20) and the regu-
lations of the German Society of Electrical Engineers (VDE) were observed in
the manufacture of this appliance.
The refrigerant circuit has been checked for leaks.
This appliance is in accordance with the following EU guidelines:
– 73/23/EWG dated 19 February 1973 - low voltage guidelines.
– 89/336/EWG dated 3 May 1989
(including guideline change notice 92/31/EWG) - EMV guideline
The compressor starts after a
period of time.
See the "Cleaning and Care"
section.
This is normal, no error has
occurred.
The compressor does not start
immediately after changing
the temperature setting.
Water on the floor or on sto-
rage shelves.
Water drain hole is blocked.
Changing the light bulb
Warning! There is a risk of electric shocks! Before changing the light bulb,
switch off the appliance and unplug it, or pull the fuse or the circuit breaker.
Light bulb data: 220-240 V, max. 15 W
1. To switch off the appliance, turn the
temperature regulator to position
"0".
2. Unplug the mains plug.
3. To change the light bulb, undo the
screw.
4. Press the light bulb cover as shown
and slide it backwards.
5. Change the defective light bulb.
6. Refit the light bulb cover and the
screw.
7. Put the refrigerator back into opera-
tion.
AEG65
Malfunction Possible Cause Remedy

67
Gracias por elegir uno de nuestros productos de alta calidad.
Con este aparato podrá experimentar la perfecta combinación entre el
diseño funcional y la tecnología más avanzada.
Convénzase de que nuestros electrodomésticos están diseñados para ofre-
cer el mejor rendimiento y control - En efecto, hemos estableciendo los más
altos niveles de excelencia (calidad)
Además de esto podrá comprobar que el respeto medioambiental y el ahor-
ro de energía son aspecto integrales de nuestros productos.
Para asegurar un funcionamiento optimo y regular de su aparato, por favor,
lea detenidamente este manual de instrucciones. Éste le ayudará a navegar
por todos los procesos de funcionamiento de modo más eficaz.
Le recomendamos que guarde este manual en un lugar seguro, para que, si
es necesario, pueda consultarlo en cualquier momento.
Le deseamos que disfrute al máximo de su nuevo aparato
En este manual se utilizan los símbolos siguientes
Información importante para su seguridad personal y para evitar daños al
electrodoméstico
Información general y consejos
Información medioambiental

68
Indice
Seguridad. . . . . . . . . . . . . . . . . . . . . . . . . . . . . . . . . . . . . . . . . . . . . .69
Eliminación . . . . . . . . . . . . . . . . . . . . . . . . . . . . . . . . . . . . . . . . . . . . .71
Información sobre el embalaje del aparato . . . . . . . . . . . . . . . . . . . . . .71
Desguace de los aparatos viejos . . . . . . . . . . . . . . . . . . . . . . . . . . . . . . . .71
Quitar el seguro para el transporte . . . . . . . . . . . . . . . . . . . . . . . . .71
Retenes-Repisas . . . . . . . . . . . . . . . . . . . . . . . . . . . . . . . . . . . . . . . . . . . . .72
Instalación . . . . . . . . . . . . . . . . . . . . . . . . . . . . . . . . . . . . . . . . . . . . .72
Lugar de instalación . . . . . . . . . . . . . . . . . . . . . . . . . . . . . . . . . . . . . . . . .72
El aparato necesita ventilación . . . . . . . . . . . . . . . . . . . . . . . . . . . . . . . .73
Reversibilidad de la puerta . . . . . . . . . . . . . . . . . . . . . . . . . . . . . . . . . . . .73
Medidas del espacio . . . . . . . . . . . . . . . . . . . . . . . . . . . . . . . . . . . . . . . . .74
Instrucciones para empotrar el aparato . . . . . . . . . . . . . . . . . . . . . . . . .74
Conexión eléctrica . . . . . . . . . . . . . . . . . . . . . . . . . . . . . . . . . . . . . . .78
Antes de la puesta en servicio . . . . . . . . . . . . . . . . . . . . . . . . . . . . .78
Puesta en servicio y regulación de la temperatura . . . . . . . . . . . . . . . . . . . . . .78
Interruptor climatico . . . . . . . . . . . . . . . . . . . . . . . . . . . . . . . . . . . . . . . . . . . . . . .79
Accesorios internos . . . . . . . . . . . . . . . . . . . . . . . . . . . . . . . . . . . . . .79
Colocación de las repisas . . . . . . . . . . . . . . . . . . . . . . . . . . . . . . . . . . . . .79
Colocación de las mensulas . . . . . . . . . . . . . . . . . . . . . . . . . . . . . . . . . .79
Refrigeración de los alimentos y de las bebidas . . . . . . . . . . . . . . .80
Congelación y sobrecongelación . . . . . . . . . . . . . . . . . . . . . . . . . . . .80
Masa eutéctica . . . . . . . . . . . . . . . . . . . . . . . . . . . . . . . . . . . . . . . . . .81
Calendario de congelación . . . . . . . . . . . . . . . . . . . . . . . . . . . . . . . . . . . . . . .82
Cubitos de hielo . . . . . . . . . . . . . . . . . . . . . . . . . . . . . . . . . . . . . . . . .82
Descongelación . . . . . . . . . . . . . . . . . . . . . . . . . . . . . . . . . . . . . . . . .82
Apagado del aparato . . . . . . . . . . . . . . . . . . . . . . . . . . . . . . . . . . . . .83
Limpieza y cuidados . . . . . . . . . . . . . . . . . . . . . . . . . . . . . . . . . . . . .84
Consejos para ahorrar energía . . . . . . . . . . . . . . . . . . . . . . . . . . . . .85
Qué hacer si... . . . . . . . . . . . . . . . . . . . . . . . . . . . . . . . . . . . . . . . . . .85
Remedio en caso de inconvenientes . . . . . . . . . . . . . . . . . . . . . . . . . . . .85
Sustitución de la bombilla . . . . . . . . . . . . . . . . . . . . . . . . . . . . . . . . . . . .87
Servicio Técnico . . . . . . . . . . . . . . . . . . . . . . . . . . . . . . . . . . . . . . . . .87
Disposiciones, Normas, Directivas . . . . . . . . . . . . . . . . . . . . . . . . . .87

69
Seguridad
La seguridad de nuestros aparatos cumple los reglamentos técnicos aproba-
dos y la ley de seguridad de los aparatos. No obstante esto, consideramos
oportuno facilitar vuestra familiaridad con las siguientes advertencias:
Utilización conforme a la finalidad prevista
• El aparato frigorífico es apto para una utilización doméstica. Es apto para
enfriar, congelar y sobrecongelar productos alimentarios y para preparar
helados. Es apto para congelar y conservar productos alimentarios y hela-
dos.
• Por motivos de seguridad no se permite en ningún caso aportar modifi-
caciones o transformaciones al aparato.
• Si se desea utilizar el aparato frigorífico en ámbito empresarial o para fina-
lidades que no sean la refrigeración o congelación de productos alimen-
tarios, se ruega ajustarse a las disposiciones de ley vigentes para vuestro
sector.
Antes de la primera puesta en servicio
• Verificar que el aparato no presente eventuales daños debidos al tran-
sporte. ¡No conectar a la red, en ningún caso, un aparato estropeado! Si
presenta daños dirigirse al proveedor.
Sustancia refrigerante
El aparato contiene, en el circuito refrigerante, un gas natural denominado
Isobutano (R600a), altamente tolerado por el medio ambiente, pero que de
todas maneras es inflamable.
• Durante el transporte y la instalación del aparato se debe prestar atención
en no estropear ningún elemento del circuito refrigerante.
• En caso de daños al circuito refrigerante:
– evitar terminantemente las llamas libres y las fuentes de ignición;
– proporcionar a una buena ventilación en el sitio donde se encuentra el
aparato.
Seguridad de los niños
• Los elementos del embalaje (por ej. hojas de plástico, poliestireno) pueden
ser peligrosos para los niños. ¡Peligro de asfisia! ¡Mantener el material de
embalaje fuera del alcance de los niños!
• Los aparatos que no se van a utilizar más, antes de desguazarlos, se deben
poner inutilizables. Desenchufar la clavija, cortar el cable de red, sacar o
destruir los eventuales cierres de bloqueo. De esta manera se evita que

70
niños puedan quedar encerrados en el aparato mientras juegan (¡Peligro
de asfisia!) y se evita que puedan encontrarse en otras situaciones peli-
grosas para su vida.
• Este aparato no está pensado para ser utilizado por personas (incluidos los
niños) con capacidades físicas, sensoriales o mentales reducidas, o que no
tengan experiencia y conocimiento, a menos que una persona responsa-
ble de su seguridad les supervise o les ofrezca instrucción en el uso del
aparato. Los niños deben ser supervisados para asegurarse de que no jue-
guen con el aparato !
En el servicio diario
• Los contenedores de gases inflamables o de líquidos, por efecto del frío
pueden perder su estanqueidad. ¡Peligro de explosiones! No guardar nun-
ca contenedores con sustancias inflamables, como por ejemplo aerosoles,
encendedores y cartuchos de abastecimiento, etc. en el frigorífico.
• Las botellas y las latas no se deben poner nunca en el congelador. Podrían
explotar tan pronto se congela su contenido, mientras que los líquidos
que contienen anhídrido carbónico (bebidas con gas) ¡pueden llegar a
estallar! No poner nunca en el congelador limonada, zumos de fruta, cer-
veza, vino, cava, etc. Hacen excepción: las bebidas superalcohólicas que se
pueden poner en el congelador.
• No tragarse los helados ni los cubitos de hielo recién sacados del conge-
lador. El helado o el hielo muy fríos se pueden congelar en contacto con
la lengua o los labios provocando heridas.
• No tocar los productos congelados con las manos mojadas. Las manos se
podrían congelar sobre el producto.
• No utilizar nunca pequeños electrodomésticos (por ej. máquinas eléctricas
para hacer helados, batidoras, etc.) dentro del frigorífico.
• Antes de efectuar las operaciones de limpieza es necesario apagar el apara-
to, desenchufar la clavija de la toma de red, o quitar el fusible.
• Desenchufar la clavija de la toma de red agarrándola siempre por el cuer-
po de la clavija y nunca tirando del cable.
En caso de inconvenientes
• Si en el aparato se produjera un inconveniente se ruega leer las instruc-
ciones bajo el epígrafe “Qué hacer si...”. Si dichas instrucciones no basta-
ran hay que abstenerse de efectuar ulteriores operaciones de reparación.
• Los aparatos frigoríficos deben ser reparados exclusivamente por personal
especializado. Las reparaciones incorrectas pueden acarrear notables rie-
sgos. En caso de necesitar una reparación, se ruega dirigirse al propio pro-
veedor o a un centro de asistencia autorizado.

71
Eliminación
Información sobre el embalaje del aparato
Todos los materiales de producción utilizados ¡son tolerados por el medio
ambiente! Se pueden tirar tranquilamente a la basura o pueden ser incine-
rados en las plantas para basuras urbanas. En cuanto a los materiales de pro-
ducción: Los materiales sintéticos también se pueden reciclar y vienen mar-
cados como sigue:
>PE< para el polietileno, por ej. en el envoltorio exterior y en las bolsas
internas.
>PS< para el poliestireno expandido, por ej. en los elementos embutidos, en
general exento de propulsores.
Las piezas de cartón están realizadas con papel reciclado y es preciso echar-
las a los contenedores destinados a la recogida del papel.
Desguace de aparatos viejos
Para proteger el medio ambiente es necesario desguazar los aparatos viejos
de una manera adecuada. Esto vale también para vuestro aparato que haya
terminado de prestar su servicio.
¡Atención! Los aparatos que ya no sirven más, antes de desguazarlos se
deben poner inutilizables. Desenchufar la clavija, cortar el cable de red, sacar
o destruir los eventuales cierres de bloqueo. De esta manera se evita que
niños puedan quedar encerrados en el aparato mientras juegan (¡Peligro de
asfisia!) y se evita que puedan encontrarse en otras situaciones peligrosas
para su vida.
Advertencias acerca del desguace :
• El aparato no debe ser tirado a la basura sino que debe ser entregado a
organizaciones autorizadas para su eliminación.
• El circuito refrigerante, en particular el intercambiador de calor situado en
la parte inferior del aparato, no se debe estropear.
• El símbolo en el producto o en su embalaje indica que este produc-
to no se puede tratar como desperdicios normales del hogar. Este produc-
to se debe entregar al punto de recolección de equipos eléctricos y elec-
trónicos para reciclaje. Al asegurarse de que este producto se deseche cor-
rectamente, usted ayudará a evitar posibles consecuencias negativas para
el ambiente y la salud pública, lo cual podría ocurrir si este producto no
se manipula de forma adecuada. Para obtener información más detallada
sobre el reciclaje de este producto, póngase en contacto con la admini-
stración de su ciudad, con su servicio de desechos del hogar o con la tien-
da donde compró el producto.
Quitar el seguro para el transporte
El aparato y los accesorios internos están protegidos para el transporte.
• Quitar las cintas adhesivas situadas en los lados de la puerta
• Quitar todas las cintas adhesivas y los elementos de bloqueo de dentro del
aparato.

72
Si fuese inevitable instalar el aparato al lado de una fuente de calor, es nece-
sario mantener las siguientes distancias mínimas:
– de los hornos eléctricos 3 cm;
– de las estufas de queroseno y leña 30 cm.
Si no fuese posible mantener dichas distancias mínimas, es necesario poner
una plancha protectora contra el calor entre el horno y el frigorífico.
Clase climática para temperaturas ambiente
SN desde +10 hasta +32 °C
N desde +16 hasta +32 °C
ST desde +18 hasta +38 °C
T desde +18 hasta +43 °C
Instalación
Lugar de instalación
Es preciso colocar el aparato en un sitio bien ventilado y seco.
La temperatura ambiente influye mucho sobre el consumo de corriente. Por
tanto el aparato no debería:
– quedar expuesto directamente a los rayos del sol;
– ser puesto al lado de elementos caloríficos, de un horno o de otras fuen-
tes de calor similares;
– mientras que debería ser colocado en un sitio en que la temperatura
ambiente se corresponda con la clase climática para la cual ha sido con-
struido.
La clase climática viene indicada en la placa de características, situada den-
tro de la cámara frigorífica a mano izquierda.
La siguiente tabla indica qué temperaturas ambiente están asociadas con las
clases climáticas:
B
A
Retenes-Repisas
Su aparato dispone de retenes-repi-
sas que permiten bloquear las repi-
sas durante el transporte.
Para quitarlos actuar como sigue:
subir la repisa por la parte trasera,
empujarla en la dirección de la fle-
cha hasta que queda libre y segui-
damente quitar los retenes.

73
El frigorífico necesita ventilación
Por motivos de seguridad la ventila-
tión debe ser la indicada en la figura.
¡Atención! Mantener las aper-
turas de ventilación libres de
obstáculos.
50 mm
min.
200 cm
2
200 cm
2
min.
D567
Reversibilidad de la puerta
La puerta, siendo reversible, se puede
montar con la apertura tanto dere-
cha (condiciones de suministro)
como izquierda, según el sitio donde
se instale el aparato.
¡Advertencia! Mientras se cambia la
apertura de la puerta el aparato debe
estar desconectado de la red eléctri-
ca. Antes que nada desenchufar la
clavija de la toma de red.
1. Desenrosque el perno superior y reti-
re el distanciador.
2. Retire el perno superior y la puerta
superior.
3. Desatornille la bisagra central y las
cubiertas del lado opuesto.
4. Retire la puerta inferior.
5. Desenrosque el perno inferior y
enrósquelo en el lado opuesto.
6. Vuelva a colocar la puerta inferior.
7. Vuelva a atornillar la bisagra central
y las cubiertas en el lado opuesto.
8. Vuelva a colocar la puerta superior
y vuelva a enroscar el perno de la
bisagra y el distanciador en el
lado opuesto.

74
Instrucciones para empotrar el aparato
1
2
44m
m
Asegúrese de que haya una distan-
cia de 44 mm entre la parte infe-
rior del mueble de cocina y el bor-
de del aparato. La tapa de la bisa-
gra inferior, incluida en la bolsa de
accesorios, permite garantizar la
posición correcta del mueble de
cocina y el aparato. Asegúrese
también de que éste no aplaste el
cable de alimentación.
D765
Pegar el tapajunta como mostrado
en la figura.
Medidas del espacio
altura 1446 mm
profundidad 550 mm
ancho 560 mm
Fijar el aparato con los 4 tornillos
incluidos en el suministro.
(I = corto) - (P = largo)
I
P

75
Tome la cubierta de plástico (E), uti-
lizada para cubrir la bisagra con el
pasador de giro, y retire la pieza tal y
como se muestra en la imagen.
La parte interior de la tapa lleva una
ranura que facilita la retirada del
componente.
"Retire la pieza marcada con DX, si el
pasador de giro está insertado en la
bisagra derecha; retire la pieza SX en
caso contrario".
B
E
E
D
C
Aplicar las tapas (C-D) sobre las
aletas de los tapajunta y en los
agujeros para los soportes.
Aplicar la rejilla de ventilación (B)
y la tapa de bisagra (E) aplicándo-
los a presión.
Separar las piezas Ha, Hb, Hc, Hd
como en la figura.
PR266
Ha
Hb
Hc
Hd

76
Abrir la puerta del aparato y la
del mueble a 90° aproximada-
mente, y poner la escuadra (Hb)
en la guía (Ha). Mantener juntas
la puerta del aparato y la puerta
del mueble y marcar los agujeros
como mostrado en la figura.
Aplicar a presión la tapa (Hc)
sobre la guía (Ha).
PR33
Hc
Ha
PR167
Ha
Hb
8mm
Apoyar la guía (Ha) en la parte
interna de la puerta del mueble,
encima y abajo, como mostrado
en la figura y marcar la posición
de los agujeros exteriores.
Después de haber taladrado los
agujeros, fijar la guía con los tor-
nillos incluidos en el suministro.
2
1
m
m
2
1
m
m
ca. 50 mm
90°
90°
ca. 50 mm

77
Aplicar a presión la tapa (Hd)
sobre la guía (Hb).
PR167/1
Hd
Hb
Ha
8mm
K
Quitar las escuadras y marcar a 8
mm del borde externo de la puer-
ta con el clavo (K).
Colocar de nuevo la escuadra
encima de la guía y fijar con los
tornillos incluidos en el sumini-
stro.
Para la eventual operación de ali-
neación de la puerta del mueble,
utilizar el juego de los agujeros
elípticos.
Al final de las operaciones es
necesario comprobar que la
puerta del frigorífico cierre per-
fectamente.
PR168
Hb

78
Conexión eléctrica
Para efectuar la conexión eléctrica es necesario utilizar una toma de cor-
riente con contacto de protección, instalada conforme a las prescripciones
vigentes. El fusible eléctrico debe ser por lo menos de 10 Amperios. Si una
vez instalado el aparato no fuese posible acceder a la toma (para eventual-
mente desenchufar el aparato), es necesario tomar las medidas adecuadas
para garantizar la desconexión del aparato de la red eléctrica (por ej. fusi-
ble, interruptor LS, interruptor de protección contra sobrecorrientes o dispo-
sitivos parecidos, que tengan una apertura entre los contactos de por lo
menos 3mm).
• Antes de poner en servicio el aparato hay que comprobar que la tensión
y la frecuencia del aparato, indicados en su placa de características, se cor-
respondan con los de la red eléctrica general de alimentación:
por. ejemplo. AC 220 ... 240 V 50 Hz o bien
220 ... 240 V~ 50 Hz
(por tanto de 220 a 240 Voltios en corriente alterna, 50 Hertz).
La placa de características se encuentra dentro de la cámara frigorífica, a
mano izquierda.
Antes de la primera puesta en servicio
• Limpiar el interior del aparato y todos los accesorios antes de poner en ser-
vicio el frigorífico (ver capítulo “Limpieza y cuidados”).
Puesta en servicio y regulación de la temperatura
• Enchufar la clavija en la toma di corriente. La luz interior se enciende
cuando la puerta está abierta. El mando del termostato está en la sección
frigorífico, a mano derecha.
Posición „0“ significa: stop - apagado.
Posición „1“ significa: Máxima temperatura interna (menos frío).
Posición „6“ significa: Mínima temperatura interna (máximo frío).
La temperatura interna depende de los factores siguientes:
– Temperatura ambiente;
– Cantidad y temperatura de los alimentos conservados;
– Frecuencia y duración de la apertura de las puertas.
La temperatura del frigorífico y del congelador no se regulan por separado.
Si se desea congelar rápidamente los alimentos se puede seleccionar la posi-
ción “6”. Atención: la temperatura de la sección frigorífico puede bajar a 0 ºC
en este caso. De ser así hay que poner el mando en la posición intermedia

79
Accesorios internos
Colocación de las repisas
• La repisa interior, encima de los
cajones de verdura/fruta, debe estar
siempre en esta posición, para man-
tener más fresca por más tiempo la
verdura y la fruta. Las demás repisas
se pueden poner a diferentes alturas:
• Para ello hay que tirar de la repisa
hacia adelante hasta que sea posible
desplazarlo para arriba o para abajo.
• La introducción en otra altura se
realiza en sentido contrario.
• Sacar la semi-repisa y situarla a
otro nivel. De esta manera se gana
espacio para poder poner, en la
superficie de abajo productos a
enfriar más bien altos.
Colocación de las mensulas
• Según las exigencias, las mensulas en la puerta se pueden sacar, empuján-
dolas para arriba, para ponerlos seguidamente sobre otros soportes.
D338
¡Importante!
Con una temperatura ambiente elevada (por ej. días veraniegos calurosos) o
con el mando puesto en las posiciones de máximo frío, el compresor puede
funcionar continuamente.
En tal caso es necesario girar el mando sobre una posición de menor frío
(posición ”3” ó ”4”). De esta manera se
regula el funcionamiento del compresor
y la descongelación, en la sección fri-
gorífico, se produce de nuevo automáti-
camente.
Interruptor climático
Con temperaturas ambientes inferio-
res a +16°C el interruptor (A) (Fig. 1)
debe ser apretado. La luz incorpora-
da se enciende.
D710
A
PR270/1

80
Refrigeración de los alimentos y de las bebidas
Para utilizar de la mejor manera la sección frigorífico es necesario:
• no poner en la cámara alimentos calientes ni líquidos en evaporación;
• tapar o envolver los alimentos, en particular si tienen aromas;
• colocar los alimentos de manera que el aire pueda circular libremente alre-
dedor de ellos.
Carne (de todas las clases): hay que envolverla en bolsas de plástico y
ponerla sobre el vidrio, encima del cajón de la verdura.
En esta posición se podrá conservar por uno o dos días a lo sumo.
Alimentos cocidos, platos fríos, etc. se deben tapar bien y se pueden poner
en cualquier sitio del frigorífico.
Fruta y verdura: se deben poner, después de lavarlas, en el/los cajón/cajo-
nes previstos.
Mantequilla y queso se deben poner en los contenedores previstos o se
deben envolver en hojas de plástico o aluminio para evitar el contacto con
el aire.
Leche en botella: bien cerradas, se ponen en el portabotellas.
Plátanos, patatas, cebolla y ajo, si no están empaquetados no se deben
poner en el frigorífico.
Congelación y sobrecongelación
Vuestro congelador es apto tanto para conservar sobrecongelados como
para congelar alimentos frescos.
Atención
• La temperatura en la sección congelador debe ser de -18°C o inferior,
antes de poner dentro los alimentos a congelar.
• Para la congelación hay que ajustarse a las cantidades indicadas en la pla-
ca de características. La cantidad para la congelación es la cantidad máxi-
ma de alimentos frescos que es posible congelar en 24 horas. Queriendo
congelar alimentos frescos por más días consecutivos, reducir la cantidad
indicada en la placa a 2/3 ó 3/4.
• Dejar enfriar eventuales alimentos calientes antes de congelarlos. El calor
lleva a una fuerte formación de escarcha y conlleva un alto consumo de
energía.
• Respetar las fechas de caducidad indicadas en los paquetes por el pro-
ductor de los sobrecongelados.

81
• Los alimentos, una vez descongelados, no se pueden congelar de nuevo
previa cocción.
• Los contenedores de gases inflamables o de líquidos, por efecto del frío
pueden perder su estanqueidad. ¡Peligro de explosión! No guardar nunca
contenedores con sustancias inflamables, como por ejemplo aerosoles,
encendedores y cartuchos de abastecimiento, etc. en el frigorífico.
• Las botellas y las latas no se deben poner nunca en el congelador. Pueden
explotar tan pronto se congela su contenido, mientras que los líquidos
que tienen anhídrido carbónico (bebidas con gas) ¡pueden llegar a estal-
lar! No poner nunca en el congelador limonada, zumos de fruta, cerveza,
vino, cava, etc. Hacen excepción: las bebidas superalcohólicas que se pue-
den poner en el congelador.
• Envolver herméticamente los alimentos antes de congelarlos, para evitar
que se sequen, pierdan el aroma o que los sabores se mezclen con los de
los otros alimentos congelados.
Atención! No tocar nunca los productos congelados con las manos moja-
das. La piel podría pegarse al producto.
1. Poner los alimentos empaquetados en los cajones. Poner los alimentos fre-
scos a congelar en el cajón superior, junto a la masa eutéctica. Los alimen-
tos no congelados no deben entrar en contacto con los ya congelados, de
los contrario los productos congelados podrían descongelarse en algunos
puntos.
2. Si se desea una congelación rápida de los alimentos o si se desea utilizar la
cantidad máxima, apretar el interruptor climático 12 horas antes de poner
los alimentos. Acordarse al final del proceso de congelación de apretar de
nuevo el interruptor climático, para evitar un consumo inútil de energía. La
luz chivato incorporada se apaga.
3. Poner los productos congelados a ser posible separados en los cajones.
Masa eutéctica
El aparato puede venir equipado con una o varias masas eutécticas.
En caso de interrupción de la corriente o de mal funcionamiento del apara-
to, la masa eutéctica permite alargar en unas horas la conservación de los
alimentos congelados. Para explotar de la mejor manera la masa eutéctica,
ésta debe ser puesta en el cajón superior. La masa eutéctica se puede utili-
zar también como elemento enfriador para los bolsos térmicos.

82
Calendario de congelación
• Los símbolos en los cajones indican diversos tipos de productos a congelar.
• Las cifras indican el periodo de almacenamiento, en meses, para cada tipo
de producto a congelar.
• Si vale el valor superior o el valor inferior del periodo de almacenamien-
to indicado, depende de la calidad de los productos alimentarios y del tra-
tamiento a que han sido sometidos antes de la congelación. Para los ali-
mentos notablemente grasos, vale siempre el valor inferior.
Cubitos de hielo
1. Llenar hasta los 3/4 la bandeja del hielo con agua fría y ponerla en el cajón
congelador.
2. Para sacar los cubitos listos basta torcer la bandeja o ponerla por poco tiem-
po debajo de un chorro de agua corriente
¡Atención! Se recomienda no utilizar utensilios puntiagudos ni con cantos
para desprender la bandeja que eventualmente se haya quedado pegada.
Utilizar la paleta para rascar la escarcha incluida en el suministro.
Descongelación
Frigorífico
En la pared trasera de la sección frigorífico, se forma un capa de escarcha
durante el funcionamiento del compresor, que es eliminada automática-
mente durante las pausas de funcionamiento del compresor. El agua gene-
rada por la descongelación, a través de un canal situado en la parte trasera
de la sección frigorífico, por un agujero de desagüe es recogida en una ban-
deja situada encima del compresor, donde evapora por efecto del calor
generador por el propio compresor.
Congelador
En el compartimento congelador la escarcha deber á ser eliminada cada vez
que se ha formado un estrato de aproximadamente 4 mm de espesor, utili-
zando un raspador en plástico. Durante esta operación no es necesario inte-
rrumpir la conexión electrica o quitar los alimentos contenidos en el com-
partimento.
En el caso que se formara una espesa capa de hielo, será necesario descon-
gelar totalmente el congelador, procediendo de la manera siguiente:

83
1. Colocar el mando del termostato en
posición «0», o desenchufar el aparato.
2. Envolver los alimentos congelados en
varios papeles de periodico y colo-
carlos en un lugar muy fresco.
3. Dejar la puerta abierta. Colocar el
rascador en la posición adecuada
como se indica en la figura poniendo
debajo una cubeta para recoger el
agua.
4. Al completar la operación secar cui-
dadosamente la cuba del congelador.
5. Conservar el rascador para usos futu-
ros.
6. Girar el mando del termostato en la posi-
ción deseada o enchufar otre vez el aparato.
7. Poner el congelador en situación de congelación rápida.z
8. Pasadas dos o tres horas, el congelador está de nuevo listo para la conser-
vación de los alimentos congelados.
Atención
Se recomienda no utilizar utensilios metálicos para quitar la
escarcha a fin de evitar graves daños al aparato.
No usar dispositivo mecánico alguno u otro medio artificial para
acelerar el processo de desescarche excepto los recomendados.
Un aumento de la temperatura de los alimentos ultracongelados
durante el desescarche podría reducir el tiempo de conservación.
Apagado del aparato
Si fuese necesario apagar el aparato por un largo plazo:
1. Vaciar las secciones del frigorífico y del congelador y también las bandejas
del hielo.
2. Apagar el aparato poniendo el mando del termostato sobre el ”0”.
3. Desenchufar la clavija de la toma de corriente o desconectar la válvula de
seguridad.
4. Descongelar la sección congelador y limpiarla (ver párrafo “Limpieza y cui-
dados”).
5. Dejar abiertas las puertas para evitar que se formen olores desagradables.
D068

84
Limpieza y cuidados
Por motivos de higiene se debería limpiar siempre y con regularidad el inte-
rior del aparato, incluidos los accesorios.
¡Advertencia!
• Durante la limpieza, el aparato debe estar desenchufado de la red eléctri-
ca. ¡Peligro de electrocución! Antes de efectuar las operaciones de limpie-
za es necesario apagar el aparato, desenchufar la clavija de la toma de
red, o quitar el fusible.
• No limpiar nunca el aparato utilizando hidrolimpiadoras a vapor. La hume-
dad podría penetrar en los elementos eléctricos, ¡Peligro de electrocución!
El vapor hirviente puede dañar las partes en material sintético.
• El aparato debe estar completamente seco antes de ponerlo de nuevo en
servicio.
¡Atención!
• Aceites esenciales y sustancias solventes orgánicas pueden atacar los ele-
mentos en material sintético, por ej.
– zumo de limón o cortezas de naranja;
– mantequilla ácida;
– sustancias detergentes que contengan ácido acético.
Evitar el contacto entre los elementos del aparato y dichas sustancias.
• No utilizar nunca sustancias detergentes abrasivas.
1. Quitar los alimentos. Envolver los sobrecongelados con varias hojas de dia-
rio. Guardar dichos alimentos en un sitio fresco.
2. Apagar el aparato y desenchufar la clavija de la toma de red o bien desco-
nectar o desenroscar el fusible.
3. Descongelar el congelador.
4. Limpiar el aparato y los accesorios internos con un paño suave empapado de
agua caliente. Eventualmente añadir un poco de detergente para lavar platos.
5. Aclarar y secar frotando.
Los depósitos de polvo en el condensador, situado en la parte trasera del
aparato, reducen notablemente la potencia de enfriamiento por lo que
aumentan el consumo energético. Es necesario pues limpiarlo esmerada-
mente, una vez al año, con un cepillo o una aspiradora.

85
D037
Qué hacer si...
Remedios en caso de inconvenientes
Probablemente se trata de un avería leve que podéis eliminar por cuenta
vuestra, siguiendo estas instrucciones, sin tener que dirigiros al servicio téc-
nico. No tenéis que efectuar ninguna otra operación si las aquí presentadas
no bastan para solucionar el caso indicado.
iAdvertencia! Las reparaciones del frigorífico han de ser efectuadas exclu-
sivamente por personal especialista. Las reparaciones no adecuadas pueden
entrañar graves riesgos para el usuario. Si fuese necesario efectuar una
reparación, dirigiros exclusivamente a vuestro revendedor autorizado o a
nuestro servicio de asistencia al cliente.
Consejos para ahorrar energía
• No instalar el aparato cerca de hornos, elementos calentadores ni otras
fuentes de calor. Con temperaturas ambiente elevadas, el compresor se
pone en marcha más a menudo y por más tiempo.
• Garantizar una ventilación suficiente en entrada y en salida. No tapar
nunca las ranuras de ventilación.
• No poner nunca alimentos calientes dentro del aparato; primero dejar que
se enfríen.
• Abrir la puerta sólo por el tiempo necesario.
• No seleccionar una temperatura más fría que lo necesario.
• Poner los alimentos a descongelar en la sección frigorífico. El frío genera-
do por la descongelación contribuye en enfriar la sección frigorífico.
• Mantener constantemente limpio el condensador situado en la parte tra-
sera del aparato.
6. Examinar el agujero de desagüe del
agua de descongelación, situado en
la parte trasera de la sección frigorí-
fico. Si el agujero está atascado, es
posible destaparlo con el limpiador
verde.
7. Una vez que todo está bien seco se
puede poner de nuevo en servicio el
aparato.

86
Al cabo de un cierto tiempo el
compresor se pone automáti-
camente en marcha
Ver párrafo “Limpieza y cuida-
dos
Esto es normal, no se trata de
un inconveniente
Después de haber modificado
la regulación de la tempera-
tura el compresor no se pone
en marcha enseguida
Rastros de agua en el fondo
de la sección frigorífico
El agujero de desagüe del agua
de descongelación está atascado
Ruido insólito
El aparato está en contacto
con la pared o con otros
objetos
El aparato no está a nivel
Un componente instalado en
la parte trasera del aparato,
por ej. un tubo, toca otro
componente o la pared
Eventualmente doblarlo con
cuidado
Alejar ligeramente el aparato
Actuar sobre las patas regula-
bles
El aparato genera demasiado
frío
La temperatura está regulada
en un valor demasiado frío
Poner el mando sobre una
posición más caliente
Inconveniente Causas posibles Remedio
El aparato no funciona
El aparato no está encendido Encender el aparato
La clavija no está enchufada o
está floja
Enchufar la clavija en la toma
de corriente
El interruptor general está
disparado o está estropeado
Comprobar el interruptor
eventualmente cambiarlo
La toma de corriente está
estropeada
Defectos de la red eléctrica
deben ser reparados por un
electricista autorizado
Alimentos demasiado calien-
tes
La iluminación interna no
funciona
El aparato está instalador al
lado de una fuente de calor
La temperatura no está regu-
lada correctamente
Ver párrafo “Puesta en servi-
cio”
La bombilla está estropeada
Ver párrafo “Cambio de la
bombilla”
Poner el termostato sobre una
posición más fría
La puerta ha quedado abierta
por demasiado tiempo
Ver párrafo “Instalación”
En el arco de las 24 horas se
han puesto grandes cantida-
des de alimentos
Abrir la puerta sólo lo estric-
tamente necesario
Gran formación de escarcha
en el aparato o en la junta de
la contrapuerta
La junta de la contrapuerta
no es más hermética (even-
tualmente después de haber
efectuado la reversibilidad de
la puerta)
Calentar con cautela los puntos no
herméticos de la junta utilizando
un secador para el cabello ( no
superar los 50°C) poniendo de nue-
vo en forma la junta, tirando de
ella, de manera que se apoye per-
fectamente

87
Cambio de la bombilla
¡Advertencia! ¡Peligro de electrocución! Antes de cambiar la bombilla es nece-
sario apagar el aparato, desenchufar la clavija de la toma de red, o quitar el
fusible. Características de la bombilla: 220-240 V, máx. 15 W, empalme: E 14
1. Apagar el aparato poniendo el mando
sobre el ”0”.
2. Desenchufar la clavija de la toma.
3. Desenroscar el tornillo de fijación del
plafón.
4. Sacar la parte móvil como mostrado en
la figura.
5. Cambiar la bombilla por una nueva.
6. Poner el plafón y fijarlo con el tornillo.
7. Encender el aparato.
AEG65
Servicio técnico
Si el inconveniente no se logra solucionar con estar instrucciones, dirigiros
a vuestro destribuidor autorizado o a nuestro servicio técnico. Las direccio-
nes y números de teléfono los encontráis en el folleto adjunto de “Condi-
ciones de garantía / Direcciones de los centros de asistencia”. Disponer de las
piezas de repuesto adecuadas permite ahorrar tiempo. Por tanto os roga-
mos que indiquéis los datos siguientes de vuestro aparato:
• Descripción del modelo
• Número de producción (N. P)
• Número de ultimación (N.U)
Estas indicaciones las encontráis en la placa de características situada den-
tro del aparato. Para tenerlos siempre al alcance de la mano os aconsejamos
apuntarlos aquí.
Advertencia: Una llamada al servicio técnico no justificada está sujeta a la
obligación de pagar los gastos, también durante la garantía.
Disposiciones, Normas, Directivas
El aparato ha sido proyectado para la utilización doméstica y ha sido fabri-
cado según las normas vigentes para esta clase de aparato. Para su pro-
ducción han sido así mismo tomadas medidas especiales conforme a la ley
de seguridad de los aparatos (GSG), las prescripciones de prevención de
accidentes para equipos de refrigeración (VBG 20) y las disposiciones de la
cooperativa eléctrica alemana (VDE). Se ha comprobado la estanqueidad del
circuito refrigerante.
Este aparato cumple las siguientes Directivas CEE:
– 73/23/CEE del 19.2.1973 - Directiva de baja tensión
– 89/336/CEE del 3.5.1989
(incluidas las sucesivas enmiendas de 92/31/CEE) – Directiva EMW.

2223 248-65-00-16112007 Änderungen vorbehalten
Con riserva di modifiche
Subject to change without notice
Con reserva de modificaciones
www.electrolux.com
www.aeg-electrolux.de
-
 1
1
-
 2
2
-
 3
3
-
 4
4
-
 5
5
-
 6
6
-
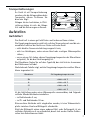 7
7
-
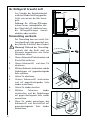 8
8
-
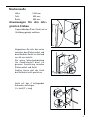 9
9
-
 10
10
-
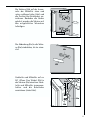 11
11
-
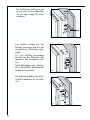 12
12
-
 13
13
-
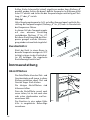 14
14
-
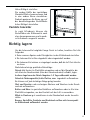 15
15
-
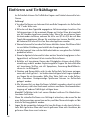 16
16
-
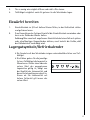 17
17
-
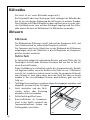 18
18
-
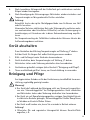 19
19
-
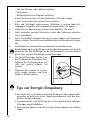 20
20
-
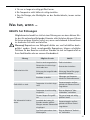 21
21
-
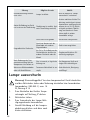 22
22
-
 23
23
-
 24
24
-
 25
25
-
 26
26
-
 27
27
-
 28
28
-
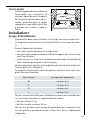 29
29
-
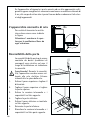 30
30
-
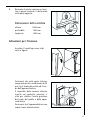 31
31
-
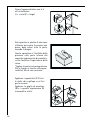 32
32
-
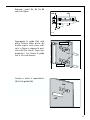 33
33
-
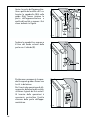 34
34
-
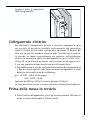 35
35
-
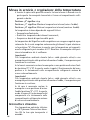 36
36
-
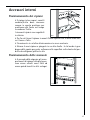 37
37
-
 38
38
-
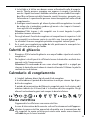 39
39
-
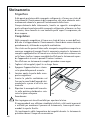 40
40
-
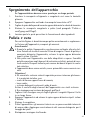 41
41
-
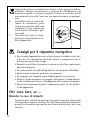 42
42
-
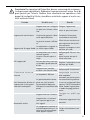 43
43
-
 44
44
-
 45
45
-
 46
46
-
 47
47
-
 48
48
-
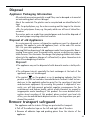 49
49
-
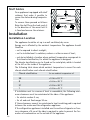 50
50
-
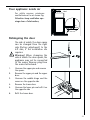 51
51
-
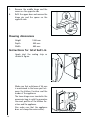 52
52
-
 53
53
-
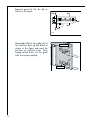 54
54
-
 55
55
-
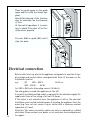 56
56
-
 57
57
-
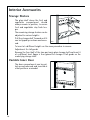 58
58
-
 59
59
-
 60
60
-
 61
61
-
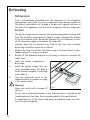 62
62
-
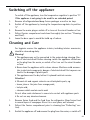 63
63
-
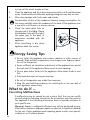 64
64
-
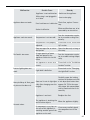 65
65
-
 66
66
-
 67
67
-
 68
68
-
 69
69
-
 70
70
-
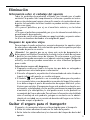 71
71
-
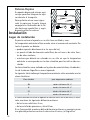 72
72
-
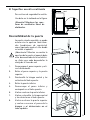 73
73
-
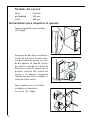 74
74
-
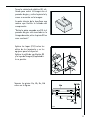 75
75
-
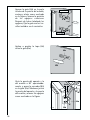 76
76
-
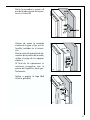 77
77
-
 78
78
-
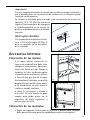 79
79
-
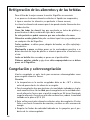 80
80
-
 81
81
-
 82
82
-
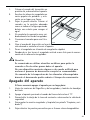 83
83
-
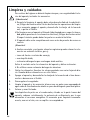 84
84
-
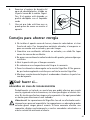 85
85
-
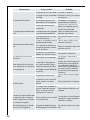 86
86
-
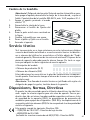 87
87
-
 88
88


Aeg-Electrolux SC71440-6I Manual de usuario
- Categoría
- Enfriadores de bebidas
- Tipo
- Manual de usuario
en otros idiomas
- italiano: Aeg-Electrolux SC71440-6I Manuale utente
- English: Aeg-Electrolux SC71440-6I User manual
- Deutsch: Aeg-Electrolux SC71440-6I Benutzerhandbuch
- português: Aeg-Electrolux SC71440-6I Manual do usuário
Artículos relacionados
-
Aeg-Electrolux SK41200-5I Manual de usuario
-
-
-
-
-
-
-
-
-