Graff G-4612-LM3 Guía de instalación
- Categoría
- Artículos sanitarios
- Tipo
- Guía de instalación

Dear Customer Estimado Cliente
Thank you for selecting our product. We are confident we can fully satisfy Muchas gracias por elegir nuestro producto. Estamos seguros que podemos
your expectations by offering you a wide range of technologically advanced satisfacer completamente sus expectativas ofreciéndole una amplia gama de
products which directly result from our many years of experience in faucet productos tecnológicamente avanzados que resultan directamente de
and fitting production. muchos años de experiencia en grifos y su producción apropiada.
ENGLISH ESPANOL
1
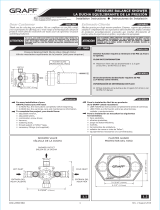
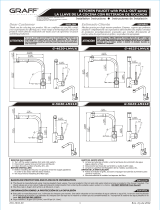
FLOW RATE INFORMATION INFORMACIÓN DE INTENSIDAD DE FLUJO
Max flow rate . GPM ( . L/min.) at 60 psi (4.1 bar). Flujo m ximo . GPM ( . L/min.) con 60 psi (4.1 bar).
ENGLISH
REMOVE OLD FAUCET EL GRIFO VIEJO
Turn off the water supplies (hot and cold water). Limpie las tuberias a fondo y cierre las llaves de suministro de agua
Disconnect supply lines and remove old faucet. (agua caliente y fría).
Clean the sink surface of putty, dirt., etc. Desconecte las líneas de suministro y quite el grifo viejo.
Limpie la superficie del fregadero de la masilla, suciedad, etc.
BEFORE INSTALLING ANTES DE LA INSTALACIÓN
Before installing the faucet, it is good to rinse the supply pipelines in Antes de instalar el grifo, es bueno ejuagar las tuberías suministro
order to do away with the dirty residues. para eliminar residuos.
e recommend installing the filter taps. ecomendamos el instalar los tapones de filtro.
ESPANOL
ENGLISH
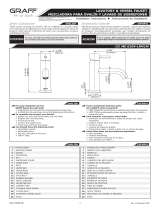
For easy installation of your
GRAFF faucet you will need:
arnings, care and maintenance
information.
To complete the project, you should:
gather the tools and all the parts you will need,
prepare the mounting area,
mount the faucet,
connect the supply lines,
finally test and flush the faucet.
You should have the following tools:
adjustable wrench,
channel pliers.
Para la instalación fácil de su grifo de la
GRAFF usted necesitará:
,
ertencias,
cuidado y mantenimiento.
Para terminar el proyecto, usted debe:
recolectar las herr
a el montaje,
monte el grifo,
conecte las líneas de fuente,
finalmente pruebe y limpie el grifo con un chorro de agua
Usted debe tener las herramientas siguientes:
llave ajustable,
alicates acanalados.
For care, use soft towel with soap and water only! Under no
circumstances should you use any chemicals.
ATTENTION! ATENCIÓN! Para el cuidado, utilice solamente una toalla suave con jabón
y aqua! Bajo ninguna circunstancia no use productos qu micos.
This faucet complies with A ME/AN I A112.18.1, A E 1016
and C A B 12 tandards.
Este grifo se encuentra conforme con losestandares
de A ME/AN I A112.18.1, de A E 1016 y de C A B 12 .
Installation Instructions Instrucciones de Instalación
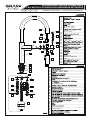
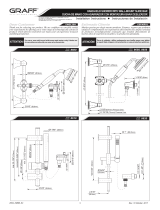
ITCHEN FAUCET with PULL-DOWN SPRAY
LA LLAVE DE LA COCINA CON PULVERIZADOR EXTENSIBLE
ESPANOL
1.8 6.8 1.8 6.8
PERFEQUE GN-4612, GN-4613
Model
Modelo
4-11/16" (120mm)
7-1/8"
(180mm)
(458mm)
(124mm)
9-5/16" (236mm)
(196mm)
4-7/8"
7-11/16"
18"
IOG 5016.20 Rev. 3 March 2021

2
19
18
20
A
B
20
A
B
1
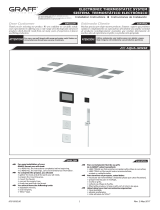
9/16"-24 UNEF
9/16"-24 UNEF
10
C
22
21
1
14
1
16
13
9
8
6
2
10
3 4
1
1
2
3
4
5
6
7
8
9
10
11
12
13
14
15
16
17
18
19
20
21
22
23
A
B
C
1
2
3
4
5
6
7
8
9
10
11
12
13
14
15
16
17
18
19
20
21
22
23
A
B
C
~
ESPANOL
ENGLISH
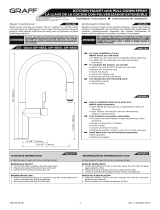
F
Ø Ø
NUT
CAP
F
FLANGED NUT
CPPE UBE (C L ATE UPPL )
A
T
FLA
AL .)
.)
AL
Ø Ø
T
T
T
T
A PLANA
DE L
This faucet complies with A ME/AN I A112.18.1, A E 1016
and C A B 12 tandards.
Este grifo se encuentra conforme con losestandares
de A ME/AN I A112.18.1, de A E 1016 y de C A B 12 .
Installation Instructions • Instrucciones de Instalación
KITCHEN FAUCET with PULL-DOWN SPRAY
LA LLAVE DE LA COCINA CON PULVERIZADOR EZTENSIBLE
23
PLASTIC SLEEVE
(1800mm)
12
11
24
24
MANGA DE PLÁSTICO
25
26
24
25
26
25
26
MAGNETIC CONNECTION
CONEXIÓN MAGNÉTICA
GASKET
EMPAQUETADORA
CHECK VALVE
VÁLVULA DE CHEQUEO
Rev. 3 March 2021
IOG 5016.20

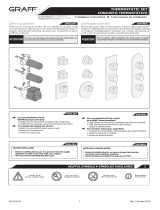
MAX. 2-9/32" (MAX. 58mm)
MIN. Ø1-11/32"
(MIN. 34mm)Ø
1
13
15
14
16
A
B
9/16"-24 UNEF
A
B
9/16"-24 UNEF
19
18
20
10
C
22
21
20
17
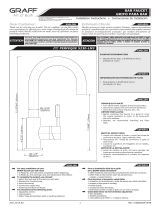
Cold water inlet
Entrada de agua fria
Hot water inlet
Entrada de agua caliente
Pull-down spray outlet
Salida del pulverizador extensible
23
23
10
Ver el dis. 2
1) Destornillar la tuerca de collar (16) del tubo roscado y quitar
la arandela de goma (15).
2) Por el agujero de montaje (por arriba) en el fregadero de
cocina insertar la manguera del pulverizador (10) y colocar
el grifo en el eje del agujero. Verificar si el anillo (14) esté en
la posición correcta en la incisión de la parte inferior del base
el grifo de cocina (13). Posicione el grifo dentro de la base
del grifo (13).
3) Por debajo del fregadero de cocina poner la arandela de
goma (15) en el tubo roscado y apretar la tuerca de collar
(16). Después de haber colocado el grifo en su posición
correcta, apretar la tuerca (16) con la llave ajustable.
ACOPLAMIENTO DE LA DUCHA EXTENSIBLE
1) La válvula de chequeo de exito (C) debería ya estar
conectada a la manguera del pulverizador (10). Ponga la
empaquetadura (22) en la salida de la pieza de conexión
(21). Conecte la válvula de chequeo (C) a la pieza de
conexión de salida del grifo (21) y apriete con una llave de
tuerca.
2) Para asegurar un buen deslice altirar de ducha, instale el
peso de la manguera (23), apenas sobre la curva (use los
tornillos proporcionados).
CONEXIÓN A LA INSTALACIÓN DE ALIMENTACIÓN
1) Atornillar las mangueras de conexión con extremos cortos
(20) /17-23/32” (450mm) de longitud/ a los tubos (17) y
(18).
2) Conecte las mangueras flexibles (20) y la válvula de
chequeo de entrada (A) a las tuberias de instalación
proporcionadas. Hay que asegurarse si las juntas con colador
(B) han sido puestas en la posición adecuada en las válvulas
de chequeos (A).
3) Prestar atención se las conexiones /la aducción/ del agua
caliente y fría sean correctas: la manguera atornillada al tubo
de cobre corto (17) conectar en agua fría, la manguera
atornillada al tubo de cobre largo (18) conectar en agua
caliente.
ENGLISH
ESPANOL
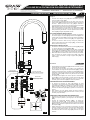
See fig. 2
1) Unscrew the flanged nut (16) from threaded pipe and
remove rubber washer (15).
2) Put through the assembly hole in the sink (from top) the
sprayer hose (10) and place the kitchen faucet in the axis of
the hole. Make sure that the o-ring (14) is situated in
correct position in the groove in the lower part of faucet base
(13). Position faucet onto the faucet base (13).
3) From underneath the sink put back the rubber washer (15)
onto the threaded pipe and secure the flanged nut (16).
After positioning the faucet in correct position secure it with
the nut (16) using the adjustable wrench.
PULL-DOWN SPRAYER INSTALLATION
1) The outlet check valve (C) should be already connected to
the end of sprayer connector (10). Place the seal (22) in the
outlet of the connector (21). Connect the check valve (C) to
the outlet connector of the faucet (21) and tighten with
wrench.
2) In order to ensure a slide run long enough to pullout the
sprayer head attach the hose weight (23), just above the
bend (use screws provided).
WATER SUPPLY INSTALLATION
1) Connect the connection hoses with short ending (20) /length
17-23/32” (450mm)/ to tubes (17) & (18).
2) Connect the flexible hoses (20) and inlet check valves (A)
with supply pipe installation. Make sure that the seals with
sieves (B) are in correct position in the inlet check valves (A).
3) Make sure that the cold and hot water is correctly connected:
hose connected to shorter copper tube (17) cold water
supply; hose connected to longer copper tube (18) hot
water supply.
1
FAUCET INSTALLATION INSTALACIÓN DEL GRIFO•
This faucet complies with ASME/ANSI A112.18.1, ASSE 1016
and CSA B 125 Standards.
Este grifo se encuentra conforme con losestandares
de ASME/ANSI A112.18.1, de ASSE 1016 y de CSA B 125.
Installation Instructions • Instrucciones de Instalación
KITCHEN FAUCET with PULL-DOWN SPRAY
LA LLAVE DE LA COCINA CON PULVERIZADOR EXTENSIBLE
3
2
IOG 5016.20 Rev. 3 March 2021
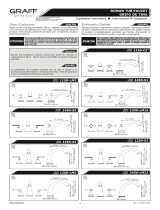
Hose Weight
location
Hose Weight
location

4
2
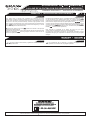
OPERATION DESCRIPCIÓN DEL FUNCIONAMIENTO
The water flow is opened and controlled by lowering the lever La apertura de la salida de agua y un estable control de su flujo se
downwards. Increase of water temperature is done by turning the lever por la desviación de la palanca hacia abajo en el plano vertical. Para
to the right (clockwise) and water temperature is decreased by turning aumentar la temperatura del agua hay que girar la palanca a la derecha y
the lever to the left (counterclockwise). Extreme right position of the para reducir la temperatura hay que girar la palanca a la El giro
lever results in hot water flow only, extreme left results in cold water flow extremo hacia la derecha produce la salida sólo del agua caliente, el giro
only. In case of positioning of the faucet according to fig. 2 faucet extremo hacia la produce la salida sólo del agua fría /A
lever at the right hand side of the user/. en el caso de colocacar la batería como en el diseño 2 la palanca de la
batería a la derecha del explotador/.
emoving the sprayer from the rotate the handle of the sprayer
lightly and pull downwards. Para extender la manecilla de la ducha del tubo hay que girar
Pressing the switch button in the spray handle changes the water stream suavemente la manecilla de la ducha y tirarla hacia abajo.
pattern to dispersed pressing it again causes the water stream to Por apretar el conmutador colocado en la manecilla se obtiene un flujo
return to regular pattern. dispersido del agua, por reapretarlo se obtiene de nuevo un flujo regular
del agua.
ENGLISH
~
ESPANOL
arranty conditions and warranty registration card are outlined on Las condiciones de la garantía y la tarjeta del registro de la
a separate sheet. garantía se encuentran en una pagina separada.
~
ESPANOL
ENGLISH
All dimensions and drawings are for reference only. For details, please refer to actual products.
Todas las dimensiones y dibujos sirven nicamente de referencia. Para consultar detalles, ver los productos.
This faucet complies with A ME/AN I A112.18.1, A E 1016
and C A B 12 tandards.
Este grifo se encuentra conforme con losestandares
de A ME/AN I A112.18.1, de A E 1016 y de C A B 12 .
Installation Instructions Instrucciones de Instalación
KITCHEN FAUCET wit PULL DOWN SPRA
LA LLAVE DE LA COCINA CON PULVERI ADOR E TENSIBLE
IOG 5016.20 Rev. 3 March 2021
•
www.graff-designs.com
-
 1
1
-
 2
2
-
 3
3
-
 4
4


Graff G-4612-LM3 Guía de instalación
- Categoría
- Artículos sanitarios
- Tipo
- Guía de instalación
En otros idiomas
- English: Graff G-4612-LM3 Installation guide
Documentos relacionados
-
 Graff G-4625-LM41K Guía de instalación
-
 Graff G-6104-LM41M Guía de instalación
-
 Graff Oscar GN-4853 Guía de instalación
-
 Graff Faucets G-6300-LM42-PC Guía de instalación
-
 Graff G-2311-LM40-SN Guía de instalación
-
 Graff G-5230-LM3 Guía de instalación
-
 Graff G-8714-PC Guía de instalación
-
 Graff Aqua-Sense Installation Instructions Manual
-
 Graff G-8052S Installation Instructions Manual
-
 Graff G-2451-LM22 Guía de instalación