
THANK YOU !
USE AND CARE GUIDE
Questions, problems, missing parts?
Before returning to the store, call
Husky Customer Service
8 a.m. - 7 p.m., EST, Monday-Friday, 9 a.m. - 6 p.m., EST, Saturday
1-888-HD-HUSKY
HUSKYTOOLS.COM
Model # HOLT52XDB12
THD.com # 1002 462 630
HUSKY 52 IN. ADJUSTABLE HEIGHT WORK TABLE
We appreciate the trust and confidence you have placed in Husky through the purchase of this work table. We strive to continually
create quality products designed to enhance your home. Visit us online to see our full line of products available for your home
improvement needs. Thank you for choosing Husky!
SKU # 1002 942 124

Table of Contents
Table of Contents ......................................................
Safety Information
........................................................
Warranty ........................................................................
Pre-Assembly
.......................................................
Assembly ...............................................................
Operation ................................................................
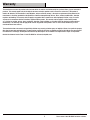
Safety Information
DANGER: Do not stand on this product. You
may fall or cause the product to tip.
WARNING: Keep the product on a level
surface. The product may become unstable and
tip if not properly leveled.
CAUTION: Do not lift this product directly
with a forklift or tow with any mechanical
devices.
CAUTION: Do not exceed the maximum weight
loading capacity of 300 lbs.
Care and Cleaning
...................................................
Service Parts
....................................................................
Tools Required ..............................................................
Hardware Included
.......................................................
Specifications ................................................................
Package Contents
................................................
2
DANGER:
Is used to indicate a hazardous situation which,
if not avoided, will result in serious injury or death.
CAUTION:
if not avoided, may result in minor injury, moderate injury,
Is used to indicate a hazardous situation which,
or property damage.
WARNING:
Indicates a hazardous situation which, if not
avoided, could result in serious injury or death.
CAUTION:
Read and follow all Safety Rules and Operating
Instructions before first use of this product.
WARNING:
Due to the product’s weight, it is recommended
that 2 or more people help assemble and move this
workbench to help reduce the risk of injury.
CAUTION:
Check screws and bolts periodically for tightness.
2
2
3
4
4
4
5
4
6
8
8
9

Warranty
3
The manufacturer warrants the product to be free from defects in materials and workmanship for a period of three years from date of(3)
purchase. This warranty applies only to the original consumer and only to products used in normal use and service. If this product is
found to be defective, the manufacturer’s only obligation, and your exclusive remedy, is the repair or replacement of the product at the
manufacturer’s discretion, provided that the product has not been damaged through misuse, abuse, accident, modifications, alteration
neglect or mishandling. This warranty shall not apply to any product that is found to have been improperly installed, set up, or used in
any way not in accordance with the instructions supplied with the product. This warranty shall not apply to a failure of the product
as a result of an accident, misuse, abuse, negligence, alteration, faulty installation, or any other failure not relating to faulty material or
workmanship. This warranty shall not apply to the finish on any portion of the products such as surface and/or weathering, as this is
considered normal wear and tear.
The manufacturer does not warrant and specifically disclaims any warranty, whether express or implied, of fitness for a particular purpose,
other than the warranty contained herein. The manufacturer specifically disclaims any liability and shall not be liable for any consequential
or incidental loss or damage, including but not limited to any labor/expense costs involved in the replacement or repair of said product.
Contact the Customer Service Team at 1-888-HD-HUSKY or visit www.huskytools.com.
HUSKYTOOLS.COM
Please contact 1-888-HD-HUSKY for further assistance.

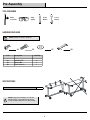
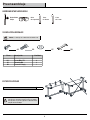
Pre-Assembly
TOOLS REQUIRED
Safety
goggles
HARDWARE INCLUDED
SPECIFICATIONS
BB
AA
Bolt M8 x 15L
4
Screw M6 x 15L
26
AA
BB
Maximum capacity 300 lbs
4
NOTE:
NOTE:
Part Description Quantity
Phillips
10 mm
Wrench
CC
CC
Washer M8
4
Hardware not shown to actual size.
Begin product assembly close to the final
intended location of your workbench. This product
is heavy and may be difficult to move after assembly.
13 mm
Wrench
dd
DD
DD
5/8 in. Wrench
1
screwdriver

5
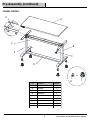
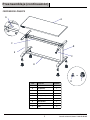
Pre-Assembly (continued)
PACKAGE CONTENTS
HUSKYTOOLS.COM
Please contact 1-888-HD-HUSKY for further assistance.
Part Description Quantity
A Wood top 1
B Leg (Right) 1
C Crank handle 1
D Leveling feet 4
E Leg (Left) 1
F Top rail 1
G Rotating rod 1
H Support rail 1
I Caster 4
G
F
E
H
A
B
I
C
D
or

Assembly
6
6
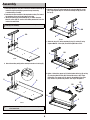
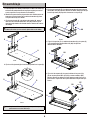
While unpacking the unit, you can leave the workbench wood top (A)
1.
inside the original packaging to prevent the top from being
scratched during assembly.
Determine the front and back of the top before starting. The front of
2.
the wood top (A) has the Husky badge on the edge.
Attach the right leg (B) to the wood top (A) as shown using four
3.
M6x15L screws (AA). Be sure that the rotating mechanism faces the
Attach the rotating rod (G) to the rotating mechanism in the leg (B).
4.
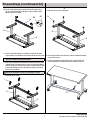
Option 1: Attach the support rail (H) to the bottom of the leg (B) and leg
7a.
Attach the top rail (F) to the wood top (A), leg (B), and leg (E) using
6.
eighteen M6x15L screws (AA). Do not overtighten the screws.
Note: Do not overtighten the screws into the wood top to avoid
damaging the wood top.
(E) using four M8x15L bolts (BB) and four M8 washers (CC). Finger
inside of the work table.
Attach the left leg (E) to the wood top (A) using four M6x15L screws
5.
(AA). Finger tighten only. Be sure that the rotating rod (G) clicks into
the leg (E).
Note: Do not turn the rotating rod yet to ensure that the leg remains
at its lowest level.
tighten only. The support rail can attach in the middle or rear of the
legs. Attach it at your desired position. See step 7b for Option 2.
Front
AA
E
G
A
AA
E
B
F
B
H
E
BB
CC
Front
G
B
A
Front
AA
A
B

Assembly (continued)
7
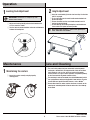
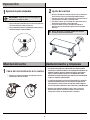
10.
8.
9.
Square the workbench and then securely tighten all fasteners with a
Screw the four leveling feet (D) or casters (I) all the way into the leg
assemblies to the maximum depth. Some adjustment may be
Using two or more people, stand the workbench in its upright
necessary after the workbench is in the desired location to properly
position.
level and use the product.
10 mm and 13 mm wrench.
Note: Use caution to not overtighten.
11.
Install the crank handle (C) into the shaft in the corner below the
Or
Caster installation
Leveling feet installation
wood top as shown.
Option 2: Attach the support rail (H) to the bottom of the leg (B) and
7b.
leg (E) using four M8x15L bolts (BB) and four M8 washers (CC).
Finger tighten only.
Note: Use caution to not overtighten.
Note: Leveling feet have been pre-assembled on the leg.
B
E
I
B
E
BB
CC
H
D
C
B
E

Operation
Height Adjustment
HUSKYTOOLS.COM
Leveling Foot Adjustment
IMPORTANT : Ensure there is no weight on top of the
workbench when leveling.
8
1
2
□
Adjust each leveling foot (D) to the desired elevation with
□
Turn the lock nut counterclockwise to elevate and clockwise
a 5/8 in. wrench as shown.
to lower the leveling foot.
□
□
□
The steel in this product has been coated with industrial powder
harsh chemicals such as oil or grease to remain on the powder
®
coating surface. Use a glass cleaner ( Windex or equivalent product)
□
The wood top is made of Parawood (also called Rubberwood), which
®
cleaned with most gentle household cleaners, such as Windex .
Insert the crank handle (C) into the shaft and align it in the hole
until it is engaged.
To raise the table, turn the crank handle counterclockwise to
the desired height.
To lower the table, turn the crank handle clockwise until it
reaches the desired height.
To avoid damage, do not keep turning the crank handle once
□
□
□
Do not allow chemicals, water, or other substances to remain on the
to the wood.
Note: Some minor squeaking is normal when operating the
crank. Lubrication is not needed.
Maintenance
Please contact 1-888-HD-HUSKY for further assistance.
it has rested at its highest or lowest position.
Care and Cleaning
Maintaining the casters
□ Grease the casters annually using high quality
bearing grease.
1
coating for a durable finish. To help protect this finish, do not allow
to clean and maintain all powder coated surfaces.
has a polyurethane coating to help protect it from moisture. It can be
wood top for extended periods of time to reduce the risk of damage
C

9
HUSKYTOOLS.COM
Please contact 1-888-HD-HUSKY for further assistance.
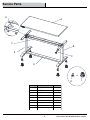
Service Parts
G
F
E
H
A
B
I
C
D
or
Part Description Quantity
A Wood top 1
B Leg (Right) 1
C Crank handle 1
D Leveling feet 4
E Leg (Left) 1
F Top rail 1
G Rotating rod 1
H Support rail 1
I Caster 4

Questions, problems, missing parts? Before returning to the store, call
Husky Customer Service
8 a.m.-7 p.m., EST, Monday-Friday, 9 a.m. - 6 p.m., EST, Saturday
1-888-HD-HUSKY
HUSKYTOOLS.COM
Retain this manual for future use.

¡GRACIAS POR TU COMPRA!
GUÍA DE USO Y MANTENIMIENTO
¿Preguntas, problemas o piezas faltantes?
Antes de devolver a la tienda, llama
al servicio al cliente de Husky,
de 8 a.m. a 7 p.m, Hora Estándar del Este, de lunes a viernes, y los sábados
HUSKYTOOLS.COM
Modelo núm. HOLT52XDB12
THD.com núm. 1002 462 630
MESA DE TRABAJO HUSKY, DE 1.3 M Y ALTURA AJUSTABLE.
Apreciamos la confianza que has depositado en Husky al comprar esta mesa de trabajo. Nos esforzamos en crear continuamente productos
de calidad diseñados para mejorar tu hogar. Visítanos por Internet para ver nuestra línea completa de productos disponibles con vistas
a las necesidades de mejoras de tu hogar. ¡Gracias por elegir Husky!
de 9 a.m. a 6 p.m., Hora Estándar del Este,
por el teléfono 1-888-HD-HUSKY
SKU núm. 1002 942 124

Tabla de contenido
Tabla de contenido ..................................................
Información de seguridad
................................
Garantía ........................................................................
Preensamblaje
.................................................
Ensamblaje. ..........................................................
Funcionamiento ................................................
Información de seguridad
PELIGRO:
No te pares sobre este producto.
Puedes caerte o provocar que el producto
ADVERTENCIA: Mantén el producto sobre una
superficie nivelada. El producto puede volverse
inestable y volcarse si no está bien nivelado.
PRECAUCIÓN: No levantes este producto
directamente con un montacargas ni lo
remolques con ningún dispositivo mecánico.
PRECAUCIÓN: No sobrepases el límite de
136.1 kg de peso máximo.
Cuidado y mantenimiento
................................
Piezas de repuesto
..................................................
Herramientas necesarias ..................................
Herrajes incluidos
..................................................
Especificaciones ....................................................
Contenido del paquete
..................................
2
PELIGRO:
Indica una situación potencialmente peligrosa
que, de no evitarse, ocasionará lesiones graves o muerte.
PRECAUCIÓN:
peligrosa que, de no evitarse, podría causar lesiones
Indica una situación potencialmente
menores o moderadas, o daños a la propiedad.
ADVERTENCIA:
Indica una situación potencialmente
graves o muerte.
PRECAUCIÓN:
Lee y cumple todas las Reglas de
Seguridad e Instrucciones de Operación antes de usar
ADVERTENCIA:
Debido al peso del producto, se
recomienda que 2 o más personas ayuden a ensamblar y
mover este banco de trabajo para reducir el riesgo de
PRECAUCIÓN:
Revisa regularmente los tornillos y
2
2
3
4
4
4
5
4
6
8
8
9
peligrosa que, de no evitarse, podría ocasionar lesiones
este producto.
lesiones.
pernos para comprobar que estén ajustados.
se vuelque.

Garantía
3
HUSKYTOOLS.COM
Para más asistencia, llama al 1-888-HD-HUSKY.
El fabricante garantiza que este producto no presentará defectos materiales ni de fabricación durante tres (3) años a partir de la fecha
original de compra. Esta garantía es válida solo para el consumidor original y cubre solo productos en uso y servicio normales.
Si se detecta algún defecto en este producto, la única obligación y solución exclusiva del fabricante, a su entera discreción,
será reparar o reponer el producto, siempre y cuando el producto no haya sido dañado por mal uso, abuso, accidente, modificaciones,
alteraciones, negligencia o manejo indebido. Esta garantía no cubre ningún producto instalado, configurado o usado sin seguir las
instrucciones adjuntas. Esta garantía no cubre fallas del producto como consecuencia de un accidente, mal uso, abuso, negligencia,
modificaciones o instalaciones defectuosas, ni cualquier otra falla no relacionada con defectos materiales o de fabricación. Esta
garantía no se aplica al acabado de ninguna parte del producto, como la superficie,ni al deterioro por condiciones ambientales,
ya que se considera desgaste normal.
El fabricante no garantiza y rechaza específicamente cualquier garantía, explícita o implícita, de la idoneidad del producto para
un propósito en particular, , que no sea la garantía establecida por este medio. El fabricante rechaza específicamente cualquier
obligación y no será responsable por ningún daño o pérdida, directos o indirectos, incluyendo, pero sin limitarse a, cualquier
costo de mano de obra/gastos relacionados con la reposición o reparación de dicho producto.
Comuníquese con el equipo de servicio al cliente llamando al 1-888-HD-HUSKY o visite www.huskytools.com.

Preensamblaje
HERRAMIENTAS NECESARIAS
Gafas
de seguridad
SE INCLUYEN HERRAJES
ESPECIFICACIONES
BB
AA
Perno M8 x 15L
4
Perno M6 x 15L
26
AA
BB
Capacidad máxima 136.1 kg
4
NOTA:
NOTA:
Pieza Descripción Cantidad
Llave
de 10 mm
CC
CC
Arandela M8
4
Los herrajes no se muestran en tamaño real.
Comienza el ensamblaje del producto cerca
de la ubicación final deseada de tu banco de trabajo.
Este producto es pesado y puede ser difícil de mover
después del ensamblaje.
Llave
de 13 mm
dd
DD
DD
Llave de 5/8 plg
1
Destornillador
Phillips

5
Preensamblaje (continuación)
CONTENIDO DEL PAQUETE
HUSKYTOOLS.COM
Pieza Descripción Cantidad
A Cubierta de madera 1
B Pata (derecha) 1
C Mango de la manivela 1
D Patas niveladoras 4
E Pata (izquierda) 1
F Riel superior 1
G Varilla giratoria 1
H Riel de soporte 1
I Rueda 4
G
F
E
H
A
B
I
C
D
or
Para más asistencia, llama al 1-888-HD-HUSKY.

Ensamblaje
6
6
Al desempaquetar la unidad, puedes dejar la cubierta de madera (A)
1.
del banco de trabajo dentro del empaque original para evitar
que la superficie se raye durante el ensamblaje.
Identifica la parte frontal y la posterior de la cubierta antes de
2.
comenzar.La parte frontal de la cubierta de madera (A) tiene
Fija la pata derecha (B) a la cubierta de madera (A), como se
3.
4.
7a.
Fija el riel superior (F) a la cubierta de madera (A) y las patas (B)
6.
y (E) con dieciocho tornillos M6 x 15L (AA). No aprietes
Nota: No aprietes demasiado los tornillos dentro de la cubierta de
madera para evitar que esta se dañe. Aprieta sólo con los dedos.
(E) con cuatro pernos M8 x 15L (BB) y cuatro arandelas (CC).
Fija la pata izquierda (E) a la cubierta de madera (A) con cuatro to
5.
rnillos M6 x 15L (AA). Aprieta sólo con los dedos. Asegúrate de que
la varilla giratoria (G) haga clic al conectarse a la pata (E).
Nota: No gires todavía la varilla giratoria para garantizar que la pata
permanezca en su nivel más bajo.
una placa de Husky en el borde.
Fija el riel de soporte (H) a la parte inferior de las patas (B) y
Fija la varilla giratoria (G) al mecanismo giratorio en la pata (B).
muestra, con cuatro tornillos M6 x 15L (AA). Verifica que el
mecanismo giratorio esté mirando hacia el interior de la mesa
de trabajo.
Aprieta sólo con los dedos.El riel de soporte puede fijarse en la
parte central o posterior de la pata. Colócalo en la posición que
desees.
demasiado los tornillos.
Front
AA
A
B
Front
G
B
A
Front
AA
E
G
A
AA
E
B
F
B
H
E
BB
CC

Ensamblaje (continuación)
7
10.
8.
9.
Ajusta el banco de trabajo a escuadra y enseguida, de forma
Enrosca por completo las cuatro patas niveladoras (D) o ruedas
(I) dentro de los ensamblajes de las patas hasta la profundidad
Con la ayuda de dos o más personas, coloca el banco de trabajo
máxima. Puede que sea necesario ajustar un poco, después que
en posición vertical.
el banco de trabajo esté en la ubicación deseada, para nivelar
segura, todos los sujetadores con una llave de 10 mm ad 13 mm.
Nota: Ten cuidado de no ajustar demasiado.
11.
Instala el mango de la manivela (C) en el eje localizado en la
Or
Instalación de las ruedas
Instalación de las patas niveladoras
esquina debajo de la cubierta de madera, como se muestra.
Fija el riel de soporte (H) a la parte inferior de las patas (B) y
7b.
(E) con cuatro pernos M8 x 15L (BB) y cuatro arandelas (CC).
Aprieta sólo con los dedos.
bien y usar el producto.
Nota: patas niveladoras han sido pre-ensamblada en la pata.
C
Para más asistencia, llama al 1-888-HD-HUSKY.
HUSKYTOOLS.COM
B
E
BB
CC
H
D
B
E
B
E
I

Operación
Ajuste de la alturaAjuste de la pata niveladora
IMPORTANTE:
sobre el banco de trabajo al nivelar.
8
1
2
□
Ajusta cada pata niveladora (D) a la altura deseada con
□
Gira la contratuerca hacia la izquierda para alzar y hacia la
una llave de 5/8 plg, como se muestra.
derecha para bajar la pata niveladora.
□
□
□
El acero de este producto ha sido revestido con cubierta granular
productos químicos agresivos, como aceite o grasa, permanezcan
sobre la superficie pulvirrevestida. Usa un limpiador para vidrio
□
La cubierta de madera está hecha de Caucho de Pará (también
para proteger la cubierta contra la humedad. Puede limpiarse
Inserta el mango de la manivela (C) en el eje y alinéalo en
el orificio hasta que haya engranado completamente.
Para elevar la mesa, gira el mango de la manivela hacia la
izquierda hasta alcanzar la altura deseada.
Para bajar la mesa, gira el mango de la manivela hacia la
derecha hasta alcanzar la altura deseada.
Para evitar daños, no sigas girando el mango de la
□
□
□
No dejes que productos químicos, agua u otras sustancias
tiempo, para reducir el riesgo de daños a la madera.
Nota: Es normal que se escuchen crujidos leves al operar
la manivela. No es necesario lubricar.
Mantenimiento
manivela una vez alcanzada la posición más elevada o
Mantenimiento y limpieza
Cómo dar mantenimiento a las ruedas
□
Engrasa las ruedas anualmente usando grasa de alta
calidad para cojinetes de bola.
1
industrial para acabado duradero. A fin de protegerlo no permitas que
(Windex® o producto equivalente) para limpiar y dar mantenimiento
denominado Rubberwood) con revestimiento de poliuretano
permanezcan sobre la cubierta de madera durante mucho
Asegúrate de que no haya ningún peso
más baja.
con los limpiadores domésticos más moderados, como Windex®.
a todas las superficies pulvirrevestida.
C

Pieza Descripción Cantidad
A Cubierta de madera 1
B Pata (derecha) 1
C Mango de la manivela 1
D Patas niveladoras 4
E Pata (izquierda) 1
F Riel superior 1
G Varilla giratoria 1
H Riel de soporte 1
I Rueda - Polipropileno gris 4
9
HUSKYTOOLS.COM
Piezas de repuesto
G
F
E
H
A
B
I
C
D
or
Para más asistencia, llama al 1-888-HD-HUSKY.

¿Preguntas, problemas o piezas faltantes?
Antes de devolver a la tienda llama al servicio al cliente de Husky,
de 8:00 a.m. a 7:00 p.m. (Hora Estándar del Este) de lunes a viernes,
por el 1-888-HD HUSKY.
HUSKYTOOLS.COM
Conserva este manual para uso futuro.
y los sábados de 9:00 a.m. a 6:00 p.m. (Hora Estándar del Este),
-
 1
1
-
 2
2
-
 3
3
-
 4
4
-
 5
5
-
 6
6
-
 7
7
-
 8
8
-
 9
9
-
 10
10
-
 11
11
-
 12
12
-
 13
13
-
 14
14
-
 15
15
-
 16
16
-
 17
17
-
 18
18
-
 19
19
-
 20
20


Husky HOLT52XDB12 Instrucciones de operación
- Tipo
- Instrucciones de operación
- Este manual también es adecuado para
en otros idiomas
Artículos relacionados
-
Husky H1025TB72STSCB Instrucciones de operación
-
-
-
-
-
-
Husky HOTC6205BB1M Instrucciones de operación
-
-
Husky 410-113-0111 Guía del usuario
-