
1
102317 Rev. A
422062
B711615-3838-WH
B711917-3838-WH
CORNER SHOWER BASE
BASE PARA DUCHAS ESQUINA
05/07/19
www.deltafaucet.com
102317
MODEL/MODELO
Read all instructions prior to installation.
Lea todas las instrucciones antes de hacer la instalación.
Register Online
Regístrese en línea
www.deltafaucet.com/registerme
To order replacement parts and access additional technical
documents and product info, visit www.delta.com
For product and installation questions, do not return to the
store. For additional help contact customer service.
Para ordenar piezas de repuesto y acceder a documentos
técnicos adicionales e información del producto,
visite www.delta.com
Para consultas sobre el producto y la instalación,
no regrese a la tienda. Para obtener ayuda adicional,
comuníquese con el servicio al cliente.
• Read complete instructions before beginning installation.
• Confirm that your model will fit in intended location and plumbing fixtures are located where required before beginning installation.
• Walls and sub-floor must be solid, plumb, and square.
• Use drop cloth to protect shower base from damage during installation.
• Do not install in areas where temperature may drop below 32ºF (0ºC).
• Allow product to reach room temperature for 30 minutes before installation.
• Lea las instrucciones completas antes de comenzar la instalación.
• Verifique que su modelo quepa en la ubicación deseada y que los accesorios de fontanería se encuentren donde sea necesario antes de iniciar la
instalación.
• Las paredes y el contrapiso deben estar firmes, nivelados y en escuadra.
• Utilice una lona protectora para proteger la base de la ducha durante la instalación.
• No realice la instalación en áreas donde la temperatura pueda ser inferior a 32°F (0 °C).
• Deje que el producto alcance la temperatura ambiente durante 30 minutos antes de la instalación.
REQUIREMENTS FOR SUCCESSFUL INSTALLATION
REQUISITOS PARA UNA INSTALACIÓN CORRECTA
!
!
These instructions include suggestions for rough construction and plumbing installation. Local building codes vary and could supersede those
suggestions. If you are not confident in your ability to perform these tasks, contract out those tasks you need help with or use a professional installer.
DO NOT use drywall screws to secure flanges to wall studs. Product damage will occur and will void the warranty.
Estas instrucciones incluyen sugerencias para construcciones sin acabar e instalación de cañerías. Los códigos locales de construcción varían según el
lugar y tienen prioridad sobre estas sugerencias. Si no se siente capaz de realizar estas tareas, tercerícelas o contrate un instalador profesional.
NO use tornillos para paneles de yeso para fijar las bridas a los montantes de la pared. Dañará el producto anulando la garantía.
KNOWLEDGE BASE:
Framing
Plumbing
BASE DE CONOCIMIENTOS:
Encuadrado
Plomería
1‑800‑355‑2721
?

2
102317 Rev. A
Mortar
Drill
Taladro
Mortar
Mortero
Shims
Cuñas
Driver Bit (for use with
extension bit holder)
Broca impulsadota
(para uso con
sujetador de extensión
para brocas)
Safety Glasses
Antiparras de
seguridad
Gloves
Guantes
Drop Cloth
Lona protectora
Drill Bit 3/16” (5 mm)
Broca para
taladro de
0,5 cm (3/16”)
Sealant (2 tubes)
Sellador (2 tubos)
Extension Bit Holder
Sujetador de
extensión para
brocas
Level
Nivel
Caulk Gun
Pistola para sellar
1/4” Square Notched
Trowel
Llana dentada
cuadrada de 1/4”
Pencil
Lápiz
Screws #8 x 1 1/2” (zinc
or stainless; panhead or
roundhead)
Tornillos #8 x 3.81 cm
(de zinc o acero
inoxidable;
cilíndricos o de
cabeza redonda)
Tape Measure
Cinta métrica
Square
Escuadra
TOOLS AND MATERIALS REQUIRED
HERRAMIENTAS Y MATERIALES NECESARIOS
• 2 x 4 lumber for additional wall studs
• Rags or padding to protect product during bracing
• Madera para montantes de pared si instala el juego para pared adicionales; consulte las instrucciones de instalación del juego para pared
• Conjunto de drenaje y desbordamiento que encajan en una bañera con una profundidad de 41,9 cm (16-1/2”)
Adhesive
Adhésif

3
102317 Rev. A
ROUGHING‑IN
TUBERÍA INTERNA
• Rough plumbing must be installed before base installation.
• Minimum stud pocket sizes are shown below.
• Drain cutout 5” diameter max. Right side plumbing rough-in shown.
• For masonry construction, floor and walls must be framed to accommodate plumbing and installation.
IMPORTANT: IF INSTALLING MATCHING ENCLOSURE, refer to Enclosure Installation Manual for specific lumber sizes and placement. Additional
studs will be required and need to be installed at this point.
• La tubería interna debe ser instalada antes de instalar base.
• Los tamaños de las hendiduras de apoyo para los montantes se muestran a continuación.
• Corte para desagüe 5” (12,7 cm) de diámetro máximo. Conexión de las cañerías del lado derecho.
• Para los trabajos de mampostería, el piso y las paredes deben acanalarse para dar lugar a las cañerías y la instalación.
IMPORTANTE: SI INSTALA EL JUEGO DE PARED, consulte las instrucciones de instalación para el juego de pared y obtendrá los tamaños
específicos y la ubicación de las maderas. Se necesitarán montantes adicionales y se deberán instalar en este punto.
Framing must be plumb and square.
El entramado debe estar nivelado y
en escuadra.
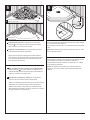
Before base installation, check that the apron retainers are secure. The retainers should fit snuggly on the posts on the base and the tabs
should be inserted into the slots on the retainers. Adjust if necessary.
Antes de instalar la base, verifique que los soportes/retenedores del delantal están fijos. Los soportes deben caber ajustados en los
postes de la base y las lengüetas deben insertarse en las ranuras de los soportes. Ajuste si es necesario.
Apron
Borde
Retainer
Retenes
Tabs
Pestañas
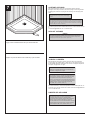
MODEL 422062
MODEL A B
422062 13” (33 cm) 13” (33 cm)
B711615-3838-WH 9” (22.9 cm) 9” (22.9 cm)
38 1/4" min
(97.16 cm)
38 1/4” min
(97.16 cm)
A
B
B711912-3838-WH 9” (22.9 cm) 9” (22.9 cm)

4
102317 Rev. A
Ensure that the waste pipe is properly located to align with the drain
assembly (not included).
Subfloor maximum diameter opening should be 5”. The drain pipe
above the subfloor should be; 422062: 5/8”, B711615-3838-WH: 1/2”
& B711917-3838-WH: 1/2”.
Mark unit position on floor and through drain opening.
Mark the locations of the studs on the flange of the base.
These marks are used to verify base location after drain is installed,
and outline where adhesive is applied.
Asegúrese de que la tubería de desagüe está adecuadamente
ubicada para alinearla con las piezas del desaguë (no se incluyen).
El diámetro máximo de la abertura en el subsuelo debe ser de 5”.
La tubería de desagüe sobre el subsuelo debe ser 422062: 5/8”,
B711615-3838-WH: 1/2” y B711917-3838-WH: 1/2”.
Marque la posición de la unidad en el piso y a través de la abertura
del desagüe.
Marque las ubicaciones de los montantes en la brida de la base.
Estas marcas se usan para verificar la ubicación de la base después
que se ha instalado el desagüe y trace una línea que marque donde
se ha aplicado el adhesivo.
422062: 5/8”
B711615-3838-WH: 1/2”
B711917-3838-WH: 1/2”
5”
(12,7 cm)
1
2
Dry fit base and verify that it is plumb and square.
If the subfloor is not flat and level, use leveling compound or mortar
bed to ensure that the base is level (shown in Step 5).
Coloque la base en la esquina. Revise la nivelación de derecha a
izquierda y de delante a atrás.
Si el subsuelo no es plano o nivelado, use un compuesto nivelador
o capa de mortero para asegurar que la base quede nivelada (se
muestra en el paso 5).

5
102317 Rev. A
1
2
4
Install drain following manufacturer's instructions.
Instale el desagüe de acuerdo con las instrucciones del fabricante.
Plumber’s putty will degrade base material, causing cracks
and potentially, property damage. DO NOT use plumber’s
putty to seal between drain and base. Use sealant or gasket.
NOTICE
DO NOT cut the TOP TRACK the same length as the BOTTOM
TRACK.
NOTICE
NOTICE
For optimal water retention, water dam installation and/or proper
caulking of this enclosure is necessary. Follow all steps as per
sealant manufacturer’s instructions.
NO corte el RIEL SUPERIOR del mismo largo que el RIEL
INFERIOR.
AVISO
AVISO
Para una retención óptima del agua, la instalación de la
lengüeta para la retención del agua y/o el calafateo de este
recinto es necesario. Siga todos los pasos en las instrucciones
del fabricante del sellador.
NE COUPEZ PAS la GLISSIÈRE SUPÉRIEURE de la même
longueur que la GLISSIÈRE INFÉRIEURE.
AVIS
AVIS
Pour assurer une bonne étanchéité, il est essentiel d’installer le
rebord d’étanchéité et d’appliquer du composé d’étanchéité
dans les interstices ainsi que les joints. Suivez les instructions
du fabricant du composé d’étanchéité.
The foam of the plastic spacers will accommodate some
misalignment between the glass and support bar.
NOTE
La goma espuma de los separadores de plástico acomodará
cierta desalineación entre el vidrio y la barra de apoyo.
The edges of the panel can scratch the shower base surface.
Use care when moving the panel into position. Check that the
glass panel is parallel with the edge of the base. Check that the
vertical edge of the glass is plumb.
NOTICE
Los bordes del panel pueden rayar la superficie de la base de
la ducha. Tenga cuidado al mover el panel a su posición.
Asegúrese que el panel de vidrio está paralelo con el borde
de la base. Fíjese que el borde vertical del vidrio esté
verticalmente aplomado.
AVISO
DO NOT sit glass panels on concrete or other hard surfaces.
N’APPUYEZ PAS les panneaux de verre sur une surface en
béton ni sur d’autres surfaces dures.
NO coloque los paneles de vidrio sobre el concreto u otras
superficies duras.
Les bords du panneau de verre peuvent égratigner la surface
de la base de douche. Déplacez le panneau de verre avec
soin et laissez les protège-coins en place jusqu’à ce qu’il soit
dans sa position définitive. Assurez-vous que le panneau de
verre et l’avant de la base sont parallèles.
AVIS
NOTICE
NOTA
AVISOAVIS
The bottom of the magnetic gasket should touch the glass
support when the door is closed.
NOTE
La parte inferior del empaque magnético debe tocar el
soporte del vidrio cuando la puerta está cerrada.
NOTA
Drill 3/16” clearance holes into flanges only. Do not drill 3/16”
holes directly into studs. Drill chuck can damage base. Use an
extended bit holder to reduce risk of drill chuck hitting base.
NOTICE
Plumber’s putty will degrade base material, causing cracks
and potentially, property damage. DO NOT use plumber’s
putty to seal between drain and base. Use sealant or gasket.
NOTICE
Gaps between flanges and studs must be less than 1/8". Insert
shims to fill gaps if needed.
NOTE
Los espacios entre las bridas y los pernos deben ser inferiores
a 1/8 ". calce para llenar los vacíos si es necesario.
NOTA
La masilla del fontanero degradará el material base, causando
grietas y potencialmente, daños a la propiedad. NO utilice la
masilla del fontanero para sellar entre el drenaje y la base.
Utilice sellador o junta.
AVISO
Taladre agujeros de 3/16 "en las bridas solamente. No perforar
3/16 "agujeros directamente en pernos. El portabrocas puede
dañar la base. Utilizar un portabits extendido para reducir el
riesgo de golpear la base de la broca.
AVISO
When using drain cleaner or clog remover, rinse thoroughly
with water.
NOTICE
Cuando utilice un limpiador de drenaje o un removedor de
tapones, enjuague bien con agua.
AVISO
Certain chemicals and cleaners may deteriorate the acrylic
surface, causing cracks and potentially, property damage. Never
use cleaning products that state on their label that they are not
suitable for Acrylic, ABS, Polystyrene or Plastic. Do not use
solvents (turpentine, lacqurt thinner, mineral spirits, paint thinner,
MEK, xylene, acetone, naphtha, etc.).
NOTICE
Ciertos productos químicos y productos de limpieza pueden
deteriorar la superficie acrílica, causando grietas y
potencialmente daños a la propiedad. Nunca utilice productos
de limpieza que indiquen en su etiqueta que no son
adecuados para acrílico, ABS, poliestireno o plástico. No
utilice solventes (aguarrás, diluyente lacqurt, alcoholes
minerales, diluyente de pintura, MEK, xileno, acetona, nafta,
etc.).
AVISO
Certain chemical and cleaners may deteriorate acrylic surfaces,
causing cracks and potentially, property damage. After
application/installation, clean up the product surface and remove
any excess sealant with denatured alcohol only. do not use
solvents (turpentine, lacqurt thinner, mineral spirits, paint
thinner, MEK, xylene, acetone, naphtha, etc.).
NOTICE
Ciertos agentes químicos y productos de limpieza pueden
deteriorar las superficies acrílicas, causando grietas y
potencialmente daños materiales. Después de la aplicación /
instalación, limpie la superficie del producto y elimine el
exceso de sellador sólo con alcohol desnaturalizado. no utilice
disolventes (aguarrás, diluyente lacqurt, alcoholes minerales,
diluyente de pintura, MEK, xileno, acetona, nafta, etc.).
AVISO
3
Drill 3/16” holes at all stud locations on top flanges.
Perfore agujeros de 3/16” en las bridas superiores en todos los sitios
donde se ubican los montantes.
Drill 3/16” clearance holes into flanges only. Do not drill 3/16”
holes directly into studs. Drill chuck can damage base. Use an
extended bit holder to reduce risk of drill chuck hitting base.
NOTICE
Perfore agujeros de 3/16" solo en las bridas, no perfore agujeros
de 3/16" directamente en los montantes. El portabrocas puede
dañar la base. Utilice una abrazadera extendida para reducir el
riesgo de golpear la base de la broca.
AVISO

6
100447 Rev. A
6
Shim
It is recommended not to stand in base while securing to wall. Set base
in corner and press it into adhesive.
Secure flanges to all studs with 1 1/2” screws through previously drilled
holes.
NOTE: Gaps between flanges and studs must be less than 1/8”. Insert
shims to fill gaps if needed.
Se recomienda no pararse en la base mientras que usted fije la pared.
Coloque la base en la esquina y presiónela en el adhesivo.
Fije las bridas en todos los montantes con tornillos de 1 1/2” a través
de los agujeros ya perforados.
NOTA: Los espacios entre las bridas y los montantes deben ser
menores de 1/8”. Si es necesario, inserte calzos para rellenar los
espacios.
A.
B.
Flat and Level Floor
Aplane y nivele el piso
Uneven Floor
Piso desnivelado
A
1
2
If subfloor is flat and level, and mortar was not used, apply
adhesive
A
on floor using 1/4" square-notched trowel, staying
within pencil line (1). Proceed to the next step.
If subfloor is not flat and level, it is recommended to put down a
mortar bed where the base will be positioned.
Apply a generous amount of mortar (2) that has been mixed to a
thick consistency. Use the mortar to fill in low areas. Place the base
in the wet mortar, adjust until it is level, and let mortar cure for 24
hours. Proceed to the next step.
A.
B.
5
Si el contrapiso está plano y nivelado y no se utilizó mortero,
aplique el adhesivo
A
en el suelo utilizando un balaustre de 1/4"
cuadrado dentado, permaneciendo dentro de la línea trazada con
el lápiz (1). Continué con el próximo paso.
Si el subsuelo no está plano y nivelado, se recomienda que
coloque un lecho de mortero en donde colocará la base.
Aplique una cantidad generosa de mortero (2) que ha sido mezclada
hasta obtener una consistencia espesa. Utilice el mortero para
rellenar las zonas bajas. Coloque la base en el mortero húmedo,
ajuste hasta que esté nivelado y deje que el mortero se cure durante
24 horas. Continué con el próximo paso.
A.
B.

7
102317 Rev. A
CARE AND CLEANING
We recommend that you clean your acrylic bathing product with mild
detergents. Use a terry cloth towel, soft cloth or sponge. Avoid using abrasive
scrubbing pads, steel wool or sponges. After cleaning, rinse thoroughly with
water.
For further inquires and a list of safe cleaners to use, contact customer service
at
[email protected] or 1-800-355-2721.
SEALANT CLEANUP
When using drain cleaner or clog remover, rinse thoroughly
with water.
NOTICE
Certain chemical and cleaners may deteriorate product surfaces, causing cracks and potentially,
property damage. After application/installation, clean up the product surface and remove any
excess sealant with denatured alcohol only. do not use solvents (turpentine, lacqurt thinner,
mineral spirits, paint thinner, MEK, xylene, acetone, naphtha, etc.).
NOTICE
CUIDADO Y LIMPIEZA
Recomendamos que limpie su producto acrílico de baño con detergentes
suaves. Utilice una toalla de felpa, un paño suave o una esponja. Evite el uso
de almohadillas abrasivas de limpieza, lana de acero o esponjas. Después de
la limpieza, enjuague bien con agua.
Para más información y una lista de limpiadores recomendables para usar, co-
muníquese con el servicio de atención al cliente al consumercare@deltafaucet.
com o al 1-800-355-2721.
LIMPIEZA DEL SELLADOR
Cuando utilice el limpiador de desagües o el removedor de
obstrucciones, enjuague bien con agua.
AVISO
Ciertos productos químicos y limpiadores pueden deteriorar la
superficie acrílica, causando grietas y potencialmente, daños
a la propiedad. Nunca utilice productos de limpieza que
indiquen en su etiqueta que no son adecuados para el acrílico,
ABS, poliestireno o plástico. No utilice disolventes (trementina,
limpiadores de lacas, alcoholes minerales, diluyentes de
pintura, MEK, xileno, acetonas, nafta, etc.)
AVISO
Ciertos agentes químicos y productos de limpieza pueden
deteriorar las superficies acrílicas, causando grietas y
potencialmente daños materiales. Después de la aplicación /
instalación, limpie la superficie del producto y elimine el
exceso de sellador sólo con alcohol desnaturalizado. no utilice
disolventes (aguarrás, diluyente lacqurt, alcoholes minerales,
diluyente de pintura, MEK, xileno, acetona, nafta, etc.).
AVISO
Certain chemicals and cleaners may deteriorate the product surface, causing cracks and potentially,
property damage. Never use cleaning products that state on their label that they are not suitable for
Acrylic, ABS, Polystyrene or Plastic. Do not use solvents (turpentine, lacqurt thinner, mineral spirits,
paint thinner, MEK, xylene, acetone, naphtha, etc.).
NOTICE
1
2
3
7
Apply a bead of sealant between the apron and finished floor.
Aplique una perla de sellador entre el delantal y el piso acabado.

8
102317 Rev. A
© 2019 Delta Faucet Company
This Delta
®
Bathing product is warranted to the original consumer purchaser or commercial user, as
applicable, to be free from defects in material and workmanship for the applicable period specied
below:
Delta
®
Tubs, Shower Bases, and Walls: Ten (10) years from the date of purchase by the original
consumer purchaser or, for commercial users, one (1) year from the date of purchase.
Delta Faucet Company will repair or replace, free of charge, during the applicable warranty period,
any part that proves defective in material and/or workmanship under normal installation, use and
service. If repair or replacement is not practical, Delta Faucet Company may elect to refund the
purchase price (the return of the product may be required at Delta Faucet Company’s option).
These are your exclusive remedies
Any labor charges incurred by the purchaser to repair, replace, install or remove this product are
not covered by this warranty. Delta Faucet Company shall not be liable for any damage to the
product resulting from reasonable wear and tear, misuse, abuse, neglect or improper or incorrectly
performed installation, maintenance or repair, including failure to follow the applicable care and
cleaning instructions. Delta Faucet Company recommends using a professional plumber for all in-
stallation and repair. We also recommend that you use only genuine Delta
®
/Peerless
®
replacement
parts. Proof of purchase (original sales receipt) from the original purchaser must be made available
to Delta Faucet Company for all warranty claims unless the purchaser has registered the product
with Delta Faucet Company. This warranty applies only to bathing products that are installed in the
United States of America, Canada and Mexico.
Limitation on Duration of Implied Warranties. TO THE EXTENT PERMITTED BY LAW, ANY
IMPLIED WARRANTY, INCLUDING THE IMPLIED WARRANTIES OF MERCHANTABILITY AND
OF FITNESS FOR A PARTICULAR PURPOSE, IS LIMITED TO THE STATUTORY PERIOD OR
THE DURATION OF THIS WARRANTY, WHICHEVER IS SHORTER. Some states/provinces do
not allow limitations on how long an implied warranty lasts, so this limitation may not apply to you.
What You Must Do To Obtain Warranty Service or Replacement Parts. A warranty claim may
Limited Warranty
be made and replacement parts may be obtained by calling 1 800 355 2721 or by writing to:
In the United States and Mexico: In Canada:
Delta Faucet Company Masco Canada Limited, Plumbing Group
Product Service Technical Service Centre
55 E. 111th Street 350 South Edgeware Road
Indianapolis, IN 46280 St. Thomas, Ontario, Canada N5P 4L1
DELTA FAUCET COMPANY SHALL NOT BE LIABLE FOR ANY SPECIAL, INCIDENTAL OR CON-
SEQUENTIAL DAMAGES (INCLUDING LABOR CHARGES TO REPAIR, REPLACE, INSTALL
OR REMOVE THIS PRODUCT), WHETHER ARISING OUT OF BREACH OF ANY EXPRESS
OR IMPLIED WARRANTY, BREACH OF CONTRACT, TORT, OR OTHERWISE. DELTA FAUCET
COMPANY SHALL NOT BE LIABLE FOR ANY DAMAGE TO THE PRODUCT RESULTING FROM
REASONABLE WEAR AND TEAR, MISUSE, ABUSE, NEGLECT OR IMPROPER OR INCOR-
RECTLY PERFORMED INSTALLATION, MAINTENANCE OR REPAIR, INCLUDING FAILURE TO
FOLLOW THE APPLICABLE INSTALLATION, CARE AND CLEANING INSTRUCTIONS. Some
states/provinces do not allow the exclusion or limitation of special, incidental or consequential dam-
ages, so these limitations and exclusions may not apply to you.
This warranty gives you special legal rights, and you may also have other rights, which vary from
state/province to state/province. This is Delta Faucet Company’s exclusive written warranty and
the warranty is not transferable. If you have any questions or concerns regarding technical support,
installation or our warranty, please call, mail or email us as provided above or visit our website at
www.deltabathing.com.
© 2019 Delta Faucet Company
Este producto de baño de Delta® está garantizado al comprador original o usuario comercial, según
sea el caso, de estar libre de defectos en materiales y mano de obra durante el período aplicable
que se especica a continuación:
Las bañeras, los platos de regaderas/duchas, y paredes/ mamparas Delta®: Diez (10) años
desde la fecha de compra por el comprador original o, para los usuarios comerciales, un (1) año
desde la fecha de compra.
Delta Faucet Company reparará o reemplazará, sin costo alguno, durante el periodo de garantía,
cualquier pieza que presente defectos en materiales y/o mano de obra bajo instalación, uso y ser-
vicio normal. Si la reparación o sustitución no es práctica, Delta Faucet Company podrá optar re-
embolsarle el precio de la compra (se puede requerir que devuelva el producto a opción de Delta
Faucet Company). Estos son sus únicos recursos.
Cualquier cargo por mano de obra incurrido por el comprador para reparar, reemplazar, instalar
y desmontar este producto no está cubierto por esta garantía. Delta Faucet Company no será
responsable por ningún daño al producto resultante del desgaste por uso normal, mal uso, abuso,
negligencia o instalación inadecuada o realizada de forma incorrecta, mantenimiento o reparación,
incluyendo el no seguir las instrucciones aplicables para el cuidado y limpieza. Delta Faucet Com-
pany recomienda que use un plomero profesional para todas las instalaciones y reparaciones. Tam-
bién recomendamos que utilice sólo piezas de repuesto Delta®/ Peerless®. La prueba de compra
(recibo de compra original) del comprador original debe ser disponible a Delta Faucet Company
para todos los reclamos a menos que el comprador haya registrado el producto en Delta Faucet
Company. Esta garantía se aplica únicamente a los productos de baño que se instalan en los Esta-
dos Unidos de América, Canadá y México.
La limitación de la duración de las garantías implícitas. THASTA DONDE LO PERMITA LA LEY,
LAS GARANTÍAS IMPLÍCITAS, INCLUYENDO LAS GARANTÍAS DE COMERCIALIZACIÓN Y DE
IDONEIDAD PARA UN FIN PARTICULAR, SE LIMITA AL PERÍODO LEGAL O A LA DURACIÓN
DE ESTA GARANTÍA, LO QUE OCURRA PRIMERO. Algunos estados/provincias no permiten limi-
taciones de la duración de una garantía implícita, por lo que esta limitación puede no aplicarse en
su caso.
Garantía limitada
Lo que usted debe hacer para obtener servicio de garantía o piezas de repuesto. Un reclamo
de garantía se puede hacer y piezas de repuesto se pueden obtener llamando al 1 800 355 2721
o escribiendo a:
En los Estados Unidos y México: En Canadá:
Delta Faucet Company Masco Canada limitada, Grupo de plomeria
Product Service Centre de servicio tecnico
55 E. 111th Street 350 South Edgeware Road
Indianapolis, IN 46280 St. Thomas, Ontario, Canada N5P 4L1
DELTA FAUCET COMPANY NO SERÁ RESPONSABLE POR DAÑOS ESPECIALES, INCIDEN-
TALES O CONSECUENTES (INCLUYENDO POR LOS CARGOS DE MANO DE OBRA PARA
REPARAR, REEMPLAZAR, INSTALAR O RETIRAR ESTE PRODUCTO), QUE RESULTEN DEL
INCUMPLIMIENTO DE CUALQUIER GARANTÍA EXPRESA O IMPLÍCITA, EL INCUMPLIMIENTO
DE CONTRATO, AGRAVIO, O DE OTRA MANERA. DELTA FAUCET COMPANY NO SERÁ RE-
SPONSABLE DE CUALQUIER DAÑO AL PRODUCTO RESULTANTES DEL DESGASTE POR
USO NORMAL, USO INDEBIDO, NEGLIGENCIA O UNA CONEXIÓN INCORRECTA O MAL RE-
ALIZADA, MANTENIMIENTO O REPARACIÓN, INCLUYENDO EL NO SEGUIR LAS INSTRUC-
CIONES APLICABLES PARA LA INSTALACIÓN, EL MANTENIMIENTO Y LA LIMPIEZA. Algunos
estados/ provincias no permiten la exclusión o limitación de daños especiales, incidentales o conse-
cuentes, por lo que estas limitaciones y exclusiones pueden no aplicarse en su caso
Esta garantía le otorga derechos legales especiales, y usted también puede tener otros derechos
que varían de estado/provincia a estado/provincia. Esta es la garantía exclusiva por escrita de Delta
Faucet Company y la garantía no es transferible. Si usted tiene alguna pregunta o duda relacionada
acerca el soporte técnico, la instalación o nuestra garantía, llámenos, envíenos un correo o email, o
visite nuestro sitio Web en www.deltabathing.com.
Transcripción de documentos
102317 CORNER SHOWER BASE BASE PARA DUCHAS ESQUINA MODEL/MODELO Read all instructions prior to installation. Lea todas las instrucciones antes de hacer la instalación. Register Online Regístrese en línea www.deltafaucet.com/registerme 422062 To order replacement parts and access additional technical documents and product info, visit www.delta.com For product and installation questions, do not return to the store. For additional help contact customer service. Para ordenar piezas de repuesto y acceder a documentos técnicos adicionales e información del producto, visite www.delta.com Para consultas sobre el producto y la instalación, no regrese a la tienda. Para obtener ayuda adicional, comuníquese con el servicio al cliente. ? ! 1‑800-355-2721 [email protected] B711615-3838-WH B711917-3838-WH REQUIREMENTS FOR SUCCESSFUL INSTALLATION KNOWLEDGE BASE: Framing Plumbing These instructions include suggestions for rough construction and plumbing installation. Local building codes vary and could supersede those suggestions. If you are not confident in your ability to perform these tasks, contract out those tasks you need help with or use a professional installer. DO NOT use drywall screws to secure flanges to wall studs. Product damage will occur and will void the warranty. • • • • • • Read complete instructions before beginning installation. Confirm that your model will fit in intended location and plumbing fixtures are located where required before beginning installation. Walls and sub-floor must be solid, plumb, and square. Use drop cloth to protect shower base from damage during installation. Do not install in areas where temperature may drop below 32ºF (0ºC). Allow product to reach room temperature for 30 minutes before installation. ! REQUISITOS PARA UNA INSTALACIÓN CORRECTA BASE DE CONOCIMIENTOS: Encuadrado Plomería Estas instrucciones incluyen sugerencias para construcciones sin acabar e instalación de cañerías. Los códigos locales de construcción varían según el lugar y tienen prioridad sobre estas sugerencias. Si no se siente capaz de realizar estas tareas, tercerícelas o contrate un instalador profesional. NO use tornillos para paneles de yeso para fijar las bridas a los montantes de la pared. Dañará el producto anulando la garantía. • Lea las instrucciones completas antes de comenzar la instalación. • Verifique que su modelo quepa en la ubicación deseada y que los accesorios de fontanería se encuentren donde sea necesario antes de iniciar la instalación. • Las paredes y el contrapiso deben estar firmes, nivelados y en escuadra. • Utilice una lona protectora para proteger la base de la ducha durante la instalación. • No realice la instalación en áreas donde la temperatura pueda ser inferior a 32°F (0 °C). • Deje que el producto alcance la temperatura ambiente durante 30 minutos antes de la instalación. www.deltafaucet.com 1 102317 Rev. A 05/07/19 TOOLS AND MATERIALS REQUIRED • 2 x 4 lumber for additional wall studs • Rags or padding to protect product during bracing HERRAMIENTAS Y MATERIALES NECESARIOS • Madera para montantes de pared si instala el juego para pared adicionales; consulte las instrucciones de instalación del juego para pared • Conjunto de drenaje y desbordamiento que encajan en una bañera con una profundidad de 41,9 cm (16-1/2”) ar Mort Mortar Gloves Mortero Guantes Level Square Nivel 1/4” Square Notched Trowel Drill Safety Glasses Caulk Gun Taladro Antiparras de seguridad Pistola para sellar Shims Drop Cloth Sealant (2 tubes) Adhesive Escuadra Cuñas Lona protectora Sellador (2 tubos) Adhésif Extension Bit Holder Drill Bit 3/16” (5 mm) Pencil Broca para taladro de 0,5 cm (3/16”) Driver Bit (for use with extension bit holder) Tape Measure Sujetador de extensión para brocas Screws #8 x 1 1/2” (zinc or stainless; panhead or roundhead) Cinta métrica Lápiz Llana dentada cuadrada de 1/4” Tornillos #8 x 3.81 cm (de zinc o acero inoxidable; cilíndricos o de cabeza redonda) 2 Broca impulsadota (para uso con sujetador de extensión para brocas) 102317 Rev. A ROUGHING-IN • • • • Rough plumbing must be installed before base installation. Minimum stud pocket sizes are shown below. Drain cutout 5” diameter max. Right side plumbing rough-in shown. For masonry construction, floor and walls must be framed to accommodate plumbing and installation. IMPORTANT: IF INSTALLING MATCHING ENCLOSURE, refer to Enclosure Installation Manual for specific lumber sizes and placement. Additional studs will be required and need to be installed at this point. TUBERÍA INTERNA • • • • La tubería interna debe ser instalada antes de instalar base. Los tamaños de las hendiduras de apoyo para los montantes se muestran a continuación. Corte para desagüe 5” (12,7 cm) de diámetro máximo. Conexión de las cañerías del lado derecho. Para los trabajos de mampostería, el piso y las paredes deben acanalarse para dar lugar a las cañerías y la instalación. IMPORTANTE: SI INSTALA EL JUEGO DE PARED, consulte las instrucciones de instalación para el juego de pared y obtendrá los tamaños específicos y la ubicación de las maderas. Se necesitarán montantes adicionales y se deberán instalar en este punto. Framing must be plumb and square. MODEL A B 422062 13” (33 cm) 13” (33 cm) B711615-3838-WH 9” (22.9 cm) 9” (22.9 cm) B711912-3838-WH 9” (22.9 cm) 9” (22.9 cm) El entramado debe estar nivelado y en escuadra. 38 1/4" min (97.16 cm) A B MODEL 422062 38 1/4” min (97.16 cm) Apron Borde Retainer Retenes Tabs Pestañas Before base installation, check that the apron retainers are secure. The retainers should fit snuggly on the posts on the base and the tabs should be inserted into the slots on the retainers. Adjust if necessary. Antes de instalar la base, verifique que los soportes/retenedores del delantal están fijos. Los soportes deben caber ajustados en los postes de la base y las lengüetas deben insertarse en las ranuras de los soportes. Ajuste si es necesario. 3 102317 Rev. A 2 1 5” (12,7 cm) 422062: 5/8” B711615-3838-WH: 1/2” B711917-3838-WH: 1/2” Ensure that the waste pipe is properly located to align with the drain assembly (not included). Dry fit base and verify that it is plumb and square. If the subfloor is not flat and level, use leveling compound or mortar bed to ensure that the base is level (shown in Step 5). Subfloor maximum diameter opening should be 5”. The drain pipe above the subfloor should be; 422062: 5/8”, B711615-3838-WH: 1/2” & B711917-3838-WH: 1/2”. Mark unit position on floor and through drain opening. Mark the locations of the studs on the flange of the base. These marks are used to verify base location after drain is installed, and outline where adhesive is applied. Coloque la base en la esquina. Revise la nivelación de derecha a izquierda y de delante a atrás. Si el subsuelo no es plano o nivelado, use un compuesto nivelador o capa de mortero para asegurar que la base quede nivelada (se muestra en el paso 5). Asegúrese de que la tubería de desagüe está adecuadamente ubicada para alinearla con las piezas del desaguë (no se incluyen). El diámetro máximo de la abertura en el subsuelo debe ser de 5”. La tubería de desagüe sobre el subsuelo debe ser 422062: 5/8”, B711615-3838-WH: 1/2” y B711917-3838-WH: 1/2”. Marque la posición de la unidad en el piso y a través de la abertura del desagüe. Marque las ubicaciones de los montantes en la brida de la base. Estas marcas se usan para verificar la ubicación de la base después que se ha instalado el desagüe y trace una línea que marque donde se ha aplicado el adhesivo. 4 102317 Rev. A 3 4 AVISO NOTICE NO corte el RIEL SUPERIOR del mismo largo que el RIEL INFERIOR. DO NOT cut the TOP TRACK the same length as the BOTTOM TRACK. 1 NOTICE For optimal water retention, water dam installation and/or proper caulking of this enclosure is necessary. Follow all steps as per sealant manufacturer’s instructions. NOTE Pour assurer une bonne rebord d’étanchéité et d’ dans les interstices ainsi du fabricant du composé Les bords du panneau de la base de douche. D soin et laissez les protè dans sa position définit verre et l’avant de la ba NOTA La goma espuma de los separadores de plástico acomodará cierta desalineación entre el vidrio y la barra de apoyo. NOTICE NOTICE DO NOT sit glass panels on concrete or other hard surfaces. AVISO NOTICE NO coloque loswill paneles de base vidriomaterial, sobre el causing concretocracks u otras Plumber’s putty degrade superficies duras. and potentially, property damage. DO NOT use plumber’s putty to seal between drain and base. Use sealant or gasket. Drill 3/16” clearance holes into flanges only. Do not drill 3/16” holes directly into studs. Drill chuck can damage base. Use an extended bit holder to reduce risk of drill chuck hitting base. NOTE N’APPUYEZ PAS les p béton ni sur d’autres su NOTA The bottom of the magnetic gasket should touch the glass support when the door is closed. La parte inferior del empaque magnético debe tocar el soporte del vidrio cuando la puerta está cerrada. AVISO Instale extended bit holder to reduce risk of drill chuck hitting base. NOTICE Perfore agujeros de 3/16" solo en las bridas, no perfore agujeros Plumber’s putty will degrade base material, causing cracks de 3/16" directamente en los montantes. El portabrocas puede and potentially, property damage. DO NOT use plumber’s dañar la base. Utilice una abrazadera extendida para reducir el putty to seal between drain and base. Use sealant or gasket. riesgo de golpear la base de la broca. NOTE Gaps between flanges and studs must be less than 1/8". Insert shims to fill gaps if needed. NOTICE When using drain cleaner or clog remover, rinse thoroughly with water. NOTICE Certain chemicals and cleaners may deteriorate the acrylic surface, causing cracks and potentially, property damage. Never use cleaning products that state on their label that they are not suitable for Acrylic, ABS, Polystyrene or Plastic. Do not use solvents (turpentine, lacqurt thinner, mineral spirits, paint thinner, MEK, xylene, acetone, naphtha, etc.). Certain chemical and cleaners may deteriorate acrylic surfaces, causing cracks and potentially, property damage. After application/installation, clean up the product surface and remove any excess sealant with denatured alcohol only. do not use solvents (turpentine, lacqurt thinner, mineral spirits, paint thinner, MEK, xylene, acetone, naphtha, etc.). 5 2 Install drain following manufacturer's instructions. misalignment between the glass and support bar. NOTICE Para una retención óptima del agua, la instalación de la lengüeta para la retención del agua y/o el calafateo de este recinto es necesario. Siga todos los pasos en las instrucciones del fabricante del sellador. Los bordes del panel pueden rayar la superficie de la base de la ducha. Tenga cuidado al mover el panel a su posición. Asegúrese que el panel de vidrio está paralelo con el borde de la base. Fíjese que el borde vertical del vidrio esté verticalmente aplomado. Drill 3/16” holes at all stud locations on top flanges. The foam of the plastic spacers will accommodate some NOTICE Perfore agujeros de 3/16” en las bridas superiores en todos los sitios Drill 3/16” clearance holes into flanges only. Do not drill 3/16” donde se ubican los montantes. holes directly into studs. Drill chuck can damage base. Use an AVISO AVISO NOTICE The edges of the panel can scratch the shower base surface. Use care when moving the panel into position. Check that the glass panel is parallel with the edge of the base. Check that the vertical edge of the glass is plumb. AVISO NE COUPEZ PAS la GL longueur que la GLISSI Taladre agujeros de 3/16 "en las bridas solamente. No perforar el3/16 desagüe acuerdo en con las instrucciones del fabricante. "agujerosde directamente pernos. El portabrocas puede dañar la base. Utilizar un portabits extendido para reducir el riesgo de golpear la base de la broca. AVISO La masilla del fontanero degradará el material base, causando grietas y potencialmente, daños a la propiedad. NO utilice la masilla del fontanero para sellar entre el drenaje y la base. Utilice sellador o junta. NOTA Los espacios entre las bridas y los pernos deben ser inferiores a 1/8 ". calce para llenar los vacíos si es necesario. AVISO Cuando utilice un limpiador de drenaje o un removedor de tapones, enjuague bien con agua. AVISO Ciertos productos químicos y productos de limpieza pueden deteriorar la superficie acrílica, causando grietas y potencialmente daños a la propiedad. Nunca utilice productos de limpieza que indiquen en su etiqueta que no son adecuados para acrílico, ABS, poliestireno o plástico. No utilice solventes (aguarrás, diluyente lacqurt, alcoholes minerales, diluyente de pintura, MEK, xileno, acetona, nafta, etc.). AVISO Ciertos agentes químicos y productos de limpieza pueden deteriorar las superficies acrílicas, causando grietas y potencialmente daños materiales. Después de la aplicación / instalación, limpie la superficie del producto y elimine el exceso de sellador sólo con alcohol desnaturalizado. no utilice disolventes (aguarrás, diluyente lacqurt, alcoholes minerales, 102317 Rev. A diluyente de pintura, MEK, xileno, acetona, nafta, etc.). 6 5 A A. B. Flat and Level Floor Aplane y nivele el piso Uneven Floor Piso desnivelado 1 Shim 2 A. If subfloor is flat and level, and mortar was not used, apply adhesive A on floor using 1/4" square-notched trowel, staying within pencil line (1). Proceed to the next step. It is recommended not to stand in base while securing to wall. Set base in corner and press it into adhesive. B. If subfloor is not flat and level, it is recommended to put down a mortar bed where the base will be positioned. NOTE: Gaps between flanges and studs must be less than 1/8”. Insert shims to fill gaps if needed. Secure flanges to all studs with 1 1/2” screws through previously drilled holes. Apply a generous amount of mortar (2) that has been mixed to a thick consistency. Use the mortar to fill in low areas. Place the base in the wet mortar, adjust until it is level, and let mortar cure for 24 hours. Proceed to the next step. Se recomienda no pararse en la base mientras que usted fije la pared. Coloque la base en la esquina y presiónela en el adhesivo. Fije las bridas en todos los montantes con tornillos de 1 1/2” a través de los agujeros ya perforados. NOTA: Los espacios entre las bridas y los montantes deben ser menores de 1/8”. Si es necesario, inserte calzos para rellenar los espacios. A. Si el contrapiso está plano y nivelado y no se utilizó mortero, aplique el adhesivo A en el suelo utilizando un balaustre de 1/4" cuadrado dentado, permaneciendo dentro de la línea trazada con el lápiz (1). Continué con el próximo paso. B. Si el subsuelo no está plano y nivelado, se recomienda que coloque un lecho de mortero en donde colocará la base. Aplique una cantidad generosa de mortero (2) que ha sido mezclada hasta obtener una consistencia espesa. Utilice el mortero para rellenar las zonas bajas. Coloque la base en el mortero húmedo, ajuste hasta que esté nivelado y deje que el mortero se cure durante 24 horas. Continué con el próximo paso. 6 100447 Rev. A 7 CARE AND CLEANING We recommend that you clean your acrylic bathing product with mild detergents. Use a terry cloth towel, soft cloth or sponge. Avoid using abrasive scrubbing pads, steel wool or sponges. After cleaning, rinse thoroughly with water. NOTICE When using drain cleaner or clog remover, rinse thoroughly with water. NOTICE Certain chemicals and cleaners may deteriorate the product surface, causing cracks and potentially, property damage. Never use cleaning products that state on their label that they are not suitable for Acrylic, ABS, Polystyrene or Plastic. Do not use solvents (turpentine, lacqurt thinner, mineral spirits, paint thinner, MEK, xylene, acetone, naphtha, etc.). For further inquires and a list of safe cleaners to use, contact customer service at [email protected] or 1-800-355-2721. SEALANT CLEANUP 1 NOTICE Certain chemical and cleaners may deteriorate product surfaces, causing cracks and potentially, property damage. After application/installation, clean up the product surface and remove any excess sealant with denatured alcohol only. do not use solvents (turpentine, lacqurt thinner, mineral spirits, paint thinner, MEK, xylene, acetone, naphtha, etc.). Apply a bead of sealant between the apron and finished floor. 2 3 Aplique una perla de sellador entre el delantal y el piso acabado. CUIDADO Y LIMPIEZA Recomendamos que limpie su producto acrílico de baño con detergentes suaves. Utilice una toalla de felpa, un paño suave o una esponja. Evite el uso de almohadillas abrasivas de limpieza, lana de acero o esponjas. Después de la limpieza, enjuague bien con agua. AVISO Cuando utilice el limpiador de desagües o el removedor de obstrucciones, enjuague bien con agua. AVISO Ciertos productos químicos y limpiadores pueden deteriorar la superficie acrílica, causando grietas y potencialmente, daños a la propiedad. Nunca utilice productos de limpieza que indiquen en su etiqueta que no son adecuados para el acrílico, ABS, poliestireno o plástico. No utilice disolventes (trementina, limpiadores de lacas, alcoholes minerales, diluyentes de pintura, MEK, xileno, acetonas, nafta, etc.) Para más información y una lista de limpiadores recomendables para usar, comuníquese con el servicio de atención al cliente al consumercare@deltafaucet. com o al 1-800-355-2721. LIMPIEZA DEL SELLADOR AVISO Ciertos agentes químicos y productos de limpieza pueden deteriorar las superficies acrílicas, causando grietas y potencialmente daños materiales. Después de la aplicación / instalación, limpie la superficie del producto y elimine el exceso de sellador sólo con alcohol desnaturalizado. no utilice disolventes (aguarrás, diluyente lacqurt, alcoholes minerales, diluyente de pintura, MEK, xileno, acetona, nafta, etc.). 7 102317 Rev. A Limited Warranty be made and replacement parts may be obtained by calling 1 800 355 2721 or by writing to: This Delta®Bathing product is warranted to the original consumer purchaser or commercial user, as applicable, to be free from defects in material and workmanship for the applicable period specified below: Delta®Tubs, Shower Bases, and Walls: Ten (10) years from the date of purchase by the original consumer purchaser or, for commercial users, one (1) year from the date of purchase. Delta Faucet Company will repair or replace, free of charge, during the applicable warranty period, any part that proves defective in material and/or workmanship under normal installation, use and service. If repair or replacement is not practical, Delta Faucet Company may elect to refund the purchase price (the return of the product may be required at Delta Faucet Company’s option). These are your exclusive remedies In the United States and Mexico: Delta Faucet Company Product Service 55 E. 111th Street Indianapolis, IN 46280 [email protected] In Canada: Masco Canada Limited, Plumbing Group Technical Service Centre 350 South Edgeware Road St. Thomas, Ontario, Canada N5P 4L1 [email protected] DELTA FAUCET COMPANY SHALL NOT BE LIABLE FOR ANY SPECIAL, INCIDENTAL OR CONSEQUENTIAL DAMAGES (INCLUDING LABOR CHARGES TO REPAIR, REPLACE, INSTALL OR REMOVE THIS PRODUCT), WHETHER ARISING OUT OF BREACH OF ANY EXPRESS OR IMPLIED WARRANTY, BREACH OF CONTRACT, TORT, OR OTHERWISE. DELTA FAUCET COMPANY SHALL NOT BE LIABLE FOR ANY DAMAGE TO THE PRODUCT RESULTING FROM REASONABLE WEAR AND TEAR, MISUSE, ABUSE, NEGLECT OR IMPROPER OR INCORRECTLY PERFORMED INSTALLATION, MAINTENANCE OR REPAIR, INCLUDING FAILURE TO FOLLOW THE APPLICABLE INSTALLATION, CARE AND CLEANING INSTRUCTIONS. Some states/provinces do not allow the exclusion or limitation of special, incidental or consequential damages, so these limitations and exclusions may not apply to you. This warranty gives you special legal rights, and you may also have other rights, which vary from state/province to state/province. This is Delta Faucet Company’s exclusive written warranty and the warranty is not transferable. If you have any questions or concerns regarding technical support, installation or our warranty, please call, mail or email us as provided above or visit our website at www.deltabathing.com. Any labor charges incurred by the purchaser to repair, replace, install or remove this product are not covered by this warranty. Delta Faucet Company shall not be liable for any damage to the product resulting from reasonable wear and tear, misuse, abuse, neglect or improper or incorrectly performed installation, maintenance or repair, including failure to follow the applicable care and cleaning instructions. Delta Faucet Company recommends using a professional plumber for all installation and repair. We also recommend that you use only genuine Delta®/Peerless® replacement parts. Proof of purchase (original sales receipt) from the original purchaser must be made available to Delta Faucet Company for all warranty claims unless the purchaser has registered the product with Delta Faucet Company. This warranty applies only to bathing products that are installed in the United States of America, Canada and Mexico. Limitation on Duration of Implied Warranties. TO THE EXTENT PERMITTED BY LAW, ANY IMPLIED WARRANTY, INCLUDING THE IMPLIED WARRANTIES OF MERCHANTABILITY AND OF FITNESS FOR A PARTICULAR PURPOSE, IS LIMITED TO THE STATUTORY PERIOD OR THE DURATION OF THIS WARRANTY, WHICHEVER IS SHORTER. Some states/provinces do not allow limitations on how long an implied warranty lasts, so this limitation may not apply to you. What You Must Do To Obtain Warranty Service or Replacement Parts. A warranty claim may © 2019 Delta Faucet Company Garantía limitada Lo que usted debe hacer para obtener servicio de garantía o piezas de repuesto. Un reclamo de garantía se puede hacer y piezas de repuesto se pueden obtener llamando al 1 800 355 2721 o escribiendo a: En los Estados Unidos y México: En Canadá: Delta Faucet Company Masco Canada limitada, Grupo de plomeria Product Service Centre de servicio tecnico 55 E. 111th Street 350 South Edgeware Road Indianapolis, IN 46280 St. Thomas, Ontario, Canada N5P 4L1 [email protected] [email protected] DELTA FAUCET COMPANY NO SERÁ RESPONSABLE POR DAÑOS ESPECIALES, INCIDENTALES O CONSECUENTES (INCLUYENDO POR LOS CARGOS DE MANO DE OBRA PARA REPARAR, REEMPLAZAR, INSTALAR O RETIRAR ESTE PRODUCTO), QUE RESULTEN DEL INCUMPLIMIENTO DE CUALQUIER GARANTÍA EXPRESA O IMPLÍCITA, EL INCUMPLIMIENTO DE CONTRATO, AGRAVIO, O DE OTRA MANERA. DELTA FAUCET COMPANY NO SERÁ RESPONSABLE DE CUALQUIER DAÑO AL PRODUCTO RESULTANTES DEL DESGASTE POR USO NORMAL, USO INDEBIDO, NEGLIGENCIA O UNA CONEXIÓN INCORRECTA O MAL REALIZADA, MANTENIMIENTO O REPARACIÓN, INCLUYENDO EL NO SEGUIR LAS INSTRUCCIONES APLICABLES PARA LA INSTALACIÓN, EL MANTENIMIENTO Y LA LIMPIEZA. Algunos estados/ provincias no permiten la exclusión o limitación de daños especiales, incidentales o consecuentes, por lo que estas limitaciones y exclusiones pueden no aplicarse en su caso Este producto de baño de Delta® está garantizado al comprador original o usuario comercial, según sea el caso, de estar libre de defectos en materiales y mano de obra durante el período aplicable que se especifica a continuación: Las bañeras, los platos de regaderas/duchas, y paredes/ mamparas Delta®: Diez (10) años desde la fecha de compra por el comprador original o, para los usuarios comerciales, un (1) año desde la fecha de compra. Delta Faucet Company reparará o reemplazará, sin costo alguno, durante el periodo de garantía, cualquier pieza que presente defectos en materiales y/o mano de obra bajo instalación, uso y servicio normal. Si la reparación o sustitución no es práctica, Delta Faucet Company podrá optar reembolsarle el precio de la compra (se puede requerir que devuelva el producto a opción de Delta Faucet Company). Estos son sus únicos recursos. Cualquier cargo por mano de obra incurrido por el comprador para reparar, reemplazar, instalar y desmontar este producto no está cubierto por esta garantía. Delta Faucet Company no será responsable por ningún daño al producto resultante del desgaste por uso normal, mal uso, abuso, negligencia o instalación inadecuada o realizada de forma incorrecta, mantenimiento o reparación, incluyendo el no seguir las instrucciones aplicables para el cuidado y limpieza. Delta Faucet Company recomienda que use un plomero profesional para todas las instalaciones y reparaciones. También recomendamos que utilice sólo piezas de repuesto Delta®/ Peerless®. La prueba de compra (recibo de compra original) del comprador original debe ser disponible a Delta Faucet Company para todos los reclamos a menos que el comprador haya registrado el producto en Delta Faucet Company. Esta garantía se aplica únicamente a los productos de baño que se instalan en los Estados Unidos de América, Canadá y México. Esta garantía le otorga derechos legales especiales, y usted también puede tener otros derechos que varían de estado/provincia a estado/provincia. Esta es la garantía exclusiva por escrita de Delta Faucet Company y la garantía no es transferible. Si usted tiene alguna pregunta o duda relacionada acerca el soporte técnico, la instalación o nuestra garantía, llámenos, envíenos un correo o email, o visite nuestro sitio Web en www.deltabathing.com. La limitación de la duración de las garantías implícitas. THASTA DONDE LO PERMITA LA LEY, LAS GARANTÍAS IMPLÍCITAS, INCLUYENDO LAS GARANTÍAS DE COMERCIALIZACIÓN Y DE IDONEIDAD PARA UN FIN PARTICULAR, SE LIMITA AL PERÍODO LEGAL O A LA DURACIÓN DE ESTA GARANTÍA, LO QUE OCURRA PRIMERO. Algunos estados/provincias no permiten limitaciones de la duración de una garantía implícita, por lo que esta limitación puede no aplicarse en su caso. © 2019 Delta Faucet Company 8 102317 Rev. A-
 1
1
-
 2
2
-
 3
3
-
 4
4
-
 5
5
-
 6
6
-
 7
7
-
 8
8


Delta 422062 Guía de instalación
- Tipo
- Guía de instalación
- Este manual también es adecuado para
En otros idiomas
- English: Delta 422062 Installation guide
Documentos relacionados
-
Delta B711917-3838-WH Guía de instalación
-
-
Delta B10912-3838 Guía de instalación
-
Delta B78311-6032R-WH Guía de instalación
-
-
-
-
-
-