Craftsman 917387261 El manual del propietario
- Categoría
- Cortadoras de césped
- Tipo
- El manual del propietario

Owner's Manual
£RRFTXMON°
4.5 HORSEPOWER
20" REAR DISCHARGE
ROTARY LAWN MOWER
Model No.
917.387261
o Safety
- Assembly
• Operation
° Maintenance
• Espa5ol
. Repair Parts
CAUTION:
Read and follow all
Safety Rules and Instructions
before operating this equipment
Sears, Roebuck and Co,,, Hoffman Estates, IL 60179

Warranty 2 ProductSpecifications 11
Safety Rules 2 Service and Adjustments 13
Assembly 4 Storage 14
Operation 6 Troubleshooting 15
Maintenance Schedule 10 Repair Parts 32
Maintenance 10 Parts Ordering Back Cover
LIMITED TWO YEAR WARRANTY ON CRAFTSMAN POWER MOWER
For two years from date of purchase, when this Craftsman Lawn Mower is maintained,
lubricated, and tuned up according to the operating and maintenance instructions in the
owner's manual, Sears will repair free of charge any defect in material or workmanship.
tf this Craftsman Lawn Mower is used for commercial or rental purposes, this warranty
applies for only 90 days from the date of purchase.
This Warranty does not cover:
• Expendable items which become worn during normal use, such as rotary mower
blades, blade adapters, belts, air cleaners and spark plug.
• Repairs necessary because of operator abuse or negligence, including bent crank-
shafts and the failure to maintain the equipment according to the instructions con-
tained in the owner's manual.
Warranty service is available by returning the Craftsman power mower to the nearest
Sears Service CentedDeparlment in the United States. This warranty applies only while
this product is in use in the United States.
This Warranty gives you specific legal rights, and you may also have other rights which
vary from state to state.
SEARS, ROEBUCK AND CO_,D/817 WA, HOFFMAN ESTATES, ILLINOIS 60179
TRAINING:
• Read thisoperator's manual carefuliy_
Become familiar with the controls and
know how to operate your mower
properly Learn how to quickly stop
mower°
• Do not allow children touse your mower.
Never allow adultsto use mower without
proper instructions.
• Keep the area of operation clear of all
persons, especially small children and
pets.
• Use mower only asthe manufacturer
intended and as described in lh{s manual.
• Do not operate mower if it has been
dropped or damaged in any manner
Always have damage repaired before
using your mower°
° Do not use accessory attachmenls that
are not recommended by the manufac_
lurer..Use of such attachments may be
hazardous.
, The blade turns when the engine is
mnning_
PREPARATION:
• Always thoroughly check thearea tobe
mowed and clear it of all stones, sticks,
wires,bones, and other foreign objects.
These objects will be thrown by the blade
andcan cause severe injury.
• Always wear safety grasses or eye
shields when starting and while using
your mower.
• Dress properly. Do not operate mower
when barefoot or wearing open sandals
Wear only solid shoes with good traction
when mowing
• Check fuel tank before starting engine°
Do not fill gas tank Indoors, when the
engineis runningor when the engine is

hotAllowthe engine to cool for several
minutes before filtingthe gas tank. Clean
off any spilled gasoline before starting the
engine.,
- Always make wheel height adjustments
before starting your mower, Never
attempt to do thiswhile the engine is
running
• Mow only in daylight or good artificial
light,
OPERATION:
• Keep your eyes and mindor]your mower
and the area being cut Do not let other
interests distract you.
- Do not mow wet or slippery grass. Never
run while operating your mower. Always
be sure of your footing -- keep a firm
hold on the handles and walk.
, Do not put hands or feet near or under
rotating parts Keep clear of the discharge
opening at all times
- Always stop the engine whenever you
leave or are not using your mower, or
before crossing driveways, walks, roads,
and any gravel--covered areas.
• Never direct discharge ofmatedal toward
bystanders nor allow anyone near the
mower while you are operating it
• Before cleaning, inspecting,or repairing
your mower, stop the engineand make
absolutely sure the blade and all moving
parts have stopped. Then disconnect the
spark plug wire and keep it away from the
spark plug to preventaccidental starting.
, Do not continue to run your mower ifyou
hit aforeign object°Follow the procedure
outlined above, then repair any damage
before restarting and operatingyou
mower.
• Do not change the governor settings or
overspeed the engine. Engine damage or
personai injury may result
= Do not operate your mower if it vibrates
abnormally_Excessive vibration is an
indicationof damage; stop the engine,
safely check forthe cause of vibration
and repair as required,
° Do not run the engine indoors, Exhaust
fumes are dangerous.
• Never cut grass by pulling the mower
towards you Mow across the face of
slopes, never up and down or you might
lose your footing Do not mow exces-
sively steep slopes° Use caution when
operating the mower on uneven terrain
or when changing directions _ maintain
good footing,
- Never operate your mower without
proper guards, plates, grass catcher or
other safety devices in place,
MAINTENANCE AND STORAGE:
° Check the blade and the engine mount-
ing bolts often to be sure they are
tightenedpropedy
• Check all boffs,nuts and screws at
frequent intervals for proper tightness to
be sure mower is insafe working
condition
• Keep all safetydevices in place and
working.
o To reduce fire hazard, keep the engine
free of grass, leaves or excessive grease
and oil
• Check grass catcher often for deteriora-
tion and wear and replace worn bags,.
Use only replacement bags that are
recommended by and comply with
specifications ofthe manufacturer of your
mower
- Always keep a sharp blade on your"
mower.
. Allow engine to cool before storing in any
enclosure.
° Never store mower with fuel in the tank
Inside a building where fumes may reach
an open flame or an ignilion source such
as a hot water heater, space heater,
clothes dryer, etc,
CAUTION: Always disconnect spark
plug were and place wire where it
cannot contact spark plug in order to
prevent accidental starting when
setting up, transporting, adjusting or
making repairs
WARNING
The engine exhaust from this product
contains chemicals known to the State
of California to cause cancer, berth
defects, or other reproductive harm.

Theseaccessorieswereavailablewhen thislawnmowerwas produced. Theyare also
availableat mostSearsretailoutletsand servicecenters, Most Searsstorescan alsoorder
repairpartsfor you,when youprovide the modelnumberof yourlawnmower° Someofthese
accessoriesmay not applytoyourlawn mower,,
LAWN MOWER PERFORMANCE
CUPP|NG DEFLECTOR
FOR REAR DISCHARGE LAWN MOWERS MULCHER KITS
GRASS CATCHERS ; _ GRASS CATCHERS
FOR _ FOR
REAR DISCHARGE SIDE DISCHARGE
LAWN MOWERS LAWN MOWERS
LAWN MOWER MAINTENANCE
STABIMZER
<2
GAS CANS
MUFFLERS
BELTS BLADES BLADE ADAPTERS
WHEELS
SPARK PLUGS
ENGINE OIL
Readtheseinstructionsand thisman[Jalin its
entiretybeforeyou attempttoassemble or
operateyournew fawnmower. Yournew lawn
mowerhas beenassembledatthe factorywith
the exceptionof thosepartsle_tunassembled
forsh{ppingpurposes,,All partssuchas nuts,
washers,bolts, etc.,necessarytocompletethe
assembly havebeen placedin thepartsbag.
Toensuresafeand properoperationofyour
lawnmower, allpartsand hardwareyou
assemble must be tightenedsecurely Use the
correcttools as necessaryto ensureproper
tightness,,
TO REMOVE LAWN MOWER FROM
CARTON
• Remove loosepartsinc_udedwithmower,
• Cut down twoendcomersof cartonand lay
endpaneldown flat
° Remove allpackingmaterialsexcept
paddingbetween upperand lower handle
andpaddingholdingoperatorpresence
controlbar toupperhandle,
4
• Rolllawnmower out ofcarton andcheck
cartonthoroughly"foradditionallooseparts.
HOW TO SET UP YOUR LAWN
MOWER
TO UNFOLDHANDLE
IMPORTANT: Unfold hand]escarefullyso as
notto pinchor damage contr,ol cables.
• Raisehandlesuntillower handlesection
locks intoplace inmowingpos'_on,,
• Remove protectivepadding,raiseupper
handle sectionintoplace on lowerhandle
andtightenbothhandle knobs,.
• Removehandlepaddingholdingoperator
presencecontrolbarto upperhandle.
• Your lawnmower handlecan be adjusted
foryourmowingcomfort. Referto "Adjust
Handte=inthe ServiceandAdjustment
sectionofthismanual°

Operatorresencecentre{bar
Uppe,handf_..,_ _.
Lowerhandle
CAUTION: Do not run your lawn mower
without mulcher plug in place or approved
clipping deflector or grass catcher in place.
Never attempt to operate the lawn mower
with the rear door removed or propped
open,
TO INSTALL ATTACHMENTS
Your'lawn mower wasshipped readytobe
usedas a mutcheroToconverttobaggingor
discharging:
. Open reardoorand removemulcherplug
Storemulcherplug ina safe place
- You can now installcatcher oroptional
dipping deflector.
• To returntomulching operation,inst_l
mulcherplugintodischargeopeningof
mower.

KNOW YOUR LAWN MOWER
READ THIS O_ER'S MANUALANDSAFETYRULESBEFORE OPERATINGYOUR
LAWNMOWER, Comparetheillustrationswithyourlawnmowertofamiliarizeyourselfwiththe
Ioca_onofvariouscontrolsandadjustments_Savethismanualforfuturereference°
These symbols mayappearonyour lawnmower orin literaturesuppliedwith theproduct,
Leam andunderstandtheirmeaning,
CAUTION ENGINE ENGINE FAST SLOW CHOKE FUEL OIL DANGER, KEEP HANDS
...........O,,R,,,,W/_,,NIN G ON OFF ............ AND FEET AWAY
_rasenoe control bar
Starter handle
Handle
Grass catcher
ine zone control cable
Gasoline fillercap
Primer
Air filter
Housing
Mutcher plug
Engine oil cap w!
dipstick
Wheel adjuster
(oneachwheel)
!urns when the engine is running., ......
Operator presencecontrolbar- must be
held down tothe handleto startthe engine,
Releasetostoptheengine,
Palmer-pumps addi',,ionalfuel fromthe
carburetortothe cylinderforuse when
startingacold engine.
Starter Handle - used for starting the
engine_
Mulcher Plug - located at the discharge
openingmust be removed when convert-
ingto bagging or discharging operation_
MEE[s CPSC SAF_ REQUIREMENTS.............................
Sears rotarywalk-behindpowerlawn mowers conformto thesafety standardsofthe American
NationalStandards lnstit'_eand the U.S,ConsumerProductSafety Commission. The blade

Theoperationofanyfawnmowercan
result+nforeignobjectsthrownintothe
eyes,whichcanresultinsevereeye
damage,Alwayswearsafetyglassesor
eyeshieldswhileoperatingyourlawn
mowerorperforminganyadjustmentsor
repairs+Werecommendawidevision
safetymaskover'thespectaclesor
standardsafetyglasses,
HOW TO USE YOUR LAWN MOWER
ENGINE SPEED
The enginespeed wassetat thefactoryfor
optimum perfonnance+Speedis notadjust-
able.
ENGINE ZONE CONTROL
CAUTION: Federal regulationsrequirean
engine controltobe installedonthislawn
mower inorderto minimizetheriskof blade
contact injury.Donot under'any circumstances
attemptto defeatthe functionof the operator
control The bladeturnswhen the engine is
running,,
+ Your lawnmower isequippedwith an
operatorpresencecontrolbar which
requ+resthe operatortobe pos+tioned
behindthe lawn mowerhandle tostartand
operatethe lawnmower.
TO ADJUST CUTTING HEIGHT
,, Raisewheefsfor lowcut and lowerwheels
forhighcut,
• Adjust cuttingheightto suityour require-
ments_Medium positionisbest for most
lawns
° To change cuttingheight,squeeze adjuster
Ievertowardwheel+Move wheelupor
downtosuityourrequirements+Besurea_l
wheelsarein thesame setting.
NOTE: Adjusterisproperlypositionedwhen
platetab insertsinto hole inlever. Also,9-
positionadjusters(if soequipped)allowlever
to bepositionedbetween thepratetabs+
Lowerwheelsfor Platetab
high cu___
Lever'
Re+sowheelsfor towcut
TO ATTACH GRASS CATCHER
° Lift the rear door of the lawn mower and
place the grass catcher frame side
hooks onto the handle bracket hooks_
. The grass catcher is secured to the lawn
mower housing when the rear door is
lowered onto the grass catcher frame,
CAUTION; Do not run your lawn mower
withoutclipping deflector or approved
grass catcher In place. Never attempt to
operate the lawn mower with the rear door
removed or propped open.
Reardoor
Hinge
bracket Grass catcher
tabs
TO EMPTY GRASS CATCHER
• Lift up on grass catcher using the frame
handle.
° Remove grass catcher with clippings
from under lawn mower handle.
° Empty clippings from bag using both
frame handle and bag handle+
NOTE: Do not drag the bag when
emptying; it will cause unnecessarywear,
BEFORE STARTING ENGINE
OIL
Yourlawnmower isshippedwithoutoilinthe
engine,
. Besure moweris levelandarea aroundoil
fillis clean
. Removeengine oilcap w/dipstickandfiilto
thefull line on the dipsUck
- Use 20 ozs.of oil For typeand gradeofoif
touse, see"ENGiNE" inCustomer
Responsibilitiessection ofthis manual,
o Pouroil stowiy+Do notoverfill
° Checkoil levelbeforeeach use+Add oilif
needed_Fill tofuIlline on dipstick+
° To readproperlevel+tighten engineollcap
eachtime.
° Reinstallengineoil capand tighten,
= Change theoil after every25 hoursof
operationor eachseason You mayneed
tochange theoilmoreotter] under dusty,
d+rtyconditions.

GAS
• Fill fuel tank. Use fresh, clean, regular
unleaded gasoline with a minimum of 87
octane.. Do not mix oil with gasoline.
Purchase fuel Inquantities that can be
used within 30 days to assure fuel
freshness,
WARNING: Experience indicates that
alcohol blended fuels (called gasohot or
using ethanol or methanol) can attract
moisture which leads to separation and
formation of acids duringstorage,. Acidic
gas can damage the fuel system of an
engine while in storage, To avoid engine
problems,the fuel system shouFdbe
emptiedbefore storage of 30 days or
longer. Drain the fuel tank, start the
engineand let it run untit fuel lines and
carburetor are empty. Use fresh fuel next
season. See Storage Instructions for
additional information°Never use engine
or carburetor cfeaner products in fuel tank
or permanent damage may occur,
Gasolinefilter
cap
Engine oil cap
w/dipstick
TO START ENGINE
• To start a cold engine, push primer five
(5) times before trying to start. Use a
firm push. This step is not usually
necessary when starting an engine
which has already run for a few
minutes.
• Hold operator presence control bar
down to the handle and pull starter
handle quickly. Do not allow starter
rope to snap back.
• To stop engine, release operator
presence control bar.
NOTE: In cooler weather it may be
necessary to repeat priming steps. In
warmer weather over priming may cause
flooding and engine will not start. If you
do flood engine, wait a few minutes
before attempting to start and do not
repeat priming steps,.
MOWING TIPS
• Under certain conditions, such as very
tall grass, tt may be necessary to raise
the height of cut to reduce pushing
effort and to keep from overloading the
engine and leaving clumps of grass
clippings,
• For extremely heavy cutting, reduce the
width of cut and raise the rear of the
lawn mower housing one (1) wheel
adjuster setting higher than the frontfor
better discharge of grass_
• When using a rear discharge lawn
mower in moist, heavy grass, dumps of
cut grass may not enter the grass
catcher. Reduce ground speed
(pushing speed) and/or run the lawn
mower over the area a second time,
• Ifa trail of grass clippings is _efton the
right side of a rear discharge lawn
mower, mow in a clockwisedirection
with a small overlap to collect the
clippings on the next pass,
• Keep top of engine around starter clear
and clean of grass clippings and chaff.
This will help engine air flow and extend
engine life.
. Pores in cloth grass catchers can
become filled with dirtand dust with use
and catcherswill coUectless grass._ To
prevent this, regularly hose catchers off
with water and let dry before using.
MULCHING MOWING TIPS
IMPORTANT: For best performance,
keep mower housing free of built-up grass
and trash. Clean UNDERSIDE OF
MOWER HOUSING after each use. See
"Cleaning" in CUSTOMER
RESPONSIBILITIES section of this
manual.
• The special mulching blade willrecut
the grass clippings many times and
reduce them in size so that as they fail
onto the lawn they will disperse into the
grass and not be noticed. Also, the
mulched grass will biodegrade quickly
to provide nutrients for the lawn.
Always mulch with your highestengine
(blade) speed as this willprovide the
best recutting action of the blades.

• Avoidcuttingyourlawnwhenitiswet.
Wetgrasstendstoformclumpsand
interfereswiththemulchingaction.The
besttimetomowyourlawnistheearly
altemoon,Atthistimethegrasshas
driedandthenewlycutareawillnotbe
exposedtothedirectsun.
o For best results, adjust the lawn mower
cutting height so that the lawn mower
cuts off only the top one-third of the
grass blades. If the lawn is overgrown it
will be necessary to raise the height of
cut to reduce pushing effort and to keep
from overloading the engine and
leaving clumps of mulched grass. For
extremely heavy mulching, reduce your
width of cut, mow slowly and raise
the rear of the lawn mower one wheel
adjuster setting higher than the front.
o Certain types of grass and grass
conditions may require that an area be
mulched a second time to completely
hide the clippings. When doing a
second cut, mow across or perpendicu-
lar to the first cut path,
• Change your cutting pattern from week
to week. Mow north to south one week
then change to east to west the next
week. This will help prevent matting
and graining of the lawno
Max 1/3

_ _ ,o,_G_o_
REGULARSERV!CE /__ SERVICEDATES..........
Check !el Loose Faslenens I,/ _ ....
ClearJInepect Gra._sCatcher
(i! Equipped) If _ I/
M i Clean Lawn Mower
j , ,
N i Clean Under Drive Cover
Wi (Power-Propelled Mowers) ik/
,. iC,eckd,v_bo=vpu,eye
"J (Power-PropelledMowers}
R iCh0ck/Sherpen/RBP'_='a=ado It,", =
Lubdcatton Chad t,/
CleaneatterW_echerge
(Electric Start Mowers) V' I/4
E Check El)gl.neOil Level = V'
N Change E0g!ne 011 IV/t_
G Clean Air Filler I/
I )nspect Muffler IV#
N €!ean or Replace Spark Plug iv/
E Replace A(rFl!ler Paper Cadddge I/2
1 ,,CP_nge mo_oellen whan operatingut'clortth__v,/lo_,d orin h_h _r,blor_tlompera_r,,
2 ,, Sotvfca more oito_q when o_er4d_ g In d_l_y or d_,_,tycon_Uons
,3., RopfiaCO bla_OS more Ofl0n When mow_g _ s,_y Boi_
4 ,, Ch_Ro 4B hou_ _! i_rld of so_sorl,
GENERAL RECOMMENDATIONS
The warranty onthislawnmowerdoesnot
cover items thathavebeensubjectedto
operator abuse ornegligenceToreceivefull
value from the warranty,operatormust
maintain mower as instructedinthismanual,
Some adjustments witlneedtobe made
periodicallyto properlymaintainyourunit,
All adjustments inthe Serviceand Adjust-
ments sectionofthismanualshouldbe
checked at leastonceeachseason,
• Once ayear,replacethesparkplug,
replace airfilterelement andcheckblade for
wear, A newsparkplugandcleanlnewair
filterelementassuresproperair4uel mixture
andhelps yourenginerunbetter and last
longer,
. Followthe maintenanceschedulein this
manual,
BEFORE EACH USE
• Check engineoillevel
• Checkfor loosefasteners
LUBRICATION
Keepunit welllubricated(See'LUBRICATION
CHART")
LUBRICATION CHART
Whee! (_ Engine oil
adjuster
(_1 Handle bracket
mounting pin
(_) Spray lubricant
(_ Brake spring
bracket
(_) Rear
door
hinge
SAE30 MOTOROIL Referto
engine- CUSTOMERRESPONSIBILITIES
section.
IMPORTANT: Do not oil or grease plastic
wheel bearings. Viscous lubricants will
attract dust and dirt that will shorten the life
of the self lubricating bearings° Ifyou feel
they must be lubricated, use only a dry,
powdered graphite type lubricant sparingly,
10

PRODUCT SPECIFICATIONS
MODEL NUMBER 917.387261
SERIAL NUMBER
DATEOF PURCHASE
HORSEPOWER: 4+5
DISPLACEMENT: 11+5CU+IN.
GASOLINE CAPACITY/TYPE: 1.5 QUARTS
UNLEADED REGULAR
OIL TYPE (API-SFtSG/SH): SAE 30 (ABOVE 32°F)
SAE 5W+30(BELOW 32°F)
OIL CAPACITY: 20 OZS.
SPARK PLUG(GAP: .6-39") CHAMPION RJ19LM
VALVECLEARANCE: iNTAKE: .004 - .008
EXHAUST: ,004+.008
SOLID STATE IGNITION
AIR GAP: ,0125 IN.
BLADE BOLT TORQUE: 35+40FT. LBS.
The model and sedat numbers will be found on a decal attached to the rear of the
lawnmower housing Record both serial number and date of purchase in space
provided above.
LAWN MOWER
Alwaysobservesafety rules when perform+ng
any maintenance+
TIRES
= Keeptirosfreeofgasoline, ell,orinsect
controlchemicalswhichcan harmrubber+
, Avo+dstumps, stones,deep ruts,sharp
objectsand other hazardsthatmay cause
tiredamage.
BLADE CARE
Forbest results,mowerblademust be kept
sharp..Replacebent ordamaged b+ades
TO REMOVE BLADE
= Disconnectsparkplugwire from sparkplug
andplacew_rewhere itcannot comein
contactwith sparkplug
, Turn lawn mower on its side. Makesureair
filterand cad3uretorareup.
, Use awood block between bladeand
mower housingtopreventbladefrom
turningwhen removingbtadebolt+
° Protectyour handswithgloves and/orwrap
bladewithheavy cloth.
+ Removeblade boltby turningcour_ter-
clockwise. Usea 9/I6" box or open-end
wrench+
,, Removebladeandattachinghardware
(bolt,lockwasherand hardened washer).
NOTE: Removethe bladeadapter andcheck
the key insidehubof bladeadapter. The key
mustbe ingoodconditionto work properly.
Replaceadapter+if damaged.
TO REPLACEBLADE
• Positionthebladeadapter onthe engine
crankshaft+Be surekey inadapter and
keywayincrankshaft arealigned.
° Positionbladeon thebladeadapter aligning
thetwo (2)holesintheblade with the raised
lugson the adapter.
,, Be surethetrai+ingedge is up towardthe
engine.
• lnstaUthebladeboltwith the rockwasher
andhardenedwasherinto bladeadapter
andcrankshaft
o Use blockofwood between bladeand lawn
mower housingandtightenthe blade bolt,
turningclockwise.
- The recommendedtighteningtorqueis35-
40 ft+lbs.
IMPORTANT: Bladebolt isgrade 8 heat
treated.
11

Blade Crankshaft
adaptor_ay
Brade Key
Hardened ,___, Trailing _daptor
washer LOCI{
washer edge
NOTE: We do notrecommendsharpening
blade- but ifyou do,be surethebladeis
balanced.
TO SHARPEN BLADE
Careshouldbe takento keeptheblade
balanced, An unbalancedbladewiltcause
eventual damagetolawnmoweror engine,
• The blade canbesharpenedwith a fileor
on agrindingwheel. Donot attemptto
sharpenwhileonthe mower.
• To check bladebalance,drivea nailintoa
beam orwail Leaveabout oneinchofthe
straightnailexposed. Placecenter hole of
bladeoverthe headofthe nail..Ifbladeis
balanced,it shouldremainin a horizontal
position. II eitherend ofthe blademoves
downward,sharpenthe heavy end untilthe
bladeis balanced.
GRASS CATCHER
o The grasscatchermaybe hosedwith
water,but mustbedr/when used,
• Check yourgrasscatcheroftenfordamage
or deterioration.Throughnormal useit will
wear. Ilcatcherneedsreplacing,replace
onlywil,ha manufacturerapproved
replacementcatcher_.Givethe lawn mower
model numberwhenordering°
ENGINE
LUBRICATION
Useonlyhigh qualitydetergento_ratedwith
API serviceclassificationSF, SGor SH,
Selecttheoi['sSAEviscositygradeaccording
to
NOTE: AIthoughmulti-viscosityoils (5W30,
10W30etc.)improvestartingtncoldweather, .
these multFviscosityotiswillresultinincreased
oilconsumptionwhen usedabove32°F
12
Check yourengineoiltevelmorefrequentlyto
avoid possibleenginedamagefrom running
low on oil
Change theoilafter every25 hoursof
operationor eachseason, Youmay need to
change the oil moreoftenunderdusty,ditty
conditions.
Check the crankcaseoillevelbeforestarting
the engine andaltereachfive(5)hours of
continuoususe°Tightenoilplug securelyeach
time you checkthe oillevel
TO CHANGE ESNGINEOIL
NOTE: Beforetippinglawnmowertodrain oil,
drainfueltank byrunningengineuntilfuel tank
isempty°
• Disconnectspat',<plugwirefrom spark plug
andplace wirewhereitcannotcome in
contactwithsparkpk_g,
• Removeengineoilcap; layaside on aclean
surface.
• Tip lawnmower onitssideas shownand
drainoil intoasuitablecontainer. Rocklawn
mowerbackand forthto remove'anyoil
trapped insideof engine,
• Wipe off anyspilledoil on lawnmowerand
onsideof engine.
• Fillengfnewith oil Fillonlytothe "FULL"
lineon thedipstick DO NOT OVERFILL
• Replaceengineoil cap,
• Reconnectsparkplugwireto sparkplug
AIR RLTER
Yourenginewi{fnotrunproperlyandmay be
damagedbyusingadirtyairfilter.
Replacethe airfiltereveryyear,moreoftenif
you mow invery dust,],dirtyconditions..Do not
wash airfiltar_
TO CHANGEAIRFILTER
• Removethe airfiltercover byturning
counterclockwisetothe stopandpullaway
from coflar.
• Removefittarfrom insideofcover.
•CIean the insideofthe coverandthe cottar
toremoveany dirtaccumulation.
• Insertnew filterintocover,
• Put alrfittercoverandfilterintocollar
aligningthe tabv_ththeslot
Pushin on coverandturnclockwiseto
tighten.

Turn
counter-
clockwise
to remove
Air filter Tab Turn
Airfiltercover clockwiseto
tighten
MUFFLER
inspectand replacecorrodedmufflerasit
couldcreate a tirehazardand/ordamage.
SPARK PLUG
Changeyoursparkplugeach yeartomake
yourenginestarteasierand runbetter,.Set
sparkplug gap at 030 inch.
CLEANING
IMPORTANT: For best performance,keep
mowerhousing freeof built-upgrassand
trash Cleanundersideof mower housingafter
each use.
CAUTION: Disconnectspark plugwire from
sparkplugandpiacewire where it cannot
comeincontactwiththe sparkplug.
• Turn lawn moweron itsside. Makesure air
tilterandcarburetorare up. Clean the
undersideofyou; lawnmower byscraping
toremovebuild-up ofgrass and trash,
- Clean engineoftento keep trashfrom
accumulating.. A clogged engine runs
hotterandshortensengine life_
o Keepfinishedsurfaces andwheelsfreeof
allgasoline,tit, etc._
• We DO NOTrecommendusing a garden
hosetoclean lawn mower unlessthe
electrica!system,muffler,air fitterand
carburetorare coveredto keep water-out..
Waterinenginecan resultin shortened
engine lile_
CAUTION: BEFORE PERFORMING ANY
SERVICE OR ADJUSTMENTS:
• Release control bar.
- Make sure the blade and all moving
parts have completely stopped.
. Disconnect spark plug wire from spark
plug and place where it cannot come in
contact with plug.
LAWN MOWER
TO ADJUSTcLFrTING HEIGHT
See =TOADJUST CUTTINGHEIGHT"inthe
Operationsectionof thismanual,
REAR DEFLECTOR
The reardeflector,attachedbetweenthe rear
wheelsofyour fawnmower,is providedto
minimizethe possibilitythat objectswill be
thrown outthe rearof the lawnmower intothe
operator'smowingposition.
Ifthereardeflectorbecomesdamaged,it
shouldbe replaced.
TO ADJUST HANDLE
Your'lawnmower handle canbe raisedor
loweredfor yourmowingcomfort_ Four(4)
positionsareavailable: high,mediumhigh,
mediumlowand low. Handles areshipped
mountedin the mediumlow pos_on,
• To changefrom mediumlowto medium
highposition,the upper and lowerhandle
sectionswill havetobe turned ove.
o Removethecable clips.
. Removethe controls andoperatorpresence
controlbarfrom theupperhandle.
13
• Removethe starterrope guidefrom the
lowerhandle,
• Remove hairpincotters.
- Disconnectthe lowerhandle from the
handlebrackets,
. "rumthe handleover and reassemblethe
hairpincottersthathave been removed.
• Reassemblethe starterrope guide°
. Reassemblethe controlsand theoperator
presencecontrol barto the upper handle.
CAUTION: The operatorpresence controlbar
mustpivotfreelytopermit bladebrake
engagementwhen control baris released Do
not overtightenthe fastenersholdingthe
controlstotheupperhandle.
° To changefrom medium lowto high
positiononlythe upper handlesection will
haveto betumed over_
,, To changefrom medium lowto low position,
only the lowerhandie sectionwill haveto be
turnedover_
Shipping position
Medium
low
Medium

Low
High _
Lowerhandle
ro ovo-
ENGINE
CARBURETOR
Yourcarburetorhasa non-adjustablef_ed
mainjetfor m_ure conLrol,Ifyourengine
doesnot operatepropedyduetosuspected
carburetorproblems,takeyourlawnmowerto
anauthorizedservicecenter forrepairor
adjustment
ENGINE SPEED
Your enginespeed has been factory seL
Do not attempttoincrease engine speed
orit may resultin personalinjury, If you
believe thatthe engine is running too fast
ortoo slow, take your lawn mower to an
authorized service center for repair and
adjustmenL
Immediatelyprepareyourlawnmower for
storageat the endofthe seasonorifthe unit
v_]lnot be usedfor30daysor more.
LAWN MOWER
When lawn mower istobe storedfor a period
of time,clean itthoroughly,removealldirt,
grease,leaves,etc Storein aclean,dry area,
o Clean entirelawnmower (See"CLEANING"
inthe CustomerResponsibilitiessectionof
thismanual).
• Lubricateas shownin the Customer
Responsibilitiessectionof thismanual.
• Be surethat all nuts,bolts,screws, andpins
are securelyfastened. Inspect moving
parts fordamage,breakageandwear.
Replaceif necessary.
• Touch upall rustedor _ipped paint
sudacas;sand lightlybeforepainting.
HANDLE
Youcan fold yourlawnmowerhandle for
storage,
• Squeezethe bottomendsofthe lower
handletoward eachotheruntilthelower
handleclearsthehandlebracket,then
movehandleforward,
• Loosenupperhandlemountingbolts
enoughtoallow upperhandleto befolded
back.
IMPORTANT; Whenfoldingthe handlefor
storageor transportation,besure tofold the
handle asshown or you maydamage the
control cables
• When settingupyourhandlefromthe
storageposition,the lower handlewill
automal_callylockinto themo_ng pos'_on
Operatorresencecontrolbar
Upperhand'"_LiLift up"_
Liftu_,_
Mowing
position
Lowerhandie
Lowerhandle
ENGINE
FUELSYSTEM
IMPORTANT: ItIsimportanttopreventgum
depositsfrom forminginess#ntialfuelsystem
partssuchascarburetor,fuelfilter,fuel hose,
ortankduring storage_Also, experience
indicatesthat alcoholblendedfuels(called
gasoholor usingethanolormethanol)can
attractmoisturewhichleadsto separationand
14

formationofacidsduringstorage,Acidicgas
candamagethefuelsystemofanengine
whileinstorage.
• Drainthefueltank.
• Starttheengineandlet itrununtilthefuel
linesandcarburetorareempb]_
- Neveruseengine orcarburetorcleaner
productsinthe fueltank or permanent
damagemay occur,
= Use freshfuelnext season
NOTE=Fuelstabilizeris an acceptable
alternativein minimizingthe formationoffuel
gumdepositsduringstorage. Add stabilizerto
gasolinein fueltank or storagecontainer.
Alwaysfollow the mixratiofoundon stabilizer
contalner_Runengineat least10 minutes
afteraddingstabilizerto allowthe stabi!Lzerto
reachthe carburetor,.Donot drainthe gas
tankandcarburetorifusing fuelstabilizer,
ENGINEOIL
Drainoil (withenginewarm) andreplacewith
cleanengineoil, (See "ENGINE"in the
CustomerResponsibilitiessectionof this
manual),
CYLINDER
,, Remove sparkplug
• Pour one ounce(29 ml)of oilthroughspark
plug hole intocylindet_
° PuItstarter'handleslowlyafewtimes to
distributeoi!,,
, Replace withnewsparkplug.
OTHER
• Do notstore gasolinefrom oneseasonto
another,
• Replaceyourgasolinecan ifyourcan starts
to rusL Rust and/ordirtin yourgasolinewilt
cause problem&
o If possible,storeyourunit indoorsandcover
itto giveprotectionfrom dust and dirt,
° Cover yourunit with asuitableprotective
covetthat does not retainmoisture, Donot
useplastic, Plasticcannotbreathewhich
allows condensationtoform andwill cause
your unittorust.
IMPORTANT: Nevercovermowerwhite
engine andexhaustareasare stillwarm.
CAUTION: Never store the lawn mower
with gasoline in the tank ir_sidea building
where fumes may reach an open flame or
spark, Allow the engine to cool before
storing in any enclosure
TROUBLESHOOTING CHART
PROBLEM
Doesnotstart
CAUSE
' Dirtyairfilte;
• Out offuel.
oStale fuel
° Water in fuel
° Spark plugwireis
disconnected,
• Bad sparkplug,
• Loosebladeor broken blade
adapter,
, Controlbarin reIeased
position.
° Controlbardefective
CORRECTION
• Clean/replaceairfilter,
° FiIIfueltank.
. Drain tankand refillwith
freshclean fuel,.
• Drain fueltank and
carburetorand refilltank
with freshgasoline
• Connectwireto plug,
- Replacesparkplug
• Tightenbladebolt or
replaceb]adeadapter
° Depresscontrolbarto
handle.
° RepTacecontrolbar,
15

TROUBLESHOOTING CHART
PROBLEM CAUSE CORRECTION
_ssofp0wer ; R_rofia_mowerho_ing ; Seito"Higher0_
or cuttingbladedragging
inheavygrass.
• Cuttingtoo muchgrass,
• Dirty airfilter,
• Buildupof grass,leaves,
andtrashunder mower,
• Toomuchoilinengine,,
position,
• Setto"Higher Cut"
pos'_on.
. ClearJreptaceair filter.
• Cleanunderside ofmower
housing.
I° Checkoli level
Poorcut- uneven
Excessive
vibration
Starterrope hard
topull
Grasscatcher
not filling (if so
_quipped)
Hardto push
• Walkingspeedtoofast, • Cut atstowerwalking
___, speed,
• Worn,bent orlooseblade. • Replaceblade,Tighten
• Wheelheights uneven
• Lowenginespeed,
° Buildupof grass,leaves
andtrashunder mower,
• Worn,bent or looseblade.
• Bentenginecrankshaft,
ti
II
Enginellywheelbraketson
whencontrolbar isreleased.
Bentenginecrankshaft.
Bladeadapterbroken.
Bladedraggingingrass.
. Cuttingheighttoolow
• Lilt onbladewornoff_
• Catchernotventinga_r.
• Lowengine speed.
• Grassistoo highorwheel
heightistoolow-
. Rearoflawn mower
housingor bladedragging
in grass.
° Grass catchertoo full,
• HandleheightposilJonnot
rightforyou,,
bladeboll
- Set allwheels atsame
height
• Set enginespeed control
infastposition,
• Cleanunderside of
mower housing,
- Reptaceblade.Tighten
bladebolt.
• Contactan authorized
servicecenter.
- Depresscontrolbarlo
upperhandlebefore
pullingstarterrope_
• Contactanauthored
servicecenter°
• Replaceblade adapter.
,, Movelawnmower tocut
grassorto hard surface
to startengine,
• Raise cuttingheight`
. Replacebladeo
° Cleangrasscatcher,
• Set enginespeed control
infastposition. ,......................
• Raise cuttingheight.
• Raiserear oflawnmower
housingone (1) setting
higher.
° Emptygrasscatcher.
• Adjust handle heightto
suiL
16

CRAFTSMAN Model No. 917.387261
Garantfa 17 Especificactonesdel Producto 25
Reglas de Seguridad 17 ServIcIo y Adjustes 27
Montaje 19 Almacenamiento 28
Operaci6n 20 tdentificact6nde problemas 30
Mantenimiento 24 Parles de repuesto Vea el manual
Programa de Mantenimiento 24 ingl_s dei dueSo
Orden ds Partes Contratapa
GA_IA LIMiTADA DE DOS ANOS PAPA LA SEGADORAA MOTOR CRAFTSMAN
Pot dos (2)afios, a pa_r de]a fechade compra,cuandoesta Segadora Cra|tsman se mantenga, [ub_ique
yaline segt_nlas instruccionespare laopemci_ny el rnantenimientoen elmanuaJdal due5o,Sears
reparar_ gratis tododefecto enelmaterialy la mano deobra
SilaSegadora Craftsmanse usa paraf_nescomercialeso dearriendo, esta garantfa s51ose aplicapot
noventa (gO)dias a partirde la fecha de compm
Esta Garantfa nocubre:
• Arlfculos que se desgastan duranteelusonormal talescomotascuchiIlassegadoras rolatorias, los
adaptadores de lacuchtila lascorteas,los filtmsde a_rey lasbujfas
• Reparaciones necesariasdebidoa] abusooa la negligenda dal operador, incluydndose a los
cig0er3alesdoblados y ala faltade mantenimientode] equipo segSnlasinstruccionescluese inc[uyen
en el manual del dueSo
ELSERVICtO DE GARANT_AESTADISPON[BLE a]devotverla segadpra a motor Craftsman al centro/
departmento de sewicio Sears mas cercanoen losestados unidos Estagarantfa se aplica solarnente
mientras el producto este en uso en los EstadosUnidos
EstaGarantfa {eotorga derechostegalesespecificos y puedequatarnbi_ntonga otros derechos qua
varfan de estado a estado
Sears, Roebuckand Co., D/817WA,Hoftman Estates,IL 60179 USA
Los estandrares de seguridad exigenla presencia
dal operator en los contmles para reducira un
minlmo elriesgode lestonarse Su unidadviene
equipada con dichos conlroles Pot ningun motk,o
trate de]e[iminar]afunciSr_de loscontrolesque
exigen lapre.senoiade] operador
ENTRENAMIENTO:
• Lea este manuaJdel operadot
cuidadosamente Familian'cesecon los
controtes y aprenda a operat su segadora en
formaadecuada Aprenda a parar su segadora
r_pidarnente
- No perm_aque tosniSosusensu segador_
Nunca permita que losadultos operen ta
segadora sin contar con lasinsttucciones
adecuades
• Mantenga el&tea de operaci6n despejada
degenre, especialmentede niSospequefios
y de animales dom6sticos
• Use ]asegadora soiamente para losfines
propuestospor elfabffcanto ysegOn las
expticaciones desorffasen este manual
• No opera tasegadora si seha caldo oda.Sadoen
cualquiera fonna Siempre repare losdaSos
antes de usada
• Nouse accesoriosqua no hayan s{do
recomendados potel fabricante E1uso de dichos
accesorios puedesetpeligreso
• Lacuchillagira cuandoel motor est_
funcionando
PREPARACiON:
• Siemprerevise cuidadosamente el drea que se
va asegar y desp_jela detodes laspiedr,=s,
paIos,a]ambres, huesos y olros objetos
extraf=osEstos objetos ser&n lanzados con la
cuchi]tay pueden producir lesionesgraves
. Siempreusa anteojos de seguddado pmtectores
deojoscuandoarranque y durante eltiempo
queuse la segadom
!7

• Vistaseen forms adecuada Nooperela
segadorasin zapatosoconsanda]ias
mientras que el motor es_ funcionando
• Siegue siempre dumnte el d[a o con buena
luz artifirJaL
OPERAClON:
• Mantenga sus ojos y su mente en la
segadora yen el_,raa que se est_ cortando
No permtta que otros inlemses Io distraigan
- No corte c_spedmojado o resba_oso Nunca
corra mientras est,_operando su segadora
Siempre asegOrase de m_tener el equilibdo
mantenga el mango agarrado firmemente y
camine
• No ponga las manes o los pies cerca odebajo
de las partes rotatofias,Mant_ngase
atejado de la abertura de descarga en todo
memento
• Siempre pare el motor cuando so vaya
ocuandono est_ usando su segadora, o
antes de atravesar las entradasparaautos,
lossenderos, caminosy dress cubiertasde
ripio_
• Nunca dirija la descarga delmaterialhacia
los espectadores nlpermitsa nadle cema de
la segadora mientras la est_operando
• Antes de limpiar,inspeccionaro de mparar I
a segadora, pare elmotory est6
comptetamente segurode que la cuchtllay
que todaslaspartes que semueven se
hayan detenido Luego, desconecte el
alambm de la bujfa y mant6nga!o atejado de
6sta p.araevitar elarranque peraccidents.
° NOcontin0e haclendofuncionar su segadora
sile pegs aun objetoextm.6o_Sigael
precedimientodescritoa.nteriotmonte, luego
repare cualquierdafioantesde velveta
arrancar y do operar su segadora.
° No ramble los ajustesdel regulador o
hagaque el motor ands a una velocidad
excesiva,.Se pueden producirdal3os en el
motor y I estones personalos
• No opere su segadora st v_ra fuera de 1o
normal La vibracI6n excasiva esuna
[ndicad6n de dafio; pareel motor, revise en
forms segura la causede tavibraci6ny hags
las reparaciones seg0n seanecasario.
• No haga funcionarelmotor en
rectntoscerrados.Los gasesde escapeson
peligrosos,
• Nunca corte elc_spedtirandola segadora
hacia usted, Siegue a travdsde lacam de
laspendientes,nunca haciaaniba o hacia
abajo pues puedoperderelequilibffo.No
steguopendientesdemasiadoemplnadas.
Tonga cutdado cuandoopera la segadora en
terranodisparejo o cuandocambie de
diracci6n - mantenga un buenequilibdo
• Nunca opere ta segadora sin las
protecciones adecuadas, las planchas, el
recogedor de c_sped y otres dispositivos de
ssguridaden su lugar.
MANTENIMIENTO Y
ALMACENAMIEN-TO:
° Revise la cuchtliay los pemosde montaje
dot motora menudo, pare asegurarse que
est_n apretados en la forms adecuada
• Revise todoslospemos, tuercasy tomillosa
intervatosfrecaentes, pare verificarst est_n
apretados en forms adecuada,y
asegurarseque lasegadora se encuentraen
condicionesde func_onamientoseguro.
. Mantenga todos los dispositivosdo seguridad
en eu lugary tistos parefunc_onar.
• Pare reducir etpeligrode tncendio,
mantenga etmotor sin c_sped, hejas y grass
o aceite en exceso.
• Revise el recogadorde c_speda menudo
pare vorilicarsi haydeterioreydesgaste y
cambis las bolsasdesgastadasoUse
solamentelas bolsasde repuesto
racomendadasper el fabricante de su
segadora o qua cumplencon las
especificacionesde _ste
= Siempre mantenga uns cuchil]aafilada en su
segsdorao
° Siempra pem'titaque e_motorse snide
antes do guardeda en cuatquierrecinto
carrado_
• Nunca guardata segadora con combustible
en el estanque dentro de un ediflcto endondo
los gases pueden alcanzar una llama
expuesta o una fuente de ignicf6n,tel come el
calentador de ague, la astufade
calefacci6n, la seceders do mpa, etc_
PRECAUCI6N: Siempre desconecte el
alambre de la buJfay p6ngalodondeno pueda
entrar en contacto con la bujla,para evitarel
arranqueper accidents, durantela preparaci6n,
eltransports, elajuste o cuandose hacan
reparaciones
PRECAUCI6N: Es conoctdopotel Estadodo
California qua los gases de escape del motor de
este productor contfenanqulmicos loscualesa
ciortosniveles, puedenocasionar,c_ncer,
defectos de nacimiento, y olros defies al sistema
reproductivo_
18

Estosaccesorios estaban disponiblescuandose produjola segadora.Tamb]_nest_'l disponib[esen Ins.
tiendasde Sears yen loscentros dese_cio Lamayorfa de ]astiendasSears tambi_n puedan mandar a
padit partesderepuesto parausted,st lesproporcionael nL_merodotmode[o desu segadora_Algunos de
estosaccesoriosta!vez nose apliquena su segadora_
RENDIMIENTO DE LA SEGADORA
PARASEGADORAS CON DESCARGATRASER_ JUEGOS PARALAACOLCHADORA ESTABf_ZADORES
,,,.IH,Hll, I
RECOREDORpAPA _ RECOREDORpAPA
SEGADORAS SEGADORAS
CON DESCARGA CON DESCARGA
TRASERA LATERAL ENVASES
DEGASOUNA
MANTENIMIENTO DE LA SEGADORA
S1LENCfADORES
_1 CUCHILLAS
FtLTROS DE A|RE
+ 0
ADAPTADORF-.,S
DE CUCH_LLA RUEOAS
BUJI'AS
ACBTE
DEL MOTOR
Leaestasinstruccionesy estemanual
completamenteantesde tratardernontaru operer
su segador_nuev&Su segadomnuew ha sido
montsdaenla f,-_.b_cac_n la excepci6nde aquellas
partes qua sedejamnsin montar potrazones de
env_o..Todaslaspartes como lastuem.as,Ins
arandelas, lospemos, elc,, qua son necesarias
paracompletar e_montaje han sidocolocadasen la
bolsadepartes.Para asegurarseque su segadora
funcioneen formasegura yadecuada, t_s {as
partesy los art[culosde ferretedaqua se monten
tienenqua serapretados seguramente. Usa las
herramientas correctas, como sea necesa=io,para
aseguca_rqua se apdelen adecuadamente.
PAPA REMOVER LA SEGADORA
DE LA CAJA DE CARTON
• Remueva Inspartes sueltas quase incluyencon
la segadora_
', Co_e iasdos esquinas de los extremosdela
cajade cad,6ny tienda elpanel del ex_remo
piano..
• Remueva todo el mater[a!de empaque, excopto
tac_Jfiaentre el mango superior y _1inferior;y la
cuSaqua sujetafa barra de loscontrol qua exJge
lapn_senciadeloperador junlocon etmango
supedor. .'
• Haga rodat lasegadora haciaafuera de la caja
deca_ldny revfsela cuidadosamente para
vetificar sitodav{a quedan partes sueI_zLs
adidona]es_
COMO PREPARAR SU
SEGADOPA
PARA DESDOBLAR EL MANGO
IMPORTANTE: Despiiegue el mangocon mucho
cuidado parano pellizcaro daSarloscables de
controL
• Levant,e losmangos basra qua la secci6ndel
mango inferiorse asegure ensu lugar; enla
posiciSnparasegar..
• Remueva la_JSaprolectora, levante la secciSn
del mango superior hastasu lugat enel mango
inferior y apriete ambas manillasdeimango_
• Remueva lacufi_ del mango qua sujetala barra
de loscontrol qua exige lapresenda del
operadorjunto con el mango superior..
• E] mango de lasegadora puede ajustarse segen
le acomode para segar.Refi6rase a"A3USTE
19

DEL MANGO" en IsSecckSnde Servicioy
Ajustesde estemanual.,
BanedecontrolquaexFgeJa
pmsenctadeloperador
Mangosuperior
In{erio_' _.-_/f Pos[ci6n
/ para segar
PAPA INSTALARLOSACCESORIOS
Susegadora rueenv[adar,smpa,=u_rse como
unaacolchadora de capavegetal.Para conve_da
de modo qua puedaensacaro d_r:
• Abra la puer_ traseray remueva latapon
acolchadora. Gudrdelaen un{ugar segum,
• Ahora puede instalarelrecogedor o eldesviador
de recortes opciona[,
• Para vofvera la operaciSnde acolcharniento con
c_a vegetal,instalelataponacorchadoraen la
abedurade descargade lasegadora,
PRECAUCION: No haga fundonarsu
segadorasin lataponac_lchadomaprobadaensu
lug_, o sin el desviador de recodes,osin el
recogedor de c_sped,aprobados,ensu fug_
Nuncatratede operar lasegadoracuandoseha
rerr_vidola pue_ traseraocuandoest_ unpo_
abierta_
Taponalcolchadora
20

EA
LEA ESTE MANUAL DEL DUENO Y LAS REGLAS DE SEGURIDAD ANTES DE OPERAR SU
SEGADORA. Compare tas ilustraciones con su segadora para famitiatizarse con la ubicaciSn de
los diversos controles y ajustes. Guarde esle manual pars referencta en el future.
Estos S_rmb01ospueden apareser sobre su segadora o en ta literatura proporcionada con el
producto. Aprenda y ¢omprenda sus signIflcados.
A"r_C;_)N O MOTOR MOTOR R_|00 LEt_t'o ESTRANGU
AOVE_3"F.,NC_A ENC_OlOO APAGADO Lt_Ci(_N
ii1_111'_ I .........................
Cable docontroldo lavetocidaddel
motor
COM.
BUSt]BLE
Barfs do control que
extge la presencia det
operador
Taps del rollenodo la
gasoline
Cobador
Flitro dol aim
Toper de la
acolchadera
Tops del deposito de acelto d_
motor con vartlla tndteadorado
nlvel
Ajustador do la rueda (on
cads rueda)
Las segadoras amotor, que se condvcendesde la partede arras,m_.atorias,Seam,cumplen con tos
est&ndamsde seguridad delAmerican National Standards Institutey dela U.S. C'snsumer Product Safety
Commission.Lacochiila giracuando el motor est,. func_onando.
BARRA DE CONTROL QUE EXIGE LA CORDON ARRANCADOR- se usapars t_cer
PRESENCIA eEL OPERADOR-tiene qua arrancarel mctor,_
sujetame abajo, junloconet mango,pars hacer TAPON DE LAACOLCHADORA- permite la
atraz',carel motor,Su_ltela pars parer el motor_ conver_6n parsla op_raci6nde descarga o
CEBADOR - bombea combustible adicional desde ensacado.
el carburador al cilindro parsuse cuandose
necesita hacerarrancar unmotor fn'o_
21

La ope_c_6nde cua_quiersegadorapusde hacor
ClUesaJtenobjetosextraSosdentrodesusojos,Io
que puedeproducerdafios gravesen _,os.
Siempreuse anteojosde segur_dadopmtecci6n
parelosojosmientras operesusegadoraocuando
hagsajustesoreparadones, Recomendamesuna
mascarade seguridaddev'mi6namp_., pareuse
esL_e_=e[oso anteojesdesequridadestandarteo
COMe USAR SU SEGADORA
VELOCIDADDEL MOTOR
Lavelocidaddel motor seest_leci6 enla!,;_brica
pare unmndimiento 6primo.La velocidadnose
puedeajustar,.
CONTROLDEZO_ DEL MOTOR
PRECAUCI6N: Lasregulac_onesfeder_es exigen
cluesoinsla[euncontrolpardelmotoren _'-ta
segadora pare mducira un m[nimoeldesgode
lesionatso deb[doalcontactocon [aoJch_la.Per
n{n_n motivetratede eliminarla fundOndel conlrol
del operador.Lacuchil[agiracuando el meierest_
funcionando.
', Su segadoraviene equtpadaconIma ban-ade
controlqua exigela pmser,ciadel operador,to
quemquierequeeloperador esl6detffd_del
mangode tasegadora pare hacerlaamancary
operarl&
PAPA AJUSTAR LA ALTURA DE
CORTE
, Levantelasruedes pareelcorte bajo ybaje las
ruedasparael cortealto..
• Ajustela alturade cortepan que se acomodea
susrequisites.La posici6nde1me_o eslameier
parela mayoffa de losc_spedeso
• Parecambiar[aa.lturade corte,empuje[a
pala,_,adel ajustador hscia [amedm Mueva la
lueda haciaaniba ohacia abajo de modecluese
acomodeasus requisites Aseg_3m..sequeredes
lasnaedesquedenigualrnenteajustadas..
ATENCION: El ajuslador estacorrectamente
colocadocuando [as orejasde la placeest_a_
insertadasen el agujerodel mango.. Tambi_n,los
ajustesde 9 posiciones (siequipado) penT_itenque
el rear,gopueda sermovido entre tasorejasdela
place.
Mando.
Paraunco_ealto,bajolas
_'uedss
Jasde
"'_-- laplace
PareuncortebaJo,tevantetasruedas
PARAADJUNTAR ELRECOGEDOR
Aviso: Si lossujetadoresdevinilioest_nmuy
duros, m_ta.lesen aguecatiente.
• Ciermlatapesoltable. Latapa soft:abledebe
estercerradacuandoseestaoperar,do la
segadora
• Levantela puertalmsera delacaja de la
segedora y ponga elbastJdordel recogedorde
c_sped enlas omjas [ormadas en elpun_ de
bisagra dela pueda traser&
• El recogedorde r_,_spedesta asegurado en la
caja dela segadora cuar_ose bajala puerla
trasera pared-esoansaren el bander del
recogedorde c_sped
PRECAUCI{3N: No I',_gafuncionarsusegadora
sin etdesviadorde recortes osinel recogedorde
r.,_sped,aprobados, ensu lugar. Nunca tratede
operar lasegadora oaandose ha removidola
puerta traseraocuando est_un poco abiert&
Puerta
tr_sal_
Pun_lde
blsagra Basltdordel
tecogadordel
cesped
PAPA VACIAR EL RECOGEDOR DE
ClaSPED
• Lewnte el recogedor dec_ped usandoel
mango delbastidor.
• Remuevael recogedorde c_sped,conlos
mcortes,de deb_,odel mango dela segadora.
° Vacfelos recortesde labolsa usandotantoel
mango dsl bastidorcome _1dela boise
AVISO: No arrastrela boise coando lavac[e;se
pmducir_ undesgaste innecesado.
Puede necesitarcambtar el aeeite_ a menudo
cuando lascondic[ones sonpolvomsasosudas
ANTES DE HACER ARRANCAR EL
MOTOR
ACEITE
Su segadorafue enviadasin aceite en elmotor,
• Aseg_mse que lasegadora est_nivetadayque
el dmaa_rededordeldep6sito de aceiteesl_
limpia.
,, Remueva la taperlel depOsitode aoeile del
motorcon lav'arillaindicadora de nively mllene
haste la lfneade llenoen _ta..
• Use 0,61(20oz.) deaceite..Paraeltipoy la
cafidadyea 'MOTOR" en la seccifnde las
"Responsab_idadesdel Cliente"en este manual
• VaUe elaceite lentamente.No Iollene
dernasiado.
• Revise el n'r_eldel aceiteantes de cadseso..
Agregue acettesi es necesario. Uerte haste la
t[neade llenoen la vadIlaindicadora der_'vel
22

• Paraleerelrftveladecuado, apriatetatapadel
dep6sito deaceitedel motor cadavez.
• Vualva a instalarla tapadel dep_ito del acaltey
apri_tala
• Cambie el aceite despu_s de 25 horas de
operaci6n o una vez por tempotada_
Tapedefdeposilode Tapedel
acelteconvarft_a / rellenadof
tndfcsdoradenivel ___de gasoline
GASOUNA
• Liens el estanquede combustible. Use gasoline
regular;sin p]omo,nueva ylimpia con el mfnimo
de87 octanos. Nomezde elacalte con la
gasoline. Pareasegurar quala gasolineutJlizada
sea fresca compreestanqueslos cuales puedan
set util_ades durante los primems30dfas,
ADVERTENCIA: Laexperienciahaindicadoqua
loscombustiblesmezclados conalcohol (conocidos
como gasohol0oeluso deetanoto metanot)
puedenatraer _ humedad,laqua conduceala
separaci6ny fon'naci6nde dodos durante et
aJmacenamiento,Lagaso_inaacl'd_capuededaSar
etsislemade] combustible doun motor durante el
aJmacenamientooPareevitat losproblemas con el
motor,se debe vaciar elsistema detcombu_'ble
antes deguardado porun peffodede 30 d_aso
m_. Vac_ee!eslanquede!combustible, hags
anancar el motory h_galofuncionar haste cluelas
lineas dalcombustible yet cerburadorqueden
vac{os..La prSx_matemporadausecombustible
nuevo..Vea las lnsttucdones Pare El
Almacenamiento parem&sinfotrnac_6noNunca use
pmductosde I{mpiezapareelmotor opara el
cerburadoren elestanquedelcombustible pues se
puedenproducird_os permanentes.
PARAHACER ARRANCAR ELMO-
TOR
• Parahacerarrancar unmotorlr_o,empujeel
cebadorcinco(5)races antesdetratadoo
Ernpujefirmaments. Este paso normalmente no
es necesario cuandose hsce anancar un molor
qua ya haestadefuncionandoporunos cuantos
minutoso
° Sujeteta bane decontrolesqua exigenla
presenctadeloperador abajo enelmango y tire
el mango dal anancador r'_pidamente.No
permita que el cord6narrancedorse devuelva
abruptamante.
, Pare parerel motor, sueItela bane de controles
que exJgenla presenciadel operador..
AVISO: Enclimes m,_ fn'ospuede que sea
necesario repetirlos pesosdel cebado. En ctimas
m,_tscaJurososelcebar demasiadopuede pmducir
elahogo y elmotor novaa anancar_Si se ahoga el
motor espere unos cuantos minutes antes de tratar
de hacettoanancar y no repitaEospesos del
cebado_
CONSEJOSPARASEGAR
• Bajotied.as condiciones,tatcomo c_spedmuy
alto, puedeset necesario elelevar laaltura del
code parereducirel esfuetzo necasadopare
empujarlasegsdera y para evitarsobrecargar el
motor, dejando montonesde recortes de c_ped..
• Parauncorte muy pesado, reduzca el ancho del
cortepasandops_almente pot encimadel lugsr
antedon'nentocod,adoy siegue lentamente.
,, Cuando use una segadera condescarga trasera
en c_spedh_medo y pesade, los montones del
c_sped cortado puedequa no entrenonel
recogedor de c_sped.Reduzca la ve!ocidadde]
recorrido(veloddad deempuje} y/ohaga
funcionar la segadora sobreel&reapot segunda
V _7-.,
• Si queda una huellade cortes eneltadoderecho
de unasegadota con descarga trasera, siegue
en la d_recd6nen qus giran las rnani]lasdal mloj,
solapando un poco parerecaudarlos recodes en
la pr6xima pasada
,, Los poros anlos recogedoresdec_sped de tela
pueden]lenarsecon mugrey polvocon eluso y
los recogedores recaudar"._menos _sped..
Pareevitar6sto, mcfe el recogedor con la
manguera de agueregularmente y d_.jalo
secarse antes deusa.rio,.
• Mantenga la parts supedor delmotor, alrededer
del amancedor,despejada ysin recortesde
c_spedypaja, Estoayudar_el flujo de[airs del
motory extender&ts duraci6n_ste
CONSEJOS PARA SEGAR Y
ACOLCHAR
IMPORTANTE: Para obtenerel major rendimiento
mantenga la cajade la segadorasina_mulaeiSn
de scesped y basura.Vea"LIMPtEZA" en la section
de "RESPONSABILtDADES DEL CL1ENTE"de
este manual.
. La cuchiilaace[chadora especiatva a volvera
cortarlos recortesde c-_spedtouchesveces, y
los reduce en tamaSo,de modo quasi se caen
en e!c_spedse van adispesar entre_ste yno
se van a notar.Tambt_n, e]c_sped acolchadose
va a deshacer _pidamente entregando
substancias nut_vas paraelc_sped Siempre
acolche con la ve]oddad del motor (cuchitta)m_s
alta, pues asfse obtendr& lamajor scci6n de
rw_=ortedo las cuchillas_
. Evitecotterelc_sped cua..'_oes!_ mojado..FJ
c6spedmojade tiend9a formar montonese
inteffiereconla acci6nde acolchade, Lamajor
horapare segar elc_spedes tempranoen la
tarde A esa hora _ste seha secado yel _rea
reci6ncortadano quedar&expuesta _Jsol
directo.
. Pare obtener losmejores resultados,ajuste la
altura del corte delasegadora de modo qua _sta
cortesolamente elterciosuperior de Ias hojasdo
c_sped..Enel casode qua ef c_spedhaya
crecido demasiade, puedeser necesario el
e[evar la altura de{corteparereducir e]es_uerzo
23

ne_s_o para empujarlasegadora ypara ev_tar
sobrecargar elmotor, dejandomontonesde
recortes de c_sped,PardunacolchamientomL,y
pesado, reduzca el anchodeltorte pasandopot
encima del lugar anteriorrnentecottadoy siegue
lentamente.
• Ciertostiposdec_spedysuscondiciones
puedenexJgirclueun_reatengaqueser
acol_ada por segundavezpara esconder
completamentelos recortes.Cuandose haga el
segundocorte,slegueat,-'avesadooen forma
perpen#_Jar a la pasadadel primercorte_
. Cambiesu palmndecode desemanaa
semana. Sieguede nortea surunasemanay
luego cambiede este aoeste [a pr6xirna
semana. Estoevitar_queelc_spedse enrede y
cambieded_reccicSn.
24

/_" _ .,_ FECHAS.......... DE SERV!CIO
Ump}a_fin_poccton_t el tecogedot do
E Umpt_d_segadom _ _ t/
G IJmp_et deba]o do Secubteda do la ttans-
mlslSn (sogadorae con pedat propulSor)
S_d_ (seg_d0_ con podet I]roputsor)
(_ Revism* los con'eas y I_ poSe-_simpul-
Revisor o/ei'ihtrice.tobias I_ CU_ih:l I,_ 3 .
Umpi_f S@ba_edWrecergar
(segadoras con arranque el6ctrlco) V _ V'4
Revisor oi nivel del eceilo I_
TO IJmpiet el filtrodo _ro ! _2
Inspeccton_ el stlenc_edor ! !f
R Utopia r e/_tmWat I_.bujl'a, I_
Combtar el r_lucho de papel desf$$tm _2 "
dea_e
t .- Cambi_tm_s =manud_ cuandoso epet= bajo_r@_ pas==d_o on _mbiont_s c_n sS_etomp_r_tut_=
2 ,- Dot aant1=_o m_,_, = menudo cuarldo #a cpete en _r_iciono= = _._a: o pol_re_st,_,
3 ,, C_,mbio lsa cu_J_l_ao m_a ==menudo cuendo aiog_o an _orrano fl II1_¢10=O
4 " Cat_ar pot ,I@ho_as al 1,_1do 61tempor_d_,
RECOMENDACIONES TABLA DE LUBRICACION
GENERALES (_)Ajust.dorde==ru_
Lagaranlia de estasegadora nocubralosarlicWos
que ban estado sujetos ai abuso oa la negIigencia
de]operador. Para recibirtodoetvalor de la
garan_ta,el operador tiene quamantener la
segadora segOnlas instnJccionesdescritas en este
manual,
Hay algunos ajustesque se t_enenquehacer en
fon'naped6dicapara podet mantenersu un[dad
adecuadamente
Todos Ios ajustes en lasecci6nde Servicioy Ajustes
de este manual tienenqueser revisados por Io
menos unvez potcada temporada..
. Una vez al a5o,cambie la buj_a,limpieo cambte
el elemento doi filtro deaire y revisesila cuchi]la
est,.desgastada..Una bujianueva y un elemento
delfiltmdo aire ]impio/nuevoaseguran Iamezcta
de alto-combustible adecuaday ayudan aque su
motor funcionemejor y que dure mdso
• Siga el programa de mantenimiento en este
manuai,
ANTES DE CADA USO
• Revise el hive]dotaceitedel motor.
- Revisesi hay sujeladores sueltos
LUBFIIOAOION
Mantenga ]aunidad bien lubdc_da(yeata"TABLA
DELUBRICACIC_N_)
Acelte de molor
(_CtaviJ_ de montaJe del
puntat del mango
(_) Puntat de
resorte
del lreno
81sagra de ia
puerto ttaseta
(D Rocie el lubficante
(_) Aceite de mo{or de SAE 30, Refieraseala
secci5ndeRESPONSABILIDADES OEL
CUENTE en "MOTOR"
IMPORTAI'_TE:Noaceite oengraselos
rodamientosde la _Jedadeplas_ico_Los
lubricantesviscososatraeranpotvoy mugre,1oclue
acortarala duraci_n de losmdamientos
autolubricantes..Si craeque tienenque lubricarse,
usesolamente un lubricantetipografrl.o,de polvo
seco, enforrna moderada_
25

ESPECIFICACIONES DEL PRODUCTO
NOMERO DE MODELO 917.387261
NOMERO DE SERIE
FECHA DE COMPRA
CABALLOS DE FUERZA: 4.5
DESPLAZAMIENTO: 11.5 CUo IN
CAPAClDAD Y TIPO 1.5 Cuartos
DE GASOLINA: REGULAR SIN PLOMO
TIPO DE ACEtTE: SAE 30 (sobre 32°F)
(API-SF/SG) SAE 5W-30 (debajo 32°F)
CAPACIDAD DE ACEITE: 20 oz. de capacidad
BUJfA (ABERTURA: _030=) CHAMPION RJ19LM
TOLERANCIA DE VALVULA: ADMISION: 004 - 008
DESCARGA: ,004 - .008
SENCENDIDO DE ESTADO
SOLIDO ABERTURA DE AIRE: .0125 IN.
TORSION DEL PERNO
DE LA CUCHILLA: 35-40 FT, LBS.
Et num_ro del nodelo y el de sede se encuentran en la calcomania adjunta ala parte
trasera de la caja de la segadora, Debe registrar tanto el num_ro de serie come la
fecha de compra y mantengalos en un lugar seguro pare refencia en e! futuro.
SEGADORA sen!Jdocontra_o enquegiran EasmaniIlasdel
reloj,
', Remuevala cu_illa y losarlfculos deIerreten'a
adjuntadores (elpemo, laarandeia deseguridad
y ta arar_etaenduredda),
AMISO:Remuevael adaptador de la cuchiltay
reviseelcubo interiorde tarenura del adaplador de
la cuchi{l_La ranuratiene que ester en buenas
cor.,dicionespareque {uncioneen formaadecuada
Cambie eladapf_dorstest,,dafiadoo
Siempre observe las reglasdesegufidadcuando
haga etmanlenim}ento.
LLANTAS
• Mantenga las Ilantassin gasolina,aceiteo
substanciasqu{micas parecontrol deinsectos
quepueden dafiar lagoma.
• Evitelos tocones, tas pi_iras, tasg_etas
profundas,tosebjetosafiladosy otn:x_peligros
quepueden d_ar alas iiantas
CUlDADO DE LA CUCHILLA
Paraobtener losmejoresresultades,tacochiIlade
la segadora tiene quemant.enereeafilada Cambie
la cochilladobtada o dafiada.
PARA REMOVER LA CUCHILLA
• Desconecte el alambre deia bujiay p6ngaloen
donde nopueda entraren contactecon _sta
• Haga descansar la segadora ensu lado
AsegOresequeelfiltrodeaJrey queel
carburador queden mirandohacia am'be.
• Use unbIoque de maderaentretacu_iIIa y Ia
_Lja de lasegadora pareevitatque lacuchiIta
girecuando se Iequite el perno
o Proteja sus manos conguanles y/o envuelvala
cuchilla con una tela gtuesa.
- Remueva elpemo de la cuchiIlagir_,:,ndo!oenel
PARA CAMBIAR LA CUCHILLA
• Pongael adaptad0rde Iacuchitla enel dgueSaJ
delmotor Aseg_m.sequela ranuradel
adaptadoryque elchaveterodal cigueSalest_n
atineados.
• Pongafacochitlaen eladaptador do_sta
afineandolos dos (2)agujeros enla cu_illa con
las saiientes eIevaffasen el adaptador.
• Aseg_rese de queel hordede salida dela
euehiIIa(opuesto alhordeafilado) est8hacia
amba haciaelmotor
. lnstaleel pemo dela cuchnlaconla arandela de
seguridady laa.randefaendurecidaenel
adaptadorde lac_chillay el cigue£-maL
• Use urkbloquedemadera entrela oJchillay ta
cajade Iasegadoray aprieleelperr_do la
euchiIlagir&ndoloen eEsentJdoenque giran las
maniIIasdel reloj
26

•, Latorsi6n pare apretar recomendedaes de 35-
40piestibras
IMPOFITANTE:El pemo delacuchilla es clase 8
tratado acator.
AVISO: No recomendamos elafilartacuchi[la-
peru si 1ohace, asegBresedeque quede
batanceada.
PARAAFtLAR LACUCHILLA
Setlene quetenet cuidado de mantenetia
bafanceada. Una cuchilfaque noest_ balanceada
va a produclr eventualmentedaSo enla segadora o
en el motor.
• La cuchilla puedeafilarse con una limao enuna
rueda rectificado_,No trate de afilada mientras
se encuentra en la segado_.
,, Pare revise,-el baJaneede lacuehi[ta,clave un
dave en unaviga o en lapared,.Deje alrededer
de una pulgada de un claverecto expuesto,
Pongael agujem centra_de la cuchilla sebrela
cabezadel clave Si laeuchiIlaes_ balanceada
debe perrnaneceren faposici6n horizontal: Si
cua_quierade los extremesde la cuchilla se
mueve hacla abajo, stile e]extreme pasado
haste que _sta quedebaJanceada
Adaptadordela C aveere de]
cuchiI{a ",,_ h t
clguenal
Cuchilla [U.__ / ._
Pemodela _ __1_----'_<_
cuchi{ta ,_-
_-_--"__ Adaptador
seguddad endurectda Botdede
seIida
RECOGEDOR DE CESPED
• FJrecogedorde c_spedpuedeset rodadocon
ei agua de lamanguera perutiene que estar
SecooJando se vayaa user.
. Revise su recogedor der__._speda menudo pare
verifisar si est_ dafiado o detedorado,.Seva a
dssgastar con el use nom_o Si se necesita
camb_arel recogedor, c_mbie!oselamente par
uno que sea apmbado perelfabricante,,D_ e]
n_Jmemde1rnodelo dela segadera cuande Io
ordene,
MOTOR
LUBRtCAClON
Use solamente aceite dedetergents dealia caJidad
dasi_cado conla dasificaci6n SF,SG o SH de
servicloAPI Seleccione lacalidad deviscosidad
SAE segOnsu temperaturede operaciSnesperada
l;_ _!..............'_ ..........=o, =.,,=o_. Go*, =_, _o% I
AVISO: A pesarde que tos aceites de
muttiviscosidad(5W30, I0W30. etc.)mejoran el
arranque enclimefile, estosaceitesde
multiviscosidad vana aumentarelconsume de
aceitecuandoseusan en temperaturessobre32°
FoReviseel nhtd del aceitedelmotorrn_ a
menudo, pareevitarun pesibledaSoen elmotor,
debidoa que notienesufidenteaceite.
Can_ieelaceitedespu_sde25 her'asde
operaci6no unavezpettemporada.Puede
nsces_rcambiarelaceitem_.sa menude cuando
lascondiclonesson polvorosaso suclaso
Reviseelniveldelaceiledelc_rterantesde
arrancatelmotorydsspu_sde cadaclnco(5)horas
de usocontinuado.Apdeteeltap6ndeiaceiteen
formsseguracadavez quereviseeln_eldel
aceite,.
PARA CAMBIAR ELACEFrE DEL MOTOR
AVISO: Antesde incliner la segadorapare drenar
e{ aceite,drene el tanquede combustiblehadendo
correr etmotor hasteque el tanque est_ vacio.
- Desconecteel aJambredela buj;ray p6nga]o de
mode que nopueda end,rat encontacts con dsta.
° Remueva la tapedel depSsitode] aceite;d_jelaa
unlade en una super_cie limpia.
= Inclinela segadora y h_,galadescansar en su
ladey drene el aceiteen un envaseadecuado.
Mueva la segadora de atr,_ pare ade[_nte pare
removerrode el aceiteque se hays quedado
atrapadodentro de!moto_
• UmpIe rodeelaceite derramado en la segadora
yen el tadodetmotor
• Uane efmotor con aceite.Ll_nelosotamente
haste la tines de"LLENO" (FULL) en (avarilia
indicadora de niveLNO LO LLENE
DEMJkStADO
- Vue_vaa poner ia tape ene]dep6sitodel aceite.
- Vuelva a conectar el alambre de le buj_'aa _sta.
_Rvese
FILTRODE AIRE
Sumotor no fundonar_enforms adecuaday
puedesulrir deSossi se usa unfiltro de a_resudo,
Cambie e] filtrode a_recads aSo,y rn_ a menudo
si siegeencondiciones muy po]vorosaso sucias,
No tave el liltrode aim
27

PARA CAMBIAR EL FILTRO DE AIRE
• Remuevaetfiltro deairsgffdndotoene[santido
contra,'ioan que giran tasinanitiesdel reloj,hasta
el tope.y ret_rslodetcoUar.
• Remuevaet ffftrodelaparteintedordela
cubie_ta,
• Utopia laparleinteriorde lacubiertay elcoltar
pareturnovertodaacumu_a_6nde mugrs,
• lnserte el filtronuevo en lacubieC..a.
• Pongala ¢ubtertade]littrode airs dentindai
collaraiineando taoreja con larantJra.
• Empuje la cubierta hadaeden';rey gfraia enel
sentido de[asmaniiIasdelraioj pareapretarfa.
Collar
Abra+
Ranu_
FlItrodealre
Omja
Cubierta del l_tm
de airs
SILENCIADOR
Glre en el
senUdo
contrado a
}as maniltas
del re_oJ
pare
remover
sent+dode
+asmanIffas
de[ reloj
pare
apretar
lnspeccione y cambie el sitenctador si est_
cormfdo pues producirunpeligrode incendio y/
o da_o.
BUJfA
Cambie su bujTscads aSopare hacer qua su
motor erranque m_s f&cilmente y funcione
meier,,Ajuste la abertura de la bujfsen 0,030
pulgada.
LIMPIEZA
IMPORTANTE: Para obtener elmajor rendi-
mtento, mantenga la caja de Ia segadora sin
acumulacionde cesped y basura.,IJmpte la
parte de abajo de su segadora despuesde
cads use,
PRECAUClON: Desconeete el aiambre de [a
bujia y p6ngaio en donde no pueda entrar en
contacto con dsta,,
• Hags descansar la segodora en su lade,
Aseg_rese qua el filtro de sire y que el
carburadorqueden mirando hac|a arriba
Limpie Ia parte inferior de su segadora
raspdndota pare remover {a acumulaci6n de
cdsped y basurs,,
,, Limple el motor a menudo pareevitar que se
acumuie la basura, Un motor tapadofuncions
m_iscaJtentey se acerta su duraei6n.
. Mantenga las superficies acabedas y las
ruedas sin gasoffna, aceite, etc.
,, No recomendamos etuse de una manguera
de jardln pare limplsr lasegadora a manes
que el sistema el6ctri¢o, el si[enciador,e!
fiitro de sire y el carburador est_n tapados
pare evitar qua les entre ai ague. Elagua en
ef motor puede acorlsr laduraci6n de dste.
PRECAUCION:ANTESDEDARCUALQUIER
SERVICIOODEHACERAJUSTES:
• Sueffelabarfsde controly pareelmotor.
. Asegr_resequala cuchtllay quaredeslas
partesmoviblessehayandetenido
completamente,
• Desconecteelalambredela buJlay p6ngsro
endende nopuedaentrareneontactocon
_sta_
SEGADORA
PARA AJUSTAR LA ALTURA DE
CORTE
Yea "PARAAJUSTAR LAALTURA DECORTE" en
la secd6n de Operaci0nde estemanual.
DESVIADOR TRASERO
Se propom_onaundesviadertrasero,adjuntoentre
tas ruedastrasems de susegadora,pare reducira
un m{nimo la posibili_adqueobjetos sean lanzados
hada afuera dela parte traserade Iasegadom,en
la posicJ6nen dende se encuentrael operador.Si
se daSaai desviadordebecamb_,se.
PAPA AJUSTARELMANGO
Sepuede tevantaro bajar el_o de susegadora
segOn[equede c6rnodooHay cuatro(4) poaiciones
disponibles:alia,meclianaalta, medina baja, baja_
Los mangosse envfanmontadesenla poaiciSn
m_iana baja+
• Parecambisrde laposiciSn mediansbajs s
medians aJta,la secci6nsuperiory la inferiordel
mango tendr_J1quada_e vuelta,
. Remueva lasabrazaderasdelcable
. Remueva loscontmlesy la bazmdecontrolque
exJgeIs presencia del operadordai mango
superior.
• Remueva Is gu{a del cotdSnarrsncador del
mangoinferior.,
• Remuevalasdav_as de horquilie+,
• Desconecte el rnangoInferiorde lospuntaies de1
mango,
• De vuettael mango y vuelva a reenterlasclavijas
de horquiUaque se hab_anremovido
• Vuelvaamontarlagu{a(:letcord6narrancador,
• Vueivaarnontarlosoontrolesylabarrade
controiosqua exigela presencesdel operador en
ai mango superior_
PRECAUClON: La bane de controlqueexige la
presenda daioperador tienequa pivotear
librementepare permitirel enganchedela cuchilia/
frenocuan_ se suaita la barfsdecontrol No
aprietedemasiadolos sujetaderesque sujetan a los
controtesaJmango superior,
28

• Paracambiarde laposici6nde modiana baja a
alia solamente se tend_ que darvuela ra
secci6n del mango superior:.
• Pare cambiar de la posidSn mediana baja a baja,
soramentesetendr_quedar vuela la socdSn
de]mango inferiot_
posicl6ndeenvlo
Medianabaja
yi alta
• ,,Mangoinferior
Aprietopara_1-'"_ _Clavija de
MOTOR
CARBUFIADOR
Sucarburadorlane unchorreprincipalfijono
aju_able parecontmlarla mez.da. Sisu motorno
est,_|uncionandoenforma adecuada dobido a
problemasque se sospecha vionen dol carburador,
leve su segadora a un centredosarvicio autorizado
parereparariay/o ajustaria
VELOCIDAD DEL MOTOR
Laveloddad del motor haside ajustadaenla
f_bica Nolate de aumentarIavelostdad del motor
pues se pueden producir lesionespersonales.Si
aee que elmotor est&funcionando demasiado
r'_ido o demasiado lerto, Ilevosu segadora aun
centre de seMcio autoizado pare mpararia o
ajustaia
lnmediatamento preparesu segadorapare el
almacenamiento alrna[ de cadatemporadaosi la
unidad noso va a userper30d_aso m_.
SEGADORA
Cuando se va a guarder la segadorapotcierto
pen'ododo lempo, lmpiefa cuidadosamenle,
remueva tide la mugre, la grasa, lashojas,etc,
Gu_rtela en un_ma Iimpiay seca.
, LJmpietodala segadora (Vea"LIMPIEZA" en la
secci6n de Responsablidados del Ctente de
esto manual)_
° Lubdquelaseg,Jnse muestra onlasecci6nde
ResponsabtidadosdelCiente do este manual,
° A.segSresede quo todas[as tuercasy davijas y
todoslos pemos y tomllos est_napreladosen
foma segure, fnspecdene las pales quo so
mueven parave_'icarsiest,_ daSadas,
quebradas o desgastadas.C£_nbielassies
necesado.,
• Retoque todas las superldes que est_n
oxidadas o con la pinlura picada; use una lja
antes do pintar.
MANGO
Puededoblar el mango do su eegadora pare
almacenar]a.
• Apriete los extremes inleriores del mango inlerior
entres_hasta que el mango infedor quede
separado del puntal del mango,luego mu_va!o
haaa ade[anlo..
• Suete los pemosde montajedel mango superior
Iosulciente comepare pem_tir queel mango
supeior sepuedadoblarhaciaatr-&s°
IMPORTANTE: Cuandodoble etmango pare et
almacenamiento o el tmnsporte,asegurese quaIo
doblesegun se muestra opuedo danar loscables
docontrol..
• Cuando preparesue mangos apartr dela
posici6nde almacana.mienl.o,el mango inferior
aulom_ticamenle so asegurar&en la posici_n
pare segar.
Puntalde]
Mangolnfe_
Barradecontrolqueexlgela
presanctadel operador
Mangosuperior ,,,
/ pare segar
29

MOTOR
SISTEMA DE COMBUSTIBLE
IMPORTANTE: Es impottanteevitar que se
formendopes|toe de gomaem partes
fundamentatssdei sistemade combustibletales
come el carburador,el liltm dotcombustible,la
manguera del combustibleo en et estanque
dumnte el almacenamiento, La expedencoa
tanbtenindica qua loscombustiblesmezclados
con alcohol (conocido come gasoholo qua
tienen etanolo metanoD puedenatraer
humedad,Io qua conduceala separacton y ala
formac[onde asides durante el
almacenamiento, La gasotinaacidicapuede
danar elsistema de combustiblede yn motor
duranteel periodo de almacenamiento,
• Drone e! estanque de combustible.
• Haga arrancar el motor y d_jelo funcionar
hasta qua ias I(neas del combustibley el
carburadorest_n vacfos
• Nunca use los productos pare timpieza del
carburadoro del motor en el estanque de
combustiblepues se pueden producerdefies
permanentes,
• Use combustible nuevo la pr6xima
temporada,
AV|SO; Et estabitizador de combustiblees una
alternativeaceptabla pare roduc[ra un m(nimo
la formaci6nde depSsitos de goma en el
combustible durante el perfodo de
atmacenamiento, Agregue eslabilizador ala
gasoline en el estanque de combustible o en el
envase para el almacenamlento, Slempre siga
la proporci_nde mezcla qua se encuentra en el
envase del estabilizador. Haga tuncionar el
motor per lo menos 10 minutes despu6s de
agregar el estabilizador,para permitirqua este
llegue al carburador,,No drene lagasoline del
eslanque de gasolina y el carburador si se est&
usande estabtl_zadorde combustible°
ACEITE DEL MOTOR
Drone el aceite (conel motor ca[iente)y
c,_mbfelocon aceitede motor limpto,(Vea
"MOTOR" en lasecciSn de Responsabtltdades
del Cllente de este manual,)
CILINDRO
• Remueva ia bujfao
• Vacfe una onza (29 ml) de aceito a travSsde!
agujem de la buj[a en el ciEindro_
• Tire la manlIla de arranque lentamente unas
cuantas veces pare distribuirefacette,
• Vue{va a reenter |a nueva bujFa,
OTROS
° No guarde la gasoline de una temporada ala
otra,
• Cambia el envase de ta gasoline st se
empieza a oxidar,, La oxidaciSn y/o la mugre
en su gasoline productr_n problemas,
° Si es posible, guarde su unidad en un recinto
cerrado y c_brala pare protegeda centre el
po]voy la mugre,
° Cubra su untdad con un form protector
edecuado que no retenga ta humedad, No
use pt_stico° El pi&sticono puede respirar, lo
que permitela formact6n de condensaciSn,1o
qua pmducir&laoxidaci6n de su untdad,
1MPORTANTE: Nunca cubra ta segadora
mtentras el motor y Fasareas de escape todavia
estan caltentes,
PRECAUCI6N: Nunca aImasene tasegadora
con gasoline en el estanque dentro de un
edificio en donde los gases pueden alcanzar
una Ifama expuesta o una chispa. Permita que
se enfrie el motor antes de almacenada en
algSn rectnto cerrado.
3O

IDENTIFICACION DE PROBLEMAS
PROBLEMA CAUSA
No ananca .F_ttmde airs sucio,
.Sin combustible,.
• Combustible rancio,
-Alambrede {abujfa
desconectado_
.Bujfa mala.
Faltade fuerza
• Agua en el combustible,
• Cuchilla suelta o adaptador
de Iacuchillaquebrado.
• Barra de control en la posici6n
suelta.
-BaRB de controldefectuosa.
• Parts trasera de la cajacuchilta
do lasegadoraarrastr_,ndese
en el c_sped pesado,.
• Est_ cortando touche c_sped
,,Filtro do airs sucio,
oAcumulaciSn de c6sped, hojas
y basura debajo do ta sega-
dora
• Demasiado aceite en el motofL
CORRECCION
Umpie/cambie el fiitrode aim.
Llene el eslanque de combustible.
Drene et estanque y vueiva a
Ilenado con combustible limpio y
nuevo,,
Drene el estanque de combustible y
el carburador y vueIva a Ilenar et
estanque con gasolina nueva_
Conecte el alambre a [a buj_a.
Cambie la bujfa..
• Apriete el pemo de ta cuchillao
ramble el adaptador de la cuchiila,
Presione la barra de control hacia el
mango.
Cambie la bana de control.
°
e
Ajuste a la posiciSn de "Corte rods
alto,"
Ajuste a la posiciSndo "Corte m_s
alto."
- Limpie/cambie el flltrode airs,
. Limpie la parts inledor do la caja de
la segadora,
* Revise el nivel del aceite,,
o Cortea unave!ocidaddorecorrido
m&slenta•
31

.....cAUSA CORRECCION
k_alcode -disparejo • Cuchtlla desgastada, doblada o
suelta.
- Allure de las ruedas dispareja+
• Velocidad del motor lenta.
Acumutaci6n de c_sped, hojas o
basura debajo de ta segadora, de la segadora. +......
Cuchil+adesgastada, dobtada o • Gamble la cuchilla.Apriete e!
e
+
i Vibraci6nexcesiva "
e
m
Cord6n arrancador
diffcir de timr
,o
i!
I.
Recogedor de c_sped
no se llena (si viene
equipado)
Dilicilde empujar
t
suelta,
Cigue5al del motor dobladoo
Eltreno del volante del motor
est,, aplicado cuando se sue!re
la barra de control.
Ciguefiat del motor dobiado,
Adaptador de la cuchiIla
quebrado,.
La cuchilla se arrastra en el
c_sped+,
Attura de cortedemasiado
baja
Levantamiento de la cuchllla
desgastado.
Recogedor sin ventilaci6n de
aire.
Velocidad del motor lenta.
El c_sped est& dames]ado alto
o la allura de la rdeda dema-
siado baja,
Parte trasera de la caja/cuchi!ta
de la segadora arrastr_ndose
en elc_sped.
Recogedor de eSsped demm
siado llano.
Posici6n de la allure det mango
no adecuada para usted.
• Cambie la cuchitta..Apriete el
pemo de la cuchillao
• Ajuste todas las ruedas ata
misma allure^
• P6ngase en contacto con su
centro de servicio autorizado
m_s cercano.
• Limpiela parle Inferior de la caja
pemode la cuchtlla,
P6ngase en contacto con su
centrode servicio autorizado
m&s cercano.
Presione la barra de control
hacia el mango superior antes de
tirarelcord6n arrancador,
P6ngase en contacto con su
centrode servicio autor;zado
m_s cemanoo
Gambleel adaplador de la
cuchilla,
Mueva la segadora a un lugaren
donde el c_sped ha sido cortado
o a una superficie firme pare
hacer arranear el motor.
Eleve laallure de code.
Gamble la cuchiltas,
Limpie el recogedor de c_sped+
Ajuste el controlde la velocidad
del motor ala posici6n r_pida
. Eleve la allure de corteo
• Eteveta parle trasera de la caja d=
la segadora (t) un lugar m_s alto.
• Vacie el recogedor de c_sped+
, Ajuste la allure del mango de
modo qua le acomode,
32

33

CRAFTSMAN 20" ROTARY LAWN MOWER - - MODEL NO. 917.387261
3_
43
.p=

KEY
NO.
CRAFTSMAN 20" ROTARY LAWN MOWER - - MODEL NO, 917.387261
PART DESCRIPTION KEY PART DESCRIPTION
NO. NO. NO.
o'1
I
2
3
4
5
7
8
9
10
1I
13
14
15
t7
t8
19
21
22
23
24
25
26
28
29
3t
32
33
34
35
36 70033IX004 Selector Spring
56902 Contrei Bar 37 145935X004 Axle Arm Assembly
145546x479 Upper Handle 38 52335 BelleviIIe Washer
150424 MaIcher Plug 39 142748 Shoulder Boil
132001 Rope Guido 40 151157 Wheel and Tire Assembly
157081X479 Lower Handle 42 83923 Hex Range Locknut
131959 Handle Bott 43 77400 Hubcap
66426 Wire Tie 44 85453 Danger Decal
51793 Hairpin Cotter 45 150406 Hex Head Thread Rolling Screw 3/8-t6 x 1
136376 Handle Knob 46 161857 Lawn Mower Housing (Incl. Key #18, 22, 24, 44,
156577 Engine Zone Control Cable 50)
750097 Hex Washer Head Screw 10-24 x tt2 47 751592 Locknut 3/8-.16
850733X004 Up*Stop Bracket 50 700938X479 Front Baffle
63601 Keps Locknut 1/4-20 5t 851064 Hex Heed Machine Screw 3/8-24 x 1-3/8 (Grd, 6)
147613 Rear Door Assemb;y Kit 52 850263 Helical Lockwasher 318
700357X470 Beck Prate 53 851074 Washer
150050 Self Tapping Screw 10_24 x 5/8 54 145106 Blade 20=
54583 Hex Head Tapping Screw 114-20 x tt2 55 850977 BIade Adapter
700063X479 Rear Baffle 56 144748 Tube Frame
86652 Hinge Screw 114-20 x !-1./4 57 '154870 Grass Bag
700363X479 SideBattle 58 ...... Eng{ne - (See Breakdown) Craftsman
144875X479 DischargeBarite Model 143,984510
140657 Rear Dellector 59 144747 Throat Frame
1515t2X479 Handle Bracket Assembly (Left) - * 184355 Owners Manual
t 515t tX479 Handle Bracket Assembly (Right)
150078 Screw 5/16,18 x 3/4 Available accessories not included with lawn mower:.
700325)(007 Wheel Adjusting Bracket 7-1 33723 HI-Whea! Kit
146630 Spacer 71 33623 Gas Con (2.5 gaL)
128415 Pop Rivet 71 33500 Fuel Stabi!Jzer
87877 Selector Knob 7.183300 SAE 30W Oil (20 oz,)
7.133417 Dual Shield
Z133316 Mower Cover

CRAFTSMAN 4-CYCLE ENGINE ....................MODELNUMBER143.984510
130
11g
416
36

CRAFTSMAN 4*CYCLE ENGINE MODELNUMBERI43.984510
KEY PART KEY PART
NO. NO DESCRIPTION NO, NO DESCRIPTION
t 37027 CyF_",det(led 2 & 20) 130 602tA Screw, 5/16-18 x 1-1/'2"
26727 DowelPin 135 35395 ResistorSpark Plug
6 33734 BreatherElement (RJ19LM)
7 36557 BreatherAss'y (incl..6 & t50 35991 Valve Spffng
12A) t5! 31673 Valve Spdng Cap
t2 36775 _]reatherTube I51A 40017 [nte.keVaive Sea_
12A 36558 BreatherCove_,& Tub8 169 36783 • Valve Covet Gasket
(_nd. 128) 172 36784 Valve Cover
129 36694 Bn_atherTube Elbow t74 30200 Screw, 1024 x 9/t6"
t4 28277 Washer t78 29752 Nut& Lock Washer, 1/4-28
15 30589 GovemorRod (led 14) 182 620I Screw, 114-28x7/8'
t6 34839A GoyemorLeve_: t84 26756 * Carbure_r To Intake Pipe
17 31335 GovernorLeverClamp Gasket
18 651018 Screw,TorxT*15, 8-32 x t85 36785 Intake Pipe
19/64" 186 32653 GovernorLink
19 36281 Ex_nsJonSpdng t89 650839 Screw, t14-20x 3/8=
29 326(X) Oil Seal t91 36559 S.E. Brake Bracket (Incl
30 36793 Crete,shaft 195)
40 35644A PisS,on,Pin& RingSet 195 610973 Terminai
(Std.) 207 34336 ThrottJeUnk
40 35545A Piston, Pin& Rug Set 2t6 33086 R.P.M AdjueUngLever
(.0t0" OS) 223 650451 Screw, 1t4-20x t*
40 35546 Piston,Pin & Ring Set 224 36786 * Intake Pipe G_sket
(,020" OS) 238 650932 Screw, 10-32 x49/64"
41 35541 Piston&Pin Ass'y (Std) 239 34338 " ._r Cteaner Gasket
(IncL 43) 24t 35797 Nr C_eanerCollar
41 35542 Piston&PinAss'yo 245 35066 Air Cleaner Filter
(.0t0" OS] (IncL 43) 250 35065 Air Cleaner Covet
41 35543 Piston& PinAss'y. 260 36980 Bk_werHousing
(,020"OS) (Incl.43) 261 30200 Screw, 10-24 x 9116"
42 35547A Ring Set (Std,) 262 650831 Screw, 114-20x 1/2"
42 35548A Ring Set (o0t0" OS) 275 36790 Muffler
42 35549 Ring Set (.020 OS) 277 650988 Screw, 1/4-20 x 2-5/16"
43 20381 PiSton PinRetaining Ring 285 35000A Starter Cup
45 36777 Connecting Rod Ass'y 287 650926 Screw, 6-32 x2t/64-"
(Ind. 46) 290 29774 Fuel Line
46 32610A Connecting Rod Bol! 292 26460 Fuel L_e Clamp
48 27241 Valve Utter 298 29763 Screw, 10-32 x 35/54"
50 37032 Camshaft (NCR) 300 36916 FuelTank (_nct 292 & 301)
52 29914 Oil Pump Ass'y. 301 36246 Fue!Cap
69 35261 ' Mounting Range Gasket 305 35647 O__l Tube
70 36995 Mounting Flange (lnc[ 72 306 36996 * "O"=Ring
thru83) 307 35499 "O".R_,g
72 36083 Oit DrainPlug 309 650562 Screw, 10-32 x 1/2"
75 27897 Oi_Seal 310 35648 Dipstid_
80 30574A GovernorShall 3t3 34080 Spacer
81 30590A Washer 370A 36261 Lubrfce_n Decal
82 30591 GovemorGear Ass'_ (Inc_ 370C 36861 P_imerDeca_
81) 370K 36695 Starter Decal
83 30598A Governor Spoo_ 380 640076 Carburetor(Incl 184)
86 650488 Screw, ti4-20 x 1-1/4' 390 590737 RewindStarter
89 611004 Rywhee!Key 400 37029A Gasket Set
50 6111I2 Rywhee[ (lncL Items Marked" in
92 650815 Bel_t_lk) Washer Notes)
93 650816 FlywheelNut 416 36085 SparkArrestorK_t
100 344436 So]_dStato Ignition (Incl.417)(OptJonal)
t01 6101t8 Spark Rug Cover 4t7 650760 Scow, 8,-32.x 3]8"
103 651007 Screw,Torx T-15,10-24 x (Opt_Dna!)
15/16" 900 ---- ReplacementEngine
110 37047 Ground Wire 7508,30,
t19 37028 " CylinderHead Gasket orderfrom 7t-999
t20 3582,5 CyliP,detHead 900 _ ReplacementSiB 750806.
125 36779 Ex_,austValve (Std,) (lncl orderfrom 71-999
t51) RPM High 2900 to 32{30
t25 36780 ExhaustValve
(I/32" OS) (Incl. t51) NOTE: This engine couldhave been builtwith 590694
126 36781 IntakeValve (Std) (Ir_cl starter,
t5t)
t 26 36782 IntakeValve (1/32" OS) NOTE: All componentdSmenslonsgiven inU.S k'_ches
(tnct. '_51) I inch=25.4 mm
37

C,RAR'SMAN 4-CYCLE ENGINE MODEL NUMBER 143.984510
1
KEY
NO.
1
2
4
5
6
7
16
I7
t6
20
20A
25
27
28
29
3O
31
35
36
37
40
44
47
48
PART
NO
640076
631615
631767
631184
631183
631036
650506
631607
651025
630766
640027
640053
631867
631024
632019
631028
631021
631022
36045A
632735
632547
640030
27110
630748
631027
DESCRIPTION
Carburetor
(lncL 164 of Engine Parts List)
Throttle Shaft & Lever Assembly
Throttle Return Spring
Dust Seal Washer
Dust Seal (Throttle)
ThrotUeShutter
Shutter Screw
Fuel Fitting
Throttle Crack Screw/
tdte Speed Screw
Tension Spring
_dIeRes_ctor Screw
idle RestrictorScrew Cap
Roat Bowl
Float Shatt
Float
Roar Bowl "O"Ring
Inlet Needle, Seat, & Cttpt,lnc[ 31)
Spdng Clip
Primer Bu[biRe_tner Ring
Main Nozzle Tube
"O" Ring, Maln Nozzle Tube
High Speed Bowl Nut
Bowl Nut Washer
Welch P_ug.Idle Mixture Wall
Wa_ehPlug, AVnesphedc Vent
38

CRAFTSMAN 4-CYCLE ENGINE MODEL NUMBER 143,9845t0
/
V_4
KEY
NO
3
6
7
8
ti
!2
t3
14
PART
NO
590737
590746
590616
590617
5906t8A
590687A
690536
690701
590741
DESCRIPTION
Rewind Starter
Retainer
Starter Dog
Dog Spring
Puiley& Rewind Spring
Ass'y
Starter HousingAss'y
(40 degree grommet)
Slarter Rope
(Length 98" x 9/64" die,)
Slatter Handto
LockingTab
KEY
NO
t
2
3
4
5
6
7
8
12
13
PART
NQ
590694
590599A
590600
590696
590601
590697
590698
590699
590700
590695
590535
590701
DESCRiPTiON
Recoll Starter
Spring Pin (lncl 4)
Washer
Retainer
Washer
Brake Spring
Starter Dog
Dog Spring
PuIley & Rewind Spring
Ass'y,
Starter Housing Ass'y,
{40 degreegrommet)
Starter Rope (98" X 9f
64" die }
Starter Handle
39

For the repair or replacement parts you need
delivered directly to your home
Calt 7 am _7 pm, 7 days a week
1-800-366-PART
(1_800-366-7278)
Para ordenar piezas con entrega a
domicilio - 1-800-659-7084
For in-house major brand repair service
Call 24 hours a day, 7 days a week
1-800-4-REPAIR
(1-800-473-7274)
Para pedir servicio de reparaci6n a
domic|iio - 1-800-676-5811
For the location of a Sears Parts and
Repair Center in your area
Call 24 hours a day, 7 days a week
1-800-488-1222
For informationon purchasing a Sears
Maintenance Agreement or to inquire
about an existing Agreement
Call 9 am - 5 pm, Monday-Saturday
1-800-827-6655
When requestingservice or ordering
parts,a|ways provide the following
information:
,,Product Type , Part Number
• Model Number • Part Description
America's Repast Specialists
164355 020398 REV2 VB Printed in US,A_
-
 1
1
-
 2
2
-
 3
3
-
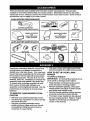 4
4
-
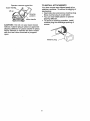 5
5
-
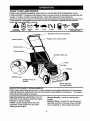 6
6
-
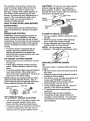 7
7
-
 8
8
-
 9
9
-
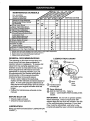 10
10
-
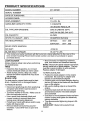 11
11
-
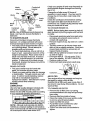 12
12
-
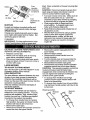 13
13
-
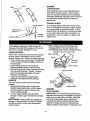 14
14
-
 15
15
-
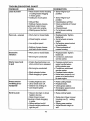 16
16
-
 17
17
-
 18
18
-
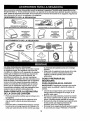 19
19
-
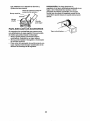 20
20
-
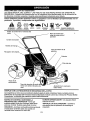 21
21
-
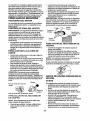 22
22
-
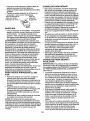 23
23
-
 24
24
-
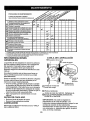 25
25
-
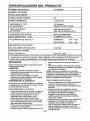 26
26
-
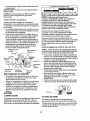 27
27
-
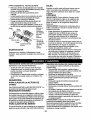 28
28
-
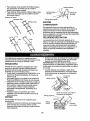 29
29
-
 30
30
-
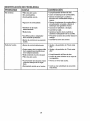 31
31
-
 32
32
-
 33
33
-
 34
34
-
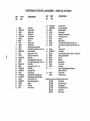 35
35
-
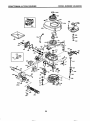 36
36
-
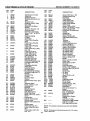 37
37
-
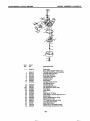 38
38
-
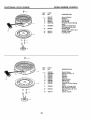 39
39
-
 40
40


Craftsman 917387261 El manual del propietario
- Categoría
- Cortadoras de césped
- Tipo
- El manual del propietario
en otros idiomas
- English: Craftsman 917387261 Owner's manual
Artículos relacionados
-
Craftsman 917.387471 El manual del propietario
-
-
-
-
-
-
-
-