
Rear Monitor Kit
Kit de Monitor
Trasero
Operating Instructions
Manual de Instrucciones
2005 Sony Corporation Printed in Korea
MV-01RK
23
1
The numbers in the list are keyed to those in the instructions.
Los números de la lista corresponden a los de las instrucciones.
English
Warning
Do not damage any pipes, tubes, fuel
tank or electric wiring system when
installing this unit.
This can cause fire. Before drilling any holes in
car panels for the installation of this unit, make
sure the installation will not damage any
hidden car parts.
Do not mount the monitor where it will
interfere with the airbag system.
This may cause the airbag to malfunction and
injury to the passenger in case of a crash.
To prevent fire or shock hazard, do not
expose the unit to rain or moisture.
Welcome!
Thank you for purchasing the Sony Rear
Monitor Kit.
This package is designed for Sony Mobile
Monitor XVM-F65 to be installed behind the
headrest of your car.
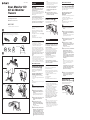
The supplied accessories are as illustrated (A).
1 Installation Kit
2 RCA Cable
3 Dual Channel Cordless Headphones
Caution
• Do not get the wires under a screw, or caught
in moving parts (e.g. seat railing).
• Before making connections, turn the car
ignition off to avoid short circuits.
After installing and connecting the unit, tape
the cords to tie them up in a bundle so it will
not interfere with normal driving operations. Be
sure that the steering, shift lever and brake
pedal do not get tangled in the cords.
It is very dangerous for the cords to become
tangled with the gearshift lever during
driving.
Notes
• Secure the connecting cords away from the seat
adjustment rails and the door frame.
• Make sure all other electric devices such as brake
lights and headlights are working properly after
installation is completed. Also check that the
indicators turn on and the horn works properly.
N Installation Kit
Installing the monitor
on the headrest B
The monitor can be installed behind the
headrest by using the supplied headrest
installation kit.
Seat types on which you can
mount the installation kit
•A seat with 2 headrest rods of diameter 10
mm to 15 mm.
•A seat with rods spaced between 42 mm and
192 mm.
Note
Depending on the seat type, it may not be possible
to mount this unit.
C
1 Remove the headrest from the seat.
2 Adjust the rod spacing A of the
installation kit depending on your
headrest.
Select either the 12 mm or 15 mm holes
depending on the diameter of the rod.
3 Insert the rods into the holes of the
installation kit and tighten the
screws.
4 Install the cradle* onto the
installation kit, and tighten the
screw on the bottom using things
like a coin.
* Supplied with XVM-F65.
5 Adjust the depth positioning of the
sliding part of the installation kit 1
according to the thickness of the
headrest, and tighten the screws.
If necessary, loosen the knob B and
adjust the angle of the cradle. Once
adjusted, tighten the knob firmly (5-
1).
2-635-946-12(1)
A
Note
The backside of the cradle should be as close as
possible to the headrest to prevent the monitor
from vibrating during driving.
If the headrest is thick, take out the
screws, slide out the part of the
installation kit and retighten the
screws (5-2).
6 Replace the headrest to the seat.
Slide the monitor on the cradle until
you hear the click sound.
Removing the monitor
from the cradle D
Slide the monitor upwards while pressing the
button on the cradle.
Ø10 mm~15 mm
B
C
2
34
5-1 5-2
Español
Advertencia
No dañe ningún conducto, tubo, tanque
de combustible o cableado eléctrico al
instalar esta unidad.
Podría ocasionar un incendio. Antes de realizar
cualquier perforación en los paneles del
automóvil, asegúrese de que la instalación no
dañe los componentes ocultos del automóvil.
No instale el monitor donde pueda
obstaculizar el funcionamiento del
sistema de airbag.
Esta instalación puede causar fallos de
funcionamiento del airbag y lesionar al
ocupante en caso de accidente.
Para evitar incendios o el riesgo de
electrocución, no exponga la unidad a la
lluvia ni a la humedad.
¡Bienvenidos!
Muchas gracias por su compra del Kit de
monitor trasero de Sony.
Hemos diseñado este paquete para el Monitor
Móvil Sony XVM-F65 para su instalación detrás
del apoyacabezas de su coche.
Los accesorios suministrados son los de la
figura (A).
1 Kit de instalación
2 Cable RCA
3 Auriculares inalámbricos de doble canal
Precaución
• No coloque los cables debajo de ningún
tornillo, ni los aprisione con piezas móviles (p.
ej., los raíles del asiento).
• Antes de realizar las conexiones, ponga la
llave de contacto en la posición OFF del
automóvil para evitar cortocircuitos.
Después de instalar y conectar la unidad,
agrupe los cables atándolos con cinta adhesiva
de modo que no interfieran durante las
operaciones de conducción normales. Asegúrese
de que la dirección, palanca de cambios y el
pedal de freno no se enredan con los cables.
Es muy peligroso que los cables se enreden
con la palanca de cambio de velocidades
durante la conducción.
Notas
• Mantenga los cables de conexión alejados de los
rieles para ajustar el asiento y de la puerta.
• Asegúrese de que el resto de los dispositivos
eléctricos como las luces de frenado y faros
inclinables funcionan correctamente una vez
concluida la instalación. Compruebe también que
se encienden los indicadores y que la bocina
funciona correctamente
42 mm~192 mm
A
A
1
1
1
B
N Kit de instalación
Instalación del monitor
en el apoyacabezas B
El monitor puede instalarse detrás del
apoyacabezas utilizando el kit de instalación de
apoyacabezas entregado.
Tipos de asiento en los que
puede montar el kit de
instalación
• Un asiento con 2 varillas de apoyacabezas con
diámetro de 10 mm a 15 mm.
• Un asiento con varillas que tengan espacio
entre 42 mm y 192 mm.
Nota
Dependiendo del tipo de asiento, puede no ser
posible montar esta unidad.
C
1 Desmonte el apoyacabezas del
asiento.
2 Ajuste el espacio de varillas A del
kit de instalación dependiendo de su
apoyacabezas.
Seleccione los orificios de 12 mm o 15 mm
según el diámetro de la varilla.
3 Inserte las varillas en los orificios del
kit de instalación y apriete los
tornillos.
4 Instale el soporte* en el kit de
instalación y apriete el tornillo en la
parte inferior utilizando algo como
una moneda.
* Suministrado con XVM-F65.
5 Ajuste la posición de profundidad de
la parte deslizante del kit de
instalación 1 de acuerdo con el
espesor del apoyacabezas y apriete
los tornillos.
Si fuera necesario, afloje la perilla B
y ajuste el ángulo del soporte. Una
vez ajustado, apriete firmemente la
perilla (5-1).
Nota
El lado trasero del soporte debe estar lo más
cerca que sea posible del apoyacabezas para
evitar que el monitor vibre durante la
conducción.
Si el apoyacabezas es grueso, saque
los tornillos, deslice hacia fuera la
parte del kit de instalación y vuelva
a apretar los tornillos (5-2).
6 Vuelva a colocar el apoyacabezas en
el asiento. Deslice el monitor en el
soporte hasta que escuche un
chasquido.
Desmontaje del
monitor del soporte D
Deslice el monitor hacia arriba mientras
presiona el botón en el soporte.
12 mm
15 mm
Front
Adelante
Front
Adelante
6
Press to release
Pulse para soltar

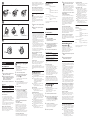
E
G
F
123
Lid (
v
)
Tapa (
v
)
12
Power (ON/OFF) switch
De alimentación (ON/OFF)
Power indicator
Indicador power
VOL control dial
Selector de control VOL
Ear pad
Almohadilla
English
N Headphones
Inserting the batteries
E
1 Open the battery compartment lid
(
v
) of the left housing.
2 Insert size R6 dry batteries into the
battery compartment, matching the
battery 3 terminals with the 3
marks in the compartment.
3 Close the battery compartment lid.
Battery life
Battery Approx. hours*
1
Sony alkaline battery
LR6/AM-3 (N)
Sony manganese battery
R6/SUM-3 (NU)
*
1
at 1 kHz, 1 mW+1 mW output
*
2
Time stated above may vary, depending on the
temperature or conditions of use.
Notes on Batteries
• Do not attempt to charge dry batteries.
• Do not carry batteries together with coins or
other metallic objects. Heat can be generated
if the positive and negative terminals
accidentally come into contact with metallic
objects.
• If you are not going to use the unit for a long
time, remove the batteries to avoid damage
from battery leakage or corrosion.
When to replace the batteries
When the batteries become weak, the power
indicator light dims, or sound becomes
distorted or noisy. Replace the batteries with
new ones as soon as possible.
the cordless headphones with other AV
equipment. Select the audio channel according
to the Mobile Monitor XVM-F65 setting of
“WireLess Headphone.”
After listening to the programmes
Take off the headphones, and then turn off the
power (Noise may occur if you turn off the
monitor before taking off the headphones).
Replacing the ear pads
G
The ear pads are replaceable. If the ear pads
become dirty or worn out, replace them as
illustrated below.
The ear pad is not commercially available.
You can order replacements at your nearest
Sony dealer.
1 Remove the old ear pad by pulling it
off.
2 Place the new ear pad around the
housing.
Precautions
• The driver must not use the headphones. It
may lead to distraction and cause an accident.
• If the headphones are used while exposed to
direct sunlight, sensitivity of the infrared
sensors may deteriorate, and inferior quality
sound may result.
• When the headphones are not to be used for a
long period of time, remove the batteries to
avoid damage caused by battery leakage and
subsequent corrosion.
• Do not leave the headphones in a location
subject to direct sunlight, heat or moisture (It
is recommended to use the headphones at a of
temperature of between 5 ˚C and 35 ˚C).
• Do not drop, hit or otherwise subject the
headphones to excessive shock of any kind, as
this could damage the product.
Notes on headphones preventing
hearing damage
Avoid using headphones at high volume.
Hearing experts advise against continuous, loud
and extended play. If you experience a ringing
in your ears, lower the volume or discontinue
use.
Caring for others
Keep the volume at a moderate level. This will
allow you to hear outside sounds and to be
considerate to the people around you.
If you have any questions or problems
concerning the headphones that are not covered
in this manual, please consult your nearest Sony
dealer.
Troubleshooting
No sound/Muffled sound
, Turn on the display monitor first, and then
put on the headphones.
, Check that the display monitor is turned
on.
, The attenuate function is activated.
• Check if there is any object between the
transmitter and the headphones.
• Use the headphones near the
transmitter.
, The headphones’ power indicator light
dims, flashes or goes off.
• Replace the batteries with new ones.
Distorted sound
, The headphones’ power indicator light
dims, flashes or goes off.
• Replace the batteries with new ones.
Loud background noise
, Move closer to the transmitter. (As you
move away from the transmitter, more
noise is likely to be heard. This is inherent
in infrared ray transmission and does not
mean that there is a problem with the
headphones.)
, Check that there are no objects between
the transmitter and the headphones.
, Check that the infrared sensors are not
obstructed by your hands or hair.
, Use the headphones away from direct
sunlight.
, The headphones’ power indicator light
dims, flashes or goes off.
• Replace the batteries with new ones.
90 hours*
2
40 hours*
2
90 horas*
2
40 horas*
2
5 Gire el selector de control VOL para
ajustar el volumen. (Vea la figura
F-2.)
Si cubre los sensores de infrarrojos con las
manos al ajustar el volumen, se activará la
función de atenuación y no podrá ajustar el
volumen. En este caso, acérquese al
transmisor o bien oriente los emisores de
infrarrojos hacia el transmisor del monitor.
Si el ruido aumenta, el sonido se atenúa
automáticamente
— Función de atenuación
Si se obstruye la emisión de rayos infrarrojos o
si se utilizan los auriculares fuera del área de
uso efectiva, aumentará el ruido y el sonido
disminuirá. Para evitar un posible daño a los
oídos como resultado de este ruido, esta función
atenúa cualquier sonido de los auriculares. El
sonido se recupera automáticamente al
acercarse al transmisor o al eliminar la
obstrucción.
Selección del canal de audio
Puede seleccionar el canal de audio con el
selector CH1/CH2 para evitar interferencias
cuando utilice los auriculares inalámbricos con
otro equipo audiovisual. Seleccione el canal de
audio según el ajuste “WireLess Headphone”
del Monitor Móvil XVM-F65.
Después de escuchar los programas
Quítese los auriculares y, a continuación,
apague la alimentación. (Es posible que escuche
ruido si desconecta el monitor antes de quitarse
los auriculares.)
Sustitución de las
almohadillas de los
auriculares G
Las almohadillas de los auriculares son
reemplazables. Si se ensucian o desgastan,
sustitúyalas como se ilustra abajo.
Las almohadillas no están disponibles en el
mercado. Puede pedir unas nuevas al
distribuidor Sony más cercano.
1 Extraiga la almohadilla vieja tirando
de ella.
2 Coloque la almohadilla nueva
alrededor del receptáculo.
Precauciones
• El conductor no debe utilizar los auriculares,
ya que puede sufrir distracciones y provocar
un accidente.
• Si usa los auriculares en un lugar expuesto a
la luz directa del sol, puede deteriorarse la
sensibilidad de los sensores infrarrojos y
disminuir la calidad del sonido.
• Cuando no vaya a emplear los auriculares
durante un largo periodo de tiempo, extraiga
las pilas para evitar daños por fugas y
corrosión de las mismas.
• No deje los auriculares estéreo inalámbricos
en un lugar expuesto a la luz directa del sol,
calor o humedad (se recomienda usar los
auriculares a una temperatura de entre 5 ºC y
35 ºC ).
• Evite que los auriculares se caigan, reciban
golpes o sufran fuertes impactos de cualquier
índole, ya que podría dañarse el producto.
Notas sobre la prevención de daños en
los oídos causados por los auriculares
Evite usar los auriculares a un volumen alto.
Los expertos en audición desaconsejan su uso
durante un periodo de tiempo prolongado con
el volumen alto. Si escucha un pitido en los
oídos, baje el volumen o deje de usarlos.
Respeto a los demás
Mantenga el volumen a un nivel moderado.
Esto le permitirá escuchar sonidos externos y
ser respetuoso con la gente que le rodea.
Si desea realizar cualquier consulta o solucionar
cualquier problema relativo a los auriculares y
que no contemple este manual, póngase en
contacto con el distribuidor Sony más cercano.
Solución de problemas
Sin sonido/Sonido amortiguado
, Primero apague el monitor de la pantalla
y, a continuación, póngase los auriculares.
, Compruebe que la pantalla del monitor
está encendida.
, La función de atenuación está activada.
• Compruebe que no haya ningún objeto
entre el transmisor y los auriculares.
• Use los auriculares cerca del transmisor.
, El indicador de energía de los auriculares
se atenúa, parpadea o se apaga.
• Sustituya las pilas por unas nuevas.
12
Listening to a program
F
Before listening
• The transmitter for the headphones is on the
display monitor.
• To prevent your ears from being damaged,
first lower the volume.
1 Turn on the display monitor.
2 Set the power switch to ON on the
left housing of the headphones.
(See figure F-1.)
The headphones turn on and the POWER
indicator glows red.
3 Put on the headphones.
Be sure to put the right housing (R) on your
right ear and the left housing (L) on your
left ear.
4 Start playback.
5 Turn the VOL control dial to adjust
the volume. (See figure F-2.)
If the infrared sensors of the headphones
are covered by your hands when adjusting
the volume, the attenuate function will be
activated and volume cannot be adjusted.
To adjust the volume, move closer to the
transmitter of the monitor, or orient the
infrared emitters towards the transmitter of
the monitor.
Sound is automatically attenuated if
noise increases
— Attenuate function
If the infrared rays are obstructed, or the
headphones are used outside their effective
range, noise will increase and sound will
diminish. To avoid potential ear damage as a
result of noise, this function attenuates any
sound in the headphones. Sound is
automatically restored when you move nearer
to the transmitter or remove the obstruction.
Selecting the audio channel
You can select the audio channel with the CH1/
CH2 switch to avoid interference when using
Specifications
Headphones
Modulation system
Frequency modulation
Carrier frequency
Right :
2.8 MHz (CH1)/3.8 MHz (CH2)
Left :
2.3 MHz (CH1)/3.2 MHz (CH2)
Frequency response
18 – 22,000 Hz
Power source DC 3.0 V; using R6 dry batteries
(2)
Mass Approx. 230 g including
batteries
Design and specifications are subject to change
without notice.
Español
N Auriculares
Inserción de las pilas
E
1 Abra la tapa (
v
) del
compartimiento de las pilas del
receptáculo izquierdo.
2 Inserte pilas secas de tamaño R6 en
el compartimiento de las pilas,
haciendo coincidir los terminales 3
de las pilas con las marcas 3 del
compartimiento.
3 Cierre la tapa del compartimiento.
Duración de las pilas
Pila Horas
aproximadas*
1
Pila alcalina de Sony
LR6/AM-3 (N)
Pila de manganeso de Sony
R6/SUM-3 (NU)
*
1
a 1kHz, salida de 1 mW+1 mW
*
2
El tiempo indicado arriba puede variar en
función de la temperatura o las condiciones de
uso.
Notas sobre las pilas
• No intente recargar pilas secas.
• No transporte las pilas junto con monedas u
otros objetos metálicos. Si los terminales
positivo y negativo de las mismas entran en
contacto accidentalmente con objetos
metálicos, puede generarse calor.
• Si no va a utilizar la unidad durante un
período de tiempo prolongado, retire las pilas
para evitar que se produzcan daños por fugas
o corrosión de las mismas.
Cuándo se deben sustituir las pilas
Cuando las pilas están a punto de agotarse, la
luz indicadora de energía se atenúa o el sonido
se distorsiona o se convierte en ruido. Sustituya
las pilas por unas nuevas en cuanto sea posible.
Recepción de un
programa F
Antes de la recepción
• El transmisor de los auriculares se encuentra
en la pantalla del monitor.
• Para evitar daños en los oídos, primero
disminuya el volumen.
1 Encienda la pantalla del monitor.
2 Ajuste el selector de alimentación en
ON en el receptáculo izquierdo de
los auriculares. (Vea la figura F-1.)
Los auriculares se encienden y el indicador
POWER (energía) se ilumina en rojo.
3 Colóquese los auriculares.
Asegúrese de colocar el receptáculo derecho
(R) en la oreja derecha y el receptáculo
izquierdo (L) en la oreja izquierda.
4 Inicie la reproducción.
Sonido distorsionado
, El indicador de energía de los auriculares
se atenúa, parpadea o se apaga.
• Sustituya las pilas por unas nuevas.
Fuerte ruido de fondo
, Acérquese al transmisor. (Conforme se
aleje del transmisor, es probable que
escuche más ruido. Esto es inherente a la
comunicación por rayos infrarrojos y no
significa que los auriculares tengan
ningún problema.)
, Compruebe que no haya ningún objeto
entre el transmisor y los auriculares.
, Compruebe que no obstruya los sensores
de infrarrojos con las manos o el pelo.
, Use los auriculares lejos de la luz directa
del sol.
, El indicador de energía de los auriculares
se atenúa, parpadea o se apaga.
• Sustituya las pilas por unas nuevas.
Especificaciones
Auriculares
Sistema de modulación
Modulación de frecuencia
Frecuencia del portador
Derecha:
2,8 MHz (CH1)/3,8 MHz (CH2)
Izquierda:
2,3 MHz (CH1)/3,2 MHz (CH2)
Respuesta de frecuencia
18 – 22 000 Hz
Fuente de alimentación
cc de 3,0 V; usando pilas secas
R6 (2)
Masa 230 g aprox., incluidas las pilas
El diseño y las especificaciones están sujetos a
cambios sin previo aviso.
Transcripción de documentos
2-635-946-12(1) Rear Monitor Kit Kit de Monitor Trasero Warning Manual de Instrucciones If the headrest is thick, take out the screws, slide out the part of the installation kit and retighten the screws (5-2). Do not damage any pipes, tubes, fuel tank or electric wiring system when installing this unit. This can cause fire. Before drilling any holes in car panels for the installation of this unit, make sure the installation will not damage any hidden car parts. Do not mount the monitor where it will interfere with the airbag system. Operating Instructions Note The backside of the cradle should be as close as possible to the headrest to prevent the monitor from vibrating during driving. English 6 Replace the headrest to the seat. Slide the monitor on the cradle until you hear the click sound. This may cause the airbag to malfunction and injury to the passenger in case of a crash. Removing the monitor from the cradle D To prevent fire or shock hazard, do not expose the unit to rain or moisture. Slide the monitor upwards while pressing the button on the cradle. MV-01RK This package is designed for Sony Mobile Monitor XVM-F65 to be installed behind the headrest of your car. The supplied accessories are as illustrated (A). The numbers in the list are keyed to those in the instructions. Los números de la lista corresponden a los de las instrucciones. 2 1 3 Press to release Español Caution B Ø10 mm~15 mm After installing and connecting the unit, tape the cords to tie them up in a bundle so it will not interfere with normal driving operations. Be sure that the steering, shift lever and brake pedal do not get tangled in the cords. It is very dangerous for the cords to become tangled with the gearshift lever during driving. 42 mm~192 mm C Notes • Secure the connecting cords away from the seat adjustment rails and the door frame. • Make sure all other electric devices such as brake lights and headlights are working properly after installation is completed. Also check that the indicators turn on and the horn works properly. 15 mm 12 mm 2 A Installing the monitor on the headrest B 1 4 Front Adelante Front Adelante The monitor can be installed behind the headrest by using the supplied headrest installation kit. Seat types on which you can mount the installation kit 1 5-1 5-2 B • Un asiento con 2 varillas de apoyacabezas con diámetro de 10 mm a 15 mm. • Un asiento con varillas que tengan espacio entre 42 mm y 192 mm. Nota Dependiendo del tipo de asiento, puede no ser posible montar esta unidad. 2 Advertencia 3 4 No dañe ningún conducto, tubo, tanque de combustible o cableado eléctrico al instalar esta unidad. Podría ocasionar un incendio. Antes de realizar cualquier perforación en los paneles del automóvil, asegúrese de que la instalación no dañe los componentes ocultos del automóvil. 5 No instale el monitor donde pueda obstaculizar el funcionamiento del sistema de airbag. Esta instalación puede causar fallos de funcionamiento del airbag y lesionar al ocupante en caso de accidente. Select either the 12 mm or 15 mm holes depending on the diameter of the rod. 1 3 6 4 Insert the rods into the holes of the installation kit and tighten the screws. Install the cradle* onto the installation kit, and tighten the screw on the bottom using things like a coin. * Supplied with XVM-F65. 5 Adjust the depth positioning of the sliding part of the installation kit 1 according to the thickness of the headrest, and tighten the screws. If necessary, loosen the knob B and adjust the angle of the cradle. Once adjusted, tighten the knob firmly (51). Ajuste la posición de profundidad de la parte deslizante del kit de instalación 1 de acuerdo con el espesor del apoyacabezas y apriete los tornillos. Si fuera necesario, afloje la perilla B y ajuste el ángulo del soporte. Una vez ajustado, apriete firmemente la perilla (5-1). Si el apoyacabezas es grueso, saque los tornillos, deslice hacia fuera la parte del kit de instalación y vuelva a apretar los tornillos (5-2). Muchas gracias por su compra del Kit de monitor trasero de Sony. Hemos diseñado este paquete para el Monitor Móvil Sony XVM-F65 para su instalación detrás del apoyacabezas de su coche. Los accesorios suministrados son los de la figura (A). Precaución Adjust the rod spacing A of the installation kit depending on your headrest. Instale el soporte* en el kit de instalación y apriete el tornillo en la parte inferior utilizando algo como una moneda. ¡Bienvenidos! Note Depending on the seat type, it may not be possible to mount this unit. Remove the headrest from the seat. Inserte las varillas en los orificios del kit de instalación y apriete los tornillos. Nota El lado trasero del soporte debe estar lo más cerca que sea posible del apoyacabezas para evitar que el monitor vibre durante la conducción. 1 Kit de instalación 2 Cable RCA 3 Auriculares inalámbricos de doble canal 1 2 Ajuste el espacio de varillas A del kit de instalación dependiendo de su apoyacabezas. Para evitar incendios o el riesgo de electrocución, no exponga la unidad a la lluvia ni a la humedad. • A seat with 2 headrest rods of diameter 10 mm to 15 mm. • A seat with rods spaced between 42 mm and 192 mm. C Desmonte el apoyacabezas del asiento. * Suministrado con XVM-F65. N Installation Kit A 3 Tipos de asiento en los que puede montar el kit de instalación Seleccione los orificios de 12 mm o 15 mm según el diámetro de la varilla. 1 Installation Kit 2 RCA Cable 3 Dual Channel Cordless Headphones • Do not get the wires under a screw, or caught in moving parts (e.g. seat railing). • Before making connections, turn the car ignition off to avoid short circuits. El monitor puede instalarse detrás del apoyacabezas utilizando el kit de instalación de apoyacabezas entregado. 1 Thank you for purchasing the Sony Rear Monitor Kit. A Instalación del monitor en el apoyacabezas B C Welcome! 2005 Sony Corporation Printed in Korea N Kit de instalación • No coloque los cables debajo de ningún tornillo, ni los aprisione con piezas móviles (p. ej., los raíles del asiento). • Antes de realizar las conexiones, ponga la llave de contacto en la posición OFF del automóvil para evitar cortocircuitos. Después de instalar y conectar la unidad, agrupe los cables atándolos con cinta adhesiva de modo que no interfieran durante las operaciones de conducción normales. Asegúrese de que la dirección, palanca de cambios y el pedal de freno no se enredan con los cables. Es muy peligroso que los cables se enreden con la palanca de cambio de velocidades durante la conducción. Notas • Mantenga los cables de conexión alejados de los rieles para ajustar el asiento y de la puerta. • Asegúrese de que el resto de los dispositivos eléctricos como las luces de frenado y faros inclinables funcionan correctamente una vez concluida la instalación. Compruebe también que se encienden los indicadores y que la bocina funciona correctamente 6 Vuelva a colocar el apoyacabezas en el asiento. Deslice el monitor en el soporte hasta que escuche un chasquido. Desmontaje del monitor del soporte D Deslice el monitor hacia arriba mientras presiona el botón en el soporte. Pulse para soltar E 1 2 the cordless headphones with other AV equipment. Select the audio channel according to the Mobile Monitor XVM-F65 setting of “WireLess Headphone.” 3 After listening to the programmes Take off the headphones, and then turn off the power (Noise may occur if you turn off the monitor before taking off the headphones). Lid (v) Tapa (v) Replacing the ear pads G The ear pads are replaceable. If the ear pads become dirty or worn out, replace them as illustrated below. The ear pad is not commercially available. You can order replacements at your nearest Sony dealer. F 1 1 2 2 Power (ON/OFF) switch De alimentación (ON/OFF) Power indicator Indicador power VOL control dial Selector de control VOL G 1 2 Ear pad Almohadilla Place the new ear pad around the housing. Before listening N Headphones Inserting the batteries E 1 2 3 Open the battery compartment lid (v) of the left housing. • The transmitter for the headphones is on the display monitor. • To prevent your ears from being damaged, first lower the volume. 1 2 Insert size R6 dry batteries into the battery compartment, matching the battery 3 terminals with the 3 marks in the compartment. Close the battery compartment lid. 3 Approx. hours*1 Sony alkaline battery LR6/AM-3 (N) 90 hours*2 Sony manganese battery R6/SUM-3 (NU) 40 hours*2 *1 at 1 kHz, 1 mW+1 mW output *2 Time stated above may vary, depending on the temperature or conditions of use. Notes on Batteries • Do not attempt to charge dry batteries. • Do not carry batteries together with coins or other metallic objects. Heat can be generated if the positive and negative terminals accidentally come into contact with metallic objects. • If you are not going to use the unit for a long time, remove the batteries to avoid damage from battery leakage or corrosion. When to replace the batteries When the batteries become weak, the power indicator light dims, or sound becomes distorted or noisy. Replace the batteries with new ones as soon as possible. Put on the headphones. Be sure to put the right housing (R) on your right ear and the left housing (L) on your left ear. 4 5 If you have any questions or problems concerning the headphones that are not covered in this manual, please consult your nearest Sony dealer. Troubleshooting Start playback. Turn the VOL control dial to adjust the volume. (See figure F-2.) If the infrared sensors of the headphones are covered by your hands when adjusting the volume, the attenuate function will be activated and volume cannot be adjusted. To adjust the volume, move closer to the transmitter of the monitor, or orient the infrared emitters towards the transmitter of the monitor. Sound is automatically attenuated if noise increases — Attenuate function If the infrared rays are obstructed, or the headphones are used outside their effective range, noise will increase and sound will diminish. To avoid potential ear damage as a result of noise, this function attenuates any sound in the headphones. Sound is automatically restored when you move nearer to the transmitter or remove the obstruction. Selecting the audio channel You can select the audio channel with the CH1/ CH2 switch to avoid interference when using , Turn on the display monitor first, and then put on the headphones. , Check that the display monitor is turned on. , The attenuate function is activated. • Check if there is any object between the transmitter and the headphones. • Use the headphones near the transmitter. , The headphones’ power indicator light dims, flashes or goes off. • Replace the batteries with new ones. Distorted sound , The headphones’ power indicator light dims, flashes or goes off. • Replace the batteries with new ones. Loud background noise , Move closer to the transmitter. (As you move away from the transmitter, more noise is likely to be heard. This is inherent in infrared ray transmission and does not mean that there is a problem with the headphones.) , Check that there are no objects between the transmitter and the headphones. , Check that the infrared sensors are not obstructed by your hands or hair. , Use the headphones away from direct sunlight. , The headphones’ power indicator light dims, flashes or goes off. • Replace the batteries with new ones. Si cubre los sensores de infrarrojos con las manos al ajustar el volumen, se activará la función de atenuación y no podrá ajustar el volumen. En este caso, acérquese al transmisor o bien oriente los emisores de infrarrojos hacia el transmisor del monitor. Si el ruido aumenta, el sonido se atenúa automáticamente — Función de atenuación Si se obstruye la emisión de rayos infrarrojos o si se utilizan los auriculares fuera del área de uso efectiva, aumentará el ruido y el sonido disminuirá. Para evitar un posible daño a los oídos como resultado de este ruido, esta función atenúa cualquier sonido de los auriculares. El sonido se recupera automáticamente al acercarse al transmisor o al eliminar la obstrucción. Puede seleccionar el canal de audio con el selector CH1/CH2 para evitar interferencias cuando utilice los auriculares inalámbricos con otro equipo audiovisual. Seleccione el canal de audio según el ajuste “WireLess Headphone” del Monitor Móvil XVM-F65. Español Inserción de las pilas E Keep the volume at a moderate level. This will allow you to hear outside sounds and to be considerate to the people around you. Gire el selector de control VOL para ajustar el volumen. (Vea la figura F-2.) Selección del canal de audio • The driver must not use the headphones. It may lead to distraction and cause an accident. • If the headphones are used while exposed to direct sunlight, sensitivity of the infrared sensors may deteriorate, and inferior quality sound may result. • When the headphones are not to be used for a long period of time, remove the batteries to avoid damage caused by battery leakage and subsequent corrosion. • Do not leave the headphones in a location subject to direct sunlight, heat or moisture (It is recommended to use the headphones at a of temperature of between 5 ˚C and 35 ˚C). • Do not drop, hit or otherwise subject the headphones to excessive shock of any kind, as this could damage the product. No sound/Muffled sound Set the power switch to ON on the left housing of the headphones. (See figure F-1.) The headphones turn on and the POWER indicator glows red. Battery life Battery Turn on the display monitor. Design and specifications are subject to change without notice. N Auriculares Caring for others Listening to a program F Modulation system Frequency modulation Carrier frequency Right : 2.8 MHz (CH1)/3.8 MHz (CH2) Left : 2.3 MHz (CH1)/3.2 MHz (CH2) Frequency response 18 – 22,000 Hz Power source DC 3.0 V; using R6 dry batteries (2) Mass Approx. 230 g including batteries Precautions Avoid using headphones at high volume. Hearing experts advise against continuous, loud and extended play. If you experience a ringing in your ears, lower the volume or discontinue use. 5 Headphones Remove the old ear pad by pulling it off. Notes on headphones preventing hearing damage English Specifications 1 2 3 Abra la tapa (v) del compartimiento de las pilas del receptáculo izquierdo. Inserte pilas secas de tamaño R6 en el compartimiento de las pilas, haciendo coincidir los terminales 3 de las pilas con las marcas 3 del compartimiento. Cierre la tapa del compartimiento. Duración de las pilas Pila Horas aproximadas*1 Pila alcalina de Sony LR6/AM-3 (N) 90 horas*2 Pila de manganeso de Sony 40 horas*2 R6/SUM-3 (NU) *1 a 1kHz, salida de 1 mW+1 mW *2 El tiempo indicado arriba puede variar en función de la temperatura o las condiciones de uso. Notas sobre las pilas • No intente recargar pilas secas. • No transporte las pilas junto con monedas u otros objetos metálicos. Si los terminales positivo y negativo de las mismas entran en contacto accidentalmente con objetos metálicos, puede generarse calor. • Si no va a utilizar la unidad durante un período de tiempo prolongado, retire las pilas para evitar que se produzcan daños por fugas o corrosión de las mismas. Cuándo se deben sustituir las pilas Cuando las pilas están a punto de agotarse, la luz indicadora de energía se atenúa o el sonido se distorsiona o se convierte en ruido. Sustituya las pilas por unas nuevas en cuanto sea posible. Recepción de un programa F Antes de la recepción • El transmisor de los auriculares se encuentra en la pantalla del monitor. • Para evitar daños en los oídos, primero disminuya el volumen. 1 2 Encienda la pantalla del monitor. Ajuste el selector de alimentación en ON en el receptáculo izquierdo de los auriculares. (Vea la figura F-1.) Los auriculares se encienden y el indicador POWER (energía) se ilumina en rojo. 3 4 Después de escuchar los programas Quítese los auriculares y, a continuación, apague la alimentación. (Es posible que escuche ruido si desconecta el monitor antes de quitarse los auriculares.) Sustitución de las almohadillas de los auriculares G Las almohadillas de los auriculares son reemplazables. Si se ensucian o desgastan, sustitúyalas como se ilustra abajo. Las almohadillas no están disponibles en el mercado. Puede pedir unas nuevas al distribuidor Sony más cercano. 1 2 Extraiga la almohadilla vieja tirando de ella. Coloque la almohadilla nueva alrededor del receptáculo. Precauciones • El conductor no debe utilizar los auriculares, ya que puede sufrir distracciones y provocar un accidente. • Si usa los auriculares en un lugar expuesto a la luz directa del sol, puede deteriorarse la sensibilidad de los sensores infrarrojos y disminuir la calidad del sonido. • Cuando no vaya a emplear los auriculares durante un largo periodo de tiempo, extraiga las pilas para evitar daños por fugas y corrosión de las mismas. • No deje los auriculares estéreo inalámbricos en un lugar expuesto a la luz directa del sol, calor o humedad (se recomienda usar los auriculares a una temperatura de entre 5 ºC y 35 ºC ). • Evite que los auriculares se caigan, reciban golpes o sufran fuertes impactos de cualquier índole, ya que podría dañarse el producto. Notas sobre la prevención de daños en los oídos causados por los auriculares Evite usar los auriculares a un volumen alto. Los expertos en audición desaconsejan su uso durante un periodo de tiempo prolongado con el volumen alto. Si escucha un pitido en los oídos, baje el volumen o deje de usarlos. Respeto a los demás Mantenga el volumen a un nivel moderado. Esto le permitirá escuchar sonidos externos y ser respetuoso con la gente que le rodea. Si desea realizar cualquier consulta o solucionar cualquier problema relativo a los auriculares y que no contemple este manual, póngase en contacto con el distribuidor Sony más cercano. Colóquese los auriculares. Solución de problemas Asegúrese de colocar el receptáculo derecho (R) en la oreja derecha y el receptáculo izquierdo (L) en la oreja izquierda. Sin sonido/Sonido amortiguado Inicie la reproducción. , Primero apague el monitor de la pantalla y, a continuación, póngase los auriculares. , Compruebe que la pantalla del monitor está encendida. , La función de atenuación está activada. • Compruebe que no haya ningún objeto entre el transmisor y los auriculares. • Use los auriculares cerca del transmisor. , El indicador de energía de los auriculares se atenúa, parpadea o se apaga. • Sustituya las pilas por unas nuevas. Sonido distorsionado , El indicador de energía de los auriculares se atenúa, parpadea o se apaga. • Sustituya las pilas por unas nuevas. Fuerte ruido de fondo , Acérquese al transmisor. (Conforme se aleje del transmisor, es probable que escuche más ruido. Esto es inherente a la comunicación por rayos infrarrojos y no significa que los auriculares tengan ningún problema.) , Compruebe que no haya ningún objeto entre el transmisor y los auriculares. , Compruebe que no obstruya los sensores de infrarrojos con las manos o el pelo. , Use los auriculares lejos de la luz directa del sol. , El indicador de energía de los auriculares se atenúa, parpadea o se apaga. • Sustituya las pilas por unas nuevas. Especificaciones Auriculares Sistema de modulación Modulación de frecuencia Frecuencia del portador Derecha: 2,8 MHz (CH1)/3,8 MHz (CH2) Izquierda: 2,3 MHz (CH1)/3,2 MHz (CH2) Respuesta de frecuencia 18 – 22 000 Hz Fuente de alimentación cc de 3,0 V; usando pilas secas R6 (2) Masa 230 g aprox., incluidas las pilas El diseño y las especificaciones están sujetos a cambios sin previo aviso.-
 1
1
-
 2
2


en otros idiomas
- English: Sony MV-01RK Operating instructions
Artículos relacionados
-
Sony MV-01RK Instrucciones de operación
-
Sony MV-02HP Instrucciones de operación
-
-
-
Sony XVM-R75 Manual de usuario
-
-
-
-
Sony XVM-F65 Instrucciones de operación
-
