GE JGB660SEJSS El manual del propietario
- Categoría
- Cocinas
- Tipo
- El manual del propietario
Este manual también es adecuado para

49-85220 07-15 GE
Safety Information ............2
Warranty ........................7
Assistance / Accessories ......8
Using The Cooktop
In Case of a Power Failure .........10
Surface Burners ...................10
Griddle ............................12
Using The Oven
Oven Controls .....................14
Oven Air Vents ....................15
Special Features ..................16
Sabbath Mode ....................17
Cooking Modes ...................18
Cookware Guidelines ..............18
Aluminum Foil and Oven Liners ....18
Oven Racks .......................19
Broil Drawer ......................19
Cooking Guide ....................20
Care and Cleaning
Cleaning the Oven ................21
Cleaning the Cooktop .............22
Cleaning the Door and Drawer .....25
Maintenance ......................26
Troubleshooting Tips .........30
Ranges
Single Oven Gas
Write the model and serial
numbers here:
Model # __________________
Serial # ___________________
You can find the rating label on the
front behind the range drawer.
In Canada contact us at:
www.GEAppliances.ca
For a Spanish version of this
manual, visit our website at
GEAppliances.com.
Para consultar una version
en español de este manual
de instrucciones, visite
nuestro sitio de internet
GEAppliances.com.
Owner’s Manual

2
49-85220
- Do not store or use gasoline or other flammable vapors and liquids in the vicinity of this or any other
appliance.
- WHAT TO DO IF YOU SMELL GAS
Ŷ Do not try to light any appliance.
Ŷ Do not touch any electrical switch; do not use any phone in your building.
Ŷ Immediately call your gas supplier from a neighbor’s phone. Follow the gas supplier’s instructions.
Ŷ If you cannot reach your gas supplier, call the fire department.
- Installation and service must be performed by a qualified installer, service agency or the gas supplier.
WARNING If the information in this manual is not followed exactly, a fire or
explosion may result, causing property damage, personal injury or death.
SAFETY INFORMATION
ANTI-TIP DEVICE
To reduce the risk of tipping
the range, the range must
be secured by a properly
installed anti-tip bracket.
See installation instructions
shipped with the bracket for complete details before attempting to install.
To check if the bracket is installed and engaged properly, look underneath the range to see that the rear
leveling leg is engaged in the bracket. On some models, the storage drawer or kick panel can be removed
for easy inspection. If visual inspection is not possible, slide the range forward, confirm the anti-tip bracket
is securely attached to the floor or wall, and slide the range back so the rear leveling leg is under the
anti-tip bracket.
If your range is removed for cleaning, servicing or any reason, be sure the anti-tip device is reengaged
properly when the range is replaced. Failure to take this precaution could result in tipping of the range and
can result in death or serious burns to children or adults.
Never completely remove the leveling legs or the range will not be secured to the anti-tip device properly.
A child or adult can tip the range and be killed.
Verify the anti-tip bracket has been properly installed
and engaged.
Ensure the anti-tip bracket is re-engaged when the range
is moved.
Do not operate the range without the anti-tip bracket in
place and engaged.
Failure to follow these instructions can result in death or
serious burns to children or adults.
Tip-Over Hazard
WARNING
Anti-Tip Bracket
Leveling
Leg
IMPORTANT SAFETY INFORMATION
READ ALL INSTRUCTIONS BEFORE USING
READ AND SAVE THESE INSTRUCTIONS

49-85220
3
GENERAL SAFETY INSTRUCTIONS
WARNING
STATE OF CALIFORNIA PROPOSITION 65 WARNING
The California Safe Drinking Water and Toxic Enforcement Act requires the Governor of California to
publish a list of substances known to the state to cause cancer, birth defects, or other reproductive harm,
and requires businesses to warn customers of potential exposure to such substances.
WARNING This product contains one or more chemicals known to the Sate of California to
cause cancer, birth defects or other reproductive harm.
Self-clean ovens can cause low-level exposure to some of these substances, including carbon monoxide,
during the cleaning cycle. Exposure can be minimized by venting with an open window or using a
ventilation fan or hood.
SAFETY INFORMATION
WARNING NEVER use this
appliance as a space heater to heat or warm
the room. Doing so may result in carbon
monoxide poisoning and overheating of the
oven.
Ŷ Use this appliance for its intended purpose as
described in this owner’s manual.
Ŷ Have your range installed and properly grounded
by a qualified installer in accordance with the
provided installation instructions.
Ŷ Any adjustment and service should be performed
only by a qualified gas range installer or service
technician. Do not attempt to repair or replace
any part of your range unless it is specifically
recommended in this manual.
Ŷ Your range is shipped from the factory set for
use with natural gas. It can be converted for use
with propane gas. If required, these adjustments
must be made by a qualified technician in
accordance with the installation instructions and
local codes. The agency performing this work
assumes responsibility for the conversion.
Ŷ Have the installer show you the location of the
range gas shut-off valve and how to turn it off if
necessary.
Ŷ Plug your range into a 120-volt grounded outlet
only. Do not remove the round grounding
prong from the plug. If in doubt about the
grounding of the home electrical system, it is
your responsibility and obligation to have an
ungrounded outlet replaced with a properly
grounded, three prong outlet in accordance with
the National Electrical Code. Do not use an
extension cord with this appliance.
Ŷ Before performing any service, unplug the range
or disconnect the power supply at the household
distribution panel by removing the fuse or
switching off the circuit breaker.
Ŷ Be sure all packing materials are removed from
the range before operating to prevent ignition of
these materials.
Ŷ Avoid scratching or impacting glass doors,
cooktops, or control panels. Doing so may lead
to glass breakage. Do not cook on a product with
broken glass. Shock, fire, or cuts may occur.
Ŷ Do not leave children alone or unattended in an
area where an appliance is in use. They should
never be allowed to climb, sit or stand on any
part of the appliance.
Ŷ
CAUTION Do not store items of
interest to children in cabinets above an oven
- children climbing on the oven to reach items
could be seriously injured.
READ AND SAVE THESE INSTRUCTIONS

4
49-85220
Ŷ Do not store or use flammable materials in
an oven or near the cooktop, including paper,
plastic, pot holders, linens, wall coverings,
curtains, drapes and gasoline or other flammable
vapors and liquids.
Ŷ Never wear loose-fitting or hanging garments while
using the appliance. These garments may ignite if
they contact hot surfaces causing severe burns.
Ŷ
Do not let cooking grease or other flammable
materials accumulate in or near the range. Grease
in the oven or on the cooktop may ignite.
SAFETY INFORMATION
GENERAL SAFETY INSTRUCTIONS (CONT.)
WARNING
Ŷ Never block the vents (air openings) of the
range. They provide the air inlets and outlets that
are necessary for the range to operate properly
with correct combustion. Air openings are located
at the rear of the cooktop, at the top and bottom
of the oven door, and at the bottom of the range
under the warming drawer, lower oven drawer or
kick panel.
Ŷ Use only dry pot holders—moist or damp pot
holders on hot surfaces may result in burns
from steam. Do not let pot holders touch surface
burners, burner grate, or oven heating element.
Do not use a towel or other bulky cloth in place
of pot holders.
Ŷ Do not touch the heating elements or the interior
surface of the oven. These surfaces may be hot
enough to burn even though they are dark in
color. During and after use, do not touch, or let
clothing or other flammable materials contact any
interior area of the oven; allow sufficient time for
cooling first. Other surfaces of the appliance may
become hot enough to cause burns. Potentially
hot surfaces include the burners, grates, oven
vent opening, surfaces near the opening, and
crevices around the oven door.
Ŷ Do not heat unopened food containers. Pressure
could build up and the container could burst,
causing an injury.
Ŷ Cook food thoroughly to help protect against
foodborne illness. Minimum safe food
temperature recommendations can be found
at www.IsItDoneYet.gov and www.fsis.usda.
gov. Use a food thermometer to take food
temperatures and check several locations.
Ŷ Do not allow anyone to climb, stand or hang on
the oven door, drawer or cooktop. They could
damage the range or tip it over causing severe
injury or death.
KEEP FLAMMABLE MATERIALS AWAY FROM THE OVEN
Failure to do so may result in fire or personal injury.
WARNING
Ŷ 'RQRWXVHZDWHURQJUHDVHILUHV1HYHUSLFNXS
a flaming pan. Turn the controls off. Smother a
flaming pan on a surface burner by covering the
pan completely with a well-fitting lid, cookie sheet,
or flat tray. If necessary, use a multi-purpose dry
chemical or foam-type fire extinguisher.
Ŷ ,IWKHUHLVDILUHLQWKHRYHQGXULQJEDNLQJ
smother the fire by closing the oven door and
turning the oven off or by using a multi-purpose
dry chemical or foam type fire extinguisher.
Ŷ ,IWKHUHLVDILUHLQWKHRYHQGXULQJVHOIFOHDQWXUQ
the oven off and wait for the fire to go out. Do
not force the door open. Introduction of fresh air
at self-clean temperatures may lead to a burst of
flame from the oven.
IN THE EVENT OF A FIRE, TAKE THE FOLLOWING
STEPS TO PREVENT INJURY AND FIRE SPREADING
WARNING
IMPORTANT SAFETY INFORMATION
READ ALL INSTRUCTIONS BEFORE USING
READ AND SAVE THESE INSTRUCTIONS

49-85220
5
SAFETY INFORMATION
Ŷ 1HYHUOHDYHWKHVXUIDFHEXUQHUVXQDWWHQGHGDW
medium or high heat settings. Foods, especially
oily foods, may ignite resulting in fire that could
spread to surrounding cabinets.
Ŷ 1HYHUOHDYHRLOXQDWWHQGHGZKLOHIU\LQJ,IDOORZHG
to heat beyond its smoking point, oil may ignite
resulting in fire that may spread to surrounding
cabinets. Use a deep fat thermometer whenever
possible to monitor oil temperature.
Ŷ 7RDYRLGRLOVSLOORYHUDQGILUHXVHWKHPLQLPXP
amount of oil when using a shallow pan-frying
and avoid cooking frozen foods with excessive
amounts of ice.
Ŷ 8VHSURSHUSDQVL]HDQGDYRLGSDQVWKDWDUH
unstable or easily tipped. Select cookware that is
matched to the size of the burner. Burner flames
should be adjusted so that they do not extend
beyond the bottom of the pan. Excessive flame
may be hazardous.
Ŷ $OZD\VXVHWKH/,7(SRVLWLRQZKHQLJQLWLQJWKH
top burners and make sure the burners have
ignited.
Ŷ :KHQXVLQJJODVVFHUDPLFFRRNZDUHPDNHVXUH
it is suitable for cooktop service; others may
break because of sudden change in temperature.
Ŷ 7RPLQLPL]HWKHSRVVLELOLW\RIEXUQVLJQLWLRQRI
flammable materials and spillage, the handle of a
container should be turned toward the center of
the range without extending over nearby burners.
Ŷ 'RQRWXVHDZRNZLWKDURXQGPHWDOVXSSRUW
ring. The ring may trap heat and block air to the
burner resulting in a carbon monoxide hazard.
Ŷ 'RQRWDWWHPSWWROLIWWKHFRRNWRS'RLQJVRPD\
damage the gas tubing to the surface burners
resulting in a gas leak and risk of fire.
Ŷ :KHQGLVDEOLQJ/RFN&RQWURORQVRPHPRGHOV
make sure the surface controls are set to the
OFF position. This will prevent unintended gas
flow from the burners.
Ŷ 'RQRWXVHDOXPLQXPIRLOWRFRYHUWKHJUDWHVRU
line any part of the cooktop. Doing so may result
in carbon monoxide poisoning, overheating of the
cooktop surfaces, or a potential fire hazard.
COOKTOP SAFETY INSTRUCTIONS
WARNING
OVEN SAFETY INSTRUCTIONS
WARNING
WARNING NEVER cover any slots,
holes, or passages in the oven bottom or
cover an entire rack with materials such as
aluminum foil or oven liners. Doing so blocks
air flow through the oven and may cause
carbon monoxide poisoning. Never place foil
or oven liners on the oven bottom. They can
trap heat causing risk of smoke or fire.
Ŷ Stand away from the range when opening the
oven door. Hot air or steam which escapes can
FDXVHEXUQVWRKDQGVIDFHDQGRUH\HV
Ŷ Never place cooking utensils, pizza or baking
stones, or any type of foil or liner on the oven
floor. These items can trap heat or melt, resulting
in damage to the product and risk of shock,
smoke or fire.
Ŷ Place oven racks in desired location while oven
is cool. If rack must be moved while oven is hot,
be careful to avoid touching hot surfaces.
Ŷ Do not leave items such as paper, cooking
utensils, or food in the oven when not in use.
Items stored in an oven can ignite.
Ŷ Do not leave items on the cooktop near the oven
vent. Items may overheat resulting in a risk of fire
or burns.
Ŷ Never broil with door open. Open-door broiling is
not permitted due to overheating of control knobs.
READ AND SAVE THESE INSTRUCTIONS

6
49-85220
SAFETY INFORMATION
The self-cleaning feature operates the oven at
temperatures high enough to burn away food soils in
the oven. Follow these instructions for safe operation.
Ŷ Do not touch oven surfaces during self-clean
operation. Keep children away from the oven
during self-cleaning. Failure to follow these
instructions may cause burns.
Ŷ Before operating the self-clean cycle, remove
pans, shiny metal oven racks, and other utensils
from the oven. Only porcelain-coated oven racks
may be left in the oven.
Ŷ Before operating the self-clean cycle, wipe
grease and food soils from the oven. Excessive
amount of grease may ignite leading to smoke
damage to your home.
Ŷ If the self-cleaning mode malfunctions, turn the
oven off and disconnect the power supply. Have
it serviced by a qualified technician.
Ŷ Do not use oven cleaners. No commercial oven
cleaner or oven liner protective coating of any kind
should be used in or around any part of the oven.
Ŷ Do not clean the door gasket. The door gasket is
essential for a good seal. Care should be taken
not to rub, damage or move the gasket.
Ŷ IMPORTANT: The health of some birds is
extremely sensitive to the fumes given off during
the self-cleaning cycle of any range. Move birds
to another well-ventilated room.
Ŷ Do not leave paper products, plastics, canned
food, or combustible materials in the drawer.
They may ignite.
Ŷ Do not touch the heating element or the interior
surface of the drawer. These surfaces may be
hot enough to cause burns.
Ŷ Use care when opening the drawer. Open the
drawer a crack and let hot air or steam escape
before removing or replacing food. Hot air or
steam that escapes can cause burns to hands,
IDFHDQGRUH\HV
Ŷ Do not use aluminum foil to line the broil drawer.
Foil is an excellent heat insulator and will trap
heat beneath it. This will upset the performance
of the drawer and potentially cause a fire hazard.
SELF-CLEANING OVEN SAFETY INSTRUCTIONS
BROIL DRAWER SAFETY INSTRUCTIONS
(on some models)
(on some models)
WARNING
WARNING
IMPORTANT SAFETY INFORMATION
READ ALL INSTRUCTIONS BEFORE USING
READ AND SAVE THESE INSTRUCTIONS

49-85220
7
WARRANTY
Staple your receipt here. Proof of the original purchase
date is needed to obtain service under the warranty.
Thank You! ... for your purchase of a GE Brand appliance.
GE Gas Range Warranty
GEAppliances.com
All warranty service is provided by our Factory Service Centers, or an authorized Customer Care
®
technician.
7RVFKHGXOHVHUYLFHRQOLQHYLVLWXVDWZZZJHDSSOLDQFHVFRPVHUYLFHBDQGBVXSSRUWRUFDOO*(&$5(6
3OHDVHKDYH\RXUVHULDOQXPEHUDQG\RXUPRGHOQXPEHUDYDLODEOHZKHQFDOOLQJIRUVHUYLFH
Servicing your appliance may require the use of the onboard data port for diagnostics. This gives a GE factory
service technician the ability to quickly diagnose any issues with your appliance and helps GE improve its products
by providing GE with information on your appliance. If you do not want your appliance data to be sent to GE, please
advise your technician not to submit the data to GE at the time of service.
For the period of one year from the date of the original purchase, GE will provide any part of the range which fails due
to a defect in materials or workmanship. During this limited one-year warranty, GE will also provide, free of charge, all
labor and in-home service to replace the defective part.
What GE will not cover:
Ŷ Service trips to your home to teach you how to use
the product.
Ŷ Improper installation, delivery, or maintenance.
Ŷ Failure of the product if it is abused, misused,
modified, or used for other than the intended purpose
or used commercially.
Ŷ 5HSODFHPHQWRIKRXVHIXVHVRUUHVHWWLQJRIFLUFXLW
breakers.
Ŷ Damage to the product caused by accident, fire,
floods, or acts of God.
Ŷ Damage to finish, such as surface rust, tarnish, or small
EOHPLVKHVQRWUHSRUWHGZLWKLQKRXUVRIGHOLYHU\
Ŷ Incidental or consequential damage caused by
possible defects with this appliance.
Ŷ Damage caused after delivery.
Ŷ Product not accessible to provide required service.
Ŷ 6HUYLFHWRUHSDLURUUHSODFHOLJKWEXOEVH[FHSWIRU/('
lamps.
EXCLUSION OF IMPLIED WARRANTIES
<RXUVROHDQGH[FOXVLYHUHPHG\LVSURGXFWUHSDLUDVSURYLGHGLQWKLV/LPLWHG:DUUDQW\$Q\LPSOLHGZDUUDQWLHV
including the implied warranties of merchantability or fitness for a particular purpose, are limited to one year or the
shortest period allowed by law.
This warranty is extended to the original purchaser and any succeeding owner for products purchased for home use
within the USA. If the product is located in an area where service by a GE Authorized Servicer is not available, you
may be responsible for a trip charge or you may be required to bring the product to an Authorized GE Service location
for service. In Alaska, the warranty excludes the cost of shipping or service calls to your home.
Some states do not allow the exclusion or limitation of incidental or consequential damages. This warranty gives you
specific legal rights, and you may also have other rights which vary from state to state. To know what your legal rights
are, consult your local or state consumer affairs office or your state’s Attorney General.
Warrantor: General Electric Company. Louisville, KY 40225
Extended Warranties: Purchase a GE extended warranty and learn about special discounts that are available while
your warranty is still in effect. You can purchase it online anytime at
ZZZJHDSSOLDQFHVFRPVHUYLFHBDQGBVXSSRUWVKRSIRUH[WHQGHGVHUYLFHSODQVKWP
RUFDOOGXULQJQRUPDOEXVLQHVVKRXUV*(&RQVXPHU+RPH6HUYLFHVZLOOVWLOOEHWKHUHDIWHU\RXU
warranty expires.
Register Your Appliance: 5HJLVWHU\RXUQHZDSSOLDQFHRQOLQHDW\RXUFRQYHQLHQFH
ZZZJHDSSOLDQFHVFRPVHUYLFHBDQGBVXSSRUWUHJLVWHU
Timely product registration will allow for enhanced communication and prompt service under the terms of your warranty,
should the need arise. You may also mail in the pre-printed registration card included in the packing material.

8
49-85220
Schedule Service: Expert GE repair service is only
one step away from your door. Schedule your service
RQOLQHDWZZZJHDSSOLDQFHVFRPVHUYLFHBDQGBVXSSRUW
RUFDOO*(&$5(6GXULQJQRUPDO
business hours.
Parts and Accessories: Individuals qualified to service
their own appliances can have parts or accessories sent
directly to their homes (VISA, MasterCard and Discover
FDUGVDUHDFFHSWHG2UGHURQOLQHWRGD\KRXUVHYHU\GD\
RUE\SKRQHDWGXULQJQRUPDOEXVLQHVVKRXUV
Instructions contained in this manual cover procedures
to be performed by any user. Other servicing generally
should be referred to qualified service personnel. Caution
must be exercised, since improper servicing may cause
unsafe operation.
Real Life Design Studio: GE supports the Universal
Design concept of products, services and environments
that can be used by people of all ages, sizes and
capabilities. We recognize the need to design for a wide
range of physical and mental abilities and impairments.
For details of GE’s Universal Design applications, including
kitchen design ideas for people with disabilities, check out
our website today. For the hearing impaired, please call
7''*($&
Contact Us: Contact us on our website with all the
details including your phone number, or write to:
General Manager, Customer Relations
GE Appliances, Appliance Park Louisville, KY 40225
ASSISTANCE / ACCESSORIES
Try the GE Appliances website (www.geappliances.com/service_and_support/KRXUVDGD\DQ\GD\RIWKH
\HDU)RUJUHDWHUFRQYHQLHQFHDQGIDVWHUVHUYLFH\RXFDQQRZGRZQORDG2ZQHU¶V0DQXDOVRUGHUSDUWVRUHYHQ
schedule service online.
Have a question or need assistance with your appliance?
Accessories
Looking For Something More?
GE offers a variety of accessories to improve your cooking and maintenance experiences!
To place an order visit us online at:
www.GEApplianceParts.com (U.S.) or www.GEAppliances.ca (Canada)
or call 800.626.2002 (U.S.) 800.661.1616 (Canada)
The following products and more are available:
Removing Protective Shipping Film and Packaging Tape
NOTE:5HPRYHDOOSURWHFWLYHSDFNLQJEHIRUHRSHUDWLQJ
the range.
Carefully grasp a corner of the protective shipping film
with your fingers and slowly peel it from the appliance
surface. Do not use any sharp items to remove the
film. If adhesive residue remains, remove it by applying
dish soap and water with a soft cloth.
Accessories
1LFNHO)ODW5DFN :%;
5HLQIRUFHG1LFNHO)ODW5DFN :%;
6HOI&OHDQ)ODW5DFN :%;
1LFNHO([WHQVLRQ5DFN :%;
6HOI&OHDQ([WHQVLRQ5DFN :%;
%URLOHU3DQô´[ó´[ò³ :%;*
5RDVWLQJ5DFN$FFHVVRU\ :%;
&RRNWRS&HQWHU*UDWH :%;
1RQVWLFN$OXPLQXP*ULGGOH :%;
5HYHUVLEOH&DVW,URQ*ULGGOH :%;
Cleaning Supplies
&LWUX6KLQH6WDLQOHVV6WHHO:LSHV :;;
6WDLQOHVV6WHHO3ROLVKLQJ&ORWK :;;
Cerama Bryte
®
%XUQW2Q*UHDVH5HPRYHU :;;

49-85220
9
Notes

10
49-85220
These flames are too
large for the pot
In Case of a Power Failure
Surface Burners
USING THE COOKTOP: In Case of a Power Failure / Surface Burners
In the event of a power failure, the oven is inoperable
and no attempt should be made to operate it. However,
the surface burners may be lit with a match. Using
extreme caution, hold a lit match near the ports beneath
the surface burner cap, then slowly turn the knob to the
/,7(SRVLWLRQ2QFHOLWVXUIDFHEXUQHUVZLOOFRQWLQXHWR
operate normally.
Lighting a Surface Burner
WARNING Burners should be operated
only when covered by cookware. Burner flames
not covered by cookware present a risk of fire or
clothing ignition. Never let flames extend beyond the
sides of the cookware. Failure to comply may result
in serious injury.
Make sure all burners are in their correct locations and
fully assembled before attempting to operate any burner.
Select a burner and find its control knob. Push the knob
LQDQGWXUQLWWRWKH/,7(SRVLWLRQ
You will hear a clicking noise—
the sound of the electric spark
igniting the burner. When one
EXUQHULVWXUQHGWR/,7(DOO
burners will spark. Sparking will
continue as long as the knob
UHPDLQVDW/,7(2QFHJDVLV
ignited, turn the knob to adjust
the flame size.
Using the Surface Burners
NOTES:
Ŷ 'RQRWRSHUDWHWKHEXUQHUIRUDQH[WHQGHGSHULRGRI
time without cookware on the grate. The finish on the
grate may discolor or chip without cookware to absorb
the heat.
Ŷ 'RQRWDWWHPSWWRGLVDVVHPEOHDQ\EXUQHUZKLOHDQRWKHU
burner is on. Damage to the product may occur.
Ŷ %HVXUHWKHEXUQHUVDQGJUDWHVDUHFRROEHIRUH\RXSODFH
your hand, a pot holder or cleaning materials on them.
Your rangetop has sealed gas burners that offer
convenience, cleanability and flexibility for a wide range
of cooking applications.
The smallest burner is the simmer burner. A simmer
EXUQHUWXUQHGGRZQWR/2SURYLGHVSUHFLVHFRRNLQJ
performance for foods such as delicate sauces that
require low heat for a long cooking time.
The extra-large burner is designed to quickly bring
large amounts of liquid to a boil. Some models have a
32:(5%2,/VHWWLQJHVSHFLDOO\GHVLJQHGIRUXVHZLWK
cookware with a diameter of 11 inches or larger.
Selecting a Flame Size
Watch the flame, not the knob, as you adjust heat. When
rapid heating is desired, the flame size should match the
size of the cookware you are using. Flames larger than
the bottom of the cookware will not heat faster and may
be hazardous.
Push the control knob in and
turn it to the LITE position.

49-85220
11
Surface Burners (Cont.)
USING THE COOKTOP: Surface Burners
Stove Top Grills
Do not use an after-market stove top grill on your
gas surface burners. A stove top grill will cause
incomplete combustion resulting in carbon monoxide
levels above allowable standards. This could be
hazardous to your health.
Using a Wok
8VHRQO\DIODWERWWRPHGZRNZLWKDGLDPHWHURI
inches or less. Make sure the wok bottom sits flat on
the grate.
Do not use a wok support ring. Placing the ring over the
burner or grate may cause the burner to work improperly,
resulting in carbon monoxide levels above allowable
standards. This could be hazardous to your health.
Use a flat-bottomed wok.
Do not use stove top grills
Top-of-Range Cookware
Aluminum: Medium-weight cookware is recommended
because it heats quickly and evenly. Most foods brown
evenly in an aluminum skillet. Use saucepans with tight-
fitting lids when cooking with minimum amounts of water.
Stainless Steel: This metal alone has poor heating
properties and is usually combined with copper,
aluminum or other metals for improved heat distribution.
Combination metal skillets usually work satisfactorily if
they are used with medium heat or as the manufacturer
recommends.
Cast-Iron: If heated slowly, most skillets will give
satisfactory results.
Enamelware: Under some conditions, the enamel of some
cookware may melt. Follow the cookware manufacturer’s
recommendations for cooking methods.
Glass: There are two types of glass cookware—those
for oven use only and those for top-of-range cooking
(saucepans, coffee and teapots). Glass conducts heat
very slowly.
Heatproof Glass Ceramic: Can be used for either surface
or oven cooking. It conducts heat very slowly and cools very
slowly. Check the cookware manufacturer’s directions to be
sure it can be used on gas ranges.

12
49-85220
USING THE COOKTOP: Griddle
Griddle (on some models)
Using Your Nonstick Aluminum Griddle
WARNING Fire Hazard
Ŷ Use care when cooking greasy foods. Spilled grease may result in fire.
Ŷ Never place any items on the griddle when it is not in use. Heat from surrounding burners can heat the
griddle and may result in fire.
Ŷ Place and remove the griddle only when griddle is cool and all surface burners are turned OFF.
Your griddle provides an extra-large cooking surface for
meats, pancakes and other foods usually prepared in
a skillet. Before first use, rinse with hot water and dry
thoroughly. For instruction on how to clean the griddle,
see the Cleaning the Cooktop section.
Griddle Precautions:
Ŷ 'RQRWXVHRLORQWKHJULGGOHIRUH[WHQGHGOHQJWKVRI
WLPH3HUPDQHQWVWDLQLQJDQGRUFUD]HOLQHVRQWKH
surface could result.
Ŷ Do not overheat the griddle/HDYLQJWKHJULGGOH
burner on at Hi for an extended amount of time
without food can damage the nonstick coating.
Ŷ 8VHRQO\SODVWLFQ\ORQZRRGHQXWHQVLOVRU
SilverStone
®
kitchen tools to prevent marring of the
coating.
Ŷ 1HYHUXVHNQLYHVRUFXWIRRGRQWKHJULGGOH
Ŷ 'RQRWXVHPHWDOXWHQVLOVZLWKVKDUSSRLQWVRUURXJK
sharp edges which might damage the griddle surface.
Ŷ 6WRUHFDUHIXOO\WRSUHYHQWVFUDWFKLQJ
Ŷ 'RQRWSODFHWKHJULGGOHLQDPLFURZDYHRYHQ
Ŷ ,IVRPHWKLQJKDVVSLOOHGXQGHUWKHJULGGOHLWVKRXOGEH
FOHDQHGXSDVVRRQDVSRVVLEOHWRSUHYHQW³EDNHGRQ´
food soil.
Ŷ 'RQRWDOORZJUHDVHWRDFFXPXODWHXQGHUWKHJULGGOH
as it can be a fire hazard. Clean under the griddle with
hot, soapy water as soon as it is cool.
Ŷ 'RQRWFOHDQ\RXUJULGGOHLQWKHGLVKZDVKHU
Ŷ 'RQRWFOHDQWKHJULGGOHLQWKHVHOIFOHDQLQJRYHQ
Doing so will damage the nonstick coating. For
instructions on how to clean the griddle, see the
Cleaning the Cooktop section of this manual.
Griddle Placement
This griddle can only be used over the center oval
burner. To position the griddle, remove the center grate
(if present) and replace it with the griddle. Do not turn on
the oval burner until you are certain the griddle has been
positioned correctly.
Preheating the griddle3UHKHDWIRUPLQXWHVRQ
Hi before placing food on the griddle and then turn heat
down to the cook setting.
Type of Food Cook Setting
Bacon Med
%UHDNIDVW6DXVDJH/LQNV Med
Fried Eggs /R
Hamburgers Med-Hi
Hot Sandwiches (such as Grilled Cheese) Med
Pancakes 0HG/R
Warming Tortillas 0HG/R
Nonstick Aluminum Griddle
Replace the center grate (if present) with the
Nonstick Aluminum Griddle

49-85220
13
USING THE COOKTOP: Griddle
Griddle (on some models) (Cont.)
Using Your Preseasoned Reversible Cast-Iron Griddle
The ribbed side of the reversible griddle can be used for
food normally grilled.
Your griddle provides an extra-large cooking surface for
meats, pancakes and other foods usually prepared in
a skillet. Before first use, rinse with hot water and dry
thoroughly. Prepare the surface with cooking spray or
vegetable oil.
Griddle Precautions:
Ŷ 'RQRWSODFHWKHJULGGOHLQDPLFURZDYHRYHQ
Ŷ 'RQRWFOHDQ\RXUJULGGOHLQWKHGLVKZDVKHU
Ŷ ,IVRPHWKLQJKDVVSLOOHGXQGHUWKHJULGGOHLWVKRXOGEH
FOHDQHGXSDVVRRQDVSRVVLEOHWRSUHYHQW³EDNHGRQ´
food soil.
Ŷ 'RQRWDOORZJUHDVHWRDFFXPXODWHXQGHUWKHJULGGOH
as it can be a fire hazard. Clean under the griddle with
hot, soapy water as soon as it is cool.
Griddle Placement
This griddle can only be used over the center oval
burner. To position the griddle, remove the center grate
(if present) and replace it with the griddle. Do not turn on
the oval burner until you are certain the griddle has been
positioned correctly.
Preheating the griddle3UHKHDWIRUPLQXWHVRQ
Hi before placing food on the griddle and then turn heat
down to the cook setting.
Type of Food Cook Setting
Bacon Med
%UHDNIDVW6DXVDJH/LQNV Med
Eggs /R
Grilled Cheese 0HG/R
Hamburgers 0HG/R
Pancakes 0HG/R
Warming Tortillas /R
Cook settings may need to be reduced if the griddle is used for an
extended time.
Preseasoned Reversible Cast-Iron Griddle
Replace the center grate (if present) with the
Preseasoned Cast-Iron Reversible Griddle

14
49-85220
2
2
187
Oven Controls
USING THE OVEN: Oven Controls
Convection
Non Convection
478
4
35
5
3
6
6
9
9
11 10

49-85220
15
1. Convection Bake (on some models):
Convection cooking uses increased air circulation
to improve performance when baking on multiple
racks. See the Cooking Modes section for more
information.
2. Traditional Cooking Modes: Your oven has
the following traditional cooking modes: Bake, Broil
+LDQG%URLO/R6HHWKH&RRNLQJ0RGHVVHFWLRQIRU
more information.
3. Clean (on some models): There are two
cleaning modes: Self Clean and Steam Clean.
See the Cleaning the Oven section for important
information about using these modes.
4. Start: Must be pressed to start any cooking,
cleaning or timed function.
5. Cancel/Off: &DQFHOV$//RYHQRSHUDWLRQVH[FHSW
the clock and timer.
6. Cook Time: Counts down cooking time and turns
off the oven when the cooking time is complete.
Program the desired cooking mode and temperature
and press Start. Then, press the Cook Time pad
and use the number pads to program a cooking
time in hours and minutes. Then, press Start again.
This can only be used with Traditional Bake and
Convection Bake.
7. Clock: Sets the oven clock time and clock display
RQVRPHPRGHOV7RVHWWKHFORFNGLVSOD\RQRII
press the Set Clock pad (on some models) once. If
your model does not have a Set Clock pad, see the
Special Features section for instructions on how to
adjust the clock display. To set the clock time, press
both the + and -SDGVDQGKROGIRUVHFRQGVRU
press the Set Clock pad until the display is flashing.
Use the + and - pads to adjust the clock. Press
Start to save the time.
8. Timer: Works as a countdown timer. Press the
Timer pad and the + and - pads to program the
time in hours and minutes. Press the Start pad.
The oven will continue to operate when the timer
countdown is complete. To turn the timer off, press
the Timer pad.
9. Delay Time: Delays when the oven will turn on.
Use this to set a time when you want the oven to
start. Press the Delay Time pad, and use the + and
- pads to program the time of day for the oven to
turn on. Then press the desired cooking mode pad,
use the + and - pads to adjust the temperature, then
press Start. After Start has been pressed, a cook
time may also be programmed if desired. Once the
Delay Time has been programmed, the start time
set for the oven will be displayed until that time is
reached. Then, either the cook time (if programmed)
or the temperature will be displayed. Delay Time
can only be used with Traditional Bake, Convection
Bake, and the Clean modes (on some models).
NOTE: When using the delay time feature, foods
that spoil easily—such as milk, eggs, fish, stuffings,
poultry, and pork—should not be allowed to sit
at room temperature for more than 1 hour before
or after cooking, as this may promote the growth
of harmful bacteria. Be sure that the oven light is
off, because heat from the bulb will speed harmful
bacteria growth.
10. Oven Light (on some models): Turns the
oven light on or off.
11. Lock Controls (on some models):/RFNV
out the control so that pressing the pads does not
activate the controls. Press and both the + and -
SDGVDQGKROGIRUVHFRQGVWRORFNRUXQORFNWKH
control. Cancel/Off is always active, even when the
control is locked.
Oven Controls (Cont.)
USING THE OVEN: Oven Controls / Oven Air Vents
Oven Air Vents
Vent appearance and location vary.
Never block the vents (air openings) of the range. They
provide the air inlet and outlet that are necessary for the
range to keep cool and operate properly with correct
combustion.
Air openings are located at the rear of the cooktop, at
the top and bottom of the oven door, and at the bottom
of the range.

16
49-85220
Special Features
USING THE OVEN: Special Features / Sabbath Mode
There are several different special features on your range. To change the settings of these special features:
Ŷ 3UHVVWKHBake and Broil pads at the same time and hold for three seconds.
Ŷ ³6)´ZLOODSSHDULQWKHGLVSOD\
Ŷ )RULQVWUXFWLRQVRQKRZWRVHOHFWGLIIHUHQWIHDWXUHVUHIHUWRWKHVHFWLRQEHORZWKDWFRUUHVSRQGVWRWKHVSHFLDO
feature of interest.
Ŷ :KHQWKHFKDQJHKDVEHHQPDGHSUHVVWKHStart key to save the change and exit the special features menu.
Adjust the Oven Temperature
This feature allows the oven baking temperature to be
DGMXVWHGXSWR)KRWWHURUGRZQWR)FRROHU8VH
this feature if you believe your oven temperature is too
hot or too cold and wish to change it. This adjustment
affects every cooking mode except broil.
After entering the special features menu, press the Bake
pad to enter the temperature adjustment mode. A number
EHWZHHQDQGZLOOGLVSOD\8VHWKH+ or - pads to
set the desired temperature adjustment. Press the Start
pad to save the temperature adjustment.
12-Hour Auto Shut-Off and Sabbath
12-hour auto shut-off turns off the oven after 12 hours
of continuous operation. The 12-hour auto shut-off may
EH³RQ´RU³R))´)RUGHWDLOVRQWKH³V$E´RSWLRQVHHWKH
Sabbath Mode Section. Enter into the special features
menu as outlined above and repeatedly press the Set
Clock pad until the desired setting is displayed. If your
model does not have a Set Clock pad, then repeatedly
press the Cook Time pad until the desired setting is
displayed. Press the Start pad to save the setting.
Clock Display (on some models)
This feature specifies if the time of day is displayed.
7KHFORFNGLVSOD\PD\EH³RQ´RU³R))´,I\RXUPRGHO
has a Set Clock pad, see the Oven Controls section for
instructions on adjusting the display. If your model does
not have a Set Clock pad, enter into the special features
menu as outlined above. Press the Timer pad to see the
current setting. Press the Timer pad again to change the
setting. Press the Start pad to save the display setting.
Increment/Decrement Speed
A setting (i.e. temperature) may be rapidly adjusted
by pressing and holding the + or - pad. To adjust the
LQFUHPHQWGHFUHPHQWVSHHGHQWHULQWRWKHVSHFLDO
features menu as outlined above. Press the + pad to
increase the speed or press the - pad to decrease the
VSHHG6HWWLQJVYDU\IURPVORZHVWWRIDVWHVW
Press the Start pad to save the speed setting.

49-85220
17
Sabbath Mode
USING THE OVEN: Sabbath Mode
The Sabbath mode feature complies with standards set forth by Star K. Only continuous baking or timed baking is
allowed in the Sabbath mode. All tones are disabled in the Sabbath mode; however the oven light is not disabled, so
the light should be removed to ensure it does not come on when the door is opened. Cooking in the Sabbath mode
is a two-step process, first the Sabbath mode must be set and then the bake mode must be set.
Setting the Sabbath Mode
Press the Bake and Broil pads at the same time and
KROGIRUWKUHHVHFRQGV³6)´ZLOODSSHDULQWKHGLVSOD\
Press the Set ClockSDGXQWLO³6$E´DSSHDUVLQWKH
display and then press Start. If your model does not
have a Set Clock pad, then press the Cook Time pad
XQWLO³6$E´DSSHDUVLQWKHGLVSOD\DQGWKHQSUHVVStart.
$VLQJOHEUDFNHW³@´ZLOODSSHDULQWKHGLVSOD\LQGLFDWLQJ
that the Sabbath mode is set. Continuous bake or timed
bake can now be set as outlined below.
Start a Continuous Bake
Press BakeLIDWHPSHUDWXUHRWKHUWKDQ)LVGHVLUHG
then press the + or - pads to adjust the temperature in
GHJUHHLQFUHPHQWVWKHQSUHVVStart. After a delay, a
VHFRQGEUDFNHW³@>´ZLOODSSHDULQWKHGLVSOD\LQGLFDWLQJ
that the oven is baking.
Adjusting the Temperature
Press Bake, then press the + or - pads to adjust the
WHPSHUDWXUHLQGHJUHHLQFUHPHQWVWKHQSUHVVStart.
An oven thermometer can be used if some indication of
temperature setting is desired.
Start a Timed Bake
Press Cook Time, then press the + or - pads to adjust
the cook time in one minute increments. Press Bake,
LIDWHPSHUDWXUHRWKHUWKDQ)LVGHVLUHGWKHQSUHVV
the + or -SDGVWRDGMXVWWKHWHPSHUDWXUHLQGHJUHH
increments, then press Start. After a delay, a second
EUDFNHW³@>´ZLOODSSHDULQWKHGLVSOD\LQGLFDWLQJWKDWWKH
oven is baking. When the cook time expires the display
ZLOOFKDQJHEDFNWRDVLQJOHEUDFNHW³@´LQGLFDWLQJWKDWWKH
oven is no longer baking.
Exit the Sabbath Mode
Exiting the Sabbath mode should be done after the
Sabbath is over. Press Cancel/Off to end any bake
mode that may be running. Press Bake and Broil pads
DWWKHVDPHWLPHDQGKROGIRUWKUHHVHFRQGV³6)´ZLOO
appear in the display. Press the Set Clock pad until
³2Q´DSSHDUVLQWKHGLVSOD\DQGWKHQSUHVVStart. If your
model does not have a Set Clock pad, then press the
Cook TimeSDGXQWLO³2Q´DSSHDUVLQWKHGLVSOD\DQG
then press Start. The display will change from a single
EUDFNHW³@´WRWKHWLPHRIGD\LQGLFDWLQJWKDWWKH6DEEDWK
mode has been exited.
Sabbath Mode Power Outage Note
If a power outage occurs during when the oven is in
Sabbath mode, the unit will return to Sabbath mode
when power is restored, however the oven will return to
the off state even if it was in the middle of a bake cycle
when the power outage occurred.

18
49-85220
Your new oven has a variety of cooking modes to help you get the best results. These modes are described below.
5HIHUWRWKH&RRNLQJ*XLGHVHFWLRQIRUUHFRPPHQGDWLRQVIRUVSHFLILFIRRGV5HPHPEHU\RXUQHZRYHQPD\SHUIRUP
differently than the oven it is replacing.
Bake
The bake mode is for baking and roasting. This mode
uses heat only from the lower burner. When preparing
baked goods such as cakes, cookies and pastries,
always preheat the oven before inserting food. Follow
recipe recommendations for food placement. If no
guidelines are provided, center food in the oven. To use
this mode, press the Bake pad, use the + and - pads to
adjust the temperature, then press Start.
Broiling Modes
Always broil with the oven door and drawer closed.
Monitor food closely while broiling. Use caution when
broiling on the upper rack positions as placing food
closer to the broil burner increases smoking, spattering,
and the possibility of fats igniting.
Try broiling foods that you would normally grill. Adjust
rack positions to adjust the intensity of the heat to the
food. Place foods closer to the broil burner when a
seared surface and rare interior is desired. Thicker foods
and foods that need to be cooked through should be
EURLOHGRQDORZHUUDFNSRVLWLRQRUE\XVLQJWKH%URLO/R
mode.
Broil Hi
The Broil Hi mode uses intense heat from the upper
burner to sear foods. Use Broil Hi for thinner cuts of
PHDWDQGRUIRRGV\RXSUHIHUOHVVGRQHRQWKHLQWHULRU
To use this mode press the Broil pad once and then
press Start. It is not necessary to preheat when using
this mode.
Broil Lo
7KH%URLO/RPRGHXVHVOHVVLQWHQVHKHDWIURPWKHXSSHU
burner to cook food thoroughly while also browning the
VXUIDFH8VH%URLO/RIRUWKLFNHUFXWVRIPHDWDQGRUIRRGV
that you would like cooked all the way through. To use
this mode press the Broil pad twice and then press Start.
It is not necessary to preheat when using this mode.
Convection Bake (on some models)
The Convection Bake mode is intended for baking
on multiple racks at the same time. This mode uses
air movement from the convection fan to enhance
cooking evenness. Your oven is equipped with Auto
5HFLSH&RQYHUVLRQVRLWLVQRWQHFHVVDU\WRDGMXVWWKH
temperature when using this mode. To use this mode
press the Conv Bake pad, use the + and - pads to
adjust the temperature, and then press Start. Always
preheat when using this mode.
Cookware Guidelines
The material, finish and size of cookware affect baking
performance.
Dark, coated and dull pans absorb heat more readily
than light, shiny pans. Pans that absorb heat more
readily can result in a browner, crisper and thicker crust.
If using dark and coated cookware check food earlier
than the minimum cook time. If undesirable results are
obtained with this type of cookware consider reducing
RYHQWHPSHUDWXUHE\)QH[WWLPH
Ŷ 6KLQ\SDQVFDQSURGXFHPRUHHYHQO\FRRNHGEDNHG
goods such as cakes and cookies.
Ŷ *ODVVDQGFHUDPLFSDQVKHDWVORZO\EXWUHWDLQKHDW
well. These types of pans work well for dishes such
as pies and custards.
Ŷ $LULQVXODWHGSDQVKHDWVORZO\DQGFDQUHGXFHERWWRP
browning.
Ŷ .HHSFRRNZDUHFOHDQWRSURPRWHHYHQKHDWLQJ
Cooking Modes
USING THE OVEN: Cooking Modes / Cookware / Aluminum Foil and Oven Liners
CAUTION Do not use any type of foil or oven liner to cover the oven bottom. These items can block
airflow or melt, resulting in damage to the product and risk of carbon monoxide poisoning, smoke or fire.
Damage from improper use of these items is not covered by the product warranty.
Foil may be used to catch spills by placing a sheet on a lower rack, several inches below the food. Do not use more
IRLOWKDQQHFHVVDU\DQGQHYHUHQWLUHO\FRYHUDQRYHQUDFNZLWKDOXPLQXPIRLO.HHSIRLODWOHDVW´IURPRYHQZDOOV
to prevent poor heat circulation.
Aluminum Foil and Oven Liners

49-85220
19
Oven Racks
USING THE OVEN: Oven Racks / Broil Drawer
Rack Positions
Your oven has six rack positions in the main oven.
5HFRPPHQGHGUDFNSRVLWLRQVIRUYDULRXVW\SHVRI
foods are provided in the Cooking Guide. Adjusting
the rack position is one way to impact cooking results.
For example, if you would prefer darker tops on cakes,
muffins or cookies, try moving food one rack position
higher. If you find foods are too brown on top, try moving
them down next time.
When baking with multiple pans and on multiple racks,
ensure there is sufficient space between pans to allow
air to flow. This may improve cooking evenness.
Removing and Replacing Racks
When placing and removing cookware, pull the rack out
to the bump (stop position) on the rack support.
To remove a rack, pull it toward you until it reaches the
stop position, tilt up the front of the rack and pull it out.
To replace a rack, place the curved end of the rack onto
the rack supports. Tilt up the front of the rack and push
the rack in until it stops. Then lay the rack flat and push
it in until it is all the way into the oven.
5DFNVPD\EHFRPHGLIILFXOWWRVOLGHHVSHFLDOO\DIWHUD
self-clean cycle. To improve sliding conditions, use a soft
cloth or paper towel to rub vegetable oil on the left and
ULJKWHGJHVRIWKHUDFNVDQGRUUDFNVXSSRUWV
NOTE:5HPRYHXQXVHGUDFNVZKHQXVLQJWKHRYHQIRU
faster preheat, improved efficiency and optimal cooking
performance.
6HHWKH$VVLVWDQFH$FFHVVRULHVVHFWLRQIRULQVWUXFWLRQV
on ordering additional racks.
Always use the broil pan and grid that comes with your
range.
The broil drawer has the three broiling positions shown
to the right. To broil in position B or C, slide the pan into
the drawer such that the handles rest on the supports.
For broiling in position A, place the pan directly on the
bottom of the broil drawer. For better searing, use the
rack positions that places the food closest to the broil
EXUQHU0RYHIRRGGRZQRUXVH%URLO/RPRGHIRUPRUH
GRQHQHVVOHVVVHDULQJ
Broil Drawer (on some models)
Rack positions
Removing racks
Replacing racks
Broil drawer positions (on some models)
Rack stop
position

20
49-85220
Cooking Guide
USING THE OVEN: Cooking Guide
FOOD TYPE
RECOMMENDED
MODE(S)
RECOMMENDED RACK
POSITION(S) ADDITIONAL SUGGESTIONS
Baked Goods
/D\HUFDNHVVKHHWFDNHV
bundt cakes, muffins, quick
breads, biscuits, scones on
D6LQJOH5DFN
Bake RU Use shiny cookware.
/D\HUFDNHVRQ0XOWLSOH
5DFNV
Bake
Convection Bake
DQG
Ensure adequate airflow
(see illustration below).
Chiffon cakes (angel food) Bake 2 Use shiny cookware.
Cookies, biscuits, scones on
D6LQJOH5DFN
Bake RU Use shiny cookware.
Cookies, biscuits, scones on
0XOWLSOH5DFNV
Convection Bake
Bake
5DFNVDQG
5DFNVDQG
Ensure adequate airflow. Switch food
location partially through cooking for more
even cooking results.
Beef & Pork
Hamburgers Broil Hi RU&
Use a broil pan; move food down for more done-
QHVVOHVVVHDULQJ:DWFKIRRGFORVHO\ZKHQEURLO-
ing. Center food under burner.
Steaks & Chops Broil Hi RU&
Use a broil pan; move food down for more done-
QHVVOHVVVHDULQJ:DWFKIRRGFORVHO\ZKHQEURLO-
ing. Center food under burner.
5RDVWV Bake RU
/HDYHXQFRYHUHGXVHDORZVLGHGSDQVXFK
as a broil pan. Preheating is not necessary.
Poultry
Whole chicken Bake RU
/HDYHXQFRYHUHGXVHDORZVLGHGSDQ
such as a broil pan.
Bone-in chicken breasts,
legs, thighs
%URLO/R
Bake
RU%
If breaded or coated in sauce avoid Broil
Hi modes. Broil skin side down first.
Watch food closely when broiling.
Boneless chicken breasts
%URLO/R
Bake
RU%
0RYHIRRGGRZQIRUPRUHGRQHQHVVOHVV
VHDULQJDQGXSIRUJUHDWHUVHDULQJEURZQLQJZKHQ
broiling.
Whole turkey Bake 1 or 2
/HDYHXQFRYHUHGXVHDORZVLGHGSDQ
such as a broil pan.
Turkey Breast Bake RU
/HDYHXQFRYHUHGXVHDORZVLGHGSDQ
such as a broil pan.
Fish %URLO/R
RU&LQFKWKLFNRUOHVV
RU%!LQFK
Watch food closely when broiling.
Casseroles Bake RU
Frozen Convenience Foods
Pizza, potato products,
chicken nuggets, appetizers
RQD6LQJOH5DFN
Bake RU Use shiny cookware.
Pizza, potato products,
chicken nuggets, appetizers
RQ0XOWLSOH5DFNV
Bake
Convection Bake
DQG
DQG
Use shiny cookware.
Switch food location partially through
cooking for more even cooking results.
:KHQEDNLQJIRXUFDNHOD\HUVDWDWLPHVWDJJHUWKH
pans as shown to the right so that one pan is not directly
above another.
Cook food thoroughly to help protect against
foodborne illness. Minimum safe food temperature
recommendations for food safety can be found at
www.IsItDoneYet.gov. Make sure to use a food
thermometer to take food temperatures.
NOTE:5HPRYHXQXVHGUDFNVZKHQXVLQJWKHRYHQIRU
faster preheat, improved efficiency and optimal cooking
performance.
Front
Placement
Rear
Placement

49-85220
21
Be sure all controls are off and all surfaces are cool before cleaning any part of the oven.
Oven Exterior
Do not use oven cleaners, abrasive cleansers, strong
liquid cleansers, steel wool, plastic scouring pads or
cleaning powders on the interior or exterior of the oven.
&OHDQZLWKPLOGVRDSDQGZDWHURUDVROXWLRQRI
YLQHJDUDQGZDWHU5LQVHZLWKFOHDQZDWHUDQGGU\ZLWKD
soft cloth. When cleaning surfaces, make sure that they
are at room temperature and not in direct sunlight.
Spillage of marinades, fruit juices, tomato sauces and
basting liquids containing acids may cause discoloration
and should be wiped up as soon as hot surfaces cool,
then clean and rinse.
Cleaning the Oven
CARE AND CLEANING: Cleaning the Oven
Oven Racks
All oven racks may be cleaned by hand with an abrasive
cleaner or steel wool. Self-clean (black) oven racks may
remain in the oven during the self-clean cycle. Nickel-
plated (silver) racks should not remain in the oven during
the self clean cycle. Doing so will tarnish the racks. If
either type of rack is left in the oven during a self-clean
cycle, the rack may become difficult to slide.
After cleaning the racks, use a soft cloth or paper towel
to rub a small amount of vegetable oil on the left and
right edges of the rack. This will ensure the racks are
easy to slide in and out of the oven
Oven Interior
The interior of your new oven can be cleaned manually
or by using the Steam Clean or Self Clean modes
(on some models).
Spillage of marinades, fruit juices, tomato sauces and
basting liquids containing acids may cause discoloration
and should be wiped up as soon as hot surfaces cool,
then clean and rinse.
Manual Cleaning
Do not use oven cleaners, abrasive cleaners, strong
liquid cleansers, steel wool, scouring pads or cleaning
powders on the interior of the oven. Clean with mild
VRDSDQGZDWHURUDVROXWLRQRIYLQHJDUDQGZDWHU
5LQVHZLWKFOHDQZDWHUDQGGU\ZLWKDVRIWFORWK:KHQ
cleaning surfaces, make sure that they are at room
temperature and not in direct sunlight.
Steam Clean Mode (on some models)
The Steam Clean feature is for cleaning light soil from
your oven at a lower temperature than Self Clean.
To use the Steam Clean feature:
1. Start with the oven at room temperature.
2. Wipe excess grease and soils from the oven.
3RXURQHFXSRIZDWHURQWRWKHERWWRPRIWKHRYHQ
&ORVHDQGODWFKWKHGRRU
3UHVVWKHSteam Clean pad and then press Start.
<RXFDQQRWRSHQWKHGRRUGXULQJWKHPLQXWH6WHDP
Clean cycle. At the end of the Steam Clean cycle, unlatch
the door, soak up the remaining water, and wipe the
moisture-softened soil from the oven walls and door.
Self Clean Mode (on some models)
5HDGWKH6HOI&OHDQLQJ2YHQ6DIHW\,QVWUXFWLRQVDWWKH
beginning of this manual before using Self Clean Mode.
Self clean uses very high temperatures to clean the
RYHQLQWHULRU)RUDPRGHUDWHO\VRLOHGRYHQUXQDKRXU
VHOIFOHDQF\FOH)RUDKHDYLO\VRLOHGRYHQUXQDKRXU
self-clean cycle. Only self-clean (black) racks and grates
may remain in the oven during the self-clean cycle. All
other items, including nickel plated (silver) racks, should
be removed. If nickel plated racks are left in the oven
during a self-clean cycle, the racks will tarnish. If either
type of rack is left in the oven during a self-clean cycle,
the rack may become difficult to slide. See the Oven
5DFNVVHFWLRQIRUOXEULFDWLRQLQVWUXFWLRQV
IMPORTANT: The health of some birds is extremely
sensitive to the fumes given off during the self-cleaning
cycle of any range. Move birds to another well-
ventilated room.
To use the Self Clean feature:
1. Start with the oven at room temperature.
2. Wipe excess grease and soils from the oven and
interior door.
5HPRYHDOOLWHPVRWKHUWKDQVHOIFOHDQEODFN
racks and grates, if desired. See Cleaning the
Cooktop to determine if your grates may be self-
cleaned and for important details regarding grate
placement.
&ORVHDQGODWFKWKHGRRU
3UHVVWKHSelf CleanSDGVHWDWLPHEHWZHHQ
DQGKRXUVDQGWKHQSUHVVStart.
You cannot open the door during the self-clean cycle. If
the oven is too hot, you will not be able to slide the latch.
At the end of the self-clean cycle, allow the oven to cool,
unlatch the door and wipe any ash out of the oven.

22
49-85220
Control Panel and Knobs
Wipe the control panel after each use of the oven with
a damp cloth. For cleaning, use mild soap and water or
DVROXWLRQRIYLQHJDUDQGZDWHU5LQVHZLWKFOHDQ
water. Polish dry with a soft cloth.
Do not use abrasive cleansers, strong liquid cleansers,
plastic scouring pads or oven cleaners on the control
panel—they will damage the finish.
Stainless Steel Surfaces (on some models)
Do not use a steel wool pad; it will scratch the surface.
To clean the stainless steel surface, use warm sudsy
water or a stainless steel cleaner or polish. Always wipe
the surface in the direction of the grain. Follow the cleaner
instructions for cleaning the stainless steel surface.
Cleaners with oxalic acid such as Bar Keepers Friend
6RIW&OHDQVHUZLOOUHPRYHVXUIDFHUXVWWDUQLVKDQG
small blemishes. Use only a liquid cleanser free of grit
and rub in the direction of the brush lines with a damp,
soft sponge.
To inquire about purchasing cleaning products
including stainless steel appliance cleaner or polish,
UHDGWKH$VVLVWDQFH$FFHVVRULHVVHFWLRQVDWWKH
beginning of this manual.
For easier cleaning, the control knobs may be removed
by pulling them directly outwards once the knobs are in
the OFF position. Do not pull knobs up or down or hang
objects on them. This can damage the gas valve shaft.
The knobs can be washed by hand with soap and water
or in a dishwasher.
To replace knobs after cleaning, align the hole on
the knob backside with
the gas valve shaft
and push inward until
the knob is securely
fastened. All knobs are
interchangeable
Surface burner knob
Cleaning the Cooktop
CARE AND CLEANING: Cleaning the Cooktop
Cleaning the Surface Burners
Turn all controls off. Allow the cooktop to cool before removing grates and burner parts. When removing the burner
FDSVDQGKHDGVUHPHPEHUWKHLUVL]HDQGORFDWLRQ5HSODFHWKHPLQWKHVDPHORFDWLRQDIWHUFOHDQLQJ
Removing Surface Burners
CAUTION Do not attempt to remove oval burner cap from burner head.
Round Burner
The burner cap and burner head can be lifted off the
cooktop and separated from one another.
Oval Burner (on some models)
The burner cap is permanently attached to the burner
head. The cap and head assembly can be lifted off the
cooktop.
Cooktop Surface
Do not use oven cleaners, abrasive cleansers, strong
liquid cleansers, steel wool, plastic scouring pads, or
cleaning powders on the cooktop surface. Clean with a
PLOGVRDSDQGZDWHURUDVROXWLRQRIYLQHJDUDQG
ZDWHU5LQVHZLWKFOHDQZDWHUDQGGU\ZLWKDVRIWFORWK
When cleaning surfaces, make sure that they are at
room temperature and not in direct sunlight.
Spillage of marinades, fruit juices, tomato sauces and
basting liquids containing acids may cause discoloration
and should be wiped up as soon as hot surfaces cool,
then clean and rinse.
If your model has a stainless steel cooktop surface,
refer to the Stainless Steel Surface cleaning instructions
featured in the Control Panel and Knobs section.
Round Burner Cap
(Removable)
Electrode
Burner Head
Oval Burner Cap
(Non-Removable)
Oval Burner
Head
Electrode

49-85220
23
Cleaning the Cooktop (Cont.)
CARE AND CLEANING: Cleaning the Cooktop
Burner cap is
properly seated.
Burner cap is
NOT properly seated.
Burner cap is
NOT properly seated.
Cleaning the Surface Burners (Cont.)
Cleaning the Burner Caps
Wash burner caps in hot, soapy water and rinse with
clean water. You may scour with a plastic scouring pad
to remove burned-on food particles. The round burner
caps may also be cleaned in your dishwasher.
Cleaning the Burner Heads
Wash the burner heads routinely, especially after bad
VSLOORYHUVZKLFKFRXOGFORJWKHEXUQHURSHQLQJV/LIW
EXUQHUVRIIZKHQFRRO:DVKZLWKKRWVRDS\ZDWHU5LQVH
with clean water. For more stubborn stains, use a brush
with plastic bristles.
NOTE: Do not use steel wool or scouring pads to clean
the burner parts as these may clog the openings. Never
wash burner heads in your dishwasher. Doing so may
cause them to discolor.
The ports in the burner heads must be kept clean at all
times for an even, unhampered flame.
Clogged or dirty burner ports or electrodes will not allow
the burner to operate properly.
For proper ignition, make sure the small hole in the notch
that fits over the electrode is kept open. A sewing needle
or wire twist-tie works well to unclog it.
Replacing Surface Burners
Before replacingWKHEXUQHUFDSVKHDGVDQGRYDOKHDG
cap assembly, shake out excess water and allow them to
dry thoroughly.
5HSODFHEXUQHUKHDGVLQWKHFRUUHFWORFDWLRQVDFFRUGLQJ
to size. Ensure each cap is properly seated on the
burner head, as pictured below.
CAUTION Do not operate the cooktop
without all burner parts and grates in place.
Any spill on or around an electrode must be carefully
cleaned. Avoid hitting the electrode with anything hard or
it could be damaged.
The electrode of the spark igniter is exposed
when the burner head is removed. When one
EXUQHULVWXUQHGWR/,7(DOOWKHEXUQHUVVSDUN
Do not attempt to disassemble or clean around
any burner while another burner is on.
Round hole in
burner head must
be kept clear
Electrode

24
49-85220
Cleaning the Cooktop (Cont.)
CARE AND CLEANING: Cleaning the Cooktop
Griddles (on some models)
Nonstick Aluminum Griddle: Wash your griddle with
dish soap and hot water. If necessary, scrub with a
non-abrasive plastic pad.
Griddle Precautions:
Ŷ If something has spilled under the griddle, it should
be cleaned up as soon as possible to prevent the
spill from getting baked onto the cooktop.
Ŷ Do not allow grease to accumulate under the griddle
as it can be a fire hazard. Clean under the griddle
with hot, soapy water as soon as it is cool.
Ŷ Do not wash your griddle in the dishwasher.
Ŷ 'RQRWFOHDQWKHJULGGOHLQWKHVHOIFOHDQLQJRYHQ
Doing so will damage the nonstick coating.
Grate Support Bumpers (on some models)
If any of the rubber grate support bumpers in the cooktop
are missing or damaged, replacement parts can be
REWDLQHGE\FDOOLQJ*(&$5(6
To insert the new bumpers, simply place the
cone-shaped end of the bumper into the hole in the
cooktop and push down while gently twisting the bumper.
Grate Support Bumpers
Burner Grates
Manual Cleaning
Grates should be washed in hot, soapy water and
rinsed with clean water. To soften burned-on food,
place grates in a solution containing ¼-cup of
household ammonia for several hours. Afterward, scrub
grates with a plastic scouring pad soaked in hot, soapy
ZDWHU5LQVHZHOODQGGU\
Self Clean Mode (on some models)
If your grates do not have rubber bumpers on their
bottom surface, they may be cleaned in the oven using
the self-clean cycle. Do not attempt to clean your grates
in the oven if your grates have rubber bumpers. Doing
so will destroy the rubber bumpers and may affect the
function of your surface burners.
Porcelain-coated grates may gradually dull if continually
exposed to self-clean temperatures.
If your oven is equipped with self-clean (black) racks,
it is recommended to follow the instructions for placing
grates on racks. If your oven is equipped with nickel-
plated (silver) racks, it is recommended to follow the
instructions for placing grates on the oven bottom.
Nickel-plated racks should not remain in the oven during
the self clean cycle. Doing so will tarnish the racks. If
either type of rack is left in the oven during a self-clean
cycle, the rack may become difficult to slide. See the
2YHQ5DFNVHFWLRQIRUOXEULFDWLRQLQVWUXFWLRQV
NOTE: When placing or removing grates from the oven,
do not slide the grates on the racks or oven bottom. Doing
so could damage the enamel on the racks or oven bottom.
To self-clean your grates on self-clean racks:
,QVHUWUDFNVLQSRVLWLRQVDQGRUSRVLWLRQVDQG
2. Gently place one grate on each rack.
To self clean your grates on the oven bottom:
5HPRYHDOORYHQUDFNV
2. Gently place one grate on the center of the oven
bottom with the grate oriented in the upright position.
Stack remaining grate(s) as shown below. Do not
place or stack grates in any other configuration.
Once the grates are placed in the oven, operate the
self-clean cycle per the instruction in the Cleaning the
Oven section.
NOTE: Use caution when removing the grates from the
oven after the self-clean cycle has ended. The grates
may still be hot.
Once the self-clean cycle is complete, the grates may
carefully be removed. You may notice a white residue on
the grates. Wipe it off with a damp sponge. If white spots
SHUVLVWZHWWKHVSRQJHZLWKDVROXWLRQRIYLQHJDU
and water and wipe the grates again.
When replacing the grates on the cooktop, be sure to
locate them correctly. Grates should fit securely into the
cooktop.

49-85220
25
Cleaning the Door and Drawer
CARE AND CLEANING: Cleaning the Door and Drawer
Cleaning the Oven Door
Cleaning the Door Interior
Do not allow excess water to run into any holes or slots
in the door .
Wipe dish soap over any baked-on spatters on the glass.
Use a single sided safety razor blade to clean it off. Then
wipe over the glass with a soapy cloth to remove any
residue and dry off.
The area outside the gasket can be cleaned with a
soap-filled plastic scouring pad. Do not rub or clean
the door gasket - it has an extremely low resistance to
abrasion.
If you notice the gasket becoming worn, frayed or
damaged in any way or if it has become displaced on the
door, you should have it replaced.
Cleaning the Door Exterior
If a stain on the door vent trim is persistent, use a mild
abrasive cleaner and a sponge-scrubber for best results.
Do not use this method on any other surface.
Stainless Steel Surfaces (on some models)
Do not use a steel wool pad; it will scratch the surface.
To clean the stainless steel surface, use warm sudsy
water or a stainless steel cleaner or polish. Always wipe
the surface in the direction of the grain. Follow the cleaner
instructions for cleaning the stainless steel surface.
Cleaners with oxalic acid such as Bar Keepers Friend
6RIW&OHDQVHUZLOOUHPRYHVXUIDFHUXVWWDUQLVKDQG
small blemishes. Use only a liquid cleanser free of grit
and rub in the direction of the brush lines with a damp,
soft sponge.
To inquire about purchasing cleaning products
including stainless steel appliance cleaner or polish,
UHDGWKH$VVLVWDQFH$FFHVVRULHVVHFWLRQVDWWKH
beginning of this manual.
Removable Storage Drawer (on some models)
The storage drawer is a good place to store cookware
and bakeware. Do not store plastics or flammable
material in the drawer.
The storage drawer may be removed for cleaning under
the range. Clean the storage drawer with a damp cloth or
sponge. Never use harsh abrasives or scouring pads.
Removing the Storage Drawer:
1. Pull drawer straight out until it stops.
2. Tilt the front of the drawer upward and pull the drawer
free of the range.
Replacing the Storage Drawer:
5HVWWKHGUDZHUVOLGHVRQWKHUDQJHVWRSV
2. Push directly backward until the drawer drops into
place.
6OLGHWKHGUDZHUDOOWKHZD\LQWRWKHRYHQ
The storage drawer may be removed for cleaning
under the range.

26
49-85220
Maintenance
SHOCK OR BURN HAZARD: Before replacing oven light bulb, disconnect the electrical
power to the oven at the main fuse or circuit breaker panel. Failure to do so may result in
electric shock or burn.
WARNING
BURN HAZARD: The glass cover and bulb should be removed when cool. Touching hot
glass with bare hands or a damp cloth can cause burns.
Before replacing your oven light bulb, disconnect the electrical power to the range at the
main fuse or circuit breaker panel. Be sure to let the light cover and bulb cool completely.
The oven light bulb is covered with a removable glass cover that is held in place with a
EDLOVKDSHGZLUH5HPRYHWKHRYHQGRRULIGHVLUHGWRUHDFKWKHFRYHUHDVLO\6HHWKH
/LIW2II2YHQ'RRUVHFWLRQIRUGHWDLOHGRYHQGRRUUHPRYDOLQVWUXFWLRQV
CAUTION
CAUTION
Oven Light
Replacing the Light Bulb:
1. Disconnect electrical power to the range.
2. Hold the glass cover stable, so it doesn’t fall when
released.
6OLGHQHDUWKHLQGHQWRIWKHFRYHUKROGHUXQWLOWKH
cover is released. Do not remove any screws to
release the glass cover.
5HSODFHEXOEZLWKDZDWWKRXVHKROGDSSOLDQFH
bulb. Do not touch hot bulb with hand or wet
cloth. Only remove bulb when it is cool.
+ROGJODVVFRYHUVWDEOHRYHUQHZEXOE
3XOOWKHZLUHFRYHUKROGHUQHDUWKHLQGHQWXQWLOWKH
indent in the wire cover holder is located in the indent
of the glass cover.
&RQQHFWHOHFWULFDOSRZHUWRUDQJH
Wire cover holder
Indent
Glass cover
CARE AND CLEANING: Maintenance

49-85220
27
Maintenance (Cont.)
CARE AND CLEANING: Maintenance
Removing the Door:
1. Fully open the oven door.
2. On each hinge, slide the hinge lock up, making sure it
snaps into its fully raised position.
)LUPO\JUDVSERWKVLGHVRIWKHGRRUQHDUWKHKDQGOH
&ORVHWKHGRRUXQWLOWKHWRSRIWKHGRRULV
DSSUR[LPDWHO\´IURPWKHUDQJHIUDPH
/LIWGRRUXSDQGDZD\IURPWKHUDQJHXQWLOERWKKLQJH
arms are clear of the slots in the range frame.
Replacing the Door:
1. Firmly grasp both sides of the door near the handle.
2. With the door at the same angle as the removal
position, rest the notch in the bottom of the left hinge
arm on the bottom edge of the left hinge slot. The
notch in the hinge arm must be fully seated onto the
ERWWRPRIWKHVORW5HSHDWIRUWKHULJKWVLGH
)XOO\RSHQWKHGRRU,IWKHGRRUZLOOQRWIXOO\RSHQWKH
KLQJHDUPVDUHQRWVHDWHGFRUUHFWO\/LIWWKHGRRURII
the range and repeat Step 2.
3XVKWKHKLQJHORFNVGRZQWRWKHORFNHGSRVLWLRQ
&ORVHWKHRYHQGRRU
Pull hinge locks up to unlock
Notch
Push hinge locks down to lock
Removal position
Lift-Off Oven Door
The door is very heavy. Be careful when removing and lifting the door. Do not lift the door by the handle.
If improperly removed, oven door hinges may suddenly close and can cause personal injury
to appendages near the hinge. Follow instructions below to avoid a risk of injury when
removing and re-installing the oven door.
WARNING

28
49-85220
Notes

49-85220
29
Notes

30
49-85220
TROUBLESHOOTING TIPS
Save time and money! Review the charts on the following pages first and you may not need to call for service.
Problem Possible Cause What To Do
My new oven doesn't
cook like my old one.
Your new oven has a different cooking system
from your old oven and therefore may cook
differently than your old oven.
For the first few uses, follow your recipe times
and temperatures carefully and use rack
positions recommended in the Cooking Guide.
If you still think your new oven is too hot or too
cold, you can adjust the temperature yourself
to meet your specific cooking preference. See
the Special Features section.
Food does not bake
properly
Oven controls improperly set. See the Cooking Modes section.
Rack position is incorrect. See the Cooking Guide.
Rack is not level. See the Installation Instructions for directions
on leveling your range.
Incorrect cookware or cookware of improper
size being used.
See the Cookware section.
Oven temperature needs adjustment. See the Special Features section.
Food does not broil
properly
Oven controls improperly set. Make sure you select the appropriate broil
mode. See the Cooking Guide.
Improper rack position being used. See Cooking Guide for rack position
suggestions.
Cookware not suited for broiling. Use a pan specifically designed for broiling.
Aluminum foil on the broil pan has not been
fitted properly or slit to drain grease.
If using aluminum foil on broil pan, wrap tightly
and add slits conforming to those in the pan to
allow grease to drain.
Oven temperature too
hot or too cold
Oven temperature needs adjustment. See the Special Features section.
Oven and/or display
appears not to work
A fuse in your home may be blown or the
circuit breaker tripped.
5HSODFHWKHIXVHRUUHVHWWKHFLUFXLWEUHDNHU
Oven controls improperly set. See the Using the Oven section.
Oven is in Sabbath Mode. Verify, that the oven is not in Sabbath Mode.
See the Special Features section.
The clock is turned off. See the Oven Controls or Special Features
section.
“Crackling” or
“popping” sound
This is the sound of the metal heating and
cooling during both the cooking and cleaning
functions.
This is normal.
Range is making a
“clicking” noise when
using my oven.
Your range has been designed to maintain a
tighter control over your oven's temperature.
You may hear your oven's heating elements
"click" on and off more frequently than in
older ovens to achieve better results during
baking, broiling, and self-clean cycles.
This is normal.
Sometimes the
oven takes longer to
preheat to the same
temperature
Cookware, food, and/or number of racks in
oven.
Cookware, food, and racks in the oven will
FDXVHGLIIHUHQFHVLQSUHKHDWWLPHV5HPRYH
excess items to reduce preheat time.
Troubleshooting tips ... Before you call for service

49-85220
31
Problem Possible Cause What To Do
Oven light does not
work
Light bulb is loose or defective. Tighten or replace bulb. See the Maintenance section for
instructions on how to replace the bulb.
Oven will not self-clean The temperature is too high to set
a self-clean operation.
Allow the oven to cool.
Oven controls improperly set. See the Cleaning the Oven section.
Excessive smoking
during clean cycle
Excessive soil or grease. Press the Cancel/Off pad. Allow the oven to cool below
the unlocking temperature. Wipe the excess soil and
reset the clean cycle.
Oven not clean after a
clean cycle
Oven controls improperly set. See the Cleaning the Oven section.
Oven was heavily soiled. Clean up heavy spillovers before starting the clean cycle.
Heavily soiled ovens may need to self-clean again or for
a longer period of time.
Strong “burning” or
“oily” odor emitting
from the vent
This is normal in a new oven and
will disappear in time.
To speed the process, set a self-clean cycle for a
PLQLPXPRIKRXUV6HHWKH&OHDQLQJWKH2YHQ VHFWLRQ
This is temporary.
Excessive smoking
during broiling
Food too close to burner element. /RZHUWKHUDFNSRVLWLRQRIWKHIRRG
Oven latch will not open. The temperature inside the
oven has not dropped below the
unlocking temperature.
Press the Cancel/Off pad. Allow the oven to cool below
the unlocking temperature.
"LOCK DOOR" flashes
in the display
The self-clean or steam-clean cycle
has been selected but the door is
not locked.
/RFNWKHRYHQGRRU
“F— and a number
or letter” flash in the
display
You have a function error code. Press the Cancel/Off pad. Allow the oven to cool for one
hour. Put the oven back into operation. If the function code
UHSHDWVGLVFRQQHFWDOOSRZHUWRWKHRYHQIRUDWOHDVW
seconds and then reconnect power. If the function error code
repeats again, call for service.
Clock flashes due to a
power outage
Power outage or surge 5HVHWWKHFORFN,IWKHRYHQZDVLQXVH\RXPXVWUHVHW
it by pressing the Cancel/Off pad, setting the clock and
resetting any cooking function.
Lock Controls or
Control Lockout feature
is activated
If LOC ON appears in the display, the range control is
locked. Turn this feature off to use the range. See the
Oven Controls section.
Surface Burners do not
light
Plug on range is not completely
inserted in the electrical outlet.
Make sure electrical plug is plugged into a live, properly
grounded outlet.
Gas supply not connected or
turned on.
See the Installation Instructions that came with your
range.
A fuse in your home may be blown
or the circuit breaker tripped.
5HSODFHWKHIXVHRUUHVHWWKHFLUFXLWEUHDNHU
Burner parts not replaced correctly. See the Care and Cleaning section.
Burner slots near the electrode, or
the round lighter port on the oval
burner, may be clogged.
5HPRYHWKHEXUQHUVDQGFOHDQWKHP&KHFNWKH
electrode area for burned-on food or grease. See the
Care and Cleaning section.
Food residue on electrode /LJKWO\SROLVKIODWWLSRIHOHFWURGHZLWKQDLOILOHRU
sandpaper until shiny.
Troubleshooting tips ... Before you call for service
TROUBLESHOOTING TIPS

32
49-85220
Troubleshooting tips ... Before you call for service
TROUBLESHOOTING TIPS
Problem Possible Cause What To Do
Top burners do not
burn evenly
Improper burner assembly. Make sure the burner caps are seated correctly. See the Care and
Cleaning section.
Burner slots on the side of the
burner may be clogged.
5HPRYHWKHEXUQHUVIRUFOHDQLQJ6HHWKH&DUHDQG&OHDQLQJ
section.
Burner flames are
very large or yellow
Improper air to gas ratio. If range is connected to Propane gas, contact the technician
who installed your range or made the conversion.
Surface burners light
but bake and broil
burners do not.
Gas to the oven burners may
have been shut off.
The oven gas shut-off is located on the gas regulator near the
JDVOLQHDWWDFKPHQWWR\RXUUDQJH/RFDWHLWDQGIOLSWKHOHYHU
My oven door glass
appears to be
"tinted" or have a
"rainbow" color.
The inner oven glass is coated
with a heat barrier to reflect
the heat back into the oven to
prevent heat loss and keep the
outer door cool while baking.
This is normal. Under certain light or angles, you may see this
tint or rainbow color.
Drawer does not slide
smoothly or drags
The drawer is out of alignment. Fully extend the drawer and push it all the way in. See the Care
and Cleaning of the range section.
Drawer is over-loaded or load is
unbalanced.
5HGXFHZHLJKWRUUHGLVWULEXWHGUDZHUFRQWHQWV
Lever is
shown closed.
PULL TO OPEN.
Sealed burner models

49-85220 07-15 GE
Información de Seguridad ....2
Garantía .........................7
Asistencia / Accesorios ........8
Uso de la Placa de Cocción
En Caso de Corte de Corriente .....10
Quemadores ......................10
Plancha ...........................12
Uso del Horno
Controles del Horno ...............14
Ventilaciones de Aire del Horno ....15
Funciones Especiales ..............16
Modo Sabático ....................17
Modos de Cocción ................18
Pautas de Uso de Utensilios .......18
Papel de Aluminio y Cobertores
del Horno .......................18
Estantes del Horno ................19
Cajón para Asar ...................19
Guía de Cocción ...................20
Cuidado y Limpieza
Limpieza del Horno ................21
Limpieza de la Placa de Cocción . . .22
Limpieza de la Puerta y el Cajón . . .25
Mantenimiento ....................26
Consejos para la
Solución de Problemas .......30
En Canadá, comuníquese
con nosotros en:
www.GEAppliances.ca
Cocinas
a Gas con Horno Simple
Escriba los números de modelo y de
serie aquí:
Nº de Modelo ______________
Nº de Serie ________________
Encontrará la placa de calificación en el
frente, detrás del cajón de la cocina.
Manual del Propietario

2
49-85220
- No guarde ni use gasolina u otros vapores inflamables y líquidos cerca de este ni de otros electrodomésticos.
- QUÉ DEBE HACER SI HUELE GAS
Ŷ 1RLQWHQWHLOXPLQDUQLQJ~QHOHFWURGRPpVWLFR
Ŷ 1RWRTXHQLQJ~QLQWHUUXSWRUHOpFWULFRQRXVHWHOpIRQRVHQVXHGLILFLR
Ŷ 'HLQPHGLDWROODPHDVXSURYHHGRUGHJDVGHVGHHOWHOpIRQRGHXQYHFLQR
Ŷ 6LQRVHSXHGHFRPXQLFDUFRQVXSURYHHGRUGHJDVOODPHDOGHSDUWDPHQWRGHERPEHURV
/DLQVWDODFLyQ\ODVUHSDUDFLRQHVGHEHUiQVHUUHDOL]DGDVSRUXQLQVWDODGRUFDOLILFDGRDJHQFLDGHVHUYLFLRVRHO
proveedor de gas.
ADVERTENCIA Si la información de este manual no se sigue exactamente, se podrá
producir un incendio o explosión, ocasionando daños sobre la propiedad, lesiones o la muerte.
INFORMACIÓN DE SEGURIDAD
LEA Y GUARDE ESTAS INSTRUCCIONES
DISPOSITIVO ANTI-VOLCADURAS
A fin de reducir el riesgo
GHFDtGDGHODFRFLQDpVWD
deberá estar asegurada por
un soporte anti-volcaduras
correctamente instalado.
Consulte las instrucciones de
LQVWDODFLyQSURYLVWDVFRQHOVRSRUWHSDUDDFFHGHUDGHWDOOHVFRPSOHWRVDQWHVGHLQWHQWDUUHDOL]DUODLQVWDODFLyQ
3DUDFRQWURODUVLHOVRSRUWHHVLQVWDODGR\DMXVWDGRGHIRUPDDSURSLDGDPLUHTXHGHEDMRGHODFRFLQDODSDWD
QLYHODGRUDWUDVHUDHVWpDMXVWDGDDOVRSRUWH(QDOJXQRVPRGHORVHOFDMyQGHDOPDFHQDPLHQWRRHOSDQHOGH
SURWHFFLyQVHSXHGHQUHWLUDUSDUDXQDIiFLOLQVSHFFLyQ6LQRHVSRVLEOHUHDOL]DUXQDLQVSHFFLyQYLVXDOGHVOLFHOD
FRFLQDKDFLDDGHODQWHFRQILUPHTXHHOVRSRUWHDQWLYROFDGXUDVHVWpDMXVWDGRGHIRUPDVHJXUDDOSLVRRODSDUHG\
deslice la cocina hacia atrás de modo que la pata niveladora trasera se encuentre debajo del soporte anti-volcaduras.
(QFDVRGHTXHODFRFLQDVHDHPSXMDGDGHODSDUHGSRUDOJXQDUD]yQVLHPSUHUHSLWDHVWHSURFHGLPLHQWRSDUD
verificar que la cocina esté correctamente asegurada por el soporte anti-volcaduras.
1XQFDUHWLUHFRPSOHWDPHQWHODVSDWDVQLYHODGRUDV\DTXHODFRFLQDQRHVWDUiDVHJXUDGDGHIRUPDDGHFXDGDDO
dispositivo antivolcaduras.
Soporte
Antivolcaduras
Pata
Niveladora
Un niño o adulto pueden volcar la cocina y morir.
Verifique que el soporte anti-volcaduras se haya
instalado y ajustado correctamente.
Asegurese de que el soporte anti volcaduras sea
reinstalado cuando se mueva la cocina.
No utilice la cocina sin que el soporte anti-volcaduras
esté colocado y ajustado.
Si estas instrucciones no se siguen, como resultado se podrá
producir la muerte o quemaduras graves de niños y adultos.
Riesgo de Volcaduras
ADVERTENCIA
INFORMACIÓN IMPORTANTE DE SEGURIDAD
LEA TODAS LAS INSTRUCCIONES ANTES DE USAR

49-85220
3
INFORMACIÓN DE SEGURIDAD
ADVERTENCIA
NUNCA use este
electrodoméstico para calentar el ambiente.
Como consecuencia de esto, se podrá
producir envenenamiento con monóxido de
carbono y el sobrecalentamiento del horno.
Ŷ 8VHHVWHHOHFWURGRPpVWLFRVyORSDUDVXSURSyVLWR
RULJLQDOFRPRVHGHVFULEHHQHOPDQXDOGHOSURSLHWDULR
Ŷ 6ROLFLWHTXHXQLQVWDODGRUFDOLILFDGRLQVWDOHVXFRFLQD\
TXHHVWpFRUUHFWDPHQWHFRQHFWDGDDWLHUUDGHDFXHUGR
con las instrucciones de instalación provistas.
Ŷ &XDOTXLHUDMXVWH\WUDEDMRGHVHUYLFLRWpFQLFRGHEHUi
VHUUHDOL]DGR~QLFDPHQWHSRULQVWDODGRUHVFDOLILFDGRV
de cocinas a gas o técnicos del servicio. No intente
UHSDUDURUHHPSOD]DUQLQJXQDSDUWHGHODFRFLQDD
menos que esto se recomiende específicamente en
este manual.
Ŷ 6XFRFLQDHVHQYLDGDGHVGHODIiEULFDSDUDXVRFRQ
gas natural. Puede ser convertida para uso con gas
SURSDQR6LVHUHTXLHUHQHVWRVDMXVWHVGHEHQVHU
realizados por un técnico calificado de acuerdo con
las instrucciones de instalación y códigos locales.
La agencia que realiza este trabajo asume la
responsabilidad de la conversión.
Ŷ 6ROLFLWHTXHHOLQVWDODGRUOHPXHVWUHODXELFDFLyQGHOD
válvula de cierre de la cocina a gas y cómo apagarla
en caso de ser necesario.
Ŷ (QFKXIHODFRFLQDHQXQWRPDFRUULHQWHFRQFRQH[LyQ
DWLHUUDGHYROWLRV~QLFDPHQWH1RUHWLUHODSDWD
UHGRQGDGHFRQH[LyQDWLHUUDGHOHQFKXIH6LWLHQH
GXGDVVREUHODFRQH[LyQDWLHUUDGHOVLVWHPDHOpFWULFR
SDUDKRJDUHVVXUHVSRQVDELOLGDG\REOLJDFLyQFRQWDU
FRQHOUHHPSOD]RGHXQWRPDFRUULHQWHVLQFRQH[LyQD
tierra por un tomacorriente de tres patas correctamente
FRQHFWDGRDWLHUUDGHDFXHUGRFRQHO&yGLJR1DFLRQDO
de Electricidad. No use prolongadores con este
electrodoméstico.
Ŷ $QWHVGHUHDOL]DUFXDOTXLHUVHUYLFLRWpFQLFRGHVHQFKXIH
la cocina o desconecte el suministro de corriente desde
HOSDQHOGHGLVWULEXFLyQGHOKRJDUUHWLUDQGRHOIXVLEOHR
desconectando el disyuntor.
Ŷ $VHJ~UHVHGHTXHWRGRVORVPDWHULDOHVGHHPEDODMH
VHDQUHWLUDGRVGHODFRFLQDDQWHVGHVXXVRDILQGH
evitar que estos materiales se incendien.
Ŷ (YLWHUDOODGXUDVRLPSDFWRVVREUHODVSXHUWDVGH
PHWDOFRFLQDVRSDQHOHVGHFRQWURO+DFHUHVWRSRGUi
producir la rotura de vidrios. No cocine un producto con
XQYLGULRURWR(VSRVLEOHTXHVHSURGX]FDQGHVFDUJDV
incendio o cortes.
Ŷ 1RGHMHDORVQLxRVVRORVRIXHUDGHVXUDGLRGH
atención en el área donde el electrodoméstico se
encuentre en uso. Nunca se les deberá permitir
WUHSDUVHQWDUVHRSDUDUVHVREUHQLQJXQDSDUWHGHO
electrodoméstico.
Ŷ PRECAUCIÓN No coloque artículos
GHLQWHUpVSDUDORVQLxRVVREUHORVJDELQHWHVTXH
HVWiQVREUHXQKRUQR±VLORVQLxRVVHWUHSDQVREUH
el horno para llegar a estos artículos podrían sufrir
lesiones graves.
INSTRUCCIONES GENERALES DE SEGURIDAD
ADVERTENCIA DE LA PROPOSICIÓN 65 DEL ESTADO DE CALIFORNIA
ADVERTENCIA
/D/H\VREUH$JXD3RWDEOH,QRFXD\7UDWDPLHQWRGH5HVLGXRV7y[LFRVGH&DOLIRUQLD&DOLIRUQLD6DIH'ULQNLQJ:DWHU
DQG7R[LF(QIRUFHPHQW$FWVROLFLWDDO*REHUQDGRUGH&DOLIRUQLDTXHSXEOLTXHXQDOLVWDGHVXVWDQFLDVTXHHOHVWDGR
UHFRQRFHTXHSURGXFHQFiQFHUGHIHFWRVGHQDFLPLHQWRXRWURVGDxRVUHSURGXFWLYRV\VROLFLWDDORVHPSUHVDULRVTXH
DGYLHUWDQDVXVFOLHQWHVVREUHODSRVLEOHH[SRVLFLyQDWDOHVVXVWDQFLDV
ADVERTENCIA Este producto contiene uno o más químicos que el Estado de California entiende
TXHSURGXFHQFiQFHUGHIHFWRVHQHOQDFLPLHQWRXRWURVGDxRVUHSURGXFWLYRV
/RVKRUQRVFRQOLPSLH]DDXWRPiWLFDSXHGHQRFDVLRQDUH[SRVLFLRQHVGHEDMRQLYHODDOJXQDVGHHVWDVVXVWDQFLDV
LQFOX\HQGRPRQy[LGRGHFDUERQRGXUDQWHHOFLFORGHOLPSLH]D/DH[SRVLFLyQSXHGHVHUPLQLPL]DGDVLVHYHQWLODFRQ
una ventana abierta o si se usa un ventilador o campana.
LEA Y GUARDE ESTAS INSTRUCCIONES

4
49-85220
Ŷ 1RJXDUGHQLXVHPDWHULDOHVLQIODPDEOHVHQXQKRUQR
RFHUFDGHODSDUWHVXSHULRUGHODFRFLQDLQFOX\HQGR
SDSHOSOiVWLFRVRVWHQHGRUHVGHROODVWUDSRV
FREHUWRUHVGHSDUHGFRUWLQDVSDxRV\JDVROLQDX
otros vapores y líquidos inflamables.
Ŷ1XQFDXVHSUHQGDVKROJDGDVRTXHFXHOJXHQPLHQWUDV
usa el electrodoméstico. Evite acumular artículos
FRP~QPHQWHXVDGRVHQJDELQHWHVVREUHODFRFLQD\
WHQJDFXLGDGRDOH[WHQGHUODPDQRVREUHODFRFLQD
La ropa que se encuentre cerca de los quemadores o
VXSHUILFLHVFDOLHQWHVVHSRGUiHQFHQGHURFDVLRQDQGR
quemaduras graves.
Ŷ1RSHUPLWDTXHODJUDVDGHODFRFFLyQXRWURV
materiales inflamables se acumulen en o cerca de la
cocina. La grasa del horno o sobre la cocina se podrá
incendiar.
Ŷ 1RXVHDJXDVREUHHOIXHJRGHODJUDVD1XQFD
tome una olla que se esté incendiando. Apague los
FRQWUROHV([WLQJDODROODTXHVHHVWpLQFHQGLDQGR
VREUHXQTXHPDGRUVXSHUILFLDOFXEULHQGRODROOD
FRPSOHWDPHQWHFRQVXWDSDFRUUHVSRQGLHQWHXQD
KRMDPHWiOLFDGHJDOOHWDVRXQDEDQGHMDSODQD6LHV
QHFHVDULRXVHXQTXtPLFRVHFRPXOWLXVRRXQH[WLQWRU
de chorro de espuma.
Ŷ6LKD\XQLQFHQGLRHQHOKRUQRGXUDQWHHOKRUQHDGR
ahogue el fuego cerrando la puerta del horno y
apagando el mismo o usando un químico seco
PXOWLSURSyVLWRRXQH[WLQWRUGHLQFHQGLRFRQHVSXPD
Ŷ(QFDVRGHTXHKD\DIXHJRHQHOKRUQRGXUDQWHHO
SHUtRGRGHDXWROLPSLH]DDSDJXHHOKRUQR\HVSHUH
DTXHHOIXHJRVHH[WLQJDNo fuerce la puerta
para abrirla. La entrada de aire fresco sobre las
temperaturas de auto limpieza podrá conducir a la
producción de llamas en el horno.
Ŷ 1XQFDEORTXHHODVYHQWLODFLRQHVDEHUWXUDVGHDLUHGHOD
cocina. Las mismas brindan las entradas y salidas de aire
que son necesarias para que la cocina opere de forma
correcta con la combustión adecuada. Las aberturas de
DLUHHVWiQXELFDGDVHQODSDUWHWUDVHUDGHODFRFLQDHQ
ODSDUWHVXSHULRUHLQIHULRUGHODSXHUWDGHOKRUQR\HQOD
SDUWHLQIHULRUGHODFRFLQDGHEDMRGHOFDMyQFDOHQWDGRUGHO
cajón del horno inferior o del panel de protección.
Ŷ 8VHVyORVRVWHQHGRUHVGHROODVVHFRV±ORV
VRVWHQHGRUHVK~PHGRVVREUHVXSHUILFLHVFDOLHQWHV
pueden producir quemaduras debido al vapor. No
permita que los sostenedores de ollas tengan contacto
FRQORVTXHPDGRUHVVXSHUILFLDOHVODSDUULOODGH
ORVTXHPDGRUHVRHOHOHPHQWRGHFDOHIDFFLyQGHO
horno. No use una toalla u otra tela voluminosa para
reemplazar el mango de las cacerolas.
Ŷ 1RWRTXHHOHOHPHQWRFDOHQWDGRUQLODVXSHUILFLHLQWHULRU
del horno. Es posible que estas superficies estén
GHPDVLDGRFDOLHQWHVFRPRSDUDTXHPDUDXQTXHVX
FRORUVHDRVFXUR'XUDQWH\GHVSXpVGHOXVRQRWRTXH
ni permita que telas u otros materiales inflamables
WRTXHQFXDOTXLHUiUHDLQWHULRUGHOKRUQRHVSHUHDTXH
haya pasado un tiempo suficiente para que se enfríen.
Otras superficies del electrodoméstico se podrán
calentar lo suficiente como para ocasionar lesiones. Las
superficies potencialmente calientes incluyen la abertura
GHODYHQWLODFLyQGHOKRUQRVXSHUILFLHVFHUFDQDVDOD
abertura y grietas alrededor de la puerta del horno.
Ŷ 1RFDOLHQWHHQYDVHVGHFRPLGDTXHQRKD\DQVLGR
DELHUWRV6HSRGUtDDFXPXODUSUHVLyQ\HOHQYDVH
SRGUtDH[SORWDURFDVLRQDQGRXQDOHVLyQ
Ŷ &RFLQHODFRPLGDFRPSOHWDPHQWHSDUDHYLWDUTXHVH
produzcan enfermedades a partir de la comida.
Puede encontrar recomendaciones de seguridad
mínima sobre la temperatura de la comida en
ZZZ,V,W'RQH<HWJRY\ZZZIVLVXVGDJRY8WLOLFHXQ
termómetro para tomar la temperatura de la comida y
haga controles en diferentes ubicaciones.
Ŷ 1RSHUPLWDTXHQDGLHVHWUHSHSDUHRFXHOJXHGHOD
SXHUWDGHOKRUQRGHOFDMyQRODFRFLQD6HSRGUiGDxDU
ODFRFLQDRSURYRFDUVXFDtGDRFDVLRQDQGROHVLRQHV
graves o la muerte.
INFORMACIÓN DE SEGURIDAD
INSTRUCCIONES GENERALES DE SEGURIDAD (CONT.)
ADVERTENCIA
MANTENGA LOS MATERIALES INFLAMABLES ALEJADOS DE LA COCINA
EN CASO DE INCENDIO, SIGA LOS SIGUIENTES PASOS
PARA EVITAR LESIONES O LA PROPAGACIÓN DEL FUEGO
Si esto no se cumple, se podrán sufrir lesiones personales graves o incendios.
ADVERTENCIA
ADVERTENCIA
INFORMACIÓN IMPORTANTE DE SEGURIDAD
LEA TODAS LAS INSTRUCCIONES ANTES DE USAR
LEA Y GUARDE ESTAS INSTRUCCIONES

49-85220
5
Ŷ 1XQFDSLHUGDGHYLVWDORVTXHPDGRUHVFXDQGRVH
encuentren en las configuraciones de calor media o alta.
/DVFRPLGDVHVSHFLDOPHQWHODVTXHVHSUHSDUDQFRQ
DFHLWHVHSXHGHQLQFHQGLDUORFXDOSXHGHRFDVLRQDUXQ
LQFHQGLRTXHVHSURSDJXHDORVJDELQHWHVSUy[LPRV
Ŷ1XQFDSLHUGDGHYLVWDHODFHLWHFXDQGRHVWpIULHQGR6L
VHFDOLHQWDPiVDOOiGHVXSXQWRGHFRFFLyQHODFHLWH
se puede quemar y provocar un incendio que se puede
SURSDJDUDORVJDELQHWHVSUy[LPRV8VHXQWHUPyPHWUR
SDUDJUDVDVSURIXQGDVVLHPSUHTXHVHDSRVLEOHDILQGH
monitorear la temperatura del aceite.
Ŷ3DUDHYLWDUGHUUDPHVHLQFHQGLRVXVHXQDFDQWLGDG
mínima de aceite al usar una sartén poco profunda y
evite la cocción de comidas congeladas con cantidades
H[FHVLYDVGHKLHOR
Ŷ8VHHOWDPDxRGHROODDGHFXDGRSDUDHYLWDUTXHVHDQ
LQHVWDEOHVRTXHVXIUDQFDtGDVIiFLOPHQWH6HOHFFLRQH
XWHQVLOLRVTXHFRLQFLGDQFRQHOWDPDxRGHOTXHPDGRU/DV
llamas del quemador se deberán ajustar de modo que no
VHH[WLHQGDQPiVDOOiGHODSDUWHLQIHULRUGHODROOD8QD
FDQWLGDGH[FHVLYDGHOODPDSXHGHUHSUHVHQWDUXQULHVJR
Ŷ6LHPSUHXVHODSRVLFLyQ/,7(DOHQFHQGHUORV
TXHPDGRUHVVXSHULRUHV\DVHJ~UHVHGHTXHHVWRVVH
hayan encendido.
Ŷ$OXVDUXWHQVLOLRVGHYLGULRFHUiPLFDDVHJ~UHVHGH
TXHVHDQDGHFXDGRVSDUDHOVHUYLFLRGHFRFLQDRWURV
se podrán romper debido a un cambio repentino de
temperatura.
Ŷ$ILQGHPLQLPL]DUSRVLEOHVTXHPDGXUDVLQFHQGLRGH
PDWHULDOHVLQIODPDEOHV\GHUUDPHVODPDQLMDGHXQ
envase deberá ser inclinada hacia el centro de la cocina
VLQTXHVHH[WLHQGDVREUHORVTXHPDGRUHVFHUFDQRV
Ŷ1RXVHXQZRNFRQXQDQLOORFRQVRSRUWHGHPHWDO
redondo. El anillo podrá atrapar calor y bloquear el aire
KDFLDHOTXHPDGRUSURGXFLHQGRHOULHVJRGHHPLVLyQGH
PRQy[LGRGHFDUERQR
Ŷ1RLQWHQWHHOHYDUODFRFLQD+DFHUHVWRSRGUtDGDxDU
ODWXEHUtDGHJDVKDVWDORVTXHPDGRUHVVXSHUILFLDOHV
ocasionando una pérdida de gas y riesgo de incendio.
Ŷ$OLQKDELOLWDUHO%ORTXHRGHO&RQWUROGH*DVHQDOJXQRV
PRGHORVDVHJ~UHVHGHTXHORVFRQWUROHVGHVXSHUILFLH
VHHQFXHQWUHQHQODSRVLFLyQ2))$SDJDGR(VWR
evitará que haya un flujo de gas no intencional desde
los quemadores.
Ŷ1RXVHSDSHOGHDOXPLQLRSDUDFXEULUUHMLOODVFXDOTXLHU
SDUWHGHODFRFLQD6LVHKDFHHVWRVHSRGUi
SURGXFLUHQYHQHQDPLHQWRFRQPRQy[LGRGHFDUERQR
sobrecalentamiento de las superficies de la cocina o un
posible riesgo de incendio.
INFORMACIÓN DE SEGURIDAD
INSTRUCCIONES DE SEGURIDAD DE LA PARTE
SUPERIOR DE LA COCINA
ADVERTENCIA
ADVERTENCIA
NUNCA cubra
ninguna ranura, agujeros o pasajes en el
fondo del horno ni cubra un estante entero
con materiales tales como papel de aluminio
o cobertores de horno. Hacer esto bloquea
el flujo de aire a través del horno y puede
ocasionar envenenamiento con monóxido de
carbono. Nunca coloque papel de aluminio o
cobertores de horno en el fondo del horno.
Podrán atrapar el calor, ocasionando riesgos
de humo o incendio.
Ŷ0DQWpQJDVHDOHMDGRGHODFRFLQDDODEULUODSXHUWDGHO
horno. El aire caliente o el vapor que sale puede causar
TXHPDGXUDVHQODVPDQRVURVWUR\XRMRV
Ŷ1XQFDFRORTXHORVXWHQVLOLRVGHFRFLQDSLHGUDVSDUD
pizza u horneado o cualquier otro tipo de aluminio
o cobertor en la base del horno. Este ítems pueden
DWUDSDUHOFDORURGHUUHWLUVHRFDVLRQDQGRGDxRVVREUH
HOSURGXFWR\HOULHVJRGHGHVFDUJDVKXPRRLQFHQGLRV
Ŷ&RORTXHORVHVWDQWHVGHOKRUQRHQODXELFDFLyQ
FRUUHVSRQGLHQWHPLHQWUDVpVWHVHHQFXHQWUDIUtR6L
es necesario retirar el estante mientras el horno se
HQFXHQWUDFDOLHQWHHYLWHWRFDUODVVXSHUILFLHVFDOLHQWHV
Ŷ1RGHMHSURGXFWRVWDOHVFRPRSDSHOXWHQVLOLRVGHFRFLQD
ni comida en el horno cuando no esté en uso. Los
artículos guardados en el horno se pueden incendiar.
Ŷ1RGHMHQLQJ~QSURGXFWRVREUHODVXSHUILFLHGHFRFFLyQ
cerca de la ventilación del horno. Los artículos se
SXHGHQVREUHFDOHQWDU\H[LVWHULHVJRGHLQFHQGLRR
quemaduras.
Ŷ1XQFDDVHFRQODSXHUWDDELHUWD6HSURKtEHDVDUFRQ
la puerta abierta debido al sobrecalentamiento de las
perillas de control.
INSTRUCCIONES DE SEGURIDAD
ADVERTENCIA
LEA Y GUARDE ESTAS INSTRUCCIONES

6
49-85220
La función de auto limpieza usa el horno en
temperaturas lo suficientemente altas como para
consumir restos de comida que haya dentro del mismo.
3DUDXQIXQFLRQDPLHQWRVHJXURVLJDHVWDVLQVWUXFFLRQHV
Ŷ1RWRTXHODVVXSHUILFLHVGHOKRUQRGXUDQWHHOFLFORGH
OLPSLH]DDXWRPiWLFD0DQWHQJDDORVQLxRVDOHMDGRV
GHOKRUQRGXUDQWHODOLPSLH]DDXWRPiWLFD6LQR
VHVLJXHQHVWDVLQVWUXFFLRQHVVHSRGUiQSURGXFLU
quemaduras.
Ŷ$QWHVGHXWLOL]DUHOFLFORGHDXWROLPSLH]DUHWLUHODV
ROODVHVWDQWHVGHPHWDOEULOODQWHGHOKRUQR\RWURV
XWHQVLOLRVTXHKD\DGHQWURGHOPLVPR6yORVHSXHGHQ
dejar dentro del horno los estantes para horno con
recubrimiento de porcelana.
Ŷ$QWHVGHXWLOL]DUHOFLFORGHDXWROLPSLH]DOLPSLHOD
JUDVD\UHVWRVGHFRPLGDTXHKD\DHQHOKRUQR8QD
FDQWLGDGH[FHVLYDGHJUDVDVHSXHGHLQFHQGLDUORFXDO
SXHGHSURGXFLUGDxRVFRQKXPRHQVXKRJDU
Ŷ6LHOPRGRGHDXWROLPSLH]DIXQFLRQDGHIRUPD
LQFRUUHFWDDSDJXHHOKRUQR\GHVFRQHFWHHOVXPLQLVWUR
GHFRUULHQWH6ROLFLWHHOVHUYLFLRGHXQWpFQLFR
calificado.
Ŷ1RXVHOLPSLDGRUHVSDUDKRUQR1RVHGHEHUiXVDU
limpiador para hornos comerciales ni revestimientos de
SURWHFFLyQSDUDKRUQRVGHQLQJ~QWLSRHQRDOUHGHGRU
de cualquier parte del horno.
Ŷ1ROLPSLHODMXQWDGHODSXHUWD/DMXQWDGHODSXHUWDHV
HVHQFLDOSDUDXQEXHQVHOODGR6HGHEHWHQHUFXLGDGR
GHQRIURWDUGDxDUQLPRYHUODMXQWD
ŶIMPORTANTE: La salud de algunas aves es
H[WUHPDGDPHQWHVHQVLEOHDORVKXPRVHPLWLGRVGXUDQWH
el ciclo de limpieza automática de cualquier cocina.
Coloque las aves en otra habitación bien ventilada.
INFORMACIÓN IMPORTANTE DE SEGURIDAD
LEA TODAS LAS INSTRUCCIONES ANTES DE USAR
INFORMACIÓN DE SEGURIDAD
INSTRUCCIONES DE SEGURIDAD DEL HORNO
CON FUNCIÓN DE AUTO LIMPIEZ
ADVERTENCIA
Ŷ1RGHMHSURGXFWRVGHSDSHOSOiVWLFRVFRPLGD
HQODWDGDRPDWHULDOHVFRPEXVWLEOHVHQHOFDMyQ6H
pueden incendiar.
Ŷ1RWRTXHHOHOHPHQWRFDOHQWDGRUQLODVXSHUILFLH
interior del cajón. Es posible que las superficies estén
lo suficientemente calientes como para provocar
quemaduras.
Ŷ7HQJDFXLGDGRDODEULUHOFDMyQ$EUDXQSRFRHOFDMyQ
y deje que salga aire caliente o vapor antes de retirar
o reemplazar la comida. El aire caliente o el vapor
TXHVDOHSXHGHFDXVDUTXHPDGXUDVHQODVPDQRV
URVWUR\XRMRV
Ŷ1RXVHSDSHOGHDOXPLQLRSDUDUHYHVWLUHOFDMyQSDUD
DVDU(ODOXPLQLRHVXQH[FHOHQWHDLVODQWHGHOFDORU
y atrapará el calor debajo de éste. Esto alterará el
IXQFLRQDPLHQWRGHOFDMyQ\H[LVWHHOULHVJRGHTXHVH
produzca un incendio.
INSTRUCCIONES DE SEGURIDAD DEL CAJÓN PARA ASAR
(en algunos modelos)
(en algunos modelos)
ADVERTENCIA
LEA Y GUARDE ESTAS INSTRUCCIONES

49-85220
7
¡Gracias! ... por su compra de un electrodoméstico de la Marca GE
GARANTÍA
Garantía de la Cocina Eléctrica de GE
GEAppliances.com
7RGRHOVHUYLFLRGHJDUDQWtDHVSURYLVWRSRUQXHVWURV&HQWURVGH6HUYLFLRGH)DEULFDFLyQRXQWpFQLFRDXWRUL]DGRGH
6HUYLFLRDO&OLHQWH&XVWRPHU&DUH
®
3DUDSURJUDPDUXQDYLVLWDGHOVHUYLFLRWpFQLFRDWUDYpVGH,QWHUQHWYLVtWHQRVHQ
ZZZJHDSSOLDQFHVFRPVHUYLFHBDQGBVXSSRUWROODPHDO*(&$5(6&XDQGROODPHSDUDVROLFLWDUHOVHUYLFLR
WHQJDORVQ~PHURVGHVHULH\PRGHORGLVSRQLEOHV
Para realizar el servicio técnico de su electrodoméstico se podrá requerir el uso de datos del puerto de abordaje para su
GLDJQyVWLFR(VWRGDDOWpFQLFRGHOVHUYLFLRGHIiEULFDGH*(ODKDELOLGDGGHGLDJQRVWLFDUGHIRUPDUiSLGDFXDOTXLHUSUREOHPDFRQ
VXHOHFWURGRPpVWLFR\GHD\XGDUD*(DPHMRUDUVXVSURGXFWRVDOEULQGDUOHD*(ODLQIRUPDFLyQVREUHVXHOHFWURGRPpVWLFR6LQR
GHVHDTXHORVGDWRVGHVXHOHFWURGRPpVWLFRVHDQHQYLDGRVD*(VROLFLWDPRVTXHOHLQGLTXHDVXWpFQLFRQRHQWUHJDUORVGDWRVD
*(HQHOPRPHQWRGHOVHUYLFLR
'XUDQWHHOSHUtRGRGHXQDxRGHVGHODIHFKDRULJLQDOGHFRPSUD*(OHEULQGDUiFXDOTXLHUSDUWHGHODFRFLQDTXHIDOOHGHELGRD
XQGHIHFWRHQORVPDWHULDOHVRODIDEULFDFLyQ'XUDQWHHVWDJDUDQWtDOLPLWDGDGHXQDxR*(WDPELpQSURYHHUiVLQFRVWRWRGRHO
trabajo y el servicio en el hogar relacionado con el reemplazo de la parte que presente defectos.
Qué no cubrirá GE:
Ŷ9LDMHVGHOWpFQLFRGHOVHUYLFLRDVXKRJDUSDUDHQVHxDUOH
sobre cómo usar el producto.
Ŷ,QVWDODFLyQHQWUHJDRPDQWHQLPLHQWRLQDGHFXDGRV
Ŷ)DOODVGHOSURGXFWRHQFDVRGHDEXVRPDOXVRPRGLILFDFLyQ
o uso para propósitos diferentes al original o uso comercial.
Ŷ Reemplazo de fusibles de la casa o reinicio de disyuntores.
Ŷ'DxRVRFDVLRQDGRVVREUHHOSURGXFWRSRUDFFLGHQWH
LQFHQGLRLQXQGDFLRQHVRFDWiVWURIHVQDWXUDOHV
Ŷ'DxRVLQFLGHQWDOHVRFRQVHFXHQWHVFDXVDGRVSRUSRVLEOHV
defectos sobre este producto.
Ŷ'DxRVVREUHHODFDEDGRWDOHVFRPRy[LGRVREUHOD
VXSHUILFLHGHVOXVWUHVRPDQFKDVSHTXHxDVQRLQIRUPDGDV
GHQWURGHODVKRUDVOXHJRGHODHQWUHJD
Ŷ'DxRFDXVDGRGHVSXpVGHODHQWUHJD
Ŷ Producto no accesible para brindar el servicio requerido.
Ŷ6ROLFLWHHOVHUYLFLRWpFQLFRSDUDUHSDUDURUHHPSOD]DUODV
OiPSDUDVH[FHSWRODVOiPSDUDV/('
EXCLUSIÓN DE GARANTÍAS IMPLÍCITAS
6X~QLFD\H[FOXVLYDDOWHUQDWLYDHVODUHSDUDFLyQGHOSURGXFWRFRPRVHLQGLFDHQOD*DUDQWtD/LPLWDGD/DVJDUDQWtDVLPSOtFLWDV
LQFOX\HQGRJDUDQWtDVLPSOtFLWDVGHFRPHUFLDELOLGDGRFRQYHQLHQFLDVREUHXQSURSyVLWRSDUWLFXODUVHOLPLWDQDXQDxRRDOSHUtRGR
más corto permitido por la ley.
(VWDJDUDQWtDVHH[WLHQGHDOFRPSUDGRURULJLQDO\DFXDOTXLHUGXHxRVXEVLJXLHQWHGHSURGXFWRVFRPSUDGRVSDUDXVRKRJDUHxR
GHQWURGH((886LHOSURGXFWRHVWiHQXQiUHDGRQGHQRVHHQFXHQWUDGLVSRQLEOHXQ3URYHHGRU$XWRUL]DGRGHO6HUYLFLR7pFQLFR
GH*(XVWHGVHUiUHVSRQVDEOHSRUHOFRVWRGHXQYLDMHRVHSRGUiUHTXHULUTXHWUDLJDHOSURGXFWRDXQDXELFDFLyQGHO6HUYLFLR
7pFQLFRGH*($XWRUL]DGRSDUDUHFLELUHOVHUYLFLR(Q$ODVNDODJDUDQWtDH[FOX\HHOFRVWRGHHQYtRROODPDGDVGHOVHUYLFLRDVX
hogar.
$OJXQRVHVWDGRVQRSHUPLWHQODH[FOXVLyQROLPLWDFLyQGHGDxRVIRUWXLWRVRFRQVHFXHQWHV(VWDJDUDQWtDOHGDGHUHFKRVOHJDOHV
específicos y es posible que tenga otros derechos legales que varían entre un estado y otro. Para conocer cuáles son sus
GHUHFKRVOHJDOHVFRQVXOWHDODRILFLQDGHDVXQWRVGHOFRQVXPLGRUORFDORHVWDWDORDO)LVFDOGHVXHVWDGR
Garante: General Electric Company. Louisville, KY 40225
Garantías Extendidas:$GTXLHUDXQDJDUDQWtDH[WHQGLGDGH*(\DSUHQGDVREUHGHVFXHQWRVHVSHFLDOHVTXHHVWiQGLVSRQLEOHV
PLHQWUDVVXJDUDQWtDD~QHVWiYLJHQWH/DSXHGHDGTXLULUHQFXDOTXLHUPRPHQWRDWUDYpVGH,QWHUQHWHQ
ZZZJHDSSOLDQFHVFRPVHUYLFHBDQGBVXSSRUWVKRSIRUH[WHQGHGVHUYLFHSODQVKWP
ROODPDQGRDOGXUDQWHHOKRUDULRFRPHUFLDOKDELWXDO/RV6HUYLFLRVSDUDHO&RQVXPLGRU+RJDUHxRGH*(D~QHVWDUiQ
allí cuando su garantía caduque.
Registre su Electrodoméstico: £5HJLVWUHVXHOHFWURGRPpVWLFRQXHYRDWUDYpVGH,QWHUQHWVHJ~QVXFRQYHQLHQFLD
ZZZJHDSSOLDQFHVFRPVHUYLFHBDQGBVXSSRUWUHJLVWHU
8QUHJLVWURSXQWXDOGHVXSURGXFWRSHUPLWLUiXQDPHMRUFRPXQLFDFLyQ\XQVHUYLFLRPiVSXQWXDOGHDFXHUGRFRQORVWpUPLQRVGHVX
JDUDQWtDHQFDVRGHVXUJLUODQHFHVLGDG7DPELpQSXHGHHQYLDUXQDFDUWDHQODWDUMHWDGHLQVFULSFLyQSUHLPSUHVDTXHVHLQFOX\HFRQ
el material embalado.
Abroche su recibo aquí. Para acceder al servicio técnico de acuerdo con
la garantía deberá contar con la prueba de la fecha original de compra.

8
49-85220
Servicio Programado: (OVHUYLFLRGHUHSDUDFLyQGHH[SHUWRV
GH*(HVWiDVyORXQSDVRGHVXSXHUWD3URJUDPHVXVHUYLFLR
WpFQLFRDWUDYpVGH,QWHUQHWHQZZZJHDSSOLDQFHVFRPVHUYLFHB
DQGBVXSSRUWROODPHDO*(&$5(6GXUDQWH
el horario de atención comercial.
Piezas y Accesorios: Aquellas personas calificadas para
realizar el servicio técnico sobre sus propios electrodomésticos
podrán solicitar el envío de piezas o accesorios directamente
DVXVKRJDUHVVHDFHSWDQODVWDUMHWDV9,6$0DVWHU&DUG\
'LVFRYHU2UGHQHDWUDYpVGH,QWHUQHWKR\GXUDQWHODV
KRUDVRHQIRUPDWHOHIyQLFDDOGXUDQWHHOKRUDULR
de atención comercial.
Las instrucciones que figuran en este manual cubren los
procedimientos que serán realizados por cualquier usuario.
Otros servicios técnicos generalmente deberían ser derivados
DSHUVRQDOFDOLILFDGRGHOVHUYLFLR6HGHEHUiWHQHUFXLGDGR\D
que una reparación indebida podrá hacer que el funcionamiento
no sea seguro.
Estudio de Diseño de la Vida Real: *(DSR\DHOFRQFHSWR
GH'LVHxR8QLYHUVDOHQSURGXFWRVVHUYLFLRV\DPELHQWHVTXH
SXHGHQVHUXVDGRVSRUSHUVRQDVGHWRGDVODVHGDGHVWDPDxRV
\FDSDFLGDGHV5HFRQRFHPRVODQHFHVLGDGGHUHDOL]DUGLVHxRV
para una amplia gama de habilidades e incapacidades físicas y
PHQWDOHV3DUDPiVGHWDOOHVVREUHODVDSOLFDFLRQHVGH'LVHxR
8QLYHUVDOGH*(LQFOX\HQGRLGHDVGHGLVHxRGHFRFLQDVSDUD
SHUVRQDVFRQLQFDSDFLGDGHVYLVLWHQXHVWURVLWLRZHEKR\6REUH
FDVRVGHLQFDSDFLGDGDXGLWLYDFRPXQtTXHVHDO7''*($&
Contáctenos: Comuníquese con nosotros a través de nuestro
VLWLR:HEFRQWRGRVORVGHWDOOHVLQFOX\HQGRVXQ~PHUR
WHOHIyQLFRRHVFUtEDQRVD
General Manager, Customer Relations
GE Appliances, Appliance Park Louisville, KY 40225
ASISTENCIA / ACCESORIOS
£&RQVXOWHHO6LWLR:HEGH(OHFWURGRPpVWLFRVGH*(www.geappliances.com/service_and_support/GXUDQWHODVKRUDV
FXDOTXLHUGtDGHODxR3DUDPD\RUFRQYHQLHQFLD\XQVHUYLFLRPiVUiSLGRDKRUDSXHGHGHVFDUJDUHO0DQXDOGHO3URSLHWDULR
ordenar piezas o incluso programar el servicio técnico a través de Internet.
¿Desea realizar una consulta o necesita ayuda con su electrodoméstico?
Accesorios
¿Busca Algo Más?
¡GE ofrece una variedad de accesorios para mejorar sus experiencias de cocción y mantenimiento!
3DUDUHDOL]DUXQDRUGHQYLVtWHQRVDWUDYpVGH,QWHUQHWHQ
www.GEApplianceParts.com((88RHQwww.GEAppliances.ca&DQDGi
o llame al 800.626.2002((88800.661.1616&DQDGi
(VWRV\RWURVSURGXFWRVHVWiQGLVSRQLEOHV
Retiro de la Película Protectora de Envío y de la Cinta de Embalaje
NOTA: Retire todo el embalaje protector antes de utilizar la
cocina.
&RQFXLGDGRWRPHXQH[WUHPRGHODSHOtFXODSURWHFWRUD
de envío con los dedos y lentamente retire la misma de la
VXSHUILFLHGHOHOHFWURGRPpVWLFR1RXWLOLFHQLQJ~QSURGXFWR
ILORVRSDUDUHWLUDUODSHOtFXOD6LTXHGDQUHVLGXRVDGKHVLYRV
elimine los mismos aplicando detergente para platos y agua
en una tela seca.
Accesorios
(VWDQWH3ODQRGH1tTXHO :%;
(VWDQWH3ODQR5HIRU]DGRGH1tTXHO :%;
(VWDQWH3ODQRFRQ/LPSLH]D$XWRPiWLFD :%;
(VWDQWH([WHQVLEOHGH1tTXHO :%;
(VWDQWH([WHQVLEOHFRQ/LPSLH]D$XWRPiWLFD :%;
2OODSDUD$VDUô´[ó´[ò³ :%;*
$FFHVRULRGHO(VWDQWHSDUD'RUDU :%;
5HMLOOD&HQWUDOGHOD6XSHUILFLHGH&RFFLyQ :%;
3ODQFKDGH$OXPLQLR1R$GKHUHQWH :%;
3ODQFKDGH+LHUUR)RUMDGR5HYHUVLEOH :%;
Suministros de Limpieza
/LPSLDGRUHVGH$FHUR,QR[LGDEOH&LWUL6KLQH :;;
3DxRGH3XOLGRGH$FHUR,QR[LGDEOH :;;
5HPRYHGRUGH*UDVD4XHPDGD&HUDPD%U\WH
®
:;;

49-85220
9
Notas

10
49-85220
Estas llamas son demasiado
grandes para la olla.
En Caso de Corte de Corriente
Quemadores
USO DE LA PLACA DE COCCIÓN: En Caso de Corte de Corriente / Quemadores
(QHOFDVRGHXQFRUWHGHOX]HOKRUQRTXHGDUiLQRSHUDEOH\
QRVHGHEHUiLQWHQWDUXVDUOR6LQHPEDUJRORVTXHPDGRUHV
superficiales se podrán encender con un fósforo. Con
H[WUHPRFXLGDGRVRVWHQJDXQIyVIRURHQFHQGLGRFHUFDGHORV
SXHUWRVGHEDMRGHODWDSDGHOTXHPDGRUVXSHUILFLDOOXHJRGH
IRUPDOHQWDJLUHODSHULOODKDVWDODSRVLFLyQ/,7(%DMR8QD
YH]HQFHQGLGRVORVTXHPDGRUHVVXSHUILFLDOHVFRQWLQXDUiQ
funcionando normalmente.
Iluminación de un Quemador Superficial
ADVERTENCIA
Los quemadores
sólo deben ser usados cuando estén cubiertos por los
utensilios. Las llamas de los quemadores que no estén
cubiertas por el utensilio presentan un riesgo de incendio
o incendio de telas. Nunca permita que las llamas se
extiendan más allá de los costados del utensilio. Si esto
no se cumple, se podrán producir lesiones graves.
$VHJ~UHVHGHTXHWRGRVORVTXHPDGRUHVHVWpQHQVXV
ubicaciones correspondientes y que estén totalmente
ensamblados antes de usar cualquiera de estos.
6HOHFFLRQHXQTXHPDGRU\EXVTXHVXSHULOODGHFRQWURO
Empuje y gire la perilla hasta la posición LITE.
Escuchará un ruido de clic – el
sonido de la chispa eléctrica que
enciende el quemador. Cuando un
TXHPDGRUVHJLUHD/,7(WRGRVORV
quemadores generarán chispas.
El chispeo continuará mientras la
SHULOODSHUPDQH]FDHQ/,7(8QD
YH]HQFHQGLGRHOJDVJLUHODSHULOOD
SDUDDMXVWDUHOWDPDxRGHODOODPD
Uso de los Quemadores
NOTAS:
Ŷ No utilice el quemador durante un período de tiempo
prolongado sin un utensilio de cocina sobre la parrilla. El
acabado de la parrilla se puede resquebrajar si no hay un
utensilio de cocina que absorba el calor.
Ŷ No intente desensamblar un quemador mientras otro
quemador está encendido. Es posible que se produzca una
GHVFDUJDHOpFWULFDORFXDOSRGUtDKDFHUTXHYXHOTXHXQ
utensilio de cocina caliente.
Ŷ $VHJ~UHVHGHTXHORVTXHPDGRUHV\ODVSDUULOODVHVWpQ
IUtRVDQWHVGHFRORFDUODPDQRWRPDUHOPDQJRGHXQDROOD
trapos de limpieza u otros materiales sobre estos.
6XKRUQRFXHQWDFRQTXHPDGRUHVGHJDVVHOODGRVTXHRIUHFHQ
FRQYHQLHQFLDKLJLHQH\IOH[LELOLGDGSDUDXQDDPSOLDYDULHGDG
de aplicaciones de cocción.
(OTXHPDGRUPiVSHTXHxRHVSDUDIXHJROHQWR8QTXHPDGRU
GHIXHJROHQWRTXHVHFRORTXHHQ/2%DMREULQGDXQD
cocción precisa para comidas tales como salsas delicadas que
requieren poco calor durante un tiempo de cocción prolongado.
(OTXHPDGRUH[WUDJUDQGHHVWiGLVHxDGRSDUDOOHYDU
rápidamente grandes cantidades de líquido a punto de hervor.
Algunos modelos cuentan con una configuración de
32:(5%2,/HVSHFLDOPHQWHGLVHxDGDSDUDXVDUFRQ
utensilios de un diámetro de 11 pulgadas o más.
Selección del Tamaño de la Llama
2EVHUYHODOODPDQRODSHULOODDPHGLGDTXHUHGXFHHOFDORU
&XDQGRVHGHVHHFDOHQWDUGHIRUPDUiSLGDHOWDPDxRGHOD
OODPDGHXQTXHPDGRUGHEHUiVHUHTXLYDOHQWHDOWDPDxRGHO
utensilio de cocina que esté usando. Cuando las llamas sean
PiVJUDQGHVTXHODSDUWHLQIHULRUGHOXWHQVLOLRGHFRFLQDQR
calentarán el utensilio más rápido y podrían ser riesgosas.
Empuje el mango de control
y gire el mismo hasta la
posición LITE.

49-85220
11
No use rejillas para la parte superior de la cocina.
Quemadores (Cont.)
USO DE LA PLACA DE COCCIÓN: Quemadores
Utensilio sobre la Cocina
Aluminio:6HUHFRPLHQGDXQXWHQVLOLRGHSHVRPHGLDQR
ya que calienta de forma rápida y pareja. La mayoría de las
comidas se doran de forma pareja en un sartén de aluminio.
8VHFDFHURODVFRQWDSDKHUPpWLFDFXDQGRFRFLQHFRQ
cantidades mínimas de agua.
Acero Inoxidable: Este metal posee propiedades de
FDOHQWDPLHQWROLPLWDGDV\QRUPDOPHQWHVHFRPELQDFRQFREUH
aluminio u otros materiales para una mejor distribución del
calor. Los sartenes con combinación de metales normalmente
IXQFLRQDQGHIRUPDVDWLVIDFWRULDVLVHXVDQFRQFDORUPHGLR
como lo recomienda el fabricante.
Hierro Forjado:6LFRFLQDUiGHIRUPDOHQWDODPD\RUtDGHORV
sartenes le darán resultados satisfactorios.
Utensilios de esmalte:%DMRFLHUWDVFRQGLFLRQHVHOHVPDOWH
GHDOJXQRVXWHQVLOLRVGHFRFLQDVHSXHGHQGHUUHWLU6LJDODV
recomendaciones sobre métodos de cocción del fabricante de
utensilios de cocina.
Vidrio:([LVWHQGRVWLSRVGHXWHQVLOLRVGHFRFLQDGHYLGULR±
DTXHOORVSDUDXVRFRQHOKRUQR~QLFDPHQWH\DTXHOORVSDUD
ODFRFFLyQHQODSDUWHVXSHULRUGHODFRFLQDFDFHURODVFDIp\
WHWHUDV/RVFRQGXFWRUHVGHYLGULRFDOLHQWDQGHIRUPDPX\OHQWD
Cerámica de Vidrio Resistente al Calor:6HSXHGHQXVDUSDUD
cualquier superficie o para cocción en el horno. Conduce el calor
de forma muy lenta y se enfría de forma muy rápida. Consulte las
instrucciones del fabricante de utensilios de cocina para saber con
seguridad si se puede usar con cocinas a gas.
Parrillas para la Parte Superior de la Cocina
No use cualquier repuesto de rejilla para la parte superior de
ODFRFLQDFRQVXVTXHPDGRUHVGHJDV\DTXHUHDOL]DUiXQD
FRPEXVWLyQLQFRPSOHWDJHQHUDQGRQLYHOHVGHPRQy[LGRGH
carbono superiores a los estándares permitidos. Esto puede
ser peligroso para su salud.
Cómo Usar un Wok
8VHVyORZRNVFRQEDVHSODQDGHXQGLiPHWURGHSXOJDGDV
RPHQRV$VHJ~UHVHGHTXHHOIRQGRGHOZRNVHDSR\HGH
forma plana sobre la rejilla.
1RXVHXQDQLOORGHVRSRUWHSDUDZRN&RORFDUHODQLOORVREUH
el quemador o parrilla podrá hacer que el quemador funcione
GHIRUPDLQDGHFXDGDSURGXFLHQGRQLYHOHVGHPRQy[LGRGH
carbono que superan los estándares permitidos. Esto puede
ser peligroso para su salud.
Use un wok con fondo plano

12
49-85220
USO DE LA PLACA DE COCCIÓN: Plancha
Plancha (en algunos modelos)
Uso de su Plancha de Aluminio No Adherente
ADVERTENCIA Riesgo de Incendio
Ŷ Tenga cuidado al cocinar comidas con grasa. La grasa esparcida puede provocar un incendio.
Ŷ Nunca coloque ni guarde un artículo en la plancha, incluso cuando no esté en uso. El calor de los demás
quemadores puede calentar la plancha y provocar un incendio.
ŶColoque y retire la plancha sólo cuando todas las parrillas y la plancha estén frías y todas las unidades
superficiales estén en OFF (Apagado).
6XSODQFKDOHEULQGDXQDVXSHUILFLHGHFRFFLyQH[WUDJUDQGH
SDUDFDUQHVSDQTXHTXHV\RWUDVFRPLGDVQRUPDOPHQWH
SUHSDUDGDVHQXQDVDUWpQ$QWHVGHOSULPHUXVRHQMXDJXH
la misma con agua caliente y séquela completamente. Para
DFFHGHUDLQVWUXFFLRQHVVREUHFyPROLPSLDUODSODQFKD
consulte la sección de Limpieza de la superficie de cocción.
Precauciones de la Plancha:
Ŷ 1RXVHDFHLWHVREUHODSODQFKDGXUDQWHSHUtRGRVGHWLHPSR
prolongados. Es posible que se produzcan manchas
SHUPDQHQWHV\RJULHWDV
Ŷ No sobrecaliente la plancha.6LHOTXHPDGRUGHODSODQFKD
VHGHMDHQ+L$OWRSRUXQSHUtRGRGHWLHPSRSURORQJDGR
VLQFRPLGDHVWRSRGUiGDxDUODFREHUWXUDDQWLDGKHUHQWH
Ŷ 8VHVyORXWHQVLOLRVGHSOiVWLFRQ\ORQRPDGHUDR
KHUUDPLHQWDVGHFRFLQD6LOYHU6WRQH
®
para evitar que se
arruine el recubrimiento.
Ŷ 1XQFDXVHFXFKLOORVQLFRUWHODFRPLGDVREUHODSODQFKD
Ŷ 1RXVHXWHQVLOLRVGHPHWDOFRQSXQWDVSURQXQFLDGDVR
H[WUHPRVPX\ILORVRVTXHSRGUtDQGDxDUODVXSHUILFLHGHOD
plancha.
Ŷ *XDUGHFRQFXLGDGRSDUDHYLWDUUDOODGXUDV
Ŷ 1RFRORTXHODSODQFKDHQXQKRUQRPLFURRQGDV
Ŷ 6LDOJRVHGHUUDPyGHEDMRGHODSODQFKDVHGHEHUiOLPSLDU
tan pronto como sea posible para evitar la suciedad de la
FRPLGD³KRUQHDGD´
Ŷ 1RSHUPLWDTXHVHDFXPXOHJUDVDGHEDMRGHODSODQFKD\D
que puede haber riesgo de incendio. Limpie debajo de la
plancha con agua caliente y jabón en cuanto esté fría.
Ŷ 1RODYHODSODQFKDHQHOODYDYDMLOODV
Ŷ 1ROLPSLHODSODQFKDHQHOKRUQRGHOLPSLH]DDXWRPiWLFD
+DFHUHVWRGDxDUiODFREHUWXUDDQWLDGKHUHQWH3DUD
DFFHGHUDLQVWUXFFLRQHVVREUHFyPROLPSLDUODSODQFKD
consulte la sección de Limpieza de la Placa de Cocción de
este manual.
Colocación de la Plancha
Esta plancha sólo puede ser usada sobre el quemador oval
en el centro de la cocina. Para SRVLFLRQDUODSODQFKDUHWLUH
ODUHMLOODFHQWUDO\UHHPSODFHODPLVPDSRUODSODQFKDVLHVWi
SUHVHQWH. No gire el quemador oval hasta que esté seguro de
que la plancha se posicionó correctamente.
Cómo precalentar la plancha3UHFDOLHQWHHQWUH\
PLQXWRVHQ+L$OWRDQWHVGHFRORFDUFRPLGDVREUHODSODQFKD
y luego baje el nivel de fuego a la configuración de cocción.
Tipo de Comida Configuración de Cocción
Panceta 0HG
(PEXWLGRVSDUDHO'HVD\XQR 0HG
+XHYRV)ULWRV %DMR/R
+DPEXUJXHVDV 0HG$OWR0HG+L
6iQGZLFKHV&DOLHQWHV7DOHV
FRPRFRQ4XHVRDOD3ODQFKD
0HG
Panquecas 0HG%DMR0HG/R
Cómo Calentar Tortillas 0HG%DMR0HG/R
Plancha de Aluminio No Adherente
Reemplace la rejilla central (si está presente) por la Plancha
de Aluminio No Adherente

49-85220
13
USO DE LA PLACA DE COCCIÓN: Plancha
Plancha (en algunos modelos)
Uso de la Plancha Presazonada de Hierro Fundido Reversible
El lado acanalado de la plancha reversible puede ser usado
para comidas normalmente cocinadas a la plancha.
6XSODQFKDOHEULQGDXQDVXSHUILFLHGHFRFFLyQH[WUDJUDQGH
SDUDFDUQHVSDQTXHTXHV\RWUDVFRPLGDVQRUPDOPHQWH
SUHSDUDGDVHQXQDVDUWpQ$QWHVGHOSULPHUXVRHQMXDJXHOD
misma con agua caliente y séquela completamente. Prepare la
superficie con espray de cocina o aceite vegetal.
Precauciones de la Plancha:
Ŷ 1RFRORTXHODSODQFKDHQXQKRUQRPLFURRQGDV
Ŷ 1RODYHODSODQFKDHQHOODYDYDMLOODV
Ŷ 6LDOJRVHGHUUDPyGHEDMRGHODSODQFKDVHGHEHUiOLPSLDU
tan pronto como sea posible para evitar la suciedad de la
FRPLGD³KRUQHDGD´
Ŷ 1RSHUPLWDTXHVHDFXPXOHJUDVDGHEDMRGHODSODQFKD\D
que puede haber riesgo de incendio. Limpie debajo de la
plancha con agua caliente y jabón en cuanto esté fría.
Colocación de la Plancha
Esta plancha sólo puede ser usada sobre el quemador oval
en el centro de la cocina. Para SRVLFLRQDUODSODQFKDUHWLUH
ODUHMLOODFHQWUDO\UHHPSODFHODPLVPDSRUODSODQFKDVLHVWi
SUHVHQWH. No gire el quemador oval hasta que esté seguro de
que la plancha se posicionó correctamente.
Cómo precalentar la plancha3UHFDOLHQWHHQWUH\
PLQXWRVHQ+L$OWRDQWHVGHFRORFDUFRPLGDVREUHODSODQFKD
y luego baje el nivel de fuego a la configuración de cocción.
Es posible que sea necesario ajustar las configuraciones de la
plancha si se usará por un período prolongado.
Plancha Precurada de Hierro Fundido Reversible
Reemplace la rejilla (si está presente) central por la Plancha
Precurada de Hierro Fundido Reversible
Tipo de Comida Configuración de Cocción
Panceta 0HG
(PEXWLGRVSDUDHO'HVD\XQR 0HG
+XHYRV %DMR/R
4XHVRDOD3ODQFKD 0HG%DMR0HG/R
+DPEXUJXHVDV 0HG%DMR0HG/R
Panqueques 0HG%DMR0HG/R
Cómo Calentar Tortillas %DMR/R

14
49-85220
Controles del Horno
USO DEL HORNO: Controles del Horno
2
2
187
Convection (Convección)
Non Convection (Sin Convección)
478
4
35
5
3
6
6
9
9
11 10

49-85220
15
1. Convection Bake (Hornear por Convección)
(en algunos modelos): La cocción por convección
XWLOL]DXQLQFUHPHQWRHQODFLUFXODFLyQGHDLUHDILQGHPHMRUDU
HOUHQGLPLHQWRDOKRUQHDUHQHVWDQWHVP~OWLSOHV3DUDPiV
LQIRUPDFLyQFRQVXOWHODVHFFLyQGH0RGRVGH&RFFLyQ
2. Traditional Cooking Modes (Modos de Cocción
Tradicionales):
6XKRUQRFXHQWDFRQORVVLJXLHQWHVPRGRV
GHFRFFLyQWUDGLFLRQDOHV%DNH+RUQHDU%URLO+L$VDU$OWR
\%URLO/R$VDU%DMR3DUDPiVLQIRUPDFLyQFRQVXOWHOD
VHFFLyQGH0RGRVGH&RFFLyQ
3. Clean (Limpieza) (en algunos modelos): +D\
GRVPRGRVGHOLPSLH]D6HOI&OHDQ/LPSLH]D$XWRPiWLFD
\6WHDP&OHDQ/LPSLH]DFRQ9DSRU3DUDDFFHGHUD
LQIRUPDFLyQLPSRUWDQWHVREUHHOXVRGHHVWRVPRGRV
FRQVXOWHODVHFFLyQGH/LPSLH]DGHO+RUQR
4. Start (Iniciar): 6HGHEHUiSUHVLRQDUSDUDFRPHQ]DU
FXDOTXLHUIXQFLyQGHFRFFLyQOLPSLH]DRSRUWLHPSR
5. Cancel/Off (Cancelar/ Apagar): &DQFHODU72'$6
ODVRSHUDFLRQHVGHOKRUQRH[FHSWRHOUHORM\HOWHPSRUL]DGRU
6. Cook Time (Tiempo de Cocción): Cuenta el tiempo
de cocción y apaga el horno cuando el tiempo de cocción
está completo. Presione el modo de cocción deseado y la
temperatura y presione Start (Iniciar)/XHJRSUHVLRQHOD
tecla Cook Time (Tiempo de Cocción)\XVHODVWHFODV
numéricas para programar un tiempo de cocción en horas y
PLQXWRV/XHJRYXHOYDDSUHVLRQDUStart (Iniciar). Esto sólo
SXHGHVHUXVDGRFRQ7UDGLWLRQDO%DNH+RUQHDGR7UDGLFLRQDO
\&RQYHFWLRQ%DNH+RUQHDUSRU&RQYHFFLyQ
7. Clock (Reloj): Configura el tiempo del reloj del horno y la
SDQWDOODGHOUHORMHQDOJXQRVPRGHORV3DUDFRQILJXUDUOD
SDQWDOODGHOUHORMHQFHQGLGRDSDJDGRSUHVLRQHODWHFODSet
Clock (Configurar Reloj)HQDOJXQRVPRGHORVXQDYH]6LVX
modelo no cuenta con la tecla Set Clock (Configurar Reloj)
consulte la sección de Funciones Especiales para acceder
a instrucciones sobre cómo ajustar la pantalla del reloj. Para
FRQILJXUDUHOWLHPSRGHOUHORMPDQWHQJDSUHVLRQDVODVWHFODV
+ y -GXUDQWHVHJXQGRVRSUHVLRQHODWHFODSet Clock
(Configurar Reloj)KDVWDTXHODSDQWDOODHVWpWLWLODQGR8VHODV
teclas + y - para ajustar el reloj. Presione Start (Iniciar) para
guardar la configuración de la hora.
8. Timer (Temporizador): Funciona como un
temporizador con cuenta regresiva. Presione la tecla Timer
(Temporizador) y las teclas + y - para programar el tiempo
en horas y minutos. Presione la tecla Start (Iniciar). El
horno continuará funcionando cuando la cuenta regresiva
del temporizador se haya completado. Para apagar el
WHPSRUL]DGRUSUHVLRQHODWHFODTimer (Temporizador).
9. Delay Time (Tiempo de Retraso): *HQHUDXQD
GHPRUDFXDQGRHOKRUQRHVHQFHQGLGR8VHHVWDWHFOD
para configurar el momento en que desee que el horno se
inicie. Presione la tecla Delay Time (Tiempo de Demora)
y use las teclas + y - para programar la hora del día en que
GHVHDTXHHOKRUQRVHHQFLHQGD/XHJRSUHVLRQHODWHFOD
GHOPRGRGHFRFFLyQGHVHDGRXVHODVWHFODV+ y - para
DMXVWDUODWHPSHUDWXUDOXHJRSUHVLRQHStart (Iniciar)8QD
YH]SUHVLRQDGDODWHFOD6WDUW,QLFLDUWDPELpQSXHGHVHU
SURJUDPDGRXQWLHPSRGHFRFFLyQVLORGHVHD8QDYH]TXH
'HOD\7LPH7LHPSRGH'HPRUDIXHSURJUDPDGRODKRUDGH
inicio configurada para el horno será mostrada hasta que la
KRUDVHDDOFDQ]DGD/XHJRWDQWRHOWLHPSRGHFRFFLyQVLHV
SURJUDPDGRRODWHPSHUDWXUDVHUiQPRVWUDGRV'HOD\7LPH
7LHPSRGH5HWUDVRVyORSXHGHVHUXVDGRFRQ7UDGLWLRQDO
%DNH+RUQHDGR7UDGLFLRQDO\ORVPRGRVGH&OHDQ
/LPSLH]DHQDOJXQRVPRGHORV
NOTA: $OXVDUODIXQFLyQGHWLHPSRGHUHWUDVRODVFRPLGDV
TXHVHHFKDQDSHUGHUUiSLGDPHQWHWDOHVFRPROHFKHKXHYRV
SHVFDGRUHOOHQRVDYH\FHUGRQRVHGHEHUiQGHMDUUHSRVDUSRU
más de 1 hora antes y después de la cocción. La temperatura
DPELHQWHHVWLPXODHOGHVDUUROORGHEDFWHULDVQRFLYDV$VHJ~UHVH
GHTXHODOX]GHOKRUQRHVWpDSDJDGD\DTXHHOFDORUGHOD
lámpara acelerará el crecimiento de bacterias nocivas.
10. Oven Light (Luz del Horno) (en algunos
modelos): Enciende o apaga la luz del horno.
11. Lock Controls (Controles de Bloqueo)
(en algunos modelos): %ORTXHDQHOFRQWUROGHPRGR
que al presionar las teclas no se activen los controles.
0DQWHQJDSUHVLRQDGDVODVWHFODV+ y -GXUDQWHVHJXQGRV
para bloquear o desbloquear el control. La función Cancel/
Off (Cancelar/ Apagar)VLHPSUHHVWiDFWLYDLQFOXVRFXDQGR
el control está bloqueado.
Controles del Horno (Cont.)
USO DEL HORNO: Controles del Horno / Ventilaciones de Aire del Horno
Ventilaciones de Aire del Horno
La apariencia y la ubicación de la ventilación varían.
1XQFDEORTXHHODVYHQWLODFLRQHVDEHUWXUDVGHDLUHGHOD
cocina. Las mismas brindan las entradas y salidas de aire
que son necesarias para que la cocina se mantenga fresca y
funcione de forma correcta con la combustión adecuada.
Las aberturas de aire se encuentran ubicadas en la parte
WUDVHUDGHODFRFLQDHQODSDUWHVXSHULRUHLQIHULRUGHODSXHUWD
GHOKRUQR\HQODSDUWHLQIHULRUGHODFRFLQD

16
49-85220
6XFRFLQDFXHQWDFRQYDULDVIXQFLRQHVHVSHFLDOHVGLIHUHQWHV3DUDPRGLILFDUODVFRQILJXUDFLRQHVGHHVWDVIXQFLRQHVHVSHFLDOHV
Ŷ 0DQWHQJDSUHVLRQDGDVODVWHFODVBake (Hornear) y Broil (Asar) al mismo tiempo durante tres segundos.
Ŷ ³6)´DSDUHFHUiHQODSDQWDOOD
Ŷ 3DUDDFFHGHUDLQVWUXFFLRQHVVREUHFyPRVHOHFFLRQDUGLIHUHQWHVIXQFLRQHVFRQVXOWHPiVDEDMRODVHFFLyQTXHFRUUHVSRQGHDO
interés o la función especial.
Ŷ &XDQGRHOFDPELRKD\DVLGRUHDOL]DGRSUHVLRQHODWHFODStart (Iniciar) para guardar el cambio y salga de las funciones
especiales.
Ajuste de la Temperatura del Horno
Esta función permite que la temperatura de horneado del
KRUQRVHDDMXVWDGDKDVWD)PiVFDOLHQWHR)PiVIUtD
8VHHVWDIXQFLyQVLSLHQVDTXHODWHPSHUDWXUDGHVXKRUQR
está demasiado caliente o demasiado fría y desea modificarla.
(VWHDMXVWHDIHFWDFDGDPRGRGHFRFFLyQH[FHSWRHOGHDVDU
/XHJRGHLQJUHVDUHOPHQ~GHIXQFLRQHVHVSHFLDOHVSUHVLRQH
la tecla Bake (Hornear) para ingresar el modo de ajuste de
WHPSHUDWXUD6HH[KLELUiXQQ~PHURHQWUH\8VHODVWHFODV
+ o - para configurar el ajuste de temperatura deseado. Presione
la tecla Start (Iniciar) para guardar el ajuste de temperatura.
Apagado automático de 12 horas y
Modo Sabático
El apagado automático de 12 horas apaga el horno luego de
12 horas de funcionamiento continuo. El apagado automático
GHKRUDVSXHGHHVWDUHQ³RQ´HQFHQGLGRRHQ³R))´
DSDJDGR3DUDDFFHGHUDGHWDOOHVVREUHODRSFLyQ³V$E´
FRQVXOWHODVHFFLyQGH0RGR6DEiWLFR,QJUHVHDOPHQ~GH
IXQFLRQHVHVSHFLDOHVFRPRVHGHWDOODPiVDUULED\GHIRUPD
repetida presione la tecla Set Clock (Configurar Reloj) hasta
TXHODFRQILJXUDFLyQGHVHDGDVHDPRVWUDGD6LVXPRGHORQR
cuenta con la tecla Set Clock (Configurar Reloj)HQWRQFHV
presione de forma repetida la tecla Clock Time (Hora del
Reloj) hasta que la configuración deseada sea mostrada.
Presione la tecla Start (Iniciar) para guardar la configuración.
Pantalla del Reloj (en algunos modelos)
(VWD)XQFLyQHVSHFLILFDVLODKRUDGHOGtDHVH[KLELGD/D
SDQWDOODGHOUHORMSXHGHHVWDUHQ³RQ´HQFHQGLGDRHQ³R))´
DSDJDGD6LVXPRGHORFXHQWDFRQODWHFODSet Clock
(Configurar Reloj)FRQVXOWHODVHFFLyQ2YHQ&RQWUROV
&RQWUROHVGHO+RUQRSDUDDFFHGHUDLQVWUXFFLRQHVVREUH
FyPRDMXVWDUODSDQWDOOD6LVXPRGHORQRFXHQWDFRQOD
tecla Set Clock (Configurar Reloj)DOPHQ~GHIXQFLRQHV
especiales como se detalla más arriba. Presione la tecla
Timer (Temporizador) para visualizar la configuración actual.
Presione la tecla Timer (Temporizador) nuevamente para
cambiar la configuración. Presione la tecla Start (Iniciar) para
guardar la configuración de la pantalla.
Incrementar/ Reducir la Velocidad
8QDFRQILJXUDFLyQSRUHMHPSORWHPSHUDWXUHSXHGHVHUDMXVWDGD
de forma rápida manteniendo presionada la tecla + o la tecla -.
3DUDDMXVWDUHOLQFUHPHQWRUHGXFFLyQGHODYHORFLGDGLQJUHVH
DOPHQ~GHIXQFLRQHVHVSHFLDOHVFRPRVHGHWDOODPiVDUULED
Presione la tecla + para incrementar la velocidad o presione la
tecla - para reducir la velocidad. Las configuraciones varían entre
PiVOHQWD\PiVUiSLGD3UHVLRQHODWHFODStart (Iniciar)
para guardar la configuración de velocidad.
Funciones especiales
USO DEL HORNO: Funciones especiales / Modo Sabático

49-85220
17
Modo Sabático
USO DEL HORNO: Modo Sabático
/DIXQFLyQGHOPRGRVDEiWLFRFXPSOHFRQORVHVWiQGDUHVHVWDEOHFLGRVSRU6WDU.6yORVHSXHGHQUHDOL]DUHOKRUQHDGRFRQWLQXR
RSRUWLHPSRHQHOPRGRVDEiWLFR7RGRVORVWRQRVHVWiQGHVDFWLYDGRVHQHOPRGRVDEiWLFRVLQHPEDUJRODOX]GHOKRUQRQR
HVWiGHVDFWLYDGDGHPRGRTXHODPLVPDGHEHVHUGHVDFWLYDGDSDUDDVHJXUDUTXHQRVHHQFLHQGDFXDQGRODSXHUWDVHDDELHUWD
/DFRFFLyQHQHOPRGRVDEiWLFRHVXQSURFHVRGHGRVSDVRVSULPHURHOPRGRVDEiWLFRGHEHVHUFRQILJXUDGR\OXHJRHOPRGR
hornear debe ser configurado.
Configuración del Modo Sabático
0DQWHQJDSUHVLRQDGDVODVWHFODVBake (Hornear) y Broil
(Asar)DOPLVPRWLHPSRGXUDQWHWUHVVHJXQGRV³6)´DSDUHFHUi
en la pantalla. Presione la tecla Set Clock (Configurar Reloj)
KDVWDTXH³6$E´DSDUH]FDHQODSDQWDOOD\OXHJRSUHVLRQH
Start (Iniciar)6LVXPRGHORQRFXHQWDFRQODWHFODSet
Clock (Configurar Reloj)HQWRQFHVSUHVLRQHODWHFODCook
Time (Cocinar por Tiempo)KDVWDTXH³6$E´DSDUH]FDHQ
la pantalla y luego presione Start (Iniciar)8QVRORFRUFKHWH
³@´DSDUHFHUiHQODSDQWDOODLQGLFDQGRTXHHOPRGRVDEiWLFR
fue configurado. Ahora pueden ser configurados el horneado
FRQWLQXRRHOKRUQHDGRSRUWLHPSRFRPRVHGHWDOODPiVDEDMR
Inicie un Horneado Continuo
Presione Bake (Hornear) si desea una temperature diferente
D)OXHJRSUHVLRQHODVWHFODV+ o - para ajustar la
WHPSHUDWXUDSRULQFUHPHQWRVGHJUDGRV\OXHJRSUHVLRQH
Start (Iniciar)/XHJRGHXQDGHPRUDXQVHJXQGRFRUFKHWH
³@>³DSDUHFHUiHQODSDQWDOODLQGLFDQGRTXHHOKRUQRHVWi
horneando.
Ajuste de temperatura
Presione Bake (Hornear)OXHJRSUHVLRQHODVWHFODV+ o - para
DMXVWDUODWHPSHUDWXUDSRULQFUHPHQWRVGHJUDGRV\OXHJR
presione Start (Iniciar)8QWHUPyPHWURSDUDKRUQRSXHGHVHU
usado si cierta indicación de configuración de temperatura es
deseada.
Inicie un Horneado por Tiempo
Presione Cook Time (Tiempo de Cocción)OXHJRSUHVLRQH
las teclas + o - para ajustar el tiempo de cocción por
incrementos de un minuto. Presione Bake (Hornear) si desea
XQDWHPSHUDWXUDGLIHUHQWHD)OXHJRSUHVLRQHODVWHFODV+
o -SDUDDMXVWDUODWHPSHUDWXUDSRULQFUHPHQWRVGHJUDGRV
y luego presione Start (Iniciar)/XHJRGHXQDGHPRUDXQ
VHJXQGRFRUFKHWH³@>³DSDUHFHUiHQODSDQWDOODLQGLFDQGRTXH
HOKRUQRHVWiKRUQHDQGR&XDQGRHOWLHPSRGHFRFFLyQILQDOLFH
ODSDQWDOODYROYHUiDFDPELDUDXQVRORFRUFKHWH³@´LQGLFDQGR
que el horno ya no está horneando.
Salga del Modo Sabático
6yORVHGHEHUiVDOLUGHOPRGRVDEiWLFRXQDYH]ILQDOL]DGRHO
mismo. Presione Cancel/Off (Cancelar/ Apagar) para finalizar
cualquier ciclo de horneado que pueda estar funcionando.
0DQWHQJDSUHVLRQDGDVODVWHFODVBake (Hornear) y Broil
(Asar)DOPLVPRWLHPSRGXUDQWHWUHVVHJXQGRV³6)´DSDUHFHUi
HQODSDQWDOOD\OXHJRSUHVLRQHStart (Iniciar)6LVXPRGHOR
no cuenta con la tecla Set Clock (Configurar Reloj)HQWRQFHV
presione la tecla Cook Time (Tiempo de Cocción) hasta que
³2Q´(QFHQGHUDSDUH]FDHQODSDQWDOOD\OXHJRSUHVLRQH
Start (Iniciar)/DSDQWDOODSDVDUiGHWHQHUXQVRORFRUFKHWH³@´
DODKRUDGHOGtDLQGLFDQGRTXHVHVDOLyGHOPRGRVDEiWLFR
Aviso de Corte de Corriente durante el
Modo Sabático
6LVHSURGXFHXQFRUWHGHFRUULHQWHPLHQWUDVHOKRUQRVH
HQFXHQWUDHQHOPRGRVDEiWLFRODXQLGDGUHJUHVDUiDOPRGR
VDEiWLFRFXDQGRHOVXPLQLVWURVHDUHHVWDEOHFLGRVLQHPEDUJR
el horno regresará al estado de apagado incluso aunque haya
estado en medio de un ciclo de horneado cuando el corte de
corriente se produjo.

18
49-85220
6XQXHYRKRUQRSRVHHXQDYDULHGDGGHPRGRVGHFRFFLyQSDUDTXHSXHGDREWHQHUORVPHMRUHVUHVXOWDGRV(VWRVPRGRV
VHGHVFULEHQDFRQWLQXDFLyQ3DUDDFFHGHUDUHFRPHQGDFLRQHVSDUDFRPLGDVHVSHFtILFDVFRQVXOWHODVHFFLyQGHOD*XtDGH
Cocción. Recuerde que es posible que su nuevo horno funcione de manera diferente que aquel que está reemplazando.
Bake (Hornear)
El modo de horneado es utilizado para hornear y dorar. Este
modo usa calor sólo desde el quemador inferior. Al preparar
FRPLGDVKRUQHDGDVWDOHVFRPRWRUWDVJDOOHWDV\PDVDV
VLHPSUHSUHFDOLHQWHHOKRUQRDQWHVGHLQVHUWDUODFRPLGD6LJD
las recomendaciones de la receta sobre la colocación de la
FRPLGD6LQRVHEULQGDQSDXWDVFHQWUHODFRPLGDHQHOKRUQR
3DUDXVDUHVWHPRGRSUHVLRQHODWHFODBake (Hornear)XVH
las teclas + y -SDUDDMXVWDUODWHPSHUDWXUDOXHJRSUHVLRQH
Start (Iniciar).
Broiling Modes (Modo para Asar)
6LHPSUHDVHFRQODVSXHUWDVGHOKRUQRSULQFLSDO\GHOFDMyQ
para asar cerradas. Tenga cuidado al asar en estantes de
SRVLFLRQHVVXSHULRUHV\DTXHFRORFDUODFRPLGDPiVFHUFD
GHOTXHPDGRUSDUDDVDULQFUHPHQWDHOKXPRVDOSLFDGXUDV\OD
posibilidad de que se incendien las grasas.
Intente asar las comidas que normalmente haría a la parrilla.
Ajuste las posiciones de los estantes para ajustar la intensidad
del calor a la comida. Coloque las comidas más cerca del
TXHPDGRUSDUDDVDUFXDQGRVHGHVHHXQDVXSHUILFLHPiV
cocinada y un interior poco cocido. Las comidas más gruesas
y aquellas que se deben cocinar completamente se deben asar
en un estante con una posición más baja o usando el modo
%URLO/R$VDU%DMR
Broil Hi (Asar Alto)
(OPRGR%URLO+L$VDU$OWRXVDFDORULQWHQVRGHOTXHPDGRU
VXSHULRUSDUDVRDVDUODVFRPLGDV8VHODIXQFLyQ%URLO+L
$VDGR$OWRSDUDFRUWHVPiVGHOJDGRVGHFDUQH\RFRPLGDV
que prefiera que quedan menos cocinadas en su interior.
3DUDXVDUHVWHPRGRSUHVLRQHODWHFODBroil (Asar) una vez
y luego presione Start (Iniciar). No es necesario realizar el
precalentamiento al usar este modo.
Broil Lo (Asar Bajo)
(OPRGR%URLO/R$VDU%DMRXVDPHQRVFDORULQWHQVRGHO
quemador superior para cocinar la comida completamente
PLHQWUDVWDPELpQVHGRUDODVXSHUILFLH8VHODIXQFLyQ%URLO/R
$VDGR%DMRSDUDFRUWHVGHFDUQHPiVJUXHVRV\RFRPLGDV
que desee que queden completamente cocinadas. Para
XVDUHVWHPRGRSUHVLRQHODWHFODBroil (Asar) dos veces y
luego presione Start (Iniciar). No es necesario realizar el
precalentamiento al usar este modo.
Convection Bake (Hornear por Convección)
(en algunos modelos):
(OPRGR&RQYHFWLRQ%DNH+RUQHDUSRU&RQYHFFLyQHVWi
SHQVDGRSDUDKRQHDUHQP~OWLSOHVHVWDQWHVDOPLVPRWLHPSR
Este modo utiliza el movimiento del aire del ventilador de
convección para mejorar la cocción haciéndola más pareja. El
horno está equipado con la función Auto Recipe Conversion
&RQYHUVLyQGH5HFHWD$XWRPiWLFDGHPRGRTXHQRHV
necesario ajustar la temperatura al usar este modo. Para
XVDUHVWHPRGRSUHVLRQHODWHFODConv Bake (Hornear
por Convección)XVHODVWHFODV+ y - para ajustar la
WHPSHUDWXUD\OXHJRSUHVLRQHStart (Iniciar)6LHPSUHUHDOLFH
el precalentamiento al usar este modo.
Pautas de Uso de Utensilios
(OPDWHULDOHODFDEDGR\HOWDPDxRGHORVXWHQVLOLRVDIHFWDQHO
horneado.
/DVROODVRVFXUDVUHYHVWLGDV\RSDFDVDEVRUEHQHOFDORUPiV
rápidamente que las ollas claras y brillantes. Al usar ollas
TXHDEVRUEHQHOFDORUPiVUiSLGDPHQWHODVFRPLGDVSRGUiQ
UHVXOWDUPiVGRUDGDVFURFDQWHV\FRQXQDFDSDPiVJUXHVD6L
XWLOL]DXWHQVLOLRVRVFXURV\UHYHVWLGRVFRQWUROHODFRPLGDDQWHV
GHOWLHPSRPtQLPRGHFRFFLyQ6LVHREWLHQHQUHVXOWDGRVQR
GHVHDGRVFRQHVWHWLSRGHXWHQVLOLRVFRQVLGHUHODSRVLELOLGDG
GHUHGXFLUODWHPSHUDWXUDGHOKRUQRHQ)ODSUy[LPDYH]
Ŷ /DVROODVEULOODQWHVSXHGHQSURGXFLUUHVXOWDGRVGHKRUQHDGR
más parejos en tortas y galletas.
Ŷ /DVROODVGHYLGULR\FHUiPLFDFDOLHQWDQFRQOHQWLWXGSHUR
retienen bien el calor. Estos tipos de ollas funcionan bien
con platos tales como tartas y postres con natilla.
Ŷ /DVROODVFRQDLVODQWHGHDLUHFDOLHQWDQOHQWDPHQWH\
pueden producir fondos dorados.
Ŷ 0DQWHQJDORVXWHQVLOLRVOLPSLRVSDUDXQDFRFFLyQPiVSDUHMD
Modos de Cocción
USO DEL HORNO: Modos de Cocción / Utensilios / Papel de Aluminio y Cobertores del Horno
PRECAUCIÓN No use ningún tipo de aluminio o cobertor de horno para cubrir el fondo del horno. Este
ítems pueden bloquear el flujo de aire o derretirse, ocasionando daños sobre el producto y el riesgo de envenenamiento
con monóxido de carbono, humo o incendios. Los daños por uso inadecuado de estos ítems no están cubiertos por la
garantía del producto.
6HSRGUiXVDUDOXPLQLRSDUDHYLWDUGHUUDPHVFRORFDQGRXQDKRMDVREUHXQHVWDQWHLQIHULRUYDULDVSXOJDGDVGHEDMRGHODFRPLGD
1RXVHPiVDOXPLQLRTXHHOQHFHVDULR\QXQFDFXEUDWRWDOPHQWHHOHVWDQWHGHXQKRUQRFRQSDSHOGHDOXPLQLR0DQWHQJDHO
DOXPLQLRDSRUORPHQRV´GHODVSDUHGHVGHOKRUQRSDUDHYLWDUXQDFLUFXODFLyQGHILFLHQWHGHOFDORU
Papel de Aluminio y Cobertores del Horno

49-85220
19
Estantes del Horno
USO DEL HORNO: Estantes del Horno / Cajón para Asar
Posiciones de los Estantes
6XKRUQRFXHQWDFRQVHLVSRVLFLRQHVGHHVWDQWHVHQHOKRUQR
SULQFLSDO(QOD*XtDGH&RFFLyQVHEULQGDQUHFRPHQGDFLRQHV
de posiciones de los estantes para diferentes tipos de
FRPLGDV6HDMXVWDXQHVWDQWHHQXQDGLUHFFLyQSDUDDIHFWDU
ORVUHVXOWDGRVGHFRFFLyQ3RUHMHPSORVLVHSUHILHUHQSDUWHV
VXSHULRUHVPiVRVFXUDVHQWDUWDVSDQHFLOORVRJDOOHWDV
pruebe moviendo la comida a un estante que se encuentre
XQDSRVLFLyQPiVDUULED6LHQFXHQWUDTXHODVFRPLGDVHVWiQ
GHPDVLDGRGRUDGDVHQODSDUWHVXSHULRUSUXHEHPRYLHQGRODV
PLVPDVPiVDEDMRODSUy[LPDYH]
$OKRUQHDUFRQP~OWLSOHVROODV\HQP~OWLSOHVHVWDQWHV
DVHJ~UHVHGHTXHKD\DVXILFLHQWHHVSDFLRHQWUHODVROODVSDUD
que fluya el aire. Esto puede mejorar la cocción haciéndola
más pareja.
Retiro y Reemplazo de los Estantes
$OFRORFDU\UHWLUDUXWHQVLOLRVGHFRFLQDHPSXMHHOHVWDQWH
KDFLDDIXHUDGHOWRSHSRVLFLyQGHGHWHQFLyQVREUHHOVRSRUWH
del estante.
3DUDUHWLUDUXQHVWDQWHHPSXMHHOPLVPRKDFLDXVWHGKDVWD
DOFDQ]DUODSRVLFLyQGRQGHVHGHWLHQHLQFOLQHHOIUHQWHKDFLD
arriba y empuje hacia afuera.
3DUDUHHPSOD]DUXQHVWDQWHFRORTXHHOH[WUHPRFXUYDGRGHO
mismo sobre los soportes de los estantes. Incline el frente del
estante hacia arriba y empuje el mismo hasta que se detenga.
Luego apoye el estante y empuje el mismo hasta que entre
completamente en el horno.
(VSRVLEOHTXHUHVXOWHGLItFLOGHVOL]DUORVHVWDQWHV
especialmente luego de un ciclo de limpieza automática. Para
PHMRUDUODVFRQGLFLRQHVGHGHVOL]DPLHQWRXVHXQDWHODVXDYH
o una toalla de papel para frotar aceite vegetal sobre los
H[WUHPRVL]TXLHUGR\GHUHFKRGHORVHVWDQWHV\RVREUHORV
soportes del estante.
NOTA: Retire los estantes en desuso al usar el horno para
XQSUHFDOHQWDPLHQWRPiVUiSLGRPD\RUHILFLHQFLD\XQ
rendimiento óptimo de la cocción.
Para acceder a instrucciones sobre cómo ordenar estantes
DGLFLRQDOHVFRQVXOWHODVHFFLyQGH$VLVWHQFLD$FFHVRULRV
6LHPSUHXVHODFDFHUROD\ODUHMLOODSDUDDVDULQFOXLGDVFRQVX
cocina.
(OFDMyQSDUDDVDUFXHQWDFRQWUHVSRVLFLRQHVSDUDDVDUODV
FXDOHVVHPXHVWUDQDODGHUHFKD3DUDDVDUHQODSRVLFLyQ%R
&GHVOLFHODFDFHURODHQHOFDMyQGHPRGRTXHODVPDQLMDVVH
DSR\HQVREUHORVVRSRUWHV3DUDDVDUHQODSRVLFLyQ$FRORTXH
la olla directamente sobre la parte inferior del cajón para asar.
3DUDXQPHMRUVRDVDGRXVHODVSRVLFLRQHVGHORVHVWDQWHV
que ubican la comida en la posición más cercana al calentador
SDUDDVDU0XHYDODFRPLGDKDFLDDEDMRRXVHHOPRGR%URLO/R
$VDGR%DMRSDUDXQDPD\RUFRFFLyQPHQRUVRDVDGR
Cajón para Asar (en algunos modelos)
Posiciones de los Estantes
Retiro de los estantes
Reemplazo de los estantes
Posiciones del cajón para Asar (en algunos modelos)
Posición de detención
del estante

20
49-85220
$OKRUQHDUFXDWURFDSDVGHWRUWDDODYH]WDPEDOHHODVROODV
FRPRVHPXHVWUDDODGHUHFKDGHPRGRTXHQRTXHGHXQD
encima de la otra.
Cocine la comida completamente para evitar que se produzcan
enfermedades a partir de la comida. Puede encontrar
recomendaciones sobre temperatura mínima para cocinar de
forma segura en www.IsItDoneYet.gov$VHJ~UHVHGHXVDU
un termómetro de comidas para medir la temperatura de las
mismas.
NOTA: Retire los estantes en desuso al usar el horno para
XQSUHFDOHQWDPLHQWRPiVUiSLGRPD\RUHILFLHQFLD\XQ
rendimiento óptimo de la cocción.
Ubicación
Frontal
Ubicación
Trasera
TIPO DE COMIDA
MODO(S)
RECOMENDADO(S)
POSICIÓN(ES) DE ESTANTES
RECOMENDADA SUGERENCIAS ADICIONALES
Productos Horneados
7RUWDVFRQFDSDVWRUWDV
UHFWDQJXODUHVURVFDVSDQHFLOORV
SDQUiSLGRHQXQ6ROR(VWDQWH
+RUQHDU R 8VHXWHQVLOLRVEULOODQWHV
7RUWDVFRQFDSDVHQ0~OWLSOHV
Estantes
+RUQHDU
+RUQHDUSRU&RQYHFFLyQ
\
$VHJ~UHVHGHTXHKD\DXQIOXMRGHDLUHDGHFXDGR
9HDODLOXVWUDFLyQ
7RUWDVGHJUDVDSDVWHOGHiQJHO +RUQHDU 2 8VHXWHQVLOLRVEULOODQWHV
*DOOHWDVJDOOHWLWDVEL]FRFKLWRVHQ
XQ6ROR(VWDQWH
+RUQHDU R 8VHXWHQVLOLRVEULOODQWHV
*DOOHWDVJDOOHWLWDVEL]FRFKLWRVHQ
0~OWLSOHV(VWDQWHV
+RUQHDUSRU&RQYHFFLyQ
+RUQHDU
(VWDQWHV±\
(VWDQWHV±\
$VHJ~UHVHGHTXHKD\DXQIOXMRGHDLUHDGHFXDGR
Cambie la ubicación de la comida parcialmente durante
ODFRFFLyQDILQGHREWHQHUUHVXOWDGRVGHFRFFLyQPiV
parejos.
Bife y Cerdo
+DPEXUJXHVDV Asar Alto R&
8VHXQDEDQGHMDSDUDDVDUPXHYDODFRPLGDPiVDEDMR
para que quede más preparada y menos soasada.
Preste atención a la comida al asarla. Centre la comida
debajo del quemador.
%LIHV\&KXOHWDV Asar Alto R&
8VHXQDEDQGHMDSDUDDVDUPXHYDODFRPLGDPiVDEDMR
para que quede más preparada y menos soasada.
Preste atención a la comida al asarla. Centre la comida
debajo del quemador.
'RUDGRV +RUQHDU R
'HMHVLQFXEULUuse una olla chata tal como una olla para
asar. No se requiere precalentarla.
Ave
Pollo entero +RUQHDU R
'HMHVLQFXEULUXVHXQDROODFKDWDWDOFRPRXQD
olla para asar.
3HFKXJDVSDWDVPXVORVFRQ
huesos
$VDGR%DMR
+RUQHDU
R%
6LVHHPSDQyRFXEULyFRQVDOVDHYLWHORVPRGRV%URLO+L
$VDU$OWR$VHGHOODGRGHODSLHOKDFLDDEDMRSULPHUR
Preste atención a la comida al asarla.
Pechugas de pollo deshuesadas
$VDGR%DMR
+RUQHDU
R%
0XHYDODFRPLGDPiVDEDMRSDUDTXHTXHGHPiV
SUHSDUDGD\PHQRVVRDVDGD\PiVDUULEDSDUDVRDVDU
dorar al asar.
Pavo entero +RUQHDU 1 o 2
'HMHVLQFXEULUXVHXQDROODFKDWDWDOFRPRXQD
olla para asar.
Pechuga de Pavo +RUQHDU R
'HMHVLQFXEULUXVHXQDROODFKDWDWDOFRPRXQD
olla para asar.
Pescado $VDGR%DMR
R&*URVRUGHSXOJDGDRPHQRV
R%!SXOJDGD
Preste atención a la comida al asarla.
Cazuelas +RUQHDU R
Comidas Congeladas a Conveniencia
3L]]DSURGXFWRVFRQSDSDV
SDWLWDVGHSROORIULWDVDSHULWLYRVHQ
XQ6ROR(VWDQWH
+RUQHDU R 8VHXWHQVLOLRVEULOODQWHV
3L]]DSURGXFWRVFRQSDSDV
SDWLWDVGHSROORIULWDVDSHULWLYRVHQ
0~OWLSOHV(VWDQWHV
+RUQHDU
+RUQHDUSRU&RQYHFFLyQ
\
\
8VHXWHQVLOLRVEULOODQWHV
Cambie la ubicación de la comida parcialmente durante
ODFRFFLyQDILQGHREWHQHUUHVXOWDGRVGHFRFFLyQPiV
parejos.
Guía de Cocción
USO DEL HORNO: Guía de Cocción

49-85220
21
Limpieza del Horno
CUIDADO Y LIMPIEZA: Limpieza del Horno
$VHJ~UHVHTXHWRGRVORVFRQWUROHVHVWpQDSDJDGRV\TXHWRGDVODVVXSHUILFLHVVHHQIUtHQDQWHVGHOLPSLDUFXDOTXLHUSDUWHGHOKRUQR
Exterior del Horno
1RXVHOLPSLDGRUHVGHKRUQROLPSLDGRUHVDEUDVLYRVOLPSLDGRUHV
OtTXLGRVIXHUWHVHVWURSDMRVGHDFHURDOPRKDGLOODVSDUDIUHJDU
GHSOiVWLFRQLSROYRVOLPSLDGRUHVHQHOLQWHULRURHOH[WHULRU
del horno. Limpie el mismo con agua y jabón o una solución
de vinagre y agua. Enjuague con agua limpia y seque con
XQDWHODVHFD$OOLPSLDUVXSHILFLHVDVHJ~UHVHGHTXHHVWpQD
temperatura ambiente y fuera del contacto con la luz solar.
(OGHUUDPHGHDGRERMXJRVGHIUXWDVDOVDVGHWRPDWH\
líquidos para humedecer que contengan ácidos pueden
ocasionar descoloración y se deberán limpiar en cuanto las
VXSHUILFLHVFDOLHQWHVVHHQIUtHQ\OXHJRVHGHEHUiQHQMXDJDU
Estantes del Horno
Todas las parrillas del horno se podrán limpiar a mano con un
limpiador abrasivo o viruta. Los estantes del horno de limpieza
DXWRPiWLFDQHJURVSRGUiQSHUPDQHFHUHQHOKRUQRGXUDQWHHO
ciclo de limpieza automática. Los estantes cubiertos de níquel
SODWHDGRVQRGHEHQSHUPDQHFHUHQHOKRUQRGXUDQWHHOFLFOR
GHOLPSLH]DDXWRPiWLFD+DFHUHVWRGHVOXVWUDUiORVHVWDQWHV6L
cualquier tipo de estante es dejado en el horno durante el ciclo
GHOLPSLH]DDXWRPiWLFDHVSRVLEOHTXHVHYXHOYDGLItFLOGHVOL]DU
el estante.
/XHJRGHOLPSLDUORVHVWDQWHVXVHXQDWHODVXDYHRXQDWRDOOD
GHSDSHOSDUDIURWDUXQDSHTXHxDFDQWLGDGGHDFHLWHYHJHWDO
VREUHORVH[WUHPRVWDQWRL]TXLHUGRFRPRGHUHFKRGHOHVWDQWH
Esto asegurará que los estantes se puedan deslizar fácilmente
hacia dentro y fuera del horno.
Interior del Horno
El interior de su nuevo horno puede ser limpiado de forma
PDQXDORXWLOL]DQGRORVPRGRV6WHDP&OHDQ/LPSLH]DFRQ9DSRU
R6HOI&OHDQ/LPSLH]D$XWRPiWLFDHQDOJXQRVPRGHORV
(OGHUUDPHGHDGRERMXJRVGHIUXWDVDOVDVGHWRPDWH\
líquidos para humedecer que contengan ácidos pueden
ocasionar descoloración y se deberán limpiar en cuanto las
VXSHUILFLHVFDOLHQWHVVHHQIUtHQ\OXHJRVHGHEHUiQHQMXDJDU
Limpieza Manual
1RXVHOLPSLDGRUHVGHKRUQROLPSLDGRUHVDEUDVLYRV
OLPSLDGRUHVOtTXLGRVIXHUWHVHVWURSDMRVGHDFHURDOPRKDGLOODV
SDUDIUHJDUQLSROYRVOLPSLDGRUHVHQHOLQWHULRUGHOKRUQR
Limpie el mismo con agua y jabón o una solución de vinagre
y agua. Enjuague con agua limpia y seque con una tela seca.
$OOLPSLDUVXSHILFLHVDVHJ~UHVHGHTXHHVWpQDWHPSHUDWXUD
ambiente y fuera del contacto con la luz solar.
Modo de Limpieza con Vapor (en algunos modelos)
/DILQDOLGDGGHODIXQFLyQ6WHDP&OHDQ/LPSLH]DFRQ9DSRU
es usar agua para limpiar la suciedad leve de su horno en una
WHPSHUDWXUDLQIHULRUDODGH6HOI&OHDQ/LPSLH]D$XWRPiWLFD
3DUDXVDUODIXQFLyQ6WHDP&OHDQ/LPSLH]DFRQ9DSRU
1. Comience con el horno a temperatura ambiente.
/LPSLHODJUDVDH[FHVLYD\ODVXFLHGDGGHOKRUQR
9LHUWDXQDWD]DGHDJXDHQODSDUWHLQIHULRUGHOKRUQR
&LHUUH\WUDEHODSXHUWD
3UHVLRQHODWHFODSteam Clean (Limpieza con Vapor) y
luego presione Start (Iniciar).
1RSRGUiDEULUODSXHUWDGXUDQWHORVPLQXWRVGHOFLFOR6WHDP
&OHDQ/LPSLH]DFRQ9DSRU$OILQDOL]DUHOFLFORGH6WHDP&OHDQ
/LPSLH]DFRQ9DSRUGHVWUDEHODSXHUWDDEVRUEDHODJXD
UHVWDQWH\OLPSLHODVXFLHGDGDEODQGDGDSRUODKXPHGDGGHODV
paredes y la puerta del horno.
Modo de Limpieza Automática (en algunos modelos)
/HDODV,QVWUXFFLRQHVGH6HJXULGDGGHO+RUQRFRQ/LPSLH]D
$XWRPiWLFDHQHOFRPLHQ]RGHHVWHPDQXDODQWHVGHXVDU
HOPRGR6HOI&OHDQ/LPSLH]D$XWRPiWLFD(VWHPRGRXVD
temperaturas muy altas para limpiar el interior del horno. Para un
KRUQRPRGHUDGDPHQWHVXFLRXVHXQFLFORGHOLPSLH]DDXWRPiWLFD
GHKRUDV3DUDXQKRUQRPX\VXFLRXVHXQFLFORGHOLPSLH]D
DXWRPiWLFDGHKRUDV6yORORVHVWDQWHVGHOKRUQRGHOLPSLH]D
DXWRPiWLFDQHJURV\ODVUHMLOODVSRGUiQSHUPDQHFHUHQHOKRUQR
GXUDQWHHOFLFORGHOLPSLH]DDXWRPiWLFD7RGRVORVGHPiVtWHPV
LQFOX\HQGRORVHVWDQWHVQLTXHODGRVSODWHDGRVGHEHUiQVHU
UHWLUDGRV6LORVHVWDQWHVQLTXHODGRVSODWHDGRVVHGHMDQGHQWUR
GHOKRUQRGXUDQWHXQFLFORGHOLPSLH]DDXWRPiWLFDORVHVWDQWHV
VXIULUiQGHVOXVWUH6LFXDOTXLHUWLSRGHHVWDQWHHVGHMDGRHQHO
KRUQRGXUDQWHHOFLFORGHOLPSLH]DDXWRPiWLFDHVSRVLEOHTXHVH
vuelva difícil deslizar el estante. Para acceder a instrucciones de
OXEULFDFLyQFRQVXOWHODVHFFLyQGH(VWDQWHVGHO+RUQR
IMPORTANTE: Las emanaciones producidas por el ciclo de
autolimpieza de cualquier horno afectan la salud de algunas
aves de manera notoria. Procure llevar sus aves a otra
habitación bien ventilada.
3DUDXVDUODIXQFLyQ6HOI&OHDQ/LPSLH]D$XWRPiWLFD
1. Comience con el horno a temperatura ambiente.
/LPSLHODJUDVDH[FHVLYD\ODVVXFLHGDGHVGHOKRUQR\
del interior de la puerta.
5HWLUHFXDOTXLHUtWHPTXHQRVHDQORVHVWDQWHV\
UHMLOODVGHOLPSLH]DDXWRPiWLFDQHJURVVLORGHVHD
&RQVXOWHVREUHOD/LPSLH]DGHOD6XSHUILFLHGH&RFFLyQ
para determinar si sus rejillas pueden ser limpiadas
automáticamente y para detalles importantes en relación
a la colocación de las rejillas.
&LHUUH\WUDEHODSXHUWD
3UHVLRQHODWHFODSelf Clean (Limpieza Automática)
FRQILJXUHXQWLHPSRHQWUH\KRUDV\OXHJRSUHVLRQH
Start (Iniciar).
No podrá abrir la puerta durante el ciclo de limpieza automática.
6LHOKRUQRHVWiGHPDVLDGRFDOLHQWHQRSRGUiGHVOL]DUODWUDED
$OILQDOL]DUHOFLFORGHOLPSLH]DDXWRPiWLFDGHMHTXHHOKRUQRVH
HQIUtHGHVWUDEHODSXHUWD\OLPSLHFXDOTXLHUFHQL]DTXHKD\D
quedado en el horno.

22
49-85220
Panel de Control y Perillas
Limpie el panel de control luego de cada uso del horno con
XQDWHODK~PHGD3DUDOLPSLDUXVHMDEyQVXDYH\DJXDRXQD
solución que sea mitad de vinagre y mitad de agua. Enjuague
con agua limpia. Pula en seco con una tela suave.
1RXVHOLPSLDGRUHVDEUDVLYRVOLPSLDGRUHVOtTXLGRVIXHUWHV
almohadillas para fregar de plástico y limpiadores de horno en
HOSDQHOGHFRQWUROGDxDUiQHODFDEDGR
Superficies de Acero Inoxidable (en algunos modelos)
1RXVHYLUXWDVGHDFHURpVWDVGDxDUiQODVXSHUILFLH
3DUDOLPSLDUODVXSHUILFLHGHDFHURLQR[LGDEOHXVHDJXDWLELD
FRQMDEyQRXQOLPSLDGRURSXOLGRUSDUDDFHURLQR[LGDEOH
6LHPSUHOLPSLHODVXSHUILFLHHQODGLUHFFLyQGHOYHWHDGR6LJD
las instrucciones del limpiador para limpiar la superficie de
DFHURLQR[LGDEOH
/RVOLPSLDGRUHVFRQiFLGRR[iOLFRWDOHVFRPR%DU.HHSHUV
)ULHQG6RIW&OHDQVHUHOLPLQDUiQHOy[LGRGHVOXVWUHV\
SHTXHxDVPDQFKDVVREUHODVXSHUILFLH8VHVyORXQOLPSLDGRU
líquido libre de material abrasivo y frote en la dirección de las
OtQHDVGHOFHSLOORFRQXQDHVSRQMDVXDYH\K~PHGD
3DUDUHDOL]DUFRQVXOWDVVREUHODDGTXLVLFLyQGHSURGXFWRV
incluyendo limpiadores o pulidores para electrodomésticos de
DFHURLQR[LGDEOHOHDODVVHFFLRQHVGH$VLVWHQFLD\$FFHVRULRV
en el comienzo de este manual.
3DUDXQDOLPSLH]DPiVIiFLOODVSHULOODVGHOFRQWUROSXHGHQVHU
retiradas empujando las mismas directamente hacia fuera una
YH]TXHODVPLVPDVHVWpQHQODSRVLFLyQ2))$SDJDGR1R
empuje las perillas hacia arriba o abajo ni sostenga objetos
VREUHODVPLVPDV(VWRSXHGHGDxDUHOHMHGHODYiOYXODGH
gas. Las perillas se podrán lavar a mano con agua y jabón o
en un lavavajillas.
Para reemplazar las perillas
OXHJRGHODOLPSLH]DDOLQHH
el agujero de la perilla de la
parte trasera con el eje de
la válvula de gas y empuje
hacia adentro hasta que la
perilla esté ajustada de forma
segura. Todas las perillas son
intercambiables.
Limpieza de la Placa de Cocción
CUIDADO Y LIMPIEZA: Limpieza de la Placa de Cocción
Limpieza de los Quemadores Superficiales
Apague todos los controles. Espere a que la placa de cocción se enfríe antes de retirar las rejillas y las partes del quemador. Al
UHWLUDUODVWDSDV\FDEH]DVGHORVTXHPDGRUHVUHFXHUGHVXWDPDxR\XELFDFLyQ9XHOYDDFRORFDUORVHQVXVPLVPDVXELFDFLRQHV
luego de la limpieza.
Retiro de las Cabezas de los Quemadores
Quemador Redondo
La tapa y la cabeza del quemador pueden ser levantadas de la
superficie de cocción y separadas una de otra.
Quemador Oval (en algunos modelos)
La tapa del quemador está adherida de forma permanente a
la cabeza del quemador. El ensamble de la tapa y la cabeza
pueden ser retiradas de la superficie de cocción.
PRECAUCIÓN
No intente retirar la tapa del quemador ovalado de la cabeza del quemador.
Base de la Superficie de Cocción
1RXVHOLPSLDGRUHVGHKRUQROLPSLDGRUHVDEUDVLYRV
OLPSLDGRUHVOtTXLGRVIXHUWHVHVWURSDMRVGHDFHURDOPRKDGLOODV
SDUDIUHJDUGHSOiVWLFRQLSROYRVOLPSLDGRUHVVREUHODEDVHGH
la superficie de cocción. Limpie el mismo con agua y jabón o
una solución de vinagre y agua. Enjuague con agua limpia y
VHTXHFRQXQDWHODVHFD$OOLPSLDUVXSHILFLHVDVHJ~UHVHGH
que estén a temperatura ambiente y fuera del contacto con la
luz solar.
(OGHUUDPHGHDGRERMXJRVGHIUXWDVDOVDVGHWRPDWH\
líquidos para humedecer que contengan ácidos pueden
ocasionar descoloración y se deberán limpiar en cuanto las
VXSHUILFLHVFDOLHQWHVVHHQIUtHQ\OXHJRVHGHEHUiQHQMXDJDU
6LVXPRGHORFXHQWDFRQXQDVXSHUILFLHGHFRFFLyQGHDFHUR
LQR[LGDEOHFRQVXOWHODVLQVWUXFFLRQHVGHOLPSLH]DGHOD
6XSHUILFLHGH$FHUR,QR[LGDEOHTXHDSDUHFHQHQODVHFFLyQGHO
Panel de Control y Perillas.
Tapa del Quemador Redondo
(Extraíble)
Electrodo
Cabeza del
Quemador
Ensamble de la Cabeza y de
la Tapa del Quemador Oval
(No Extraíble)
Cabeza del
Quemador Oval
Electrodo
Perilla del quemador superficial

49-85220
23
Limpieza de la Placa de Cocción (Cont.)
CUIDADO Y LIMPIEZA: Limpieza de la Placa de Cocción
Limpieza de los Quemadores Superficiales (Cont.)
Limpieza de las Tapas de los Quemadores
Lave las tapas de los quemadores en agua caliente con jabón
y enjuague con agua limpia. Puede fregar con una base de
fregado plástica para eliminar partículas de comida quemadas.
Las tapas redondas de los quemadores también se pueden
limpiar en un lavavajillas.
Limpieza de las Cabezas de los Quemadores
/LPSLHODVFDEH]DVGHORVTXHPDGRUHVGHIRUPDUXWLQDULD
HVSHFLDOPHQWHOXHJRGHGHUUDPHVLPSRUWDQWHVTXHSRGUtDQ
bloquear las aberturas del quemador. Retire los quemadores
cuando estén fríos. Lave los mismos con agua caliente y
jabón. Enjuague con agua limpia. Para eliminar las manchas
PiVUHEHOGHVXVHXQFHSLOORFRQFHUGDSOiVWLFD
NOTA: No use lana de acero ni estropajos para limpiar las
SDUWHVGHOTXHPDGRU\DTXHSRGUiQEORTXHDUODVDEHUWXUDV
Nunca lave las cabezas de los quemadores en el lavavajillas.
Esto podrá hacer que se descoloren.
Las hendiduras de las cabezas de los quemadores se deben
mantener limpias en todo momento para obtener una llama
pareja y sin obstrucción.
Las partes bloqueadas o sucias de los quemadores o los
electrodos no permitirán que el quemador funcione de forma
correcta.
3DUDXQHQFHQGLGRDGHFXDGRDVHJ~UHVHGHTXHHODJXMHURSH-
TXHxRHQODVHFFLyQTXHFRLQFLGHFRQHOHOHFWURGRVHPDQWHQJD
abierto. Puede usar una aguja de coser o un precinto para
desbloquearlo.
Reemplazo de los Quemadores Superficiales
Antes de colocar las tapas y cabezas de los quemadores y el
HQVDPEOHGHODFDEH]DWDSDQXHYDPHQWHHVFXUUDHOH[FHVR
de agua y luego seque las mismas totalmente.
Vuelva a colocar las cabezas de los quemadores en las
XELFDFLRQHVFRUUHFWDVGHDFXHUGRFRQVXVWDPDxRV
$VHJ~UHVHGHTXHFDGDWDSDTXHGHFRUUHFWDPHQWHDSR\DGD
VREUHODFDEH]DGHOTXHPDGRUFRPRVHPXHVWUDD
continuación.
PRECAUCIÓN No use la parte superior
de la cocina sin que todas las partes de los quemadores y
las parrillas estén en sus respectivos lugares.
Cualquier derrame en o alrededor de un electrodo se deberá
limpiar de forma cuidadosa. Evite golpear el electrodo con cual-
TXLHUFRVDGXUD\DTXHSRGUiVHUGDxDGR
El electrodo del encendedor de la chispa es
H[SXHVWRFXDQGRODFDEH]DGHOTXHPDGRUHV
retirada. Cuando un quemador se gira a LITE
todos los quemadores hacen chispa. No intente
desensamblar ni limpiar un quemador mientras
otro quemador está encendido.
El agujero redondo en la
cabeza del quemador se
deberá mantener limpio.
Electrodo
La tapa del
quemador está
correctamente
colocada.
La tapa del
quemador NO está
correctamente
colocada.
La tapa del
quemador NO está
correctamente
colocada.

24
49-85220
Limpieza de la Placa de Cocción (Cont.)
CUIDADO Y LIMPIEZA: Limpieza de la Placa de Cocción
Plancha (en algunos modelos)
Plancha de Aluminio No Adherente: Lave la plancha con
GHWHUJHQWHSDUDSODWRV\DJXDFDOLHQWH'HVHUQHFHVDULRIURWH
con una almohadilla plástica no abrasiva.
Precauciones de la Plancha:
Ŷ 6LDOJRVHGHUUDPyGHEDMRGHODSODQFKDVHGHEHUiOLPSLDU
tan pronto como sea posible para evitar que sea horneado
en la placa de cocción.
Ŷ 1RSHUPLWDTXHVHDFXPXOHJUDVDGHEDMRGHODSODQFKD\DTXH
puede haber riesgo de incendio. Limpie debajo de la plancha
FRQDJXDFDOLHQWH\MDEyQWDQSURQWRFRPRVHDSRVLEOH
Ŷ No lave la plancha en el lavavajillas.
Ŷ No limpie la plancha en el horno de limpieza automática.
+DFHUHVWRGDxDUiODFREHUWXUDDQWLDGKHUHQWH
Protectores de Soportes de Rejillas (en algunos modelos)
6LXQRGHORVSURWHFWRUHVGHJRPDGHODUHMLOODGHOD
SODFDGHFRFFLyQVHSLHUGHRGDxDVHSRGUiQREWHQHU
SLH]DVGHUHSXHVWROODPDQGRDO*(&$5(6
3DUDLQVHUWDUORVQXHYRVSURWHFWRUHVVLPSOHPHQWH
FRORTXHHOH[WUHPRGHOSURWHFWRUFRQIRUPDFyQLFDHQHO
agujero de la placa de cocción y empuje hacia abajo de
IRUPDVXDYHGREODQGRHOSURWHFWRU
Protectores para Soportes de Rejillas
Parrillas de Quemadores
Limpieza Manual
Las rejillas se deberán lavar con agua caliente y jabón y
deberán ser enjuagadas con agua limpia. Para ablandar la
FRPLGDTXHPDGDFRORTXHODVUHMLOODVHQXQDVROXFLyQFRQó
GHWD]DGHDPRQtDFRKRJDUHxRGXUDQWHYDULDVKRUDV/XHJR
friegue las rejillas con un estropajo de plástico con agua
caliente y jabón. Enjuague a fondo y seque.
Modo Self Clean (Limpieza Automática)
(en algunos modelos)
6LODVUHMLOODVQRFXHQWDQFRQSURWHFWRUHVGHJRPDHQOD
VXSHUILFLHLQIHULRUSRGUiQVHUOLPSLDGDVHQHOKRUQRXVDQGR
el ciclo de limpieza automática. No intente limpiar las rejillas
en el horno si las mismas cuentan con protectores de goma.
+DFHUHVWRGHVWUXLUiORVSURWHFWRUHVGHJRPDDIHFWDQGRHO
funcionamiento de los quemadores.
Las rejillas cubiertas de porcelana se podrán volver
JUDGXDOPHQWHiVSHUDVVLVRQH[SXHVWDVGHIRUPDFRQWLQXDD
las temperaturas de limpieza automática.
6LVXKRUQRHVWiHTXLSDGRFRQHVWDQWHVGHOLPSLH]DDXWRPiWLFD
QHJURVVHUHFRPLHQGDVHJXLUODVLQVWUXFFLRQHVSDUDOD
FRORFDFLyQGHSDUULOODVHQORVHVWDQWHV6LVXKRUQRHVWi
HTXLSDGRFRQHVWDQWHVQLTXHODGRVVHUHFRPLHQGDVHJXLU
las instrucciones para la colocación de rejillas en el fondo
GHOKRUQR/RVHVWDQWHVFXELHUWRVGHQtTXHOSODWHDGRVQR
deben permanecer en el horno durante el ciclo de limpieza
DXWRPiWLFD+DFHUHVWRGHVOXVWUDUiORVHVWDQWHV6LFXDOTXLHU
tipo de estante es dejado en el horno durante el ciclo de
OLPSLH]DDXWRPiWLFDHVSRVLEOHTXHVHYXHOYDGLItFLOGHVOL]DUHO
HVWDQWH3DUDDFFHGHUDLQVWUXFFLRQHVGHOXEULFDFLyQFRQVXOWH
ODVHFFLyQGH(VWDQWHGHO+RUQR
NOTA:$OFRORFDURUHWLUDUUHMLOODVGHOKRUQRQRGHVOLFHODV
PLVPDVVREUHORVHVWDQWHVQLVREUHHOIRQGRGHOKRUQR+DFHU
HVWRSRGUtDGDxDUHOHVPDOWHGHORVHVWDQWHVRHOIRQGRGHOKRUQR
Para realizar la limpieza automática de sus parrillas en los
estantes de limpieza automática:
,QVHUWHORVHVWDQWHVHQODVSRVLFLRQHV\RHQODV
SRVLFLRQHV\
'HIRUPDVXDYHFRORTXHXQDUHMLOODHQFDGDHVWDQWH
Para realizar la limpieza automática de sus rejillas en el
fondo del horno:
1. Retire todos los estantes del horno.
'HIRUPDVXDYHFRORTXHXQDUHMLOODHQHOFHQWURGHO
fondo del horno con la rejilla orientada en la posición
HUJXLGD$SLOHODUHMLOODVUHVWDQWHFRPRVHPXHVWUDD
continuación. No coloque ni apile las rejillas en ninguna
otra configuración.
8QDYH]TXHODVUHMLOODVIXHURQFRORFDGDVHQHOKRUQRXVHHO
ciclo de limpieza automática siguiendo las instrucciones de la
VHFFLyQGH/LPSLH]DGHO+RUQR
NOTA: Tenga cuidado al retirar las parrillas del horno superior
una vez que el ciclo de auto limpieza haya finalizado. Es
SRVLEOHTXHODVSDUULOODVD~QHVWpQFDOLHQWHV
8QDYH]FRPSOHWDGRHOFLFORGHOLPSLH]DDXWRPiWLFDODVUHMLOODV
pueden ser retiradas de forma cuidadosa. Es posible que
observe un residuo blanco en las rejillas. Limpie el mismo con
XQDHVSRQMDK~PHGD6LODVPDQFKDVEODQFDVSHUVLVWHQPRMH
la esponja con una solución mitad de vinagre y mitad de agua
y vuelva a limpiar las rejillas.
$OUHHPSOD]DUODVUHMLOODVHQODVXSHUILFLHGHFRFFLyQDVHJ~UHVH
de ubicarlas de forma correcta. Las rejillas se deben poder
posicionar de forma segura en la superficie de cocción.

49-85220
25
Limpieza de la Puerta y el Cajón
CUIDADO Y LIMPIEZA: Limpieza de la Puerta y el Cajón
Cajón de Almacenamiento Extraíble (en algunos modelos)
El cajón de almacenamiento es un buen lugar para guardar
utensilios de cocina y panadería. No guarde plásticos ni
materiales inflamables en el cajón.
El cajón de almacenamiento se podrá retirar para limpiar
debajo de la cocina. Limpie el cajón de almacenamiento con
XQDWHODRHVSRQMDK~PHGD1XQFDXVHDEUDVLYRVGXURVQL
almohadillas para fregar.
Retiro del Cajón de Almacenamiento:
1. Empuje el cajón hacia afuera hasta que se detenga.
2. Incline el frente del cajón hacia arriba y empuje el mismo
hacia fuera de la cocina.
Reemplazo del Cajón de Almacenamiento:
1. Apoye los costados del cajón en los topes de la cocina.
2. Empuje directamente hacia atrás hasta que el cajón quede
en su posición.
'HVOLFHHOFDMyQFRPSOHWDPHQWHGHQWURGHOKRUQR
El cajón de almacenamiento se podrá retirar para
limpiar debajo de la cocina.
Limpieza de la Puerta del Horno
Limpieza del Interior de la Puerta
1RSHUPLWDTXHHOH[FHGHQWHGHDJXDHQWUHDQLQJ~QDJXMHURR
ranuras de la puerta.
Aplique detergente para lavar platos sobre cualquier
VDOSLFDGXUDTXHKD\DVREUHHOYLGULRGHELGRDOKRUQHDGR8VH
el filo de una navaja del lado seguro para despejarlo. Luego
limpie el vidrio con una tela con jabón para eliminar cualquier
residuo y seque.
El área que está fuera de la junta se puede limpiar con un
estropajo de plástico con jabón. No frote ni limpie la junta de la
SXHUWDSRVHHXQDUHVLVWHQFLDH[WUHPDGDPHQWHEDMDDODDEUDVLyQ
6LREVHUYDTXHODMXQWDVHHPSLH]DDJDVWDUVHGHVKLODFKDR
GDxDGHFXDOTXLHUIRUPD\VLTXHGyIXHUDGHODSXHUWDGHEHUi
reemplazar la misma.
Limpieza del Exterior de la Puerta
6LODVPDQFKDVHQHOERUGHGHODYHQWDQDGHODSXHUWDVRQ
SHUVLVWHQWHVXVHXQOLPSLDGRUDEUDVLYRVXDYHRXQDHVSRQMD
con estropajo para obtener un mejor resultado. No use este
método sobre ninguna otra superficie.
Superficies de Acero Inoxidable (en algunos modelos)
1RXVHYLUXWDVGHDFHURpVWDVGDxDUiQODVXSHUILFLH
3DUDOLPSLDUODVXSHUILFLHGHDFHURLQR[LGDEOHXVHDJXDWLELD
FRQMDEyQRXQOLPSLDGRURSXOLGRUSDUDDFHURLQR[LGDEOH
6LHPSUHOLPSLHODVXSHUILFLHHQODGLUHFFLyQGHOYHWHDGR6LJD
las instrucciones del limpiador para limpiar la superficie de
DFHURLQR[LGDEOH
/RVOLPSLDGRUHVFRQiFLGRR[iOLFRWDOHVFRPR%DU.HHSHUV
)ULHQG6RIW&OHDQVHUHOLPLQDUiQHOy[LGRGHVOXVWUHV\
SHTXHxDVPDQFKDVVREUHODVXSHUILFLH8VHVyORXQOLPSLDGRU
líquido libre de material abrasivo y frote en la dirección de las
OtQHDVGHOFHSLOORFRQXQDHVSRQMDVXDYH\K~PHGD
3DUDUHDOL]DUFRQVXOWDVVREUHODDGTXLVLFLyQGHSURGXFWRV
incluyendo limpiadores o pulidores para electrodomésticos de
DFHURLQR[LGDEOHOHDODVVHFFLRQHVGH$VLVWHQFLD\$FFHVRULRV
en el comienzo de este manual.

26
49-85220
Mantenimiento
CUIDADO Y LIMPIEZA: Mantenimiento
PELIGRO DE DESCARGA O QUEMADURAS: Antes de reemplazar la lámpara de luz
GHOKRUQRGHVFRQHFWHODFRQH[LyQHOpFWULFDGHOKRUQRGHOIXVLEOHSULQFLSDORGHOSDQHOGHO
GLV\XQWRU6LHVWRQRVHFXPSOHVHSRGUiSURGXFLUXQDGHVFDUJDHOpFWULFDRXQLQFHQGLR
ADVERTENCIA
PRECAUCIÓN
PRECAUCIÓN
RIESGO DE INCENDIO: La tapa de vidrio y la lámpara de luz se deberán retirar cuando
HVWpQIUtDV7RFDUHOYLGULRFDOLHQWHVLQSURWHFFLyQHQODVPDQRVRFRQXQWUDSRK~PHGR
puede ocasionar quemaduras.
$QWHVGHUHHPSOD]DUODOiPSDUDGHOX]GHOKRUQRGHVFRQHFWHODFRQH[LyQHOpFWULFDGHOD
FRFLQDGHOIXVLEOHSULQFLSDORGHOSDQHOGHOGLV\XQWRU$VHJ~UHVHGHGHMDUTXHODWDSDGHODOX]
y la lámpara se enfríen completamente.
/DOiPSDUDGHOX]GHOKRUQRHVWiFXELHUWDSRUXQDWDSDGHYLGULRH[WUDtEOHTXHHVVRVWHQLGD
SRUXQFDEOHTXHODFUX]D5HWLUHODSXHUWDGHOKRUQRVLORGHVHDSDUDOOHJDUDODWDSD
fácilmente. 5HWLUHODSXHUWDGHOKRUQRVLORGHVHDSDUDOOHJDUDODWDSDIiFLOPHQWH3DUD
DFFHGHUDLQVWUXFFLRQHVGHWDOODGDVVREUHHOUHWLURGHODSXHUWDGHOKRUQRFRQVXOWHODVHFFLyQ
VREUH&yPR5HWLUDUOD3XHUWDGHO+RUQR
Luz del Horno
Reemplazo de la Lámpara:
'HVFRQHFWHHOFDEOHGHHOHFWULFLGDGDODFRFLQD
0DQWHQJDHVWDEOHODWDSDGHYLGULRGHPRGRTXHQRVH
caiga al ser liberada.
'HVOLFHODPLVPDFHUFDGHOERUGHGHOVXVSHQVRUGHODWDSD
hasta que la tapa sea liberada. No retire ningún tornillo
para retirar la tapa de vidrio.
5HHPSODFHODOiPSDUDSRUXQDSDUDHOHFWURGRPpVWLFRVGH
ZDWWVNo toque la lámpara caliente con la mano o una
tela húmeda. Sólo retire la lámpara cuando esté fría.
0DQWHQJDODWDSDGHYLGULRHVWDEOHVREUHODOiPSDUDQXHYD
(PSXMHHOVXVSHQVRUGHODWDSDGHOFDEOHFHUFDGHOERUGH
hasta que el borde del suspensor de la tapa del cable esté
ubicado en el borde de la tapa de vidrio.
&RQHFWHODHOHFWULFLGDGDODFRFLQD
Amplio suspensor de tapa
Borde
Tapa de vidrio

49-85220
27
Mantenimiento (Cont.)
CUIDADO Y LIMPIEZA: Mantenimiento
Puerta del Horno Desmontable
La puerta es muy pesada. Tenga cuidado al retirar y levantar la puerta. No levante la puerta usando la manija.
Retiro de la Puerta:
1. Abra la puerta totalmente.
6REUHFDGDELVDJUDGHVOLFHHOEORTXHRGHODELVDJUDKDFLD
DUULEDDVHJXUDQGRTXHVHDMXVWHHQVXSRVLFLyQWRWDOPHQWH
hacia arriba.
)LUPHPHQWHWRPHDPERVODGRVGHODSXHUWDFHUFDGHOD
manija.
&LHUUHODSXHUWDKDVWDTXHODSDUWHVXSHULRUGHODPLVPD
TXHGHDDSUR[LPDGDPHQWH´GHODHVWUXFWXUDGHODFRFLQD
/HYDQWHODSXHUWDKDFLDDUULED\DIXHUDGHODFRFLQDKDVWD
que ambos brazos de las bisagras estén fuera de las
ranuras de la estructura de la cocina.
Reemplazo de la Puerta:
1. Firmemente tome ambos lados de la puerta cerca de la
manija.
2. Con la puerta en el mismo ángulo que en la posición de
UHWLURDSR\HODDEHUWXUDHQODSDUWHLQIHULRUGHOEUD]RGHOD
ELVDJUDL]TXLHUGDVREUHHOH[WUHPRLQIHULRUGHODUDQXUDGH
la bisagra izquierda. La abertura en el brazo de la bisagra
deberá estar totalmente apoyada en la parte inferior de la
ranura. Repita el procedimiento del lado derecho.
$EUDODSXHUWDWRWDOPHQWH6LODSXHUWDQRVHDEUH
FRPSOHWDPHQWHORVEUD]RVGHODPDQLMDQRHVWiQ
asentados correctamente. Retire la puerta de la cocina y
repita el Paso 2.
(PSXMHORVEORTXHRVGHODELVDJUDKDFLDDEDMRKDVWDOD
posición de bloqueo.
&LHUUHODSXHUWDGHOKRUQR
Empuje los bloqueos de las bisagras
hacia arriba para desbloquearlos
Abertura
Empuje los bloqueos de la
bisagra hacia abajo para
bloquear
Posición de retiro
6LVHHOLPLQDQGHIRUPDLQDSURSLDGDODVELVDJUDVGHODSXHUWDGHOKRUQRVHSRGUiQFHUUDU
UHSHQWLQDPHQWH\RFDVLRQDUOHVLRQHVSHUVRQDOHVVREUHH[WUHPLGDGHVTXHHVWpQFHUFDGHOD
ELVDJUD6LJDODVVLJXLHQWHVLQVWUXFFLRQHVDILQGHHYLWDUULHVJRVGHOHVLyQDOUHWLUDU\YROYHU
a instalar la puerta del horno.
ADVERTENCIA

28
49-85220
Notas

49-85220
29
Notas

30
49-85220
CONSEJOS PARA LA SOLUCIÓN DE PROBLEMAS
¡Ahorre tiempo y dinero! Primero revise los cuadros que aparecen en las siguientes páginas y es posible que no necesite
solicitar reparaciones.
Consejos para la Solución de Problemas... Antes de solicitar el servicio técnico
Problema Causa Posible Qué Hacer
Mi horno nuevo no
cocina como el anterior.
Su horno nuevo cuenta con un sistema de cocción
diferente con relación al anterior y, por lo tanto, es
posible que cocine de forma diferente.
'XUDQWHORVSULPHURVXVRVVLJDORVWLHPSRV\
temperaturas de sus recetas atentamente y use
las posiciones de los estantes recomendadas en la
*XtDGH&RFFLyQ6LD~QSLHQVDTXHVXKRUQRQXHYR
FRFLQDFRQGHPDVLDGRFDORURGHPDVLDGRIUtRSRGUi
ajustar el termostato usted mismo para aplicar su
preferencia de cocción específica. Consulte la sección
de Funciones Especiales.
La comida no se hornea
de forma apropiada
Controles del horno configurados de forma
incorrecta.
&RQVXOWHODVHFFLyQ0RGRVGH&RFFLyQ
La posición del estante es incorrecta. &RQVXOWHODVHFFLyQ*XtDGH&RFFLyQ
El estante no está nivelado. Para acceder a instrucciones sobre cómo nivelar su
FRFLQDFRQVXOWHODV,QVWUXFFLRQHVGH,QVWDODFLyQ
Uso de un utensilio incorrecto o de un utensilio de
tamaño inadecuado.
&RQVXOWHODVHFFLyQGH8WHQVLOLRV
La temperatura del horno debe ser ajustada. Consulte la sección Funciones Especiales.
La comida no asa de
forma apropiada
Controles del horno configurados de forma
incorrecta.
$VHJ~UHVHGHVHOHFFLRQDUHOPRGRFRUUHFWRSDUD
DVDU&RQVXOWHODVHFFLyQ*XtDGH&RFFLyQ
Se usó una posición incorrecta del estante. Para acceder a sugerencias de ubicación de los
HVWDQWHVFRQVXOWHOD*XtDGH&RFFLyQ
Utensilio de cocina inadecuado para asar. 8VHXQDROODHVSHFtILFDPHQWHGLVHxDGDSDUDDVDU
El papel de aluminio sobre la olla para asar
no fue ajustado de forma apropiada ni cortado
apropiadamente para drenar la grasa.
6LXVDUiSDSHOGHDOXPLQLRHQODROODSDUDDVDU
envuelva de forma ajustada y agregue cortes
conforme con aquellos en la olla para permitir que la
grasa sea drenada.
La temperatura del horno
es demasiado caliente o
demasiado fría
La temperatura del horno debe ser ajustada. Consulte la sección Funciones Especiales.
El horno y/o la pantalla
parecen no estar
funcionando
Es posible que un fusible de su hogar se haya
quemado o que el disyuntor se haya desconectado.
Reemplace el fusible o reinicie el disyuntor.
Controles del horno configurados de forma
incorrecta.
&RQVXOWHODVHFFLyQ8VRGHO+RUQR
El horno se encuentra en Sabbath Mode (Modo
Sabático)
9HULILTXHTXHHOKRUQRQRHVWpHQ6DEEDWK0RGH
0RGR6DEiWLFR&RQVXOWHODVHFFLyQ)XQFLRQHV
Especiales.
El reloj está apagado. &RQVXOWHODVHFFLyQGH&RQWUROHVGHO+RUQRR
Funciones Especiales.
Sonido de “chisporroteo”
o “traqueo”
Éste es el sonido de metal calentándose o
enfriándose durante las funciones de cocción y
limpieza.
Esto es normal.
La cocina está haciendo
un sonido de “clic”
cuando uso el horno.
Su estufa fue diseñada para mantener un control
más ajustado sobre la temperatura del horno.
Es posible que escuche que los elementos de
calentamiento del horno hagan sonidos de “clic”
con mayor frecuencia que con hornos más
antiguos para lograr mejores resultados durante
los ciclos de horneado, asado, convección y
limpieza automática.
Esto es normal.
A veces el horno tarda
más en precalentarse a la
misma temperatura
Utensilio o comida en el horno El utensilio o la comida en el horno hará que éste
tarde más en precalentarse. Retire estos artículos para
reducir el tiempo de precalentamiento.
Número de estantes en el horno Agregar más estantes al horno hará que éste tarde
más en precalentarse. Retire algunos estantes.

49-85220
31
Problema Causa Posible Qué Hacer
La luz del horno no
funciona
La lámpara está floja o presenta defectos. Ajuste o reemplace la lámpara. Para acceder a
LQVWUXFFLRQHVVREUHFyPRUHHPSOD]DUODOiPSDUDFRQVXOWH
ODVHFFLyQGH0DQWHQLPLHQWR
El modo de limpieza
automática del horno no
funciona
La temperatura del horno es demasiado
caliente como para configurar la limpieza
automática.
Espere a que el horno se enfríe.
Los controles del horno están configurados de
forma incorrecta.
&RQVXOWHODVHFFLyQGH/LPSLH]DGHO+RUQR
Exceso de humo
durante un ciclo de
limpieza
Suciedad o grasa excesiva. Presione la tecla Cancel/Off (Cancelar/ Apagar) Abra las
ventanas para liberar el humo en la habitación. Espere a
que el horno se enfríe por debajo de la temperatura de
GHVEORTXHR/LPSLHHOH[FHVRGHVXFLHGDG\UHLQLFLHHO
ciclo de limpieza.
El horno no limpia
luego de un ciclo de
limpieza
Los controles del horno están configurados de
forma incorrecta.
&RQVXOWHODVHFFLyQGH/LPSLH]DGHO+RUQR
El horno estaba demasiado sucio. /LPSLHGHUUDPHVH[FHVLYRVDQWHVGHLQLFLDUHOFLFORGH
OLPSLH]D(VSRVLEOHTXHHQKRUQRVFRQPXFKDVXFLHGDG
sea necesario usar la limpieza automática nuevamente o
usarla durante un período de tiempo más prolongado.
Fuerte olor a
“quemado” o a “aceite”
desde la ventilación
Esto es normal en un horno nuevo y
desaparecerá con el tiempo.
3DUDDFHOHUDUHOSURFHVRFRQILJXUHXQFLFORGHOLPSLH]D
DXWRPiWLFDSRUXQPtQLPRGHKRUDV&RQVXOWHODVHFFLyQ
GH/LPSLH]DGHO+RUQR
Humo excesivo al asar La comida está demasiado cerca del quemador. %DMHODSRVLFLyQGHOHVWDQWHFRQFRPLGD
La traba del horno no
se abre.
La temperatura dentro del horno no descendió
hasta la temperatura de desbloqueo.
Presione la tecla Cancel/Off (Cancelar/ Apagar). Espere
a que el horno se enfríe por debajo de la temperatura de
desbloqueo.
“TRABA DE LA
PUERTA” titila en la
pantalla.
El ciclo de limpieza automática o de limpieza
con vapor fue seleccionado pero la puerta no
está bloqueada.
%ORTXHHODSXHUWDGHOKRUQR
“F – y un número o
letra” titila en la pantalla
Tiene un código de error de función. Presione la tecla Cancel/Off (Cancelar/ Apagar) Permita
que el horno se enfríe durante una hora. Vuelva a poner
HOKRUQRHQIXQFLRQDPLHQWR6LHOFyGLJRGHODIXQFLyQ
VHUHSLWHGHVFRQHFWHWRWDOPHQWHODFRUULHQWHGHOKRUQR
GXUDQWHSRUORPHQRVPLQXWRV\YXHOYDDFRQHFWDUOD
PLVPD6LHOFyGLJRGHHUURUGHIXQFLyQVHUHSLWHOODPHDO
servicio técnico.
El reloj titila debido a un
corte de corriente
Corte o exceso de corriente 5HLQLFLHHOUHORM6LHOKRUQRHVWXYRHQXVRGHEHUiUHLQLFLDU
el mismo presionando la tecla Cancel/ Off (Cancelar/
Apagar) configurando el reloj y reiniciando cualquier
función de cocción.
Controles de Bloqueo
o Control La función de
bloqueo está activada.
6LDSDUHFHLOC ONHQODSDQWDOODHOFRQWUROGHODFRFLQD
está bloqueado. Apague esta función para usar la cocina.
&RQVXOWHODVHFFLyQGH&RQWUROHVGHO+RUQR
Los quemadores no se
encienden
El enchufe en la cocina no está completamente
insertado en el toma corriente eléctrico.
$VHJ~UHVHGHTXHHOFDEOHGHHOHFWULFLGDGHVWpHQFKXIDGR
en un tomacorriente correctamente conectado a tierra.et.
El suministro de gas no fue conectado o
encendido.
Consulte las Instrucciones de Instalación provistas con su
cocina.
Es posible que un fusible de su hogar se
haya quemado o que el disyuntor se haya
desconectado.
Reemplace el fusible o reinicie el disyuntor.
Las piezas del quemador no fueron
reemplazadas correctamen.
Lea la sección de Cuidado y Limpieza.
Es posible que las hendiduras de los
quemadores, o el puerto del encendedor
redondo en el quemador oval, estén atascados.
Retire los quemadores o limpie los mismos. Controle
que no haya comida quemada ni grasa en el área del
electrodo. Lea la sección de Cuidado y Limpieza.
Residuos de comida en el electrodo 6XDYHPHQWHSXODHOH[WUHPRSODQRGHOHOHFWURGRFRQXQD
OLPDGHXxDVRFRQXQDOLMDKDVWDTXHTXHGHEULOORVR
Consejos para la Solución de Problemas... Antes de solicitar el servicio técnico
CONSEJOS PARA LA SOLUCIÓN DE PROBLEMAS

32
49-85220
Consejos para la Solución de Problemas... Antes de solicitar el servicio técnico
CONSEJOS PARA LA SOLUCIÓN DE PROBLEMAS
Problema Causa Posible Qué Hacer
Los quemadores
superiores no queman
de forma pareja
Ensamble del quemador inapropiado. $VHJ~UHVHGHTXHODVWDSDVGHORVTXHPDGRUHVHVWpQLQVWDODGDV
correctamente. Lea la sección de Cuidado y Limpieza.
Las hendiduras al costado del
quemador se podrán atascar.
Retire los quemadores para su limpieza. Lea la sección de Cuidado y
Limpieza.
Llamas de los
quemadores son muy
grandes o amarillas
Promedio inadecuado de aire a gas. 6LODFRFLQDHVFRQHFWDGDDJDV3URSDQRFRQWDFWHDOWpFQLFRTXHLQVWDOy
la cocina o que hizo la conversión.
Los quemadores
superficiales se
iluminan pero los
quemadores para
hornear y asar no.
Es posible que los quemadores de
gas del horno hayan sido apagados.
El apagado del gas del horno está ubicado en el regulador de gas cerca
GHODDGKHUHQFLDGHODWXEHUtDGHJDVDODFRFLQD8ELTXHODPLVPD\Gp
vuelta la palanca.
La puerta de vidrio
del horno parece
estar “teñida” o tener
un color “arcoíris”.
El vidrio del horno interno está
cubierto con una barrera de calor que
refleja este último nuevamente hacia
el horno, a fin de evitar la pérdida
de calor y de mantener fría la puerta
externa mientras se hornea.
(VWRHVQRUPDO%DMRFLHUWDVOXFHV\iQJXORVHVSRVLEOHTXHYLVXDOLFH
esta tinta o arcoíris.
El cajón no se desliza
de forma pareja o se
arrastra
El cajón está desalineado. ([WLHQGDWRWDOPHQWHHOFDMyQ\HPSXMHHOPLVPRWRWDOPHQWHKDFLD
adentro. Consulte la sección Cuidado y limpieza de la cocina.
El cajón está sobrecargado o la carga
está des balanceada.
Reduzca peso o redistribuya los contenidos de los cajones.
La palanca
se muestra
cerrada.
EMPUJE PARA ABRIR.
Modelos con quemador sellado
-
 1
1
-
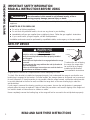 2
2
-
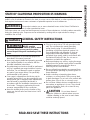 3
3
-
 4
4
-
 5
5
-
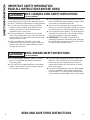 6
6
-
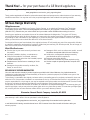 7
7
-
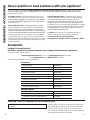 8
8
-
 9
9
-
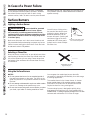 10
10
-
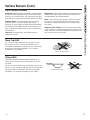 11
11
-
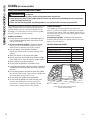 12
12
-
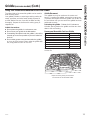 13
13
-
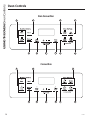 14
14
-
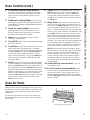 15
15
-
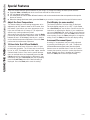 16
16
-
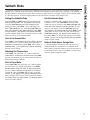 17
17
-
 18
18
-
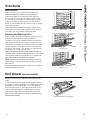 19
19
-
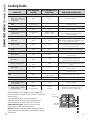 20
20
-
 21
21
-
 22
22
-
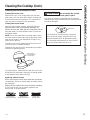 23
23
-
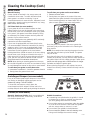 24
24
-
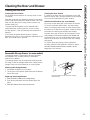 25
25
-
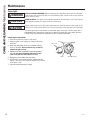 26
26
-
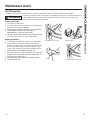 27
27
-
 28
28
-
 29
29
-
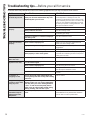 30
30
-
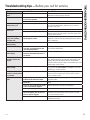 31
31
-
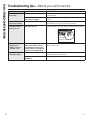 32
32
-
 33
33
-
 34
34
-
 35
35
-
 36
36
-
 37
37
-
 38
38
-
 39
39
-
 40
40
-
 41
41
-
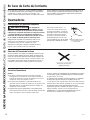 42
42
-
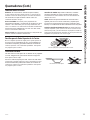 43
43
-
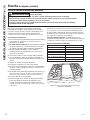 44
44
-
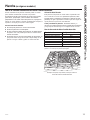 45
45
-
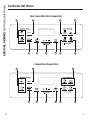 46
46
-
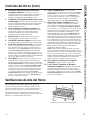 47
47
-
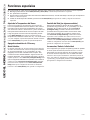 48
48
-
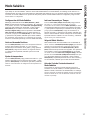 49
49
-
 50
50
-
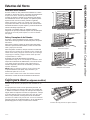 51
51
-
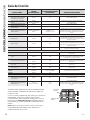 52
52
-
 53
53
-
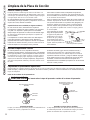 54
54
-
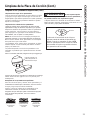 55
55
-
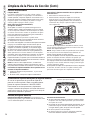 56
56
-
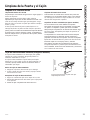 57
57
-
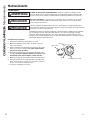 58
58
-
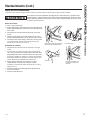 59
59
-
 60
60
-
 61
61
-
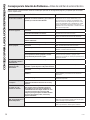 62
62
-
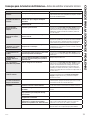 63
63
-
 64
64


GE JGB660SEJSS El manual del propietario
- Categoría
- Cocinas
- Tipo
- El manual del propietario
- Este manual también es adecuado para
En otros idiomas
- English: GE JGB660SEJSS Owner's manual
Documentos relacionados
-
GE Appliances JGB700DEJ4BB El manual del propietario
-
GE JGBS62DEKWW El manual del propietario
-
GEAppliances PGB940DEFBB El manual del propietario
-
GEAppliances 49-85223-2 El manual del propietario
-
GE PGB980ZEJSS Manual de usuario
-
-
GE Profile P2B940DEHWW El manual del propietario
-
GE Profile P2S920SEF4SS El manual del propietario
-
GE Appliances PGB940SEJSS El manual del propietario
-
