Westinghouse Iron WST5019MEX Manual de usuario
- Categoría
- Hierros
- Tipo
- Manual de usuario
Este manual también es adecuado para

WST5019MEX
SStteeaamm IIrroonn
YYoouu ccaann bbee ssuurree......iiff iitt’’ss WWeessttiinngghhoouussee
PPllaanncchhaa ddee VVaappoorr
WST5019MEX
UUsstteedd ppuueeddee eessttaarr sseegguurroo......ssii eess WWeessttiinngghhoouussee
WST5019MEX_IB.qxp 1/19/2007 5:12 PM Page 1

MEDIDAS DE SEGURIDAD
IMPORTANTES
Cuando utilice aparatos eléctricos, siempre siga las precauciones básicas de
seguridad, incluyendo las siguientes:
1. Lea todas las instrucciones.
2. Utilice la plancha solamente como se indica en estas instrucciones.
3. Para evitar riesgo de electrocución, no sumerja la plancha en agua o en
otro líquido.
4. Antes de conectar o desconectar la plancha gire el control a la posición
“MIN”. Nunca tire del cable para desconectarla del tomacorriente en vez de
esto, desconéctela tirando de la clavija de conexión.
5. No permita que el cable eléctrico entre en contacto con superficies calientes.
Deje que la plancha se enfríe completamente antes de guardarla. Enrolle el
cable holgadamente alrededor de la plancha cuando la guarde.
6. Siempre desconecte la plancha del tomacorriente cuando la llene con agua
o la vacie o cuando no esté utilizándola.
7. No utilice ningún aparato con el cable o clavija dañado o después de que
funcione mal o si se ha dejado caer o ha resultado dañado de alguna man-
era. Contacte o lleve el aparato a un Centro de Servicio Autorizado para ser
revisado, reparado o ajustado.
8. Es necesario ejercer una estricta supervisión cuando este electrodoméstico
se utilice cerca de los niños. No deje desatendida la plancha mientras esté
conectada o se encuentre sobre una tabla de planchar.
9. Se pueden producir quemaduras si se tocan las partes de metal calientes, el
agua caliente o el vapor. Tenga cuidado al voltear la plancha hacia abajo,
puede que tenga agua caliente en el depósito.
INSTRUCCIONES ESPECIALES
1. A fin de evitar una sobrecarga eléctrica, no utilice ningún otro aparato de alto
consumo con el mismo circuito.
2. Si es absolutamente necesario utilice un cable de extensión, un cable de 15-
amperes es lo indicado. Los cables de menor amperaje se podrían sobreca-
lentar. El cable se debe colocar con cuidado para evitar que puedan tirar de
éste o que se tropiecen con él.
GUARDE ESTAS INSTRUCCIONES
Para Uso Doméstico Solamente
1
IMPORTANT SAFEGUARDS
When using electrical appliances, basic safety precautions should always be fol-
lowed, including the following:
1. Read all instructions.
2. Use iron only for its intended use.
3. To protect against a risk of electric shock, do not immerse the iron in water
or other liquids.
4. The iron should always be turned to the “MIN” setting before plugging or
unplugging from outlet. Never yank cord to disconnect from outlet; instead,
grasp plug and pull to disconnect.
5. Do not allow cord to touch hot surfaces. Let iron cool completely before put-
ting away. Loop cord loosely around iron when storing.
6. Always disconnect iron from electrical outlet when filling with water or empty-
ing and when not in use.
7. Do not operate iron with a damaged cord or if the iron has been dropped or
damaged. To avoid the risk of electric shock, do not disassemble the iron.
Incorrect reassembly can cause a risk of electric shock when the iron is
used. Contact Consumer Service for examination and repair.
8. Close supervision is necessary for any appliance being used by or near chil-
dren. Do not leave iron unattended while connected or on an ironing board.
9. Burns can occur from touching hot metal parts, hot water, or steam. Use
caution when you turn a steam iron upside down---there may be hot water in
the water tank.
SPECIAL INSTRUCTIONS
1. To avoid a circuit overload, do not operate another high wattage appliance
on the same circuit.
2. If an extension cord is absolutely necessary, a 15-ampere cord should be
used. Cords rated for less amperage may overheat. Care should be taken to
arrange the cord so that it cannot be pulled or tripped over.
SAVE THESE INSTRUCTIONS
For Household Use Only
1
WST5019MEX_IB.qxp 1/19/2007 5:12 PM Page 3

ADDITIONAL
IMPORTANT SAFEGUARDS
CAUTION HOT SURFACES: This appliance generates heat and
escaping steam during use. Proper precautions must be taken to
prevent the risk of burns, fires or other injury to persons or damage
to property.
1. All users of this appliance must read and understand this Owner’s
Manual before operating or cleaning this appliance.
2. The cord to this appliance should be plugged into a 127V AC electri-
cal outlet only.
3. If this appliance begins to malfunction during use, immediately
unplug the cord. Do not use or attempt to repair the malfunctioning
appliance.
4. Do not leave this appliance unattended during use.
Polarized Plug
This appliance has a polarized plug (one blade is wider than the other).
To reduce the risk of electric shock, this plug is intended to fit into a polar-
ized outlet only one way. If the plug does not fit fully in the outlet, reverse
the plug. If it still does not fit, contact a qualified electrician. Do not
attempt to modify the plug in any way.
Electric Power
If the electrical circuit is overloaded with other appliances, your appliance
may not operate properly. It should be operated on a separate electrical
circuit from other appliances.
Electrical Specifications
127V ~ 60Hz 1300W
2
MEDIDAS DE SEGURIDAD
IMPORTANTES ADICIONALES
PRECAUCIÓN SUPERFICIES CALIENTES: Este aparato genera calor
y escapes de vapor durante su uso. Deberán tomarse las precau-
ciónes necesarias para evitar riesgo de quemaduras, incendios, u
otras lesiones a las personas o daños a la propiedad.
1. Todos los usuarios de este aparato deberán leer y comprender esta
Guía de Uso y Cuidado antes de operar o limpiar el mismo.
2. El cordón de este producto deberá conectarse solamente en un
tomacorriente de 127V AC.
3. Si este producto empieza a funcionar mal durante su uso, inmedi-
atamente desconéctelo. No trate de utilizar o reparar un aparato
descompuesto.
4. No deje desatendido este producto durante su uso.
Clavija Polarizada
Este electrodoméstico posee una clavija polarizada (una de sus patas es
más ancha que la otra), como una medida de seguridad para reducir el
riesgo de descargas eléctricas, esta clavija está diseñada para conec-
tarse de una sola manera en un tomacorriente polarizado, si la clavija no
se conecta correctamente en el tomacorriente inviértala, si no conecta
bien, consulte con un electricista calificado. No intente alterar esta medi-
da de seguridad de ninguna manera.
Corriente Eléctrica
Si el circuito está sobrecargado con otros electrodomésticos, es posible
que su electrodoméstico no funcione correctamente. Se recomienda
operar este aparato en un circuito eléctrico separado.
Especificaciones Eléctricas
127V ~ 60Hz 1300W
2
WST5019MEX_IB.qxp 1/19/2007 5:12 PM Page 5

MAX
11
3
3
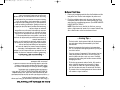
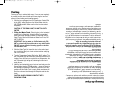
Getting To Know Your Iron
Product may vary slightly from illustrations.
Conociendo Su Plancha
El producto puede variar un poco en relación con la ilustración.
1. Water Fill Opening
2. Steam Button
3. Pivot Cord
4. Selection Arrow
5. Heel Rest
6. Temperature Control Dial
7. Thermostat Light
8. Water Tank
9. Maximum Water Level Line
10. Non-stick Soleplate
11. Filler Cup
(P/N 50761)
1. Orificio del Depósito de Agua
2. Botón de Vapor
3. Pivote Movible del Cordón
4. Indicador de Funciones de
Planchado
5. Base de Descanso
6. Control de Temperatura
7. Luz del Termostato
8. Depósito de Agua
9. Línea Indicadora del
Nivel Máximo
10. Placa con Antiadherente
11. Taza Medidora (P/N 50761)
3
4
6
1
7
9
10
8
2
5
NO STEAM
STEAM
Steam Button Positions:
MAX
11
3
4
6
1
7
9
10
8
2
5
SIN VAPOR
VAPOR
Posiciones del Botón de Vapor:
WST5019MEX_IB.qxp 1/19/2007 5:12 PM Page 7

Antes de Utilizarla por Primera Vez
1. Retire todo el material de empaque de la Placa y del cuerpo
de la plancha. Desenrolle y estire el cable.
2. Limpie los orificios del vapor de la placa de planchado medi-
ante descargas de vapor para evitar que cualquier residuo
del proceso de fabricación manche su ropa. (Ver INSTRUC-
CIONES DE MANTENIMIENTO DEL USUARIO.)
NOTA: Cuando la Plancha es utilizada por primera vez,
usted notará que ligeramente humea; esto es normal y
dejará de hacerlo después de unos minutos en cuanto la
plancha se siga calentando.
4
Before First Use
1. Remove all packaging materials from the Soleplate and the
body of the Iron. Unwind and straighten the power cord.
2. Flush the soleplate steam vents to ensure that no stain is
transferred onto the fabric from residue possibly left in the
vents from the manufacturing process. (See USER MAINTE-
NANCE INSTRUCTIONS.)
NOTE: When the Iron is used for the first time, you may
notice a slight amount of smoke; this is normal and will stop
after a few minutes as the Iron continues to heat.
4
~ Ironing Tips ~
• For best results, check garment labels for the tempera-
ture and steam setting recommended by the fabric
manufacturer.
• Always iron garments that require a low temperature
first. This will prevent damage to garments by using an
iron that is too hot.
• If you are unsure of a garment’s fabric content, start on
a low setting and test the iron on an area of the gar-
ment that does not show, such as a seam. Gradually
increase the heat setting until wrinkles remove without
damaging the fabric.
• To freshen up garments made of velvet, felt, suede or
velour, hold the steaming iron horizontally 2 inches
(5cm) above the fabric for a gentle steaming. Make
sure the iron does not come in contact with the fabric.
• To prevent shine, iron dark garments or those made of
silk, acetate or rayon inside out.
~ Sugerencias de Planchado ~
• Para obtener mejores resultados, consulte las etiquetas
de sus prendas de vestir para saber cual es la temper-
atura y el vapor recomendado por el fabricante.
• Siempre planche primero las prendas de vestir que
requieran de una temperatura baja de las que
requieren más calor. Esto evitará que las prendas de
vestir se dañen utilizando una plancha que se encuen-
tre demasiado caliente.
• Si usted no está seguro del tipo de tejido de una pren-
da de vestir, empiece con una temperatura baja y
planche en un área que normalmente no sea visible,
como por ejemplo, en una costura. Incremente grad-
ualmente la temperatura hasta que las arrugas desa-
parezcan sin dañar el tejido.
• Para desarrugar alguna prenda hecha de velludillo, fiel-
tro, ante o terciopelo, sostenga la Plancha de vapor
horizontalmente a 5 cm de distancia de la prenda para
realizar un vaporizado suave. Asegúrese de que la
Plancha no entre en contacto con las prendas de vestir.
• Para evitar que sus prendas oscuras, de seda, acetato
o de rayón se abrillanten, plánchelas al revés.
WST5019MEX_IB.qxp 1/19/2007 5:12 PM Page 9

5
Planchado en Seco
La Plancha puede utilizarse en seco, con o sin agua en el
Depósito de Agua. Sin embargo, es mejor evitar que el Depósito
de Agua esté lleno mientras plancha en seco.
1. Gire el Control de Temperatura a la [setting] “MIN” y
asegúrese de que el Botón de Vapor se encuentre en la
posición SIN VAPOR.
2. Coloque la Plancha en posición vertical (sobre su Base de
Descanso) sobre una superficie resistente al calor y
conéctela en un tomacorriente de 127V.
3. Gire el Control de Temperatura a la posición deseada. La
Luz roja del Termostato se iluminará, indicando que la
Plancha está caliente.
NOTA: Para obtener mejores resultados, cheque las etique-
tas de sus prendas de vestir para ver la temperatura
recomendada por el fabricante.
4. Una vez que la Plancha ha alcanzado la temperatura indica-
da, la Luz roja del Termostato se apagará indicando que la
Plancha está lista para utilizarse.
NOTA: La Luz roja del Termostato continuará encendién-
dose y apagándose durante su uso para que la Plancha
mantenga la temperatura deseada.
5. Cuando cambie de una temperatura alta a una temperatura
baja, espere hasta que la Luz roja del Termostato se
encienda y después se apague de nuevo antes de planchar.
6. Cuando termine de planchar, gire el Control de Temperatura
a la posición “MIN” y desconecte la Plancha. Coloque la
Plancha en posición vertical (sobre su base de descanso) y
permita que se enfríe completamente antes de limpiarla o
guardarla.
PRECAUCIÓN: Nunca llene el Depósito de Agua mientras la
plancha todavía se encuentre caliente.
OPERATING INSTRUCTIONS
Using as a Dry Iron
The Iron can be used on the dry setting with or without water in
the Water Tank. However, it is best to avoid having water in the
Water Tank while dry ironing.
1. Turn the Temperature Control Dial to the “MIN” setting and
make sure that the Steam Button is in the NO STEAM
position.
2. Stand the Iron in the vertical position (on its Heel Rest) on a
heat resistant surface and plug into a 127V outlet.
3. Turn the Temperature Control Dial to the desired setting.
The red Thermostat Light will illuminate, indicating that the
Iron is heating.
NOTE: For best results, check garment labels for the tem-
perature setting recommended by the fabric manufacturer.
4. Once the Iron has reached the set temperature, the red
Thermostat Light will go off, indicating that the Iron is ready
for use.
NOTE: The red Thermostat Light will continue to cycle off
and on during use as the Iron maintains the desired
temperature.
5. When changing from a higher temperature setting to a lower
temperature setting, wait until the red Thermostat Light
cycles on and then off again before ironing.
6. When finished ironing, turn the Temperature Control Dial to
the “MIN” position and unplug the Iron. Stand the Iron back
in the vertical position (on its Heel Rest) and allow it to cool
completely before cleaning or storing.
WARNING: Never fill the Water Tank while the Iron is still hot.
5
INSTRUCCIONES DE OPERACIÓN
WST5019MEX_IB.qxp 1/19/2007 5:12 PM Page 11

Planchado con Vapor
El Control de Temperatura deberá permanecer en la posición
“MAX” mientras se encuentre planchando con vapor.
1. Gire el Control de Temperatura a la posición “MIN” y
asegúrese de que el Botón de Vapor se encuentre en la
posición SIN VAPOR.
2. Asegúrese de que la plancha esté desconectada y se haya
enfriado completamente antes de llenarla.
PRECAUCIÓN: SI LA PLANCHA ESTA CALIENTE, NO LA
LLENE CON AGUA.
3.
Llenando el Depósito de Agua:
Coloque la plancha en
posición horizontal (sobre su Placa de Planchado). Utilice la
taza medidora que se proporciona, lentamente vierta el
agua a través del Orificio hasta que el Depósito de Agua se
llene hasta la Línea Indicadora del Nivel Máximo de agua;
NO LO SOBRELLENE.
IMPORTANTE: Utilice agua de la llave o destilada sola-
mente. No utilice agua con muchos químicos o
cualquier otro líquido.
4. Con el Depósito de Agua lleno, coloque la Plancha en posi-
ción vertical (sobre su Base de Descanso) sobre una super-
ficie resistente al calor y conéctela en un tomacorriente
de 127V.
5. Gire el Control de Temperatura a la posición “MAX”. La Luz
roja del Termostato se iluminará, indicando que la Plancha
se encuentra caliente.
NOTA: Para mejores resultados, cheque las etiquetas de
las prendas de vestir para ver la posición de temperatura y
vapor recomendados por el fabricante.
6. Una vez que la Plancha haya alcanzado la temperatura
seleccionada, la Luz roja del Termostato se apagará, indi-
cando que la Plancha está lista para utilizarse.
NOTA: La Luz roja del Termostato continuará encendién-
dose y apagándose durante su uso para que la Plancha
mantenga la temperatura deseada.
6
Using as a Steam Iron
The Temperature Control Dial must remain at the “MAX” setting
while steam ironing.
1. Turn the Temperature Control Dial to the “MIN” setting and
make sure that the Steam Button is in the NO STEAM
position.
2. Make sure that the Iron is unplugged and has cooled com-
pletely before filling.
CAUTION: IF THE IRON IS HOT, DO NOT FILL WITH
WATER.
3.
Filling the Water Tank:
Place the Iron in the horizontal
position (on its Soleplate). Using the Filler Cup provided,
slowly pour water through the Water Fill Opening until the
Water Tank is filled to the Maximum Water Level Line; DO
NOT OVERFILL.
IMPORTANT: Use tap water or distilled water only. Do
not use chemically descaled water or any other liquids.
4. With the Water Tank full, stand the Iron in the vertical posi-
tion (on its Heel Rest) on a heat resistant surface and plug
into a 127V outlet.
5. Turn the Temperature Control Dial to the “MAX” setting. The
red Thermostat Light will illuminate, indicating that the Iron
is heating.
NOTE: For best results, check garment labels for the tem-
perature and steam settings recommended by the fabric
manufacturer.
6. Once the Iron has reached the set temperature, the red
Thermostat Light will go off, indicating that the Iron is ready
for use.
NOTE: The red Thermostat Light will continue to cycle off
and on during use as the Iron maintains the desired temper-
ature.
7. Press the Steam Button into the STEAM position. Steam will
be released continuously once the Iron is held in the hori-
zontal position.
6
WST5019MEX_IB.qxp 1/19/2007 5:13 PM Page 13

7. Presione el Botón de Vapor hasta la posición de VAPOR. El
vapor se liberará continuamente una vez que la Plancha se
mantenga en posición horizontal.
NOTA: El vapor puede detenerse sosteniendo la Plancha en
posición vertical, o presionando de nuevo el Botón de Vapor
hasta la posición SIN VAPOR.
PRECAUCIÓN: EVITE EL CONTACTO CON EL ESCAPE
DE VAPOR.
8. Cuando termine de planchar, presione el Botón de Vapor
hasta la posición SIN VAPOR, gire el Control de
Temperatura a la posición “MIN”, y desconecte la Plancha.
Si es necesario, vacíe el Depósito de Agua (vea “Vaciando
el Deposito de Agua”). Coloque la Plancha en posición verti-
cal (sobre su Base de Descanso) y permita que se enfríe
completamente antes de limpiarla o guardarla.
NOTA: El Depósito de Agua debe vaciarse después de
cada uso.
Vaciando el Depósito de Agua
El Depósito de Agua debe vaciarse después de cada uso.
1. Después de uso, presione el Botón de Vapor hasta la posi-
ción SIN VAPOR, gire el Control de Temperatura a la posi-
ción “MIN”, y desconecte la Plancha.
2. Mientras la Plancha todavía continúe caliente, sostenga la
Plancha sobre el fregadero y coloque la plancha al revés
para permitir que toda el agua salga del Orificio.
3. Coloque la Plancha en posición vertical (sobre su Base de
Descanso). El calor de la Plancha secará cualquier residuo
de agua que haya quedado.
PRECAUCIÓN: EVITE EL CONTACTO CON EL AGUA O
ESCAPE DE VAPOR.
7
NOTE: Steam can be stopped by holding the Iron in the ver-
tical position, or by pressing the Steam Button back into the
NO STEAM position.
CAUTION: AVOID COMING IN CONTACT WITH ESCAP-
ING STEAM.
8. When finished ironing, press the Steam Button into the NO
STEAM position, turn the Temperature Control Dial to the
“MIN” setting, and unplug the Iron. If necessary, empty the
Water Tank (see “Emptying the Water Tank”). Stand the Iron
back in the vertical position (on its Heel Rest) and allow it to
cool completely before cleaning or storing.
NOTE: The Water Tank should be emptied after each use.
Emptying the Water Tank
The Water Tank should be emptied after each use.
1. After use, press the Steam Button into the NO STEAM posi-
tion, turn the Temperature Control Dial to the “MIN” setting,
and unplug the Iron.
2. While the Iron is still warm, hold the Iron over a sink and
turn the Iron upside down, allowing water to drain from the
Water Fill Opening.
3. Stand the Iron back in the vertical position (on its Heel
Rest). The warmth of the Iron should dry out any remaining
water.
CAUTION: AVOID COMING IN CONTACT WITH WATER OR
ESCAPING STEAM.
7
WST5019MEX_IB.qxp 1/19/2007 5:13 PM Page 15

INSTRUCCIONES DE
MANTENIMIENTO DEL
USUARIO
Este producto requiere de poco mantenimiento. No trate de
repararlo usted mismo. Recurra a un técnico especializado si
necesita alguna reparación.
Cuidado y Limpieza
PRECAUCIÓN: Desconecte la Plancha del tomacorriente y
permita que se enfríe completamente antes de limpiarla y
guardarla. Nunca sumerja la Plancha en agua o en cualquier
otro líquido.
NOTA: No agregue ningún producto de limpieza químico ni sol-
ventes en el Depósito de Agua, o en cualquier parte de la
Plancha.
1. Humedezca un trapo suave con unos toques de vinagre
para quitar manchas de la Placa. Tenga cuidado de no rallar
la placa con antiadherente.
PRECAUCIÓN: Nunca utilice estropajos o limpiadores
abrasivos sobre la Placa, ya que estos pueden rallar la
superficie.
2. Limpie las superficies exteriores de la Plancha con un trapo
húmedo. Si es necesario, utilice una pequeña cantidad de
detergente para limpiarla.
3. Antes de utilizarla de nuevo, precaliéntela y mueva la
Plancha sobre una prenda vieja para retirar cualquier resid-
uo de la Placa.
8
USER MAINTENANCE
INSTRUCTIONS
This appliance requires little maintenance. It contains no user
serviceable parts. Do not try to repair it yourself. Any servicing
requiring disassembly must be preformed by a qualified appli-
ance repair technician.
Care and Cleaning
CAUTION: Unplug the Iron from the electrical outlet and
allow it to cool completely before cleaning and storing.
Never immerse the Iron in water or any other liquid.
NOTE: Do not put any chemical cleaning agents or solvents in
the Water Tank, or on any part of the Iron.
1. Moisten a soft cloth with a dab of vinegar to remove spots
from the Soleplate. Take care not to scratch the non-stick
coating.
CAUTION: Never use scouring pads or abrasive clean-
ers on the Soleplate, as this may scratch the surface.
2. Wipe the outside surfaces of the Iron with a damp cloth. If
necessary, use a small amount of mild detergent to clean.
3. Before using again, preheat and move the iron over an old
cloth several times to remove any residue from the
Soleplate.
8
WST5019MEX_IB.qxp 1/19/2007 5:13 PM Page 17

Descarga De Vapor
Se aconseja limpiar y descargar la plancha después de cada 5
usos para prevenir la acumulación de minerales que puedan
obstruir la plancha, para así asegurar que siempre se caliente y
vaporice correctamente.
1. Con la Plancha desconectada, gire el Control de
Temperatura a la posición “MIN” y asegúrese de que el
Botón de Vapor se encuentre en la posición SIN VAPOR.
Asegúrese de que la plancha se ha enfriado completa-
mente.
PRECAUCIÓN: SI LA PLANCHA SE ENCUENTRA
CALIENTE, NO LA LLENE CON AGUA.
2.
Llenando el Depósito del Agua:
Coloque la Plancha
en posición horizontal (sobre su base de planchado).
Utilizando la taza medidora que se proporcionó, lentamente
vierta agua a través del Orificio hasta que el depósito de
Agua se llene hasta la Línea de Nivel Máximo; NO LO
SOBRELLENE.
IMPORTANTE: Utilice agua de la llave o agua destilada
solamente. NO UTILICE agua y otros líquidos con quími-
cos. NO UTILICE limpiadores con agentes químicos ni
solventes dentro del Depósito de Agua.
3. Con el Depósito de Agua lleno, coloque la Plancha en posi-
ción vertical (sobre su base de descanso) en una superficie
resistente al calor y conéctela en un tomacorriente de 127V.
4. Gire el Control de Temperatura a la posición “MAX”. La Luz
roja del Termostato se iluminará, indicando que la Plancha
se encuentra caliente. Una vez que la Plancha ha alcanza-
do la temperatura seleccionada, la Luz roja del Termostato
se apagará, indicando que la Plancha está lista para
utilizarse.
9
Flushing
Flushing the iron is advised after every 5 uses or more regularly
to prevent harmful mineral build-up that can clog the iron and
prevent it from heating and steaming properly.
1. With the Iron unplugged, turn the Temperature Control Dial
to the “MIN” setting and press the Steam Button into the
NO STEAM position. Make sure that the Iron has cooled
completely.
CAUTION: IF THE IRON IS HOT, DO NOT FILL WITH
WATER.
2.
Filling the Water Tank:
Place the Iron in the horizontal
position (on its Soleplate). Using the Filler Cup provided,
slowly pour water through the Water Fill Opening until the
Water Tank is filled to the Maximum Water Level Line; DO
NOT OVERFILL.
IMPORTANT: Use tap water or distilled water only. DO
NOT use chemically descaled water or any other liquids.
DO NOT put any chemical cleaning agents or solvents
into the Water Tank.
3. With the Water Tank full, stand the Iron in the vertical posi-
tion (on its Heel Rest) on a heat resistant surface and plug
into a 127V outlet.
4. Turn the Temperature Control Dial to the “MAX” setting. The
red Thermostat Light will illuminate, indicating that the Iron is
heating. Once the Iron has reached the set temperature, the
red Thermostat Light will go off, indicating that the Iron is
ready for use.
5. Hold the Iron horizontally over a basin or bowl and press the
Steam Button into the STEAM position -- steam will begin to
flow through the Soleplate. Continue to hold the Iron in this
position until the Water Tank is empty. Water and steam will
flush the scale and dust through the Soleplate and into the
basin.
CAUTION: AVOID COMING IN CONTACT WITH
ESCAPING STEAM.
9
WST5019MEX_IB.qxp 1/19/2007 5:13 PM Page 19

5. Sostenga la Plancha en forma horizontal sobre el lavabo o
tazón y presione el Botón de Vapor hasta la posición
VAPOR -- el vapor empezará a fluir a través de la placa.
Continúe manteniendo la Plancha en esta posición hasta
que el Depósito de Agua se vacíe. Agua y vapor limpiarán el
sarro y lo expulsarán a través de la Placa de Planchado
dentro del lavabo.
PRECAUCIÓN: EVITE EL CONTACTO CON EL ESCAPE
DE VAPOR.
6. Cuando el Depósito de Agua esté vacío, presione el Botón
de Vapor hasta la posición SIN VAPOR, gire el Control de
Temperatura a la posición “MIN”, y desconecte la Plancha.
Vuelva a colocar la plancha en posición vertical (sobre su
base de descanso) y permita que se enfríe completamente
antes de guardarla.
Almacenaje de la Plancha
Retire el cordón del tomacorriente sosteniendo la clavija -- nunca
jale el cordón. Vacíe el Depósito del Agua después de cada uso
(vea “Vaciando el Deposito de Agua”). Permita que la plancha
se enfrie completamente antes de guardarla. Para proteger la
Placa, coloque la plancha vertical sobre su base de descanso;
envuelva el cordón ligeramente alrededor de la Base de la
Plancha.
10
6. When the Water Tank is empty, press the Steam Button into
the NO STEAM position, turn the Temperature Control Dial
to the “MIN” setting, and unplug the Iron. Stand the Iron
back in the vertical position (on its Heel Rest) and allow it to
cool completely before storing.
Storing the Iron
Remove the cord from the outlet by grasping the plug -- never
pull on the cord. Empty the Water Tank after each use (see
“Emptying the Water Tank”). Allow the Iron to cool completely
before storing. To protect the Soleplate, stand the Iron in an
upright position on its Heel Rest; wrap the cord loosely around
the base of the Iron.
10
WST5019MEX_IB.qxp 1/19/2007 5:13 PM Page 21

LIMITED ONE-YEAR WARRANTY
Office and Service Center: Toastmaster de México, S.A. de C.V.
Centeotl #223-A
Col. Industrial San Antonio,
Delegación Azcapotzalco, México. D.F. C.P. 02760
Ph: 01800-201-3373 or 3375
Fax: 52(55) 5353-7207 EXT. 115
Warranty: This product is warranted against defects in materials or workmanship for a
period of (1) year from the original purchase date.
Warranty Coverage: This warranty is void if the product has been damaged by accident
in shipment, unreasonable use, misuse, neglect, improper service, commercial use,
repairs by unauthorized personnel, normal wear, improper assembly, installation or
maintenance abuse or other causes not arising out of defects in materials or workman-
ship. This warranty is effective only if the product is purchased and operated in MEXI-
CO, and does not extend to any units which have been used in violation of written
instructions furnished with the product or to units which have been altered or modified or
to damage to products or parts thereof which have had the serial number removed,
altered, defaced or rendered illegible.
Implied Warranties: ANY IMPLIED WARRANTIES WHICH THE PURCHASER MAY
HAVE ARE LIMITED IN DURATION TO ONE (1) YEAR FROM THE DATE OF PUR-
CHASE. Some States do not allow limitations on how long an implied warranty lasts, so
the above limitation may not apply to you.
Warranty Performance: During the above one-year warranty period, a product with a
defect will be either repaired or replaced with a similar model, as long as you notified to
the following number: 01800-201-3373. The repaired or replacement product will be in
warranty for the balance of the one-year warranty period and an additional one-month
period. No charge will be made for such repair or replacement.
Important Notice: If there are missing parts or are defective, return this product to the
place you bought it. You should call the CONSUMER SERVICE, stating that you are a
consumer with a problem at the phone number: 01800-201-3373 or 3375.
Limitation of Remedies: No representative or person is authorized to assume for us,
any other liability in connection with the sale of our products. There shall be no claims
for defects or failure of performance or product failure under any theory of damages,
contract or commercial law including, but not limited to negligence, gross negligence,
strict liability, breach of warranty and breach of contract. Repair, replacement or refund
shall be the sole remedy of the purchaser under this warranty. Some states do not allow
the exclusion or limitation of incidental or consequential damages, so the above limita-
tion or exclusion may not apply to you.
Legal Rights: WESTINGHOUSE, and “YOU CAN BE SURE...IF IT’S WESTING-
HOUSE” are trademarks of WESTINGHOUSE ELECTRIC CORPORATION and used
under license.
For more information on our products, visit our website: www.maxim-toastmaster.com.
©2006 All rights reserved.
Made in China 1/07
GARANTÍA LIMITADA DEL PRODUCTO POR UN AÑO
Oficina y Centro de Servicio: Toastmaster de México, S.A. de C.V.
Centeotl #223-A
Col. Industrial San Antonio,
Delegación Azcapotzalco, México. D.F. C.P. 02760
Tel: 01800-201-3373 or 3375
Fax: 52(55) 5353-7207 EXT. 115
Garantía: Se garantiza este producto contra cualquier defecto de materiales y mano de obra
por un período de un (1) año a partir de la fecha de compra original.
Cobertura de la Garantía: Esta garantía es nula si el producto ha sido dañado por un acci-
dente durante su traslado, uso irrazonable, uso indebido, negligencia, mantenimiento inade-
cuado, uso comercial, reparaciones realizadas por personal no autorizado, desgaste natural,
montaje o instalación indebidos, abuso en su mantenimiento u otras causas no relacionadas
con defectos en los materiales o mano de obra. Esta garantía es efectiva solamente si el pro-
ducto es comprado y operado en MÉXICO, y no se extiende a unidades que se hayan usado
violando las instrucciones escritas provistas con el producto o a unidades que hayan sido
alteradas o modificadas o al daño a productos o partes de los mismos a los que se haya
quitado, modificado, estropeado o hecho ilegible el número de serie.
Garantías Implícitas: TODA GARANTÍA IMPLÍCITA QUE EL COMPRADOR PUEDA TENER
ESTÁ LIMITADA A UN (1) AÑO DE DURACIÓN DESDE LA FECHA DE LA COMPRA. Algunos
estados y provincias no permiten limitaciones acerca de la duración de una garantía implícita,
por consiguiente la limitación antes mencionada puede no ser aplicable a su caso.
Funcionamiento de la Garantía: Durante el período de garantía de un año mencionado pre-
viamente, un producto defectuoso será reparado o reemplazado por un modelo similar siem-
pre y cuando sea notificado al numero 01800-201-3373. El producto reparado o reemplazado
estará en garantía por el plazo no transcurrido del año de garantía más un período adicional
de un mes. No se cobrará tal reparación o reemplazo dentro del período de garantía.
Aviso Importante: Si faltaren partes o las mismas fueren defectuosas, devuelva este produc-
to al lugar de compra. Se pueden dirigir preguntas y comentarios al Departamento de rela-
ciones con el cliente. Póngase en contacto llamando al: 01800-201-3373 y 3375.
Limitación de Recursos: No se autoriza a ningún representante o persona a asumir por
nuestra cuenta cualquier otra responsabilidad relacionada con la compra de nuestros produc-
tos. No habrá reclamos por defectos o fallas en el funcionamiento o falla del producto, bajo
cualquier teoría de perjuicios, contrato o ley comercial incluyendo pero sin limitarse a negli-
gencia, negligencia grave, responsabilidad objetiva, incumplimiento de garantía e incumplim-
iento del contrato. La reparación, el reemplazo o la devolución de dinero serán los únicos
recursos del comprador bajo esta garantía. Algunos estados y provincias no permiten la
exclusión o limitación de daños incidentales o mediatos, por consiguiente la limitación o
exclusión antes mencionada puede no aplicarse a su caso.
Derechos Legales: WESTINGHOUSE, y “USTED PUEDE ESTAR SEGURO...SI ES
WESTINGHOUSE” son marcas comerciales de WESTINGHOUSE ELECTRIC CORPORA-
TION y usadas bajo licencia.
Para mayor información sobre nuestros productos, visite nuestro sitio web:
www.maximtoastmaster.com.
©2006 Todos los derechos reservados.
Hecho en China 1/07
WST5019MEX_IB.qxp 1/19/2007 5:13 PM Page 23
-
 1
1
-
 2
2
-
 3
3
-
 4
4
-
 5
5
-
 6
6
-
 7
7
-
 8
8
-
 9
9
-
 10
10
-
 11
11
-
 12
12


Westinghouse Iron WST5019MEX Manual de usuario
- Categoría
- Hierros
- Tipo
- Manual de usuario
- Este manual también es adecuado para