Küppersbusch FKG9801.0E Manual de usuario
- Tipo
- Manual de usuario

CKKBS-B01
2023-04-03
80g双胶
刘亚丽
廖晓艳
胶装
ןੋןԘġϱౄ印刷

BEDIENUNGSANWEISUNG
mit Montageanweisungen
INStrUctIoNS for USE
and installation
Lesen Sie unbedingt die Gebrauchsanleitung
und den Montageplan vor Aufstellung,
Installation sowie Inbetriebnahme.
Please read the users and installation
instructions carefully before installation
of the appliance and before starting to use it.
DE
DE
DE
DE
DE
DE
DE
DE
DE
DE
DE
EN
ES
FR
PT
DE
DE
DE
DE
DE
FKG9801.0E

Sicherheitsinformation
Lesen Sie im Interesse Ihrer Sicherheit und zur
Gewährleistung der korrekten Verwendung dieses
Benutzerhandbuch vor der Installation und dem ersten
Gebrauch des Geräts sorgfältig durch, einschließlich
aller Hinweise und Warnungen. Um unnötige Fehler und
Unfälle zu vermeiden, ist es wichtig sicherzustellen, dass
alle Personen, die das Gerät verwenden, gründlich mit
seiner Bedienung und seinen Sicherheitsfunktionen
vertraut sind. Bewahren Sie diese Anleitung auf und
stellen Sie sicher, dass sie bei einem Transport oder
Verkauf des Geräts verbleibt, damit jeder, der es
während seiner Lebensdauer verwendet,
ordnungsgemäß über die Verwendung und Sicherheit
des Geräts informiert ist. Halten Sie zum Schutz von
Leben und Eigentum die Vorsichtsmaßnahmen dieser
Gebrauchsanweisung ein, da der Hersteller nicht für
Schäden verantwortlich ist, die durch Unterlassung
verursacht werden.
Sicherheit von Kindern und gefährdeten
Personen
Dieses Gerät kann von Kindern ab 8 Jahren und
Personen mit eingeschränkten körperlichen,
sensorischen oder geistigen Fähigkeiten oder Mangel
an Erfahrung und Wissen verwendet werden, wenn
sie beaufsichtigt oder bezüglich der sicheren
Verwendung des Geräts unterwiesen wurden und die
Gefahren verstehen beteiligt.
Kinder im Alter von 3 bis 8 Jahren dürfen dieses Gerät
be- und entladen.
1

Sicherheitsinformation
Kinder sollten beaufsichtigt werden, um
sicherzustellen, dass sie nicht mit dem Gerät spielen.
Reinigung und Benutzerwartung dürfen nicht von
Kindern durchgeführt werden, es sei denn, sie sind
älter als 8 Jahre und werden beaufsichtigt.
Halten Sie alle Verpackungen von Kindern fern. Es
besteht Erstickungsgefahr.
Wenn Sie das Gerät entsorgen, ziehen Sie den
Stecker aus der Steckdose, schneiden Sie das
Anschlusskabel ab (so nah wie möglich am Gerät)
und entfernen Sie die Tür, um zu verhindern, dass
spielende Kinder einen Stromschlag erleiden oder
sich darin einschließen.
Wenn dieses Gerät mit magnetischen Türdichtungen
ein älteres Gerät mit einem Federschloss
(Verriegelung) an der Tür oder dem Deckel ersetzen
soll, stellen Sie sicher, dass diese Feder unbrauchbar
ist, bevor Sie das alte Gerät entsorgen. Dadurch wird
verhindert, dass es zu einer Todesfalle für ein Kind
wird.
Allgemeine Sicherheit
WARNUNG! Halten Sie Lüftungsöffnungen im
Gerätegehäuse oder in der Einbaustruktur frei von
Hindernissen.
WARNUNG! Verwenden Sie keine anderen als
die vom Hersteller empfohlenen mechanischen
Vorrichtungen oder andere Mittel, um den
Abtauvorgang zu beschleunigen.
2

Sicherheitsinformation
WARNUNG! Den Kältemittelkreislauf nicht
beschädigen.
WARNUNG! Verwenden Sie keine anderen
Elektrogeräte (z. B. Eismaschinen) in Kühlgeräten,
es sei denn, sie sind vom Hersteller für diesen
Zweck zugelassen.
WARNUNG! Berühren Sie die Glühbirne nicht,
wenn sie längere Zeit eingeschaltet war, da sie sehr
heiß sein könnte.1)
WARNUNG! Stellen Sie beim Aufstellen des
Geräts sicher, dass das Netzkabel nicht
eingeklemmt oder beschädigt wird.
WARNUNG! Platzieren Sie keine tragbaren
Mehrfachsteckdosen oder tragbaren Stromquellen
auf der Rückseite des Geräts.
Lagern Sie in diesem Gerät keine explosiven
Substanzen wie Aerosoldosen mit brennbarem
Treibmittel.
Im Kältemittelkreislauf des Gerätes ist das Kältemittel
Isobutan (R-600a) enthalten, ein Erdgas mit hoher
Umweltverträglichkeit, das dennoch brennbar ist.
Achten Sie beim Transport und beim Aufstellen des
Gerätes darauf, dass keine Bauteile des
Kältekreislaufs beschädigt werden.
- offene Flammen und Zündquellen vermeiden;
1) Wenn es ein Licht im Fach gibt.
3

Sicherheitsinformation
- lüften Sie den Raum, in dem sich das Gerät befindet,
gründlich.
Es ist gefährlich, die Spezifikationen zu ändern oder
dieses Produkt in irgendeiner Weise zu modifizieren.
Jegliche Beschädigung des Kabels kann zu
Kurzschlüssen, Bränden und/oder Stromschlägen
führen.
Dieses Gerät ist für den Einsatz im Haushalt und
ähnlichen Anwendungen wie
- Personalküchenbereiche in Geschäften, Büros und
anderen Arbeitsumgebungen;
- Bauernhäuser und von Kunden in Hotels, Motels und
anderen Wohnumgebungen;
- Bed & Breakfast-ähnliche Umgebungen;
- Catering und ähnliche Nicht-
Einzelhandelsanwendungen.
WARNUNG! Alle elektrischen Komponenten
(Stecker, Netzkabel, Kompressor usw.) müssen von
einem zertifizierten Servicevertreter oder
qualifiziertem Servicepersonal ausgetauscht werden.
WARNUNG! Die mit diesem Gerät gelieferte
Glühbirne ist eine „Sondergebrauchslampe“, die nur
mit dem mitgelieferten Gerät verwendet werden
kann. Diese „Sondergebrauchslampe“ ist nicht für
die Haushaltsbeleuchtung geeignet.1)
Netzkabel darf nicht verlängert werden.
Achten Sie darauf, dass der Netzstecker nicht durch
die Geräterückseite gequetscht oder beschädigt wird.
1) Wenn es ein Licht im Fach gibt.
4

Sicherheitsinformation
Ein gequetschter oder beschädigter Netzstecker kann
überhitzen und einen Brand verursachen.
Stellen Sie sicher, dass Sie an den Netzstecker des
Geräts kommen können.
Ziehen Sie nicht am Netzkabel.
Wenn die Netzsteckdose lose ist, stecken Sie den
Netzstecker nicht ein. Es besteht die Gefahr eines
Stromschlags oder Feuers.
Sie dürfen das Gerät nicht ohne Lampe betreiben.
Dieses Gerät ist schwer. Beim Bewegen ist Vorsicht
geboten.
Entfernen oder berühren Sie keine Gegenstände aus
dem Gefrierfach, wenn Ihre Hände feucht/nass sind,
da dies zu Hautabschürfungen oder
Erfrierungen/Gefrierbrand führen kann.
Vermeiden Sie es, das Gerät längere Zeit direkter
Sonneneinstrahlung auszusetzen.
Täglicher Gebrauch
Setzen Sie die Kunststoffteile im Gerät nicht heiß ab.
Stellen Sie Lebensmittel nicht direkt an die Rückwand.
Aufgetaute Lebensmittel dürfen nicht wieder
eingefroren werden.1)
Lagern Sie vorverpackte Tiefkühlkost gemäß den
Anweisungen des Tiefkühlkostherstellers.1)
Die Lagerungsempfehlungen der Gerätehersteller
sollten strikt eingehalten werden. Siehe
entsprechende Anweisungen.
1) Wenn ein Gefrierfach vorhanden ist.
2) Wenn ein Frischhaltefach vorhanden ist.
5

Sicherheitsinformation
Stellen Sie keine kohlensäurehaltigen oder
kohlensäurehaltigen Getränke in das Gefrierfach, da
dies Druck auf den Behälter ausübt, wodurch dieser
explodieren und das Gerät beschädigen kann.1)
Eis am Stiel kann Erfrierungen verursachen, wenn es
direkt aus dem Gerät konsumiert wird.1)
Um eine Kontamination von Lebensmitteln zu
vermeiden, beachten Sie bitte die folgenden
Anweisungen.
Ein längeres Öffnen der Tür kann zu einem
erheblichen Temperaturanstieg in den Fächern des
Geräts führen.
Reinigen Sie regelmäßig Oberflächen, die mit
Lebensmitteln in Berührung kommen können, und
zugängliche Abflusssysteme.
Reinigen Sie die Wassertanks, wenn sie 48 Stunden
lang nicht benutzt wurden; Spülen Sie das an eine
Wasserversorgung angeschlossene Wassersystem,
wenn 5 Tage lang kein Wasser entnommen wurde.
Lagern Sie rohes Fleisch und Fisch in geeigneten
Behältern im Kühlschrank, damit es nicht mit anderen
Lebensmitteln in Kontakt kommt oder darauf tropft.
Zwei-Sterne-Tiefkühlfächer (sofern im Gerät
vorhanden) eignen sich zum Aufbewahren von
vorgefrorenen Lebensmitteln, zum Aufbewahren oder
Zubereiten von Speiseeis und zum Zubereiten von
Eiswürfeln.
Ein-, Zwei- und Drei-Sterne-Fächer (sofern im Gerät
vorhanden) sind nicht zum Einfrieren frischer
Lebensmittel geeignet.
6

Sicherheitsinformation
Wenn das Gerät längere Zeit leer gelassen wird,
schalten Sie es aus, tauen Sie es ab, reinigen Sie es,
trocknen Sie es und lassen Sie die Tür offen, um
Schimmelbildung im Gerät zu vermeiden.
Pflege und Reinigung
Schalten Sie das Gerät vor Wartungsarbeiten aus und
ziehen Sie den Netzstecker aus der Steckdose.
Reinigen Sie das Gerät nicht mit Metallgegenständen.
Verwenden Sie keine scharfen Gegenstände, um Reif
vom Gerät zu entfernen. Verwenden Sie einen
Plastikschaber.1)
Untersuchen Sie regelmäßig den Abfluss im
Kühlschrank auf aufgetautes Wasser. Reinigen Sie
bei Bedarf den Abfluss. Wenn der Abfluss verstopft
ist, sammelt sich Wasser unten im Gerät.2)
Vorsicht!
Stellen Sie bei Verwendung der Eisbereitungs- und
Kühlfunktion sicher, dass die Wasserquelle und der
Filter angeschlossen sind.
Vor der Verwendung des Produkts sollte der Filter 5
Minuten lang mit Wasser oder 5 l Wasser gespült
werden, um sicherzustellen, dass der Toner im Filter
sauber gespült wird.
Nachdem der Kühlschrank an die Wasserquelle
angeschlossen ist, muss die Abgasbehandlung
gemäß den Installationsanweisungen durchgeführt
1) Wenn ein Gefrierfach vorhanden ist.
2) Wenn ein Frischhaltefach vorhanden ist.
7

Sicherheitsinformation
werden. Überprüfen Sie nach 5 Minuten Wartezeit den
Wasserweg auf Undichtigkeiten.
Stellen Sie sicher, dass der Wasserdruck innerhalb
der erforderlichen Spezifikationen liegt. Ein zu hoher
Wasserdruck kann leicht zu Wasserlecks führen, ein
zu niedriger Wasserdruck kann die Produktfunktion
nicht unterstützen.
Berühren Sie den Eisbereiter während des Gebrauchs
nicht mit Händen oder Werkzeugen, um Schäden am
Personal oder am Eisbereiter zu vermeiden.
Stellen Sie während der Verwendung des Produkts
sicher, dass die Eismaschine und die
Eisaufbewahrungsbox sauber sind, um zu vermeiden,
dass eine große Menge Staub, fester Schmutz und
andere Schadstoffe hineinfallen.
Lassen Sie Kinder die Eisbox nicht herausnehmen,
damit sie nicht herunterfällt und verletzt wird.
In der Eisbox befinden sich Metallmesser. Kinder
dürfen nicht damit spielen, um Verletzungen zu
vermeiden.
Installation
Wichtig! Befolgen Sie für den elektrischen Anschluss
sorgfältig die Anweisungen in den jeweiligen
Abschnitten.
Packen Sie das Gerät aus und überprüfen Sie es auf
Beschädigungen. Schließen Sie das Gerät nicht an,
wenn es beschädigt ist. Melden Sie eventuelle
Schäden sofort dort, wo Sie es gekauft haben.
Bewahren Sie in diesem Fall die Verpackung auf.
8

Sicherheitsinformation
Es ist ratsam, mindestens vier Stunden zu warten,
bevor Sie das Gerät anschließen, damit das Öl in den
Kompressor zurückfließen kann.
Um das Gerät herum sollte eine ausreichende
Luftzirkulation herrschen, da dies zu einer
Überhitzung führt. Um eine ausreichende Belüftung zu
erreichen, beachten Sie die für die Installation
relevanten Anweisungen.
Wo immer möglich, sollten die Abstandshalter des
Produkts an einer Wand anliegen, um zu vermeiden,
dass warme Teile (Kompressor, Kondensator) berührt
oder erfasst werden, um mögliche Verbrennungen zu
vermeiden.
Das Gerät darf nicht in der Nähe von Heizkörpern
oder Herden aufgestellt werden.
Stellen Sie sicher, dass der Netzstecker nach der
Installation des Geräts zugänglich ist.
Service
Alle elektrischen Arbeiten, die für die Wartung des
Geräts erforderlich sind, sollten von einem
qualifizierten Elektriker oder einer kompetenten
Person durchgeführt werden.
Dieses Produkt muss von einem autorisierten
Servicecenter gewartet werden, und es dürfen nur
Originalersatzteile verwendet werden.
Energieeinsparung
Stellen Sie keine heißen Speisen in das Gerät;
Packen Sie Lebensmittel nicht dicht aneinander, da
dies die Luftzirkulation verhindert;
9

Sicherheitsinformation
Achten Sie darauf, dass keine Lebensmittel die
Rückseite des/der Fach(s) berühren;
Wenn der Strom ausfällt, öffnen Sie die Tür(en) nicht;
Öffnen Sie die Tür(en) nicht häufig;
Lassen Sie die Tür(en) nicht zu lange offen;
Stellen Sie den Thermostat nicht auf zu kalte
Temperaturen ein;
Alle Zubehörteile wie Schubladen, Regale und
Balkone sollten dort aufbewahrt werden, um den
Energieverbrauch zu senken.
Umweltschutz
Dieses Gerät enthält weder im Kühlkreislauf noch in
den Isoliermaterialien Gase, die die Ozonschicht
schädigen könnten. Das Gerät darf nicht zusammen mit
Hausmüll und Hausmüll entsorgt werden. Der
Isolierschaum enthält brennbare Gase: Das Gerät muss
gemäß der Geräteverordnung entsorgt werden, die Sie
bei Ihren örtlichen Behörden erhalten. Vermeiden Sie
Beschädigungen der Kühleinheit, insbesondere des
Wärmetauschers. Die für dieses Gerät verwendeten
Materialien, die mit dem Symbol gekennzeichnet sind,
sind recycelbar.
Das Symbol auf dem Produkt oder seiner
Verpackung weist darauf hin, dass dieses
Produkt nicht als Haushaltsabfall behandelt
werden darf.
Stattdessen sollte es zu einer geeigneten Sammelstelle
für das Recycling von Elektro- und Elektronikgeräten
gebracht werden. Indem Sie sicherstellen, dass dieses
10

Sicherheitsinformation
Produkt ordnungsgemäß entsorgt wird, tragen Sie dazu
bei, mögliche negative Folgen für die Umwelt und die
menschliche Gesundheit zu vermeiden, die andernfalls
durch eine unsachgemäße Entsorgung dieses Produkts
verursacht werden könnten.
Für nähere Informationen zum Recycling dieses
Produkts wenden Sie sich bitte an Ihre
Gemeindeverwaltung, Ihren Hausmüllentsorgungsdienst
oder das Geschäft, in dem Sie das Produkt gekauft
haben.
Verpackungsmaterialien
Die Materialien mit dem Symbol sind recycelbar.
Entsorgen Sie die Verpackung in einem geeigneten
Sammelbehälter, um sie zu recyceln.
Gerät Entsorgung
1. Ziehen Sie den Netzstecker aus der Steckdose.
2. Schneiden Sie das Netzkabel ab und entsorgen Sie
es.
WARNUNG! Achten Sie während
der Verwendung, Wartung und Entsorgung
des Geräts auf das Symbol ähnlich der
linken Seite, das sich auf der Rückseite des
Geräts (Rückwand oder Kompressor)
befindet und gelb oder orange ist.
Es ist ein Brandgefahr-Warnsymbol. In den
Kältemittelleitungen und im Kompressor
befinden sich brennbare Materialien.
11

Sicherheitsinformation
Bitte seien Sie während der Verwendung,
Wartung und Entsorgung weit entfernt von
Feuerquellen.
12

Überblick
(Entfernen Sie die Metallabdeckung des Kompressorraums)
Schalttafel
Wasser-/Eisspender
Hauptsteuertafel
Netzkabel
Kompressor
Externes Hauptwasserventil
13

Überblick
Diese Abbildung dient nur zur Veranschaulichung, die Details überprüfen Sie bitte an Ihrem
Gerät.
Kühlschrank Balkon*4
Kühlschrankregale*3
Kühlschrank-Crispers*2
Abdeckung der Eisbox
Aufbewahrungsbox für Eis
Gefrierregale* 3
Gefrierschubladen*2
Gefrierschrank Balkon* 1
Verbinder für Wasserleitungen
14

'bNN9RU5XT6Cc$4XTB9R_V9c#J5$c
'bNN9RU5XT6CTVR4^9cc
c#9HT9KGDR6C9Kc
/9H9:LKcccc
)4DHc GXK79K7D9KTV
GX9NN9RT5XT6C79c
&KV9RK9VcZZZGX9NN9RT5XT6CCLJ96LJc
)LKV4Bc5DTc LKK9RTV4Bc
"R9DV4Bc
YLKcc 0CRc5ETcc 0CRc
YLKcc 0CRc5ETcc0CRc
3XT_V]HD6Cc ]Xc T9DK9Kc #9Z_CRH9DTVXKBT4KTNRb6C9Kc 4XTc T9EK9Jc
'4X@9RVR4Bc JDVc 79Jc $_K7H9Rc H9ETV9Kc ZDRc 79Jc !K745K9CJ9Rc 7ER9GVc
#4R4KVD9c :bRc 'bNN9RT5XT6C$4XTB9R_V9c 9Rc 0J:4KBc XKT9R9Rc
#4R4KVD9cZER8cK46CTV9C9K7cB9R9B9HVc
)_KB9Hc4Jc#9R_Vc 7E9cK46CZ9DTHD6Cc4X:c9DK9Jc)4V9RD4H XK7L79R
$9RTV9IIXKBT:9CI9Rc 59RXC9Kc Z9R79Kc K46Cc )4^B459c 79Rc :LHB9K79K
-9B9HXKB9Kc XK9KVB9HVIE6Cc 59CL59Kc Z9KKc TE9c XKTc XKY9SbBIE6C
K46Cc"9TVTV9HHXKBcXK7cEKK9RC4I5cYLKcc)LK4V9KcK46Cc(E9:9RXKBc4K
79Kc 9RTV9Kc !K745K9CJ9Rc 4KB9]9EBVc Z9R79Kc 9Dc B9Z9R5IE6C9J
#95R4X6Cc L79Rc BH9D6C]XT9V]9K79Rc 94KTNRX6CXKBc 59VR_BVc 7D9
#4R4KVD9:RETVc I97DBHD6Cc c )LK4V9c "bRc B95R4X6CV9c #9R_V9c BEIV
959K:4HHTc 7D9c "RDTVc YLKc c )LK4V9Kc /REVVc79Rc )4KB9HcDKK9RC4I5c YLK
c )LK4V9Kc45c (D9:9RXKBc4X:c ZDR7cY9RJXV9Vc 74TTc9TcTD6CcXJc9DK9K
)4V9RD4I L79Rc$9RTV9IIXKBT:9CH9RcC4K79HV
"bRc H9D6CVc ]9R5R96CIE6C9c /9DH9c ZD9c ]c #I4Tc 'XKTVTVL<c XK7
#IbCH4JN9Kc ZER7c G9DK9c #4R4KVD9c b59RKLJJ9Kc #9RDKB:bBDB9
5Z9D6CXKB9Kc YLKc 79Rc .LII9T6C4:;9KC9EVc 7D9c :bRc 79Kc29RVc XK7
7E9c#95R4X6CTV4XBID6CG9EVc79Tc#9R_VTcXK9RC95HE6CcTEK7c 59BRbK79Kc
X^9RC4H5c79Rc D9KTV]9DV9KcV9EI9Kc.E9cXKTc %CR9c2bKT6C9c5DVV9cN9Rc
/9H9:4[cL79Rc &KV9RK9VcXKV9RcZZZGX9NN9RT5XT6CCLJ96LJcJDVc G9EK9Kc #4R4KVD94KTNRX6Cc !59KTLc Z9KDBc I9ETV9Kc ZDRc #4R4KVE9c 59Ec
/9G4cXTVRD4c#J5$c
!DVK9RB4TT9cc
2D9Kc
/9H9:LKc cccc c
/9H9:4[c cccc c
&KV9RK9VcZZZGX9OP9RT5XT6C4Vc
)LKV4Bc5DTc"R9DV4Bc YLKcc0CRc5ETcc0CRc
.6C_79Kc 4XTc 6C9JET6C9Kc XK7c 9I9GVRL6C9JDT6C9Kc !DKZDRGXKB9Kc
YLKc24TT9RcTLZD9c 4IIB9J9DKcXKB9ZaCKIE6C9Kc 0JZ9IV597DKBXKB9Kc
L79Rc T46C:R9J79Kc 9VRE95T597DKBXKB9Kc L79Rc Z9KKc 74Tc #9R_Vc JEVc
XKB99DBK9V9Kc .VL:;9Kc EKc 9RbCRXKBc B9GLJJ9Kc DTVc .6CHD9^HD6Cc
I9ETV9Kc ZDRc 4X6Cc G9DK9c #4R4KVE9c Z9KKc 7D9c )_KB9Ic 4Jc #9R_Vc 4X:c
/R4KTNLRWT6C_79Kc 7D9c KD6CVc YLKc XKTc ]Xc Y9RVR9V9Kc TEK7c 4X:c KE6CVc
:46CB9R96CV9c &KTV4IH4VDLKc XK7c )LKV4B9c 4X:c "9CHB95R4X6Cc 4X:c
J4KB9HK79c ,:H9B9c L79Rc 4X:c *E6CV5946CVXKBc79Rc 97E9KXKBT L79Rc
)LKV4B9CDKZ9ET9c ]XRb6G]X:bCR9Kc TEK7c 9Rc #4R4KVD94KTNRX6Cc
9RIET6CVc Z9KKc -9N4R4VXR9Kc L79Rc !DKBRD=9c DKc 74Tc #9R_Vc YLKc
,9RTLK9Kc YLRB9KLJJ9Kc Z9R79Kc 7D9c CE9R]Xc KD6CVc YLKc XKTc
9RJ_6CVDBVc TDK7c L79Rc Z9KKc XKT9R9c #9R_V9c JDVc !RT4V]V9DH9Kc
!RB_K]XKBTL79Rc 3X59CaRV9DH9Kc Y9RT9C9Kc Z9R79Kc 7D9c G9DK9c
+RDBDK4HV9DH9cTEK7cXK7c747XR6Cc9DKc 9:9GVcY9RXRT46CVcZXR79c
0KT9R9c #4R4KVE9I9ETVXKBc 59TV9CVc 74REKc 74TTc ZDRc K46Cc XKT9R9R
X^9RC4H5c79Rc D9KTV]9DV9KcV9EI9Kc.E9cXKTc%CR9c2bKT6C9c5DVV9cN9Rc 24CHc9KVZ979RcJ4KB9HC4:W9c/9DH9cXK9KVB9IVIE6CcDKTV4K7T9V]9KcL79R
/9H9:4[cL79Rc %KV9RK9VcXKV9RcZZZGX9NN9RT5XT6C4VcJDVc 7XR6Cc 9DKZ4K7:R9D9c /9EI9c9RT9V]9Kc &KTV4K7T9V]XKB9KcZ9R79KcK46C
)aBHD6CG9DVc 4Jc X:TV9IIXKBTLRVc YLRB9KLJJ9Kc 3XRc -9N4R4VXR
4KTV9C9K79c #9R_V9c TEK7c TLc ]XB_KBIE6Cc ]Xc J46C9Kc 74^
4JDVcXKT9Rc'XK79K7E9KTVc-9N4R4VXR9KcTLRB:`IVDBcYLR59R9DV9KcXK7c XK9DKB9T6CR_KGVc $4K7C45XKBc XT54Xc XK7c !DK54Xc 7XR6Cc 7D9
7D9c59KaVDBV9Kc!RT4V]V9EI9c59R9EVTV9HH9KcG4KKc59KaVEB9KcZDRc59DcHCR9R/96CKDG9Rc JaBHD6Cc ETVc XK7c G9DK9c 9T6C_7DBXKB9Kc 4Kc )a59HK
'XK79K7D9KTV4K:MR79RXKBc7E9c:MIB9K79Kc&K>RJ4VDLK9Kc L79K59H4Bc 9V6c 9KVTV9C9Kc GaKK9Kc 9Dc #9R_V9Kc 7E9c KD6CVc K46C
c&CR9cB9K4X9cKT6CRE?c XKT9R9Kc !DK54XRD6CVIEKE9Kc JLKVD9RVc TDK7c Z9R79Kc 7E9c 4K:4HH9K79K
c&CR9c/9H9:LK XK7cBB:c/9H9:4[KXJJ9Rc 3XT4V]H9DTVXKB9Kc DKc -96CKXKBc B9TV9HHVc &Kc F979Jc "4IIc 79R
c24KKcG4KKc79Rc'XK79K7E9KTVc.D9c59TX6C9Kc &K4KTNRX6CK4CJ9c YLKc #4R4KVD9H9ETVXKB9Kc DTVc 79Rc '4X:59H9Bc
D9cB9K4X9c#9R_V959]9E6CKXKBc )L7cXK7c"*Rc/\N9KT6CDH7c YLR]XH9B9Kc XK7c74Tc '4X: XK7c TLZ9DVcCE9RYLKc45Z9D6C9K7c 74T
XK7L79Rc'4X:59H9Bc]Xc-4V9c]E9C9Kc (E9:9R74VXJc K46C]XZ9ET9Kc !RT9V]V9c /9EI9c B9C9Kc DKc XKT9R
c 4Tc'4X:74VXJcL79Rc(E9:9R74VXJc !EB9KVXJcb59R
D9cB9K4X9c9T6CR9E5XKBc79Tc,RL5H9J9TcL79Rc &CR9Tc.9RYE69 %Kc "_HH9Kc DKc79K9Kc7E9c*46C59TT9RXKBc:9CHT6CH_BVcL79RcYLKcXKT
2XKT6C9Tc$4IV9Kc.D9c5EVV9c]XT_V]HD6Cc&CR9Kc'4X:59H9Bc59R9DV 45B9H9CKVc ZDR7c IE9:9RKc ZDRc DKK9RC4I5c 79Rc L59KB9K4KKV9K
.LcC9H:9Kc.E9cXKTcXKKaVDB9Kc39DV XK7c 'LTV9K4XA4K7c]X #4R4KVD9]9EVc 4X:c 2XKT6Cc 79Tc !K745K9CJ9RTc GLTV9K:R9D
Y9RJ9E79KcXK7c4X6Cc:bRc.E9c9:;D]D9KV9Rc]Xc4R59EV9K BI9E6CZ9RVDB9Kc!RT4V]
#4R4KVD9H9DTVXKB9Kc 59ZERG9Kc Z979Rc 9DK9c 19RI_KB9RXKBc 79R
#4R4KVD9:RETVc KL6Cc T9V]9Kc TD9c 9DK9c K9X9c #4R4KVE9:RETVc EKc (4X:c D9
#4R4KVD9:RETVc :bRc 9DKB954XV9c !RT4V]V9DH9c 9K79Vc JDVc 79Rc #4R4KVD9:RDTV
:bRc74TcB4K]9c#9R_V
29DV9RB9C9K79c L79Rc 4K79R9c KTNRb6C9c EKT59TLK79R9c TLH6C9
4X:c !RT4V]c 4X^9RC4H5c 79Tc #9R_V9Tc 9KVTV4K79K9Rc .6C_79Kc TEK7c
JEVc XTK4CJ9c 79Rc $4?XKBc :bRc .6C_79Kc 4XTc 79Rc 19RI9V]XKBc 79T
(959KTc 79Tc 'aRN9RTc L79Rc 79Rc #9TXK7C9DVc 7D9c 4X:c 9EK9R
:4CRI_TTDB9Kc ,:HD6CVY9RI9V]XKBc YLKc XKTc L79Rc 9DK9Rc YLRT_V]HE6C9K
L79Rc :4CRH_TTDB9Kc ,:IE6CVY9RI9V]XKBc XKT9R9Rc !R:bIIXKBTB9CDH:9K
59RXC9Kc 4XTB9T6CHLTT9Kc D9T9c #4R4KVD9597DKBXKB9Kc B9IV9K
BRXK7T_V]HD6CcKXRc:bRcEKc 9XVT6CH4K7cB9G4X:W9c#9R_V9c.LZ9DVcZDRcDK
79Jc 9KVTNR96C9K79Kc (4K7c b59Rc 9DKc 'XK79K7D9KTVK9V]c Y9R:bB9K
B9IV9Kc 7D9T9c #4R4KVD9597EKB9Kc 4X6Cc :bRc EKTc XTH4K7c Y9R5R46CV9
#9R_V9c YLR4XTB9T9V]Vc TD9c Z9ET9Kc 7E9c V96CKDT6C9K
1LR4XTT9V]XKB9Kc ZE9c ]c .N4KKXKBc "R9QX9K]c #4T4RVc :bRc 74T
9KVTNR96C9K79c (4K7c 4X:c XK7c TDK7c :bRc 7D9c F9Z9EIDB9Kc 'HDJ4 XK7
0JZ9HV597DKBXKB9Kc B99EBK9Vc "bRc DJc XTH4K7c B9G4X:W9c #9R_V9
B9IV9Kc 7D9c YLKc XKT9R9Rc F9Z9DHTc ]XTV_K7EB9Kc XTH4K7TB9T9IIT6C4:W
L79Rc (4K79TY9RVR9VXKBc C9R4XTB9B959K9Kc #4R4KVE9597EKBXKB9K
7E9c b59Rc 79Kc "46CC_K7H9Rc L79Rc 7ER9GVc 59Dc XKT9R9R
XTH4K7TB9T9IIT6C4:Wc L79Rc (4K79TY9RVR9VXKBc 4KB9>R79RVc Z9R79K
GaKK9K
15

Installation
Produktzubehör
Entfernung der Türen
Erforderliche Werkzeuge: Kreuzschlitzschraubendreher, Schlitzschraubendreher.
Stellen Sie sicher, dass das Gerät vom Stromnetz getrennt und leer ist.
Zum Abnehmen der Tür muss das Gerät nach hinten gekippt werden. Sie sollten das Gerät
auf etwas Festem abstellen, damit es beim Entfernen der Tür nicht verrutscht.
Alle entfernten Teile müssen für den Wiedereinbau der Tür aufbewahrt werden.
Legen Sie das Gerät nicht flach hin, da dies das
Kühlmittelsystem beschädigen kann.
Es ist besser, wenn 2 Personen das Gerät während der Montage
handhaben.
1. Schrauben Sie die Scharnierabdeckung mit einem
Kreuzschlitzschraubendreher ab.
2. Trennen Sie den Kabelbaum.
Wasserleitungsanschluss*1
Wasserfilteranschluss*2
Anti-Rutsch-Clips *8
Wasserfilter * 1
Wasserleitungsteile * 1
Bedienungsanleitung * 1
Spender-Wasserschale * 1
16

Installation
3. Oberes Scharnier abschrauben.
4. An der Unterseite des Kühlschranks mit Gefrierfach befindet sich ein
Wasserleitungsanschluss. Entfernen Sie es von der Schutzabdeckung und trennen Sie es von
der Wasserleitung, und denken Sie daran, die Wasserleitung aus dem unteren Scharnier zu
ziehen.
5. Heben Sie die Tür an und legen Sie sie auf eine weiche Unterlage. Entfernen Sie dann eine
andere Tür wie derselbe Vorgang.
6. Schrauben Sie die unteren Scharniere ab.
7. Nachdem das Gerät positioniert ist, montieren Sie die Türen in umgekehrter Reihenfolge.
17

Installation
Platzbedarf
Halten Sie ausreichend Platz bei geöffneter Tür.
Halten Sie an beiden Seiten und hinten mindestens 50 mm Abstand.
A
900
B
660
C
1770
D
Min=50
E
Min=50
F
1800
G
1560
H
135°
Kühlschrank Nivellierung
Türen
- Drehen Sie die Füße im Uhrzeigersinn, um sie von
Hand zu erhöhen.
- Drehen Sie die Füße gegen den Uhrzeigersinn, um
sie von Hand abzusenken.
18

Installation
Positionierung
Installieren Sie dieses Gerät an einem Ort, an dem die Umgebungstemperatur der auf dem
Typenschild des Geräts angegebenen Klimaklasse entspricht:
für Kältegeräte mit Klimaklasse:
- Erweiterter Temperaturbereich: Dieses Kühlgerät ist für den Einsatz bei
Umgebungstemperaturen zwischen 10 °C und 32 °C bestimmt; (SN)
- gemäßigt: Dieses Kühlgerät ist für den Einsatz bei Umgebungstemperaturen zwischen 16 °C
und 32 °C bestimmt;(N)
- subtropisch: Dieses Kühlgerät ist für den Einsatz bei Umgebungstemperaturen zwischen 16
°C und 38 °C bestimmt;(ST)
- tropisch: Dieses Kühlgerät ist für den Einsatz bei Umgebungstemperaturen zwischen 16 °C
und 43 °C bestimmt;(T)
Standort
Das Gerät sollte weit entfernt von Wärmequellen wie Heizkörpern, Boilern, direkter
Sonneneinstrahlung usw. installiert werden. Stellen Sie sicher, dass die Luft frei um die
Rückseite des Schranks zirkulieren kann. Wenn das Gerät unter einem überhängenden
Oberschrank aufgestellt wird, muss der Mindestabstand zwischen der Oberkante des Schranks
und dem Oberschrank mindestens 50 mm betragen, um eine optimale Leistung zu
gewährleisten. Idealerweise sollte das Gerät jedoch nicht unter überhängenden Oberschränken
positioniert werden. Eine genaue Nivellierung wird durch einen oder mehrere verstellbare Füße
am Boden des Schranks gewährleistet.
Dieses Kältegerät ist nicht als Einbaugerät bestimmt;
Warnung! Das Gerät muss vom Stromnetz getrennt werden können; der Stecker muss
daher nach der Installation leicht zugänglich sein.
Elektrische Verbindung
Vergewissern Sie sich vor dem Einstecken, dass die auf dem Typenschild angegebene
Spannung und Frequenz mit Ihrem Hausnetz übereinstimmt. Das Gerät muss geerdet sein. Der
Stecker des Stromversorgungskabels ist zu diesem Zweck mit einem Kontakt versehen.
19

Täglicher Gebrauch
Wichtig!
So installieren Sie den Wasserfilter und die Wasserleitung
1. Vor der Installation sollte der Filter 5 Minuten lang mit Wasser oder 5 l Wasser gespült werden, um
sicherzustellen, dass der Toner im Filter sauber gespült wird.
2. Öffnen Sie die Kühlschranktür und nehmen Sie die Crispers heraus.
3. Nehmen Sie die Gummistopfen auf beiden Seiten des Wasserkastens heraus.
Wasserquelle
Schlauch
anschließen
Filter
Becken
Gummistopfen
Wasserkasten
20

Täglicher Gebrauch
4. Wasserfilter aus dem Zubehörbeutel nehmen, die Verbindungsstücke auf beiden Seiten des Filters
einstecken, dann das Wasserrohr anschließen und in die Anti-Rutsch-Clips einklemmen (Richtung
des Filterpfeils beachten)
5. Montieren Sie die Wasserfilterteile mit der Halteklammer über dem Wasserkasten und verbinden
Sie die Wasserrohre des Wasserkastens mit dem Wasserfilter.
6. Nehmen Sie den Gummistopfen ab. Verbinden Sie das Wasserleitungsteil mit dem Hauptventil an
der Kompressorabdeckung mit Anschluss, und denken Sie daran, die rutschfesten Clips
einzusetzen, und verbinden Sie dann das Ende der Wasserleitung mit der Mutter mit der
Wasserquelle.
Wasserfilter
Anschlüsse
Wasserrohre
Anti-Rutsch-Clips
Befestigen Sie die
Wasserfilterteile
Verbinden Sie die
Wasserleitungen des
Wasserkastens mit dem
Filter
21

Täglicher Gebrauch
Vorsicht!
Die externe Wasserquelle muss sauber sein und der Wasserdruck sollte 1,5 bis 7 bar betragen, um
eine ordnungsgemäße Funktion zu gewährleisten.
Prüfen Sie den Anschluss der Wasserleitung, prüfen Sie, ob sich noch andere Dinge in der
Eismaschine und der Eisaufbewahrungsbox befinden.
Nachdem Sie auf die Wasserquelle zugegriffen haben, öffnen Sie den Wasserhahn und prüfen Sie,
ob zwischen dem Wasserhahn und dem Verbindungsrohr ein Leck vorhanden ist. Überprüfen Sie
bei Undichtigkeiten den Anschluss des Rohrs.
Wählen Sie die Wasserfunktion, drücken Sie mit einer großen Tasse auf den Spender, lassen Sie
das Wasser 5 Minuten lang ausströmen, bis das Wasser sauber und glatt ist, während des
Vorgangs ist das entnommene Wasser nicht trinkbar.
Wählen Sie die Funktion Eis nehmen und Eis brechen, verwenden Sie eine große Tasse, um auf
den Spender zu drücken, und überprüfen Sie den normalen Betrieb des internen Motors anhand
der gesunden Beurteilung.
Warten Sie 3 Minuten und prüfen Sie, ob das Wassereinlassventil des Kühlschranks, die
Wasserleitungsanschlüsse und der Wasserfilter undicht sind oder nicht.
Wasserquelle
Nehmen Sie den Gummistopfen
ab
Verbinden Sie die
Wasserleitung mit dem
Verbindungsstück und
denken Sie daran, Anti-
Rutsch-Clips auf beiden
Seiten des
Verbindungsstücks
einzusetzen.
Verbinden Sie das
Ende der
Wasserleitung mit der
Mutter mit der
Wasserquelle
Wasserrohr
22

Täglicher Gebrauch
Systemsteuerung Verwendung
Tasten
Drücken, um die Temperatur des Gefrierfachs (linke Seite) von -14 °C bis -22 °C einzustellen.
Drücken, um die Temperatur des Kühlfachs (rechte Seite) von 2 °C bis 8 °C und „OFF“ einzustellen.
Bei Auswahl von „OFF“ wird das Kühlfach ausgeschaltet.
Drücken Sie , um den Betriebsmodus SUPER KÜHLUNG auszuwählen , SUPER GEFRIER
,SMART , ECO und BENUTZEREINSTELLUNG (kein Symbol im Display).
Drücken Sie 3 SEK. Taste und 3 Sekunden lang gedrückt halten, um andere Tasten zu sperren.
Halten Sie sie 3 Sekunden lang gedrückt, um andere Tasten zu entsperren.
Drücken Sie die Eis-Aus-Taste, um den Eisbereiter zu steuern. Wenn Sie den Eisbereiter schließen
möchten, drücken Sie diese Taste, dann hört das Produkt mit der Eisbereitung auf, bis Sie diese
Taste erneut drücken.
“wechseln Sie Ihren Wasserfilter”.
Generell sollten Sie den Wasserfilter alle 6 Monate benötigen, um die höchste Wasserqualität zu
gewährleisten. Nach einem halben Jahr leuchtet das Displaysymbol auf, um Sie daran zu
erinnern, einen neuen Wasserfilter auszutauschen. Sie können einen neuen Wasserfilter bei dem
Händler erwerben, bei dem Sie den Kühlschrank oder das Kundendienstsystem kaufen. Nachdem
Sie einen neuen Wasserfilter im Kühlschrank ausgetauscht haben, sollten Sie diese Taste
drücken und 3 Sekunden lang gedrückt halten, das Anzeigesymbol erlischt und der Wasserfilter
wird zurückgesetzt.
Drücken Sie diese Taste, um Eiswürfel zu erhalten. Sie können diese Taste drücken, um die Art des
auszugebenden Eises auszuwählen.
Drücken Sie diese Taste, um Crush-Eis zu erhalten. Sie können diese Taste drücken, um die Art
des auszugebenden Eises auszuwählen.
Drücken Sie diese Taste, um Kühlwasser zu erhalten. Sie können diese Taste drücken, um das
auszugebende Kühlwasser auszuwählen.
Hinweis!
Wenn die Tür des Gefrierschranks geöffnet oder die Kindersicherung aktiviert ist, funktioniert der
Spender nicht.
Sie müssen die Tür schließen oder die Kindersicherung entriegeln, um die gewünschten Eiswürfel,
Crushed Ice und Kühlwasser zu erhalten.
Sie brauchen kein Eis, schalten Sie die Funktion aus, um Energie zu sparen (siehe Eis aus oben).
23

Täglicher Gebrauch
Wenn kein oder nur langsam Wasser ausgegeben wird, müssen Sie den Wasserfilter austauschen,
da er verstopfen kann.
Manche Gegenden haben viel Kalk im Wasser, wodurch der Wasserfilter schneller verstopft.
Anzeige
SMART Modus stellt der Kühlschrank die Temperatur von zwei Fächern automatisch
entsprechend der Innentemperatur und der Umgebungstemperatur ein.
ECO Modus läuft der Kühlschrank in der niedrigsten Energieverbrauchseinstellung.
SUPER KÜHLUNG kühlt das Kühlteil für ca. 2,5 Stunden. Dann wird die vor dem Supermodus
eingestellte Temperatur automatisch wiederhergestellt.
SUPER GEFRIER kühlt das Gefrierfach auf die niedrigste Temperatur für ca. 50 Stunden. Dann
wird die vor dem Supermodus eingestellte Temperatur automatisch wiederhergestellt.
SPERRE, das Symbol leuchtet auf, wenn die Tasten gesperrt sind.
Zeigt die eingestellte Temperatur des Gefrierfachs an.
Zeigt die eingestellte Temperatur des Kühlfachs an.
EIS AUS -Modus leuchtet das Symbol auf, wenn Sie die Taste zum Schließen des Eisbereiters
berühren, was bedeutet, dass der Kühlschrank aufhört, Eis zu produzieren.
ERINNERUNG AN WASSERFILTERWECHSEL -Modus, das Symbol leuchtet auf, wenn der
Wasserfilter 6 Monate lang verwendet wurde, um Sie daran zu erinnern, rechtzeitig einen neuen
Wasserfilter auszutauschen. Bis Sie einen neuen Filter ersetzen und die Taste 3 Sekunden
lang gedrückt halten, erlischt das Symbol.
Tür-Offen-Alarm
Wenn eine Tür 60 Sekunden lang offen bleibt, wird ein periodischer Alarm ausgelöst, bis die Tür
geschlossen wird.
Modus
Kontrollleucht
e
Gefriertemperaturanzeige
Kühlschranktemperatur
Anzeige
Smart
Die Temperaturanzeige für Gefrierschrank und Kühlschrank
ändert sich je nach Umgebungstemperatur (siehe Tabelle
unten).
ECO
-15°C
+8°C
Super Kühlung
Keine Änderung
+2°C
Super
eingefriert.
-25°C
Keine Änderung
24

Täglicher Gebrauch
HINWEISE:
ECO Modus (Energiesparmodus): Wählen Sie diesen Modus, wenn Sie Strom sparen möchten.
Super Kühlmodus: Dieser Modus ermöglicht das schnelle Abkühlen von Speisen und wird nach 2,5
Stunden Betrieb automatisch deaktiviert.
Super-Gefriermodus: Dieser Modus ermöglicht das schnelle Einfrieren von Lebensmitteln und wird
nach 50 Betriebsstunden automatisch deaktiviert.
Tür-Offen-Alarm
Wenn eine Tür etwa 60 Sekunden lang offen gelassen oder nicht vollständig geschlossen wird, gibt
das Gerät einen Alarm aus. Schließen Sie die Kühlschranktür, dann stoppt der Alarm.
Wenn die Tür nicht richtig geschlossen ist, ertönt der Alarm 5 Mal alle 30 Sekunden, bis die Türen
richtig geschlossen sind.
Wenn die Türen 10 Minuten lang ohne Schließen geöffnet sind, wird das interne LED-Licht
automatisch ausgeschaltet.
Kindersicherung
Diese Funktion soll verhindern, dass Kinder das Gerät bedienen.
Um die Funktion zu aktivieren, halten Sie etwa 3 Sekunden lang gedrückt. Die
Sperranzeige leuchtet auf, um anzuzeigen, dass die Sicherheitssperrfunktion aktiviert ist.
Um die Funktion zu deaktivieren, halten Sie ca. 3 Sekunden lang gedrückt. Die
Entriegelungsanzeige leuchtet auf, um anzuzeigen, dass die Sicherheitsverriegelungsfunktion
deaktiviert ist.
25

Täglicher Gebrauch
Erste Benutzung
Innenraum Reinigung
Waschen Sie vor dem ersten Gebrauch des Geräts den Innenraum und alle internen Zubehörteile mit
lauwarmem Wasser und etwas Neutralseife, um den typischen Geruch eines fabrikneuen Produkts zu
entfernen, und trocknen Sie ihn anschließend gründlich ab.
Wichtig! Verwenden Sie keine Reinigungsmittel oder Scheuerpulver, da diese die Oberfläche
beschädigen.
Spender Benutzung
Sie können Eiswürfel, zerstoßenes Eis und Kühlwasser erhalten, indem Sie den Paddelschalter
drücken, der durch Anzeigen des Bedienfelds ausgewählt wird;
Hinweis! Wenn der Paddelschalter länger als 3 Minuten ununterbrochen gedrückt wird, stellt der
Spender den Betrieb ein, um die elektrischen Komponenten zu schützen. Wenn Sie mehr Kühlwasser
oder Eis benötigen, können Sie den Paddle-Schalter loslassen und erneut drücken, um mehr Wasser
oder Eis zu erhalten, wie Sie möchten.
Kühlwasser besorgen
Wählen Sie den Kühlwassermodus , stellen Sie die Tasse in die Mitte des Paddelschalters,
drücken Sie den Paddelschalter, um Wasser zu erhalten, und hören Sie auf, den Paddelschalter zu
drücken, nachdem Sie eine angemessene Menge Wasser entnommen haben, und das Wasser hört
automatisch auf zu fließen.
Hinweis!
Warten Sie 2 Sekunden, bevor Sie die Tasse wegnehmen, damit kein Wasser heraus spritzt.
Wenn kühleres Wasser benötigt wird, füllen Sie das Glas vor der Einnahme mit Eis;
Wenn mehr als 800 ml Wasser auf einmal entnommen werden, kann Wasser mit hoher Temperatur
entnommen werden. In diesem Fall wird empfohlen, eine halbe Stunde auf ein kaltes Getränk zu
warten;
Eis bekommen
Wählen Sie den Eiswürfelmodus oder den Zerstoßenes Eis-Modus um die gewünschte
Eissorte zu erhalten..
Stellen Sie die Tasse in die Mitte des Paddelschalters, drücken Sie den Paddelschalter, um Eis zu
erhalten, und hören Sie auf, den Paddelschalter zu drücken, nachdem Sie eine angemessene Menge
Eis genommen haben, und das Eis hört automatisch auf zu fließen.
Hinweis!
Warten Sie 2 Sekunden, bevor Sie den Becher wegnehmen, um zu vermeiden, dass das Eis
heraus spritzt.
Eiswürfel, zerstoßenes Eis,
Kühlwassermodus
Paddelschalter
26

Täglicher Gebrauch
Um zu verhindern, dass Eis aus dem Becher fällt, stellen Sie den Becher so nah wie möglich an
den Spenderauslass.
Beim Entnehmen von Eis läuft der interne Motor, um Eis aufzuwirbeln und zu brechen, was
Geräusche verursachen kann.
Nachdem Sie Eis genommen haben, verwenden Sie es bitte so schnell wie möglich, um ein
Schmelzen des Eises zu vermeiden.
27

Täglicher Gebrauch
Wichtig!
In diesem Abschnitt erfahren Sie, wie Sie die meisten Probleme vermeiden können, die auftreten
würden. Wir empfehlen Ihnen, diese vor Gebrauch des Geräts sorgfältig durchzulesen.
1. Wenn Sie zum ersten Mal Wasser zu sich nehmen oder längere Zeit kein Wasser zu sich nehmen,
nehmen Sie bitte 1 bis 2 l Wasser heraus und gießen Sie es weg;
2. Wenn Sie den Eisbereiter zum ersten Mal benutzen oder ihn längere Zeit nicht benutzen, sollte
die erste Eiswürfelpackung nicht verwendet werden;
3. Es wird empfohlen, einen Becher mit einem Durchmesser von mehr als 70 mm zu verwenden, um
Wasser und Eis zu entnehmen;
4. Verwenden Sie keine zerbrechlichen Behälter zur Entnahme von Eiswürfeln, um Schäden durch
zerbrochene Behälter zu vermeiden;
5. Stecken Sie Ihre Hände oder Werkzeuge nicht in den Öffnungsteil des Verteilers, um eine Störung
des internen Mechanismus zu vermeiden;
6. Ziehen Sie den Paddelschalter nicht zu stark, um den Ausfall des Paddelschalters zu vermeiden;
7. Der Eisbereiter stellt automatisch Eis ohne manuelle Bedienung her. Wenn die
Eisaufbewahrungsbox mit Eis gefüllt ist (ca. 1,6 kg), stoppt die Eismaschine automatisch die
Eisbereitung;
8. Im Smart-Modus beträgt die tägliche Eisproduktionskapazität des Kühlschranks etwa 1,2 kg;
9. Bei geöffneter Gefrierfachtür ist der Eiswasserverteiler gesperrt und kann weder Wasser noch Eis
austragen;
10. Wenn die Tür des Gefrierabteils geöffnet ist und der Eisbereiter gerade Eis herstellt, fällt etwas Eis
in die Eisaufbewahrungsbox.
11. Wenn das Eis nicht reibungslos abgeführt wird, überprüfen Sie bitte, ob der Eisauslass des
Verteilers durch Eis blockiert ist. Wenn ja, reinigen Sie das Eis, bevor Sie es nehmen.
12. Nachdem der Kühlschrank zum ersten Mal eingeschaltet wurde, schalten Sie die Eismaschine ein,
die Eismaschine beginnt etwa 10 Stunden später mit der Eisbereitung;
13. Während des Gebrauchs hören Sie möglicherweise das Geräusch des Öffnens des Wasserventils,
des fließenden Wassers und des fallenden Eises, was normal ist;
14. Wenn Sie im Urlaub sind oder längere Zeit keine Eiswürfel benötigen, schalten Sie bitte die
Eisbereitungsfunktion aus und nehmen Sie die Eiswürfel aus der Eisbox, um zu vermeiden, dass
die Eiswürfel zusammenfrieren und den Auslass blockieren.
15. Reinigen Sie im Falle eines Stromausfalls rechtzeitig die Lebensmittel im Kühlschrank und reinigen
Sie das Eis in der Eisbox, um ein Schmelzen des Eises zu vermeiden.
16. Essen Sie die Eiswürfel nicht, wenn sie Geruch haben. Überprüfen Sie, ob der Filter abgelaufen ist
oder ob sich unverschlossene Lebensmittel mit stechendem Geruch im Kühlschrank befinden.
Wie wird der Spender gereinigt und gepflegt?
Verwenden Sie ein weiches Handtuch, um den Kühlschrank zu reinigen, und stellen Sie sicher, dass
die Stromversorgung unterbrochen ist, bevor Sie ihn reinigen. Bitte verwenden Sie zur Reinigung
sauberes Wasser, verwenden Sie kein Benzol, Verdünnungsmittel, Natriumhypochlorit, Scheuermittel,
Bleichmittel und andere chemische Reagenzien. Sprühen Sie das Reinigungsmittel nicht direkt auf
den Bildschirm, da sonst der gedruckte Text auf dem Bildschirm abfallen kann.
1) Nehmen Sie den Wasserkasten des Verteilers regelmäßig ab und gießen Sie das Wasser darin aus
und wischen Sie ihn sauber.
28

Täglicher Gebrauch
2) Reinigen Sie die Eisbox regelmäßig
Wenn das Eis längere Zeit nicht verwendet oder die Tür des Gefrierschranks häufig geöffnet wird,
kann das Eis in der Eisaufbewahrungsbox schmelzen und zusammengefroren werden, wodurch der
Auslass des Verteilers blockiert wird. Das Eis in der Eisbox muss manuell entfernt werden.
Beim Reinigen der Eisbox muss die Eisbereiterfunktion ausgeschaltet werden, um zu vermeiden, dass
Eis in den Kühlschrank oder auf den Boden fällt.
3) So montieren und demontieren Sie die Eisspeicherbox
Greifen Sie die Eisaufbewahrungsbox mit beiden Händen an der Schnalle, heben Sie die
Eisaufbewahrungsbox mit etwas Kraft etwa 10 mm an und ziehen Sie dann die Eisaufbewahrungsbox
aus der festen Schnalle;
Nehmen Sie nach dem Herausnehmen der Eisspeicherbox das interne Eis manuell und vorsichtig
heraus und reinigen Sie es dann mit sauberem Wasser.
Installieren Sie die Eisbox nach der Reinigung in umgekehrter Reihenfolge.
Hinweis!
Verwenden Sie keine Säuren, chemischen Lösungsmittel (Alkohol, Spülmittel) und andere
Scheuermittel;
Nach der Reinigung muss die Eisbox vor dem Einbau in den Kühlschrank gründlich getrocknet
werden, um ein Einfrieren des Eises zu vermeiden.
Verwenden Sie ein sauberes Handtuch, um den Eisauslass zu reinigen, drücken Sie nicht mit zu
viel Kraft auf die innere Struktur, um eine Beschädigung des inneren Mechanismus zu vermeiden;
Stellen Sie nichts anderes in den Eisauslass, um den Eisauslass nicht zu blockieren;
Lassen Sie Ihr Kind nicht auf den Kühlschrank klettern, da es herunterfallen und Personen
verletzen könnte.
29

Täglicher Gebrauch
Stecken Sie nicht Ihre Finger, Hände oder andere ungeeignete Gegenstände in die Eisrutsche oder
den Eiskübel. Dies kann zu Personen- oder Sachschäden führen.
Auftauen
Tiefgefrorene oder gefrorene Lebensmittel können vor der Verwendung im Gefrierfach oder bei
Raumtemperatur aufgetaut werden, je nachdem, wie viel Zeit für diesen Vorgang zur Verfügung steht.
Kleine Stücke können sogar noch gefroren direkt aus dem Gefrierschrank gegart werden. In diesem
Fall dauert das Garen länger.
Eiswürfel
Dieses Gerät kann mit einem oder mehreren Eiswürfeln ausgestattet
sein, um Eis zu produzieren.
Zubehör
Bewegliche Regale
Die Wände des Kühlschranks sind mit einer Reihe von Schienen
ausgestattet, so dass die Regale wie gewünscht positioniert werden
können.
Positionierung der Türbalkone
Um Lebensmittelpakete unterschiedlicher Größe lagern zu können,
können die Türbalkone in unterschiedlichen Höhen angebracht werden.
Um diese Einstellungen vorzunehmen, gehen Sie wie folgt vor: Ziehen
Sie den Balkon schrittweise in Pfeilrichtung, bis er sich löst, und
positionieren Sie ihn dann wie erforderlich neu.
30

Täglicher Gebrauch
Temperatureinstellung Empfehlung
Empfehlung zur Temperatureinstellung
Umgebungstemper
atur
Temperatureinstellung
Sommer
Kühlschrank auf 4°C eingestellt
Gefrierschrank auf -18°C eingestellt
Normal
Kühlschrank auf 4°C eingestellt
Gefrierschrank auf -18°C eingestellt
Winter
Kühlschrank auf 4°C eingestellt
Gefrierschrank auf -18°C eingestellt
Die obigen Informationen geben Benutzern Empfehlungen zur Temperatureinstellung.
Täglicher Gebrauch
Positionieren Sie verschiedene Lebensmittel in verschiedenen Fächern gemäß der folgenden Tabelle
Kühlfächer
Essen Art
Tür oder Balkone des Kühlfachs
Lebensmittel mit natürlichen Konservierungsstoffe wie
Marmeladen, Säfte, Getränke, Gewürze.
Lagern Sie keine verderblichen Lebensmittel.
Knusprig-Schublade
(Salatschublade)
Obst, Kräuter und Gemüse sollten separat in die
Frischhaltebox gegeben werden.
Bewahren Sie Bananen, Zwiebeln, Kartoffeln und
Knoblauch nicht im Kühlschrank auf.
Kühlschrankregal – Mitte
Milchprodukte, Eier
Kühlschrankregal – oben
Lebensmittel, die nicht gekocht werden müssen, wie
Fertiggerichte, Wurstwaren, Reste.
Gefrierschublade(n)/Regal
Lebensmittel für die Langzeitlagerung.
Untere Schublade/Ablage für rohes Fleisch, Geflügel,
Fisch.
31

Täglicher Gebrauch
Mittlere Schublade/Ablage für Tiefkühlgemüse,
Pommes.
Obere Schublade/Ablage für Eiscreme, gefrorenes
Obst, gefrorene Backwaren.
Impact on Food Storage
Unter der empfohlenen Einstellung beträgt die beste Aufbewahrungszeit des Kühlschranks nicht
mehr als 3 Tage.
Unter der empfohlenen Einstellung beträgt die beste Aufbewahrungszeit des Gefrierschranks nicht
mehr als 1 Monat.
Unter anderen Einstellungen kann sich die beste Lagerzeit verkürzen.
32

Täglicher Gebrauch
Hilfreiche Hinweise und Tipps
Hinweise zum Einfrieren
Um Ihnen dabei zu helfen, das Beste aus dem Einfrierprozess herauszuholen, hier einige wichtige
Hinweise:
die maximale Menge an Lebensmitteln, die in 24 Stunden eingefroren werden kann. ist auf dem
Typenschild angegeben;
der Gefriervorgang dauert 24 Stunden. Während dieser Zeit sollten keine weiteren einzufrierenden
Lebensmittel hinzugefügt werden;
Nur frische und gründlich gereinigte Lebensmittel von höchster Qualität einfrieren;
Lebensmittel in kleinen Portionen zubereiten, um sie schnell und vollständig einzufrieren und später
nur die benötigte Menge aufzutauen;
Wickeln Sie die Lebensmittel in Alufolie oder Polyäthylen ein und vergewissern Sie sich, dass die
Verpackungen luftdicht sind;
frische, nicht gefrorene Lebensmittel nicht mit bereits gefrorenen Lebensmitteln in Berührung
bringen, um deren Erwärmung zu vermeiden;
magere Lebensmittel besser und länger lagern als fetthaltige; Salz verringert die Haltbarkeit von
Lebensmitteln;
Wassereis kann, wenn es unmittelbar nach der Entnahme aus dem Gefrierfach verzehrt wird,
möglicherweise zu Gefrierbrand auf der Haut führen.
es ist ratsam, das Einfrierdatum auf jeder einzelnen Packung anzugeben, damit Sie sie aus dem
Gefrierfach entnehmen können, kann möglicherweise zu Gefrierbrand auf der Haut führen;
Es ist ratsam, das Einfrierdatum auf jeder einzelnen Packung anzugeben, damit Sie die Lagerzeit
im Auge behalten können.
Tiefkühlkost Aufbewahrung Hinweise
Um die beste Leistung von diesem Gerät zu erhalten, sollten Sie:
Stellen Sie sicher, dass die im Handel erhältlichen Tiefkühlkost vom Händler ausreichend gelagert
wurde;
Stellen Sie sicher, dass gefrorene Lebensmittel so schnell wie möglich vom Lebensmittellager in
den Gefrierschrank gebracht werden;
Öffnen Sie die Tür nicht häufig oder lassen Sie sie länger als unbedingt nötig geöffnet;
Einmal aufgetaute Lebensmittel verderben schnell und können nicht wieder eingefroren werden;
Überschreiten Sie nicht die vom Lebensmittelhersteller angegebene Lagerzeit.
Frische Lebensmittel Kühlungshinweise
Um die beste Leistung zu erzielen:
Lagern Sie keine warmen Speisen oder verdunstende Flüssigkeiten im Kühlschrank;
Decken oder wickeln Sie das Essen ein, besonders wenn es einen starken Geschmack hat.
Kühlungshinweise
Nützliche Hinweise:
Zubereitung (alle Sorten): In Polyäthylenbeutel wickeln und auf die Glasböden über der
Gemüseschublade legen.
Zur Sicherheit nur ein bis zwei Tage auf diese Weise lagern.
Gekochte Speisen, kalte Speisen usw.: Diese sollten abgedeckt werden und können auf jeder
Ablage platziert werden.
Obst und Gemüse: Diese sollten gründlich gereinigt und in die dafür vorgesehene(n) Schublade(n)
gelegt werden.
Butter und Käse: Diese sollten in spezielle luftdichte Behälter gegeben oder in Aluminiumfolie oder
Polyäthylenbeutel eingewickelt werden, um so viel Luft wie möglich auszuschließen.
Milchflasche: Diese sollte einen Verschluss haben und in den Balkonen an der Tür aufbewahrt
werden.
Unverpackte Bananen, Kartoffeln, Zwiebeln und Knoblauch dürfen nicht im Kühlschrank aufbewahrt
werden.
33

Täglicher Gebrauch
Reinigung
Aus hygienischen Gründen sollte der Geräteinnenraum inklusive Innenausstattung regelmäßig
gereinigt werden.
Vorsicht! Das Gerät darf während der Reinigung nicht an das Stromnetz angeschlossen sein.
Stromschlaggefahr! Schalten Sie vor der Reinigung das Gerät aus und ziehen Sie den Stecker
aus der Steckdose, oder schalten Sie den Schutzschalter oder die Sicherung aus oder ziehen
Sie sie heraus. Reinigen Sie das Gerät niemals mit einem Dampfreiniger. In elektrischen
Bauteilen kann sich Feuchtigkeit ansammeln, Stromschlaggefahr! Heiße Dämpfe können zur
Beschädigung von Kunststoffteilen führen. Das Gerät muss trocken sein, bevor es wieder in
Betrieb genommen wird.
Wichtig! Ätherische Öle und organische Lösungsmittel können Kunststoffteile angreifen, z.B.
Zitronensaft oder Saft aus Orangenschalen, Buttersäure, Reinigungsmittel, die Essigsäure enthalten.
Lassen Sie solche Substanzen nicht mit den Geräteteilen in Berührung kommen.
Verwenden Sie keine Scheuermittel.
Nehmen Sie die Lebensmittel aus dem Gefrierschrank. Bewahren Sie sie gut abgedeckt an einem
kühlen Ort auf.
Schalten Sie das Gerät aus und ziehen Sie den Stecker aus der Steckdose, oder schalten Sie den
Sicherungsautomaten aus oder ziehen Sie ihn heraus.
Reinigen Sie das Gerät und die Innenausstattung mit einem Tuch und lauwarmem Wasser. Nach
der Reinigung mit klarem Wasser nachwischen und trocken reiben.
Nachdem alles trocken ist, nehmen Sie das Gerät wieder in Betrieb.
Fehlerbehebung
Wenn Sie ein Problem mit Ihrem Gerät haben oder befürchten, dass das Gerät nicht richtig
funktioniert, können Sie die folgenden Tipps befolgen, um das Gerät zu überprüfen, bevor Sie den
Kundendienst anrufen.
Vorsicht! Trennen Sie vor der Fehlersuche die Stromversorgung. Nur ein qualifizierter
Elektriker oder eine kompetente Person darf die Fehlerbehebung durchführen, die nicht in
diesem Handbuch enthalten ist.
Wichtig! Während des normalen Gebrauchs (Kompressor, Kältemittelkreislauf) treten einige
Geräusche auf.
Problem
Mögliche Ursache
Lösung
Gerätedosis
funktioniert nicht
Netzstecker ist nicht eingesteckt
oder locker
Netzstecker einstecken.
Sicherung ist durchgebrannt oder
defekt
Sicherung prüfen, ggf. ersetzen.
Steckdose ist defekt
Netzstörungen sind durch eine
Elektrofachkraft zu beheben.
Das Gerät friert ein
oder kühlt zu stark
ab
Die Temperatur ist zu niedrig
eingestellt oder das Gerät läuft im
SUPER -Modus.
Drehen Sie den Temperaturregler
vorübergehend auf eine wärmere
Einstellung.
Das Essen ist nicht
tief genug gefroren.
Die Temperatur ist nicht richtig
eingestellt.
Bitte sehen Sie im ersten Abschnitt
Temperatureinstellung nach.
Tür stand längere Zeit offen.
Öffnen Sie die Tür nur so lange wie
nötig.
Innerhalb der letzten 24 Stunden
wurde eine große Menge warmer
Speisen in das Gerät gestellt.
Stellen Sie die Temperaturregelung
vorübergehend auf eine kältere
Stufe.
34

Täglicher Gebrauch
Das Gerät steht in der Nähe einer
Wärmequelle.
Bitte schauen Sie im Abschnitt
Installationsort nach.
Starke Reifbildung
an der Türdichtung.
Türdichtung ist nicht luftdicht.
Erwärmen Sie die undichten Stellen
der Türdichtung vorsichtig mit einem
Föhn (auf kühle Stufe). Gleichzeitig
die erwärmte Türdichtung von Hand
so formen, dass sie korrekt sitzt.
Ungewöhnliche
Geräusche
Gerät steht nicht eben.
Stellen Sie die Füße neu ein.
Das Gerät berührt die Wand oder
andere Gegenstände.
Bewegen Sie das Gerät etwas.
Eine Komponente, z.B. ein Rohr an
der Geräterückseite einen anderen
Teil des Gerätes oder die Wand
berührt.
Falls erforderlich, biegen Sie die
Komponente vorsichtig zur Seite.
Seitenteile sind heiß
Es ist normal. Der
Wärmeaustausch erfolgt in den
Seitenwänden
Nehmen Sie bei Bedarf Handschuhe
mit, um die Seitenwände zu
berühren.
Spender konnte kein
Kühlwasser
bekommen
Kein Zugang zur Wasserquelle
oder kein Öffnen des Wasserventils
Stellen Sie sicher, dass die
Wasserquelle und das Ventil
geöffnet sind
Der Filter ist nicht richtig installiert
Prüfen Sie, ob die Filterrichtung
umgekehrt ist
Das Wasserventil oder die
Anschlüsse sind nicht richtig
installiert
Prüfen Sie, ob Wasserventil oder
Anschlüsse vertauscht sind
Das Wasser wird
nicht ausreichend
gekühlt
Die Kühlschranktemperatur ist zu
hoch eingestellt
Stellen Sie die
Kühlschranktemperatur niedriger ein
Nehmen Sie zu viel Wasser auf
einmal (1L)
Warten Sie, bis das Wasser
abgekühlt ist
Wasser oft nehmen
Warten Sie, bis das Wasser
abgekühlt ist
Spender konnte kein
Eis bekommen
Kein Eis in der Aufbewahrungsbox
Warten Sie, bis der Eisbereiter mit
der Eisbereitung fertig ist (wenn der
Kühlschrank zum ersten Mal
vollständig abgekühlt sein muss,
beginnt der Eisbereiter mit der
Eisbereitung);
Kein Zugang zur Wasserquelle
oder kein Öffnen des Wasserventils
Stellen Sie sicher, dass die
Wasserquelle und das Ventil
geöffnet sind
Der Modus „Eis aus“ funktioniert,
die Eisherstellung wird beendet
Schalten Sie den „Eis aus“-Modus
aus
Der Druck der Wasserquelle reicht
nicht aus
Stellen Sie sicher, dass der
Quellwasserdruck 1,5 ~ 7 bar
beträgt
Das Wasserventil oder die
Anschlüsse sind nicht richtig
installiert
Prüfen Sie, ob Wasserventil oder
Anschlüsse vertauscht sind
35

Täglicher Gebrauch
Der Filter ist nicht richtig installiert
Prüfen Sie, ob die Filterrichtung
umgekehrt ist
Die Eiswürfel werden in der
Aufbewahrungsbox
zusammengefroren, um den
Eisauslass zu blockieren
Entfernen Sie die gefrorenen
Eiswürfel
In der Aufbewahrungsbox befindet
sich etwas Hartes, das den Motor
am Laufen hindert
Entfernen Sie das Ding, das den
Ausgang blockiert
Die Türen sind nicht vollständig
geschlossen, wodurch die kalte Luft
entweichen kann
Stellen Sie sicher, dass die Türen
vollständig geschlossen sind
Die Eis- oder
Wasserwürfel sind
zu klein
Der Druck der Wasserquelle reicht
nicht aus
Stellen Sie sicher, dass der
Quellwasserdruck 1,5 ~ 7 bar
beträgt
Der Wasserfilter ist verstopft, weil
er zu lange benutzt wurde
Ersetzen Sie einen neuen
Wasserfilter
Der Wasserdurchflussmesser ist
defekt
Wenden Sie sich an das
Wartungspersonal
Wenn die Störung erneut auftritt, wenden Sie sich an das Service Center.
Diese Daten sind notwendig, um Ihnen schnell und richtig helfen zu können. Notwendige Daten hier
eintragen, siehe Typenschild.
36

Handbuch Merkblatt
Die unten aufgeführten Funktionen sind nicht für alle Modelle geeignet,
diese Broschüre dient nur als Referenz.
Diese Liste enthält alle Ökodesign-Anforderungen (in Anlehnung an
(EU) 2019/2019 Ökodesign und (EU) 2019/2016
Energiekennzeichnung), sofern die Anforderung auf Ihr Produkt
zutrifft.
Das Kältegerät ist nicht zur Verwendung als Einbaugerät bestimmt,
es sei denn, dies ist ausdrücklich in seiner Bedienungsanleitung
angegeben.
Die Schubladen, Körbe und Regale sollten in ihrer aktuellen Position
belassen werden, sofern in diesem Dokument nicht anders
angegeben.
Türen und Deckel des Kältegeräts sollten vor der Entsorgung auf der
Deponie entfernt werden, um zu verhindern, dass Kinder oder Tiere
darin eingeschlossen werden.
Empfohlene Einstellung:
Kühlfach: +4°C
Gefrierfach: -18°C
SCHNELLES EINFRIEREN
Die Verwendung dieser Funktion wird empfohlen, wenn eine sehr
große Menge an einzufrierenden Lebensmitteln in das Gefrierfach
gelegt wird. Drücken Sie 24 Stunden vor dem Einfrieren frischer
Lebensmittel die Schnellgefriertaste, um die Schnellgefrierfunktion zu
aktivieren. Wenn aktiviert, leuchtet die Schnellgefrieranzeige auf.
Legen Sie die einzufrierenden Lebensmittel nach 24 Stunden in die
Gefrierzone des Gefrierfachs. Die Funktion wird nach 72 Stunden
automatisch deaktiviert oder kann manuell durch Drücken der
Schnellgefriertaste deaktiviert werden.
SCHNELLE KÜHLUNG
Mit der Fast Cool-Funktion ist es möglich, die Kühlleistung im
Kühlfach zu erhöhen. Die Verwendung dieser Funktion wird
empfohlen, wenn Sie eine sehr große Menge an Lebensmitteln in das
Kühlfach legen. Drücken Sie die Schnellkühltaste, um die
Schnellkühlfunktion zu aktivieren. Wenn aktiviert, leuchtet die Fast
Cool-Anzeige auf. Die Funktion wird nach 6 Stunden automatisch
deaktiviert oder kann manuell durch erneutes Drücken der Fast Cool-
Taste deaktiviert werden.
So lagern Sie Lebensmittel:
37

Um Lebensmittelverschwendung zu vermeiden, beachten Sie bitte
die empfohlenen Einstell- und Lagerzeiten:
Kühlschrankfach: Verschiedene Lebensmittel, insbesondere Gemüse
und Obst, haben unterschiedliche Lagertemperaturen. Die Lagerzeit
beträgt 1 bis 3 Tage (Temperatureinstellung: mittel)
Gefrierfach: 1 Woche (Temperatureinstellung: Min.) und 1 Monat
(Temp.
Einstellung: Maximal)
Um die Gefriergeschwindigkeit zu optimieren und mehr Stauraum zu
erhalten, kann das Gefrierfach ohne die Gefrierschubladen verwendet
werden.
Die Menge an frischen Lebensmitteln, die in einem bestimmten
Zeitraum eingefroren werden kann, ist auf dem Typenschild
angegeben. Belastungsgrenzen werden durch Körbe, Klappen,
Schubladen, Fachböden usw. bestimmt. Achten Sie darauf, dass sich
diese Bauteile nach dem Beladen noch leicht schließen lassen.
Um Lebensmittelverschwendung zu vermeiden, beachten Sie bitte
die empfohlenen Einstell- und Lagerzeiten in der
Bedienungsanleitung.
Die Modellinformationen können über den im Energielabel
ausgewiesenen QR-Code abgerufen werden.
Das Etikett enthält auch die Modellkennung, mit der das Portal der
Registrierungsstelle konsultiert werden kann, unter
https://eprel.ec.europa.eu
Dieses Produkt enthält ein Leuchtmittel der Energieeffizienzklasse G
(falls vorhanden).
38

Childrenandvulnerablepeoplesafety
1

2

3

4

5

Caution!
• When using the ice making and cooling function,
make sure the water source and filter are
connected.
• Before using the product, the filter should be
rinsed with water for 5 minutes or 5L of water to
ensure that the toner in the filter is rinsed clean.
• After the refrigerator is connected to the water
source, exhaust treatment shall be carried out
according to the installation instructions. After
waiting 5 minutes, check the waterway for leaks.
6

• Ensure that the water pressure is within the
required specifications. Too high water pressure
is easy to cause water leakage, too low water
pressure can not support the product function.
• Do not touch the ice maker with hands or tools in
the process of use to prevent damage to
personnel or the ice maker.
• During using the product, please ensure that the
ice making machine and the ice storage box are
clean to avoid a large amount of dust, solid
debris and other pollutants falling into them.
• Do not allow children to take out the ice box to
prevent it from falling off and hurting.
• There are metal knives inside the ice box.
Children are not allowed to play with them to
avoid being hurt.
7

8

9

Packagingmaterials
Disposaloftheappliance
10

Control panel
Water/ ice Dispenser
(Remove away the metal compressor room cover)
Main control board
Power cord
Compressor
External main water valve
11

Ice box cover
Ice storage box
Freezer shelves*3
Freezer drawers*2
Freezer balcony*1
Water pipe connector
Fridge balcony*4
Fridge shelves*3
Fridge crispers*2
12

Product accessories
Water pipe parts * 1 Water filter * 1 Water pipe connector*1
Water filter connector*2
Anti-slip clips *8
Dispenser water tray * 1 User manual * 1
13

4. There is a water pipe connector at the bottom of the refrigerator freezer. Remove it from the
protective cover and disconnect from the water pipe, and remember to pull the water pipe out of
the lower hinge.
14

15

50
Location
Electricalconnection
Positioning
16

Important!
How to install the water filter and water pipe
1.Before installing, the filter should be rinsing with water for 5 minutes or 5L of water to ensure that the
toner in the filter is rinsed clean.
Water source
Connect tube
Filter
Basin
2. Open the refrigerator door and take out the crispers.
3. Take out the rubber plugs on both sides of the water box.
Rubber plugs
Water box
17

4. Take out the water filter from the accessory bag, insert the connectors on both sides of the filter, then
connect the water pipe and clamp into the anti-slip clips (pay attention to the direction of the filter arrow)
Water filter
Connectors
Water pipes
Anti-slip clips
5. Assemble the water filter parts with retaining bracket above the water box, and connect the water
pipes of water box with water filter.
Fix the water filter parts
Connect the water pipes
of water box with filter
6. Take off the rubber plug. Connect the water pipe part to the main valve on the compressor cover
with connector, and remember to insert the anti- slip clips, then connect the end of the water pipe
with the nut to the water source.
Take off the rubber plug Connect the water pipe with
connector,and remember to
insert anti-slip clips on both
side of connector.
Water pipe connect the end of the
water pipe with the nut
to the water source
Water source
18

Caution!
• The external water source must be clean and the water pressure should be 1.5~7 bar to guarantee
proper working.
• Check the water pipe connection, check whether there are any other things inside the ice making
machine and ice storage box.
• After accessing the water source, open the faucet and check whether there is leakage between the
faucet and the connecting pipe. If there is leakage, check the connection of the pipe.
• Select the water function, use a large cup to press the dispenser, keep the water exhausting for 5
minutes until the water is clean and smooth, during the process the water taken out is not drinkable.
• Select the function of taking ice and breaking ice, use a large cup to press the dispenser, and check
the normal operation of the internal motor through the sound judgment.
• Wait for 3 minutes and check whether the water inlet valve of the refrigerator, the water pipe
connectors and water filter are leaking or not.
19

E
SUPER COOLING ,SUPER FREEZER ,SMART ,
ECO
Press the ice off button to control the ice maker. If you want to close the ice maker, press this
button, then the product will stop making ice until you press this button again.
“ change your water filter”.
In general, you should need the water filter every 6 months to ensure the highest water quality.
After half a year, the display icon will be lit up for reminding you should replace a new water
filter.You can purchase a new water filter from the retailer where you buy the refrigerator or the
after-sales system. After you finish replacing a new water filter inside the refrigerator, you should
Press this button and hold for 3s, the display icon will be extinguished, and the water filter
will be reset.
Press this button to receive cubed ice. You can press this button to choose the type of ice to be
dispensed.
Press this button to receive crush ice. You can press this button to choose the type of ice to be
dispensed.
Press this button to receive cooling water. You can press this button to choose cooling water to
be dispensed.
F
G
Note!
• When the freezer door is opened or child lock is on, the dispenser will not work.
you need to close the door or unlock the child lock to receive the cubed ice, crushed ice, cooling
water you want.
• You don’t need ice, turn the function off to save energy.(see ice off above)
• If water is not dispensed or dispensed slowly, you need to replace the water filter because it may
become clogged.
• Some areas have large amounts of lime in the water, which causes the water filter to clog more
quickly.
E
F
G
20

2.5
50
60
8ICE OFF mode, the symbol will light on when you touch the button to close the ice maker, it
means the refrigerator will stop making ice any more.
REMIND CHANGING WATER FILTER mode, the symbol will light on when the water filter has
been used for 6 months to remind you replace a new water filter in time. Until you replace a new
filter and keep press the button for 3s, the symbol will be extinguished.
9
8
9
21

2.5
30
5 times
3 seconds
22

First use
Cleaningtheinterior
How to use the dispenser?
You can get cubed ice, crushed ice and cooling water by pressing the paddle switch, which is
selected by displaying the operation panel;
Note! If the paddle switch is pressed continuously for more than 3 minutes, the dispenser will stop
working to protect the electrical components. If you need more cooling water or ice, you can release
the paddle switch and press it again to get more water or ice as you want.
Cubed ice, crushed ice,
cooling water mode
Paddle switch
Get cooling water
Select the cooling water mode , place the cup in the middle of the paddle switch, press the paddle
switch to receive water, and stop pressing the paddle switch after taking an appropriate amount of
water, and the water will stop flowing automatically.
Note!
• Wait for 2 seconds before taking the cup away to avoid the water splash out.
• If cooler water is needed, fill the glass with ice before taking;
• If more than 800ml of water is taken at one time, water with high temperature may be taken out. In
this case, it is recommended to wait half an hour for a cold drink;
Get ice
Select the cube ice mode or crushed ice mode to get ice type as you want.
Place the cup in the middle of the paddle switch, press the paddle switch to receive ice, and stop
pressing the paddle switch after taking an appropriate amount of ice, and the ice will stop flowing
automatically.
Note!
• Wait for 2 seconds before taking the cup away to avoid the ice splash out.
• To prevent ice from falling out of the cup, place the cup as close to the dispenser outlet as possible.
• When taking ice, the internal motor runs to churn ice and break ice, which may produce some noise.
• After taking ice, please use it as soon as possible to avoid melting ice.
23

Important!
This section tells you how to avoid most issues you would happen. We recommend
that you read through them carefully before using the appliance.
1. When taking water for the first time or not taking water for a long time, please take out 1~2L of
water and pour it away;
2. When using the ice maker for the first time or not using it for a long time, the first box of ice cubes
should not be used;
3. It is recommended to use a cup with a diameter of more than 70mm to take water and ice;
4. Do not use fragile containers to take ice cubes, so as to avoid damage caused by broken
containers;
5. Do not put your hands or tools into the opening part of the distributor, so as to avoid causing
failure to the internal mechanism;
6. Do not pull the paddle switch too much force, so as to avoid the failure of the paddle switch;
7. The ice maker automatically makes ice without manual operation. When the ice storage box is
filled with ice (about 1.6kg), the ice maker automatically stops making ice;
8. In the smart mode, the daily ice production capacity of the refrigerator is about 1.2kg;
9. When the freezer door is open, the ice water distributor is locked and cannot carry out water or ice;
10. When the freezer door is open, if the ice maker is performing the making ice procedure, some ice
will fall into the ice storage box.
11. If the ice is not discharged smoothly, please check whether the ice outlet of the distributor is
blocked by ice. If so, clean up the ice before taking it;
12. After the refrigerator is powered on in the first time, turn on the ice maker, the ice maker will start
making ice about 10 hours later;
13. During the process of using, you may hear the sound of water valve opening, water flowing and
ice falling, which is normal;
14. If you are on vacation or do not need ice cubes for a long time, please turn off the ice making
function and take out the ice cubes in the ice box to avoid the ice cubes become frozen together
to block the outlet.
15. In case of power failure, please clean the food in the refrigerator in time, and clean the ice in the
ice storage box to avoid ice melting.
16. Do not eat the ice cubes when they have odor. Check if the filter has expired or if there are
unsealed foods with pungent odor in the refrigerator.
How to clean and care the dispenser?
Use a soft towel to clean the refrigerator and ensure to disconnect the power supply before cleaning it.
Please use clean water when cleaning, do not use benzene, diluent, sodium hypochlorite, abrasive,
bleach and other chemical reagents. Do not spray detergent directly on the display screen, otherwise
the printed text on the display screen may fall off.
1) Take down the water box of the distributor regularly and pour out the water inside, and wipe it clean.
24

2) Clean the ice storage box regularly
If the ice is not used for a long time or the freezer door is frequently opened, the ice in the ice storage
box may melt and became frozen together, which makes the distributor outlet blocked. The ice in the
ice storage box needs to be removed manually.
When cleaning the ice storage box, it is necessary to turn off the ice maker function to avoid the ice
falling into the refrigerator or the floor.
3) How to assemble and disassemble the ice storage box
Grasp the ice storage box with both hands on the buckle, lift the ice storage box up about 10mm with
a little force, and then drag the ice storage box out of the fixed buckle;
1
2
After taking out the ice storage box, take out the internal ice manually and carefully, and then clean
with clean water.
After cleaning the ice storage box, install it as reversed process.
Note!
• Do not use acid, chemical solvents (alcohol, dishwashing liquid) and other scrubbing;
• After cleaning, it is necessary to dry the ice box thoroughly before installing in the refrigerator to
avoid ice freezing;
• Use a clean towel to clean the ice outlet, do not press the internal structure with too much force to
avoid damaging the internal mechanism;
• Do not place anything else in the ice outlet to avoid blocking the ice outlet;
• Do not allow child to climb on the refrigerator, or it may fall down to hurt people.
• Do not put your fingers, hands, or any other unsuitable objects in the ice chute or ice bucket. This
can cause personal injury or material damage.
25

Thawing
Ice-cube
Accessories
Movable shelves
Positioning the door balconies
26

Daily use
27

Helpfulhintsandtips
Hints for freezing
Hints for storage of frozen food
Hints for fresh foodrefrigeration
Hints for refrigeration
Cleaning
28

Troubleshooting
If you experience a problem with your appliance or are concerned that theappliance is not functioning
properly, you could follow below tips to check the appliancebefore calling for service.
29

Dispenser couldn’t get
cooling water
Failing to access the water source
or open the water valve
Make sure the water source and the
valve is open
The filter is not installed correctly Check whether the filter direction is
reversed
The water valve or connectors are
not installed correctly
Check whether water valve or
connectors are reversed
The water is not cooled
enough
The fridge temperature is set too high
Set the fridge temperature lower
Take too much water in one time (1L) Wait for the water cool down
Take the water so often Wait for the water cool down
Dispenser couldn’t
get ice
No ice inside the storage box
Wait for the ice maker to finish making
ice (the first time on the refrigerator
needs to be fully cooled, the ice maker
will start making ice);
Failing to access the water source or
open the water valve
Make sure the water source and the
valve is open
The “ice off” mode is working, it will
stop making ice Turn off the “ice off “ mode
The pressure of water source is not
enough
Ensure the source water pressure is
1.5 ~ 7 bar
The water valve or connectors are
not installed correctly
Check whether water valve or
connectors are reversed
The filter is not installed correctly Check whether the filter direction is
reversed
The ice cubes are frozen together in
the storage box to block the ice outlet Remove the frozen ice cubes
There is something hard in the
storage box, which prevents the
motor from running
Remove the thing which blocks the outlet
The doors is not closed totally which
will make the cold air leak out Ensure the doors is closed totally
The pressure of water source is not
enough
Ensure the source water pressure is
1.5 ~ 7 bar
The cubed ice or
water is too small
The water filter is blocked, because
it has been used too long time Replace a new water filter
The water flow meter is fault Contact maintenance personnel
30

31

Manual Leaflet
Below mentioned functions are not suitable for all models, this leaflet
is just a reference.
This list provides all Eco-design requirements (following the
(EU)2019/2019 Eco-design and (EU)2019/2016 Energy labelling) ,
if the requirement is applicable to your product.
The refrigerating appliance is not intended to be used as a built-in
appliance, unless specifically shown as such into its instruction
manual.
The drawers, baskets and shelves should be kept in their current
position unless otherwise specified in this document.
Doors and lids of the refrigeration appliance should be removed
before disposal in the landfill, to avoid children or animals getting
trapped inside.
Recommended setting:
Refrigerator compartment: +4ºC
Freezer compartment: -18ºC
FAST FREEZE
The use of this function is recommended when placing a very high
quantity of food to be frozen in the freezer compartment. 24 hours
before freezing fresh food, press the Fast Freeze button to activate
the Fast Freeze function. When activated, the Fast Freeze indicator
turns on. After 24 hours place the food to be frozen in the freezing
zone of freezer compartment. The function is automatically disabled
after 72 hours, or can be manually disabled by pressing Fast Freeze
button.
FAST COOL
Using Fast Cool function it is possible to increase the cooling capacity
in the refrigerator compartment. The use of this function is
recommended when placing a very high quantity of food in the
refrigerator compartment. Press the Fast Cool button to activate Fast
Cool function. When activated, the Fast Cool indicator turns on. The
function is automatically disabled after 6 hours, or can be manually
disabled by pressing Fast Cool button again.
How to store foodstuffs:
To avoid food waste, please refer to the recommended setting and
storage times:
Fridge compartment: Different food, especially vegetable and fruit,
have different storage temperature. The storage time is 1 to 3 days
(temp setting: middle)
Freezer compartment: 1 week (temp setting: Min) and 1 month (temp
32

setting: Max)
To optimize freezing speed and get more storage space, the freezer
compartment can be used without the freezer drawers.
The quantity of fresh food that can be frozen in a specific time period
is indicated on the rating plate. Load limits are determined by baskets,
flaps, drawers, shelves etc. Make sure that these components can still
close easily after loading.
To avoid food waste, please refer to the recommended setting and
storage times found in the user manual.
The model information can be retrieved using the QR-Code reported
in the energy label.
The label also includes the model identifier that can be used to consult
the portal of the registry at
https://eprel.ec.europa.eu
This product contains a light source of energy efficiency class G (if
present).
33

Información relativa a la seguridad
Por su seguridad y para garantizar el uso correcto, antes
de instalar y utilizar por primera vez el aparato, lea
atentamente este manual del usuario, incluidos sus
consejos y las advertencias. Para evitar errores y
accidentes innecesarios, es importante asegurarse de
que todas las personas que usan el aparato estén
completamente familiarizadas con su funcionamiento y
características de seguridad. Guarde estas instrucciones
y asegúrese de que permanezcan con el aparato si se
mueve o se vende, para que todos los que lo usen
durante toda su vida útil estén informados
adecuadamente sobre sus características de uso y
seguridad. Con el fin de proteger la vida y sus bienes,
respete las precauciones que se indican en este manual
del usuario, ya que el fabricante no es responsable de
los daños causados por omisión.
Seguridad de niños y personas vulnerables
Este aparato puede ser utilizado por niños a partir de
8 años y personas con capacidades físicas,
sensoriales o mentales reducidas, o con falta de
experiencia y conocimientos si son debidamente
supervisados o reciben instrucciones sobre su uso
seguro y entienden los peligros correspondientes.
Los niños de 3 a 8 años pueden cargar y descargar
este aparato.
Los niños deben ser supervisados para asegurarse de
que no jueguen con el aparato.
Los niños no deben realizar la limpieza y el
mantenimiento del usuario, a menos que estos tengan
una edad de 8 años y estén supervisados.
1

Información relativa a la seguridad
Mantenga el material de embalaje lejos del alcance de
los niños, ya que entraña riesgo de asfixia.
Si está desechando el aparato, saque el enchufe de la
toma de corriente, corte el cable de conexión (lo más
cerca que pueda del aparato) y retire la puerta para
evitar que los niños sufran una descarga eléctrica o
se queden encerrados.
Si este aparato con juntas magnéticas en la puerta
reemplaza a un aparato más antiguo que tiene seguro
de resorte (pestillo) en la puerta o tapa, asegúrese de
que no se pueda usar ese resorte antes de desechar
el aparato antiguo. Esto evitará que se convierta en
una trampa mortal para un niño.
Seguridad general
¡ADVERTENCIA! Mantenga libres de
obstrucciones los orificios de ventilación del
cerramiento del aparato o del mueble en el que este
se integre.
¡ADVERTENCIA! No utilice dispositivos
mecánicos u otros medios para acelerar el proceso
de descongelación que no sean los recomendados
por el fabricante.
¡ADVERTENCIA! No dañe el circuito de
refrigerante.
¡ADVERTENCIA! No use otros aparatos
eléctricos (como heladeras) dentro de aparatos de
refrigeración, a menos que estén aprobados para
este propósito por el fabricante.
2

Información relativa a la seguridad
¡ADVERTENCIA! No toque la bombilla si ha
estado encendida durante un largo período de
tiempo porque podría estar muy caliente.1)
¡ADVERTENCIA! Al colocar el aparato,
asegúrese de que el cable de alimentación no esté
atrapado o dañado.
¡ADVERTENCIA! No ubique regletas portátiles
ni proveedores de energía portátiles en la parte
posterior del aparato.
No almacene sustancias explosivas como latas de
aerosol con un propelente inflamable en este aparato.
El circuito de refrigerante del aparato contiene gas
refrigerante isobutano (R-600a), un gas natural con un
alto nivel de compatibilidad ambiental, que es, sin
embargo, inflamable.
Durante el transporte y la instalación del aparato,
asegúrese que no se dañe ninguno de los
componentes del circuito de refrigerante.
- Evite las llamas abiertas y las fuentes de ignición.
- Ventile bien la estancia en la que se encuentra el
aparato.
Es peligroso alterar las especificaciones o modificar
este producto de cualquier modo. El deterioro del
cable puede causar un cortocircuito, un incendio o
una descarga eléctrica.
Este aparato está diseñado para ser utilizado en
aplicaciones domésticas y similares, como:
1) Si hay luz en el compartimento.
3

Información relativa a la seguridad
- zonas de cocina de personal en tiendas, oficinas y
otros entornos de trabajo;
- granjas y por clientes en hoteles, moteles y otros
entornos de tipo residencial;
- establecimientos de tipo «bed & breakfast»;
- aplicaciones de catering y similares.
¡ADVERTENCIA! Los componentes eléctricos
(enchufe, cable de alimentación, compresor, etc.)
deben ser reemplazados por un agente de servicio
certificado o personal de servicio cualificado.
¡ADVERTENCIA! La bombilla suministrada con este
aparato es una «bombilla de uso especial» que solo
debe utilizarse en el aparato suministrado. Esta
«bombilla de uso especial» no debe utilizarse para
iluminación doméstica.1)
El cable de alimentación no debe alargarse.
Compruebe que el enchufe de alimentación no esté
aplastado ni deteriorado por la parte posterior del
aparato. Un enchufe de alimentación aplastado o
deteriorado puede sobrecalentarse y provocar un
incendio.
Asegúrese de que puede conectarse a la toma de
corriente del aparato.
No tire del cable de alimentación.
Si las clavijas del enchufe están flojas, no inserte el
enchufe. Existe riesgo de descarga eléctrica o
incendio.
No utilice el aparato sin la bombilla.
1) Si hay luz en el compartimento.
4

Información relativa a la seguridad
Este aparato es pesado. Tenga cuidado al moverlo.
No saque ni toque artículos del congelador con las
manos húmedas/mojadas, ya que esto podría
provocar abrasiones o quemaduras por congelación
en la piel.
Evite la exposición prolongada del aparato a la luz
solar directa.
Uso diario
No aplique calor a las piezas de plástico del aparato.
No coloque alimentos directamente contra la pared
trasera posterior.
Los alimentos congelados no deben volver a
congelarse una vez descongelados1)
Conserve los alimentos congelados preenvasados
conforme a las instrucciones del fabricante de los
alimentos.1)
Deben respetarse estrictamente las recomendaciones
de conservación del fabricante del aparato. Consulte
las instrucciones correspondientes.
No meta bebidas gaseosas o carbonatadas en el
congelador, ya que esto crea una presión en el
recipiente que puede hacerlo explotar, provocando
daños al aparato.1)
Los polos de hielo pueden causar quemaduras por
congelación si se consumen directamente del
aparato.1)
1) Si hay un compartimento del congelador.
2) Si hay un compartimento para alimentos frescos.
5

Información relativa a la seguridad
Para evitar la contaminación de los alimentos, siga
estas instrucciones.
Dejar la puerta abierta durante largos períodos puede
ocasionar un aumento importante de la temperatura
en los compartimentos del aparato.
Limpie regularmente las superficies que puedan
entrar en contacto con alimentos y sistemas de
desagüe accesibles.
Limpie los depósitos de agua si no se han utilizado
durante 48 h; enjuague el sistema de agua conectado
a un suministro de agua si no se ha extraído agua
durante 5 días.
Guarde la carne y el pescado crudos en recipientes
adecuados en el frigorífico, de modo que no entren en
contacto con otros alimentos.
Los compartimentos de alimentos congelados de dos
estrellas (si se incluyen en el aparato) son adecuados
para conservar alimentos precongelados, conservar o
fabricar helados, y fabricar cubitos de hielo.
Los compartimentos de una, dos y tres estrellas (si se
incluyen en el aparato) no son adecuados para la
congelación de alimentos frescos.
Si el aparato se deja vacío durante largos períodos,
apague, descongele, limpie y deje la puerta abierta
para prevenir el desarrollo de moho en su interior.
Cuidados y limpieza
Antes de realizar cualquier tarea de mantenimiento,
apague el aparato y desconecte el enchufe de la toma
de corriente.
6

Información relativa a la seguridad
No limpie el aparato con objetos metálicos.
No utilice objetos afilados para eliminar la escarcha
del aparato. Utilice un rascador de plástico.1)
Examine periódicamente el desagüe del refrigerador
para comprobar si hay agua descongelada. Si es
necesario, límpielo. Si el desagüe está bloqueado, el
agua se acumulará en la parte inferior del aparato.2)
¡Precaución!
Cuando utilice la función de fabricación y refrigeración
de hielo, compruebe que estén conectados el filtro y
el depósito de agua.
Antes de usar el producto, enjuague el filtro con agua
durante 5 minutos o con 5 litros de agua para limpiar
perfectamente el cartucho del filtro.
Una vez conectado al depósito de agua, se llevará a
cabo un tratamiento de gases de escape de acuerdo
con las instrucciones de instalación. Transcurridos 5
minutos, compruebe si existen fugas.
Compruebe que la presión del agua se encuentre
dentro de las especificaciones. Una presión de agua
excesiva podría causar una fuga de agua; por el
contrario, un defecto de presión podría provocar un
fallo.
No toque el generador de hielo con las manos o con
herramientas durante su uso para evitar daños al
personal o al aparato.
1) Si hay un compartimento del congelador.
2) Si hay un compartimento para alimentos frescos.
7

Información relativa a la seguridad
Durante el uso del producto, compruebe que el
generador de hielo y el depósito de hielo estén
limpios, evitando que se acumule en ellos polvo,
residuos sólidos y otros contaminantes.
No permita que los niños extraigan el depósito de
hielo, para evitar que se caiga y les cause daños.
El interior del depósito de hielo alberga cuchillas
metálicas. No permita que los niños jueguen con ellas
para evitar herirse.
Instalación
¡Importante! Para realizar la conexión eléctrica,
siga las instrucciones que se ofrecen al respecto.
Desembale el aparato y compruebe si ha sufrido
algún daño. No conecte el aparato si está dañado.
Comunique de inmediato los posibles daños al
establecimiento donde lo compró. En ese caso,
conserve el material de embalaje.
Es recomendable esperar como mínimo cuatro horas
antes de conectar el aparato para que el aceite
regrese al compresor.
Debe proporcionarse un flujo de aire adecuado
alrededor del aparato, para evitar el
sobrecalentamiento. Para lograr una ventilación
suficiente, siga las instrucciones relativas a la
instalación.
Siempre que sea posible, coloque los separadores
contra una pared para evitar el contacto con piezas
calientes (como el compresor o el condensador) y
prevenir posibles quemaduras.
8

Información relativa a la seguridad
No coloque el aparato cerca de radiadores ni hornos.
Compruebe que pueda acceder al enchufe de
alimentación después de la instalación del aparato.
Servicio
Todas las labores eléctricas necesarias para el
mantenimiento del aparato deben ser llevadas a cabo
por un electricista cualificado o una persona
competente.
Este producto debe ser reparado por un centro de
servicio autorizado con piezas de repuesto originales.
Ahorro energético
No guarde alimentos calientes en el aparato.
No apile ni junte mucho los alimentos, ya que esto
impide la circulación de aire.
Vigile que los alimentos no entren en contacto con la
parte trasera de los compartimentos.
Si se produce un apagón, no abra la(s) puerta(s) del
aparato.
No abra la(s) puerta(s) con frecuencia.
No deje la(s) puerta(s) abierta(s) durante largos
períodos.
No ajuste el termostato a temperaturas demasiado
bajas.
Todos los accesorios, como cajones, estantes o
baldas, deben mantenerse colocados para reducir el
consumo energético.
9

Información relativa a la seguridad
Protección ambiental
Este aparato no contiene gases perjudiciales para la
capa de ozono, ni en el circuito de refrigerante ni en los
materiales de aislamiento. No elimine el aparato junto
con los residuos urbanos y la basura. La espuma
aislante contiene gases inflamables: el aparato debe
eliminarse de acuerdo con la normativa pertinente que
podrá solicitar a sus autoridades locales. Evite daños en
la unidad de refrigeración, especialmente en el
intercambiador de calor. Los materiales que están
marcados con el símbolo son reciclables.
El símbolo en el producto o en sus materiales
de embalaje indica que este producto no
puede tratarse como residuo doméstico.
Deben llevarse al punto limpio correspondiente para el
reciclaje de los equipos eléctricos y electrónicos. La
eliminación correcta de este producto ayuda a prevenir
posibles consecuencias perjudiciales para el medio
ambiente y la salud humana que un tratamiento de
residuos incorrecto podrían causar.
Para obtener información más detallada sobre el
reciclaje de este producto, póngase en contacto con su
ayuntamiento, su punto limpio o el establecimiento en el
que compró el producto.
Materiales de embalaje
Los materiales con el símbolo son reciclables. Deposite
los materiales de embalaje en un contenedor idóneo
para reciclarlos.
Eliminación de aparato
10

Información relativa a la seguridad
1. Desconecte el enchufe de la toma eléctrica.
2. Corte el cable de alimentación y deséchelo.
¡ADVERTENCIA! Durante el uso,
servicio y eliminación del aparato, preste
atención a un símbolo similar al que se
presenta a la izquierda, que se encuentra en
la parte posterior del aparato (panel trasero
o compresor) de color amarillo o naranja.
Es el símbolo de advertencia de riesgo de
incendio. Los tubos de refrigerante y el
compresor contienen materiales inflamables.
Mantenga el aparato alejado de fuentes de
calor durante el uso, el servicio y la
eliminación.
11

Visión general
(Extraiga la tapa de la carcasa del compresor)
Panel de control
Dispensador de agua /
hielos
Consola de control principal
Cable de alimentación
Compresor
Válvula de agua principal
externa
12

Visión general
Esta figura es meramente ilustrativa. Para más detalles, vaya al aparato.
Balda de la puerta del
frigorífico (x4)
Estante del frigorífico (x3)
Cajón de verduras del
frigorífico (x2)
Tapa del depósito de hielo
Depósito de hielo
Estante del congelador
(x3)
Cajón del congelador (x2)
Balda de la puerta del
congelador (x1)
Conector del tubo de agua
13

Instalación
Accesorios del producto
Desmontaje de las puertas
Herramienta necesaria: Destornillador Philips, destornillador de punta plana.
Compruebe que la unidad esté desenchufada y vacía.
Para desmontar la puerta, es necesario inclinar la unidad hacia atrás. Debe colocar la
unidad sobre una superficie estable para que no se deslice durante el proceso de
desmontaje de la puerta.
Todas las piezas extraídas deben guardarse para volver a instalar la puerta.
No tumbe por completo la unidad, ya que podría dañar el
sistema refrigerante.
Se recomienda que 2 personas manejen la unidad durante el
montaje.
1. Desatornille la tapa bisagrada con el destornillador Philips.
2. Desconecte el mazo de cables.
Conector del tubo de agua
(x1)
Conector del filtro de agua
(x2)
Clips antideslizantes (x8)
Filtro de agua (x1)
Piezas del tubo de agua (x1)
Manual de usuario (x1)
Bandeja de agua del
dispensador (x1)
14

Instalación
3. Desatornille la bisagra superior.
4. En la parte inferior del congelador está el conector del tubo de agua. Sáquelo de la cubierta
protectora y desconéctelo del tubo de agua; saque el tubo de agua de la bisagra inferior tirando
de él hacia fuera.
5. Levante la puerta y colóquela sobre un cojín blando. Después, desmonte la otra puerta
siguiendo el mismo proceso.
6. Desatornille las bisagras inferiores.
7. Una vez colocado el aparato, instale las puertas siguiendo el proceso a la inversa.
15

Instalación
Requisitos de espacio
Deje espacio suficiente para abrir la puerta.
Deje como mínimo un hueco de 50 mm a ambos laterales y en la parte posterior.
A
900
B
660
C
1770
D
mín.=50
E
mín.=50
F
1800
G
1560
H
135°
Nivelación del frigorífico
Puertas
- Gire las patas en sentido horario para subirlas
manualmente.
- Gire las patas en sentido antihorario para bajarlas
manualmente.
16

Instalación
Colocación
Instale este aparato en un lugar en el que la temperatura ambiente se corresponda con la clase
climática indicada en su placa de características:
para aparatos de refrigeración con clase climática:
- subnormal: este aparato de refrigeración está previsto para utilizarse en temperaturas
ambiente de entre 10 °C y 32 °C;(SN)
- normal: este aparato de refrigeración está previsto para utilizarse en temperaturas ambiente
de entre 16 °C y 32 °C;(N)
- subtropical: este aparato de refrigeración está previsto para utilizarse en temperaturas
ambiente de entre 16 °C y 38 °C;(ST)
- tropical: este aparato de refrigeración está previsto para utilizarse en temperaturas ambiente
de entre 16 °C y 43 °C;(N)
Ubicación
Este aparato debe instalarse lejos de fuentes de calor como radiadores, calderas, luz solar
directa, etc. El aire debe circular libremente alrededor del armario. Para garantizar el mejor
rendimiento, si el aparato está situado debajo de un módulo mural saliente, la distancia entre la
parte superior del aparato y el módulo mural debe ser como mínimo de 50 mm. Sin embargo,
se recomienda no colocar el aparato debajo de módulos murales salientes. La nivelación
precisa se realiza gracias a las patas ajustables situadas en la base del armario.
Este aparato de refrigeración no está previsto para utilizarse como aparato integrado.
¡Advertencia! Debe ser posible desconectar el aparato de la toma eléctrica; por lo tanto,
el enchufe debe ser fácilmente accesible después de la instalación.
Conexión eléctrica
Antes de enchufar el aparato, compruebe que la tensión y la frecuencia indicadas en la placa
de características se corresponde con el suministro eléctrico doméstico. El aparato debe
conectarse a tierra. El enchufe del cable de alimentación incorpora un contacto con esta
finalidad.
17

Uso diario
¡Importante!
Cómo instalar el filtro de agua y el tubo de agua
1. Antes de instalar el aparato, enjuague el filtro con agua durante 5 minutos o con 5 litros de agua
para limpiar perfectamente el cartucho del filtro.
2. Abra la puerta del frigorífico y saque el cajón de verduras.
3. Extraiga los tapones de plástico situados a ambos lados del recipiente de agua.
Depósito de agua
Tubo de conexión
Filtro
Cuenco
Tapones de plástico
Recipiente de agua
18

Uso diario
4. Extraiga el filtro de agua de la bolsa accesoria, inserte los conectores a ambos lados del filtro;
seguidamente, conecte el tubo de agua y engánchelo en los clips antideslizantes (preste atención a
la dirección de la flecha del filtro)
5. Sujete las piezas del filtro de agua con el soporte de sujeción situado encima del recipiente de
agua y conecte los tubos de agua del recipiente de agua al filtro de agua.
6. Extraiga el tapón de plástico. Conecte la pieza del tubo de agua a la válvula principal situada en la
cubierta del compresor con el conector, y no olvide insertar los clips antideslizantes; seguidamente,
conecte el extremo del tubo de agua al depósito de agua con la tuerca.
Filtro de agua
Conectores
Tubos de agua
Clips
antideslizantes
Fije las piezas del filtro de
agua
Conecte los tubos de
agua del recipiente de
agua con el filtro.
Depósito de agua
Extraiga el tapón de plástico
Conecte el tubo de agua al
conector, y no olvide insertar
los clips antideslizantes a
ambos lados del conector.
Conecte el extremo
del tubo de agua al
depósito de agua con
la tuerca
Tubo de agua
19

Uso diario
¡Precaución!
El depósito de agua externo debe estar limpio y la presión de agua debe ser de 1,5~7 bar para
garantizar un funcionamiento correcto.
Compruebe la conexión del tubo de agua. Compruebe si hay otros objetos dentro del generador de
hielo y el depósito de hielo.
Tras acceder al depósito de agua, abra el grifo y compruebe si existe alguna fuga entre el grifo y el
tubo de conexión. Si existe una fuga, compruebe la conexión del tubo.
Seleccione la función de agua, utilice un vaso grande para presionar el dispensador, deje salir agua
durante 5 minutos hasta que salga limpia; el agua que sale durante este proceso no es potable.
Seleccione la función de hielo, utilice un vaso grande para presionar el dispensador, y compruebe
el funcionamiento del motor interno.
Espere 3 minutos y compruebe si hay fugas en la válvula de entrada de agua, los conectores de los
tubos de agua y el filtro de agua.
20

Uso diario
Uso del panel de control
Botones
Presione para ajustar la temperatura del congelador (lado izquierdo) de -14 °C a -22 °C.
Presione para ajustar la temperatura del frigorífico (lado derecho) de 2 °C a 8 °C y presione el botón
«OFF». Si selecciona el botón «OFF», el frigorífico se apagará.
Presione para seleccionar el modo de funcionamiento entre SUPER COOLING , SUPER
FREEZER ,SMART , ECO y AJUSTE DE USUARIO (no se muestra ningún símbolo).
Mantenga el botón 3 SEC presionado durante 3 segundos para bloquear el resto de los botones.
Mantenga el botón presionado durante 3 segundos para desbloquear el resto de los botones.
Presione el botón «ICE OFF» para controlar el generador de hielo. Si desea cerrar el generador de
hielo, presione este botón y el aparato dejará de fabricar hielo hasta que vuelva a presionarlo.
«cambie el filtro de agua».
En general, el filtro de agua debe cambiarse cada 6 meses para obtener agua de la mejor calidad.
Transcurrido medio año, el icono se iluminará para recordarle que debe cambiar el filtro de agua.
Puede comprar un filtro de agua nuevo en el establecimiento en el que compró el aparato o a través
del sistema de posventa. Cuando termine de instalar el filtro de agua nuevo, debe mantener
presionado el botón durante 3 segundos; el icono se apagará y el filtro de agua se
restablecerá.
Presione este botón para obtener hielo en cubitos. Puede presionar este botón para elegir el tipo de
hielo que se dispensa.
Presione este botón para obtener hielo picado. Puede presionar este botón para elegir el tipo de
hielo que se dispensa.
Presione este botón para obtener agua refrigerada. Puede presionar este botón para elegir agua
refrigerada.
¡Nota!
El dispensador no funcionará mientras la puerta del congelador esté abierta o si está activado el
bloqueo antiniños.
Debe cerrar la puerta o desactivar el bloqueo antiniños para obtener hielo en cubitos, hielo picado o
agua refrigerada.
Si no necesita hielo, desactive la función para ahorrar energía (véase más arriba).
Si no sale agua del dispensador, o sale demasiado despacio, debe cambiar el filtro de agua, ya que
podría estar obstruido.
21

Uso diario
En algunas zonas el agua contiene mucha cal, lo que acelera la obstrucción del filtro de agua.
Pantalla
Modo SMART: el aparato establece la temperatura de los dos compartimentos de forma
automática atendiendo a la temperatura interna y a la temperatura ambiente.
Modo ECO: el aparato funciona en el ajuste de consumo de energía más bajo.
Modo SUPER COOLING: el compartimento del frigorífico enfría a la temperatura más baja
durante aproximadamente 2,5 horas. Seguidamente, se restablece automáticamente la
temperatura ajustada antes de este modo.
Modo SUPER FREEZING: el compartimento del congelador enfría a la temperatura más baja
durante aproximadamente 50 horas. Seguidamente, se restablece automáticamente la
temperatura ajustada antes de este modo.
Modo LOCK: el símbolo se iluminará si los botones están bloqueados.
Se muestra la temperatura de ajuste del congelador.
Se muestra la temperatura de ajuste del frigorífico.
Modo ICE OFF: el símbolo se iluminará cuando presione el botón para desactivar el generador
de hielo; esto significa que el aparato dejará de hacer hielo.
Modo REMIND CHANGING WATER FILTER: el símbolo se iluminará cuando el filtro de agua se
haya utilizado durante 6 meses para recordarle que tiene que cambiar el filtro de agua en su
debido momento. Cuando cambie el filtro y presione el botón durante 3 segundos, el símbolo
desaparecerá.
Alarma de puerta abierta
Si la puerta se mantiene abierta durante 60 segundos, se activará una alarma periódica hasta que se
cierre.
Modo
Luz indicadora
Pantalla de temperatura del
congelador
Pantalla de temperatura del
frigorífico
Smart
La pantalla de temperatura del congelador y del frigorífico
cambiará en función de la temperatura ambiente (ver la tabla
siguiente).
ECO
-15 °C
+8 °C
Super cooling
Sin cambios
+2 °C
Super freezing
-25 °C
Sin cambios
22

Uso diario
NOTAS:
Modo ECO: Seleccione este modo cuando desee ahorrar energía.
Modo Super cooling: Este modo permite enfriar alimentos rápidamente y se desactivará de forma
automática después de 2 horas y media.
Modo Super freezing: Este modo permite congelar alimentos rápidamente y se desactivará de forma
automática después de 50 horas.
Alarma de puerta abierta
Cuando la puerta se deja abierta o no se cierra por completo durante 60 segundos, se activa una
alarma sonora. Cierre la puerta del frigorífico y la alarma dejará de sonar.
Si la puerta no está bien cerrada, la alarma sonará 5 veces cada 30 segundos hasta que la cierre.
Si las puertas permanecen abiertas durante más de 10 minutos seguidos, la luz LED interna se
apagará automáticamente.
Bloqueo antiniños
Esta función está diseñada para evitar que los niños utilicen el aparato.
Para activar la función, mantenga presionado el botón durante 3 segundos. La luz
indicadora de bloqueo se iluminará para indicar que la función de bloqueo está activada.
Para desactivar la función, mantenga presionado el botón durante 3 segundos. La luz
indicadora de desbloqueo se iluminará para indicar que la función de bloqueo está
desactivada.
23

Uso diario
Primer uso
Limpieza del interior
Antes de usar el aparato por primera vez, limpie el interior y todos los accesorios con agua templada y
un jabón neutro para eliminar el típico olor a nuevo. Seguidamente, seque bien.
¡Importante! No utilice detergentes ni polvos abrasivos, ya que estos dañan el acabado.
¿Cómo usar el dispensador?
Puede obtener hielo en cubitos, hielo picado y agua refrigerada presionando la palanca, que se
selecciona en el panel de funcionamiento.
¡Nota! Si la palanca se presiona continuamente durante más de 3 minutos, el dispensador dejará de
funcionar para proteger los componentes eléctricos. Si necesita más agua refrigerada o hielo, puede
liberar la palanca y volver a presionarla hasta obtener la cantidad deseada.
Obtención de agua refrigerada
Seleccione el modo de agua refrigerada , coloque el vaso en el centro de la palanca, presione esta
palanca para obtener agua y deje de presionarla una vez obtenida la cantidad de agua deseada. El
agua dejará de salir de forma automática.
¡Nota!
Espere 2 segundos para separar el vaso y evitar que salpique el agua.
Si necesita agua más fría, llene el vaso de hielo antes de sacarla.
Si extrae más de 800 ml de agua de una vez, puede que el agua salga más caliente. En este caso,
se recomienda esperar media hora para extraer agua fría.
Obtención de hielo
Seleccione el modo hielo en cubitos o el modo hielo picado para obtener el tipo de hielo que
desee.
Coloque el vaso en el centro de la palanca, presione esta palanca para obtener el hielo y deje de
presionarla una vez obtenida la cantidad de hielo deseada. El hielo dejará de salir de forma
automática.
¡Nota!
Espere 2 segundos para separar el vaso y evitar que salpique el hielo.
Para evitar que el hielo se salga del vaso, colóquelo lo más cerca que pueda de la salida del
dispensador.
Al extraer hielo, el motor interno se pone en funcionamiento para remover y machacar el hielo, lo
que puede producir algo de ruido.
Tras extraer el hielo, utilícelo lo antes posible para evitar que se deshaga.
Modo hielo en cubitos, hielo
picado o agua refrigerada
Palanca
24

Uso diario
¡Importante!
En esta sección se explica cómo evitar la mayoría de los problemas que podrían producirse. Le
recomendamos que la lea atentamente antes de usar el aparato.
1. Al extraer agua por primera vez o si no ha extraído agua durante una larga temporada, extraiga
entre 1 y 2 litros de agua y tírela.
2. Cuando utilice el generador de hielo por primera vez o si no lo ha utilizado durante una larga
temporada, no consuma el primer depósito de cubitos de hielo.
3. Se recomienda utilizar un vaso con un diámetro superior a 70 mm para extraer agua o hielo.
4. No utilice recipientes frágiles para extraer cubitos de hielo, ya que podrían romperse y ocasionar
daños.
5. No coloque las manos o herramientas en la abertura del dispensador para evitar el fallo del
mecanismo interno.
6. No apriete la palanca con demasiada fuerza, ya que podría dañarla.
7. El generador de hielo fabrica hielo de forma automática sin intervención manual. Cuando el
depósito de hielo está lleno de hielo (aprox. 1,6 kg), deja de fabricar hielo de forma automática.
8. En modo SMART, la capacidad de producción diaria de hielo del aparato es de alrededor de
1,2 kg.
9. Cuando la puerta del congelador está abierta, el dispensador de agua y hielo se bloquea y no
dispensa.
10. Si abre la puerta del congelador mientras el generador de hielo está fabricando hielo, parte del
mismo caerá en el depósito de hielo.
11. Si el hielo no se dispensa de forma correcta, compruebe si la salida del dispensador de hielo ha
quedado bloqueada. De ser así, retire el hielo de la salida.
12. Tras encender por primera vez el aparato, active el generador de hielo y este empezará a
funcionar al cabo de unas 10 horas.
13. Durante el proceso de uso, puede que oiga el sonido de la apertura de la válvula de agua, el fluir
del agua o la caída del hielo; es normal.
14. Si se va de vacaciones o va a estar una larga temporada sin necesitar cubitos de hielo, desactive
la función de fabricación de hielo y extraiga los cubitos de hielo del depósito de hielo para evitar
que estos conformen un bloque que bloquee la salida.
15. Si se produce un apagón, saque la comida del frigorífico y límpielo. Retire también el hielo del
depósito de hielo para evitar que se deshaga.
16. No consuma cubitos de hielo que tengan olor. Compruebe si el filtro ha caducado o si hay
alimentos sin sellar con olor acre en el aparato.
¿Cómo limpiar y cuidar el dispensador?
Utilice un paño suave para limpiar el aparato y no olvide desconectarlo de la red eléctrica antes de
limpiarlo. Utilice agua limpia; no utilice benceno, diluyentes, hipoclorito de sodio, productos abrasivos,
lejía u otros reactivos químicos. No pulverice detergente directamente sobre la pantalla, ya que el
texto impreso en ella podría borrarse.
1) Extraiga el recipiente de agua del dispensador de forma regular, vacíelo y límpielo.
25

Uso diario
2) Limpie con regularidad el depósito de hielo.
Si no utiliza el hielo durante una larga temporada o si la puerta del congelador se abre con frecuencia,
el hielo del depósito de hielo podría deshacerse y volverse a congelar en bloque, lo que provoca el
bloqueo de la salida del dispensador. El hielo del depósito de hielo debe extraerse de forma manual.
Cuando limpie el depósito de hielo, debe desactivar la función de fabricación de hielos para evitar que
el hielo caiga al aparato o al suelo.
3) Cómo montar y desmontar el depósito de hielo
Agarre el depósito de hielo con las dos manos, levántelo unos 10 mm ejerciendo un poco de fuerza y,
seguidamente, arrástrelo para sacarlo del soporte fijo.
Una vez extraído el depósito de hielo, saque el hielo que hay dentro con la mano, con cuidado, y lave
el depósito con agua limpia.
Tras limpiar el depósito de hielo, vuelva a montarlo siguiendo el proceso a la inversa.
¡Nota!
No utilice productos ácidos, disolventes químicos (alcohol, líquido para lavavajillas) ni otros agentes
corrosivos.
Después de limpiar el depósito de hielo, séquelo bien antes de instalarlo en el aparato para evitar
la congelación.
Utilice un paño limpio para limpiar la salida de hielos, sin presione en exceso la estructura interna
para evitar dañar el mecanismo interno.
No coloque nada en la salida de hielos para evitar bloquearla.
No permita que los niños se suban al aparato, ya que podría caerse y sufrir daños físicos.
No coloque los dedos, las manos u otros objetos inadecuados en la salida de hielos ni en el
depósito de hielo. Esto podría ocasionar daños físicos o materiales.
26

Uso diario
Descongelación
Los alimentos congelados o ultracongelados se pueden descongelar en el frigorífico o a temperatura
ambiente, dependiendo del tiempo de que disponga.
Los trozos pequeños pueden incluso cocinarse estando congelados. En este caso, tendrá que
cocinarlos durante más tiempo.
Cubiteras
Este aparato puede estar equipado con una o más cubiteras para
fabricar hielo.
Accesorios
Estantes móviles
Las paredes del aparato están equipadas con una serie de carriles para
colocar los estantes en la posición que desee.
Colocación de las baldas de la puerta
Las baldas de la puerta se pueden colocar a diferentes alturas para
albergar envases de distintos tamaños. Para realizar estos ajuste, haga
lo siguiente: tire gradualmente de la balda en la dirección de las flechas
hasta sacarla de su sitio y colóquela donde desee.
Recomendaciones de ajuste de la temperatura
Recomendaciones de ajuste de la temperatura
Temperatura
ambiente
Ajuste de temperatura
Verano
Frigorífico a 4 °C
27

Uso diario
Congelador a -18 °C
Normal
Frigorífico a 4 °C
Congelador a -18 °C
Invierno
Frigorífico a 4 °C
Congelador a -18 °C
La información anterior es una recomendación sobre el ajuste de temperatura.
Uso diario
Coloque los distintos alimentos en compartimentos distintos conforme a la siguiente tabla.
Compartimentos del aparato
Tipo de alimento
Baldas de la puerta del
frigorífico
Alimentos con conservantes naturales, como
mermeladas, zumos, bebidas y condimentos.
No coloque alimentos perecederos.
Cajón de verduras
Las frutas, las hierbas y las verduras deben guardarse
por separado en el cajón de verduras.
No guarde plátanos, cebollas, patatas ni ajos en el
frigorífico.
Estante del frigorífico - medio
Productos lácteos, huevos
Estante del frigorífico - superior
Alimentos que no necesiten cocinado, como alimentos
listos para consumir, embutidos y sobras.
Cajón(es)/estante del
congelador
Alimentos para conservar durante largo tiempo.
Cajón/estante inferior para carne y pescado crudos
Cajón/estante medio para patatas fritas y verduras
congeladas
Cajón/estante superior para helados, fruta congelada y
productos horneados congelados.
Impacto sobre la conservación de alimentos
Conforme al ajuste recomendado, el tiempo de conservación de los alimentos en el frigorífico es de
hasta 3 días.
Conforme al ajuste recomendado, el tiempo de conservación de los alimentos en el congelador es
de hasta 1 mes.
El tiempo de conservación recomendado puede acortarse si se utiliza un ajuste de temperatura
distinto.
28

Uso diario
Consejos útiles
Consejos para la congelación
He aquí algunos consejos para sacar el máximo partido del proceso de congelación:
La cantidad máxima de alimentos que pueden congelarse en 24 horas se muestra en la placa de
características.
El proceso de congelación dura 24 horas. Durante este período no deben añadirse más alimentos
para congelar.
Congele solamente alimentos frescos de máxima calidad y bien limpios.
Prepare los alimentos en raciones pequeñas para poder congelarlos por completo de forma rápida
y descongelar solamente la cantidad necesaria.
Envuelva los alimentos en papel de aluminio o plástico de polietileno de forma hermética.
No coloque alimentos frescos descongelados en contacto con alimentos ya congelados para evitar
una subida de temperatura de estos últimos.
Los alimentos magros se conservan mejor y durante más tiempo que los alimentos grasos; la sal
reduce el tiempo de conservación de los alimentos.
Los cubitos de hielo consumidos inmediatamente después de sacarlos del congelador pueden
causar quemaduras por congelación.
Se recomienda indicar la fecha de congelación en cada paquete individual para tener en cuenta el
tiempo de congelación.
Se recomienda indicar la fecha de congelación en cada paquete individual para tener en cuenta el
tiempo de congelación.
Consejos para conservar alimentos congelados
Para conseguir los mejores resultados de este aparato, debe:
Asegurarse de que los alimentos que compra congelados hayan sido conservados correctamente
por el vendedor.
Asegurarse de que los alimentos congelados pasan de la tienda al congelador en el menor tiempo
posible.
No abrir la puerta con frecuencia ni dejarla abierta más tiempo del necesario.
Una vez descongelados, los alimentos se deterioran rápidamente y no se pueden volver a
congelar.
No superar la fecha de caducidad indicada por el fabricante de los alimentos.
Consejos para refrigerar alimentos frescos
Para obtener los mejores resultados:
No guarde en el frigorífico alimentos calientes o líquidos en evaporación.
Tape o envuelva los alimentos, especialmente si tienen un sabor fuerte.
Consejos para la refrigeración
Consejos útiles:
Alimentos para cocinar (de todo tipo): envuelva en plástico de polietileno y coloque en los estantes
de cristal encima del cajón de verduras.
Por seguridad, conserve de este modo solo uno o dos días como máximo.
Alimentos cocinados, platos fríos, etc.: deben taparse y colocarse en cualquier estante.
Frutas y verduras: deben limpiarse bien y colocarse en el cajón especial.
Mantequilla y queso: deben colocarse en recipientes herméticos especiales o envolverse en papel
de aluminio o plástico de polietileno para que no les dé el aire.
Envases de leche: deben tener tapa y colocarse en las baldas de la puerta.
Plátanos, patatas, cebollas y ajo: si no están envasados, no deben conservarse en el frigorífico.
Limpieza
Por razones de higiene, el interior del aparato y sus accesorios deben limpiarse con regularidad.
¡Precaución! El aparato no debe estar conectado a la red eléctrica durante la limpieza.
¡Peligro de descarga eléctrica! Antes de limpiar, apague el aparato y extraiga el enchufe de la
29

Uso diario
toma eléctrica, o desconecte el disyuntor o el fusible. Nunca limpie el aparato con vapor. La
humedad podría acumularse en los componentes eléctricos. ¡Peligro de descarga eléctrica!
Los vapores calientes pueden deteriorar las piezas de plástico. El aparato debe secarse antes
de volver a ponerlo en funcionamiento.
¡Importante! Los aceites esenciales y los disolventes orgánicos pueden dañar las piezas de plástico,
por ejemplo, el zumo de limón o el zumo de la piel de naranja, el ácido butírico o los limpiadores que
contienen ácido acético.
Evite que estas sustancias entren en contacto con las distintas partes del aparato.
No utilice limpiadores abrasivos.
Saque los alimentos del congelador. Guárdelos en un lugar fresco, bien tapados.
Apague el aparato y extraiga el enchufe de la toma eléctrica, o desconecte el disyuntor o el fusible.
Limpie el aparato y los accesorios del interior con un paño y agua templada. Seguidamente, pase
un paño con agua limpia y seque frotando.
Una vez seco, vuelva a encender el aparato.
Localización y resolución de averías
Si tiene algún problema con el aparato o le preocupa que no funcione correctamente, siga estos
consejos antes de llamar al servicio de asistencia.
¡Precaución! Antes de nada, desconecte el aparato de la red eléctrica. Solo un electricista
cualificado o persona competente puede realizar labores de localización y resolución de
averías que no se incluyan en este manual.
¡Importante! Durante el uso normal, se escuchan algunos ruidos (compresor, circulación del
refrigerante).
Problema
Posible causa
Solución
El aparato no
funciona
El enchufe no está conectado a la
toma o está flojo
Inserte el enchufe a la toma de
alimentación.
El fusible está fundido o defectuoso
Compruebe el fusible y sustituya si
es necesario.
El enchufe está defectuoso
Las averías eléctricas debe
solucionarlas un electricista.
El aparato congela o
enfría demasiado
El ajuste de la temperatura es
demasiado frío o el aparato
funciona en modos SUPER.
Coloque el regulador a una
temperatura más alta de forma
temporal.
Los alimentos no
están bien
congelados.
La temperatura no está bien
ajustada.
Consulte la sección Ajuste de
temperatura inicial.
La puerta estuvo abierta durante
mucho tiempo.
Abra la puerta solo durante el
tiempo necesario.
Metió una gran cantidad de
alimentos calientes en el aparato
en las últimas 24 horas.
Coloque el regulador a una
temperatura más baja de forma
temporal.
El aparato está cerca de una fuente
de calor.
Consulte la sección Lugar de
instalación.
Acumulación
importante de
escarcha en la junta
de la puerta.
La junta de la puerta no es
hermética.
Caliente con cuidado las secciones
filtrantes de la junta de la puerta con
un secador (en un entorno fresco).
Al mismo tiempo, dé forma con la
mano a la junta de la puerta caliente
para que se asiente correctamente.
30

Uso diario
Ruidos inusuales
El aparato no está nivelado.
Reajuste las patas.
El aparato está en contacto con la
pared u otros objetos.
Mueva un poco el aparato.
Un componente (como una tubería)
de la parte posterior del aparato
está en contacto con otra parte de
aparato o con la pared.
Si es necesario, doble con cuidado
el componente para apartarlo.
Los paneles
laterales están
calientes
Es normal. El intercambio de calor
se realiza en los paneles laterales
Póngase unos guantes para tocar
los paneles laterales si es necesario.
El dispensador no
proporciona agua
refrigerada
Fallo al acceder al depósito de
agua o al abrir la válvula de agua
Compruebe el depósito de agua y
compruebe que la válvula esté
abierta
El filtro no está bien instalado
Compruebe si la dirección del filtro
está invertida
La válvula de agua o los
conectores nos están bien
instalados
Compruebe si la válvula de agua o
los conectores están invertidos
El agua no está
suficientemente fría
La temperatura del frigorífico es
demasiado alta
Configure la temperatura del
frigorífico para que sea más baja
Se ha extraído demasiada agua de
una vez (1 litro)
Espere a que el agua se enfríe
Se extrae agua con demasiada
frecuencia
Espere a que el agua se enfríe
El dispensador no
proporciona hielo
No hay hielo en el depósito de hielo
Espere a que el generador de hielo
termine de fabricar hielo (la primera
vez, el frigorífico debe estar
totalmente frío para que el
generador comience a hacer hielo).
Fallo al acceder al depósito de
agua o al abrir la válvula de agua
Compruebe el depósito de agua y
compruebe que la válvula esté
abierta
El modo «ICE OFF» está
funcionando, dejará de hacer hielo
Desactive el modo «ICE OFF»
La presión del depósito de agua es
insuficiente
Compruebe que la presión de la
fuente de agua se sitúe entre 1,5 y 7
bar
La válvula de agua o los
conectores nos están bien
instalados
Compruebe si la válvula de agua o
los conectores están invertidos
El filtro no está bien instalado
Compruebe si la dirección del filtro
está invertida
Los cubitos de hielo se han
congelado en bloque en el depósito
de hielo y han bloqueado la salida
de hielos
Retire los cubitos de hielo
congelados
31

Uso diario
Hay algo duro en el depósito de
hielo que impide que el motor
funcione
Extraiga el objeto que bloquea la
salida
Las puertas no estén totalmente
cerradas, por lo que el aire frío se
escapará
Compruebe que las puertas estén
totalmente cerradas
Los cubitos son
demasiado
pequeños
La presión del depósito de agua es
insuficiente
Compruebe que la presión de la
fuente de agua se sitúe entre 1,5 y 7
bar
El filtro de agua se ha bloqueado
porque se ha usado durante
demasiado tiempo
Cambie por un filtro de agua nuevo
El caudalímetro está defectuoso
Póngase en contacto con el
personal de mantenimiento
Si el fallo reaparece, póngase en contacto con el centro de servicio.
Estos datos son necesarios para que podamos ayudarle de forma rápida y correcta. Anote aquí los
datos necesarios consultando la placa de características.
32

Folleto del manual
Las siguientes funciones no son aptas para todos los modelos; este
folleto es solo una referencia.
En la lista se indican todos los requisitos de diseño ecológico
[conforme al Reglamento (UE) 2019/2019 sobre diseño ecológico y el
Reglamento (UE) 2019/2016 relativo al etiquetado energético), si el
requisito es de aplicación a su producto.
El aparato de refrigeración no está previsto para ser utilizado como
electrodoméstico integrado, salvo que se indique en el manual de
instrucciones.
Los cajones, los estantes y las baldas deben mantenerse en su
posición actual, salvo que se indique de otro modo en este
documento.
Las puertas y las tapas del aparato de refrigeración deben
desmontarse antes de su eliminación en el punto limpio, para evitar
que niños o animales queden atrapados en su interior.
Configuración recomendada:
Compartimento del frigorífico: +4 °C
Compartimento del congelador: -18 °C
CONGELACIÓN RÁPIDA
Se recomienda el uso de esta función al guardar una cantidad muy
grande de alimentos en el congelador. 24 horas antes de congelar
los alimentos frescos, presione el botón Fast Freeze para activar la
función de congelación rápida. Una vez activada, se enciende el
indicador Fast Freeze. Transcurridas 24 horas, guarde los alimentos
que desee congelar en la zona helada del congelador. La función se
desactiva automáticamente después de 72 horas, o se puede
desactivar manualmente pulsando el botón Fast Freeze.
REFRIGERACIÓN RÁPIDA
Puede utilizar la función Fast Cool para incrementar la capacidad de
refrigeración del frigorífico. Se recomienda el uso de esta función al
guardar una cantidad muy grande de alimentos en el frigorífico.
Presione el botón Fast Cool para activar la función de refrigeración
rápida. Una vez activada, se enciende el indicador Fast Cool. La
función se desactiva automáticamente después de 6 horas, o se
puede desactivar manualmente pulsando de nuevo el botón Fast
Cool.
Cómo conservar alimentos:
33

Para evitar derrochar alimentos, consulte las recomendaciones de
ajuste y tiempos de conservación:
Compartimento del frigorífico: Cada alimento, especialmente las
frutas y verduras, tienen una temperatura de conservación distinta. El
tiempo de conservación es de 1 a 3 días (ajuste de temperatura:
medio)
Compartimento del congelador: 1 semana (ajuste de temperatura:
mín.) y 1 mes (ajuste de temperatura: máx.)
Para optimizar la velocidad de congelación y obtener más espacio de
conservación, el congelador se puede usar sin los cajones.
La cantidad de alimentos frescos que se pueden congelar en un
período concreto se indica en la placa de características. Los límites
de carga vienen determinados por los cajones, las tapas, los
estantes, etc. Compruebe que estos componentes puedan cerrarse
después de llenarlos.
Para evitar derrochar alimentos, consulte las recomendaciones de
ajuste y tiempos de conservación en el manual del usuario.
La información sobre el modelo se puede recuperar utilizando el
código QR que aparece en la etiqueta energética.
La etiqueta también incluye el identificador del modelo que se puede
usar para consultar el portal del registro en
https://eprel.ec.europa.eu
Este producto contiene una fuente de luz con clase de eficiencia
energética G (de haberla).
34

Informations relatives à la sécurité
Dans l'intérêt de votre sécurité et pour garantir une
utilisation correcte, avant d'installer et d'utiliser pour la
première fois l'appareil, lisez attentivement ce manuel
d'utilisation, y compris les conseils et les avertissements
qu'il contient. Pour éviter les erreurs et les accidents
inutiles, il est important de s'assurer que toutes les
personnes qui utilisent l'appareil connaissent
parfaitement son fonctionnement et ses caractéristiques
de sécurité. Conservez ces instructions et assurez-vous
qu'elles restent avec l'appareil s'il est déplacé ou vendu,
afin que toute personne l'utilisant pendant sa durée de
vie soit correctement informée sur l'utilisation et la
sécurité de l'appareil. Pour la sécurité de la vie et des
biens, respectez les précautions de ces instructions
d'utilisation, car le fabricant n'est pas responsable des
dommages causés par omission.
Sécurité des enfants et personnes vulnérables
Cet appareil peut être utilisé par des enfants à partir
de 8 ans et des personnes ayant des capacités
physiques, sensorielles ou mentales réduites ou un
manque d'expérience et de connaissances s'ils ont
reçu une supervision ou des instructions concernant
l'utilisation de l'appareil en toute sécurité et s'ils
comprennent les risques encourus.
Les enfants âgés de 3 à 8 ans sont autorisés à
charger et décharger cet appareil.
Les enfants doivent être surveillés pour s'assurer
qu'ils ne jouent pas avec l'appareil.
Le nettoyage et l'entretien par les utilisateurs ne
doivent pas être effectués par des enfants, à moins
1

Informations relatives à la sécurité
qu'ils ne soient âgés de 8 ans ou plus et qu'ils soient
supervisés.
Conservez tous les emballages hors de portée des
enfants. Il y a un risque de suffocation.
Si vous mettez l'appareil au rebut, débranchez la fiche
de la prise de courant, coupez le câble de
raccordement (le plus près possible de l'appareil) et
retirez la porte pour éviter que des enfants en train de
jouer ne subissent une électrocution ou ne s'y
enferment.
Si cet appareil doté de joints de porte magnétiques
doit remplacer un appareil plus ancien muni d'un
verrou à ressort (loquet) sur la porte ou le couvercle,
assurez-vous de rendre ce verrou à ressort inutilisable
avant de jeter l'ancien appareil. Cela évitera qu'il ne
devienne un piège mortel pour un enfant.
Sécurité générale
AVERTISSEMENT ! Veillez à ce que les
ouvertures de ventilation, dans le boîtier de l'appareil
ou dans la structure intégrée, ne soient pas
obstruées.
AVERTISSEMENT ! N'utilisez pas de
dispositifs mécaniques ou d'autres moyens pour
accélérer le processus de dégivrage, autres que
ceux recommandés par le fabricant.
AVERTISSEMENT ! Ne pas endommager le
circuit du réfrigérant.
2

Informations relatives à la sécurité
AVERTISSEMENT ! N'utilisez pas d'autres
appareils électriques (comme les sorbetières) à
l'intérieur des appareils de réfrigération, à moins
qu'ils ne soient approuvés à cette fin par le fabricant.
AVERTISSEMENT ! Ne touchez pas
l'ampoule si elle est restée allumée pendant une
longue période car elle pourrait être très chaude.1)
AVERTISSEMENT ! Lorsque vous
positionnez l'appareil, assurez-vous que le cordon
d'alimentation n'est pas coincé ou endommagé.
AVERTISSEMENT ! Ne placez pas plusieurs
prises de courant portables ou des fournisseurs
d'énergie portables à l'arrière de l'appareil.
Ne stockez pas de substances explosives telles que
des bombes aérosols contenant un gaz propulseur
inflammable dans cet appareil.
Le circuit frigorifique de l'appareil contient de
l'isobutane (R-600a), un gaz naturel très respectueux
de l'environnement, mais inflammable.
Pendant le transport et l'installation de l'appareil,
veillez à ce qu'aucun des composants du circuit
frigorifique ne soit endommagé.
- éviter les flammes nues et les sources d'ignition ;
- ventiler soigneusement la pièce dans laquelle se
trouve l'appareil.
Il est dangereux d'altérer les spécifications ou de
modifier ce produit de quelque manière que ce soit.
1) S'il y a de la lumière dans le compartiment.
3

Informations relatives à la sécurité
Tout dommage au cordon peut provoquer un court-
circuit, un incendie et/ou une électrocution.
Cet appareil est destiné à être utilisé dans des
applications domestiques et similaires telles que
- les cuisines du personnel dans les magasins, les
bureaux et autres environnements de travail ;
- les fermes et par les clients des hôtels, des motels et
d'autres environnements de type résidentiel ;
- les environnements de type chambres d'hôtes ;
- la restauration et les applications non commerciales
similaires.
AVERTISSEMENT ! Tous les composants
électriques (fiche, cordon d'alimentation,
compresseur, etc.) doivent être remplacés par un
agent de service certifié ou un personnel de service
qualifié.
AVERTISSEMENT ! L'ampoule fournie avec cet
appareil est une "ampoule à usage spécial" utilisable
uniquement avec l'appareil fourni. Cette "lampe à
usage spécial" n'est pas utilisable pour l'éclairage
domestique.1)
Le cordon d'alimentation ne doit pas être allongé.
Veillez à ce que la fiche d'alimentation ne soit pas
écrasée ou endommagée par l'arrière de l'appareil.
Une fiche d'alimentation écrasée ou endommagée
peut surchauffer et provoquer un incendie.
Assurez-vous que vous pouvez accéder à la fiche
secteur de l'appareil.
1) S'il y a de la lumière dans le compartiment.
4

Informations relatives à la sécurité
Ne tirez pas sur le câble d'alimentation.
Si la prise de la fiche d'alimentation est desserrée,
n'insérez pas la fiche d'alimentation. Il y a un risque
d'électrocution ou d'incendie.
Vous ne devez pas faire fonctionner l'appareil sans la
lampe.
Cet appareil est lourd. Il faut faire attention en le
déplaçant.
Ne retirez pas et ne touchez pas les articles du
compartiment congélateur si vos mains sont humides
ou mouillées, car cela pourrait provoquer des
abrasions de la peau ou des brûlures dues au gel ou à
la congélation.
Évitez l'exposition prolongée de l'appareil aux rayons
directs du soleil.
Utilisation quotidienne
Ne mettez pas de produits chauds sur les parties en
plastique de l'appareil.
Ne placez pas de produits alimentaires directement
contre la paroi arrière.
Les aliments congelés ne doivent pas être recongelés
une fois qu'ils ont été décongelés.1)
Conservez les aliments congelés préemballés
conformément aux instructions du fabricant d'aliments
congelés.1)
1) S'il y a un compartiment congélateur.
2) S'il y a un compartiment de stockage des aliments frais.
5

Informations relatives à la sécurité
Les recommandations de conservation du fabricant de
l'appareil doivent être strictement respectées.
Reportez-vous aux instructions correspondantes.
Ne placez pas de boissons gazeuses dans le
compartiment congélateur car cela crée une pression
sur le récipient, ce qui peut le faire exploser et
endommager l'appareil.1)
Les sucettes glacées peuvent provoquer des brûlures
par le gel si elles sont consommées directement dans
l'appareil.1)
Pour éviter la contamination des aliments, veuillez
respecter les instructions suivantes.
L'ouverture de la porte pendant de longues périodes
peut provoquer une augmentation significative de la
température dans les compartiments de l'appareil.
Nettoyez régulièrement les surfaces qui peuvent
entrer en contact avec les aliments et les systèmes de
drainage accessibles.
Nettoyez les réservoirs d'eau s'ils n'ont pas été utilisés
pendant 48h ; rincez le système d'eau relié à une
alimentation en eau si l'eau n'a pas été tirée pendant
5 jours.
Conservez la viande et le poisson crus dans des
récipients appropriés au réfrigérateur, de manière à ce
qu'ils ne soient pas en contact avec d'autres aliments
ou qu'ils ne dégoulinent pas.
Les compartiments pour aliments surgelés à deux
étoiles (s'ils sont présentés dans l'appareil) sont
adaptés à la conservation d'aliments pré-congelés, à
6

Informations relatives à la sécurité
la conservation ou à la préparation de glaces et à la
fabrication de glaçons.
Les compartiments à une, deux et trois étoiles (s'ils
sont présentés dans l'appareil) ne sont pas adaptés à
la congélation des aliments frais.
Si l'appareil reste vide pendant de longues périodes,
éteignez-le, dégivrez-le, nettoyez-le, séchez-le et
laissez la porte ouverte afin d'éviter la formation de
moisissures dans l'appareil.
Entretien et nettoyage
Avant tout entretien, éteignez l'appareil et débranchez
la fiche de la prise de courant.
Ne nettoyez pas l'appareil avec des objets
métalliques.
N'utilisez pas d'objets pointus pour retirer le givre de
l'appareil. Utilisez un grattoir en plastique.1)
Examinez régulièrement le drain du réfrigérateur pour
voir s'il y a de l'eau décongelée. Si nécessaire,
nettoyez le drain. Si le drain est bloqué, l'eau
s'accumule dans le fond de l'appareil.2)
Attention !
Lorsque vous utilisez la fonction de fabrication de
glace et de refroidissement, assurez-vous que la
source d'eau et le filtre sont connectés.
Avant d'utiliser le produit, le filtre doit être rincé avec
de l'eau pendant 5 minutes ou 5L d'eau afin de
1) S'il y a un compartiment congélateur.
2) S'il y a un compartiment de conservation des aliments frais.
7

Informations relatives à la sécurité
s'assurer que le toner contenu dans le filtre est bien
rincé.
Après le raccordement du réfrigérateur à la source
d'eau, le traitement des gaz d'échappement doit être
effectué conformément aux instructions d'installation.
Après avoir attendu 5 minutes, vérifiez l'étanchéité de
la voie d'eau.
Assurez-vous que la pression de l'eau est conforme
aux spécifications requises. Une pression d'eau trop
élevée peut facilement provoquer des fuites d'eau,
une pression d'eau trop faible ne peut pas soutenir la
fonction du produit.
Ne touchez pas la machine à glaçons avec les mains
ou des outils en cours d'utilisation pour éviter
d'endommager le personnel ou la machine à glaçons.
Pendant l'utilisation du produit, veillez à ce que la
machine à glace et le bac à glace soient propres afin
d'éviter qu'une grande quantité de poussière, de
débris solides et d'autres polluants n'y tombent.
Ne laissez pas les enfants sortir le bac à glace pour
éviter qu'il ne tombe et ne se blesse.
Il y a des couteaux en métal dans la glacière. Les
enfants ne sont pas autorisés à jouer avec pour éviter
de se blesser.
Installation
Important ! Pour le raccordement électrique, suivez
attentivement les instructions données dans les
paragraphes spécifiques.
8

Informations relatives à la sécurité
Déballez l'appareil et vérifiez s'il n'est pas
endommagé. Ne branchez pas l'appareil s'il est
endommagé. Signalez immédiatement les dommages
éventuels à l'endroit où vous l'avez acheté. Dans ce
cas, conservez les emballages.
Il est conseillé d'attendre au moins quatre heures
avant de brancher l'appareil pour permettre à l'huile
de refluer dans le compresseur.
L'appareil doit être entouré d'une circulation d'air
suffisante, faute de quoi il risque de surchauffer. Pour
obtenir une ventilation suffisante, suivez les
instructions relatives à l'installation.
Dans la mesure du possible, les écarteurs du produit
doivent être placés contre un mur pour éviter de
toucher ou d'attraper les parties chaudes
(compresseur, condenseur) afin d'éviter toute brûlure
éventuelle.
L'appareil ne doit pas être placé à proximité de
radiateurs ou de cuisinières.
Assurez-vous que la prise de courant est accessible
après l'installation de l'appareil.
Service
Tout travail électrique nécessaire à l'entretien de
l'appareil doit être effectué par un électricien qualifié
ou une personne compétente.
Ce produit doit être réparé par un centre de service
agréé et seules des pièces de rechange d'origine
doivent être utilisées.
9

Informations relatives à la sécurité
Économie d'énergie
Ne mettez pas d'aliments chauds dans l'appareil ;
Ne serrez pas les aliments les uns contre les autres,
car cela empêche l'air de circuler ;
Veillez à ce que les aliments ne touchent pas l'arrière
du ou des compartiments ;
Si l'électricité est coupée, n'ouvrez pas la ou les
portes ;
N'ouvrez pas fréquemment la ou les portes ;
Ne gardez pas la ou les portes ouvertes trop
longtemps ;
Ne réglez pas le thermostat sur des températures trop
froides ;
Tous les accessoires, tels que les tiroirs, les étagères
et les balcons, doivent être conservés à cet endroit
pour réduire la consommation d'énergie.
Protection de l'environnement
Cet appareil ne contient pas de gaz susceptibles
d'endommager la couche d'ozone, que ce soit dans son
circuit frigorifique ou dans les matériaux d'isolation.
L'appareil ne doit pas être jeté avec les déchets et les
ordures urbaines. La mousse isolante contient des gaz
inflammables : l'appareil doit être mis au rebut
conformément aux réglementations sur les appareils à
obtenir auprès des autorités locales. Évitez
d'endommager le groupe de refroidissement, en
particulier l'échangeur de chaleur. Les matériaux utilisés
sur cet appareil marqués par le symbole sont
recyclables.
10

Informations relatives à la sécurité
Le symbole figurant sur le produit ou sur son
emballage indique que ce produit ne doit pas
être traité comme un déchet ménager.
Il doit plutôt être apporté au point de collecte approprié
pour le recyclage des équipements électriques et
électroniques. En vous assurant que ce produit est
éliminé correctement, vous contribuerez à prévenir les
conséquences négatives potentielles pour
l'environnement et la santé humaine, qui pourraient
autrement être causées par une manipulation
inappropriée des déchets de ce produit.
Pour des informations plus détaillées sur le recyclage de
ce produit, veuillez contacter votre mairie, votre service
d'élimination des déchets ménagers ou le magasin où
vous avez acheté le produit.
Matériaux d'emballage
Les matériaux portant le symbole sont recyclables. Jetez
l'emballage dans un conteneur de collecte approprié
pour le recycler.
Mise au rebut de l'appareil
1. Débranchez la fiche secteur de la prise de courant.
2. Coupez le câble d'alimentation et jetez-le.
11

Informations relatives à la sécurité
AVERTISSEMENT ! Lors de
l'utilisation, de l'entretien et de la mise au
rebut de l'appareil, veuillez prêter attention
au symbole similaire à celui de gauche, qui
se trouve à l'arrière de l'appareil (panneau
arrière ou compresseur) et qui est de
couleur jaune ou orange.
C'est un symbole de risque d'incendie. Il y a
des matériaux inflammables dans les tuyaux
de réfrigérant et le compresseur.
Veuillez vous éloigner de la source de feu
pendant l'utilisation, l'entretien et
l'élimination.
12

Présentation générale
(Retirez le couvercle métallique de la chambre du compresseur)
Panneau de commande
Diffuseur d'eau/de glace
Carte de commande
principale
Câble d'alimentation
Compresseur
Vanne d'eau principale
externe
13

Présentation générale
Cette illustration n'est qu'une indication, les détails sont à vérifier sur votre appareil.
Balcon réfrigéré*4
Étagères du réfrigérateur*3
Bacs à légumes du
réfrigérateur*2
Couvercle de la glacière
Boîte à glace
Étagères du réfrigérateur*3
Tiroirs du congélateur*2
Balcon du congélateur* 1
Connecteur pour tuyau d'eau
14

Installation
Accessoires de produits
Retrait des portes
Outillage requis : Tournevis Philips, Tournevis à lame plate.
Assurez-vous que l'appareil est débranché et vide.
Pour enlever la porte, il est nécessaire de basculer l'appareil vers l'arrière. Vous devez
poser l'appareil sur quelque chose de solide afin qu'il ne glisse pas pendant le processus de
retrait de la porte.
Toutes les pièces retirées doivent être conservées pour effectuer la réinstallation de la
porte.
Ne posez pas l'appareil à plat, car cela pourrait endommager le
système de refroidissement.
Il est préférable que 2 personnes manipulent l'unité pendant le
montage.
1. Dévissez le couvercle de la charnière à l'aide d'un tournevis
Philips.
2. Débranchez le faisceau de câbles.
Connecteur pour tuyau
d'eau*1
Connecteur pour filtre à eau*2
Clips antidérapants *8
Filtre à eau * 1
Pièces pour tuyaux d'eau * 1
Manuel d'utilisation * 1
Bac de distribution d'eau * 1
15

Installation
3. Dévissez la charnière supérieure.
4. Il y a un raccord de tuyau d'eau au bas du réfrigérateur-congélateur. Retirez-le du couvercle de
protection et déconnectez-le du tuyau d'eau, et n'oubliez pas de tirer le tuyau d'eau hors de la
charnière inférieure.
5. Soulevez la porte et posez-la sur un support souple. Ensuite, retirez une autre porte en
procédant de la même manière.
6. Dévissez les charnières inférieures.
7. Après avoir positionné l'appareil, installez les portes en suivant le processus inverse.
16

Installation
Exigences en matière d'espace
Gardez un espace suffisant de la porte ouverte.
Maintenez un espace d'au moins 50 mm sur les deux côtés et à l'arrière.
A
900
B
660
C
1770
D
min=50
E
min=50
F
1800
G
1560
H
135°
Mise à niveau du réfrigérateur
Portes
- Faites tourner les pieds dans le sens des aiguilles
d'une montre pour les rehausser à la main.
-
Faites tourner les pieds dans le sens inverse des
aiguilles d'une montre pour les abaisser à la main.
17

Installation
Positionnement
Installez cet appareil dans un endroit où la température ambiante correspond à la classe
climatique indiquée sur la plaque signalétique de l'appareil :
pour les appareils de réfrigération avec classe climatique :
- tempéré étendu : cet appareil de réfrigération est destiné à être utilisé à des températures
ambiantes comprises entre 10°C et 32°C ; (SN)
- tempéré : cet appareil frigorifique est destiné à être utilisé à des températures ambiantes
comprises entre 16°C et 32°C ;(N)
- subtropicale : cet appareil de réfrigération est destiné à être utilisé à des températures
ambiantes comprises entre 16°C et 38°C ;(ST)
- tropical : cet appareil de réfrigération est destiné à être utilisé à des températures ambiantes
comprises entre 16°C et 43°C ;(T)
Emplacement
L'appareil doit être installé à l'écart des sources de chaleur telles que les radiateurs, les
chaudières, la lumière directe du soleil, etc. Assurez-vous que l'air peut circuler librement à
l'arrière de l'armoire. Pour garantir les meilleures performances, si l'appareil est placé sous une
unité murale en surplomb, la distance minimale entre le haut de l'armoire et l'unité murale doit
être d'au moins 50 mm. L'idéal est cependant de ne pas placer l'appareil sous des éléments
muraux en surplomb. Une mise à niveau précise est assurée par un ou plusieurs pieds
réglables à la base de l'armoire.
Cet appareil de réfrigération n'est pas destiné à être utilisé comme un appareil encastré ;
Avertissement ! Il doit être possible de débrancher l'appareil du réseau électrique ; la
fiche doit donc être facilement accessible après l'installation.
Branchement électrique
Avant de brancher l'appareil, assurez-vous que la tension et la fréquence indiquées sur la
plaque signalétique correspondent à votre alimentation électrique domestique. L'appareil doit
être relié à la terre. La fiche du câble d'alimentation est munie d'un contact à cet effet.
18

Utilisation quotidienne
Important !
Comment installer le filtre à eau et la conduite d'eau
1. Avant l'installation, le filtre doit être rincé avec de l'eau pendant 5 minutes ou 5L d'eau pour
s'assurer que le toner contenu dans le filtre est bien rincé.
2. Ouvrez la porte du réfrigérateur et sortez les bacs à légumes.
3. Retirez les bouchons en caoutchouc des deux côtés de la boîte à eau.
Source d'eau
Tube de
raccordement
Filtre
Bassin
Bouchons en
caoutchouc
Bac à eau
19

Utilisation quotidienne
4. Sortez le filtre à eau du sac d'accessoires, insérez les connecteurs des deux côtés du filtre, puis
connectez le tuyau d'eau et fixez-le dans les clips antidérapants (faites attention à la direction de la
flèche du filtre)
5. Assemblez les pièces du filtre à eau avec le support de retenue au-dessus de la boîte à eau, et
raccordez les tuyaux d'eau de la boîte à eau au filtre à eau.
6. Retirez le bouchon en caoutchouc. Connectez la partie du tuyau d'eau à la valve principale sur le
couvercle du compresseur avec le connecteur, et n'oubliez pas d'insérer les clips antidérapants,
puis connectez l'extrémité du tuyau d'eau avec l'écrou à la source d'eau.
Filtre à eau
Connecteurs
Tuyaux d'eau
Clips
antidérapants
Réparez les pièces du filtre
à eau
Connectez les tuyaux
d'eau de la boîte à eau
avec le filtre
Source d'eau
Retirez le bouchon en
caoutchouc
Connectez le tuyau d'eau
avec le connecteur, et
n'oubliez pas d'insérer des
clips antidérapants des deux
côtés du connecteur.
raccorder l'extrémité
du tuyau d'eau avec
l'écrou à la source
d'eau
Tuyau d'eau
20

Utilisation quotidienne
Attention !
La source d'eau externe doit être propre et la pression de l'eau doit être de 1,5-7 bar pour garantir
un bon fonctionnement.
Vérifiez le raccordement du tuyau d'eau, vérifiez s'il y a d'autres choses à l'intérieur de la machine à
glace et du bac à glace.
Après avoir accédé à la source d'eau, ouvrez le robinet et vérifiez s'il y a des fuites entre le robinet
et le tuyau de raccordement. S'il y a des fuites, vérifiez le raccordement du tuyau.
Sélectionnez la fonction eau, utilisez une grande tasse pour appuyer sur le diffuseur, laissez l'eau
s'évacuer pendant 5 minutes jusqu'à ce qu'elle soit propre et lisse, pendant le processus l'eau
extraite n'est pas potable.
Sélectionnez la fonction de prise de glace et de bris de glace, utilisez un grand gobelet pour
appuyer sur le diffuseur, et vérifiez le fonctionnement normal du moteur interne grâce au jugement
sain.
Attendez 3 minutes et vérifiez si la valve d'entrée d'eau du réfrigérateur, les raccords des tuyaux
d'eau et le filtre à eau fuient ou non.
21

Utilisation quotidienne
Utilisation du panneau de commande
Boutons
Appuyez pour régler la température du compartiment congélateur (côté gauche) de -14°C à -22°C.
Appuyez pour régler la température du compartiment réfrigérateur (côté droit) de 2°C à 8°C et
"OFF". Si vous sélectionnez "OFF", le compartiment réfrigérateur sera éteint.
Appuyez pour sélectionner le mode de fonctionnement parmi SUPER REFROIDISSEMENT ,
SUPER CONGÉLATION ,INTELLIGENT , ECO et RÉGLAGE DE L'UTILISATEUR (aucun
symbole à l'écran).
Appuyez sur le bouton 3 SEC. et maintenez-le enfoncé pendant 3 secondes pour verrouiller les
autres boutons.
Appuyez sur ce bouton et maintenez-le enfoncé pendant 3 secondes pour déverrouiller les autres
boutons.
Appuyez sur le bouton d'arrêt pour contrôler la machine à glaçons. Si vous voulez fermer la machine
à glaçons, appuyez sur ce bouton, puis le produit cessera de produire des glaçons jusqu'à ce que
vous appuyiez à nouveau sur ce bouton.
"changez votre filtre à eau".
En général, vous devez changer le filtre à eau tous les 6 mois pour garantir une qualité d'eau
optimale. Au bout de six mois, l'icône s'allume pour vous rappeler que vous devez remplacer un
nouveau filtre à eau. Vous pouvez acheter un nouveau filtre à eau chez le détaillant où vous
achetez le réfrigérateur ou auprès du système après-vente. Après avoir fini de remplacer un
nouveau filtre à eau à l'intérieur du réfrigérateur, vous devez Appuyer sur ce bouton et maintenir
pendant 3s, l'icône d'affichage s'éteindra, et le filtre à eau sera réinitialisé.
Appuyez sur ce bouton pour recevoir des glaçons. Vous pouvez appuyer sur ce bouton pour choisir
le type de glace à distribuer.
Appuyez sur ce bouton pour recevoir de la glace pilée. Vous pouvez appuyer sur ce bouton pour
choisir le type de glace à distribuer.
Appuyez sur ce bouton pour recevoir de l'eau de refroidissement. Vous pouvez appuyer sur ce
bouton pour choisir l'eau de refroidissement à distribuer.
Remarque !
Lorsque la porte du congélateur est ouverte ou que la sécurité enfant est activée, le diffuseur ne
fonctionne pas.
22

Utilisation quotidienne
vous devez fermer la porte ou déverrouiller la sécurité enfant pour recevoir les cubes de glace, la
glace pilée ou l'eau fraîche que vous souhaitez.
Si vous n'avez pas besoin de glace, désactivez la fonction pour économiser de l'énergie (voir
"Désactivation de la glace" ci-dessus).
Si l'eau n'est pas distribuée ou si elle est distribuée lentement, vous devez remplacer le filtre à eau
car il peut être obstrué.
Certaines régions ont de grandes quantités de calcaire dans l'eau, ce qui fait que le filtre à eau se
bouche plus rapidement.
Affichage
En mode INTELLIGENT, le réfrigérateur règle automatiquement la température de deux
compartiments en fonction de la température interne et de la température ambiante.
En mode ECO, le réfrigérateur fonctionne avec la consommation d'énergie la plus faible.
SUPER REFROIDISSEMENT refroidit le compartiment réfrigérateur à la température la plus basse
pendant environ 2,5 heures. Ensuite, la température réglée avant le mode super est
automatiquement rétablie.
SUPER CONGÉLATION refroidit le compartiment congélateur à la température la plus basse
pendant environ 50 heures. Ensuite, la température réglée avant le mode super est
automatiquement rétablie.
VERROU, le symbole s'allume si les boutons sont verrouillés.
Affiche la température de consigne du compartiment congélateur.
Affiche la température de consigne du compartiment réfrigérateur.
Mode ARRÊT GLACE, le symbole s'allume lorsque vous touchez le bouton pour fermer la
machine à glaçons, cela signifie que le réfrigérateur ne produira plus de glaçons.
En mode RAPPEL DE CHANGEMENT DE FILTRE D'EAU, le symbole s'allume lorsque le filtre à
eau a été utilisé pendant 6 mois pour vous rappeler de remplacer un nouveau filtre à eau à temps.
Tant que vous ne remplacez pas un nouveau filtre et que vous n'appuyez pas sur le bouton
pendant 3s, le symbole s'éteint.
23

Utilisation quotidienne
Alarme d'ouverture de porte
Si une porte reste ouverte pendant 60 secondes, une alarme périodique se déclenche jusqu'à ce que
la porte soit fermée.
Mode
Voyant
lumineux
Affichage de la température
du congélateur
Affichage de la température
du réfrigérateur
Intelligent
L'affichage de la température du congélateur et du réfrigérateur
change en fonction de la température ambiante (voir le tableau
ci-dessous).
ECO
-15°C
+8°C
Super
refroidissement
Aucun changement
+2°C
Super
congélation
-25°C
Aucun changement
REMARQUES :
Mode ECO : Sélectionnez ce mode lorsque vous souhaitez économiser de l'énergie.
Mode super refroidissement : Ce mode vous permet de refroidir rapidement les aliments et sera
automatiquement désactivé après 2,5 heures de fonctionnement.
Mode super congélation : Ce mode vous permet de congeler rapidement des aliments et sera
automatiquement désactivé après 50 heures de fonctionnement.
Alarme d'ouverture de porte
Lorsqu'une porte reste ouverte ou n'est pas complètement fermée pendant environ 60 secondes,
l'appareil déclenche une alarme. Fermez la porte du réfrigérateur et l'alarme s'arrêtera.
Si la porte n'est pas bien fermée, l'alarme se déclenche 5 fois toutes les 30 secondes jusqu'à ce que
les portes soient bien fermées.
Si les portes restent ouvertes pendant 10 minutes sans se fermer, le voyant LED interne s'éteint
automatiquement.
Verrouillage de sécurité pour enfants
Cette fonction est destinée à empêcher les enfants d'utiliser l'appareil.
Pour activer la fonction, appuyez sur la touche et maintenez-la enfoncée pendant
environ 3 secondes. Le témoin lumineux de verrouillage s'allume pour indiquer que la fonction
de verrouillage de sécurité est activée.
Pour désactiver la fonction, maintenez la touche enfoncée pendant environ 3 secondes.
Le voyant de déverrouillage s'allume pour indiquer que la fonction de verrouillage de sécurité
est désactivée.
24

Utilisation quotidienne
Première utilisation
Nettoyage intérieur
Avant d'utiliser l'appareil pour la première fois, laver l'intérieur et tous les accessoires internes avec de
l'eau tiède et un peu de savon neutre afin d'éliminer l'odeur typique d'un produit neuf, puis sécher
soigneusement.
Important ! N'utilisez pas de détergents ou de poudres abrasives, car ils endommageraient la finition.
Comment utiliser le diffuseur ?
Vous pouvez obtenir de la glace en cubes, de la glace pilée et de l'eau de refroidissement en
appuyant sur l'interrupteur à palette, qui est sélectionné en affichant le panneau de commande ;
Remarque ! Si l'interrupteur à palette est pressé de façon continue pendant plus de 3 minutes, le
diffuseur s'arrête de fonctionner pour protéger les composants électriques. Si vous avez besoin de
plus d'eau de refroidissement ou de glace, vous pouvez relâcher l'interrupteur à palette et l'appuyer à
nouveau pour obtenir plus d'eau ou de glace selon vos besoins.
Obtenir de l'eau de refroidissement
Sélectionnez le mode eau de refroidissement , placez la tasse au milieu de l'interrupteur à palettes,
appuyez sur l'interrupteur à palettes pour recevoir de l'eau, et arrêtez d'appuyer sur l'interrupteur à
palettes après avoir pris une quantité d'eau appropriée, et l'eau s'arrêtera de couler automatiquement.
Remarque !
Attendez 2 secondes avant de retirer la tasse pour éviter les projections d'eau.
Si une eau plus fraîche est nécessaire, remplissez le verre de glace avant de le prendre ;
Si l'on prend plus de 800 ml d'eau en une seule fois, l'eau à température élevée peut être retirée.
Dans ce cas, il est recommandé d'attendre une demi-heure avant de boire une boisson froide ;
Obtenir de la glace
Sélectionnez le mode glace en cube ou le mode glace pilée pour obtenir le type de glace que
vous souhaitez.
Placez le gobelet au milieu de l'interrupteur à palettes, appuyez sur l'interrupteur à palettes pour
recevoir de la glace, et arrêtez d'appuyer sur l'interrupteur à palettes après avoir pris une quantité
appropriée de glace, et la glace s'arrêtera de couler automatiquement.
Remarque !
Attendez 2 secondes avant de retirer la tasse pour éviter que la glace ne soit projetée.
Pour éviter que la glace ne tombe du gobelet, placez le gobelet aussi près que possible de la sortie
du diffuseur.
Lors de la prise de glace, le moteur interne fonctionne pour baratter et briser la glace, ce qui peut
produire un certain bruit.
Après avoir pris de la glace, veuillez l'utiliser le plus rapidement possible pour éviter que la glace ne
fonde.
Glace en cubes, glace
pilée, mode eau de
refroidissement
Interrupteur à palette
25

Utilisation quotidienne
Important !
Cette section vous indique comment éviter la plupart des problèmes que vous pourriez rencontrer.
Nous vous recommandons de les lire attentivement avant d'utiliser l'appareil.
1. Lorsque vous prenez de l'eau pour la première fois ou que vous n'avez pas pris d'eau depuis
longtemps, veuillez prélever 1-2L d'eau et la verser ;
2. Lorsque vous utilisez la machine à glaçons pour la première fois ou que vous ne l'avez pas utilisée
pendant une longue période, la première boîte de glaçons ne doit pas être utilisée ;
3. Il est recommandé d'utiliser une tasse d'un diamètre supérieur à 70 mm pour prendre de l'eau et
de la glace ;
4. N'utilisez pas de récipients fragiles pour prendre les glaçons, afin d'éviter les dommages causés
par des récipients cassés ;
5. Ne mettez pas vos mains ou vos outils dans la partie ouverte du distributeur, afin d'éviter de
provoquer une défaillance du mécanisme interne ;
6. Ne tirez pas sur l'interrupteur à palette avec trop de force, afin d'éviter la défaillance de
l'interrupteur à palette ;
7. La machine à glaçons fabrique automatiquement des glaçons sans opération manuelle. Lorsque le
bac à glace est rempli de glace (environ 1,6 kg), la machine à glaçons arrête automatiquement de
produire de la glace ;
8. En mode intelligent, la capacité de production quotidienne de glace du réfrigérateur est d'environ
1,2 kg ;
9. Lorsque la porte du congélateur est ouverte, le diffuseur d'eau glacée est verrouillé et ne peut pas
distribuer d'eau ou de glace ;
10. Lorsque la porte du congélateur est ouverte, si la machine à glaçons effectue la procédure de
fabrication de glace, une partie de la glace tombera dans le bac à glace.
11. Si la glace n'est pas évacuée en douceur, vérifiez si la sortie de glace du diffuseur est bloquée par
de la glace. Si c'est le cas, nettoyez la glace avant de la prendre ;
12. Après la première mise sous tension du réfrigérateur, mettez la machine à glaçons en marche. La
machine à glaçons commencera à produire de la glace environ 10 heures plus tard ;
13. Pendant l'utilisation, vous pouvez entendre le bruit de l'ouverture de la vanne d'eau, de l'eau qui
coule et de la glace qui tombe, ce qui est normal ;
14. Si vous êtes en vacances ou si vous n'avez pas besoin de glaçons pendant une longue période,
veuillez éteindre la fonction de fabrication de glaçons et retirer les glaçons de la glacière pour
éviter que les glaçons ne se figent ensemble et ne bloquent la sortie.
15. En cas de panne de courant, veuillez nettoyer les aliments dans le réfrigérateur à temps, et
nettoyer la glace dans le bac à glace pour éviter que la glace ne fonde.
16. Ne mangez pas les glaçons lorsqu'ils ont une odeur. Vérifiez si le filtre est périmé ou si le
réfrigérateur contient des aliments non scellés dégageant une odeur âcre.
Comment nettoyer et entretenir le diffuseur ?
Utilisez une serviette douce pour nettoyer le réfrigérateur et veillez à débrancher l'alimentation
électrique avant de le nettoyer. Veuillez utiliser de l'eau propre pour le nettoyage, ne pas utiliser de
benzène, de diluant, d'hypochlorite de sodium, d'abrasif, d'agent de blanchiment et d'autres réactifs
chimiques. Ne vaporisez pas de détergent directement sur l'écran d'affichage, sinon le texte imprimé
sur l'écran d'affichage risque de se détacher.
1) Démontez régulièrement la boîte à eau du diffuseur, videz l'eau qu'elle contient et essuyez-la.
26

Utilisation quotidienne
2) Nettoyez régulièrement le bac à glace
Si la glace n'est pas utilisée pendant une longue période ou si la porte du congélateur est
fréquemment ouverte, la glace dans le bac à glace peut fondre et se congeler ensemble, ce qui
bloque la sortie du diffuseur. La glace dans le bac à glace doit être retirée manuellement.
Lorsque vous nettoyez le bac à glace, il est nécessaire d'arrêter la fonction de fabrication de glace
pour éviter que la glace ne tombe dans le réfrigérateur ou sur le sol.
3) Comment monter et démonter le bac à glace ?
Saisissez le bac à glace avec les deux mains sur la boucle, soulevez le bac à glace d'environ 10 mm
avec un peu de force, puis faites glisser le bac à glace hors de la boucle fixe ;
Après avoir retiré le bac à glace, retirez manuellement et soigneusement la glace interne, puis
nettoyez-la à l'eau claire.
Après avoir nettoyé le bac à glace, installez-le en suivant le processus inverse.
Remarque !
N'utilisez pas d'acide, de solvants chimiques (alcool, liquide vaisselle) et autres produits à récurer ;
Après le nettoyage, il est nécessaire de bien sécher la glacière avant de l'installer dans le
réfrigérateur pour éviter que la glace ne gèle ;
Utilisez une serviette propre pour nettoyer la sortie de glace, n'appuyez pas sur la structure interne
avec trop de force pour éviter d'endommager le mécanisme interne ;
Ne placez rien d'autre dans la sortie de glace pour éviter de la bloquer ;
Ne laissez pas les enfants grimper sur le réfrigérateur, car il pourrait tomber et blesser des
personnes.
Ne mettez pas vos doigts, vos mains ou tout autre objet inapproprié dans la chute à glace ou le
seau à glace. Cela peut provoquer des blessures ou des dégâts matériels.
27

Utilisation quotidienne
Décongélation
Les aliments surgelés ou congelés, avant d'être utilisés, peuvent être décongelés dans le
compartiment congélateur ou à température ambiante, selon le temps disponible pour cette opération.
Les petits morceaux peuvent même être cuits encore congelés, directement à partir du congélateur.
Dans ce cas, la cuisson sera plus longue.
Bac à glaçons
Cet appareil peut être équipé d'un ou plusieurs bacs à glaçons pour
produire de la glace.
Accessoires
Étagères amovibles
Les parois du réfrigérateur sont équipées d'une série de glissières
permettant de positionner les étagères à volonté.
Positionnement des balcons de porte
Pour permettre le rangement d'emballages alimentaires de différentes
tailles, les balcons des portes peuvent être placés à différentes hauteurs.
Pour effectuer ces réglages, procédez comme suit : tirez
progressivement le balcon dans le sens des flèches jusqu'à ce qu'il se
libère, puis repositionnez-le selon les besoins.
Recommandation de réglage de température
Recommandation de réglage de température
Température
ambiante
Réglage de la température
Été
Réfrigérateur réglé sur 4°C
28

Utilisation quotidienne
Congélateur réglé sur -18°C
Normal
Réfrigérateur réglé sur 4°C
Congélateur réglé sur -18°C
Hiver
Réfrigérateur réglé sur 4°C
Congélateur réglé sur -18°C
Les informations ci-dessus donnent aux utilisateurs des recommandations sur le réglage
de la température.
Utilisation quotidienne
Placez les différents aliments dans les différents compartiments selon le tableau ci-dessous
Compartiments du réfrigérateur
Type d'aliments
Porte ou balcons du
compartiment réfrigérateur
Les aliments contenant des conservateurs naturels,
comme les confitures, les jus, les boissons, les
condiments.
Ne conservez pas les aliments périssables.
Tiroir à légumes (tiroir à salade)
Les fruits, les herbes et les légumes doivent être placés
séparément dans le bac à légumes.
Ne pas conserver les bananes, les oignons, les
pommes de terre, l'ail dans le réfrigérateur.
Étagère du réfrigérateur - milieu
Produits laitiers, œufs
Étagère du réfrigérateur - haut
Les aliments qui ne nécessitent pas de cuisson, tels
que les aliments prêts à consommer, la charcuterie, les
restes.
Tiroir(s)/étagère(s) du
congélateur
Aliments à conserver à long terme.
Tiroir du bas/étagère pour la viande, la volaille et le
poisson crus.
Tiroir du milieu/étagère pour les légumes surgelés, les
chips.
Tiroir supérieur/étagère pour les glaces, les fruits
congelés, les pâtisseries congelées.
Impact sur la conservation des aliments
En réglage recommandé, la meilleure durée de conservation du réfrigérateur ne dépasse pas 3
jours.
Dans le cadre du réglage recommandé, la meilleure durée de conservation du congélateur n'est
pas supérieure à 1 mois.
La meilleure durée de conservation peut diminuer avec d'autres paramètres.
29

Utilisation quotidienne
Conseils et astuces utiles
Conseils pour la congélation
Pour vous aider à tirer le meilleur parti du processus de congélation, voici quelques conseils
importants :
la quantité maximale d'aliments pouvant être congelés en 24 heures est indiquée sur la plaque
signalétique ;
le processus de congélation prend 24 heures. Aucun autre aliment à congeler ne doit être ajouté
pendant cette période ;
ne congèle que des aliments de première qualité, frais et soigneusement nettoyés ;
préparez les aliments en petites portions afin qu'ils puissent être rapidement et complètement
congelés et qu'il soit possible de ne décongeler ensuite que la quantité nécessaire ;
emballez les aliments dans du papier d'aluminium ou du polyéthylène et veillez à ce que les
emballages soient hermétiques ;
ne pas laisser les aliments frais et non congelés toucher les aliments déjà congelés, afin d'éviter
une augmentation de la température de ces derniers ;
les aliments maigres se conservent mieux et plus longtemps que les aliments gras ; le sel réduit la
durée de conservation des aliments ;
les glaces à l'eau, si elles sont consommées immédiatement après avoir été retirées du
compartiment congélateur, peuvent éventuellement provoquer des brûlures de la peau ;
il est conseillé d'indiquer la date de congélation sur chaque emballage individuel pour vous
permettre de le retirer du compartiment congélateur, ce qui peut provoquer des brûlures de
congélation de la peau ;
il est conseillé d'indiquer la date de congélation sur chaque emballage individuel pour vous
permettre de suivre la durée de conservation.
Conseils pour la conservation des aliments congelés
Pour obtenir les meilleures performances de cet appareil, vous devez :
Assurez-vous que les denrées alimentaires commercialement congelées ont été correctement
conservées par le détaillant ;
Veillez à ce que les aliments congelés soient transférés du magasin d'alimentation au congélateur
dans les plus brefs délais ;
N'ouvrez pas la porte fréquemment et ne la laissez pas ouverte plus longtemps que nécessaire ;
Une fois décongelés, les aliments se détériorent rapidement et ne peuvent pas être recongelés ;
Ne pas dépasser la période de conservation indiquée par le fabricant de l'aliment.
Conseils pour la réfrigération des aliments frais
Pour obtenir les meilleures performances :
Ne conservez pas d'aliments chauds ou de liquides en cours d'évaporation dans le réfrigérateur ;
Couvrez ou enveloppez les aliments, en particulier s'ils ont un goût prononcé.
Conseils pour la réfrigération
Conseils utiles :
Préparez (tous les types) : emballez-les dans des sacs en polyéthylène et placez-les sur les
étagères en verre au-dessus du tiroir à légumes.
Pour des raisons de sécurité, ne les conservez de cette manière qu'un ou deux jours au maximum.
Les aliments cuits, les plats froids, etc... : ils doivent être couverts et peuvent être placés sur
n'importe quelle étagère.
Fruits et légumes : ils doivent être soigneusement nettoyés et placés dans le ou les tiroirs spéciaux
prévus à cet effet.
le beurre et le fromage : ils doivent être placés dans des récipients spéciaux hermétiques ou
enveloppés dans du papier d'aluminium ou des sacs en polyéthylène pour exclure le plus d'air
possible.
Biberon de lait : ils doivent avoir un bouchon et doivent être rangés dans les balcons sur la porte.
30

Utilisation quotidienne
Les bananes, les pommes de terre, les oignons et l'ail, s'ils ne sont pas emballés, ne doivent pas
être conservés dans le réfrigérateur.
Nettoyage
Pour des raisons d'hygiène, l'intérieur de l'appareil, y compris les accessoires intérieurs, doit être
nettoyé régulièrement.
Attention ! L'appareil ne doit pas être branché au secteur pendant le nettoyage. Danger
d'électrocution ! Avant de procéder au nettoyage, éteignez l'appareil et débranchez la fiche du
secteur, ou éteignez ou coupez le disjoncteur ou le fusible. Ne nettoyez jamais l'appareil avec
un nettoyeur à vapeur. L'humidité peut s'accumuler dans les composants électriques, risque
d'électrocution ! Les vapeurs chaudes peuvent endommager les pièces en plastique. L'appareil
doit être sec avant d'être remis en service.
Important ! Les huiles éthérées et les solvants organiques peuvent attaquer les pièces en plastique,
par exemple le jus de citron ou le jus de l'écorce d'orange, l'acide butyrique, les nettoyants contenant
de l'acide acétique.
Ne laissez pas ces substances entrer en contact avec les pièces de l'appareil.
N'utilisez pas de nettoyants abrasifs.
Retirez les aliments du congélateur. Conservez-les dans un endroit frais, bien couverts.
Éteignez l'appareil et débranchez la fiche du secteur, ou éteignez ou débranchez le disjoncteur ou
le fusible.
Nettoyez l'appareil et les accessoires intérieurs avec un chiffon et de l'eau tiède. Après le
nettoyage, essuyer avec de l'eau fraîche et frotter pour sécher.
Une fois que tout est sec, remettez l'appareil en service.
Dépannage
Si vous rencontrez un problème avec votre appareil ou si vous craignez qu'il ne fonctionne pas
correctement, vous pouvez suivre les conseils ci-dessous pour vérifier l'appareil avant de faire appel à
un technicien.
Attention ! Avant de procéder au dépannage, débranchez l'alimentation électrique. Seul un
électricien qualifié ou une personne compétente doit effectuer le dépannage qui ne figure pas
dans ce manuel.
Important ! Il y a quelques sons pendant l'utilisation normale (compresseur, circulation du réfrigérant).
Problème
Cause possible
Solution
L'appareil ne
fonctionne pas
La fiche secteur n'est pas branchée
ou est desserrée
Insérez la fiche secteur.
Le fusible a sauté ou est
défectueux
Vérifiez le fusible, remplacez-le si
nécessaire.
La prise est défectueuse
Les dysfonctionnements du réseau
électrique doivent être corrigés par
un électricien.
L'appareil gèle ou
refroidit trop
La température est réglée trop
froide ou l'appareil fonctionne en
mode SUPER.
Mettez temporairement le régulateur
de température sur un réglage plus
chaud.
Les aliments ne sont
pas assez congelés.
La température n'est pas
correctement réglée.
Veuillez consulter la section sur le
réglage initial de la température.
La porte est restée ouverte pendant
une longue période.
N'ouvrez la porte que le temps
nécessaire.
31

Utilisation quotidienne
Une grande quantité de nourriture
chaude a été placée dans l'appareil
au cours des dernières 24 heures.
Réglez temporairement la régulation
de la température sur un réglage
plus froid.
L'appareil se trouve à proximité
d'une source de chaleur.
Veuillez consulter la section sur
l'emplacement de l'installation.
Forte accumulation
de givre sur le joint
de la porte.
Le joint de la porte n'est pas
étanche.
Réchauffez délicatement les
sections non étanches du joint de
porte avec un sèche-cheveux (sur
un réglage froid). Dans le même
temps, façonnez à la main le joint de
porte chauffé de manière à ce qu'il
se place correctement.
Bruits inhabituels
L'appareil n'est pas à niveau.
Réajustez les pieds.
L'appareil touche le mur ou d'autres
objets.
Déplacez légèrement l'appareil.
Un élément, par exemple un tuyau,
situé à l'arrière de l'appareil, touche
une autre partie de l'appareil ou le
mur.
Si nécessaire, pliez délicatement le
composant pour le dégager.
Les panneaux
latéraux sont chauds
C'est normal. L'échange de chaleur
se fait dans les panneaux latéraux
Prenez des gants pour toucher les
panneaux latéraux si nécessaire.
Le diffuseur n'a pas
pu obtenir de l'eau
de refroidissement
Défaut d'accès à la source d'eau ou
d'ouverture de la vanne d'eau
Assurez-vous que la source d'eau et
la valve sont ouvertes
Le filtre n'est pas installé
correctement
Vérifiez si le sens du filtre est
inversé
La vanne d'eau ou les connecteurs
ne sont pas installés correctement
Vérifiez si la vanne d'eau ou les
connecteurs sont inversés
L'eau n'est pas
assez refroidie
La température du réfrigérateur est
trop élevée
Réglez la température du
réfrigérateur à un niveau plus bas
Prendre une quantité importante
d'eau en une seule fois (1L)
Attendez que l'eau refroidisse
Prendre de l'eau aussi souvent
Attendez que l'eau refroidisse
Le diffuseur n'a pas
pu obtenir de glace
Pas de glace à l'intérieur du bac de
rangement
Attendez que la machine à glaçons
ait fini de fabriquer des glaçons (la
première fois que le réfrigérateur
doit être complètement refroidi, la
machine à glaçons commencera à
fabriquer des glaçons) ;
Défaut d'accès à la source d'eau ou
d'ouverture de la vanne d'eau
Assurez-vous que la source d'eau et
la valve sont ouvertes
Le mode « arrêt glace" fonctionne,
il arrêtera de faire de la glace
Désactiver le mode « arrêt glace"
La pression de la source d'eau
n'est pas suffisante
S'assurer que la pression de la
source d'eau est de 1,5 - 7 bar
La vanne d'eau ou les connecteurs
ne sont pas installés correctement
Vérifiez si la vanne d'eau ou les
connecteurs sont inversés
32

Utilisation quotidienne
Le filtre n'est pas installé
correctement
Vérifiez si le sens du filtre est
inversé
Les glaçons sont congelés
ensemble dans le bac de
rangement pour bloquer la sortie de
la glace
Retirez les glaçons congelés
Il y a quelque chose de dur dans le
bac de rangement, ce qui empêche
le moteur de fonctionner
Retirez l'objet qui bloque la sortie
Les portes ne sont pas totalement
fermées, ce qui fait fuir l'air froid.
Assurez-vous que les portes sont
totalement fermées
Les cubes de glace
ou d'eau sont trop
petits
La pression de la source d'eau
n'est pas suffisante
S'assurer que la pression de la
source d'eau est de 1,5 - 7 bar
Le filtre à eau est bloqué, car il a
été utilisé trop longtemps
Remplacez un nouveau filtre à eau
Le débitmètre d'eau est défectueux
Contactez le personnel de
maintenance
Si le dysfonctionnement se reproduit, contactez le centre de service.
Ces données sont nécessaires pour vous aider rapidement et correctement. Inscrivez ici les données
nécessaires, en vous référant à la plaque signalétique.
33

Brochure du manuel
Les fonctions mentionnées ci-dessous ne conviennent pas à tous les
modèles, cette notice n'est qu'une référence.
Cette liste fournit toutes les exigences d'éco-conception (suite à l'éco-
conception (UE) 2019/2019 et à l'étiquetage énergétique (UE)
2019/2016), si l'exigence est applicable à votre produit.
L'appareil de réfrigération n'est pas destiné à être utilisé comme un
appareil encastré, sauf s'il est spécifiquement indiqué comme tel
dans son manuel d'instructions.
Les tiroirs, paniers et étagères doivent être conservés dans leur
position actuelle, sauf indication contraire dans ce document.
Les portes et les couvercles de l'appareil de réfrigération doivent être
enlevés avant de le mettre à la décharge, afin d'éviter que des
enfants ou des animaux ne se retrouvent coincés à l'intérieur.
Réglage recommandé :
Compartiment réfrigérateur : +4°C
Compartiment congélateur : -18°C
CONGÉLATION RAPIDE
L'utilisation de cette fonction est recommandée lorsque vous placez
une très grande quantité d'aliments à congeler dans le compartiment
congélateur. 24 heures avant de congeler des aliments frais, appuyez
sur le bouton de congélation rapide pour activer la fonction de
congélation rapide. Lorsqu'il est activé, l'indicateur de gel rapide
s'allume. Après 24 heures, placez les aliments à congeler dans la
zone de congélation du compartiment congélateur. La fonction est
automatiquement désactivée après 72 heures, ou peut être
désactivée manuellement en appuyant sur le bouton Congélation
Rapide.
REFROIDISSEMENT RAPIDE
La fonction Refroidissement rapide permet d'augmenter la capacité
de refroidissement du compartiment réfrigérateur. L'utilisation de
cette fonction est recommandée lorsque vous placez une très grande
quantité d'aliments dans le compartiment réfrigérateur. Appuyez sur
le bouton de refroidissement rapide pour activer la fonction de
refroidissement rapide. Lorsqu'il est activé, le voyant de
refroidissement rapide s'allume. La fonction est automatiquement
désactivée après 6 heures, ou peut être désactivée manuellement en
appuyant à nouveau sur le bouton Refroidissement rapide.
Comment conserver les denrées alimentaires :
34

Pour éviter le gaspillage de nourriture, veuillez vous référer aux
temps de réglage et de conservation recommandés :
Compartiment du réfrigérateur : Les différents aliments, notamment
les légumes et les fruits, ont des températures de conservation
différentes. La durée de conservation est de 1 à 3 jours (réglage de la
température : moyenne)
Compartiment congélateur : 1 semaine (réglage de la température :
Min) et 1 mois (réglage
de la température : Max)
Pour optimiser la vitesse de congélation et obtenir plus d'espace de
rangement, le compartiment congélateur peut être utilisé sans les
tiroirs de congélation.
La quantité d'aliments frais pouvant être congelés pendant une
période donnée est indiquée sur la plaque signalétique. Les limites de
charge sont déterminées par les paniers, les rabats, les tiroirs, les
étagères, etc. Assurez-vous que ces composants peuvent encore se
fermer facilement après le chargement.
Pour éviter le gaspillage de nourriture, veuillez vous référer aux
temps de réglage et de conservation recommandés dans le manuel
d'utilisation.
Les informations sur le modèle peuvent être récupérées à l'aide du
code QR figurant sur l'étiquette énergétique.
L'étiquette comprend également l'identifiant du modèle qui peut être
utilisé pour consulter le portail du registre à l'adresse suivante
https://eprel.ec.europa.eu
Ce produit contient une source lumineuse de classe d'efficacité
énergétique G (si elle est présente).
35

Informação de segurança
Para sua segurança e para assegurar uma utilização
correta, antes da instalação e da primeira utilização do
aparelho, leia cuidadosamente este manual de
utilização, incluindo os conselhos e avisos. Para evitar
erros e acidentes desnecessários, é importante
assegurar que todas as pessoas que utilizam o aparelho
estejam completamente familiarizadas com o seu
funcionamento e características de segurança. Guarde
estas instruções perto do aparelho se este for movido ou
vendido, para que todos os utilizadores ao longo da sua
vida útil sejam devidamente informados sobre as
questões relacionadas com a utilização e a segurança
do aparelho. Para preservar vidas e a propriedade,
observe as precauções indicadas neste manual. O
fabricante não é responsável por danos causados por
omissão.
Segurança das crianças e das pessoas
vulneráveis
Este aparelho pode ser utilizado por crianças a partir
dos 8 anos de idade e por pessoas com capacidades
físicas, sensoriais ou mentais reduzidas ou com falta
de experiência e conhecimentos, mas estas pessoas
devem ser supervisionadas ou receber instruções
relativas à utilização do aparelho de uma forma
segura e compreender os perigos envolvidos.
As crianças com idades compreendidas entre os 3 e
os 8 anos são autorizadas a utilizar este aparelho
para colocar e retirar produtos.
As crianças devem ser supervisionadas para
assegurar que não brincam com o aparelho.
1

Informação de segurança
A limpeza e a manutenção não devem ser feitas por
crianças, a menos que tenham 8 anos de idade ou
mais e sob supervisão.
Mantenha todas as embalagens afastadas das
crianças. Existe o risco de asfixia.
Se estiver a eliminar o aparelho, retire a ficha da
tomada, corte o cabo de ligação (o mais próximo
possível do aparelho) e retire a porta para evitar que
as crianças sofram choques elétricos ou se fechem no
interior.
Se este aparelho com vedações magnéticas na porta
for substituir um aparelho mais antigo com uma
fechadura de mola (trinco) na porta ou tampa,
certifique-se de inutilizar a mola antes de eliminar o
aparelho antigo. Isso evitará que se torne uma
armadilha mortal para uma criança.
Segurança geral
AVISO! Manter livres de obstrução as aberturas
de ventilação do próprio aparelho ou da estrutura de
encastre.
AVISO! Não utilizar dispositivos mecânicos ou
outros meios para acelerar o processo de
descongelação, para além dos recomendados pelo
fabricante.
AVISO! Não danificar o circuito do refrigerante.
AVISO! Não utilizar outros aparelhos elétricos
(como máquinas de gelados) dentro dos aparelhos
2

Informação de segurança
de refrigeração, a menos que sejam aprovados para
tal fim pelo fabricante.
AVISO! Não tocar na lâmpada se esta estiver
ligada durante um longo período de tempo, pois
pode estar muito quente.1)
AVISO! Ao posicionar o aparelho, certifique-se de
que o cabo de alimentação não está preso ou
danificado.
AVISO! Não colocar várias tomadas ou extensões
atrás do aparelho.
Não armazenar no aparelho substâncias explosivas,
tais como latas de aerossóis com propulsor
inflamável.
O refrigerante isobutano (R-600a) encontra-se no
interior do circuito de refrigeração do aparelho. Trata-
se de um gás natural com um elevado nível de
compatibilidade ambiental, mas que é inflamável.
Durante o transporte e instalação do aparelho,
assegurar que nenhum dos componentes do circuito
de refrigeração se danifica.
- evitar chamas abertas e fontes de ignição;
- ventilar bem a sala em que o aparelho se encontra.
É perigoso modificar as especificações ou fazer
qualquer tipo de alterações a este produto. Qualquer
dano no cabo pode causar curto-circuito, incêndio
e/ou choque elétrico.
1) Se existir uma luz no compartimento.
3

Informação de segurança
Este aparelho destina-se a aplicações domésticas e
similares, tais como
- áreas de cozinha do pessoal em lojas, escritórios e
outros ambientes de trabalho;
- uso em casas rurais, hotéis, motéis e outros
ambientes de tipo residencial por parte dos clientes;
- alojamento local;
- catering e aplicações similares não retalhistas.
AVISO! Os componentes elétricos (ficha, cabo
elétrico, compressor e etc.) devem ser substituídos
por um trabalhador certificado e qualificado.
AVISO! A lâmpada fornecida com este aparelho é
uma "lâmpada de uso especial" utilizável apenas no
aparelho com que é fornecida. Esta "lâmpada de uso
especial" não é utilizável em iluminação doméstica.1)
O cabo de alimentação não deve ser utilizado com
extensões.
Assegurar que a ficha elétrica não é esmagada ou
danificada pela parte traseira do aparelho. Uma ficha
esmagada ou danificada pode sobreaquecer e causar
um incêndio.
Assegurar que é possível chegar à ficha de
alimentação do aparelho.
Não puxar o cabo de alimentação.
Se a tomada de alimentação estiver solta, não inserir
a ficha. Existe risco de choque elétrico ou incêndio.
Não colocar o aparelho a funcionar sem a lâmpada.
1) Se existir uma luz no compartimento.
4

Informação de segurança
Este aparelho é pesado. É necessário ter cuidado ao
movê-lo.
Não retire nem toque nos artigos do compartimento
do congelador se as suas mãos estiverem
húmidas/molhadas, uma vez que isso pode causar
abrasões na pele ou queimaduras pelo frio.
Evitar a exposição prolongada do aparelho à luz solar
direta.
Uso diário
Não aplicar calor aos componentes de plástico do
aparelho.
Não colocar os produtos alimentares diretamente
encostados à parede traseira.
Os alimentos que tenham sido descongelados não
devem voltar a ser congelados.1)
Os alimentos congelados pré-embalados devem ser
armazenados de acordo com as instruções do
fabricante dos alimentos.1)
As recomendações de armazenamento do fabricante
do aparelho devem ser rigorosamente cumpridas.
Consultar as instruções pertinentes.
Não colocar bebidas carbonatadas ou gaseificadas no
compartimento do congelador, uma vez que a
pressão criada sobre o recipiente pode causar a sua
explosão, resultando em danos no aparelho.1)
1) Se existir um compartimento de congelador.
2) Se existir um compartimento de comida fresca.
5

Informação de segurança
Os gelados de gelo podem causar queimaduras por
frio se forem consumidos imediatamente após serem
retirados do aparelho.1)
Para evitar a contaminação dos alimentos, observe as
seguintes instruções.
A abertura da porta por longos períodos pode causar
um aumento significativo da temperatura nos
compartimentos do aparelho.
Limpar regularmente as superfícies que possam
entrar em contacto com alimentos e sistemas de
drenagem acessíveis.
Limpar os depósitos de água se não forem utilizados
durante 48 horas; lavar o sistema de água ligado a
um sistema de abastecimento se a água não for
retirada durante 5 dias.
Armazenar carne e peixe crus em recipientes
adequados no frigorífico, para que não estejam em
contacto com outros alimentos ou pinguem sobre
outros alimentos.
Os compartimentos de alimentos congelados com
duas estrelas (se mostradas no aparelho) são
adequados para armazenar alimentos pré-
congelados, armazenar ou fazer gelados e fazer
cubos de gelo.
Os compartimentos de uma, duas e três estrelas (se
mostradas no aparelho) não são adequados para a
congelação de alimentos frescos.
Se o aparelho for deixado vazio durante longos
períodos, deverá ser desligado, descongelado, limpo,
6

Informação de segurança
seco e deixado com a porta aberta para evitar a
formação de bolor no interior do aparelho.
Cuidado e limpeza
Antes da qualquer manutenção, desligar o aparelho e
desligar a ficha da rede elétrica.
Não limpar o aparelho com objetos metálicos.
Não utilizar objetos afiados para remover gelo do
aparelho. Utilizar um raspador de plástico.1)
Examinar regularmente o escoamento da água
descongelada no frigorífico. Se necessário, limpar o
orifício de escoamento. Se o orifício de escoamento
estiver bloqueado, a água irá acumular-se no fundo
do aparelho.2)
Cuidado!
Ao utilizar a função de fazer gelo e de arrefecimento,
certifique-se de que a fonte de água e o filtro estão
ligados.
Antes de utilizar o aparelho, o filtro deve ser
enxaguado com água durante 5 minutos ou 5 litros de
água, para assegurar que o filtro está bem limpo.
Depois de ligar o frigorífico à fonte de água, devem
ser seguidos os procedimentos indicados nas
instruções de instalação. Após aguardar 5 minutos,
verificar se existem fugas no canal de água.
Assegurar que a pressão da água está dentro das
especificações exigidas. Uma pressão de água
demasiado elevada pode causar fugas de água e uma
1) Se existir um compartimento de congelador.
2) Se existir um compartimento de comida fresca.
7

Informação de segurança
pressão demasiado baixa não pode suportar esta
função do produto.
Não tocar na máquina de fazer gelo com as mãos ou
ferramentas durante o processo de utilização, para
evitar danos às pessoas ou à máquina de fazer gelo.
Durante a utilização do produto, assegurar que a
máquina de fazer gelo e a caixa de armazenamento
do gelo estão limpas, para evitar que uma grande
quantidade de pó, detritos sólidos e outros poluentes
caiam no seu interior.
Não permitir que as crianças retirem a caixa de gelo
para evitar que esta caia e as magoe.
Há lâminas de metal no interior da caixa de gelo. As
crianças não estão autorizadas a brincar com as
lâminas, para evitar ferimentos.
Instalação
Importante! Para a ligação elétrica, seguir
cuidadosamente as instruções dos parágrafos
específicos.
Desembalar o aparelho e verificar se o mesmo
apresenta danos. Não ligar o aparelho se este
apresentar danos. Comunicar imediatamente os
possíveis danos ao estabelecimento onde foi
adquirido. Nesse caso, conservar a embalagem.
É aconselhável esperar pelo menos quatro horas
antes de ligar o aparelho, para permitir que o óleo
volte a fluir no compressor.
Deve existir circulação de ar adequada em redor do
aparelho, para evitar o sobreaquecimento. Para obter
8

Informação de segurança
ventilação suficiente devem ser seguidas as
instruções pertinentes durante a instalação.
Sempre que possível, os espaçadores do produto
devem estar encostados a uma parede para evitar o
contacto com peças quentes (compressor,
condensador) e evitar possíveis queimaduras.
O aparelho não deve ser colocado próximo de
radiadores ou fogões.
Assegurar que é possível chegar à ficha de
alimentação depois de instalar o aparelho.
Reparação
Qualquer trabalho elétrico necessário para a
manutenção deve ser efetuado por um eletricista
qualificado ou por uma pessoa competente.
A manutenção deste aparelho deve ser realizada por
um Centro de Assistência Técnica autorizado e só
devem ser utilizadas peças de reposição originais.
Poupança de energia
Não colocar comida quente no aparelho;
Não colocar os alimentos próximos entre si, pois isso
impede a circulação de ar;
Assegurar que os alimentos não tocam na parte de
trás do(s) compartimento(s);
Se houver corte de eletricidade, não abrir a(s)
porta(s);
Não abrir a(s) porta(s) frequentemente;
Não manter a(s) porta(s) aberta(s) durante muito
tempo;
9

Informação de segurança
Não configurar o termóstato para temperaturas
demasiado frias;
Todos os acessórios, como gavetas, prateleiras ou
prateleiras das portas devem ser mantidos no seu
lugar para um menor consumo de energia.
Proteção ambiental
Este aparelho não contém gases que possam
danificar a camada de ozono, quer no seu circuito de
refrigeração, quer nos materiais de isolamento. O
aparelho não deve ser eliminado juntamente com o lixo
e resíduos urbanos. A espuma para isolamento contém
gases inflamáveis: o aparelho deve ser eliminado de
acordo com os regulamentos das autoridades locais.
Evitar danos à unidade de refrigeração, particularmente
ao permutador de calor. Os materiais utilizados neste
aparelho que estejam marcados com o símbolo são
recicláveis.
O símbolo no produto ou na respetiva
embalagem indica que este produto não pode
ser tratado como lixo ou resíduos domésticos.
Deve ser levado para um ponto de recolha apropriado
para a reciclagem de equipamentos elétricos e
eletrónicos. Assegurar que este produto é eliminado
corretamente ajudará a evitar potenciais consequências
negativas para o ambiente e para a saúde humana, que
poderiam resultar de um manuseamento inadequado
dos resíduos deste produto.
Para informações mais detalhadas sobre a reciclagem
deste produto, contactar as autoridades locais, um
10

Informação de segurança
centro de eliminação de resíduos domésticos ou o
estabelecimento onde adquiriu o produto.
Materiais de embalamento
Os materiais com o símbolo são recicláveis. Eliminar a
embalagem em recipientes de recolha adequados.
Eliminação do aparelho
1. Desligar a ficha da tomada da rede elétrica.
2. Cortar o cabo de alimentação e eliminá-lo.
AVISO! Durante a utilização,
manutenção/reparação e eliminação do
aparelho, deve-se prestar atenção ao
símbolo semelhante ao da esquerda, que se
encontra na parte traseira do aparelho
(painel traseiro ou compressor) em cor
amarela ou laranja.
É um símbolo de aviso de incêndio. Existem
materiais inflamáveis nos tubos de
refrigeração e no compressor.
Manter longe de fontes de ignição durante a
utilização, manutenção/reparação e
eliminação.
11

Visão geral
(Retire a tampa do compartimento do compressor de metal)
Painel de controlo
Distribuidor de água/gelo
Painel de comando principal
Cabo de alimentação
Compressor
Válvula de água externa
principal
12

Visão geral
Esta figura é apenas ilustrativa e pode não representar em detalhe o seu aparelho.
Prateleira de porta do
frigorífico*4
Prateleiras do frigorífico*3
Gavetas inferiores do
frigorífico*2
Tampa da caixa de gelo
Caixa de armazenamento
de gelo
Prateleiras do
congelador*3
Gavetas do congelador*2
Prateleiras de porta do
congelador*1
Ligação para tubo de água
13

Instalação
Acessórios
Retirar as portas
Ferramentas necessárias: Chave de fendas Philips, chave de fendas de lâmina plana.
Assegurar que o aparelho está desligado da rede e vazio.
Para retirar a porta, é necessário inclinar a unidade para trás. Apoiar a unidade em algo
sólido, para não escorregar durante o processo de remoção da porta.
Todas os elementos removidos devem ser guardados para a recolocação da porta.
Não colocar a unidade na horizontal, pois isso pode danificar o
sistema de refrigeração.
A montagem do aparelho deve ser realizada por duas pessoas.
1. Desaparafusar a tampa da dobradiça com uma chave Philips.
2. Retirar a armadura.
Ligação para tubo de água*1
Ligação para filtro de água*2
Grampos antiderrapantes *8
Filtro de água * 1
Elementos do tubo de água * 1
Manual de utilização * 1
Tabuleiro do distribuidor de
água * 1
14

Instalação
3. Desaparafusar a dobradiça superior.
4. Existe uma ligação para tubo de água na parte inferior do frigorífico side by side. Retirar da
película protetora e desacoplar do tubo de água. Puxar o tubo de água para fora da dobradiça
inferior.
5. Levantar a porta e colocá-la sobre uma superfície macia. Depois, retirar a outra porta seguindo
o mesmo processo.
6. Desaparafusar as dobradiças inferiores.
7. Depois de posicionar o aparelho, instalar as portas seguindo o processo inverso.
15

Instalação
Requisitos de espaço
Reserve espaço para a abertura das portas.
Reserve um espaço de 50 mm na traseira e nas laterais.
A
900
B
660
C
1770
D
mín.=50
E
mín.=50
F
1800
G
1560
H
135 °
Nivelar o frigorífico
Portas
- Para subir os pés niveladores, rode-os com a mão
no sentido dos ponteiros do relógio
-
Para descer os pés niveladores, rode-os com a
mão no sentido contrário ao dos ponteiros do relógio
16

Instalação
Posicionamento
Instale o aparelho num local cujo ambiente corresponda aos tipos de climas indicados na placa
de especificações do aparelho:
para aparelhos de refrigeração com tipo de clima:
- temperado: este aparelho de refrigeração foi concebido para utilização a temperaturas entre
10 °C e 32 °C; (SN)
- temperado mediterrânico: este aparelho de refrigeração foi concebido para utilização a
temperaturas entre 16 °C e 32 °C; (N)
- subtropical: este aparelho de refrigeração foi concebido para utilização a temperaturas entre
16 °C e 38 °C; (ST)
- tropical: este aparelho de refrigeração foi concebido para utilização a temperaturas entre 16
°C e 43 °C; (ST)
Localização
O aparelho deve ser instalado num local afastado de fontes de calor tais como radiadores,
caldeiras, luz solar direta, etc. Assegurar que o ar pode circular livremente na parte traseira do
armário do frigorífico. Para assegurar o melhor desempenho, se o aparelho estiver posicionado
por baixo de um armário de parede saliente, a distância mínima entre o topo do frigorífico e o
armário de parede deve ser de pelo menos 50 mm. Contudo, o ideal é que o aparelho não
seja posicionado por baixo de armários de parede suspensos. O correto nivelamento é obtido
por meio de um ou mais pés ajustáveis na base do armário do frigorífico.
Este aparelho de refrigeração não se destina a ser utilizado como aparelho encastrado;
Aviso! Deve ser possível desligar o aparelho da rede elétrica; portanto, a ficha deve ficar
facilmente acessível após a instalação.
Ligação elétrica
Antes de estabelecer a ligação elétrica, assegurar que a tensão e a frequência indicadas na
placa de especificações correspondem à fonte de alimentação doméstica da região de
instalação. O aparelho deve estar ligado à terra. Para este fim, a ficha do cabo de alimentação
é fornecida com um contacto.
17

Uso diário
Importante!
Como instalar o filtro de água e o tubo de água.
1. Antes de instalar, o filtro deve ser enxaguado com água durante 5 minutos ou 5 litros de água, para
assegurar que o filtro está bem limpo.
2. Abrir a porta do frigorífico e retirar as gavetas inferiores.
3. Retirar os tampões de borracha em ambos os lados da caixa de água.
Fonte de água
Tubo de ligação
Filtro
Bacia
Tampões de
borracha
Caixa de água
18

Uso diário
4. Retire o filtro de água da bolsa de acessórios, insira os conectores em ambos os lados do filtro e
ligue o tubo de água e a abraçadeira aos grampos antiderrapantes (preste atenção à direção da
seta no filtro)
5. Montar os elementos do filtro de água com suporte de fixação acima da caixa de água e ligar os
tubos de água da caixa de água ao filtro de água.
6. Retirar o tampão de borracha. Ligar o tubo de água à válvula principal na tampa do compressor
com conector e lembrar-se de inserir os grampos antiderrapantes; depois, ligar a extremidade do
tubo de água com porca à fonte de água.
Filtro de água
Conectores
Tubos de água
Grampos
antiderrapantes
Fixar os elementos do filtro
de água
Ligue os tubos de água
da caixa de água ao filtro
Fonte de água
Retirar o tampão de borracha
Ligar o tubo de água com
conector e lembrar-se de
inserir os grampos
antiderrapantes em ambos
os lados do conector.
Ligar a extremidade
do tubo de água com
porca à fonte de água
Tubo de água
19

Uso diário
Cuidado!
A fonte de água externa deve estar limpa e a pressão da água deve ser de 1,5~7 bar para garantir
um bom funcionamento.
Verificar a ligação da tubagem de água, verificar se existem outras coisas dentro da máquina de
fazer gelo e da caixa de armazenamento de gelo.
Depois de aceder à fonte de água, abrir a torneira e verificar se existem fugas entre a torneira e o
tubo de ligação. Se existirem fugas, verificar a ligação do tubo de ligação.
Selecionar a função água, utilizar um copo grande para pressionar o distribuidor, manter a água a
correr durante 5 minutos até estar limpa e suave; a água retirada durante este processo não é
potável.
Selecionar a função de retirar gelo e quebrar gelo, utilizar um copo grande para pressionar o
distribuidor, e verificar o funcionamento normal do motor interno através do sentido comum.
Aguardar 3 minutos e verificar se a válvula de entrada de água do frigorífico, os conectores do tubo
de água e o filtro de água apresentam fugas.
20

Uso diário
Utilizar o painel de controlo
Botões
Premir para regular a temperatura do compartimento congelador (lado esquerdo) de -14 °C a -22
°C.
Premir para regular a temperatura do compartimento frigorífico (lado direito) de 2 °C a 8 °C e para
desligar (OFF). Ao desligar (OFF), o compartimento frigorífico será desligado.
Premir para selecionar o modo de funcionamento: SUPER COOLING , SUPER FREEZER ,
SMART , ECO e CONFIGURAÇÃO DO UTILIZADOR (sem símbolo no visor).
Manter premido o botão 3 SEC. durante 3 segundos para bloquear os outros botões.
Manter premido durante 3 segundos para desbloquear os outros botões.
O botão de desligar o gelo permite controlar a máquina de gelo. Premir este botão para fechar a
máquina de fazer gelo. O aparelho deixará de fazer gelo até premir novamente este botão.
"substituir o filtro de água".
De forma geral, é necessário substituir o filtro de água de 6 em 6 meses para garantir a mais alta
qualidade da água. Ao fim de meio ano, o ícone acende no visor para lembrar que deve
substituir o filtro de água. Pode adquirir um novo filtro de água no estabelecimento onde comprou o
frigorífico ou através do sistema de após-venda. Depois de colocar o novo filtro de água dentro do
frigorífico, premir o botão durante 3 segundos, até o ícone apagar no visor. O filtro de água
será reiniciado.
Premir este botão para obter gelo em cubos. Premir este botão permite escolher o tipo de gelo a ser
servido.
Premir este botão para obter gelo picado. Premir este botão permite escolher o tipo de gelo a ser
servido.
Premir este botão para obter água fria. Premir este botão permite escolher água fria.
Nota!
Quando a porta do congelador está aberta ou o bloqueio para crianças está ativado, o distribuidor
não irá funcionar.
É necessário fechar a porta ou desativar o bloqueio para crianças para obter gelo em cubos, gelo
picado ou água fria.
Se não for preciso gelo, é aconselhável desligar a função para poupar energia. (ver a função de
desligar gelo acima)
21

Uso diário
Se a água não for servida ou for servida lentamente, será necessário substituir o filtro de água
porque pode estar entupido.
Algumas regiões têm grandes quantidades de calcário na água, o que leva o filtro de água a
entupir mais rapidamente.
Visor
Modo SMART, o frigorífico define automaticamente a temperatura dos dois compartimentos
tendo em conta a temperatura interna e a temperatura ambiente.
Modo ECO, o frigorífico funciona com o menor consumo de energia.
SUPER COOLING, arrefece o compartimento frigorífico até à temperatura mais baixa durante
aproximadamente 2,5 horas. Depois, a temperatura definida antes do modo de super refrigeração
será automaticamente restaurada.
SUPER FREEZING, arrefece o compartimento congelador até à temperatura mais baixa durante
aproximadamente 50 horas. Depois, a temperatura definida antes do modo de super congelação
será automaticamente restaurada.
BLOQUEIO, o símbolo acende se os botões estiverem bloqueados.
Temperatura configurada para o compartimento congelador.
Temperatura configurada para o compartimento frigorífico.
Modo ICE OFF, o símbolo acende ao tocar no botão para fechar a máquina de gelo; significa
que o frigorífico deixará de fazer gelo.
Modo AVISO FILTRO DE ÁGUA, o símbolo acende quando o filtro de água tiver 6 meses de
utilização, para recordar que é necessário substituir o filtro de água por um novo. Enquanto o filtro
não for substituído, premir o botão durante 3 segundos para apagar.
Alarme de porta aberta
Se qualquer porta do frigorífico se mantiver aberta durante 60 segundos, irá soar um alarme periódico
até que a porta seja fechada.
Modo
Luz indicadora
Visor de temperatura do
congelador
Visor de temperatura do
frigorífico
Smart
O visor de temperatura do congelador e do frigorífico mudará
com base na temperatura ambiente (ver a tabela abaixo).
ECO
-15 °C
+8 °C
Super Cooling
Sem alteração
+2 °C
Super Freezing
-25 °C
Sem alteração
22

Uso diário
NOTAS:
Modo ECO: Selecionar este modo permite poupar energia.
Modo Super Cooling: Este modo permite arrefecer os alimentos rapidamente e será automaticamente
desativado após 2,5 horas de funcionamento.
Modo Super Freezing: Este modo permite congelar os alimentos rapidamente e será
automaticamente desativado após 50 horas de funcionamento.
Alarme de porta aberta
Quando qualquer porta é deixada aberta ou não estiver completamente fechada durante cerca de 60
segundos, o aparelho fará soar um alarme. O alarme irá parar ao fechar a porta do frigorífico.
Se a porta não estiver bem fechada, o alarme soará 5 vezes de 30 em 30 segundos até as portas
estarem bem fechadas.
Se as portas estiverem abertas durante 10 minutos contínuos sem fechar, a luz LED interna será
apagada automaticamente.
Bloqueio de segurança para crianças
Esta função foi concebida para impedir que as crianças utilizem o aparelho.
Para ativar a função, manter premido durante cerca de 3 segundos o botão . A luz
indicadora de bloqueio acende, indicando que a função de bloqueio de segurança está ativada.
Para desativar a função, manter premido durante cerca de 3 segundos o botão . A luz
indicadora de desbloqueio acende, indicando que a função de bloqueio de segurança está
desativada.
23

Uso diário
Primeira utilização
Limpeza do interior
Antes de utilizar o aparelho pela primeira vez, lavar o interior e todos os acessórios internos com água
morna e um sabão neutro para eliminar o odor típico de um eletrodoméstico novo. Deixar secar bem.
Importante! Não utilizar detergentes ou pós abrasivos, pois irão danificar o acabamento do aparelho.
Como utilizar o distribuidor?
O distribuidor permite obter gelo em cubos, gelo picado e água fria premindo a respetiva alavanca. A
seleção e feita no painel de comando;
Nota! Se a alavanca doseadora for premida continuamente durante mais de 3 minutos, o dispensador
deixará de funcionar para proteger os componentes elétricos. Para reativar, basta soltar a alavanca e
voltar a premi-la para obter mais água ou gelo.
Obter água fria
Selecionar o modo de água fria , colocar o copo a meio da alavanca doseadora, premir a alavanca
para obter água. Soltar a alavanca doseadora depois de ter uma quantidade apropriada de água,
para que esta deixe de correr.
Nota!
Aguardar 2 segundos antes de retirar o copo chávena para evitar que a água salpique.
Se for necessária água mais fria, é aconselhável encher o copo com gelo antes de utilizar;
Se forem retirados mais de 800 ml de água, esta poderá sair a temperatura mais altas. Aguardar
meia hora para a água sair fria;
Obter gelo
Selecionar modo cubos de gelo ou modo de gelo picado para obter o tipo de gelo desejado.
Colocar o copo a meio da alavanca doseadora, premir a alavanca para obter gelo. Soltar a alavanca
doseadora depois de ter uma quantidade apropriada de gelo, para que este deixe de correr.
Nota!
Aguardar 2 segundos antes de retirar o copo chávena para evitar que o gelo salpique.
Para evitar que o gelo caia para fora do copo, colocar o copo o mais próximo possível da saída do
doseador.
Ao retirar o gelo, o motor interno trabalha para agitar e quebrar o gelo, o que pode produzir algum
ruído.
Depois de retirar o gelo, utilize-o o mais rapidamente possível para evitar o seu derretimento.
Cubos de gelo, gelo picado
e água fria
Alavanca doseadora
24

Uso diário
Importante!
Esta secção explica como evitar a maior parte dos problemas que podem ocorrer. Recomendamos
que leia atentamente antes de utilizar o aparelho.
1. Ao retirar água pela primeira vez ou se não for retirada água durante muito tempo, é
recomendável retirar 1~2 litros de água e deitar fora;
2. Ao retirar água pela primeira vez ou se não for retirada água durante muito tempo, a primeira
caixa de cubos de gelo não deve ser utilizada;
3. Recomenda-se a utilização de um copo com um diâmetro superior a 70 mm para retirar água e
gelo;
4. Não utilizar recipientes frágeis para transportar cubos de gelo, de modo a evitar danos causados
por recipientes partidos;
5. Não colocar as mãos ou ferramentas na abertura do distribuidor, de modo a evitar falhas do
mecanismo interno;
6. Não utilizar força excessiva sobre a alavanca dispensadora, de modo a evitar falhas;
7. A máquina de gelo faz gelo automaticamente sem ação manual. Quando a caixa de
armazenamento de gelo está cheia de gelo (cerca de 1,6 kg), a máquina de gelo deixa
automaticamente de fazer gelo;
8. No modo Smart, a capacidade diária de produção de gelo do frigorífico é de cerca de 1,2 kg;
9. Quando a porta do congelador está aberta, o distribuidor de água fecha e não pode é possível
retirar água ou gelo;
10. Quando a porta do congelador está aberta, se a máquina de gelo estiver a produzir gelo, irá cair
algum gelo dentro da caixa de armazenamento de gelo.
11. Se o gelo não sair suavemente, verificar se a saída de gelo está bloqueada pelo próprio gelo. Em
caso afirmativo, limpar o gelo;
12. Depois de ligar o frigorífico pela primeira vez, ativar a máquina de gelo; a máquina de gelo
começará a fazer gelo aproximadamente 10 horas mais tarde;
13. Durante o processo de utilização, pode ouvir-se o som de abertura da válvula de água, o fluxo de
água e a queda de gelo, o que é normal;
14. Se o utilizador estiver de férias ou não precisar de cubos de gelo durante muito tempo, é
recomendável desligar a função de fazer gelo e retirar os cubos de gelo da caixa de gelo para
evitar que os cubos de gelo se unam e bloqueiem a saída.
15. Em caso de falha de energia, retirar os alimentos do frigorífico atempadamente e limpar o gelo da
caixa de gelo para evitar o derretimento.
16. Não consumir comer cubos de gelo se estes apresentarem algum odor. Verificar se o filtro expirou
ou se existem alimentos não selados com odor pungente no frigorífico.
Como limpar e manter o distribuidor de gelo?
Utilizar uma toalha macia para limpar o frigorífico e assegurar-se de desligar a alimentação antes de
limpar. Utilizar apenas água limpa, não utilizar benzeno, diluente, hipoclorito de sódio, abrasivos,
lixívia e outros reagentes químicos. Não pulverizar detergente diretamente sobre o visor, caso
contrário o texto no ecrã de visualização pode cair.
1) Retirar a caixa de água do distribuidor regularmente e verter a água do seu interior para limpar a
caixa.
25

Uso diário
2) Limpar regularmente a caixa de armazenamento do gelo
Se não for utilizado gelo durante muito tempo ou se a porta do congelador for frequentemente aberta,
os cubos gelo na caixa de armazenamento do gelo podem derreter e unir-se, originando bloqueios na
saída do distribuidor. O gelo na caixa de armazenamento do gelo tem de ser retirado manualmente.
Ao limpar a caixa de armazenamento do gelo, é necessário desligar a função de fazer gelo para evitar
que o mesmo caia para o frigorífico ou para o chão.
3) Montar e desmontar a caixa de armazenamento de gelo
Pegar na caixa de gelo com ambas as mãos, levantar a caixa de gelo cerca de 10 mm usando um
pouco de força e arrastar a caixa de gelo para fora do encaixe fixo;
Depois de retirar a caixa de armazenamento de gelo, retirar o gelo interno manualmente e com
cuidado, antes de limpar com água limpa.
Depois de limpar a caixa de armazenamento do gelo, voltar a colocá-la utilizando o procedimento
inverso.
Nota!
Não utilizar ácido, solventes químicos (álcool, líquido para lavar louça) e outras produtos similares;
Após a limpeza, é necessário secar bem a caixa de gelo antes de a instalar no frigorífico para
evitar o congelamento do gelo;
Utilizar uma toalha limpa para limpar a saída de gelo, não pressionar a estrutura interna com
demasiada força para evitar danos ao mecanismo interno;
Não colocar nada na saída de gelo para evitar bloqueios;
Não permitir que crianças subam ou se pendurem no frigorífico, pois este poderia cair e causar
ferimentos a pessoas.
26

Uso diário
Não colocar os dedos, mãos, ou quaisquer outros objetos inadequados na calha de gelo ou no
balde de gelo. Isso poderá provocar ferimentos pessoais ou danos materiais.
Descongelação
Antes da utilização, os alimentos ultracongelados ou congelados podem ser descongelados no
compartimento frigorífico ou à temperatura ambiente, dependendo do tempo disponível.
Alguns alimentos podem ser cozinhados ainda congelados, diretamente do congelador. Neste caso, a
cozedura irá demorar mais tempo.
Cuvetes de gelo
Este aparelho pode ser equipado com uma ou mais cuvetes para
produzir gelo.
Acessórios
Prateleiras amovíveis
As paredes do frigorífico estão equipadas com uma série de corrediças
para que as prateleiras possam ser posicionadas conforme desejado.
Posicionamento das prateleiras da porta
Para permitir o armazenamento de embalagens alimentares de vários
tamanhos, as prateleiras da porta podem ser colocadas a diferentes
alturas. Para o efeito, proceder da seguinte forma: puxar gradualmente a
prateleira na direção das setas até a libertar e reposicionar conforme
desejado.
Recomendação de configuração da temperatura
Recomendação de configuração da temperatura
Temperatura
ambiente
Configuração da temperatura
27

Uso diário
Verão
Frigorífico configurado para 4 °C
Congelador configurado para -18 °C
Normal
Frigorífico configurado para 4 °C
Congelador configurado para -18 °C
Inverno
Frigorífico configurado para 4 °C
Congelador configurado para -18 °C
As informações acima oferecem recomendações para a configuração da temperatura.
Uso diário
Posicionar os diferentes alimentos nos compartimentos apropriados, de acordo com a tabela abaixo
Compartimentos do frigorífico
Tipo de alimento
Porta ou prateleiras da porta do
frigorífico
Alimentos com conservantes naturais, como compotas,
sumos, bebidas, condimentos.
Não armazenar alimentos perecíveis.
Gaveta inferior
Frutas, ervas aromáticas e legumes devem ser
colocados na gaveta inferior, separados dos restantes
alimentos.
Não armazenar bananas, cebolas, batatas e alho no
frigorífico.
Prateleira do frigorífico - média
Produtos lácteos, ovos
Prateleira do frigorífico -
superior
Alimentos que não necessitam de ser cozinhados,
como alimentos prontos a comer, charcutaria, sobras
de refeições.
Gaveta(s)/prateleira(s) do
congelador
Alimentos para armazenamento a longo prazo.
Prateleira/gaveta inferior para carne, aves e peixe crus.
Prateleira/gaveta média para legumes congelados,
batatas fritas.
Prateleira/gaveta superior para gelados, fruta
congelada, produtos cozinhados congelados.
Impacto no armazenamento de alimentos
Na configuração recomendada, o tempo de armazenamento do frigorífico é de 3 dias.
Na configuração recomendada, o tempo de armazenamento do congelador é de 1 mês.
O tempo de armazenamento pode ser inferior noutras configurações.
28

Uso diário
Conselhos e sugestões úteis
Conselhos para congelar
Para ajudar a tirar todo o partido do processo de congelação, apresentamos alguns conselhos
importantes:
a quantidade máxima de alimento que pode ser congelada em 24 horas é indicada na placa de
especificações;
o processo de congelação demora 24 horas. Durante este período, não deve ser adicionado
qualquer outro alimento para ser congelado;
congelar apenas alimentos de qualidade superior, frescos e completamente limpos;
preparar os alimentos em pequenas porções para que possam ser completamente congelados de
forma rápida e para que posteriormente seja possível descongelar apenas a quantidade
necessária;
enrolar os alimentos em folha de alumínio ou película alimentar e assegurar que as embalagens
utilizadas são herméticas;
não permitir que alimentos frescos e não congelados toquem alimentos já congelados, evitando
assim um aumento da temperatura destes últimos;
os alimentos magros podem ser armazenados mais tempo do que os alimentos com alto teor de
gordura; o sal reduz o tempo de conservação dos alimentos;
os gelados de água, se consumidos imediatamente após sair do congelador, podem causar
queimaduras de frio na pele;
é aconselhável indicar a data de congelação em cada embalagem para facilitar o controlo dos
produtos congelados.
Conselhos para armazenamento de alimentos congelados
Para obter o melhor desempenho deste aparelho, é importante
Assegurar que os produtos comerciais congelados foram adequadamente armazenados pelo
retalhista;
Assegurar que os alimentos congelados são transferidos da loja para o congelador no menor
tempo possível;
Não abrir a porta frequentemente ou deixá-la aberta mais tempo do que o estritamente necessário;
Depois de descongelados, os alimentos deterioram-se rapidamente e não podem ser congelados
novamente;
Não exceder o período de armazenamento indicado pelo fabricante dos alimentos.
Conselhos para a refrigeração de alimentos frescos
Para obter o melhor desempenho:
Não armazenar alimentos quentes ou líquidos que evaporem no frigorífico;
Cobrir ou embrulhar os alimentos, particularmente se tiverem um sabor forte.
Conselhos para a refrigeração
Conselhos úteis:
Produtos cozinhados (todos os tipos): embrulhar em sacos de plástico alimentar e colocar nas
prateleiras de vidro por cima da gaveta de vegetais inferior.
Para segurança, armazenar desta forma no máximo durante um ou dois dias.
Alimentos cozinhados, pratos frios, etc...: devem estar cobertos e podem ser colocados em
qualquer prateleira.
Frutas e vegetais: devem ser cuidadosamente limpos e colocados na(s) gaveta(s) específica(s)
fornecida(s).
Manteiga e queijo: devem ser colocados em recipientes especiais herméticos ou envolvidos em
folha de alumínio ou película alimentar, para eliminar o máximo de ar possível.
Garrafa de leite: deve ter tampa e ser armazenada nas prateleiras da porta.
Bananas, batatas, cebolas e alho não devem ser guardados no frigorífico se não estiverem
devidamente embalados.
29

Uso diário
Limpeza
Por motivos de higiene, o interior do aparelho, incluindo os acessórios interiores, deve limpar-se
regularmente.
Cuidado! O aparelho não pode estar ligado à rede durante a limpeza. Perigo de choque
elétrico! Antes de limpar, desligar o aparelho e retirar a ficha da rede elétrica, ou desligar o
disjuntor ou o fusível. Nunca limpar o aparelho com um aparelho de limpeza a vapor. A
humidade pode acumular-se nos componentes elétricos, causado risco de choque elétrico! Os
vapores quentes podem danificar as peças de plástico. O aparelho deve estar seco antes de
ser colocado em serviço novamente.
Importante! Os óleos etéreos e solventes orgânicos podem atacar os componentes do plástico. Por
exemplo, sumo de limão ou sumo de laranja, ácido butírico ou produtos de limpeza com ácido acético.
Não permitir que estas substâncias entrem em contacto com os componentes do aparelho.
Não utilizar produtos de limpeza abrasivos.
Retirar os alimentos do congelador. Armazená-los num local fresco e bem coberto.
Desligar o aparelho e retirar a ficha da rede elétrica, ou desligar o disjuntor ou o fusível.
Limpar o aparelho e os acessórios interiores com um pano e água morna. Após a limpeza,
enxaguar com água fresca e secar com um pano sem pelos.
Depois de bem seco, colocar o aparelho em serviço novamente.
Resolução de problemas
Em caso de problema com o aparelho ou se o aparelho não estiver a funcionar corretamente, as
sugestões abaixo devem ser seguidas antes de contactar o serviço técnico.
Cuidado! Antes de aplicar a resolução de problemas é importante desligar a alimentação
elétrica. Apenas um eletricista qualificado ou outro profissional competente deverá aplicar
resoluções de problemas não descritas neste manual.
Importante! Ocorrem alguns sons durante a utilização normal (compressor, circuito de refrigeração).
Problema
Possível causa
Solução
O aparelho não
funciona
A ficha principal não está ligada à
rede ou está solta
Ligar bem a ficha de alimentação.
O fusível queimou ou está
defeituoso
Verificar o fusível e substituir, se
necessário.
A tomada está defeituosa
As avarias da rede devem ser
corrigidas por um eletricista.
O aparelho congela
ou arrefece
demasiado
A temperatura está configurada
para um valor demasiado baixo ou
o aparelho está a funcionar em
modo SUPER.
Temporariamente, definir o
regulador de temperatura para um
valor mais alto.
Os alimentos não
ficam
suficientemente
congelados.
A temperatura não está
devidamente configurada.
Consultar a secção Configuração da
temperatura.
A porta esteve aberta durante um
longo período.
A porta deve permanecer aberta
apenas o tempo estritamente
necessário.
Foi colocada uma grande
quantidade de alimentos quentes
no aparelho nas últimas 24 horas.
Configurar temporariamente a
temperatura para que fique mais
fria.
O aparelho encontra-se próximo de
uma fonte de calor.
Consulte a secção Local da
instalação.
30

Uso diário
Ocorre acumulação
intensa de gelo nas
vedações da porta.
A vedação da porta não é
estanque.
Aquecer cuidadosamente as partes
das vedações da porta com um
secador de cabelo (num ambiente
fresco). Simultaneamente, coloque a
vedação da porta manualmente, de
modo a que fique corretamente
assente.
Ruídos incomuns
O aparelho não está nivelado.
Reajustar os pés.
O aparelho está a tocar na parede
ou noutros objetos.
Deslocar ligeiramente o aparelho.
Um componente (por exemplo, um
tubo) na parte traseira do aparelho
está a tocar noutra parte do
aparelho ou na parede.
Se necessário, dobrar
cuidadosamente o componente para
que fique fora do caminho.
Os painéis laterais
estão quentes
É normal. A permuta de calor é
feita nos painéis laterais
Se necessário, usar luvas para tocar
nos painéis laterais.
O distribuidor não
serve água fria
Falha no acesso à fonte de água
ou na abertura da válvula de água
Assegurar que a fonte de água e a
válvula estão abertas
O filtro não está instalado
corretamente
Verificar se a direção do filtro está
invertida
A válvula ou os conectores de água
não estão instalados corretamente
Verificar se a válvula de água ou os
conectores estão invertidos
A água não está
suficientemente fria
A temperatura do frigorífico está
demasiado elevada
Diminuir a temperatura do frigorífico
Foi retirada demasiada água de
uma só vez (1L)
Esperar que a água arrefeça
Retirar água espaçadamente
Esperar que a água arrefeça
O distribuidor não
serve gelo
A caixa de armazenamento não
tem gelo
Esperar que a máquina de gelo
termine de produzir gelo (o frigorífico
tem de estar completamente
refrigerado para que a máquina de
gelo comece a trabalhar);
Falha no acesso à fonte de água
ou na abertura da válvula de água
Assegurar que a fonte de água e a
válvula estão abertas
O modo "ice off" (gelo desligado)
está ativado, vai deixar de produzir
gelo
Desativar o modo "ice off"
A pressão da fonte de água não é
suficiente
Assegurar que a pressão da água
na fonte é de 1,5 ~ 7 bar
A válvula ou os conectores de água
não estão instalados corretamente
Verificar se a válvula de água ou os
conectores estão invertidos
O filtro não está instalado
corretamente
Verificar se a direção do filtro está
invertida
Os cubos de gelo estão unidos
entre si na caixa de
armazenamento e bloqueiam a
saída de gelo
Retirar os cubos de gelo congelados
entre si
31

Uso diário
Há alguma coisa duro na caixa de
armazenamento, que impede o
funcionamento do motor
Retirar o elemento que bloqueia a
saída
As portas não estão totalmente
fechadas, o que leva o ar frio a
deslocar-se para o exterior
Assegurar que as portas estão
totalmente fechadas
Os cubos de gelo
são demasiado
pequenos
A pressão da fonte de água não é
suficiente
Assegurar que a pressão da água
na fonte é de 1,5 ~ 7 bar
O filtro de água está bloqueado,
porque está a ser utilizado há
demasiado tempo
Substituir por um novo filtro de água
O medidor do fluxo de água está
defeituoso
Contactar um profissional de
manutenção
Se a avaria se manifestar novamente, contactar o Centro de Assistência Técnica.
Estes dados são necessários para ajudar o utilizador de forma rápida e adequada. Os dados
necessários devem ser apontados aqui, consultando a placa de especificações.
32

Anexo ao manual de instruções
As funções mencionadas abaixo não são adequadas para todos os
modelos, este folheto é apenas uma referência.
Esta lista fornece todos os requisitos de design ecológico (de acordo
com o regulamento (UE) 2019/2019 sobre design ecológico e o
regulamento (UE) 2019/2016 sobre rotulagem energética, se esses
requisitos forem aplicáveis ao seu produto.
Este refrigerador não foi projetado para ser integrado em uma peça
de mobília, a menos que indicado de outra forma no manual de
instruções.
Gavetas, cestos e prateleiras devem ser mantidos em suas posições
atuais, a menos que especificado de outra forma neste documento.
As portas e tampas do refrigerador devem ser removidas antes do
descarte, para evitar que crianças ou animais fiquem presos no
interior.
Configurações recomendadas:
Geladeira: +4 ºC
Freezer: -18 ºC
CONGELAMENTO RÁPIDO
Recomenda-se usar esta função ao colocar uma grande quantidade
de alimentos para congelar no congelador. 24 horas antes de
congelar alimentos frescos, pressione o botão "Fast Freeze" para
ativar a função de congelamento rápido. Quando esta função é
ativada, o indicador "Fast Freeze" acende. Decorridas as 24 horas,
coloque os alimentos a congelar no congelador. Esta função é
desativada automaticamente após 72 horas; Também pode ser
desativado manualmente pressionando o botão "Fast Freeze".
RESFRIAMENTO RÁPIDO
Com a função de resfriamento rápido, é possível aumentar a
capacidade de resfriamento do refrigerador. Recomenda-se usar esta
função ao colocar uma grande quantidade de alimentos no
refrigerador. Para ativar a função de resfriamento rápido, pressione o
botão "Fast Cool". Quando esta função é ativada, o indicador "Fast
Cool" acende. Esta função é desativada automaticamente após 6
horas; Também pode ser desativado manualmente pressionando o
botão "Fast Cool".
Como armazenar alimentos:
Para evitar o desperdício de alimentos, consulte os tempos e
33

configurações de armazenamento recomendados:
Geladeira: Alimentos diferentes, especialmente frutas e vegetais, têm
diferentes temperaturas de armazenamento. O tempo de
armazenamento é de 1-3 dias (com configuração de temperatura
"média").
Congelador: 1 semana (configuração de temperatura: Min) 1 mês
(configuração de temperatura: Max)
Para otimizar a velocidade de congelamento e obter mais espaço de
armazenamento, o freezer pode ser usado sem as gavetas
embutidas.
A quantidade de alimentos frescos que podem ser congelados em um
determinado período de tempo está indicada na placa de dados. Os
limites de carga são determinados por cestos, gavetas, prateleiras,
etc. Certifique-se de que esses componentes podem ser facilmente
fechados após inserir os alimentos.
Para evitar desperdício de alimentos, consulte o manual do usuário
para saber os tempos e configurações de armazenamento
recomendados.
Informações sobre o modelo podem ser obtidas digitalizando o código
QR impresso na etiqueta de energia.
Esta etiqueta também inclui o identificador do modelo, que pode ser
usado para consultar o portal de registro em:
https://eprel.ec.europa.eu
Este produto contém uma fonte de luz de classe G de eficiência
energética (se equipado).
34

www.kueppersbusch.de
Küppersbusch Hausgeräte GmbH
Postfach 10 01 32, D-45801 Gelsenkirchen,
Küppersbuschstraße 2, D-45883 Gelsenkirchen
Telefon: (0209) 401-0, Telefax: (0209) 401-303
www.kueppersbusch-home.com
CKKBS-%01
-
 1
1
-
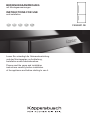 2
2
-
 3
3
-
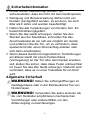 4
4
-
 5
5
-
 6
6
-
 7
7
-
 8
8
-
 9
9
-
 10
10
-
 11
11
-
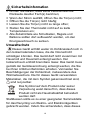 12
12
-
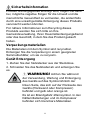 13
13
-
 14
14
-
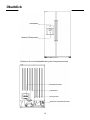 15
15
-
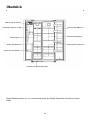 16
16
-
 17
17
-
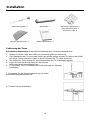 18
18
-
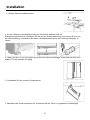 19
19
-
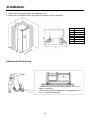 20
20
-
 21
21
-
 22
22
-
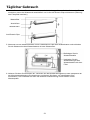 23
23
-
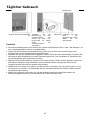 24
24
-
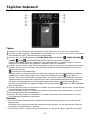 25
25
-
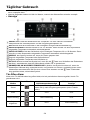 26
26
-
 27
27
-
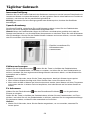 28
28
-
 29
29
-
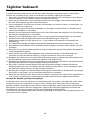 30
30
-
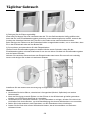 31
31
-
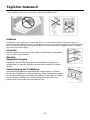 32
32
-
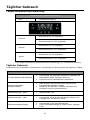 33
33
-
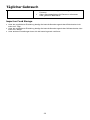 34
34
-
 35
35
-
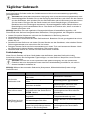 36
36
-
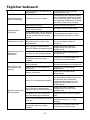 37
37
-
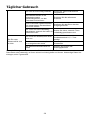 38
38
-
 39
39
-
 40
40
-
 41
41
-
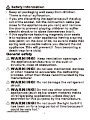 42
42
-
 43
43
-
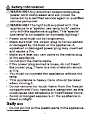 44
44
-
 45
45
-
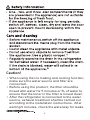 46
46
-
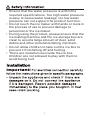 47
47
-
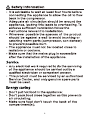 48
48
-
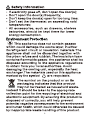 49
49
-
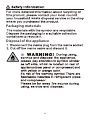 50
50
-
 51
51
-
 52
52
-
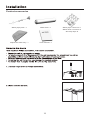 53
53
-
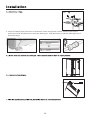 54
54
-
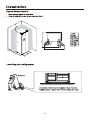 55
55
-
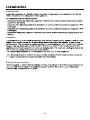 56
56
-
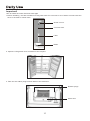 57
57
-
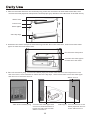 58
58
-
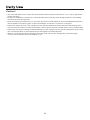 59
59
-
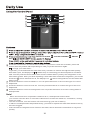 60
60
-
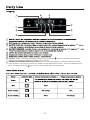 61
61
-
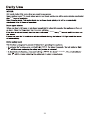 62
62
-
 63
63
-
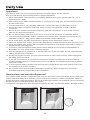 64
64
-
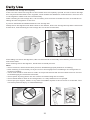 65
65
-
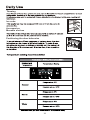 66
66
-
 67
67
-
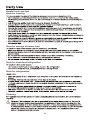 68
68
-
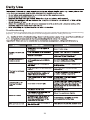 69
69
-
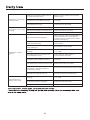 70
70
-
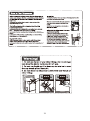 71
71
-
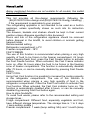 72
72
-
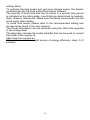 73
73
-
 74
74
-
 75
75
-
 76
76
-
 77
77
-
 78
78
-
 79
79
-
 80
80
-
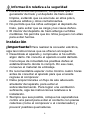 81
81
-
 82
82
-
 83
83
-
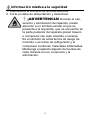 84
84
-
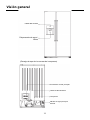 85
85
-
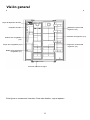 86
86
-
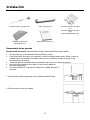 87
87
-
 88
88
-
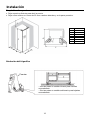 89
89
-
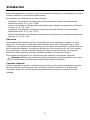 90
90
-
 91
91
-
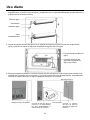 92
92
-
 93
93
-
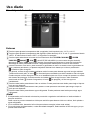 94
94
-
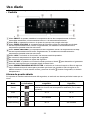 95
95
-
 96
96
-
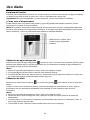 97
97
-
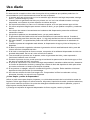 98
98
-
 99
99
-
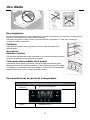 100
100
-
 101
101
-
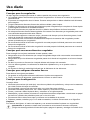 102
102
-
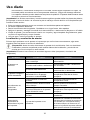 103
103
-
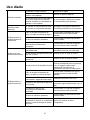 104
104
-
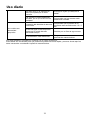 105
105
-
 106
106
-
 107
107
-
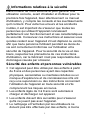 108
108
-
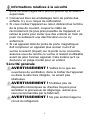 109
109
-
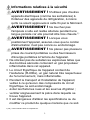 110
110
-
 111
111
-
 112
112
-
 113
113
-
 114
114
-
 115
115
-
 116
116
-
 117
117
-
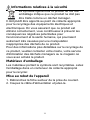 118
118
-
 119
119
-
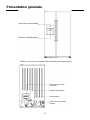 120
120
-
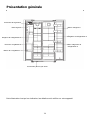 121
121
-
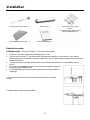 122
122
-
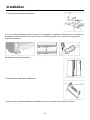 123
123
-
 124
124
-
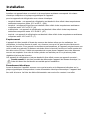 125
125
-
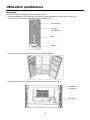 126
126
-
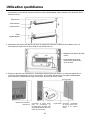 127
127
-
 128
128
-
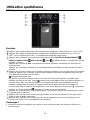 129
129
-
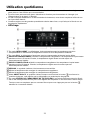 130
130
-
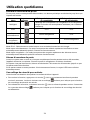 131
131
-
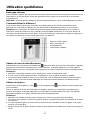 132
132
-
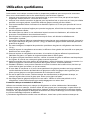 133
133
-
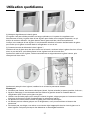 134
134
-
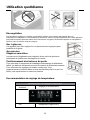 135
135
-
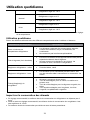 136
136
-
 137
137
-
 138
138
-
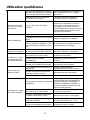 139
139
-
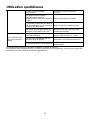 140
140
-
 141
141
-
 142
142
-
 143
143
-
 144
144
-
 145
145
-
 146
146
-
 147
147
-
 148
148
-
 149
149
-
 150
150
-
 151
151
-
 152
152
-
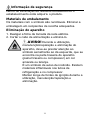 153
153
-
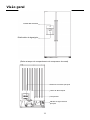 154
154
-
 155
155
-
 156
156
-
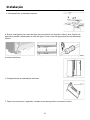 157
157
-
 158
158
-
 159
159
-
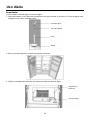 160
160
-
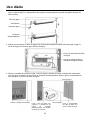 161
161
-
 162
162
-
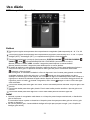 163
163
-
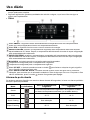 164
164
-
 165
165
-
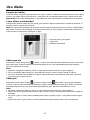 166
166
-
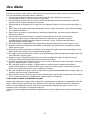 167
167
-
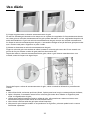 168
168
-
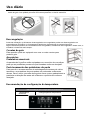 169
169
-
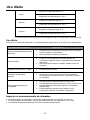 170
170
-
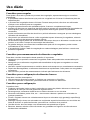 171
171
-
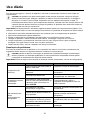 172
172
-
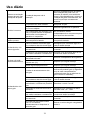 173
173
-
 174
174
-
 175
175
-
 176
176
-
 177
177


Küppersbusch FKG9801.0E Manual de usuario
- Tipo
- Manual de usuario
en otros idiomas
- français: Küppersbusch FKG9801.0E Manuel utilisateur
- Deutsch: Küppersbusch FKG9801.0E Benutzerhandbuch
- português: Küppersbusch FKG9801.0E Manual do usuário
Otros documentos
-
Hisense RF750N4ISF El manual del propietario
-
Haier HSOGPIF9183 Manual de usuario
-
Haier HFW7918EIMP Manual de usuario
-
Teka RLF 74925 Manual de usuario
-
LG SIGNATURE LSR100SIGNATURE LSR100 INSTAVIEW El manual del propietario
-
Candy HVTOS 544WHN Manual de usuario
-
Samsung RF24HSESBSR Manual de usuario
-
Electrolux KNT2LF18S Manual de usuario
-
Electrolux KNT2FF18T Manual de usuario
-
Electrolux ENT6TE18S Manual de usuario