Artika DIM-PULW Pulsar Smart Wi-Fi Dimmer Manual de usuario
- Tipo
- Manual de usuario

Made in China
Residential use only
Indoor use only
Fabriqué en Chine
Usage résidentiel seulement
Usage intérieur seulement
Hecho en China
Uso residencial solamente
Uso interiores solamente
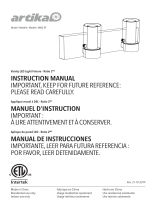
Smart Wi-Fi dimmer - PulsarTM
INSTRUCTION MANUAL
IMPORTANT, KEEP FOR
FUTURE REFERENCE:
PLEASE READ CAREFULLY.
Gradateur intelligent Wi-Fi - PulsarMC
MANUEL
D’INSTRUCTIONS
IMPORTANT, CONSERVER
POUR CONSULTATION
ULTÉRIEURE:
LIRE ATTENTIVEMENT.
Gradator inteligente Wi-Fi -
Pulsar
MR
MANUAL DE
INSTRUCCIONES
IMPORTANTE, CONSERVAR
PARA FUTURA REFERENCIA :
LEER DETENIDAMENTE.
Model / Modèle / Modelo: DIM-PULW
FCC ID: 2AUHG-DIM-PULW-1
IC : 21811-DIMPULW Rev. 14.05.2021

2
INSTRUCTION MANUAL / MANUEL D’INSTRUCTIONS / MANUAL DE INSTRUCCIONES
EN
INCLUDED
FR
INCLUS
ES
INCLUIDO
WHAT YOU WILL NEED... VOUS AUREZ BESOIN DE... LO QUE NECESITARÁ...
Item
Pièce
Pieza
Description
Description
Descripción
Quantity
Quantité
Cantidad
Wire connector
Capuchon de connexion
Conector de cable
x 4 +1 extra
Junction box screw
Vis de boitier de raccordement
Tornillo de caja de conexiones
x 2 +1 extra
Switch assembled
Interrupteur assemblé
Interruptor montado
x 1
Switch plate
Plaque d’interrupteur
Placa de interruptor
x 1
Philips screwdriver
Tournevis Philips
Destornillador Philips
Flat screwdriver
Tournevis plat
Destornillador plano

3
EN
IMPORTANT
The installer and/or user must
read, understand and follow these
instructions before installing the
product. This product must be
properly installed before it is used.
If instructions are not followed,
the manufacturer will not be held
responsible for any problems or
product malfunction. Failure to
follow installation and/or operating
instructions voids the warranty.
We recommend that this product be
installed by a certified electrician.
In some states or provinces, it is
a legal requirement for this type
of product to be installed by a
certified electrician, according to
the electrical and building codes
effective in the region where the
unit is used.
FR
IMPORTANT
Avant l’installation de ce produit,
l’utilisateur et/ou l’installateur doit
avoir lu et compris ces instructions.
Cet appareil doit être installé
convenablement avant usage.
Si ces instructions ne sont pas
respectées, le fabricant ne
pourra être tenu responsable
d’aucun problème ou de
dysfonctionnement du produit.
Le non-respect des instructions
d’installation et/ou d’utilisation
annulera la garantie en vigueur.
Nous recommandons que
ce produit soit installé par
un électricien certifié. Dans
certains États ou provinces, il est
légalement requis que ce type
de produit soit installé par un
électricien certifié conformément
aux codes de l’électricité et du
bâtiment en vigueur.
ES
IMPORTANTE
El instalador o usuario debe leer
detenidamente las instrucciones
antes de instalar el producto y
seguirlas fielmente. El producto
debe estar correctamente instalado
antes de su utilización. Si no siguen
las instrucciones, el fabricante no
se hará responsable de problemas
o de un funcionamiento incorrecto
del producto. Si no sigue las
instrucciones de instalación o de
uso, se anulará la garantía.
Le recomendamos que el producto
sea instalado por un electricista
certificado. En algunos estados
o provincias, se requiere por ley
que este tipo de producto sea
conectado por un electricista
certificado siguiendo los códigos
eléctricos y arquitectónicos de la
región.
SWITCH OFF THE MAIN
ELECTRICAL SUPPLY FROM THE
FUSE BOX/CIRCUIT BREAKER
BEFORE INSTALLING THE UNIT OR
DOING ANY MAINTENANCE.
IL EST IMPORTANT DE COUPER
L’ALIMENTATION ÉLECTRIQUE
DU DISJONCTEUR AVANT DE
PROCÉDER À L’INSTALLATION OU À
L’ENTRETIEN.
DESCONECTE LA INSTALACIÓN
ELÉCTRICA EN LA CAJA DE
CIRCUITOS/DISYUNTOR ANTES
DE INSTALAR ESTA UNIDAD
O REALIZAR TAREAS DE
MANTENIMIENTO EN ELLA.
WARNING:
Risk of electrical shock.
Turn off breaker at the panel.
AVERTISSEMENT :
Risque de décharge électrique.
Éteindre le disjoncteur sur
le panneau électrique.
ADVERTENCIA:
Riesgo de descarga eléctrica.
Desconectar la corriente
eléctrica del panel (disyuntor).

4
INSTRUCTION MANUAL / MANUEL D’INSTRUCTIONS / MANUAL DE INSTRUCCIONES
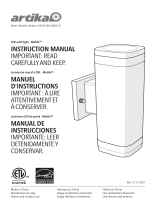
ON
“A” Level
“B” Level
“C” Level
MORE BRIGHTNESS TOUCH BUTTON
BRIGHTNESS INTENSITY INDICATORS
LESS BRIGHTNESS TOUCH BUTTON
DIP-1 Switch DIP-2 Switch
DIP-2 Switch
“Down Light”
“LED Bulb”
Switch only
DIP-1 Switch
OFF
Level Level
A
B
Down Light
LED Bulb
INC Bulb
D
C
A
BL
S
S
C
A
B
C
NotesLoad Type
1
2
2
3
4
5
13
5
4
(Factory default):Connect low power 6.5-15w,the few number of down
light in series, total power is less than 150W.
Connect over 50W single down light, total power is less than 150W.
Connect 100-150W single down light
Factory default state
Factory default state
If LED bulb is ickering on the level “A”,please choose level “B”.
If INC bulb is ickering on the level “A”,please choose level “B”.
If your light can't support dimmer function, this level can be used as smart
switch only.
If LED bulb still icker after selected level “B”,please choose level “C”.
Light Can’t Support Dimmer
Remark: Before you change the DIP switch level each time, you have to adjust the brightness to number "1" And then up to"H" at rst. To ensure
the bulb is working.
1
2
3
6
5
4

5
EN
DIMMER FUNCTIONS
1 Turn ON the dimmer
Hold 5s to pair
2 Turn OFF the dimmer
3 Brightness UP signal
4 Brightness level display area
5 ON-OFF / WI-FI signal
ON position (Red light)
OFF position (No light)
Default pairing mode
(Blue flash rapidly)
AP mode (1 blue flash / 3 sec)
Ø internet (Blue flash slowly)
6 Brightness DOWN signal
FR
FUNCIONS DU GRADATEUR
1 Allumer le gradateur
Maintenez 5s pour jumeler
2 Éteindre le gradateur
3 Signal de luminosité (+)
4 Zone d'affichage du niveau
de luminosité
5 ON-OFF / Signal WI-FI
Position ON (Signal rouge)
Position OFF (Ø signal)
Mode par défaut
(Signal bleu rapide)
Mode AP (1 signal bleu / 3 sec)
Ø internet (Signal bleu lent)
6 Signal de luminosité (-)
ES
FUNCIONES DEL GRADATOR
1 Enciende el atenuador
Mantenga 5 segundos para
emparejar
2 Apaga el atenuador
3 Señal de brillo (+)
4 Área de visualización de nivel
de brillo
5 ON-OFF / señal WI-FI
Posición ON (señal roja)
Posición OFF (señal ø)
Modo de falla (Señal azul rápida)
Modo AP
(1 señal azul / 3 segundos)
Ø internet (señal azul lenta)
6 Señal de brillo (-)

6
INSTRUCTION MANUAL / MANUEL D’INSTRUCTIONS / MANUAL DE INSTRUCCIONES
RECOMMENDED
BULBS
INCANDESCENT BULB
Total power
500 Watts maximum
LED BULB
Total power
150 Watts maximum
AMPOULES
RECOMMANDÉES
AMPOULE INCANDESCENTE
Puissance totale
500 Watts maximum
AMPOULE À DEL
Puissance totale
150 Watts maximum
BOMBILLAS
RECOMENDADAS
BOMBILLA INCANDESCENTE
Potencia total
500 vatios máximo
BOMBILLA LED
Potencia total
150 vatios máximo
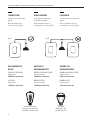
EN
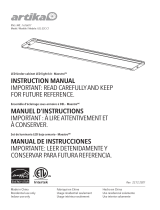
CONNECTION
Single pole switches only.
(fig. A)
Not compatible with
a 3-way switch. (fig. B)
FR
BRANCHEMENT
Interrupteurs unipolaires
uniquement. (fig.A)
Non compatible avec un
interrupteur à 3 voies. (fig. B)
ES
CONEXIÓN
Solo interruptores unipolares.
(fig. A)
No es compatible con un
interruptor de 3 vías. (fig. B)
Single
Incandescent Bulbs
Max 500 Watts
Multiple
Incandescent Bulbs
Total Power Max 500 Watts
Multiple
LED Bulbs
Total Power Max 150 Watts
Single-Pole Switches Only
Not compatible with a 3-wayswitch
Single
LED Bulbs
Max 150 Watts
Single
Incandescent Bulbs
Max 500 Watts
Multiple
Incandescent Bulbs
Total Power Max 500 Watts
Multiple
LED Bulbs
Total Power Max 150 Watts
Single-Pole Switches Only
Not compatible with a 3-wayswitch
Single
LED Bulbs
Max 150 Watts
Single
Incandescent Bulbs
Max 500 Watts
Multiple
Incandescent Bulbs
Total Power Max 500 Watts
Multiple
LED Bulbs
Total Power Max 150 Watts
Single-Pole Switches Only
Not compatible with a 3-wayswitch
Single
LED Bulbs
Max 150 Watts
Single
Incandescent Bulbs
Max 500 Watts
Multiple
Incandescent Bulbs
Total Power Max 500 Watts
Multiple
LED Bulbs
Total Power Max 150 Watts
Single-Pole Switches Only
Not compatible with a 3-wayswitch
Single
LED Bulbs
Max 150 Watts
fig. A fig. B
Incandescent bulb
Ampoule incandescente
bombilla incandescente
LED bulb
Ampoule à DEL
bombilla de LED

7
fig. 1
EN
STEP-BY-STEP
INSTALLATION
1. Turn off the power from the
electrical panel and the circuit
breaker. Make sure the power is off
before removing the old plug.
2. Remove the switch plate by
unscrewing the screws on the
switch plate. (fig. 1)
3. Unscrew the screws of the switch.
Remove the old switch. (fig. 2)
FR
INSTALLATION
ÉTAPE PAR ÉTAPE
1. Couper le courant à partir
du panneau électrique et du
disjoncteur. S’assurer que le
courant est bien coupé avant de
retirer l’ancienne prise.
2. Retirer la plaque d’interrupteur
en devissant les vis de la plaque
d’interrupteur. (fig. 1)
3. Devisser les vis de l’interrupteur
Retirer l’ancien interrupteur. (fig. 2)
ES
INSTALACIÓN
ETAPA POR ETAPA
1. Desconecte la alimentación del
panel eléctrico y del disyuntor.
Asegúrese de que la alimentación
esté apagada antes de quitar el
enchufe viejo.
2. Retire la placa del interruptor
desatornillando los tornillos de la
placa del interruptor. (fig. 1)
3. Desatornille los tornillos del
interruptor.
Retire el viejo interruptor. (fig. 2)
fig.2

8
INSTRUCTION MANUAL / MANUEL D’INSTRUCTIONS / MANUAL DE INSTRUCCIONES
EN
STEP-BY-STEP
INSTALLATION
4. Identify the wires before
disconnecting them from the old
switch. Identify the white wire (N),
the black wire (L), the grounding
wire (G) and the red wire (Lo).
RED (Lo): load
BLACK (L): Live
WHITE (N): Neutral
NON-INSULATED (G): Ground
5. Disconnect the old switch (fig. 3).
FR
INSTALLATION
ÉTAPE PAR ÉTAPE
4. Identifier les fils avant de
les débrancher de l’ancien
interrupteur. Identifier le fil blanc
(N), le fil noir (L), le fil de mise à la
terre (G) et le fil rouge (Lo).
ROUGE (Lo): Charge
NOIR (L): Live
BLANC (N): Neutre
NON-ISOLÉ (G): Terre
5. Déconnecter l'ancien
interrupteur (fig. 3).
ES
INSTALACIÓN
ETAPA POR ETAPA
4. Identifique los cables antes de
desconectarlos del interruptor
anterior. Identifique el cable blanco
(N), el cable negro (L), el cable
de conexión a tierra (G) y el cable
negro (Lo).
ROJO (Lo): Carga
NEGRO (L): Live
BLANCO (N): Neutro
SIN AISLAMIENTO (G): Tierra
5. Desconecte el interruptor (fig.
3).
Identier les ls avant de les démonter
de l’ancien interrupteur.
Black (L)
Noir (L)
Negro (L)
White (N)
Blanc (N)
Blanco (N)
Load (Lo)
Charge (Lo)
Carga (Lo)
Ground wire (G)
Fil de mise à la terre (G)
Cable de tierra (G)
fig. 3

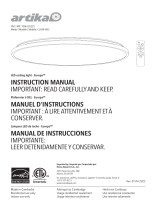
9
Use wire connectors to connect the switch wires to your
home wires, following the diagram. Be careful to match
“LINE” and “LOAD” wires.
Black (L)
Noir (L)
Negro (L)
White (N)
Blanc (N)
Blanco (N)
Load (Lo)
Charge (Lo)
Carga (Lo)
Ground wire (G)
Fil de mise à la terre (G)
Cable de tierra (G)
fig. 4
EN
STEP-BY-STEP
INSTALLATION
6. Use wire connectors to connect
the switch wires to your home
wires, following the diagram. Be
careful to match “LINE” and “LOAD”
wires. (fig. 4)
RED (Lo): load
BLACK (L): Live
WHITE (N): Neutral
NON-INSULATED (G): Ground
7. Remove your identification
stickers.
FR
INSTALLATION
ÉTAPE PAR ÉTAPE
6. Utilisez des connecteurs de
fils pour connecter les fils de
l'interrupteur aux fils de votre
maison, en suivant le schéma.
Veillez à faire correspondre les fils
«LINE» et «LOAD». (fig. 4)
ROUGE (Lo): Charge
NOIR (L): Live
BLANC (N): Neutre
NON-ISOLÉ (G): Terre
7. Retirez ensuite vos autocollants
d'identification.
ES
INSTALACIÓN
ETAPA POR ETAPA
6. Use conectores de cable para
conectar los cables del interruptor
a los cables de su hogar, siguiendo
el diagrama. Tenga cuidado de
hacer coincidir los cables "LÍNEA" y
"CARGA". (Fig. 4)
ROJO (Lo): Carga
NEGRO (L): Live
BLANCO (N): Neutro
SIN AISLAMIENTO (G): Tierra
7. Retire sus etiquetas de
identificación.
Wire connector
Capuchon de connexion
Conector de cables
Switch
Interrupteur
Interruptor
Junction box
Boîtier de raccordement
Caja de conexiones

10
INSTRUCTION MANUAL / MANUEL D’INSTRUCTIONS / MANUAL DE INSTRUCCIONES
Screw the switch to the wall
fig. 5
EN
STEP-BY-STEP
INSTALLATION
6. Screw the switch to the junction
box . (fig. 5)
FR
INSTALLATION
ÉTAPE PAR ÉTAPE
6. Vissez l'interrupteur à la jonction
boîte . (fig. 5)
ES
INSTALACIÓN
ETAPA POR ETAPA
6. Atornille el interruptor a la unión
caja . (fig. 5)
Switch
Interrupteur
Interruptor
Junction box
Boîtier de raccordement
Caja de conexiones

11
Attach the plate to the Switch core.
fig. 6
EN
STEP-BY-STEP
INSTALLATION
7. Fix the plate to the swith. (fig. 6)
8. Restore electrical power.
FR
INSTALLATION
ÉTAPE PAR ÉTAPE
7. Fixez la plaque à l'interrupteur.
(fig.6)
6. Rétablissez l'alimentation
électrique.
ES
INSTALACIÓN
ETAPA POR ETAPA
7. Fije la placa al interruptor. (fig. 6)
8. Restaurar la energía eléctrica.

12
INSTRUCTION MANUAL / MANUEL D’INSTRUCTIONS / MANUAL DE INSTRUCCIONES
1
EN
CONVENTIONAL
USE
This device can be used as a regular
unit without using the APP. However,
some of the functions are only
possible to control with the APP.
Ex: programming based on different
parameters.
FR
UTILISATION
CONVENTIONNELLE
Cet appareil peut être utilisé comme
une unité régulière sans utiliser
l’application. Cependant, certaines
fonctions ne peuvent être contrôlées
qu’avec l’APP.
Ex: programmation basée sur
différents paramètres.
ES
USO
CONVENCIONAL
Este dispositivo se puede usar
como una unidad normal sin usar
la aplicación. Sin embargo, algunas
de las funciones solo se pueden
controlar con la aplicación.
Ej: programación basada en
diferentes parámetros.

13
2
APP SET UP AND PAIRING / CONFIGURATION ET ASSOCIATION DE L’APPLICATION / APLICACIÓN Y EMPAREJAMIENTO
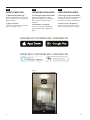
EN
SMART CONNECTION
1. Download the Artika app
Download the Artika app from your
App Store (IOS users) / Google Play
(Android users).
2. Login / Register
Follow the step by step instructions
given in the app. (fig. 1)
FR
CONNEXION INTELLIGENTE
1. Téléchargez l’application Artika
Téléchargez l’application Artika
depuis votre App Store (utilisateurs
IOS) / Google Play (utilisateurs
android).
2. Connexion / inscription
Suivez les instructions étape par
étape données dans l’application.
(fig. 1)
ES
CONEXIÓN INTELIGENTE
1. Descargue la aplicación Artika
Descargue la aplicación Artika desde
su App Store (usuarios de IOS) /
Google Play (usuarios de Android).
2. Iniciar sesión / Registrarse
Siga las instrucciones paso a paso
que se dan en la aplicación. (fig. 1)
AVAILABLE ON / DISPONIBLE SUR / DISPONIBLE EN
WORKS WITH / FONCTIONNE AVEC / FUNCIONA CON
(fig. 1)

14
INSTRUCTION MANUAL / MANUEL D’INSTRUCTIONS / MANUAL DE INSTRUCCIONES
3
EN
3. Device Pairing
A) To add a device, click on the “+” at
the top right corner. (fig. 2)
B) Select the pairing method “Add
manually” or “Auto Scan”. (fig. 3)
If you decide to add manually, please
select your device in the list
NOTE: Devices are separated by
category, please select the right one
on the left end side of the screen.
C) Follow the instructions shown in
the app.
FR
3. Jumelage des appareils
A) Pour ajouter un appareil, cliquez
sur le «+» dans le coin supérieur
droit. (fig. 2)
B) Sélectionnez la méthode de
jumelage «Ajouter manuellement»
ou «Scan automatique». (fig. 3)
Si vous décidez d’ajouter
manuellement, veuillez sélectionner
votre appareil dans la liste
REMARQUE: Les appareils sont
séparés par catégorie, veuillez
sélectionner celui de droite sur le
côté gauche de l’écran.
C) Suivez les instructions affichées
dans l’application.
ES
3. Emparejamiento de
dispositivos
A) Para agregar un dispositivo, haga
clic en “+” en la esquina superior
derecha. (fig. 2)
B) Seleccione el método de
emparejamiento “Agregar
manualmente” o “Escaneo
automático”. (fig. 3)
Si decide agregar manualmente,
seleccione su dispositivo en la lista
NOTA: Los dispositivos están
separados por categoría, seleccione
el derecho en el lado izquierdo de la
pantalla.
C) Siga las instrucciones que se
muestran en la aplicación.
(fig. 2) (fig. 3)
EN
3. Device Pairing
A) Press and hold the "ON" button for
5 seconds, green light will flash and
will become steady upon successful
pairing.
B) To add a device, click on the “+” at
the top right corner. (fig. 2)
C) Select the pairing method “Add
manually” or “Auto Scan”. (fig. 3)
If you decide to add manually, please
select your device in the list
NOTE: Devices are separated by
category, please select the right one
on the left end side of the screen.
D) Follow the instructions shown in
the app.
FR
3. Jumelage des appareils
A) Appuyez sur le bouton «ON» et
maintenez-le enfoncé pendant 5
secondes, le voyant vert clignotera et
deviendra fixe une fois le couplage
réussi.
B) Pour ajouter un appareil, cliquez
sur le «+» dans le coin supérieur
droit. (fig. 2)
C) Sélectionnez la méthode de
jumelage «Ajouter manuellement»
ou «Scan automatique». (fig. 3)
Si vous décidez d’ajouter
manuellement, veuillez sélectionner
votre appareil dans la liste
REMARQUE: Les appareils sont
séparés par catégorie, veuillez
sélectionner celui de droite sur le
côté gauche de l’écran.
D) Suivez les instructions affichées
dans l’application.
ES
3. Emparejamiento de
dispositivos
A) Mantenga presionado el botón
"ENCENDIDO" durante 5 segundos,
la luz verde parpadeará y se
mantendrá estable al emparejarse
correctamente.
B) Para agregar un dispositivo, haga
clic en “+” en la esquina superior
derecha. (fig. 2)
C) Seleccione el método de
emparejamiento “Agregar
manualmente” o “Escaneo
automático”. (fig. 3)
Si decide agregar manualmente,
seleccione su dispositivo en la lista
NOTA: Los dispositivos están
separados por categoría, seleccione
el derecho en el lado izquierdo de la
pantalla.
D) Siga las instrucciones que se
muestran en la aplicación.

15
4
APP SET UP AND PAIRING / CONFIGURATION ET ASSOCIATION DE L’APPLICATION / APLICACIÓN Y EMPAREJAMIENTO
EN
CAUTION
If manual pairing method has been
selected, make sure that the mode of
connection selected is EZ Mode. This
should be selected as default, but if
the AP mode is selected, the pairing
will fail. To change the connection
method, click on “AP mode” at the top
right corner and select EZ mode from
the dropdown list. (fig. 4)
FR
MISE EN GARDE
Si la méthode de jumelage manuel a
été sélectionnée, assurez-vous que le
mode de connexion sélectionné est
Mode EZ. Cela doit être sélectionné
par défaut, mais si le mode AP est
sélectionné, l’appairage échouera.
Pour changer la méthode de
connexion, cliquez sur «Mode AP»
dans le coin supérieur droit et
sélectionnez le mode EZ dans la liste
déroulante. (fig.4)
ES
PRECAUCIÓN
Si se ha seleccionado el método
de emparejamiento manual,
asegúrese de que el modo de
conexión seleccionado sea el Modo
EZ. Esto debe seleccionarse como
predeterminado, pero si se selecciona
el modo AP, el emparejamiento
fallará. Para cambiar el método de
conexión, haga clic en “Modo AP”
en la esquina superior derecha y
seleccione el modo EZ de la lista
desplegable. (fig. 4)
(fig. 4)
! ! !

16
INSTRUCTION MANUAL / MANUEL D’INSTRUCTIONS / MANUAL DE INSTRUCCIONES
EN
Operation is subject to the
following two conditions:
1. This device may not cause
interference,
and
2. this device must accept any
interference, including interference
that may cause undesired
operation of the device.
FR
L’exploitation est autorisée aux
deux conditions suivantes :
1. L’appareil ne doit pas produire
de brouillage,
et
2. l’appareil doit accepter tout
brouillage radioélectrique
subi, même si le brouillage est
susceptible d’en compromettre le
fonctionnement.
ES
La operación está sujeta a las dos
condiciones siguientes:
1. Este dispositivo no puede causar
interferencias perjudiciales,
y
2. este dispositivo debe aceptar
cualquier interferencia recibida,
incluidas las interferencias
que puedan provocar un
funcionamiento no deseado
Canada (IC)

17
EN
This device complies with Part 15 of
the FCC Rules. Operation is subject to
the following two conditions:
1. This device may not cause harmful
interference;
and
2. this device must accept any
interference received, including
interference that may cause
undesired operation.
NOTE: This equipment has been
tested and found to comply with
the limits for Class B digital device,
pursuant to part 15 of the FCC Rules.
These limits are designed to provide
reasonable protection against
harmful interference in a residential
installation. This equipment
generates, uses and can radiate
radio frequency energy and if not
installed and used in accordance with
the instructions, may cause harmful
interference to radio or television
reception, which can be determined
by turning the equipment off and
on. The user is encouraged to try to
correct the interference by one or
more of the following measures:
• Reorient or relocate the receiving
antenna.
• Increase the separation between
the equipment and the receiver.
• Connect the equipment into an
outlet on a circuit different from that
to which the receiver is connected.
• Consult the dealer or an
experienced radio/TV
technician for help.
FR
Ce dispositif est conforme à la
partie 15 des règles de la FCC. Son
fonctionnement est soumis aux deux
conditions suivantes :
1. ce dispositif ne peut pas causer
d’interférences nuisibles;
et
2. cet appareil doit accepter toute
interférence reçue, y compris les
interférences qui peuvent causer un
fonctionnement indésirable.
REMARQUE : Cet équipement a été
testé et déclaré comme respectant
les limites d’un dispositif numérique
de classe B, conformément à la
partie 15 des règles de la FCC. Ces
limites sont destinées à fournir
une protection raisonnable contre
les interférences nuisibles dans
une installation résidentielle. Cet
équipement génère, utilise et peut
émettre de l’énergie radiofréquence
et, s’il n’est pas installé et utiliser
conformément aux instructions,
peut provoquer des interférences
nuisibles aux communications
radio. Cependant, il n’est pas
garanti que des interférences ne se
produiront pas dans une installation
particulière. Si cet équipement cause
des interférences nuisibles à la
réception radio ou de télévision, ce
qui peut être déterminé en mettant
l’équipement hors puis sous tension,
l’utilisateur est encouragé à essayer
de corriger l’interférence par une ou
plusieurs mesures suivantes :
• Réorienter ou déplacer l’antenne
de réception.
• Augmenter la distance entre
l’équipement et le récepteur.
• Brancher l’appareil à une autre
prise pour que l’équipement et le
récepteur soient sur des circuits
différents.
• Consulter le revendeur ou un
technicien radio / TV expérimenter.
ES
Este dispositivo cumple con la
sección 15 de las normas de la FCC.
La operación está sujeta a las dos
condiciones siguientes :
1. Este dispositivo no puede causar
interferencias perjudiciales;
y
2. este dispositivo debe aceptar
cualquier interferencia recibida,
incluidas las interferencias que
puedan provocar un funcionamiento
no deseado
NOTA : Este equipo ha sido probado
y se comprobó que cumple con los
límites para un dispositivo digital de
Clase B, de acuerdo con la Parte 15
de las Reglas de la FCC.
Estos límites están diseñados
para proporcionar una protección
razonable frente a la interferencia
perjudicial en una instalación
residencial. Este equipo genera,
usa y puede irradiar energía de
radiofrecuencia, y si no se instala
y utiliza de acuerdo con las
instrucciones, podría causar una
interferencia perjudicial en las radio
comunicaciones. Sin embargo,
no se puede garantizar que dicha
interferencia no ocurra en una
instalación determinada. Si este
equipo causa una interferencia
perjudicial para la recepción de
radio o televisión, lo cual se puede
determinar apagando y encendiendo
el equipo, se insta al usuario a
intentar corregir la interferencia
aplicando una o más de las
siguientes medidas:
• Reorientar o reubicar la antena de
recepción.
• Aumentar la separación entre el
equipo y el receptor.
• Conectar el equipo a una toma
en un circuito diferente al que está
conectado el receptor.
• Consultar al vendedor o a un
técnico de radio/TV con experiencia
para obtener ayuda.
USA (FCC)
NOTE2 : Any changes or
modifications to this unit not
expressly approved by the party
responsible for compliance could
void the user's authority to
operate the equipment.
This equipment complies with
the FCC RF radiation exposure
limits set forth for an
uncontrolled environment. This
equipment should be installed
and operated with a minimum
distance of 20cm between the
radiator and any part of your
body.

18
INSTRUCTION MANUAL / MANUEL D’INSTRUCTIONS / MANUAL DE INSTRUCCIONES

19
EN
WARRANTY
Artika For Living Inc. is proud to offer
you a three (3) years limited warranty
on manufacturing defects from the
date of purchase for residential use
only. The warranty is extended to the
original owner in USA and Canada and
is non-transferable. It does not apply
to retailers, commercial applications or
establishments. The original sales receipt
is required for all warranty claims. The
remedy under this limited warranty shall
be product or part replacement at Artika’s
discretion as provided herein and cannot
exceed the original purchase price.
This warranty is valid only on products
installed in accordance with the building
code and laws effective in the region
where the unit is used as well as in
accordance with the provided instruction
manual. It does not cover products
installed incorrectly or subjected to
abnormal use. Product(s) or component
part(s) may be required to be returned for
inspection and verification.
Normal wear and tear, misuse,
negligence, vandalism, improper
maintenance (surface damage due to
chemical interaction or cleaning agents
including, but not limited to, scouring
pads, use of cleaners containing abrasives,
alcohol or other organic solvents)
improper handling, accident, abuse,
fire, flood, theft, acts of God, neglect,
or alteration of the product will not be
covered under this limited warranty. It
excludes any accessories that accompany
the product including but not limited to
bulbs or batteries.
The warranty does not cover handling,
labor, transportation, or any other
cost associated with the installation
or replacement of the product. This
limited warranty is valid in the country
of purchase and by Artika authorized
retailers only.
Artika for Living Inc. will not be held
responsible for any direct or consequential
damages or injuries related to the use of
this product arising from improper use or
installation of this product.
Please visit www.artika.com to discover
more about Artika for Living Inc.
FR
GARANTIE
Artika For Living Inc. est fière de vous
offrir une garantie limitée de trois (3)
ans contre tout défaut de fabrication, à
compter de la date d’achat, pour un usage
domestique uniquement. Cette garantie
n’est valide que pour le propriétaire
d’origine aux États-Unis et au Canada
et est incessible. Elle ne s’applique
pas aux détaillants ni aux applications
ou établissements commerciaux. Le
reçu de vente original est exigé pour
toute demande de garantie. Le recours
prévu par cette garantie limitée est le
remplacement du produit ou d’une
pièce du produit, à la discrétion d’Artika
conformément au présent document,
et ne peut pas excéder le prix d’achat
original.
Cette garantie couvre uniquement les
produits installés conformément au code
du bâtiment et aux lois en vigueur dans
la région où le produit est utilisé, et les
produits utilisés conformément au mode
d’emploi fourni. Elle ne couvre pas les
produits mal installés ou soumis à un
usage anormal. Le ou les produits ou
pièces peuvent vous être demandés aux
fins d’inspection et de vérification.
L’usure normale, une mauvaise utilisation,
la négligence, le vandalisme, un mauvais
entretien (surface endommagée à cause
d’une interaction chimique ou de produits
nettoyants, incluant sans s’y limiter
les éponges métalliques, l’utilisation
de produits nettoyants contenant des
agents abrasifs, de l’alcool ou d’autres
solvants organiques), une manipulation
inadéquate, un accident, un abus, un
incendie, une inondation, un vol, une
catastrophe naturelle ou la modification
du produit ne sont pas des motifs couverts
par cette garantie limitée. Elle exclut tout
accessoire fourni avec le produit, incluant
sans s’y limiter les ampoules et les piles.
Cette garantie ne couvre pas la
manutention, la main-d’œuvre, le
transport, ou tout autre coût lié à
l’installation ou au remplacement du
produit. Cette garantie limitée est valide
uniquement dans le pays où l’achat a été
effectué auprès de détaillants autorisés
Artika.
Artika for Living Inc. ne pourra être
tenue responsable en cas de blessure ou
de dommage direct ou indirect causé par
l’utilisation du produit si le produit a été
mal installé ou mal utilisé.
Visitez www.artika.com pour en savoir
plus sur Artika for Living Inc.
ES
GARANTÍA
Artika For Living Inc. se enorgullece de
ofrecerle una garantía limitada tres (3)
años en defectos de manufactura desde
la fecha de compra del producto para uso
residencial únicamente. Esta garantía
cubre al dueño original en EE. UU. y en
Canadá, y no es transferible. No se aplica
a minoristas, aplicaciones comerciales ni
a establecimientos. Se deberá presentar
el recibo de venta original para todas
las reclamaciones de garantía. La
compensación ofrecida por esta garantía
limitada será el reemplazo del producto
o de la pieza a entera discreción de Artika
como aquí se indica, y no puede exceder
el precio de adquisición original.
Esta garantía solo es válida en productos
instalados de acuerdo con el código de
construcción y la legislación en vigor en
la región donde se use esta unidad, así
como el manual de instrucciones provisto.
Nuestra garantía no incluye productos
instalados incorrectamente o que hayan
tenido un uso anormal. Es posible que
se pida la devolución de los productos
o componentes para su inspección o
verificación.
El desgaste normal, uso incorrecto,
negligencia, vandalismo, mantenimiento
incorrecto (daños en la superficie por
interacción química o agentes de limpieza
incluyendo, entre otros, paños abrasivos,
sustancias de limpieza abrasivas, alcohol
o solventes orgánicos), manejo incorrecto,
accidente, abuso, incendio, inundación,
robo, causas de fuerza mayor, negligencia
o alteración del producto no serán
cubiertos bajo esta garantía limitada. No
cubre ningún accesorio que acompañe
al producto, incluyendo entre otros
bombillas o baterías.
La garantía no cubre gastos de manejo,
gastos laborales, de transporte ni
cualquier otro coste asociado con la
instalación o reemplazo del producto.
Esta garantía limitada es válida en el
país de adquisición, siempre que se haya
adquirido en un minorista autorizado
por Artika.
Artika For Living Inc. no se hará
responsable de ningún daño directo,
consecuente o resultante, ni de lesiones
que puedan resultar de un mal uso o
instalación de este producto.
Visite www.artika.com para saber más
sobre Artika For Living Inc.

Artika For Living Inc.
50th Avenue,
Montréal (Lachine), Québec
Canada H8T 2V5
INSTRUCTION MANUAL / MANUEL D’INSTRUCTIONS / MANUAL DE INSTRUCCIONES
1-866-661-9606
www.artika.com
Customer Service
Monday to Friday
9 a.m. - 5 p.m. EST
Service à la clientèle
du lundi au vendredi
de 9 h à 17 h, heure de l’Est
Atención al cliente
Lunes a viernes
9 a.m. - 5 p.m. hora del Este
-
 1
1
-
 2
2
-
 3
3
-
 4
4
-
 5
5
-
 6
6
-
 7
7
-
 8
8
-
 9
9
-
 10
10
-
 11
11
-
 12
12
-
 13
13
-
 14
14
-
 15
15
-
 16
16
-
 17
17
-
 18
18
-
 19
19
-
 20
20


Artika DIM-PULW Pulsar Smart Wi-Fi Dimmer Manual de usuario
- Tipo
- Manual de usuario
en otros idiomas
Artículos relacionados
-
 Artika OUT-STW-C Smart Wall Mounted LED light Manual de usuario
-
 Artika CAR36-ON Instrucciones de operación
-
 Artika VAN2-RT Instrucciones de operación
-
 Artika NSBLES-C1 Instrucciones de operación
-
Artika FM-SWR-C Swirl LED Ceiling Light Fixture Manual de usuario
-
Artika CL-ERR Instrucciones de operación
-
 Artika UCL-S2C Manual de usuario
-
 Artika CL-ERR-HD2 Instrucciones de operación
-
 Artika PDT1-SWR Mini Swirl LED Pendant Light Fixture Manual de usuario
-
 Artika DRGL-C1 Instrucciones de operación


