Celestron 22470 Manual de usuario
- Categoría
- Telescopios
- Tipo
- Manual de usuario

#22470 STARSENSE EXPLORER 8” DOBSONIAN #22471 STARSENSE EXPLORER 10” DOBSONIAN
INSTRUCTION MANUAL

2 I ENGLISH
INTRODUCTION
Congratulations on your purchase of the StarSense Explorer Dobsonian (SSE Dob) telescope. Your SSE Dob combines large
optics with the exciting StarSense Explorer dock and app to make finding and observing all kinds of astronomical objects fun
and easy! You’ll be able to locate faint deep-sky objects—galaxies, nebulae, star clusters and more— and place them within the
field of view of the eyepiece in seconds. The large primary mirror collects lots of light, enabling you to see details in objects that
you have never seen before.
Before you take your StarSense Explorer Dob outside for your first night of observing, we recommend reading through this
manual. It will help you to better understand the features of your telescope and know what to expect.

ENGLISH I 3
TABLE OF CONTENTS
What’s in the Box . . . . . . . . . . . . . . . . . . . . . . . . . . . . . . . . . . . . . . . . . . . . . . 4
Base Assembly . . . . . . . . . . . . . . . . . . . . . . . . . . . . . . . . . . . . . . . . . . . . . . . 5
Telescope Assembly . . . . . . . . . . . . . . . . . . . . . . . . . . . . . . . . . . . . . . . . . . . . 6
Pointing the Telescope . . . . . . . . . . . . . . . . . . . . . . . . . . . . . . . . . . . . . . . . . . . 7
Focusing . . . . . . . . . . . . . . . . . . . . . . . . . . . . . . . . . . . . . . . . . . . . . . . . . . .8
Using the StarPointer . . . . . . . . . . . . . . . . . . . . . . . . . . . . . . . . . . . . . . . . . . . . 9
StarSense Explorer Dock and App . . . . . . . . . . . . . . . . . . . . . . . . . . . . . . . . . . . . . 10
Determining Magnification and Selecting Eyepieces . . . . . . . . . . . . . . . . . . . . . . . . . . . 11
Cooling your Telescope’s Optics . . . . . . . . . . . . . . . . . . . . . . . . . . . . . . . . . . . . . . 11
Your First Night Out - What to Expect . . . . . . . . . . . . . . . . . . . . . . . . . . . . . . . . . . . 12
Dark Adaptation and Light Pollution . . . . . . . . . . . . . . . . . . . . . . . . . . . . . . . . . . . . 13
Use of Filters. . . . . . . . . . . . . . . . . . . . . . . . . . . . . . . . . . . . . . . . . . . . . . . . .13
Collimating the Optics . . . . . . . . . . . . . . . . . . . . . . . . . . . . . . . . . . . . . . . . . . . 14
Transporting . . . . . . . . . . . . . . . . . . . . . . . . . . . . . . . . . . . . . . . . . . . . . . . . . 16
Care and Maintenance . . . . . . . . . . . . . . . . . . . . . . . . . . . . . . . . . . . . . . . . . . . 17
Specifications StarSense Explorer 8” Dobsonian . . . . . . . . . . . . . . . . . . . . . . . . . . . . . 18
Specifications StarSense Explorer 10” Dobsonian. . . . . . . . . . . . . . . . . . . . . . . . . . . . .19
Solar Warning . . . . . . . . . . . . . . . . . . . . . . . . . . . . . . . . . . . . . . . . . . . . . . . . 20

4 I ENGLISH
A1
P
OQ
E
F
K1 K2 L1 L2
M
J1 J2
H1 H2 H3 H4 H5
G1 G2 G3
A2 B C D
N1
N2
R1
S
T
U
WHAT’S IN THE BOX
Box 1 - Dobsonian Base
Box 2 - Optical Tube Assembly
Left side panel
Feet (x3)
AZIMUTH PIVOT BOLT ASSEMBLYFEET ASSEMBLY
HANDLE ASSEMBLY EYEPIECE RACK ASSEMBLY
INCLUDED TOOLS
ALTITUDE BEARING ASSEMBLY
Base
handle
Eyepiece rack
Rubber
bumper
Optical tube assembly with dust cover
25mm Omni
Plössl eyepiece
2”-to1.25” eyepiece
adapter with 1.25”
cover cap
2” focuser
extension tube
Collimation cap with
2mm and 2.5mm hex keys*
*2.5mm hex key included with 8” Dob only
NOTE: For collimating your telescope’s
optics, refer to page 14
Altitude
tensioning knob
Cosmetic knob
Screwdriver
StarSense dock StarPointer
red dot finderscope
Crescent
wrenches (x2)
Hex keys (x2)
Rack
Screws (x2)
Altitude bearing
cylinders (x4)
Bearing
screws (x4)
Handle
screws (x2)
Feet screw
covers (x3)
Feet screws
(x3)
Bolt Nut Steel
washers
(x2)
Hollow
plastic
cylinder
Teflon
washer
Right side panel Front panel Top plate Bottom plate
Side supports
(x2)
Base assembly
screws (x22)

ENGLISH I 5
BASE ASSEMBLY
A1
A2
E
E
F
F
F
F
F
F
F
F
F
F
F
F
F
F
F
F
F
F
F
F
F
F
K1
L1
L1
L1
L1
L2
L2
L2
L2
H1
H2
H3
H3
H4
H5
J1
J2
J2
B
C
D
G1
G1
G1
G2
G2
G2
G3
G3
G3
Figure 1A: Exploded view of the StarSense
Explorer Dobsonian base.

6 I ENGLISH
N1
N2
O
Q
P
R1
T
S
Figure 1B: Exploded view of the StarSense Explorer Optical Tube Assembly
Refer to Figure 1 to see how the parts of the SSE Dob fit together.
For detailed assembly instructions, refer to the printed Quick Setup Guide included in the box, or on the SSE Dob product page
at www.celestron.com
TELESCOPE ASSEMBLY

ENGLISH I 7
POINTING THE TELESCOPE
Dobsonian bases are altazimuth mounts. This means that
the telescope moves in two directions: up-and-down
(i.e. altitude), and left-to-right (i.e. azimuth) (Figure 2).
ALTITUDE
AZIMUTH
Figure 2: The StarSense Explorer Dobsonians have two axes of motion:
altitude (up-and-down) and azimuth (left-to-right).
Pointing your Dob at an object is easy. Simply move the
telescope tube up-and-down and left-to-right until the
telescope is pointed toward the desired object and the
object appears in the telescope’s eyepiece. The panning
knob at the front of the telescope tube provides a convenient
place to grasp the tube for pointing (Figure 3). Using this
knob also prevents heat from your hand from entering the
optical path, which can temporarily distort the view.
Figure 3: The panning knob provides an excellent place for your fingers to
grasp when pointing the telescope.
You can adjust the tension along the altitude axis by turning
the knob located on the same side as the telescope’s
focuser—the altitude tensioning knob (Figure 4).
Figure 4: The tension of the altitude motion can be adjusted with the
altitude tensioning knob. (NOTE: the other knob on the opposite side does
not function for adjusting altitude tension.)
Turn the knob to add enough tension to provide a smooth
up-and-down motion. Under most circumstances you won’t
need to add much tension. The telescope is balanced for
normal use. However, if you are using a heavy eyepiece or
a larger smartphone, you may need to add more tension so
that the telescope remains still when not touched.

8 I ENGLISH
FOCUSING
The SSE Dobs come with a 2” Crayford focuser, a 2”
extension tube, and a 2”-to-1.25” eyepiece adapter.
With these three items, you can use virtually any telescope
eyepiece with the SSE Dob.
For most eyepieces, make sure the 2” extension tube
is in place in the focuser. If it’s not, the eyepiece will not
reach focus. If you’re using an eyepiece that requires a lot of
inward focus travel, remove the 2” extension tube. You may
need to remove the tube if attempting to use your Dob with
an astronomical imaging camera.
If you wish to use a 1.25” format eyepiece, you’ll need to
use the 2”-to-1.25” eyepiece adapter. Simply place it in the
focuser (with 2” extension tube attached), and then place
the 1.25” eyepiece in the adapter. Tighten the thumbscrew
on the adapter to secure the eyepiece in place. The adapter
uses an internal brass compression ring so your eyepiece
barrel won’t be scratched or marred.
To focus, turn the focus knobs clockwise or counterclockwise
until the object in the telescope eyepiece is in sharp focus.
To lock the focuser position in place once you have achieved
sharp focus, tighten the focus lock thumbscrew (Figure
5). If you need to adjust the focus knob’s tension, you can
tighten or loosen the focuser tensioning set screw using the
provided hex key.
FOCUS LOCK
THUMBSCREW
FOCUSER
TENSIONING
SET SCREW
Figure 5: The focus lock thumbscrew locks the focuser in place once
focus has been achieved. The focus tensioning set screw adjusts the
tension of the focusing knobs.
Since the SSE Dob is a Newtonian reflector, the images
you’ll see will appear upside-down as compared to the
naked eye (Figure 6). While this has little impact on
astronomical observing, it can be a bit confusing when you
are viewing land-based objects.
Figure 6: Like all Newtonian reflectors, the SSE Dobs produce images
that appear upside-down as compared to the naked eye.
VIEW THROUGH NEWTONIAN REFLECTOR TELESCOPE
NAKED EYE VIEW

ENGLISH I 9
USING THE STARPOINTER
Although you won’t need to rely on the StarPointer red-dot
finder when you are using the StarSense Explorer app, it can
help you align the app with the telescope. The StarPointer
also comes in handy when you are locating objects during
the day, since the app only works under the stars at night.
To align the StarPointer, first point the telescope at an
object that is at least ¼ mile away. We recommend aligning
during the day. Choose a distant tree, sign, building, or
other landmark. If you are aligning at night, you can use a
streetlight, the Moon, or a bright star or planet.
Once you have pointed the telescope at the object, check
to ensure that it appears in the eyepiece. Next, turn the
StarPointer on using the LED dial (Figure 7).
LED DIAL
ALTITUDE KNOB AZIMUTH KNOB
Figure 7: The StarPointer red-dot finderscope.
Turn up the brightness level until you can easily see the
red dot. Now, without moving the telescope, use the
StarPointer’s altitude and azimuth adjustment knobs to
center the red dot on the same object that you centered
in the telescope eyepiece. When you’re finished, check
to make sure the object is still centered in the telescope
eyepiece. If it is, you are done aligning the StarPointer. If
not, move the telescope so the object in the telescope’s
eyepiece is centered again. Continue using StarPointer’s
altitude and azimuth adjustment knobs to center the red dot
on the object again.
Turn off the StarPointer when you aren’t using it to conserve
its battery. While the StarPonter’s battery should last a long
time, eventually it will need to be replaced with a CR2032
3V Lithium button cell battery. These are very common and
available from a wide variety of retailers.
To replace the battery:
1. Use a Phillips-head screwdriver to remove the battery
cover securing screw (Figure 8).
Figure 8: To open the StarPointer’s battery cover, first remove the
securing screw.
2. Remove the discharged battery from the battery com-
partment. You may need to use a knife or screwdriver to
pry the battery out of its holder.
3. Insert the new battery so that the positive side is visible to
you. Make sure the battery is properly seated within the
battery compartment (Figure 9).
Figure 9: When the battery is properly seated in the compartment as
shown, the battery cover should be easy to reinstall.
4. Close the battery compartment and reinstall the securing
screw.

10 I ENGLISH
STARSENSE EXPLORER DOCK
AND APP
Perhaps the most exciting feature of the StarSense
Explorer Dobsonian is the StarSense Explorer dock and the
StarSense Explorer smartphone app. With the app to guide
you, you’ll spend more time observing objects instead of
struggling to find them among myriad stars overhead! The
Celestron StarSense Explorer is the only Dobsonian that
includes this incredible feature.
To begin, download and install the app from the Apple
App Store (iOS) or Google Play (Android). You’ll also find
the minimum system requirements there. If you have any
questions about whether your smartphone is compatible
with the app, please visit celestron.com/SSE
Once you have downloaded the app, use the app unlock
code that you’ll find on the printed card that came with your
telescope (Figure 10).
Download the app from the
before your first observing session
.
or
When prompted, enter the unique unlock code below to
enable telescope control on your device.
Figure 10: The StarSense Explorer App unlock code is printed on the card
included with your telescope.
Each code can enable up to five devices to use the
StarSense Explorer functionality. If you use the code all five
times and need to unlock the app on more devices, please
contact Celestron Technical Support at celestron.com/
pages/technical-support for options.
With the app unlocked, you are ready to begin. Place your
smartphone into the StarSense Explorer dock and press
the StarSense icon at the bottom of the planetarium screen
(Figure 11).
Choose the “NEEDS ALIGNMENT” option and follow the
on-screen prompts to align the smartphone’s camera with
the telescope. Once this procedure is complete, you can
use the app to locate objects.
Select an object to view from the planetarium or the
“Tonight’s Best” list (i.e. press the star icon). Arrows will
appear on screen, guiding you to the object. Follow the
arrows until the bullseye turns green and the object is in
your telescope’s field of view. It’s that easy!
While you observe, you can read detailed information about
the object. Hundreds of the most popular objects also offer
an audio presentation. To listen, press the bar at the bottom
of the screen that contains the object’s name (Figure 12).
STARSENSE ICON
Figure 11: Once you have unlocked the StarSense Explorer app, press the
StarSense icon to begin finding objects.
Figure 12: Press the Object Info bar to receive additional information about
the selected object, including images and audio presentations for many
objects.

ENGLISH I 11
DETERMINING MAGNIFICATION
AND SELECTING EYEPIECES
To change the magnification of the telescope, you’ll need
to swap out the eyepiece in the telescope’s focuser. To
calculate the magnification you can achieve with a given
eyepiece, use this formula:
Focal length of telescope ÷
Focal length of eyepiece
= Magnification
The SSE Dobs have a focal length of 1200mm. They come
with a 25mm Omni Plössl eyepiece. Using the formula, we
can calculate that this combination yields a magnification
of 48x (1200mm ÷ 25mm = 48x). This is an excellent
magnification for locating and observing wide-field deep
space objects. You may want to consider purchasing a
higher-magnification eyepiece, like a 10mm Omni Plössl,
for higher-power views of the Moon and planets. Do not
increase magnification too much though, or the view may
degrade due to atmospheric seeing conditions (i.e. air
turbulence).
The maximum magnification for any telescope is about 60
times per inch, which equates to 480x for the 8” SSE Dob,
and 600x for the 10” SSE Dob. In many locations, however,
it will be difficult to achieve sharp images much over 100x
magnification due to turbulence in the air above you. If you
notice that the stars overhead are twinkling heavily, seeing
conditions are poor. You should stick to lower magnification.
If the stars appear to shine steadily, seeing conditions are
good. You can try using higher-magnification eyepieces.
The SSE Dobs can accept both 1.25” and 2” format
eyepieces. 2” eyepieces generally provide a wider field of
view but can cost significantly more. To use a 2” eyepiece,
remove the 2”-to-1.25” adapter from the focuser and insert
the eyepiece directly into the 2” extension tube. Secure the
eyepiece with the thumbscrews on the 2” extension tube.
The eyepiece rack located on the front of the base provides
a convenient place to put eyepieces when they are not
in use. It can accept three 1.25” eyepieces and one 2”
eyepiece (Figure 13).
Figure 13: The eyepiece rack is a convenient place to store additional
eyepieces during your observing session.
DETERMINING MAGNIFICATION AND SELECTING
EYEPIECES
COOLING YOUR
TELESCOPE’S OPTICS
You’ll get the best views through your telescope when it
has reached thermal equilibrium with the ambient air. If the
telescope is warmer than the outside air, the mirror will
be acclimating to the temperature and its figure will be
changing. The images you see through a telescope that
has not cooled will not appear as sharp as they otherwise
would. If you are taking your telescope from a heated house
to the outdoors, allow around one hour before expecting it
to produce sharp images. For this reason, we recommend
storing your telescope in a dry but unheated area like a
garage or storage shed.
For the 10” SSE Dob, there is an optional USB Cooling Fan
for Dobsonians available. It mounts onto the rear of the mirror
cell and blows air on the mirror to expedite cooling (Figure
14). The fan will help the optics reach thermal equilibrium
faster. (The 8” SSE Dob does not have a fan mount so it is
not compatible with the Cooling Fan.)
Figure 14: The optional USB Cooling Fan for Dobsonians is compatible with
the 10” SSE Dob..

12 I ENGLISH
YOUR FIRST NIGHT OUT
WHAT TO EXPECT
You can observe literally thousands of objects with the
larger aperture of the SSE Dobs:
The Moon
Observing the lunar surface is a great place to start. You’ll
easily see craters, maria, lacus, valleys, mountains, and
other features. The Moon is so bright that you might want
to consider using an optional Moon filter. It threads onto
bottom of the eyepiece to dim the view. We also recommend
a higher-power eyepiece to help you explore the Moon
up-close.
Planets
The best planets to view are Jupiter, Saturn, Mars, and
Venus. A higher-power eyepiece will help bring out the
fine details. You’ll be able to see the rings of Saturn,
surface detail on Jupiter along with its moons, the phases
of Venus, and perhaps some surface detail on Mars if it is
near opposition (i.e. when it is closest to the Earth).
Stars and Double Stars
Stars will appear like points of light regardless of the
magnification used. However, a telescope can reveal a
star’s color and also “split” double stars using higher
magnifications. For variable stars, see if you can detect
a star’s change in brightness over a period of days or
weeks.
Open Star Clusters
These are star groups that formed together within our
Milky Way galaxy. They can appear spectacular in the
telescope eyepiece, even from somewhat light-polluted
skies. Astronomers often describe star clusters as
resembling “crushed diamonds on black velvet” in the
telescope’s eyepiece. Clusters are generally best viewed
with low-power eyepieces, as they usually require a wide
field of view to see the entire cluster.
Globular Star Clusters
These are tight clusters of hundreds of thousands of
stars that coalesced early in our galaxy’s formation. These
clusters appear like globes of light. The brighter ones can
be resolved into individual stars in good conditions. Most
globular clusters are best viewed with a medium-power
eyepiece, as they are not nearly as wide as open clusters,
yet not bright enough for high power either.
Nebulae
You’ll generally need to be under dark skies to see
gaseous nebulae, which appear as a faint glow around
stars. Don’t expect to see any nebulosity from urban skies
except for perhaps the brightest ones, like the Orion
Nebula and Lagoon Nebula.
Galaxies
Perhaps the most fascinating of all objects to view,
galaxies are like “island universes” unto themselves.
While you can detect the brightest galaxies, like the
Andromeda Galaxy, from somewhat light-polluted skies,
they are best observed from dark skies. Literally hundreds
of galaxies are well within the observing reach of the SSE
Dobs. The best ones display fine details like faint spiral
arms and dust lanes. Many, however, will just appear as
non-stellar “streaks” or “blobs.” Even so, just being able
to detect the light from another galaxy outside our own is
rewarding in itself.
One thing to keep in mind is that the SSE Dobs are not
motorized. This means that they will not automatically track
celestial objects as the Earth rotates. As a result, you will
notice that objects drift a bit as you observe them and will
exit the eyepiece’s field of view within a minute or two,
depending on the magnification you are using. Objects will
drift out of the field of higher-power eyepieces faster, since
their field of view is narrower. You will need to manually push
the Dob along to keep objects centered over time. This is
easy to do. Grab hold of the telescope’s panning knob and
move it slightly up-and-down and left-to-right as needed.

ENGLISH I 13
DARK ADAPTATION AND
LIGHT POLLUTION
It takes at least a half-hour for the human eye to become
dark-adapted, so don’t immediately expect to see subtle
detail in faint deep-sky objects as soon as you get outside.
While you are observing, avoid any bright lights (like
going from outside to inside a lighted house) or else your
dark adaption will need time to reset. Use red flashlights
designed for astronomical use, as the red light will not
greatly affect your night vision. The Moon will also affect
your dark adaptation, so if you directly observe the Moon
expect it to take time to regain your night vision.
Local light pollution will greatly diminish the appearance
and contrast of fainter deep-sky objects in the telescope.
Do not expect to see much detail from urban skies. You’ll
get your best views from dark sky locations away from city
or suburban night lighting. Bright objects such as the Moon,
planets, double stars, and bright open star clusters are not
affected by light pollution as much, so they make good
objects for backyard viewing regardless of where you are.
Also keep in mind that the Moon itself can light up much of
the night sky, preventing views of faint objects even from
dark sites. So schedule deep sky observing when the Moon
won’t be visible.
USE OF FILTERS
Experiment with adding optional filters to your setup to
help improve the view. Astronomical filters thread onto the
bottom of your eyepiece and usually come in both 1.25” and
2” formats. Simply remove the eyepiece from the focuser,
thread the filter onto the bottom of the eyepiece’s barrel,
and then reinsert it into the focuser.
There are many useful filters to choose from:
Moon Filter – An essential for viewing lunar details, this
filter cuts down on glare and makes bright objects dimmer.
Variable Polarizer – Like a Moon filter, a polarizer dims your
view. The key difference is that you can customize the extent
of the dimming effect by rotating the polarizer.
Color Filters – Available in a variety of colors, these can
improve contrast when observing planetary details.
Light Pollution Filters – If you are viewing deep-space
objects from urban or suburban skies, these improve
contrast by blocking the “bad” light from local light pollution
and transmitting the “good light” from deep-sky objects.
You’ll notice the greatest improvement in contrast when
observing nebulae

14 I ENGLISH
COLLIMATING THE OPTICS
Collimation is the process of aligning the telescope’s optics.
Dobsonians use the Newtonian reflector optical design,
which consists of a parabolic primary mirror and a flat
secondary mirror. To ensure best performance, you should
periodically check the alignment of the optics. To help with
this, we have included a special “collimation cap” you can
use. In addition, the primary mirror is center-marked with an
adhesive ring label to aid in collimation.
To check alignment of the mirrors, first remove any
eyepieces. Make sure the 2”-to-1.25” adapter is installed in
the focuser. Then, place the collimation cap in the focuser
(Figure 15).
Figure 15: To check the alignment of the mirrors, use the included
collimation cap in the focuser.
Look through the small hole in the center of the collimation
cap. The view should look like Figure 16. If it does not, you’ll
need to make some adjustments to the mirrors’ alignment.
Bottom edge
of focuser
drawtube
Reflection of
your eye
Edge of
secondary
mirror
Secondary
mirror
holder
Primary
mirror clip
Reflection of
secondary mirror holder
Figure 16: If your telescope is properly aligned, the view through the
collimation cap should look like the drawing above.
It is easiest to collimate a telescope during the day with
the telescope pointed toward a blank wall. This will provide
a high-contrast view, making it easier to determine which
adjustments should be made. Use the supplied hex key(s)
to make adjustments. The 8” SSE Dob comes with 2mm
and 2.5mm hex keys. The 10” SSE Dob comes with a single
2mm hex key. For the 8” SSE Dob, you’ll also need to use
the supplied Phillips head screwdriver.
First, adjust the secondary mirror at the front of the telescope
using the 2mm hex key. While making adjustments, we
recommend positioning the tube horizontally. This prevents
anything from falling onto the primary mirror.
1. You should be able to see the reflection of the entire
primary mirror centered within the secondary mirror as
shown in Figure 16. If you can’t (like in Figure 17, for
example), use the three socket-head set screws in the
secondary mirror holder to adjust the tilt of the secondary
mirror (Figure 18).
Edge of
secondary
mirror
Reflection of
primary mirror
Figure 17: If the reflection of the primary mirror is not centered within
the secondary mirror as shown above, you will need to adjust the tilt of
the secondary mirror.
2mm
Hex key
Figure 18: The three socket head set screws in the secondary mirror
holder adjust the tilt of the secondary mirror.
Reflection
of primary
mirror

ENGLISH I 15
a. Adjust one set screw at a time. Make only small
adjustments.
b. If one set screw becomes too tight or too loose, make
adjustments to the other set screws to compensate.
2. Continue adjusting the set screws until the primary mirror
appears centered within the secondary mirror (Figure
19). When you are finished, make sure all three of the set
screws are snug.
Edge of
secondary
mirror
Reflection of
primary mirror
Reflection of
secondary mirror
Figure 19: Continue making tilt adjustments to the secondary mirror until
the primary mirror reflection is centered as shown in the drawing above.
3. Next, adjust the tilt of the primary mirror until the reflection
of the secondary mirror is centered within the reflection
of the primary mirror.
For the 8” Dobsonian, use the 2.5mm hex key and
Phillips head screwdriver to tilt the primary mirror. There are
three pairs of collimation screws. Each pair works together
to adjust the tilt.
a. Adjust one pair of screws at a time. Start by
loosening one of the screws in the pair and
tightening the other (Figure 20).
Figure 20: For the 8” Dob, there are three sets of push-pull screws
in the mirror cell that adjust the tilt of the primary mirror. Loosen one
screw in the pair and tighten the other to adjust the tilt.
b. If the mirror tilts opposite the desired direction,
loosen the screw that you previously tightened,
and tighten the other screw in the pair.
c. Once you have adjusted one pair of screws as
much as you can, move onto another pair of screws.
d. Continue adjusting until the reflection of the
secondary mirror is centered within the reflection
of the primary mirror. When you are finished, the
view through the collimation cap should look like
Figure 16.

16 I ENGLISH
For the 10” Dobsonian, you won’t need any tools
to tilt the primary mirror. Instead, simply adjust the
thumbscrews. Three of the thumbscrews are locking
screws, while the other three thumbscrews adjust the
tilt.
a. Start by loosening all three of the locking
thumbscrews (Figure 21).
Figure 21: For the 10” Dob, there are three spring-loaded collimation
thumbscrews that adjust the tilt of the primary mirror. The other three
thumbscrews lock the mirror in place once tilt adjustments are completed.
b. Adjust the collimation thumbscrews one at a time.
Each collimation thumbscrew is spring-loaded, so
you can rotate it clockwise or counterclockwise.
c. Continue adjusting the screws until the reflection
of the secondary mirror is centered within the
reflection of the primary mirror.
d. Re-tighten the three locking thumbscrews until
snug.
e. When you are finished, the view through the
collimation cap should look like Figure 16.
Your telescope’s optics are now aligned and ready for use.
You can also confirm a telescope’s alignment at night by
pointing the telescope at a bright star at high magnification.
Center the star in the field of view and slightly defocus the
star—it should appear like a circle with a hole in the middle.
(The “hole” is the shadow from the secondary mirror.) If the
hole is not centered within the circle, you’ll need to make
additional adjustments to collimation (Figure 22).
GOOD COLLIMATION NEEDS ADJUSTMENT
Figure 22: You can check collimation by defocusing a bright star centered
in the field of view and checking to see if the “hole” is centered. If it is not
centered, some adjustment is needed.
TRANSPORTING
Transporting the StarSense Explorer Dobsonian is
easy, especially considering its size. First, remove the
telescope tube from the base by loosening the altitude
tensioning knob and lifting the telescope tube. You can
carry the tube and the base separately by their integrated
carry handles. The handles are positioned to balance the
load, so neither component should be awkward to carry.
LOCKING
THUMBSCREWS

ENGLISH I 17
CARE AND MAINTENANCE
Store the telescope indoors in a dry place. A garage is
ideal; it will keep the optics near the ambient outdoor
temperature so the optics won’t take as long to acclimate.
Keep the dust cover on the front of the telescope and the
cover cap on the focuser when the telescope is not in
use. Otherwise, dust and particles can accumulate on
the optics.
If the telescope is wet from dew, dry the exterior of the
telescope tube and base with a towel prior to storage.
While a small amount of water on the exterior of the
tube and base won’t harm the telescope, storing it wet
long-term could cause corrosion or water damage. The
wooden base has sealed melamine surfaces. Still, water
can seep into cracks if left wet during storage.
It is normal for some dust and particles to accumulate on
the primary mirror over time. They will not have any effect
on optical performance. However, if the primary mirror
gets excessively dirty, you should clean it.
To clean the primary mirror:
1. Remove the primary mirror cell from the telescope
tube by removing the screws on the tube just above
the mirror cell (Figure 23). You’ll need the Phillips
head screwdriver to do this.
2. Carefully pull the mirror cell off of the tube.
3. The mirror surface is now exposed for cleaning.
We recommend leaving the primary mirror in its cell
during cleaning.
4. Use a blower bulb and optics cleaning brush to
remove larger particles and dust. In some instances,
this will be all the cleaning necessary.
Figure 23: To remove the primary mirror from the telescope tube for
cleaning, first remove the screws located just above the mirror cell.
5. To remove marks and oils, use lens cleaning fluid
and lens cleaning tissue to clean the mirror surface.
Apply the fluid to the tissue and gently wipe the
mirror surface. Use radial strokes (i.e. from the
center of the mirror to the edge). Use a new tissue
for every wipe. Avoid rubbing; this typically just
spreads oils around instead of removing them.
6. Once the mirror is clean, reinstall the mirror cell
into the telescope tube and replace the screws.
The secondary mirror will not get dirty often, as its optical
surface is pointed downward. However, if it does require
cleaning, it can be cleaned in the same manner as the
primary mirror. You do not need to remove the secondary
mirror from the telescope to clean it. Point the telescope
horizontally during cleaning to prevent anything from
falling onto the primary mirror.
You may clean the exposed optical surfaces of your
eyepieces in the same manner described above.

18 I ENGLISH
#22470 StarSense Explorer 8” Dobsonian
Optical Design Newtonian reflector
Aperture 8” (203mm)
Focal Length 1200mm
Focal Ratio F/5.9
Optical Coatings XLT reflective coatings with silicon dioxide and tantalum pentoxide protective
overcoatings for primary and secondary mirrors
Mirror Material Pyrex equivalent for primary and secondary mirrors
Primary mirror thickness 25mm (approx. 1:8 thickness ratio)
Secondary mirror thickness 8.5mm
Minor axis of secondary mirror 47mm
Tube material Steel
Focuser 2” Crayford, includes 2” extension tube and 2”-to-1.25” adapter
Eyepiece / Magnification 25mm Plössl, 48x
Finderscope StarPointer red-dot finderscope
Other Accessories StarSense Explorer dock, eyepiece rack, collimation cap,
carry handles for OTA and base, pointing knob, dust covers
Tripod Altazimuth Dobsonian base, adjustable altitude tensioning
Optical Tube Dimensions 44” x 9.5” diameter
Optical Tube Weight 20.6 lbs.
Base dimensions 27” x 19” x 19”
Base weight 22.8 lbs.
Total Telescope Kit Weight 43.4 lbs.
SPECIFICATIONS

ENGLISH I 19
#22471 StarSense Explorer 10” Dobsonian
Optical Design Newtonian reflector
Aperture 10” (254mm)
Focal Length 1200mm
Focal Ratio F/4.7
Optical Coatings XLT reflective coatings with silicon dioxide and tantalum pentoxide protective
overcoatings for primary and secondary mirrors
Mirror Material Pyrex equivalent for primary and secondary mirrors
Primary mirror thickness 30mm (approx. 1:8.5 thickness ratio)
Secondary mirror thickness 11.5mm
Minor axis of secondary mirror 64mm
Tube material Steel
Focuser 2” Crayford, includes 2” extension tube and 2”-to-1.25” adapter
Eyepiece / Magnification 25mm Plössl, 48x
Finderscope StarPointer red-dot finderscope
Other Accessories StarSense Explorer dock, eyepiece rack, collimation cap,
carry handles for OTA and base, pointing knob, dust covers
Tripod Altazimuth Dobsonian base, adjustable altitude tensioning
Optical Tube Dimensions 44” x 11.5” diameter
Optical Tube Weight 29.2 lbs.
Base dimensions 26.5” x 21” x 21”
Base weight 25.6 lbs.
Total Telescope Kit Weight 54.8 lbs.
SPECIFICATIONS

20 I ENGLISH
• Never look directly at the Sun with the naked eye or with a telescope (unless you have the proper solar filter). Perma-
nent and irreversible eye damage may result.
• Never use your telescope to project an image of the Sun onto any surface. Internal heat build-up can damage the tele-
scope and any accessories attached to it.
• Never use an eyepiece solar filter or a Herschel wedge. Internal heat build-up inside the telescope can cause these de-
vices to crack or break, allowing unfiltered sunlight to pass through to the eye.
• Never leave the telescope unsupervised. Make sure an adult who is familiar with the correct operating procedures is with
your telescope at all times, especially when children are present.
SOLAR WARNING
Need assistance?
Contact Celestron Technical Support by visiting
celestron.com/pages/technical-support © 2022 Celestron • All rights reserved • celestron.com
2835 Columbia Street • Torrance, CA 90503 U.S.A.
celestron.com
This device complies with Part 15 of the FCC Rules. Operation is subject to the following two conditions: (1) This device may not cause harmful interference, and (2) this device must accept any interference received, including interference that may cause
undesired operation.
CAUTION: Changes or modifications not expressly approved by the party responsible for compliance could void the user’s authority to operate the equipment.
NOTE: This equipment has been tested and found to comply with the limits for a Class B digital device, pursuant to part 15 of the FCC Rules. These limits are designed to provide reasonable protection against harmful interference in a residential installation.
This equipment generates, uses and can radiate radio frequency energy and, if not installed and used in accordance with the instructions, may cause harmful interference to radio communications. However, there is no guarantee that interference will not occur
in a particular installation.
If this equipment does cause harmful interference to radio or television reception, which can be determined by turning the equipment off and on, the user is encouraged to try to correct the interference by one or more of the following measures:
• Reorient or relocate the receiving antenna.
• Increase the separation between the equipment and receiver.
• Connect the equipment into an outlet on a circuit different from that to which the receiver is connected.
• Consult the dealer or an experienced radio/TV technician for help.
Product design and specifications are subject to change without prior notification. This product is designed and intended for use by those 14 years of age and older.
celestron.com/pages/warranty
WARNING: KEEP BATTERIES OUT OF REACH OF CHILDREN.
• Examine devices and make sure the battery compartment is correctly secured, e.g. that the
screw or other mechanical fastener is tightened.
• Do not use if compartment is not secure.
• Dispose of used button batteries immediately and safely. Flat batteries can still be dangerous.
• Tell others about the risk associated with button batteries and how to keep their children safe.
0522

FRANÇAIS I 21
#22470 STARSENSE EXPLORER 8” DOBSONIEN #22471 STARSENSE EXPLORER 10" DOBSONIEN
MODE D'EMPLOI

22 I FRANÇAIS
INTRODUCTION
Félicitations pour votre achat du télescope StarSense Explorer Dobsonien (SSE Dob). Votre SSE Dob combine de grands
éléments optiques avec la base et l'application StarSense Explorer pour vous permettre de trouver et d'observer toutes sortes
d'objets astronomiques facilement et facilement! Vous serez en mesure de localiser des objets du ciel profond: des galaxies, des
nébuleuses, des amas d’étoiles et plus encore, et de les centrer dans le champ de vision de l’oculaire en quelques secondes. Le
miroir principal est capable de capter une grande quantité de lumière, ce qui vous permet d’observer les objets en détails comme
jamais avant.
Avant de commencer une observation avec StarSense Explorer Dob en extérieur pour la première nuit, nous vous recommandons
de lire ce manuel. Il vous aidera à mieux comprendre les caractéristiques de votre télescope et à savoir à quoi vous attendre.

FRANÇAIS I 23
TABLE DES MATIÈRES
Contenu de la boîte . . . . . . . . . . . . . . . . . . . . . . . . . . . . . . . . . . . . . . . . . . . . . 24
Assemblage de la monture . . . . . . . . . . . . . . . . . . . . . . . . . . . . . . . . . . . . . . . . . 25
Assemblage du télescope. . . . . . . . . . . . . . . . . . . . . . . . . . . . . . . . . . . . . . . . . . 26
Pointer le télescope . . . . . . . . . . . . . . . . . . . . . . . . . . . . . . . . . . . . . . . . . . . . . 27
Mise au point . . . . . . . . . . . . . . . . . . . . . . . . . . . . . . . . . . . . . . . . . . . . . . . . 28
Utilisation de StarPointer . . . . . . . . . . . . . . . . . . . . . . . . . . . . . . . . . . . . . . . . . . 29
Station d'accueil StarSense Explorer et application . . . . . . . . . . . . . . . . . . . . . . . . . . . . 30
Détermination du grossissement et sélection des oculaires . . . . . . . . . . . . . . . . . . . . . . . . 31
Refroidir les optiques de votre télescope. . . . . . . . . . . . . . . . . . . . . . . . . . . . . . . . . . 31
Votre première observation en extérieur – À quoi vous attendre . . . . . . . . . . . . . . . . . . . . . 32
Adaptation à l’obscurité et pollution légère. . . . . . . . . . . . . . . . . . . . . . . . . . . . . . . . . 33
Utilisation des filtres . . . . . . . . . . . . . . . . . . . . . . . . . . . . . . . . . . . . . . . . . . . . . 33
Collimation des optiques . . . . . . . . . . . . . . . . . . . . . . . . . . . . . . . . . . . . . . . . . . 34
Transport . . . . . . . . . . . . . . . . . . . . . . . . . . . . . . . . . . . . . . . . . . . . . . . . . . . 36
Entretien et Maintenance . . . . . . . . . . . . . . . . . . . . . . . . . . . . . . . . . . . . . . . . . . 37
Spécifications du StarSense Explorer 8” Dobsonien . . . . . . . . . . . . . . . . . . . . . . . . . . . 38
Spécifications du StarSense Explorer 10” Dobsonien . . . . . . . . . . . . . . . . . . . . . . . . . . . 39
Avertissement sur le Soleil . . . . . . . . . . . . . . . . . . . . . . . . . . . . . . . . . . . . . . . . . 40

24 I FRANÇAIS
A1
P
OQ
E
F
K1 K2 L1 L2
M
J1 J2
H1 H2 H3 H4 H5
G1 G2 G3
A2 B C D
N1
N2
R1
S
T
U
CONTENU DE LA BOÎTE
Boîte 1 – Base Dobsonienne
Boîte 2 – Composants du tube optique
Panneau latéral
gauche
Pieds (x3)
COMPOSANTS DE L’AXE DU PIVOT D'AZI-
MUT
COMPOSANTS DES PIEDS
COMPOSANTS DE LA POIGNÉE COMPOSANTS DU PORTE-OCU-
LAIRE
OUTILS INCLUS
COMPOSANTS DE L'ORIENTATION
EN ALTITUDE
Base
la base
Support de
l'oculaire
Amortisseurs
en caout-
chouc
Tube optique avec cache-poussière
Oculaire Omni de
25mm Plössl
Oculaire de 2” à 1,25”
Adaptateur avec cache
de 1,25”
Oculaire de 2”
tube de rallonge
Capuchon de collimation
avec clés hexagonales de
2mm et 2,5mm*
Clé hexagonale *2,5mm incluse avec le Dob de 8"
uniquement
REMARQUE: Pour collimater les optiques de votre
télescope (p34)
Bouton de tension
d’altitude
Cache décoratif
Tournevis
Dock StarSense Chercheur à point
rouge StarPointer
Clés
anglaises (x2)
Clés hexagonales
(x2)
Vis du
support (x2)
Palier d'altitude
cylindres (x4)
Vis
de palier (x4)
Vis de
poignée (x2)
Cache - Vis
des pieds (x3)
Boulon Écrou Rondelles
en acier
(x2)
Cylindre
de plastique
creux
Rondelle
de téflon
Panneau latéral
droit
Panneau avant Plaque supérieure Plaque inférieure
Supports
latéraux
(x2)
Vis de
l’ensemble de
la base (x22)
Vis des
pieds (x3)

FRANÇAIS I 25
ASSEMBLAGE DE LA MONTURE
A1
A2
E
E
F
F
F
F
F
F
F
F
F
F
F
F
F
F
F
F
F
F
F
F
F
F
K1
L1
L1
L1
L1
L2
L2
L2
L2
H1
H2
H3
H3
H4
H5
J1
J2
J2
B
C
D
G1
G1
G1
G2
G2
G2
G3
G3
G3
Figure 1A: Vue éclatée de la base StarSense
Explorer Dobsonien.

26 I FRANÇAIS
N1
N2
O
Q
P
R1
T
S
Figure 1B: Vue éclatée du tube optique StarSense Explorer
Reportez-vous à la figure 1 pour voir comment les composants de SSE Dob s'emboîtent.
Pour obtenir la liste complète des pièces et les instructions d'assemblage, consultez le guide de configuration rapide imprimé
inclus dans la boîte ou la page produit du SSE Dob à l'adresse www.celestron.com
ASSEMBLAGE DU TÉLESCOPE

FRANÇAIS I 27
POINTER LE TÉLESCOPE
Les bases dobsoniennes sont des montures altazimutales.
Cela signifie que le télescope se déplace dans deux
directions: vers le haut et vers le bas (p. ex., en altitude)
et de gauche à droite (p. ex., azimuth) (figure 2).
ALTITUDE
AZIMUT
Figure 2: Les StarSense Explorer Dobsoniennes ont deux axes de
mouvement: l'altitude (haut en bas) et l'azimuth (de gauche à droite).
Il est facile de pointer votre Dob vers un objet. Il suffit de
déplacer le tube télescope de haut en bas et de gauche
à droite jusqu’à ce que le télescope soit dirigé vers l’objet
désiré et que l’objet apparaisse dans l’oculaire du télescope.
La poignée de panoramique à l'avant du tube télescopique
est pratique pour saisir le tube et le pointer (figure 3). Cette
poignée empêche aussi la chaleur de votre main d’entrer
dans le circuit optique, ce qui peut fausser temporairement
l’observation.
(Figure 3). La poignée panoramique permet de tenir le télescope lorsque
vous le pointez.
Vous pouvez régler la tension le long de l'axe d'altitude en
tournant le bouton situé du même côté que le focaliseur du
télescope — le bouton de tension d’altitude (Figure 4).
Figure 4: La tension du mouvement d'altitude peut être réglée à l'aide du
bouton de tension d'altitude. (REMARQUE: l'autre bouton du côté opposé
ne fonctionne pas pour régler la tension en altitude.)
Tournez le bouton pour ajouter suffisamment de tension
et permettre un mouvement de haut en bas en douceur.
Dans la plupart des cas, vous n’aurez pas besoin d’ajouter
beaucoup de tension. Le télescope est équilibré pour une
utilisation normale. Toutefois, si vous utilisez un oculaire
lourd ou un téléphone intelligent plus grand, vous devrez
peut-être augmenter la tension pour que le télescope reste
stable quand vous n'y touchez pas.

28 I FRANÇAIS
MISE AU POINT
Les SSE Dobs sont livrés avec un système de focale
Crayford de 2”, un tube d’extension de 2” et un adaptateur
d’oculaire de 2 à 1,25”. Avec ces trois éléments, vous
pouvez utiliser pratiquement n'importe quel oculaire de
télescope avec la Dob du SSE.
Pour la plupart des oculaires, assurez-vous que le tube
d'extension de 2” est en place dans le porte-oculaire. Si ce
n'est pas le cas, l'oculaire n'atteindra pas la mise au point. Si
vous utilisez un oculaire qui nécessite une grande distance
de mise au point interne, retirez le tube de d’extension de 2”.
Vous devrez peut-être retirer le tube si vous tentez d'utiliser
votre Dob avec une caméra d'imagerie astronomique.
Si vous souhaitez utiliser un oculaire au format 1,25”, vous
devrez utiliser l’adaptateur oculaire 2” à 1,25”. Il suffit de
le placer dans l’oculaire (avec un tube d’extension de 2”
fixé), puis de placer l’oculaire de 1,25” dans l’adaptateur.
Serrez les vis à main pour sécuriser l’oculaire en place.
L’adaptateur utilise un anneau de compression interne en
laiton pour éviter que le barillet de votre oculaire ne soit
égratigné ou abîmé.
Pour faire la mise au point, tournez les boutons de mise
au point dans le sens horaire ou antihoraire jusqu'à ce
que l'objet dans l'oculaire du télescope soit correctement
au point. Pour verrouiller la position du porte-oculaire en
place une fois que vous avez atteint une mise au point
nette, serrez la vis à oreilles du verrouillage de mise au point
(Figure 5). Si vous devez régler la tension du bouton de
mise au point, vous pouvez serrer ou desserrer la vis de
réglage du système de focale à l’aide de la clé hexagonale
fournie.
LA VIS À
OREILLES DU
VERROUILLAGE
DE MISE AU
POINT
VIS DE
RÉGLAGE DU
SYSTÈME DE
FOCALE
Figure 5: La vis à oreilles du verrouillage de mise au point verrouille le
système de focale une fois la mise au point effectuée. La vis de réglage de
la tension de mise au point règle la tension des boutons de mise au point.
Étant donné que le SSE Dob est un réflecteur Newtonien,
les images que vous verrez apparaîtront comme vues
dans un miroir et inversées par rapport à la vue directe
(Figure 6). Bien que cela ait peu d'impact sur l'observation
astronomique, cela peut être un peu déroutant lorsque vous
regardez des objets terrestres.
Figure 6: Comme tous les réflecteurs Newtonien, les SSE Dob produisent
des images qui semblent inversées et retournée par rapport à l’observation
à l'œil nu.
VUE À TRAVERS UN TÉLESCOPE À RÉFLECTEUR NEWTONIEN
VUE À L'ŒIL NU

FRANÇAIS I 29
UTILISATION DU STARPOINTER
Bien que vous n’ayez pas besoin de vous fier au chercheur
à point rouge StarPointer lorsque vous utilisez l’application
StarSense Explorer, elle peut vous aider à aligner
l’application avec le télescope. Le StarPointer est aussi
très pratique lorsque vous repérez des objets durant la
journée, puisque l'application fonctionne uniquement sous
les étoiles la nuit.
Pour aligner le StarPointer, pointez d'abord le télescope
vers un objet situé à au moins ¼ mille de distance. Nous
vous recommandons d’effectuer l’alignement pendant la
journée. Choisissez un arbre, une affiche, un bâtiment ou un
autre point d'intérêt distant. Si vous effectuez l’alignement
de nuit, vous pouvez utiliser un lampadaire, la lune, une
étoile ou une planète brillante.
Une fois que vous avez pointé le télescope vers l'objet,
assurez-vous qu'il apparaît dans l'oculaire. Ensuite, activez
le StarPointer à l'aide du cadran à DEL (figure 7).
AFFICHAGE DEL
BOUTON DE TENSION
D'ALTITUDE
BOUTON D’AZIMUT
Figure 7: Chercheur à point rouge StarPointer
Montez le niveau de luminosité jusqu'à ce que vous voyiez
facilement le point rouge. Maintenant, sans bouger le
télescope, utilisez l’altitude du StarPointer et les boutons
de réglage azimut pour centrer le point rouge sur le même
objet que vous avez centré dans l’oculaire télescope.
Lorsque vous avez terminé, assurez-vous que l'objet est
toujours centré dans l'oculaire de télescope. Si c'est le
cas, vous avez terminé l'alignement du StarPointer. Si ce
n'est pas le cas, orientez le télescope de façon à ce que
l'objet de l'oculaire du télescope soit centré de nouveau.
Continuez à utiliser les boutons de réglage de l'altitude et
de l'azimut du StarPointer pour centrer à nouveau le point
rouge sur l'objet.
Éteignez le StarPointer lorsque vous ne l'utilisez pas pour
économiser sa pile. Bien que la pile de StarPointer dure
longtemps, elle devra au bout d’un moment être remplacée
par une pile bouton au lithium CR2032 3V. Ces produits
sont très courants et offerts par une grande variété de
détaillants.
Pour remplacer la pile:
1. À l'aide d'un tournevis cruciforme, retirez la vis de fixation
du couvercle du compartiment des piles (figure 8).
Figure 8: Pour ouvrir le couvercle de la pile du StarPointer, retirez d'abord
la vis de fixation.
2. Retirez la pile déchargée du compartiment de la pile.
Vous devrez peut-être utiliser un couteau ou un tournevis
pour extraire la pile de son support.
3 . Insérez la nouvelle pile de façon à ce que le côté positif
soit visible pour vous. Assurez-vous que la pile est bien
insérée dans le compartiment de la pile (figure 9).
Figure 9: Lorsque la pile est correctement insérée dans le compartiment,
comme illustré, le couvercle du compartiment de la pile doit être facile à
réinstaller.
4. Fermez le compartiment de la pile et réinstallez la vis de
fixation.

30 I FRANÇAIS
STATION D’ACCUEIL ET
APPLICATION STARSENSE
EXPLORER
La fonction la plus intéressante de StarSense Explorer Dobsonien est
probablement la station d’accueil StarSense Explorer et l’application
StarSense Explorer pour téléphone intelligent. Avec l’application pour
vous guider, vous passerez plus de temps à observer des objets qu’a
essayer de les trouver parmi la myriade d’étoiles au-dessus de vous!
Le système d’exploration StarSense Explorer de Celestron est le seul
système dobsonien qui intègre cette fonction incroyable.
Pour commencer, téléchargez et installez l’application à partir de l’App
Store d’Apple (iOS) ou de Google Play (Android). Vous y trouverez
également les exigences système minimales. Si vous avez des questions
sur la compatibilité de votre téléphone intelligent avec l’application,
veuillez visiter le site celestron.com/SSE
Une fois l’application téléchargée, utilisez le code de déverrouillage de
l’application que vous trouverez sur la carte imprimée fournie avec votre
télescope (figure 10).
Download the app from the
before your first observing session
.
or
When prompted, enter the unique unlock code below to
enable telescope control on your device.
Figure 10: Le code de déverrouillage de l’application StarSense Explorer est imprimé sur
la carte fournie avec votre télescope
Chaque code peut permettre à jusqu’à cinq appareils d’utiliser la
fonctionnalité StarSense Explorer. Si vous utilisez le code les cinq fois
disponibles et que vous souhaitez déverrouiller l’application sur plus
d’appareils, veuillez communiquer avec le soutien technique de Celestron
à l’adresse celestron.com/pages/technical-support pour obtenir des
options.
Lorsque l’application est déverrouillée, vous êtes prêt à commencer.
Placez votre téléphone intelligent sur la base StarSense Explorer et
appuyez sur l’icône StarSense au bas de l’écran planétarium (figure 11).
Choisissez l’option « ALIGNEMENT REQUIS » et suivez les invites
à l’écran pour aligner l’appareil photo du téléphone intelligent avec le
télescope. Une fois cette procédure terminée, vous pouvez utiliser
l’application pour localiser des objets.
Sélectionnez un objet à afficher dans le planétarium ou dans la liste «Le
meilleur de cette nuit». Des flèches apparaissent à l’écran pour vous
guider vers l’objet. Suivez les flèches jusqu’à ce que la cible devienne
verte et que l’objet se trouve dans le champ de vision de votre télescope.
C’est aussi simple que ça!
Pendant que vous observez, vous pouvez lire des informations détaillées
sur l’objet. Des centaines d’objets les plus populaires disposent
également d’une présentation audio. Pour en écouter, appuyez sur la
barre au bas de l’écran qui contient le nom de l’objet (figure 12)
ICÔNE STARSENSE
Figure 11: Une fois que vous avez déverrouillé l’application
StarSense Explorer, appuyez sur l’icône StarSense pour
commencer à trouver des objets.
Figure 12: Appuyez sur la barre d’information de l’objet
pour recevoir des informations supplémentaires sur l’objet
sélectionné, y compris des images et des exposés audio pour
un grand nombre d’entre eux.

FRANÇAIS I 31
DÉTERMINATION DE
L'AGRANDISSEMENT ET
SÉLECTION DES OCULAIRES
Pour changer le grossissement du télescope, vous devrez
changer l’oculaire du focalisateur du télescope. Pour
calculer le grossissement que vous pouvez obtenir avec un
oculaire donné, utilisez cette formule :
Longueur focale du télescope ÷
Longueur focale de l'oculaire
= grossissement
Le SSE Dobs a une longueur focale de 1200mm. Ils sont
dotés d’un oculaire Omni Plösslun de 25mm. Avec cette
formule, nous pouvons calculer que cette combinaison
donne un grossissement de 48x (1200mm ÷ 25mm = 48x).
Il s'agit d'un excellent facteur de grossissement pour repérer
et observer les objets à champ large du ciel profond. Vous
pourriez envisager l'achat d'un oculaire à grossissement
plus élevé, comme un Omni Plössl 10mm, pour des vues
plus puissantes de la lune et des planètes. N'augmentez
pas trop le grossissement, sinon la vue pourrait se dégrader
en raison des conditions de vision atmosphérique (p. ex., les
turbulences atmosphériques).
Le grossissement maximal pour tout télescope est d'environ
60 fois par pouce, ce qui équivaut à 480x pour le SSE Dob
de 8 pouces et à 600x pour le SSE Dob de 10 pouces.
Cependant, dans de nombreux endroits, il sera difficile
d'obtenir des images nettes avec un grossissement de plus
de 100x en raison des turbulences atmosphériques au-
dessus de vous. Si vous remarquez que les étoiles au-dessus
de vous scintillent fortement, les conditions de vision sont
mauvaises. Vous devriez vous en tenir à un grossissement
plus faible. Si les étoiles semblent briller sans scintillement,
les conditions de vision sont bonnes. Vous pouvez essayer
d'utiliser des oculaires à grossissement élevé.
Les porte-oculaires se peuvent accepter les oculaires de
format 1,25” et 2”. Les oculaires de 2” offrent généralement
un champ de vision plus large, mais ils peuvent coûter
beaucoup plus cher. Pour utiliser un oculaire de 2”, retirez
l'adaptateur de 2” à 1,25” du porte-oculaire et insérer
l'oculaire directement dans le tube d'extension de 2”. Fixez
l'oculaire à l'aide des vis de serrage du tube de rallonge de
2”.
Le support d'oculaire situé à l'avant de la base offre un
endroit pratique pour ranger les oculaires lorsqu'ils ne sont
pas utilisés. Il peut accepter trois oculaires de 1,25” et un
oculaire de 2” (figure 13).
Figure 13: Le support d'oculaire est un endroit pratique pour ranger des
oculaires supplémentaires pendant votre séance d'observation.
REFROIDIR LES OPTIQUES DE
VOTRE TÉLESCOPE
Vous obtiendrez les meilleures observations à travers
votre télescope lorsqu’il aura atteint l’équilibre thermique
avec l’air ambiant. Si le télescope est plus chaud que l'air
extérieur, le miroir s'acclimatera à la température et sa forme
changera. Les images que vous voyez dans un télescope
qui n'a pas refroidi ne seront pas aussi nettes. Si vous
sortez votre télescope d'une maison chauffée à l'extérieur,
attendez environ une heure avant pour qu’il produise les
images les plus nettes possibles. C'est pourquoi nous vous
recommandons de ranger votre télescope dans un endroit
sec mais non chauffé, comme un garage ou une remise.
Pour le SSE Dob 10", un ventilateur de refroidissement
USB est offert en option. Il se monte à l'arrière de la cellule
du miroir et souffle de l'air sur ce dernier pour accélérer le
refroidissement (figure 14).
Le ventilateur aidera les éléments optiques à atteindre
l'équilibre thermique plus rapidement. (Les SSE Dob de 8”
ne possède pas de support de ventilateur, et ne sont pas
compatible avec le ventilateur de refroidissement.)
Figure 14: Le ventilateur de refroidissement USB optionnel pour Dobsonians
est compatible avec le DSE Dob 10".

32 I FRANÇAIS
VOTRE PREMIÈRE
OBSERVATION EN EXTÉRIEUR
À QUOI VOUS ATTENDRE
Vous pouvez observer littéralement des milliers d’objets
avec la plus grande ouverture des SSE Dob:
La Lune
Observer la surface lunaire est un excellent point
de départ. Vous verrez facilement des cratères, les
marias, les lacus, les vallées, les montagnes, et d'autres
points d’intérêt. La lune est si lumineuse que vous
pourriez envisager d'utiliser un filtre lune en option. Il
se fixe au fond de l'oculaire pour réduire l'intensité de
l’image. Nous recommandons également un oculaire
à puissance plus élevée pour vous aider à explorer
la Lune de près.
Planètes
Les meilleures planètes à observer sont Jupiter, Saturne,
Mars et Vénus. Un oculaire plus puissant fera ressortir
les détails les plus subtils. Vous serez en mesure de
voir les anneaux de Saturne, les détails de surface sur
Jupiter avec ses lunes, les phases de Vénus, et peut-être
quelques détails de la surface sur mars si elle est proche
de l'opposition (c'est-à-dire lorsqu'elle est la plus proche
de la Terre).
Étoiles et étoiles Doubles
Les étoiles apparaîtront comme des points lumineux, peu
importe le grossissement utilisé. Toutefois, un télescope
peut révéler la couleur d’une étoile et aussi des étoiles
doubles « séparées » en utilisant des grossissements plus
élevés. Pour les étoiles variables, voyez si vous pouvez
détecter le changement de luminosité d’une étoile sur
une période de jours ou de semaines.
Amas d'étoiles Ouverts
Ce sont des groupes d’étoiles qui se sont formés en
groupe dans notre galaxie de la voie lactée. Ils peuvent
sembler spectaculaires dans l'oculaire du télescope,
même dans un ciel plutôt pollué par la lumière. Les
astronomes décrivent souvent un amas d'étoiles comme
ressemblant à des « diamants poudrés sur du velours
noir » dans l'oculaire du télescope. Les amas sont
généralement mieux vus avec des oculaires à faible
puissance, car ils nécessitent habituellement un grand
champ de vision pour voir leur ensemble.
Amas d'étoiles Globulaires
Ce sont des amas serrés de centaines de milliers d’étoiles
qui sont entrées en coalescence au début de la formation
de notre galaxie. Ces amas ressemblent à des globes
de lumière. Les plus brillants peuvent être vus en étoiles
individuelles dans de bonnes conditions. La plupart des
amas globulaires sont mieux observés avec un oculaire
de puissance moyenne, car ils ne sont pas aussi larges
que des amas ouvertes, mais pas assez brillants pour
l’observation à puissance élevée non plus.
Nébuleuses
Vous devrez généralement observer sous un ciel sombre
pour voir des nébuleuses gazeuses, qui apparaissent
comme une faible lueur autour des étoiles. Ne vous
attendez pas à repérer une nébulosité dans un ciel urbain,
sauf pour les plus brillantes, comme la nébuleuse d’Orion
et la nébuleuse du Lagon.
Galaxies
Parmi les plus fascinants de tous les objets observables,
les galaxies sont comme des «univers insulaires». Bien
que vous puissiez observer les galaxies les plus brillantes,
comme la galaxie d'Andromède dans un ciel un peu
pollué, elles sont mieux observés dans les cieux sombres.
Littéralement, des centaines de galaxies sont à portée
d'observation d’un SSE Dob. Les meilleures présentent
des détails en finesse, comme des bras en spirale pâles
et des bandes de poussière. Beaucoup, cependant,
apparaissent comme des « stries » non stellaires ou
« taches ». Même si c'est le cas, être en mesure de
détecter la lumière d'une autre galaxie à l'extérieur de
notre propre galaxie est une expérience gratifiante en soi.
Il faut garder à l'esprit que les SSE Dob se ne sont
pas motorisés. Cela signifie qu'ils ne peuvent pas
automatiquement effectuer le suivi des objets célestes
à mesure que la Terre tourne. Par conséquent, vous
remarquerez que les objets dérivent un peu pendant
que vous les observez et sortiront du champ de vision
de l'oculaire en l’espace d’une minute ou deux, selon le
grossissement que vous utilisez. Les objets sortent du
champ des oculaires plus puissants plus rapidement, car
leur champ de vision est plus étroit. Vous devrez pousser
orienter le Dob pour garder les objets centrés au fil du
temps. Ce n’est pas difficile. Saisissez la poignée de
panoramique du télescope et déplacez-le légèrement de
haut en bas et de gauche à droite au besoin.

FRANÇAIS I 33
ADAPTATION À L’OBSCURITÉ ET
POLLUTION LÉGÈRE
Il faut au moins une demi-heure à l’œil humain pour
s’adapter à l’obscurité, alors ne vous attendez pas
immédiatement à repérer des détails subtils dans des
objets sombres immédiatement après être sorti. Pendant
que vous observez, évitez les lumières fortes (comme
par exemple en sortant d’une d'une maison éclairée) ou
votre adaptation à l’obscurité devra prendre le temps de
se redéclencher. Utilisez des lampes de poche rouges
conçues pour l'observation astronomique, car la lumière
rouge n'affectera pas grandement votre vision nocturne.
La Lune affectera également votre adaptation à l’obscurité,
donc si vous observez directement la Lune, il vous faudra un
moment de réadaptation.
La pollution de la lumière locale diminuera considérablement
l'apparence et le contraste des objets les plus pâles dans
le télescope. Ne vous attendez pas à voir beaucoup de
détails dans les cieux urbains. Vous obtiendrez une vue
optimale des endroits sombres loin des lumières de la ville
ou de la banlieue. Les objets brillants comme la Lune, les
planètes et les amas d'étoiles ouverts lumineux ne sont
pas autant affectés par la pollution lumineuse, donc ils font
de bons objets pour une observation depuis votre jardin,
peu importe où vous êtes. Gardez aussi à l'esprit que la
Lune elle-même peut illuminer une grande partie du ciel
nocturne, empêchant ainsi les objets pâles d’apparaître.
Alors, planifiez votre observation des zones sombres du ciel
lorsque la Lune n’est pas présente.
UTILISATION DES FILTRES
Essayez d'ajouter des filtres optionnels à votre configuration
pour améliorer l’observation. Les filtres astronomiques
se fixent au fond de votre oculaire et sont généralement
disponibles aux tailles 1,25” et 2”. Il suffit de retirer l'oculaire
du porte-oculaire, de placer le filtre sur le fond du barillet de
l'oculaire, puis de le réinsérer dans le porte-oculaire.
Il existe de nombreux filtres utiles parmi lesquels choisir:
Filtre lunaire – essentiel pour voir les détails lunaires, ce
filtre réduit les reflets et atténue les objets lumineux.
Filtre polarisant variable – comme un filtre lunaire, un
filtre polarisant réduit la luminosité de la vue. La principale
différence est que vous pouvez personnaliser l'ampleur
de l'effet de réduction de la luminosité en tournant le filtre
polarisant.
Filtres de couleur – offerts dans une variété de couleurs,
ils peuvent améliorer le contraste lors de l'observation de
détails planétaires.
Filtres de pollution lumineuse – si vous regardez des
objets du ciel profond sous des cieux urbains ou de
banlieue, ils améliorent le contraste en bloquant la lumière
«parasite» de la pollution lumineuse locale et en laissant
passer la «bonne lumière» des objets du ciel profond. Vous
remarquerez la plus grande amélioration du contraste lors
de l'observation des nébuleuses.

34 I FRANÇAIS
COLLIMATION DES OPTIQUES
La collimation est le processus d'alignement de l'optique
du télescope. Les Dobsoniens utilisent un réflecteur
optique newtonien, qui est composé d'un miroir primaire
parabolique et d'un miroir secondaire plat. Pour assurer
un rendement optimal, vous devez vérifier périodiquement
l'alignement des éléments optiques. Pour vous aider, nous
avons inclus un capuchon de collimation spécial. De plus,
le miroir primaire est marqué au centre d'une étiquette
autocollante pour faciliter la collimation.
Pour vérifier l'alignement des miroirs, retirez d'abord les
oculaires. Assurez-vous que l'adaptateur 2” à 1,25” est
installé dans le porte-oculaire. Puis, placez le capuchon de
collimation dans le système de focalisation (figure 15).
Figure 15: Pour vérifier l'alignement des miroirs, utilisez le capuchon de
collimation inclus dans le système de focalisation.
Regardez par le petit trou au centre du capuchon de
collimation. La vue devrait être comme montré dans la figure
16. Si ce n’est pas le cas, vous devrez ajuster l’alignement
des miroirs.
Bord inférieur
du tube du
système de
focale
Reflet du
Miroir
primaire
Reflet de
votre œil
Bord du
miroir
secondaire
Porte-
miroir
secondaire
Reflet du
Miroir
primaire
Reflet du
porte-miroir secondaire
Figure 16: Si votre télescope est bien aligné, la vue à travers le capuchon
de collimation devrait être comme montré dans la figure ci-dessus.
Il est plus facile d’effectuer la collimation d’un télescope
pendant la journée avec le télescope pointé vers un mur
sans décoration. Cela permet d'obtenir une vue à contraste
élevé, ce qui facilite la détermination des ajustements à
faire. Utilisez la ou les clés hexagonales fournies pour
effectuer les réglages. Le SSE Dob de 8” comprend des
clés hexagonales de 2mm et 2,5mm. Le SSE Dob de 10”
est fourni avec une seule clé hexagonale de 2mm. Pour le
SSE Dob de 8", vous devrez également utiliser le tournevis
cruciforme fourni.
Tout d'abord, réglez le miroir secondaire à l'avant du
télescope à l'aide de la clé hexagonale de 2mm.
1. Vous devriez être en mesure de voir le reflet de l'ensemble
du miroir principal centré dans le miroir secondaire,
comme illustré à la figure 16.
Si ce n’est pas le cas (comme dans la figure 17, par
exemple), utilisez les trois vis de réglage à tête creuse du
support de miroir secondaire pour régler l’inclinaison du
miroir secondaire (figure 18).
Bord du
miroir
secondaire
Reflet du
Miroir primaire
Figure 17: Si le reflet du miroir principal n'est pas centré dans le miroir
secondaire comme illustré ci-dessus, vous devrez régler l'inclinaison du
miroir secondaire.
la clé
hexagonale
de 2mm
Figure 18: Les trois vis à tête creuse de réglage du miroir secondaire
permettent de régler l'inclinaison du miroir secondaire.

FRANÇAIS I 35
a. Réglez une vis de pression à la fois. Faites seulement
de petits ajustements.
b. Si une vis de réglage devient trop serrée ou trop
desserrée, ajuster les autres vis pour compenser.
2. Continuez de régler les vis jusqu'à ce que le miroir
principal apparaisse centré dans le miroir secondaire
(figure 19). Lorsque vous avez terminé, assurez-vous que
les trois vis de réglage sont bien serrées.
Bord du
miroir
secondaire
Reflet du
Miroir primaire
Reflet du
Miroir secondaire
Figure 19: Continuez de régler l'inclinaison du miroir secondaire jusqu'à
ce que le reflet du miroir principal soit centré, comme illustré ci-dessus.
3. Ensuite, réglez l'inclinaison du miroir principal jusqu'à ce
que le reflet du miroir secondaire soit centré dans le reflet
du miroir principal.
Pour le Dobsonien de 8", utilisez la clé hexagonale de
2,5mm et le tournevis cruciforme pour incliner le miroir
principal. Il se trouve trois paires de vis de collimation.
Chaque paire travaille de concert pour régler l'inclinaison.
a. Ajustez une paire de vis à la fois. Commencez par
desserrer une des vis de la paire et serrer l'autre
(figure 20).
Figure 20: Pour le Dob de 8", trois jeux de vis de réglage dans la
cellule du miroir permettent de régler l'inclinaison du miroir principal.
Desserrez une vis de la paire et serrez l'autre pour régler l'inclinaison.
b. Si le miroir s'incline dans la direction voulue,
desserrez la vis que vous avez déjà serrée et serrez
l'autre vis dans la paire.
c. Une fois que vous avez ajusté une paire de vis
autant que possible, passez à une autre paire de
vis.
d. Continuez le réglage jusqu'à ce que le reflet du
miroir secondaire soit centré dans le reflet du
miroir principal. Lorsque vous avez terminé, la vue
au travers du capuchon de collimation devrait être
comme montré dans la figure 16.

36 I FRANÇAIS
Pour le Dobsonien de 10", vous n’aurez pas besoin
d’outils pour incliner le miroir principal. Vous n'avez
qu'à ajuster les vis à main. Trois des vis à main sont
utilisées pour le verrouillage, tandis que les trois autres
permettent de régler l'inclinaison.
a. Commencez par desserrer les trois vis à main de
verrouillage (figure 21).
VIS À MAIN DE
VERROUILLAGE
Figure 21: Pour le Dob de 10", il se trouve trois vis de serrage à ressort
qui règlent l’inclinaison du miroir principal. Les trois autres vis à main
verrouillent le miroir en place une fois les réglages d'inclinaison terminés.
b. Réglez les vis à main de collimation une à la fois.
Chaque vis de serrage comporte un ressort, ce qui
vous permet de la faire pivoter dans le sens des
aiguilles d'une montre ou dans le sens contraire
des aiguilles d'une montre.
c . Continuez de régler les vis jusqu'à ce que le reflet
du miroir secondaire soit centré dans le reflet du
miroir principal.
d. Resserrez les trois vis à main de verrouillage jusqu'à
ce qu'elles soient bien ajustées.
e. Lorsque vous avez terminé, la vue à travers le
capuchon de collimation devrait être comme
montré dans la figure 16.
Les éléments optiques de votre télescope sont maintenant
alignés et prêts à être utilisés. Vous pouvez également
confirmer l’alignement d’un télescope de nuit en pointant
le télescope vers une étoile lumineuse à un grossissement
élevé. Centrez l'étoile dans le champ de vision et réduisez la
mise au point sur l'étoile légèrement; elle devrait apparaître
comme un cercle avec un trou au milieu. (Le «trou » est
l'ombre du miroir secondaire.) Si le trou n'est pas centré
dans le cercle, vous devrez effectuer des ajustements
supplémentaires pour la collimation (figure 22).
Figure 23: Pour retirer le miroir principal du tube du télescope et le
nettoyer, retirez d'abord les vis situées juste au-dessus de la cellule du
miroir.
TRANSPORT
Transporter le StarSense Explorer Dobsonien est facile ,
surtout compte-tenu de sa taille. Tout d'abord, retirez le tube
télescopique de la base en desserrant le bouton de tension
de l'altitude et en soulevant le tube télescopique. Vous
pouvez transporter le tube et la base séparément grâce à
leurs poignées intégrées. Les poignées sont positionnées
pour équilibrer la charge, alors aucun des composants ne
devrait être encombrant.
COLLIMATION CORRECTE NÉCESSITE UN RÉGLAGE

FRANÇAIS I 37
ENTRETIEN ET MAINTENANCE
Rangez le télescope à l'intérieur dans un endroit sec. Un
garage est idéal; il gardera les éléments optiques près de la
température extérieure ambiante pour que les ces derniers
ne prennent pas autant de temps à s’acclimater. Gardez
le cache-poussière installé sur l'avant du télescope et le
capuchon sur le porte-oculaire lorsque le télescope n'est
pas utilisé. Sinon, la poussière et les particules peuvent
s'accumuler sur l'optique.
Si le télescope est humide de rosée, séchez l'extérieur du
tube télescopique et la base avec une serviette avant de
le ranger. Bien qu'une petite quantité d'eau à l'extérieur du
tube et de la base n'endommagera pas le télescope, le
rangement en environnement humide à long terme pourrait
causer de la corrosion ou des dommages causés par l'eau.
La base en bois est recouvert de surfaces en mélamine
scellées. Toutefois, l'eau peut s'infiltrer dans les fissures si
elle est laissée humide pendant l'entreposage.
Il est normal que certaines poussières et particules
s'accumulent sur le miroir principal au fil du temps.
Cela n’aura aucun effet sur les performances optiques.
Cependant, si le miroir principal devient excessivement
sale, vous devez le nettoyer.
Pour nettoyer le miroir principal:
1. Retirez la cellule du miroir principal du tube du
télescope en retirant les vis du tube juste au-dessus
de la cellule du miroir (figure 23). Vous aurez besoin
du tournevis cruciforme pour le faire.
Figure 23 : Pour retirer le miroir primaire du tube du télescope pour
le nettoyer, retirez d’abord les vis situées juste au-dessus de la cellule
du miroir
2. Retirez soigneusement la cellule du miroir du tube.
3. La surface du miroir est maintenant exposée pour être
nettoyée. Nous recommandons de laisser le miroir
principal dans sa cellule pendant le nettoyage.
4. Utilisez une poire et une brosse de nettoyage pour
éliminer les plus grosses particules et la poussière.
Dans certains cas, ce sera tout le nettoyage
nécessaire.
5. Pour enlever les marques et les graisses, utilisez du
liquide de nettoyage de lentille et du tissu de nettoyage
de lentille pour nettoyer la surface du miroir. Appliquez
le liquide sur le tissu et essuyez délicatement la
surface du miroir. Effectuez des mouvements droits
(c.-à-d. du centre du miroir jusqu'au bord). Utilisez un
nouveau mouchoir à chaque mouvement. Évitez de
frotter, car cela peut généralement étaler répandre
les graisses plutôt que de les enlever.
6. Une fois le miroir propre, réinstallez la cellule du miroir
dans le tube du télescope et remplacez les vis.
Le miroir secondaire ne devient pas sale, car sa surface
optique est orientée vers le bas. Cependant, si elle doit
être nettoyée, elle peut être nettoyée de la même façon
que le miroir principal. Il n'est pas nécessaire de retirer le
miroir secondaire du télescope pour le nettoyer. Pointez le
télescope horizontalement pendant le nettoyage pour éviter
qu'il ne tombe sur le miroir principal.
Vous pouvez nettoyer les surfaces optiques exposées de
vos oculaires de la même manière que celle décrite ci-
dessus.

38 I FRANÇAIS
#22470 Starsense Explorer 8” Dobsonien
Type d'optiques Réflecteur newtonien
Ouverture 8” (203mm)
Longueur de focale 1200mm
Ratio de focale F/5.9
Revêtements optiques Revêtements réfléchissants XLT à base de dioxyde de silicium et revêtements
protecteurs au pérotoxide de tantale pour les miroirs primaires et secondaires
Matériau du miroir Équivalent Pyrex pour miroirs primaires et secondaires
Épaisseur du miroir principal 25mm (rapport d'épaisseur d’environ 1:8)
Épaisseur du miroir secondaire 8,5mm
Axe mineur du miroir secondaire 47mm
Matériau du tube Acier
Système de mise au point Crayford 2”, comprend un tube de rallonge de 2” et un adaptateur de 2” à 1,25”
Oculaire/grossissement Plössl 25mm, 48x
Chercheur Chercheur à point rouge StarPointer
Autres accessoires Station d'accueil StarSense Explorer, support pour oculaires, capuchon de
collimation,
Poignées de transport pour l'OTA et la base, poignée de pointage et pare-poussière
Trépied Base altazimutale Dobsonien, tension de l'altitude réglable
Dimensions du tube optique 44” x 9,5” de diamètre
Poids du tube optique 20,6 lbs.
Dimensions de la base 27” x 19” x 19”
Poids de la base 22,8 lbs.
Poids total de l’ensemble du
télescope
43,4 lbs.
SPÉCIFICATIONS

FRANÇAIS I 39
#22471 Starsense Explorer 10” Dobsonien
Type d'optiques Réflecteur newtonien
Ouverture 10” (254mm)
Longueur de focale 1200mm
Ratio de focale F/4.7
Revêtements optiques Revêtements réfléchissants XLT à base de dioxyde de silicium et revêtements
protecteurs au pérotoxide de tantale pour les miroirs primaires et secondaires
Matériau du miroir Équivalent Pyrex pour miroirs primaires et secondaires
Épaisseur du miroir principal 30mm (rapport d'épaisseur d’environ 1:8,5)
Épaisseur du miroir secondaire 11,5mm
Axe mineur du miroir secondaire 64mm
Matériau du tube Acier
Système de mise au point Crayford 2”, comprend un tube de rallonge de 2” et un adaptateur de 2” à 1,25”
Oculaire/grossissement Plössl 25mm, 48x
Chercheur Chercheur à point rouge StarPointer
Autres accessoires Station d'accueil StarSense Explorer, support pour oculaires, capuchon de
collimation,
Poignées de transport pour l'OTA et la base, poignée de pointage et pare-poussière
Trépied Base altazimutale Dobsonien, tension de l'altitude réglable
Dimensions du tube optique 44” x 11,5” de diamètre
Poids du tube optique 29,2 lbs.
Dimensions de la base 26,5” x 21” x 21”
Poids de la base 25,6 lbs.
Poids total de l’ensemble du
télescope
54,8 lbs.
SPÉCIFICATIONS

40 I FRANÇAIS
• Ne regardez jamais directement le Soleil à l’œil nu ou dans un télescope sans un fitre solaire adéquat. Cela peut
causer des lésions oculaires permanentes et irréversibles.
• N’utilisez jamais le télescope pour projeter l’image du Soleil sur n’importe quelle surface. Une concentration de chaleur
dangereuse peut être générée à l’intérieur et endommager le télescope et les accessoires attachés.
• Ne jamais utiliser un filtre solaire d'oculaire ou une cale de Herschel. De la chaleur peut se concentrer dans le téles-
cope, risquant d'entraîner des failles ou des cassures sur les autres appareils, permettant à la lumière non filtrée du
Soleil d'atteindre les yeux.
• Ne jamais laisser le télescope sans surveillance. Assurez-vous qu'un adulte connaissant les bonnes procédures d'uti-
lisation soit à proximité de votre télescope tout le temps, surtout en présence d’enfants.
AVERTISSEMENT SUR LE SOLEIL
Besoin d'assistance?
Contactez le support technique de Celestron
celestron.com/pages/technical-support © 2022 Celestron • Tous droits réservés • celestron.com
2835 Columbia Street • Torrance, CA 90503 É.-U.
celestron.com
NOTE DE LA FCC: Cet équipement a été testé et jugé conforme aux limites établies pour un dispositif numérique de classe B, conformément à la section 15 de la réglementation de la FCC. Ces limites sont conçues pour fournir une protection raisonnable contre les interférences nuisibles dans une
installation résidentielle. Cet équipement génère, utilise et peut émettre une énergie de fréquence radio et, s’il n’est pas installé et utilisé conformément aux instructions, peut causer des interférences nuisibles aux communications radio. Mais il n'existe aucune garantie que des interférences ne seront pas
produites dans une installation particulière. Si cet équipement cause des interférences nuisibles à la réception radio ou télévision, ce qui peut être déterminé en éteignant et en rallumant l'équipement, l'utilisateur est encouragé à essayer de corriger l'interférence par une ou plusieurs des mesures suivantes:
• Réorientez ou déplacez l'antenne de réception.
• Augmentez la séparation entre l'équipement et le récepteur.
• Connecter l'équipement dans une prise sur un circuit différent de celui auquel le récepteur est connecté
• Consultez le revendeur ou un technicien radio / TV expérimenté pour obtenir de l'aide
Cet appareil respecte la section 15 des règles de la FCC. Son utilisation est sujette aux deux conditions suivantes: (1) Cet appareil ne doit pas causer d'interférences nuisibles et (2) cet appareil doit accepter toutes les interférences reçues, y compris celles pouvant entraîner un fonctionnement indésirable.
Notez que les changements ou les modifications non expressément approuvée par le fournisseur de cet appareil annule l'autorité de l'utilisateur à utiliser cet appareil.
L'apparence et les caractéristiques techniques du produit sont sujettes à modification sans préavis. Ce produit est conçu et prévu pour être utilisé par des personnes âgées de 14 ans et plus.
celestron.com/pages/warranty
WARNING: KEEP BATTERIES OUT OF REACH OF CHILDREN.
AVERTISSEMENT : GARDEZ LES PILES HORS DE PORTÉE DES ENFANTS.
• Examinez les appareils et assurez-vous que le compartiment à piles est correctement fixé, par
ex. que la vis ou autre fixation mécanique est serrée.
• Ne pas utiliser si le compartiment n’est pas sécurisé.
• Jetez les piles boutons usagées immédiatement et en toute sécurité. Les batteries déchargées
peuvent toujours être dangereuses.
• Parlez aux autres des risques associés aux piles bouton et de la façon de protéger leurs
enfants.
0522

DEUTSCH I 41
BEST.NR. 22470 STARSENSE EXPLORER 8” DOBSON BEST.NR. 22471 STARSENSE EXPLORER 10” DOBSON
BEDIENUNGSANLEITUNG

42 I DEUTSCH
EINLEITUNG
Herzlichen Glückwunsch zum Kauf des StarSense Explorer Dobson (SSE Dob) Teleskops. Ihr SSE Dob kombiniert eine große
Optik mit dem faszinierenden StarSense Explorer-Dock und der App, damit das Auffinden und Beobachten aller Arten von ast-
ronomischen Objekten einfach und unterhaltsam wird! Sie können schwache Deep-Sky-Objekte – Galaxien, Nebel, Sternhaufen
und mehr – in Sekundenschnelle auffinden und im Sichtfeld des Okulars anzeigen. Der große Hauptspiegel sammelt viel Licht
und macht es möglich, Details in Objekten zu beobachten, die Sie noch nie zuvor gesehen haben.
Bevor Sie Ihr StarSense Explorer Dob für Ihre erste nächtliche Beobachtung mit nach draußen nehmen, raten wir, dieses Hand-
buch sorgfältig durchzulesen. Es wird Ihnen helfen, die Funktionen Ihres Teleskops besser zu verstehen und zu erfahren, was Sie
erwartet.

DEUTSCH I 43
INHALTSVERZEICHNIS
Lieferumfang . . . . . . . . . . . . . . . . . . . . . . . . . . . . . . . . . . . . . . . . . . . . . . . . 44
Montierung zusammenbauen . . . . . . . . . . . . . . . . . . . . . . . . . . . . . . . . . . . . . . . .45
Teleskop zusammenbauen . . . . . . . . . . . . . . . . . . . . . . . . . . . . . . . . . . . . . . . . . 46
Teleskop ausrichten . . . . . . . . . . . . . . . . . . . . . . . . . . . . . . . . . . . . . . . . . . . . . 47
Fokussierung. . . . . . . . . . . . . . . . . . . . . . . . . . . . . . . . . . . . . . . . . . . . . . . . .48
StarPointer verwenden . . . . . . . . . . . . . . . . . . . . . . . . . . . . . . . . . . . . . . . . . . . 49
StarSense Explorer-Dock und App . . . . . . . . . . . . . . . . . . . . . . . . . . . . . . . . . . . . .50
Vergrößerung bestimmen und Okulare auswählen . . . . . . . . . . . . . . . . . . . . . . . . . . . . .51
Optik ihres teleskops kühlen . . . . . . . . . . . . . . . . . . . . . . . . . . . . . . . . . . . . . . . . 51
Ihre erste Nacht draußen – was Sie erwartet . . . . . . . . . . . . . . . . . . . . . . . . . . . . . . . 52
Dunkeladaption und lichtverschmutzung . . . . . . . . . . . . . . . . . . . . . . . . . . . . . . . . . .53
Filter verwenden . . . . . . . . . . . . . . . . . . . . . . . . . . . . . . . . . . . . . . . . . . . . . . .53
Optik kolliminieren . . . . . . . . . . . . . . . . . . . . . . . . . . . . . . . . . . . . . . . . . . . . . .54
Transport . . . . . . . . . . . . . . . . . . . . . . . . . . . . . . . . . . . . . . . . . . . . . . . . . . .56
Pflege und Wartung . . . . . . . . . . . . . . . . . . . . . . . . . . . . . . . . . . . . . . . . . . . . .57
Technische Daten des Explorer 8” Dobson. . . . . . . . . . . . . . . . . . . . . . . . . . . . . . . . .58
Technische Daten des Explorer 10” Dobson . . . . . . . . . . . . . . . . . . . . . . . . . . . . . . . . 59
Sonnenstrahlen-Warnhinweis. . . . . . . . . . . . . . . . . . . . . . . . . . . . . . . . . . . . . . . .60

44 I DEUTSCH
A1
P
OQ
E
F
K1 K2 L1 L2
M
J1 J2
H1 H2 H3 H4 H5
G1 G2 G3
A2 B C D
N1
N2
R1
S
T
U
LIEFERUMFANG
Karton 1 – Dobson-Sockel
Karton 2 – Optische Tubus-Baugruppe
Linke Seitenwand
Füße (x3)
MONTAGEELEMENTE DES AZI-
MUT-SCHWENKBOLZENS
MONTAGEELEMENTE DER FÜßE
MONTAGEELEMENTE DES HAND-
GRIFFS
MONTAGEELEMENTE DES OKU-
LARHALTERS
MITGELIEFERTE WERKZEUGE
MONTAGEELEMENTE DES HÖ-
HENLAGERS
Sockel-
Griff
Okularhalter
Gummi-
puffer
Optische Tubus-Baugruppe mit Staub-
schutzabdeckung
25-mm-Omni-
Plössl-Okular
2"-auf-1,25"-Okular-
Adapter mit 1,25“-
Abdeckkappe
2“ Fokussierer-
Verlängerungstubus
Kollimationskappe mit
2-mm- und
2,5-mm-Sechskantschlüs-
sel*
*2,5-mm-Sechskantschlüssel nur beim 20,3-cm-Dob im
Lieferumfang enthalten
HINWEIS: Detaillierte Anweisungen zur Kollimation Ihrer
Teleskopoptik finden (p54)
Höhen-
Widerstandsknopf
Zierknopf
Schraubendreher
StarSense-Dock StarPointer-
Leuchtpunkt-Su-
cherfernrohr
Sichel- Schrauben-
schlüssel (x2)
Sechskant-
schlüssel (x2)
Halter-
Schrauben
(x2)
Höhenlager-
Zylinder (x4)
Lager-
Schrauben
(x4)
Griff-
Schrauben (x2)
Abdeckungen
für Fußschrau-
ben (x3)
Schrauben für
Füße (x3)
Bolzen Mutter Stahl-Unter-
legscheiben
(x2)
Kunststoff-
Hohl-
Zylinder
Teflon-
Unterleg-
scheibe
Rechte Seiten-
wand
Frontblende Obere Platte Untere Platte
Seitliche Stützen
(x2)
Schrauben des
Sockels (x2)

DEUTSCH I 45
MONTIERUNG ZUSAMMENBAUEN
A1
A2
E
E
F
F
F
F
F
F
F
F
F
F
F
F
F
F
F
F
F
F
F
F
F
F
K1
L1
L1
L1
L1
L2
L2
L2
L2
H1
H2
H3
H3
H4
H5
J1
J2
J2
B
C
D
G1
G1
G1
G2
G2
G2
G3
G3
G3
Abbildung 1A: Explosionsdarstellung des Sockels
des StarSense Explorer Dobson.

46 I DEUTSCH
N1
N2
O
Q
P
R1
T
S
Abbildung 1B: Explosionsdarstellung der optischen Tubus-Baugruppe des StarSense Explorer
In Abbildung 1 sehen Sie, wie die SSE Dob zusammengehören.
Eine vollständige Teileliste und Montageanleitung finden Sie in der gedruckten Kurzanleitung, die der Verpackung beiliegt oder
auf der Produktseite des SSE Dob unter www.celestron.com
TELESKOP ZUSAMMENBAUEN

DEUTSCH I 47
TELESKOP AUSRICHTEN
Dobson Sockel sind azimutale Montierungen. Das bedeu-
tet, dass sich das Teleskop in zwei Richtungen bewegt: auf
und ab (d. h. Höhe) und von links nach rechts (d. h. Azimut)
(Abbildung 2).
HÖHE
AZIMUT
Abbildung 2: Die StarSense Explorer Dobson Teleskope haben zwei Bewe-
gungsachsen: Höhe (auf und ab) und Azimut (von links nach rechts).
Das Ausrichten des Dobs auf ein Himmelsobjekt ist einfach.
Bewegen Sie einfach den Teleskoptubus auf und ab und
von links nach rechts, bis das Teleskop auf das gewünsch-
te Objekt gerichtet ist und dieses im Okular des Teleskops
erscheint. Der Schwenkknopf auf der Vorderseite des Te-
leskoptubus bietet eine bequeme Lösung, den Tubus zum
Ausrichten zu ergreifen (Abbildung 3). Die Verwendung die-
ses Knopfes verhindert auch, dass die Wärme Ihrer Hand in
den Strahlengang gelangt, was zu einer vorübergehenden
Verzerrung des Bildes führen kann.
Abbildung 3: Der Schwenkknopf bietet einen hervorragenden Halt für Ihre
Finger beim Ausrichten des Teleskops.
Sie können den Widerstand längst der Höhenachse einstel-
len, indem Sie den Knopf drehen, der sich auf der gleichen
Seite wie der Fokussierer des Teleskops befindet – der Hö-
hen-Widerstandsknopf (Abbildung 4).
Abbildung 4: Der Widerstand der Höhenbewegung kann mit dem
Höhen-Widerstandsknopf angepasst werden. (HINWEIS: Der andere
Knopf auf der gegenüberliegenden Seite dient nicht zum Anpassen des
Höhenwiderstands).
Drehen Sie den Knopf, um ausreichend Widerstand für eine
gleichmäßige Auf- und Abwärtsbewegung zu erzielen. In
den meisten Fällen müssen Sie nicht viel Widerstand auf-
bauen. Das Teleskop ist für den normalen Gebrauch aus-
balanciert. Wenn Sie jedoch ein schweres Okular oder ein
größeres Smartphone verwenden, müssen Sie möglicher-
weise mehr Widerstand aufbauen, damit sich das Teleskop
nicht bewegt, wenn Sie es anfassen.

48 I DEUTSCH
FOKUSSIERUNG
Im Lieferumfang der SSE Dobs befinden sich ein
2"-Crayford-Fokussierer, ein 2"-Verlängerungstubus und
ein 2"-auf-1,25"-Okularadapter. Mit diesen drei Teilen
können Sie praktisch jedes Teleskopokular mit dem SSE
Dob verwenden.
Achten Sie bei den die meisten Okularen darauf, dass der
2"-Verlängerungstubus im Fokussierer eingesetzt ist. Ist
dies nicht der Fall, kann das Okular nicht scharf gestellt
werden. Wenn Sie ein Okular verwenden, bei dem viel
innerer Fokussiererweg benötigt wird, entfernen Sie den
2"-Verlängerungstubus. Möglicherweise müssen Sie den
Tubus entfernen, wenn Sie Ihr Dob mit einer Kamera für
astronomische Aufnahmen verwenden möchten.
Wenn Sie ein 1,25"-Okular verwenden möchten, müssen
Sie den 2"-auf-1,25"-Okularadapter einsetzen. Setzen
Sie ihn einfach in den Fokussierer ein (mit eingesetztem
2"-Verlängerungstubus) und stecken Sie dann das
1,25"-Okular in den Adapter. Ziehen Sie die Rändelschraube
am Adapter fest, um das Okular zu fixieren. Der Adapter
verwendet einen internen Messing-Kompressionsring,
damit der Okulartubus nicht zerkratzt oder beschädigt wird.
Drehen Sie zum Fokussieren die Fokussierknöpfe im
oder gegen den Uhrzeigersinn, bis das Objekt im Okular
des Teleskops scharf eingestellt ist. Um die Position
des Fokussierers beizubehalten, nachdem Sie in scharf
gestellt haben, ziehen Sie die Rändelschraube des
Fokussiers fest (Abbildung 5). Wenn Sie den Widerstand
des Fokussierknopfes anpassen müssen, können Sie die
Fokussierer-Widerstandsschraube mit dem mitgelieferten
Sechskantschlüssel festziehen oder lösen.
RÄN
DELSCHRAUBE
DES FOKUSSIERS
FOKUSSIERER
WIDERSTAND
SSCHRAUBE
Abbildung 5: Die Stellschraube für die Verriegelung des Fokussiers fixiert
diesen, sobald die Scharfeinstellung erfolgt ist. Mit der Stellschraube für
den Widerstand des Fokussierers wird der Widerstand der Fokussierknöp-
fe angepasst.
Da das SSE Dob ein Newton-Reflektor ist, erscheinen
die angezeigten Bilder spiegelverkehrt und invertiert im
Vergleich zur Ansicht mit bloßem Auge (Abbildung 6).
Dies hat zwar nur geringe Auswirkungen auf astronomische
Beobachtungen, kann aber bei der Betrachtung von
Objekten an Land ein wenig irritierend sein.
Abbildung 6: Wie alle Newton-Reflektoren erzeugen die SSE-Dobs Bilder,
die im Vergleich zum bloßen Auge spiegelverkehrt und invertiert angezeigt
werden.
ANSICHT DURCH EIN NEWTONREFLEKTORTELESKOP
ANSICHT MIT BLOSSEM AUGE

DEUTSCH I 49
STARPOINTER VERWENDEN
Obwohl Sie sich nicht auf das StarPointer Leuchtpunkt-
Sucherfernrohr verlassen müssen, wenn Sie die StarSense
Explorer App verwenden, kann es beim Ausrichten der App
mit dem Teleskop hilfreich sein. Der StarPointer ist auch
nützlich, wenn Sie tagsüber Objekte suchen, da die App
nur nachts unter dem Sternenhimmel funktioniert.
Um den StarPointer auszurichten, zeigen Sie mit dem
Teleskop zunächst auf ein Objekt, das mindestens 400
Meter entfernt ist. Wir raten, die Ausrichtung tagsüber
vorzunehmen. Wählen Sie einen weit entfernten
Baum, ein Schild, ein Gebäude oder einen anderen
Orientierungspunkt. Wenn Sie nachts ausrichten, können
Sie eine Straßenlaterne, den Mond, einen hellen Stern oder
Planeten verwenden.
Sobald Sie das Teleskop auf das Objekt gerichtet haben,
kontrollieren Sie, ob es im Okular erscheint. Schalten
Sie dann den StarPointer mit dem LED-Einstellrad ein
(Abbildung 7).
LEDEINSTELLRAD
HÖHENKNOPF AZIMUTKNOPF
Abbildung 7: Das StarPointer Leuchtpunkt-Sucherfernrohr.
Erhöhen Sie die Helligkeit so, dass Sie den roten Punkt
gut sehen können. Verwenden Sie nun, ohne das Teleskop
zu bewegen, die Höhen- und Azimut-Einstellknöpfe des
StarPointers, um den roten Punkt auf dem gleichen Objekt
zu zentrieren, das Sie im Okular des Teleskops zentriert
haben. Wenn Sie fertig sind, kontrollieren Sie, ob das
Objekt immer noch im Okular des Teleskops zentriert
ist. Ist dies der Fall, ist die Ausrichtung des StarPointers
abgeschlossen. Falls nicht, bewegen Sie das Teleskop so,
dass das Objekt wieder im Okular des Teleskops zentriert
ist. Fahren Sie mit dem Einsatz der Höhen- und Azimut-
Einstellknöpfe des StarPointer fort, um den roten Punkt
wieder auf dem Objekt zu zentrieren.
Schalten Sie den StarPointer aus, wenn er nicht verwendet
wird, um seine Batterie zu schonen. Die Batterie des
StarPointers sollte zwar lange halten, aber es kommt
der Zeitpunkt, an dem durch eine CR2032 3-V-Lithium-
Knopfzelle ersetzt werden muss. Diese Zellen sind weit
verbreitet und bei einer Vielzahl von Händlern erhältlich.
Batterie ersetzen:
1. Entfernen Sie die Sicherungsschraube der Batterieab-
deckung mit einem Kreuzschlitzschraubendreher (Abbil-
dung 8).
Abbildung 8: Um die Batterieabdeckung des StarPointers zu öffnen,
entfernen Sie zunächst die Sicherungsschraube.
2. Entfernen Sie die leere Batterie aus dem Batteriefach.
Möglicherweise müssen Sie ein Messer oder einen
Schraubenzieher verwenden, um die Batterie aus ihrer
Halterung herauszuhebeln.
3. Legen Sie die neue Batterie so ein, dass der Pluspol
nach oben zeigt. Achten Sie darauf, dass die Batterie
richtig im Batteriefach sitzt (Abbildung 9).
Abbildung 9: Wenn die Batterie wie dargestellt richtig in das Batterie-
fach eingesetzt wurde, lässt sich die Batteriefachabdeckung leicht wieder
schließen.
4. Schließen Sie das Batteriefach und setzen Sie die Siche-
rungsschraube wieder ein.

50 I DEUTSCH
STARSENSE EXPLORERDOCK
UND APP
Die vielleicht faszinierendste Funktion des StarSense Explorer Dobson ist
das StarSense Explorer-Dock und die StarSense Explorer Smartphone-App.
Mit der App, die Sie anleitet, werden Sie mehr Zeit mit der Beobachtung
von Objekten verbringen, anstatt sich mit der Suche nach ihnen unter den
unzähligen Sternen am Himmel abzumühen! Das Celestron StarSense
Explorer ist das einzige Dobson, der diese unglaubliche Funktion bietet.
Laden Sie zuerst die App aus dem Apple App Store (iOS) oder von Google
Play (Android) herunter und installieren Sie sie. Dort finden Sie auch die
minimalen Systemanforderungen. Wenn Sie sich nicht sicher sind, ob Ihr
Smartphone mit der App kompatibel ist, besuchen Sie bitte celestron.com/
SSE
Sobald Sie die App heruntergeladen haben, verwenden Sie den App-
Freischaltcode, den Sie auf der gedruckten Karte finden, die im Lieferumfang
des Teleskops enthalten ist (Abbildung 10).
Download the app from the
before your first observing session
.
or
When prompted, enter the unique unlock code below to
enable telescope control on your device.
Abbildung 10: Den Freischaltcode für die StarSense Explorer App finden Sie auf der Karte, die
sich im Lieferumfang Ihres Teleskops befindet.
Jeder Code kann bis zu fünf Geräte für die Nutzung der StarSense Explorer-
Funktionen freischalten. Wenn Sie den Code fünf Mal verwendet haben und
die App auf weiteren Geräten freischalten müssen, wenden Sie sich bitte an
den technischen Unterstützung von Celestron unter celestron.com/pages/
technical-support.
Nachdem Sie die App freigeschaltet haben, können Sie beginnen. Platzieren
Sie Ihr Smartphone im StarSense Explorer-Dock und drücken Sie das
StarSense-Symbol am unteren Rand des Planetariumbildschirms (Abbildung
11).
Wählen Sie die Option „AUSRICHTUNG ERFORDERLICH“ und folgen Sie
den Anweisungen auf dem Bildschirm, um die Kamera des Smartphones mit
dem Teleskop auszurichten. Sobald dieser Vorgang abgeschlossen ist, können
Sie die App zum Auffinden von Objekten verwenden.
Wählen Sie ein Objekt im Planetarium oder aus der Liste „Das Beste von heute
Nacht“ zur Beobachtung aus. Auf dem Bildschirm werden Pfeile angezeigt,
die Sie zu dem Objekt führen. Folgen Sie den Pfeilen, bis das Fadenkreuz
grün wird und das Objekt sich im Sichtfeld Ihres Teleskops befindet. Es ist so
einfach!
Sie können während der Beobachtung detaillierte Informationen über das
Objekt nachschlagen. Hunderte der beliebtesten Objekte bieten auch eine
Audio-Präsentation. Drücken Sie zum Anhören auf die Leiste am unteren
Bildschirmrand, in der der Name des Objekts aufgeführt ist (Abbildung 12).
STARSENSESYMBOL
Abbildung 11: Sobald Sie die StarSense Explorer
App freigeschaltet haben, drücken Sie das StarSense-
Symbol, um mit der Objektsuche zu beginnen.
Abbildung 12: Drücken Sie die Objektinformationen-
Leiste, um zusätzliche Informationen über das
ausgewählte Objekt abzurufen, einschließlich
Bildern und Audio-Präsentationen für viele Objekte.

DEUTSCH I 51
VERGRÖSSERUNG FESTLEGEN
UND OKULARE AUSWÄHLEN
Um die Vergrößerung des Teleskops zu ändern, müssen Sie
das Okular im Fokussierer des Teleskops wechseln. Zum
Berechnen der Vergrößerung, die Sie mit einem bestimmten
Okular erreichen können, verwenden Sie diese Formel:
Brennweite des Teleskops /
Brennweite des Okulars
= Vergrößerung
Die SSE Dobs haben eine Brennweite von 1200 mm. In
ihrem Lieferumfang befindet sich ein 25-mm-Omni-Plössl-
Okular. Anhand der Formel können wir berechnen, dass
diese Kombination eine Vergrößerung von 48-fach ergibt
(1200 mm / 25 mm = 48-fach). Dies ist eine hervorragende
Vergrößerung für das Auffinden und Beobachten von
weit entfernten Objekten im Weltall. Vielleicht möchten
Sie ein Okular mit höherer Vergrößerung kaufen, z. B. ein
10-mm-Omni-Plössl, um den Mond und die Planeten mit
höherer Vergrößerung zu beobachten. Erhöhen Sie die
Vergrößerung jedoch nicht zu stark, da sonst die Sicht
aufgrund atmosphärischer Störungen (z. B. Luftturbulenzen)
beeinträchtigt werden kann.
Die maximale Vergrößerung eines Teleskops liegt bei
etwa 60-facher Vergrößerung pro Zoll, also 480-fach für
das 8" SSE Dob und 600-fach für das 10" SSE Dob. An
vielen Orten kann es jedoch schwierig sein, scharfe Bilder
mit mehr als 100-facher Vergrößerung zu erzielen, da es
in der Luft über Ihnen zu Turbulenzen kommt. Wenn Sie
feststellen, dass die Sterne über Ihnen stark funkeln, sind
die Sichtbedingungen schlecht. Sie müssen dann eine
geringere Vergrößerung wählen. Wenn die Sterne ruhig
zu leuchten scheinen, sind die Sichtbedingungen gut. Sie
können versuchen, Okulare mit höherer Vergrößerung zu
verwenden.
Die SSE Dobs können sowohl mit Okularen im 1,25"-
als auch im 2"-Format verwendet werden. 2"-Okulare
bieten normalerweise ein größeres Sichtfeld, kosten aber
auch möglicherweise deutlich mehr. Entfernen Sie zur
Verwendung eines 2"-Okulars den 2"-auf-1,25"-Adapter
vom Fokussierer und stecken Sie das Okular direkt in den
2"-Verlängerungstubus. Sichern Sie das Okular mit den
Rändelschrauben am 2-Zoll-Verlängerungstubus.
Der Okularhalter an der Vorderseite des Sockels bietet eine
praktische Ablage für Okulare, die nicht verwendet werden.
Er kann drei 1,25-Zoll-Okulare und ein 2-Zoll-Okular
aufnehmen (Abbildung 13).
Abbildung 13: Der Okularhalter ist ein praktischer Platz, um zusätzliche
Okulare während der Beobachtungssitzung aufzubewahren.
VERGRÖSSERUNG FESTLEGEN UND OKULARE
AUSWÄHLEN
OPTIK IHRES TELESKOPS
KÜHLEN
Sie erhalten die beste Sicht durch Ihr Teleskop, wenn es
sich im therimschen Gleichgewicht mit der Umgebungsluft
befindet. Wenn das Teleskop wärmer ist als die Außenluft,
passt sich der Spiegel an die Temperatur an und seine Form
verändert sich. Bilder, die Sie durch ein nicht abgekühltes
Teleskop betrachten, erscheinen nicht so scharf, wie sie es
sonst wären. Wenn Sie Ihr Teleskop aus einem beheizten
Haus ins Freie bringen, müssen Sie etwa eine Stunde
warten, bevor Sie scharfe Bilder erwarten können. Aus
diesem Grund empfehlen wir Ihnen, Ihr Teleskop in einem
trockenen, aber ungeheizten Raum wie einer Garage oder
einem Schuppen aufzubewahren.
Für das 10" SSE Dob gibt es einen optionalen USB-Kühl-
ventilator für Dobsons. Er wird an der Rückseite der Spie-
gelzelle montiert und bläst Luft auf den Spiegel, um die
Kühlung zu beschleunigen (Abbildung 14).
Der Lüfter hilft der Optik, das thermische Gleichgewicht
schneller zu erreichen. (Das 8" SSE Dob hat keine Lüfter-
halterung und ist daher mit dem Kühlventilator nicht kom-
patibel).
Abbildung 14: Der optionale USB-Kühlventilator für Dobsons ist mit dem
10" SSE Dob kompatibel.

52 I DEUTSCH
IHRE ERSTE NACHT DRAUSSEN
WAS SIE ERWARTET
Mit der größeren Blende der SSE Dobs können Sie
buchstäblich Tausende von Objekten beobachten:
Der Mond
Die Beobachtung der Mondoberfläche ist ein guter
Ausgangspunkt. Sie können leicht Krater, Marias,
Lakus, Täler, Berge und andere Merkmale erkennen.
Der Mond ist so hell, dass Sie die Verwendung eines
optionalen Mondfilters in Betracht ziehen sollten. Er lässt
sich auf die Unterseite des Okulars schrauben, um die
Ansicht abzudunkeln. Wir empfehlen auch ein Okular
mit höherer Leistung, damit Sie den Mond aus der
Nähe betrachten können.
Planeten
Die besten beobachtbaren Planeten sind Jupiter, Saturn,
Mars und Venus. Ein Okular mit höherer Leistung hebt
die kleinen Details hervor. Sie können die Ringe des
Saturns, Oberflächendetails auf dem Jupiter und seinen
Monden, die Phasen der Venus und vielleicht einige
Oberflächendetails auf dem Mars beobachten, wenn er
in Opposition steht (d. h. wenn er der Erde am nächsten
ist).
Sterne und Doppelsterne
Sterne erscheinen unabhängig von der verwendeten
Vergrößerung als Lichtpunkte. Mit einem Teleskop
können Sie jedoch die Farbe eines Sterns erkennen und
bei höherer Vergrößerung auch Doppelsterne „aufteilen“.
Achten Sie bei variablen Sternen darauf, ob Sie die
Helligkeitsänderung eines Sterns über einen Zeitraum
von Tagen oder Wochen feststellen können.
Offene Sternhaufen
Dies sind Sterngruppen, die in unserer Galaxie, der
Milchstraße, entstanden sind. Sie können im Okular
des Teleskops eindrucksvoll beobachtet werden, selbst
bei etwas lichtverschmutztem Himmel. Astronomen
beschreiben Sternhaufen oft so, dass sie im Okular des
Teleskops wie „zerdrückte Diamanten auf schwarzem
Samt“ aussehen. Sternhaufen lassen sich normalerweise
am besten mit lichtschwachen Okularen betrachten, da
sie in der Regel ein großes Sichtfeld erfordern, um den
gesamten Sternhaufen zu erkennen.
Kugelsternhaufen
Dabei handelt es sich um dichte Haufen von
Hunderttausenden von Sternen, die sich schon früh bei
der Entstehung unserer Galaxie gebildet haben. Diese
Sternhaufen sehen aus wie Kugeln aus Licht. Die helleren
Haufen können bei guten Bedingungen in einzelne Sterne
aufgelöst werden. Die meisten Kugelsternhaufen lassen
sich am besten mit einem Okular mittlerer Vergrößerung
betrachten, da sie nicht annähernd so groß sind wie
offene Sternhaufen, aber auch nicht hell genug für hohe
Vergrößerungen.
Nebel
Normalerweise brauchen Sie einen dunklen Himmel, um
Gasnebel zu beobachten, die als schwaches Leuchten
um Sterne herum erscheinen. Erwarten Sie nicht, dass
Sie am Stadthimmel Nebel sehen können, außer vielleicht
die hellsten, wie den Orionnebel und den Lagunennebel.
Galaxien
Galaxien sind vielleicht die faszinierendsten aller Objekte,
die man beobachten kann. Sie sind wie Inseluniversen
für sich selbst. Die hellsten Galaxien, wie z. B. die
Andromeda-Galaxie, kann man zwar bei einem etwas
lichtverschmutzten Himmel erkennen, aber am besten
lassen sie sich bei dunklen Himmel beobachten. In der
Beobachtungsreichweite der SSE Dobs befinden sich
buchstäblich Hunderte von Galaxien. Die besten Bilder
zeigen kleine Details wie schwache Spiralarme und
Staubspuren. Viele werden jedoch nur als nicht-stellare
„Schlieren“ oder „Klumpen“ erscheinen. Trotzdem ist
allein die Möglichkeit, das Licht einer anderen Galaxie
außerhalb unserer eigenen zu entdecken, schon lohnend.
Dabei ist zu beachten, dass die SSE Dobs nicht motorisiert
sind. Das bedeutet, dass sie Himmelsobjekten nicht
automatisch folgen, wenn sich die Erde dreht. Daher
werden Sie feststellen, dass Objekte bei der Beobachtung
ein wenig driften und je nach Vergrößerung innerhalb von
ein oder zwei Minuten aus dem Sichtfeld des Okulars
verschwinden. Bei Okularen mit höherer Vergrößerung
driften die Objekte schneller aus dem Gesichtsfeld, da ihr
Gesichtsfeld schmaler ist. Sie müssen das Dob manuell
nachführen, um die Objekte im Zeitverlauf zu zentrieren. Das
ist leicht zu bewerkstelligen. Halten Sie den Schwenkknopf
des Teleskops fest und bewegen Sie ihn je nach Bedarf
etwas auf und ab und von links nach rechts.

DEUTSCH I 53
DUNKELADAPTION UND
LICHTVERSCHMUTZUNG
Es dauert mindestens eine halbe Stunde, bis sich das
menschliche Auge an die Dunkelheit gewöhnt hat. Erwarten
Sie also nicht, dass Sie sofort kleine Details in schwachen
Deep-Sky-Objekten erkennen, sobald Sie ins Freie gehen.
Vermeiden Sie während der Beobachtung helles Licht (z.
B. wenn Sie von draußen in ein beleuchtetes Haus gehen),
sonst braucht Ihre Dunkeladaption erneut Zeit, um sich
wieder anzupassen. Verwenden Sie rote Taschenlampen,
die für den astronomischen Gebrauch bestimmt sind, da
das rote Licht Ihre Nachtsicht nicht stark beeinträchtigt.
Auch der Mond beeinträchtigt Ihre Dunkeladaption. Wenn
Sie also den Mond direkt beobachten, müssen Sie damit
rechnen, dass es einige Zeit dauert, bis Sie Ihre Nachtsicht
wieder hergestellt ist.
Örtliche Lichtverschmutzung beeinträchtigt stark das
Aussehen und den Kontrast von schwächeren Deep-Sky-
Objekten im Teleskop. Erwarten Sie nicht, dass Sie am
Stadthimmel viele Details erkennen können. Die besten
Beobachtungsmöglichkeiten erhalten Sie an dunklen
Orten, die von der nächtlichen Beleuchtung von Städten
oder Vorstädten weit entfernt sind. Helle Objekte wie der
Mond, Planeten und helle offene Sternhaufen werden von
der Lichtverschmutzung nicht so stark beeinträchtigt und
eignen sich daher gut für die Beobachtung im Garten, egal
wo man sich befindet. Vergessen Sie nicht, dass auch der
Mond selbst einen großen Teil des Nachthimmels erhellen
kann, was die Beobachtung schwacher Objekte selbst von
dunklen Standorten aus verhindert. Planen Sie Deep-Sky-
Beobachtungen daher für Zeiträume, in denen der Mond
nicht zu sehen ist.
FILTER VERWENDEN
Experimentieren Sie mit optionalen Filtern, um die Sicht zu
verbessern. Astronomische Filter werden auf die Unterseite
des Okulars aufgeschraubt und sind normalerweise im
1,25"- und 2"-Format erhältlich. Entfernen Sie einfach das
Okular aus dem Fokussierer, schrauben Sie den Filter unten
auf die Steckhülse des Okulars und setzen Sie dieses dann
wieder in den Fokussierer ein.
Es stehen viele nützliche Filter zur Auswahl:
Mondfilter – Dieser für die Beobachtung von Monddetails
unverzichtbare Filter verringert die Blendung und macht
helle Objekte dunkler.
Variabler Polarisator – Wie der Mondfilter verdunkelt auch
der Polarisator Ihre Sicht. Der Hauptunterschied besteht
darin, dass Sie die Stärke des Abdunklungseffekts durch
Drehen des Polarisators individuell einstellen können.
Farbfilter – Diese Filter sind in einer Vielzahl von Farben
erhältlich und können den Kontrast bei der Beobachtung
von Planetendetails verbessern.
Lichtverschmutzungsfilter – Wenn Sie Deep-Sky-
Objekte von einem Stadt- oder Vorstadt-Himmel aus
beobachten, verbessern diese Filter den Kontrast, indem
sie das „schlechte“ Licht der örtlichen Lichtverschmutzung
blockieren und das „gute“ Licht von Objekten am Deep-Sky
durchlassen. Sie werden die größte Kontrastverbesserung
bei der Beobachtung von Nebeln feststellen.

54 I DEUTSCH
OPTIK KOLLIMIEREN
Unter Kollimation versteht man das Ausrichten der Optik
des Teleskops. Dobson-Teleskope verwenden eine Newton-
Reflektoroptik, die aus einem parabolischen Haupt- und
einem flachen Zweitspiegel besteht. Um eine optimale
Leistung zu gewährleisten, müssen Sie die Ausrichtung der
Optik regelmäßig überprüfen. Um Ihnen dabei zu helfen,
haben wir eine spezielle „Kollimationskappe“ beigelegt, die
Sie verwenden können. Darüber hinaus ist der Hauptspiegel
mit einem selbstklebenden Ring markiert, der die Kollimation
erleichtert.
Um die Ausrichtung der Spiegel zu überprüfen, entfernen
Sie zunächst alle Okulare. Vergewissern Sie sich, dass
der 2"-auf-1,25"-Adapter im Fokussierer eingesetzt ist.
Setzen Sie dann die Kollimationskappe auf den Fokussierer
(Abbildung 15).
Abbildung 15: Um die Ausrichtung der Spiegel zu überprüfen, verwenden
Sie die mitgelieferte Kollimationskappe mit dem Fokussierer.
Schauen Sie durch das kleine Loch in der Mitte der
Kollimationskappe. Die Ansicht sollte wie in Abbildung 16
aussehen. Ist dies nicht der Fall, müssen Sie die Ausrichtung
der Spiegel korrigieren.
Untere Kante
des Auszugstu-
bus des Fokus-
sierers
Reflexion
Ihres Auges
Rand des
Zweit-
Spiegels
Zweit-
Spiegelhalter Reflexion
des
Hauptspie-
gels
Reflexion des
Zweit-Spiegelhalters
Haupt-
Spie-
gel-
klemme
Abbildung 16: Wenn Ihr Teleskop richtig ausgerichtet wurde, sollte der
Blick durch die Kollimationskappe wie in der Abbildung oben aussehen.
Es ist am einfachsten ein Teleskop tagsüber zu kollimieren,
wenn das Teleskop auf eine weiße Wand gerichtet ist.
So erhalten Sie eine kontrastreiche Ansicht und können
leichter feststellen, welche Anpassungen vorgenommen
werden müssen. Verwenden Sie den/die mitgelieferten
Sechskantschlüssel, um die Anpassungen vorzunehmen.
Im Lieferumfang des 8" SSE Dob befinden sich ein
2-mm- und 2,5-mm-Sechskantschlüssel. Im Lieferumfang
des 10"-SSE-Dob befindet sich ein einzelner 2-mm-
Sechskantschlüssel. Für das 8" SSE Dob benötigen Sie
außerdem den mitgelieferten Kreuzschlitzschraubendreher.
Stellen Sie zunächst den Zweitspiegel auf der Vorderseite
des Teleskops mit dem 2-mm-Sechskantschlüssel ein.
1. Sie müssen in der Lage sein, die Reflexion des gesamten
Hauptspiegels zentriert im Zweitspiegel zu sehen, wie in
Abbildung 16 dargestellt.
Ist dies nicht der Fall (wie z. B. in Abbildung 17),
stellen Sie die Neigung des Zweitspiegels mit den drei
Innensechskantschrauben im Zweitspiegelhalter ein
(Abbildung 18).
Reflexion des
Rand des
Zweit-
Spiegels
Reflexion des
Hauptspiegels
Abbildung 17: Wenn die Reflexion des Hauptspiegels nicht wie oben
dargestellt im Zweitspiegel zentriert ist, müssen Sie die Neigung des
Zweitspiegels anpassen.
2-mm
Sechs-
kantschlüssel
ein.
Abbildung 18: Mit den drei Innensechskantschrauben im

DEUTSCH I 55
Zweitspiegelhalter wird die Neigung des Zweitspiegels eingestellt.
a. Stellen Sie jeweils eine Stellschraube ein. Nehmen
Sie nur kleine Anpassungen vor.
b. Wenn eine Stellschraube zu fest oder zu locker
sitzt, nehmen Sie die Anpassungen an den anderen
Schrauben vor, um dies auszugleichen.
2. Fahren Sie mit der Einstellung der Stellschrauben fort,
bis der Hauptspiegel in der Mitte des Zweitspiegels
erscheint (Abbildung 19). Wenn Sie fertig sind, achten
Sie darauf, dass alle drei Stellschrauben gut festgezogen
sind.
Rand des
Zweit-
Spiegels
Reflexion des
Hauptspiegels
Reflexion
des Zweit-
Spiegels
Abbildung 19: Fahren Sie mit der Einstellung der Neigung des
Zweitspiegels fort, bis die Reflexion des Hauptspiegels wie in der Abbildung
oben dargestellt zentriert ist.
3. Stellen Sie als Nächstes die Neigung des Hauptspiegels
ein, bis die Reflexion des Zweitspiegels innerhalb der
Reflexion des Hauptspiegels zentriert ist.
Verwenden Sie beim 8"-Dobson den 2,5-mm-
Sechskantschlüssel und den Kreuzschlitzschraubendreher,
um den Hauptspiegel zu neigen. Es gibt drei
Kollimationsschrauben-Paare. Jedes Paar arbeitet
zusammen, um die Neigung einzustellen.
a. Stellen Sie jeweils ein Schraubenpaar ein. Lösen
Sie zunächst eine der beiden Schrauben und ziehen
Sie die andere fest (Abbildung 20).
Abbildung 20: Beim 8"-Dob befinden sich in der Spiegelzelle drei Sätze
von Push-Pull-Schrauben, mit denen die Neigung des Hauptspiegels
eingestellt wird. Lösen Sie eine Schraube des Paares und ziehen Sie
die andere fest, um die Neigung einzustellen.
b. Wenn der Spiegel entgegen der gewünschten
Richtung kippt, lösen Sie die Schraube, die Sie
zuvor asngezogen haben und ziehen Sie die andere
Schraube des Paares fest.
c. Sobald Sie ein Schraubenpaar so weit wie möglich
eingestellt haben, machen Sie mit einem anderen
Schraubenpaar weiter.
d. Fahren Sie mit der Anpassung fort, bis die Reflexion
des Zweitspiegels innerhalb der Reflexion des
Hauptspiegels zentriert ist. Wenn Sie fertig sind,
sollte der Blick durch die Kollimationskappe wie in
Abbildung 16 aussehen.

56 I DEUTSCH
Für das 10"-Dobson benötigen Sie kein Werkzeug, um
den Hauptspiegel zu neigen. Stellen Sie stattdessen
einfach die Rändelschrauben ein. Drei der Rändelschrauben
sind Arretierschrauben, während mit den anderen drei
Rändelschrauben die Neigung eingestellt wird.
1. Lösen Sie zunächst alle drei Rändelschrauben
(Abbildung 21).
RÄNDELSCHRAUBEN
Abbildung 21: Beim 10"-Dob gibt es drei federgelagerte
Kollimationsschrauben, mit denen die Neigung des Hauptspiegels angepasst
wird. Die anderen drei Rändelschrauben fixieren den Spiegel, sobald die
Neigungsanpassung abgeschlossen ist.
2. Stellen Sie die Rändelschrauben für die Kollimation
nacheinander ein. Jede Kollimationsschraube ist
federgelagert, sodass Sie sie im oder gegen den
Uhrzeigersinn drehen können.
3. Passen Sie die Schrauben weiter an, bis die Reflexion
des Zweitspiegels innerhalb der Reflexion des
Hauptspiegels zentriert ist.
4. Ziehen Sie die drei Rändelschrauben wieder fest, bis
sie gut sitzen.
5. Wenn Sie fertig sind, sollte der Blick durch die
Kollimationskappe wie in Abbildung 16 aussehen.
Die Optik Ihres Teleskops ist nun ausgerichtet und
einsatzbereit. Sie können die Ausrichtung des Teleskops
auch nachts überprüfen, indem Sie das Teleskop bei starker
Vergrößerung auf einen hellen Stern richten. Zentrieren Sie
den Stern im Sichtfeld und defokussieren Sie ihn leicht – er
sollte wie ein Kreis mit einem Loch in der Mitte aussehen.
(Das „Loch“ ist der Schatten des Zweitspiegels.) Wenn sich
das Loch nicht in der Mitte des Kreises befindet, müssen
Sie die Kollimation zusätzlich anpassen (Abbildung 22).
Abbildung 23: Um den Hauptspiegel zum Reinigen aus dem
Teleskoptubus herauszunehmen, entfernen Sie zunächst die Schrauben,
die sich direkt über der Spiegelzelle befinden.
TRANSPORT
Der Transport des StarSense Explorer Dobson ist einfach,
besonders wenn man seine Größe bedenkt. Nehmen Sie
zunächst den Teleskoptubus vom Sockel ab, indem Sie den
Höhen-Widerstandsknopf lösen und den Teleskoptubus
anheben. Sie können den Tubus und den Sockel separat
mit den integrierten Tragegriffen transportieren. Die Griffe
sind so angebracht, dass sie die Last ausbalancieren,
sodass keine der beiden Komponenten umständlich zu
transportieren sein dürfte.
GUTE KOLLIMATION MUSS ANGEPASST WERDEN

DEUTSCH I 57
PFLEGE UND WARTUNG
Bewahren Sie das Teleskop an einem trockenen Ort im
Haus auf. Eine Garage ist ein idealer Ort. Sie hält die Optik
in der Nähe der Außentemperatur, sodass die Optik nicht
so lange braucht, um sich zu akklimatisieren. Behalten Sie
die Staubschutzkappe auf der Vorderseite des Teleskops
und die Abdeckkappe auf dem Fokussierer, wenn Sie das
Teleskop nicht verwenden. Andernfalls können sich Staub
und Partikel auf der Optik ansammeln.
Wenn das Teleskop durch Tau feucht geworden ist,
trocknen Sie die Außenseite des Teleskoptubus und des
Sockels vor der Aufbewahrung mit einem Handtuch ab.
Während eine kleine Menge Wasser auf der Außenseite
des Tubus und dem Sockel dem Teleskop nicht schadet,
kann eine langfristige Lagerung im feuchten Zustand zu
Korrosion oder Wasserschäden führen. Der Holzsockel hat
versiegelte Melaminoberflächen. Dennoch kann Wasser in
Risse eindringen, wenn er feucht gelagert wird.
Es ist normal, dass sich im Laufe der Zeit etwas Staub
und einige Partikel auf dem Hauptspiegel ansammeln. Sie
haben keinen Einfluss auf die optische Leistung. Wenn der
Hauptspiegel jedoch übermäßig verschmutzt ist, müssen
Sie ihn reinigen.
Hauptspiegel reinigen:
1. Entfernen Sie die Hauptspiegelzelle vom
Teleskoptubus, indem Sie die Schrauben am Tubus
direkt über der Spiegelzelle entfernen (Abbildung 23).
Dazu benötigen Sie den Kreuzschlitzschraubendreher.
Abbildung 23: Um den Hauptspiegel zur Reinigung vom Teleskoptubus
zu entfernen, entfernen Sie zuerst die Schrauben, die sich direkt über
der Spiegelzelle befinden.
2. Ziehen Sie die Spiegelzelle vorsichtig vom Tubus ab.
3. Die Spiegeloberfläche liegt nun zur Reinigung frei. Wir
empfehlen, den Hauptspiegel während der Reinigung
in seiner Zelle zu belassen.
4. Verwenden Sie einen Puster und eine Optik-
Reinigungsbürste, um größere Partikel und Staub
zu entfernen. In manchen Fällen ist dies die einzige
erforderliche Reinigung.
5. Um Flecken und Öl zu entfernen, verwenden Sie
Objektivreinigungsflüssigkeit und -tücher, um
die Spiegeloberfläche zu säubern. Tragen Sie
die Flüssigkeit auf das Tuch auf und wischen Sie
vorsichtig über die Spiegeloberfläche. Wischen Sie
dabei radial (d. h. von der Mitte des Spiegels zum
Rand hin). Verwenden Sie für jeden Wischvorgang
ein neues Tuch. Reiben Sie nicht, dadurch wird Öl
normalerweise nur verteilt, anstatt es zu entfernen.
6. Wenn der Spiegel sauber ist, setzen Sie die
Spiegelzelle wieder in den Teleskoptubus ein und
ziehen die Schrauben fest.
Der Zweitspiegel ist oft nicht verschmutzt, da seine optische
Oberfläche nach unten gerichtet ist. Wenn er jedoch
gereinigt werden muss, kann er auf die gleiche Weise
wie der Hauptspiegel gereinigt werden. Sie müssen den
Zweitspiegel nicht aus dem Teleskop entfernen, um ihn zu
reinigen. Richten Sie das Teleskop während der Reinigung
waagerecht aus, damit keine Objekte auf den Hauptspiegel
fallen können.
Sie können die freiliegenden optischen Oberflächen Ihrer
Okulare auf die gleiche Weise wie oben beschrieben
reinigen.

58 I DEUTSCH
Best.-Nr. 22470 Starsense Explorer 8” Dobson
Optisches Design Newton-Reflektor
Blende 8“ (203 mm)
Brennweite 1200 mm
Öffnungsverhältnis F/5,9
Optische Beschichtungen XLT-Reflexionsschichten mit Siliziumdioxid- und Tantalpentoxid-Schutzschichten für
Haupt- und Zweitspiegel
Spiegelmaterial Pyrex-Äquivalent für Haupt- und Zweitspiegel
Dicke des Hauptspiegels 25 mm (ca. 1:8 Dickenverhältnis)
Dicke des Zweitspiegels 8,5 mm
Nebenachse des Zweitspiegels 47 mm
Tubusmaterial Stahl
Fokussierer 2" Crayford, einschließlich 2"-Verlängerungstubus und 2"-auf-1,25"-Adapter
Okular / Vergrößerung 25-mm-Plössl, 48-fach
Suchfernrohr StarPointer Leuchtpunkt-Sucherfernrohr
Weitere Zubehörartikel StarSense Explorer-Dock, Okularhalter, Kollimationskappe,
Tragegriffe für OTA und Sockel, Ausrichtungsknopf, Staubschutzabdeckungen
Stativ Azimutaler Dobson Sockel, einstellbarer Höhenwiderstand
Abmessungen des optischen Tubus 112 cm x 24 cm Durchmesser
Gewicht des optischen Tubus 9,3 kg.
Sockelabmessungen 60,9 cm x 48 cm x 48 cm
Sockelgewicht 10,3 kg.
Gesamtgewicht des Teleskop-Kits 19,7 kg.
TECHNISCHE DATEN

DEUTSCH I 59
Best.-Nr. 22471 Starsense Explorer 10” Dobson
Optisches Design Newton-Reflektor
Blende 10 Zoll (254 mm)
Brennweite 1200 mm
Öffnungsverhältnis F/4,7
Optische Beschichtungen XLT-Reflexionsschichten mit Siliziumdioxid- und Tantalpentoxid-Schutzschichten für
Haupt- und Zweitspiegel
Spiegelmaterial Pyrex-Äquivalent für Haupt- und Zweitspiegel
Dicke des Hauptspiegels 30 mm (ca. 1:8,5 Dickenverhältnis)
Dicke des Zweitspiegels 11,5 mm
Nebenachse des Zweitspiegels 64 mm
Tubusmaterial Stahl
Fokussierer 2" Crayford, einschließlich 2"-Verlängerungstubus und 2"-auf-1,25"-Adapter
Okular / Vergrößerung 25-mm-Plössl, 48-fach
Suchfernrohr StarPointer Leuchtpunkt-Sucherfernrohr
Weitere Zubehörartikel StarSense Explorer-Dock, Okularhalter, Kollimationskappe,
Tragegriffe für OTA und Sockel, Ausrichtungsknopf, Staubschutzabdeckungen
Stativ Azimutaler Dobson Sockel, einstellbarer Höhenwiderstand
Abmessungen des optischen Tubus 112 cm x 29 cm Durchmesser
Gewicht des optischen Tubus 13,2 kg.
Sockelabmessungen 67,3 cm x 53,3 cm x 53,3cm”
Sockelgewicht 11,6 kg.
Gesamtgewicht des Teleskop-Kits 24,9 kg.
TECHNISCHE DATEN

60 I DEUTSCH
• Niemals mit bloßem Auge oder mit einem Teleskop (außer bei Verwendung eines vorschriftsmäßigen Sonnenfilters)
direkt in die Sonne schauen. Sie könnten permanente und irreversible Augenschäden davontragen.
• Das Teleskop keinesfalls zur Projektion eines Bildes der Sonne auf eine Oberfläche verwenden. Durch die interne
Wärmeakkumulation können das Teleskop und etwaiges daran angeschlossenes Zubehör beschädigt werden.
• Niemals einen Okularsonnenfilter oder einen Herschelkeil verwenden. Die interne Wärmeakkumulation im Teleskop
kann zu Rissen oder Brüchen dieser Instrumente führen. Dadurch könnte ungefiltertes Sonnenlicht ins Auge gelan-
gen.
• Lassen Sie das Teleskop niemals unbeaufsichtigt. Achten Sie darauf, dass ein Erwachsener, der mit den richtigen
Betriebsverfahren Ihres Teleskops vertraut ist, stets gegenwärtig ist, insbesondere wenn Kinder in der Nähe sind.
SONNENSTRAHLENWARNHINWEIS
Brauchen Sie Unterstützung?
Wenden Sie sich an die technische Unterstützung von Celestron durch Aufrufen
von
celestron.com/pages/technical-support
© 2022 Celestron • Alle Rechte vorbehalten • celestron.com
2835 Columbia Street • Torrance, CA 90503 USA.
celestron.com
FCC-ERKLÄRUNG: Dieses Gerät wurde getestet und entspricht den Grenzwerten für digitale Geräte der Klasse B in Übereinstimmung mit Abschnitt 15 der FCC-Bestimmungen. Diese Grenzwerte sollen einen angemessenen Schutz vor schädlichen Störungen in einer Wohnumgebung bieten. Dieses Gerät
erzeugt, verwendet Hochfrequenzenergie und kann diese ausstrahlen und kann, wenn es nicht in Übereinstimmung mit den Anweisungen installiert und verwendet wird, Störungen im Funkverkehr verursachen. Allerdings gibt es keine Garantie, dass bei einer bestimmten Installation keine Störungen auftreten
werden. Wenn dieses Gerät den Radio- oder Fernsehempfang stört, was ermittelt werden kann, indem man das Gerät ein- und ausschaltet, so sollte der Benutzer die Störungen auf eine oder mehrere der folgenden Maßnahmen beheben:
• Neuausrichtung oder Neuplatzierung der Empfangsantenne.
• Den Abstand zwischen dem Gerät und dem Empfänger vergrößern.
• Schließen Sie das Gerät an eine Steckdose an, die nicht an den Stromkreis des Empfängers angeschlossen ist.
• Den Händler oder einen erfahrenen Radio- und Fernsehtechniker um Hilfe bitten.
Dieses Gerät erfüllt Teil 15 der FCC-Richtlinien. Der Betrieb unterliegt den folgenden beiden Bedingungen: (1) Dieses Gerät darf keine schädlichen Störungen erzeugen und (2) dieses Gerät muss Störungen von außen akzeptieren, dazu gehören solche Störungen, die einen unerwünschten Betrieb verursachen.
Bitte beachten Sie, dass Änderungen oder Modifikationen an diesem Gerät, die nicht ausdrücklich vom Hersteller zugelassen sind, zum Verlust der allgemeinen Betriebserlaubnis führen können.
Produktdesign und technische Daten können ohne vorherige Ankündigung geändert werden. Dieses Produkt wurde für die Verwendung durch Personen von 14 Jahren und darüber entworfen und vorgesehen.
celestron.com/pages/warranty
WARNUNG: BATTERIEN AUSSERHALB DER REICHWEITE VON KINDERN AUFBEWAHREN.
• Untersuchen Sie Geräte und stellen Sie sicher, dass das Batteriefach richtig befestigt ist, z.
dass die Schraube oder ein anderes mechanisches Befestigungselement angezogen ist.
• Nicht verwenden, wenn das Fach nicht sicher ist.
• Entsorgen Sie gebrauchte Knopfbatterien sofort und sicher. Leere Batterien können dennoch
gefährlich sein.
• Informieren Sie andere über die mit Knopfbatterien verbundenen Risiken und darüber, wie sie
ihre Kinder schützen können.
0522

ITALIANO I 61
STARSENSE EXPLORER 8” DOBSON 22470 STARSENSE EXPLORER 10” DOBSON 22471
MANUALE DI ISTRUZIONI

62 I ITALIANO
INTRODUZIONE
Complimenti per aver acquistato il telescopio StarSense Explorer dobson (SSE Dob). Il telescopio SSE Dob combina grandi ot-
tiche a un aggancio e un’app StarSense Explorer che rendono facile e divertente la ricerca e l’osservazione di tutti i corpi celesti.
È possibile individuare oggetti deboli del profondo cielo, galassie, nebulose, amassi stellari e tanto altro, e posizionarli in pochi
secondi nel campo visivo dell’oculare. Un ampio specchio primario raccoglie grandi quantità di luce, consentendo di accedere
a dettagli degli oggetti mai visti prima.
Prima di portare all’esterno lo StarSense Explorer Dob per la prima osservazione notturna, si consiglia di leggere per intero il
presente manuale. Ciò consente di comprendere appieno le funzioni del telescopio e di sapere cosa aspettarsi.

ITALIANO I 63
INDICE
Contenuto della confezione . . . . . . . . . . . . . . . . . . . . . . . . . . . . . . . . . . . . . . . . .64
Montaggio montatura . . . . . . . . . . . . . . . . . . . . . . . . . . . . . . . . . . . . . . . . . . . . 65
Montaggio telescopio . . . . . . . . . . . . . . . . . . . . . . . . . . . . . . . . . . . . . . . . . . . . 66
Come puntare il telescopio . . . . . . . . . . . . . . . . . . . . . . . . . . . . . . . . . . . . . . . . . 67
Messa a fuoco . . . . . . . . . . . . . . . . . . . . . . . . . . . . . . . . . . . . . . . . . . . . . . . .68
Utilizzo dello StarPointer . . . . . . . . . . . . . . . . . . . . . . . . . . . . . . . . . . . . . . . . . . 69
Aggancio e app StarSense Explorer . . . . . . . . . . . . . . . . . . . . . . . . . . . . . . . . . . . . 70
Selezione ingrandimento e oculari . . . . . . . . . . . . . . . . . . . . . . . . . . . . . . . . . . . . . 71
Raffreddamento delle ottiche del telescopio . . . . . . . . . . . . . . . . . . . . . . . . . . . . . . . .71
La prima osservazione notturna - Cosa aspettarsi . . . . . . . . . . . . . . . . . . . . . . . . . . . . . 72
Adattamento al buio e inquinamento luminoso . . . . . . . . . . . . . . . . . . . . . . . . . . . . . . 73
Utilizzo dei filtri. . . . . . . . . . . . . . . . . . . . . . . . . . . . . . . . . . . . . . . . . . . . . . . .73
Collimazione delle ottiche . . . . . . . . . . . . . . . . . . . . . . . . . . . . . . . . . . . . . . . . . .74
Trasporto. . . . . . . . . . . . . . . . . . . . . . . . . . . . . . . . . . . . . . . . . . . . . . . . . . .76
Cura e Manutenzione . . . . . . . . . . . . . . . . . . . . . . . . . . . . . . . . . . . . . . . . . . . . 77
Specifiche Starsense Explorer 8” dobson . . . . . . . . . . . . . . . . . . . . . . . . . . . . . . . . . 78
Specifiche Starsense Explorer 10” dobson. . . . . . . . . . . . . . . . . . . . . . . . . . . . . . . . .79
Avvertenza solare . . . . . . . . . . . . . . . . . . . . . . . . . . . . . . . . . . . . . . . . . . . . . . 80

64 I ITALIANO
A1
P
OQ
E
F
K1 K2 L1 L2
M
J1 J2
H1 H2 H3 H4 H5
G1 G2 G3
A2 B C D
N1
N2
R1
S
T
U
CONTENUTO DELLA CONFEZIONE
Confezione 1 - Base dobson
Confezione 2 - Gruppo tubo ottico
Pannello laterale
sinistro
Piedini (x3)
MONTAGGIO BULLONE PERNO
AZIMUT
MONTAGGIO PIEDINI
MONTAGGIO IMPUGNATURA MONTAGGIO GRIGLIA PER OCU-
LARI
ATTREZZI IN DOTAZIONE
MONTAGGIO CUSCINETTI ALTI-
TUDINE
Impugna-
tura base
Griglia per
oculari
Ammortiz-
zatore in
gomma
Gruppo tubo ottico con copertura antipolvere
Oculare Omni
Plössl 25 mm
Adattatore oculare
da 2” a 1,25”
con tappo da 1,25”
Prolunga
focheggiatore
2”
Tappo per collimazione con
chiavi a brugola da 2 mm e
2,5 mm*
* chiave a brugola da 2,5 mm in dotazione solo con dobson 8”
NOTA: per la collimazione delle ottiche del telescopio (p74)
Manopola di
tensionamento
altitudine
Manopola decorativa
Cacciavite
Aggancio
StarSense
Cercatore con
mirino
StarPointer
Chiavi inglesi
regolabili (x2)
Chiavi a brugola
(x2)
Viti
griglia (x2)
Cuscinetti cilindrici
altitudine (x4)
Viti
cuscinetti
(x2)
Viti impugnatura
(x2)
Cappucci
copriviti
piedini (x3)
Bullone Dado Rondelle in
acciaio
(x2)
Cilindro
in plastica
cavo
Rondella in
teflon
Pannello laterale
destro
Pannello
anteriore
Piastra superiore Piastra inferiore
Supporti laterali
(x2)
Viti
montaggio
base (x22)
Viti per
piedi (x3)

ITALIANO I 65
MONTAGGIO MONTATURA
A1
A2
E
E
F
F
F
F
F
F
F
F
F
F
F
F
F
F
F
F
F
F
F
F
F
F
K1
L1
L1
L1
L1
L2
L2
L2
L2
H1
H2
H3
H3
H4
H5
J1
J2
J2
B
C
D
G1
G1
G1
G2
G2
G2
G3
G3
G3
Figura 1A: vista esplosa della base dello
StarSense Explorer dobson.

66 I ITALIANO
N1
N2
O
Q
P
R1
T
S
Figura 1B: vista esplosa del gruppo tubo ottico dello StarSense Explorer.
Consultare la Figura 1 per informazioni su come assemblare i componenti dello SSE Dob.
Per un elenco completo dei componenti e le istruzioni di montaggio, consultare la Guida rapida cartacea inclusa nella confezione
oppure la pagina relativa al telescopio SSE Dob su www.celestron.com
MONTAGGIO TELESCOPIO

ITALIANO I 67
COME PUNTARE IL TELESCOPIO
Le basi dobsoniane sono montature altazimutali. Ciò
significa che il telescopio si sposta in due direzioni:
su-giù (altitudine) e sinistra-destra (azimut) (Figura 2).
ALTITUDINE
AZIMUT
Figura 2: i telescopi StarSense Explorer dobson si spostano lungo due assi:
altitudine (su-giù) e azimut (sinistra-destra).
Puntare il dobson verso un oggetto è facile. Spostare
semplicemente il tubo del telescopio verso su-giù e verso
sinistra-destra fino a quando il telescopio è puntato verso
l’oggetto desiderato e questo appare nell’oculare. La
manopola di rotazione nella parte anteriore del tubo del
telescopio è ideale per afferrare il tubo e puntarlo (Figura
3). Utilizzare questa manopola impedisce inoltre al calore
della mano di penetrare nel percorso ottico, distorcendo
temporaneamente la visuale.
Figura 3: la manopola di rotazione è ideale per poggiare le dita e afferrare
il telescopio per puntarlo.
È possibile regolare la tensione lungo l’asse dell’altitudine
ruotando la manopola posta sullo stesso lato del
focheggiatore del telescopio, la manopola di tensionamento
dell’altitudine (Figura 4).
Figura 4: il tensionamento dell’altitudine può essere regolato mediante
l’apposita manopola. (NOTA: l’altra manopola sul lato opposto non serve
per regolare il tensionamento dell’altitudine).
Ruotare la manopola per aggiungere abbastanza tensione
per consentire un movimento uniforme verso su-giù. Nella
maggior parte delle circostanze non occorre aggiungere
molta tensione. Il telescopio è già in equilibrio per un
normale utilizzo. Tuttavia, se si utilizza un oculare pesante
o un grande smartphone, potrebbe essere necessario
aggiungere maggiore tensione in modo che il telescopio
rimanga fermo se non viene toccato.

68 I ITALIANO
MESSA A FUOCO
I telescopi SSE Dob sono forniti in dotazione con un
focheggiatore Crayford da 2”, una prolunga da 2” e un
adattatore per oculare da 2” a 1,25”. Grazie a questi tre
elementi è virtualmente possibile utilizzare qualsiasi tipo di
oculare con il telescopio SSE Dob.
Per la maggior parte degli oculari assicurarsi che la prolunga
da 2” sia in posizione sul focheggiatore. In caso contrario,
l’oculare non raggiungerà la messa a fuoco. Se si utilizza un
oculare che richiede un elevato percorso verso l’interno per
la messa a fuoco, rimuovere la prolunga da 2”. Potrebbe
essere necessario rimuovere la prolunga se si desidera
utilizzare il dobson con una fotocamera per catturare
immagini astronomiche.
Se si desidera utilizzare un oculare di misura 1,25”, occorre
impiegare l’adattatore per oculare da 2” a 1,25”. Sistemarlo
semplicemente sul focheggiatore (con fissata la prolunga
da 2”), quindi sistemare l’oculare da 1,25” nell’adattatore.
Serrare la vite di fissaggio sull’adattatore per tenere
l’oculare in posizione. L’adattatore presenta un anello di
compressione interno in ottone in modo da non graffiare o
rovinare il cilindro dell’oculare.
Per mettere a fuoco, ruotare le apposite manopole in senso
orario o antiorario fino ad ottenere una messa a fuoco nitida
dell’oggetto nell’oculare del telescopio. Per bloccare la
posizione del focheggiatore una volta raggiunta la messa a
fuoco, serrare la vite di fissaggio del blocco della messa a
fuoco (Figura 5). Se occorre regolare il tensionamento della
manopola di messa a fuoco, è possibile serrare o allentare
la vite di tensionamento del focheggiatore mediante la
chiave a brugola in dotazione.
VITE DI FISSAG
GIO DEL BLOCCO
DELLA MESSA A
FUOCO
VITE DI
TENSIONAMENTO
DEL
FOCHEGGIATORE
Figura 5: la vite di blocco della messa a fuoco blocca il focheggiatore in
posizione una volta raggiunta la messa a fuoco. La vite di tensionamento
della messa a fuoco regola la tensione delle manopole di messa a fuoco.
Poiché il telescopio SSE Dob è un riflettore newtoniano,
le immagini visualizzate appaiono capovolte e a specchio
rispetto a quanto visualizzato a occhio nudo (Figura 6).
Sebbene ciò abbia poca rilevanza durante l’osservazione
astronomica, potrebbe creare qualche confusione nel caso
di osservazioni di oggetti sulla Terra.
Figura 6: come tutti i riflettori newtoniani, il telescopio SSE Dob produce
immagini che sono a specchio e capovolte rispetto a quanto visualizzato a
occhio nudo.
VISTA ATTRAVERSO UN TELESCOPIO RIFLETTORE NEWTONIANO
VISTA A OCCHIO NUDO

ITALIANO I 69
UTILIZZO DELLO STARPOINTER
Sebbene non sia necessario fare affidamento sul cercatore
con mirino StarPointer quando si utilizza l’app StarSense
Explorer, può aiutare ad allineare l’app con il telescopio.
Lo StarPointer è utile anche quando si localizzano oggetti
durante il giorno, poiché l’app funziona solo di notte.
Per allineare lo StarPointer, innanzitutto puntare il telescopio
su un oggetto distante almeno 400 metri. Si consiglia di
effettuare l’allineamento durante il giorno. Scegliere un
albero, un cartello, un edificio o un elemento caratteristico
che siano distanti. Se si esegue l’allineamento di notte, è
possibile utilizzare un lampione, la Luna, una stella luminosa
o un pianeta.
Una volta puntato il telescopio verso l’oggetto, verificare
che appaia nell’oculare. Quindi accendere lo StarPointer
mediante la ghiera a LED (Figura 7).
GHIERA A LED
MANOPOLA
ALTITUDINE
MANOPOLA AZIMUT
Figura 7: il cercatore con mirino StarPointer.
Aumentare il livello di luminosità fino a visualizzare
facilmente il mirino. Ora, senza muovere il telescopio,
utilizzare le manopole di regolazione di altitudine e azimut
dello StarPointer per centrare il mirino sullo stesso
oggetto già centrato nell’oculare del telescopio. Al termine,
verificare che l’oggetto sia ancora centrato nell’oculare
del telescopio. In caso affermativo, l’allineamento dello
StarPointer è avvenuto con successo. In caso negativo,
spostare il telescopio in modo da centrare nuovamente
l’oggetto nell’oculare. Continuare a utilizzare le manopole di
regolazione di altitudine e azimut per centrare nuovamente
il mirino sull’oggetto.
Spegnere lo StarPointer quando non in uso per preservare
la batteria. Sebbene la batteria dello StarPointer duri
parecchio, dovrà alla fine essere sostituita con una batteria
al litio a bottone CR2032 da 3 V. Sono batterie molto
comuni disponibili presso la maggior parte dei rivenditori.
Per sostituire la batteria procedere come segue.
1. Utilizzare un cacciavite a croce per rimuovere la vite di
sicurezza del coperchio della batteria (Figura 8).
Figura 8: per aprire il coperchio della batteria dello StarPointer, rimuovere
innanzitutto la vite di sicurezza.
2. Rimuovere la batteria scarica dal vano batteria. Potrebbe
essere necessario utilizzare un coltello o un cacciavite
per fare leva sulla batteria ed estrarla dal supporto.
3. Inserire la nuova batteria in modo che il lato positivo sia
rivolto verso di sé. Assicurarsi che la batteria sia posizio-
nata correttamente nel vano batteria (Figura 9).
Figure 9: When the battery is properly seated in the compartment as
shown, the battery cover should be easy to reinstall.
4. Chiudere il vano batteria e posizionare nuovamente la vite
di sicurezza.

70 I ITALIANO
AGGANCIO E APP STARSENSE
EXPLORER
Forse le caratteristiche più entusiasmanti del telescopio
StarSense Explorer dobson sono l’aggancio StarSense
Explorer e l’app per smartphone StarSense Explorer. Con l’app
come guida, sarà possibile passare più tempo a osservare gli
oggetti piuttosto che perdere tempo a cercarli tra miriadi di
stelle. Il telescopio Celestron StarSense Explorer è l’unico
dobson che presenta questa incredibile funzione.
Innanzitutto scaricare l’app da Apple App Store (iOS) o
Google Play (Android) e installarla. Sono elencati anche i
requisiti minimi di sistema. In caso di domande relative alla
compatibilità del proprio smartphone con l’app, visitare
celestron.com/SSE
Una volta scaricata l’app, utilizzare il codice di sblocco dell’app
che si trova nella scheda inclusa con il telescopio (Figura 10).
Download the app from the
before your first observing session
.
or
When prompted, enter the unique unlock code below to
enable telescope control on your device.
Figura 10: il codice di sblocco dell’app StarSense Explorer è stampato sulla
scheda inclusa con il telescopio.
Ogni codice consente di abilitare un massimo di cinque
dispositivi per godere delle funzionalità StarSense Explorer. Se
si utilizza il codice per cinque volte e si desidera sbloccare l’app
su più dispositivi, contattare il supporto tecnico Celestron su
celestron.com/pages/technical-support per ulteriori opzioni.
Una volta sbloccata l’app, tutto è pronto per iniziare. Sistemare
lo smartphone sull’aggancio StarSense Explorer e premere
l’icona StarSense in basso nella schermata del planetario
(Figura 11).
Scegliere l’opzione “ALLINEAMENTO NECESSARIO” e
seguire le istruzioni sullo schermo per allineare la fotocamera
dello smartphone al telescopio. Una volta completata la
procedura, è possibile utilizzare l’app per localizzare gli oggetti.
Selezionare un oggetto da osservare dal planetario oppure
dall’elenco “Il meglio di oggi”. Appaiono delle frecce sullo
schermo che conducono all’oggetto. Seguire le frecce fino
a quando il bersaglio diventa verde e l’oggetto si trova nel
campo visivo dell’oculare. È davvero semplice!
Durante l’osservazione, è possibile accedere a informazioni
dettagliate sull’oggetto. Centinaia di oggetti tra i più popolari
offrono inoltre una presentazione audio. Per ascoltare,
premere la barra in basso nello schermo che contiene il nome
dell’oggetto (Figura 12).
ICONA STARSENSE
Figura 11: una volta sbloccata l’app StarSense Explorer, premere l’icona
StarSense per iniziare a trovare oggetti.
Figura 12: premere la Barra info oggetto per ottenere informazioni
aggiuntive sull’oggetto selezionato, comprese immagini e presentazioni
audio per molti oggetti.

ITALIANO I 71
SELEZIONE INGRANDIMENTO E
OCULARI
Per modificare l’ingrandimento del telescopio, occorre
cambiare oculare nel focheggiatore del telescopio. Per
calcolare l’ingrandimento che si può ottenere con un
determinato oculare, utilizzare la seguente formula:
Lunghezza focale del telescopio ÷
Lunghezza focale dell'oculare
= Ingrandimento
Il telescopio SSE Dob ha una lunghezza focale di 1200
mm. È dotato di un oculare Omni Plössl da 25 mm.
Utilizzando la formula è possibile calcolare che questa
combinazione porta a un ingrandimento di 48x (1200 mm
÷ 25 mm = 48x). Questo ingrandimento è eccellente per
localizzare e osservare oggetti del profondo cielo con un
ampio campo. Considerare l’acquisto di un oculare con
maggiore ingrandimento, ad es. Omni Plössl da 10 mm, per
osservazioni a maggiore potenza della Luna e dei pianeti.
Tuttavia, non aumentare troppo l’ingrandimento per evitare
la degradazione della visuale a causa di condizioni di
visibilità atmosferica (ad es. turbolenza dell’aria).
Il massimo ingrandimento per un qualsiasi telescopio è di
circa 60 volte ogni pollice, pari a 480x per il telescopio
SSE Dob 8” e 600x per il telescopio SSE Dob 10”.
In molte località, tuttavia, è difficile ottenere immagini
nitide con ingrandimenti maggiori di 100x a causa della
turbolenza nell’aria. Se si nota che le stelle sopra di sé
sono molto luccicanti, le condizioni di visibilità sono scarse.
Meglio attenersi a un ingrandimento inferiore. Se le stelle
risplendono in maniera fissa, le condizioni di visibilità
sono buone. È possibile provare a utilizzare oculari con un
maggiore ingrandimento.
I telescopi SSE Dob possono accettare oculari di formato
1,25” e 2”. Gli oculari da 2” forniscono generalmente un più
ampio campo visivo, ma sono significativamente più costosi.
Per usare l’oculare da 2”, rimuovere l’adattatore da 2” a
1,25” dal focheggiatore e inserire l’oculare direttamente
nella prolunga da 2”. Fissare l’oculare con le apposite viti
sulla prolunga da 2”.
La griglia per oculari posta nella parte anteriore della base
è un luogo ideale in cui sistemare gli oculari quando non in
uso. Può contenere tre oculari da 1,25” e un oculare da 2”
(Figura 13).
Figura 13: la griglia per oculari è un luogo ideale in cui conservare oculari
aggiuntivi durante la sessione di osservazione.
SELEZIONE INGRANDIMENTO E OCULARI
RAFFREDDAMENTO DELLE
OTTICHE DEL TELESCOPIO
È possibile ottenere osservazioni ottimali dal telescopio
quando questo ha raggiunto l’equilibrio termico con
l’aria circostante. Se il telescopio è più caldo dell’aria, lo
specchio deve acclimatarsi alla temperatura e l’immagine
muterà. Le immagini osservate attraverso un telescopio che
non si è raffreddato non appaiono nitide come dovrebbero.
Se si trasporta il telescopio da un’abitazione riscaldata
all’esterno, attendere circa un’ora prima di poter ottenere
immagini nitide. Per questa ragione si consiglia di conservare
il telescopio in un luogo asciutto ma non riscaldato come un
garage o una casetta degli attrezzi.
Per il telescopio SSE Dob 10” è disponibile una ventola di
raffreddamento USB opzionale per dobson. Si monta sul
retro della cella dello specchio e soffia aria nello specchio
per velocizzare il raffreddamento (Figura 14).
La ventola consente alle ottiche di raggiungere l’equilibrio
termico più velocemente. (Il telescopio SSE Dob 8” non è
dotato di una montatura per ventola, pertanto non è compa-
tibile con la ventola di raffreddamento.)
Figura 14: la ventola di raffreddamento USB opzionale per dobson è
compatibile con il telescopio SSE Dob 10”.

72 I ITALIANO
LA PRIMA OSSERVAZIONE
NOTTURNA COSA ASPETTARSI
È possibile osservare letteralmente migliaia di oggetti con la
maggiore apertura dei telescopi SSE Dob.
La Luna
Osservare la superficie della Luna è un ottimo inizio. È
facile osservare crateri, mari, laghi, valli, montagne e altre
caratteristiche. La Luna è così luminosa da considerare
eventualmente l’utilizzo di un filtro lunare opzionale. Si
avvita alla base dell’oculare per ridurre la luminosità.
Si consiglia inoltre un oculare a elevata potenza per
consentire un’esplorazione ravvicinata della Luna.
Pianeti
I migliori pianeti da osservare sono Giove, Saturno, Marte
e Venere. Un oculare a elevata potenza contribuisce a
visualizzare i dettagli più piccoli. È possibile vedere gli
anelli di Saturno, i dettagli della superficie di Giove e i
suoi satelliti, le fasi di Venere e magari qualche dettaglio
della superficie di Marte quando è in opposizione alla
Terra (cioè più vicino).
Stelle e Stelle Doppie
Le stelle appaiono come punti di luce a prescindere
dall’ingrandimento utilizzato. Tuttavia, un telescopio può
rivelare il colore di una stella e anche “dividere” stelle
doppie utilizzando ingrandimenti maggiori. Per stelle
variabili, provare a rilevare i cambi di luminosità in un
periodo di tempo di giorni o settimane.
Ammassi Stellari Aperti
Questi sono gruppi di stelle che si sono formati insieme
all’interno della nostra galassia, la Via Lattea. Possono
apparire spettacolari nell’oculare del telescopio, anche
in cieli con un qualche inquinamento luminoso. Gli
astronomi spesso descrivono gli ammassi stellari visibili
nell’oculare del telescopio come “diamanti polverizzati su
velluto nero”. Gli ammassi sono in genere visibili meglio
con oculari a bassa potenza e richiedono di solito un
ampio campo visivo per poterli visualizzare per intero.
Ammassi Stellari Globulari
Si tratta di fitti ammassi composti da centinaia di migliaia
di stelle formatisi presto all’interno della nostra galassia.
Questi ammassi appaiono come sfere di luce. In quelli
più luminosi è possibile distinguere le singole stelle
in buone condizioni. La maggior parte degli ammassi
globulari sono osservabili meglio con un oculare a media
potenza, poiché non sono ampi come gli ammassi aperti,
ma nemmeno abbastanza luminosi per usare una potenza
elevata.
Nebulose
In generale è necessario trovarsi in totale oscurità per
osservare le nebulose gassose che appaiono come
un debole bagliore intorno alle stelle. Non ci si deve
aspettare di osservare nebulose all’interno delle città, ad
eccezione di quelle più luminose, come la Nebulosa di
Orione e la Nebulosa Laguna.
Galassie
Forse gli oggetti più spettacolari da osservare, le
galassie sono come “universi isola” rispetto a se stesse.
Sebbene sia possibile rilevare le galassie più luminose,
come la Galassia di Andromeda, da cieli con un qualche
inquinamento luminoso, è meglio osservarle in totale
oscurità. Centinaia di galassie sono letteralmente alla
portata di osservazione del telescopio SSE Dob. Le
migliori mostrano dettagli come deboli spirali e bande
di polveri. Molte, tuttavia, appaiono come “strisce” o
“chiazze” non stellari. Nonostante ciò, anche riuscire
a osservare un’altra galassia al di fuori della nostra è
comunque una soddisfazione.
Una cosa da tenere a mente è il fatto che i telescopi SSE
Dob non sono motorizzati. Ciò significa che non seguono
automaticamente i corpi celesti con il ruotare della Terra.
Di conseguenza, l’oggetto si sposta leggermente durante
l’osservazione e scompare dal campo visivo dell’oculare
entro un minuto o due, a seconda dell’ingrandimento
utilizzato. Gli oggetti scompaiono più velocemente dal
campo visivo di oculari a elevata potenza poiché il loro
campo visivo è più stretto. Occorre spostare manualmente
il dobson per mantenere centrati gli oggetti col passare
del tempo. Ciò è semplice. Basta afferrare la manopola di
rotazione del telescopio e spostarlo leggermente verso su-
giù e verso sinistra-destra come necessario.

ITALIANO I 73
ADATTAMENTO AL BUIO E
INQUINAMENTO LUMINOSO
Occorre almeno mezz’ora all’occhio umano per adattarsi
all’oscurità, pertanto non ci si può aspettare di osservare
subito dettagli di oggetti deboli del profondo cielo non
appena usciti all’esterno. Durante l’osservazione evitare le
luci (ad esempio passare dall’esterno all’interno di una casa
illuminata) perché, in tal caso, gli occhi avranno bisogno
di tempo per riadattarsi al buio. Utilizzare torce progettate
per l’osservazione astronomica poiché la luce rossa non
ha effetti sulla visione notturna. Anche la Luna ha effetti
sull’adattamento al buio, pertanto, se si osserva la Luna,
occorre del tempo per ottenere nuovamente la visione
notturna.
L’inquinamento luminoso locale riduce fortemente l’aspetto
e il contrasto di oggetti del profondo cielo più deboli
nel telescopio. Non aspettarsi di vedere molti dettagli
all’interno delle città. Le migliori osservazioni si ottengono
in totale oscurità lontano dalle luci notturne di aree urbane
e periferiche. Oggetti luminosi come la Luna, i pianeti e gli
ammassi stellari aperti luminosi non subiscono tanto gli
effetti dell’inquinamento luminoso, pertanto sono oggetti
ottimali per un’osservazione in città a prescindere dal
proprio punto di osservazione. Tenere inoltre presente
che la Luna stessa può illuminare parte del cielo di notte,
impedendo l’osservazione di oggetti deboli anche in
assenza di inquinamento luminoso. Pertanto, pianificare
l’osservazione di oggetti del profondo cielo quando la Luna
non è visibile.
UTILIZZO DEI FILTRI
Sperimentare l’aggiunta di filtri opzionali alla propria
configurazione per migliorare l’osservazione. I filtri
astronomici si avvitano alla base dell’oculare e hanno in
genere i formati di 1,25” e 2”. Rimuovere semplicemente
l’oculare dal focheggiatore, avvitare il filtro alla base
del cilindro dell’oculare, quindi inserire nuovamente il
focheggiatore.
Sono disponibili numerosi filtri tra cui scegliere.
Filtro lunare – Essenziale per osservare i dettagli della
Luna, questo filtro riduce il bagliore e rende più deboli gli
oggetti luminosi.
Polarizzatore variabile – Simile a un filtro lunare, un
polarizzatore riduce la luminosità. La differenza chiave è
la possibilità di personalizzare la riduzione di luminosità
ruotando il polarizzatore.
Filtri colorati – Disponibili in diversi colori, consentono di
migliorare il contrasto durante l’osservazione di dettagli dei
pianeti.
Filtri inquinamento luminoso – Se si osservano oggetti del
profondo cielo da una posizione urbana o periferica, questi
migliorano il contrasto bloccando la luce “cattiva” derivante
dall’inquinamento luminoso locale, lasciando passare la
luce “buona” proveniente dagli oggetti del profondo cielo.
È possibile osservare un netto miglioramento nel contrasto
quando si osservano le nebulose.

74 I ITALIANO
COLLIMAZIONE DELLE OTTICHE
La collimazione è la procedura di allineamento delle ottiche
del telescopio. I telescopi dobson utilizzano il design ottico
di un riflettore newtoniano che comprende uno specchio
primario parabolico e uno specchio secondario piatto. Per
garantire prestazioni ottimali, verificare periodicamente
l’allineamento delle ottiche. Per facilitare ciò è stato incluso
in dotazione un speciale “tappo per collimazione” da poter
utilizzare. Inoltre, lo specchio principale è segnato al centro
con un’etichetta tonda adesiva per aiutare la collimazione.
Per verificare l’allineamento degli specchi, rimuovere
innanzitutto gli oculari. Assicurarsi che sia installato nel
focheggiatore l'adattatore da 2” a 1,25”. Quindi sistemare il
tappo per collimazione nel focheggiatore (Figura 15).
Figura 15: per verificare l’allineamento degli specchi, utilizzare il tappo
per collimazione in dotazione nel focheggiatore.
Guardare attraverso il piccolo foro al centro del tappo per
collimazione. La Figura 16 mostra ciò che dovrebbe essere
visibile. In caso contrario, occorre operare delle regolazioni
all’allineamento degli specchi.
Bordo inferiore
tubo scorrevo-
le focheggia-
tore Riflesso
specchio
primario
Riflesso
dell’occhio
Bordo
specchio
secondario
Supporto
specchio
secondario
Fermo
specchio
primario
Riflesso supporto
specchio secondario
Figura 16: se il telescopio è allineato correttamente, la vista attraverso il
tappo per collimazione dovrebbe apparire come l’immagine sopra.
È più facile effettuare la collimazione del telescopio durante
il giorno con il telescopio puntato verso una parete vuota.
Ciò fornisce una vista a elevato contrasto, rendendo più
semplice capire quali regolazioni occorre fare. Utilizzare la/e
chiave/i a brugola in dotazione per effettuare le regolazioni.
Il telescopio SSE Dob 8” viene fornito con chiavi a brugola
da 2 mm e 2,5 mm. Il telescopio SSE Dob 10” viene fornito
con un’unica chiave a brugola da 2 mm. Per il telescopio
SSE Dob 8” occorre inoltre utilizzare il cacciavite a croce
fornito in dotazione.
Innanzitutto regolare lo specchio secondario nella parte
anteriore del telescopio mediante la chiave a brugola da 2
mm.
1. Dovrebbe essere possibile vedere il riflesso dell’intero
specchio primario nello specchio secondario come
mostrato nella Figura 16.
In caso contrario (come nella Figura 17, per esempio),
utilizzare le tre viti a brugola nel supporto dello specchio
secondario per regolare l’inclinazione dello specchio
secondario (Figura 18).
Bordo
specchio
secondario
Riflesso
specchio
primario
Figura 17: se il riflesso dello specchio primario non è centrato nello
specchio secondario come mostrato sopra, occorre regolare l’inclinazione
dello specchio secondario.
La chiave a
brugola da 2 mm
Figura 18: le tre viti a brugola nel supporto dello specchio secondario
regolano l’inclinazione dello specchio secondario.

ITALIANO I 75
a. Regolare una vite alla volta. Effettuare solo piccole
regolazioni.
b. Se una vite è troppo stretta o troppo allentata,
effettuare regolazioni alle altre viti per compensare.
2. Continuare a regolare le viti fino a quando lo specchio
primario appare centrato nello specchio secondario
(Figura 19). Al termine, assicurarsi che tutte e tre le viti
siano serrate.
Bordo
specchio
secondario
Riflesso
specchio
primario
Riflesso
specchio
secondario
Figura 19: continuare a effettuare regolazioni all’inclinazione dello specchio
secondario fino a quando il riflesso dello specchio primario è centrato come
mostrato nell’immagine sopra.
3. Quindi, regolare l’inclinazione dello specchio primario
fino a quando il riflesso dello specchio secondario è
centrato all’interno del riflesso dello specchio primario.
Per il dobson 8”, utilizzare la chiave a brugola da 2,5 mm e
il cacciavite a croce per inclinare lo specchio primario. Sono
presenti tre coppie di viti di collimazione. Ogni coppia lavora
insieme per regolare l’inclinazione.
1. Regolare una coppia di viti alla volta. Iniziare allentando
una delle viti della coppia e serrando l’altra (Figura 20).
Figura 20: per il dobson 8”, sono presenti tre set di viti push-pull nella cella
dello specchio che regolano l’inclinazione dello specchio primario. Allentare
una vite della coppia e serrare l’altra per regolare l’inclinazione.
2. Se lo specchio si inclina in direzione opposta a quella
desiderata, allentare la vite precedentemente serrata e
serrare l’altra vite della coppia.
3. Una volta regolato quanto desiderato un paio di viti,
passare a un’altra coppia di viti.
4. Continuare a regolare fino a quando il riflesso dello
specchio secondario è centrato all’interno del riflesso
dello specchio primario. Al termine, la vista attraverso il
tappo per collimazione deve apparire come in Figura 16.

76 I ITALIANO
Per il dobson 10”, non occorrono attrezzi per inclinare
lo specchio primario. Regolare semplicemente le viti di
fissaggio. Tre delle viti di fissaggio sono viti di blocco,
mentre le altre tre regolano l’inclinazione.
1. Iniziare allentando tutte e tre le viti di blocco (Figura
21).
VITI DI BLOCCO
Figura 21: per il dobson 10”, sono presenti tre set di viti di collimazione
caricate a molla che regolano l’inclinazione dello specchio primario. Le altre
tre viti di fissaggio bloccano lo specchio in posizione una volta ultimate le
regolazioni all’inclinazione.
2. Regolare le viti di collimazione una alla volta. Ciascuna
vite di collimazione è caricata a molla in modo da
poter essere ruotata in senso orario o antiorario.
3. Continuare a regolare le viti fino a quando il riflesso
dello specchio secondario è centrato all’interno del
riflesso dello specchio primario.
4. Serrare nuovamente le tre viti di blocco fino a ottenere
una tenuta salda.
5. Al termine, la vista attraverso il tappo per collimazione
deve apparire come in Figura 16.
Le ottiche del telescopio sono allineate e pronte all’uso. È
anche possibile confermare l’allineamento del telescopio
di notte puntandolo verso una stella luminosa con un
elevato ingrandimento. Centrare la stella nel campo visivo e
diminuire leggermente la messa a fuoco; dovrebbe apparire
come un cerchio con un foro al centro. (Il “foro” è l’ombra
dello specchio secondario.) Se il foro non è centrato nel
cerchio, occorre effettuare ulteriori regolazioni per la
collimazione (Figura 22).
Figura 23: per rimuovere lo specchio primario dal tubo del telescopio per
la pulizia, rimuovere innanzitutto le viti poste appena al di sopra della cella
dello specchio.
TRASPORTO
Trasportare lo StarSense Explorer dobson è facile,
specialmente considerate le sue dimensioni. Innanzitutto
rimuovere il tubo del telescopio dalla base allentando la
manopola di tensionamento dell’altitudine e sollevando
il tubo. È possibile trasportare separatamente il tubo e
la base utilizzando le relative impugnature integrate. Le
impugnature sono posizionate in modo tale da bilanciare il
carico, pertanto nessuno dei due componenti sarà difficile
da trasportare.
COLLIMAZIONE
CORRETTA
REGOLAZIONE NECESSARIA

ITALIANO I 77
CURA E MANUTENZIONE
Conservare il telescopio al chiuso in un luogo asciutto. Un
garage rappresenta il luogo ideale; la temperatura delle
ottiche è vicina a quella dell’ambiente esterno in modo
che non sia necessario molto tempo per acclimatarsi.
Mantenere la copertura antipolvere sulla parte anteriore del
telescopio e il tappo sul focheggiatore quando il telescopio
non è in uso. In caso contrario, polvere e particelle possono
accumularsi sulle ottiche.
Se il telescopio presenta della condensa, asciugare
l’esterno del tubo del telescopio e la base con un
asciugamano prima di riporlo. Sebbene una piccola quantità
di condensa all’esterno del tubo e della base non provochi
danni al telescopio, conservarlo ancora umido per un
periodo prolungato può causare corrosione o danni dovuti
all’umidità. La base in legno presenta superfici in melamina
sigillata. Tuttavia, l’umidità può penetrare all’interno se
conservata ancora umida.
È normale che polvere e particelle si accumulino sullo
specchio primario nel tempo. Ciò non ha alcun effetto
sulle prestazioni ottiche. Tuttavia, se lo specchio primario si
sporca eccessivamente occorre pulirlo.
Per pulire lo specchio primario procedere come
segue.
1. Rimuovere la cella dello specchio primario dal tubo
del telescopio rimuovendo le viti sul tubo che si
trovano appena sopra la cella dello specchio (Figura
23). Per fare ciò, utilizzare il cacciavite a croce.
Figura 23: Per rimuovere lo specchio primario dal tubo del telescopio per
la pulizia, rimuovere prima le viti che si trovano appena sopra la cella dello
specchio.
2. Estrarre con cautela la cella dello specchio dal tubo.
3. La superficie dello specchio è ora esposta per la
pulizia. Si consiglia di lasciare lo specchio primario
nella cella durante la pulizia.
4. Utilizzare un soffiatore e un pennello per la pulizia delle
ottiche per rimuovere particelle di grandi dimensioni e
polvere. In alcune circostanze, questo è tutto ciò che
occorre per la pulizia.
5. Per rimuovere impronte e macchie oleose, utilizzare
un liquido di pulizia per le lenti e un panno apposito
per pulire la superficie dello specchio. Applicare il
liquido al panno e pulire delicatamente la superficie
dello specchio. Procedere a raggiera (dal centro dello
specchio verso il bordo). Utilizzare un panno nuovo
per ciascuna nuova zona. Evitare di sfregare: ciò
normalmente diffonde la sporcizia anziché rimuoverla.
6. Una volta pulito lo specchio, sistemare nuovamente la
cella dello specchio nel tubo del telescopio e le viti.
Lo specchio secondario non si sporca spesso poiché la
propria superficie ottica è rivolta verso il basso. Tuttavia,
se occorre pulirlo, procedere alla stessa maniera dello
specchio primario. Non occorre rimuovere lo specchio
secondario dal telescopio per pulirlo. Puntare in orizzontale
il telescopio durante la pulizia per evitare che possa cadere
qualcosa sullo specchio primario.
È possibile pulire le superfici ottiche esposte degli oculari
nella stessa maniera descritta sopra.

78 I ITALIANO
StarSense Explorer 8” dobson 22470
Design ottico Riflettore newtoniano
Apertura 8” (203 mm)
Lunghezza focale 1200 mm
Rapporto focale F/5.9
Rivestimenti ottici Rivestimenti riflettenti XLT con protezione superiore in silice e ossido di tantalio per
specchio primario e secondario
Materiale specchio Equivalente Pyrex per specchio primario e secondario
Spessore specchio primario 25 mm (rapporto spessore circa 1:8)
Spessore specchio secondario 8,5 mm
Asse minore dello specchio
secondario
47 mm
Materiale tubo Acciaio
Focheggiatore Crayford da 2”, inclusi prolunga da 2” e adattatore da 2” a 1,25”
Oculare / ingrandimento Plössl da 25 mm, 48x
Cercatore Cercatore con mirino StarPointer
Altri accessori Aggancio StarSense Explorer, griglia per oculari, tappo per collimazione,
impugnature di trasporto per OTA e base, manopola di puntamento, coperture
antipolvere
Treppiede Base altazimutale dobsoniana, tensionamento altitudine regolabile
Dimensioni tubo ottico Diametro 112 x 24 cm (44” x 9,5”)
Peso tubo ottico 9,3 kg (20,6 libbre)
Dimensioni base 60,9 x 48 x 48 cm (27” x 19” x 19”)
Peso base 10,3 kg (22,8 libbre)
Peso totale del kit telescopio 19,7 kg (43,4 libbre)
SPECIFICHE

ITALIANO I 79
StarSense Explorer 10” dobson 22471
Design ottico Riflettore newtoniano
Apertura 10” (254 mm)
Lunghezza focale 1200 mm
Rapporto focale F/4.7
Rivestimenti ottici Rivestimenti riflettenti XLT con protezione superiore in silice e ossido di tantalio per
specchio primario e secondario
Materiale specchio Equivalente Pyrex per specchio primario e secondario
Spessore specchio primario 30mm (rapporto spessore circa 1:8,5)
Spessore specchio secondario 11,5 mm
Asse minore dello specchio
secondario
64 mm
Materiale tubo Acciaio
Dispositivo di messa a fuoco Crayford da 2”, inclusi prolunga da 2” e adattatore da 2” a 1,25”
Oculare / ingrandimento Plössl da 25 mm, 48x
Cercatore Cercatore con mirino StarPointer
Altri accessori Aggancio StarSense Explorer, griglia per oculari, tappo per collimazione,
impugnature di trasporto per OTA e base, manopola di puntamento, coperture
antipolvere
Treppiede Base altazimutale dobsoniana, tensionamento altitudine regolabile
Dimensioni tubo ottico Diametro 112 x 29 cm (44” x 11,5”)
Peso tubo ottico 13,2 kg (29,2 libbre)
Dimensioni base 67 x 53 x 53 cm (26,5” x 21” x 21”)
Peso base 11,6 kg (25,6 libbre)
Peso totale del kit telescopio 24,9 kg (54,8 libbre)
SPECIFICHE

80 I ITALIANO
• Mai guardare direttamente il Sole a occhio nudo o con un telescopio (a meno che non si disponga di un filtro solare
adeguato). Ciò potrebbe causare danni permanenti e irreversibili agli occhi.
• Mai utilizzare il telescopio per proiettare un'immagine del Sole su una qualsiasi superficie. L'accumulo di calore interno
può danneggiare il telescopio e qualsiasi accessorio ad esso collegato.
• Non utilizzare mai un filtro solare per oculare o un prisma di Herschel. L'accumulo di calore all'interno del telescopio
può causare l'incrinatura o la rottura di tali dispositivi, lasciando che la luce solare non filtrata passi attraverso l'occhio.
• Mai lasciare il telescopio incustodito. Assicurarsi che un adulto che abbia familiarità con le procedure di funzionamen-
to corrette sia sempre presente con il telescopio, specialmente in presenza di bambini.
AVVERTENZA SOLARE
Bisogno di aiuto?
Contattare il supporto tecnico Celestron visitando
celestron.com/pages/technical-support © 2022 Celestron • Tutti i diritti riservati • celestron.com
2835 Columbia Street • Torrance, CA 90503 Stati Uniti
celestron.com
NOTA FCC: La presente apparecchiatura è stata testata ed è risultata conforme ai limiti imposti per i dispositivi digitali di Classe B, ai sensi della Parte 15 delle Normative FCC. Tali limiti sono stati ideati per fornire un’adeguata protezione nei confronti di interferenze dannose in installazioni residenziali. La
presente apparecchiatura genera, utilizza e può irradiare energia in radio frequenza e, se non installata e utilizzata conformemente alle istruzioni, può causare interferenze dannose alle radiocomunicazioni. Tuttavia, non esiste alcuna garanzia che l’interferenza non si verifichi in una particolare installazione.
Nel caso in cui la presente apparecchiatura causi interferenze dannose alla ricezione radio o televisiva, il che potrebbe essere determinato dall'accensione e dallo spegnimento dell'apparecchiatura, l'utente è incoraggiato a tentare di correggere l'interferenza mediante una o più delle misure seguenti:
• Riorientare o riposizionare l’antenna di ricezione.
• Aumentare la distanza tra l’apparecchiatura e il ricevitore.
• Collegare l’apparecchiatura a una presa su un circuito diverso da quello a cui è collegato il ricevitore.
• Consultare il rivenditore o un tecnico specializzato per ricevere assistenza.
Il presente dispositivo è conforme alla Parte 15 delle Norme FCC. L'utilizzo è soggetto alle seguenti due condizioni: (1) Il presente dispositivo non deve causare interferenze dannose, e (2) il presente dispositivo deve accettare qualsiasi interferenza ricevuta, comprese interferenze che potrebbero causare
un funzionamento indesiderato.
Notare che cambi o modifiche non approvati espressamente dall'ente responsabile della conformità possono annullare l'autorità dell'utente a mettere in funzione l'apparecchiatura.
Il design del prodotto e le specifiche sono soggetti a modifiche senza previa notifica. Questo prodotto è progettato per essere utilizzato da persone di età pari o superiore ai 14 anni.
celestron.com/pages/warranty
ATTENZIONE: TENERE LE BATTERIE FUORI DALLA PORTATA DEI BAMBINI.
• Esaminare i dispositivi e assicurarsi che il vano batteria sia fissato correttamente, ad es. che la
vite o altro dispositivo di fissaggio meccanico sia serrato.
• Non utilizzare se lo scomparto non è sicuro.
• Smaltire le batterie a bottone usate immediatamente e in modo sicuro. Le batterie scariche
possono ancora essere pericolose.
• Spiega agli altri i rischi associati alle batterie a bottone e come proteggere i propri figli.
0522

ESPAÑOL I 81
#22470 STARSENSE EXPLORER 8" DOBSONIANO #22471 STARSENSE EXPLORER 10" DOBSONIANO
MANUAL DE INSTRUCCIONES

82 I ESPAÑOL
INTRODUCCIÓN
Felicidades por su adquisición del telescopio StarSense Explorer Dobsoniano (SSE Dob). ¡Su SSE Dob combina grandes ópti-
cas con el emocionante conector y app StarSense Explorer para hacer que localizar y observar todo tipo de objetos astronómi-
cos sea divertido y sencillo! Podrá localizar objetos del espacio profundo tenues - galaxias, nebulosas, cúmulos estelares y más
- y ponerlos en el campo de visión del ocular en segundos. El gran espejo primario recoge gran cantidad de luz, permitiéndole
ver detalles en objetos que no había visto nunca antes.
Antes de sacar su StarSense Explorer Dob al exterior para su primera noche de observación, recomendamos leer todo este
manual. Le ayudará a comprender mejor las funciones de su telescopio y saber lo que esperar.

ESPAÑOL I 83
ÍNDICE
Contenido de la caja . . . . . . . . . . . . . . . . . . . . . . . . . . . . . . . . . . . . . . . . . . . . 84
Montaje - Estructura del soporte . . . . . . . . . . . . . . . . . . . . . . . . . . . . . . . . . . . . . . 85
Montaje - Estructura del telescopio . . . . . . . . . . . . . . . . . . . . . . . . . . . . . . . . . . . . 86
Apuntar el telescopio . . . . . . . . . . . . . . . . . . . . . . . . . . . . . . . . . . . . . . . . . . . . 87
Enfoque . . . . . . . . . . . . . . . . . . . . . . . . . . . . . . . . . . . . . . . . . . . . . . . . . . . 88
Usar StarPointer. . . . . . . . . . . . . . . . . . . . . . . . . . . . . . . . . . . . . . . . . . . . . . .89
Conector StarSense Explorer y App . . . . . . . . . . . . . . . . . . . . . . . . . . . . . . . . . . . . 90
Determinar el aumento y seleccionar oculares . . . . . . . . . . . . . . . . . . . . . . . . . . . . . . .91
Refrigerar la óptica de su telescopio . . . . . . . . . . . . . . . . . . . . . . . . . . . . . . . . . . . .91
Su primera noche en el exterior - Qué esperar. . . . . . . . . . . . . . . . . . . . . . . . . . . . . . .92
Adaptación a la oscuridad y contaminación nocturna . . . . . . . . . . . . . . . . . . . . . . . . . . .93
Uso de filtros. . . . . . . . . . . . . . . . . . . . . . . . . . . . . . . . . . . . . . . . . . . . . . . . .93
Colimado de óptica . . . . . . . . . . . . . . . . . . . . . . . . . . . . . . . . . . . . . . . . . . . . . 94
Transporte . . . . . . . . . . . . . . . . . . . . . . . . . . . . . . . . . . . . . . . . . . . . . . . . . . 96
Cuidados y mantenimiento . . . . . . . . . . . . . . . . . . . . . . . . . . . . . . . . . . . . . . . . . 97
Especificaciones de Starsense Explorer 8" Dobsoniano . . . . . . . . . . . . . . . . . . . . . . . . . 98
Especificaciones de Starsense Explorer 10" Dobsoniano . . . . . . . . . . . . . . . . . . . . . . . . .99
Aviso solar . . . . . . . . . . . . . . . . . . . . . . . . . . . . . . . . . . . . . . . . . . . . . . . . . . 100

84 I ESPAÑOL
A1
P
OQ
E
F
K1 K2 L1 L2
M
J1 J2
H1 H2 H3 H4 H5
G1 G2 G3
A2 B C D
N1
N2
R1
S
T
U
CONTENIDO DE LA CAJA
Caja 1 - Base dobsoniana
Caja 2 - Estructura del tubo óptico
Panel de lado
izquierdo
Patas (x3)
MONTAJE DE PERNO DE PIVOTAJE
AZIMUT
MONTAJE DE PATAS
MONTAJE DEL MANGO MONTAJE DEL SOPORTE DE
OCULARES
HERRAMIENTAS INCLUIDAS
MONTAJE DEL RODAMIENTO DE
ALTITUD
Base del
mango
Soporte de
oculares
Paracho-
ques de
caucho
Estructura de tubo óptico con cubierta para polvo
Ocular de 25mm
Omni Plössl
Adaptador de ocular
de 2" a 1,25" con tapa
de 1,25"
Tubo extensor de
enfoque de 2"
Tapón de colimado con
llaves hexagonales de
2mm y 2,5mm*
*Llave hexagonal de 2,5mm incluida solamente con Dob de 8"
NOTA: Para el colimado de la óptica de
su telescopio (p94)
Mando de
tensión de altitud
Mando cosmético
Destornillador
Conector de
StarSense
Localizador
de punto rojo
StarPointer
Llaves
inglesas (x2)
Llaves hexagona-
les (x2)
Tornillos de
soporte (x2)
Cilindros de
rodamiento de
altitud (x4)
Tornillos de
rodamiento
(x4)
Tornillos del
mango (x2)
Cubiertas de
tornillos
de patas (x3)
Tornillos
de patas (x3)
Perno Rosca Arandelas
de acero
(x2)
Cilindro de
plástico
hueco
Arandela
de teflón
Panel de lado
derecho
Panel frontal Plancha superior Plancha inferior
Soportes laterales
(x2)
Tornillos de
montaje de
base (x22)

ESPAÑOL I 85
MONTAJE ESTRUCTURA DEL
SOPORTE
A1
A2
E
E
F
F
F
F
F
F
F
F
F
F
F
F
F
F
F
F
F
F
F
F
F
F
K1
L1
L1
L1
L1
L2
L2
L2
L2
H1
H2
H3
H3
H4
H5
J1
J2
J2
B
C
D
G1
G1
G1
G2
G2
G2
G3
G3
G3
Figura 1A: Visión en explosión de la base de la base de
StarSense Explorer Dobsoniano.

86 I ESPAÑOL
N1
N2
O
Q
P
R1
T
S
Figura 1B: Visión en explosión de la estructura del tubo óptico de StarSense Explorer Dobsoniano.
Consulte la Figura 1 para ver cómo encajan las piezas del SSE Dob.
Para una lista completa de piezas e instrucciones de montaje, consulte la Guía Rápida de Instalación incluida en la caja, o en la
página de producto de SSE Dob en www.celestron.com
MONTAJE ESTRUCTURA DEL
TELESCOPIO

ESPAÑOL I 87
APUNTAR EL TELESCOPIO
Las bases dobsonianas son soportes altazimut.
Esto implica que el telescopio se mueve en dos
direcciones: arriba y abajo (es decir, altitud), y de
izquierda a derecha (es decir, azimut) (Figura 2).
ALTITUD
AZIMUT
Figura 2: Los StarSense Explorer Dobsonianos tienen dos ejes de
movimiento: altitud (arriba y abajo) y azimut (izquierda a derecha).
Es fácil apuntar su Dob a un objeto. Solo tiene que mover el
tubo del telescopio arriba y abajo y de izquierda a derecha
hasta que el objeto esté apuntado al objeto deseado y el
objeto aparezca en el ocular del telescopio. El mando de
desplazamiento de la parte anterior del tubo del telescopio
ofrece una ubicación práctica para agarrar el tubo para
apuntar (Figura 3).
Figura 3: El mando de desplazamiento ofrece un lugar excelente para que
sus dedos se agarren al apuntar el telescopio.
Usar este mando también evita que el calor de su mano entre
en la ruta óptica, lo que podría distorsionar temporalmente
la vista.
Puede ajustar la tensión en el eje de altitud girando el mando
situado en el mismo lado que el enfoque del telescopio - el
mando de tensión de altitud (Figura 4).
Figura 4: La tensión del movimiento de altitud puede ajustarse con el
mando de tensión de altitud. (NOTA: el otro mando en el lado opuesto no
funciona para ajustar la tensión de altitud).
Gire el mando para añadir la tensión suficiente para producir
un movimiento de ascenso y descenso suave. En la mayoría
de circunstancias no necesitará añadir mucha tensión.El
telescopio está equilibrado para uso normal. Sin embargo,
si usa un ocular pesado o un teléfono grande, puede tener
que añadir más tensión de forma que el telescopio quede
quieto cuando no se toque.

88 I ESPAÑOL
ENFOQUE
Los SSE Dob incluyen un enfoque de 2" Crayford, un tubo
extensor de 2", y un adaptador de ocular de 2" a 1,25". Con
estos tres elementos puede usar virtualmente cualquier
ocular de telescopio con el SSE Dob.
Con la mayoría de oculares, asegúrese de que el tubo
extensor de 2" esté en posición en el enfoque. Si no, el
telescopio no llegará a enfocar. Si usa un ocular que precise
de mucho recorrido de enfoque hacia dentro, retire el tubo
extensor de 2". Puede tener que retirar el tubo si usa su
Dob con una cámara de astrofotografía.
Si desea usar un ocular de formato 1,25", deberá usar el
adaptador de ocular de 2" a 1,25". Colóquelo en el enfoque
(con el tubo extensor de 2" instalado) y a continuación
coloque el ocular de 1,25" en el adaptador. Apriete el
tornillo manual del adaptador para fijar el ocular en posición.
El adaptador usa una arandela de latón compresora interna
de forma que el cañón de su ocular no se raye ni dañe.
Para enfocar, gire los mandos de enfoque en sentido horario
o antihorario hasta que el objeto en el ocular del telescopio
esté enfocado con definición. Para bloquear la posición
del enfoque cuando haya conseguido un enfoque definido,
apriete el tornillo manual de bloqueo del enfoque (Figura 5).
Si necesita ajustar la tensión del mando de enfoque, puede
apretar o soltar el tornillo de tensión del enfoque usando la
llave hexagonal incluida.
TORNILLO
MANUAL DE
BLOQUEO DEL
ENFOQUE
TORNILLO DE
TENSIÓN DEL
ENFOQUE
Figura 5: El tornillo de bloqueo del enfoque bloquea en posición el enfo-
que cuando se haya conseguido enfocar. El tornillo de tensión de enfoque
ajusta la tensión de los mandos de enfoque.
Como el SSE Dob es un reflector newtoniano, las imágenes
que verá aparecerán en espejo e invertidas comparadas
con la vista desnuda (Figura 6).
Aunque esto tiene poco impacto en la observación
astronómica, puede ser un poco confuso cuando esté
observando objetos terrestres.
Figura 6: Como todos los reflectores newtonianos, los SSE Dob producen
imágenes que aparecen en espejo e invertidas, comparadas con el ojo
desnudo.
VISTA POR TELESCOPIO REFLECTOR NEWTONIANO
VISTA DESNUDA

ESPAÑOL I 89
USAR STARPOINTER
Aunque no necesitará depender del localizador de punto
rojo StarPointer cuando use la app StarSense Explorer,
puede ayudarle a alinear la app con el telescopio. StarPointer
también resulta práctico cuando esté localizando objetos
de día, dado que la app solamente funciona de noche, bajo
las estrellas.
Para alinear el StarPointer, apunte primero el telescopio a
un objeto que esté como mínimo a ¼ de milla (400 m).
Recomendamos alinear durante el día. Elija un árbol, señal,
edificio u otra característica del paisaje lejana. Si está
alineando de noche, puede usar una farola, la Luna, o una
estrella o planeta brillante.
Cuando haya apuntado el telescopio al objeto, asegúrese
de que aparezca en el ocular. A continuación, encienda el
StarPointer usando el dial LED (Figura 7).
DIAL DE LED
MANDO DE ALTITUD MANDO DE AZIMUT
Figura 7: Localizador de punto rojo StarPointer.
Aumente el nivel de brillo hasta que pueda ver con facilidad
el punto rojo. Ahora, sin mover el telescopio, use los mandos
de ajuste de altitud y azimut del StarPointer para centrar el
punto rojo en el mismo objeto que ha centrado en el ocular
del telescopio. Cuando haya terminado, asegúrese de que
el objeto siga centrado en el ocular del telescopio. Si lo
está, ha terminado de alinear el StarPointer. Si no, mueva el
telescopio de forma que el objeto en el ocular del telescopio
vuelva a estar centrado. Siga usando los mandos de ajuste
de altitud y azimut de StarPointer para centrar otra vez el
punto rojo en el objeto.
Apague el StarPointer cuando no lo use para conservar
su batería. Aunque la batería del StarPointer debería durar
mucho tiempo, eventualmente deberá sustituirse por una
batería de botón de litio CR2032 de 3V. Son muy comunes
y están disponibles en diversos comercios.
Para sustituir la batería:
1. Use un destornillador de cabezal Phillips para sacar el
tornillo de fijación de la cubierta de la batería (Figura 8).
Figura 8: Para abrir la cubierta de la batería del StarPointer, retire primero
el tornillo de fijación.
2. Retire la batería gastada del compartimiento de batería.
Puede tener que usar una cuchilla o destornillador para
sacar la batería de su soporte.
3. Introduzca la nueva batería de forma que el lado positi-
vo quede visible. Asegúrese de que la batería esté co-
rrectamente asentada en el compartimiento de batería
(Figura 9).
Figura 9: Cuando la batería esté correctamente colocada en el comparti-
miento como se indica, la cubierta de la batería debería ser fácil de volver
a colocar.
4. Cierre el compartimiento de batería y vuelva a instalar el
tornillo de fijación.

90 I ESPAÑOL
CONECTOR STARSENSE
EXPLORER Y APP
Posiblemente, la característica más interesante del StarSense
Explorer Dobsoniano sea el conector StarSense Explorer y la
app para teléfonos StarSense Explorer. ¡Con la app para guiarle,
pasará más tiempo observando objetos, en lugar de esforzarse
en encontrarlos entre la miríada de estrellas del firmamento!
StarSense Explorer de Celestron es el único dobsoniano que
incluye esta increíble función.
Para comenzar, descargue e instale la app de Apple App
Store (iOS) o Google Play (Android). También encontrará allí
los requisitos mínimos de sistema. Si tiene dudas sobre su su
teléfono es compatible con la app, visite celestron.com/SSE
Cuando haya descargado la app, use el código de desbloqueo
de app que encontrará en la tarjeta impresa incluida con su
telescopio (Figura 10).
Download the app from the
before your first observing session
.
or
When prompted, enter the unique unlock code below to
enable telescope control on your device.
Figura 10: El código de desbloqueo de la app StarSense Explorer está impreso
en la tarjeta incluida con su telescopio.
Cada código puede habilitar hasta cinco dispositivos para
usar la funcionalidad StarSense Explorer. Si usa el código las
cinco veces y necesita desbloquear la app en más dispositivos,
contacte con el Soporte Técnico de Celestron en celestron.com/
pages/technical-support para conocer las opciones.
Con la app desbloqueada, está preparado para comenzar.
Ponga el teléfono en el conector StarSense Explorer y pulse el
icono StarSense en la parte inferior de la pantalla del planetario
(Figura 11).
Seleccione la opción “NECESITA ALINEACIÓN” y siga las
indicaciones en pantalla para alinear la cámara del teléfono con
el telescopio. Cuando termine este procedimiento, puede usar la
app para localizar objetos.
Seleccione un objeto para verlo desde el planetario o la lista “Lo
mejor de esta noche”. Aparecerán flechas en pantalla, guiándole
al objeto. Siga las flechas hasta que el punto de mira se ponga
verde y el objeto estará en el campo visual de su telescopio. ¡Así
de fácil!
Mientras observa, puede leer información detallada sobre el
objeto. Cientos de los objetos más populares también ofrecen
una presentación audio. Para escucharla, pulse la barra en la
parte inferior de la pantalla, que contiene el nombre del objeto
(Figura 12).
ICONO DE STARSENSE
Figura 11: Cuando haya desbloqueado la app StarSense Explorer, pulse el
icono StarSense para comenzar a localizar objetos.
Figura 12: Pulse la barra Información de objeto para recibir
información adicional sobre el objeto seleccionado, incluyendo
imágenes y presentaciones audio de muchos objetos.

ESPAÑOL I 91
DETERMINAR EL AUMENTO Y
SELECCIONAR OCULARES
Para cambiar el aumento del telescopio, deberá cambiar el
ocular del enfoque del telescopio. Para calcular el aumento
que puede lograr con un ocular concreto, use esta fórmula:
Longitud focal del telescopio ÷
Longitud focal del ocular
= Aumento
Los SSE Dob tienen una longitud focal de 1200mm.
Incluyen un ocular Omni Plössl de 25mm. Usando la
fórmula, podemos calcular que esta combinación ofrece
un aumento de 48x (1200mm ÷ 25mm = 48x). Es un
aumento excelente para localizar y observar objetos del
espacio profundo con campo amplio. Puede querer adquirir
un ocular con mayor aumento, como un Omni Plössl de
10mm, para observaciones con más potencia de la Luna
y los planetas. Sin embargo, no use demasiado aumento,
o podría degradar la vista debido a las condiciones de
observación atmosféricas (como las turbulencias del aire).
El aumento máximo de cualquier telescopio es normalmente
de 60 veces por pulgada, lo que equivale a 480x para el SSE
Dob de 8", y 600x para el SSE Dob de 10". Sin embargo,
en muchos lugares será difícil lograr imágenes definidas
con más de 100x de aumento, debido a las turbulencias del
aire. Si observa que las estrellas del firmamento parpadean
mucho, las condiciones de observación son malas. Debería
limitarse a un aumento menor. Si las estrellas parecen
brillar de forma estable, las condiciones de observación
son buenas. Puede probar con oculares de mayor aumento.
Los SSE Dob pueden aceptar oculares en formato de 1,25"
y 2". Los oculares de 2" ofrecen normalmente un campo
visual más amplio, pero tienen un coste notablemente
mayor. Para usar un ocular de 2", retire el adaptador de 2"
a 1,25" del enfoque e introduzca directamente el ocular en
el tubo extensor de 2". Asegure el ocular con los tornillos
manuales en el tubo extensor de 2".
El soporte de oculares situado en la parte anterior de la
base ofrece una ubicación práctica para colocar oculares
cuando no se usen. Puede aceptar tres oculares de 1,25" y
un ocular de 2" (Figura 13).
Figura 13: El soporte de oculares es un lugar práctico para guardar
oculares adicionales durante su sesión.
REFRIGERAR LA ÓPTICA DE SU
TELESCOPIO
Obtendrá las mejores vistas con su telescopio cuando
llegue a un equilibrio térmico con el aire ambiente. Si el
telescopio está más caliente que el aire del exterior, el
espejo se aclimatará a la temperatura y su forma cambiará.
Las imágenes que vea por un telescopio que no se haya
enfriado no serán tan definidas como deberían. Si está
llevando su telescopio de una casa con calefacción al
exterior, deje aproximadamente una hora antes de esperar
que produzca imágenes definidas. Por ello, recomendamos
que guarde su telescopio en un lugar seco pero sin
calefacción, como el garaje o un cobertizo.
Para el SSE Dob de 10" está disponible un ventilador de
refrigeración USB para dobsonianos. Se monta en la parte
posterior de la célula del espejo y proyecta aire sobre el
espejo para acelerar su enfriamiento (Figura 14).
El ventilador ayudará a que la óptica logre un equilibrio tér-
mico con mayor rapidez. (El SSE Dob de 8" no tiene un
soporte de ventilador, por lo que no es compatible con el
ventilador de refrigeración).
Figura 14: El ventilador de refrigeración USB opcional para dobsonianos es
compatible con el SSE Dob de 10".

92 I ESPAÑOL
SU PRIMERA NOCHE EN EL
EXTERIOR QUÉ ESPERAR
Puede observar miles de objetos con la mayor apertura de
los SSE Dob:
La Luna
Observar la superficie lunar es un excelente comienzo.
Verá con facilidad cráteres, mares, lagos, valles,
montañas y otras características. La Luna es tan
brillante que puede querer usar un filtro lunar opcional.
Se enrosca en la parte inferior del ocular para
atenuar la vista. También recomendamos un ocular
de mayor potencia para ayudarle a explorar la Luna
de cerca.
Planetas
Los mejores planetas para observar son Júpìter, Saturno,
Marte y Venus. Un ocular de mayor potencia ayudará
a observar detalles. Podrá ver los anillos de Saturno,
detalles de la superficie de Júpiter con sus lunas, las
fases de Venus, y quizá algo de detalle de la superficie
de Marte si está cerca de su oposición (es decir, más
cercano a la Tierra).
Estrellas y Estrellas Dobles
Las estrellas aparecerán como puntos de luz sin importar
el aumento usado. Sin embargo, un telescopio puede
revelar el color de una estrella y también "separar"
estrellas dobles usando aumentos superiores. Para las
estrellas variables, pruebe a detectar el cambio de brillo
de una estrella en un periodo de días o semanas.
Cúmulos Estelares Abiertos
Son grupos estelares que se formaron conjuntamente en
nuestra Vía Láctea. Pueden aparecer espectaculares en
el ocular del telescopio, incluso en firmamentos con cierta
contaminación lumínica. Los astrónomos describen a
menudo los cúmulos estelares como parecidos a "polvo
de diamante sobre terciopelo negro" en el ocular del
telescopio. Los cúmulos se observan mejor normalmente
con oculares de baja potencia, dado que normalmente
precisan de un campo visual amplio para ver todo el
cúmulo.
Cúmulos Estelares Globulares
Son cúmulos prietos de cientos de miles de estrellas,
que se unieron en los primeros tiempos de la formación
de nuestra galaxia. Estos cúmulos aparecen como
globos de luz. Los más brillantes pueden resolverse en
estrellas individuales en buenas condiciones. La mayoría
de cúmulos globulares se ven mejor con un ocular de
potencia media, dado que no son en absoluto tan
amplios como los cúmulos abiertos, y a la vez no son
lo suficientemente brillantes para una potencia elevada.
Nebulosas
Normalmente necesitará estar bajo un firmamento oscuro
para ver nebulosas gaseosas, que aparecen como un
tenue resplandor alrededor de las estrellas. No espere
ver ninguna nebulosidad desde firmamentos urbanos,
excepto quizá las más brillantes, como la Nebulosa de
Orión y la Nebulosa de la Laguna.
Galaxias
Quizá los objetos más fascinantes para ser observados,
las galaxias son como "universos en islas" en sí mismas.
Aunque puede detectar las galaxias más brillantes,
como la Galaxia de Andrómeda, desde firmamentos con
cierta contaminación lumínica, se observan mejor con
firmamentos oscuros. Literalmente, cientos de galaxias
están dentro del alcance de observación de los SSE Dob.
Las mejores muestran detalles, como tenues brazos en
espiral y vías de polvo. Muchas, sin embargo, solamente
aparecerán como "manchas" o "borrones" no estelares.
Incluso en este caso, poder detectar la luz de una galaxia
fuera de la nuestra es gratificante en sí mismo.
Un aspecto que debe tener en cuenta es que los SSE
Dob no están motorizados. Esto implica que no seguirán
automáticamente objetos celestes a medida que gire la
Tierra. Como resultado, notará que los objetos se mueven
ligeramente a medida que los observa, y saldrán del campo
visual del ocular en uno o dos minutos, según el aumento
que use. Los objetos saldrán más rápido del campo de
oculares de alta potencia, dado que su campo visual es
más estrecho. Deberá mover manualmente el Dob para
mantener centrados los objetos con el tiempo. Es fácil.
Agarre el mando de desplazamiento del telescopio y
muévalo ligeramente arriba y abajo y de izquierda a derecha
según sea necesario.

ESPAÑOL I 93
ADAPTACIÓN A LA OSCURIDAD
Y CONTAMINACIÓN NOCTURNA
El ojo humano tarda como mínimo media hora en adaptarse
a la oscuridad, por lo que no espere ver inmediatamente
detalles sutiles en objetos del espacio profundo tenues en
cuanto salga al exterior. Mientras observe, evite cualquier
luz potente (como entrar del exterior a una casa con luz)
o su adaptación a la oscuridad precisará de tiempo para
restablecerse. Use linternas rojas, diseñadas para uso
astronómico, dado que la luz roja no afectará mucho a su
visión nocturna. La Luna también afectará a su adaptación
a la oscuridad, por lo que si observa directamente la Luna,
espere a que tarde en recuperar su visión nocturna.
La contaminación lumínica local reducirá en gran medida
la apariencia y el contraste de objetos del espacio
profundo más tenues en el telescopio. No espere ver
mucho detalle con firmamentos urbanos. Obtendrá las
mejores vistas en ubicaciones con firmamentos oscuros,
lejos de la iluminación de la ciudad o los suburbios. Los
objetos brillantes como la Luna, los planetas y los cúmulos
estelares abiertos brillantes no se ven tan afectados por
la contaminación lumínica, por lo que son buenos objetos
para la observación de patio, sin importar donde esté. Tenga
también en cuenta que la misma Luna puede iluminar gran
parte del firmamento nocturno, evitando la observación
de objetos tenues incluso en lugares oscuros. Por ello,
programe la observación del espacio profundo cuando la
Luna no vaya a ser visible.
USO DE FILTROS
Experimente añadiendo filtros opcionales en su instalación
para ayudarle a mejorar la vista. Los filtros astronómicos se
enroscan en la parte inferior de su ocular, y normalmente
están en formatos de 1,25" y 2". Retire el ocular del
enfoque, enrosque el filtro en la parte inferior del cañón del
ocular, y vuelva a introducirlo en el enfoque.
Puede elegir entre muchos filtros útiles:
Filtro lunar – Esencial para ver detalles lunares, este filtro
reduce el resplandor y atenúa los objetos brillantes.
Polarizador variable – Como un filtro lunar, un polarizador
atenúa su observación. La principal diferencia es que puede
personalizar el grado de atenuación girando el polarizador.
Filtros de color – Disponibles en diversos colores, pueden
mejorar el contraste cuando observe detalles planetarios.
Filtros de contaminación lumínica – Si está observando
objetos del espacio profundo en firmamentos urbanos o
suburbanos, mejoran el contraste bloqueando la luz "mala"
de la contaminación lumínica y transmitiendo la "luz buena"
de los objetos del espacio profundo. Observará una mejora
superior en contraste cuando observe nebulosas.

94 I ESPAÑOL
COLIMADO DE LA ÓPTICA
El colimado es el proceso de alineación de la óptica del
telescopio. Los dobsonianos usan diseño óptico de
reflector newtoniano, que consiste en un espejo primario
parabólico y un espejo secundario plano. Para garantizar
su mejor rendimiento, debería comprobar periódicamente
la alineación de la óptica. Para ayudarle, hemos incluido un
"tapón de colimado" especial que puede usar. Además, el
espejo primario tiene el centro marcado con una etiqueta
circular adhesiva para ayudar en el colimado.
Para comprobar la alineación de los espejos, retire primero
el ocular. Asegúrese de que el adaptador de 2" a 1,25" esté
instalado en el enfoque. A continuación, ponga el tapón de
colimado en el enfoque (Figura 15).
Figura 15: Para comprobar la alineación de los espejos, use el tapón de
colimado incluido en el enfoque.
Mire por el pequeño agujero del centro del tapón de
colimado. La vista debería ser como en la Figura 16. Si
no, deberá realizar algunos ajustes a la alineación de los
espejos.
Borde inferior
del tubo del
enfoque
Reflejo del
espejo
primario
Reflejo de
su ojo
Borde del
espejo
secun-
dario
Soporte
del espejo
secundario
Clip del
espejo
primario
Reflejo del
soporte del espejo secundario
Figura 16: Si su telescopio está correctamente alineado, la vista por el
tapón de colimado debe ser como en la imagen anterior.4
Es más fácil colimar un telescopio de día con el telescopio
apuntando a una pared vacía. De este modo conseguirá una
vista de alto contraste, facilitando determinar los ajustes que
deben realizarse. Use la(s) llave(s) hexagonal(es) incluida(s)
para realizar los ajustes. El SSE Dob de 8" incluye llaves
hexagonales de 2mm y 2,5mm. El SSE Dob de 10" incluye
una única llave hexagonal de 2mm. Para el SSE Dob de 8"
también necesitará usar el destornillador de cabezal Phillips
incluido.
Ajuste primero el espejo secundario de la parte anterior del
telescopio con la llave de 2mm.
1. Debería poder ver el reflejo de todo el espejo primario
centrado en el espejo secundario, como se muestra en
la Figura 16.
Si no puede (por ejemplo, como en la Figura 17), use
los tres tornillos de cabezal hexagonal en el soporte del
espejo secundario para ajustar la inclinación del espejo
secundario (Figura 18).
Borde del
espejo
secundario
Reflejo del
espejo primario
Figura 17: Si el reflejo del espejo primario no está centrado en el espejo
secundario como se indica anteriormente, deberá ajustar la inclinación del
espejo secundario.
La llave
de 2mm
Figura 18: Los tres tornillos de cabezal hexagonal del soporte del espejo
secundario ajustan la inclinación del espejo secundario.

ESPAÑOL I 95
a. Ajuste un tornillo cada vez. Realice solamente
ajustes pequeños.
b. Si un tornillo se aprieta o suelta demasiado, ajuste
los otros tornillos para compensar.
2. Siga ajustando los tornillos hasta que el espejo primario
aparezca centrado con el espejo secundario (Figura
19). Cuando haya terminado, asegúrese de que los tres
tornillos estén ajustados.
Borde del
espejo
secundario
Reflejo del
espejo primario
Reflejo del
espejo secundario
Figura 19: Siga realizando ajustes de inclinación del espejo secundario
hasta que el reflejo del espejo primario esté centrado como se indica en
la imagen anterior.
3. A continuación, ajuste la inclinación del espejo primario
hasta que el reflejo del espejo secundario esté centrado
en el reflejo del espejo primario.
Para el dobsoniano de 8", use la llave hexagonal de
2,5mm y un destornillador de cabezal Phillips para inclinar
el espejo primario. Tiene tres pares de tornillos de colimado.
Cada par funciona conjuntamente para ajustar la inclinación.
a. Ajuste un par de tornillos cada vez. Comience
aflojando uno de los tornillos del par y apretando el
otro (Figura 20).
Figura 20: Para el Dob de 8", dispone de tres grupos de tornillos
de empuje-tiro en la célula del espejo que ajustan la inclinación del
espejo primario. Afloje un tornillo del par y apriete el otro para ajustar
la inclinación.
b. Si el espejo se inclina en dirección opuesta a
la deseada, afloje el tornillo que haya apretado
previamente y apriete el otro tornillo del par.
c. Cuando haya ajustado un par de tornillos tanto
como pueda, pase a otro par de tornillos.
d. Siga ajustando hasta que el reflejo del espejo
secundario esté centrado en el reflejo del espejo
primario. Cuando haya terminado, la vista por el
tapón de colimado debería ser como en la Figura
16.

96 I ESPAÑOL
Para el dobsoniano de 10", no necesitará
herramientas para inclinar el espejo primario. En su
lugar, ajuste los tornillos manuales. Tres de los tornillos
manuales son tornillos de bloqueo, mientras que los
otros tres ajustan la inclinación.
a. Comience aflojando los tres tornillos manuales de
bloqueo (Figura 21).
TORNILLOS
MANUALES DE
BLOQUEO
Figura 21: Para el Dob de 10", dispone de tres tornillos manuales con
muelle de colimado que ajustan la inclinación del espejo primario. Los otros
tres tornillos manuales bloquean en posición el espejo cuando finalicen los
ajustes de inclinación.
b. Ajuste los tornillos manuales de colimado de uno
en uno. Cada tornillo manual de colimado tiene un
muelle, por lo que puede girarlo en sentido horario
o antihorario.
c. Siga ajustando los tornillos hasta que el reflejo del
espejo secundario esté centrado en el reflejo del
espejo primario.
d. Vuelva a apretar los tres tornillos manuales de
bloqueo hasta que queden ajustados.
e. Cuando haya terminado, la vista por el tapón de
colimado debería ser como en la Figura 16.
La óptica de su telescopio estará alineada y lista para el uso.
También puede confirmar la alineación de un telescopio de
noche apuntando el telescopio a una estrella brillante con
aumento elevado. Centre la estrella en el campo visual y
desenfoque ligeramente la estrella - debería aparecer
como un círculo con un agujero en el centro. (El "agujero"
es la sombra del espejo secundario). Si el agujero no está
centrado en el círculo, deberá realizar más ajustes de
colimado (Figura 22).
Figura 23: Para retirar el espejo primario del tubo del telescopio para
limpiarlo, retire primero los tornillos situados sobre la célula del espejo.
TRANSPORTE
Transportar el StarSense Explorer Dobsoniano es fácil,
especialmente considerando su tamaño. Primero, retire
el tubo del telescopio de la base aflojando el mando de
tensión de altitud y levantando el tubo del telescopio.
Puede transportar el tubo y la base por separado con sus
asas de transporte integrada. Las asas están posicionadas
para equilibrar la carga, de forma que no debería resultar
incómodo llevar ningún componente.
BUEN COLIMADO NECESITA AJUSTE

ESPAÑOL I 97
CUIDADOS Y MANTENIMIENTO
Guarde el telescopio en interiores en un lugar seco. Un
garaje es ideal; mantendrá la óptica cerca de la temperatura
ambiente exterior, de forma que no tardará tanto en
aclimatarse. Ponga la tapa para polvo en la parte anterior
del telescopio y la tapa en el enfoque cuando no use el
telescopio. En caso contrario, puede acumularse polvo y
partículas en la óptica.
Si el telescopio está húmedo por condensación, seque el
exterior del tubo del telescopio y la base con una gamuza
antes de guardarlo. Aunque una pequeña cantidad de agua
en el exterior del tubo y la base no dañarán el telescopio,
guardarlo mojado durante mucho tiempo puede causar
corrosión o daños por agua. La base de madera tiene
superficies de melamina selladas. Sin embargo, puede
entrar agua por grietas si se deja guardado mojado.
Es normal que se acumule algo de polvo y partículas
en el espejo primario con el tiempo. No afectarán a su
rendimiento óptico. Sin embargo, si el espejo primario se
ensucia en exceso, debería limpiarlo.
Para limpiar el espejo primario:
1. Retire la célula del espejo primario del tubo del
telescopio sacando los tornillos del tubo, encima
de la célula del espejo (Figura 23). Necesitará el
destornillador de cabezal Phillips para hacerlo.
Figura 23: Para quitar el espejo principal del tubo del telescopio para
limpiarlo, primero quite los tornillos que se encuentran justo encima de
la celda del espejo.
2. Saque cuidadosamente la célula del espejo del tubo.
3. La superficie del espejo estará expuesta para
limpiarla. Recomendamos dejar el espejo primario en
su célula durante la limpieza.
4. Use una perilla y pincel de limpieza de ópticas para
eliminar las partículas y polvo más importantes. En
algunos casos, con esta limpieza será suficiente.
5. Para eliminar marcas y aceites, use líquido limpiador
de lentes y tisú para limpiar lentes para limpiar la
superficie del espejo. Aplique el líquido en el tisú
y limpie con suavidad la superficie del espejo. Use
pasadas radiales (es decir, del centro del espejo al
borde). Use un nuevo tisú para cada pasada. Evite
frotar, normalmente solamente esparcirá los aceites
en lugar de eliminarlos.
6. Cuando el espejo esté limpio, vuelva a instalar la
célula del espejo en el tubo del telescopio y vuelva a
poner los tornillos.
El espejo secundario no se ensuciará a menudo, dado
que su superficie óptica está apuntando hacia abajo. Sin
embargo, si precisa de limpieza, puede limpiarse igual que
el espejo primario. No necesita sacar el espejo secundario
del telescopio para limpiarlo. Apunte el telescopio horizontal
durante la limpieza para evitar que caiga nada en el espejo
primario.
Puede limpiar las superficies ópticas expuestas de sus
oculares del modo descrito anteriormente.

98 I ESPAÑOL
#22470 Starsense Explorer 8" Dobsoniano
Diseño óptico Reflector newtoniano
Apertura 8" (203mm)
Longitud focal 1200mm
Apertura focal F/5.9
Recubrimiento de ópticas Recubrimiento reflector XLT con recubrimiento protector de dióxido de silicio y
pentóxido de tántalo para los espejos primario y secundario
Material del espejo Equivalente a pyrex para los espejos primario y secundario
Grosor del espejo primario 25mm (relación de grosor aproximada de 1:8)
Grosor del espejo secundario 8,5mm
Eje menor del espejo secundario 47mm
Material del tubo Acero
Enfoque Crayford de 2", incluye tubo extensor de 2" y adaptador de 2" a 1,25"
Ocular / Aumento Plössl de 25mm, 48x
Localizador Localizador de punto rojo StarPointer
Otros accesorios Conector StarSense Explorer, soporte de oculares, tapón de colimado,
asas de transporte para ETO y base, mando de apuntado, cubiertas para polvo
Trípode Base dobsoniana altazimut, tensión de altitud ajustable
Dimensiones del tubo óptico 44” x 9,5” de diámetro
Peso del tubo óptico 20,6 lbs.
Dimensiones de la base 27” x 19” x 19”
Peso de la base 22,8 lbs.
Peso total del telescopio 43,4 lbs.
ESPECIFICACIONES

ESPAÑOL I 99
#22471 Starsense Explorer 10" Dobsoniano
Diseño óptico Reflector newtoniano
Apertura 10" (254mm)
Longitud focal 1200mm
Apertura focal F/4.7
Recubrimiento de ópticas Recubrimiento reflector XLT con recubrimiento protector de dióxido de silicio y
pentóxido de tántalo para los espejos primario y secundario
Material del espejo Equivalente a pyrex para los espejos primario y secundario
Grosor del espejo primario 30mm (relación de grosor aproximada de 1:8,5)
Grosor del espejo secundario 11,5mm
Eje menor del espejo secundario 64mm
Material del tubo Acero
Enfoque Crayford de 2", incluye tubo extensor de 2" y adaptador de 2" a 1,25"
Ocular / Aumento Plössl de 25mm, 48x
Localizador Localizador de punto rojo StarPointer
Otros accesorios Conector StarSense Explorer, soporte de oculares, tapón de colimado,
asas de transporte para ETO y base, mando de apuntado, cubiertas para polvo
Trípode Base dobsoniana altazimut, tensión de altitud ajustable
Dimensiones del tubo óptico 44” x 11,5” de diámetro
Peso del tubo óptico 29,2 lbs.
Dimensiones de la base 26.5” x 21” x 21”
Peso de la base 25,6 lbs.
Peso total del telescopio 54,8 lbs.
ESPECIFICACIONES

100 I ESPAÑOL
• No mire nunca directamente al Sol con los ojos descubiertos o un telescopio a menos que tenga un filtro solar ade-
cuado. Puede producir daños oculares permanentes e irreversibles.
• No use nunca el telescopio para proyectar una imagen del Sol en ninguna superficie. La acumulación interna de calor
puede dañar el telescopio y cualquier accesorio que tenga instalado.
• No use nunca un filtro solar de ocular ni una cuña Herschel. La acumulación interna de calor en el telescopio puede
hacer que los dispositivos se agrieten o rompan, permitiendo pasar la luz solar sin filtrar hasta el ojo.
• No deje nunca el telescopio sin supervisión. Asegúrese de que un adulto familiarizado con los procedimientos de uso
adecuados esté con el telescopio en todo momento, especialmente en presencia de niños.
AVISO SOLAR
¿Necesita ayuda?
Contacte con el soporte técnico de Celestron visitando
celestron.com/pages/technical-support © 2022 Celestron • Todos los derechos reservados • celestron.com
2835 Columbia Street • Torrance, CA 90503 EE.UU.
0522
celestron.com
NOTA FCC: Este equipo ha sido probado y cumple con los límites de un dispositivo digital de Clase B, según el apartado 15 de las normas FCC. Estos límites están diseñados para proporcionar una protección razonable contra interferencias dañinas en una instalación doméstica. Este equipo genera, usa e
irradia energía de radiofrecuencia y, si no se instala y utiliza de acuerdo con las instrucciones, puede provocar interferencias dañinas en comunicaciones por radio. Sin embargo, no existe ninguna garantía de que no se produzcan interferencias en una instalación concreta. Si este equipo causa interferencias
dañinas en la recepción de radio o televisión, lo que puede determinarse apagando y encendiendo el equipo, se recomienda al usuario intentar corregir las interferencias con una o varias de las medidas siguientes:
• Reorientar o recolocar la antena receptora.
• Aumentar la separación entre el equipo y el receptor.
• Conectar el equipo a una toma de un circuito distinto al que esté conectado el receptor.
• Consultar al vendedor o a un técnico experimentado de radio/TV para obtener ayuda.
Este dispositivo cumple con el apartado 15 de las normas FCC. Su uso está sujeto a las dos condiciones siguientes: (1) este dispositivo no puede causar interferencias nocivas, y (2) este dispositivo debe admitir cualquier interferencia recibida, incluidas las interferencias que puedan causar un funcionamiento
indeseado.
Tenga en cuenta que los cambios o modificaciones no aprobadas explícitamente por la parte responsable del cumplimiento pueden anular la autoridad del usuario para usar el equipo.
El diseño y las especificaciones del producto están sujetos a cambios sin notificación previa. Este producto ha sido diseñado y está pensado para ser usado por personas de 14 años o más de edad.
celestron.com/pages/warranty
ADVERTENCIA: MANTENGA LAS PILAS FUERA DEL ALCANCE DE LOS NIÑOS.
• Examine los dispositivos y asegúrese de que el compartimiento de la batería esté correctamente
asegurado, p. que el tornillo u otro sujetador mecánico esté apretado.
• No lo use si el compartimiento no es seguro.
• Deseche las pilas de botón usadas de forma inmediata y segura. Las baterías descargadas
aún pueden ser peligrosas.
• Dígales a otros sobre el riesgo asociado con las pilas de botón y cómo mantener seguros a
sus hijos.
-
 1
1
-
 2
2
-
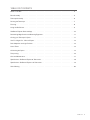 3
3
-
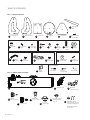 4
4
-
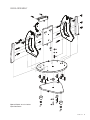 5
5
-
 6
6
-
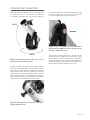 7
7
-
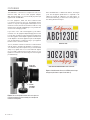 8
8
-
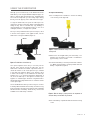 9
9
-
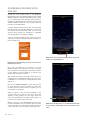 10
10
-
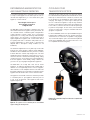 11
11
-
 12
12
-
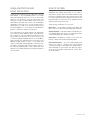 13
13
-
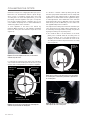 14
14
-
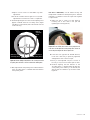 15
15
-
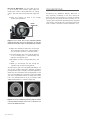 16
16
-
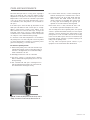 17
17
-
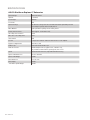 18
18
-
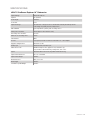 19
19
-
 20
20
-
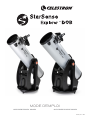 21
21
-
 22
22
-
 23
23
-
 24
24
-
 25
25
-
 26
26
-
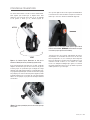 27
27
-
 28
28
-
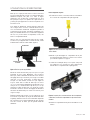 29
29
-
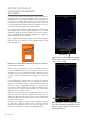 30
30
-
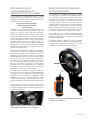 31
31
-
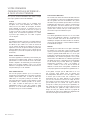 32
32
-
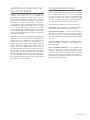 33
33
-
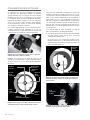 34
34
-
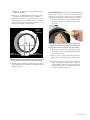 35
35
-
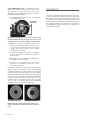 36
36
-
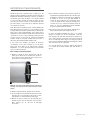 37
37
-
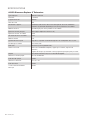 38
38
-
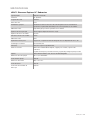 39
39
-
 40
40
-
 41
41
-
 42
42
-
 43
43
-
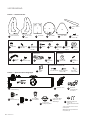 44
44
-
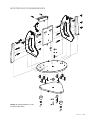 45
45
-
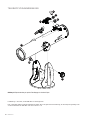 46
46
-
 47
47
-
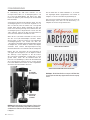 48
48
-
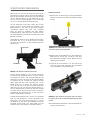 49
49
-
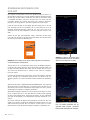 50
50
-
 51
51
-
 52
52
-
 53
53
-
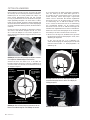 54
54
-
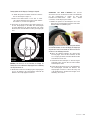 55
55
-
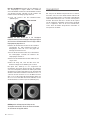 56
56
-
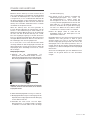 57
57
-
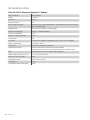 58
58
-
 59
59
-
 60
60
-
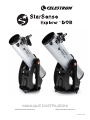 61
61
-
 62
62
-
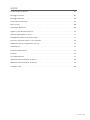 63
63
-
 64
64
-
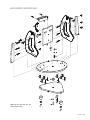 65
65
-
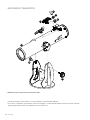 66
66
-
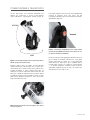 67
67
-
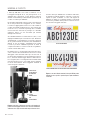 68
68
-
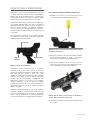 69
69
-
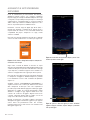 70
70
-
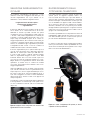 71
71
-
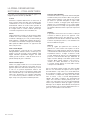 72
72
-
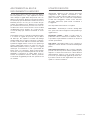 73
73
-
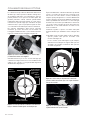 74
74
-
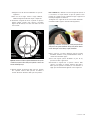 75
75
-
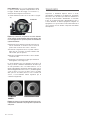 76
76
-
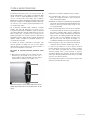 77
77
-
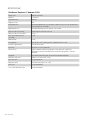 78
78
-
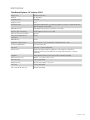 79
79
-
 80
80
-
 81
81
-
 82
82
-
 83
83
-
 84
84
-
 85
85
-
 86
86
-
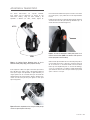 87
87
-
 88
88
-
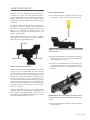 89
89
-
 90
90
-
 91
91
-
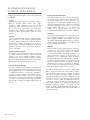 92
92
-
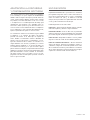 93
93
-
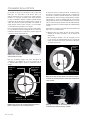 94
94
-
 95
95
-
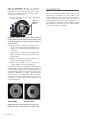 96
96
-
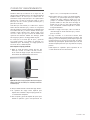 97
97
-
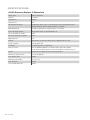 98
98
-
 99
99
-
 100
100


Celestron 22470 Manual de usuario
- Categoría
- Telescopios
- Tipo
- Manual de usuario
en otros idiomas
- français: Celestron 22470 Manuel utilisateur
- italiano: Celestron 22470 Manuale utente
- English: Celestron 22470 User manual
- Deutsch: Celestron 22470 Benutzerhandbuch
Artículos relacionados
-
Celestron 22470 Guía del usuario
-
Celestron 22462 Guía del usuario
-
Celestron 21073 Manual de usuario
-
Celestron AstroMaster EQ Telescope Series Manual de usuario
-
-
Celestron 22480 Guía del usuario
-
Celestron PowerSeeker 50AZ El manual del propietario
-
-
Celestron PowerSeeker 60, 70, 80, 114, 127 EQ Manual de usuario
-
Celestron 81037 Manual de usuario