Aroma AWK-115S Manual de usuario
- Categoría
- Hervidores eléctricos
- Tipo
- Manual de usuario

Las respuestas a muchas
preguntas comunes e incluso
piezas de repuesto se pueden
encontrar en línea. Visita:
www.AromaCo.com/Support.
Nos expertos de servicio al
cliente estará encantado de
ayudarle. Llámenos al número
gratuito a 1-800-276-6286.
¿Preguntas o dudas acerca
de su pava eléctrica?
Antes de regresar a la
tienda...
Manual de instrucciones
Hot H
2
0 X-Press
™
Pava eléctrica
AWK-115S
Questions or concerns
about your electric kettle?
Before returning to the
store...
Aroma’s customer service
experts are happy to help.
Call us toll-free at
1-800-276-6286.
Answers to many common
questions and even replacement
parts can be found online. Visit
www.AromaCo.com/Support.
Instruction Manual
Hot H
2
0 X-Press
™
Electric Kettle
AWK-115S

Congratulations on your purchase of the Aroma
®
Hot H
2
0 X-Press
™
, the best way to boil! The Hot H
2
0 X-Press
™
is the ideal solution for any need in the kitchen that
calls for boiling water in a hurry. It’s perfect for soothing hot tea, an easy bowl of noodles, an invigorating cup of instant coffee, a hearty helping of oatmeal, delicious hot
chocolate and so much more!
Faster than the stovetop, your new kettle will boil water at a blazing cup-a-minute speed. And there’s no need to worry about a forgotten kettle, as the Hot H
2
0 X-Press
™
shuts off automatically once water has boiled.
Serving favorite hot beverages to friends and family is made easy as the Hot H
2
0 X-Press
™
lifts off the power base for cordless pouring.
For more information on your Aroma
®
Hot H
2
0 X-Press
™
, or for product service, replacement parts and other home appliance solutions, please visit us online at
www.AromaCo.com.
See what’s brewing with Aroma online!
Published By:
Aroma Housewares Co.
6469 Flanders Drive
San Diego, CA 92121
U.S.A.
1-800-276-6286
www.AromaCo.com
©2014 Aroma Housewares Company
All rights reserved.
www.AromaTestKitchen.com AromaHousewares AromaHousewares AromaHousewares AromaHousewares
Felicitaciones por comprar la pava Aroma
®
Hot H
2
0 X-Press
™
, ¡la mejor forma de hervir agua! Ideal para preparar un relajante té caliente, un sencillo plato de fi deos, una
energizante taza de café instantáneo, un sustancioso plato de avena, un delicioso chocolate caliente, e infi nidad de cosas más. La pava Hot H
2
0 X-Press
™
es la solución
ideal para cuando se necesita hervir agua rápidamente.
Su nueva pava hierve el agua a gran velocidad, a una taza por minuto, mucho más rápido que sobre una hornalla. Y no hay que preocuparse por olvidarse la pava en el
fuego, ya que la Hot H
2
0 X-Press
™
se apaga automáticamente cuando el agua hierve.
Servir las bebidas calientes favoritas a su familia y amigos es fácil ya que la Hot H
2
0 X-Press
™
se puede retirar de la base para usarse como jarra.
Para más información sobre su Aroma
®
Hot H
2
0 X-Press
™
, consultas sobre servicio técnico, piezas de repuesto y otros electrodomésticos, visítenos en
www.AromaCo.com.
Publicada Por:
Aroma Housewares Co.
6469 Flanders Drive
San Diego, CA 92121
U.S.A.
1-800-276-6286
www.AromaCo.com
©2014 Aroma Housewares Company
Todos los derechos reservados.

1. Lea las instrucciones cuidadosamente antes de usar el
electrodoméstico.
2. No toque las superfi cies calientes. Use las manijas o los botones. Las
superfi cies metálicas pueden calentarse en extremo.
3. Para evitar incendios, descargas eléctricas y lesiones personales, no
sumerja el cable, enchufe o pava en agua u otro líquido.
4. No deje la pava al alcance de los niños. Evite que los niños utilicen la
pava sin la supervisión de un adulto.
5. Siempre desenchufe el artefacto cuando no esté en uso y antes de
limpiarlo. Espere a que la pava se enfríe por completo antes de poner o
quitar piezas, y de limpiar el artefacto.
6. Nunca utilice el artefacto con el cable de alimentación o fi cha dañada,
o si ha presentado signos de mal funcionamiento o ha sido dañado de
alguna forma. Consulte al Servicio al Cliente de Aroma
®
para la revisión,
reparación o ajuste mecánico o eléctrico de la pava.
7. El uso de accesorios no recomendados por Aroma
®
puede resultar en
riesgo de incendio, descargas eléctricas o daños personales.
8. No use el artefacto al aire libre.
9. Evite que el cable de alimentación cuelgue del borde de la mesa o
mesada, o que toque superfi cies calientes.
10. No coloque la pava sobre o cerca de una hornalla eléctrica o a gas, o
dentro del horno caliente.
11. Para desconectarla, ponga el interruptor en “OFF”, luego desenchúfela.
12. No utilice la pava para otro propósito distinto para el cual fue diseñada.
13. La pava eléctrica puede ser utilizada únicamente con la base suministrada.
14. Use la pava solo para calentar agua. No coloque otros líquidos dentro de la pava.
15. No intente quitar tornillos de la pava o base, o desarmar la pava por su cuenta.
16. No mueva la pava mientras calienta agua.
17. Este producto es apto solo para uso doméstico.
18. No sumerja el artefacto o alguna de sus partes en agua.
19. Nunca quite la tapa mientras la pava está en funcionamiento.
20. Precaución: Nunca llene con agua más del nivel “MAX” porque el agua hervida
podría derramarse.
21. Use la pava únicamente en una superfi cie nivelada, seca y resistente al calor.
22. Desenchufe siempre la pava desde la base en el enchufe de la pared. Nunca tire
del cable.
23. Use la pava eléctrica en un circuito eléctrico diferente al de otros
electrodomésticos en funcionamiento. Si se sobrecarga el circuito eléctrico la
pava puede no funcionar correctamente.
24. No abra la tapa de la pava durante la operación.
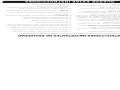
GUARDE ESTAS INSTRUCCIONES
INSTRUCCIONES IMPORTANTES DE SEGURIDAD
1
Cuando se usen aparatos electricos, siempre deberán observarse las precauciones básicas de seguridad, incluyendo las siguientes:
1. Read all instructions carefully before using the appliance.
2. Do not touch hot surfaces. Use handles or knobs. Metal surfaces
become extremely hot.
3. To protect against fi re, electric shock and injury to persons, do
not immerse cord, plug or kettle in water or any other liquid. See
instructions for cleaning.
4. Close supervision is necessary when the appliance is used by or near
children.
5. Always unplug the appliance from the outlet when not in use and
before cleaning. Allow the kettle to cool completely before putting on or
taking off parts, and before cleaning the appliance.
6. Do not operate appliance with a damaged cord or plug, or after
appliance malfunctions or has been damaged in any manner. Contact
Aroma
®
customer service for examination, repair or electrical/
mechanical adjustment.
7. The use of accessory attachments not recommended by Aroma
®
Housewares may result in fi re, electrical shock or injury.
8. Do not use outdoors.
9. Do not let cord hang over the edge of a table or counter or to touch hot
surfaces.
10. Do not place kettle on or near a hot gas or electric burner or in a
heated oven.
11. To disconnect, turn any control to the “OFF” position, then remove the plug from the
wall outlet.
12. Do not use kettle for other than its intended use.
13. The power base must only be used with the provided kettle.
14. Only use the kettle to heat water. No other liquids should be placed inside the kettle.
15. Do not unscrew any screws on the kettle or power base or attempt to
disassemble them in any way.
16. Do not move kettle during the heating process.
17. This appliance is for household use only.
18. Do not immerse this appliance or any of its parts in water.
19. Scalding may occur if the lid is removed during the boiling cycle.
20. Caution: If water exceeds the “MAX” line, the boiled water may spill out.
21 Use only on a level, dry and heat-resistant surface.
22 Always unplug from the base of the wall outlet. Never pull on the cord.
23 The electric kettle should be operated on a separate electrical circuit from other
operating appliances. If the electrical circuit is overloaded with other appliances the
electric kettle may not operate properly.
24. Do not open the kettle lid when in operation.
SAVE THESE INSTRUCTIONS
IMPORTANT SAFEGUARDS
1
When using electrical appliances basic safety precautions should always be followed, including the following:

THIS APPLIANCE IS FOR HOUSEHOLD USE ONLY.
1. A short power-supply cord is provided to reduce the risks resulting from becoming entangled
in or tripping over a longer cord.
2. Longer extension cords are available and may be used if care is exercised in their use.
3. If a longer extension cord is used:
a. The marked electrical rating of the extension cord should be at least as great as the
electrical rating of the appliance.
b. The longer cord should be arranged so that it will not drape over the countertop or
tabletop where it can be pulled by children or tripped over unintentionally.
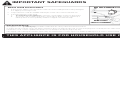
Short Cord Instructions
IMPORTANT SAFEGUARDS
2
Polarized Plug
This appliance has a polarized plug (one blade is wider than the other); follow the instructions below:
To reduce the risk of electric shock, this plug is intended to fi t into a polarized outlet only one way. If the plug does not fi t fully into the outlet, reverse the plug.
If it still does not fi t, contact a qualifi ed electrician. Do not attempt to modify the plug in any way.
If the supply cord is damaged, it must be replaced by the manufacturer, its service agent or a similarly qualifi ed person in order to avoid a hazard.
DO NOT DRAPE CORD!
KEEP AWAY
FROM CHILDREN!
ESTE APARATO ES PARA USO DOMÉSTICO.
1. Se proporciona un cable eléctrico corto con el propósito de reducir el riesgo de tropezarse o
enredarse con un cable más largo.
2. Hay cables de extensión más largos disponibles y deben ser usados con sumo cuidado.
3. Si se usa un cable de extensión más largo:
a. La clasifi cación eléctrica marcada en el cable de extensión debe ser por lo menos
igual que la clasifi cación eléctrica del aparato.
b. El cable más largo debe ser colocado de manera que no cuelguepor el borde del
mostrador o mesa en donde pudiera ser jalado por un niño o alguien pudiera
tropezarse con el cable sin querer.
Instrucciones de cable corto
INSTRUCCIONES IMPORTANTES DE SEGURIDAD
2
PLOYA POLARIZADA
Si este aparato tiene ploya polarizada:
Para reducir el riesgo de descarga eléctrica, este ploya intencionalmente solo debe de enchufar un lado en enchufes de luz de ploya polarisada. Si la clavija no
entra completamente, da vuelta a la clavija. Si aun la clavija no puede entrar, llame a un electricista califi cada. No intente de modifi car la clavija, es muy peligroso.
Si esté estropeado el cordón eléctrico, hay que ser reemplazado por el fabricante o su agencia de servicio u otra persona califi cada para hacer que se evita
cualquier peligro.
¡NO DEJE QUE EL
CABLE CUELGUE!
¡MANTÉNGALO
LEJOS DE LOS
NIÑOS!

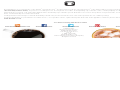
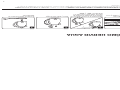
IDENTIFICACIÓN DE PARTES
3
Indicador de nivel de agua
Pico
Luz de
indicador poder
Cuerpo de pava
Filtro permanente
de acero inoxidable
Manija de fácil agarre
Tecla de encendido
Base de
alimentación
Tapa agarre de frío al tacto
Tapa de la tetera
Water Level Indicator
Pour Spout
Power
Indicator Light
Kettle Body
Permanent Stainless
Steel Filter
Easy-Grip Handle
Power Switch
Power Base
PARTS IDENTIFICATION
3
Cool-Touch Lid Grip
Kettle Lid

4
BEFORE FIRST USE
1. Remove all packing materials and make sure that the product has been received in good condition.
2. Taking care to keep the electrical components on the exterior of the kettle dry, wipe out the interior of the kettle with a damp cloth. If your hand will
not fi t inside the kettle, swish warm, soapy water around in the interior of the kettle with the lid closed.
3. Rinse out the inside of the kettle thoroughly with water.
4. With a damp cloth, gently wipe off the exterior of the kettle. Do not wipe off electrical components as this may cause damage to the unit.
5. Dry all parts completely.
6. It is recommended to run your kettle through one boiling cycle before using it to consume beverages. Following the instructions in “To Boil
Water” on page 5, boil one kettle of water. When water has boiled, pour it out and rinse the inside of the kettle once more. The kettle is now ready
for use.
Before using for the fi rst time, it is recommended to clean the interior of the kettle thoroughly. Please follow the procedures below
before using the kettle:
ANTES DE USAR POR PRIMERA VEZ
1. Retire todo el material de empaque y compruebe que el producto haya llegado en buenas condiciones.
2. Limpie el interior de la pava con un trapo húmedo, con cuidado para mantener secos los componentes eléctricos en el exterior. Si no puede
introducir la mano en la pava, vierta agua tibia jabonosa en su interior y agítela con la tapa cerrada.
3. Enjuague bien el interior de la pava con agua.
4. Limpie suavemente el exterior de la pava con un paño húmedo. No limpie con un paño húmedo los componentes eléctricos ya que podría dañar
la unidad.
5. Seque cuidadosamente todas las partes.
6. Se recomienda realizar un ciclo completo de ebullición de agua antes de hervir agua para consumo. Siga las instrucciones en “Cómo
hervir agua” en la página 5, y hierva una pava de agua, luego viértala y vuelva a enjuagar el interior. La pava está ahora lista para usar.
Antes de usar la pava por primera vez, se recomienda limpiar bien el interior. Antes de usar la pava siga estas instrucciones:
4

• Las partes de acero inoxidable se calientan durante el uso y tardan un tiempo en enfriarse. No toque el cuerpo de acero inoxidable
o la tapa hasta que la pava no se haya enfriado por completo.
• Para cerrar la tapa mientras la pava está caliente, presione tapa agarre de frío al tacto. Las partes de acero inoxidable de la tapa se
calentarán.
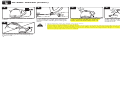
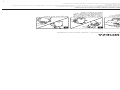
CÓMO HERVIR AGUA
PRECAUCIÓN
Coloque la base sobre una
super cie, nivelada, estable y seca.
Coloque la pava en la base de
alimentación.
Cierre y trabe bien la tapa. Abra la tapa de la tetera y llénela con
agua por la apertura de la tapa. El
nivel de agua debe estar entre los
indicadores “MÍN” y “MÁX.”
5
41 32
5
4
1
• The stainless steel portions of the kettle will become extremely hot during use and remain hot for sometime after. Do not touch the
stainless steel body or lid until the kettle has cooled completely.
• To close the lid while the kettle is hot, press down on the plastic cool-touch lid grip. The stainless steel portions of the lid will become
hot.
32
TO BOIL WATER
CAUTION
Place power base on a sturdy, level
and dry surface.
Place the kettle onto the power base.Close the lid, ensuring it locks into
place.
Open the kettle lid and ll with water
through lid opening. Water must be
lled between the “MIN” and “MAX”
levels, shown on the water level
window.

6
NOTE
Press down on the power switch. The
power indicator light will illuminate
and the kettle will begin heating the
water.
9
7 865
TO BOIL WATER (CONT.)
• Never fi ll kettle with any liquid other than water.
• Never open the lid while water is boiling.
• If the kettle is heated with no water, the internal safety mechanism will automatically turn the kettle off. The
power switch will not automatically return to the “OFF” position. The kettle will begin working again after the
kettle is removed from and returned to the base and the internal temperature drops to a safe level. The kettle
functions properly when water is added.
Once the water reaches a boil, the
power switch will ip up and the
kettle will automatically shut off.
Using the easy-grip handle, lift the
kettle off the power base to serve. Do
not touch the stainless steel body, as
it will be hot.
Plug the power cord into an available
outlet.
When nished serving, pour out
any remaining water and unplug the
power cord.
NOTA
Presione hacia abajo La tecla de
encendido. La luz de incador poder
se iluminará y el aguase comenzará
a calentar.
CÓMO HERVIR AGUA (CONT.)
• Utilice solo con agua.
• Nunca abra la tapa cuando el agua está en ebullición.
• Si la pava se calienta con nada de agua, el mecanismo interno de seguridad se activará automáticamente
a apagarla. La tecla de encendido no volverá automáticamente a la posición “OFF”. La pava comienza a
funcionar de nuevo después de se retirala y regresó a la base y baja la temperatura interior a un nivel seguro.
La pava función correctamente cuando se le añade agua.
Una vez que el agua hierva, La
tecla de encendido cambia de
posición y la pava se apaga en forma
automática.
Con la manija de fácil agarre, retire la
pava de la base para servir. No toque
el cuerpo de acero inoxidable, ya
que estará caliente.
Enchufe el cable de alimentación.
Cuando termine de servir, vierta
el resto del agua y desenchufe el
artefacto.
6
9
7 865

LIMPIEZA
Limpie el exterior de la pava con
un paño húmedo, evitando los
componentes eléctricos.
Enjuague bien. Vacíe la pava.Limpie el interior con una esponja
suave, y agua tibia y jabonosa. Si
no puede introducir la mano, agite
agua tibia jabonosa dentro de la
pava con la tapa cerrada.
• Nunca intente desarmar la pava o la base de alimentación.
• Nunca sumerja la pava, cable, enchufe o base en el agua.
• No permita que ningún líquido entre en contacto con los componentes eléctricos.
• No utilice limpiadores abrasivos, o esponjas de plástico o metal, para limpiar la pava o la base. Podría dañar el exterior y generar riesgo de
descarga eléctrica.
• La reparación del artefacto debe hacerla solamente Aroma
®
Housewares.
NOTA
Siempre desenchufe y deje enfriar por completo la pava antes de limpiarla.
7
1 32
7
TO CLEAN
Wipe the exterior of the kettle with a
damp cloth, taking care to avoid the
electrical components.
Rinse any remaining soapy water
from the kettle. Drain.
Clean the interior of the kettle with
a soft sponge and warm, soapy
water. If your hand does not t in
the lid opening, swish warm, soapy
water around inside the kettle with
the lid closed.
1
• Never attempt to disassemble the kettle or the power base.
• Never immerse the kettle, power cord, plug or power base in water.
• Always take care not to allow electrical components to come into contact with water.
• Do not use abrasive cleaners or scouring pads of any kind on the kettle or power base. This will cause damage to the fi nish and may
create a risk of electrical shock.
• Any other servicing should be performed by Aroma
®
Housewares.
2
NOTE
Always unplug the kettle and allow it to cool completely before cleaning.
3

8
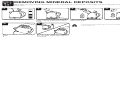
Allow the mixture to soak overnight.
4
1.5L
MAX
1.0L
0.6L
MIN
Fill the kettle halfway with water. Add one cup of white vinegar to the
water in the kettle.
Following the instructions in “To Boil
Water” on page 5, bring the water to
a boil.
1
HELPFUL
HINT
• Using distilled water will help to prevent the buildup of
mineral deposits.
32
REMOVING MINERAL DEPOSITS
Hard water can leave mineral deposits that create scale build-up on the interior of the kettle. If mineral deposits occur, follow
these steps:
Re ll the kettle with water only. Bring
it to a boil and empty again. Repeat
as needed.
6
Empty the mixture and rinse out the
kettle.
5
Déjelo reposar toda la noche.Llene la pava con agua hasta la
mitad.
Agregue una taza de vinagre blanco. Siga las instrucciones en “Cómo
hervir agua” en página 5 para llevar
el agua a ebullición.
CONSEJO
ÚTIL
• Usar agua destilada evita la formación de sarro.
ELIMINACIÓN DE DEPÓSITOS MINERALES
El agua dura puede dejar restos minerales que forman sarro en el interior de la pava. Si se forma sarro, siga las instrucciones a
continuación:
Vuelva a llenar la pava con agua. Lleve
el agua a ebullición y vierta nuevamente.
Repita las veces necesarias.
Vierta el líquido y enjuague.
8
4
1.5L
MAX
1.0L
0.6L
MIN
1 32
65

La tetera y luz indicadora no
funcionan cuando la tecla de
encendido hacia abajo.
• Asegúrese de que la tetera esté bien asentada en la base y que la base esté conectada a una toma
de corriente eléctrica que funcione.
• Si la pava se calienta con nada de agua, el mecanismo interno de seguridad se activará automáticamente
a apagarla. La tecla de encendido no volverá automáticamente a la posición “OFF”. La pava comienza
a funcionar de nuevo después de se retirala y regresó a la base y baja la temperatura interior a un nivel
seguro. La pava función correctamente cuando se le añade agua.
• Si persiste el problema, por favor póngase en contacto con nuestro departamento de servicio al
cliente al número gratuito (800) 276-6286 o por correo electrónico a [email protected].
El agua hierve pero la tecla de
encendido y la luz indicadora no
se apagan.
• La función de apagado automático no opera forma adecuada si la tapa no está bien cerrada.
Deje que la tetera se enfríe y luego verifi que que la tapa esté bien cerrada.
• Si persiste el problema, por favor póngase en contacto con nuestro departamento de servicio al
cliente al número gratuito (800) 276-6286 o por correo electrónico a [email protected].
La tecla de encendido no baja y
la tetera no se enciende.
• Asegúrese de que la tetera esté bien colocada sobre la base y que la base esté conectada a una
toma de corriente eléctrica que funcione.
• El agua o la suciedad en la parte inferior de la tetera o la base pueden interferir con el
funcionamiento de la tetera. Asegúrese de que la base de la tetera y la base estén secas y libres de
suciedad.
• Si persiste el problema, por favor póngase en contacto con nuestro departamento de servicio al
cliente al número gratuito (800) 276-6286 o por correo electrónico a [email protected].
Hay sarro en el interior de la
tetera.
• Es normal que se acumule cierta cantidad de sarro después de periodos largos de uso y es
consecuencia de los minerales que contiene el agua dura. La mejor manera de evitar el sarro es
usar siempre agua destilada en la tetera.
• Para eliminar los depósitos, inténtelo llenando la tetera a hasta la mitad con agua y agregue unas cuantas
rebanadas de limón y póngala a hervir. Si esto no funciona, por favor vea la sección de la página 8
titulada “Eliminación de depósitos minerales.”
RESOLUCION DE PROBLEMAS
9
9
The kettle and indicator light do
not work when the power switch
is down.
• Make sure the kettle is seated properly on the power base and that the base is connected to a functioning
electrical outlet.
• If the kettle is heated with no water, the internal safety mechanism will automatically turn the kettle off. The
power switch will not automatically return to the “OFF” position. The kettle will begin working again after
the kettle is removed from and returned to the base and the internal temperature drops to a safe level. The
kettle functions properly when water is added.
• If the problem persists, please contact our customer service department toll-free at (800) 276-6286 or
through email at CustomerService@AromaCo.com.
The water is boiling, but the
power switch and indicator light
do not turn off.
• The auto shut-off function will not operate properly if the lid is not completely closed. Allow kettle to cool,
then check to see that the the lid is properly locked into place.
• If the problem persists, please contact our customer service department toll-free at (800) 276-6286 or
through email at CustomerService@AromaCo.com.
The power awitch won’t depress
and the kettle will not turn on.
• Make sure that the kettle is seated properly on the power base and that the base is connected to a
functioning electrical outlet.
• Water or debris on the bottom of the kettle or on the power base may interfere with the functioning of the
kettle. Be sure that the base of the kettle and the power base are dry and free of debris.
• If the problem persists, please contact our customer service department toll-free at (800) 276-6286 or
through email at CustomerService@AromaCo.com.
There are mineral deposits on
the interior of the kettle.
• A certain amount of scale build-up is normal after long periods of use and is caused by minerals contained
in hard water. The best way to prevent mineral deposits is to always use distilled water in the kettle.
• To remove deposits, try fi lling the kettle halfway with water and adding a few slices of lemon, then boil. If
this does not work, please see the section on page 8 entitled “Removing Mineral Deposits.”
TROUBLESHOOTING

10
• Proof of purchase is required for all warranty claims.
Aroma Housewares Company warrants its products against defects in
material and workmanship for two years from provable date of purchase in
the United States.
Within this warranty period, Aroma Housewares Company will repair or
replace, at its discretion, defective parts at no charge, provided the product
is returned, freight prepaid with proof of purchase and U.S. $15.00 for
shipping and handling charges payable to Aroma Housewares Company.
Before returning an item, please call the toll free number below for a return
authorization number. Allow 2-4 weeks for return shipping.
This warranty does not apply if the warranty period expired; the products
has been modifi ed by any unauthorized service center or personnel; the
defect was subject to abuse, improper use not conforming to product
manual instructions, or environment conditions more severe than those
specifi ed in the manual and specifi cation, neglect of the owner or improper
installation; the defect was subject to Force Majeure such as fl ood,
lightning, earthquake, other natural calamities, war, vandalism, theft,
brownouts or sags (damage due to low voltage disturbances).
This warranty gives you specifi c legal rights, which may vary from state to
state, and does not cover areas outside the United States.
AROMA HOUSEWARES COMPANY
6469 Flanders Drive
San Diego, California 92121
1-800-276-6286
M-F, 8:30 AM - 4:30 PM, Pacifi c Time
Website: www.AromaCo.com
LIMITED WARRANTY
SERVICE & SUPPORT
In the event of a warranty claim, or if service is required for this product, please
contact Aroma
®
customer service toll-free at:
1-800-276-6286
M-F, 8:30AM-4:30PM, Pacifi c Time
Or we can be reached online at CustomerService@AromaCo.com.
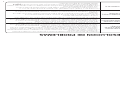
For your records, we recommend stapling your sales receipt to this page along with
a written record of the following:
Date of Purchase:
Place of Purchase:
LIMITED WARRANTY
NOTE
Aroma Housewares Company garantiza que este producto no tenga defectos
en sus materiales y fabricación durante un período de dos años a partir de la
fecha
comprobada de compra dentro de los Estados Unidos.
Dentro de este período de garantía, Aroma Housewares Company reparará o
reemplazará, a su opción, las partes defectuosas sin ningún costo, siempre y
cuando el producto sea devuelto, con el fl ete prepagado, con comprobación de
compra y $15.00 dólares para cargos de envío y manejo a favor de Aroma
Housewares Company. Antes de devolver un producto, sírvase llamar al número
telefónico gratuito que está más abajo para obtener un número de autorización
de devolución. Espere entre 2-4 semanas para recibir el aparato nuevamente.
Esta garantía no cubre la instalación incorrecta, el uso indebido, maltrato o
negligencia por parte del usuario. La garantía también es inválida en caso
de que el aparato sea desarmado o se le dé mantenimiento en un centro de
servicio no autorizado.
Esta garantía le da derechos legales específi cos los cuales podrán variar de un
estado a otro y no cubre áreas fuera de los Estados Unidos.
AROMA HOUSEWARES COMPANY
6469 Flanders Drive
San Diego, California 92121
1-800-276-6286
L-V, 8:30 AM - 4:30 PM, Tiempo del Pacífi co
Sitio Web: www.AromaCo.com
GARANTÍA
GARANTÍA LIMITADA SERVICIO Y SOPORTE
En la eventualidad de un reclamo de garantía, o si el servicio se requiere para
este producto, póngase en contacto con Aroma
®
de servicio al cliente al
número gratuito:
1-800-276-6286
L-V, 8:30AM – 4:30PM, Tiempo del Pacifi co
O podemos ser alcanzados en línea en [email protected].
Para su registro, le recomendamos grapar su recibo a esta página, junto con un
registro escrito de lo siguiente:
Fecha de compra:
Lugar de compra:
• La prueba de compra es necesaria para todos los reclamos.
NOTA
10
Transcripción de documentos
Answers to many common questions and even replacement parts can be found online. Visit www.AromaCo.com/Support. Aroma’s customer service experts are happy to help. Call us toll-free at 1-800-276-6286. Questions or concerns about your electric kettle? Before returning to the store... Hot H20 X-Press™ Electric Kettle AWK-115S Manual de instrucciones Hot H20 X-Press™ Pava eléctrica ¿Preguntas o dudas acerca de su pava eléctrica? Antes de regresar a la tienda... Nos expertos de servicio al cliente estará encantado de ayudarle. Llámenos al número gratuito a 1-800-276-6286. Las respuestas a muchas preguntas comunes e incluso piezas de repuesto se pueden encontrar en línea. Visita: www.AromaCo.com/Support. Instruction Manual AWK-115S Publicada Por: Aroma Housewares Co. 6469 Flanders Drive San Diego, CA 92121 U.S.A. 1-800-276-6286 www.AromaCo.com ©2014 Aroma Housewares Company Todos los derechos reservados. Congratulations on your purchase of the Aroma® Hot H20 X-Press™, the best way to boil! The Hot H20 X-Press™ is the ideal solution for any need in the kitchen that calls for boiling water in a hurry. It’s perfect for soothing hot tea, an easy bowl of noodles, an invigorating cup of instant coffee, a hearty helping of oatmeal, delicious hot chocolate and so much more! Faster than the stovetop, your new kettle will boil water at a blazing cup-a-minute speed. And there’s no need to worry about a forgotten kettle, as the Hot H20 X-Press™ shuts off automatically once water has boiled. Serving favorite hot beverages to friends and family is made easy as the Hot H20 X-Press™ lifts off the power base for cordless pouring. Para más información sobre su Aroma® Hot H20 X-Press™, consultas sobre servicio técnico, piezas de repuesto y otros electrodomésticos, visítenos en www.AromaCo.com. For more information on your Aroma® Hot H20 X-Press™, or for product service, replacement parts and other home appliance solutions, please visit us online at www.AromaCo.com. Servir las bebidas calientes favoritas a su familia y amigos es fácil ya que la Hot H20 X-Press™ se puede retirar de la base para usarse como jarra. See what’s brewing with Aroma online! Su nueva pava hierve el agua a gran velocidad, a una taza por minuto, mucho más rápido que sobre una hornalla. Y no hay que preocuparse por olvidarse la pava en el fuego, ya que la Hot H20 X-Press™ se apaga automáticamente cuando el agua hierve. AromaHousewares AromaHousewares Published By: Aroma Housewares Co. 6469 Flanders Drive San Diego, CA 92121 U.S.A. 1-800-276-6286 www.AromaCo.com ©2014 Aroma Housewares Company All rights reserved. AromaHousewares AromaHousewares Felicitaciones por comprar la pava Aroma® Hot H20 X-Press™, ¡la mejor forma de hervir agua! Ideal para preparar un relajante té caliente, un sencillo plato de fideos, una energizante taza de café instantáneo, un sustancioso plato de avena, un delicioso chocolate caliente, e infinidad de cosas más. La pava Hot H20 X-Press™ es la solución ideal para cuando se necesita hervir agua rápidamente. www.AromaTestKitchen.com S AV E T H E S E I N S T R U C T I O N S 10. Do not place kettle on or near a hot gas or electric burner or in a heated oven. 1 24. Do not open the kettle lid when in operation. The use of accessory attachments not recommended by Aroma® Housewares may result in fire, electrical shock or injury. 21 Use only on a level, dry and heat-resistant surface. 8. Do not use outdoors. 22 Always unplug from the base of the wall outlet. Never pull on the cord. 9. Do not let cord hang over the edge of a table or counter or to touch hot surfaces. 23 The electric kettle should be operated on a separate electrical circuit from other operating appliances. If the electrical circuit is overloaded with other appliances the electric kettle may not operate properly. 1. INSTRUCCIONES IMPORTANTES DE SEGURIDAD Cuando se usen aparatos electricos, siempre deberán observarse las precauciones básicas de seguridad, incluyendo las siguientes: Lea las instrucciones cuidadosamente antes de usar el electrodoméstico. 11. Para desconectarla, ponga el interruptor en “OFF”, luego desenchúfela. 12. No utilice la pava para otro propósito distinto para el cual fue diseñada. 7. 2. No toque las superficies calientes. Use las manijas o los botones. Las superficies metálicas pueden calentarse en extremo. No deje la pava al alcance de los niños. Evite que los niños utilicen la pava sin la supervisión de un adulto. 4. Para evitar incendios, descargas eléctricas y lesiones personales, no sumerja el cable, enchufe o pava en agua u otro líquido. 3. 20. Caution: If water exceeds the “MAX” line, the boiled water may spill out. To protect against fire, electric shock and injury to persons, do not immerse cord, plug or kettle in water or any other liquid. See instructions for cleaning. 13. The power base must only be used with the provided kettle. 4. Close supervision is necessary when the appliance is used by or near children. 15. Do not unscrew any screws on the kettle or power base or attempt to disassemble them in any way. 5. Always unplug the appliance from the outlet when not in use and before cleaning. Allow the kettle to cool completely before putting on or taking off parts, and before cleaning the appliance. 16. Do not move kettle during the heating process. Do not operate appliance with a damaged cord or plug, or after appliance malfunctions or has been damaged in any manner. Contact Aroma® customer service for examination, repair or electrical/ mechanical adjustment. 18. Do not immerse this appliance or any of its parts in water. 13. La pava eléctrica puede ser utilizada únicamente con la base suministrada. 14. Use la pava solo para calentar agua. No coloque otros líquidos dentro de la pava. 15. No intente quitar tornillos de la pava o base, o desarmar la pava por su cuenta. 16. No mueva la pava mientras calienta agua. 6. 19. Scalding may occur if the lid is removed during the boiling cycle. 5. 17. This appliance is for household use only. 6. 7. 3. 1. Read all instructions carefully before using the appliance. 2. Do not touch hot surfaces. Use handles or knobs. Metal surfaces become extremely hot. 14. Only use the kettle to heat water. No other liquids should be placed inside the kettle. 12. Do not use kettle for other than its intended use. 11. To disconnect, turn any control to the “OFF” position, then remove the plug from the wall outlet. 8. 9. Siempre desenchufe el artefacto cuando no esté en uso y antes de limpiarlo. Espere a que la pava se enfríe por completo antes de poner o quitar piezas, y de limpiar el artefacto. Nunca utilice el artefacto con el cable de alimentación o ficha dañada, o si ha presentado signos de mal funcionamiento o ha sido dañado de alguna forma. Consulte al Servicio al Cliente de Aroma® para la revisión, reparación o ajuste mecánico o eléctrico de la pava. El uso de accesorios no recomendados por Aroma® puede resultar en riesgo de incendio, descargas eléctricas o daños personales. No use el artefacto al aire libre. Evite que el cable de alimentación cuelgue del borde de la mesa o mesada, o que toque superficies calientes. 10. No coloque la pava sobre o cerca de una hornalla eléctrica o a gas, o dentro del horno caliente. When using electrical appliances basic safety precautions should always be followed, including the following: IMPORTANT SAFEGUARDS 17. Este producto es apto solo para uso doméstico. 18. No sumerja el artefacto o alguna de sus partes en agua. 19. Nunca quite la tapa mientras la pava está en funcionamiento. 20. Precaución: Nunca llene con agua más del nivel “MAX” porque el agua hervida podría derramarse. 21. Use la pava únicamente en una superficie nivelada, seca y resistente al calor. 22. Desenchufe siempre la pava desde la base en el enchufe de la pared. Nunca tire del cable. 23. Use la pava eléctrica en un circuito eléctrico diferente al de otros electrodomésticos en funcionamiento. Si se sobrecarga el circuito eléctrico la pava puede no funcionar correctamente. 24. No abra la tapa de la pava durante la operación. GUA R D E ESTAS IN ST RUCCIONES 1 INSTRUCCIONES IMPORTANTES DE SEGURIDAD Instrucciones de cable corto 3. Hay cables de extensión más largos disponibles y deben ser usados con sumo cuidado. 2. Se proporciona un cable eléctrico corto con el propósito de reducir el riesgo de tropezarse o enredarse con un cable más largo. 1. ¡NO DEJE QUE EL CABLE CUELGUE! ¡MANTÉNGALO LEJOS DE LOS NIÑOS! PLOYA POLARIZADA If a longer extension cord is used: a. The marked electrical rating of the extension cord should be at least as great as the electrical rating of the appliance. b. The longer cord should be arranged so that it will not drape over the countertop or tabletop where it can be pulled by children or tripped over unintentionally. Si este aparato tiene ploya polarizada: 3. Para reducir el riesgo de descarga eléctrica, este ploya intencionalmente solo debe de enchufar un lado en enchufes de luz de ploya polarisada. Si la clavija no entra completamente, da vuelta a la clavija. Si aun la clavija no puede entrar, llame a un electricista calificada. No intente de modificar la clavija, es muy peligroso. Longer extension cords are available and may be used if care is exercised in their use. Si esté estropeado el cordón eléctrico, hay que ser reemplazado por el fabricante o su agencia de servicio u otra persona calificada para hacer que se evita cualquier peligro. 2. Si se usa un cable de extensión más largo: a. La clasificación eléctrica marcada en el cable de extensión debe ser por lo menos igual que la clasificación eléctrica del aparato. b. El cable más largo debe ser colocado de manera que no cuelguepor el borde del mostrador o mesa en donde pudiera ser jalado por un niño o alguien pudiera tropezarse con el cable sin querer. THIS APPLIANCE IS FOR HOUSEHOLD USE ONLY. A short power-supply cord is provided to reduce the risks resulting from becoming entangled in or tripping over a longer cord. DO NOT DRAPE CORD! ESTE APARATO ES PARA USO DOMÉSTICO. 2 2 If the supply cord is damaged, it must be replaced by the manufacturer, its service agent or a similarly qualified person in order to avoid a hazard. To reduce the risk of electric shock, this plug is intended to fit into a polarized outlet only one way. If the plug does not fit fully into the outlet, reverse the plug. If it still does not fit, contact a qualified electrician. Do not attempt to modify the plug in any way. This appliance has a polarized plug (one blade is wider than the other); follow the instructions below: Polarized Plug KEEP AWAY FROM CHILDREN! 1. Short Cord Instructions IMPORTANT SAFEGUARDS 3 IDENTIFICACIÓN DE PARTES Power Base Tapa agarre de frío al tacto Tapa de la tetera Power Indicator Light Power Switch Filtro permanente de acero inoxidable Pico Kettle Body Manija de fácil agarre Indicador de nivel de agua Water Level Indicator Easy-Grip Handle Cuerpo de pava Pour Spout Permanent Stainless Steel Filter Tecla de encendido Luz de indicador poder Kettle Lid Base de alimentación Cool-Touch Lid Grip PARTS IDENTIFICATION 3 4 BEFORE FIRST USE Before using for the first time, it is recommended to clean the interior of the kettle thoroughly. Please follow the procedures below before using the kettle: Retire todo el material de empaque y compruebe que el producto haya llegado en buenas condiciones. It is recommended to run your kettle through one boiling cycle before using it to consume beverages. Following the instructions in “To Boil Water” on page 5, boil one kettle of water. When water has boiled, pour it out and rinse the inside of the kettle once more. The kettle is now ready for use. 1. 6. Limpie el interior de la pava con un trapo húmedo, con cuidado para mantener secos los componentes eléctricos en el exterior. Si no puede introducir la mano en la pava, vierta agua tibia jabonosa en su interior y agítela con la tapa cerrada. Dry all parts completely. 2. 5. Enjuague bien el interior de la pava con agua. With a damp cloth, gently wipe off the exterior of the kettle. Do not wipe off electrical components as this may cause damage to the unit. 3. 4. Limpie suavemente el exterior de la pava con un paño húmedo. No limpie con un paño húmedo los componentes eléctricos ya que podría dañar la unidad. Rinse out the inside of the kettle thoroughly with water. 4. 3. Seque cuidadosamente todas las partes. Taking care to keep the electrical components on the exterior of the kettle dry, wipe out the interior of the kettle with a damp cloth. If your hand will not fit inside the kettle, swish warm, soapy water around in the interior of the kettle with the lid closed. 5. 2. Se recomienda realizar un ciclo completo de ebullición de agua antes de hervir agua para consumo. Siga las instrucciones en “Cómo hervir agua” en la página 5, y hierva una pava de agua, luego viértala y vuelva a enjuagar el interior. La pava está ahora lista para usar. Remove all packing materials and make sure that the product has been received in good condition. 6. 1. Antes de usar la pava por primera vez, se recomienda limpiar bien el interior. Antes de usar la pava siga estas instrucciones: ANTES DE USAR POR PRIMERA VEZ 4 5 TO BOIL WATER PRECAUCIÓN • Las partes de acero inoxidable se calientan durante el uso y tardan un tiempo en enfriarse. No toque el cuerpo de acero inoxidable o la tapa hasta que la pava no se haya enfriado por completo. • Para cerrar la tapa mientras la pava está caliente, presione tapa agarre de frío al tacto. Las partes de acero inoxidable de la tapa se calentarán. 1 2 3 4 Coloque la base sobre una superficie, nivelada, estable y seca. Abra la tapa de la tetera y llénela con agua por la apertura de la tapa. El nivel de agua debe estar entre los indicadores “MÍN” y “MÁX.” Cierre y trabe bien la tapa. Coloque la pava en la base de alimentación. Place power base on a sturdy, level and dry surface. Open the kettle lid and fill with water through lid opening. Water must be filled between the “MIN” and “MAX” levels, shown on the water level window. Close the lid, ensuring it locks into place. Place the kettle onto the power base. 1 2 3 CAUTION • The stainless steel portions of the kettle will become extremely hot during use and remain hot for sometime after. Do not touch the stainless steel body or lid until the kettle has cooled completely. • To close the lid while the kettle is hot, press down on the plastic cool-touch lid grip. The stainless steel portions of the lid will become hot. CÓMO HERVIR AGUA 5 4 Cuando termine de servir, vierta el resto del agua y desenchufe el artefacto. 6 TO BOIL WATER (CONT.) 6 7 8 NOTA 5 • Utilice solo con agua. • Nunca abra la tapa cuando el agua está en ebullición. • Si la pava se calienta con nada de agua, el mecanismo interno de seguridad se activará automáticamente a apagarla. La tecla de encendido no volverá automáticamente a la posición “OFF”. La pava comienza a funcionar de nuevo después de se retirala y regresó a la base y baja la temperatura interior a un nivel seguro. La pava función correctamente cuando se le añade agua. 9 Enchufe el cable de alimentación. Using the easy-grip handle, lift the kettle off the power base to serve. Do not touch the stainless steel body, as it will be hot. Con la manija de fácil agarre, retire la pava de la base para servir. No toque el cuerpo de acero inoxidable, ya que estará caliente. Once the water reaches a boil, the power switch will flip up and the kettle will automatically shut off. Una vez que el agua hierva, La tecla de encendido cambia de posición y la pava se apaga en forma automática. Press down on the power switch. The power indicator light will illuminate and the kettle will begin heating the water. Presione hacia abajo La tecla de encendido. La luz de incador poder se iluminará y el aguase comenzará a calentar. Plug the power cord into an available outlet. 9 6 CÓMO HERVIR AGUA (CONT.) 7 8 When finished serving, pour out any remaining water and unplug the power cord. 6 5 NOTE • Never fill kettle with any liquid other than water. • Never open the lid while water is boiling. • If the kettle is heated with no water, the internal safety mechanism will automatically turn the kettle off. The power switch will not automatically return to the “OFF” position. The kettle will begin working again after the kettle is removed from and returned to the base and the internal temperature drops to a safe level. The kettle functions properly when water is added. 7 TO CLEAN Always unplug the kettle and allow it to cool completely before cleaning. NOTA • Nunca intente desarmar la pava o la base de alimentación. • Nunca sumerja la pava, cable, enchufe o base en el agua. • No permita que ningún líquido entre en contacto con los componentes eléctricos. • No utilice limpiadores abrasivos, o esponjas de plástico o metal, para limpiar la pava o la base. Podría dañar el exterior y generar riesgo de descarga eléctrica. • La reparación del artefacto debe hacerla solamente Aroma® Housewares. 1 2 3 Limpie el exterior de la pava con un paño húmedo, evitando los componentes eléctricos. Limpie el interior con una esponja suave, y agua tibia y jabonosa. Si no puede introducir la mano, agite agua tibia jabonosa dentro de la pava con la tapa cerrada. Enjuague bien. Vacíe la pava. Wipe the exterior of the kettle with a damp cloth, taking care to avoid the electrical components. 1 NOTE Clean the interior of the kettle with a soft sponge and warm, soapy water. If your hand does not fit in the lid opening, swish warm, soapy water around inside the kettle with the lid closed. Rinse any remaining soapy water from the kettle. Drain. • • • • Never attempt to disassemble the kettle or the power base. Never immerse the kettle, power cord, plug or power base in water. Always take care not to allow electrical components to come into contact with water. Do not use abrasive cleaners or scouring pads of any kind on the kettle or power base. This will cause damage to the finish and may create a risk of electrical shock. • Any other servicing should be performed by Aroma® Housewares. 7 2 3 Siempre desenchufe y deje enfriar por completo la pava antes de limpiarla. LIMPIEZA Vuelva a llenar la pava con agua. Lleve el agua a ebullición y vierta nuevamente. Repita las veces necesarias. 8 Vierta el líquido y enjuague. REMOVING MINERAL DEPOSITS Hard water can leave mineral deposits that create scale build-up on the interior of the kettle. If mineral deposits occur, follow these steps: 2 3 4 1.5L MAX CONSEJO ÚTIL • Usar agua destilada evita la formación de sarro. 1.0L 6 Déjelo reposar toda la noche. Allow the mixture to soak overnight. 0.6L MIN Add one cup of white vinegar to the water in the kettle. Agregue una taza de vinagre blanco. 6 • Using distilled water will help to prevent the buildup of mineral deposits. 1.0L HELPFUL HINT 1.5L MAX 2 3 4 El agua dura puede dejar restos minerales que forman sarro en el interior de la pava. Si se forma sarro, siga las instrucciones a continuación: Refill the kettle with water only. Bring it to a boil and empty again. Repeat as needed. ELIMINACIÓN DE DEPÓSITOS MINERALES Empty the mixture and rinse out the kettle. 8 1 5 Following the instructions in “To Boil Water” on page 5, bring the water to a boil. Siga las instrucciones en “Cómo hervir agua” en página 5 para llevar el agua a ebullición. Fill the kettle halfway with water. Llene la pava con agua hasta la mitad. 0.6L MIN 5 1 The kettle and indicator light do not work when the power switch is down. • Make sure the kettle is seated properly on the power base and that the base is connected to a functioning electrical outlet. • If the kettle is heated with no water, the internal safety mechanism will automatically turn the kettle off. The power switch will not automatically return to the “OFF” position. The kettle will begin working again after the kettle is removed from and returned to the base and the internal temperature drops to a safe level. The kettle functions properly when water is added. • If the problem persists, please contact our customer service department toll-free at (800) 276-6286 or through email at [email protected]. The water is boiling, but the power switch and indicator light do not turn off. • The auto shut-off function will not operate properly if the lid is not completely closed. Allow kettle to cool, then check to see that the the lid is properly locked into place. • If the problem persists, please contact our customer service department toll-free at (800) 276-6286 or through email at [email protected]. The power awitch won’t depress and the kettle will not turn on. • Make sure that the kettle is seated properly on the power base and that the base is connected to a functioning electrical outlet. • Water or debris on the bottom of the kettle or on the power base may interfere with the functioning of the kettle. Be sure that the base of the kettle and the power base are dry and free of debris. • If the problem persists, please contact our customer service department toll-free at (800) 276-6286 or through email at [email protected]. There are mineral deposits on the interior of the kettle. • A certain amount of scale build-up is normal after long periods of use and is caused by minerals contained in hard water. The best way to prevent mineral deposits is to always use distilled water in the kettle. • To remove deposits, try filling the kettle halfway with water and adding a few slices of lemon, then boil. If this does not work, please see the section on page 8 entitled “Removing Mineral Deposits.” 9 RESOLUCION DE PROBLEMAS La tetera y luz indicadora no funcionan cuando la tecla de encendido hacia abajo. • Asegúrese de que la tetera esté bien asentada en la base y que la base esté conectada a una toma de corriente eléctrica que funcione. • Si la pava se calienta con nada de agua, el mecanismo interno de seguridad se activará automáticamente a apagarla. La tecla de encendido no volverá automáticamente a la posición “OFF”. La pava comienza a funcionar de nuevo después de se retirala y regresó a la base y baja la temperatura interior a un nivel seguro. La pava función correctamente cuando se le añade agua. • Si persiste el problema, por favor póngase en contacto con nuestro departamento de servicio al cliente al número gratuito (800) 276-6286 o por correo electrónico a [email protected]. • La función de apagado automático no opera forma adecuada si la tapa no está bien cerrada. El agua hierve pero la tecla de Deje que la tetera se enfríe y luego verifique que la tapa esté bien cerrada. encendido y la luz indicadora no • Si persiste el problema, por favor póngase en contacto con nuestro departamento de servicio al se apagan. cliente al número gratuito (800) 276-6286 o por correo electrónico a [email protected]. La tecla de encendido no baja y la tetera no se enciende. Hay sarro en el interior de la tetera. TROUBLESHOOTING • Asegúrese de que la tetera esté bien colocada sobre la base y que la base esté conectada a una toma de corriente eléctrica que funcione. • El agua o la suciedad en la parte inferior de la tetera o la base pueden interferir con el funcionamiento de la tetera. Asegúrese de que la base de la tetera y la base estén secas y libres de suciedad. • Si persiste el problema, por favor póngase en contacto con nuestro departamento de servicio al cliente al número gratuito (800) 276-6286 o por correo electrónico a [email protected]. • Es normal que se acumule cierta cantidad de sarro después de periodos largos de uso y es consecuencia de los minerales que contiene el agua dura. La mejor manera de evitar el sarro es usar siempre agua destilada en la tetera. • Para eliminar los depósitos, inténtelo llenando la tetera a hasta la mitad con agua y agregue unas cuantas rebanadas de limón y póngala a hervir. Si esto no funciona, por favor vea la sección de la página 8 titulada “Eliminación de depósitos minerales.” 9 10 NOTA • La prueba de compra es necesaria para todos los reclamos. SERVICE & SUPPORT LIMITED WARRANTY GARANTÍA LIMITADA 1-800-276-6286 L-V, 8:30AM – 4:30PM, Tiempo del Pacifico Place of Purchase: Aroma Housewares Company garantiza que este producto no tenga defectos en sus materiales y fabricación durante un período de dos años a partir de la fecha comprobada de compra dentro de los Estados Unidos. O podemos ser alcanzados en línea en [email protected]. En la eventualidad de un reclamo de garantía, o si el servicio se requiere para este producto, póngase en contacto con Aroma® de servicio al cliente al número gratuito: SERVICIO Y SOPORTE • Proof of purchase is required for all warranty claims. NOTE GARANTÍA 10 Para su registro, le recomendamos grapar su recibo a esta página, junto con un registro escrito de lo siguiente: Date of Purchase: Fecha de compra: For your records, we recommend stapling your sales receipt to this page along with a written record of the following: Dentro de este período de garantía, Aroma Housewares Company reparará o reemplazará, a su opción, las partes defectuosas sin ningún costo, siempre y cuando el producto sea devuelto, con el fl ete prepagado, con comprobación de compra y $15.00 dólares para cargos de envío y manejo a favor de Aroma Housewares Company. Antes de devolver un producto, sírvase llamar al número telefónico gratuito que está más abajo para obtener un número de autorización de devolución. Espere entre 2-4 semanas para recibir el aparato nuevamente. Or we can be reached online at [email protected]. This warranty gives you specific legal rights, which may vary from state to state, and does not cover areas outside the United States. AROMA HOUSEWARES COMPANY 6469 Flanders Drive San Diego, California 92121 1-800-276-6286 M-F, 8:30 AM - 4:30 PM, Pacific Time Website: www.AromaCo.com Lugar de compra: This warranty does not apply if the warranty period expired; the products has been modified by any unauthorized service center or personnel; the defect was subject to abuse, improper use not conforming to product manual instructions, or environment conditions more severe than those specified in the manual and specification, neglect of the owner or improper installation; the defect was subject to Force Majeure such as flood, lightning, earthquake, other natural calamities, war, vandalism, theft, brownouts or sags (damage due to low voltage disturbances). 1-800-276-6286 M-F, 8:30AM-4:30PM, Pacific Time Esta garantía no cubre la instalación incorrecta, el uso indebido, maltrato o negligencia por parte del usuario. La garantía también es inválida en caso de que el aparato sea desarmado o se le dé mantenimiento en un centro de servicio no autorizado. Within this warranty period, Aroma Housewares Company will repair or replace, at its discretion, defective parts at no charge, provided the product is returned, freight prepaid with proof of purchase and U.S. $15.00 for shipping and handling charges payable to Aroma Housewares Company. Before returning an item, please call the toll free number below for a return authorization number. Allow 2-4 weeks for return shipping. In the event of a warranty claim, or if service is required for this product, please contact Aroma® customer service toll-free at: Esta garantía le da derechos legales específi cos los cuales podrán variar de un estado a otro y no cubre áreas fuera de los Estados Unidos. Aroma Housewares Company warrants its products against defects in material and workmanship for two years from provable date of purchase in the United States. AROMA HOUSEWARES COMPANY 6469 Flanders Drive San Diego, California 92121 1-800-276-6286 L-V, 8:30 AM - 4:30 PM, Tiempo del Pacífico Sitio Web: www.AromaCo.com LIMITED WARRANTY-
 1
1
-
 2
2
-
 3
3
-
 4
4
-
 5
5
-
 6
6
-
 7
7
-
 8
8
-
 9
9
-
 10
10
-
 11
11
-
 12
12


Aroma AWK-115S Manual de usuario
- Categoría
- Hervidores eléctricos
- Tipo
- Manual de usuario
En otros idiomas
- English: Aroma AWK-115S User manual
Documentos relacionados
-
Aroma AWK-125B Manual de usuario
-
-
-
Aroma AWK-270W Manual de usuario
-
-
-
-
Aroma Hot H20 X-Press Manual de usuario
-
Aroma AWK-290BD Manual de usuario
-
Aroma AWK-290SBD Manual de usuario
