Campbell Hausfeld DG460300CK S Manual de usuario
- Categoría
- Herramientas eléctricas
- Tipo
- Manual de usuario
Este manual también es adecuado para

Operating Instructions and Parts Manual DG460300CK S
Jig Saw
Please read and save these instructions. Read carefully before attempting to assemble, install, operate or maintain the product described. Protect
yourself and others by observing all safety information. Failure to comply with instructions could result in personal injury and/or property damage!
Retain instructions for future reference.
IN713102AV 12/06
For parts, product & service information
visit www.chpower.com
BUILT TO LAST
© 2006 Campbell Hausfeld/Scott Fetzer
See Warranty on page 7 for important information about commercial use of this product.
REMINDER: Keep your dated proof of purchase for warranty purposes! Attach it to this manual or file it for safekeeping.
Description
Jigsaws are versatile tools capable of
cutting cleanly and accurately through
a wide range of materials, including
wood, metal, plastics, cardboard, and
leather. The jigsaw is a curve-cutting
machine with a multitude of features
that enable it to accomplish various
types of cuts. Plunge cutting is an
action unique to jigsaws. It allows you
to make cuts to material starting in the
middle of the workpiece.
Unpacking
When unpacking this product, carefully
inspect for any damage that may have
occurred during transit.
General Safety
Information
This manual contains information that is
very important to know and understand.
This information is provided for SAFETY
and to PREVENT EQUIPMENT PROBLEMS.
To help recognize this information,
observe the following symbols.
Danger
indicates
an imminently hazardous situation
which, if not avoided, will result in
death or serious injury.
Warning
indicates
a potentially hazardous situation which,
if not avoided, could result in death or
serious injury.
Caution
indicates
a potentially hazardous situation which,
if not avoided, may result in minor or
moderate injury.
Notice
indicates
important information, that if not
followed, may cause damage to
equipment.
General Power Tool
Safety Warnings
Read all
safety
warnings and all instructions. Failure
to follow the warnings and instruc-
tions may result in electric shock, fire
and/or serious injury.
Save all warnings and instructions for
future reference.
The term "power tool" in the warnings
refers to your mains-operated (corded)
power tool or battery-operated (cord-
less) power tool.
CALIFORNIA PROPOSITION 65
You can create dust when
you cut, sand, drill or grind
materials such as wood,
paint, metal, concrete, cement, or other
masonry. This dust often contains
chemicals known to cause cancer, birth
defects, or other reproductive harm.
Wear protective gear.
This
product
or its power cord contains chemicals
known to the State of California to
cause cancer and birth defects or other
reproductive harm. Wash hands after
handling.
The following safety precautions must be
followed at all times along with any
other existing safety rules.
1. Read all manuals included
with this product carefully.
Be thoroughly familiar
with the controls and the
proper use of the equipment.
2. Only persons well acquainted with
these rules of safe operation should
be allowed to use the saw.
Safety glasses and ear
protection must be worn
during operation.
3. Do not wear loose fitting clothing,
scarves, or neck ties in work area.
Loose clothing may become caught
in moving parts and result in serious
personal injury.
4. Do not wear jewelry when
operating any tool. Jewelry may
become caught in moving parts and
result in serious personal injury.
5. Always use attachments designed
for use with this tool. Do not use
damaged or worn attachments.
MANUAL
Specifications
Tool
Voltage 120V 60Hz
Power Rating 3.0 A
Speed 500 - 3000 spm
Weight 3.75 lbs (1.7 kg)
Maximum Capabilities
Depth of cut
Wood 2-1/8"
Steel 1/4"
Cutting Angles 0 ± 45°
24 Sp
Manual de Instrucciones y Lista de Piezas
Garantía Limitada
1 DURACION: A partir de la fecha de compra por el comprador original tal como se especifica a continuación: Un
año
2. QUIEN OTORGA ESTA GARANTIA (EL GARANTE: Campbell Hausfeld / The Scott Fetzer Company 100 Production
Drive, Harrison, Ohio 45030 Teléfono: (800) 543-6400
3. QUIEN RECIBE ESTA GARANTIA (EL COMPRADOR): El comprador original (que no sea un revendedor) del
producto Campbell Hausfeld.
4. PRODUCTOS CUBIERTOS POR ESTA GARANTIA: Cualquier herramienta a motor de Campbell Hausfeld
proporcionada o fabricada por el garante.
5. COBERTURA DE LA GARANTIA: Los defectos substanciales de material y fabricación que ocurran dentro
del período de validez de la garantía.
6. LO QUE NO ESTA CUBIERTO POR ESTA GARANTIA:
A. Las garantías implícitas, incluyendo aquellas de comercialidad E IDONEIDAD PARA FINES PARTICULARES,
ESTAN LIMITADOS A LO ESPECIFICADO EN EL PARRAFO DE DURACION. Si este producto es empleado para
uso comercial, industrial o para alquiler, no se aplicará ninguna garantía. En algunos estados no se permiten
limitaciones a la duración de las garantías implícitas, por lo tanto, en tales casos esta limitación no es
aplicable.
B. CUALQUIER PERDIDA DAÑO INCIDENTAL, INDIRECTO O CONSECUENTE QUE PUEDA RESULTAR DE UN
DEFECTO, FALLA O MALFUNCIONAMIENTO DEL PRODUCTO CAMPBELL HAUSFELD. En algunos estados no se
permite la exclusión o limitación de daños incidentales o consecuentes, por lo tanto, en tales casos esta
limitación o exclusión no es aplicable
C. Cualquier falla que resulte de un accidente, abuso, negligencia o incumplimiento de las instrucciones de
funcionamiento y uso indicadas en el (los) manual(es) que se adjunta(n) al producto. Dichos accidentes,
abusos por parte del comprador, o falta de operar el producto siguiendo las instrucciones del manual de
instrucciones suministrado también debe incluir la desconexión o modificación de los instrumentos de
seguridad. Si dichos instrumentos de seguridad son desconectados, la garantía quedaría cancelada.
D. Los ajustes normales explicados en el(los) manual(es) suministrado(s) con el producto.
7. RESPONSABILIDADES DEL GARANTE BAJO ESTA GARANTIA: Reparar o reemplazar, como lo decida el Garante, los
productos o componentes que estén defectuosos, se hayan dañado o hayan dejado de funcionar
adecuadamente, durante el período de validez de la garantía
8. RESPONSABILIDADES DEL COMPRADOR BAJO ESTA GARANTIA:
A. Suministrar prueba fechada de compra y la historia de mantenimiento del producto.
B. Entregar o enviar el producto o componente Campbell Hausfeld al Centro de Servicio autorizado Campbell
Hausfeld más cercano. Los gastos de flete, de haberlos, deben ser pagados por el comprador.
C. Seguir las instrucciones sobre operación y mantenimiento del producto, tal como se indica(n) en el (los)
manual(es) del propietario
Esta garantía limitada es válida sólo en los EE.UU., Canadá y México y otorga derechos legales específicos. Usted
también puede tener otros derechos que varían de un Estado a otro. o de un país a otro.
Para Ordenar Repuestos o Asistencia Técnica, Llame al Teléfono 1-800-424-8936
Sirvase darnos la siguiente información:
- Número del modelo
- Código impreso
- Descripción y número del repuesto
según la lista de repuestos
Descripción
Número del
Ctd.
Repuesto
Dirija toda la correspondencia a:
Campbell Hausfeld
Attn: Customer Service
100 Production Drive
Harrison, OH 45030 U.S.A.
Lista de Repuestos
Hoja de la sierra DG025800AV 1
Puerto para polvo DG028100AV 1
Llave Allen de 3mm DG026100AV 1
Tornillos de fijación de la hoja (2) DG029000AV 2

23 Sp
DG460300CK
Alinee en el ángulo deseado en el
cuadrante calibrado. Luego ajuste las
perillas de ajuste del corte diagonal.
Debido a la cantidad aumentada de
accionamientos de la hoja en el trabajo
y la estabilidad disminuida del pie,
la hoja puede atascarse.
Mantenga la sierra pareja y el pie
firmemente sobre la pieza de trabajo.
EXTRACCIÓN DEL POLVO
Se pueden realizar operaciones
de corte limpias conectando esta
herramienta a una aspiradora.
Introduzca la manguera de la
aspiradora en el orificio de la parte
trasera de la herramienta.
No utilice el adaptador de aspiración
cuando corte metal. Las virutas de
metal estarán calientes y podrían
encenderse dentro del dispositivo
de aspiración.
La extracción del polvo no se puede
realizar o se realiza con una eficacia
reducida cuando se hacen cortes en
diagonal.
Mantenimiento
El servicio de la herramienta debe ser
realizado sólo por personal de
reparaciones calificado. El servicio
o mantenimiento realizado por
personas no calificadas puede provocar
riesgo de lesiones.
Si la herramienta no enciende o no
funciona correctamente, devuelva la
herramienta a una instalación de
servicios para repararla.
Limpieza
Limpie el polvo y los desechos de
los orificios y contactos eléctricos,
soplando con aire comprimido.
Los orificios de ventilación del motor
y los interruptores deben mantenerse
limpios y libres de materiales extraños.
No intente limpiarla introduciendo
objetos con punta a través de las
aberturas. Mantenga los mangos de las
herramientas limpios, secos y libres de
aceite o grasa. Use únicamente un
jabón suave y un paño húmedo para
limpiar la herramienta, evitando todos
los contactos eléctricos.
Ciertos agentes de limpieza y solventes
son nocivos para los plásticos y otras
piezas aisladas. Algunos de éstos
incluyen gasolina, aguarrás, solvente
para laca, solvente de pintura,
solventes de limpieza con cloro,
amoníaco y detergentes de uso
doméstico que contengan amoníaco.
Nunca use solventes inflamables ni
combustibles cerca de las herramientas.
LUBRICACIÓN
Para su seguridad y protección
eléctrica continuas, la lubricación y el
servicio de esta herramienta deberán
ser realizados ÚNICAMENTE por un
CENTRO DE SERVICIO AUTORIZADO
DE CAMPBELL HAUSFELD.
SERVICIO TÉCNICO
Para obtener información con relación al
funcionamiento o reparación de este
producto, sírvase llamar al 1-800-424-8936.
El servicio de la herramienta debe
ser realizado sólo por personal de
reparaciones calificado. El servicio
o mantenimiento realizado por
personas no calificadas puede provocar
riesgo de lesiones.
Al realizarle un servicio a la
herramienta, utilice únicamente
piezas de repuesto idénticas. Siga las
instrucciones de la sección
Mantenimiento de este manual. El uso
de piezas no autorizadas o el no seguir
las instrucciones de Mantenimiento
puede crear un riesgo de choque
eléctrico o lesión.
6. Never trigger the tool when not
applied to a work object.
Attachments must be securely
attached. Loose attachments can
cause serious injury.
7. Never point a tool at oneself or any
other person. Serious injury could
occur.
8. Use steady, even pressure when
using tool. Do not force. Too much
pressure can cause blade to break or
overheat.
9. Keep all nuts, bolts and screws tight
and ensure equipment is in safe
working condition.
10.Do not put hands near or under
moving parts.
WORK AREA
Keep
work
area clean and well lit. Cluttered or
dark areas invite accidents.
Do not operate power tools
in explosive atmospheres,
such as in the presence of
flammable liquids, gases or dust.
Power tools create sparks which may
ignite the dust or fumes.
Keep
children
and bystanders away while operating a
power tool. Distractions can cause you
to lose control.
ELECTRICAL SAFETY
Power tool plugs must match
the outlet. Never modify the
plug in any way. Do not use
any adapter plugs with earthed
(grounded) power tools. Unmodified
plugs and matching outlets will reduce
risk of electric shock.
Avoid
body
contact with earthed or grounded sur-
faces, such as pipes, radiators, ranges
and refrigerators. There is an increased
risk of electric shock if your body is
earthed or grounded.
Do not
expose
power tools to rain or wet conditions.
Water entering a power tool will
increase the risk of electric shock.
Do not
abuse
the cord. Never use the cord for carry-
ing, pulling or unplugging the power
tool. Keep cord away from heat, oil,
sharp edges or moving parts. Damaged
or entangled cords increase the risk of
electric shock.
When
operat-
ing a power tool outdoors, use an
extension cord suitable for outdoor
use. Use of a cord suitable for outdoor
use reduces the risk of electric shock.
If operat-
ing a
power tool in a damp location is
unavoidable, use a residual current
device (GFCI) protected supply. Use of a
GFCI reduces the risk of electric shock.
Double insulated tools are equipped with
a polarized plug (one plug blade is wider
that the other). This plug will fit in a
polarized outlet only one way. If the plug
does not fit fully into the outlet, turn the
plug over and insert into plug again.
1. Make sure cord is located so that it
will not be stepped on, tripped over,
or otherwise subjected to damage or
stress.
2. Do not use an extension cord unless
absolutely necessary. Use of improper
extension cord could result in a risk of
fire and electric shock. If an extension
cord must be used, make sure:
• That the pins on plug of extension
cord are the same number, size and
shape as those of plug.
• That the extension cord is properly
wired and in good electrical
condition.
• If an extension cord is to be used
outdoors it must be marked
with the suffix “W-A” or “W”
following the cord type designation
to indicate it is acceptable for
outdoor use. For example – SJTW-A
3. Do not expose to rain, snow or frost.
Water entering a power tool will
increase the risk of electric shock.
PERSONAL SAFETY
Stay
alert,
watch what you are doing and use com-
mon sense when operating a power
tool. Do not use a power tool while you
are tired or under the influence of drugs,
alcohol or medication. A moment of inat-
tention while operating power tools
may result in serious personal injury.
Use personal protective
equipment. Always wear eye
protection. Protective equip-
ment such as dust mask, non-skid safe-
ty shoes, hard hat, or hearing protec-
tion used for appropriate conditions
will reduce personal injuries.
Prevent
uninten-
tional starting. Ensure the switch is in
the off-position before connecting to
power source and/or battery pack, pick-
ing up or carrying the tool. Carrying
power tools with your finger on the
switch or energising power tools that
have the switch on invites accidents.
Remove
any
adjusting key or wrench before turning
the power tool on. A wrench or a key
left attached to a rotating part of the
power tool may result in personal injury.
Do not overreach. Keep prop-
er footing and balance at all
times. This enables better con-
trol of the power tool in unexpected sit-
uations.
Dress
properly.
Do not wear loose clothing or jew-
ellery. Keep your hair, clothing and
gloves away from moving parts. Loose
clothes, jewellery or long hair can be
caught in moving parts.
If devices
are pro-
vided for the connection of dust
extraction and collection facilities,
ensure these are connected and proper-
ly used. Use of dust collection can
reduce dust-related hazards.
1. Hold power tool by insulated gripping
surfaces when performing an operation
where the cutting tool may contact
hidden wiring or its own cord. Contact
with a “live” wire will make exposed
metal parts of the tool “live” and shock
the operator.
2. Use clamps or another practical way
to secure and support the workpiece
to a stable platform. Holding the
work by hand or against your body
leaves it unstable and may lead to
loss of control.
Do not
misuse
this product. Excessive exposure to
vibration, work in awkward positions,
and repetitive work motions can cause
injury to hands and arms. Stop using any
tool if discomfort, numbness, tingling, or
pain occur, and consult a physician.
3. Always work in a well-
ventilated area. Wear an
OSHA-approved dust mask
and safety glasses.
4. Keep hands away from moving parts.
5. Always use blades of the correct
size and shape mounting holes.
Blades that do not match the
mounting hardware of the saw will
increase risk of injury to the user
and damage to the tool.
2
www.chpower.com
Operating Instructions and Parts Manual
General Power Tool
Safety Warnings (Cont’d.)
Figura 4
Pernos de ajuste de corte diagonal
Pie plano a 0°
(línea punteada)
Pie en ángulo
Funcionamiento (Cont.)

22 Sp
Manual de Instrucciones y Lista de Piezas
RECORTES/ CORTE DEL AGUJERO
Los recortes se pueden hacer de dos
modos:
1. Haciendo un orificio inicial:
Para los cortes internos sin un corte
de entrada desde el borde, haga un
orificio inicial de 12 mm (1/2") o más
de diámetro con un taladro.
Introduzca la hoja en este orificio
y comience a cortar.
2. Corte por penetración:
El corte por penetración es útil y ahorra
tiempo cuando se hacen aberturas
toscas en materiales blandos.
No intente cortar por penetración
materiales duros tales como el acero.
CORTES POR PENETRACIÓN
1. Si el corte en bolsillo es de líneas
rectas, no se necesita un orificio
pretaladrado.
2. Incline la herramienta hacia adelante
sobre el borde delantero de la base
con la hoja ubicada apenas encima de
la superficie de la pieza (Figura 3).
3. Aplique presión sobre la herramienta
de modo que el borde delantero de
la base no se mueva cuando
encienda la herramienta y
suavemente baje la parte trasera de
la herramienta con lentitud.
4. Una vez que la sierra alcanza la
velocidad máxima, bájela
lentamente en la pieza de trabajo.
5. Mientras la hoja perfora la pieza,
baje lentamente la base de la
herramienta hacia la superficie de la
pieza de trabajo.
6. Mantenga ambas manos sobre la sierra
mientras esté cortando.
7. Complete el corte de manera normal.
8. Para 90° u otras esquinas en ángulo,
corte hasta la esquina luego retroceda
antes de redondear la esquina. Una
vez que haya cortado el bolsillo,
acérquese a la esquina desde la
dirección contraria y corte el ángulo.
CORTES DE BOLSILLO
Los cortes de bolsillo se hacen en el
medio de la pieza de trabajo cuando
no pueden cortarse desde un borde.
Se pueden comenzar con un orificio
pretaladrado o la sierra vertical puede
crear un punto de inicio (corte por
penetración).
Los cortes por penetración no se
recomiendan para materiales más
duros como el acero y no se deben
usar las hojas de calar para cortes
por penetración.
CORTES EN CÍRCULO
Una guía de corte en círculo puede
ayudarlo para cortar círculos. El corte
se debe preparar con un orificio
pretaladrado o un leve corte por
penetración próximo a la línea de
corte. Si usa una guía, asegúrese de
que cumpla con las instrucciones de la
sierra vertical y del fabricante.
CALADOS
Se pueden realizar trabajos complicados
con una sierra vertical usando una hoja
de calado. Asegúrese de que la hoja se
utilice de acuerdo a las instrucciones del
fabricante.
CORTE DE METALES
• Cuando corte piezas de trabajo de
metal, sujete el material con
abrazaderas y corte cerca del punto
de sujeción para reducir la posibilidad
de que se tuerza y la vibración.
• Si la hoja comienza a vibrar o a hacer
un ruido excesivo, reemplace la hoja
con una hoja para cortes en metal
que tenga dientes más finos.
• Para metales blandos, la hoja se
puede obstruir por lo tanto use una
hoja con dientes más gruesos.
• Los conductos, hierro en ángulo
o tuberías se deben sujetar en una
prensa de tornillo y cortar lo más
cerca posible de la prensa.
• Los metales de hoja delgada deben
colocarse entre dos tablas de madera
o se deben colocar sobre tablones de
madera más gruesos, como madera
terciada y el diseño o diagramado se
debe poner encima. Esto permite
cortar el metal sin problemas y evita
el desgarro del material de metal.
• La hoja se puede lubricar para
facilitar el corte. Use una barra
de cera para corte, si hubiese
disponible, y use aceite para corte
cuando corte acero.
• La porción expuesta de la barra de
la sierra se debe mantener limpia.
Elimine frecuentemente los restos
de metal usando un paño con aceite.
Después de usar, deseche
adecuadamente el paño con aceite
para evitar riesgos de incendio.
• Cuando corte metal sujete el material
con abrazaderas, continúe lentamente
y use las velocidades más bajas.
• No doble, tuerza ni fuerce la hoja. Si
la sierra salta o se balancea, use una
hoja con dientes más finos. Si la hoja
parece obstruida cuando corte
materiales blandos, use una hoja con
dientes más gruesos.
• Para un corte más fácil, lubrique la
hoja con cera para corte, si hubiese
disponible, o aceite para corte
cuando corte acero. El metal delgado
debe colocarse entre dos láminas de
madera o debe sujetarse firmemente
con abrazaderas a una sola pieza de
madera (la madera sobre el metal).
• Dibuje el diseño o las líneas de corte
en la parte superior de madera.
Cuando corte aluminio extruido o
hierro en ángulo, sujete el trabajo
con una prensa de tornillo y corte
cerca de las mordazas de la prensa.
• Cuando corte tuberías y el diámetro
sea mayor que la profundidad de la
hoja, corte la pared de la tubería y
luego introduzca la hoja en el corte
girando la tubería mientras corta.
No utilice el adaptador de aspiración
cuando corte metal. Las virutas de
metal estarán calientes y podrían
causar un incendio.
CORTE DE LÁMINAS
Mientras la hoja de la sierra corta en la
dirección ascendente, la superficie más
cercana a la placa de la zapata podría
astillarse.
1. Utilice una hoja de sierra con
dientes finos.
2. Corte desde la superficie posterior
de la pieza (lado terminado hacia
abajo).
3. Para minimizar el astillado, sujete
la pieza con madera de desecho
o aglomerado por ambos lados de la
pieza y corte con la pieza en el medio.
TERMINACIÓN DE BORDES
Para recortar los bordes o hacer ajustes
dimensionales, haga correr la hoja
apenas por los bordes de corte.
AJUSTE DEL CORTE DIAGONAL
Siempre asegúrese de que la
herramienta esté apagada. Desenchufe
la herramienta. El pie puede ajustarse
hasta 45°, soltando los pernos de ajuste
de corte diagonal, en la parte inferior
de la sierra.
Funcionamiento (Cont.)
6. NEVER hold piece being cut in your
hands or across your leg. It is
important to support the work
properly to minimize body exposure,
blade binding, or loss of control.
7. Wear ear protection when using the
tool for extended periods. Prolonged
exposure to high intensity noise can
cause hearing loss.
8. Make sure that all nails have been
pulled from workpiece before starting
cutting operation.
9. This saw is not designed to cut hollow
pipe. Perform cuts on approved
materials only.
10.Do not touch metal parts of saw while
cutting in blind areas. Blind spots like
walls and floors may contain live
electric wires.
11.Do not touch metal parts of saw or
blade immediately after use. Parts will
be hot and can cause serious burn.
POWER TOOL USE AND CARE
Do not
force the
power tool. Use the correct power tool
for your application. The correct power
tool will do the job better and safer at
the rate for which it was designed.
Do not
use the
power tool if the switch does not turn
it on and off. Any power tool that can-
not be controlled with the switch is
dangerous and must be repaired.
Disconnect the plug from the power
source and/or the battery pack from
the power tool before making any
adjustments, changing accessories, or
storing power tools. Such preventive
safety measures reduce the risk of
starting the power tool accidentally.
Store idle power tools out of the reach
of children and do not allow persons
unfamiliar with the power tool or
these instructions to operate the
power tool. Power tools are dangerous
in the hands of untrained users.
Maintain
power
tools. Check for misalignment or bind-
ing of moving parts, breakage of parts
and any other condition that may affect
the power tool’s operation. If damaged,
have the power tool repaired before
use. Many accidents are caused by poor-
ly maintained power tools.
Keep
cutting
tools sharp and clean. Properly main-
tained cutting tools with sharp cutting
edges are less likely to bind and are
easier to control.
Use the
power
tool, accessories and tool bits etc. in
accordance with these instructions,
taking into account the working condi-
tions and the work to be performed.
Use of the power tool for operations
different from those intended could
result in a hazardous situation.
1. This tool must NOT be modified or
used for any application other than
that for which it was designed.
2. Some wood contains preservatives
which can be toxic. Take extra care
to prevent inhalation and skin
contact when working with these
materials. Request and follow all
safety information available from
your material supplier.
3. Store tools out of reach of children
and other untrained persons. Tools
are dangerous in the hands of
untrained users.
4. Avoid cutting nails. Inspect
workpiece for any nails and remove
them before operation.
5. Do not cut hollow pipe.
6. Do not cut oversize workpiece.
7. Check for the proper clearance
beyond the workpiece before
cutting so that the blade will not
strike the floor, workbench, etc.
8. Make sure the blade is not
contacting the workpiece before
the switch is turned on.
9. Keep hands away from moving parts.
10.Do not leave the tool running. Operate
the tool only when hand-held.
11.Always switch off and wait for the
blade to come to a complete stop
before removing the blade from the
workpiece.
12.Do not touch the blade or the
workpiece immediately after
operation; they may be extremely
hot and could burn your skin.
CAUSES AND USER PREVENTION
OF KICKBACK:
Kickback is a sudden reaction to a
pinched, bound or misaligned saw
blade, causing an uncontrolled saw to
lift up and out of the workpiece
toward the operator.
When the blade is pinched or bound
tightly by the kerf, or cutting slot,
closing down, the blade stalls and the
motor reaction drives the unit rapidly
back toward the operator.
If the blade becomes twisted or
misaligned in the cut, the teeth at the
back edge of the blade can dig into
the top surface of the wood causing
the blade to climb out of the kerf and
jump back toward operator.
Kickback is the result of tool misuse
and/ or incorrect operating procedures
or conditions and can be avoided by
taking proper precautions as given
below:
1. Maintain a firm grip with both
hands on the saw and position your
body and arm to allow you to resist
kickback forces. Kickback forces can
be controlled by the operator, if
proper precautions are taken.
2. When blade is binding, or when
interrupting a cut for any reason,
release the trigger and hold the saw
motionless in the material until the
blade comes to a complete stop.
Never attempt to remove the saw
from the work or pull the saw
backward while the blade is in
motion or kickback may occur.
Investigate and take corrective
actions to eliminate the cause of
blade binding.
3. When restarting a saw in the
workpiece, center the saw blade in
the kerf, or cut, and check that saw
teeth are not engaged into the
material. If saw blade is binding, it
may walk up or kickback from the
workpiece as the saw is restarted.
4. Support large panels to minimize
the risk of blade pinching and
kickback. Large panels tend to sag
under their own weight. Supports
must be placed under the panel on
both sides, near the line of cut and
near the edge of the panel.
5. Do not use dull or damaged blades.
Unsharpened or improperly set
blades produce narrow kerf causing
excessive friction, blade binding and
kickback.
6. Blade depth and bevel adjusting
locking levers must be tight and
secure before making cut. If blade
adjustment shifts while cutting, it
may cause binding and kickback.
7. Use extra caution when making a
“Pocket Cut” into existing walls or
other blind areas. The protruding
blade may cut objects that can
cause kickback.
8. Be cautious of pitchy, knotty, wet or
warped stock. These are most likely
to create pinching conditions and
possible kickback.
3
www.chpower.com
DG460300CK
General Power Tool
Safety Warnings (Cont’d.)
Figura 3

21 Sp
DG460300CK
3. Ajuste el perno girando hacia la
derecha para asegurar la hoja.
4. Afloje los pernos de ajuste del corte
diagonal. Deslice el rodamiento del
soporte de la hoja hacia adelante
para que la hoja trabaje en la
ranura. Vuelva a apretar los pernos
de ajuste del corte diagonal.
Verifique este ajuste por cada
cambio de la hoja o ajuste del corte
diagonal.
Para quitar la hoja, siga el
procedimiento de instalación a la
inversa.
Lubrique el rodillo ocasionalmente.
Previo al
Funcionamiento
La planificación adecuada puede evitar
accidentes al momento de usar
herramientas mecánicas. Planifique los
cortes con anticipación. Marque una
línea de corte en la pieza de trabajo
para asegurarse de saber la dirección
que debe tomar al usar la herramienta.
Funcionamiento
Use equipo de seguridad. Siempre use
protección para los ojos. Se debe usar
máscara para polvo, calzado de
seguridad antideslizante, o protección
de audición para la condición adecuada.
Se deberán usar gafas de seguridad
durante la operación.
Asegúrese de que el trabajo esté sujeto
en forma segura en una prensa de
tornillo o mordaza antes de comenzar
la operación. Si la pieza de trabajo está
floja puede girar y causar lesiones
corporales.
Mantenga las manos alejadas del área
de corte y de la hoja.
FUNCIONAMIENTO GENERAL
• Antes de cortar, asegúrese de que el
espacio debajo del material a cortar sea
más profundo que la hoja de la sierra.
• Coloque el lado bueno del material
hacia abajo y asegúrelo con una
prensa o mordaza.
• Ciertas hojas son útiles para diferentes
tipos de cortes y materiales. Asegúrese
de que la hoja en uso esté aprobada
por el fabricante para la operación que
se está llevando a cabo.
• Mida todos los cortes a realizar para
asegurarse de que están claramente
marcados.
• Encienda la sierra y deje que alcance el
valor de velocidad establecido antes de
tocar el material.
• Cuando haya completado el corte,
deje que la sierra se detenga por
completo antes de retirarla del
material de trabajo.
• Si está sosteniendo la sierra con
ambas manos, no correrá riesgo de
cortárselas con la hoja. Sostenga la
sierra con firmeza para evitar perder
el control. NUNCA coloque la mano
delante de la hoja de la sierra ya que
la sierra podría saltar hacia adelante
sobre su mano.
• Cuando siga curvas, corte lentamente
de modo que la hoja pueda cortar
cruzado a la veta. Esto le dará un corte
preciso y evitará que la hoja se desvíe.
• No intente alcanzar nada debajo del
trabajo. No intente retirar el material
de corte cuando la hoja se esté
moviendo.
• NUNCA sostenga una pieza que está
cortando en sus manos ni sobre sus
piernas. Es importante apoyar el
trabajo correctamente para
minimizar la exposición corporal, el
atascamiento de la hoja o la pérdida
de control.
CORTE CON UNA REGLA
Use siempre una hoja de corte dura
cuando sea posible. Sujete una regla en
el trabajo de modo paralelo a la línea
de corte y a nivel con el lado del pie de
la sierra. Primero marque la línea de
corte y luego coloque la regla paralela
y a la misma distancia que entre la hoja
y el borde lateral del pie, o primero
marque el borde lateral del pie y luego
sujete la regla en la marca y paralela a
la línea de corte.
Al cortar, mantenga el borde del pie de
la sierra a nivel contra la regla y plano
sobre la pieza de trabajo.
• Si usa un delimitador o guía,
asegúrese de que esté fijada con
seguridad y que cumpla con las
instrucciones del fabricante.
BLOQUEO DEL INTERRUPTOR
DE ENCENDIDO/APAGADO
Al presionar el interruptor de encendido/
apagado y usar el botón de “bloqueo”,
se puede usar la sierra vertical de forma
continua. El botón de bloqueo se puede
desbloquear de inmediato simplemente
presionando una vez más el botón de
encendido/ apagado.
CORTE DE PANELES Y TABLAS
Los paneles grandes y las tablas largas
se curvan o doblan si no están sujetados
correctamente. Si intenta cortar sin nivelar
ni sujetar la pieza de trabajo
correctamente, la hoja tenderá a atascarse,
provocando un contragolpe. Sujete los
paneles grandes. Asegúrese de definir la
profundidad del corte para que solamente
pueda cortar a través de la pieza de
trabajo, no a través de los soportes.
• Siempre sujete la pieza de trabajo en
forma segura en un caballete de
aserrar o banco.
• Siempre mantenga la base a nivel de la
pieza de trabajo. De lo contrario podrá
romper la hoja, lo cual puede resultar en
lesiones graves. Avance muy lentamente
con la herramienta cuando corte curvas
o cale. Forzar la herramienta puede
hacer que la superficie de corte se incline
y rompa la hoja.
TIPOS DE CORTE
Cortes rectos
Se puede lograr un corte recto fácilmente
sin usar un delimitador de corte o una
guía. Sujete con abrazaderas un borde
recto o una pieza de madera pareja sobre
la pieza de trabajo y guíe el borde de la
sierra contra éste. Complete el corte sólo
en una dirección.
CORTES EN DIRECCIÓN DE LA VETA
Serrar es cortar a lo largo siguiendo
la veta. Seleccione la hoja adecuada para
su trabajo. Use una guía de corte para
cortes a lo largo de 4" de ancho o menos.
CORTES CRUZADOS
Cortar cruzado es cortar transversalmente
a la veta. Seleccione la hoja adecuada
para su trabajo. Avance con la sierra
lentamente para evitar astillar la madera.
CORTES DIAGONALES/EN ÁNGULO
Asegúrese siempre de que la
herramienta esté apagada y
desenchufada antes de inclinar la base.
Con la base inclinada, puede hacer
cortes en diagonal en cualquier ángulo
entre 0° y 45° (a izquierda o derecha).
Afloje los pernos que se encuentran en
la parte inferior de la herramienta con
una llave allen.
Incline la base hasta obtener el ángulo
deseado. El borde de la carcasa del motor
indica el ángulo de la base mediante
graduaciones grabadas en la base.
Ajuste los pernos para asegurar la base.
Ensamblaje
(Continuación)
SERVICE
Have
your
power tool serviced by a qualified repair
person using only identical replacement
parts. This will ensure that the safety of
the power tool is maintained.
Assembly
ATTACHING THE BLADE
Always unplug tool and place the
switch in the off position before
making any assembly, adjustments or
changing accessories. Such preventive
safety measures reduce the risk of
starting the tool accidentally.
Always
clean out
all chips or foreign matter adhering to
the blade and/or blade holder. Failure
to do so may cause insufficient
tightening of the blade, resulting in a
serious personal injury.
1. Loosen the two bolts
counterclockwise on the blade holder
with the allen wrench (see Figure 2).
2. With the blade teeth facing forward,
insert the blade into the blade holder
as far as it will go. Make sure that the
back edge of the blade fits into the
blade support bearing (see Figure 2) .
3. Tighten the bolt clockwise to secure
the blade.
4. Loosen the base adjustment bolts.
Slide the blade support bearing
forward so that the blade is riding in
the groove. Retighten the base
adjustment bolts. Check this
adjustment when ever the blade is
changed or the base is adjusted.Test
saw in a safe direction, away from
others, before beginning use with
new blade.
To remove the blade, follow the
installation procedure in reverse.
Occasionally lubricate the roller.
Pre-Operation
Proper planning can prevent accidents
when using power tools. Plan your cuts
ahead of actually doing them. Mark a
cutting line on the work piece to ensure
you know the direction you need to
take while using the tool.
Operation
Use safe-
ty equipment. Always wear eye protec-
tion. Dust mask, non-skid safety shoes,
hard-hat, or hearing protection must be
used for appropriate condition.
Safety
glasses
and ear protection must be worn dur-
ing operation.
Make sure
work is
held securely in vise or clamped in
place prior to starting operation. Loose
work may spin and cause bodily injury.
Keep
hands
away from cutting area and blade.
GENERAL OPERATION
• Before cutting, make sure the space
below the material to be cut is deeper
than the saw blade.
• Face the good side of the material
down and secure it in a bench vise or
clamp it down.
• Certain blades are useful for
different types of cuts and materials.
Make sure the blade in use is
approved by the manufacturer for
the operation being performed.
• Measure all cuts to be made and make
sure they are marked clearly.
• If both hands are holding the saw,
they cannot be cut by the blade.
Hold the saw firmly to prevent loss of
control. NEVER place your hand
ahead of the saw blade since the saw
could jump forward over your hand.
• Do not reach underneath the work.
Do not attempt to remove cut material
when blade is moving.
• Turn the tool on without the blade
making any contact and wait until
the blade attains full speed. Then rest
the base flat on the workpiece and
gently move the tool forward along
the previously marked cutting line.
• When following curves, cut slowly so
the blade can cut through cross grain.
This will give you an accurate cut and
will prevent the blade from wandering.
• When cut is completed, allow saw to
come to a complete stop before
removing from work material.
4
www.chpower.com
Operating Instructions and Parts Manual
Figure 2
Saw Blade
Holder Bolts
Saw Blade -
Blade Teeth
Facing
Forward
General Power Tool
Safety Warnings (Cont’d.)
1. On/Off Switch
2. Lock Button
3. Safety Guard / Dust
Guard
4. Saw Blade Holder Bolts
5. Base
6. Dust Extraction Port
7. Dust Extraction
Attachment
8. Blade Support Bearing
1
2
3
4
5
6
7
Figure 1
8
Base Angle
Degree Guide

20 Sp
Manual de Instrucciones y Lista de Piezas
El CONTRAGOLPE es el resultado de un
mal uso de la herramienta y/o de
procedimientos o condiciones de
funcionamiento incorrectos y puede
evitarse tomando las precauciones
necesarias que se proporcionan
a continuación:
1. Sostenga la sierra con firmeza con
las dos manos y posicione su cuerpo
y brazo de un modo que le permita
resistir las fuerzas de CONTRAGOLPE.
El operador puede controlar las
fuerzas de CONTRAGOLPE si toma
las precauciones necesarias.
2. Cuando la hoja se atasque,
o cuando se interrumpa el corte
por algún motivo, libere el
interruptor y sostenga la sierra sin
moverla sobre el material hasta que
la hoja se detenga por completo.
Nunca intente retirar la sierra del
trabajo ni tirar la sierra hacia atrás
mientras la hoja esté en movimiento
o puede haber un CONTRAGOLPE.
Investigue y tome acciones
correctivas para eliminar la causa
del atascamiento de la hoja.
3. Cuando reinicie una sierra en la
pieza de trabajo, centre la hoja de
la sierra en la entalla o corte y
verifique que los dientes de la sierra
no queden enganchados en el
material. Si la hoja de la sierra está
atascada, puede salirse o provocar
un CONTRAGOLPE desde la pieza de
trabajo mientras se reinicia la sierra.
4. Apoye bien los paneles grandes para
minimizar el riesgo de morder la hoja
y de CONTRAGOLPE. Los paneles
grandes tienden a curvarse por su
propio peso. Se deben colocar apoyos
a ambos lados debajo del panel,
junto a la línea de corte y cerca del
borde del panel.
5. No utilice hojas desafiladas ni
dañadas. Las hojas desafiladas o en
mal estado producen que la entalla
se angoste causando fricción
excesiva, atascamiento de la hoja
y CONTRAGOLPE.
6. Los tornillos de ajuste de la base
deben estar ajustados y seguros
antes de hacer el corte. Si el ajuste
de la hoja se mueve durante el
corte, puede provocar atascamiento
y CONTRAGOLPE.
7. Tenga extremo cuidado al hacer
un “Corte en bolsillo” en paredes
existentes u otras áreas ciegas.
La hoja que sobresale puede cortar
objetos que pueden causar
CONTRAGOLPE.
8. Tenga cuidado con los materiales
inclinados, nudosos, húmedos
o deformados. Es muy probable
que estos materiales creen
condiciones de mordida y
posiblemente CONTRAGOLPE.
9. Manténgase alerta. Cualquier
distracción puede provocar que
la hoja se tuerza o se atasque.
Los cortes repetitivos pueden llevar
al usuario a tener movimientos
descuidados.
MANTENIMIENTO
Haga
que sólo
personal calificado preste mantenimiento
a su herramienta eléctrica y usando sólo
repuestos idénticos. Esto asegura que se
preserva la seguridad de la herramienta
eléctrica.
Ensamblaje
CÓMO COLOCAR LA HOJA
Siempre desconecte la herramienta
y deje el interruptor en la posición de
apagado antes de hacer cualquier
armado, ajuste o de cambiar accesorios.
Dichas medidas de seguridad
preventivas reducen el riesgo de que la
herramienta se active por accidente.
Quite siempre las lascas o el material
extraño que se acumulen en la hoja
y/o en el soporte de la hoja. De lo
contrario, la hoja podrá no quedar lo
suficientemente ajustada, lo cual puede
resultar en lesiones personales graves.
1. Afloje el perno girando hacia la
izquierda en el soporte de la hoja
usando la llave allen (ver Figura 2).
2. Con los dientes de la hoja hacia
adelante, introduzca la hoja en el
soporte de la hoja hasta el tope.
Asegúrese de que el borde trasero
de la hoja encaje en el cojinete de
apoyo de la hoja (ver Figura 2).
CUTTING WITH A STRAIGHTEDGE
Always use a rough cut blade when
possible. Clamp a straightedge on the
work parallel to the line of cut and
flush with the side of the saw base.
Either first mark the line of cut and
then position the straightedge parallel
and at the same distance as between
the blade and the side edge of the base
or first mark the side edge of the base
and then clamp the straightedge on the
mark and parallel to the cut line.
As you cut, keep the saw base edge
flush against the straightedge and flat
on the workpiece.
• If using a fence or guide, make sure it
is securely fastened and complies with
manufacturer’s instructions.
LOCK ON/OFF SWITCH
Pressing the ON/OFF switch and using
the “lock” button, the jig saw can be
used continually. The lock button can
be unlocked immediately by simply
pressing the on/ off button again.
CUTTING PANELS AND BOARDS
Large panels and long boards sag or
bend if they are not correctly supported.
If you attempt to cut without leveling
and properly supporting the workpiece,
the blade will tend to bind, causing
kickback. Support large panels. Be sure
to set the depth of the cut so that you
only cut through the workpiece, not
through the supports.
• Always clamp the work piece securely
on a saw horse or bench.
• Always hold the base flush with the
workpiece. Failure to do so may cause
blade breakage, resulting in a serious
injury. Advance the tool very slowly
when cutting curves or scrolling.
Forcing the tool may cause a slanted
cutting surface and blade breakage.
• NEVER hold piece being cut in your
hands or across your leg. It is
important to support the work
properly to minimize body exposure,
blade binding, or loss of control.
TYPES OF CUTTING
Straight Cuts
Without the use of a rip-fence or
guide, a straight cut can very easily be
made. Clamp a straight edge or even a
piece of wood to the workpiece and
guide the edge of the saw against it.
Complete the cut in one direction only.
RIP-CUTTING
Ripping is cutting length wise with
the grain. Select the proper blade
for your job. Use a rip fence for rips
4" wide or less.
CROSS-CUTTING
Cross-cutting is cutting across the
grain. Select the proper blade for
your job. Advance the saw slowly to
avoid splintering the wood.
BEVEL/ ANGLE CUTTING
Always be
sure that
the tool is switched off and unplugged
before tilting the base.
• With the base tilted, you can make
bevel cuts at any angle between 0°
and 45° (left or right).
• Loosen the bolts on the underside of
the tool with an allen wrench.
• Tilt the base until the desired angle is
obtained. The edge of the motor
housing indicates the base angle by
graduations stamped on the base.
• Tighten the 2 bolts to secure the
base.
Cutouts (Hole/ Pocket Cutting)
Pocket cuts are made in the middle of
the workpiece when it cannot be cut
from an edge. They can be made one
of two ways:.
1. Boring a starting hole:
For internal cutouts without a lead-in
cut from an edge, pre-drill a starting
hole 12 mm (1/2") or more in diameter.
Insert the blade into this hole to start
your cut.
2. Plunge cutting:
Plunge cutting is useful and time-
saving in making rough openings in
softer materials. Plunge cutting is not
recommended for harder materials
like steel and scroll blades should
not be used for plunging.
PLUNGE CUTS
1. If the pocket cut is straight-lined, a
pre-drilled hole is not necessary.
2. Tilt the tool up on the front edge of
the base with the blade point
positioned just above the workpiece
surface (see Figure 3).
3. Apply pressure to the tool so that the
front edge of the base will not move
when you switch on the tool and gently
lower the back end of the tool slowly.
4. Once the saw reaches maximum
speed, lower it slowly into the
workpiece.
5. As the blade pierces the workpiece,
slowly lower the base of the tool
down onto the workpiece surface.
6. Keep both hands on the saw while
cutting.
7. Complete the cut in the normal
manner.
8. For 90° or other sharp corners, cut up
to the corner then back out before
rounding the corner off. Once opening
the pocket, approach the corner from
the opposite direction to square it off.
CIRCLE CUTS
A circle cutting guide can help assist in
the sawing of circles. The cut should be
prepared by a pre-drilled hole or a
slight plunge cut near the cutting line.
If using a guide, make sure it complies
with the jig saw and the
Manufacturer’s instructions.
Scroll Cutting
Intricate work can be performed by a jig
saw using a scrolling blade. Make sure
that the blade being used according to
the manufacture’s instructions.
Metal Cutting
• When cutting metal workpieces,
clamp the material down and saw
close to the clamping point to reduce
bending and vibration.
• If the blade begins to vibrate or
chatter excessively, replace blade with
a metal cutting blade with finer teeth.
• For soft metals the blade can become
clogged so use a blade with coarser
teeth.
• Conduit, angle iron, or pipe should
be clamped in a vice and cut as close
to the clamp as possible
• Thin sheet metals should be
“sandwiched” between or laid on top of
tougher wood boards, like plywood,
and the design or layout set on top. This
allows the metal to be cut smoothly and
prevents tearing on the metal material.
• The exposed portion of the saw bar
must be kept clean. Wipe metal chips
away frequently by using an oily cloth.
After use, dispose of oily cloth
appropriately, to prevent fire hazards.
5
www.chpower.com
DG460300CK
Figure 3
Operation (Cont’d.)
Información General
de Seguridad sobre
Herramientas
Eléctricas (contuación)
1. Interruptor de
encendido/apagado
2. Botón de bloqueo
3. Protección de
seguridad / Protector
para polvo
4. Pernos del soporte de
la hoja de la sierra
5. Pie (Base)
6. Puerto de extracción
de polvo
7. Accesorio para
extracción de polvo
8. Cojinete de apoyo
de la hoja
1
2
3
4
5
6
7
Figura 1
Figura 2
Pernos del
soporte de la
hoja de la
sierra
Hoja de
la sierra –
Los dientes
hacia
adelante
8
Guía de grados del
ángulo de la base

19 Sp
DG460300CK
No intente alcanzar lugares
fuera de alcance. Mantenga
un buen soporte y equilibrio
en todo momento. Esto le permitirá un
mayor control de la herramienta
eléctrica en situaciones inesperadas.
Vístase
adecuadamente. No use alhajas ni
vestimenta suelta. Mantenga su cabello,
vestimenta y guantes alejados de las
piezas móviles. Las alhajas, las prendas
sueltas, y el cabello largo pueden
quedar atrapados en las partes móviles.
Si se
proporcionan dispositivos para la
conexión a sistemas de recolección y
extracción de polvo, asegúrese de que
queden conectados y se usen
adecuadamente. El uso de colectores de
polvo puede reducir los peligros
relacionados con el polvo.
1. Sostenga la herramienta por la
superficie de sujeción aislada cuando
realice una operación en la que la
herramienta pueda entrar en
contacto con un cableado oculto.
Al entrar en contacto con un cable
de corriente las piezas metálicas de
la herramienta conducirán la
electricidad y el usuario recibirá un
choque eléctrico.
2. Use sujetadores u otra manera
práctica de asegurar la pieza de
trabajo a una plataforma estable.
Nunca sostenga el trabajo en sus
manos, su regazo ni contra otras
partes de su cuerpo cuando corte.
No use este producto en forma
inadecuada. La exposición excesiva
a la vibración, trabajar en posiciones
incómodas y los movimientos de trabajo
repetitivos pueden causar lesiones a las
manos y brazos. Deje de usar cualquier
herramienta si aparece incomodidad,
cosquilleo o dolor y consulte a un médico.
3. Trabaje siempre en un
área bien ventilada. Use
una máscara para polvo
y gafas de seguridad
aprobadas por OSHA.
4. Mantenga las manos alejadas
de las piezas móviles.
5. Utilice siempre hojas que tengan el
tamaño y los orificios de montaje de
la forma correcta. Las hojas que no
coincidan con la ferretería de
montaje de la sierra aumentarán el
riesgo de lesión al usuario y daño
a la herramienta.
USO Y CUIDADO DE LA
HERRAMIENTA ELÉCTRICA
No fuerce
la
herramienta eléctrica. Use la
herramienta eléctrica correcta para cada
aplicación. La herramienta eléctrica
correcta hará el trabajo mejor y en
forma más segura a la velocidad para la
cual fue diseñada.
No use
la
herramienta si el interruptor no la
enciende o no la apaga. Cualquier
herramienta que no pueda ser
controlada con el interruptor es
peligrosa y debe repararse.
Antes de
hacer
cualquier ajuste, cambio de accesorios
o de guardar una herramienta
eléctrica, desconecte el enchufe del
suministro de corriente y/o la batería
de la herramienta eléctrica. Dichas
medidas de seguridad preventivas
reducen el riesgo de que la
herramienta eléctrica se active por
accidente.
Almacene
las
herramientas eléctricas desactivadas
fuera del alcance de niños y no permita
que personas que no estén
familiarizadas con herramientas
eléctricas o con estas instrucciones,
hagan funcionar una herramienta
eléctrica. Las herramientas eléctricas
son peligrosas cuando están en manos
de usuarios inexpertos.
Preste
mantenimiento a las herramientas
eléctricas. Verifique que las piezas
móviles no estén desaliñadas ni
bloqueadas, que no haya piezas rotas y
que no exista ningún otro problema
que pueda afectar el funcionamiento
de la herramienta. Si está dañada,
haga reparar la herramienta eléctrica
antes de usarla. Muchos accidentes son
causados por herramientas eléctricas
que no tienen un mantenimiento
adecuado.
Mantenga
sus
herramientas de corte afiladas y limpias.
Es menos probable que las herramientas
de corte con un mantenimiento adecuado
y con bordes de corte afilados se atasquen
y además son más fáciles de controlar.
Use la
herramienta eléctrica, sus accesorios yUse
la brocas etc. de acuerdo con estas
instrucciones, tomando en cuenta las
condiciones de trabajo y el trabajo que
desea hacer. El uso de una herramienta
eléctrica para trabajos diferentes de
aquellos para los cuales ha sido diseñada,
puede resultar en una situación peligrosa.
1. Esta herramienta NO debe
modificarse ni usarse para ninguna
aplicación que no sea la aplicación
para la cual fue diseñada.
2. Algunas maderas contienen
conservadores que pueden ser
tóxicos. Tenga especial cuidado para
evitar la inhalación y el contacto de la
piel con estos materiales. Solicite
y cumpla con toda la información de
seguridad disponible por parte de su
proveedor de materiales.
3. Guarde las herramientas fuera del
alcance de los niños y de otras
personas no capacitadas para
usarlas. Las herramientas son
peligrosas cuando están en manos
de usuarios inexpertos.
4. Evite cortar clavos. Inspeccione la pieza
de trabajo en busca de clavos y quítelos
antes de comenzar a trabajar.
5. No corte caños huecos.
6. No corte piezas de tamaño excesivo.
7. Verifique que haya espacio suficiente
detrás de la pieza de trabajo antes de
cortar, de modo que la hoja no golpee
el piso, banco, etc.
8. Asegúrese de que la hoja no entre
en contacto con la pieza antes de
presionar el interruptor de
encendido.
9. Mantenga las manos alejadas de las
piezas móviles.
10.No deje la herramienta en
funcionamiento. Haga funcionar
la herramienta sólo cuando la esté
sosteniendo.
11.Cuando apague la herramienta
espere siempre a que la hoja se
detenga por completo antes de
quitarla de la pieza.
12.No toque la hoja ni la pieza de
trabajo inmediatamente después del
trabajo; pueden estar
extremadamente calientes y podrían
quemarle la piel.
CAUSAS Y PREVENCIÓN DEL
CONTRAGOLPE POR PARTE DEL
USUARIO:
El CONTRAGOLPE es una reacción
repentina de una hoja de sierra mordida,
atascada o mal alineada, provocando
que una sierra fuera de control se
levante y salga de la pieza de trabajo.
Información General
de Seguridad sobre
Herramientas
Eléctricas (contuación)
6
www.chpower.com
Operating Instructions and Parts Manual
• When cutting metal, clamp material
down. Proceed slowly and use lower
speeds.
• Do not twist, bend, or force the blade.
If the saw jumps or bounces, use a
blade with finer teeth. If the blade
seems clogged when cutting soft metal,
use a blade with coarser teeth.
• For easier cutting, lubricate the blade
with a stick of cutting wax, if available,
or cutting oil when cutting steel. Thin
metal should be sandwiched between
two pieces of wood or tightly clamped
on a single piece of wood (wood on
top of the metal).
• Draw the cut lines or design on the
top piece of wood. When cutting
aluminum extrusion or angle iron,
clamp the work in a bench vise and
saw close to the vise jaws.
• When sawing tubing that has a
diameter larger than the blade is
deep, cut through the wall of the
tubing and then insert the blade into
the cut rotating the tube as you saw.
Do not
use
vacuum adapter when cutting metal. Metal
filings will be hot and may cause a fire.
SAWING LAMINATES
As the saw blade cuts on the upward
stroke, splintering may occur on the
surface closest to the shoe plate.
1. Use a fine-tooth saw blade.
2. Saw from the back surface of the
workpiece (finished side down).
3. To minimize splintering, clamp a
piece of scrap wood or hardboard to
both sides of the workpiece and saw
through this sandwich.
FINISHING EDGES
To trim edges or make dimensional
adjustments, run the blade lightly
along the cut edges.
BASE ADJUSTMENT
Always be sure that the tool is switched off.
Unplug tool. The base can be adjusted up
to 45° by loosening the base adjustment
bolts on the underside of the saw (Figure 4).
Align to the desired angle on
calibrated quadrant. Then tighten base
adjustment bolts (2). Because of the
increased amount of blade
engagement in the work and
decreased stability of the base, blade
binding may occur.
Keep the saw steady and the base
firmly on the workpiece.
DUST EXTRACTION
Clean cutting operations can be
performed by connecting this tool to a
vacuum cleaner. Insert the hose of the
vacuum cleaner into the hole at the
rear of the tool.
Do not
use
vacuum adapter when cutting metal.
Metal filings will be hot and may cause
a fire inside the vacuum.
Dust
extraction
cannot be performed or has reduced
effectivity when making bevel cuts.
Maintenance
Tool service must be performed only
by qualified repair personnel. Service
or maintenance performed by
unqualified personnel could result in
a risk of injury.
If the tool does not start or operate
properly, return the tool to a service
facility for repairs.
Cleaning
Clean out dust and debris from vents
and electrical contacts by blowing with
compressed air. Motor vents and
switch levers must be kept clean and
free of foreign matter. Do not attempt
to clean by inserting pointed objects
through openings. Keep tool handles
clean, dry and free of oil or grease.
Use only mild soap and a damp cloth
to clean the tool, keeping away from
all electrical contacts.
Certain cleaning agents and solvents
are harmful to plastics and other
insulated parts. Some of these include
gasoline, turpentine, lacquer thinner,
paint thinner, chlorinated cleaning
solvents, ammonia and household
detergents containing ammonia.
Never use flammable or combustible
solvents around tools.
LUBRICATION
For your continued safety and
electrical protection, lubrication and
service on this tool should ONLY be
performed by an AUTHORIZED
CAMPBELL HAUSFELD SERVICE
CENTER.
TECHNICAL SERVICE
For information regarding the
operation or repair of this product,
please call 1-800-424-8936.
Tool
service
must be performed only by qualified
repair personnel. Service or maintenance
performed by unqualified personnel
could result in a risk of injury.
When servicing a tool, use only
identical replacement parts. Follow
instructions in the Maintenance section
of this manual. Use of unauthorized
parts or failure to follow Maintenance
instructions may create a risk of
electrical shock or injury.
Operation (Cont’d.)
Figure 4
Base Adjustment Bolts
Base flat at 0°
(dotted line)
Base angled

Manual de Instrucciones y Lista de Piezas
3. No use vestimenta suelta, bufandas
o corbatas en el área de trabajo.
Las prendas sueltas pueden quedar
atrapadas en las partes móviles
y provocar graves lesiones personales.
4. No use alhajas al manejar
herramientas. Las alhajas pueden
quedar atrapadas en las partes
móviles y provocar graves lesiones
personales.
5. Utilice siempre los accesorios
diseñados para ser usados con esta
herramienta. No utilice accesorios
dañados ni desgastados.
6. Nunca accione la herramienta si no
está aplicada a un objeto de trabajo.
Los accesorios deben colocarse en
forma segura. Los accesorios sueltos
pueden causar lesiones graves.
7. Nunca apunte una herramienta
hacia usted ni hacia otra persona.
Pueden ocurrir lesiones graves.
8. Utilice presión firme y pareja al usar
la herramienta. No la fuerce.
Demasiada presión puede provocar
que la hoja se quiebre o se recaliente.
9. Mantenga todas las tuercas, pernos
y tornillos ajustados y asegúrese de
que el equipo esté en condiciones
de trabajo seguras.
10. No acerque las manos a las piezas
móviles ni las coloque debajo de
ellas.
SEGURIDAD EN EL ÁREA DE
TRABAJO
Mantenga
el área
de trabajo limpia y bien iluminada.
Las áreas desordenadas u obscuras
propician los accidentes.
No haga funcionar la
herramienta eléctrica en
entornos explosivos, como
por ejemplo cuando haya polvo, líquidos
o gases inflamables. Las herramientas
eléctricas hacen chispas que pueden
encender los vapores o el polvo.
Mantenga
alejados
a los observadores y niños mientras
hace funcionar una herramienta
eléctrica. Las distracciones pueden
hacerle perder el control.
SEGURIDAD ELÉCTRICA
Los enchufes de la
herramienta eléctrica deben
coincidir con el tomacorriente.
Nunca modifique el enchufe de ninguna
manera. No use enchufes adaptadores
con herramientas eléctricas conectadas a
tierra (aterradas). Los enchufes no
modificados y los tomacorrientes
correspondientes reducirán el riesgo de
choque eléctrico.
Evite el
contacto
corporal con las superficies conectadas a
tierra, tales como tuberías, radiadores,
cocinas y refrigeradores. Existe un
mayor riesgo de choque eléctrico si su
cuerpo está conectado a tierra.
No
exponga
las herramientas a motor a la lluvia ni
a superficies mojadas. Si entra agua
dentro de una herramienta a motor, el
riesgo de choque eléctrico aumenta.
Trate el
cable con
cuidado. No utilice nunca el cable para
llevar, halar o desenchufar la
herramienta eléctrica. Mantenga el
cable alejado del calor, aceite, bordes
filosos o piezas móviles. Los cables
dañados o enredados aumentan el
riesgo de choque eléctrico.
Cuando
acciona
una herramienta eléctrica en
exteriores, use un cable de extensión
apto para el uso en exteriores. El uso
de un cable apto para exteriores
reduce el riesgo de choque eléctrico.
Si no es
posible
evitar el uso una herramienta eléctrica
en un lugar de mucha humedad, use un
suministro de energía protegido de
corrientes residuales (GFCI – con
interruptor de descarga a tierra). El
uso de un interruptor de circuito con
descarga a tierra (GFCI) reduce el
riesgo de choque eléctrico.
Las herramientas doblemente aisladas
están equipadas con un enchufe
polarizado (un borne del enchufe es más
ancho que el otro). Este enchufe calzará
en un solo sentido en un tomacorriente
polarizado. Si el enchufe no calza
completamente en el tomacorriente, dé
vuelta el enchufe y vuelva a introducirlo.
1. Asegúrese de que el cable esté
ubicado de tal manera que nadie
lo pise ni se tropiece con él, y que
no esté sujeto de alguna otra
manera a algún daño o tensión.
2. No use un cable de extensión a menos
que sea absolutamente necesario. El
uso de un cable de extensión
inadecuado puede resultar en un
riesgo de incendio y choque eléctrico.
Si se debe usar un cable de extensión,
asegúrese de lo siguiente:
• Que las clavijas del enchufe del cable
de extensión tengan el mismo número,
tamaño y forma que las del enchufe.
• Que el cable de extensión esté
correctamente cableado y en buenas
condiciones eléctricas.
• Si el cable de extensión va a usarse en
exteriores debe estar marcado con el
sufijo “W-A” o “W” después de la
designación del tipo de cable para
indicar que es apto para usarse en
exteriores. Por ejemplo: SJTW-A
3. No la exponga a la lluvia, nieve
o heladas. Si entra agua dentro de
una herramienta a motor, el riesgo
de choque eléctrico aumenta.
SEGURIDAD PERSONAL
Manténgase alerta, preste atención a
lo que hace y use su sentido común
cuando maneje cualquier herramienta
eléctrica. No use una herramienta
eléctrica si está cansado o bajo la
influencia de drogas, alcohol o
medicamentos. Un momento de
distracción mientras maneja cualquier
herramienta a motor puede dar como
resultado graves lesiones personales.
Use equipo de protección
personal. Siempre use
protección para los ojos. El equipo de
protección como máscara para polvo,
calzado de seguridad antideslizante,
casco o protección para los oídos, usado
en las condiciones adecuadas, reduce el
riesgo de lesiones personales.
Evite
que se
encienda accidentalmente. Verifique que
el interruptor se encuentre en la
posición de apagado (off) antes de
conectar el suministro de energía y/o la
batería, recoger o transportar la
herramienta. Transportar una
herramienta eléctrica con el dedo sobre
el interruptor o suministrar corriente a
herramientas con el interruptor en
posición de encendido (on) favorece la
ocurrencia de accidentes.
Retire
toda
llave de ajuste u otro tipo de llave
antes de encender la herramienta
eléctrica. Una llave o llave de ajuste
que quede sujetada a una parte
rotatoria de la herramienta eléctrica
puede causar lesiones personales.
18 Sp
Información General
de Seguridad sobre
Herramientas
Eléctricas (contuación)
7
DG460300CK
Limited Warranty
1. DURATION: From the date of purchase by the original purchaser as follows: one year.
2. WHO GIVES THIS WARRANTY (WARRANTOR): Campbell Hausfeld / Scott Fetzer Company, 100 Production
Drive, Harrison, Ohio, 45030, Telephone: (800) 424-8936.
3. WHO RECEIVES THIS WARRANTY (PURCHASER): The original purchaser (other than for purposes of resale)
of the Campbell Hausfeld product.
4. WHAT PRODUCTS ARE COVERED BY THIS WARRANTY: Any Campbell Hausfeld power tool supplied or
manufactured by Warrantor.
5. WHAT IS COVERED UNDER THIS WARRANTY: Substantial defects in material and workmanship which occur
within the duration of the warranty period.
6. WHAT IS NOT COVERED UNDER THIS WARRANTY:
A. Implied warranties, including those of merchantability and FITNESS FOR A PARTICULAR PURPOSE ARE
LIMITED FROM THE DATE OF ORIGINAL PURCHASE AS STATED IN THE DURATION. If this product is used
for commercial, industrial or rental purposes, no warranty applies. Some States do not allow limitation
on how long an implied warranty lasts, so the above limitations may not apply to you.
B. ANY INCIDENTAL, INDIRECT, OR CONSEQUENTIAL LOSS, DAMAGE, OR EXPENSE THAT MAY RESULT
FROM ANY DEFECT, FAILURE, OR MALFUNCTION OF THE CAMPBELL HAUSFELD PRODUCT. Some States
do not allow the exclusion or limitation of incidental or consequential damages, so the above limitation
or exclusion may not apply to you.
C. Any failure that results from an accident, purchaser’s abuse, neglect or failure to operate products in
accordance with instructions provided in the owner’s manual(s) supplied with product. Accident,
purchaser’s abuse, neglect or failure to operate products in accordance with instructions shall also
include the removal or alteration of any safety devices. If such safety devices are removed or altered,
this warranty is void.
D. Normal adjustments which are explained in the owner’s manual(s) provided with the product.
7. RESPONSIBILITIES OF WARRANTOR UNDER THIS WARRANTY: Repair or replace, at Warrantor’s option,
products or components which are defective, have malfunctioned and/or failed to conform within duration
of the warranty period.
8. RESPONSIBILITIES OF PURCHASER UNDER THIS WARRANTY:
A. Provide dated proof of purchase and maintenance records.
B. Call Campbell Hausfeld (800-424-8936) to obtain your warranty service options. Freight costs must be
borne by the purchaser.
C. Use reasonable care in the operation and maintenance of the products as described in the owner’s
manual(s).
This Limited Warranty applies in the United States, Canada and Mexico only and gives you specific legal rights.
You may also have other rights which vary from state to state or country to country.
For Replacement Parts or Technical Assistance, call 1-800-424-8936
or visit our website: www.chpower.com
Please provide following information:
- Model number
- Serial number (if any)
- Part description and number as
shown in parts list
Address any correspondence to:
Campbell Hausfeld
Attn: Customer Service
100 Production Drive
Harrison, OH 45030 U.S.A.
Description Part Number Qty
Saw Blade DG025800AV 1
Dust Port DG028100AV 1
3mm Allen Wrench DG026100AV 1
Blade set screws (2) DG029000AV 2
Replacement Parts List
www.chpower.com

Manual de Instrucciones y Lista de Piezas DG460300CKS
Sierra vertical
Sírvase leer y guardar estas instrucciones. Lea con cuidado antes de tratar de armar, instalar, manejar o darle servicio al producto descrito en
este manual. Protéjase Ud. y a los demás observando todas las reglas de seguridad. El no seguir las instrucciones podría resultar en heridas y/o
daños a su propiedad. Guarde este manual como referencia.
IN713102AV 12/06
BUILT TO LAST
© 2006 Campbell Hausfeld/Scott Fetzer
Ver la Garantía en página 24 para información importante sobre el uso comercial de este producto.
Descripción
Las sierras verticales son herramientas
versátiles capaces de atravesar
limpiamente y con precisión una gran
variedad de materiales, incluyendo
madera, metal, plásticos, cartón y cuero.
La sierra vertical es una máquina de corte
en curvas con una variedad de
características que le permiten obtener
varios tipos de corte. El corte por
penetración es una característica exclusiva
de las sierras verticales. Le permite cortar
el material comenzando en medio de la
pieza de trabajo.
Para desempacar
Cuando desempaque este producto,
inspecciónelo cuidadosamente para
detectar cualquier daño que pueda
haber ocurrido durante el envío.
Informaciones
Generales de Seguridad
Este manual contiene información que es
muy importante que sepa y comprenda.
Esta información se la suministramos
como medida de SEGURIDAD y para
EVITAR PROBLEMAS CON EL EQUIPO.
Debe reconocer los siguientes símbolos.
Ésto le indica que hay una situación
inmediata que LE OCASIONARIA la
muerte o heridas de gravedad.
Ésto le
indica que hay una situación que
PODRIA ocasionarle la muerte o heridas
de gravedad.
Ésto le
indica que hay una situación que PODRIA
ocasionarle heridas no muy graves.
Ésto le indica una información
importante, que de no seguirla, le podría
ocasionar daños al equipo.
Información General
de Seguridad sobre
Herramientas Eléctricas
Lea
todas las
advertencias y todas las instrucciones.
El no cumplir con las advertencias
e instrucciones puede causar un
choque eléctrico, incendio y/o lesiones
personales graves.
Guarde todas las advertencias e
instrucciones para referencia futura.
La palabra “herramienta eléctrica”
en las advertencias se refiere a una
herramienta eléctrica accionada por
la red eléctrica (por medio de cable)
o a una herramienta eléctrica
accionada por baterías (sin cable).
PROPOSICIÓN DE CALIFORNIA 65
Cuando corta lija, taladra
o pule materiales como por
ejemplo madera, pintura, metal,
hormigón, cemento, u otro tipo de
mampostería se puede producir polvo.
Con frecuencia este polvo contiene
productos químicos que se conocen
como causantes de cáncer, defectos
congénitos u otros daños reproductivos.
Use equipo de protección.
Este
producto,
o su cordón eléctrico, contiene productos
químicos conocidos por el estado de
California como causantes de cáncer y
defectos de nacimiento u otros daños
reproductivos. Lave sus manos
minuciosamente después de usar.
Las siguientes precauciones de seguridad
se deben seguir en todo momento junto
con cualquier otra norma de seguridad.
1. Lea con cuidado los
manuales incluidos con este
producto. Familiarícese con
los controles y el uso
adecuado del equipo.
2. Sólo se les debe permitir usar la sierra
a aquellas personas bien
familiarizadas con estas reglas
de manejo seguro.
Se deberán usar gafas de
seguridad durante la
operación.
MANUAL
17 Sp
RECORDATORIO: ¡Guarde su comprobante de compra con fecha para fines de la garantía!
Adjúntela a este manual o archívela en lugar seguro.
Especificaciones
Herramienta
Voltaje 120V 60Hz
Clasificación
de corriente 3,0 A
Velocidad sin carga 500 - 3000 rpm
Peso 3,75 lbs 1,7 kg
Capacidades máximas
Profundidad de corte
Madera 5,4 cm (2-1/8")
Acero 6,4 mm (1/4")
Ángulos de corte 0 ± 45°
®
8Fr
Instructions d’Utilisation et Manual de Pièces DG460300CK S
Scie sauteuse
S’il vous plaît lire et conserver ces instructions. Lire attentivement avant de monter, installer, utiliser ou de procéder à l’entretien du produit
décrit. Se protéger ainsi que les autres en observant toutes les instructions de sécurité, sinon, il y a risque de blessure et/ou dégâts matériels !
Conserver ces instructions comme référence.
IN713102AV 12/06
BUILT TO LAST
© 2006 Campbell Hausfeld/Scott Fetzer
Voir la Garantie à la page 16 pour de l’information importante sur l’utilisation commercial de ce produit.
MÉMENTO : Gardez votre preuve datée d’achat à fin de la garantie !
Joignez-la à ce manuel ou classez-la dans un dossier pour plus de sécurité.
Description
Les scies sauteuses sont des outils
polyvalents pouvant couper
proprement et exactement une variété
de matériaux, y compris le bois,
le métal, les plastiques, le carton et le
cuir. La scie sauteuse est une machine
à coupe curviligne avec une multitude
de fonctions permettant d’offrir divers
types de coupes. La coupe en plongée
est une action unique des scies
sauteuses. Elle permet des coupes pour
des matériaux commençant au centre
de la pièce de travail.
Déballage
En déballant ce produit, inspecter
attentivement pour tout signe de
dommage en transit.
Directives De Sécurité
Ce manuel contient de l’information très
importante qui est fournie pour la
SÉCURITÉ et pour ÉVITER LES PROBLÈMES
D’ÉQUIPEMENT. Rechercher les symboles
suivants pour cette information.
Danger indique une situation hasardeuse
imminente qui RÉSULTERA en perte de vie
ou blessures graves.
Avertissement indique une situation
hasardeuse potentielle qui PEUT résulter
en perte de vie ou blessures graves.
Attention indique une situation
hasardeuse potentielle qui PEUT résulter
en blessures.
Avis indique l’information importante
pour éviter le dommage de l’équipement.
Avertissements de
sécurité généraux
pour l’outil
Lire tous
les
avertissements de sécurité et toutes
les instructions. Ne pas suivre les
avertissements et instructions peut
donner lieu à un choc électrique, un
incendie et/ou une blessure sérieuse.
Conserver tous les avertissements et
toutes les instructions pour pouvoir s'y
reporter ultérieurement.
Le terme «outil» dans les
avertissements fait référence à votre
outil électrique alimenté par le secteur
(avec cordon d’alimentation) ou votre
outil fonctionnant sur batterie (sans
cordon d’alimentation).
PROPOSITION 65 CALIFORNIE
Vous pouvez créer de la
poussière en coupant,
ponçant, perçant ou meulant
les matériaux tels que le bois, la
peinture, le métal, le béton, le ciment
ou autre maçonnerie. Cette poussière
contient souvent des produits chimiques
reconnus pour causer le cancer, les
déformations congénitales ou autres
problèmes de la reproduction. Portez de
l’équipement de protection.
Ce produit ou son cordon contient des
produits chimiques qui de l’avis de l’État
de Californie peut causer le cancer et des
anomalies congénitales ou autres
problèmes de reproduction. Lavez-vous
les mains après la manipulation.
Les précautions de sécurité suivantes
doivent être respectées en tout temps
en plus de toute autre règle de
sécurité actuelle.
1. Lire attentivement tous les
manuels, y compris celui de
ce produit. Bien se
familiariser avec les
commandes et l’utilisation
correcte de l’équipement.
2. Seules les personnes familières avec ces
règles d’utilisation sans danger
devraient utiliser la scie.
Porter des
lunettes de
sécurité et une protection des
oreilles pendant son fonctionnement.
3. Ne pas porter de vêtements amples,
de foulards ou de cravates dans
l’aire de travail. Les vêtements
amples pourraient se prendre dans
les pièces mobiles de l’appareil
et mener à de graves blessures.
MANUAL
Spécifications
Outil
Tension 120 V 60 Hz
Puissance nominale 3,0 A
Vitesse au ralenti 500 à 3 000
tr/min
Poids 1,7 kg (3,75 lb)
Capacités maximum
Profondeur de coupe
Bois 5,4 cm (2 1/8 po)
Acier 6,4 mm (1/4 po)
Angles de coupe 0 ± 45°
La página se está cargando ...
La página se está cargando ...
La página se está cargando ...
La página se está cargando ...
Transcripción de documentos
Manual de Instrucciones y Lista de Piezas See Warranty on page 7 for important information about commercial use of this product. Para Ordenar Repuestos o Asistencia Técnica, Llame al Teléfono 1-800-424-8936 Sirvase darnos la siguiente información: - Número del modelo - Código impreso - Descripción y número del repuesto según la lista de repuestos Dirija toda la correspondencia a: Campbell Hausfeld Attn: Customer Service 100 Production Drive Harrison, OH 45030 U.S.A. Lista de Repuestos Descripción Número del Repuesto Hoja de la sierra Puerto para polvo Llave Allen de 3mm Tornillos de fijación de la hoja (2) DG025800AV DG028100AV DG026100AV DG029000AV DG460300CK S Jig Saw Ctd. 1 1 1 2 Garantía Limitada 1 Operating Instructions and Parts Manual Please read and save these instructions. Read carefully before attempting to assemble, install, operate or maintain the product described. Protect yourself and others by observing all safety information. Failure to comply with instructions could result in personal injury and/or property damage! Retain instructions for future reference. DURACION: A partir de la fecha de compra por el comprador original tal como se especifica a continuación: Un año 2. QUIEN OTORGA ESTA GARANTIA (EL GARANTE: Campbell Hausfeld / The Scott Fetzer Company 100 Production Drive, Harrison, Ohio 45030 Teléfono: (800) 543-6400 3. QUIEN RECIBE ESTA GARANTIA (EL COMPRADOR): El comprador original (que no sea un revendedor) del producto Campbell Hausfeld. 4. PRODUCTOS CUBIERTOS POR ESTA GARANTIA: Cualquier herramienta a motor de Campbell Hausfeld proporcionada o fabricada por el garante. 5. COBERTURA DE LA GARANTIA: Los defectos substanciales de material y fabricación que ocurran dentro del período de validez de la garantía. 6. LO QUE NO ESTA CUBIERTO POR ESTA GARANTIA: A. Las garantías implícitas, incluyendo aquellas de comercialidad E IDONEIDAD PARA FINES PARTICULARES, ESTAN LIMITADOS A LO ESPECIFICADO EN EL PARRAFO DE DURACION. Si este producto es empleado para uso comercial, industrial o para alquiler, no se aplicará ninguna garantía. En algunos estados no se permiten limitaciones a la duración de las garantías implícitas, por lo tanto, en tales casos esta limitación no es aplicable. B. CUALQUIER PERDIDA DAÑO INCIDENTAL, INDIRECTO O CONSECUENTE QUE PUEDA RESULTAR DE UN DEFECTO, FALLA O MALFUNCIONAMIENTO DEL PRODUCTO CAMPBELL HAUSFELD. En algunos estados no se permite la exclusión o limitación de daños incidentales o consecuentes, por lo tanto, en tales casos esta limitación o exclusión no es aplicable C. Cualquier falla que resulte de un accidente, abuso, negligencia o incumplimiento de las instrucciones de funcionamiento y uso indicadas en el (los) manual(es) que se adjunta(n) al producto. Dichos accidentes, abusos por parte del comprador, o falta de operar el producto siguiendo las instrucciones del manual de instrucciones suministrado también debe incluir la desconexión o modificación de los instrumentos de seguridad. Si dichos instrumentos de seguridad son desconectados, la garantía quedaría cancelada. D. Los ajustes normales explicados en el(los) manual(es) suministrado(s) con el producto. 7. RESPONSABILIDADES DEL GARANTE BAJO ESTA GARANTIA: Reparar o reemplazar, como lo decida el Garante, los productos o componentes que estén defectuosos, se hayan dañado o hayan dejado de funcionar adecuadamente, durante el período de validez de la garantía 8. RESPONSABILIDADES DEL COMPRADOR BAJO ESTA GARANTIA: A. Suministrar prueba fechada de compra y la historia de mantenimiento del producto. B. Entregar o enviar el producto o componente Campbell Hausfeld al Centro de Servicio autorizado Campbell Hausfeld más cercano. Los gastos de flete, de haberlos, deben ser pagados por el comprador. C. Seguir las instrucciones sobre operación y mantenimiento del producto, tal como se indica(n) en el (los) manual(es) del propietario Esta garantía limitada es válida sólo en los EE.UU., Canadá y México y otorga derechos legales específicos. Usted también puede tener otros derechos que varían de un Estado a otro. o de un país a otro. BUILT TO LAST Description Jigsaws are versatile tools capable of cutting cleanly and accurately through a wide range of materials, including wood, metal, plastics, cardboard, and leather. The jigsaw is a curve-cutting machine with a multitude of features that enable it to accomplish various types of cuts. Plunge cutting is an action unique to jigsaws. It allows you to make cuts to material starting in the middle of the workpiece. Unpacking When unpacking this product, carefully inspect for any damage that may have occurred during transit. General Safety Information This manual contains information that is very important to know and understand. This information is provided for SAFETY and to PREVENT EQUIPMENT PROBLEMS. To help recognize this information, observe the following symbols. Danger indicates an imminently hazardous situation which, if not avoided, will result in death or serious injury. Warning indicates a potentially hazardous situation which, if not avoided, could result in death or serious injury. General Power Tool Safety Warnings Read all safety warnings and all instructions. Failure to follow the warnings and instructions may result in electric shock, fire and/or serious injury. Save all warnings and instructions for future reference. The term "power tool" in the warnings refers to your mains-operated (corded) power tool or battery-operated (cordless) power tool. CALIFORNIA PROPOSITION 65 You can create dust when you cut, sand, drill or grind materials such as wood, paint, metal, concrete, cement, or other masonry. This dust often contains chemicals known to cause cancer, birth defects, or other reproductive harm. Wear protective gear. This product or its power cord contains chemicals known to the State of California to cause cancer and birth defects or other reproductive harm. Wash hands after handling. The following safety precautions must be followed at all times along with any other existing safety rules. 1. Read all manuals included with this product carefully. Be thoroughly familiar with the controls and the proper use of the equipment. 2. Only persons well acquainted with these rules of safe operation should be allowed to use the saw. 3. Do not wear loose fitting clothing, scarves, or neck ties in work area. Loose clothing may become caught in moving parts and result in serious personal injury. 4. Do not wear jewelry when operating any tool. Jewelry may become caught in moving parts and result in serious personal injury. 5. Always use attachments designed for use with this tool. Do not use damaged or worn attachments. Specifications Tool Voltage 120V 60Hz MANUAL Caution indicates a potentially hazardous situation which, if not avoided, may result in minor or moderate injury. Notice indicates important information, that if not followed, may cause damage to equipment. Safety glasses and ear protection must be worn during operation. Power Rating Speed 3.0 A 500 - 3000 spm Weight 3.75 lbs (1.7 kg) Maximum Capabilities Depth of cut Wood Steel Cutting Angles 2-1/8" 1/4" 0 ± 45° REMINDER: Keep your dated proof of purchase for warranty purposes! Attach it to this manual or file it for safekeeping. 24 Sp © 2006 Campbell Hausfeld/Scott Fetzer For parts, product & service information visit www.chpower.com IN713102AV 12/06 Operating Instructions and Parts Manual DG460300CK General Power Tool Safety Warnings (Cont’d.) sharp edges or moving parts. Damaged or entangled cords increase the risk of electric shock. 6. Never trigger the tool when not applied to a work object. Attachments must be securely attached. Loose attachments can cause serious injury. 7. Never point a tool at oneself or any other person. Serious injury could occur. 8. Use steady, even pressure when using tool. Do not force. Too much pressure can cause blade to break or overheat. 9. Keep all nuts, bolts and screws tight and ensure equipment is in safe working condition. 10.Do not put hands near or under moving parts. When operating a power tool outdoors, use an extension cord suitable for outdoor use. Use of a cord suitable for outdoor use reduces the risk of electric shock. WORK AREA Keep work area clean and well lit. Cluttered or dark areas invite accidents. Do not operate power tools in explosive atmospheres, such as in the presence of flammable liquids, gases or dust. Power tools create sparks which may ignite the dust or fumes. Keep children and bystanders away while operating a power tool. Distractions can cause you to lose control. ELECTRICAL SAFETY Power tool plugs must match the outlet. Never modify the plug in any way. Do not use any adapter plugs with earthed (grounded) power tools. Unmodified plugs and matching outlets will reduce risk of electric shock. Avoid body contact with earthed or grounded surfaces, such as pipes, radiators, ranges and refrigerators. There is an increased risk of electric shock if your body is earthed or grounded. Do not expose power tools to rain or wet conditions. Water entering a power tool will increase the risk of electric shock. Do not abuse the cord. Never use the cord for carrying, pulling or unplugging the power tool. Keep cord away from heat, oil, If operating a power tool in a damp location is unavoidable, use a residual current device (GFCI) protected supply. Use of a GFCI reduces the risk of electric shock. Double insulated tools are equipped with a polarized plug (one plug blade is wider that the other). This plug will fit in a polarized outlet only one way. If the plug does not fit fully into the outlet, turn the plug over and insert into plug again. 1. Make sure cord is located so that it will not be stepped on, tripped over, or otherwise subjected to damage or stress. 2. Do not use an extension cord unless absolutely necessary. Use of improper extension cord could result in a risk of fire and electric shock. If an extension cord must be used, make sure: • That the pins on plug of extension cord are the same number, size and shape as those of plug. • That the extension cord is properly wired and in good electrical condition. • If an extension cord is to be used outdoors it must be marked with the suffix “W-A” or “W” following the cord type designation to indicate it is acceptable for outdoor use. For example – SJTW-A 3. Do not expose to rain, snow or frost. Water entering a power tool will increase the risk of electric shock. PERSONAL SAFETY Stay alert, watch what you are doing and use common sense when operating a power tool. Do not use a power tool while you are tired or under the influence of drugs, alcohol or medication. A moment of inattention while operating power tools may result in serious personal injury. Use personal protective equipment. Always wear eye protection. Protective equipment such as dust mask, non-skid safety shoes, hard hat, or hearing protection used for appropriate conditions will reduce personal injuries. www.chpower.com Prevent unintentional starting. Ensure the switch is in the off-position before connecting to power source and/or battery pack, picking up or carrying the tool. Carrying power tools with your finger on the switch or energising power tools that have the switch on invites accidents. No intente limpiarla introduciendo objetos con punta a través de las aberturas. Mantenga los mangos de las herramientas limpios, secos y libres de aceite o grasa. Use únicamente un jabón suave y un paño húmedo para limpiar la herramienta, evitando todos los contactos eléctricos. Ciertos agentes de limpieza y solventes son nocivos para los plásticos y otras piezas aisladas. Algunos de éstos incluyen gasolina, aguarrás, solvente para laca, solvente de pintura, solventes de limpieza con cloro, amoníaco y detergentes de uso doméstico que contengan amoníaco. Nunca use solventes inflamables ni combustibles cerca de las herramientas. Pernos de ajuste de corte diagonal Pie en ángulo Remove any adjusting key or wrench before turning the power tool on. A wrench or a key left attached to a rotating part of the power tool may result in personal injury. Do not overreach. Keep proper footing and balance at all times. This enables better control of the power tool in unexpected situations. Dress properly. Do not wear loose clothing or jewellery. Keep your hair, clothing and gloves away from moving parts. Loose clothes, jewellery or long hair can be caught in moving parts. If devices are provided for the connection of dust extraction and collection facilities, ensure these are connected and properly used. Use of dust collection can reduce dust-related hazards. 1. Hold power tool by insulated gripping surfaces when performing an operation where the cutting tool may contact hidden wiring or its own cord. Contact with a “live” wire will make exposed metal parts of the tool “live” and shock the operator. 2. Use clamps or another practical way to secure and support the workpiece to a stable platform. Holding the work by hand or against your body leaves it unstable and may lead to loss of control. Do not misuse this product. Excessive exposure to vibration, work in awkward positions, and repetitive work motions can cause injury to hands and arms. Stop using any tool if discomfort, numbness, tingling, or pain occur, and consult a physician. Pie plano a 0° (línea punteada) LUBRICACIÓN Figura 4 Funcionamiento (Cont.) Alinee en el ángulo deseado en el cuadrante calibrado. Luego ajuste las perillas de ajuste del corte diagonal. Debido a la cantidad aumentada de accionamientos de la hoja en el trabajo y la estabilidad disminuida del pie, la hoja puede atascarse. Mantenga la sierra pareja y el pie firmemente sobre la pieza de trabajo. EXTRACCIÓN DEL POLVO Se pueden realizar operaciones de corte limpias conectando esta herramienta a una aspiradora. Introduzca la manguera de la aspiradora en el orificio de la parte trasera de la herramienta. No utilice el adaptador de aspiración cuando corte metal. Las virutas de metal estarán calientes y podrían encenderse dentro del dispositivo de aspiración. La extracción del polvo no se puede realizar o se realiza con una eficacia reducida cuando se hacen cortes en diagonal. Mantenimiento El servicio de la herramienta debe ser realizado sólo por personal de reparaciones calificado. El servicio o mantenimiento realizado por personas no calificadas puede provocar riesgo de lesiones. Si la herramienta no enciende o no funciona correctamente, devuelva la herramienta a una instalación de servicios para repararla. Limpieza Limpie el polvo y los desechos de los orificios y contactos eléctricos, soplando con aire comprimido. Los orificios de ventilación del motor y los interruptores deben mantenerse limpios y libres de materiales extraños. 3. Always work in a wellventilated area. Wear an OSHA-approved dust mask and safety glasses. 4. Keep hands away from moving parts. 5. Always use blades of the correct size and shape mounting holes. Blades that do not match the mounting hardware of the saw will increase risk of injury to the user and damage to the tool. 23 Sp 2 Para su seguridad y protección eléctrica continuas, la lubricación y el servicio de esta herramienta deberán ser realizados ÚNICAMENTE por un CENTRO DE SERVICIO AUTORIZADO DE CAMPBELL HAUSFELD. SERVICIO TÉCNICO Para obtener información con relación al funcionamiento o reparación de este producto, sírvase llamar al 1-800-424-8936. El servicio de la herramienta debe ser realizado sólo por personal de reparaciones calificado. El servicio o mantenimiento realizado por personas no calificadas puede provocar riesgo de lesiones. Al realizarle un servicio a la herramienta, utilice únicamente piezas de repuesto idénticas. Siga las instrucciones de la sección Mantenimiento de este manual. El uso de piezas no autorizadas o el no seguir las instrucciones de Mantenimiento puede crear un riesgo de choque eléctrico o lesión. Manual de Instrucciones y Lista de Piezas Funcionamiento (Cont.) RECORTES/ CORTE DEL AGUJERO Los recortes se pueden hacer de dos modos: 1. Haciendo un orificio inicial: Para los cortes internos sin un corte de entrada desde el borde, haga un orificio inicial de 12 mm (1/2") o más de diámetro con un taladro. Introduzca la hoja en este orificio y comience a cortar. 2. Corte por penetración: El corte por penetración es útil y ahorra tiempo cuando se hacen aberturas toscas en materiales blandos. No intente cortar por penetración materiales duros tales como el acero. CORTES POR PENETRACIÓN 1. Si el corte en bolsillo es de líneas rectas, no se necesita un orificio pretaladrado. 2. Incline la herramienta hacia adelante sobre el borde delantero de la base con la hoja ubicada apenas encima de la superficie de la pieza (Figura 3). DG460300CK vez que haya cortado el bolsillo, acérquese a la esquina desde la dirección contraria y corte el ángulo. CORTES DE BOLSILLO Los cortes de bolsillo se hacen en el medio de la pieza de trabajo cuando no pueden cortarse desde un borde. Se pueden comenzar con un orificio pretaladrado o la sierra vertical puede crear un punto de inicio (corte por penetración). Los cortes por penetración no se recomiendan para materiales más duros como el acero y no se deben usar las hojas de calar para cortes por penetración. CORTES EN CÍRCULO Una guía de corte en círculo puede ayudarlo para cortar círculos. El corte se debe preparar con un orificio pretaladrado o un leve corte por penetración próximo a la línea de corte. Si usa una guía, asegúrese de que cumpla con las instrucciones de la sierra vertical y del fabricante. 3. Aplique presión sobre la herramienta de modo que el borde delantero de la base no se mueva cuando encienda la herramienta y suavemente baje la parte trasera de la herramienta con lentitud. 4. Una vez que la sierra alcanza la velocidad máxima, bájela lentamente en la pieza de trabajo. 5. Mientras la hoja perfora la pieza, baje lentamente la base de la herramienta hacia la superficie de la pieza de trabajo. 6. Mantenga ambas manos sobre la sierra mientras esté cortando. 7. Complete el corte de manera normal. 8. Para 90° u otras esquinas en ángulo, corte hasta la esquina luego retroceda antes de redondear la esquina. Una • • • CALADOS Se pueden realizar trabajos complicados con una sierra vertical usando una hoja de calado. Asegúrese de que la hoja se utilice de acuerdo a las instrucciones del fabricante. CORTE DE METALES Figura 3 • • Cuando corte piezas de trabajo de metal, sujete el material con abrazaderas y corte cerca del punto de sujeción para reducir la posibilidad de que se tuerza y la vibración. • Si la hoja comienza a vibrar o a hacer un ruido excesivo, reemplace la hoja con una hoja para cortes en metal que tenga dientes más finos. • Para metales blandos, la hoja se puede obstruir por lo tanto use una hoja con dientes más gruesos. • Los conductos, hierro en ángulo o tuberías se deben sujetar en una prensa de tornillo y cortar lo más cerca posible de la prensa. • Los metales de hoja delgada deben colocarse entre dos tablas de madera o se deben colocar sobre tablones de madera más gruesos, como madera terciada y el diseño o diagramado se debe poner encima. Esto permite cortar el metal sin problemas y evita el desgarro del material de metal. • La hoja se puede lubricar para facilitar el corte. Use una barra de cera para corte, si hubiese disponible, y use aceite para corte cuando corte acero. • La porción expuesta de la barra de la sierra se debe mantener limpia. Elimine frecuentemente los restos • de metal usando un paño con aceite. Después de usar, deseche adecuadamente el paño con aceite para evitar riesgos de incendio. Cuando corte metal sujete el material con abrazaderas, continúe lentamente y use las velocidades más bajas. No doble, tuerza ni fuerce la hoja. Si la sierra salta o se balancea, use una hoja con dientes más finos. Si la hoja parece obstruida cuando corte materiales blandos, use una hoja con dientes más gruesos. Para un corte más fácil, lubrique la hoja con cera para corte, si hubiese disponible, o aceite para corte cuando corte acero. El metal delgado debe colocarse entre dos láminas de madera o debe sujetarse firmemente con abrazaderas a una sola pieza de madera (la madera sobre el metal). Dibuje el diseño o las líneas de corte en la parte superior de madera. Cuando corte aluminio extruido o hierro en ángulo, sujete el trabajo con una prensa de tornillo y corte cerca de las mordazas de la prensa. Cuando corte tuberías y el diámetro sea mayor que la profundidad de la hoja, corte la pared de la tubería y luego introduzca la hoja en el corte girando la tubería mientras corta. No utilice el adaptador de aspiración cuando corte metal. Las virutas de metal estarán calientes y podrían causar un incendio. CORTE DE LÁMINAS Mientras la hoja de la sierra corta en la dirección ascendente, la superficie más cercana a la placa de la zapata podría astillarse. 1. Utilice una hoja de sierra con dientes finos. 2. Corte desde la superficie posterior de la pieza (lado terminado hacia abajo). 3. Para minimizar el astillado, sujete la pieza con madera de desecho o aglomerado por ambos lados de la pieza y corte con la pieza en el medio. TERMINACIÓN DE BORDES Para recortar los bordes o hacer ajustes dimensionales, haga correr la hoja apenas por los bordes de corte. AJUSTE DEL CORTE DIAGONAL Siempre asegúrese de que la herramienta esté apagada. Desenchufe la herramienta. El pie puede ajustarse hasta 45°, soltando los pernos de ajuste de corte diagonal, en la parte inferior de la sierra. General Power Tool Safety Warnings (Cont’d.) 6. NEVER hold piece being cut in your hands or across your leg. It is important to support the work properly to minimize body exposure, blade binding, or loss of control. 7. Wear ear protection when using the tool for extended periods. Prolonged exposure to high intensity noise can cause hearing loss. 8. Make sure that all nails have been pulled from workpiece before starting cutting operation. 9. This saw is not designed to cut hollow pipe. Perform cuts on approved materials only. 10.Do not touch metal parts of saw while cutting in blind areas. Blind spots like walls and floors may contain live electric wires. 11.Do not touch metal parts of saw or blade immediately after use. Parts will be hot and can cause serious burn. POWER TOOL USE AND CARE Do not force the power tool. Use the correct power tool for your application. The correct power tool will do the job better and safer at the rate for which it was designed. Do not use the power tool if the switch does not turn it on and off. Any power tool that cannot be controlled with the switch is dangerous and must be repaired. Disconnect the plug from the power source and/or the battery pack from the power tool before making any adjustments, changing accessories, or storing power tools. Such preventive safety measures reduce the risk of starting the power tool accidentally. Store idle power tools out of the reach of children and do not allow persons unfamiliar with the power tool or these instructions to operate the power tool. Power tools are dangerous in the hands of untrained users. Maintain power tools. Check for misalignment or binding of moving parts, breakage of parts and any other condition that may affect the power tool’s operation. If damaged, have the power tool repaired before use. Many accidents are caused by poorly maintained power tools. Keep cutting tools sharp and clean. Properly maintained cutting tools with sharp cutting edges are less likely to bind and are easier to control. Use the power tool, accessories and tool bits etc. in accordance with these instructions, taking into account the working conditions and the work to be performed. Use of the power tool for operations different from those intended could result in a hazardous situation. 1. This tool must NOT be modified or used for any application other than that for which it was designed. 2. Some wood contains preservatives which can be toxic. Take extra care to prevent inhalation and skin contact when working with these materials. Request and follow all safety information available from your material supplier. 3. Store tools out of reach of children and other untrained persons. Tools are dangerous in the hands of untrained users. 4. Avoid cutting nails. Inspect workpiece for any nails and remove them before operation. 5. Do not cut hollow pipe. 6. Do not cut oversize workpiece. 7. Check for the proper clearance beyond the workpiece before cutting so that the blade will not strike the floor, workbench, etc. 8. Make sure the blade is not contacting the workpiece before the switch is turned on. 9. Keep hands away from moving parts. 10.Do not leave the tool running. Operate the tool only when hand-held. 11.Always switch off and wait for the blade to come to a complete stop before removing the blade from the workpiece. 12.Do not touch the blade or the workpiece immediately after operation; they may be extremely hot and could burn your skin. CAUSES AND USER PREVENTION OF KICKBACK: Kickback is a sudden reaction to a pinched, bound or misaligned saw blade, causing an uncontrolled saw to lift up and out of the workpiece toward the operator. When the blade is pinched or bound tightly by the kerf, or cutting slot, closing down, the blade stalls and the motor reaction drives the unit rapidly back toward the operator. If the blade becomes twisted or misaligned in the cut, the teeth at the back edge of the blade can dig into the top surface of the wood causing the blade to climb out of the kerf and jump back toward operator. Kickback is the result of tool misuse and/ or incorrect operating procedures or conditions and can be avoided by taking proper precautions as given below: 1. Maintain a firm grip with both hands on the saw and position your body and arm to allow you to resist kickback forces. Kickback forces can be controlled by the operator, if proper precautions are taken. 2. When blade is binding, or when interrupting a cut for any reason, release the trigger and hold the saw motionless in the material until the blade comes to a complete stop. Never attempt to remove the saw from the work or pull the saw backward while the blade is in motion or kickback may occur. Investigate and take corrective actions to eliminate the cause of blade binding. 3. When restarting a saw in the workpiece, center the saw blade in the kerf, or cut, and check that saw teeth are not engaged into the material. If saw blade is binding, it may walk up or kickback from the workpiece as the saw is restarted. 4. Support large panels to minimize the risk of blade pinching and kickback. Large panels tend to sag under their own weight. Supports must be placed under the panel on both sides, near the line of cut and near the edge of the panel. 5. Do not use dull or damaged blades. Unsharpened or improperly set blades produce narrow kerf causing excessive friction, blade binding and kickback. 6. Blade depth and bevel adjusting locking levers must be tight and secure before making cut. If blade adjustment shifts while cutting, it may cause binding and kickback. 7. Use extra caution when making a “Pocket Cut” into existing walls or other blind areas. The protruding blade may cut objects that can cause kickback. 8. Be cautious of pitchy, knotty, wet or warped stock. These are most likely to create pinching conditions and possible kickback. www.chpower.com 22 Sp 3 Operating Instructions and Parts Manual DG460300CK 1. On/Off Switch 2. Lock Button 3. Safety Guard / Dust Guard 4. Saw Blade Holder Bolts 5. Base 6. Dust Extraction Port 7. Dust Extraction Attachment 8. Blade Support Bearing 2 1 6 4 8 Base Angle Degree Guide Figure 1 SERVICE Have your power tool serviced by a qualified repair person using only identical replacement parts. This will ensure that the safety of the power tool is maintained. forward so that the blade is riding in the groove. Retighten the base adjustment bolts. Check this adjustment when ever the blade is changed or the base is adjusted.Test saw in a safe direction, away from others, before beginning use with new blade. To remove the blade, follow the installation procedure in reverse. Assembly ATTACHING THE BLADE Occasionally lubricate the roller. Always unplug tool and place the switch in the off position before making any assembly, adjustments or changing accessories. Such preventive safety measures reduce the risk of starting the tool accidentally. Always clean out all chips or foreign matter adhering to the blade and/or blade holder. Failure to do so may cause insufficient tightening of the blade, resulting in a serious personal injury. 1. Loosen the two bolts counterclockwise on the blade holder with the allen wrench (see Figure 2). 2. With the blade teeth facing forward, insert the blade into the blade holder as far as it will go. Make sure that the back edge of the blade fits into the blade support bearing (see Figure 2) . 3. Tighten the bolt clockwise to secure the blade. 4. Loosen the base adjustment bolts. Slide the blade support bearing (Continuación) Use safety equipment. Always wear eye protection. Dust mask, non-skid safety shoes, hard-hat, or hearing protection must be used for appropriate condition. 3 General Power Tool Safety Warnings (Cont’d.) Ensamblaje Proper planning can prevent accidents when using power tools. Plan your cuts ahead of actually doing them. Mark a cutting line on the work piece to ensure you know the direction you need to take while using the tool. Operation 7 5 Pre-Operation Saw Blade Holder Bolts Saw Blade Blade Teeth Facing Forward Figure 2 www.chpower.com Safety glasses and ear protection must be worn during operation. Make sure work is held securely in vise or clamped in place prior to starting operation. Loose work may spin and cause bodily injury. Keep hands away from cutting area and blade. GENERAL OPERATION • Before cutting, make sure the space below the material to be cut is deeper than the saw blade. • Face the good side of the material down and secure it in a bench vise or clamp it down. • Certain blades are useful for different types of cuts and materials. Make sure the blade in use is approved by the manufacturer for the operation being performed. • Measure all cuts to be made and make sure they are marked clearly. • If both hands are holding the saw, they cannot be cut by the blade. Hold the saw firmly to prevent loss of control. NEVER place your hand ahead of the saw blade since the saw could jump forward over your hand. • Do not reach underneath the work. Do not attempt to remove cut material when blade is moving. • Turn the tool on without the blade making any contact and wait until the blade attains full speed. Then rest the base flat on the workpiece and gently move the tool forward along the previously marked cutting line. • When following curves, cut slowly so the blade can cut through cross grain. This will give you an accurate cut and will prevent the blade from wandering. • When cut is completed, allow saw to come to a complete stop before removing from work material. 3. Ajuste el perno girando hacia la derecha para asegurar la hoja. 4. Afloje los pernos de ajuste del corte diagonal. Deslice el rodamiento del soporte de la hoja hacia adelante para que la hoja trabaje en la ranura. Vuelva a apretar los pernos de ajuste del corte diagonal. Verifique este ajuste por cada cambio de la hoja o ajuste del corte diagonal. Para quitar la hoja, siga el procedimiento de instalación a la inversa. Lubrique el rodillo ocasionalmente. Previo al Funcionamiento La planificación adecuada puede evitar accidentes al momento de usar herramientas mecánicas. Planifique los cortes con anticipación. Marque una línea de corte en la pieza de trabajo para asegurarse de saber la dirección que debe tomar al usar la herramienta. Funcionamiento Use equipo de seguridad. Siempre use protección para los ojos. Se debe usar máscara para polvo, calzado de seguridad antideslizante, o protección de audición para la condición adecuada. Se deberán usar gafas de seguridad durante la operación. Asegúrese de que el trabajo esté sujeto en forma segura en una prensa de tornillo o mordaza antes de comenzar la operación. Si la pieza de trabajo está floja puede girar y causar lesiones corporales. Mantenga las manos alejadas del área de corte y de la hoja. FUNCIONAMIENTO GENERAL • Antes de cortar, asegúrese de que el espacio debajo del material a cortar sea más profundo que la hoja de la sierra. • Coloque el lado bueno del material hacia abajo y asegúrelo con una prensa o mordaza. • Ciertas hojas son útiles para diferentes tipos de cortes y materiales. Asegúrese de que la hoja en uso esté aprobada por el fabricante para la operación que se está llevando a cabo. • Mida todos los cortes a realizar para asegurarse de que están claramente marcados. • Encienda la sierra y deje que alcance el valor de velocidad establecido antes de tocar el material. • Cuando haya completado el corte, deje que la sierra se detenga por completo antes de retirarla del material de trabajo. • Si está sosteniendo la sierra con ambas manos, no correrá riesgo de cortárselas con la hoja. Sostenga la sierra con firmeza para evitar perder el control. NUNCA coloque la mano delante de la hoja de la sierra ya que la sierra podría saltar hacia adelante sobre su mano. • Cuando siga curvas, corte lentamente de modo que la hoja pueda cortar cruzado a la veta. Esto le dará un corte preciso y evitará que la hoja se desvíe. • No intente alcanzar nada debajo del trabajo. No intente retirar el material de corte cuando la hoja se esté moviendo. • NUNCA sostenga una pieza que está cortando en sus manos ni sobre sus piernas. Es importante apoyar el trabajo correctamente para minimizar la exposición corporal, el atascamiento de la hoja o la pérdida de control. CORTE CON UNA REGLA Use siempre una hoja de corte dura cuando sea posible. Sujete una regla en el trabajo de modo paralelo a la línea de corte y a nivel con el lado del pie de la sierra. Primero marque la línea de corte y luego coloque la regla paralela y a la misma distancia que entre la hoja y el borde lateral del pie, o primero marque el borde lateral del pie y luego sujete la regla en la marca y paralela a la línea de corte. Al cortar, mantenga el borde del pie de la sierra a nivel contra la regla y plano sobre la pieza de trabajo. • Si usa un delimitador o guía, asegúrese de que esté fijada con seguridad y que cumpla con las instrucciones del fabricante. BLOQUEO DEL INTERRUPTOR DE ENCENDIDO/APAGADO Al presionar el interruptor de encendido/ apagado y usar el botón de “bloqueo”, se puede usar la sierra vertical de forma continua. El botón de bloqueo se puede 21 Sp 4 desbloquear de inmediato simplemente presionando una vez más el botón de encendido/ apagado. CORTE DE PANELES Y TABLAS Los paneles grandes y las tablas largas se curvan o doblan si no están sujetados correctamente. Si intenta cortar sin nivelar ni sujetar la pieza de trabajo correctamente, la hoja tenderá a atascarse, provocando un contragolpe. Sujete los paneles grandes. Asegúrese de definir la profundidad del corte para que solamente pueda cortar a través de la pieza de trabajo, no a través de los soportes. • Siempre sujete la pieza de trabajo en forma segura en un caballete de aserrar o banco. • Siempre mantenga la base a nivel de la pieza de trabajo. De lo contrario podrá romper la hoja, lo cual puede resultar en lesiones graves. Avance muy lentamente con la herramienta cuando corte curvas o cale. Forzar la herramienta puede hacer que la superficie de corte se incline y rompa la hoja. TIPOS DE CORTE Cortes rectos Se puede lograr un corte recto fácilmente sin usar un delimitador de corte o una guía. Sujete con abrazaderas un borde recto o una pieza de madera pareja sobre la pieza de trabajo y guíe el borde de la sierra contra éste. Complete el corte sólo en una dirección. CORTES EN DIRECCIÓN DE LA VETA Serrar es cortar a lo largo siguiendo la veta. Seleccione la hoja adecuada para su trabajo. Use una guía de corte para cortes a lo largo de 4" de ancho o menos. CORTES CRUZADOS Cortar cruzado es cortar transversalmente a la veta. Seleccione la hoja adecuada para su trabajo. Avance con la sierra lentamente para evitar astillar la madera. CORTES DIAGONALES/EN ÁNGULO Asegúrese siempre de que la herramienta esté apagada y desenchufada antes de inclinar la base. Con la base inclinada, puede hacer cortes en diagonal en cualquier ángulo entre 0° y 45° (a izquierda o derecha). Afloje los pernos que se encuentran en la parte inferior de la herramienta con una llave allen. Incline la base hasta obtener el ángulo deseado. El borde de la carcasa del motor indica el ángulo de la base mediante graduaciones grabadas en la base. Ajuste los pernos para asegurar la base. Manual de Instrucciones y Lista de Piezas DG460300CK 1. Interruptor de encendido/apagado 2. Botón de bloqueo 3. Protección de seguridad / Protector para polvo 4. Pernos del soporte de la hoja de la sierra 5. Pie (Base) 6. Puerto de extracción de polvo 7. Accesorio para extracción de polvo 8. Cojinete de apoyo de la hoja 2 MANTENIMIENTO CUTTING WITH A STRAIGHTEDGE Haga que sólo personal calificado preste mantenimiento a su herramienta eléctrica y usando sólo repuestos idénticos. Esto asegura que se preserva la seguridad de la herramienta eléctrica. Always use a rough cut blade when possible. Clamp a straightedge on the work parallel to the line of cut and flush with the side of the saw base. Either first mark the line of cut and then position the straightedge parallel and at the same distance as between the blade and the side edge of the base or first mark the side edge of the base and then clamp the straightedge on the mark and parallel to the cut line. As you cut, keep the saw base edge flush against the straightedge and flat on the workpiece. • If using a fence or guide, make sure it is securely fastened and complies with manufacturer’s instructions. CROSS-CUTTING Cross-cutting is cutting across the grain. Select the proper blade for your job. Advance the saw slowly to avoid splintering the wood. BEVEL/ ANGLE CUTTING CÓMO COLOCAR LA HOJA 3 6 4 5 8 Guía de grados del ángulo de la base Figura 1 El CONTRAGOLPE es el resultado de un mal uso de la herramienta y/o de procedimientos o condiciones de funcionamiento incorrectos y puede evitarse tomando las precauciones necesarias que se proporcionan a continuación: 1. Sostenga la sierra con firmeza con las dos manos y posicione su cuerpo y brazo de un modo que le permita resistir las fuerzas de CONTRAGOLPE. El operador puede controlar las fuerzas de CONTRAGOLPE si toma las precauciones necesarias. 2. Cuando la hoja se atasque, o cuando se interrumpa el corte por algún motivo, libere el interruptor y sostenga la sierra sin moverla sobre el material hasta que la hoja se detenga por completo. Nunca intente retirar la sierra del trabajo ni tirar la sierra hacia atrás mientras la hoja esté en movimiento o puede haber un CONTRAGOLPE. Investigue y tome acciones correctivas para eliminar la causa del atascamiento de la hoja. 3. Cuando reinicie una sierra en la pieza de trabajo, centre la hoja de la sierra en la entalla o corte y verifique que los dientes de la sierra no queden enganchados en el material. Si la hoja de la sierra está for your job. Use a rip fence for rips 4" wide or less. Ensamblaje 7 Información General de Seguridad sobre Herramientas Eléctricas (contuación) Operation (Cont’d.) al usuario a tener movimientos descuidados. 1 4. 5. 6. 7. 8. 9. atascada, puede salirse o provocar un CONTRAGOLPE desde la pieza de trabajo mientras se reinicia la sierra. Apoye bien los paneles grandes para minimizar el riesgo de morder la hoja y de CONTRAGOLPE. Los paneles grandes tienden a curvarse por su propio peso. Se deben colocar apoyos a ambos lados debajo del panel, junto a la línea de corte y cerca del borde del panel. No utilice hojas desafiladas ni dañadas. Las hojas desafiladas o en mal estado producen que la entalla se angoste causando fricción excesiva, atascamiento de la hoja y CONTRAGOLPE. Los tornillos de ajuste de la base deben estar ajustados y seguros antes de hacer el corte. Si el ajuste de la hoja se mueve durante el corte, puede provocar atascamiento y CONTRAGOLPE. Tenga extremo cuidado al hacer un “Corte en bolsillo” en paredes existentes u otras áreas ciegas. La hoja que sobresale puede cortar objetos que pueden causar CONTRAGOLPE. Tenga cuidado con los materiales inclinados, nudosos, húmedos o deformados. Es muy probable que estos materiales creen condiciones de mordida y posiblemente CONTRAGOLPE. Manténgase alerta. Cualquier distracción puede provocar que la hoja se tuerza o se atasque. Los cortes repetitivos pueden llevar Siempre desconecte la herramienta y deje el interruptor en la posición de apagado antes de hacer cualquier armado, ajuste o de cambiar accesorios. Dichas medidas de seguridad preventivas reducen el riesgo de que la herramienta se active por accidente. LOCK ON/OFF SWITCH Quite siempre las lascas o el material extraño que se acumulen en la hoja y/o en el soporte de la hoja. De lo contrario, la hoja podrá no quedar lo suficientemente ajustada, lo cual puede resultar en lesiones personales graves. 1. Afloje el perno girando hacia la izquierda en el soporte de la hoja usando la llave allen (ver Figura 2). 2. Con los dientes de la hoja hacia adelante, introduzca la hoja en el soporte de la hoja hasta el tope. Asegúrese de que el borde trasero de la hoja encaje en el cojinete de apoyo de la hoja (ver Figura 2). Pernos del soporte de la hoja de la sierra Pressing the ON/OFF switch and using the “lock” button, the jig saw can be used continually. The lock button can be unlocked immediately by simply pressing the on/ off button again. CUTTING PANELS AND BOARDS Large panels and long boards sag or bend if they are not correctly supported. If you attempt to cut without leveling and properly supporting the workpiece, the blade will tend to bind, causing kickback. Support large panels. Be sure to set the depth of the cut so that you only cut through the workpiece, not through the supports. • Always clamp the work piece securely on a saw horse or bench. • Always hold the base flush with the workpiece. Failure to do so may cause blade breakage, resulting in a serious injury. Advance the tool very slowly when cutting curves or scrolling. Forcing the tool may cause a slanted cutting surface and blade breakage. • NEVER hold piece being cut in your hands or across your leg. It is important to support the work properly to minimize body exposure, blade binding, or loss of control. TYPES OF CUTTING Hoja de la sierra – Los dientes hacia adelante Figura 2 Straight Cuts Without the use of a rip-fence or guide, a straight cut can very easily be made. Clamp a straight edge or even a piece of wood to the workpiece and guide the edge of the saw against it. Complete the cut in one direction only. RIP-CUTTING Ripping is cutting length wise with the grain. Select the proper blade Always be sure that the tool is switched off and unplugged before tilting the base. • With the base tilted, you can make bevel cuts at any angle between 0° and 45° (left or right). • Loosen the bolts on the underside of the tool with an allen wrench. • Tilt the base until the desired angle is obtained. The edge of the motor housing indicates the base angle by graduations stamped on the base. • Tighten the 2 bolts to secure the base. Cutouts (Hole/ Pocket Cutting) Pocket cuts are made in the middle of the workpiece when it cannot be cut from an edge. They can be made one of two ways:. 1. Boring a starting hole: For internal cutouts without a lead-in cut from an edge, pre-drill a starting hole 12 mm (1/2") or more in diameter. Insert the blade into this hole to start your cut. 2. Plunge cutting: Plunge cutting is useful and timesaving in making rough openings in softer materials. Plunge cutting is not recommended for harder materials like steel and scroll blades should not be used for plunging. PLUNGE CUTS 1. If the pocket cut is straight-lined, a pre-drilled hole is not necessary. 2. Tilt the tool up on the front edge of the base with the blade point positioned just above the workpiece surface (see Figure 3). 3. Apply pressure to the tool so that the front edge of the base will not move when you switch on the tool and gently lower the back end of the tool slowly. 4. Once the saw reaches maximum speed, lower it slowly into the workpiece. 5. As the blade pierces the workpiece, slowly lower the base of the tool down onto the workpiece surface. 6. Keep both hands on the saw while cutting. 7. Complete the cut in the normal manner. 8. For 90° or other sharp corners, cut up to the corner then back out before rounding the corner off. Once opening the pocket, approach the corner from the opposite direction to square it off. CIRCLE CUTS A circle cutting guide can help assist in the sawing of circles. The cut should be prepared by a pre-drilled hole or a slight plunge cut near the cutting line. If using a guide, make sure it complies with the jig saw and the Manufacturer’s instructions. Scroll Cutting Intricate work can be performed by a jig saw using a scrolling blade. Make sure that the blade being used according to the manufacture’s instructions. Metal Cutting • When cutting metal workpieces, clamp the material down and saw close to the clamping point to reduce bending and vibration. • If the blade begins to vibrate or chatter excessively, replace blade with a metal cutting blade with finer teeth. • For soft metals the blade can become clogged so use a blade with coarser teeth. • Conduit, angle iron, or pipe should be clamped in a vice and cut as close to the clamp as possible • Thin sheet metals should be “sandwiched” between or laid on top of tougher wood boards, like plywood, and the design or layout set on top. This allows the metal to be cut smoothly and prevents tearing on the metal material. • The exposed portion of the saw bar must be kept clean. Wipe metal chips away frequently by using an oily cloth. After use, dispose of oily cloth appropriately, to prevent fire hazards. Figure 3 www.chpower.com 20 Sp 5 Operating Instructions and Parts Manual DG460300CK Operation (Cont’d.) • When cutting metal, clamp material down. Proceed slowly and use lower speeds. • Do not twist, bend, or force the blade. If the saw jumps or bounces, use a blade with finer teeth. If the blade seems clogged when cutting soft metal, use a blade with coarser teeth. • For easier cutting, lubricate the blade with a stick of cutting wax, if available, or cutting oil when cutting steel. Thin metal should be sandwiched between two pieces of wood or tightly clamped on a single piece of wood (wood on top of the metal). • Draw the cut lines or design on the top piece of wood. When cutting aluminum extrusion or angle iron, clamp the work in a bench vise and saw close to the vise jaws. • When sawing tubing that has a diameter larger than the blade is deep, cut through the wall of the tubing and then insert the blade into the cut rotating the tube as you saw. Do not use vacuum adapter when cutting metal. Metal filings will be hot and may cause a fire. SAWING LAMINATES As the saw blade cuts on the upward stroke, splintering may occur on the surface closest to the shoe plate. 1. Use a fine-tooth saw blade. 2. Saw from the back surface of the workpiece (finished side down). Maintenance 3. To minimize splintering, clamp a piece of scrap wood or hardboard to both sides of the workpiece and saw through this sandwich. FINISHING EDGES To trim edges or make dimensional adjustments, run the blade lightly along the cut edges. BASE ADJUSTMENT Always be sure that the tool is switched off. Unplug tool. The base can be adjusted up to 45° by loosening the base adjustment bolts on the underside of the saw (Figure 4). Align to the desired angle on calibrated quadrant. Then tighten base adjustment bolts (2). Because of the increased amount of blade engagement in the work and decreased stability of the base, blade binding may occur. Keep the saw steady and the base firmly on the workpiece. DUST EXTRACTION Clean cutting operations can be performed by connecting this tool to a vacuum cleaner. Insert the hose of the vacuum cleaner into the hole at the rear of the tool. Do not use vacuum adapter when cutting metal. Metal filings will be hot and may cause a fire inside the vacuum. Dust extraction cannot be performed or has reduced effectivity when making bevel cuts. Tool service must be performed only by qualified repair personnel. Service or maintenance performed by unqualified personnel could result in a risk of injury. If the tool does not start or operate properly, return the tool to a service facility for repairs. Cleaning Clean out dust and debris from vents and electrical contacts by blowing with compressed air. Motor vents and switch levers must be kept clean and free of foreign matter. Do not attempt to clean by inserting pointed objects through openings. Keep tool handles clean, dry and free of oil or grease. Use only mild soap and a damp cloth to clean the tool, keeping away from all electrical contacts. Certain cleaning agents and solvents are harmful to plastics and other insulated parts. Some of these include gasoline, turpentine, lacquer thinner, paint thinner, chlorinated cleaning solvents, ammonia and household detergents containing ammonia. Never use flammable or combustible solvents around tools. LUBRICATION For your continued safety and electrical protection, lubrication and service on this tool should ONLY be performed by an AUTHORIZED CAMPBELL HAUSFELD SERVICE CENTER. TECHNICAL SERVICE For information regarding the operation or repair of this product, please call 1-800-424-8936. Base Adjustment Bolts Tool service must be performed only by qualified repair personnel. Service or maintenance performed by unqualified personnel could result in a risk of injury. Base angled When servicing a tool, use only identical replacement parts. Follow instructions in the Maintenance section of this manual. Use of unauthorized parts or failure to follow Maintenance instructions may create a risk of electrical shock or injury. Base flat at 0° (dotted line) Figure 4 Información General de Seguridad sobre Herramientas Eléctricas (contuación) No intente alcanzar lugares fuera de alcance. Mantenga un buen soporte y equilibrio en todo momento. Esto le permitirá un mayor control de la herramienta eléctrica en situaciones inesperadas. Vístase adecuadamente. No use alhajas ni vestimenta suelta. Mantenga su cabello, vestimenta y guantes alejados de las piezas móviles. Las alhajas, las prendas sueltas, y el cabello largo pueden quedar atrapados en las partes móviles. Si se proporcionan dispositivos para la conexión a sistemas de recolección y extracción de polvo, asegúrese de que queden conectados y se usen adecuadamente. El uso de colectores de polvo puede reducir los peligros relacionados con el polvo. 1. Sostenga la herramienta por la superficie de sujeción aislada cuando realice una operación en la que la herramienta pueda entrar en contacto con un cableado oculto. Al entrar en contacto con un cable de corriente las piezas metálicas de la herramienta conducirán la electricidad y el usuario recibirá un choque eléctrico. 2. Use sujetadores u otra manera práctica de asegurar la pieza de trabajo a una plataforma estable. Nunca sostenga el trabajo en sus manos, su regazo ni contra otras partes de su cuerpo cuando corte. No use este producto en forma inadecuada. La exposición excesiva a la vibración, trabajar en posiciones incómodas y los movimientos de trabajo repetitivos pueden causar lesiones a las manos y brazos. Deje de usar cualquier herramienta si aparece incomodidad, cosquilleo o dolor y consulte a un médico. 3. Trabaje siempre en un área bien ventilada. Use una máscara para polvo y gafas de seguridad aprobadas por OSHA. 4. Mantenga las manos alejadas de las piezas móviles. 5. Utilice siempre hojas que tengan el tamaño y los orificios de montaje de la forma correcta. Las hojas que no coincidan con la ferretería de montaje de la sierra aumentarán el riesgo de lesión al usuario y daño a la herramienta. USO Y CUIDADO DE LA HERRAMIENTA ELÉCTRICA No fuerce la herramienta eléctrica. Use la herramienta eléctrica correcta para cada aplicación. La herramienta eléctrica correcta hará el trabajo mejor y en forma más segura a la velocidad para la cual fue diseñada. No use la herramienta si el interruptor no la enciende o no la apaga. Cualquier herramienta que no pueda ser controlada con el interruptor es peligrosa y debe repararse. Antes de hacer cualquier ajuste, cambio de accesorios o de guardar una herramienta eléctrica, desconecte el enchufe del suministro de corriente y/o la batería de la herramienta eléctrica. Dichas medidas de seguridad preventivas reducen el riesgo de que la herramienta eléctrica se active por accidente. Almacene las herramientas eléctricas desactivadas fuera del alcance de niños y no permita que personas que no estén familiarizadas con herramientas eléctricas o con estas instrucciones, hagan funcionar una herramienta eléctrica. Las herramientas eléctricas son peligrosas cuando están en manos de usuarios inexpertos. Preste mantenimiento a las herramientas eléctricas. Verifique que las piezas móviles no estén desaliñadas ni bloqueadas, que no haya piezas rotas y que no exista ningún otro problema que pueda afectar el funcionamiento de la herramienta. Si está dañada, haga reparar la herramienta eléctrica antes de usarla. Muchos accidentes son causados por herramientas eléctricas que no tienen un mantenimiento adecuado. Mantenga sus herramientas de corte afiladas y limpias. Es menos probable que las herramientas de corte con un mantenimiento adecuado y con bordes de corte afilados se atasquen y además son más fáciles de controlar. www.chpower.com 6 19 Sp Use la herramienta eléctrica, sus accesorios yUse la brocas etc. de acuerdo con estas instrucciones, tomando en cuenta las condiciones de trabajo y el trabajo que desea hacer. El uso de una herramienta eléctrica para trabajos diferentes de aquellos para los cuales ha sido diseñada, puede resultar en una situación peligrosa. 1. Esta herramienta NO debe modificarse ni usarse para ninguna aplicación que no sea la aplicación para la cual fue diseñada. 2. Algunas maderas contienen conservadores que pueden ser tóxicos. Tenga especial cuidado para evitar la inhalación y el contacto de la piel con estos materiales. Solicite y cumpla con toda la información de seguridad disponible por parte de su proveedor de materiales. 3. Guarde las herramientas fuera del alcance de los niños y de otras personas no capacitadas para usarlas. Las herramientas son peligrosas cuando están en manos de usuarios inexpertos. 4. Evite cortar clavos. Inspeccione la pieza de trabajo en busca de clavos y quítelos antes de comenzar a trabajar. 5. No corte caños huecos. 6. No corte piezas de tamaño excesivo. 7. Verifique que haya espacio suficiente detrás de la pieza de trabajo antes de cortar, de modo que la hoja no golpee el piso, banco, etc. 8. Asegúrese de que la hoja no entre en contacto con la pieza antes de presionar el interruptor de encendido. 9. Mantenga las manos alejadas de las piezas móviles. 10.No deje la herramienta en funcionamiento. Haga funcionar la herramienta sólo cuando la esté sosteniendo. 11.Cuando apague la herramienta espere siempre a que la hoja se detenga por completo antes de quitarla de la pieza. 12.No toque la hoja ni la pieza de trabajo inmediatamente después del trabajo; pueden estar extremadamente calientes y podrían quemarle la piel. CAUSAS Y PREVENCIÓN DEL CONTRAGOLPE POR PARTE DEL USUARIO: El CONTRAGOLPE es una reacción repentina de una hoja de sierra mordida, atascada o mal alineada, provocando que una sierra fuera de control se levante y salga de la pieza de trabajo. Manual de Instrucciones y Lista de Piezas Información General de Seguridad sobre Herramientas Eléctricas (contuación) 3. No use vestimenta suelta, bufandas o corbatas en el área de trabajo. Las prendas sueltas pueden quedar atrapadas en las partes móviles y provocar graves lesiones personales. 4. No use alhajas al manejar herramientas. Las alhajas pueden quedar atrapadas en las partes móviles y provocar graves lesiones personales. 5. Utilice siempre los accesorios diseñados para ser usados con esta herramienta. No utilice accesorios dañados ni desgastados. 6. Nunca accione la herramienta si no está aplicada a un objeto de trabajo. Los accesorios deben colocarse en forma segura. Los accesorios sueltos pueden causar lesiones graves. 7. Nunca apunte una herramienta hacia usted ni hacia otra persona. Pueden ocurrir lesiones graves. 8. Utilice presión firme y pareja al usar la herramienta. No la fuerce. Demasiada presión puede provocar que la hoja se quiebre o se recaliente. 9. Mantenga todas las tuercas, pernos y tornillos ajustados y asegúrese de que el equipo esté en condiciones de trabajo seguras. 10. No acerque las manos a las piezas móviles ni las coloque debajo de ellas. SEGURIDAD EN EL ÁREA DE TRABAJO Mantenga el área de trabajo limpia y bien iluminada. Las áreas desordenadas u obscuras propician los accidentes. No haga funcionar la herramienta eléctrica en entornos explosivos, como por ejemplo cuando haya polvo, líquidos o gases inflamables. Las herramientas eléctricas hacen chispas que pueden encender los vapores o el polvo. Mantenga alejados a los observadores y niños mientras hace funcionar una herramienta eléctrica. Las distracciones pueden hacerle perder el control. DG460300CK SEGURIDAD ELÉCTRICA Los enchufes de la herramienta eléctrica deben coincidir con el tomacorriente. Nunca modifique el enchufe de ninguna manera. No use enchufes adaptadores con herramientas eléctricas conectadas a tierra (aterradas). Los enchufes no modificados y los tomacorrientes correspondientes reducirán el riesgo de choque eléctrico. Evite el contacto corporal con las superficies conectadas a tierra, tales como tuberías, radiadores, cocinas y refrigeradores. Existe un mayor riesgo de choque eléctrico si su cuerpo está conectado a tierra. No exponga las herramientas a motor a la lluvia ni a superficies mojadas. Si entra agua dentro de una herramienta a motor, el riesgo de choque eléctrico aumenta. Trate el cable con cuidado. No utilice nunca el cable para llevar, halar o desenchufar la herramienta eléctrica. Mantenga el cable alejado del calor, aceite, bordes filosos o piezas móviles. Los cables dañados o enredados aumentan el riesgo de choque eléctrico. Cuando acciona una herramienta eléctrica en exteriores, use un cable de extensión apto para el uso en exteriores. El uso de un cable apto para exteriores reduce el riesgo de choque eléctrico. Si no es posible evitar el uso una herramienta eléctrica en un lugar de mucha humedad, use un suministro de energía protegido de corrientes residuales (GFCI – con interruptor de descarga a tierra). El uso de un interruptor de circuito con descarga a tierra (GFCI) reduce el riesgo de choque eléctrico. Las herramientas doblemente aisladas están equipadas con un enchufe polarizado (un borne del enchufe es más ancho que el otro). Este enchufe calzará en un solo sentido en un tomacorriente polarizado. Si el enchufe no calza completamente en el tomacorriente, dé vuelta el enchufe y vuelva a introducirlo. 1. Asegúrese de que el cable esté ubicado de tal manera que nadie lo pise ni se tropiece con él, y que no esté sujeto de alguna otra manera a algún daño o tensión. 2. No use un cable de extensión a menos que sea absolutamente necesario. El uso de un cable de extensión inadecuado puede resultar en un riesgo de incendio y choque eléctrico. Si se debe usar un cable de extensión, asegúrese de lo siguiente: • Que las clavijas del enchufe del cable de extensión tengan el mismo número, tamaño y forma que las del enchufe. • Que el cable de extensión esté correctamente cableado y en buenas condiciones eléctricas. • Si el cable de extensión va a usarse en exteriores debe estar marcado con el sufijo “W-A” o “W” después de la designación del tipo de cable para indicar que es apto para usarse en exteriores. Por ejemplo: SJTW-A 3. No la exponga a la lluvia, nieve o heladas. Si entra agua dentro de una herramienta a motor, el riesgo de choque eléctrico aumenta. SEGURIDAD PERSONAL Manténgase alerta, preste atención a lo que hace y use su sentido común cuando maneje cualquier herramienta eléctrica. No use una herramienta eléctrica si está cansado o bajo la influencia de drogas, alcohol o medicamentos. Un momento de distracción mientras maneja cualquier herramienta a motor puede dar como resultado graves lesiones personales. Use equipo de protección personal. Siempre use protección para los ojos. El equipo de protección como máscara para polvo, calzado de seguridad antideslizante, casco o protección para los oídos, usado en las condiciones adecuadas, reduce el riesgo de lesiones personales. Evite que se encienda accidentalmente. Verifique que el interruptor se encuentre en la posición de apagado (off) antes de conectar el suministro de energía y/o la batería, recoger o transportar la herramienta. Transportar una herramienta eléctrica con el dedo sobre el interruptor o suministrar corriente a herramientas con el interruptor en posición de encendido (on) favorece la ocurrencia de accidentes. Retire toda llave de ajuste u otro tipo de llave antes de encender la herramienta eléctrica. Una llave o llave de ajuste que quede sujetada a una parte rotatoria de la herramienta eléctrica puede causar lesiones personales. For Replacement Parts or Technical Assistance, call 1-800-424-8936 or visit our website: www.chpower.com Replacement Parts List Description Part Number Qty Saw Blade Dust Port 3mm Allen Wrench Blade set screws (2) DG025800AV DG028100AV DG026100AV DG029000AV 1 1 1 2 Please provide following information: - Model number - Serial number (if any) - Part description and number as shown in parts list Address any correspondence to: Campbell Hausfeld Attn: Customer Service 100 Production Drive Harrison, OH 45030 U.S.A. Limited Warranty 1. DURATION: From the date of purchase by the original purchaser as follows: one year. 2. WHO GIVES THIS WARRANTY (WARRANTOR): Campbell Hausfeld / Scott Fetzer Company, 100 Production Drive, Harrison, Ohio, 45030, Telephone: (800) 424-8936. 3. WHO RECEIVES THIS WARRANTY (PURCHASER): The original purchaser (other than for purposes of resale) of the Campbell Hausfeld product. 4. WHAT PRODUCTS ARE COVERED BY THIS WARRANTY: Any Campbell Hausfeld power tool supplied or manufactured by Warrantor. 5. WHAT IS COVERED UNDER THIS WARRANTY: Substantial defects in material and workmanship which occur within the duration of the warranty period. 6. WHAT IS NOT COVERED UNDER THIS WARRANTY: A. Implied warranties, including those of merchantability and FITNESS FOR A PARTICULAR PURPOSE ARE LIMITED FROM THE DATE OF ORIGINAL PURCHASE AS STATED IN THE DURATION. If this product is used for commercial, industrial or rental purposes, no warranty applies. Some States do not allow limitation on how long an implied warranty lasts, so the above limitations may not apply to you. B. ANY INCIDENTAL, INDIRECT, OR CONSEQUENTIAL LOSS, DAMAGE, OR EXPENSE THAT MAY RESULT FROM ANY DEFECT, FAILURE, OR MALFUNCTION OF THE CAMPBELL HAUSFELD PRODUCT. Some States do not allow the exclusion or limitation of incidental or consequential damages, so the above limitation or exclusion may not apply to you. C. Any failure that results from an accident, purchaser’s abuse, neglect or failure to operate products in accordance with instructions provided in the owner’s manual(s) supplied with product. Accident, purchaser’s abuse, neglect or failure to operate products in accordance with instructions shall also include the removal or alteration of any safety devices. If such safety devices are removed or altered, this warranty is void. D. Normal adjustments which are explained in the owner’s manual(s) provided with the product. 7. RESPONSIBILITIES OF WARRANTOR UNDER THIS WARRANTY: Repair or replace, at Warrantor’s option, products or components which are defective, have malfunctioned and/or failed to conform within duration of the warranty period. 8. RESPONSIBILITIES OF PURCHASER UNDER THIS WARRANTY: A. Provide dated proof of purchase and maintenance records. B. Call Campbell Hausfeld (800-424-8936) to obtain your warranty service options. Freight costs must be borne by the purchaser. C. Use reasonable care in the operation and maintenance of the products as described in the owner’s manual(s). This Limited Warranty applies in the United States, Canada and Mexico only and gives you specific legal rights. You may also have other rights which vary from state to state or country to country. www.chpower.com 18 Sp 7 Voir la Garantie à la page 16 pour de l’information importante sur l’utilisation commercial de ce produit. ® Instructions d’Utilisation et Manual de Pièces DG460300CK S S’il vous plaît lire et conserver ces instructions. Lire attentivement avant de monter, installer, utiliser ou de procéder à l’entretien du produit décrit. Se protéger ainsi que les autres en observant toutes les instructions de sécurité, sinon, il y a risque de blessure et/ou dégâts matériels ! Conserver ces instructions comme référence. Ver la Garantía en página 24 para información importante sobre el uso comercial de este producto. Manual de Instrucciones y Lista de Piezas DG460300CKS Sírvase leer y guardar estas instrucciones. Lea con cuidado antes de tratar de armar, instalar, manejar o darle servicio al producto descrito en este manual. Protéjase Ud. y a los demás observando todas las reglas de seguridad. El no seguir las instrucciones podría resultar en heridas y/o daños a su propiedad. Guarde este manual como referencia. Scie sauteuse BUILT TO LAST Description Les scies sauteuses sont des outils polyvalents pouvant couper proprement et exactement une variété de matériaux, y compris le bois, le métal, les plastiques, le carton et le cuir. La scie sauteuse est une machine à coupe curviligne avec une multitude de fonctions permettant d’offrir divers types de coupes. La coupe en plongée est une action unique des scies sauteuses. Elle permet des coupes pour des matériaux commençant au centre de la pièce de travail. Déballage En déballant ce produit, inspecter attentivement pour tout signe de dommage en transit. Directives De Sécurité Ce manuel contient de l’information très importante qui est fournie pour la SÉCURITÉ et pour ÉVITER LES PROBLÈMES D’ÉQUIPEMENT. Rechercher les symboles suivants pour cette information. Danger indique une situation hasardeuse imminente qui RÉSULTERA en perte de vie ou blessures graves. Avertissement indique une situation hasardeuse potentielle qui PEUT résulter en perte de vie ou blessures graves. Attention indique une situation hasardeuse potentielle qui PEUT résulter en blessures. Avis indique l’information importante pour éviter le dommage de l’équipement. BUILT TO LAST Avertissements de sécurité généraux pour l’outil Descripción Las sierras verticales son herramientas versátiles capaces de atravesar limpiamente y con precisión una gran variedad de materiales, incluyendo madera, metal, plásticos, cartón y cuero. La sierra vertical es una máquina de corte en curvas con una variedad de características que le permiten obtener varios tipos de corte. El corte por penetración es una característica exclusiva de las sierras verticales. Le permite cortar el material comenzando en medio de la pieza de trabajo. Lire tous les avertissements de sécurité et toutes les instructions. Ne pas suivre les avertissements et instructions peut donner lieu à un choc électrique, un incendie et/ou une blessure sérieuse. Conserver tous les avertissements et toutes les instructions pour pouvoir s'y reporter ultérieurement. Le terme «outil» dans les avertissements fait référence à votre outil électrique alimenté par le secteur (avec cordon d’alimentation) ou votre outil fonctionnant sur batterie (sans cordon d’alimentation). PROPOSITION 65 CALIFORNIE Vous pouvez créer de la poussière en coupant, ponçant, perçant ou meulant les matériaux tels que le bois, la peinture, le métal, le béton, le ciment ou autre maçonnerie. Cette poussière contient souvent des produits chimiques reconnus pour causer le cancer, les déformations congénitales ou autres problèmes de la reproduction. Portez de l’équipement de protection. Ce produit ou son cordon contient des produits chimiques qui de l’avis de l’État de Californie peut causer le cancer et des anomalies congénitales ou autres problèmes de reproduction. Lavez-vous les mains après la manipulation. Les précautions de sécurité suivantes doivent être respectées en tout temps en plus de toute autre règle de sécurité actuelle. 1. Lire attentivement tous les manuels, y compris celui de ce produit. Bien se familiariser avec les commandes et l’utilisation correcte de l’équipement. MANUAL Para desempacar 2. Seules les personnes familières avec ces règles d’utilisation sans danger devraient utiliser la scie. Porter des lunettes de sécurité et une protection des oreilles pendant son fonctionnement. 3. Ne pas porter de vêtements amples, de foulards ou de cravates dans l’aire de travail. Les vêtements amples pourraient se prendre dans les pièces mobiles de l’appareil et mener à de graves blessures. Spécifications Outil Tension 120 V 60 Hz Puissance nominale Vitesse au ralenti tr/min Poids 3,0 A 500 à 3 000 1,7 kg (3,75 lb) Capacités maximum Profondeur de coupe Bois Acier Angles de coupe 5,4 cm (2 1/8 po) 6,4 mm (1/4 po) 0 ± 45° MÉMENTO : Gardez votre preuve datée d’achat à fin de la garantie ! Joignez-la à ce manuel ou classez-la dans un dossier pour plus de sécurité. © 2006 Campbell Hausfeld/Scott Fetzer Sierra vertical 8 Fr Cuando desempaque este producto, inspecciónelo cuidadosamente para detectar cualquier daño que pueda haber ocurrido durante el envío. Informaciones Generales de Seguridad Este manual contiene información que es muy importante que sepa y comprenda. Esta información se la suministramos como medida de SEGURIDAD y para EVITAR PROBLEMAS CON EL EQUIPO. Debe reconocer los siguientes símbolos. Ésto le indica que hay una situación inmediata que LE OCASIONARIA la muerte o heridas de gravedad. Ésto le indica que hay una situación que PODRIA ocasionarle la muerte o heridas de gravedad. Ésto le indica que hay una situación que PODRIA ocasionarle heridas no muy graves. Ésto le indica una información importante, que de no seguirla, le podría ocasionar daños al equipo. Lea todas las advertencias y todas las instrucciones. El no cumplir con las advertencias e instrucciones puede causar un choque eléctrico, incendio y/o lesiones personales graves. Guarde todas las advertencias e instrucciones para referencia futura. La palabra “herramienta eléctrica” en las advertencias se refiere a una herramienta eléctrica accionada por la red eléctrica (por medio de cable) o a una herramienta eléctrica accionada por baterías (sin cable). PROPOSICIÓN DE CALIFORNIA 65 Cuando corta lija, taladra o pule materiales como por ejemplo madera, pintura, metal, hormigón, cemento, u otro tipo de mampostería se puede producir polvo. Con frecuencia este polvo contiene productos químicos que se conocen como causantes de cáncer, defectos congénitos u otros daños reproductivos. Use equipo de protección. Este producto, o su cordón eléctrico, contiene productos químicos conocidos por el estado de California como causantes de cáncer y defectos de nacimiento u otros daños reproductivos. Lave sus manos minuciosamente después de usar. Las siguientes precauciones de seguridad se deben seguir en todo momento junto con cualquier otra norma de seguridad. 1. Lea con cuidado los manuales incluidos con este producto. Familiarícese con los controles y el uso adecuado del equipo. MANUAL 2. Sólo se les debe permitir usar la sierra a aquellas personas bien familiarizadas con estas reglas de manejo seguro. Se deberán usar gafas de seguridad durante la operación. Especificaciones Herramienta Voltaje 120V 60Hz Clasificación de corriente Velocidad sin carga Peso 3,0 A 500 - 3000 rpm 3,75 lbs 1,7 kg Capacidades máximas Profundidad de corte Madera Acero 5,4 cm (2-1/8") 6,4 mm (1/4") 0 ± 45° Ángulos de corte RECORDATORIO: ¡Guarde su comprobante de compra con fecha para fines de la garantía! Adjúntela a este manual o archívela en lugar seguro. © 2006 Campbell Hausfeld/Scott Fetzer IN713102AV 12/06 Información General de Seguridad sobre Herramientas Eléctricas 17 Sp IN713102AV 12/06-
 1
1
-
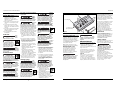 2
2
-
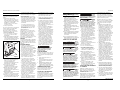 3
3
-
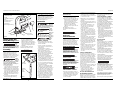 4
4
-
 5
5
-
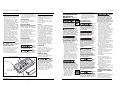 6
6
-
 7
7
-
 8
8
-
 9
9
-
 10
10
-
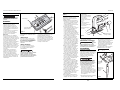 11
11
-
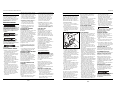 12
12


Campbell Hausfeld DG460300CK S Manual de usuario
- Categoría
- Herramientas eléctricas
- Tipo
- Manual de usuario
- Este manual también es adecuado para
En otros idiomas
Documentos relacionados
-
Campbell Hausfeld Saw DG460500CK Manual de usuario
-
-
-
-
-
-
-
-