Cadet Manufacturing 13170 Guía de instalación
- Categoría
- Calentadores espaciales
- Tipo
- Guía de instalación

When using electrical appliances, basic precautions should always be followed to reduce the
risk of fire, electric shock, and injury to persons, including the following:
Read all instructions before using this heater and thermostat.
All electrical work and materials must comply with the National Electric Code (NEC), the
Occupational Safety and Health Act (OSHA), and all state and local codes.
If you are uncomfortable working with electrical appliances, unable to follow these guidelines,
or do not have the necessary equipment; consult a licensed electrician.
WARNING
Turn the electrical power off at the electrical panel board (circuit breaker or fuse box) and lock
or tag the panel board door to prevent someone from turning on power while you are working on
the heater. Failure to do so could result in serious electrical shock, burns, or possible death.
TEL: 360-693-2505 www.cadetco.com P.O. Box 1675 Vancouver, WA 98668-1675
IMPORTANT INSTRUCTIONS
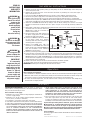
FIGURE 1: Remove Junction Box Cover
Figure 2: Junction Box
Cover Adapter
For EBHA Series
Tools Required: Phillips Screwdriver, Insulated Wire
Connectors (Wire Nuts
®
), Strain Relief Connector
SAVE THESE INSTRUCTIONS
Description
The EBKN end cap thermostat kit is an accessory for
the EBHN Series of hydronic baseboard heaters.
This kit will provide thermostatic control of the heater
in place of a wall mounted thermostat.
Note: The EBKN end cap thermostat is designed to
control only one EBHN heater unit.
If using for an older model EBHA unit, use the
provided alternate junction box cover to adapt.
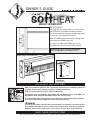
OWNER’S GUIDE
EBKN THERMOSTAT

1. Remove the heater front panel by lifting up and pulling out on the bottom edge of the front panel.
Set the front panel aside.
2. Remove the junction box cover at the left end of the heater by removing the screw (See Figure 1).
Keep screw for future use.
3. If you are installing the EBKN thermostat kit as part of a new installation, proceed to Step 6.
4. Disconnect the power supply wires and remove the wiring strain relief device from the heater.
5. Remove heater from the wall. It is best to replace the thermostat while the heater is not mounted.
6. Remove the existing end cap or EBKN thermostat kit by removing the screw and clip located on the back
of the heater and sliding the end cap away from the heater. Keep screw and clip for future use.
7. Attach the new EBKN thermostat kit by sliding it onto the heater, making sure no wires are caught
between the thermostat and heater. Secure in place using the screw and clip previously removed in
Step 6.
8. Route power supply wires through the wiring knockout hole and secure to heater using the strain relief
connector. If this is a new unit, refer to the
EBHN owner’s guide for instructions on
how to install the heater.
9. Re-attach heater to the wall, making sure
the power supply wires are not pinched
between the wall and the heater.
10. Connect one red wire from the thermostat
to one power supply wire. Connect
remaining red wire from thermostat to
remaining power supply wire.
11. Connect one black wire from the
thermostat to one black wire from the
heater. Connect the remaining black wire
from the thermostat to the remaining
black wire from the heater.
12. Connect ground to grounding pigtail provided in junction box. Note: All wires must be used.
13. Inspect all wire connections to be sure they are fastened securely. Push wiring back into the junction
box and re-attach the junction box cover using screw previously removed. Note: If you are installing the
EBKN Thermostat on an older model EBHA Series, an alternate heater junction box cover is required for
the thermostat to fit properly. Use the provided Junction Box Cover Adapter (Figure 2), to replace the
old junction box cover, and discard.
14. Reattach the heater front panel and turn the thermostat to the lowest position.
15. Restore power at the electrical panel board (circuit breaker or fuse box).
IMPORTANT: All wiring must comply with all local electrical codes.
RED
RED
ELEMENT
TERMINALS
SUPPLY WIRES
EBKN
THERMOSTAT
LIMIT CONTROL
BLACK
BLACK
FACTORY
SPLICE
FOUR
CUSTOMER
WIRE
CONNECTORS
Installation Instructions
READ ALL
INSTRUCTIONS
AND SAFETY
INFORMATION.
WARNING!
Risk of electrical
shock. Turn off all
power at the
electrical panel
board supplying
power to the
heater before
doing any
electrical wiring.
WARNING!
Do not hit or damage
the temperature limit
sensing switch on
this heater.
WARNING!
Do not operate the
heater without the
front cover in place.
IMPORTANT!
It is extremely
important that you
verify the electrical
supply wires are the
same voltage as the
heater (i.e. 120 volt
heater to 120 volt
power supply and
240 volt heater to 240
volt power supply).
©2007 Cadet Manufacturing Co. Printed in U.S.A. Rev. 7/11 #706982
Warranty
LIMITED ONE-YEAR WARRANTY: Cadet will repair or replace any
Cadet product, including thermostats, found to be defective within
one year after the date of purchase.
These warranties do not apply:
1. Damage occurs to the product through improper installation or
incorrect supply voltage;
2. Damage occurs to the product through improper maintenance,
misuse, abuse, accident, or alteration;
3. The product is serviced by anyone other than Cadet.
4. If the date of manufacture of the product cannot be determined;
5. If the product is damaged during shipping through no fault of Cadet.
6. CADET’S WARRANTY IS LIMITED TO REPAIR OR REPLACEMENT
AS SET OUT HEREIN. CADET SHALL NOT BE LIABLE FOR DAMAGES
SUCH AS PROPERTY DAMAGE OR FOR CONSEQUENTIAL
DAMAGES AND/OR INCIDENTAL EXPENSES RESULTING FROM
BREACH OF THESE WRITTEN WARRANTIES OR ANY EXPRESS OR
IMPLIED WARRANTY.
7. IN THE EVENT CADET ELECTS TO REPLACE ANY PART OF YOUR
CADET PRODUCT, THE REPLACEMENT PARTS ARE SUBJECT TO THE
SAME WARRANTIES AS THE PRODUCT. THE INSTALLATION OF
REPLACEMENT PARTS DOES NOT MODIFY OR EXTEND THE UNDERLYING
WARRANTIES. REPLACEMENT OR REPAIR OF ANY CADET PRODUCT
OR PART DOES NOT CREATE ANY NEW WARRANTIES.
8. These warranties give you specific legal rights, and you may also
have other rights which vary from state to state. Cadet neither
assumes, nor authorizes anyone to assume for it, any other obligation
or liability in connection with its products other than as set out herein.
If you believe your Cadet product is defective, please, contact Cadet
Manufacturing Co. at 360-693-2505, during the warranty period, for
instructions on how to have the repair or replacement processed.
Warranty claims made after the warranty period has expired will be
denied. Products returned without authorization will be refused.
Parts and Service
Visit http://support.cadetco.com for information on where to obtain parts
and service.
How to operate your thermostat
1. Once installation is complete and power has been restored, turn the thermostat knob to the highest position.
2. When the room reaches your comfort level, slowly turn the thermostat knob down to a lower setting until
click sound is heard. The heater will automatically cycle around this preset temperature.
3. To reduce the room temperature, turn the knob to a lower setting. To increase the room temperature,
turn the knob to a higher position.
Operation

Al utilizar artefactos eléctricos, siempre se deben adoptar precauciones básicas para reducir el
riesgo de incendios, electrocución y lesiones personales, incluyendo lo siguiente:
Lea todas las instrucciones antes de usar este calentador y termostato.
Todo trabajo y materiales eléctricos deben cumplir con el Código Eléctrico Nacional (“NEC”, por
su sigla en inglés), con la Ley de Seguridad y Salud Ocupacional (“OSHA”, por su sigla en inglés)
y con todos los códigos estatales y locales.
Si no se siente cómodo al trabajar con artefactos eléctricos, no está en condiciones de acatar
estas pautas o no cuenta con los equipos necesarios, solicite los servicios de un técnico
electricista calificado.
¡ADVERTENCIA!
Desconecte la electricidad en el tablero del panel eléctrico (cortacircuito o caja de fusibles) y
trabe o coloque un cartel en la puerta del tablero del panel para evitar que alguien vuelva a
conectar la energía mientras se esté trabajando en el calentador. De lo contrario podrían
producirse graves golpes eléctricos, quemaduras e incluso la muerte.
TEL: 360-693-2505 Fax: 360-694-8668 P.O. Box 1675 Vancouver, WA 98668-1675
INSTRUCCIONES IMPORTANTES
Descripción
El juego de termostato EBKN de tapa extrema es un
accesorio para la serie EBHN de calentadores de zócalo
Softheat hidrónicos. Este juego brinda control termostático
al calentador en lugar de un termostato de montaje mural.
Nota: El termostato de tapa extrema está diseñado para
controlar sólo la unidad calentadora EBKN.
Si utiliza un modelo antiguo de la unidad EBHA, use como
adaptador la tapa de la caja de conexiones alternativa
suministrada.
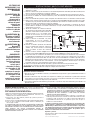
HERRAMIENTAS NECESARIAS:
Destornillador Phillips, conectores de alambre aislados
(Wire Nuts
®
), Conector De Alivio de Tensión
CONSERVE ESTAS INSTRUCCIONES
FIGURA 1:
Retire la cubierta de la
caja de conexiones
FIGURA 2: Adaptador de la
tapa de la caja de empalmes
Para la serie EBHA
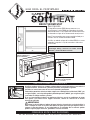
EBKN THERMOSTAT
GUÍA PARA EL PROPIETARIO

Instrucciones para la instalación
1. Retire el panel delantero del calentador levantando y extrayendo el borde inferior del panel. Deje el panel
delantero a un lado.
2. Retire la cubierta de la caja de conexiones en el extremo izquierdo del calentador quitando el tornillo (vea la
figura 1). Conserve el tornillo para usarlo más adelante.
3. Si va a instalar el juego de termostato EBKN como parte de una instalación nueva, proceda con el paso 6.
4. Desconecte los alambres de suministro eléctrico y retire del calentador el dispositivo de alivio de tensión
del cableado.
5. Retire el calentador de la pared. Es mejor reemplazar el termostato mientras el calentador no está montado.
6. Retire la tapa extrema izquierda existente o el juego de termostato EBKN quitando el tornillo y la presilla
situados en la parte posterior del calentador y deslizando la tapa extrema en sentido contrario a este último.
Conserve el tornillo y la presilla para usarlos más adelante.
7. Conecte el nuevo juego de termostato EBKN deslizándolo sobre el calentador, y cerciórese de que no
queden alambres atrapados entre ambos. Afiáncelo en su lugar usando el tornillo y la presilla que retiró
anteriormente en el paso 6.
8. Tienda los alambres de suministro eléctrico
por el orificio del destapadero del cableado y
afiáncelos al calentador usando el conector de
alivio de tensión. Si es una unidad nueva,
consulte las instrucciones en la guía para el
propietario de la unidad EBHN a fin de instalar
el calentador.
9. Vuelva a conectar el calentador a la pared,
cerciorándose de que los alambres de
suministro eléctrico no queden apretados
entre ambos.
10. Conecte un alambre rojo desde el termostato
hasta un alambre del suministro. Conecte el
alambre rojo restante desde el termostato
hasta el alambre restante del suministro
eléctrico.
11. Conecte uno de los alambres negros desde el termostato a uno de los negros proveniente del calentador.
Conecte el otro alambre negro del termostato al otro alambre negro que proviene del calentador.
13. Inspeccione todas las conexiones de alambres para cerciorarse de que estén firmemente seguras. Empuje
el cableado para introducirlo en la caja de conexiones y vuelva a conectar la cubierta de la caja usando el
tornillo que retiró anteriormente. Nota: Si ha de instalar el termostato EBKN en un modelo antiguo de la serie
EBHA (con fecha de fabricación anterior a 7/11), se requerirá una tapa alternativa para la caja de conexiones
de modo que el termostato calce correctamente. Use la tapa adaptadora suministrada para la caja de
conexiones (figura 2) a fin de reemplazar la tapa antigua, y elimínela.
14. Vuelva a unir el panel delantero del calentador y gire el termostato hasta la posición más baja.
15. Restablezca la energía en el tablero del panel eléctrico (cortacircuito o caja de fusibles).
IMPORTANTE: Todo el cableado debe cumplir los códigos eléctricos locales.
LEA TODAS LAS
INSTRUCCIONES Y LA
INFORMACIÓN DE
SEGURIDAD
¡ADVERTENCIA!
Riesgo de
electrocución.
Apague toda la
electricidad en el
tablero del panel
eléctrico que
alimenta el
calentador antes de
realizar el cableado
eléctrico.
¡ADVERTENCIA!
No golpee ni dañe el
interruptor limitador
de temperatura en
este calentador.
¡ADVERTENCIA!
No opere el
calentador sin la
cubierta delantera en
su lugar.
¡IMPORTANTE!
Es extremadamente
importante verificar
que los alambres de
suministro eléctrico
sean del mismo
voltaje que el
calentador (es decir,
un calentador de 120
voltios con un
suministro de energía
del mismo voltaje, y
un calentador de 240
voltios con un
suministro de energía
de ese mismo valor).
©2007 Cadet Manufacturing Co. Printed in U.S.A. Rev. 7/11 #706982
Garantía
GARANTÍA LIMITADA DE UN AÑO: Cadet reparará o reemplazará todo
producto Cadet, incluyendo los termostatos, que presente averías en un
plazo de un año a partir de la fecha de compra.
ESTAS GARANTÍAS NO SON PERTINENTES PARA:
1. Daños que sufra el producto por instalación o voltaje de suministro incorrectos;
2. Daños que sufra el producto por mantenimiento incorrecto, uso
indebido, abuso, accidente o alteraciones;
3. Servicio que se le haya dado al producto por parte de personas o
entidades ajenas a Cadet.
4. Casos en que no se pueda determinar la fecha de fabricación del producto;
5. Casos en que el producto resulte dañado durante el embarque por
causas ajenas a Cadet.
6. LA GARANTÍA DE CADET SE LIMITA A LA REPARACIÓN O REEMPLAZO,
TAL COMO SE ESTABLECE EN ESTE DOCUMENTO. CADET NO SE HARÁ
RESPONSABLE POR DAÑOS A LA PROPIEDAD O DAÑOS CONSECUENTES,
COMO TAMPOCO POR GASTOS ACCIDENTALES DEBIDO AL
INCUMPLIMIENTO DE ESTAS GARANTÍAS ESCRITAS O DE CUALQUIER
GARANTÍA EXPRESA O IMPLÍCITA.
Cómo hacer funcionar el termostato
1. Una vez que se haya realizado la instalación y reestablecido la energía eléctrica, gire la perilla del termostato a su
posición más alta.
2. Cuando la habitación haya alcanzado una temperatura cómoda, gire lentamente la perilla del termostato
hacia abajo o a un ajuste inferior hasta que se escuche un chasquido. El calentador se encenderá y apagará
automáticamente según esta temperatura preestablecida.
3. Para reducir la temperatura del ambiente, gire la perilla a un ajuste más bajo. Para aumentarla, gire la perilla a una
posición más alta.
Operación
7. EN CASO DE QUE CADET DECIDA REEMPLAZAR ALGUNA PIEZA DEL
PRODUCTO CADET, LOS REPUESTOS SE REGIRÁN POR LAS MISMAS
GARANTÍAS DEL PRODUCTO. LA INSTALACIÓN DE LOS REPUESTOS NO
MODIFICA NI PROLONGA LAS GARANTÍAS VIGENTES. EL REEMPLAZO O
REPARACIÓN DE TODO PRODUCTO O PIEZA CADET NO ORIGINA
NINGÚN TIPO DE NUEVA GARANTÍA.
8. Estas garantías le otorgan derechos legales específicos y es posible que
usted tenga otros derechos que varíen de un estado a otro. Cadet no asume
ni autoriza a nadie que lo haga en su nombre, ninguna otra obligación o
responsabilidad en relación con sus productos que no sean las que se
establecen en este documento.
Si durante el período de garantía usted considera que su producto Cadet
presenta defectos, comuníquese con Cadet Manufacturing Co. llamando al
360-693-2505 para obtener instrucciones sobre cómo tramitar la reparación
o el reemplazo del producto. Los reclamos de garantía presentados después
de la finalización del período no serán acogidos. Los productos que se
devuelvan sin autorización serán rechazados.
Repuestos y servicio
En http://support.cadetco.com encontrará información sobre dónde obtener
repuestos y servicio.
RED
RED
ELEMENT
TERMINALS
SUPPLY WIRES
EBKN
THERMOSTAT
LIMIT CONTROL
BLACK
BLACK
FACTORY
SPLICE
FOUR
CUSTOMER
WIRE
CONNECTORS
-
 1
1
-
 2
2
-
 3
3
-
 4
4


Cadet Manufacturing 13170 Guía de instalación
- Categoría
- Calentadores espaciales
- Tipo
- Guía de instalación