LEDWORKS Twinkly strings Series Manual de usuario
- Tipo
- Manual de usuario

strings
instructions guide | guide d’instructions | guía de instrucciones | handleiding |
guida alle istruzioni | betriebsanleitung
fo r in do or a nd o ut do or u se | p er u so i nt er no e d es te rn o | po ur u sa ge i nt ér ie ur e t e xté r i e u r |
f ür d en i nn en - un d au ss en be re ic h | pa ra u so e n in te ri or es y a l ai re l ib re | v o or b i n n e n - e n b u i t e n g e b r u i k

EN
Read and follow all safety instructions.
1. Read and follow all instructions on the product or provided with the
product.
2. Do not use an extension cable. Do not install the product within 3 metres
of a swimming pool. Do not use in a bathroom.
3. Refer to the NFPA 70 National Electrical Code for installation of wiring and
clearances from power and lighting conductors.
4. Installation work and electrical wiring must be done by qualied person(s)
in accordance with all applicable codes and standards, including re
regulations.
DE
Lesen und befolgen Sie alle Sicherheitshinweise.
1. Lesen und befolgen Sie alle Anweisungen, die sich auf dem Produkt be-
nden oder mit dem Produkt geliefert werden.
2. Verwenden Sie kein Verlängerungskabel, installieren Sie das Gerät in
mindestens 3 m Abstand zu Schwimmbädern und nicht in Badezimmern.
3. Wir verweisen auf den National Electrical Code, NFPA 70, speziell für die
Installation von Kabeln und die Abstände von Netz- und Beleuchtung-
sleitern.
4. Installationsarbeiten und elektrische Verdrahtung müssen von Fachper-
sonal gemäß den anwendbaren Vorschriften und Normen durchgeführt
werden, einschließlich der Brandschutzbestimmungen.
IT
Leggi e segui tutte le istruzioni di sicurezza.
1. Leggere e seguire tutte le istruzioni che si trovano sul prodotto o fornite
con il prodotto.
2. Non utilizzare una prolunga,non installare il dispositivo a meno di 3 metri
da una piscina, non usare in bagno.
3. Fare riferimento al National Electrical Code, NFPA 70, specicamente per
l’installazione di cablaggi e distanze dai conduttori di alimentazione e di
illuminazione.
4. I lavori di installazione e il cablaggio elettrico devono essere eseguiti da
personale qualicato in conformità con tutti i codici e le norme applicabili,
compresa la costruzione antincendio.
ES
Lea y siga todas las instrucciones de seguridad.
1. Lea y respete todas las instrucciones que se encuentran en el producto
o entregadas con el producto.
2. No utilice un cable alargador, no instale el dispositivo a menos de 3 met-
ros de distancia de una piscina, no lo utilice en el baño.
3. Consulte el Código Eléctrico Nacional, NFPA 70, en lo especíco para la
instalación de cableado y distancias entre los conductores de alimentac-
ión e iluminación.
4. Los trabajos de instalación y conexión eléctrica deben ser realizados por
personal cualicado respetando todos los códigos y normas aplicables,
incluidas las normas de lucha contra incendio.

2
FR
Lisez et suivez toutes les instructions de sécurité.
1. Lisez et suivez toutes les instructions qui gurent sur le produit ou qui
sont fournies avec le produit.
2. N’utilisez pas de rallonge, n’installez pas l’appareil à moins de 3 mètres
d’une piscine, ne l’utilisez pas dans une salle de bain.
3. Consultez le code national de l’électricité, NFPA 70, en particulier pour
l’installation de câblage et les distances à respecter par rapport aux con-
ducteurs d’alimentation et d’éclairage.
4. Les travaux d’installation et le câblage électrique doivent être eectués
par des personnes qualiées, conformément à tous les règlements et
normes en vigueur, y compris ceux qui concernent la construction ré-
sistant au feu.
NL
Lees en volg alle veiligheidsinstructies op..
1. Lees en volg alle instructies op die op het product staan of die bij
het product worden geleverd.
2. Geen verlengsnoer gebruiken, de apparatuur niet binnen een straal
van 3 meter van een zwembad installeren, niet gebruiken in een
badkamer.
3. Raadpleeg de National Electrical Code, NFPA 70, met name voor de
installatie van bedrading en afstanden tot stroom- en lichtgeleiders.
4. Installatiewerkzaamheden en elektrische bedrading moeten
worden uitgevoerd door gekwaliceerd personeel in overeenstem-
ming met alle van toepassing zijnde regels en normen, inclusief de
regelgeving inzake brandbestrijding.

attention
attenzione / attention / beachtung / atención / aandacht

4
EN
Class A Disclaimer: This equipment has been tested and found to comply with
the limits for a Class A digital device, pursuant to Part 15 of the FCC Rules. These
limits are designed to provide reasonable protection against harmful interference
in a residential installation. This equipment generates, uses and can radiate
radio frequency energy and, if not installed and used in accordance with the
instructions, may cause harmful interference to radio communications. However,
there is no guarantee that interference will not occur in a particular installation. If
this equipment does cause harmful interference to radio or television reception,
which can be determined by turning the equipment o and on, the user is
encouraged to try to correct the interference by one or more of the following
measures:
• Reorient or relocate the receiving antenna.
• Increase the separation between the equipment and receiver.
• Connect the equipment into an outlet on a circuit dierent from that to which
the receiver is connected.
• Consult the dealer or an experienced radio/television technician for help.
ATTENZIONE!
Non collegare l’illuminazione alla corrente elettrica quando è ancora nella
confezione. Il cavo di collegamento non può essere riparato o sostituito.
LA LAMPADINA NON È SOSTITUIBILE. Non collegare elettricamente questa
illuminazione a dispositivi di un altro produttore. ATTENZIONE! Pericolo di
strangolamento. Tenere fuori dalla portata dei bambini.
WARNING!
Do not connect the light string to the power supply while it is in the packaging.
The connecting cable cannot be repaired or replaced. NON-REPLACEABLE
BULBS. Do not connect this light string electrically to devices from another man-
ufacturer. CAUTION! Strangulation hazard. Keep out of reach of young children.
Requisito del sistema
I requisiti minimi di sistema per i telefoni cellulari sono iOS 11 e Android
5 Controlla l’app store per l’ultimo aggiornamento per garantire le migliori
prestazioni.
Speciche Tecniche
Alimentazione: vedi etichetta
Protezione IP: IP44
System Requirement
The minimum system requirement for mobile phones are iOS 11 and Android 5
Check the app store for the latest update to ensure best performance.
Technical Specications
Power supply: see label
IP protection: IP44
Il simbolo del bidone della spazzatura barrato indica che l’articolo deve
essere smaltito separatamente dai riuti domestici. L’articolo deve essere
consegnato per il riciclaggio in conformità con le normative ambientali locali
per lo smaltimento dei riuti.
TThe crossed-out wheeled bin symbol indicates that the item should be
disposed of separately from household waste. The item should be handed in for
recycling in accordance with local environmental regulations for waste disposal.
Dichiarazione di non responsabilità di classe A: questa apparecchiatura è
stata testata e trovata conforme ai limiti per un dispositivo digitale di Classe
A, in conformità alla Parte 15 delle Norme FCC. Questi limiti sono progettati
per fornire una protezione ragionevole contro interferenze dannose in
un’installazione residenziale. Questa apparecchiatura genera utilizzi e può
irradiare energia in radiofrequenza e, se non installata e utilizzata secondo
le istruzioni, può causare interferenze dannose alle comunicazioni radio.
Tuttavia, non vi è alcuna garanzia che non si verichino interferenze in una
particolare installazione. Se questa apparecchiatura causa interferenze
dannose alla ricezione radio o televisiva, che possono essere determinate
spegnendo e riaccendendo l’apparecchio, l’utente è incoraggiato a provare a
correggere l’interferenza adottando una o più delle seguenti misure:
• Riorientare o riposizionare l’antenna ricevente.
• Aumentare la separazione tra l’apparecchiatura e il ricevitore.
• Collegare l’apparecchiatura a una presa su un circuito diverso da quello a
cui è collegato il ricevitore.
• Consultare il rivenditore o un tecnico radiotelevisivo esperto per assistenza.
rev.05
IT

DEFR
ACHTUNG!
Schließen Sie die Beleuchtung nicht an, solange sie noch in der Verpackung ist. Das
Anschlusskabel kann nicht repariert oder ersetzt werden. DIE LAMPEN SIND NICHT
ERSETZBAR. Schließen Sie diese Beleuchtung nicht an Geräte anderer Hersteller an.
WARNUNG! Strangulierungsrisiko. Nicht in Reichweite von Kindern aufbewahren.
AVERTISSEMENT!
Ne branchez pas l’appareil à la prise quand il est encore dans l’emballage. Le câble de
connexion ne peut pas être remplacé ni réparé. LES AMPOULES NE PEUVENT PAS ÊTRE
REMPLACÉES. Ne connectez pas cet appareil à un produit d’un autre fabricant. ATTEN-
TION! Danger d’étranglement. Tenez hors de portée des enfants
System Anforderungen
Die minimalen Systemvoraussetzungen für Mobiltelefone sind iOS 11 oder Android
5 Suchen Sie im App Store nach dem neuesten Update, um die beste Leistung
sicherzustellen.
Technische Daten
Stromversorgung: siehe Etikett
IP-Schutz: IP44
Conguration requise
La conguration minimale requise pour les smartphones est iOS 11 et Android 5
Recherchez sur l’App Store la dernière mise à jour pour optimiser les performances.
Technical Specications
Alimentation: voir l’étiquette
Protection IP: IP44
Das Symbol der durchgestrichener Mülltonne weist darauf hin, dass das
Produkt nicht mit dem normalen Hausmüll entsorgt werden darf. Das Produkt muss
gemäß den örtlichen Abfallbestimmungen entsorgt werden.
Le symbole de la poubelle barrée indique que l’article doit être éliminé séparé-
ment des ordures ménagères. L’article doit être déposé pour le recyclage conformé-
ment aux réglementations environnementales locales pour l’élimination des déchets.
Haftungsausschluss der Klasse A: Dieses Gerät wurde getestet und als konform
zu den Grenzwerten für digitale Geräte der Klasse A gemäß Teil 15 der FCC-
Bestimmungen befunden. Diese Grenzwerte bieten einen angemessenen Schutz
gegen Funkstörungen in Wohninstallationen. Dieses Gerät erzeugt, verbraucht und
kann Hochfrequenzenergie ausstrahlen. Falls es nicht gemäß den Anweisungen
installiert und verwendet wird, kann es Störungen der Funkkommunikation
verursachen. Es kann jedoch nicht garantiert werden, dass bei bestimmten
Installationen keine Störungen auftreten. Wenn dieses Gerät Funkstörungen beim
Radio- oder Fernsehempfang verursacht, was Sie durch Aus- und Einschalten des
Geräts feststellen können, sollten Sie versuchen, diese Funkstörungen mit einer oder
mehrerer der folgenden Maßnahmen zu beheben:
• Richten Sie die Empfangsantenne neu aus.
• Vergrößern Sie den Abstand zwischen Gerät und Empfänger.
• Schließen Sie das Gerät und den Empfänger an Steckdosen mit verschiedenem
Stromkreis an.
• Wenden Sie sich an den Händler oder einen erfahrenen Radio- / Fernsehtechniker.
Clause de non-responsabilité de classe A: cet appareil a été testé et déclaré
conforme aux limites imposées aux appareils numériques de classe A, conformément
à la section 15 des normes FCC. Ces limites sont conçues pour fournir une protection
raisonnable contre les interférences nuisibles dans une installation résidentielle. Cet
appareil génère, utilise et peut émettre de l’énergie de fréquence radio et, s’il n’est
pas installé et utilisé conformément aux instructions, il peut causer des interférences
nuisibles aux communications radio. Cependant, rien ne garantit que des interférences
ne se produiront pas dans une installation particulière. Si cet appareil provoque des
interférences nuisibles avec la réception de radio ou de télévision, qui peuvent se
vérier en éteignant et en rallumant l’appareil, l’utilisateur est invité à tenter de corriger
l’interférence en appliquant l’une ou plusieurs des mesures suivantes:
• Réorientez ou déplacez l’antenne de réception.
• Augmentez la distance entre l’appareil et le récepteur.
• Branchez l’appareil sur une prise d’un circuit diérent de celui auquel le récepteur
est connecté.
• Consultez le revendeur ou un technicien expérimenté en radio/télévision pour
obtenir de l’aide.

6
NLES
OPGELET!
Sluit de verlichting niet aan op de elektrische stroom wanneer deze zich nog in de
verpakking bevindt. De verbindingskabel kan niet worden gerepareerd of vervan-
gen. DE LAMPJES KUNNEN NIET WORDEN VERVANGEN. Sluit deze verlichting niet
elektrisch aan op apparaten van een andere fabrikant. OPGELET! Wurgingsgevaar.
Buiten het bereik van kinderen houden.
¡ADVERTENCIA!
No conecte la iluminación a la fuente de alimentación eléctrica mientras está en el
embalaje. El cable de conexión no puede ser reparado o reemplazado. BOMBILLAS NO
REEMPLAZABLES. No conecte esta guirnalda de luces eléctricamente a los dispositivos
de otro fabricante. ¡ATENCIÓN! Peligro de estrangulamiento. Manténgase fuera del
alcance de los niños.
Systeemvereisten
De minimale systeemvereisten voor mobiele telefoons zijn iOS 11 en Android 5 Kijk
in de app store voor de laatste update om zeker te zijn van de beste prestaties.
Technische specicaties
Voeding: zie label
IP-bescherming: IP44
Requisitos del sistema
Los requisitos mínimos del sistema para teléfonos móviles son iOS 11 y Android 5
Consulte en la tienda de aplicaciones la última actualización para garantizar el mejor
rendimiento.
Especicaciones técnicas
Alimentación: ver etiqueta
Protección IP: IP44
Het symbool van een doorkruiste afvalcontainer geeft aan dat het artikel apart
verwijderd dient te worden van het huisafval. Het artikel dient te worden ingeleverd
voor recycling in overeenstemming met de plaatselijke milieuvoorschriften voor af-
valverwerking.
El símbolo del contenedor con ruedas tachado indica que el artículo no debe
eliminarse con la basura doméstica. El artículo debe ser entregado para su reciclaje de
acuerdo con las normativas ambientales locales para la eliminación de residuos.
Klasse A-disclaimer: deze apparatuur is getest en in overeenstemming bevonden
met de limieten van een digitaal apparaat uit klasse A, conform deel 15 van de
FCC-voorschriften. Deze beperkingen zijn opgesteld om een redelijke bescherming
te bieden tegen schadelijke storingen in een woonomgeving. Deze apparatuur
genereert en maakt gebruik van radiofrequente straling en kan deze afgeven. Indien
deze apparatuur niet volgens de instructies wordt geïnstalleerd en gebruikt, kan deze
schadelijke storing van radiocommunicatie veroorzaken. Er is echter geen garantie
dat in bepaalde situaties geen storing zal optreden. Als deze apparatuur schadelijke
storing in radio- of televisieontvangst veroorzaakt, wat kan worden vastgesteld door
de apparatuur in en uit te schakelen, kan de gebruiker proberen deze storing op één
of meer van de volgende manieren op te heen:
• De ontvangstantenne verplaatsen of anders richten.
• De afstand tussen de apparatuur en de ontvanger vergroten.
• De apparatuur aansluiten op een ander stopcontact in een ander circuit dan dat
waarop de ontvanger is aangesloten.
• Raadpleeg voor hulp de dealer of een ervaren radio- en televisiemonteur.
Descargo de responsabilidad Clase A: este equipo ha sido probado y cumple con los
límites establecidos para un dispositivo digital de Clase A, de conformidad con la sección
15 de las Normas de la FCC. Estos límites están diseñados para ofrecer una protección
adecuada contra interferencias nocivas cuando el equipo se utiliza en un entorno
residencial. Este equipo genera, utiliza y puede irradiar energía de radiofrecuencia y,
si no se instala y utiliza de acuerdo con el manual de instrucciones, podría provocar
interferencias perjudiciales para las comunicaciones por radio. Sin embargo, no es
posible garantizar que no se produzcan interferencias en una instalación determinada.
Si este equipo causara interferencias perjudiciales a la recepción de radio o televisión,
que es posible determinar apagándolo y volviéndolo a encender, el usuario podrá
intentar corregir la interferencia tomando una o varias de las siguientes medidas:
• Reorientar o reubicar la antena receptora.
• Aumentar la separación entre el equipo y el receptor.
• Conectar el equipo a una toma de corriente en un circuito diferente al que está
conectado el receptor.
• Consultar al distribuidor o a un técnico experto en radio/televisión para obtener
ayuda.

configuration physique / configuración física / fysieke opstelling /
installazione fisica / physikalische einrichtungsetup
1. 2.
physical setup
1. Decora il tuo albero con Twinkly Strings. Per
facilitare l’installazione delle luci parti dal centro
del tuo albero e disponile a spirale, verso l’alto e
verso il basso.
2. Collega la treccia all’alimentatore.
3. Attacca l’alimentatore ad una presa di corrente, le
luci si accendono.
IT
1. Décorez votre arbre avec Twinkly Strings. Pour
faciliter l’installation des guirlandes, commencez
toujours par le milieu de l’arbre et disposez-les en
spirale vers le haut et vers le bas.
2. Connectez la guirlande Twinkly à l’adaptateur
d’alimentation.
3. Branchez l’adaptateur dans une prise secteur, les
lumières s’allument.
FR
1. Decorate your tree with Twinkly Strings. Arrange
as a spiral for best results. Always start from the
middle of the tree to top and bottom.
2. onnect the Twinkly String to the power adapter.
3. Plug the power adapter into a power socket and
the lights will switch on.
EN

8
3.
1. Decore su árbol con Twinkly Strings. Para facilitar
la instalación de las luces, es recomendable
comenzar desde el centro del árbol y proseguir en
espiral, hacia arriba y hacia abajo.
2. Conecte cable trenzado al adaptador alimentador
de corriente.
3. Enchufe el adaptador alimentador en una toma de
corriente, las luces se encienden.
ES NL
1. Versier uw boom met Twinkly Strings. Om de
installatie van de lichtjes te vergemakkelijken,
begint u vanuit het midden van de boom en
brengt u ze in spiraalvorm naar boven en
naar beneden toe aan.
2. Verbind het snoer met de voedingsadapter.
3. Sluit de voedingsadapter aan op een stopcon-
tact en de lichtjes gaan branden.
1. Schmücken Sie Ihren Baum mit Twinkly Strings.
Verlegen Sie die Beleuchtung spiralförmig und
beginnen Sie dabei immer von der Mitte des
Baums nach oben und unten.
2. Verbinden Sie Twinkly mit dem Netzteil.
3. Schließen Sie das Netzteil an eine Steckdose an,
und schon schaltet sich die Beleuchtung ein.
DE

controllore / manette / regler / controlador / controleurcontroller
EN
• CONTINUOUS GREEN: AP mode, connected
• FLASHING GREEN: AP mode, no device connected
• CONTINUOUS BLUE: Wi-Fi mode, connected
• FLASHING BLUE: Wi-Fi mode, connection in progress
• FLASHING RED: Wi-Fi mode, unable to connect
• CYAN: SETUP MODE (Bluetooth ON)
• YELLOW: Firmware Update in progress
• CONTINUOUS RED: General error
• FLASHING WHITE: Reset procedure in progress
• VERT FIXE: mode Access Point, connecté
• VERT CLIGNOTANT: mode Access Point, aucun appareil connecté
• BLEU FONCÉ FIXE: Mode Wi-Fi, connecté
• BLEU FONCÉ CLIGNOTANT: mode Wi-Fi, connexion en cours
• ROUGE CLIGNOTANT: mode Wi-Fi, impossible de se connecter
• BLEU CLAIR FIXE: mode CONFIGURATION (Bluetooth activé)
• JAUNE FIXE: mise à jour du micrologiciel en cours
• ROUGE FIXE: erreur générale
• BLANC CLIGNOTANT: procédure de réinitialisation en cours
• VERDE FISSO: modalità Access Point - connesso
• VERDE LAMPEGGIANTE: modalità Access Point - nessun dispositivo collegato
• BLU FISSO: modalità WiFi - connesso
• BLU LAMPEGGIANTE: modalità WiFi - connessione in corso
• ROSSO LAMPEGGIANTE: modalità WiFi - impossibile connettersi
• AZZURRO: Modalità SETUP (Bluetooth acceso)
• GIALLO: Aggiornamento Firmware in corso
• ROSSO FISSO: Errore generale
• BIANCO LAMPEGGIANTE: Procedura Reset in corso
• GRÜN ERLEUCHTET: AP-Modus, verbunden
• GRÜN BLINKEND: AP-Modus, kein Gerät verbunden
• BLAU ERLEUCHTET: WLAN-Modus, verbunden
• BLAU BLINKEND: WLAN-Modus, Verbindung wird hergestellt
• ROT BLINKEND: WLAN-Modus, keine Verbindung möglich
• HELLBLAU: SETUP-Modus (Bluetooth EIN)
• GELB: Firmware wird aktualisiert
• ROT ERLEUCHTET: Allgemeiner Fehler
• WEISS BLINKEND: Vorgang wird zurückgesetzt
IT
FR
DE

10
• LUZ VERDE FIJA: modo Access Point, conectado
• LUZ VERDE INTERMITENTE: modo Access Point, no hay ningún dispositivo conectado
• LUZ AZUL FIJA: modo wi, conectado
• LUZ AZUL INTERMITENTE: modo wi, conectándose
• LUZ ROJA INTERMITENTE: modo wi, imposible conectarse
• AZUL: modo de CONFIGURACIÓN (Bluetooth encendido)
• AMARILLO: rmware actualizándose
• LUZ ROJA FIJA: error general
• LUZ BLANCA INTERMITENTE: procedimiento de reinicio en curso
• CONTINU GROEN: Access Point modus - verbonden
• GROEN KNIPPEREN: Access Point modus, geen apparaat aangesloten
• CONTINU BLAUW: wimodus, verbonden
• BLAUW KNIPPEREN: wimodus, bezig met verbinden
• ROOD KNIPPEREN: wimodus, niet in staat om verbinding te maken
• CYAAN: SETUP modus (Bluetooth aan)
• GEEL: Firmware update wordt uitgevoerd
• CONTINU ROOD: algemene fout
• WIT KNIPPEREN: resetprocedure wordt uitgevoerd
ES
NL
BUTTON / PULSANTE / BOUTON /
TASTE / BOTÓN / KNOP
LED INDICATOR / INDICATORE LED /
VOYANT / LED-ANZEIGE / INDICADOR LED
/ LEDLAPJE

téléchargement d’application / descarga de la aplicación / app downloaden /
descargar la aplicación / app downloadenapp download
1.
1. Accedi ad App Store / Google Play Store (o
scansiona il codice QR)
2. Scarica e installa l’applicazione “Twinkly”
3. Assicurati che l’applicazione sia correttamente
installata sul tuo smartphone
IT
1. Allez sur l’AppStore ou Google Play (ou en
scannant le QR code)
2. Téléchargez et installez l’application «Twinkly»
3. Assurez-vous que l’application est installée
correctement sur votre smartphone
FR
1. Go to App Store/Google Play Store (or scan QR
code)
2. Download and install the Twinkly app
3. Ensure that the Twinkly app is correctly installed
on your smartphone
EN

12
3.2.
1. Vaya a App Store / Google Play Store (o escanee
el código QR)
2. Descargue e instale la aplicación “Twinkly”
3. Asegúrese de que la aplicación Twinkly esté
instalada correctamente en su dispositivo móvil
ES NL
1. Ga naar App Store / Google Play (of scan de
QR-code)
2. Download en installeer de “Twinkly” app
3. Zorg ervoor dat de applicatie correct is geïn-
stalleerd op uw smartphone
1. Önen Sie den App Store/Google Play Store
(oder scannen Sie den QR-Code)
2. Laden und installieren Sie die „Twinkly“ App
3. Stellen sie sicher, dass die Twinkly App korrekt
auf Ihrem Smartphone installiert ist
DE
Twinkly

setup twinkly
1. 2.
1. Assicurati che il Bluetooth sul tuo telefono
sia acceso.
2. Avvia l’applicazione Twinkly e seleziona
il controller corrispondente al prodotto
acquistato
3. Premi e mantieni premuto il pulsante del
controller no a quando l’indicatore LED
diventa AZZURRO (circa 5 secondi)
4. Inserisci la password della rete Wi-Fi locale
IT
1. Make sure Bluetooth is turned on
2. Open the Twinkly app and select your
controller
3. Press and hold the controller button until
the LED is CYAN (approx 5 sec)
4. Select your Wi-Fi network and enter your
passwordI
EN
1. Assurez-vous que le Bluetooth est activé sur
votre smartphone.
2. Lancez l’application Twinkly et sélectionnez le
contrôleur correspondant au produit acheté.
3. Appuyez sur le bouton et maintenez-le enfoncé
jusqu’à ce que le voyant devienne BLEU CLAIR.
(environ 5 secondes).
4. Saisissez le mot de passe du Wi-Fi local.
FR
Bluetooth
Bluetooth
Bluetooth
Bluetooth
configurazione twinkly / configuration twinkly / twinkly einrichten /
configurar twinkly / twinkly instellen
Choose your controller
GENERATION I
GENERATION II
If you do not have access to a local Wi-Fi net-
work, connect directly to your smartphone
Wi-Fi by following the instructions in the
“Troubleshooting” section
Se non hai a disposizione una rete Wi-Fi lo-
cale, per collegarti direttamente al Wi-Fi del
tuo smartphone, segui le indicazioni presenti
alla sezione “troubleshooting”
Si vous ne disposez pas de réseau Wi-Fi local,
pour vous connecter directement au Wi-Fi
de votre smartphone, suivez les indications
présentes à la section «dépannage»
Twinkly

14
3. 4.
1. Asegúrese de que el Bluetooth de su
teléfono esté activo.
2. Inicie la aplicación Twinkly y seleccione el
controlador que corresponde al producto
que ha comprado.
3. Mantenga presionado el botón del
controlador hasta que el indicador LED se
ponga AZUL. (aprox. 5 segundos)
4. Introduzca la contraseña de la red wi local.
ES NL
1. Zorg ervoor dat Bluetooth op uw telefoon is
ingeschakeld
2. Start de Twinkly app en selecteer de controller
van het product dat u heeft aangeschaft
3. Houd de knop van de controller ingedrukt tot
het ledlampje CYAAN wordt (ong. 5 seconden)
4. Voer het wachtwoord van het lokale
winetwerk in.
1. Vergewissern Sie sich, dass Bluetooth auf
Ihrem Smartphone aktiviert ist.
2. Starten Sie die Twinkly App und wählen Sie
Ihren Controller aus.
3. Halten Sie die Taste des Controllers solange
gedrückt, bis die LED-Anzeige HELLBLAU
erscheint (ca. 5 s)
4. Geben Sie das lokale WLAN-Passwort ein
DE
Connecting...
Insert your Wi-Fi password
Home Internet
Conguring Twinkly with
xxxxxxxxxx
Congure
Insert your Wi-Fi password
Home Internet
Conguring Twinkly with
xxxxxxxxxx
Congure
5
sec
Falls Sie nicht über ein lokales WLAN-Netzwerk
verfügen, befolgen Sie die Anweisungen im
Abschnitt „Fehlerbehebung“ für die direkte
Verbindung mit dem WLAN Ihres Smartphones
Si no dispone de una red wi local, para conec-
tarse directamente al wi de su dispositivo
móvil, siga las indicaciones de la sección “solu-
ción de problemas”
Als u geen lokaal winetwerk ter beschikking
heeft, volgt u de aanwijzingen uit de rubriek
“troubleshooting” om rechtstreeks verbinding
te maken met de wi van uw smartphone

choose eects
scegli effetti / choisissez les effets / effekte wählen / seleccionar
efectos / effecten kiezen
1. 2.
edit apply
1. Avvia l’applicazione Twinkly e apri Galleria Eetti
2. Seleziona l’eetto desiderato per vedere
l’anteprima in tempo reale sulla tua
installazione
3. Sfoglia gli eetti scorrendo verso sinistra o
verso destra
4. Tocca “Applica” per salvare l’eetto e
riprodurlo continuativamente
IT
1. Lancez l’application Twinkly et ouvrez la galerie d’eets
2. Sélectionnez l’eet désiré pour le voir s’acher à
l’écran en temps réel
3. Parcourir les eets en les faisant déler à gauche
ou à droite
4. Appuyez sur «Appliquer» pour stocker l’eet dans
le contrôleur et pour le reproduire en continu
FR
1. Launch the Twinkly app and open the Eects
Gallery
2. Select the desired eect to see the real-time
preview on your Twinkly set-up
3. Swipe left or right to browse eects
4. Tap “Apply” to store the eect and play
continuously
EN
ra in bo w
sn ow
ve rt ig o
he ar tb ea t
rainbow

16
edit apply
3. 4.
1. Inicie la aplicación y abra la Galería de efectos
2. Seleccione el efecto que le interesa para ver
el efecto que se reproduce inmediatamente
3. Vea los efectos disponibles deslizando hacia
la izquierda o hacia la derecha
4. Toque “Aplicar” para guardar el efecto y
reproducirlo continuamente
ES NL
1. Start de Twinkly app en open de Eectengalerie
2. Selecteer het gewenste eect om onmiddellijk
een preview op uw installatie te zien
3. Blader door de eecten door naar links of
rechts te vegen
4. Klik op “Toepassen” om het eect op te slaan
en continu af te spelen
1. Starten Sie die App und önen Sie die Galerie Eekte
2. Tippen Sie den gewünschten Eekt an, um die
Vorschau an Ihrem Baum in Echtzeit zu sehen
3. Scrollen Sie die Eekte, indem Sie nach links oder
rechts wischen
4. Tippen Sie auf „Anwenden“, um den Eekt zu
speichern und kontinuierlich abzuspielen
DE
rainbow vertigo
edit apply
vertigo

calibrazione / calibrage / mapping / mapeo / kalibratiemapping
1. 2.
Eseguire la Mappatura delle luci sulla tua
installazione permette di accedere ad una
selezione più ampia di eetti
1. Apri Layout e tocca il pulsante “Map Lights”
2. Inquadra il tuo albero da una distanza di 1.5-
2.5m
3. Tocca “Start Mapping” (i LED assumono diversi
colori durante il processo)
4. Completato con successo il processo, torna alla
Galleria Eetti e divertiti con gli eetti calibrati!
IT
Eectuer le calibrage des lumières sur
votre arbre vous permet d’accéder à un
plus grand nombre d’eets
1. Ouvrez le modèle et appuyez sur le bouton
«calibrage»
2. Cadrez l’arbre à une distance d’au moins 1,5-2,5
mètres
3. Appuyez sur le bouton «calibrage» (les leds
prennent des couleurs diérentes au cours du
processus)
4. Une fois le processus terminé avec succès,
retournez dans la galerie d’eets pour utiliser
les eets avancés
FR
Mapping the lights on your tree gives you
access to advanced eects
1. Open Layout and tap the “Map Lights” button
2. Frame the tree from a distance of 1.5-2.5
metres
3. Tap the “Start Mapping” button (LEDs turn dier-
ent RGB colours during the process)
4. Once the process is completed successfully, go
back to the Eect Gallery and enjoy advanced
eects!
EN
m ap pi n g

18
3. 4.
Si realiza un “mapeo” de las luces en su
árbol podrá acceder a una selección más
amplia de efectos
1. Abra el Layout y toque el botón “mapeo”
2. Encuadre el árbol desde una distancia de 1,5-
2,5 metros como mínimo
3. Toque el botón “inciar mapeo” (todos los LED
producen diferentes colores durante el proceso)
4. Una vez que el proceso se completa
correctamente, regrese a la Galería de Efectos y
disfrute de los efectos.
ES NL
Door de lichtjes in uw installatie in
kaart te brengen, krijgt u toegang tot
een bredere selectie eecten
1. Open Layout en klik op “kalibratie”
2. Kadreer de boom van een afstand van
minstens 1,5-2,5 meter
3. Klik op “kalibratie” (de leds branden in ver-
schillende kleuren tijdens het proces)
4. Zodra het proces succesvol is voltooid, gaat
u terug naar de Eectengalerie en kunt u
genieten van gekalibreerde eecten!
Durch das Mapping der Lichter an Ihrem Baum
haben Sie Zugri auf erweiterte Eekte
1. Önen Sie das Layout und tippen Sie auf die Taste
„Mapping“
2. Nehmen Sie den Baum aus mindestens 1,5-2,5
Metern Entfernung auf
3. Tippen Sie auf „Mapping“ (die LEDs leuchten während
des Vorgangs in verschiedenen Farben auf)
4. Kehren Sie nach erfolgreichem Abschluss des
Vorgangs zur Galerie Eekte zurück und genießen Sie
die kalibrierten Eekte!
DE
m ap p i ng
ra inbow
sn ow
ve rtigo
he artbe at
edit appl y
ve rtigo

mapping tips
Note: For best results, avoid reflective surfaces behind
the tree, keep the mobile cam steady during the
process and ensure a moderate ambient light (not
too dark).
Nota: Per risultati ottimali, evita superfici riflettenti
dietro le luci, mantieni ferma la fotocamera durante
il processo, assicurati di avere una luce ambiente
moderata (non troppo scura).
Conseil: Pour de meilleurs résultats, évitez les
surfaces réfléchissantes derrière la guirlande,
gardez la caméra mobile stable pendant le
processus et assurez une lumière ambiante
modérée (pas trop sombre).
Tip: voor het beste resultaat vermijdt u reflecter-
ende oppervlakken achter de lichtjes, houdt u de
fotocamera stil tijdens het proces en zorgt u voor
een gematigd omgevingslicht (niet te donker).
Un consejo: para obtener los mejores resultados, evite
las superficies reflectantes detrás de las luces, man-
tenga estable la cámara del móvil durante el proceso
y asegúrese de tener una luz ambiental moderada (no
demasiado oscura).
Hinweis: Um beste Ergebnisse zu erzielen,
vermeiden Sie reflektierende Oberflächen hinter
dem Baum, halten Sie die Kamera während des
Vorgangs ruhig in der Hand und sorgen Sie für ein
normales Umgebungslicht (nicht zu dunkel).
IT FREN
ES NLDE
consigli per la mappatura / conseils puor le calibrage / mappingtipps /
sugerencias para el mapeo / tips voor het in kaart brengen

20
advanced features
fonctionnalités avancées / características avanzadas
funzionalità avanzate / erweiterte funktionen / geavanceerde functies
For all these features and more, see www.twinkly.com/referenceguide | Per queste funzionalità e altro, consultare www.twinkly.com/referenceguide | Pour toutes
ces fonctionnalités et plus, voir www.twinkly.com/referenceguide | Informationen zu diesen Funktionen nden Sie unter www.twinkly.com/referenceguide | Para
todas estas funciones y más, visite www.twinkly.com/referenceguide | Voor al deze functies en meer, zie www.twinkly.com/referenceguide
Connect to local WiFi.
Connetti al WiFi locale.
Connectez-vous au Wi-Fi local.
Verbinden Sie sich mit dem lokalen WLAN.
Conéctese a la red wi local.
Maak verbinding met lokale wi.
Synchronize with music.
Sincronizza con la musica.
Synchronisez l’appareil avec de la musique.
Synchronisieren Sie die Eekte mit Musik.
Sincronice con la música.
Synchroniseer met muziek.
Control with Smart Home Assistant.
Controllo con Smart Home Assistant.
Contrôlez avec Smart Home Assistant.
Steuerung mit Smart Home Assistent.
Controle con Asistente de Casa Inteligente.
Besturing met Smart Home Assistant.
Group multiple devices together.
Raggruppa più dispositivi insieme.
Regroupez plusieurs appareils ensemble.
Gruppieren Sie mehrere Geräte zusammen.
Agrupe múltiples dispositivos juntos.
Groepeer meerdere apparaten samen.
Download new eects.
Scarica nuovi eetti.
Téléchargez de nouveaux eets.
Laden Sie neue Eekte herunter.
Descargue nuevos efectos.
Download nieuwe eecten.
Create new eects.
Crea nuovi eetti.
Créez de nouveaux eets.
Erstellen Sie neue Eekte.
Cree nuevos efectos.
Creëer nieuwe eecten.

troubleshooting
Q THE LIGHTS DO NOT SWITCH ON
• Check that the power adapter is plugged in and that the controller is correctly
connected to the device
• Check that the LED status indicator on the controller is lit
• Briey press the button on the controller
• If this doesn’t work, unplug the power adapter, wait 30 seconds and plug in
again
Q LE LUCI NON SI ACCENDONO
• Vericare che l’alimentatore sia collegato e che il controller sia connesso
correttamente al dispositivo
• Controllare che l’indicatore di stato a LED sul controller sia acceso
• Premere brevemente il pulsante sul controller
• Se ciò non funziona, scollegare l’alimentazione, attendere 30 secondi e
collegarlo di nuovo
Q THE LED INDICATOR IS CYAN, BUT MY SMARTPHONE CANNOT FIND
TWINKLY
• Unplug the power adapter, wait 30 seconds, plug it in again and repeat
Conguration procedure
• If this does not work, try to Reset (see Reset procedure below)
• If this won’t work, see online reference manual
http://www.twinkly.com/support
Q L’INDICATORE LED È CIANO, MA IL MIO SMARTPHONE NON PUO ‘TRO-
VARE GETTAMENTE
• Scollegare l’alimentatore, attendere 30 secondi, ricollegarlo e ripetere la
procedura di congurazione
• Se questo non funziona, esegui la procedura di Reset (vedi indicazioni Reset)
• Se questo non funziona, consultare il manuale di riferimento online
http://www.twinkly.com/support
Q THE LIGHTS TURNED ON BUT ARE BLOCKED
• Briey press the button on the controller
• If this does not work, unplug the power adapter, wait 30 seconds and plug it
in again
Q LE LUCI SONO ACCESI MA SONO BLOCCATE
• Premere brevemente il pulsante sul controller
• Se questo non funziona, scollegare l’alimentazione, attendere 30 secondi e
collegarlo di nuovo
Q TWINKLY SETUP WAS SUCCESSFUL, BUT THE LIGHTS DON’T RESPOND TO
COMMANDS
• Within the Twinkly application, open “Devices” and tap the circling arrow
symbol (see Rescan procedure below)
• If this does not work, stop the Twinkly application and launch it again
• If this does not work, try to Reset (see Reset procedure below)
• If this does not work, delete the Twinkly application from your smartphone,
then download the latest version from AppStore or Google Play Store
Q HOW CAN I CONNECT TWINKLY WITHOUT LOCAL WI-FI
• Open Wi-Fi settings on your smartphone
• Find and select “Twinkly_XXXXXX network”
• Enter the Wi-Fi password “ Twinkly2019 ” and ensure that the “Twinkly_
XXXXXX” network is connected
Q COME POSSO COLLEGARMI DIRETTAMENTE A TWINKLY SENZA UTILIZZA-
RE UNA RETE WI-FI LOCALE
• Vai alle impostazioni Wi-Fi del tuo smartphone
• Cerca e seleziona la rete “Twinkly_xxxxxx”
• Inserisci la password Wi-Fi “ Twinkly2019 ”, assicurarti che la rete “twin-
kly_xxxxx” sia connessa
Q IL SETUP TWINKY È STATO SUCCESSO, MA LE LUCI NON RISPONDONO AI
COMANDI
• All’interno dell’applicazione Twinkly, apri “Dispositivi” e tocca l’icona “frecce
circolari” (vedi procedura di Ricerca Dispositivi di seguito)
• Se questo non funziona, arresta l’applicazione Twinkly e riavviala
• Se questo non funziona, esegui la procedura di Reset (vedere la procedura di
ripristino di seguito)
• Se questo non funziona, elimina l’applicazione Twinkly dallo smartphone,
quindi scarica la versione più recente da AppStore o Google Play
EN IT
dépannage / solución de problemas / risoluzione dei problemi
fehlerbehebung / probleemoplossen

22
Q COMMENT PUIS-JE ME CONNECTER DIRECTEMENT À TWINKLY SANS
UTILISER UN RÉSEAU WI-FI LOCAL?
• Ouvrez les paramètres Wi-Fi de votre smartphone
• Recherchez et sélectionnez le réseau «Twinkly_XXXXXX»
• nsérez le mot de passe Wi-Fi «Twinkly2019», assurez-vous que le
réseau «Twinkly_XXXXXX» est connecté
Q WIE KANN ICH TWINKLY OHNE LOKALES WLAN VERBINDEN?
• Önen Sie die WLAN-Einstellungen Ihres Smartphones
• Suchen und wählen Sie das Netzwerk „Twinkly_xxxxxx“
• Geben sie das WLAN-Passwort „ Twinkly2019 “ ein und stellen sie sicher, dass das
Netzwerk „Twinkly_xxxxx“ verbunden ist
Q LES LUMIÈRES NE S’ALLUMERONT PAS
• Vériez que l’alimentation est connectée et que le contrôleur est cor-
rectement connecté à l’appareil
• Vériez que le voyant d’état sur le contrôleur est allumé
• Appuyez brièvement sur le bouton du contrôleur
• Si cela ne fonctionne pas, débranchez l’alimentation, attendez 30 sec-
ondes et rebranchez-le.
Q DIE BELEUCHTUNG SCHALTET SICH NICHT EIN
• Stellen Sie sicher, dass das Netzteil angeschlossen und der Controller korrekt mit
dem Gerät verbunden ist
• Stellen Sie sicher, dass die LED-Statusanzeige am Controller leuchtet
• Drücken Sie kurz die Taste am Controller
• Sollte dies nicht funktionieren, trennen Sie das Netzteil, warten Sie 30 Sekunden
und schließen Sie es erneut an
Q LE VOYANT EST BLEU CLAIR, MAIS MON SMARTPHONE NE TROUVE
PAS TWINKLY
• Débranchez l’alimentation, attendez 30 secondes, rebranchez-le et
répétez la procédure de conguration.
• Si cela ne fonctionne pas, essayez de réinitialiser (voir la procédure de
réinitialisation ci-dessous).
• Si cela ne fonctionne pas, consultez le manuel de référence en ligne
http://www.twinkly.com/support
Q DIE LED-ANZEIGE LEUCHTET HELLBLAU, ABER MEIN SMARTPHONE KANN
TWINKLY NICHT FINDEN
• Trennen Sie das Netzteil, warten Sie 30 Sekunden, schließen Sie sie erneut an und
wiederholen Sie den Setup-Vorgang
• Sollte dies nicht funktionieren, versuchen Sie es mit einem Reset (siehe Reset-Ver-
fahren unten).
• Falls dies ebenfalls nicht funktionieren sollte, sehen Sie das Online-Referenzhand-
buch ein http://www.twinkly.com/support
Q LES LUMIÈRES ALLUMÉES MAIS SONT BLOQUÉES
• Appuyez brièvement sur le bouton du contrôleur
• Si cela ne fonctionne pas, débranchez l’alimentation, attendez 30 sec-
ondes et rebranchez-la.
Q DIE BELEUCHTUNG IST EINGESCHALTET, ABER BLOCKIERT
• Drücken Sie kurz die Taste am Controller
• Sollte dies nicht funktionieren, trennen Sie das Netzteil, warten Sie 30 Sekunden und
schließen Sie es erneut an
Q L’INSTALLATION TWINKLY S’EST CONCLUE CORRECTEMENT MAIS
LES LUMIÈRES NE RÉPONDENT PAS AUX COMMANDES
• Dans l’application Twinkly, ouvrez «Appareils» et appuyez sur le symbole
«Flèches circulaires» (voir procédure de recherche des appareils
ci-dessous).
• Si cela ne fonctionne pas, arrêtez l’application Twinkly et relancez-la
• Si cela ne fonctionne pas, essayez de réinitialiser (voir la procédure de
réinitialisation ci-dessous).
• Si cela ne fonctionne pas, supprimez l’application Twinkly de votre
smartphone, puis téléchargez la dernière version à partir de l’AppStore
ou de Google Play.
Q DAS TWINKLY SETUP WAR ERFOLGREICH, ABER DIE BELEUCHTUNG REAGIERT
NICHT AUF DIE STUERBEFEHLE
• Önen Sie „Geräte“ in der Anwendung Twinkly und tippen Sie auf das Symbol „Kreisp-
feile“ (siehe Geräte suchen unten).
• Sollte dies nicht funktionieren, schließen Sie die Twinkly-Anwendung und starten Sie sie
neu
• Sollte dies nicht funktionieren, versuchen Sie es mit einem Reset (siehe Reset-Verfahren
unten).
• Wenn dies nicht funktioniert, löschen Sie die Twinkly-Anwendung von Ihrem Smartphone
und laden Sie dann die neueste Version aus App Store oder Google Play herunter
FR DE

ES NL
Q LAS LUCES NO SE ENCIENDEN
• Compruebe que el adaptador alimentador esté conectado y que el contro-
lador esté conectado correctamente al dispositivo
• Compruebe que el indicador LED de estado en el controlador esté encendido
• Presione brevemente el botón en el controlador
• Si esto no funciona, desenchufe el adaptador alimentador, espere 30 segun-
dos y conéctelo de nuevo
Q DE LICHTJES GAAN NIET BRANDEN
• Controleer of de voedingsadapter is aangesloten en of de controller correct
met het apparaat is verbonden
• Controleer of de led-statusindicator op de controller brandt
• Druk kort op de knop op de controller
• Als dit niet werkt, koppel de voedingsadapter dan los, wacht 30 seconden en
sluit hem opnieuw aan
Q EL INDICADOR LED SE PONE DE COLOR AZUL, PERO MI DISPOSITIVO
MÓVIL NO ENCUENTRA A TWINKLY
• Desenchufe el adaptador alimentador, espere 30 segundos, conéctelo de
nuevo y repita el procedimiento de conguración
• Si esto no funciona, realice el procedimiento de Reinicio (consulte el proced-
imiento de reinicio)
• Si esto no funciona, consulte el manual de referencia en línea
http://www.twinkly.com/support
Q HET LEDLAMPJE IS CYAAN, MAAR MIJN SMARTPHONE KAN TWINKLY NIET
VINDEN
• Koppel de voedingsadapter los, wacht 30 seconden, sluit hem opnieuw aan en
herhaal de instellingsprocedure
• Als dit niet werkt, voer dan de Resetprocedure uit (zie Reset aanwijzingen)
• Als dit niet werkt, raadpleeg dan de referentiehandleiding online
http://www.twinkly.com/support
Q LAS LUCES ESTÁN ENCENDIDAS PERO BLOQUEADAS
• Presione brevemente el botón en el controlador
• Si esto no funciona, desenchufe el adaptador alimentador, espere 30 segundos
y conéctelo de nuevo
Q DE LICHTJES BRANDEN MAAR ZIJN GEBLOKKEERD
• Druk kort op de knop op de controller
• Als dit niet werkt, koppel dan de voedingsadapter los, wacht 30 seconden en
sluit hem opnieuw aan
Q TWINKLY SE CONFIGURÓ CORRECTAMENTE, PERO LAS LUCES NO RE-
SPONDEN A LOS COMANDOS
• Dentro de la aplicación Twinkly, abra “Dispositivos” y toque el símbolo de
“echas circulares” (consulte el procedimiento de Búsqueda de dispositivos a
continuación)
• Si esto no funciona, detenga la aplicación Twinkly y vuelva a iniciarla
• Si esto no funciona, intente realizar un Reinicio (consulte el procedimiento de
reinicio a continuación)
• Si esto no funciona, elimine la aplicación Twinkly de su dispositivo móvil, luego
descargue la última versión desde AppStore o Google Playreinicio a continu-
ación)
Q TWINKLY WERD SUCCESVOL INGESTELD, MAAR DE LICHTJES REAGEREN
NIET OP DE COMMANDO’S
• Open “Apparaten” in de Twinkly app en klik op het pictogram “cirkelpijlen” (zie
procedure Apparaten zoeken hieronder)
• Als dit niet werkt, sluit de Twinkly app dan af en start deze opnieuw
• Als dit niet werkt, voer dan de Reset procedure uit (zie de herstelprocedure
hieronder)
• Als dit niet werkt, verwijdert u de Twinkly app van uw smartphone en downloadt
u de nieuwste versie uit AppStore of Google Play
Q ¿CÓMO PUEDO CONECTARME DIRECTAMENTE A TWINKLY SIN UTILIZAR
UNA RED WIFI LOCAL?
• Abra la conguración wi de su dispositivo móvil
• Busque y seleccione la red “Twinkly_xxxxxx”
• Inserte la contraseña wi “ Twinkly2019 ”, asegúrese de que la red “Twin-
kly_xxxxxx” está conectada.
Q HOE KAN IK RECHTSTREEKS VERBINDING MAKEN MET TWINKLY ZONDER
EEN LOKAAL WIFINETWERK TE GEBRUIKEN
• Ga naar de wi-instellingen van uw smartphone
• Zoek en selecteer het ‘Twinkly_xxxxxx’ netwerk
• Voer het wiwachtwoord ‘ Twinkly2019 ’ in en controleer of er verbinding
wordt gemaakt met het ‘Twinkly_xxxxx’ netwerknetwerk is verbonden

24
ra inbow
sn ow
ve rtigo
he artbeat
devices rescan
ricerca dispositivi / recherche des appareils / geräte suchen / búsqueda de
dispositivos / apparaten zoeken
All’interno dell’applicazione Twinkly, apri “Dispositivi”
e tocca l’icona “frecce circolari”.
Attendi che i dispositivi Twinkly appaiano nella lista
dei dispositivi disponibili.
IT
Desde el menú de la aplicación Twinkly, abra
“Dispositivos” y toque el símbolo “echas circulares”.
Espere a que los dispositivos Twinkly aparezcan en
la lista de dispositivos disponibles.
ES NL
Dans le menu de l’application Twinkly, ouvrez
l’option «Appareils» et appuyez sur le symbole
«èches circulaires». Attendez que les appareils
Twinkly apparaissent dans la liste des appareils
disponibles.
FR
Open “Apparaten” in de Twinkly app en klik op het
pictogram ‘cirkelpijlen’.
Wacht tot de Twinkly apparaten in de lijst met
beschikbare apparaten verschijnen.
Within the menu of Twinkly application, open
“Devices” and tap the circling arrows symbol.
Wait until the Twinkly devices appear in the list of
available devices.
EN
Önen Sie „Geräte“ in der Anwendung Twinkly und
tippen Sie auf das Symbol „Kreispfeile“ .
Warten Sie, bis die Twinkly Geräte in der Liste der
verfügbaren Geräte angezeigt werden.
DE
CREATE GROUP
twinkly_2440E2
Twinkly Found!
175 LED
i
1. 2. 3. 4.
CREATE GROUP
Effects Gallery
Layout
Devices
Settings
Account
Help
Credits

reset / réinitialisation / reset / reinicio / resettenreset twinkly
1. Stacca Twinkly dalla presa di corrente, premi e
continua a mantenere premuto il bottone del
controller
2. Mentre stai ancora premendo il bottone, collega
nuovamente Twinkly alla corrente
3. Mantieni premuto il bottone no a quando i LED
diventano rossi, quindi rilascia il pulsante
IT
1. Débranchez Twinkly puis appuyez sur le bou-
ton du contrôleur et gardez-le enfoncé
2. Tout en maintenant le bouton enfoncé,
rebranchez Twinkly
3. Maintenez le bouton enfoncé jusqu’à ce que
tous les voyants deviennent rouges, puis
relâchez le bouton
FR
1. Unplug Twinkly from the power socket. Press
and hold the controller button
2. While holding the button, plug in Twinkly
3. Keep holding the button until all LEDs turn red,
then release the button
EN
1. 2.

26
1. Desenchufe Twinkly de la toma de corriente,
presione y mantenga presionado el botón del
controlador
2. Mientras todavía sigue presionando el botón,
conecte de nuevo Twinkly a la corriente
3. Mantenga presionado el botón hasta que todos
los LED se pongan rojos, luego suelte el botón
ES NL
1. Haal de stekker van Twinkly uit het stop-
contact en houd de knop van de controller
ingedrukt
2. Steek de stekker van Twinkly terug in het
stopcontact, terwijl u de knop ingedrukt
houdt
3. Houd de knop ingedrukt totdat de leds rood
worden en laat daarna de knop los
1. Ziehen Sie Twinkly aus der Steckdose und halten
Sie die Controller-Taste gedrückt
2. Schließen Sie bei gehaltener Taste Twinkly
wieder an das Stromnetz an
3. Halten Sie die Taste solange gedrückt, bis alle
LEDs rot leuchten, lassen Sie dann die Taste los
DE
3.
RED LIGHT / LUCE ROSSA / LUMIÈRE ROUGE /
ROTES LICHT / LUZ ROJA / ROOD LICHT

LEDWORKS Srl
Via Tortona, 37 - 20144
Milano - Italy
http://twinkly.com/support
mo re i nf o | ul te ri or i in fo rm az io ni | p lu s d’in fo rm at io ns
me hr i nf o | má s in fo rm ac ió n | me er i nf or ma ti e
Transcripción de documentos
strings instructions guide | guide d’instructions | guía de instrucciones guida alle istruzioni | betriebsanleitung for indoor and outdoor use | per uso interno ed esterno für den innen- und aussenbereich | para uso en interiores y al aire libre | | handleiding | pour usage intérieur et extérieur | | voor binnen- en buitengebruik EN Read and follow all safety instructions. 1. Read and follow all instructions on the product or provided with the product. 2. Do not use an extension cable. Do not install the product within 3 metres of a swimming pool. Do not use in a bathroom. 3. Refer to the NFPA 70 National Electrical Code for installation of wiring and clearances from power and lighting conductors. 4. Installation work and electrical wiring must be done by qualified person(s) in accordance with all applicable codes and standards, including fire regulations. IT Leggi e segui tutte le istruzioni di sicurezza. 1. Leggere e seguire tutte le istruzioni che si trovano sul prodotto o fornite con il prodotto. 2. Non utilizzare una prolunga,non installare il dispositivo a meno di 3 metri da una piscina, non usare in bagno. 3. Fare riferimento al National Electrical Code, NFPA 70, specificamente per l’installazione di cablaggi e distanze dai conduttori di alimentazione e di illuminazione. 4. I lavori di installazione e il cablaggio elettrico devono essere eseguiti da personale qualificato in conformità con tutti i codici e le norme applicabili, compresa la costruzione antincendio. DE Lesen und befolgen Sie alle Sicherheitshinweise. 1. Lesen und befolgen Sie alle Anweisungen, die sich auf dem Produkt befinden oder mit dem Produkt geliefert werden. 2. Verwenden Sie kein Verlängerungskabel, installieren Sie das Gerät in mindestens 3 m Abstand zu Schwimmbädern und nicht in Badezimmern. 3. Wir verweisen auf den National Electrical Code, NFPA 70, speziell für die Installation von Kabeln und die Abstände von Netz- und Beleuchtungsleitern. 4. Installationsarbeiten und elektrische Verdrahtung müssen von Fachpersonal gemäß den anwendbaren Vorschriften und Normen durchgeführt werden, einschließlich der Brandschutzbestimmungen. ES Lea y siga todas las instrucciones de seguridad. 1. Lea y respete todas las instrucciones que se encuentran en el producto o entregadas con el producto. 2. No utilice un cable alargador, no instale el dispositivo a menos de 3 metros de distancia de una piscina, no lo utilice en el baño. 3. Consulte el Código Eléctrico Nacional, NFPA 70, en lo específico para la instalación de cableado y distancias entre los conductores de alimentación e iluminación. 4. Los trabajos de instalación y conexión eléctrica deben ser realizados por personal cualificado respetando todos los códigos y normas aplicables, incluidas las normas de lucha contra incendio. 2 FR Lisez et suivez toutes les instructions de sécurité. 1. Lisez et suivez toutes les instructions qui figurent sur le produit ou qui sont fournies avec le produit. 2. N’utilisez pas de rallonge, n’installez pas l’appareil à moins de 3 mètres d’une piscine, ne l’utilisez pas dans une salle de bain. 3. Consultez le code national de l’électricité, NFPA 70, en particulier pour l’installation de câblage et les distances à respecter par rapport aux conducteurs d’alimentation et d’éclairage. 4. Les travaux d’installation et le câblage électrique doivent être effectués par des personnes qualifiées, conformément à tous les règlements et normes en vigueur, y compris ceux qui concernent la construction résistant au feu. NL Lees en volg alle veiligheidsinstructies op.. 1. Lees en volg alle instructies op die op het product staan of die bij het product worden geleverd. 2. Geen verlengsnoer gebruiken, de apparatuur niet binnen een straal van 3 meter van een zwembad installeren, niet gebruiken in een badkamer. 3. Raadpleeg de National Electrical Code, NFPA 70, met name voor de installatie van bedrading en afstanden tot stroom- en lichtgeleiders. 4. Installatiewerkzaamheden en elektrische bedrading moeten worden uitgevoerd door gekwalificeerd personeel in overeenstemming met alle van toepassing zijnde regels en normen, inclusief de regelgeving inzake brandbestrijding. attention attenzione / attention / beachtung / atención / aandacht 4 EN Class A Disclaimer: This equipment has been tested and found to comply with the limits for a Class A digital device, pursuant to Part 15 of the FCC Rules. These limits are designed to provide reasonable protection against harmful interference in a residential installation. This equipment generates, uses and can radiate radio frequency energy and, if not installed and used in accordance with the instructions, may cause harmful interference to radio communications. However, there is no guarantee that interference will not occur in a particular installation. If this equipment does cause harmful interference to radio or television reception, which can be determined by turning the equipment off and on, the user is encouraged to try to correct the interference by one or more of the following measures: • • • • IT rev.05 Dichiarazione di non responsabilità di classe A: questa apparecchiatura è stata testata e trovata conforme ai limiti per un dispositivo digitale di Classe A, in conformità alla Parte 15 delle Norme FCC. Questi limiti sono progettati per fornire una protezione ragionevole contro interferenze dannose in un’installazione residenziale. Questa apparecchiatura genera utilizzi e può irradiare energia in radiofrequenza e, se non installata e utilizzata secondo le istruzioni, può causare interferenze dannose alle comunicazioni radio. Tuttavia, non vi è alcuna garanzia che non si verifichino interferenze in una particolare installazione. Se questa apparecchiatura causa interferenze dannose alla ricezione radio o televisiva, che possono essere determinate spegnendo e riaccendendo l’apparecchio, l’utente è incoraggiato a provare a correggere l’interferenza adottando una o più delle seguenti misure: Reorient or relocate the receiving antenna. Increase the separation between the equipment and receiver. Connect the equipment into an outlet on a circuit different from that to which the receiver is connected. Consult the dealer or an experienced radio/television technician for help. • • • • Riorientare o riposizionare l’antenna ricevente. Aumentare la separazione tra l’apparecchiatura e il ricevitore. Collegare l’apparecchiatura a una presa su un circuito diverso da quello a cui è collegato il ricevitore. Consultare il rivenditore o un tecnico radiotelevisivo esperto per assistenza. WARNING! Do not connect the light string to the power supply while it is in the packaging. The connecting cable cannot be repaired or replaced. NON-REPLACEABLE BULBS. Do not connect this light string electrically to devices from another manufacturer. CAUTION! Strangulation hazard. Keep out of reach of young children. ATTENZIONE! Non collegare l’illuminazione alla corrente elettrica quando è ancora nella confezione. Il cavo di collegamento non può essere riparato o sostituito. LA LAMPADINA NON È SOSTITUIBILE. Non collegare elettricamente questa illuminazione a dispositivi di un altro produttore. ATTENZIONE! Pericolo di strangolamento. Tenere fuori dalla portata dei bambini. TThe crossed-out wheeled bin symbol indicates that the item should be disposed of separately from household waste. The item should be handed in for recycling in accordance with local environmental regulations for waste disposal. Il simbolo del bidone della spazzatura barrato indica che l’articolo deve essere smaltito separatamente dai rifiuti domestici. L’articolo deve essere consegnato per il riciclaggio in conformità con le normative ambientali locali per lo smaltimento dei rifiuti. System Requirement The minimum system requirement for mobile phones are iOS 11 and Android 5 Check the app store for the latest update to ensure best performance. Requisito del sistema I requisiti minimi di sistema per i telefoni cellulari sono iOS 11 e Android 5 Controlla l’app store per l’ultimo aggiornamento per garantire le migliori prestazioni. Technical Specifications Power supply: see label IP protection: IP44 Specifiche Tecniche Alimentazione: vedi etichetta Protezione IP: IP44 FR DE Clause de non-responsabilité de classe A: cet appareil a été testé et déclaré conforme aux limites imposées aux appareils numériques de classe A, conformément à la section 15 des normes FCC. Ces limites sont conçues pour fournir une protection raisonnable contre les interférences nuisibles dans une installation résidentielle. Cet appareil génère, utilise et peut émettre de l’énergie de fréquence radio et, s’il n’est pas installé et utilisé conformément aux instructions, il peut causer des interférences nuisibles aux communications radio. Cependant, rien ne garantit que des interférences ne se produiront pas dans une installation particulière. Si cet appareil provoque des interférences nuisibles avec la réception de radio ou de télévision, qui peuvent se vérifier en éteignant et en rallumant l’appareil, l’utilisateur est invité à tenter de corriger l’interférence en appliquant l’une ou plusieurs des mesures suivantes: Haftungsausschluss der Klasse A: Dieses Gerät wurde getestet und als konform zu den Grenzwerten für digitale Geräte der Klasse A gemäß Teil 15 der FCCBestimmungen befunden. Diese Grenzwerte bieten einen angemessenen Schutz gegen Funkstörungen in Wohninstallationen. Dieses Gerät erzeugt, verbraucht und kann Hochfrequenzenergie ausstrahlen. Falls es nicht gemäß den Anweisungen installiert und verwendet wird, kann es Störungen der Funkkommunikation verursachen. Es kann jedoch nicht garantiert werden, dass bei bestimmten Installationen keine Störungen auftreten. Wenn dieses Gerät Funkstörungen beim Radio- oder Fernsehempfang verursacht, was Sie durch Aus- und Einschalten des Geräts feststellen können, sollten Sie versuchen, diese Funkstörungen mit einer oder mehrerer der folgenden Maßnahmen zu beheben: • • • • • • • Réorientez ou déplacez l’antenne de réception. Augmentez la distance entre l’appareil et le récepteur. Branchez l’appareil sur une prise d’un circuit différent de celui auquel le récepteur est connecté. Consultez le revendeur ou un technicien expérimenté en radio/télévision pour • Richten Sie die Empfangsantenne neu aus. Vergrößern Sie den Abstand zwischen Gerät und Empfänger. Schließen Sie das Gerät und den Empfänger an Steckdosen mit verschiedenem Stromkreis an. Wenden Sie sich an den Händler oder einen erfahrenen Radio- / Fernsehtechniker. obtenir de l’aide. AVERTISSEMENT! ACHTUNG! Ne branchez pas l’appareil à la prise quand il est encore dans l’emballage. Le câble de Schließen Sie die Beleuchtung nicht an, solange sie noch in der Verpackung ist. Das connexion ne peut pas être remplacé ni réparé. LES AMPOULES NE PEUVENT PAS ÊTRE Anschlusskabel kann nicht repariert oder ersetzt werden. DIE LAMPEN SIND NICHT REMPLACÉES. Ne connectez pas cet appareil à un produit d’un autre fabricant. ATTEN- ERSETZBAR. Schließen Sie diese Beleuchtung nicht an Geräte anderer Hersteller an. TION ! Danger d’étranglement. Tenez hors de portée des enfants WARNUNG! Strangulierungsrisiko. Nicht in Reichweite von Kindern aufbewahren. Le symbole de la poubelle barrée indique que l’article doit être éliminé séparé- Das Symbol der durchgestrichener Mülltonne weist darauf hin, dass das ment des ordures ménagères. L’article doit être déposé pour le recyclage conformé- Produkt nicht mit dem normalen Hausmüll entsorgt werden darf. Das Produkt muss ment aux réglementations environnementales locales pour l’élimination des déchets. gemäß den örtlichen Abfallbestimmungen entsorgt werden. Configuration requise La configuration minimale requise pour les smartphones est iOS 11 et Android 5 Recherchez sur l’App Store la dernière mise à jour pour optimiser les performances. System Anforderungen Die minimalen Systemvoraussetzungen für Mobiltelefone sind iOS 11 oder Android 5 Suchen Sie im App Store nach dem neuesten Update, um die beste Leistung sicherzustellen. Technical Specifications Alimentation : voir l’étiquette Protection IP : IP44 Technische Daten Stromversorgung: siehe Etikett IP-Schutz: IP44 6 ES Descargo de responsabilidad Clase A: este equipo ha sido probado y cumple con los límites establecidos para un dispositivo digital de Clase A, de conformidad con la sección 15 de las Normas de la FCC. Estos límites están diseñados para ofrecer una protección adecuada contra interferencias nocivas cuando el equipo se utiliza en un entorno residencial. Este equipo genera, utiliza y puede irradiar energía de radiofrecuencia y, si no se instala y utiliza de acuerdo con el manual de instrucciones, podría provocar interferencias perjudiciales para las comunicaciones por radio. Sin embargo, no es posible garantizar que no se produzcan interferencias en una instalación determinada. Si este equipo causara interferencias perjudiciales a la recepción de radio o televisión, que es posible determinar apagándolo y volviéndolo a encender, el usuario podrá NL intentar corregir la interferencia tomando una o varias de las siguientes medidas: Klasse A-disclaimer: deze apparatuur is getest en in overeenstemming bevonden met de limieten van een digitaal apparaat uit klasse A, conform deel 15 van de FCC-voorschriften. Deze beperkingen zijn opgesteld om een redelijke bescherming te bieden tegen schadelijke storingen in een woonomgeving. Deze apparatuur genereert en maakt gebruik van radiofrequente straling en kan deze afgeven. Indien deze apparatuur niet volgens de instructies wordt geïnstalleerd en gebruikt, kan deze schadelijke storing van radiocommunicatie veroorzaken. Er is echter geen garantie dat in bepaalde situaties geen storing zal optreden. Als deze apparatuur schadelijke storing in radio- of televisieontvangst veroorzaakt, wat kan worden vastgesteld door de apparatuur in en uit te schakelen, kan de gebruiker proberen deze storing op één of meer van de volgende manieren op te heffen: • • • • • • • Reorientar o reubicar la antena receptora. Aumentar la separación entre el equipo y el receptor. Conectar el equipo a una toma de corriente en un circuito diferente al que está conectado el receptor. Consultar al distribuidor o a un técnico experto en radio/televisión para obtener • De ontvangstantenne verplaatsen of anders richten. De afstand tussen de apparatuur en de ontvanger vergroten. De apparatuur aansluiten op een ander stopcontact in een ander circuit dan dat waarop de ontvanger is aangesloten. Raadpleeg voor hulp de dealer of een ervaren radio- en televisiemonteur. ayuda. ¡ADVERTENCIA! No conecte la iluminación a la fuente de alimentación eléctrica mientras está en el embalaje. El cable de conexión no puede ser reparado o reemplazado. BOMBILLAS NO REEMPLAZABLES. No conecte esta guirnalda de luces eléctricamente a los dispositivos de otro fabricante. ¡ATENCIÓN! Peligro de estrangulamiento. Manténgase fuera del alcance de los niños. OPGELET! Sluit de verlichting niet aan op de elektrische stroom wanneer deze zich nog in de verpakking bevindt. De verbindingskabel kan niet worden gerepareerd of vervangen. DE LAMPJES KUNNEN NIET WORDEN VERVANGEN. Sluit deze verlichting niet elektrisch aan op apparaten van een andere fabrikant. OPGELET! Wurgingsgevaar. Buiten het bereik van kinderen houden. El símbolo del contenedor con ruedas tachado indica que el artículo no debe eliminarse con la basura doméstica. El artículo debe ser entregado para su reciclaje de acuerdo con las normativas ambientales locales para la eliminación de residuos. Het symbool van een doorkruiste afvalcontainer geeft aan dat het artikel apart verwijderd dient te worden van het huisafval. Het artikel dient te worden ingeleverd voor recycling in overeenstemming met de plaatselijke milieuvoorschriften voor afvalverwerking. Requisitos del sistema Los requisitos mínimos del sistema para teléfonos móviles son iOS 11 y Android 5 Consulte en la tienda de aplicaciones la última actualización para garantizar el mejor rendimiento. Systeemvereisten De minimale systeemvereisten voor mobiele telefoons zijn iOS 11 en Android 5 Kijk in de app store voor de laatste update om zeker te zijn van de beste prestaties. Especificaciones técnicas Alimentación: ver etiqueta Protección IP: IP44 Technische specificaties Voeding: zie label IP-bescherming: IP44 physical setup configuration physique installazione fisica 1. / configuración física / fysieke opstelling / physikalische einrichtungsetup 2. EN 1. / IT Decorate your tree with Twinkly Strings. Arrange 1. FR Decora il tuo albero con Twinkly Strings. Per 1. Décorez votre arbre avec Twinkly Strings. Pour as a spiral for best results. Always start from the facilitare l’installazione delle luci parti dal centro faciliter l’installation des guirlandes, commencez middle of the tree to top and bottom. del tuo albero e disponile a spirale, verso l’alto e toujours par le milieu de l’arbre et disposez-les en 2. onnect the Twinkly String to the power adapter. verso il basso. 3. Plug the power adapter into a power socket and 2. Collega la treccia all’alimentatore. the lights will switch on. 3. Attacca l’alimentatore ad una presa di corrente, le luci si accendono. spirale vers le haut et vers le bas. 2. Connectez la guirlande Twinkly à l’adaptateur d’alimentation. 3. Branchez l’adaptateur dans une prise secteur, les lumières s’allument. 8 3. DE 1. ES Schmücken Sie Ihren Baum mit Twinkly Strings. 1. NL Decore su árbol con Twinkly Strings. Para facilitar 1. Versier uw boom met Twinkly Strings. Om de Verlegen Sie die Beleuchtung spiralförmig und la instalación de las luces, es recomendable installatie van de lichtjes te vergemakkelijken, beginnen Sie dabei immer von der Mitte des comenzar desde el centro del árbol y proseguir en begint u vanuit het midden van de boom en Baums nach oben und unten. espiral, hacia arriba y hacia abajo. brengt u ze in spiraalvorm naar boven en 2. Verbinden Sie Twinkly mit dem Netzteil. 3. Schließen Sie das Netzteil an eine Steckdose an, und schon schaltet sich die Beleuchtung ein. 2. 3. Conecte cable trenzado al adaptador alimentador naar beneden toe aan. de corriente. 2. Verbind het snoer met de voedingsadapter. Enchufe el adaptador alimentador en una toma de 3. Sluit de voedingsadapter aan op een stopcon- corriente, las luces se encienden. tact en de lichtjes gaan branden. controller controllore / manette / regler EN / controlador / controleur FR • • • • • CONTINUOUS GREEN: AP mode, connected • • • • • VERT FIXE : mode Access Point, connecté • • • CYAN: SETUP MODE (Bluetooth ON) BLEU CLAIR FIXE : mode CONFIGURATION (Bluetooth activé) CONTINUOUS RED: General error • • • • FLASHING WHITE: Reset procedure in progress • BLANC CLIGNOTANT : procédure de réinitialisation en cours FLASHING GREEN: AP mode, no device connected CONTINUOUS BLUE: Wi-Fi mode, connected FLASHING BLUE: Wi-Fi mode, connection in progress FLASHING RED: Wi-Fi mode, unable to connect YELLOW: Firmware Update in progress IT VERT CLIGNOTANT : mode Access Point, aucun appareil connecté BLEU FONCÉ FIXE : Mode Wi-Fi, connecté BLEU FONCÉ CLIGNOTANT : mode Wi-Fi, connexion en cours ROUGE CLIGNOTANT : mode Wi-Fi, impossible de se connecter JAUNE FIXE : mise à jour du micrologiciel en cours ROUGE FIXE : erreur générale DE • • • • • VERDE FISSO: modalità Access Point - connesso • • • • • GRÜN ERLEUCHTET: AP-Modus, verbunden • • • AZZURRO: Modalità SETUP (Bluetooth acceso) HELLBLAU: SETUP-Modus (Bluetooth EIN) ROSSO FISSO: Errore generale • • • • BIANCO LAMPEGGIANTE: Procedura Reset in corso • WEISS BLINKEND: Vorgang wird zurückgesetzt VERDE LAMPEGGIANTE: modalità Access Point - nessun dispositivo collegato BLU FISSO: modalità WiFi - connesso BLU LAMPEGGIANTE: modalità WiFi - connessione in corso ROSSO LAMPEGGIANTE: modalità WiFi - impossibile connettersi GIALLO: Aggiornamento Firmware in corso GRÜN BLINKEND: AP-Modus, kein Gerät verbunden BLAU ERLEUCHTET: WLAN-Modus, verbunden BLAU BLINKEND: WLAN-Modus, Verbindung wird hergestellt ROT BLINKEND: WLAN-Modus, keine Verbindung möglich GELB: Firmware wird aktualisiert ROT ERLEUCHTET: Allgemeiner Fehler 10 ES • • • • • LUZ VERDE FIJA: modo Access Point, conectado • • • AZUL: modo de CONFIGURACIÓN (Bluetooth encendido) • LUZ BLANCA INTERMITENTE: procedimiento de reinicio en curso LUZ VERDE INTERMITENTE: modo Access Point, no hay ningún dispositivo conectado LUZ AZUL FIJA: modo wifi, conectado LUZ AZUL INTERMITENTE: modo wifi, conectándose LUZ ROJA INTERMITENTE: modo wifi, imposible conectarse AMARILLO: firmware actualizándose LUZ ROJA FIJA: error general NL • • • • • CONTINU GROEN: Access Point modus - verbonden • • • CYAAN: SETUP modus (Bluetooth aan) • WIT KNIPPEREN: resetprocedure wordt uitgevoerd GROEN KNIPPEREN: Access Point modus, geen apparaat aangesloten CONTINU BLAUW: wifimodus, verbonden BLAUW KNIPPEREN: wifimodus, bezig met verbinden ROOD KNIPPEREN: wifimodus, niet in staat om verbinding te maken GEEL: Firmware update wordt uitgevoerd CONTINU ROOD: algemene fout BUTTON / PULSANTE / BOUTON / TASTE / BOTÓN / KNOP LED INDICATOR / INDICATORE LED / VOYANT / LED-ANZEIGE / INDICADOR LED / LEDLAPJE app download téléchargement d’application descargar la aplicación / / descarga de la aplicación / app downloaden / app downloaden 1. EN 1. IT Go to App Store/Google Play Store (or scan QR 1. code) FR Accedi ad App Store / Google Play Store (o 1. scansiona il codice QR) Allez sur l’AppStore ou Google Play (ou en scannant le QR code) 2. Download and install the Twinkly app 2. Scarica e installa l’applicazione “Twinkly” 2. Téléchargez et installez l’application « Twinkly » 3. Ensure that the Twinkly app is correctly installed 3. Assicurati che l’applicazione sia correttamente 3. Assurez-vous que l’application est installée on your smartphone installata sul tuo smartphone correctement sur votre smartphone 12 2. 3. Twinkly DE 1. ES Öffnen Sie den App Store/Google Play Store 1. (oder scannen Sie den QR-Code) NL Vaya a App Store / Google Play Store (o escanee 1. el código QR) Ga naar App Store / Google Play (of scan de QR-code) 2. Laden und installieren Sie die „Twinkly“ App 2. Descargue e instale la aplicación “Twinkly” 2. Download en installeer de “Twinkly” app 3. Stellen sie sicher, dass die Twinkly App korrekt 3. Asegúrese de que la aplicación Twinkly esté 3. Zorg ervoor dat de applicatie correct is geïn- auf Ihrem Smartphone installiert ist instalada correctamente en su dispositivo móvil stalleerd op uw smartphone setup twinkly configurazione twinkly configurar twinkly 1. / / configuration twinkly / twinkly einrichten / twinkly instellen 2. Bluetooth Bluetooth Choose your controller Twinkly Bluetooth GENERATION I Bluetooth GENERATION II EN IT 1. Make sure Bluetooth is turned on 2. Open the Twinkly app and select your controller 3. 4. 1. FR Assicurati che il Bluetooth sul tuo telefono 2. Avvia l’applicazione Twinkly e seleziona Press and hold the controller button until il controller corrispondente al prodotto the LED is CYAN (approx 5 sec) acquistato Select your Wi-Fi network and enter your 3. passwordI Wi-Fi by following the instructions in the “Troubleshooting” section 4. Assurez-vous que le Bluetooth est activé sur votre smartphone. 2. Lancez l’application Twinkly et sélectionnez le contrôleur correspondant au produit acheté. 3. Premi e mantieni premuto il pulsante del Appuyez sur le bouton et maintenez-le enfoncé jusqu’à ce que le voyant devienne BLEU CLAIR. controller fino a quando l’indicatore LED If you do not have access to a local Wi-Fi network, connect directly to your smartphone 1. sia acceso. (environ 5 secondes). diventa AZZURRO (circa 5 secondi) 4. Inserisci la password della rete Wi-Fi locale Si vous ne disposez pas de réseau Wi-Fi local, Saisissez le mot de passe du Wi-Fi local. Se non hai a disposizione una rete Wi-Fi lo- pour vous connecter directement au Wi-Fi cale, per collegarti direttamente al Wi-Fi del de votre smartphone, suivez les indications tuo smartphone, segui le indicazioni presenti présentes à la section « dépannage » alla sezione “troubleshooting” 14 3. 4. 5 sec Configuring Twinkly with Home Internet Insert your Wi-Fi password xxxxxxxxxx Connecting... Configuring Twinkly with Home Internet Configure Insert your Wi-Fi password xxxxxxxxxx DE 1. ES Vergewissern Sie sich, dass Bluetooth auf 1. Ihrem Smartphone aktiviert ist. 2. 3. Starten Sie die Twinkly App und wählen Sie Asegúrese de que el Bluetooth de su 1. teléfono esté activo. 2. Inicie la aplicación Twinkly y seleccione el Ihren Controller aus. controlador que corresponde al producto Halten Sie die Taste des Controllers solange que ha comprado. gedrückt, bis die LED-Anzeige HELLBLAU 4. NL 3. ingeschakeld 2. controlador hasta que el indicador LED se Geben Sie das lokale WLAN-Passwort ein ponga AZUL. (aprox. 5 segundos) Introduzca la contraseña de la red wifi local. Configure Start de Twinkly app en selecteer de controller van het product dat u heeft aangeschaft 3. Mantenga presionado el botón del erscheint (ca. 5 s) Zorg ervoor dat Bluetooth op uw telefoon is Houd de knop van de controller ingedrukt tot het ledlampje CYAAN wordt (ong. 5 seconden) 4. Voer het wachtwoord van het lokale wifinetwerk in. Als u geen lokaal wifinetwerk ter beschikking Falls Sie nicht über ein lokales WLAN-Netzwerk 4. verfügen, befolgen Sie die Anweisungen im Si no dispone de una red wifi local, para conec- heeft, volgt u de aanwijzingen uit de rubriek Abschnitt „Fehlerbehebung“ für die direkte tarse directamente al wifi de su dispositivo “troubleshooting” om rechtstreeks verbinding Verbindung mit dem WLAN Ihres Smartphones móvil, siga las indicaciones de la sección “solu- te maken met de wifi van uw smartphone ción de problemas” choose effects scegli effetti efectos 1. / / choisissez les effets / effekte wählen / seleccionar effecten kiezen 2. RAINBOW VERTIGO RAINBOW SNOW HEARTBEAT edit EN 1. 2. IT apply FR Launch the Twinkly app and open the Effects 1. Avvia l’applicazione Twinkly e apri Galleria Effetti 1. Lancez l’application Twinkly et ouvrez la galerie d’effets Gallery 2. Seleziona l’effetto desiderato per vedere 2. Sélectionnez l’effet désiré pour le voir s’afficher à Select the desired effect to see the real-time l’anteprima in tempo reale sulla tua preview on your Twinkly set-up installazione 3. Swipe left or right to browse effects 4. Tap “Apply” to store the effect and play continuously 3. Sfoglia gli effetti scorrendo verso sinistra o verso destra 4. l’écran en temps réel 3. Tocca “Applica” per salvare l’effetto e riprodurlo continuativamente Parcourir les effets en les faisant défiler à gauche ou à droite 4. Appuyez sur « Appliquer » pour stocker l’effet dans le contrôleur et pour le reproduire en continu 16 3. 4. RAINBOW edit VERTIGO VERTIGO apply DE edit ES NL 1. Starten Sie die App und öffnen Sie die Galerie Effekte 1. Inicie la aplicación y abra la Galería de efectos 1. 2. Tippen Sie den gewünschten Effekt an, um die 2. Seleccione el efecto que le interesa para ver 2. Vorschau an Ihrem Baum in Echtzeit zu sehen 3. Scrollen Sie die Effekte, indem Sie nach links oder el efecto que se reproduce inmediatamente 3. rechts wischen 4. Tippen Sie auf „Anwenden“, um den Effekt zu speichern und kontinuierlich abzuspielen Vea los efectos disponibles deslizando hacia Toque “Aplicar” para guardar el efecto y reproducirlo continuamente Start de Twinkly app en open de Effectengalerie Selecteer het gewenste effect om onmiddellijk een preview op uw installatie te zien 3. la izquierda o hacia la derecha 4. apply Blader door de effecten door naar links of rechts te vegen 4. Klik op “Toepassen” om het effect op te slaan en continu af te spelen mapping calibrazione / calibrage 1. / mapping / mapeo / kalibratie 2. mapping EN IT FR Mapping the lights on your tree gives you Eseguire la Mappatura delle luci sulla tua Effectuer le calibrage des lumières sur access to advanced effects installazione permette di accedere ad una votre arbre vous permet d’accéder à un 1. Open Layout and tap the “Map Lights” button selezione più ampia di effetti plus grand nombre d’effets 2. Frame the tree from a distance of 1.5-2.5 1. Apri Layout e tocca il pulsante “Map Lights” 1. metres 2. Inquadra il tuo albero da una distanza di 1.5- 3. Tap the “Start Mapping” button (LEDs turn different RGB colours during the process) 4. 2.5m 3. Once the process is completed successfully, go back to the Effect Gallery and enjoy advanced effects! 4. « calibrage » 2. Tocca “Start Mapping” (i LED assumono diversi colori durante il processo) Ouvrez le modèle et appuyez sur le bouton Cadrez l’arbre à une distance d’au moins 1,5-2,5 mètres 3. Completato con successo il processo, torna alla Appuyez sur le bouton « calibrage » (les leds prennent des couleurs différentes au cours du Galleria Effetti e divertiti con gli effetti calibrati! processus) 4. Une fois le processus terminé avec succès, retournez dans la galerie d’effets pour utiliser les effets avancés 18 3. 4. RAINBOW VERTIGO SNOW HEARTBEAT VERTIGO mapping edit DE ES apply NL Durch das Mapping der Lichter an Ihrem Baum Si realiza un “mapeo” de las luces en su Door de lichtjes in uw installatie in haben Sie Zugriff auf erweiterte Effekte árbol podrá acceder a una selección más kaart te brengen, krijgt u toegang tot 1. Öffnen Sie das Layout und tippen Sie auf die Taste amplia de efectos een bredere selectie effecten „Mapping“ 1. Abra el Layout y toque el botón “mapeo” 1. Open Layout en klik op “kalibratie” Nehmen Sie den Baum aus mindestens 1,5-2,5 2. Encuadre el árbol desde una distancia de 1,5- 2. Kadreer de boom van een afstand van 2. Metern Entfernung auf 3. Tippen Sie auf „Mapping“ (die LEDs leuchten während 2,5 metros como mínimo 3. des Vorgangs in verschiedenen Farben auf) 4. Kehren Sie nach erfolgreichem Abschluss des Toque el botón “inciar mapeo” (todos los LED minstens 1,5-2,5 meter 3. producen diferentes colores durante el proceso) 4. Una vez que el proceso se completa Klik op “kalibratie” (de leds branden in verschillende kleuren tijdens het proces) 4. Zodra het proces succesvol is voltooid, gaat Vorgangs zur Galerie Effekte zurück und genießen Sie correctamente, regrese a la Galería de Efectos y u terug naar de Effectengalerie en kunt u die kalibrierten Effekte! disfrute de los efectos. genieten van gekalibreerde effecten! mapping tips EN consigli per la mappatura / conseils puor le calibrage sugerencias para el mapeo / tips voor het in kaart brengen IT / mappingtipps / FR Note: For best results, avoid reflective surfaces behind Nota: Per risultati ottimali, evita superfici riflettenti Conseil : Pour de meilleurs résultats, évitez les the tree, keep the mobile cam steady during the dietro le luci, mantieni ferma la fotocamera durante surfaces réfléchissantes derrière la guirlande, process and ensure a moderate ambient light (not il processo, assicurati di avere una luce ambiente gardez la caméra mobile stable pendant le too dark). moderata (non troppo scura). processus et assurez une lumière ambiante modérée (pas trop sombre). DE ES NL Hinweis: Um beste Ergebnisse zu erzielen, Un consejo: para obtener los mejores resultados, evite Tip: voor het beste resultaat vermijdt u reflecter- vermeiden Sie reflektierende Oberflächen hinter las superficies reflectantes detrás de las luces, man- ende oppervlakken achter de lichtjes, houdt u de dem Baum, halten Sie die Kamera während des tenga estable la cámara del móvil durante el proceso fotocamera stil tijdens het proces en zorgt u voor Vorgangs ruhig in der Hand und sorgen Sie für ein y asegúrese de tener una luz ambiental moderada (no een gematigd omgevingslicht (niet te donker). normales Umgebungslicht (nicht zu dunkel). demasiado oscura). advanced features fonctionnalités avancées funzionalità avanzate / / características avanzadas erweiterte funktionen / Connect to local WiFi. Create new effects. Connetti al WiFi locale. Crea nuovi effetti. Connectez-vous au Wi-Fi local. Créez de nouveaux effets. Verbinden Sie sich mit dem lokalen WLAN. Erstellen Sie neue Effekte. Conéctese a la red wifi local. Cree nuevos efectos. Maak verbinding met lokale wifi. Creëer nieuwe effecten. Group multiple devices together. Download new effects. Raggruppa più dispositivi insieme. Scarica nuovi effetti. Regroupez plusieurs appareils ensemble. Téléchargez de nouveaux effets. Gruppieren Sie mehrere Geräte zusammen. Laden Sie neue Effekte herunter. Agrupe múltiples dispositivos juntos. Descargue nuevos efectos. Groepeer meerdere apparaten samen. Download nieuwe effecten. Synchronize with music. Control with Smart Home Assistant. Sincronizza con la musica. Controllo con Smart Home Assistant. Synchronisez l’appareil avec de la musique. Synchronisieren Sie die Effekte mit Musik. Sincronice con la música. Synchroniseer met muziek. 20 geavanceerde functies Contrôlez avec Smart Home Assistant. Steuerung mit Smart Home Assistent. Controle con Asistente de Casa Inteligente. Besturing met Smart Home Assistant. For all these features and more, see www.twinkly.com/referenceguide | Per queste funzionalità e altro, consultare www.twinkly.com/referenceguide | Pour toutes ces fonctionnalités et plus, voir www.twinkly.com/referenceguide | Informationen zu diesen Funktionen finden Sie unter www.twinkly.com/referenceguide | Para todas estas funciones y más, visite www.twinkly.com/referenceguide | Voor al deze functies en meer, zie www.twinkly.com/referenceguide troubleshooting dépannage / solución de problemas fehlerbehebung EN / / risoluzione dei problemi probleemoplossen IT QQ THE LIGHTS DO NOT SWITCH ON QQ LE LUCI NON SI ACCENDONO •• •• Check that the power adapter is plugged in and that the controller is correctly connected to the device Verificare che l’alimentatore sia collegato e che il controller sia connesso correttamente al dispositivo •• Check that the LED status indicator on the controller is lit •• Controllare che l’indicatore di stato a LED sul controller sia acceso •• Briefly press the button on the controller •• Premere brevemente il pulsante sul controller •• If this doesn’t work, unplug the power adapter, wait 30 seconds and plug in •• Se ciò non funziona, scollegare l’alimentazione, attendere 30 secondi e again QQ THE LED INDICATOR IS CYAN, BUT MY SMARTPHONE CANNOT FIND collegarlo di nuovo QQ L’INDICATORE LED È CIANO, MA IL MIO SMARTPHONE NON PUO ‘TRO- TWINKLY •• Unplug the power adapter, wait 30 seconds, plug it in again and repeat VARE GETTAMENTE •• Configuration procedure Scollegare l’alimentatore, attendere 30 secondi, ricollegarlo e ripetere la procedura di configurazione •• If this does not work, try to Reset (see Reset procedure below) •• Se questo non funziona, esegui la procedura di Reset (vedi indicazioni Reset) •• If this won’t work, see online reference manual •• Se questo non funziona, consultare il manuale di riferimento online http://www.twinkly.com/support http://www.twinkly.com/support QQ THE LIGHTS TURNED ON BUT ARE BLOCKED QQ LE LUCI SONO ACCESI MA SONO BLOCCATE •• Briefly press the button on the controller •• Premere brevemente il pulsante sul controller •• If this does not work, unplug the power adapter, wait 30 seconds and plug it •• Se questo non funziona, scollegare l’alimentazione, attendere 30 secondi e in again QQ TWINKLY SETUP WAS SUCCESSFUL, BUT THE LIGHTS DON’T RESPOND TO collegarlo di nuovo QQ IL SETUP TWINKY È STATO SUCCESSO, MA LE LUCI NON RISPONDONO AI COMMANDS •• Within the Twinkly application, open “Devices” and tap the circling arrow COMANDI •• symbol (see Rescan procedure below) All’interno dell’applicazione Twinkly, apri “Dispositivi” e tocca l’icona “frecce circolari” (vedi procedura di Ricerca Dispositivi di seguito) •• If this does not work, stop the Twinkly application and launch it again •• Se questo non funziona, arresta l’applicazione Twinkly e riavviala •• If this does not work, try to Reset (see Reset procedure below) •• Se questo non funziona, esegui la procedura di Reset (vedere la procedura di •• If this does not work, delete the Twinkly application from your smartphone, then download the latest version from AppStore or Google Play Store ripristino di seguito) •• Se questo non funziona, elimina l’applicazione Twinkly dallo smartphone, quindi scarica la versione più recente da AppStore o Google Play QQ HOW CAN I CONNECT TWINKLY WITHOUT LOCAL WI-FI QQ COME POSSO COLLEGARMI DIRETTAMENTE A TWINKLY SENZA UTILIZZA- •• Open Wi-Fi settings on your smartphone •• Find and select “Twinkly_XXXXXX network” •• Enter the Wi-Fi password “ Twinkly2019 ” and ensure that the “Twinkly_ •• Vai alle impostazioni Wi-Fi del tuo smartphone XXXXXX” network is connected •• Cerca e seleziona la rete “Twinkly_xxxxxx” •• Inserisci la password Wi-Fi “ Twinkly2019 ”, assicurarti che la rete “twin- RE UNA RETE WI-FI LOCALE kly_xxxxx” sia connessa 22 FR DE QQ LES LUMIÈRES NE S’ALLUMERONT PAS QQ DIE BELEUCHTUNG SCHALTET SICH NICHT EIN •• •• Vérifiez que l’alimentation est connectée et que le contrôleur est correctement connecté à l’appareil Stellen Sie sicher, dass das Netzteil angeschlossen und der Controller korrekt mit dem Gerät verbunden ist •• Vérifiez que le voyant d’état sur le contrôleur est allumé •• Stellen Sie sicher, dass die LED-Statusanzeige am Controller leuchtet •• Appuyez brièvement sur le bouton du contrôleur •• Drücken Sie kurz die Taste am Controller •• Si cela ne fonctionne pas, débranchez l’alimentation, attendez 30 sec- •• Sollte dies nicht funktionieren, trennen Sie das Netzteil, warten Sie 30 Sekunden ondes et rebranchez-le. QQ LE VOYANT EST BLEU CLAIR, MAIS MON SMARTPHONE NE TROUVE und schließen Sie es erneut an QQ DIE LED-ANZEIGE LEUCHTET HELLBLAU, ABER MEIN SMARTPHONE KANN PAS TWINKLY •• Débranchez l’alimentation, attendez 30 secondes, rebranchez-le et répétez la procédure de configuration. •• Si cela ne fonctionne pas, essayez de réinitialiser (voir la procédure de réinitialisation ci-dessous). •• Si cela ne fonctionne pas, consultez le manuel de référence en ligne http://www.twinkly.com/support QQ LES LUMIÈRES ALLUMÉES MAIS SONT BLOQUÉES •• Appuyez brièvement sur le bouton du contrôleur •• Si cela ne fonctionne pas, débranchez l’alimentation, attendez 30 secondes et rebranchez-la. QQ L’INSTALLATION TWINKLY S’EST CONCLUE CORRECTEMENT MAIS LES LUMIÈRES NE RÉPONDENT PAS AUX COMMANDES •• Dans l’application Twinkly, ouvrez « Appareils » et appuyez sur le symbole « Flèches circulaires » (voir procédure de recherche des appareils ci-dessous). •• Si cela ne fonctionne pas, arrêtez l’application Twinkly et relancez-la •• Si cela ne fonctionne pas, essayez de réinitialiser (voir la procédure de réinitialisation ci-dessous). •• Si cela ne fonctionne pas, supprimez l’application Twinkly de votre smartphone, puis téléchargez la dernière version à partir de l’AppStore TWINKLY NICHT FINDEN •• wiederholen Sie den Setup-Vorgang •• Sollte dies nicht funktionieren, versuchen Sie es mit einem Reset (siehe Reset-Verfahren unten). •• Falls dies ebenfalls nicht funktionieren sollte, sehen Sie das Online-Referenzhandbuch ein http://www.twinkly.com/support QQ DIE BELEUCHTUNG IST EINGESCHALTET, ABER BLOCKIERT •• Drücken Sie kurz die Taste am Controller •• Sollte dies nicht funktionieren, trennen Sie das Netzteil, warten Sie 30 Sekunden und schließen Sie es erneut an QQ DAS TWINKLY SETUP WAR ERFOLGREICH, ABER DIE BELEUCHTUNG REAGIERT NICHT AUF DIE STUERBEFEHLE •• Öffnen Sie „Geräte“ in der Anwendung Twinkly und tippen Sie auf das Symbol „Kreispfeile“ (siehe Geräte suchen unten). •• Sollte dies nicht funktionieren, schließen Sie die Twinkly-Anwendung und starten Sie sie neu •• Sollte dies nicht funktionieren, versuchen Sie es mit einem Reset (siehe Reset-Verfahren unten). •• Wenn dies nicht funktioniert, löschen Sie die Twinkly-Anwendung von Ihrem Smartphone und laden Sie dann die neueste Version aus App Store oder Google Play herunter ou de Google Play. QQ COMMENT PUIS-JE ME CONNECTER DIRECTEMENT À TWINKLY SANS Trennen Sie das Netzteil, warten Sie 30 Sekunden, schließen Sie sie erneut an und QQ WIE KANN ICH TWINKLY OHNE LOKALES WLAN VERBINDEN? UTILISER UN RÉSEAU WI-FI LOCAL ? •• Öffnen Sie die WLAN-Einstellungen Ihres Smartphones •• Ouvrez les paramètres Wi-Fi de votre smartphone •• Suchen und wählen Sie das Netzwerk „Twinkly_xxxxxx“ •• Recherchez et sélectionnez le réseau « Twinkly_XXXXXX » •• •• nsérez le mot de passe Wi-Fi « Twinkly2019 », assurez-vous que le réseau « Twinkly_XXXXXX » est connecté Geben sie das WLAN-Passwort „ Twinkly2019 “ ein und stellen sie sicher, dass das Netzwerk „Twinkly_xxxxx“ verbunden ist ES NL QQ LAS LUCES NO SE ENCIENDEN QQ DE LICHTJES GAAN NIET BRANDEN •• •• Compruebe que el adaptador alimentador esté conectado y que el controlador esté conectado correctamente al dispositivo Controleer of de voedingsadapter is aangesloten en of de controller correct met het apparaat is verbonden •• Compruebe que el indicador LED de estado en el controlador esté encendido •• Controleer of de led-statusindicator op de controller brandt •• Presione brevemente el botón en el controlador •• Druk kort op de knop op de controller •• Si esto no funciona, desenchufe el adaptador alimentador, espere 30 segun- •• Als dit niet werkt, koppel de voedingsadapter dan los, wacht 30 seconden en dos y conéctelo de nuevo QQ EL INDICADOR LED SE PONE DE COLOR AZUL, PERO MI DISPOSITIVO sluit hem opnieuw aan QQ HET LEDLAMPJE IS CYAAN, MAAR MIJN SMARTPHONE KAN TWINKLY NIET MÓVIL NO ENCUENTRA A TWINKLY •• Desenchufe el adaptador alimentador, espere 30 segundos, conéctelo de VINDEN •• nuevo y repita el procedimiento de configuración •• •• Koppel de voedingsadapter los, wacht 30 seconden, sluit hem opnieuw aan en herhaal de instellingsprocedure Si esto no funciona, realice el procedimiento de Reinicio (consulte el proced- •• Als dit niet werkt, voer dan de Resetprocedure uit (zie Reset aanwijzingen) imiento de reinicio) •• Als dit niet werkt, raadpleeg dan de referentiehandleiding online Si esto no funciona, consulte el manual de referencia en línea http://www.twinkly.com/support http://www.twinkly.com/support QQ LAS LUCES ESTÁN ENCENDIDAS PERO BLOQUEADAS QQ DE LICHTJES BRANDEN MAAR ZIJN GEBLOKKEERD •• Presione brevemente el botón en el controlador •• Druk kort op de knop op de controller •• Si esto no funciona, desenchufe el adaptador alimentador, espere 30 segundos •• Als dit niet werkt, koppel dan de voedingsadapter los, wacht 30 seconden en y conéctelo de nuevo QQ TWINKLY SE CONFIGURÓ CORRECTAMENTE, PERO LAS LUCES NO RE- sluit hem opnieuw aan QQ TWINKLY WERD SUCCESVOL INGESTELD, MAAR DE LICHTJES REAGEREN SPONDEN A LOS COMANDOS •• Dentro de la aplicación Twinkly, abra “Dispositivos” y toque el símbolo de NIET OP DE COMMANDO’S •• “flechas circulares” (consulte el procedimiento de Búsqueda de dispositivos a Open “Apparaten” in de Twinkly app en klik op het pictogram “cirkelpijlen” (zie procedure Apparaten zoeken hieronder) continuación) •• Als dit niet werkt, sluit de Twinkly app dan af en start deze opnieuw •• Si esto no funciona, detenga la aplicación Twinkly y vuelva a iniciarla •• Als dit niet werkt, voer dan de Reset procedure uit (zie de herstelprocedure •• Si esto no funciona, intente realizar un Reinicio (consulte el procedimiento de reinicio a continuación) •• hieronder) •• Si esto no funciona, elimine la aplicación Twinkly de su dispositivo móvil, luego Als dit niet werkt, verwijdert u de Twinkly app van uw smartphone en downloadt u de nieuwste versie uit AppStore of Google Play descargue la última versión desde AppStore o Google Playreinicio a continuación) QQ HOE KAN IK RECHTSTREEKS VERBINDING MAKEN MET TWINKLY ZONDER EEN LOKAAL WIFINETWERK TE GEBRUIKEN QQ ¿CÓMO PUEDO CONECTARME DIRECTAMENTE A TWINKLY SIN UTILIZAR UNA RED WIFI LOCAL? •• Abra la configuración wifi de su dispositivo móvil •• Busque y seleccione la red “Twinkly_xxxxxx” •• Inserte la contraseña wifi “ Twinkly2019 ”, asegúrese de que la red “Twinkly_xxxxxx” está conectada. •• Ga naar de wifi-instellingen van uw smartphone •• Zoek en selecteer het ‘Twinkly_xxxxxx’ netwerk •• Voer het wifiwachtwoord ‘ Twinkly2019 ’ in en controleer of er verbinding wordt gemaakt met het ‘Twinkly_xxxxx’ netwerknetwerk is verbonden devices rescan 1. ricerca dispositivi dispositivos / / recherche des appareils / geräte suchen / 24 búsqueda de apparaten zoeken 2. 3. 4. Effects Gallery twinkly_2440E2 175 LED i Layout Devices RAINBOW VERTIGO Settings Twinkly Found! Account Help Credits SNOW HEARTBEAT CREATE GROUP EN IT CREATE GROUP FR Within the menu of Twinkly application, open All’interno dell’applicazione Twinkly, apri “Dispositivi” Dans le menu de l’application Twinkly, ouvrez “Devices” and tap the circling arrows symbol. e tocca l’icona “frecce circolari”. l’option « Appareils » et appuyez sur le symbole Wait until the Twinkly devices appear in the list of Attendi che i dispositivi Twinkly appaiano nella lista « flèches circulaires ». Attendez que les appareils available devices. dei dispositivi disponibili. Twinkly apparaissent dans la liste des appareils disponibles. DE ES NL Öffnen Sie „Geräte“ in der Anwendung Twinkly und Desde el menú de la aplicación Twinkly, abra Open “Apparaten” in de Twinkly app en klik op het tippen Sie auf das Symbol „Kreispfeile“ . “Dispositivos” y toque el símbolo “flechas circulares”. pictogram ‘cirkelpijlen’. Warten Sie, bis die Twinkly Geräte in der Liste der Espere a que los dispositivos Twinkly aparezcan en Wacht tot de Twinkly apparaten in de lijst met verfügbaren Geräte angezeigt werden. la lista de dispositivos disponibles. beschikbare apparaten verschijnen. reset twinkly reset / réinitialisation 1. reset / reinicio / resetten 2. EN 1. / IT Unplug Twinkly from the power socket. Press 1. FR Stacca Twinkly dalla presa di corrente, premi e and hold the controller button continua a mantenere premuto il bottone del 2. While holding the button, plug in Twinkly controller 3. Keep holding the button until all LEDs turn red, 2. then release the button Débranchez Twinkly puis appuyez sur le bouton du contrôleur et gardez-le enfoncé 2. Mentre stai ancora premendo il bottone, collega nuovamente Twinkly alla corrente 3. 1. Tout en maintenant le bouton enfoncé, rebranchez Twinkly 3. Maintenez le bouton enfoncé jusqu’à ce que Mantieni premuto il bottone fino a quando i LED tous les voyants deviennent rouges, puis diventano rossi, quindi rilascia il pulsante relâchez le bouton 26 3. RED LIGHT / LUCE ROSSA / LUMIÈRE ROUGE / ROTES LICHT / LUZ ROJA / ROOD LICHT DE 1. 2. ES Ziehen Sie Twinkly aus der Steckdose und halten Desenchufe Twinkly de la toma de corriente, Sie die Controller-Taste gedrückt presione y mantenga presionado el botón del Schließen Sie bei gehaltener Taste Twinkly controlador wieder an das Stromnetz an 3. 1. NL 2. Halten Sie die Taste solange gedrückt, bis alle LEDs rot leuchten, lassen Sie dann die Taste los Mientras todavía sigue presionando el botón, 1. contact en houd de knop van de controller ingedrukt 2. conecte de nuevo Twinkly a la corriente 3. Steek de stekker van Twinkly terug in het stopcontact, terwijl u de knop ingedrukt Mantenga presionado el botón hasta que todos los LED se pongan rojos, luego suelte el botón Haal de stekker van Twinkly uit het stop- houdt 3. Houd de knop ingedrukt totdat de leds rood worden en laat daarna de knop los more info LEDWORKS Srl Via Tortona, 37 - 20144 Milano - Italy | ulteriori informazioni mehr info | más información | | plus d’informations meer informatie http://twinkly.com/support-
 1
1
-
 2
2
-
 3
3
-
 4
4
-
 5
5
-
 6
6
-
 7
7
-
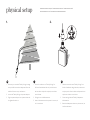 8
8
-
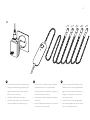 9
9
-
 10
10
-
 11
11
-
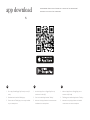 12
12
-
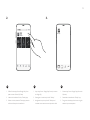 13
13
-
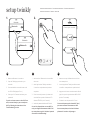 14
14
-
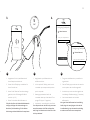 15
15
-
 16
16
-
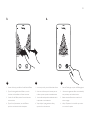 17
17
-
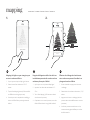 18
18
-
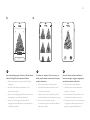 19
19
-
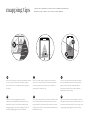 20
20
-
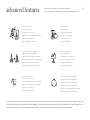 21
21
-
 22
22
-
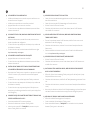 23
23
-
 24
24
-
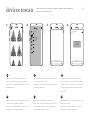 25
25
-
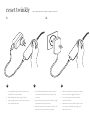 26
26
-
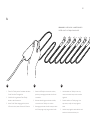 27
27
-
 28
28


LEDWORKS Twinkly strings Series Manual de usuario
- Tipo
- Manual de usuario
En otros idiomas
Otros documentos
-
iLuv Rainbow8 Guía de inicio rápido
-
LIVARNO 427120 El manual del propietario
-
Tivoli Audio Sub El manual del propietario
-
Tivoli Audio SPHERA/ORB El manual del propietario
-
-
Tivoli Audio ORB Manual de usuario
-
Tivoli Audio One Digital/+ Manual de usuario
-
Yamaha MusicCast WX-030 El manual del propietario
-
PURE Jongo S3 Guía del usuario
-
Extel DES9700VDP/10 Manual de usuario