
TEMPORIZADOR PARA
24 HORAS
MANUAL DE INSTRUCCIONES
V0.0 TEMP24H/MINI 0618A
• Este aparato no se destina para utilizarse por personas (incluyendo niños), cuyas capacidades físicas, sensoriales o
mentales sean diferentes o estén reducidas, o carezcan de experiencia o conocimiento.
• Los niños deben supervisarse para asegurar que no empleen el aparato como juguete.
• Siempre utilice un paño suave, limpio y seco para limpiar el equipo.
• No intente abrir el equipo, puede ocasionar mal funcionamiento y anulación de la garantía.
• No use ni almacene este equipo en lugares donde existan goteras o salpicaduras de agua.
• El sistema del equipo es electromecánico; puede haber desfases en el tiempo de programación.
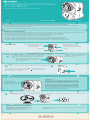
Para ajustar la hora actual, gire la perilla de
selección en el sentido de las manecillas del
reloj.
Es importante que primero configure la hora actual
para utilizar el modo temporizador.
Perilla de selección
de hora actual
Interruptor de modo:
encendido permanente o
programado (temporizador)
Pestañas de programación
Contacto
Clavija
El triángulo debe señalar el número
que corresponde a la hora actual.
El formato es 24 h.
Si no utiliza el modo temporizador, puede deslizar el
interruptor a encendido permanente ( ) para que funcione
como un contacto normal.
Ej: si en su reloj son las 4 de
la tarde , ubique la perilla en
el número 16.
Lea cuidadosamente este manual para evitar cualquier mal funcionamiento.
La información que se muestra en este manual sirve únicamente como referencia sobre el producto. Debido a
actualizaciones pueden existir diferencias.
Por favor, consulte nuestra página web www.steren.com para obtener la versión más reciente de este manual.
PRECAUCIONES
MODO DE USO
PARTES
ESPECIFICACIONES
2
3
2
2
2
1
2
0
1
9
1
8
1
7
1
6
1
5
1
4
1
3
1
2
1
1
1
0
9
8
7
6
5
4
3
2
1
0
2
3
2
2
2
1
2
0
1
9
1
8
1
7
1
6
1
5
1
4
1
3
1
2
1
1
1
0
9
8
7
6
5
4
3
2
1
0
1
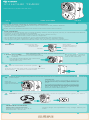
Deslice el interruptor de modo a la posición de temporizador ( ).
2
Baje o levante las pestañas de programación para elegir el tiempo de encendido o apagado automático. Se
recomienda que utilice un objeto puntiagudo.
Si desea que el aparato conectado al temporiza-
dor permanezca encendido sólo durante un lapso
determinado, por ejemplo, de las 7 a las 11 de la
noche, presione desde la pestaña 19 hasta la 23.
Si desea que el aparato permanezca encendido
todo el día y se apague a ciertas horas, primero
baje todas las pestañas y luego levante sólo las
que corresponden a las horas deseadas, por
ejemplo, para que se apague a las 3 y 5 de la
tarde, levante las pestañas 15 y 17.
EJEMPLOS:
Alimentación: 120 V~ 60 Hz 15 A máx.
Salida: 120 V~ 60 Hz 15 A máx.
Temperatura de operación 0 °C a 40 °C
Carga resistiva: 1 760 W máx.
3
2
3
2
2
2
1
2
0
1
9
1
8
1
7
1
6
1
5
1
4
1
3
1
2
1
1
1
0
9
8
7
6
5
4
3
2
1
0
2
3
2
2
2
1
2
0
1
9
1
8
1
7
1
6
1
5
1
4
1
3
1
2
1
1
1
0
9
8
7
6
5
4
3
2
1
0
El diseño del producto y las especificaciones pueden cambiar
sin previo aviso.
2
3
2
2
2
1
2
0
1
9
1
8
1
7
1
6
1
5
1
4
1
3
1
2
1
1
1
0
9
8
7
6
5
4
3
2
1
0
Cada pestaña
corresponde a un
lapso de 30 minutos
2
3
2
2
2
1
2
0
1
9
1
8
1
7
1
6
1
5
1
4
1
3
1
2
1
1
1
0
9
8
7
6
5
4
3
2
1
0
Conecte el temporizador a un tomacorriente y en el temporizador conecte el equipo cuyo encendido desea
automatizar.
4

24 HOUR TIMER
INSTRUCTION MANUAL
V0.0 TEMP24H/MINI 0618A
• This device is not intended for use by people (including children), whose physical, sensory or mental abilities are different
or reduced, or who lack experience or knowledge.
• Children should be supervised to ensure they do not use the device as a toy.
• Always use a soft, clean and dry cloth to clean the equipment.
• Do not attempt to open the equipment, it may cause malfunction and void the warranty.
• Do not use or store this equipment in places where there are leaks or splashes of water.
• The equipment system is electromechanical; There may be time lags in the programming time.
To set the current time, turn the selection knob
clockwise.
this important that you first set the current time to
use the timer mode.
Selection knob
of current time
Mode switch:
permanent ignition or
programmed (timer)
Programming tabs
Contact
Plug
The triangle should indicate the number that
corresponds to the current time.
The format is 24 h.
If you do not use the timer mode, you can slide the switch
to permanent ( ) to work as a normal contact.
Ex: if your watch is 4 o'clock
in the afternoon, place the
knob on the number 16.
Read this manual carefully to avoid any malfunction.
The information shown in this manual serves only as a reference for the product. Because
Updates may exist differences.
Please check our website www.steren.com for the most recent version of this manual.
CAUTIONS
HOW TO USE
PARTS
SPECIFICATIONS
2
3
2
2
2
1
2
0
1
9
1
8
1
7
1
6
1
5
1
4
1
3
1
2
1
1
1
0
9
8
7
6
5
4
3
2
1
0
2
3
2
2
2
1
2
0
1
9
1
8
1
7
1
6
1
5
1
4
1
3
1
2
1
1
1
0
9
8
7
6
5
4
3
2
1
0
1
Slide the mode switch to the timer position ( ).
2
Lower or lift the programming tabs to choose the automatic on or off time. It is recommended that you use a
pointed object.
If you want the device connected to the timer to
remain on for only a certain period of time, for
example, from 7 a.m. to 11 p.m., press from tab 19
to 23.
If you want the appliance to remain on all day and
turn off at certain times, first lower all the tabs and
then lift only those that correspond to the desired
hours, for example, to turn off at 3 and 5 in the
afternoon, lift the tabs 15 and 17.
EXAMPLES:
Input: 120 V~ 60 Hz 15 A max.
Output: 120 V~ 60 Hz 15 A max.
Operating temperature: 0 °C to 40 °C
Resistive load: 1 760 W máx.
3
2
3
2
2
2
1
2
0
1
9
1
8
1
7
1
6
1
5
1
4
1
3
1
2
1
1
1
0
9
8
7
6
5
4
3
2
1
0
2
3
2
2
2
1
2
0
1
9
1
8
1
7
1
6
1
5
1
4
1
3
1
2
1
1
1
0
9
8
7
6
5
4
3
2
1
0
Product design and specifications may change without prior
notice.
2
3
2
2
2
1
2
0
1
9
1
8
1
7
1
6
1
5
1
4
1
3
1
2
1
1
1
0
9
8
7
6
5
4
3
2
1
0
Each tab
corresponds to a
lapse of 30 minutes.
2
3
2
2
2
1
2
0
1
9
1
8
1
7
1
6
1
5
1
4
1
3
1
2
1
1
1
0
9
8
7
6
5
4
3
2
1
0
Connect the timer to an electrical outlet and on the timer connect the equipment whose ignition you want to
automate.
4
-
 1
1
-
 2
2


Steren TEMP-24H/MINI El manual del propietario
- Tipo
- El manual del propietario
- Este manual también es adecuado para
en otros idiomas
- English: Steren TEMP-24H/MINI Owner's manual