Bestron AGL30 Manual de usuario
- Categoría
- Barbacoas
- Tipo
- Manual de usuario


Gebruikershandleiding
3
Nederlands
Gefeliciteerd met de aankoop van deze grill-bakoven waarmee u de lekkerste gerechten kunt toasten,
grillen en bakken. De oven heeft een variabele thermostaat, heteluchtfunctie, boven en onder
verwarmingselementen voor een gelijkmatige boven- en onderwarmte en een inhoud van 26 liter.
VEILIGHEIDSVOORSCHRIFTEN - Algemeen
• Lees de gebruiksaanwijzing goed door en bewaar deze zorgvuldig.
• Gebruik dit apparaat alleen zoals beschreven in deze gebruiksaanwijzing.
• Dit apparaat mag niet gebruikt worden door kinderen en personen die door een lichamelijke,
zintuiglijke of geestelijke beperking, of gebrek aan ervaring en kennis het apparaat niet veilig kunnen
gebruiken, tenzij ze instructies hebben gehad over het gebruik van het apparaat door een persoon die
verantwoordelijkis voor hun veiligheid.
• Kinderen moeten in de gaten gehouden worden om er zeker van te zijn dat ze niet met het apparaat
spelen.
• Laat reparaties uitvoeren door een gekwalificeerde monteur. Probeer nooit zelf het apparaat te
repareren.
VEILIGHEIDSVOORSCHRIFTEN - Elektriciteit en warmte
Bepaalde delen van het apparaat kunnen heet worden.
Raak deze niet aan om te voorkomen dat u zich verbrandt.
• Controleer of de netspanning overeenkomt met de aangegeven netspanning op het typeplaatje van het
apparaat, voordat u het apparaat gebruikt.
• Controleer of de contactdoos waarop u het apparaat aansluit geaard is.
• Haal altijd de stekker uit het stopcontact voordat u het apparaat verplaatst en wanneer u het apparaat
niet gebruikt.
• Trek niet aan het snoer als u de stekker uit het stopcontact neemt, maar aan de stekker zelf.
• Controleer regelmatig of het snoer van het apparaat nog intact is. Gebruik het apparaat niet als het
snoer beschadigingen vertoont. Laat een beschadigd snoer vervangen door een gekwalificeerde
servicedienst.
• Bepaalde delen van het apparaat kunnen heet worden. Raak deze niet aan om te voorkomen dat u
zich verbrandt.
• Zorg er voor dat het apparaat voldoende vrij is en niet in contact kan komen met
brandbaar materiaal. Tevens mag het apparaat niet worden bedekt. Het apparaat moet zijn warmte
kwijt kunnen om brandgevaar te voorkomen.
• Zorg ervoor dat het apparaat en het snoer niet in aanraking komen met hittebronnen, zoals een hete
kookplaat of open vuur.
• Zorg ervoor dat het snoer en de stekker niet in aanraking komen met water.
VEILIGHEIDSVOORSCHRIFTEN - Gebruik
• Gebruik het apparaat nooit buitenshuis.
• Gebruik het apparaat nooit in vochtige ruimten.
• Plaats het apparaat op een stabiele en vlakke ondergrond, op een plaats waar het niet kan vallen.
• Zorg ervoor dat uw handen droog zijn als u het apparaat, het snoer of de stekker aanraakt.
• Schakel het apparaat uit en verwijder de stekker uit het stopcontact als u tijdens het gebruik storingen
ondervindt, het apparaat gaat reinigen, een accessoire aanbrengt of verwijdert, of klaar bent met het
gebruik.
• Laat het apparaat nooit onbeheerd achter als het in gebruik is.
• Verplaats het apparaat nooit als het is ingeschakeld of nog warm is. Schakel het apparaat eerst uit en
verplaats het pas als het is afgekoeld.
• Zorg voor voldoende vrije ruimte rondom het apparaat (minimaal 10 cm) en boven het apparaat
(minimaal 30 cm).
• Tijdens gebruik wordt de glazen deur heet. Gebruik daarom altijd de handgreep op de deur om de deur
te openen en te sluiten.
• Gebruik de uitneemgrepen om de bakplaat, het rooster of het draaispit uit de hete oven te nemen.
• Plaats de volgende materialen niet boven op het apparaat: karton, plastic, papier, kaarsen of
ontvlambare materialen.
• Plaats geen zware voorwerpen op de ovendeur als deze geopend is.
• Wees extra voorzichtig bij het uitnemen van een bakplaat met hete sappen en vetten.
• Voorkom dat er tijdens of direct na gebruik water op de hete ovendeur komt. Hierdoor kan het glas
breken.

Gebruikershandleiding
4
Nederlands
• Plaats het apparaat niet in de buurt van een gasbrander of een andere hittebron, of direct naast een
elektrische ventilator. Deze kunnen een nadelige invloed hebben op de temperatuurregeling van het
apparaat.
• Pak het apparaat niet op wanneer het in het water is gevallen. Trek direct de stekker uit het
stopcontact. Gebruik het apparaat niet meer.
• Maak het apparaat na gebruik grondig schoon (zie ‘Reiniging en onderhoud’).
• Dompel het apparaat, het snoer en de stekker van het apparaat nooit onder in water of een andere
vloeistof.
• Het toestel mag niet in werking worden gesteld door middel van een externe tijdschakelaar, of door
een afzonderlijk systeem met afstandsbediening.
WERKING - Algemeen
De gril-bakoven is alleen bedoeld
voor huishoudelijke doeleinden,
niet voor professioneel gebruik.
1. Behuizing
2. Afstandhouder
3. Snoer met stekker
4. Ventilatiesleuven
5. Knop ‘TEMPerature’
(temperatuur)
6. Knop ‘selector’
(boven- en/of onderwarmte)
7. Knop ‘TIMER’ (tijd)
8. Aan/uit-indicatielampje
9. Verwarmingselementen
10. Hetelucht ventilator
11. Aandrijfhuls draaispit
12. Handgreep deur
13. Deur
14. Draaispit
15. Klem draaispit
16. Uitneemgreep draaispit
17. Uitneemgreep bakplaat/rooster
18. Bakplaat
19. Rooster Figuur 1
De eerste keer dat u het apparaat in gebruik neemt, kan er lichte rookontwikkeling en een specifieke
geur ontstaan. Dit is normaal en zal vanzelf verdwijnen. Zorg voor voldoende ventilatie.
WERKING - Voor het eerste gebruik
1. Verwijder de verpakking.
2. Reinig alle accessoires om eventuele resten van het fabricageproces te verwijderen (zie ‘Reiniging en
onderhoud’). Droog ze vervolgens goed af.
3. Zet de lege oven gedurende 15 minuten met boven- en onderwarmte op de hoogste temperatuur aan,
met de deur open. Zo verwijdert u de eventuele verpakkingsgeur uit het apparaat.
WERKING - Voorverwarmen
Het is niet noodzakelijk om de oven voor te verwarmen. In bepaalde gevallen verkrijgt u echter een beter
resultaat als u de oven voorverwarmt, bijvoorbeeld bij vlees dat medium-rare (roze van binnen met een
rode kern) moet worden gebakken of bij het bereiden van cake.
WERKING - Heteluchtfunctie
De ventilator in de zijwand verdeelt de hete lucht door de oven. Hiermee worden de gerechten verwarmd.
U kunt op meerdere niveaus tegelijk bakken, waardoor u energie kunt besparen. Door de intensieve
warmte overdracht kunt u een ca. 20 °C lagere temperatuur kiezen dan bij conventionele recepten staat
aangegeven.
1
5
6
7
43
2
8
13
12
14
17
18
19
15
16
0
9
11
10

Gebruikershandleiding
5
Nederlands
De heteluchtfunctie is uitermate geschikt voor het
bakken van cakes, koekjes en appeltaarten. U kunt
zelfs op meerdere richels tegelijk bakken. Wel moeten
dan de vormen recht onder elkaar gezet worden.
Bakplaten met koekjes plaatst u op de tweede en derde
richel van onderen.
WERKING - Bakken
1. Open de ovendeur.
2. Plaats de bakplaat met de etenswaren op de gewenste hoogte in de sleuven in de oven.
3. Sluit de ovendeur.
4. Stel de gewenste temperatuur in met de knop ‘TEMPerature’.
5. Draai de knop ‘selector’ naar de stand .
6. Stel de gewenste baktijd in met de knop ‘TIMER’. De bereidingstijd is afhankelijk van de soort
etenswaren en de hoeveelheid ervan.Het aan/uit- indicatielampje gaat aan.
7. Bak de etenswaren totdat deze gaar zijn.Aan het einde van de baktijd is een geluidsignaal hoorbaar en
schakelt de oven automatisch uit. Het aan/uit- indicatielampje gaat uit.
Als de etenswaren gaar zijn maar de baktijd nog niet verstreken is, kunt u de oven uitschakelen door
de knop ’selector’ naar de stand ‘OFF’ te draaien. De timer loopt dan nog wel door, maar de oven
verwarmt niet meer.
8. Doe ovenhandschoenen aan.
9. Open de ovendeur. Voorzichtig! De deur is heet.
10. Neem de bakplaat met de uitneemgreep uit de oven.
11. Sluit de ovendeur.
12. Neem de etenswaren van de bakplaat en plaats
deze op een bord. Voorzichtig! De etenswaren zijn heet.
13. Draai als u klaar bent met bakken de knop ’selector’
naar de stand ‘OFF’ en neem de stekker uit
het stopcontact.
Figuur 2 Bakplaat uitnemen
WERKING - Grillen
Met de grillfunctie kunt u vlees, vis, gevogelte en ovenschotels van een goudbruin korstje voorzien.
1. Open de ovendeur.
2. Plaats de bakplaat in de onderste sleuven in de oven. De bakplaat vangt eventuele sappen en vetten
tijdens het grillen op en voorkomt dat deze op het onderste verwarmingselement komen.
3. Plaats het rooster met de etenswaren in de middelste of bovenste sleuven in de oven.
4. Laat de ovendeur op een kier openstaan om de lucht te kunnen laten circuleren.
5. Stel de gewenste temperatuur in met de knop ‘TEMPerature’.
6. Draai de knop ‘selector’ naar de stand .
7. Stel de gewenste grilltijd in met de knop ‘TIMER’. De bereidingstijd is afhankelijk van de soort
etenswaren en de hoeveelheid ervan.Het aan/uit- indicatielampje gaat aan.
8. Grill de etenswaren totdat deze gaar zijn. Aan het einde van de grilltijd is een geluidsignaal hoorbaar
en schakelt de oven automatisch uit. Het aan/uit- indicatielampje gaat uit.
Als de etenswaren gaar zijn maar de grilltijd nog niet verstreken is, kunt u de oven uitschakelen door
de knop ’selector’ naar de stand ‘OFF’ te draaien. De timer loopt dan nog wel door, maar de oven
verwarmt niet meer.
9. Doe ovenhandschoenen aan.
10. Open de ovendeur. Voorzichtig! De deur is heet.
11. Neem het rooster met de etenswaren met de uitneemgreep uit de oven.
Stand schakelaar Bakinstelling
OFF Uit
Bovenwarmte
Onderwarmte
Boven- en onderwarmte

Gebruikershandleiding
6
Nederlands
12. Neem de etenswaren van het rooster en plaats ze op
een bord. Voorzichtig! De etenswaren zijn heet.
13. Neem de bakplaat met de uitneemgreep uit de oven.
Voorzichtig! Eventuele sappen en vetten op de bakplaat
zijn heet!
14. Sluit de ovendeur.
15. Draai als u klaar bent met grillen de knop ’SELECTOR’
naar de stand ‘OFF’ en neem de stekker uit het
stopcontact.
Figuur 3 Rooster uitnemen
WERKING - Draaispit gebruiken
Met het draaispit kunt u vlees en gevogelte mooi egaal bruin roosteren.
1. Open de ovendeur.
2. Plaats de bakplaat in de onderste sleuven in de oven. De bakplaat vangt eventuele sappen en vetten
tijdens het roosteren op en voorkomt dat deze op het onderste verwarmingselement komen.
3. Verwijder de klem aan het afgeronde uiteinde van het draaispit.
4. Spies het te roosteren vlees of gevogelte aan het afgeronde uiteinde op het draaispit. Zorg ervoor dat
het draaispit door het midden van het vlees of gevogelte steekt.
5. Zet het te grillen vlees of gevogelte met de klemmen op het draaispit vast.
Figuur 4 Draaispit plaatsen
6. Plaats het draaispit met het vlees of gevogelte in de oven. Steek het afgeronde uiteinde van het
draaispit in de aandrijfhuls. Plaats het rechte uiteinde van het draaispit op de steun.
Zorg ervoor dat het vlees of gevogelte tijdens het draaien niet tegen het bovenste verwarmingselement
komt.
7. Laat de ovendeur op een kier openstaan om de lucht te kunnen laten circuleren.
8. Stel de gewenste temperatuur in met de knop ‘temperature’.
9. Draai de knop ‘selector’ naar de stand . Bij gebruik van het draaispit adviseren wij om alleen
bovenwarmte te gebruiken, omdat het onderwarmte element afgedekt wordt door de bakplaat die het
druipvet opvangt en dus geen effect heeft.
10. Stel de gewenste grilltijd in met de knop ‘TIMER’. De bereidingstijd is afhankelijk van het soort
etenswaar en de hoeveelheid ervan.Het aan/uit- indicatielampje gaat aan.
11. Grill het vlees of gevogelte totdat dit gaar is. Aan het einde van de roostertijd is een geluidsignaal
hoorbaar en schakelt de oven automatisch uit. Het aan/uit- indicatielampje gaat uit.

Gebruikershandleiding
7
Nederlands
Als het vlees of gevogelte gaar is maar de grilltijd nog niet verstreken is, kunt u de oven uitschakelen
door de knop ’selector’ naar de stand ‘OFF’ te draaien. De timer loopt dan nog wel door, maar de oven
verwarmt niet meer.
12. Doe ovenhandschoenen aan.
13. Open de ovendeur. Voorzichtig! De deur is heet.
Figuur 5 Draaispit uitnemen
14. Neem het draaispit met het vlees of gevogelte met de uitneemgreep uit de oven en plaats deze op een
bord.
15. Sluit de ovendeur.
16. Verwijder de klem aan het afgeronde uiteinde van het draaispit en neem het draaispit uit het vlees of
gevogelte. Voorzichtig! De draaispit en het vlees of gevogelte zijn heet.
17. Neem de bakplaat met de uitneemgreep uit de oven. Voorzichtig! Eventuele sappen en vetten op de
bakplaat zijn heet!
18. Draai als u klaar bent met roosteren de knop ‘selector’ naar de stand ‘OFF’ en neem de stekker uit het
stopcontact
REINIGING EN ONDERHOUD
Reinig het apparaat na ieder gebruik.
1. Neem de stekker uit het stopcontact en laat het apparaat volledig afkoelen.
2. Reinig de bakplaat, het rooster, het draaispit en klemmen en de uitneemgrepen in warm water met
afwasmiddel. Spoel de onderdelen goed af en droog ze vervolgens grondig af.
3. Reinig de binnen- en buitenzijde van de oven en de deur met een vochtige doek. Droog ze vervolgens
grondig af.
4. Plaats alle onderdelen terug in de oven en berg de oven op.
• Zorg ervoor dat het apparaat niet is aangesloten op het stopcontact als u het gaat schoonmaken.
• Gebruik geen agressieve of schurende schoonmaakmiddelen of scherpe voorwerpen (zoals
messen of harde borstels) bij het reinigen.
• Dompel het apparaat, het snoer en de stekker van het apparaat nooit onder in water of een andere
vloeistof.
TECHNISCHE GEGEVENS
Type: AGL30
Vermogen: 1600W
Netspanning: 220-240V ~ 50Hz
MILIEU
• Werp verpakkingsmateriaal zoals plastic en dozen in de daarvoor bestemde containers.
• Dit product aan het eind van de gebruiksduur niet inleveren als normaal huishoudelijk afval, maar
bij een inzamelpunt voor hergebruik van elektrische en elektronische apparatuur. Let op het
symbool op het product, de gebruiksaanwijzing of de verpakking.
• De materialen kunnen hergebruikt worden zoals aangegeven. Door uw hulp bij hergebruik, de
verwerking van de materialen of ander vormen van de benutting van oude apparatuur levert u een
belangrijke bijdrage aan de bescherming van ons milieu.
• Informeer bij de gemeente naar het juiste inzamelpunt bij u in de buurt.

Gebruikershandleiding
8
Nederlands
GARANTIEBEPALINGEN
De importeur geeft onder de volgende voorwaarden 60 maanden na aankoopdatum garantie op deze
apparatuur tegen defecten die zijn ontstaan door fabricage- en/of materiaalfouten.
1. In de genoemde garantieperiode zullen geen kosten worden berekend voor arbeidsloon en materiaal.
De onder garantie uitgevoerde reparatie verlengt de garantietermijn niet.
2. Defecte onderdelen of bij remplace (omruiling) de defecte apparaten zelf, worden automatisch
eigendom van de importeur.
3. Elke aanspraak op garantie dient vergezeld te gaan van het aankoopbewijs van de firma.
4. Aanspraken op garantie moeten worden gedaan bij de dealer waar het apparaat is gekocht of bij de
importeur.
5. De garantie is uitsluitend geldig voor de eerste koper en niet overdraagbaar.
6. De garantie is niet geldig voor schade die is ontstaan door:
a. ongevallen, verkeerd gebruik, slijtage en/of verwaarlozing;
b. foutieve installatie en/of gebruik op een manier die in strijd is met de geldende wettelijke,
technische of veiligheidsnormen;
c. aansluiting op een andere netspanning dan die op het typeplaatje staat vermeld;
d. een ongeautoriseerde wijziging;
e. een reparatie die is uitgevoerd door derden;
f. een onzorgvuldige transportwijze zonder geschikte verpakking respectievelijk bescherming.
7. Op deze garantiebepalingen zal geen aanspraak gemaakt kunnen worden bij:
a. verliezen die zich tijdens het transport voordoen;
b. het verwijderen of wijzigen van het serienummer van het apparaat.
8. Uitgezonderd van garantie zijn snoeren, lampen en glazen onderdelen.
9. De garantie geeft geen enkel recht op vergoeding van eventuele schade, buiten de vervanging
respectievelijk reparatie van de defecte onderdelen. De importeur kan nooit aansprakelijk gesteld
worden voor eventuele vervolgschade of enigerlei andere consequenties die door of in relatie met de
door hem geleverde apparatuur zijn ontstaan.
10. Om aanspraak te maken op garantie kunt u zich wenden tot uw winkelier. Bestron biedt ook de
mogelijkheid om het apparaat rechtstreeks ter reparatie aan te bieden aan de Bestron Service Dienst.
Stuur echter nooit zomaar iets op. Het pakket kan dan namelijk geweigerd worden en eventuele kosten
zijn voor uw rekening. Neem contact op met de Service Dienst en zij zullen u vertellen hoe u het
apparaat moet inpakken en verzenden.
11. Het apparaat is niet voor professioneel gebruik geschikt.
SERVICE
Mocht zich onverhoopt een storing voordoen, dan kunt u zich in verbinding stellen met de BESTRON-
servicedienst: www.bestron.com/service
CE-CONFORMITEITSVERKLARING
Dit product voldoet aan de bepalingen in de volgende Europese richtlijnen op het gebied van veiligheid:
• EMC-richtlijn 2004/108/EC
• Laagspanningsrichtlijn 2006/95/EC
R. Neyman
Quality control

Gebrauchsanweisung
9
Deutsch
Wir gratulieren Ihnen zum Kauf dieses Grillbackofens, mit dem Sie die leckersten Gerichte toasten, grillen
und backen können. Der Ofen verfügt über einen variablen Thermostat, Umluftfunktion, oben und unten
über Heizelemente für eine gleichmäßige Ober- und Unterhitze und er hat ein Fassungsvermögen von 26
Litern.
SICHERHEITSBESTIMMUNGEN - Allgemein
• Lesen Sie die Bedienungsanleitung gut durch und bewahren Sie diese sorgfältig auf.
• Verwenden Sie dieses Gerät nur so wie in dieser Bedienungsanleitung beschrieben.
• Kinder oder Personen, denen es an Wissen oder Erfahrung im Umgang mit dem Gerät mangelt,
oder die in ihren körperlichen, sensorischen oder geistigen Fähigkeiten eingeschränkt sind, dürfen
das Gerät nicht ohne Aufsicht oder Anleitung durch eine für ihre Sicherheit verantwortliche Person
benutzen.
• Kinder müssen beaufsichtigt werden, damit sie nicht mit dem Gerät spielen.
• Lassen Sie Reparaturen von einem qualifizierten Mechaniker ausführen. Versuchen Sie nie, das Gerät
selbst zu reparieren.
SICHERHEITSBESTIMMUNGEN - Elektrizität und Wärme
Bestimmte Teile des Geräts können heiß werden.
Um Verbrennungen zu vermeiden, sollten Sie diese nicht berühren.
• Bevor Sie das Gerät verwenden, prüfen Sie, ob die Netzspannung mit der auf dem Typenschild des
Geräts angegebenen Stromstärke übereinstimmt.
• Kontrollieren Sie, ob die Steckdose, an die Sie das Gerät anschließen, geerdet ist.
• Ziehen Sie immer den Stecker aus der Steckdose, wenn Sie das Gerät umstellen und wenn Sie es
nicht benutzen.
• Ziehen Sie beim Entfernen des Steckers aus der Steckdose am Stecker und nicht am Kabel.
• Überprüfen Sie regelmäßig, ob das Gerätekabel noch intakt ist. Benutzen Sie das Gerät nicht, wenn
das Kabel beschädigt ist. Lassen Sie ein beschädigtes Kabel von einem qualifizierten Wartungsdienst
ersetzen.
• Bestimmte Teile des Geräts können heiß werden. Um Verbrennungen zu vermeiden, sollten Sie diese
nicht berühren.
• Sorgen Sie also dafür, dass das Gerät ausreichend frei steht und nicht in Kontakt mit brennbarem
Material kommen kann. Das Gerät darf auch nicht abgedeckt werden. Um Brandgefahr zu verhindern,
muss das Gerät seine Wärme abgeben können.
• Sorgen Sie dafür, dass das Gerät und das Kabel nicht mit Hitzequellen wie heißen Kochplatten oder
offenem Feuer in Berührung kommen.
SICHERHEITSBESTIMMUNGEN - Benutzung
• Benutzen Sie das Gerät nie im Freien.
• Benutzen Sie das Gerät nie in feuchten Räumen.
• Stellen Sie das Gerät auf einen stabilen und ebenen Untergrund und an eine Stelle, wo es nicht
herunterfallen kann.
• Sorgen Sie dafür, dass Ihre Hände trocken sind, wenn Sie das Gerät, das Kabel oder den Stecker
berühren.
• Schalten Sie das Gerät aus und ziehen Sie den Stecker aus der Steckdose, wenn bei der Benutzung
Störungen auftreten, Sie das Gerät reinigen, Zubehör anbringen oder abnehmen oder Sie das Gerät
nicht mehr benutzen.
• Lassen Sie das Gerät bei der Benutzung niemals unbeaufsichtigt.
• Verschieben Sie das Gerät keinesfalls in eingeschaltetem Zustand oder wenn es noch warm ist.
Schalten Sie das Gerät zuerst aus und verschieben Sie es erst, wenn es abgekühlt ist.
• Sorgen Sie dafür, dass um das Gerät herum (mindestens 10cm) und über dem Gerät (mindestens
30cm) ausreichend Platz ist.
• Während der Benutzung werden die Glastüren des Ofens heiß. Verwenden Sie zum Öffnen und
Schließen der Tür darum immer den Handgriff.
• Verwenden Sie die Pfannengriffe, um das Backblech, den Rost oder den Drehspieß aus dem heißen
Ofen herauszunehmen.
• Stellen Sie die folgenden Materialien nicht auf das Gerät: Pappe, Kunststoff, Papier, Kerzen oder
entflammbare Materalien.
• Stellen Sie keine schweren Gegenstände auf die Ofentür, wenn diese geöffnet ist.
• Seien Sie beim Herausnehmen des Backblechs sehr vorsichtig mit heißem Bratensaft und Fett.

Gebrauchsanweisung
10
Deutsch
• Vermeiden Sie, dass während oder direkt nach der Benutzung Wasser auf die heiße Ofentür gelangt.
Dadurch kann das Glas springen.
• Stellen Sie das Gerät nicht in der Nähe eines Gasbrenners oder einer anderen Hitzequelle oder direkt
neben einem elektrischen Ventilator auf. Diese können sich nachteilig auf die Temperatursteuerung
des Geräts auswirken.
• Nehmen Sie das Gerät nicht auf, wenn es ins Wasser gefallen ist. Ziehen Sie sofort den Stecker aus
der Steckdose. Benutzen Sie das Gerät nicht mehr.
• Reinigen Sie das Gerät nach der Benutzung gründlich (siehe Reinigung und Wartung).
• Tauchen Sie das Gerät, das Kabel und den Stecker des Geräts nie in Wasser oder andere
Flüssigkeiten
• Verwenden Sie das Gerät nicht mit externen Zeitschaltuhren o.ä.
VERWENDUNG - Allgemein
Der Grillbackofen ist nur für
den Hausgebrauch vorgesehen,
nicht für die professionelle
Verwendung.
1. Gehäuse
2. Abstandhalter
3. Kabel mit Stecker
4. Lüftungsschlitze
5. “TEMPerature”-Taste
(Temperatur)
6. “selector“-Taste
(Ober- und/oder Unterhitze)
7. “TIMER“-Taste (Zeit)
8. Ein/Aus-Kontrolllampe
9. Heizelemente
10. Umluftventilator
11. Antriebshülse Drehspieß
12. Türgriff
13. Tür
14. Drehspieß
15. Drehspießklemme
16. Pfannengriff Drehspieß
17. Pfannengriff
Backblech/Rost
18. Fettpfanne
19. Rost Abbildung 1
VERWENDUNG - Vor der ersten gebrauch
1. Entfernen Sie die Verpackung.
2. Reinigen Sie alle Zubehörteile, um eventuelle Reste des Herstellungsprozesses zu entfernen (siehe
“Reinigung und Wartung“). Trocknen Sie sie anschließend gründlich ab.
3. Schalten Sie den Ofen mit geöffneter Tür für die Dauer von 15 Minuten mit Ober- und Unterhitze auf
der höchsten Temperatur ein. So entfernen Sie den eventuell vorhandenen Verpackungsgeruch aus
dem Gerät.
Bei der ersten Verwendung des Geräts können eine leichte Rauchentwicklung sowie ein spezieller
Geruch entstehen. Das ist normal und geht von selbst wieder weg. Sorgen Sie für ausreichende
Belüftung.
VERWENDUNG - Vorheizen
Es ist nicht nötig, den Ofen vorzuheizen. In bestimmten Fällen erhalten Sie jedoch ein besseres Ergebnis,
wenn Sie den Ofen vorheizen, zum Beispiel bei Fleisch, das halbgar (innen rosa mit einem roten Kern)
zubereitet werden muss, oder beim Backen von Kuchen.
VERWENDUNG - Umluftfunktion
Der Ventilator in der Seitenwand verteilt die heiße Luft, mit der die Speisen erhitzt werden, durch den Ofen.
1
5
6
7
43
2
8
13
12
14
17
18
19
15
16
0
9
11
10

Gebrauchsanweisung
11
Deutsch
Sie können auf mehreren Ebenen zugleich backen und so Energie sparen. Durch die intensive Wärme
übertragung können Sie eine um ca. 20°C niedrigere Temperatur einstellen als in herkömmlichen
Rezepten angegeben.
Die Umluftfunktion eignet sich besonders zum Backen
von Kuchen und Plätzchen. Sie können sogar auf
mehreren Schienen gleichzeitig backen. Dabei müssen
die Kuchenformen jedoch genau untereinander stehen.
Backbleche mit Plätzchen müssen auf die zweite und
dritte Schiene von unten geschoben werden.
VERWENDUNG - Backen
1. Öffnen Sie die Ofentür.
2. Schieben Sie das Backblech mit den Esswaren auf der gewünschten Höhe in die Schienen des Ofens.
3. Schließen Sie die Ofentür.
4. Stellen Sie die gewünschte Temperatur mit der “TEMPerature“-Taste ein.
5. Drehen Sie die “selector“-Taste auf die Einstellung .
6. Stellen Sie die gewünschte Backzeit mit der “TIMER“-Taste ein. Die Zubereitungszeit hängt von der Art
der Lebensmittel und der Menge ab. Die Ein/Aus-Kontrolllampe schaltet sich ein.
7. Backen Sie die Esswaren, bis sie gar sind.Am Ende der Backzeit ertönt ein akustisches Signal und der
Ofen schaltet sich automatisch aus. Die Ein/Aus-Kontrolllampe erlischt.
Wenn die Esswaren gar sind, aber die Backzeit noch nicht vorüber ist, können Sie den Ofen
ausschalten, indem Sie die “selector”-Taste auf “OFF” drehen. Der Timer läuft dann zwar noch weiter,
aber der Ofen heizt nicht mehr.
8. Verwenden Sie Topflappen.
9. Öffnen Sie die Ofentür. Vorsicht! Die Tür ist heiß.
10. Nehmen Sie das Backblech mit dem Pfannengriff
aus dem Ofen.
11. Schließen Sie die Ofentür.
12. Nehmen Sie die Esswaren von der Backblech
herunter und legen Sie sie auf einen Teller.
Vorsicht! Die Esswaren sind heiß.
13. Wenn Sie mit dem Backen fertig sind, dann
stellen Sie die ”SELECTOR“-Taste auf “OFF“
und ziehen Sie den Stecker aus der Steckdose.
Abbildung 2 Backblech herausnehmen
VERWENDUNG - GRILLEN
Mit der Grillfunktion können Sie Fleisch, Fisch, Geflügel und Aufläufe mit einer golbraunen Kruste
versehen.
1. Öffnen Sie die Ofentür.
2. Schieben Sie das Backblech auf die unterste Schiene des Ofens. Das Backblech fängt eventuelle
Bratensäfte und Fett während des Grillens auf und verhindert, dass diese auf das untere Heizelement
gelangen.
3. Schieben Sie den Rost mit den Esswaren auf die mittlere oder obere Schiene im Ofen.
4. Lassen Sie die Ofentür einen Spalt breit geöffnet, damit die Luft zirkulieren kann.
5. Stellen Sie die gewünschte Temperatur mit der “TEMPerature“-Taste ein.
6. Drehen Sie die “selector“-Taste auf die Einstellung .
7. Stellen Sie die gewünschte Grillzeit mit der “TIMER“-Taste ein. Die Zubereitungszeit hängt von der Art
der Esswaren und der Menge ab.Die Ein/Aus-Kontrolllampe schaltet sich ein.
8. Grillen Sie das Grillgut, bis dieses gar ist. Am Ende der Grillzeit ertönt ein akustisches Signal und der
Ofen schaltet sich automatisch aus. Die Ein/Aus- Kontrolllampe erlischt.
Wenn die Esswaren gar sind, aber die Grillzeit noch nicht vorüber ist, können Sie den Ofen
ausschalten, indem Sie die ”selector”-Taste auf “OFF” drehen. Der Timer läuft dann zwar noch weiter,
aber der Ofen heizt nicht mehr.
Stand Schalter Stand Wahlschalter
OFF Aus
Oberhitze
Unterhitze
Ober- und Unterhitze

Gebrauchsanweisung
12
Deutsch
9. Verwenden Sie Topflappen.
10. Öffnen Sie die Ofentür. Vorsicht! Die Tür ist heiß.
11. Nehmen Sie den Rost mit den Esswaren mithilfe
des Pfannengriffs aus dem Ofen.
12. Nehmen Sie die Esswaren vom Rost und legen
Sie sie auf einen Teller. Vorsicht! Die Esswaren
sind heiß.
13. Nehmen Sie das Backblech mit dem Pfannengriff
aus dem Ofen. Vorsicht! Eventuell auf der
Backblech vorhandene Bratensäfte oder
vorhandenes Fett sind bzw. ist heiß!
14. Schließen Sie die Ofentür.
15. Wenn Sie mit dem Grillen fertig sind, dann
stellen Sie die “selector“-Taste auf “OFF“ und
ziehen Sie den Stecker aus der Steckdose.
Abbildung 3 Rost herausnehmen
VERWENDUNG - Verwendung des Drehspießes
Mit dem Drehspieß können Sie Fleisch und Geflügel schön gleichmäßig braun rösten.
1. Öffnen Sie die Ofentür.
2. Schieben Sie die Fettfpanne auf die unterste Schiene des Ofens. Die Backblech fängt eventuelle
Bratensäfte und Fett während des Röstens auf und verhindert, dass diese auf das untere Heizelement
gelangen.
3. Entfernen Sie die Klemme, die sich am abgerundeten Ende des Drehspießes befindet.
4. Stecken Sie das zu röstende Fleisch oder Geflügel am abgerundeten Ende auf den Drehspieß. Sorgen
Sie dafür, dass der Drehspieß in der Mitte des Fleisch- oder Geflügelstücks steckt.
5. Befestigen Sie das zu grillende Fleisch- oder Geflügelstück mit den Klemmen auf dem Drehspieß.
Abbildung 4 Einsetzen des Drehspießes
6. Platzieren Sie den Drehspieß mit dem Fleisch oder Geflügel im Ofen. Stecken Sie das abgerundete
Ende des Drehspießes in die Antriebshülse. Legen Sie das rechte Ende des Drehspießes auf die
Stütze.
Sorgen Sie dafür, dass das Fleisch oder Geflügel beim Drehen nicht mit dem oberen Heizelement in
Berührung kommt.
7. Lassen Sie die Ofentür einen Spalt breit geöffnet, damit die Luft zirkulieren kann.
8. Stellen Sie die gewünschte Temperatur mit der “TEMPerature“-Taste ein.
9. Drehen Sie die “Selector“-Taste auf die Einstellung . Wir empfehlen beim Einsatz des Rotisserie-
Spießes nur die Oberhitze zu nutzen, da das untere Heizelement durch ein Blech vor tropfendem Fett
etc. abgedeckt sein sollte und dann keine Heizfunktion mehr besitzt.
10. Stellen Sie die gewünschte Grillzeit mit der “TIMER“-Taste ein. Die Zubereitungszeit hängt von der Art

Gebrauchsanweisung
13
Deutsch
der Esswaren und der Menge ab.Die Ein/Aus-Kontrolllampe schaltet sich ein.
11. Grillen Sie das Fleisch oder Geflügel, bis es gar ist. Am Ende der Röstzeit ertönt ein akustisches
Signal und der Ofen schaltet sich automatisch aus. Die Ein/Aus-Kontrolllampe erlischt.
Wenn das Fleisch oder Geflügel gar, aber die Grillzeit noch nicht vorüber ist, können Sie den Ofen
ausschalten, indem Sie die “selector”-Taste auf “OFF” drehen. Der Timer läuft dann zwar noch weiter,
aber der Ofen heizt nicht mehr.
12. Verwenden Sie Topflappen.
13. Öffnen Sie die Ofentür. Vorsicht!
Die Tür ist heiß.
14. Nehmen Sie den Drehspieß mit dem
Fleisch oder Geflügel mithilfe des
Pfannengriffs aus dem Ofen heraus und
legen Sie ihn auf einen Teller.
15. Schließen Sie die Ofentür.
16. Entfernen Sie die Klemme am
abgerundeten Ende des Drehspießes und
ziehen Sie den Drehspieß aus dem Fleisch
oder Geflügel heraus. Vorsicht! Der
Drehspieß und das Fleisch oder Geflügel
sind heiß. Abbildung 5 Herausnehmen des Drehspießes
17. Nehmen Sie das Backblech mit dem Pfannengriff aus dem Ofen. Vorsicht! Eventuell auf der Backblech
vorhandene Bratensäfte oder vorhandenes Fett sind bzw. ist heiß!
18. Wenn Sie mit dem Rösten fertig sind, dann stellen Sie die “selector“-Taste auf “OFF“ und ziehen Sie
den Stecker aus der Steckdose.
REINIGUNG UND WARTUNG
Reinigen Sie das Gerät nach jeder Verwendung.
1. Ziehen Sie den Stecker aus der Steckdose und lassen Sie das Gerät vollständig abkühlen.
2. Reinigen Sie das Backblech, den Rost, den Drehspieß und die Klemmen sowie die Pfannengriffe
in warmem Wasser mit Spülmittel. Spülen Sie die Teile gut ab und trocknen Sie sie anschließend
gründlich ab.
3. Reinigen Sie die Innen- und Außenseite des Ofens und die Tür mit einem feuchten Tuch. Trocknen Sie
anschließend alles gründlich ab.
4. Bringen Sie alle Zubehörteile wieder im Ofen an und verstauen Sie ihn.
• Sorgen Sie dafür, dass das Gerät bei der Reinigung nicht an die Steckdose angeschlossen ist.
• Verwenden Sie zur Reinigung keine aggressiven Reinigungs- oder Scheuermittel oder scharfen
Gegenstände (wie Messer oder harte Bürsten).
• Tauchen Sie das Gerät, das Kabel und den Stecker des Geräts nie in Wasser oder andere
Flüssigkeiten.
TECHNISCHE DATEN
Type: AGL30
Leistung: 1600W
Netzspannung: 220-240V ~ 50Hz
UMWELT
• Werfen Sie Verpackungsmaterial wie Kunststoff und Kartons in die dafür vorgesehenen Container.
• Geben Sie dieses Produkt am Ende der Nutzungsdauer nicht als normalen Haushaltsabfall ab,
sondern bei einem Sammelpunkt für die Wiederverwendung elektrischer und elektronischer Geräte.
Achten Sie auf das Symbol auf dem Produkt, der Gebrauchsanweisung oder der Verpackung.
• Die Materialien können wie angegeben wiederverwendet werden. Durch Ihre Hilfe bei der
Wiederverwendung, der Verarbeitung der Materialien oder anderen Formen der Benutzung alter
Geräte liefern Sie einen wichtigen Beitrag zum Schutz unserer Umwelt.
• Erkundigen Sie sich bei den Stadtverwaltungen nach dem richtigen Sammelpunkt in Ihrer Nähe.

Gebrauchsanweisung
14
Deutsch
GARANTIEBESTIMMUNGEN
Der Importeur gewährt für dieses Gerät unter den folgenden Bedingungen 60 Monate Garantie ab
Kaufdatum auf Schäden, die aufgrund von Herstellungs- und/ oder Materialfehlern entstanden sind.
1. Innerhalb der genannten Garantiefrist werden keine Kosten für Arbeitslohn und Material berechnet. Die
Garantiefrist wird durch die unter Garantie ausgeführte Reparatur nicht verlängert.
2. Schadhafte Teile oder, im Falle eines Umtauschs, die schadhaften Geräte selbst werden automatisch
Eigentum des Importeurs.
3. Bei jedem Garantieanspruch muss ein Kaufbeleg der Firma vorgelegt werden.
4. Garantieansprüche müssen entweder beim Händler, bei dem das Gerät gekauft wurde, geltend
gemacht werden oder beim Importeur.
5. Die Garantie gilt nur für den ersten Käufer und ist nicht übertragbar.
6. Die Garantie gilt nicht für Schäden, die entstanden sind durch:
a. Unfälle, verkehrte Benutzung, Abnutzung und/oder Verwahrlosung
b. falsche Montage und/oder Benutzung, die gegen die einschlägigen gesetzlichen und technischen
Normen oder gegen Sicherheitsnormen verstößt
c. Anschluss an eine andere Netzspannung als die auf dem Typenschild angegebene
d. eine ungenehmigte Veränderung
e. eine Reparatur, die durch Dritte ausgeführt wurde
f. nachlässigen Transport ohne geeignete Verpackung bzw. ohne geeigneten Schutz
7. Auf diese Garantiebestimmungen kann kein Anspruch erhoben werden im Falle von:
a. Verlusten, die während des Transports auftreten
b. Entfernung oder Änderung der Geräteseriennummer
8. Ausgenommen von der Garantie sind Kabel, Lampen und Glasteile.
9. Außer einem Ersatz bzw. einer Reparatur der schadhaften Teile räumt die Garantie kein Recht
auf Erstattung eines eventuellen Schadens ein. Der Importeur kann in keinem Fall für eventuelle
Folgeschäden oder irgendwelche anderen Folgen haftbar gemacht werden, die durch das von ihm
gelieferte oder in Verbindung mit dem von ihm gelieferten Gerät entstanden sind.
10. Um Garantieleistungen in Anspruch zu nehmen, wenden Sie sicht direkt an Ihren Händler. Bestron bietet
auch die Möglichkeit direkt mit dem Werkskundendienst abzuwickeln. Voraussetzung hierfür ist, dass
Sie sich zunächst telefonisch, per Fax oder Mail an den Werkskundendienst wenden. Bitte schicken
Sie keine Geräte unaufgefordert. Insbesondere dürfen Pakete niemals unfrei eingesendet werden.
Sprechen Sie daher zuerst mit uns. Wir sagen Ihnen wie Sie Ihr Gerät an uns einsenden sollen.
11. Das Gerät eignet sich nicht für die professionelle Verwendung.
KUNDENDIENST
Sollte unerwartet eine Störung auftreten dann können Sie sich mit dem BESTRON-Kundendienst in
Verbindung setzen: www.bestron.com/service
CE-KONFORMITÄTSERKLÄRUNG
Dieses Produkt entspricht auf dem Gebiet der Sicherheit den Bestimmungen der folgenden europäischen
Richtlinien:
• EMC-Richtlinie 2004/108/EC
• Niederspannungsrichtlinie 2006/95/EC.
R. Neyman
Qualitätskontrolle

Mode d’emploi
15
Français
Nous vous félicitons de votre achat! Votre four avec grill vous permettra de faire toaster, cuire et griller
les plats les plus délicieux. Le four est équipé d’un thermostat variable, d’une fonction d’air pulsé, ainsi
que d’éléments chauffants en haut et en bas pour une chaleur supérieure et inférieure constante; il a un
contenu de 26 litres.
CONSIGNES DE SÉCURITÉ - Généralités
• Lisez soigneusement le mode d’emploi et conservez-le précieusement.
• Utilisez cet appareil uniquement suivant les instructions décrites dans le mode d’emploi.
• Cet appareil ne peut être utilisé par des enfants ou des personnes avec des capacités physiques,
mentales ou sensorielles limitées, manquant d’expérience ou de connaissance; à moins qu’elles
n’aient eu des instructions et ne soient encadrées par des personnes responsables de leur sécurité.
• Cet appareil n’est pas un jouet. En présence d’enfants, il est important de s’assurer qu’ils ne jouent
pas avec l’appareil.
• Faites effectuer les réparations par un technicien qualifié. Ne tentez jamais de réparer vous-même
l’appareil.
CONSIGNES DE SÉCURITÉ - Électricité et chaleur
Certaines parties de cet appareil peuvent s’échauffer fortement.
Évitez de les toucher pour ne pas vous brûler.
• Avant d’utiliser cet appareil, assurez-vous que la tension du réseau correspond à la tension du réseau
indiquée sur la plaquette type de l’appareil.
• Branchez l’appareil uniquement sur une prise raccordée à la terre.
• Débranchez toujours l’appareil lorsque vous ne l’utilisez pas.
• Lorsque vous débranchez la fiche, saisissez la fiche elle-même; ne tirez pas sur le cordon.
• Vérifiez régulièrement que le cordon de l’appareil est intact. N’utilisez pas l’appareil si vous constatez
que le cordon est endommagé. Faites remplacer le cordon endommagé par un service technique
qualifié.
• Si vous utilisez une rallonge, assurez-vous qu’elle est complètement déroulée.
• Utilisez uniquement une rallonge agréée.
• Certaines parties de cet appareil peuvent s’échauffer fortement. Évitez de les toucher pour ne pas
vous brûler.
• L’appareil doit pouvoir évacuer sa chaleur, sinon il y risque d’incendie. Laissez donc suffisamment
d’espace autour de l’appareil et évitez tout contact avec des matériaux inflammables. L’appareil ne doit
jamais être recouvert.
• N’utilisez pas l’appareil à proximité de matières inflammables.•Assurez-vous que ni l’appareil, ni le
cordon, ni la fiche n’entre en contact avec une source de chaleur telle qu’une plaque électrique chaude
ou une flamme.
• Assurez-vous que ni l’appareil, ni le cordon, ni la fiche n’entre en contact avec de l’eau.
CONSIGNES DE SÉCURITÉ - Pendant l’utilisation
• N’utilisez jamais l’appareil à l’extérieur.
• N’utilisez jamais l’appareil dans une pièce humide.
• Installez l’appareil sur une surface plane et stable, à un endroit où il ne risque pas de tomber.
• Assurez-vous que vos mains sont sèches avant de toucher l’appareil, le cordon ou la fiche.
• Éteignez l’appareil et débranchez la fiche en cas de problème durant l’utilisation, pour le nettoyage, le
montage ou le démontage d’un accessoire, et dès que vous avez fini de l’utiliser.
• Ne laissez jamais l’appareil sans surveillance pendant qu’il est en marche.
• Ne déplacez jamais l’appareil pendant qu’il est en marche, ni s’il est encore chaud. Éteignez-le
d’abord, laissez-le bien refroidir, et déplacez-le ensuite.
• Veillez à laisser un espace libre suffisant autour de l’appareil (minimum 10cm) et au dessus de
l’appareil (minimum 30cm).
• La porte vitrée du four s’échauffe fortement durant l’utilisation. Ouvrez et fermez donc toujours la porte
uniquement par la poignée.
• Pour sortir la plaque du four, la grille ou la broche du four chaud, servez-vous des poignées de retrait.
• Ne placez jamais sur l’appareil les matériaux suivants: carton, plastique, papier, bougies et tout
matériau inflammable.
• Ne posez jamais d’objet lourd sur la porte ouverte du four.
• Redoublez de prudence si la plaque que vous sortez du four contient du jus et des graisses brûlantes.
• Évitez de mouiller la porte vitrée du four durant l’utilisation, ou juste après. La vitre risque de se briser.

Mode d’emploi
16
Français
• Ne placez pas l’appareil à proximité d’un brûleur à gaz, ni d’une autre source de chaleur, ni d’un
ventilateur électrique. Ils peuvent dérégler le réglage de la température de l’appareil.
• Si l’appareil est tombé à l’eau, ne le rattrapez pas. Débranchez immédiatement la fiche. Cessez
d’utiliser l’appareil.
• Nettoyez soigneusement l’appareil après l’utilisation (voir ‘Nettoyage et entretien’).
• N’immergez jamais l’appareil, le cordon ni la fiche dans l’eau ou tout autre liquide.
• Cet appareil ne doit pas être utilisé avec un timer externe ou une télécommande.
FONCTIONNEMENT - Généralités
Ce four avec grill est destiné
uniquement à l’utilisation
domestique, et non à l’usage
professionnel.
1. Corps de l’appareil
2. Cale de distance de sécurité
3. Cordon et fiche
4. Fentes de ventilation
5. Bouton “TEMPerature”
(température)
6. Bouton “selector” (chauffage
en haut et/ou en bas)
7. Bouton “TIMER” (minuterie)
8. Témoin lumineux marche/arrêt
9. Éléments chauffants
10. Ventilateur d’air chaud
11. Entraînement de la broche
12. Poignée de la porte
13. Porte
14. Broche à rôti
15. Fiche de la broche
16. Poignée de retrait
de la broche
17. Poignée de retrait de la
plaque/grille
18. Plaque
19. Grille Figure 1
FONCTIONNEMENT - Avant la première utilisation
1. Enlevez l’emballage.
2. Nettoyez tous les accessoires pour enlever tout reste éventuel du processus de fabrication (voir
‘Nettoyage et entretien’). Séchez bien.
3. Mettez le four en marche, à la température la plus élevée, chauffage en haut et en bas, pendant 15
minutes. Ceci élimine l’odeur de l’emballage qui pourrait être restée présente dans l’appareil.
Lorsque vous utilisez l’appareil pour la première fois, une légère fumée peut se développer,
accompagnée d’une odeur caractéristique. C’est un phénomène normal qui disparaît de lui-même. La
ventilation doit toujours être suffisante.
UTILISATION - Préchauffage
Il n’est pas nécessaire de préchauffer le four. Cependant, il y a des cas où vous obtiendrez de meilleurs
résultats si vous préchauffez le four, par exemple si vous préparez une viande légèrement saignante
(l’intérieur est rose, le centre rouge), ou encore pour faire cuire un cake.
UTILISATION - Fonction d’air pulsé
Le ventilateur intégré dans la paroi latérale diffuse l’air chaud dans le four et permet de chauffer les plats.
Vous pouvez cuire simultanément à plusieurs niveaux, de manière à économiser de l’énergie. La diffusion
d’une chaleur intense vous permet de sélectionner une température d’environ 20 °C inférieure à celle
indiquée pour les recettes conventionnelles.
1
5
6
7
43
2
8
13
12
14
17
18
19
15
16
0
9
11
10

Mode d’emploi
17
Français
La fonction d’air chaud convient parfaitement pour la
cuisson de cakes, de biscuits et de tartes aux pommes.
Vous pouvez même cuire simultanément sur plusieurs
claies. Dans ce cas, veillez à placer les formes
précisément les unes en-dessous des autres. Placez
les plaques de cuisson contenant les biscuits sur la
deuxième ou la troisième claie du bas.
UTILISATION - Cuisson
Cuisson
1. Ouvrez la porte du four.
2. Placez la plaque du four contenant les aliments à la hauteur désirée dans les rainure du four.
3. Fermez la porte.
4. Réglez le thermostat sur la température voulue au moyen du bouton ‘TEMPerature’.
5. Mettez le bouton ‘selector’ en position .
6. Réglez la durée de cuisson voulue au moyen du bouton ‘TIMER’. La durée de la cuisson dépend de
l’aliment et de la quantité.Le témoin lumineux marche/arrêt s’allume.
7. Grillez les aliments jusqu’à ce qu’ils soient prêts.Une fois la durée de cuisson écoulée, un signal
sonore retentit et le four s’éteint automatiquement. Le témoin lumineux marche/arrêt s’éteint.
Si les aliments sont prêts, mais que la durée de cuisson réglée n’est pas encore écoulée, vous pouvez
arrêtez le four en mettant le bouton ‘selector’ en position ‘OFF’. La minuterie continue son compte à
rebours, mais le four ne chauffe plus.
8. Protégez-vous les mains d’une manique ou d’un torchon.
9. Ouvrez la porte du four. Attention! La porte est très chaude.
10. Sortez la plaque du four au moyen de la poignée de retrait.
11. Fermez la porte.
12. Faites passer les aliments de la plaque sur une assiette.
Attention! Les aliments sont très chauds.
13. Lorsque vous avez fini de faire cuire tous les aliments,
mettez le bouton ‘selector’ sur ‘OFF’ et débranchez
la fiche.
Figure 2 Retirer la plaque du four
UTILISATION - Grillades
La fonction grill vous permet de faire griller viande, poisson, et volaille bien dorés, et de gratiner des plats.
1. Ouvrez la porte du four.
2. Enfilez la plaque dans la rainure inférieure du four. La plaque recevra le jus et la graisse qui s’écoulent
pendant que les aliments grillent, et protègent l’élément chauffant inférieur.
3. Placez la griller contenant les aliments dans la rainure du milieu ou la rainure supérieur du four.
4. Laissez la porte entrouverte pour que l’air puisse circuler.
5. Réglez le thermostat sur la température voulue au moyen du bouton ‘TEMPerature’.
6. Mettez le bouton ‘selector’ en position .
7. Réglez la durée voulue au moyen du bouton ‘TIMER’. La durée de la cuisson dépend de l’aliment et de
la quantité.Le témoin lumineux marche/arrêt s’allume.
8. Grillez les aliments jusqu’à ce qu’ils soient prêts. Une fois la durée de cuisson écoulée, un signal
sonore retentit et le four s’éteint automatiquement. Le témoin lumineux marche/arrêt s’éteint.
Position d’interrupteur
Réglage de la cuisson
OFF Eteint
Résistance en dessus
Résistance en dessous
Résistance en dessous
et en dessus

Mode d’emploi
18
Français
Si les aliments sont prêts, mais que la durée de cuisson réglée n’est pas encore écoulée, vous pouvez
arrêtez le four en mettant le bouton ‘selector’ en position ‘OFF’. La minuterie continue son compte à
rebours, mais le four ne chauffe plus.
9. Protégez-vous les mains d’une manique ou d’un torchon.
10. Ouvrez la porte du four. Attention! La porte est très chaude.
11. Sortez la grille du four au moyen de la poignée de retrait.
12. Faites passer les aliments de la grille sur une assiette.
Attention! Les aliments sont très chauds.
13. Sortez la plaque du four au moyen de la poignée de
retrait. Attention! S’il y a du jus et de la graisse dans la
plaque du four, ils sont brûlants!
14. Fermez la porte.
15. Lorsque vous avez fini de faire griller tous les aliments,
mettez le bouton ‘selector’ sur ‘OFF’ et débranchez la
fiche.
Figure 3 Retirer la grille
UTILISATION - Utilisation de la broche pour rôti
La broche permet de faire rôtir viande et volaille de façon égale et dorée.
1. Ouvrez la porte du four.
2. Enfilez la plaque dans la rainure inférieure du four. La plaque recevra le jus et la graisse qui s’écoulent
pendant que les aliments rôtissent, et protègent l’élément chauffant inférieur.
3. Retirer la fiche passée sur le bout arrondi de la broche.
4. Embrochez la viande ou la volaille à faire rôtir, en l’enfilant sur la broche par le bout arrondi de celle-ci.
Veillez à ce que la broche passe bien au milieu de la pièce à rôtir.
5. Fixer soigneusement la pièce à rôtir sur la broche, au moyen des fiches.
Figure 4 Mise en place de la broche
6. Enfournez la broche avec la pièce à rôtir. Enfilez le bout arrondi de la broche dans l’entraînement.
Placez le bout droit de la broche sur le support.
Veillez bien à ce que la pièce à rôtir, en tournant, ne touche pas l’élément chauffant supérieur.
7. Laissez la porte entrouverte pour que l’air puisse circuler.
8. Réglez le thermostat sur la température voulue au moyen du bouton ‘TEMPerature’.
9. Mettez le bouton ‘selector’ en position . Lorsque vous utilisez la rôtissoire, nous vous conseillons
d’utiliser uniquement la cuisson par le haut. En effet, la plaque de cuisson recouvre l’élément chauffant
du dessous, il n’y a donc pas d’intérêt à utiliser la cuisson par le bas.
10. Réglez la durée voulue au moyen du bouton ‘TIMER’. La durée de la cuisson dépend de l’aliment et de
la quantité.Le témoin lumineux marche/arrêt s’allume.
11. Faites rôtir la viande ou volaille jusqu’à ce qu’elle soit prête. Une fois la durée de cuisson écoulée, un
signal sonore retentit et le four s’éteint automatiquement. Le témoin lumineux marche/arrêt s’éteint.

Mode d’emploi
19
Français
Si les aliments sont prêts, mais que la durée de cuisson réglée n’est pas encore écoulée, vous pouvez
arrêtez le four en mettant le bouton ‘selector’ en position ‘OFF’. La minuterie continue son compte à
rebours, mais le four ne chauffe plus.
12. Protégez-vous les mains d’une manique ou d’un torchon.
13. Ouvrez la porte du four. Attention! La porte est très chaude.
Figure 5 Retirer la broche
14. Sortez la broche du four au moyen de la poignée de retrait, et posez-la sur une assiette, avec la pièce
rôtie.
15. Fermez la porte.
16. Retirez la fiche du bout arrondi de la broche, et retirez la broche de la pièce rôtie. Attention! La broche,
ainsi que les aliments rôtis, sont brûlants.
17. Sortez la plaque du four au moyen de la poignée de retrait. Attention! S’il y a du jus et de la graisse
dans la plaque du four, ils sont brûlants!
18. Lorsque vous avez fini de faire rôtir tous les aliments, mettez le bouton ‘selector’ sur ‘OFF’ et
débranchez la fiche.
NETTOYAGE ET ENTRETIEN
Nettoyez l’appareil chaque fois que vous l’avez utilisé.
1. Débranchez la fiche et laissez refroidir complètement l’appareil.
2. Nettoyez la plaque du four, la grille, la broche, les fiches et les poignées de retrait à l’eau chaude
additionnée d’un peu de détergent pour la vaisselle. Rincez bien les pièces puis séchez-les.
3. Nettoyez l’intérieur et l’extérieur du four et de la porte avec un chiffon humide. Séchez bien.
4. Remettez tous les composants dans le four et rangez le four.
• L’appareil ne doit pas être branché sur le réseau électrique pendant que vous le nettoyez.
• N’utilisez pas de détergents agressifs ou décapants ni d’objets tranchants (tels que couteaux ou
brosses dures) pour le nettoyage.
• N’immergez jamais l’appareil, le cordon ni la fiche dans l’eau ou tout autre liquide.
DONNÉES TECHNIQUES
Type: AGL30
Puissance: 1600W
Tension réseau: 220-240V ~ 50 Hz
ENVIRONNEMENT
• Jetez le matériel d’emballage, tel que le plastique et les boîtes, dans les conteneurs prévus à cet
effet.
• Lorsque l’appareil est usé, ne le mettez pas aux ordures ménagères, mais portez-le dans un
centre de collecte agréé pour les appareils électriques et électroniques. Attention au symbole
figurant sur le produit, le mode d’emploi ou l’emballage.
• Les matériaux peuvent être recyclés selon les indications. Votre collaboration au recyclage des
appareils et/ou au retraitement des matériaux, sous quelle forme que ce soit, est une contribution
précieuse à la sauvegarde de notre environnement.
• Les autorités de votre commune vous renseigneront sur le centre de collecte le plus proche.

Mode d’emploi
20
Français
CONDITIONS DE GARANTIE
À compter de la date d’achat de cet appareil, l’importateur donne, aux conditions suivantes, 60 mois de
garantie couvrant tous les défauts consécutifs à des défauts de pièce et main d’œuvre.
1. Pendant la période de garantie aucun frais ne sera facturé pour les pièces et la main d’œuvre. Les
réparations effectuées sous garantie ne prolongent pas le délai de garantie.
2. En cas d’échange, les pièces défectueuses ou les appareils défectueux deviennent automatiquement
la propriété de l’importateur.
3. Toute demande de garantie doit être assortie de la preuve d’achat de l’entreprise.
4. Toute demande de garantie doit être faite auprès du revendeur où l’appareil a été acheté ou auprès de
l’importateur.
5. La garantie est uniquement valable pour le premier acheteur et ne peut être transférée.
6. La garantie ne couvre pas les dommages causés par:
a. les accidents, l’utilisation impropre, l’usure et / ou la négligence ;
b. l’installation incorrecte et/ou une utilisation contraire aux normes de sécurité, aux normes
techniques ou aux dispositions légales en vigueur ;
c. le branchement sur un réseau d’une tension autre que celle figurant sur la plaquette type ;
d. toute modification non autorisée ;
e. toute réparation effectuée par des tiers ;
f. le transport sans précautions suffisantes, telles que la protection et l’emballage appropriés.
7. Les présentes conditions de garantie ne peuvent pas être invoquées dans les cas suivants:
a. pertes survenues pendant le transport;
b. effacement ou modification du numéro de série de l’appareil.
8. Les cordons, ampoules et pièces en verre ne sont pas couverts par la garantie.
9. La garantie ne donne aucun droit d’indemnisation pour des dommages éventuels, autres que le
remplacement ou la réparation de pièces défectueuses. L’importateur ne peut être tenu responsable
d’aucun dommage indirect, ni d’aucune conséquence quelle qu’elle soit, causé par ou ayant un
quelconque rapport avec l’appareil qu’il a fourni.
10. Pour pouvoir faire appel à la garantie, vous pouvez vous adresser à votre revendeur. Bestron offre
aussi la possibilité de faire réparer l’appareil directement par le service après-vente de Bestron.
Toutefois, n’envoyez jamais rien sans avoir reçu d’instructions au préalable. Le colis pourrait en effet
être refusé et les frais éventuels seraient à votre charge. Prenez contact avec le service après-vente
qui vous expliquera comment vous devez emballer et expédier l’appareil.
11. L’appareil n’est pas destiné à l’usage professionnel.
MAINTENANCE
Si, par malheur, une panne se produisait, veuillez contacter le service de maintenance de BESTRON:
www.bestron.com/service
DÉCLARATION DE CONFORMITÉ CE
Le présent produit répond aux dispositions des directives européennes suivantes en matière de sécurité.
• Directive EMC 2004/108/EC
• Directive sur la basse tension 2006/95/EC
R. Neyman
Contrôle de la qualité

User’s instructions
21
English
Congratulations with the purchase of this grill-oven, which you can use to toast, bake, grill and roast the
most delicious dishes. The oven has a variable thermostat, convection function and top and bottom heating
elements to equally heat the top and bottom of the 26 litre oven
SAFETY INSTRUCTIONS - General
• Please read these instructions carefully and retain them for reference.
• Use this appliance solely in accordance with these instructions.
• This appliance is not intended for use by persons (including children) with reduced physical, sensory or
mental capabilities, or lack of experience and knowledge, unless they have been given supervision or
instruction concerning use of the appliance by a person responsible for their safety.
• Children should be supervised to ensure that they do not play with the appliance.
• Have any repairs carried out solely by a qualified electrician. Never try to repair the appliance yourself.
SAFETY INSTRUCTIONS - Electricity and heat
Certain parts of the appliance may get hot.
Do not touch these parts to prevent burning yourself.
• Before use please verify that the mains voltage is the same as indicated on the rating plate of the
appliance.
• Make sure that you always use an earthed wall socket to connect the appliance.
• Always remove the plug from the socket when the appliance is not in use.
• Remove the plug from the wall socket by pulling the plug, not the power cord.
• Check the appliance’s power cord regularly to make sure it is not damaged. Do not use the appliance if
the power cord is damaged. Have a damaged power cord replaced by a qualified repair service.
• When using an extension lead always make sure that the entire cable is unwound from the reel.
• Use solely approved extension leads.
• Certain parts of the appliance may get hot. Do not touch these parts to prevent burning yourself.
• To prevent the risk of fire the appliance needs space to allow it to loose heat. Make sure that it has
sufficient space around, and that it makes no contact with flammable material. Do not cover the
appliance. Also make sure that the air vents are not covered or blocked.
• Never use the appliance when it is close to flammable materials.
• Make sure that the appliance, the power cord or the plug do not make contact with hot services, such
as a hot hob or naked flame.
• Make sure that the appliance, the power cord and plug do not make contact with water..
SAFETY INSTRUCTIONS - During use
• Never use the appliance outdoors.
• Never use the appliance in a humid room.
• Place the appliance on a flat, stable surface.
• Make sure that your hands are dry before touching the appliance, power cord or plug.
• Switch off the appliance and remove the plug from the wall socket in the event of a malfunction during use,
and before cleaning the appliance, fitting or removing an accessory, or storing the appliance after use.
• Never leave the appliance unsupervised whilst it is in use.
• Never move the appliance whilst it is switched on or is still hot. Switch off the appliance, and wait until
it has cooled down before you move it.
• Make sure there is sufficient free space around the appliance (at least 10cm), as well as above the
appliance (at least 30cm).
• The oven’s glass door becomes hot during use. Therefore, always use the handle to open and close
the door.
• Use the removal tool to remove the baking tray, the grille or the roasting spit from the hot oven.
• Do not place the following items on top of the appliance: cardboard, plastic, paper, candles or
flammable objects.
• Do not place heavy objects on the oven door when it is open.
• Carefully remove the baking tray when it contains hot juices or fat.
• Avoid water coming into contact with the oven door during or shortly after use. This may cause the
glass to break.
• Do not place the appliance near a gas ring or another heat source, nor immediately next to an
electrical fan. They may have a negative effect on the appliance’s temperature control.
• Do not pick up the appliance if it falls into water. Remove the plug from the wall socket immediately
and do not use the appliance any more.

User’s instructions
22
English
• Clean the appliance thoroughly after use (see “Cleaning and maintenance”).
• Never immerse the appliance, the power cord or the plug in water or any other fluid.
• This appliance may not be used through an external timer or by means of a remote control.
OPERATION - General
The grill-oven is only
intended for domestic use,
not for professional use.
1. Housing
2. Spacer
3. Power cord and plug
4. Ventilation slots
5. ‘TEMPerature’ knob
(temperature)
6. ‘selector’ knob (top and/or
bottom heating element)
7. ‘TIMER’ knob
8. On/Off indicator light
9. Heating elements
10. Convection ventilator
11. Roasting spit drive sleeve
12. Door handle
13. Door
14. Roasting spit
15. Roasting spit clamp
16. Roasting spit removal tool
17. Baking tray/grille
removal tool
18. Baking tray
19. Grille Figure 1
OPERATION - Before using for the first time
1. Remove the packaging.
2. Clean all the accessories to remove any residue that may be left from the manufacturing process (see
“Cleaning and maintenance”). Dry them thoroughly.
3. Turn on the top and bottom heating elements for 15 minutes at the highest temperature with the door
open. This will remove any packaging odour from the appliance.
The appliance may emit a little smoke and a characteristic smell when you switch it on for the first time.
This is normal, and will soon stop. Make sure the appliance has sufficient ventilation.
OPERATION - Preheating
It is not necessary to preheat the oven. In certain cases, however, you may achieve a better result if the
oven is preheated, for example, for meat that must be cooked medium rare or when baking a cake
OPERATION - Convection function
The fan in the back of the oven blows hot air into the oven. This is used to heat the dishes. You can
use several levels at the same time, thus saving energy. Because of the intensiv heat you can select a
temperature of 20 °C lower then indicated in the conventional recepy.
The hot air system is highly suitable for baking cakes,
cookies and apple tarts. You can bake on multiple levels
simultaneously if desired, in which case the tins should
be aligned directly under one another. Baking sheets
with cookies should be positioned on the second and
third levels.
1
5
6
7
43
2
8
13
12
14
17
18
19
15
16
0
9
11
10
Position Control Switch
Settings
OFF Off
Top heat
Bottom heat
Top and bottom heat

User’s instructions
23
English
OPERATION - Baking
1. Open the oven door.
2. Place the baking tray with the food at the desired height in the grooves in the oven.
3. Close the oven door.
4. Use the TEMPerature knob to set the required temperature.
5. Rotate the selector knob to the setting .
6. Use the TIMER knob to set the baking time. The amount of time required depends on the type and
quantity of food.The On/Off indicator will be lit.
7. Bake the food until it is cooked.The oven will turn itself off automatically and a sound signal will be
heard once the baking time has elapsed. The On/Off indicator light will go out.
If the food is ready but the baking time has not yet elapsed, you can turn off the oven by rotating the
selector knob to “OFF”. The timer will continue, but the oven will no longer be heated.
8. Wear oven gloves.
9. Open the oven door. Take care! The door is hot.
Figure 2 Removing the baking tray
10. Use the removal tool to remove the baking tray from the oven.
11. Close the oven door.
12. Remove the food from the baking tray and put it on a plate. Take care! The food is hot.
13. Once you have finished, rotate the selector knob to “OFF” and remove the plug from the plug socket.
OPERATION - Grilling
You can use the grill function to give fish, poultry and oven dishes a golden brown crust.
1. Open the oven door.
2. Place the baking tray in the bottom groove in the oven. The baking tray will collect any juice and fat
whilst grilling and prevent the juice and fat from getting on the bottom heating element.
3. Place the grille with the food in the middle or top grooves in the oven.
4. Leave the oven door slightly open so as to allow the air to circulate.
5. Use the TEMPerature knob to set the required temperature.
6. Rotate the selector knob to the setting .
7. Use the TIMER knob to set the grilling time. The amount of time required depends on the type and
quantity of food.The On/Off indicator will be lit.
8. Grill the food until it is cooked. The oven will turn itself off automatically and a sound signal will be
heard once the grilling time has elapsed. The On/Off indicator light will go out.
If the food is ready but the grilling time has not yet elapsed, you can turn off the grill by rotating the
selector knob to “OFF”. The timer will continue, but the grill will no longer be turned on.
9. Wear oven gloves.
10. Open the oven door. Take care! The door is hot.

User’s instructions
24
English
Figure 3 Removing the grille
11. Use the removal tool to remove the grille with the food from the oven.
12. Remove the food from the grille and put it on a plate. Take care! The food is hot.
13. Use the removal tool to remove the baking tray from the oven. Take care! Any juice and fat on the
baking tray will be hot!
14. Close the oven door.
15. Once you have finished grilling, rotate the selector knob to “OFF” and remove the plug from the plug
socket.
OPERATION - Using the roasting spit
You can use the roasting spit to roast meat and poultry to a nice, even brown colour.
1. Open the oven door.
2. Place the baking tray in the bottom groove in the oven.
The baking tray will collect any juice and fat whilst roasting
and prevent it from getting on the bottom heating element.
3. Remove the clamp from the round end of the roasting spit.
4. Spike the meat or poultry to be roasted on the round end of
the roasting spit. Make sure the roasting spit is inserted
through the middle of the meat or poultry.
5. Use the clamps to secure the meat or poultry to the
roasting spit.
Figure 4 Fitting the roasting spit
6. Place the roasting spit with the meat or poultry in the oven. Insert the round end of the roasting spit into
the drive sleeve. Place the straight end of the roasting spit on the support.
Make sure the meat or poultry does not touch the top heating element when turning.
7. Leave the oven door slightly open so as to allow the air to circulate.
8. Use the TEMPerature knob to set the required temperature.
9. Rotate the Selector knob to the setting . When using the roasting spit we advise you to use only
the top heat, because the bottom heat elements are covered by the baking tray which catches grease
and therefore it has no effect.
10. Use the TIMER knob to set the roasting time. The amount of time required depends on the type and
quantity of food.The On/Off indicator will be lit.
11. Roast the meat or poultry until it is cooked. The oven will turn itself off automatically and a sound signal
will be heard once the roasting time has elapsed. The On/Off indicator light will go out.

User’s instructions
25
English
If the meat or poultry is ready but the roasting time has not yet elapsed, you can turn off the oven by
rotating the selector knob to “OFF”. The timer will continue, but the oven will no longer be heated.
12. Wear oven gloves.
13. Open the oven door. Take care! The door is hot.
Figure 5 Removing the roasting spit
14. Use the removal tool to remove the roasting spit with the meat or poultry and place it on a plate.
15. Close the oven door.
16. Remove the clamp from the round end of the roasting spit and remove the meat or poultry from the
roasting spit. Take care! The roasting spit and the meat or poultry are hot.
17. Use the removal tool to remove the baking tray from the oven. Take care! Any juice and fat on the
baking tray will be hot!
18. Once you have finished, rotate the SELECTOR knob to “OFF” and remove the plug from the plug
socket.
CLEANING AND MAINTENANCE
Clean the appliance every time after use.
1. Remove the plug from the wall socket and allow the appliance to cool down completely.
2. Use warm water with a small amount of washing-up liquid to clean the baking tray, the grille, the
roasting spit and the removal tool. Rinse the items with plenty of water and dry them thoroughly.
3. Use a damp cloth to clean the interior and exterior of the oven and the door. Dry them thoroughly.
4. Place all the items back in the oven and store the oven
• Make sure the plug has been removed from the plug socket before cleaning the appliance.
• Never use corrosive or scouring cleaning agents or sharp objects (such as knives or hard brushes)
to clean the appliance.
• Never immerse the appliance, the power cord or the plug in water or any other fluid.
TECHNICAL INFORMATION
Type: AGL30
Output: 1600W
Power supply: 220-240V ~ 50Hz
THE ENVIRONMENT
• Dispose of packaging material, such as plastic and boxes, in the appropriate waste containers.
• When this product reaches the end of its useful life do not dispose of it by putting it in a dustbin;
hand it in at a collection point for the reuse of electrical and electronic equipment. Please refer to
the symbols on the product, the user’s instructions or the packaging.
• The materials can be re-used as indicated. Your help in the re-use, recycling or other means of
making use of old electrical equipment will make an important contribution to the protection of the
environment.
• Contact your municipality for the address of the appropriate collection point in your neighbourhood.

User’s instructions
26
English
GUARANTEE TERMS
The importer guarantees the appliance against defects caused by manufacturing and/or material faults for
60 months from the date of purchase, subject to the following conditions.
1. No charges will be made for labour costs or materials during the warranty period. Any repairs carried
out during the warranty period do not extend the warranty period.
2. The importer automatically becomes the owner of any faulty parts that he replaces or a faulty
appliance (in the event of replacement of the appliance).
3. All claims submitted under warranty must be accompanied by the original bill of sale.
4. Claims under warranty must be submitted to the dealer where the appliance was purchased or to the
importer.
5. The warranty is issued solely to the first purchaser and cannot be transferred.
6. The warranty does not cover damage caused by:
a. Accidents, incorrect use, wear and/or neglect.
b. Faulty installation and/or use in a manner contravening the prevailing legal, technical or safety
regulations.
c. Connection to a mains voltage other than the voltage specified on the type plate.
d. Unauthorized modifications.
e. Repairs carried out by third parties.
f. Careless transport, i.e. without suitable packaging materials or protection.
7. No claims may be made under this warranty for:
a. Losses incurred during transport.
b. The removal or changing of the appliance’s serial number.
8. The guarantee does not cover power cords, lamps or glass parts.
9. No claims can be submitted under this warranty for damage other than the repair or replacement of
faulty parts. The importer can never be held responsible for any consequential loss or damage or any
other consequences, resulting either directly or indirectly from the appliance supplied by the importer.
10. In case of claims under guarantee you can contact your dealer where the appliance is purchased.
Bestron offers you also the possibility to send the appliance directly to our Service Department. Do not
send your appliance without consulting us. The package may be refused and any any costs will be for
your account. Please contact the Service Department and they will tell you how to pack and send the
appliance.
11. This appliance is not suitable for professional use.
SERVICE
If a fault should occur please contact the BESTRON service department: www.bestron.com/service
CE DECLARATION OF CONFORMITY
This product conforms to the essential requirements of the following EU safety directives:
• EMC Directive 2004/108/EC
• Low Voltage Directive 2006/95/EC
R. Neyman
Quality control

Istruzioni per l’uso
27
Italiano
Desideriamo congratularci con voi per l’acquisto di questo forno elettrico con grill con il quale potrete
tostare, cuocere e grigliare le pietanze più buone. Il forno è dotato di un termostato regolabile, di funzione
forno ventilato, di resistenze superiori e inferiori per una distribuzione uniforme del calore di cottura sui lati
e di una capacità di 26 litri.
PRESCRIZIONI DI SICUREZZA - Generalità
• Leggere attentamente le istruzioni d’uso e conservarle con cura.
• Utilizzare questo apparecchio seguendo scrupolosamente le presenti istruzioni per l’uso.
• Questo apparecchio non può essere utilizzato da bambini e da persone che, a causa di una limitazione
fisica, sensoriale o mentale, o per mancanza di esperienza e conoscenza, non siano in grado di
utilizzare l’apparecchio in modo sicuro, a meno che non abbiano ricevuto delle istruzioni sull’uso
dell’apparecchio da una persona che sia responsabile della loro sicurezza.
• I bambini vanno sorvegliati per accertarsi che non si mettano a giocare con l’apparecchio.
• Far eseguire le riparazioni da un tecnico qualificato. Non cercare mai di riparare da soli l’apparecchio.
PRESCRIZIONI DI SICUREZZA - Elettricità e calore
Alcune parti dell’apparecchio possono surriscaldarsi.
Evitare di entrare in contatto con tali elementi per non correre rischi di ustione.
• Prima di utilizzare l’apparecchio, controllare che la tensione di rete corrisponda alla tensione di
esercizio indicata sulla targhetta di identificazione dell’apparecchio.
• Verificare che la presa di corrente alla quale viene collegato l’apparecchio sia provvista di messa a
terra.
• Estrarre sempre la spina dalla presa quando l’apparecchio non è in uso.
• Quando si toglie la spina dalla presa, esercitare la trazione sulla spina stessa e non sul cavo.
• Verificare regolarmente l’integrità del cavo dell’apparecchio. Non utilizzare l’apparecchio qualora il
cavo risultasse danneggiato. Per sostituire il cavo danneggiato, rivolgersi a un servizio di assistenza
qualificato.
• Alcune parti dell’apparecchio possono surriscaldarsi. Evitare di entrare in contatto con tali elementi per
non correre rischi di ustione.
• Assicurarsi che l’apparecchio e il cavo non vengano in contatto con sorgenti di calore, quali per es.
piani di cottura caldi o fiamme libere.
• Prestare attenzione a non far entrare in contatto con l’acqua l’apparecchio, il cavo e la spina.
PRESCRIZIONI DI SICUREZZA - Utilizzo del podotto
• Non utilizzare mai l’apparecchio in ambienti esterni.
• Non utilizzare l’apparecchio in ambienti umidi.
• Posizionare l’apparecchio su di una superficie piana e stabile, in un punto in cui esso non possa
cadere o ribaltarsi.
• Assicurarsi di avere le mani asciutte prima di toccare l’apparecchio, il cavo o la spina.
• Spegnere l’apparecchio e disinserire la spina dalla presa se durante l’uso si verificano
malfunzionamenti e quando si pulisce l’apparecchio, si monta o smonta un accessorio o si è terminato
di utilizzare l’apparecchio.
• Sorvegliare sempre l’apparecchio mentre questo è in funzione.
• Non spostare mai l’apparecchio mentre è acceso o ancora caldo. Spegnere l’apparecchio e
trasportarlo soltanto quando esso si è completamente raffreddato.
• Assicurarsi che le zone presenti attorno all’apparecchio (spazio minimo: 10cm) al di sopra
dell’apparecchio (spazio minimo: 30cm) risultino sufficientemente libere da ostacoli.
• Durante l’utilizzo del forno, la parete in vetro dello sportello si surriscalda. Assicurarsi pertanto di aprire
e di chiudere lo sportello del forno agendo sempre sull’apposita maniglia.
• Utilizzare le apposite pinze in metallo per estrarre dal forno la teglia, la griglia o lo spiedo per
girarrosto.
• Assicurarsi di non collocare mai i seguenti materiali od oggetti sulla parte superiore del forno: cartone,
plastica, carta, candele o materiali infiammabili.
• Non poggiare mai oggetti pesanti sullo sportello del forno quando esso è aperto.
• Prestare la massima attenzione quando la teglia che si desidera estrarre dal forno contiene grasso e
liquidi caldi.
• Assicurarsi che durante o immediatamente dopo l’utilizzo del forno non venga versata acqua sullo
sportello caldo del forno, poiché ciò potrebbe provocare la rottura del vetro.
• Non collocare l’apparecchio in prossimità di fornelli a gas o di altre sorgenti di calore né nelle

Istruzioni per l’uso
28
Italiano
immediate vicinanze di ventilatori elettrici. Tali apparecchiature potrebbero infatti sortire un effetto
negativo sulla regolazione della temperatura del prodotto.
• Non tentare di recuperare l’apparecchio qualora esso sia caduto in acqua. In tal caso, estrarre subito
la spina dalla presa e non utilizzare più l’apparecchio.
• Dopo l’uso pulire a fondo l’apparecchio (vedere la sezione “Pulizia e manutenzione”).
• Non immergere mai l’apparecchio, il cavo e la presa in acqua o in altri liquidi.
• L’apparecchio non può essere azionato tramite un temporizzatore esterno, o un sistema indipendente
con telecomando.
• L’apparecchio non può essere azionato tramite un temporizzatore esterno, o un sistema indipendente
con telecomando.
FUNZIONAMENTO - Avvertenze general
Il forno elettrico con grill è stato
concepito esclusivamente
per usi domestici e non
per l’uso professionale.
1. Corpo dell’apparecchio
2. Distanziatore
3. Cavo elettrico e spina
4. Prese di ventilazione
5. Manopola “TEMPerature”
(termostato temperatura)
6. Manopola “selector”
(selezione elemento
riscaldante superiore
e/o inferiore)
7. Manopola “TIMER” (regolazione
tempo di cottura)
8. Spia luminosa di
accensione/spegnimento
9. Resistenze
10. Ventola per la funzione di
ventilazione
11. Alloggiamento rotante
per spiedo per girarrosto
12. Maniglia dello sportello
13. Sportello del forno
14. Spiedo per girarrosto
15. Forca di bloccaggio per girarrosto
16. Pinza per estrazione spiedo per girarrosto
17. Pinza per estrazione teglia/griglia
18. Teglia di cottura
19. Griglia Figura 1
FUNZIONAMENTO - Primo utilizzo
1. Rimuovere l’imballaggio.
2. Pulire accuratamente tutti gli accessori per eliminare gli eventuali residui di produzione (vedere il
capitolo “Pulizia e manutenzione”). Asciugare quindi a fondo gli elementi.
3. Azionare il forno per 15 minuti alla massima temperatura con entrambi gli elementi riscaldanti accesi
(superiore e inferiore), avendo cura di lasciare aperto lo sportello del forno. In tal modo sarà possibile
eliminare gli eventuali odori dovuti agli imballaggi.
La prima volta che si utilizza l’apparecchio, può verificarsi una leggera emissione di fumo
accompagnata da un odore particolare. Si tratta di un fenomeno normale che scomparirà
automaticamente. Predisporre una sufficiente ventilazione.
FUNZIONAMENTO - Preriscaldamento
Non è necessario provvedere al preriscaldemento del forno. In alcuni casi, è tuttavia possibile ottenere un
miglior risultato di cottura preriscaldando il forno, per es. quando si desidera preparare carni con cottura
1
5
6
7
43
2
8
13
12
14
17
18
19
15
16
0
9
11
10

Istruzioni per l’uso
29
Italiano
media o al sangue oppure qualora si cuociano dei dolci.
FUNZIONAMENTO - Funzione forno ventilato
La ventola inserita nella parete laterale
provvede a distribuire l’aria calda all’interno
del forno. In tal modo, le pietanze vengono
riscaldate in modo ottimale. Ciò consente di
eseguire le operazioni di cottura su più livelli,
ottenendo altresì un risparmio di energia.
La distribuzione intensiva del calore permette
di selezionare una temperatura di cottura
più bassa di ca. 20 °C rispetto a quella
normalmente indicata all’interno delle ricette
tradizionali.
La funzione forno ventilato è particolarmente indicata per la cottura di dolci, biscotti e torte di mele. È
altresì possibile procedere alla cottura di varie pietanze su più posizioni. In tal caso, sarà necessario
inserire le leccarde esattamente l’una al di sopra dell’altra. Si consiglia di inserire le leccarde contenenti i
biscotti nella seconda e nella terza guida a partire dal basso.
FUNZIONAMENTO - Cottura
1. Aprire lo sportello del forno.
2. Inserire la teglia con i cibi da preparare all’altezza desiderata servendosi delle apposite guide presenti
nel forno.
3. Chiudere lo sportello del forno.
4. Impostare la temperatura desiderata mediante la manopola “TEMPerature”.
5. Ruotare la manopola “selector” sulla posizione .
6. Impostare il tempo di cottura desiderato mediante la manopola “TIMER”. Il tempo di cottura varia a
seconda del tipo e della quantità dei cibi. La spia luminosa di accensione/spegnimento verrà attivata.
7. Lasciare i cibi sulla teglia fino a quando non sono cotti.Una volta terminato il tempo di cottura
impostato, l’apparecchio emetterà un segnale acustico e si spegnerà automaticamente. La spia
luminosa di accensione/spegnimento verrà disattivata.
Qualora i cibi risultino cotti prima dello scadere del tempo di cottura impostato, sarà possibile spegnere
il forno ruotando la manopola “selector” sulla posizione di “OFF”. In tal modo, il forno verrà disattivato e
il contaminuti continuerà a funzionare.
8. Indossare i guanti da forno.
9. Aprire lo sportello del forno. Prestare attenzione: ricordare sempre che lo sportello scotta.
10. Estrarre la teglia dal forno servendosi dell’apposita
pinza.
11. Chiudere lo sportello del forno.
12. Togliere i cibi dalla teglia e disporli su un piatto.
Fare attenzione a non ustionarsi con i cibi bollenti.
13. Una volta terminata la cottura, ruotare la manopola
“selector” sulla posizione “OFF” ed estrarre la
spina dalla presa di corrente.
Figura 2 Estrazione della teglia
Interruttore di posizione Regolazioni
OFF Spento
elemento riscaldanti superiore
elemento riscaldanti inferiore
elemento riscaldante superiore e inferiore

Istruzioni per l’uso
30
Italiano
FUNZIONAMENTO - Utilizzo della griglia
Con la funzione grill è possibile arrostire carni, pesce, volatili e sformati dotandoli di una gustosa crosta dorata.
1. Aprire lo sportello del forno.
2. Inserire la teglia nelle guide inferiori del forno. La teglia servirà alla raccolta degli eventuali grassi e
liquidi che verranno prodotti durante la cottura, evitando che questi entrino in contatto con l’elemento
riscaldante inferiore.
3. Inserire nel forno la griglia con i cibi da preparare servendosi delle apposite guide intermedie o
superiori presenti.
4. Assicurarsi di lasciare lo sportello del forno leggermente aperto per favorire la circolazione dell’aria
all’interno.
5. Impostare la temperatura desiderata mediante la manopola “TEMPerature”.
6. Ruotare la manopola “selector” sulla posizione .
7. Impostare il tempo di cottura desiderato mediante la manopola “TIMER”. Il tempo di cottura varia a
seconda del tipo e della quantità dei cibi.La spia luminosa di accensione/spegnimento verrà attivata.
8. Grigliare i cibi fino a quando non sono cotti. Una volta terminato il tempo di cottura impostato,
l’apparecchio emetterà un segnale acustico e si spegnerà automaticamente. La spia luminosa di
accensione/spegnimento verrà disattivata.
Qualora i cibi risultino cotti prima dello scadere del tempo di cottura impostato, sarà possibile spegnere
il forno ruotando la manopola “selector” sulla posizione di “OFF”. In tal modo, il forno verrà disattivato e
il contaminuti continuerà a funzionare.
9. Indossare i guanti da forno.
10. Aprire lo sportello del forno. Prestare attenzione:
ricordare sempre che lo sportello scotta.
11. Estrarre dal forno la griglia con i cibi servendosi
dell’apposita pinza.
12. Togliere i cibi dalla griglia e disporli in un piatto.
Fare attenzione a non ustionarsi con i cibi bollenti.
13. Estrarre la teglia dal forno servendosi dell’apposita
pinza. Fare attenzione a non ustionarsi con il grasso
e i liquidi caldi presenti nella teglia.
14. Chiudere lo sportello del forno.
15. Una volta terminata la cottura, ruotare la
manopola “selector” sulla posizione “OFF”
ed estrarre la spina dalla presa di corrente.
Figura 3 Estrazione della griglia
FUNZIONAMENTO - Utilizzo della spiedo per girarosto
Lo spiedo per girarrosto permette di preparare cibi che richiedono una cottura uniforme su tutta la loro
superficie.
1. Aprire lo sportello del forno.
2. Inserire la teglia nelle guide inferiori del forno. La teglia servirà alla raccolta degli eventuali grassi e
liquidi che verranno prodotti durante la cottura, evitando che questi entrino in contatto con l’elemento
riscaldante inferiore.
3. Rimuovere la forca di bloccaggio presente sul lato arrotondato dello spiedo.
4. Inserire sullo spiedo le carni o i volatili da preparare avendo cura di infilarli dal lato arrotondato.
Assicurarsi che lo spiedo sia stato perfettamente inserito al centro delle carni o dei volatili da
preparare.
5. Fermare le carni o i volatili sullo spiedo mediante gli appositi forconi di bloccaggio.

Istruzioni per l’uso
31
Italiano
Figura 4 Posizionamento dello spiedo per girarrosto
6. Inserire nel forno lo spiedo per girarrosto completo di carne. Inserire il lato arrotondato dello spiedo
nell’apposito alloggiamento rotante presente nel forno. Collocare l’estremità cubica dello spiedo per
girarrosto nell’apposito supporto.
Assicurarsi che le carni o i volatili non vengano a contatto con l’elemento riscaldante superiore durante
la cottura allo spiedo.
7. Assicurarsi di lasciare lo sportello del forno leggermente aperto per favorire la circolazione dell’aria
all’interno.
8. Impostare la temperatura desiderata mediante la manopola “TEMPerature”.
9. Ruotare la manopola “selector” sulla posizione .
10. Impostare il tempo di cottura desiderato mediante la manopola “TIMER”. Il tempo di cottura varia a
seconda del tipo e della quantità di cibo.La spia luminosa di accensione/spegnimento verrà attivata.
11. Attendere la completa cottura delle carni o dei volatili. Una volta terminato il tempo di cottura
impostato, l’apparecchio emetterà un segnale acustico e si spegnerà automaticamente. La spia
luminosa di accensione/spegnimento verrà disattivata.
Qualora le carni o i volatili risultino cotti prima dello scadere del tempo di cottura impostato, sarà
possibile spegnere il forno ruotando la manopola “selector” sulla posizione di “OFF”. In tal modo, il
forno verrà disattivato e il contaminuti continuerà a funzionare.
12. Indossare i guanti da forno.
13. Aprire lo sportello del forno. Prestare attenzione: ricordare sempre che lo sportello scotta.
Figura 5 Estrazione dello spiedo per girarrosto

Istruzioni per l’uso
32
Italiano
14. Estrarre dal forno lo spiedo per girarrosto completo di carne servendosi dell’apposita pinza e disporre
lo spiedo su un piatto.
15. Chiudere lo sportello del forno.
16. Rimuovere la forca di bloccaggio presente sul lato arrotondato dello spiedo e sfilare le carni o i volatili
dallo spiedo. Prestare attenzione: lo spiedo e le carni sono calde.
17. Estrarre la teglia dal forno servendosi dell’apposita pinza. Fare attenzione a non ustionarsi con il
grasso e i liquidi caldi presenti nella teglia.
18. Una volta terminata la cottura, ruotare la manopola “selector” sulla posizione “OFF” ed estrarre la spina
dalla presa di corrente.
PULIZIA E MANUTENZIONE
Lavare l’apparecchio dopo ogni utilizzo.
1. Estrarre la spina dalla presa e lasciare raffreddare completamente l’apparecchio.
2. Pulire la teglia, la griglia, lo spiedo per girarrosto, le forche di bloccaggio e le pinze di estrazione
utilizzando acqua calda e detergente per piatti. Risciacquare bene gli accessori e asciugarli quindi a
fondo.
3. Pulire le pareti interne ed esterne e lo sportello del forno servendosi di un panno umido. Quindi
asciugare a fondo.
4. Reinserire tutti gli accessori nel forno e riporre l’elettrodomestico.
• Assicurarsi che l’apparecchio non sia collegato all’alimentazione di rete mentre lo si pulisce.
• Non utilizzare detergenti aggressivi o abrasivi né utensili taglienti o acuminati (come coltelli o
spazzole dure) per eseguire la pulizia.
• Non immergere mai l’apparecchio, il cavo e la presa in acqua o in altri liquidi
SPECIFICHE TECNICHE
Modello: AGL30
Potenza: 1600W
Tensione di rete: 220-240V ~ 50Hz
TUTELA DELL’AMBIENTE
• Gettare il materiale di imballaggio, come plastica e cartone, negli appositi contenitori.
• Una volta raggiunta la durata massima del prodotto, non smaltirlo alla stregua dei rifiuti generali,
ma portarlo presso un punto di raccolta per il riciclo di apparecchiature elettriche ed elettroniche.
Prestare attenzione al simbolo sul prodotto, alle istruzioni per l’uso o all’imballaggio.
• I materiali possono essere riutilizzati come indicato. Grazie al riciclaggio, la trasformazione di
materiali o altri metodi di utilizzo di vecchie apparecchiature contribuiscono in modo essenziale alla
salvaguardia dell’ambiente.
• Rivolgersi al proprio comune per informazioni sul punto di raccolta più vicino.
CONDIZIONI DI GARANZIA
Di seguito sono riportate le condizioni alle quali l’importatore fornisce la garanzia per il presente
apparecchio per un periodo di 60 mesi a decorrere dalla data d’acquisto, a copertura dei difetti di materiale
e/o di fabbricazione.
1. Durante la validità di tale periodo di garanzia non verrà addebitato alcun costo di manodopera o di
materiale. Le riparazioni effettuate nel corso di validità della garanzia non prolungano la durata della
stessa.
2. Le parti difettose o, in caso di sostituzione (cambio), l’apparecchio difettoso stesso divengono
automaticamente proprietà dell’importatore.
3. Qualsiasi ricorso alla garanzia dovrà essere accompagnato dalla prova d’acquisto dell’azienda
rivenditrice.
4. I ricorsi alla garanzia devono essere eseguiti presso il rivenditore ove l’apparecchio è stato acquistato
o presso l’importatore.
5. La garanzia è valida esclusivamente per il primo acquirente e non è trasferibile.
6. La garanzia non si applica ai danni derivanti da:
a. incidenti, uso improprio, usura e/o negligenza;
b. erronea installazione e/o utilizzo in contrasto con le disposizioni normative, tecniche o di sicurezza
vigenti;
c. collegamento del prodotto a una tensione di rete diversa da quella indicata nella targhetta di
identificazione;

Istruzioni per l’uso
33
Italiano
d. modifiche non autorizzate;
e. riparazioni eseguite da terzi;
f. trasporto eseguito in modo improprio privo dell’imballaggio o delle protezioni idonee.
7. Le presenti condizioni di garanzia non si applicano inoltre in caso di:
a. perdite che si verificano durante il trasporto;
b. rimozione o modifica del numero di serie dell’apparecchio.
8. Sono esclusi dalla garanzia i cavi, le spie luminose, le lampade e i componenti in vetro.
9. La garanzia non riconosce alcun diritto al risarcimento di eventuali danni al di là della mera
sostituzione o riparazione delle parti difettose. In nessun caso l’importatore potrà essere ritenuto
responsabile per eventuali danni consequenziali o per conseguenze di altro tipo verificatesi a causa
delle apparecchiature da questi fornite o a esse correlate.
10. Per reclamare la garanzia, potete rivolgervi al vostro negoziante. Bestron offre anche la possibilità
di far riparare l’apparecchio direttamente dal Centro assistenza Bestron. Tuttavia, non spedite mai
l’apparecchio senza aver fatto le dovute considerazioni. Il pacco può infatti essere respinto e le
eventuali spese sono a vostro carico. Contattate il Centro assistenza e vi diranno come imballare e
spedire l’apparecchio.
11. L’apparecchio non è concepito per l’uso professionale.
SERVICE
Mocht zich onverhoopt een storing voordoen, dan kunt u zich in verbinding stellen met de BESTRON-
servicedienst: www.bestron.com/service
DICHIARAZIONE DI CONFORMITÀ CE
Questo prodotto soddisfa i requisiti e le seguenti norme europee nel campo della sicurezza:
• Direttiva EMC 2004/108/EC
• Direttiva sulla bassa tensione 2006/95/EC
R. Neyman
Controllo qualità

Manual del usuario
34
Español
Le felicitamos por la compra de este Horno Grill que le permitirá tostar, hornear y preparar a la plancha los
más deliciosos platos. El horno está provisto de un termostato variable, función de aire caliente, elementos
calefactores arriba y abajo para distribuir uniforme del calor, y un contenido de 26 litros.
NORMAS DE SEGURIDAD - General
• Lea las instrucciones de uso con detenimiento y guárdelas cuidadosamente.
• Utilice este aparato únicamente en la forma que se describe en las instrucciones.
• Este aparato no puede ser utilizado por niños ni por personas que, debido a alguna limitación física,
sensorial o mental, o por falta de experiencia y conocimientos, no puedan manejarlo de forma
suficientemente segura, a menos que hayan recibido instrucciones sobre el uso del aparato de una
persona que se haga responsable de su seguridad.
• Es preciso vigilar que los niños no jueguen con el aparato.
• Haga reparar el aparato únicamente por un técnico cualificado. No intente nunca
reparar el aparato usted mismo.
NORMAS DE SEGURIDAD - Electricidad y calor
Algunas partes del aparato pueden calentarse.
No las toque para evitar quemaduras.
• Antes de utilizar el aparato, verifique que el voltaje de la red corresponda al voltaje indicado en la
placa.
• Verifique que la toma de corriente a la que va a conectar el aparato tenga conexión a tierra.
• Retire siempre el enchufe de la toma de corriente cuando no lo esté utilizando.
• Al retirar el enchufe de la toma de corriente, asegúrese de tirar del enchufe y no del cable.
• Verifique regularmente que el cable del aparato esté en buenas condiciones. No lo use si el cable está
averiado. Haga sustituir el cable deteriorado por personal de servicio cualificado.
• Algunas partes del aparato pueden calentarse. No las toque para evitar quemaduras.
• Asegúrese de que ni el aparato, ni el cable están en contacto con fuentes decalor, como por ejemplo
con una placa caliente o con fuego abierto.
• Asegúrese de que ni el aparato, ni el cable, ni el enchufe están en contacto con el agua.
NORMAS DE SEGURIDAD - Uso
• No use nunca este aparato fuera del hogar.
• No utilice el aparato nunca en lugares húmedos.
• Colóquelo sobre una superficie plana y estable, en un lugar donde no pueda caerse.
• Asegúrese de tener las manos secas cuando manipule el aparato, el cable o el enchufe.
• Desconecte el aparato y retire el enchufe de la toma de alimentación si se presentan fallos durante el
uso, cuando quiera limpiar el aparato, para montar o desmontar un accesorio, o después del uso del
aparato.
• No deje el aparato sin vigilancia mientras está en funcionamiento.
• No desplace nunca el aparato mientras esté caliente o encendido. Debe apagarlo primero y sólo podrá
desplazarlo cuando se haya enfriado.
• Asegúrese de que hay suficiente espacio libre alrededor (mínimo 10cm) y encima del aparato (mínimo
30cm).
• La puerta de cristal del horno se calienta durante el uso. Por eso use siempre la empuñadura para
abrir y cerrar la puerta.
• Use las pinzas adjuntas para sacar del horno caliente la plancha de asado, la parrilla o el asador.
• No coloque sobre el horno los siguientes materiales: cartón, plástico, papel, velas o materiales
inflamables.
• No coloque objetos pesados sobre la puerta del horno cuando ésta esté abierta.
• Tenga especial cuidado con la grasa y los zumos que suelta la carne cuando vaya a sacar del horno la
plancha de asado.
• Evite que caiga agua sobre la puerta caliente del horno mientras éste está en uso o inmediatamente
después de usarlo. Esto puede ocasionar el rompimiento del cristal.
• No coloque el aparato cerca de un quemador a gas u otra fuente de calor, ni tampoco directamente al
lado de un ventilador eléctrico. Éstos pueden influir negativamente en el regulador de temperatura del
aparato.
• No recoja el aparato si éste ha caído en el agua. Retire inmediatamente el enchufe de la toma de
alimentación. No vuelva a utilizarlo.
• Limpie muy bien el aparato después de usarlo (véase el capítulo ‘Limpieza y mantenimiento’).

Manual del usuario
35
Español
• No sumerja nunca el aparato, ni el cable, ni el enchufe en agua o en otro líquido.
• El aparato no se puede poner en funcionamiento mediante un cronómetro externo ni con otro sistema
separado con control remoto.
FUNCIONAMIENTO - Generalidades
El Horno Grill está concebido
únicamente para uso doméstico,
no para uso profesional.
1. Carcasa
2. Medidor de distancia
3. Cable con enchufe
4. Rejilla de ventilación
5. Botón ‘TEMPerature’
(temperatura)
6. Botón ‘selector’
(calor arriba y/o abajo)
7. Botón ‘TIMER’ (temporizador)
8. Indicador de encendido/apagado
9. Elementos calefactores
10. Ventilador de aire caliente
11. Manguito de propulsión del asador
12. Empuñadura de la puerta
13. Puerta
14. Asador
15. Perno sujetador del asador
16. Pinza para sacar el asador
17. Pinza para sacar la
plancha de asado/parrilla
18. Plancha de asado
19. Parrilla Figura 1
FUNCIONAMIENTO - Antes del primer uso
1. Quite el embalaje.
2. Limpie todos los accesorios para eliminar cualquier posible resto de fabricación (véase ‘Limpieza y
mantenimiento’). A continuación séquelos bien.
3. Encienda el horno vacío durante 15 minutos, arriba y abajo, a la temperatura más alta, con la puerta
abierta. De este modo elimina del aparato cualquier posible olor del embalaje.
Cuando se utiliza el aparato por primera vez, éste puede producir un poco de humo y desprender un
olor particular. Esto es normal y tanto el humo como el olor desaparecerán automáticamente. Procure
tener suficiente ventilación.
FUNCIONAMIENTO - Precalentar
No es necesario precalentar el horno. En algunos casos, sin embargo, se obtienen mejores resultados al
precalentar el horno, por ejemplo cuando quiera asar carne a término medio (rosada por dentro, con el
centro rojo), o si va a hornear una tarta.
FUNCIONAMIENTO - Función de aire caliente
El ventilador de la pared lateral distribuye el
aire caliente por todo el horno calentando así
los alimentos. Puede usted hornear en
diferentes niveles simultáneamente; de esta
manera ahorra energía. Gracias a la
transmisión intensiva de calor, es posible
elegir una temperatura aproximadamente
20 °C más baja que lo que recomiendan las
recetas convencionales.
Interruptor de posición Ajustes
OFF Desconectar
calor uniforme arriba
calor uniforme abajo
calor uniforme arriba y abajo
1
5
6
7
43
2
8
13
12
14
17
18
19
15
16
0
9
11
10

Manual del usuario
36
Español
La función de aire caliente es especialmente apta para hornear bizcochos, galletas y tarta de manzana.
Puede asar simultáneamente en varias parrillas. Al hacerlo, tenga en cuenta de colocar los moldes
exactamente uno debajo del otro. Las bandejas de asado con galletas se colocan en el segundo o tercer
nivel de abajo hacia arriba.
FUNCIONAMIENTO - Hornear
1. Abra la puerta del horno.
2. Coloque la plancha de asado con los alimentos a la altura deseada dentro del horno.
3. Cierre la tapa del horno.
4. Fije la temperatura deseada con el botón ‘TEMPerature’.
5. Gire el botón ‘selector’ a la posición .
6. Fije el tiempo de asado deseado con el botón ‘TIMER’. El tiempo de
preparación depende de la clase de alimentos y su cantidad.El indicador de encendido/apagado se
encenderá.
7. Ase los alimentos hasta que estén hechos.Al finalizar el tiempo de preparación escuchará una señal
acústica y el horno se apagará automáticamente. El indicador de encendido/apagado se apagará.
Si los alimentos están hechos pero el tiempo de preparación aún no ha terminado, puede apagar el
horno girando el botón ‘selector’ a la posición ‘OFF’. El temporizador continuará activo, pero el horno
no seguirá calentando.
8. Use guantes para retirar los alimentos del horno.
9. Abra la puerta del horno. ¡Cuidado! La puerta
está caliente.
10. Saque la plancha de asado del horno utilizando
la pinza.
11. Cierre la tapa del horno.
12. Saque los alimentos de la plancha de asado
y colóquelos en un plato. ¡Cuidado! Los
alimentos están calientes.
13. Cuando haya terminado de preparar los
alimentos, gire el botón ‘selector’ a la
posición ‘OFF’ y retire el enchufe de la toma
de alimentación.
Figura 2 Sacar la plancha de asado
FUNCIONAMIENTO - Asar a la plancha
Con la función de asar a la plancha puede usted dorar la carne, el pescado, las aves y los platos
horneados.
1. Abra la puerta del horno.
2. Coloque la plancha de asado en la altura más baja del horno. La plancha de asado recibe las grasas y
los zumos que suelta la carne al asarla, evitando que caigan sobre el elemento calefactor inferior.
3. Coloque la parrilla con los alimentos en la altura media del horno.
4. Deje entreabierta la puerta del horno para que el aire caliente pueda circular.
5. Fije la temperatura deseada con el botón ‘TEMPerature’.
6. Gire el botón ‘selector’ a la posición .
7. Fije el tiempo de asado a la plancha deseado con el botón ‘TIMER’. El tiempo de preparación depende
de la clase de alimentos y su cantidad.El indicador de encendido/apagado se encenderá.
8. Ase los alimentos hasta que estén hechos. Al finalizar el tiempo de preparación escuchará una señal
acústica y el horno se apagará automáticamente. El indicador de encendido/apagado se apagará.
Si los alimentos están hechos pero el tiempo de preparación aún no ha terminado, puede apagar el
horno girando el botón ‘selector’ a la posición ‘OFF’. El temporizador continuará activo, pero el horno
no seguirá calentando.

Manual del usuario
37
Español
9. Use guantes para retirar los alimentos del horno.
10. Abra la puerta del horno. ¡Cuidado! La puerta está caliente.
11. Saque del horno la parrilla con los alimentos usando la pinza.
12. Saque los alimentos de la parrilla y colóquelos en un plato. ¡Cuidado! Los alimentos están calientes.
13. Saque la plancha de asado del horno utilizando la pinza. ¡Cuidado! ¡Las grasas y zumos que sueltan
la carne están calientes!
14. Cierre la tapa del horno.
15. Cuando haya terminado de preparar los alimentos, gire
el botón ‘selector’ a la posición ‘OFF’ y retire el enchufe
de la toma de alimentación.
Figura 3 Sacar la parrilla
FUNCIONAMIENTO - Uso del asador
Con el asador los alimentos adquieren con un color dorado uniforme.
1. Abra la puerta del horno.
2. Coloque la plancha de asado en la altura más baja del horno. La plancha de asado recibe las grasas y
los zumos que suelta la carne al asarla, evitando que caigan sobre el elemento calefactor inferior.
3. Retire el perno sujetador del extremo redondo del asador.
4. Inserte la carne o el ave que va a asar a través del extremo redondo del asador. Asegúrese de que el
asador atraviesa la carne o el ave por todo el centro.
5. Fije la carne o el ave al asador mediante los pernos sujetadores.
Figura 4 Colocación del asador
6. Coloque el asador con la carne o el ave en el horno. Introduzca el extremo redondo del asador en el
manguito de propulsión. Coloque el lado recto del asador sobre el apoyo.
Asegúrese de que la carne o el ave, al girar, no hagan contacto con el elemento calefactor superior.
7. Deje entreabierta la puerta del horno para que el aire caliente pueda circular.
8. Fije la temperatura deseada con el botón ‘TEMPerature’.
9. Gire el botón ‘selector’ a la posición .
10. Fije el tiempo de asado a la plancha deseado con el botón ‘TIMER’. El tiempo de preparación depende
de la clase de alimentos y su cantidad. El indicador de encendido/apagado se encenderá.
11. Ase la carne o el ave hasta que estén hechos. Al finalizar el tiempo de preparación escuchará una
señal acústica y el horno se apagará automáticamente. El indicador de encendido/apagado se
apagará.

Manual del usuario
38
Español
Si los alimentos están hechos pero el tiempo de preparación aún no ha terminado, puede apagar el
horno girando el botón ‘selector’ a la posición ‘OFF’. El temporizador continuará activo, pero el horno
no seguirá calentando.
12. Use guantes para retirar los alimentos del horno.
13. Abra la puerta del horno. ¡Cuidado! La puerta está caliente.
Figura 5 Sacar el asador
14. Saque del horno el asador con la carne o el ave usando la pinza y colóquelo sobre un plato.
15. Cierre la tapa del horno.
16. Retire el perno sujetador del extremo redondo del asador y saque la varilla de la carne o el ave.
¡Cuidado! El asador y la carne o el ave están calientes.
17. Saque la plancha de asado del horno utilizando la pinza. ¡Cuidado! ¡Las grasas y zumos que suelta la
carne están calientes!
18. Cuando haya terminado de preparar los alimentos, gire el botón ‘selector’ a la posición ‘OFF’ y retire el
enchufe de la toma de alimentación.
LIMPIEZA Y MANTENIMIENTO
Limpie el aparato después de cada uso.
1. Retire el enchufe de la fuente de alimentación y deje enfriar el aparato completamente.
2. Limpie la plancha de asado, la parrilla, el asador, los pernos y las pinzas con agua caliente y un
detergente líquido. Enjuague y seque bien todas las partes.
3. Limpie la parte interior y exterior del horno y de la puerta con un paño húmedo. A continuación,
séquelos bien.
4. Vuelva a colocar todas las partes en el horno y guárdelo.
• Asegúrese de que el aparato no está conectado a la red de alimentación eléctrica cuando vaya a
limpiarlo.
• No use limpiadores fuertes ni abrasivos, ni objetos con filo (como cuchillos o cepillos con cerdas
duras) para limpiar el aparato.
• No sumerja nunca el aparato, ni el cable, ni el enchufe en agua o en otro líquido.
FICHA TÉCNICA
Tipo: AGL30
Potencia: 1600W
Tensión de la red: 220-240V ~ 50Hz
MEDIO AMBIENTE
• Tire el material de embalaje, como plástico y cajas, en los contenedores destinados para ello.
• No tire este producto al final de su vida útil con los residuos domésticos normales, en su lugar
llévelo a un centro de recolección para reutilización de aparatos eléctricos y electrónicos. Tenga en
cuenta el símbolo que aparece en el aparato, el manual de instrucciones o el embalaje.
• Los materiales pueden reutilizarse como se ha indicado. Su ayuda para reutilización,
procesamiento de materiales u otras formas de utilización de aparatos viejos es una contribución
importante a la conservación de nuestro medio ambiente.
• Infórmese con las autoridades sobre los puntos de recolección en su localidad.

Manual del usuario
39
Español
DISPOSICIONES DE GARANTÍA
Bajo las siguientes condiciones, y durante un período de 60 meses contado a partir de la fecha de
compra, el importador otorgará garantía de este aparato por defectos ocasionados por deficiencias en la
fabricación o en los materiales.
1. Durante el período de garantía mencionado no se cobrarán los costes de la mano de obra ni el
material. Una reparación que tenga lugar durante el período de garantía no prolonga dicho período.
2. En caso de reemplazo, las piezas defectuosas o los aparatos defectuosos mismos pasarán
automáticamente a propiedad del importador.
3. Toda reclamación por garantía deberá ir acompañada de la factura de compra de la empresa.
4. Toda reclamación por garantía deberá hacerse al distribuidor donde ha sido comprado el aparato o al
importador.
5. La garantía es válida únicamente para el comprador y no es susceptible de transferencia.
6. La garantía no cubre los daños ocasionados por:
a. accidentes, mala utilización, desgaste y/o descuido;
b. mala instalación y/o uso en contradicción con las normas técnicas o de seguridad legales
vigentes;
c. conexión a una red eléctrica cuyo voltaje no corresponde al voltaje indicado en la placa;
d. una modificación no autorizada;
e. una reparación ejecutada por terceros;
f. negligencia en el transporte del aparato sin el embalaje o protección adecuados.
7. No podrá apelarse a estas disposiciones de garantía en los siguientes casos:
a. pérdida ocurrida durante el transporte;
b. remoción o modificación del número de serie del aparato.
8. La garantía no cubre los cables, las bombillas, ni las partes de cristal.
9. La garantía no concede derecho a reclamar indemnización alguna por daños, diferente a la sustitución
o reparación, respectivamente, de las partes defectuosas. El importador no podrá ser responsabilizado
por daños consecuenciales o por cualquier otra clase de efectos causados por el aparato suministrado
por él o que guarden relación con el mismo.
10. Para hacer valer la garantía. Puede acudir a la tienda donde compró el producto. Bestron también
ofrece la posibilidad de entregar el aparato directamente al servicio técnico Bestron para su
reparación. Pero no podrá enviarlo de cualquier manera. El paquete podría ser rechazado y los costes
asociados correrían de su cuenta. Póngase en contacto con el servicio técnico, donde le indicarán
cómo debe embalar y enviar el aparato.
11. Este aparato no es apto para uso profesional.
SERVICIO
Si se presenta un fallo inesperado, puede ponerse en contacto con el departamento de servicios de
BESTRON: www.bestron.com/service
CERTIFICACIÓN DE CONFORMIDAD (CE)
Este producto satisface las disposiciones de las siguientes directivas de la Unión Europea en el marco de
la seguridad:
• Directiva de compatibilidad electromagnética 2004/108/EC
• Directiva de bajo voltaje 2006/95/EC
R. Neyman
Control de calidad

-
 1
1
-
 2
2
-
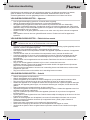 3
3
-
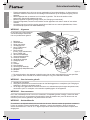 4
4
-
 5
5
-
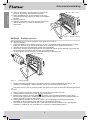 6
6
-
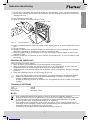 7
7
-
 8
8
-
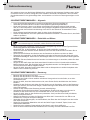 9
9
-
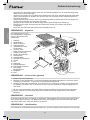 10
10
-
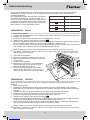 11
11
-
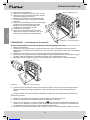 12
12
-
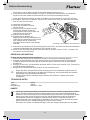 13
13
-
 14
14
-
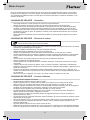 15
15
-
 16
16
-
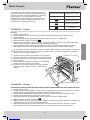 17
17
-
 18
18
-
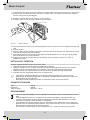 19
19
-
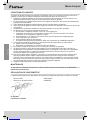 20
20
-
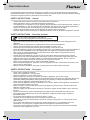 21
21
-
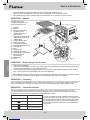 22
22
-
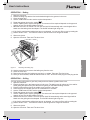 23
23
-
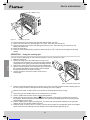 24
24
-
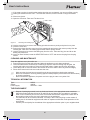 25
25
-
 26
26
-
 27
27
-
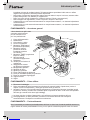 28
28
-
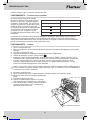 29
29
-
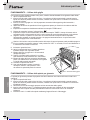 30
30
-
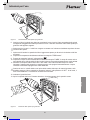 31
31
-
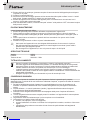 32
32
-
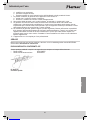 33
33
-
 34
34
-
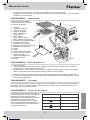 35
35
-
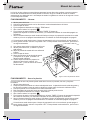 36
36
-
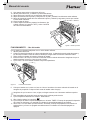 37
37
-
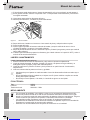 38
38
-
 39
39
-
 40
40


Bestron AGL30 Manual de usuario
- Categoría
- Barbacoas
- Tipo
- Manual de usuario
en otros idiomas
- français: Bestron AGL30 Manuel utilisateur
- italiano: Bestron AGL30 Manuale utente
- English: Bestron AGL30 User manual
- Deutsch: Bestron AGL30 Benutzerhandbuch
Artículos relacionados
Otros documentos
-
Valberg VG-MF60CRC Noir El manual del propietario
-
Princess 112756 Manual de usuario
-
Zanussi ZOB341N Manual de usuario
-
Unold 68846 Instrucciones de operación
-
Whirlpool FN 34 XA (EU) S Guía del usuario
-
Whirlpool FP E6.1 GF (MI) S Guía del usuario
-
Whirlpool FP E6.1 GF S El manual del propietario
-
-
Mestic MHO-120 Manual de usuario
-
Mestic MO-80 Manual de usuario