Commercial Electric 91767 Guía de instalación
- Tipo
- Guía de instalación

THANK YOU
We appreciate the trust and condence you have placed in Commercial Electric through the purchase of this recessed light. We strive to
continually create quality products designed to enhance your home. Visit us online to see our full line of products available for your home
improvement needs. Thank you for choosing Commercial Electric!
USE AND CARE GUIDE
SLIM LED MOTION ACTIVATED RECESSED KIT
Questions, problems, missing parts?
Before returning to the store,
call Commercial Electric Customer Service
8 a.m. - 7 p.m., EST, Monday - Friday, 9 a.m. - 6 p.m., EST, Saturday
1-877-527-0313
HOMEDEPOT.COM
Item #1007 961 135
Model #91767

2
Table of Contents
Table of Contents ...................................2
Safety Information ..................................2
Warranty ..........................................3
Pre-Installation .....................................3
Installation ........................................5
Care and Cleaning ..................................7
Safety Information
IMPORTANT SAFETY INSTRUCTIONS. SAVE
THESE INSTRUCTIONS.
Most electrical accidents are caused by carelessness or ignorance.
Review these basic electrical guidelines before you begin this
installation.
□Use tools with insulated handles and ladders made of wood or
berglass.
□Keep dry-chemical re extinguishers in the kitchen, basement,
and workshop.
□Never disable grounding devices. Ensure all appliances that
require grounding are properly grounded, and that the electrical
system itself is properly grounded.
□Meet or exceed all electrical code requirements that cover the
work you are doing.
□Always work with enough light to see what you are doing. It is
easy to make a mistake when you work in dim light.
□Certied Airtight per ASTM E283-04.
□When in doubt about the safety of any electrical repair or test,
call in a professional.
□This xture is IC rated for direct contact with insulation.
□This xture is intended for indoor or damp location use.
□Do not modify this xture. If any modications are made, it may
render the product unsafe and void the warranty.
WARNING: Before touching any wire, use a voltage tester
to ensure it is not live.
WARNING: When you check for voltage in a receptacle,
check both outlets as each may be controlled by a separate
wiring circuit.
WARNING: Before working on a circuit, go to the main
service panel and remove the fuse or trip the breaker that
controls that circuit. Tape a sign to the panel warning others
to leave the circuit alone while you work.
WARNING: CONSULT A QUALIFIED ELECTRICIAN TO
ENSURE CORRECT BRANCH CIRCUIT CONDUCTOR.
WARNING: Changes or modications to this unit not
expressly approved by the party responsible for compliance
could void the user’s authority to operate the equipment.
This device complies with part 15 of the FCC rules.
Operation is subject to the following two conditions: (1) this
device may not cause harmful interference, and (2) this
device must accept any interference received, including
interference that may cause undesired operation.
NOTE: This equipment has been tested and found to comply
with the limits for a Class B digital device, pursuant to Part
15 of the FCC Rules. These limits are designed to provide
reasonable protection against harmful interference in a
residential installation. This equipment generates, uses
and can radiate radio frequency energy and, if not installed
and used in accordance with the instructions, may cause
harmful interference to radio communications. However,
there is no guarantee that interference will not occur in a
particular installation. If this equipment does cause harmful
interference to radio or television reception, which can be
determined by turning the equipment off and on, the user is
encouraged to try to correct the interference by one or more
of the following measures:
□Reorient or relocate the receiving antenna.
□Increase the separation between the equipment
and receiver.
□Connect the equipment into an outlet on a circuit
different from that to which the receiver is
connected.
□Consult the dealer or an experienced radio/TV
technician for help.
FCC Responsible Party
Globe Electric
2264 East 6th Street
San Bernardino, CA 92410
www.globe-electric.com

3 HOMEDEPOT.COM
Please contact 1-877-527-0313 for further assistance.
Warranty
5-YEAR LIMITED WARRANTY
The manufacturer warrants this lighting xture against defects in materials and workmanship for a period of ve years from the date of
purchase. If within this period the product is found to be defective in material or workmanship, the product must be returned, with a copy
of the bill of sale as proof of purchase, to the original place of purchase. The manufacturer will, at its option, repair, replace, or refund the
purchase price to the original purchaser or consumer. This warranty does not cover light bulbs or the xture becoming damaged due to
misuse, accidental damage, improper handling and/or installation, and specially excludes liability for direct, incidental, or consequential
damages. As some states do not allow exclusions or limitations on an implied warranty, so the above exclusions and limitations may not
apply. This warranty gives you specic rights and you may also have other rights that vary from state to state.
Contact the Customer Service Team at 1-877-527-0313 or visit www.HomeDepot.com.
Pre-Installation
PLANNING INSTALLATION
Compare all parts with the Hardware Included and Package Contents sections. If any part appears missing or damaged, do not install this
product and contact the Customer Service Team at 1-877-527-0313.
TOOLS REQUIRED
Ladder Safety goggles Wire strippers Pencil
Gloves Drywall saw Cable clamp

4
Pre-Installation (continued)
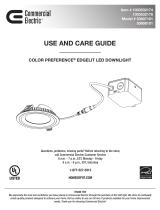
PACKAGE CONTENTS
Part Description Quantity
(Single-pack)
Quantity
(4-pack)
A Junction box 1 4 Beam angle
B Foam gasket 1 4
C Light panel 1 4
D Template 1 1
A
C
BD

5 HOMEDEPOT.COM
Please contact 1-877-527-0313 for further assistance.
Installation
1 Turning off the power
□Place the wall switch in the off position.
□Turn off the main power at the breaker panel or remove the fuse from the fuse box.
2 Preparing the installation location
□Use the template (D) to mark the desired installation
location.
□Use a drywall saw to cut the opening marked by the
template.
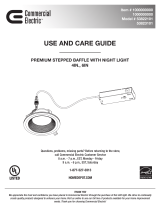
3 Connecting the wires
□Unplug the connector cable separating the junction box (A)
from the light panel (C).
□Open the junction box (A) cover and remove the
knockout(1) on the side panel.
□Insert the electrical supply cable through the knockout (1).
□Using the quick-connect push terminals, connect the
ground wire from the junction box (A) to the ground wire
from the supply circuit, the black wire from the junction
box (A) to the black wire from the supply circuit, and the
white wire from the junction box (A) to the white wire from
the supply circuit.
□Secure the wire in the knockout hole using a cable clamp
(not provided).
□Place all wiring and connections into the junction box (A)
and close the cover.
□Plug the connector cable from the junction box (A) into the
connector cable from the light panel (C).
D
D
C
A1

6
Installation (continued)
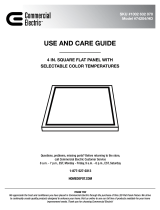
4 Selecting the brightness
□Use the CCT switch (2) on the connector cable to select
2700K, 3000K, 3500K, 4000K, or 5000K.
5000K
4000K
3500K
3000K
2700K
5 Adjusting the motion sensor
sensitivity
□Select the sensitivity level. When the sensitivity switch (3)
is set to High, the motion sensor will detect motion up to
26.24 feet away. When the sensitivity switch (3) is set to
Low, the motion sensor will detect motion up to 13.12 feet
away.
□To detect motion, the maximum height of installation is
9.84 feet.
□If motion is not detected for 30 seconds, the light will turn
off.
NOTE: The higher the sensitivity setting, the greater the
possibility of false triggering. To reduce false triggering,
slide the sensitivity switch toward the low setting.
2
3

7 HOMEDEPOT.COM
Please contact 1-877-527-0313 for further assistance.
Installation (continued)
6 Installing the junction box and light
panel
□Insert the junction box (A) through the mounting hole.
□Push the spring-loaded clips (4) on the light panel (C)
upward and insert the light panel base into the mounting
hole. Release the clips (4). The light panel (C) will be pulled
ush to the ceiling.
□For airtight installations, install the foam gasket (B)
between the light panel (C) and the ceiling.
Care and Cleaning
□To clean the xture, rst disconnect the power to the xture by turning off the circuit breaker of by removing the fuse at the fuse box.
□Use a dry or slightly dampened, clean cloth (use clean water, never use a solvent) to wipe the surface of the xture.
□Allow the xture to dry completely before power is restored.
A
B
C
4
C

Questions, problems, missing parts?
Before returning to the store,
call Commercial Electric Customer Service
8 a.m. - 7 p.m., EST, Monday-Friday, 9 a.m. - 6 p.m., EST, Saturday
1-877-527-0313
HOMEDEPOT.COM
Retain this manual for future use.

GRACIAS
Agradecemos la conanza que ha puesto en Commercial Electric con la compra de esta luz empotrada. Nos esforzamos continuamente para
crear productos de calidad diseñados para mejorar su hogar. Visítenos en línea para ver nuestra línea completa de productos disponibles
parasus necesidades de mejoramiento del hogar. ¡Gracias por elegir a Commercial Electric!
GUÍA DE USO Y CUIDADO
KIT EMPOTRADO DELGADO DE LEDS CON SENSOR DE MOVIMIENTO
¿Tiene preguntas o problemas, o le faltan piezas?
Antes de devolver a la tienda,
llame al Servicio al Cliente de Commercial Electric
Lunes a viernes de 8:00 a.m. a 7:00 p.m., EST, y los sábados de 9:00 a.m. a 6:00 p.m., EST
1-877-527-0313
HOMEDEPOT.COM
Artículo n.° 1007 961 135
Modelo n.° 91767

10
Índice
Índice ...........................................10
Información de seguridad ...........................10
Garantía. . . . . . . . . . . . . . . . . . . . . . . . . . . . . . . . . . . . . . . . . . 11
Antes de la instalación ..............................11
Instalación .......................................13
Cuidado y limpieza .................................15
Información de seguridad
INSTRUCCIONES IMPORTANTES DE SEGURIDAD.
GUARDE ESTAS INSTRUCCIONES.
La mayoría de los accidentes eléctricos son resultado de descuidos
e ignorancia. Revise estas directrices eléctricas básicas antes de
comenzar la instalación.
□Use herramientas con mangos aislados y escaleras hechas de
madera o bra de vidrio.
□Disponga de extintores de polvo químico en la cocina, sótano
ytaller.
□Nunca desactive los dispositivos de conexión a tierra. Asegúrese
de que todos los aparatos que requieran conexión a tierra la
posean, y que el sistema eléctrico mismo esté bien conectado
atierra.
□Cumpla o exceda los requisitos del código eléctrico relacionados
a la tarea que está realizando.
□Siempre trabaje con luz suciente para ver lo que está haciendo.
Es fácil cometer un error cuando no hay suciente luz.
□Certicado hermético según ASTM E283-04.
□Si tiene dudas sobre la seguridad de una reparación o prueba
eléctrica, llame a un profesional.
□Esta lámpara está calicada CI para contacto directo
conaislamiento.
□Este accesorio está diseñado para uso en interiores o en lugares
húmedos.
□No modique esta lámpara. Si se realizan modicaciones, esto
puede hacer que el producto sea inseguro y anular la garantía.
ADVERTENCIA: Antes de tocar cualquier cable, use un
voltímetro para vericar que no esté vivo.
ADVERTENCIA: Cuando verique el voltaje en un
tomacorriente, compruebe ambas salidas ya que podrían
estar conectadas a diferentes circuitos.
ADVERTENCIA: Antes de trabajar en un circuito, vaya
al panel de servicio principal y quite el fusible o abra el
disyuntor que controla el circuito. Pegue una señal al panel
para advertir a otros a n de que dejen el circuito solo
mientras usted trabaja.
ADVERTENCIA: CONSULTE A UN ELECTRICISTA
CALIFICADO PARA ASEGURARSE DE QUE SE USE EL
CONDUCTOR DEL CIRCUITO DE DERIVACIÓN CORRECTO.
ADVERTENCIA: Los cambios o las modicaciones a
esta unidad que no sean aprobados en forma expresa por
la parte responsable del cumplimiento pueden invalidar el
permiso del usuario para usar el equipo. Este equipo cumple
con la parte 15 de las reglas de la FCC. El funcionamiento
está sujeto a las siguientes dos condiciones: (1) este
dispositivo no puede causar interferencia dañina, y (2) este
dispositivo debe aceptar toda interferencia recibida, incluso
la que puede causar un funcionamiento indeseado.
NOTA: Las pruebas realizadas en este equipo permiten
armar que cumple con los límites de un dispositivo digital
de Clase B, según lo estipulado en la Sección 15 de las
normas de la FCC. Estos límites están diseñados para
brindar una protección razonable contra la interferencia
dañina en una instalación residencial. Este equipo genera,
utiliza y puede emitir energía de radiofrecuencia y, si
no se instala y utiliza de acuerdo con las instrucciones,
puede causar interferencias perjudiciales en las
radiocomunicaciones. Sin embargo, no existe garantía de
que no ocurra interferencia en una instalación en particular.
Si este equipo efectivamente causa interferencia dañina a la
recepción de radio o televisión, lo cual puede determinarse
apagando y encendiendo el equipo, se recomienda al
usuario que trate de corregir la interferencia realizando uno
o varios de los siguientes pasos:
□Cambiar de dirección o de lugar la antena receptora.
□Aumentar la separación entre el equipo y el
receptor.
□Conectar el equipo en un tomacorriente de
un circuito diferente al que está conectado
elreceptor.
□Consultar al concesionario o a un técnico de
radio/TV con experiencia para que le ayude.
Persona Responsable en la FCC
Globe Electric
2264 East 6th Street
San Bernardino, CA 92410
www.globe-electric.com

11 HOMEDEPOT.COM
Llame al 1-877-527-0313 para obtener asistencia adicional.
Garantía
GARANTÍA LIMITADA POR 5 AÑOS
El fabricante garantiza que esta lámpara estará libre de defectos en materiales y mano de obra por un periodo de cinco años a partir de la
fecha de su compra. Si durante este lapso, el producto resulta defectuoso en cuanto a material o mano de obra, deberá devolverlo al lugar
de la compra original, junto con una copia de la factura de venta como comprobante de la compra. El fabricante, según su criterio, reparará,
sustituirá o reembolsará el precio de la compra al comprador o consumidor original. Esta garantía no cubre los focos ni que el dispositivo
resulte dañado debido a un mal uso, daño accidental, manejo o instalación inapropiados y, asimismo, de manera especíca excluye la
responsabilidad por daños directos, incidentales o emergentes. Puesto que algunos estados no permiten las exclusiones o limitaciones
en una garantía implícita, es posible que las exclusiones y limitaciones anteriores no se apliquen. Esta garantía le brinda derechos legales
especícos y quizás usted tenga también otros derechos que varían según el estado.
Comuníquese con el equipo de Atención al Cliente al 1-877-527-0313 o visite www.HomeDepot.com.
Antes de la instalación
PLANIFICACIÓN DE LA INSTALACIÓN
Verique todas las piezas con las secciones de Herraje incluido y Contenido del paquete. Si alguna pieza falta o está dañada, no instale
este producto y póngase en contacto con el Equipo de Servicio al Cliente al 1-877-527-0313.
HERRAMIENTAS REQUERIDAS
Escalera Lentes
protectores
Alicates
pelacables Lápiz
Guantes Sierra para panel
de yeso
Abrazadera para
cables

12
Antes de la instalación (continuación)
CONTENIDO DEL PAQUETE
Pieza Descripción Cantidad
(paquete de uno)
Cantidad
(paquete de cuatro)
A Caja de conexiones 1 4 Ángulo del haz
B Junta de espuma 1 4
C Panel de luz 1 4
D Plantilla 1 1
A
C
BD

13 HOMEDEPOT.COM
Llame al 1-877-527-0313 para obtener asistencia adicional.
Instalación
1 Corte la alimentación
□Coloque el interruptor de pared en la posición de apagado.
□Corte la alimentación en el disyuntor o quite el fusible de la caja de fusibles.
2 Preparación del sitio de la
instalación
□Use la plantilla (D) para marcar el sitio deseado para
lainstalación.
□Use una sierra para panel de yeso para cortar la abertura
marcada con la plantilla.
3 Conexión de los cables
□Desenchufe el cable de conexión para separar la caja de
conexiones (A) del panel de luz (C).
□Abra la cubierta de la caja de conexiones (A) y quite la tapa
precortada (1) del panel lateral.
□Inserte el cable de suministro eléctrico a través del oricio
de la tapa (1).
□Use los terminales a presión de conexión rapida
para conectar el cable de tierra desde de la caja
de conexiones(A) al cable de tierra del circuito de
alimentación, el cable negro de la caja de conexiones (A) al
cable negro del circuito de alimentación, y el cable blanco
de la caja de conexiones (A) al cable blanco del circuito de
alimentación.
□Fije el cable en el oricio de la tapa con una abrazadera
para cables (no incluida).
□Coloque todos los cables y conexiones en la caja de
conexiones (A) y cierre la cubierta.
□Enchufe el cable de conexión de la caja de conexiones (A)
al cable de conexión del panel de luz (C).
D
D
C
A1

14
Instalación (continuación)
4 Selección de brillo
□Use el interruptor CCT (2) en el cable de conexión para
seleccionar 2700K, 3000K, 3500K, 4000K, o 5000K.
5000K
4000K
3500K
3000K
2700K
5 Ajuste de la sensibilidad del sensor
de movimiento
□Seleccione el nivel de sensibilidad. Cuando el interruptor
de sensibilidad (3) está en el ajuste alto, el sensor
detectará movimiento hasta 8 metros (26,24 pies) de
distancia. Cuando el interruptor de sensibilidad (3)
está establecido en el ajuste Bajo, el sensor detectará
movimiento hasta 4 metros (13,12 pies) de distancia.
□Para que se detecte el movimiento, la instalación debe
hacerse a una altura máxima de 3 metros (9,84 pies).
□Si no detecta movimiento en 30 segundos, la luz se
apagará.
NOTA: Cuanto mayor sea el ajuste de sensibilidad, mayor
será la posibilidad de que la luz se encienda por error. Para
reducir la posibilidad de que se encienda por error, deslice
el interruptor de sensibilidad hacia el ajuste bajo.
3
2

15 HOMEDEPOT.COM
Llame al 1-877-527-0313 para obtener asistencia adicional.
Instalación (continuación)
6 Instalación de la caja de conexiones
yel panel de luz
□Inserte la caja de conexiones (A) a través del oricio
demontaje.
□Presione las presillas con resorte (4) en el panel de luz (C)
hacia arriba e inserte la base del panel de luz en el oricio
de montaje. Suelte las presillas (4). El panel de luz (C)
quedara a ras del cielo raso.
□Para instalaciones selladas, instale la junta de espuma (B)
entre el panel de luz (C) y el cielo raso.
Cuidado y limpieza
□Para limpiar la lámpara, primero desconecte la alimentación de la lámpara abriendo el disyuntor o quitando el fusible de la caja de fusibles.
□Use un trapo limpio y húmedo o apenas humedecido (use agua limpia, nunca use solventes) para frotar la supercie de la lámpara.
□Espere que la lámpara se seque por completo antes de volver a conectar la electricidad.
A
B
C
4
C

¿Tiene preguntas o problemas, o le faltan piezas?
Antes de devolver a la tienda,
llame al Servicio al Cliente de Commercial Electric
Lunes a viernes de 8:00 a.m. a 7:00 p.m., EST, y los sábados de 9:00 a.m. a 6:00 p.m., EST
1-877-527-0313
HOMEDEPOT.COM
Guarde este manual para su uso futuro.
-
 1
1
-
 2
2
-
 3
3
-
 4
4
-
 5
5
-
 6
6
-
 7
7
-
 8
8
-
 9
9
-
 10
10
-
 11
11
-
 12
12
-
 13
13
-
 14
14
-
 15
15
-
 16
16


Commercial Electric 91767 Guía de instalación
- Tipo
- Guía de instalación
en otros idiomas
Artículos relacionados
-
 Commercial Electric 53805301 Guía de instalación
-
Commercial Electric 53820101 Guía de instalación
-
 Commercial Electric 2003031602 Guía de instalación
-
 Commercial Electric 53807101-4PK Guía de instalación
-
 Commercial Electric 53823101-4PK Guía de instalación
-
 Commercial Electric 53198101 Guía de instalación
-
Commercial Electric 74206/HD Guía de instalación
-
 Commercial Electric 74204/HD Guía de instalación
-
 Commercial Electric 74210/HD/3 Guía de instalación
-
 Commercial Electric 74220/HD Guía de instalación


