Commercial Electric 53198101 Guía de instalación
- Tipo
- Guía de instalación

THANK YOU
We appreciate the trust and confidence you have placed in Commercial Electric through the purchase of this
recessed retrofit downlight. We strive to continually create quality products designed to enhance your home. Visit
us online to see our full line of products available for your home improvement needs. Thank you for choosing
Commercial Electric!
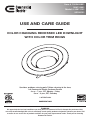
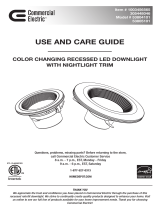
USE AND CARE GUIDE
COLOR CHANGING RECESSED LED DOWNLIGHT
WITH COLOR TRIM RINGS
Questions, problems, missing parts? Before returning to the store,
call Commercial Electric Customer Service
8 a.m. - 7 p.m., EST, Monday - Friday
9 a.m. - 6 p.m., EST, Saturday
1-877-527-0313
HOMEDEPOT.COM
Item # 1003455821
306112991
Model # 53811101
53198101

2
Safety Information
WARNING: Carefully read and understand the information
given in this manual before beginning the assembly and
installation. Failure to do so could lead to electric shock, fire,
or other injuries which could be hazardous or even fatal.
WARNING: Ensure the electricity to the wires you are
working on is shut off. Either remove the fuse or turn off the
circuit breaker.
WARNING: Risk of fire or electric shock. Installation of this
LED Retrofit Kit assembly requires a person familiar with the
construction and operation of the light fixture’s/luminaire’s
electrical system and the hazard involved. If not qualified,
do not attempt installation. Contact a qualified electrician.
WARNING: Install this kit only in luminaires (light fixtures)
that have the construction features and dimensions shown
in the photographs and/or drawings included in these
installation instructions, and where the input rating of the
retrofit kit does not exceed the input rating of the luminaire.
WARNING: Do not make or alter any open holes in an
enclosure of wiring or electrical components during kit
installation.
WARNING: To prevent wiring damage or abrasion, do not
expose wiring to edges of sheet metal or other sharp objects.
WARNING: Risk of fire or electric shock. Luminaire wiring
and electrical parts may be damaged when drilling for
installation of LED retrofit kit. Check for enclosed wiring and
components.
NOTICE: The retrofit kit is accepted as a component of a luminaire
where the suitability of the combination shall be determined by
authorities having jurisdiction. Product must be installed by a qualified
electrician in accordance with the applicable and appropriate electrical
codes. The installation guide does not supersede local or national
regulations for electrical installations.
NOTICE: This equipment has been tested and found to comply with
the limits for a Class B digital device, pursuant to Part 15 of the FCC
Rules. These limits are designed to provide reasonable protection against
harmful interference in a residential installation.
This equipment generates, uses and can radiate radio frequency energy
and, if not installed and used in accordance with the instructions, may
cause harmful interference to radio communications.
However, there is no guarantee that interference will not occur in a
particular installation. If this equipment does cause harmful interference
to radio or television reception, which can be determined by turning
the equipment off and on, the user is encouraged to try to correct the
interference by one or more of the following measures:
□ Reorient or relocate the receiving antenna
□ Increase the separation between the equipment and the receiver.
□ Connect the equipment into an outlet on a circuit different from that to
which the receiver is connected.
□ Consult the dealer or an experienced radio/TV technician for help.
WARNING: Changes or modifications not expressly
approved by the party responsible for compliance could void
the user’s authority to operate the equipment.
NOTICE: Minimum lamp compartment dimensions for Model #
53811101: 4 inch diameter and 8 inch depth when used in a 4-inch
recessed luminaire.
NOTICE: Minimum lamp compartment dimensions for Model #
53198101:
5 inch diameter and 8 inch depth when used in a 5-inch recessed
luminaire.
6 inch diameter and 8 inch depth when used in a 6-inch recessed
luminaire.
Table of Contents
Table of Contents ......................................2
Safety Information ....................................2
Warranty ...................................................3
Pre-Installation .........................................3
Planning Installation ..............................3
Tools Required .......................................3
Package Contents ..................................3
Installation ................................................4
Changing Color Trim Rings .......................5
Adjusting the Color Temperature
of the Light ...........................................5
Care & Cleaning ........................................6
Troubleshooting ........................................6
Light Distribution ......................................7

3 HOMEDEPOT.COM
Please contact 1-877-527-0313 for further assistance.
Pre-Installation
PLANNING INSTALLATION
Before beginning assembly, installation or operation of product, make sure all parts are present. Compare parts
with the package contents list. If any part is missing or damaged, do not attempt to assemble, install or operate the
product. Contact customer service for replacement parts.
NOTE: Keep your receipt and these instructions for proof of purchase.
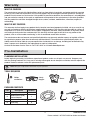
TOOLS REQUIRED
Warranty
WHAT IS COVERED
The manufacturer warrants this lighting fixture to be free from defects in materials and workmanship for a period
of five (5) years from date of purchase. This warranty applies only to the original consumer purchaser and only to
products used in normal use and service. If this product is found to be defective, the manufacturer’s only obligation,
and your exclusive remedy, is the repair or replacement of the product at the manufacturer’s discretion, provided
that the product has not been damaged through misuse, abuse, accident, modifications, alterations, neglect, or
mishandling.
WHAT IS NOT COVERED
This warranty shall not apply to any product that is found to have been improperly installed, set-up, or used in any
way not in accordance with the instructions supplied with the product. This warranty shall not apply to a failure of
the product as a result of an accident, misuse, abuse, negligence, alteration, faulty installation, or any other failure
not relating to faulty material or workmanship. This warranty shall not apply to the finish on any portion of the
product, such as surface and/or weathering, as this is considered normal wear and tear.
The manufacturer does not warrant and specifically disclaims any warranty, whether express or implied, of fitness
for a particular purpose, other than the warranty contained herein. The manufacturer specifically disclaims any
liability and shall not be liable for any consequential or incidental loss or damage, including but not limited to any
labor / expense costs involved in the replacement or repair of said product.
Contact the Customer Service Team at 1-877-527-0313 or visit www.HomeDepot.com.
Phillips
screwdriver
Safety
Goggles
Gloves
Ladder
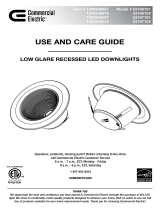
PACKAGE CONTENTS
Part Description Quantity
A LED Light Module 1
B
Medium Base (E26)
Socket Adapter
1
C Lever 1
D Trim Ring 4
A B D
C

4
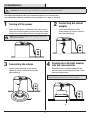
Installation
WARNING: Shut off the power at the circuit breaker or fuse panel before removing the old fixture.
Item 306112991/Model # 53811101 should be installed in 4 in. housings only.
Item 1003455821/Model # 53198101 can be installed in 5 in. and 6 in. housings.
1
Turning off the power
□ Make sure the power is turned off at the source to the
recessed can housing where the fixture will be installed.
□ Remove the existing bulb and trim, revealing the socket.
NOTE: Stick the replacement label on the inner wall of the recessed
housing before installation.
2
Connecting the socket
adapter
□ Screw the medium base (E26)
socket adapter (B) into the socket in
the recessed housing.
3
Connecting the cables
□ Plug the cable connector on the socket
adapter (B) into the connector on the LED
light module (A).
4
Pushing the LED light module
into the recessed can
□ Carefully push the LED light module (A) into
the recessed can housing until the trim is flush
with the ceiling surface.
NOTICE: Select the preferred color temperature of the light before
pushing the LED light module into the recessed can housing.
B
B
A
A

2700K
3000K
3500K
4000K
5000K
5 HOMEDEPOT.COM
Please contact 1-877-527-0313 for further assistance.
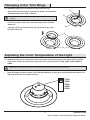
Adjusting the Color Temperature of the Light
This downlight allows you to customize the color temperature of the light anywhere from warm white to daylight.
□ Choose your favorite correlated color temperature (CCT) from five options: 2700K, 3000K, 3500K, 4000K, or
5000K.
NOTE: The factory setting for the correlated color temperature (CCT) is 2700K, which is the warmest white light.
□ Move the toggle switch on the back of the LED light module (A) to make your selection before pushing the LED
light module into the recessed can housing.
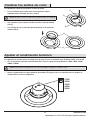
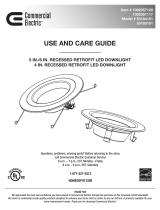
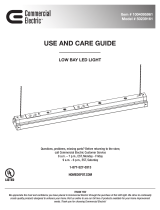
Changing Color Trim Rings
This downlight allows you to customize the color of the trim ring.
□ Choose your favorite color trim ring from four options: Brushed Nickel,
Oil Rubbed Bronze, Rose Gold, or Chrome.
NOTE: The product is shipped with the Brushed Nickel trim ring installed on the
downlight.
□ Use the lever (C) to remove the current trim ring from the LED light
module (A).
□ Carefully snap the desired color trim ring (D) into the center of the
LED light module (A).
C
D
A
D
A

6
Care & Cleaning
CAUTION: Before attempting to clean the fixture, disconnect the power to the fixture by turning the breaker off or removing the fuse from
the fuse box.
□ Clean the fixture with a soft, dry cloth.
□ Do not use cleaners with chemicals, solvents, or harsh abrasives.
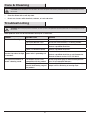
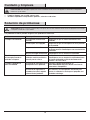
Troubleshooting
WARNING: Before doing any work on the fixture, disconnect power to the light fixture by turning the breaker off or removing the fuse from
the fuse box.
Minor problems often can be fixed without the help of an electrician.
Problem Possible Cause Solution
The fixture will not light. The power is off. Ensure the power supply is on.
The circuit breaker is off. Ensure the circuit breaker is in the on position.
There is a bad connection. Check to ensure proper wire connections are made.
Contact a qualified electrician.
There is a defective switch. Contact a qualified electrician.
The fuse blows or the circuit
breaker trips when the light
is turned on.
The wires are crossed or the
power wire is grounding out.
Check the wire connections.
Contact a qualified electrician or call Commercial
Electric customer service 1-877-527-0313.
The light fixture flickers or
makes a buzzing sound.
The dimmer circuit is not
compatible with the product.
Check the product page at www.HomeDepot.com
for a list of compatible dimmers.
The dimming circuit is set
outside the dimming range of
the product.
Turn or slide the dimmer switch to adjust the light
output until the flickering or buzzing stops.

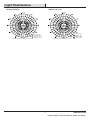
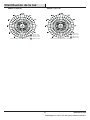
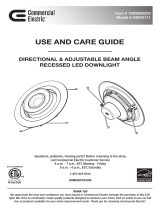
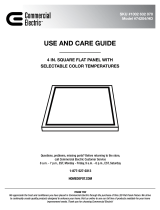
AVERAGE BEAM ANGLE (50%): 102.8 DEG
C0/180, 102.7
80
160
240
320
400
C30/210, 102.8
C60/240, 102.8
C90/240, 102.8
C0/180, 94.5
110
220
330
440
550
C30/210, 94.5
C60/240, 94.5
C90/240, 94.5
AVERAGE BEAM ANGLE (50%): 94.5 DEG
7 HOMEDEPOT.COM
Please contact 1-877-527-0313 for further assistance.
Light Distribution
Model # 53198101 Model # 53811101

Questions, problems, missing parts? Before returning to the store,
call Commercial Electric Customer Service
8 a.m. - 7 p.m., EST, Monday - Friday
9 a.m. - 6 p.m., EST, Saturday
1-877-527-0313
HOMEDEPOT.COM
Retain this manual for future use.

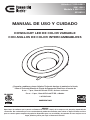
MANUAL DE USO Y CUIDADO
DOWNLIGHT LED DE COLOR VARIABLE
CON ANILLOS DE COLOR INTERCAMBIABLESS
¿Preguntas, problemas, piezas faltantes? Antes de devolver el producto a la tienda,
llame al Centro de Atención al Cliente de Commercial Electric en el horario de
8 a.m. - 7 p.m., Hora del Este de EE.UU., de lunes a viernes.
9 a.m. - 6 p.m., Hora del Este de EE.UU., sábados.
1-877-527-0313
HOMEDEPOT.COM
GRACIAS
Apreciamos la confianza que ha puesto en Commercial Electric a través de la compra e este proyector empotrable de
renovación. Nos esforzamos por crear constantemente productos diseñados para realzar su hogar. Visítenos en línea
para ver nuestra gama completa de productos disponibles para sus necesidades al momento de hacer mejoras en su
hogar. ¡Muchas gracias por elegir a Commercial Electric!
Artículo # 1003455821
306112991
Modelo # 53811101
53198101

10
Información sobre seguridad
ADVERTENCIA: Lea cuidadosamente y comprenda la
información incluida en este manual antes de comenzar el
armado e instalación. No hacerlo puede provocar descarga
eléctrica, incendio, u otras lesiones que pueden ser graves or
mortales.
ADVERTENCIA: Asegúrese de cortar el suministro eléctrico
en los cables con los que trabajará. Extraiga los fusibles o
apague el cortacircuitos.
ADVERTENCIA: Riesgo de incendio o descarga eléctrica.
La instalación de este conjunto de renovación LED debe ser
realizada por una persona familiarizada con la construcción y
operación del sistema eléctrico de la lámpara / luminaria y de los
posibles riesgos. Si no está calificado, no intente la instalación.
Póngase en contacto con un electricista calificado.
ADVERTENCIA: Instale este conjunto únicamente en
luminarias (lámparas) que cuenten con las características
de construcción y las dimensiones que se muestran en las
fotografías o dibujos incluidos en estas instrucciones de
instalación, donde la potencia de entrada del conjunto de
renovación no supere la potencia de entrada de la lámpara.
ADVERTENCIA: No haga ni altere orificios abiertos en
una caja de cableado ni componentes eléctricos durante la
instalación del conjunto.
ADVERTENCIA: Para evitar que los cables se dañen o se
pelen, no los exponga a los bordes de láminas de metal o a otros
objetos afilados.
ADVERTENCIA: Riesgo de incendio o descarga eléctrica.
Los cables y las piezas eléctricas de la lámpara pueden dañarse
durante la perforación para la instalación del kit de actualización
de LED. Verifique si hay cables o piezas cerrados.
AVISO: El kit de actualización se acepta como un componente de una
luminaria donde la idoneidad de la combinación estará determinada por las
autoridades competentes. El producto debe ser instalado por un electricista
cualificado, conforme a los códigos eléctricos aplicables y apropiados. El
manual de instalación no reemplaza las normas locales o nacionales para
instalaciones eléctricas.
AVISO: Este equipo ha sido probado y se halló que cumple con los
límites establecidos para la clase B de dispositivos digitales, con-
forme a la Parte 15 de las Normas de FCC. Estos límites se establecen
para brindar protección razonable contra interferencia dañina en una
instalación residencial.
Este equipo genera, utiliza y puede irradiar energía de frecuencias de
radio y, si no se instala conforme a las instrucciones, puede provocar
interferencia dañina a las comunicaciones de radio.
Sin embargo, no existe garantía de que la interferencia no se
produzca en una instalación en particular. Si este equipo produce
interferencia dañina a la recepción de radio o televisión, lo que puede
determinarse encendiendo y apagando el equipo, se insta al usuario
a intentar corregir la interferencia mediante uno de los siguientes
métodos:
□ Cambie la orientación o ubicación de la antena receptora.
□ Aumente la separación entre el equipo y el receptor.
□ Conecte el equipo en un tomacorriente que esté en un circuito
diferente al cual está conectado el receptor.
□ Consulte con el representante o con un técnico experimentado en
radio y televisión para solicitar asistencia.
ADVERTENCIA: Cambios o modificaciones no
aprobadasen forma expresa por la parte responsable del
cumplimientopuede invalidar la autoridad del usuario de
manejar elequipo.
AVISO: Dimensiones mínimas del vano lámpara para Modelo #
53811101: 4 pulgadas de diámetro y 8 pulgadas de
altura cuando se utiliza en una carcasa empotrable de 4 pulgadas.
AVISO: Dimensiones mínimas del vano lámpara para Modelo #
53198101:
5 pulgadas de diámetro y 8 pulgadas de altura cuando se utiliza en
una carcasa empotrable de 5 pulgadas.
6 pulgadas de diámetro y 8 pulgadas de altura cuando se utiliza en
una carcasa empotrable de 6 pulgadas.
Contenido
Contenido ................................................10
Información sobre seguridad .................10
Garantía. ..................................................11
Previo a la instalación ............................11
Planificación de la instalación .............11
Herramientas necesarias .....................11
Contenido del paquete .........................11
Instalación ..............................................12
Cambiar los anillos de color ...................13
Ajustar el rendimiento lumínico .............13
Cuidado y limpieza .................................14
Solución de problemas ...........................14
Distribución de la luz ..............................15

11 HOMEDEPOT.COM
Comuníquese al 1-877-527-0313 para solicitar asistencia.
Garantía
CUBRE
El fabricante garantiza que este aparato de iluminación no tendrá defectos en los materiales o en la mano de obra
por un periodo de cinco (5) años desde la fecha de compra. Esta garantía se aplica sólo al comprador consumidor
original y sólo a los productos que se utilizan y reciben servicio en forma normal. Si se encuentra que este producto
tiene defectos, la única obligación del fabricante, y su exclusiva solución, es reparar o reemplazar el producto
a su entera discreción, siempre y cuando el producto no se haya dañado debido al mal uso, abuso, accidente,
modificaciones, alteraciones, negligencias o mal manejo del mismo.
NO CUBRE
Esta garantía no se aplica a ningún producto que se ha instalado incorrectamente, ajustado o utilizado en una forma
que no concuerde con las instrucciones suministradas junto con el producto. Esta garantía no se aplicará a fallas
del producto como resultado de un accidente, uso incorrecto, abuso, negligencia, alteración, instalación defectuosa,
o ninguna otra falla no relacionada con el material o mano de obra defectuosa. Esta garantía no se aplica a los
acabados en ninguna parte del producto, tal como la superficie ni a la acción de los elementos, ya que esto se
considera desgaste normal.
El fabricante no garantiza y no acepta responsabilidad, ya sea expresa o implícita de la idoneidad para un fin
particular, a excepción de la garantía contenida en el presente. El fabricante niega específicamente cualquier
responsabilidad y no será responsable por daños o pérdidas indirectas o consecuenciales, e incluye pero no se
limita a los costos de mano de obra, gastos relacionados en el reemplazo o reparación de dicho producto.
Comuníquese con el equipo de Servicio al Cliente al 1-877-527-0313 or visit www.HomeDepot.com.
Previo a la instalación
PLANIFICACIÓN DE LA INSTALACIÓN
Antes de comenzar el armado, la instalación o antes de operar el producto, asegúrese de que tiene todas las piezas.
Compare las piezas con la lista de contenido. Si falta alguna pieza o si está dañada, no proceda a armar, instalar ni
operar el producto. Comuníquese con el servicio al cliente para el reemplazo de las piezas.
NOTA: Guarde el recibo de compra y estas instrucciones como prueba de compra.
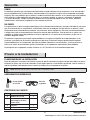
HERRAMIENTAS NECESARIAS
Destornillador
de estrella
Gafas de
seguridad
Guantes
Escalera
CONTENIDO DEL PAQUETE
Pieza Descripción Cantidad
A Módulo de luz LED 1
B Adaptador para
portalámpara de base
media (E26)
1
C Palanca 1
D Anillos 4
A B D
C

12
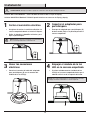
Instalación
ADVERTENCIA: Extraiga los fusibles o apague el cortacircuitos antes de quitar la lámpara existente.
Artículo 306112991/Modelo n.º 53811101 debe instalarse solo en cajas de 4 pulg.
Artículo 1003455821/Modelo # 53198101 puede instalarse en carcasas de 5 pulg y 6 pulg.
1
Cortar el suministro eléctrico
□ Asegúrese de cortar el suministro eléctrico a la
carcasa empotrada donde se instalará lámpara.
□ Retire el reborde y la bombilla existentes, para
dejar el portalámpara.
NOTA: Aplique la etiqueta de reemplazo en la pared interior
de la carcasa empotrada antes de la instalación.
2
Conectar el adaptador para
portalámpara
□ Enrosque el adaptador para portalámpara (B)
de base media (E26) en el portalámpara de la
carcasa empotrada.
3
Hacer las conexiones
eléctricas
□ Conecte el conector del cable del adaptador
para portalámpara (B) con el conector del
módulo de la luz LED (A).
4
Empujar el módulo de la luz
LED en la carcasa empotrada
□ Presione cuidadosamente el módulo de luz
LED (A) en la carcasa empotrada hasta que el
reborde esté al ras de la supercie del techo.
AVISO: Seleccione la temperatura de color preferida de la luz antes
de empujar el módulo de luz LED en la carcasa empotrada.
B
B
A
A

2700K
3000K
3500K
4000K
5000K
13 HOMEDEPOT.COM
Comuníquese al 1-877-527-0313 para solicitar asistencia.
Ajustar el rendimiento lumínico
Este proyector le permite ajustar la temperatura de color de la luz en cualquier lugar de blanco cálido a luz del día.
□ Elija su temperatura de color correlacionada (CCT) favorita a partir de cinco opciones: 2700K, 3000K, 3500K,
4000K, o 5000K.
NOTA: El ajuste inicial de la temperatura de color correlacionada (CCT) es 2700K, que es la luz blanca cálida.
□ Mueva el conmutador en la parte posterior del módulo LED (A) para hacer su selección antes de empujar el
módulo LED en la carcasa empotrada.
Cambiar los anillos de color
Este downlight le permite personalizar el color del anillo.
□ Elija su anillo de color favorito entre cuatro opciones: níquel
cepillado, bronce aceitado, oro rosa o cromo.
NOTA: El producto se envía con el anillo de níquel cepillado instalado en el downlight.
□ Use la palanca (C) para quitar el anillo actual de la caja del módulo
LED (A).
□ Con cuidado, encaje el anillo de color deseado (D) en el centro del
módulo LED (A).
C
D
A
D
A

14
Solución de problemas
ADVERTENCIA: Antes de realizar cualquier trabajo en el aparato, desconecte el suministro eléctrico hacia este apagando el cortacircuitos
o extrayendo el fusible de la caja de fusibles.
Los problemas menores pueden arreglarse sin ayuda de un electricista.
Problema Causa posible Medida correctiva
La lámpara no enciende. El suministro eléctrico está
cortado.
Asegúrese de que el suministro eléctrico esté
activado.
El interruptor está apagado. Asegúrese de que el interruptor esté en la posición
de encendido.
Hay una mala conexión. Asegúrese de que se hayan conectado los cables
de forma correcta. Comuníquese con un electricista
calificado.
Hay un interruptor defectuoso. Comuníquese con un electricista calificado.
El fusible se quema o salta
el interruptor cuando se
enciende la lámpara.
Los cables están cruzados o el
cable de suministro eléctrico
no está puesto a tierra.
Verifique las conexiones de los cables.
Comuníquese con un electricista calificado o llame
al Centro de Atención al Cliente de Commercial
Electric 1-877-527-0313.
La lámpara parpadea o
emite un zumbido.
El circuito de atenuación no es
compatible con el producto.
Consulte la página de productos en
www.HomeDepot.com para obtener una lista de
atenuadores compatibles.
El circuito de regulación se
establece fuera del rango de
atenuación del producto.
Gire o deslice el interruptor de atenuación para
ajustar la salida de luz hasta que el parpadeo o el
zumbido se detenga.
Cuidado y limpieza
PRECAUCIÓN: Antes de limpiar el aparato, desconecte el suministro eléctrico hacia este apagando el cortacircuitos o extrayendo el
fusible de la caja de fusibles.
□ Limpie la lámpara con un paño suave y seco.
□ No utilice limpiadores con productos químicos, solventes o abrasivos.

ÁNGULO PROMEDIO DE HAZ (50%): 102.8 DEG
C0/180, 102.7
C30/210, 102.8
C60/240, 102.8
C90/240, 102.8
80
160
240
320
400
ÁNGULO PROMEDIO DE HAZ (50%): 94.5 DEG
C0/180, 94.5
110
220
330
440
550
C30/210, 94.5
C60/240, 94.5
C90/240, 94.5
15 HOMEDEPOT.COM
Comuníquese al 1-877-527-0313 para solicitar asistencia.
Distribución de la luz
Modelo # 53198101 Modelo # 53811101

¿Preguntas, problemas, piezas faltantes? Antes de devolver el producto a la tienda,
llame al Centro de Atención al Cliente de Commercial Electric en el horario de
8 a.m. – 7 p.m., Hora del Este de EE.UU., de lunes a viernes.
9 a.m. – 6 p.m., Hora del Este de EE.UU., el sábado.
1-877-527-0313
HOMEDEPOT.COM
Conserve este manual para uso futuro.
-
 1
1
-
 2
2
-
 3
3
-
 4
4
-
 5
5
-
 6
6
-
 7
7
-
 8
8
-
 9
9
-
 10
10
-
 11
11
-
 12
12
-
 13
13
-
 14
14
-
 15
15
-
 16
16


Commercial Electric 53198101 Guía de instalación
- Tipo
- Guía de instalación
en otros idiomas
Artículos relacionados
-
Commercial Electric 53196102-4pk Guía de instalación
-
-
 Commercial Electric 53805301 Guía de instalación
-
 Commercial Electric 53807101-4PK Guía de instalación
-
 Commercial Electric 53196101 Guía de instalación
-
 Commercial Electric 53183103 Guía de instalación
-
 Commercial Electric 53803111-8PK Guía de instalación
-
 Commercial Electric 74202/HD Guía de instalación
-
 Commercial Electric 74204/HD Guía de instalación
-
 Commercial Electric 50239161 Guía de instalación


