Sony NPA-MQZ1K Manual de usuario
- Categoría
- Bancos de energía
- Tipo
- Manual de usuario
Este manual también es adecuado para

a
b
4-694-093-13(1)
Multi Battery Adaptor Kit
多電池供應器套件
Operating Instructions / Mode d’emploi / Manual de
instrucciones / Instruções de operação / 使用說明書 /
NPA-MQZ1K
©2017 Sony Corporation
Printed in China
Avant utilisation
Caractéristiques
•L'adaptateur multibatteries NPA-MQZ1 (appelé ci-dessous « cet appareil »)
peut contenir jusqu'à quatre batteries « InfoLITHIUM »™ (série Z) pour fournir
une alimentation électrique externe et prend en charge les périphériques
suivants :
– Les appareils photo qui prennent en charge les batteries « InfoLITHIUM »
(séries Z / W)
– Les périphériques qui prennent en charge l'alimentation électrique par USB
•Il n'y a aucune restriction quant au nombre de batteries actuellement
installées dans cet appareil ou à la priorité d'utilisation des emplacements de
batterie de cet appareil lors de la charge.
•Vous pouvez connecter l'adaptateur secteur fourni avec cet appareil pour
utiliser l'appareil comme chargeur de batteries « InfoLITHIUM » (série Z).
À propos de l'alimentation électrique
Lorsque plusieurs batteries sont installées dans cet appareil et qu'elles
présentent le même niveau de charge, l'alimentation électrique est distribuée
équitablement depuis toutes les batteries. Lorsque le niveau de charge des
batteries installées varie, l'alimentation est distribuée depuis la batterie dont le
niveau de charge est le plus élevé.
Remarques concernant cet appareil lors de
l'alimentation électrique
•Lorsque cet appareil alimente en électricité le périphérique raccordé, ne
placez pas le sélecteur DC OUT/CHARGE sur « CHARGE » car l'alimentation
électrique depuis cet appareil sera arrêtée.
•Lorsque le périphérique raccordé est en cours de fonctionnement, il peut
s'éteindre si vous :
– placez le sélecteur DC OUT A ou DC OUT B sur « CAMERA » ou « USB » ;
– retirez l'une des batteries de cet appareil.
Remarques sur le remplacement des batteries
Lorsque s'affiche à l'écran de l'appareil photo raccordé à cet appareil,
chargez ou remplacez la ou les batteries installées dans cet appareil.
Pour remplacer la ou les batteries, suivez l'une des procédures ci-dessous :
•Retirez toutes les batteries de cet appareil, ne touchez pas à l'appareil
pendant un certain temps, puis installez la ou les batteries chargées.
•Retirez la plaque d'insertion de l'appareil photo raccordé, ne les touchez pas
pendant un certain temps, puis réinstallez la plaque sur l'appareil photo.
À propos de l'adaptateur secteur
L'alimentation électrique ne peut pas directement être distribuée vers le
périphérique raccordé en branchant l'adaptateur secteur de cet appareil dans
une prise secteur.
Accessoires fournis (le chiffre entre
parenthèses indique le nombre de
pièces.)
•Adaptateur multibatteries (NPA-MQZ1) (1)
•Protège-batterie*¹ (1)
•Plaque d'insertion (pour les batteries de la série Z)*¹ (1)
•Adaptateur secteur (AC-UES1230/AC-UES1230M/AC-UES1230M T)*² (1)
•Cordon d’alimentation (1)
•Batterie rechargeable (NP-FZ100) (2)
•Plaque de fixation (1)
•Vis (2)
•Protège-câble (1)
•Couvercle du compartiment de batterie (2)
•Cordon antichute (1)
•Jeu de documents imprimés
*¹ Fixé à l'expédition
*² Le numéro de modèle et la forme de l'adaptateur secteur varient selon le pays
ou la région.
Identification des éléments
Port USB (DC OUT)
Sélecteur DC OUT A
Sélecteur DC OUT/CHARGE
Sélecteur DC OUT B
Touche BATT CHECK
Orifices de fixation du protège-câble
Levier de libération de batterie
Orifice du cordon antichute
Témoin CHARGE
Témoin de l'autonomie des batteries
Port DC IN (5 V)
Orifice pour vis de fixation (1/4-20 UNC)
Protège-batterie
Port DC IN (12 V)
Plaque d'insertion (pour les batteries de la série W)*
Encadrement de la plaque de fixation (pour les batteries de la série
Z)*
Installation/Retrait des batteries
Vérification de l'autonomie des
batteries
1 Appuyez sur la touche BATT CHECK.
Vous pouvez vérifier l'indication du témoin d'autonomie des batteries (qui
s'allume pendant environ dix secondes) pour savoir l'autonomie approximative
de la ou des batteries.
... Éteint, ... Allumé
Indications de l'autonomie des batteries
70% - 100%
40% - 70%
10% - 40%
0% - 10%
Les indications du témoin d'autonomie des batteries et le pourcentage
d'autonomie (%) listés ci-dessus sont fournis en guise de référence.
L'état actuel peut varie selon la température ambiante ou l'état de la batterie.
Conseil
Lorsque cet appareil est raccordé à un appareil photo, vous pouvez également
vérifier l'autonomie des batteries à l'écran de l'appareil photo.
Quel que soit le nombre de batteries installées dans cet appareil, l'écran de
l'appareil photo affiche une seule icône (
). L'autonomie réelle des batteries
pour l'appareil photo varie selon le nombre de batteries installées.
Charge de la ou des batteries
1 Faites passer le sélecteur DC OUT/CHARGE sur « CHARGE ». (
)
2 Branchez cet appareil sur une prise secteur (
) à l'aide de
l'adaptateur secteur fourni. (
)
Le témoin CHARGE des batteries en cours de charge s'allume pour indiquer la
progression de la charge. (
)
Lorsque plusieurs batteries sont installées dans cet appareil, la charge
commence par la batterie dont le niveau de charge est le plus faible. Lorsque
toutes les batteries atteignent une charge d'au moins 90 %, le témoin CHARGE
s'éteint. (Charge normale)
Si vous chargez une ou des batteries pendant environ 160 minutes* après
l'extinction du témoin CHARGE, l'autonomie des batteries sera prolongée.
(Charge complète)
* Temps approximatif pour charger de quatre batteries
Conseil
Vous pouvez charger la ou les batteries en branchant un adaptateur secteur
USB dans le port DC IN (5 V) de cet appareil et dans une prise secteur ou en
branchant un câble USB dans le port USB de cet appareil et celui d'un autre
périphérique, d'un ordinateur par exemple.
Le temps de charge varie selon les caractéristiques de l'adaptateur secteur USB
ou du périphérique raccordé.
À propos du temps de charge (avec l'adaptateur secteur
fourni)
Batterie rechargeable Une batterie NP-FZ100 Quatre batteries NP-FZ100
Temps d'une charge
normale (environ)
120 min 480 min
Temps d'une charge
complète (environ)
160 min 640 min
•Les temps indiqués correspondent à la charge d’une batterie vide et usée sur cet
appareil, à une température ambiante de 25 °C (77 °F).
•Le temps de charge peut varier selon l'état de la batterie ou la température
ambiante.
Remarques
•Si le témoin d'autonomie des batteries de cet appareil indique un niveau de
charge de 0 % à 10 % (le témoin est éteint) mais que le témoin CHARGE ne
s'allume pas, assurez-vous que la ou les batteries sont correctement installées.
Une installation incorrecte empêche l'appareil de charger.
•Lorsque vous chargez une batterie qui n'a pas été utilisée pendant longtemps, le
temps de charge peut être plus long.
Alimentation électrique vers le
périphérique raccordé
1 Faites passer le sélecteur DC OUT/CHARGE sur « DC OUT ». (
)
2 Raccordez un appareil photo ou un périphérique USB à cet
appareil.
Utilisez la plaque d'insertion (
) pour raccorder l'appareil photo ; et le port USB
(
) pour le périphérique USB.
Pour fixer la plaque d'insertion à l'appareil photo, alignez le repère
de la
plaque sur le repère
de l'appareil photo, puis insérez la plaque dans le
compartiment de la batterie de l'appareil photo.
Lorsque vous fermez le couvercle du compartiment de la batterie de l'appareil
photo, acheminez le câble dans l'entaille du couvercle comme illustré pour
éviter que le câble se coince sous le couvercle. (
-a)
3 Sélectionnez la destination de l'alimentation électrique selon le
périphérique raccordé.
Placez le sélecteur DC OUT A ou DC OUT B sur « CAMERA » ou « USB ». (
)
-b
DC OUT- :
Sélectionnez la destination de l'alimentation électrique de la batterie des
emplacements A1 et A2.
DC OUT-
:
Sélectionnez la destination de l'alimentation électrique de la batterie des
emplacements B1 et B2.
Installation de la plaque de fixation
Vous pouvez installer la plaque de fixation selon la direction de montage de cet
appareil à une structure rigide, telle qu'un cadre, sur lequel vous fixez l'appareil.
Installation du protège-câble
Lorsque vous branchez un câble USB sur cet appareil, utilisez le protège-câble pour
sécuriser le câble.
À propos du protège-batterie
Si vous n'envisagez pas d'installer une batterie dans les emplacements A2 ou B2,
vous pouvez remplacer le protège-batterie (
) par le couvercle d'emplacement de
batterie (
) pour faciliter la manipulation.
Remarque
Le protège-batterie est nécessaire pour protéger les batteries. Lorsque vous avez
installé la batterie dans l'emplacement A2/B2 ou les deux, assurez-vous d'installer
le protège-batterie sur cet appareil.
Fixation du cordon antichute
Il est conseillé d'utiliser le cordon antichute afin d'éviter la chute de cet appareil et
d'endommager les périphériques.
Attachez le cordon antichute à cet appareil et faites passer son extrémité autour
d'une structure rigide, telle qu'une pièce métallique, à proximité de l'appareil.
Remarque
Lorsque le cordon antichute est fixé sur cet appareil, ne l'enroulez pas autour d’une
partie du corps, telle que votre poignet.
Raccordement d'un appareil photo
qui prend en charge les batteries
«InfoLITHIUM» (série W)
1 Retirez l'encadrement de la plaque d'insertion (pour les
batteries de la série Z).
2 Retirez la batterie de l'appareil photo puis introduisez la
plaque d'insertion (pour les batteries de la série W) dans le
compartiment de la batterie de l'appareil photo.
Lors de l'installation de l'encadrement de la plaque d'insertion retiré (pour les
batteries de la série Z) sur la plaque d'insertion (pour les batteries de la série W),
assurez-vous que la surface de l'encadrement avec le sélecteur passe par-dessus la
surface de la plaque avec le repère W.
Conseil
Lorsque l'autonomie de batterie de l'appareil photo est d'environ 1/3,
s'affiche à l'écran de l'appareil photo.
Remarque sur l'utilisation de cet
appareil
•Lorsque vous n'utilisez plus cet appareil, débranchez le cordon d'alimentation de
la prise secteur.
Lorsque vous débranchez le cordon d'alimentation, prenez-le par la fiche.
•Ne retirez pas la partie en ferrite du câble de la plaque d'insertion. Elle permet
d'éviter l'émission de parasites.
•Conservez les contacts de la plaque d'insertion libres de corps étrangers,
notamment de la poussière et des grains de sable.
•Lorsque vous utilisez la plaque de fixation, assurez-vous de la fixer correctement
à l'aide des vis fournies.
•L'encadrement de la plaque d'insertion (pour les batteries de la série Z) n'est pas
conçu pour contenir une batterie « InfoLITHIUM » (série W).
•Vous ne pouvez pas charger les batteries installées dans cet appareil en
raccordant l'appareil à un appareil photo.
•Cet appareil n'est pas conçu pour se protéger des infiltrations ; il n'est pas non
plus étanche.
Cet appareil supporte les tensions du monde entier, de 100 V à 240 V.
N’utilisez pas de transformateur de tension électronique qui pourrait causer un
dysfonctionnement.
La forme des prises murales diffère selon les pays et les régions. Vérifiez ce
point avant votre départ.
En cas de problème
Lorsque le témoin CHARGE clignote, vérifiez les points du tableau suivant.
Le témoin CHARGE clignote de deux façons.
Clignotement lent : S’allume et s’éteint toutes les 1,3 secondes de façon répétée.
Clignotement rapide : S’allume et s’éteint toutes les 0,3 secondes de façon répétée.
La mesure à prendre dépend de la façon dont le témoin CHARGE clignote.
Lorsque le témoin CHARGE continue de clignoter lentement
La charge est en pause. Cet appareil est en attente.
Si la température de la pièce est hors de la plage de températures appropriée, la
charge s’arrête automatiquement.
Lorsque la température de la pièce revient dans la plage appropriée, le témoin
CHARGE s’allume et la charge redémarre.
Il est conseillé de charger la batterie rechargeable entre 10 °C et 30 °C
(50 °F et 86 °F).
Lorsque le témoin CHARGE continue de clignoter rapidement
La première fois que vous chargez la batterie dans une des situations suivantes,
le témoin CHARGE peut clignoter rapidement.
Dans ce cas, retirez la batterie de cet appareil puis réinsérez-la et chargez-la de
nouveau.
Si la batterie est restée longtemps inutilisée
Si la batterie est restée longtemps dans l’appareil photo
Immédiatement après l’achat
Si le témoin CHARGE continue de clignoter rapidement, vérifiez les points du
tableau suivant.
Veuillez contacter le revendeur Sony le plus proche du produit présentant
éventuellement un problème.
Retirez la batterie rechargeable qui a été chargée et insérez-la de nouveau
fermement dans le chargeur.
Le témoin CHARGE clignote de
nouveau :
Installez une autre batterie.
Le témoin CHARGE s’allume et ne
clignote plus :
Si le témoin CHARGE s’éteint parce
que le temps de charge est dépassé,
il n’y a aucun problème.
Le témoin CHARGE clignote de
nouveau :
Le problème vient de cet appareil.
Le témoin CHARGE s’allume et ne
clignote plus :
Si le témoin CHARGE s’éteint parce
que le temps de charge est dépassé,
le problème vient de la première
batterie installée.
La batterie ne peut pas être chargée.
•Le cordon d'alimentation n'est pas branché sur une prise murale (prise
électrique).
Branchez correctement le cordon d'alimentation sur une prise murale (prise
électrique).
•La batterie n’est pas bien insérée.
Insérez la batterie correctement dans cet accessoire.
•Cet appareil prend en charge les batteries « InfoLITHIUM » (série Z).
•Le logo
est apposé sur les batteries « InfoLITHIUM » (série Z).
•« InfoLITHIUM » est une marque commerciale de Sony Corporation.
This unit will generate heat when charging. Always charge in a well ventilated area.
Do not charge under pillows, blankets or on flammable surfaces. Keep the unit
away from heat sources, direct sunlight, combustible gas, humidity, water or other
liquids. Do not disassemble, open, microwave, incinerate, paint or insert foreign
objects into the unit. Do not subject the unit to mechanical shock such as crushing,
bending, puncturing or shredding. Avoid dropping or placing heavy object on
the unit. Do not short-circuit the unit or store it in a receptacle where it may be
short-circuited by other metallic or conductive objects. Do not operate the unit if it
has been wet or otherwise damaged, to prevent against electric shock, explosion
and/or injury. Usage of this unit by children should be supervised. Please read
the operating instructions (including charging instructions and information on the
minimum and maximum operating temperatures), supplied with the unit.
This product has been tested and found compliant with the limits set out in the
EMC regulation for using connection cables shorter than 3 meters (9.8 feet).
For Customers in the U.S.A.
This device complies with Part 15 of the FCC Rules. Operation is subject to the
following two conditions:
(1) This device may not cause harmful interference, and (2) this device must
accept any interference received, including interference that may cause undesired
operation.
CAUTION
You are cautioned that any changes or modifications not expressly approved in this
manual could void your authority to operate this equipment.
Note:
This equipment has been tested and found to comply with the limits for a Class B
digital device, pursuant to Part 15 of the FCC Rules.
These limits are designed to provide reasonable protection against harmful
interference in a residential installation. This equipment generates, uses, and
can radiate radio frequency energy and, if not installed and used in accordance
with the instructions, may cause harmful interference to radio communications.
However, there is no guarantee that interference will not occur in a particular
installation. If this equipment does cause harmful interference to radio or television
reception, which can be determined by turning the equipment off and on, the user
is encouraged to try to correct the interference by one or more of the following
measures:
– Reorient or relocate the receiving antenna.
– Increase the separation between the equipment and receiver.
– Connect the equipment into an outlet on a circuit different from that to which the
receiver is connected.
– Consult the dealer or an experienced radio/TV technician for help.
Before use
Features
•The NPA-MQZ1 Multi-Battery Adaptor (here in after referred to as “this unit”)
can accommodate up to four Sony “InfoLITHIUM”™ battery packs (Z series) to
provide external power supply and supports the following devices:
– Cameras that support the “InfoLITHIUM” battery pack (Z series/W series)
– Devices that support USB power supply
•There are no restrictions on the number of battery packs concurrently
attached to this unit or the priority of using the battery seats on this unit for
charging.
•You can connect the supplied AC adaptor to this unit to use the unit as a
charger for the “InfoLITHIUM” battery packs (Z series).
About power supply
When multiple battery packs are attached to this unit and they are evenly
charged, power supply is provided evenly from all of the packs. When the
remaining power varies among the attached battery packs, power supply starts
from the most charged battery pack.
Notes on using this unit while it is supplying power
•While this unit is supplying power to the connected device, do not slide the
DC OUT/CHARGE switch to “CHARGE” as it stops power supply from the unit.
•While the connected device is in operation, it may turn off if you:
– slide the DC OUT A or DC OUT B switch to “CAMERA” or “USB.”
– remove one of the battery packs from this unit.
Notes on battery pack replacement
When appears on the monitor of the camera connected to this unit,
charge or replace the battery pack(s) attached to this unit.
To replace the battery pack(s), do either of the following:
•Remove all the battery packs from this unit, leave the unit as it is for a while,
and then attach the charged battery pack(s).
•Remove the plug-in plate from the connected camera, leave them as they are
for a while, and then attach the plate back to the camera.
About the AC adaptor
You cannot supply power directly to the connected device by connecting this
unit to a power outlet with the supplied AC adaptor.
Supplied accessories (The number in
parentheses indicates the number of
pieces.)
•Multi Battery Adaptor (NPA-MQZ1) (1)
•Battery pack protector*¹ (1)
•Plug-in plate (for the Z series battery pack)*¹ (1)
•AC adaptor (AC-UES1230/AC-UES1230M/AC-UES1230M T)*² (1)
•Power cord (mains lead) (1)
•Rechargeable battery pack (NP-FZ100) (2)
•Mounting plate (1)
•Screw (2)
•Cable protector (1)
•Battery seat lid (2)
•Leash cord (1)
•Set of printed documentation
*¹ Attached at shipment
*² The model number and shape of the AC adaptor vary depending on the country
or region.
Identifying the parts
USB port (DC OUT)
DC OUT A switch
DC OUT/CHARGE switch
DC OUT B switch
BATT CHECK button
Cable protector mounting holes
Battery pack release latch
Leash hole
CHARGE lamp
Remaining battery power lamp
DC IN (5 V) port
Mounting screw holes (1/4-20 UNC)
Battery pack protector
DC IN (12 V) port
Plug-in plate (for the W series battery pack)*
Plug-in plate casing (for the Z series battery pack)*
Attaching/Removing battery packs
Checking the remaining battery
power
1 Press the BATT CHECK button.
You can check the indication of the remaining battery power lamp (which lights
for about 10 seconds) to learn the approximate remaining power of the battery
pack(s).
... Off, ... Lit up
Remaining battery power indications
70% - 100%
40% - 70%
10% - 40%
0% - 10%
The indications of the remaining battery power lamp and the remaining power
rate (%) listed above are provided as reference.
The actual state may vary depending on the ambient temperature or the
condition of the battery pack.
Tip
When this unit is attached to a camera, you can check the remaining battery
power on the monitor of the camera as well.
Regardless of the number of the battery packs attached to this unit, the monitor
of the camera shows only one icon (
). The actual battery life for the camera
varies depending on the number of the attached battery packs.
Charging the battery pack(s)
1 Slide the DC OUT/CHARGE switch to “CHARGE.” (
)
2 Connect this unit and a power outlet (
) with the supplied AC
adaptor. (
)
The CHARGE lamp for the battery pack being charged lights to indicate that
charging is in progress. (
)
When multiple battery packs are attached to this unit, charging starts with the
one with the least remaining battery power. When all the battery packs are
charged at least 90%, the CHARGE lamp goes out. (Normal charge)
If you charge the battery pack(s) additionally for about 160 minutes* after the
CHARGE lamp goes out, you will have a longer battery life. (Full charge)
* An approximate time for charging four battery packs
Tip
You can charge the battery pack(s) by connecting the DC IN (5 V) port on this
unit and a power source with a USB AC adaptor or connecting the port and a
USB port on another device, such as a PC, with a USB cable.
The charging time varies depending on the specifications of the USB AC adaptor
or the connected device.
About the charging time (with the supplied AC adaptor)
Battery pack One NP-FZ100 pack Four NP-FZ100 packs
Normal charging time (Approx.) 120 min 480 min
Full charging time (Approx.) 160 min 640 min
•The time periods shown are for charging an empty battery pack which has been
run out, using this unit at an ambient temperature of 25 °C (77 °F).
•The charging time may vary depending on the condition of the battery pack or
the ambient temperature.
Notes
•If the remaining battery power lamp on this unit indicates the remaining power
rate of 0% - 10% (the lamp is unlit) but the CHARGE lamp does not light, make
sure that the battery pack(s) are properly attached. Improper attachment prevents
this unit from charging.
•When you charge the battery pack that has not been use for a long period of
time, it may take longer to charge the battery pack.
Supplying power to the connected
device
1 Slide the DC OUT/CHARGE switch to “DC OUT.” (
)
2 Connect a camera or a USB device to this unit.
Use the plug-in plate (
) for connecting the camera; and the USB port (
) for
the USB device.
To attach the plug-in plate to the camera, align the
mark on the plate with
the
mark on the camera, and then insert the plug-in plate into the battery
chamber of the camera.
When you close the battery chamber lid of the camera, route the cable through
the notch on the lid as illustrated so that the cable is not caught under the lid.
(
-a)
3 Select the power supply destination according to the connected
device.
Slide the DC OUT A switch or the DC OUT B switch to “CAMERA” or “USB.” (
)
-b
DC OUT- :
Select the destination of power supply from the battery pack in the battery
seats A1 and A2.
DC OUT-
:
Select the destination of power supply from the battery pack in the battery
seats B1 and B2.
Attaching the mounting plate
You can attach the mounting plate in the orientation suitable for mounting this unit
to a rigid structure, such as a frame structure, where you secure the unit.
Attaching the cable protector
When you connect a USB cable to this unit, use the cable protector to secure the
cable on the unit.
About the battery pack protector
When you do not intend to attach the battery pack to either of the seats A2 and
B2, you can replace the battery pack protector (
) with the battery seat lid (
) for
compact handling.
Note
The battery pack protector is required for battery pack protection. When you have
attached the battery pack to seat A2/B2 or both, be sure to attach the battery pack
protector to this unit.
Attaching the Leash Cord
It is recommended that you use the leash cord to prevent this unit from dropping
and damaging peripheral devices.
Tie the leash cord to this unit and fasten the leash cord end around a part of a rigid
structure, such as a frame structure, near where you secure the unit.
Note
When the leash cord is attached to this unit, do not tie the leash cord end around
your limb, such as the wrist.
Connecting the camera that
supports the “InfoLITHIUM” battery
pack (W series)
1 Remove the plug-in plate casing (for the Z series battery pack).
2 Remove the battery pack from the camera and insert the plug-
in plate (for the W series battery pack) into the battery chamber
of the camera.
When attaching the removed plug-in plate casing (for the Z series battery pack)
back to the plug-in plate (for the W series battery pack), make sure that the casing
surface with the slide switch comes over the plate surface with the W mark.
Tip
When the battery power of the camera is reduced to about 1/3 of the full battery
power,
appears on the monitor of the camera.
Notes on using this unit
•When you are finished with using this unit, unplug the power cord from the
power outlet.
When you unplug the power cord, be sure to grasp its plug.
•Do not remove the ferrite core from the plug-in plate cable. It is attached to
prevent unwanted radio waves from being emitted.
•Keep the plug-in plate contacts from foreign objects, including dust and sand.
•When you use the mounting plate, be sure to secure it with the supplied screws.
•The plug-in plate casing (for the Z series battery pack) is not designed to contain
the “InfoLITHIUM” battery pack (W series).
•You cannot charge the battery pack(s) attached to this unit by connecting the unit
and a camera.
•This unit is not designed for ingress protection, nor for water resistance.
This unit supports worldwide voltages 100 V to 240 V.
Do not use an electronic voltage transformer, as this may cause a malfunction.
The shape of wall outlets (wall sockets) differs depending on the country and
region. Check before departure.
Troubleshooting
When the CHARGE lamp blinks, check through the following chart.
The CHARGE lamp blinks in two ways.
Blinks slowly: Turns on and off repeatedly every 1.3 seconds
Blinks quickly: Turns on and off repeatedly every 0.3 seconds
The action to be taken depends on the way the CHARGE lamp blinks.
When the CHARGE lamp keeps blinking slowly
Charging is pausing. This unit is in the standby state.
If the room temperature is out of the appropriate temperature range, charging
stops automatically.
When the room temperature returns to the appropriate range, the CHARGE lamp
lights up and charging restarts.
We recommend charging the battery pack at 10 °C to 30 °C (50 °F to 86 °F).
When the CHARGE lamp keeps blinking quickly
When charging the battery pack for the first time in one of the following
situations, the CHARGE lamp may blink quickly.
If this happens, remove the battery pack from this unit, reattach it and charge it
again.
When the battery pack is left for a long time
When the battery pack is left installed in the camera for a long time
Immediately after purchase
If the CHARGE lamp keeps blinking quickly, check through the following chart.
Please contact your nearest Sony dealer in connection with the product that may
have a problem.
Remove the battery pack that is being charged and then firmly attach the same
battery pack again.
The CHARGE lamp blinks again:
Install another battery pack.
The CHARGE lamp lights up and
does not blink again:
If the CHARGE lamp goes out because
the charging time has passed, there
is no problem.
The CHARGE lamp blinks again:
The problem is with this unit.
The CHARGE lamp lights up and
does not blink again:
If the CHARGE lamp goes out because
the charging time has passed, the
problem is with the battery pack first
installed.
The battery pack cannot be charged.
•The power cord (mains lead) is not connected to the wall outlet (wall socket).
Connect the power cord (mains lead) to the wall outlet (wall socket) properly.
•The battery pack is not firmly attached.
Attach the battery pack to this unit correctly.
•This unit supports the “InfoLITHIUM” battery pack (Z series).
•The “InfoLITHIUM” battery pack (Z series) has the
logo on it.
•“InfoLITHIUM” is a trademark of Sony Corporation.
Specifications
Multi Battery Adaptor (NPA-MQZ1)
Power requirements DC 12 V, 1.8 A
USB output rating DC 5 V, 1.5 A
Operating temperature 0 °C to 40 °C (32 °F to 104 °F)
Storage temperature –20 °C to +60 °C (–4 °F to +140 °F)
Dimensions (Approx.) 123.4 mm x 67.8 mm x 66.2 mm (w/h/d) (4 7/8 in. x
23/4in. x 2 5/8 in.)
Mass Approx. 410 g (14.5 oz)
AC adaptor (AC-UES1230/AC-UES1230M/AC-UES1230M T)
Power requirements AC 100 V-240 V, 50Hz/60Hz, 0.75 A-0.4 A
Output voltage DC 12 V, 3 A
Rechargeable battery pack (NP-FZ100)
Nominal voltage DC 7.2 V
Design and specifications of this unit and the supplied accessories are subject to
change without notice.
Cet appareil produit de la chaleur lors de la charge. Charger toujours dans un
endroit bien aéré. Ne pas charger sous un oreiller, une couverture ou sur une
surface inflammable. Éloigner l'appareil des sources de chaleur, de la lumière
directe du soleil, des gaz combustibles, de l'humidité, de l'eau ou d'autres liquides.
Ne pas démonter, ouvrir, mettre dans un micro-ondes, incinérer, peindre ou
insérer des corps étrangers dans l'appareil. Ne pas soumettre l'appareil à un choc
mécanique tel que le broyage, le pliage, la perforation ou le déchiquetage. Éviter
de faire tomber ou de placer un objet lourd sur l'appareil. Ne pas court-circuiter
l'appareil ou le stocker dans un réceptacle où il pourrait être court-circuité par
d'autres objets métalliques ou conducteurs. Ne pas faire fonctionner l'appareil s'il
a été mouillé ou endommagé afin d'éviter tout risque d'électrocution, d'explosion
ou de blessure. L'utilisation de cet appareil par les enfants doit être supervisée. Lire
le mode d'emploi (notamment les instructions de charge et les informations sur les
températures minimale et maximale de fonctionnement), fourni avec l'appareil.
Cet appareil a été testé et jugé conforme aux limites établies par la réglementation
EMC visant l’utilisation de câbles de connexion de moins de 3 mètres (9,8 pi.).
Spécifications
Adaptateur multibatteries (NPA-MQZ1)
Alimentation 12 V CC, 1,8 A
Puissance nominale de sortie USB 5 V CC, 1,5 A
Température de fonctionnement 0 °C à 40 °C (32 °F à 104 °F)
Température de stockage –20 °C à +60 °C (–4 °F à +140 °F)
Dimensions (environ) 123,4 mm x 67,8 mm x 66,2 mm (l/h/p) (4 7/8 po.
x 2 3/4 po. x 2 5/8 po.)
Poids environ 410 g (14,5 oz)
Adaptateur secteur (AC-UES1230/AC-UES1230M/AC-UES1230M T)
Alimentation électrique 100 V-240 V CA , 50 Hz/60 Hz, 0,75 A-0,4 A
Tension de sortie 12 V CC, 3 A
Batterie rechargeable (NP-FZ100)
Tension nominale 7,2 V CC
La conception et les spécifications de cet appareil et des accessoires fournis
peuvent être modifiées sans préavis.
Nombre del producto: Adaptador multibaterías
Modelo: NPA-MQZ1
Esta unidad generará calor al cargar. Cargue siempre en un área bien ventilada.
No cargue bajo almohadas, mantas o sobre superficies normalmente inflamables.
Mantenga la unidad alejada de fuentes de calor, luz solar directa, gas combustible,
humedad, agua u otros líquidos. No desmonte, abra, meta en microondas, incinere,
pinte o inserte objetos extraños en la unidad. No someta la unidad a choques
mecánicos tales como aplastamiento, doblado, perforación o trituración. Evite dejar
caer o colocar objetos pesados sobre la unidad. No cortocircuite la unidad ni la
almacene en un receptáculo donde pueda cortocircuitarse mediante otros objetos
metálicos o conductores. No utilice la unidad si se ha mojado o dañado de otro
modo, para evitar la posibilidad de descargas eléctricas, explosión y/o lesiones. El
uso de esta unidad por niños debe ser supervisado. Lea el manual de instrucciones
(incluyendo las instrucciones de carga y la información sobre las temperaturas
mínima y máxima de funcionamiento) suministrado con la unidad.
Este producto ha sido probado y cumple con los límites estipulados por el
reglamento EMC para utilizar cables de conexión de menos de 3 metros de
longitud.
Antes del uso
Características
•El adaptador multibaterías NPA-MQZ1 (denominado en adelante “esta
unidad”) puede acomodar hasta cuatro baterías Sony “InfoLITHIUM”™ (serie Z)
para proporcionar alimentación externa, y admite los dispositivos siguientes:
– Cámaras que admitan batería “InfoLITHIUM” (serie Z/serie W)
– Dispositivos que admitan alimentación a través de USB
•No hay restricciones en el número de baterías conectadas simultáneamente
a esta unidad ni en la prioridad de utilizar los asientos para baterías de esta
unidad para cargar.
•Puede conectar el adaptador de ca suministrado a esta unidad para utilizarla
como cargador de baterías “InfoLITHIUM” (serie Z).
Acerca de la alimentación
Cuando se fijen varias baterías a esta unidad y se carguen uniformemente,
todas ellas suministrarán alimentación por igual. Cuando la energía restante
varíe entre las baterías fijadas, la alimentación comenzará a suministrarse
desde la batería más cargada.
Notas sobre el uso de esta unidad mientras esté
suministrando alimentación
•Mientras esta unidad esté suministrando alimentación al dispositivo
conectado, no deslice el selector DC OUT/CHARGE hasta “CHARGE”, ya que la
unidad dejará de suministrar alimentación.
•Mientras el dispositivo conectado esté en funcionamiento, puede apagarse si:
– desliza el selector DC OUT A o DC OUT B hasta “CAMERA” o “USB”.
– retira una de las baterías de esta unidad.
Notas sobre la sustitución de baterías
Cuando en el monitor de la cámara conectada a esta unidad aparezca ,
cargue o sustituya la(s) batería(s) fijadas(s) a esta unidad.
Para sustituir la batería(s), realice una de las acciones siguientes:
•Retire todas las baterías de esta unidad, deje la unidad como está durante
cierto tiempo, y después fije la(s) batería(s) cargada(s).
•Retire la placa enchufable de la cámara conectada, déjelas como están
durante cierto tiempo, y después vuelva a fijar la placa en la cámara.
Acerca del adaptador de ca
No puede suministrar alimentación directamente al dispositivo conectado
mediante la conexión de esta unidad a una toma de corriente con el adaptador
de ca suministrado.
Accesorios suministrados (El número
entre paréntesis indica el número de
piezas.)
•Adaptador multibaterías (NPA-MQZ1) (1)
•Protector de baterías*¹ (1)
•Placa enchufable (para batería de la serie Z)*¹ (1)
•Adaptador de ca (AC-UES1230/AC-UES1230M/AC-UES1230M T)*² (1)
•Cable de alimentación (1)
•Batería recargable (NP-FZ100) (2)
•Placa de montaje (1)
•Tornillo (2)
•Protector de cable (1)
•Tapa de asiento de batería (2)
•Cordón de correa (1)
•Juego de documentación impresa
*¹ Se ha fijado antes del envío.
*² El número de modelo y la forma del adaptador de ca varían dependiendo del
país o la región.
Identificación de las partes
Puerto USB (DC OUT)
Selector DC OUT A
Selector OUT/CHARGE
Selector DC OUT B
Botón BATT CHECK
Orificios de montaje del protector de cable
Pestillo de liberación de batería
Orificio para el cordón de correa
Lámpara CHARGE
Lámpara de energía restante de batería
Puerto DC IN (5 V)
Orificios para tornillos de montaje (1/4-20 UNC)
Protector de baterías
Puerto DC IN (12 V)
Placa enchufable (para batería de la serie W)*
Cubierta de la placa enchufable (para batería de la serie Z)*
Fijación/extracción de baterías
Comprobación de la energía
restante de las baterías
1 Pulse el botón BATT CHECK.
Puede comprobar la indicación de la lámpara de energía restante de batería
(que se enciende durante unos 10 segundos) para conocer la energía restante
aproximada de la(s) batería(s).
... Apagada, ... Encendida
Indicaciones de energía restante de batería
70% - 100%
40% - 70%
10% - 40%
0% - 10%
Las indicaciones de la lámpara de energía restante de batería y el porcentaje de
energía restante (%) de arriba se ofrecen a modo de referencia.
El estado real puede variar dependiendo de la temperatura ambiental o la
condición de la batería.
Sugerencia
Cuando esta unidad está conectada a una cámara, podrá comprobar también la
energía restante de batería en el monitor de la cámara.
Independientemente del número de baterías conectadas a esta unidad, el
monitor de la cámara solo mostrará un icono (
). La duración real de la
batería de la cámara varía dependiendo del número de baterías fijadas.
(Continúa en la página posterior)

Carga de la(s) batería(s)
1 Deslice el selector DC OUT/CHARGE hasta “CHARGE”. (
)
2 Conecte esta unidad y una toma de corriente (
) con el
adaptador de ca suministrado. (
)
La lámpara CHARGE de la batería que se esté cargando se iluminará para indicar
que la carga está en curso. (
)
Cuando se fijen varias baterías a esta unidad, la carga se iniciará con la que
tenga menos energía restante. Cuando todas las baterías se hayan cargado al
90% por lo menos, la lámpara CHARGE se apagará. (Carga normal)
Si carga la(s) batería(s) adicionalmente durante unos 160 minutos* después de
que se haya apagado la lámpara CHARGE, la duración de la(s) misma(s) será
más larga. (Carga completa)
* Tiempo aproximado para cargar cuatro baterías.
Sugerencia
Puede cargar la(s) batería(s) conectando el puerto DC IN (5 V) de esta unidad y
una fuente de alimentación con un adaptador de ca USB o conectando dicho
puerto y un puerto USB de otro dispositivo, como un PC, con un cable USB.
El tiempo de carga varía dependiendo de las especificaciones del adaptador de
ca USB o del dispositivo conectado.
Acerca del tiempo de carga (con el adaptador de ca
suministrado)
Batería Una batería NP-FZ100 Cuatro baterías NP-FZ100
Tiempo de carga normal
(aprox.)
120 min 480 min
Tiempo de carga completa
(aprox.)
160 min 640 min
•Los períodos de tiempo mostrados son para carga de una batería vacía que se
haya agotado, utilizando esta unidad a una temperatura ambiental de 25 °C.
•El tiempo de carga puede variar dependiendo de la condición de la batería o de
la temperatura ambiental.
Notas
•Si la lámpara de energía restante de batería de esta unidad indica que el
porcentaje de energía restante es de 0% - 10% (la lámpara estará apagada) pero
la lámpara CHARGE no se enciende, asegúrese de que la(s) batería(s) estén
correctamente fijadas. La fijación inadecuada impedirá que esta unidad cargue.
•Cuando cargue una batería que no haya sido utilizada durante un largo período
de tiempo, la carga puede tardar más tiempo en realizarse.
Suministro de alimentación al
dispositivo conectado
1 Deslice el selector DC OUT/CHARGE hasta “DC OUT”. (
)
2 Conecte una cámara o un dispositivo USB a esta unidad.
Utilice la placa enchufable (
) para conectar la cámara; y el puerto USB (
)
para el dispositivo USB.
Para conectar la placa enchufable a la cámara, alinee la marca
en la placa con
la marca
de la cámara, e inserte la placa enchufable en el compartimiento de
la batería de la cámara.
Antes de cerrar la tapa del compartimiento de la cámara, pase el cable a través
de la muesca de la tapa como se muestra en la ilustración para que el cable no
quede atrapado debajo de la tapa. (
-a)
3 Seleccione el destino de la alimentación de acuerdo con el
dispositivo conectado.
Deslice el selector DC OUT A o el selector DC OUT B hasta “CAMERA” o “USB”.
(
)
-b
DC OUT- :
Seleccione el destino de la fuente de la alimentación de las baterías de los
asientos de batería A1 y A2.
DC OUT-
:
Seleccione el destino de la fuente de la alimentación de las baterías de los
asientos de batería B1 y B2.
Fijación de la placa de montaje
Puede fijar la placa de montaje en la orientación adecuada para montar esta
unidad en una estructura rígida, como una estructura de bastidor, en la que
asegure la unidad.
Fijación del protector de cable
Cuando conecte un cable USB a esta unidad, utilice el protector de cable para
asegurar el cable en la unidad.
Acerca del protector de baterías
Si no desea fijar una batería en cualquiera de los asientos A2 y B2, puede sustituir
el protector de baterías (
) por la tapa de asiento de batería (
) para una
manipulación compacta.
Nota
El protector de baterías es necesario para la protección de las baterías. Cuando
haya conectado una batería al asiento A2/B2 o a ambos, asegúrese de colocar el
protector de baterías en esta unidad.
Fijación del cordón de la correa
Se recomienda utilizar el cordón de correa para evitar que esta unidad caiga y se
dañen dispositivos periféricos.
Ate el cordón de correa a esta unidad y sujete el extremo del cordón de correa
alrededor de una parte de una estructura rígida, como una estructura de bastidor,
cerca de donde asegure la unidad.
Nota
Cuando el cordón de correa esté fijado a esta unidad, no ate el extremo del cordón
de correa alrededor de una de sus extremidades, como la muñeca.
Conexión de una cámara que admita
batería “InfoLITHIUM” (serie W)
1 Retire la cubierta de la placa enchufable (para batería de la serie
Z).
2 Retire la batería de la cámara e inserte la placa enchufable (para
batería de la serie W) en el compartimiento de la batería de la
cámara.
Cuando vuelva a fijar la cubierta de la placa enchufable (para batería de la serie Z)
en la placa enchufable (para batería de la serie W), asegúrese de que la superficie
de la cubierta con el interruptor deslizable se encuentre sobre la superficie de la
placa con la marca W.
Sugerencia
Cuando la energía de la batería de la cámara se reduzca a aproximadamente 1/3 de
la energía total de la batería, en el monitor de la cámara aparecerá
.
Notas sobre el uso de esta unidad
•Cuando haya terminado de utilizar esta unidad, desenchufe el cable de
alimentación de la toma de corriente.
Cuando desenchufe el cable de alimentación, asegúrese de sujetar su enchufe.
•No quite el núcleo de ferrita del cable de la placa enchufable. Está colocado para
evitar la emisión de ondas de radio no deseadas.
•Mantenga los contactos de la placa enchufable exentos de objetos extraños,
incluyendo polvo y arena.
•Cuando utilice la placa de montaje, asegúrese de asegurarla con los tornillos
suministrados.
•La cubierta de la placa enchufable (para batería de la serie Z) no está diseñada
para contener una batería “InfoLITHIUM” (serie W).
•No puede cargar la(s) batería(s) conectada(s) a esta unidad mediante la conexión
de la unidad y una cámara.
•Esta unidad no está diseñada para protección contra la entrada de materias
extrañas, ni para resistir al agua.
Esta unidad es compatible con las tensiones de todo el mundo de 100 V a 240 V
No utilice un transformador de voltaje electrónico, porque es posible que
ocasione un mal funcionamiento.
La forma de las tomas de corriente de la pared difiere dependiendo del país o la
región. Compruebe antes de la salida.
Solución de problemas
Cuando la lámpara CHARGE parpadee, compruebe lo siguiente.
La lámpara CHARGE parpadea de dos formas.
Parpadeo lento: Se enciende y apaga repetidamente cada 1,3 segundos
Parpadeo rápido: Se enciende y apaga repetidamente cada 0,3segundos
La acción a tomarse dependerá de la forma en la que parpadee la lámpara
CHARGE.
La lámpara CHARGE permanece parpadeando lentamente
La carga está en pausa. Esta unidad está en estado de espera.
Si la temperatura ambiental sale fuera del margen apropiado, la carga se parará
automáticamente.
Cuando la temperatura ambiental vuelva al margen apropiado, la lámpara CHARGE
se encenderá una vez y se reiniciará la carga.
Recomendamos cargar la batería de 10 °C a 30 °C
Cuando la lámpara CHARGE continúe parpadeando
rápidamente
Cuando cargue la batería por primera vez en una de las situaciones siguientes, la
lámpara CHARGE puede parpadear rápidamente.
Cuando suceda esto, retire la batería de esta unidad, vuelva a fijarla y cárguela.
Cuando la batería que no se haya utilizado durante mucho tiempo.
Cuando la batería se haya dejado instalada en la cámara durante mucho
tiempo.
Inmediatamente después de la adquisición
Si la lámpara CHARGE continúa parpadeando rápidamente, compruebe la tabla
siguiente.
Póngase en contacto con su proveedor Sony más cercano con respecto al
producto que pueda tener el problema.
Extraiga la batería que esté cargando y vuelva a fijarla firmemente.
La lámpara CHARGE vuelve a
parpadear:
Instale otra batería.
La lámpara CHARGE se enciende y
no vuelve a parpadear:
Si la lámpara CHARGE se apaga
debido a que haya transcurrido el
tiempo de carga, no habrá ningún
problema.
La lámpara CHARGE vuelve a
parpadear:
El problema se encuentra en esta
unidad.
La lámpara CHARGE se enciende y
no vuelve a parpadear:
Si la lámpara CHARGE se apaga
debido a que haya transcurrido el
tiempo de carga, el problema se
encuentra en la primera batería
instalada.
La batería no puede cargarse.
•El cable de alimentación no está conectado a la toma de corriente (toma de la
red).
Conecte correctamente el cable de alimentación a la toma de corriente (toma
de la red).
•La batería no está firmemente fijada.
Fije correctamente la batería a esta unidad.
•Esta unidad admite baterías “InfoLITHIUM (serie Z).
•Las baterías “InfoLITHIUM” (serie Z) poseen el logotipo
en ellas.
•“InfoLITHIUM” es marca comercial de Sony Corporation.
Especificaciones
Adaptador multibaterías (NPA-MQZ1)
Requisitos de alimentación cc 12 V, 1,8 A
Salida nominal de USB cc 5 V, 1,5 A
Temperatura de funcionamiento 0 °C a 40 °C
Temperatura de almacenamiento –20 °C a +60 °C
Dimensiones (aprox.) 123,4 mm x 67,8 mm x 66,2 mm (an/al/prf)
Peso Aprox. 410 g
Adaptador de ca (AC-UES1230/AC-UES1230M/AC-UES1230M T)
Requisitos de alimentación ca 100 V-240 V, 50 Hz/60 Hz, 0,75 A-0,4 A
Tensión de salida cc 12 V, 3 A
Batería recargable (NP-FZ100)
Tensión nominal cc 7,2 V
El diseño y las especificaciones de esta unidad y de los accesorios suministrados
están sujetos a cambios sin previo aviso.
Esta unidade gera calor durante o carregamento. Efetue sempre o carregamento
numa área bem ventilada. Não efetue o carregamento com a unidade sob
almofadas, cobertores e superfícies inflamáveis. Mantenha a unidade afastada
de fontes de calor, luz direta solar, gás combustível, humidade, água ou outros
líquidos. Não desmonte, abra, coloque no micro-ondas, incinere, pinte ou insira
objetos estranhos na unidade. Não sujeite a unidade a choque mecânico como
esmagamento, dobragem, perfuração ou trituração. Evite a queda ou colocação
que objetos pesados sobre a unidade. Não provoque o curto-circuito da unidade
ou armazene a mesma num recetáculo onde pode sofrer curto-circuito por outros
objetos metálicos ou condutores. Não opere a unidade se tiver sido molhada ou
danificada para evitar choque elétrico, explosão e/ou lesão. A utilização desta
unidade por crianças deve ser supervisionada. Leia o manual de instruções
(incluindo instruções de carregamento e informações sobre as temperaturas
mínima e máxima de funcionamento) fornecido com a unidade.
Este produto foi testado e está em conformidade com os limites estabelecidos no
regulamento EMC relativamente à utilização de cabos com comprimento inferior a
3 metros.
Antes da utilização
Funções
•O adaptador de bateria múltiplo NPA-MQZ1 (a seguir designado por “esta
unidade”) pode acomodar até quatro baterias Sony “InfoLITHIUM”™ (série
Z) para fornecer fonte de alimentação externa e suporta os seguintes
dispositivos:
– Câmaras que suportam a bateria “InfoLITHIUM” (série Z/série W)
– Dispositivos que suportam fonte de alimentação por USB
•Não há restrições no número de baterias ligadas em simultâneo a esta
unidade ou à prioridade de utilização de sedes de bateria nesta unidade para
carregamento.
•Pode ligar o transformador de CA fornecida a esta unidade para utilizar a
unidade como carregador para as baterias “InfoLITHIUM” (série Z).
Sobre a fonte de alimentação
Quando estão ligadas várias baterias a esta unidade e são carregadas de
igual modo, a fonte de alimentação é fornecida de igual modo de todas as
baterias. Quando a energia restante varia entre as baterias ligadas, a fonte de
alimentação começa a partir da bateria mais carregada.
Notas sobre a utilização desta unidade enquanto está a
fornecer energia
•Enquanto esta unidade está a fornecer energia ao dispositivo ligado, não
deslize o interruptor DC OUT/CHARGE para “CHARGE”, pois corta a fonte de
alimentação da unidade.
•Enquanto o dispositivo ligado está em funcionamento, pode desligar se:
– deslizar o interruptor DC OUT A ou DC OUT B para “CAMERA” ou “USB”.
– remover uma das baterias desta unidade.
Notas sobre a substituição da bateria
Quando é apresentado no monitor da câmara ligada a esta unidade,
carregue ou substitua a(s) bateria(s) ligada(s) a esta unidade.
Para substituir a(s) bateria(s), faça o seguinte:
•Retire todas as baterias desta unidade, deixe a unidade assim durante um
tempo e volte a ligar a(s) bateria(s) carregada(s).
•Retire a placa de ligação da câmara ligada, deixe assim durante um tempo e
volte a ligar a placa à câmara.
Sobre o transformador de CA
Não é possível fornecer alimentação diretamente ao dispositivo ligado ligando
esta unidade a uma tomada com o transformador de CA fornecido.
Acessórios fornecidos (o número entre
parênteses indica o número de peças)
•Adaptador de bateria múltiplo (NPA-MQZ1) (1)
•Protetor de bateria*¹ (1)
•Placa de ligação (para bateria da série Z)*¹ (1)
•Transformador de CA (AC-UES1230/AC-UES1230M/AC-UES1230M T)*² (1)
•Cabo de corrente (1)
•Bateria recarregável (NP-FZ100) (2)
•Placa de montagem (1)
•Parafuso (2)
•Protetor do cabo (1)
•Tampa da sede de bateria (2)
•Cabo de segurança (1)
•Documentos impressos
*¹ Montada no transporte
*² O número de modelo e forma do transformador de CA varia consoante o país ou
região.
Identificação das peças
Porta USB (DC OUT)
Interruptor DC OUT A
Interruptor DC OUT/CHARGE
Interruptor DC OUT B
Botão BATT CHECK
Orifício de montagem do protetor para cabos
Patilha de libertação da bateria
Orifício para cabo de segurança
Luz CHARGE
Luz de energia restante da bateria
Porta DC IN (5 V)
Orifícios para parafuso de montagem (1/4-20 UNC)
Protetor para bateria
Porta DC IN (12 V)
Placa de ligação (para bateria da série W)*
Revestimento da placa de ligação (para bateria da série Z)*
Ligar/remover baterias
Verificar a energia restante da
bateria
1 Prima o botão BATT CHECK.
É possível verificar a indicação da luz de energia restante da bateria (que
acende durante 10 segundos) para saber a energia restante aproximada da(s)
bateria(s).
... Apagada, ... Acesa
Indicações de energia restante da bateria
70% - 100%
40% - 70%
10% - 40%
0% - 10%
As indicações da luz de energia restante da bateria e o índice de energia
restante (%) listados acima são fornecidos como referência.
O estado atual pode variar consoante a temperatura ambiente ou a condição
da bateria.
Dica
Quando esta unidade está ligada a uma câmara, é possível verificar a energia
restante da bateria no monitor da câmara.
Independentemente do número de baterias ligadas a esta unidade, o monitor
da câmara mostra apenas um ícone (
). A duração atual da bateria para a
câmara varia consoante o número de baterias ligadas.
Carregar a(s) bateria(s)
1 Deslize o interruptor DC OUT/CHARGE para “CHARGE”. (
)
2 Ligue esta unidade e uma tomada (
) com o transformador de
CA fornecido. (
)
A luz CHARGE da bateria a ser carregada acende para indicar que o
carregamento está em curso. (
)
Quando estão ligadas várias baterias a esta unidade, o carregamento começa
pela bateria com menos energia restante. Quando todas as baterias estiverem
carregadas pelo menos 90%, a luz CHARGE apaga. (Carga normal)
Se carregar a(s) bateria(s) adicionalmente por 160 minutos* depois de a luz
CHARGE apagar, terá uma duração da bateria maior. (Carga completa)
* Um tempo aproximado para carregar quatro baterias
Dica
Pode carregar a(s) bateria(s) ao ligar a porta DC IN (5 V) nesta unidade e uma
fonte de alimentação com um transformador de CA USB ou ligando a porta e
uma porta USB noutro dispositivo, como um PC, com um cabo USB.
O tempo de carregamento varia consoante as especificações do transformador
de CA USB ou o dispositivo ligado.
Sobre o tempo de carregamento (com o transformador de
CA fornecido)
Bateria Uma bateria NP-FZ100 Quatro baterias NP-FZ100
Tempo para carga normal
(aprox.)
120 min 480 min
Tempo para carga completa
(aprox.)
160 min 640 min
•Os períodos de tempo mostrados referem-se ao carregamento de uma bateria
vazia que tenha esgotado, utilizando esta unidade a uma temperatura ambiente
de 25 °C.
•O tempo de carregamento pode variar, dependendo do estado da bateria ou da
temperatura ambiente.
Notas
•Se a luz de energia restante da bateria nesta unidade indicar o índice de energia
restante de 0%-10% (a luz está apagada), mas a luz CHARGE não acende,
certifique-se de que a(s) bateria(s) está(ão) bem ligada(s). Uma ligação incorreta
impede que esta unidade carregue.
•Quando carrega uma bateria que não é utilizada há muito tempo, pode demorar
mais tempo a carregar a bateria.
Fornecer energia ao dispositivo
ligado
1 Deslize o interruptor DC OUT/CHARGE para “DC OUT”. (
)
2 Ligue uma câmara ou um dispositivo USB a esta unidade.
Utilize a placa de ligação (
) para ligar a câmara e a porta USB (
) para o
dispositivo USB.
Para ligar a placa de ligação à câmara, alinhe a marca
na placa com a marca
na câmara e insira a placa de ligação na câmara da bateria da câmara.
Quando fecha a tampa da câmara da bateria da câmara, encaminhe o cabo
através do entalhe na tampa como ilustrado para que o cabo não fique preso
sob a tampa. (
-a)
3 Selecione o destino da fonte de alimentação de acordo com o
dispositivo ligado.
Deslize o interruptor DC OUT A ou o interruptor DC OUT B para “CAMERA” ou
“USB”. (
)
-b
DC OUT- :
Selecione o destino da fonte de alimentação da bateria nas sedes de bateria A1
e A2.
DC OUT-
:
Selecione o destino da fonte de alimentação da bateria nas sedes de bateria B1
e B2.
Fixar a placa de montagem
Pode fixar a placa de montagem na orientação adequada para montagem desta
unidade numa estrutura rígida, como uma estrutura de quadro, onde fixa a
unidade.
Fixar o protetor do cabo
Quando liga um cabo USB a esta unidade, utilize o protetor do cabos para fixar o
cabo à unidade.
Sobre o protetor para bateria
Quando não pretende ligar a bateria a uma das sedes A2 e B2, pode substituir o
protetor de bateria (
) pela tampa da sede de bateria (
) para um manuseamento
compacto.
Nota
O protetor para bateria é necessário para proteção da bateria. Quando ligou a
bateria à sede A2/B2 ou ambas, certifique-se de que liga o protetor para bateria a
esta unidade.
Fixar o cabo de segurança
Recomenda-se que utilize o cabo de segurança para impedir a queda desta
unidade e danosem dispositivos periféricos.
Fixe o cabo de segurança a esta unidade e ate a extremidade do cabo de
segurança à volta de uma estrutura rígida, como uma estrutura de quadro, próximo
de onde fixa a unidade.
Nota
Quando o cabo de segurança estiver fixo a esta unidade, não ate a extremidade do
cabo de segurança à volta de um dos seus membros, como o seu pulso.
Ligar a câmara que suporta a bateria
“InfoLITHIUM” (série W)
1 Retire o revestimento da placa de ligação (para bateria da série
Z).
2 Retire a bateria da câmara e insira a placa de ligação (para a
bateria da série W) na câmara da bateria da câmara.
Ao voltar a colocar o revestimento da placa de ligação removido (para bateria
da série Z) na placa de ligação (para bateria da série W), certifique-se de que a
superfície do revestimento com o interruptor de deslize fica sobre a superfície da
placa com a marca W.
Dica
Quando a energia da bateria da câmara for reduzida para cerca de 1/3 da energia
total da bateria,
aparece no monitor da câmara.
Notas sobre a utilização desta unidade
•Quando terminar de utilizar esta unidade, desligue o cabo de alimentação da
tomada.
Quando desliga o cabo de alimentação, certifique-se de que segura na ficha.
•Não retire o núcleo de ferrite do cabo da placa de ligação. Está ligado para evitar
a emissão de ondas radioelétricas indesejadas.
•Mantenha os contactos da placa de ligação afastados de objetos estranhos,
incluindo pó e areia.
•Quando utilizar a placa de montagem, certifique-se de que a fixa com os
parafusos fornecidos.
•O revestimento da placa de ligação (para bateria da série Z) não foi concebido
para conter a bateria “InfoLITHIUM” (série W).
•Não é possível carregar a(s) bateria(s) ligada(s) a esta unidade ao ligar a unidade
e a câmara.
•Esta unidade não foi concebida para proteção contra penetração nem resistência
à água.
Esta unidade suporta as tensões mundiais de 100 V a 240 V.
Não utilize um transformador de tensão eletrónico, pois pode causar uma
avaria.
A forma das tomadas de parede difere dependendo do país e região. Verifique
antes de ir de viagem.
本裝置充電時會產⽣熱,請務必在通⾵場所進⾏充電。充電時請勿置於枕頭
或⽑毯下,或是置於易燃性物質表⾯上。請勿讓本裝置靠近熱源、陽光直射
處、可燃性氣體、受潮,或是被⽔或其他液體濺溼。請勿將本裝置拆卸、拆
開、微波、焚燒或上漆,或是將異物插⼊本裝置中。請勿讓本裝置受到機械
性衝擊,例如:壓碎、彎折、穿刺或切碎。避免讓重物掉落⾄本裝置上,或
是置於其上。請勿對本裝置進⾏短路處理,或是將其置於可能會被其他⾦屬
或導體短路的容器中。若裝置潮溼或因其他原因受損,請勿進⾏操作,以防
發⽣觸電、爆炸及/或⼈員受傷的意外。兒童應在成年⼈的指導下使⽤本裝
置。請詳閱本裝置隨附的使⽤說明書(包含充電說明以及最低與最⾼操作溫
度的資訊)。
本產品已經過測試並確定符合EMC規定中所提出的使⽤連接電纜不得超過3公
尺的限制。
電纜上附有鐡芯時,這個鐵芯係抑制電磁波⼲擾⽤,請勿任意拆卸。
僅適⽤於台灣
⽣產國別:中國
委製廠商:SONY CORPORATION
進⼝商:台灣索尼股份有限公司
地址:台北市⾧春路145號5樓
諮詢專線:4499111
使⽤前
功能
• NPA-MQZ1 多電池供應器(以下稱“本裝置”)最多可容納四個 Sony
“InfoLITHIUM”
TM
電池組(Z 系列),可提供外部供電並⽀援以下裝
置:
– ⽀援“InfoLITHIUM”電池組(Z 系列/W 系列)的相機
– ⽀援 USB 供電的裝置
• 本裝置沒有限制同時安裝的電池組數,或是安裝電池座進⾏充電的順
序。
• 您可以將交換式電源供應器連接⾄本裝置,將其當作“InfoLITHIUM”
電池組(Z 系列)的充電器使⽤。
關於供電
本裝置安裝多個平均充電的電池組時,其電源會由所有電池組平均供應。
安裝多個電量不均的電池組時,裝置的電源會由剩餘電量最多的電池組開
始供應。
於供電狀態使⽤本裝置時的注意事項
• 本裝置正為連接的裝置供電時,請勿將 DC OUT/CHARGE 開關推
⾄“CHARGE”,否則本裝置的供電會停⽌。
• 若您進⾏以下操作,使⽤中的連接裝置可能會關閉:
– 將 DC OUT A 或 DC OUT B 開關推⾄“CAMERA”或“USB”。
– 拆下本產品的其中⼀組電池組。
更換電池組時的注意事項
安裝⾄本裝置的相機螢幕顯⽰ 時,請為本裝置使⽤的電池組進⾏充
電或更換。
若要更換電池組,請使⽤以下其中⼀種⽅式:
• 拆下本裝置的所有電池組並稍待⽚刻,然後裝上充飽電的電池組。
• 從連接的相機拔下輸⼊插頭並稍待⽚刻,然後將插頭裝回相機。
關於交換式電源供應器
使⽤隨附的交換式電源供應器連接電源插座和本裝置無法直接為連接的裝
置進⾏供電。
隨附配件(括弧中的數字代表件數)
• 多電池供應器 (NPA-MQZ1) (1)
• 電池組保護裝置*
1
(1)
• 輸⼊插頭(適⽤於 Z 系列電池組)*
1
(1)
• 交換式電源供應器(AC-UES1230/AC-UES1230M/AC-UES1230M T)*
2
(1)
• 電源線 (1)
• 充電電池 (NP-FZ100) (2)
• 安裝板 (1)
• 螺絲 (2)
• 電纜保護裝置 (1)
• 電池座蓋 (2)
• 繫繩 (1)
• 成套印刷⽂件
*
1
出貨時已完成安裝
*
2
交換式電源供應器的型號和外型會因國家或地區⽽異。
零件識別
USB 連接埠 (DC OUT)
DC OUT A 開關
DC OUT/CHARGE 開關
DC OUT B 開關
BATT CHECK 按鈕
電纜保護裝置安裝孔
電池組釋放閂
繫孔
CHARGE 指⽰燈
剩餘電池電量指⽰燈
DC IN (5V) 埠
安裝螺絲孔 (1/4-20 UNC)
電池組保護裝置
DC IN (12V) 埠
輸⼊插頭(適⽤於 W 系列電池組)*
輸⼊插頭護罩(適⽤於 Z 系列電池組)*
安裝/拆卸電池組
檢查剩餘電池電量
1 按下 BATT CHECK 按鈕。
您可以檢查剩餘電池電量指⽰燈的指⽰(亮起約 10 秒),瞭解電池組的
約略剩餘電量。
... 熄滅, ... 亮起
剩餘電池電量指⽰
70% - 100%
40% - 70%
10% - 40%
0% - 10%
以上所列的剩餘電池電量指⽰燈指⽰以及剩餘電量⽐率 (%) 僅供參考。
實際狀態可能會因周圍溫度或電池狀況⽽有差異。
提⽰
相機安裝本裝置時,您也可以在相機螢幕上檢查本裝置的剩餘電池電量。
不論本裝置安裝多少電池組,相機螢幕都僅會顯⽰⼀個電池圖⽰ (
)。
相機的實際電池壽命會因安裝的電池組數⽽有差異。
電池組充電
1 將 DC OUT/CHARGE 開關推⾄“CHARGE”。 (
)
2 使⽤隨附交換式電源供應器連接本裝置和電源插座 (
)。 (
)
電池組的 CHARGE 指⽰燈於充電期間亮起時,表⽰電池組正在充電。 (
)
本裝置安裝多個電池組時,會由剩餘電量最少的電池組開始進⾏充電。所
有電池組的電量都充⾄ 90% 以上時,CHARGE 指⽰燈就會熄滅。(⼀般充
電)
若您於 CHARGE 指⽰燈熄滅後繼續充電約 160 分鐘*,將會獲得更⾧的電
池壽命。(完全充電)
* 四組電池組的約略充電時間
提⽰
您可以使⽤ USB 電源供應器連接本裝置的 DC IN (5V) 埠和電源,或是
改使⽤ USB 電纜連接電腦等其他裝置的 USB 連接埠來為電池組充電。
充電時間會因 USB 電源供應器規格或連接的裝置⽽有差異。
關於充電時間(使⽤隨附的交換式電源供應器)
電池 ⼀個 NP-FZ100 電池組 四個 NP-FZ100 電池組
⼀般充電時間(約) 120 分鐘 480 分鐘
完全充電時間(約) 160 分鐘 640 分鐘
• 表中顯⽰的時間是指在 25°C 的周圍溫度下,使⽤本產品為電量耗盡的電
池進⾏充電所需的時間。
• 充電時間會因電池狀況或周圍溫度⽽有差異。
備註
• 若本裝置的剩餘電池電量指⽰燈顯⽰剩餘電量⽐例為 0% ⾄ 10%(指⽰燈
未亮起),但是 CHARGE 指⽰燈卻沒有亮起,請確認已正確安裝電池組。
若未正確安裝電池組,本裝置無法進⾏充電。
• 為⾧時間未使⽤的電池充電時,可能需要較⾧的充電時間。
為連接的裝置供電
1 將 DC OUT/CHARGE 開關推⾄“DC OUT”。 (
)
2 將相機或 USB 裝置連接⾄本裝置。
輸⼊插頭 (
) ⽤於連接相機,⽽ USB 連接埠 (
) ⽤於連接 USB 裝
置。
若要將輸⼊插頭連接⾄相機,請將插頭上的 標記對準相機上的 標
記,然後將輸⼊插頭插⼊相機的電池室。
蓋上相機的電池室蓋時,請依圖例說明將電纜穿過蓋上的凹槽,避免電纜
卡在蓋下。(
-a)
3 依連接的裝置選擇供電類型。
將 DC OUT A 開關或 DC OUT B 開關推⾄“CAMERA”或“USB”。 (
)
-b
DC OUT- :
選擇電池座 A1 和 A2 的電池組供電類型。
DC OUT- :
選擇電池座 B1 和 B2 的電池組供電類型。
連接安裝板
連接安裝板時可以進⾏調整,找出適合將本裝置安裝⾄堅固結構(如固定本
裝置的框架結構)的⽅向。
連接電纜保護裝置
使⽤ USB 電纜連接本裝置時,請使⽤電纜保護裝置將電纜固定在本裝置上。
關於電池組保護裝置
電池座 A2 和 B2 不安裝電池組時,可⽤電池座蓋 (
) 取代電池組保護裝
置 (
) 來縮⼩本裝置的體積。
備註
保護電池組需要使⽤電池組保護裝置。電池座 A2 或 B2 安裝電池組,或兩
者同時安裝電池組時,請務必在本裝置安裝電池組保護裝置。
安裝繫繩
建議您使⽤繫繩,避免本裝置摔落及損壞周邊裝置。
請將繫繩繫緊本裝置,並將繫繩末端纏繞固定於堅固結構的某個部分,例
如:靠近本裝置固定位置的框架結構。
備註
繫繩繫⾄本裝置時,請勿將繫繩末端纏繞於四肢,例如⼿腕。
連接⽀援“InfoLITHIUM”電池組(W 系
列)的相機
1 拆下輸⼊插頭護罩(適⽤於 Z 系列電池組)。
2 拆下相機的電池組,然後將輸⼊插頭(適⽤於 W 系列電池組)插⼊
相機的電池室。
將拆下的輸⼊插頭護罩(適⽤於 Z 系列電池組)裝回輸⼊插頭(適⽤於 W
系列電池組)時,請確認有滑動開關的護罩表⾯與有 W 標記的插頭表⾯⾯向
同⼀側。
提⽰
相機的電池電量剩下約 1/3 時,相機的螢幕就會顯⽰
。
本裝置的使⽤注意事項
• 本裝置使⽤完畢時,請從電源插座拔除電源線。
拔除電源線時,務必緊握插頭。
• 請勿拆下輸⼊插頭電纜的鐵芯,否則裝置會發出不必要的無線電波。
• 請勿讓輸⼊插頭接觸異物,包含灰塵和沙粒。
• 使⽤安裝板時,務必使⽤隨附的螺絲進⾏固定。
• 請勿將“InfoLITHIUM”電池組(W 系列)裝⼊輸⼊插頭護罩(適⽤於 Z
系列電池組)。
• 連接本裝置和相機無法為安裝於本裝置的電池組充電。
• 本裝置沒有異物防護及防⽔功能。
本產品⽀援 100V ⾄ 240V 的全球電壓。
請勿使⽤變壓器,這可能導致故障。
牆壁插座的外形視國家與地區⽽有不同。出發前請務必確認。
故障排除
當 CHARGE 指⽰燈閃爍時,請按照下表進⾏檢查。
CHARGE 指⽰燈有兩種閃爍⽅式。
緩慢閃爍:每隔 1.3 秒亮起並熄滅
快速閃爍:每隔 0.3 秒亮起並熄滅
故障排除操作會因 CHARGE 指⽰燈的閃爍⽅式⽽異。
CHARGE 指⽰燈緩慢閃爍時
充電暫停中。本產品處於待命狀態。
若室內溫度超過適當的溫度範圍,將⾃動停⽌充電。
當室內溫度回到適當的範圍後,CHARGE 指⽰燈即會亮起並開始充電。
建議在 10 ℃ 到 30 ℃ 的溫度範圍內進⾏充電。
CHARGE 指⽰燈快速閃爍時
⾸次在下列任⼀情況下對電池充電時,CHARGE 指⽰燈可能會快速閃爍。
若發⽣此情形,請重新安裝電池,然後再充電⼀次。
⾧時間拿起電池時
電池⾧時間安裝在相機時
購買後⽴即充電時
若 CHARGE 指⽰燈持續快速閃爍,請按照下表進⾏檢查。
電池無法充電。
• 電源線未連接⾄電源插座(牆壁插座)。
將電源線正確連接⾄電源插座(牆壁插座)。
• 電池未確實安裝。
將電池正確裝⼊本產品。
• 本裝置⽀援“InfoLITHIUM”電池組(Z 系列)。
• “InfoLITHIUM”電池組(Z 系列)上標有
標誌。
• “InfoLITHIUM”為 Sony Corporation 的商標。
規格
多電池供應器 (NPA-MQZ1)
電源需求 DC 12V,1.8A
USB 輸出額定值 DC 5V,1.5A
操作溫度 0°C ⾄ 40°C
存放溫度 –20°C ⾄ +60 °C
尺⼨(約) 123.4 mm × 67.8 mm × 66.2 mm(寬/⾼/深)
重量 約 410 g
交換式電源供應器(AC-UES1230/AC-UES1230M/AC-UES1230M T)
電源需求 AC 100V-240V,50Hz/60Hz,0.75A-0.4A
輸出電壓 DC 12V,3A
充電電池 (NP-FZ100)
標稱電壓 DC 7.2V
本裝置和隨附配件的設計和規格如有變更,恕不另⾏通知。
. .
.
.
.
.
.
.
.
) .
.(
• (« » ) NPA-MQZ1
(Z ) Sony "InfoLITHIUM"™
:
–(W /Z ) "InfoLITHIUM"
–USB
•
.
•
.(Z ) "InfoLITHIUM"
.
.
• DC OUT/CHARGE
. "CHARGE"
•:
–."USB" "CAMERA" DC OUT B DC OUT A
–.
. ()
:()
•
. ()
•
.
.
)
(.
• (1) (NPA-MQZ1)
•(1) *
• (1) *(Z )
• (1) *(AC-UES1230M T/AC-UES1230M/AC-UES1230)
•(1)
• (2) (NP-FZ100)
•(1)
•(2)
•(1)
•(2)
•(1)
•
*
.
*
(DC OUT) USB
DC OUT A
DC OUT/CHARGE
DC OUT B
BATT CHECK
CHARGE
( 5) DC IN
(1/4-20 UNC)
( 12) DC IN
*(W )
*(Z )
/
.BATT CHECK 1
( 10 )
.()
... ...
% 100 - % 70
% 70 - % 40
% 40 - % 10
% 10 - % 0
(%)
.
.
.
.
.(
)
()
( ) ."CHARGE" DC OUT/CHARGE 1
() . () 2
() . CHARGE
.
( ) . % 90 CHARGE
CHARGE * 160 ()
( ) .
*
( 5) DC IN ()
USB USB
.USB
. USB
( )
NP-FZ100 NP-FZ100
480 120 (
)
640 160 (
)
•
. 25
•.
• % 10 - % 0
() CHARGE ( )
. .
•.
( ) ."DC OUT" DC OUT/CHARGE 1
. USB 2
.USB ( ) USB ()
.
(-a) .
.
3
( ) ."USB" "CAMERA" DC OUT B DC OUT A
-b
:DC OUT-
.A2 A1
:DC OUT-
.B2 B1
.
. USB
() B2 A2
. ()
A2/B2 .
.
.
.
.
"InfoLITHIUM"
(W )
.(Z ) 1
(W ) 2
.
(Z )
(W )
.W
3/1
.
• .
.
• .
.
•.
•.
•.(W ) "InfoLITHIUM" (Z )
•. ()
•.
. 240 100
.
. .
. CHARGE
. CHARGE
1.3 :
0.3 :
.CHARGE
CHARGE
. .
.
. CHARGE
. 30 10
CHARGE
. CHARGE
.
. CHARGE
.
. Sony
: CHARGE
.
: CHARGE
.
: CHARGE
CHARGE
.
: CHARGE
CHARGE
.
.
•.
h.
•.
h.
•.(Z ) "InfoLITHIUM"
•.(Z ) "InfoLITHIUM"
•.Sony "InfoLITHIUM"
(NPA-MQZ1)
1.8 12
1.5 5 USB
40 0
60 + 20 –
( / /) 66.2 × 67.8 × 123.4 (
)
410
(AC-UES1230M T/AC-UES1230M/AC-UES1230)
0.4- 0.75 60/ 50 240- 100
3 12
(NP-FZ100)
7.2
.
. .
.
.
.
.
.
.
.
) .
.(
• (« » ) NPA-MQZ1
(Z ) Sony "InfoLITHIUM"™
:
–(W /Z ) "InfoLITHIUM"
–USB
•
.
•
.(Z ) "InfoLITHIUM"
.
.
• DC OUT/CHARGE
. "CHARGE"
•:
–."USB" "CAMERA" DC OUT B DC OUT A
–.
. ()
:()
•
. ()
•
.
.
)
(.
• (1) (NPA-MQZ1)
•(1) *
• (1) *(Z )
• (1) *(AC-UES1230M T/AC-UES1230M/AC-UES1230)
•(1)
• (2) (NP-FZ100)
•(1)
•(2)
•(1)
•(2)
•(1)
•
*
.
*
(DC OUT) USB
DC OUT A
DC OUT/CHARGE
DC OUT B
BATT CHECK
CHARGE
( 5) DC IN
(1/4-20 UNC)
( 12) DC IN
*(W )
*(Z )
/
.BATT CHECK 1
( 10 )
.()
...
...
% 100 - % 70
% 70 - % 40
% 40 - % 10
% 10 - % 0
(%)
.
.
.
.
.( )
()
( ) ."CHARGE" DC OUT/CHARGE 1
() . () 2
() . CHARGE
.
( ) . % 90 CHARGE
CHARGE * 160 ()
( ) .
*
( 5) DC IN ()
USB USB
.USB
. USB
( )
NP-FZ100 NP-FZ100
480 120 (
)
640 160 (
)
•
. 25
•.
• % 10 - % 0
() CHARGE ( )
. .
•.
( ) ."DC OUT" DC OUT/CHARGE 1
. USB 2
.USB ( ) USB ()
.
(-a) .
.
3
( ) ."USB" "CAMERA" DC OUT B DC OUT A
-b
:DC OUT-
.A2 A1
:DC OUT-
.B2 B1
.
. USB
() B2 A2
. ()
A2/B2 .
.
.
.
.
"InfoLITHIUM"
(W )
.(Z ) 1
(W ) 2
.
(Z )
(W )
.W
3/1
.
• .
.
• .
.
•.
•.
•.(W ) "InfoLITHIUM" (Z )
•. ()
•.
. 240 100
.
. .
. CHARGE
. CHARGE
1.3 :
0.3 :
.CHARGE
CHARGE
. .
.
. CHARGE
. 30 10
CHARGE
. CHARGE
.
. CHARGE
.
. Sony
: CHARGE
.
: CHARGE
.
: CHARGE
CHARGE
.
: CHARGE
CHARGE
.
.
•.
h.
•.
h.
•.(Z ) "InfoLITHIUM"
•.(Z ) "InfoLITHIUM"
•.Sony "InfoLITHIUM"
(NPA-MQZ1)
1.8 12
1.5 5 USB
40 0
60 + 20 –
( / /) 66.2 × 67.8 × 123.4 (
)
410
(AC-UES1230M T/AC-UES1230M/AC-UES1230)
0.4- 0.75 60/ 50 240- 100
3 12
(NP-FZ100)
7.2
.
Resolução de problemas
Quando a luz CHARGE piscar, consulte o esquema abaixo.
A luz CHARGE pisca de duas formas.
Pisca devagar: Acende-se e apaga-se repetidas vezes a cada 1,3segundos.
Pisca depressa: Acende-se e apaga-se repetidas vezes a cada 0,3segundos.
A medida a tomar depende da forma como a luz CHARGE estiver a piscar.
Quando a luz CHARGE continua a piscar devagar
O carregamento está a entrar em pausa. Esta unidade está no modo de espera.
Se a temperatura ambiente estiver fora do intervalo de temperaturas adequado, o
carregamento para automaticamente.
Quando a temperatura ambiente voltar a um valor adequado, a luz CHARGE
acende-se e o carregamento é retomado.
Recomendamos que o carregamento da bateria seja feito a uma temperatura de
10°C a 30 °C.
Quando a luz CHARGE continua a piscar depressa
Quando carregar a bateria pela primeira vez numa das seguintes situações, a luz
CHARGE poderá piscar depressa.
Se isso acontecer, retire a bateria desta unidade e volte a instalá-la e a carregá-la.
Quando a bateria ficou no carregador durante muito tempo.
Quando a bateria ficou na câmara durante muito tempo.
Imediatamente após a compra.
Se a luz CHARGE continuar a piscar depressa, consulte o esquema abaixo.
Contacte o seu revendedor Sony mais próximo em relação com o produto que
poderá ter um problema.
Retire a bateria que estiver a ser carregada e depois volte a encaixar
corretamente a mesma bateria.
A luz CHARGE pisca novamente:
Instale outra bateria.
A luz CHARGE acende-se e não
pisca novamente:
Se a luz CHARGE se apagar porque o
tempo de carregamento já passou,
não há qualquer problema.
A luz CHARGE pisca novamente:
O problema está nesta unidade.
A luz CHARGE acende-se e não pisca
novamente:
Se a luz CHARGE se apagar porque o
tempo de carregamento já passou, o
problema está na bateria que instalou
da primeira vez.
Não é possível carregar a bateria.
•O cabo de corrente não está ligado à tomada de parede.
Ligue o cabo de corrente à tomada de parede corretamente.
•A bateria não está encaixada firmemente.
Encaixe corretamente a bateria na unidade.
•Esta unidade suporta a bateria “InfoLITHIUM” (série Z).
•A bateria “InfoLITHIUM” (série Z) tem o logótipo
.
•“InfoLITHIUM” é uma marca comercial da Sony Corporation.
Especificações
Adaptador de bateria múltiplo (NPA-MQZ1)
Requisitos energéticos de CC 12 V, 1,8 A
Saída USB CC 5 V, 1,5 A
Temperatura de funcionamento 0 ºC a 40 °C
Temperatura de armazenamento –20 ºC a +60 °C
Dimensões (aprox.) 123,4 mm x 67,8 mm x 66,2 mm (l/a/p)
Massa aprox. 410 g
Transformador de CA (AC-UES1230/AC-UES1230M/AC-UES1230M T)
Requisitos energéticos CA 100 V-240 V, 50 Hz/60 Hz, 0,75 A-0,4 A
Tensão de saída CC 12 V, 3 A
Bateria recarregável (NP-FZ100)
Tensão nominal CC 7,2 V
O design e as especificações desta unidade e os acessórios fornecidos estão
sujeitos a alterações sem aviso prévio.
(Continuación de la página frontal)
本裝置充電時會產⽣熱,請務必在通⾵場所進⾏充電。充電時請勿置於枕頭
或⽑毯下,或是置於易燃性物質表⾯上。請勿讓本裝置靠近熱源、陽光直射
處、可燃性氣體、受潮,或是被⽔或其他液體濺溼。請勿將本裝置拆卸、拆
開、微波、焚燒或上漆,或是將異物插⼊本裝置中。請勿讓本裝置受到機械
性衝擊,例如:壓碎、彎折、穿刺或切碎。避免讓重物掉落⾄本裝置上,或
是置於其上。請勿對本裝置進⾏短路處理,或是將其置於可能會被其他⾦屬
或導體短路的容器中。若裝置潮溼或因其他原因受損,請勿進⾏操作,以防
發⽣觸電、爆炸及/或⼈員受傷的意外。兒童應在成年⼈的指導下使⽤本裝
置。請詳閱本裝置隨附的使⽤說明書(包含充電說明以及最低與最⾼操作溫
度的資訊)。
本產品已經過測試並確定符合EMC規定中所提出的使⽤連接電纜不得超過3公
尺的限制。
電纜上附有鐡芯時,這個鐵芯係抑制電磁波⼲擾⽤,請勿任意拆卸。
僅適⽤於台灣
⽣產國別:中國
委製廠商:SONY CORPORATION
進⼝商:台灣索尼股份有限公司
地址:台北市⾧春路145號5樓
諮詢專線:4499111
使⽤前
功能
• NPA-MQZ1 多電池供應器(以下稱“本裝置”)最多可容納四個 Sony
“InfoLITHIUM”
TM
電池組(Z 系列),可提供外部供電並⽀援以下裝
置:
– ⽀援“InfoLITHIUM”電池組(Z 系列/W 系列)的相機
– ⽀援 USB 供電的裝置
• 本裝置沒有限制同時安裝的電池組數,或是安裝電池座進⾏充電的順
序。
• 您可以將交換式電源供應器連接⾄本裝置,將其當作“InfoLITHIUM”
電池組(Z 系列)的充電器使⽤。
關於供電
本裝置安裝多個平均充電的電池組時,其電源會由所有電池組平均供應。
安裝多個電量不均的電池組時,裝置的電源會由剩餘電量最多的電池組開
始供應。
於供電狀態使⽤本裝置時的注意事項
• 本裝置正為連接的裝置供電時,請勿將 DC OUT/CHARGE 開關推
⾄“CHARGE”,否則本裝置的供電會停⽌。
• 若您進⾏以下操作,使⽤中的連接裝置可能會關閉:
– 將 DC OUT A 或 DC OUT B 開關推⾄“CAMERA”或“USB”。
– 拆下本產品的其中⼀組電池組。
更換電池組時的注意事項
安裝⾄本裝置的相機螢幕顯⽰ 時,請為本裝置使⽤的電池組進⾏充
電或更換。
若要更換電池組,請使⽤以下其中⼀種⽅式:
• 拆下本裝置的所有電池組並稍待⽚刻,然後裝上充飽電的電池組。
• 從連接的相機拔下輸⼊插頭並稍待⽚刻,然後將插頭裝回相機。
關於交換式電源供應器
使⽤隨附的交換式電源供應器連接電源插座和本裝置無法直接為連接的裝
置進⾏供電。
隨附配件(括弧中的數字代表件數)
• 多電池供應器 (NPA-MQZ1) (1)
• 電池組保護裝置*
1
(1)
• 輸⼊插頭(適⽤於 Z 系列電池組)*
1
(1)
• 交換式電源供應器(AC-UES1230/AC-UES1230M/AC-UES1230M T)*
2
(1)
• 電源線 (1)
• 充電電池 (NP-FZ100) (2)
• 安裝板 (1)
• 螺絲 (2)
• 電纜保護裝置 (1)
• 電池座蓋 (2)
• 繫繩 (1)
• 成套印刷⽂件
*
1
出貨時已完成安裝
*
2
交換式電源供應器的型號和外型會因國家或地區⽽異。
零件識別
USB 連接埠 (DC OUT)
DC OUT A 開關
DC OUT/CHARGE 開關
DC OUT B 開關
BATT CHECK 按鈕
電纜保護裝置安裝孔
電池組釋放閂
繫孔
CHARGE 指⽰燈
剩餘電池電量指⽰燈
DC IN (5V) 埠
安裝螺絲孔 (1/4-20 UNC)
電池組保護裝置
DC IN (12V) 埠
輸⼊插頭(適⽤於 W 系列電池組)*
輸⼊插頭護罩(適⽤於 Z 系列電池組)*
安裝/拆卸電池組
檢查剩餘電池電量
1 按下 BATT CHECK 按鈕。
您可以檢查剩餘電池電量指⽰燈的指⽰(亮起約 10 秒),瞭解電池組的
約略剩餘電量。
... 熄滅, ... 亮起
剩餘電池電量指⽰
70% - 100%
40% - 70%
10% - 40%
0% - 10%
以上所列的剩餘電池電量指⽰燈指⽰以及剩餘電量⽐率 (%) 僅供參考。
實際狀態可能會因周圍溫度或電池狀況⽽有差異。
提⽰
相機安裝本裝置時,您也可以在相機螢幕上檢查本裝置的剩餘電池電量。
不論本裝置安裝多少電池組,相機螢幕都僅會顯⽰⼀個電池圖⽰ (
)。
相機的實際電池壽命會因安裝的電池組數⽽有差異。
電池組充電
1 將 DC OUT/CHARGE 開關推⾄“CHARGE”。 (
)
2 使⽤隨附交換式電源供應器連接本裝置和電源插座 (
)。 (
)
電池組的 CHARGE 指⽰燈於充電期間亮起時,表⽰電池組正在充電。 (
)
本裝置安裝多個電池組時,會由剩餘電量最少的電池組開始進⾏充電。所
有電池組的電量都充⾄ 90% 以上時,CHARGE 指⽰燈就會熄滅。(⼀般充
電)
若您於 CHARGE 指⽰燈熄滅後繼續充電約 160 分鐘*,將會獲得更⾧的電
池壽命。(完全充電)
* 四組電池組的約略充電時間
提⽰
您可以使⽤ USB 電源供應器連接本裝置的 DC IN (5V) 埠和電源,或是
改使⽤ USB 電纜連接電腦等其他裝置的 USB 連接埠來為電池組充電。
充電時間會因 USB 電源供應器規格或連接的裝置⽽有差異。
關於充電時間(使⽤隨附的交換式電源供應器)
電池 ⼀個 NP-FZ100 電池組 四個 NP-FZ100 電池組
⼀般充電時間(約) 120 分鐘 480 分鐘
完全充電時間(約) 160 分鐘 640 分鐘
• 表中顯⽰的時間是指在 25°C 的周圍溫度下,使⽤本產品為電量耗盡的電
池進⾏充電所需的時間。
• 充電時間會因電池狀況或周圍溫度⽽有差異。
備註
• 若本裝置的剩餘電池電量指⽰燈顯⽰剩餘電量⽐例為 0% ⾄ 10%(指⽰燈
未亮起),但是 CHARGE 指⽰燈卻沒有亮起,請確認已正確安裝電池組。
若未正確安裝電池組,本裝置無法進⾏充電。
• 為⾧時間未使⽤的電池充電時,可能需要較⾧的充電時間。
為連接的裝置供電
1 將 DC OUT/CHARGE 開關推⾄“DC OUT”。 (
)
2 將相機或 USB 裝置連接⾄本裝置。
輸⼊插頭 (
) ⽤於連接相機,⽽ USB 連接埠 (
) ⽤於連接 USB 裝
置。
若要將輸⼊插頭連接⾄相機,請將插頭上的 標記對準相機上的 標
記,然後將輸⼊插頭插⼊相機的電池室。
蓋上相機的電池室蓋時,請依圖例說明將電纜穿過蓋上的凹槽,避免電纜
卡在蓋下。(
-a)
3 依連接的裝置選擇供電類型。
將 DC OUT A 開關或 DC OUT B 開關推⾄“CAMERA”或“USB”。 (
)
-b
DC OUT- :
選擇電池座 A1 和 A2 的電池組供電類型。
DC OUT- :
選擇電池座 B1 和 B2 的電池組供電類型。
連接安裝板
連接安裝板時可以進⾏調整,找出適合將本裝置安裝⾄堅固結構(如固定本
裝置的框架結構)的⽅向。
連接電纜保護裝置
使⽤ USB 電纜連接本裝置時,請使⽤電纜保護裝置將電纜固定在本裝置上。
關於電池組保護裝置
電池座 A2 和 B2 不安裝電池組時,可⽤電池座蓋 (
) 取代電池組保護裝
置 (
) 來縮⼩本裝置的體積。
備註
保護電池組需要使⽤電池組保護裝置。電池座 A2 或 B2 安裝電池組,或兩
者同時安裝電池組時,請務必在本裝置安裝電池組保護裝置。
安裝繫繩
建議您使⽤繫繩,避免本裝置摔落及損壞周邊裝置。
請將繫繩繫緊本裝置,並將繫繩末端纏繞固定於堅固結構的某個部分,例
如:靠近本裝置固定位置的框架結構。
備註
繫繩繫⾄本裝置時,請勿將繫繩末端纏繞於四肢,例如⼿腕。
連接⽀援“InfoLITHIUM”電池組(W 系
列)的相機
1 拆下輸⼊插頭護罩(適⽤於 Z 系列電池組)。
2 拆下相機的電池組,然後將輸⼊插頭(適⽤於 W 系列電池組)插⼊
相機的電池室。
將拆下的輸⼊插頭護罩(適⽤於 Z 系列電池組)裝回輸⼊插頭(適⽤於 W
系列電池組)時,請確認有滑動開關的護罩表⾯與有 W 標記的插頭表⾯⾯向
同⼀側。
提⽰
相機的電池電量剩下約 1/3 時,相機的螢幕就會顯⽰
。
本裝置的使⽤注意事項
• 本裝置使⽤完畢時,請從電源插座拔除電源線。
拔除電源線時,務必緊握插頭。
• 請勿拆下輸⼊插頭電纜的鐵芯,否則裝置會發出不必要的無線電波。
• 請勿讓輸⼊插頭接觸異物,包含灰塵和沙粒。
• 使⽤安裝板時,務必使⽤隨附的螺絲進⾏固定。
• 請勿將“InfoLITHIUM”電池組(W 系列)裝⼊輸⼊插頭護罩(適⽤於 Z
系列電池組)。
• 連接本裝置和相機無法為安裝於本裝置的電池組充電。
• 本裝置沒有異物防護及防⽔功能。
本產品⽀援 100V ⾄ 240V 的全球電壓。
請勿使⽤變壓器,這可能導致故障。
牆壁插座的外形視國家與地區⽽有不同。出發前請務必確認。
故障排除
當 CHARGE 指⽰燈閃爍時,請按照下表進⾏檢查。
CHARGE 指⽰燈有兩種閃爍⽅式。
緩慢閃爍:每隔 1.3 秒亮起並熄滅
快速閃爍:每隔 0.3 秒亮起並熄滅
故障排除操作會因 CHARGE 指⽰燈的閃爍⽅式⽽異。
CHARGE 指⽰燈緩慢閃爍時
充電暫停中。本產品處於待命狀態。
若室內溫度超過適當的溫度範圍,將⾃動停⽌充電。
當室內溫度回到適當的範圍後,CHARGE 指⽰燈即會亮起並開始充電。
建議在 10 ℃ 到 30 ℃ 的溫度範圍內進⾏充電。
CHARGE 指⽰燈快速閃爍時
⾸次在下列任⼀情況下對電池充電時,CHARGE 指⽰燈可能會快速閃爍。
若發⽣此情形,請重新安裝電池,然後再充電⼀次。
⾧時間拿起電池時
電池⾧時間安裝在相機時
購買後⽴即充電時
若 CHARGE 指⽰燈持續快速閃爍,請按照下表進⾏檢查。
電池無法充電。
• 電源線未連接⾄電源插座(牆壁插座)。
將電源線正確連接⾄電源插座(牆壁插座)。
• 電池未確實安裝。
將電池正確裝⼊本產品。
• 本裝置⽀援“InfoLITHIUM”電池組(Z 系列)。
• “InfoLITHIUM”電池組(Z 系列)上標有
標誌。
• “InfoLITHIUM”為 Sony Corporation 的商標。
規格
多電池供應器 (NPA-MQZ1)
電源需求 DC 12V,1.8A
USB 輸出額定值 DC 5V,1.5A
操作溫度 0°C ⾄ 40°C
存放溫度 –20°C ⾄ +60 °C
尺⼨(約) 123.4 mm × 67.8 mm × 66.2 mm(寬/⾼/深)
重量 約 410 g
交換式電源供應器(AC-UES1230/AC-UES1230M/AC-UES1230M T)
電源需求 AC 100V-240V,50Hz/60Hz,0.75A-0.4A
輸出電壓 DC 12V,3A
充電電池 (NP-FZ100)
標稱電壓 DC 7.2V
本裝置和隨附配件的設計和規格如有變更,恕不另⾏通知。
. .
.
.
.
.
.
.
.
) .
.(
• (« » ) NPA-MQZ1
(Z ) Sony "InfoLITHIUM"™
:
–(W /Z ) "InfoLITHIUM"
–USB
•
.
•
.(Z ) "InfoLITHIUM"
.
.
• DC OUT/CHARGE
. "CHARGE"
•:
–."USB" "CAMERA" DC OUT B DC OUT A
–.
. ()
:()
•
. ()
•
.
.
)
(.
• (1) (NPA-MQZ1)
•(1) *
• (1) *(Z )
• (1) *(AC-UES1230M T/AC-UES1230M/AC-UES1230)
•(1)
• (2) (NP-FZ100)
•(1)
•(2)
•(1)
•(2)
•(1)
•
*
.
*
(DC OUT) USB
DC OUT A
DC OUT/CHARGE
DC OUT B
BATT CHECK
CHARGE
( 5) DC IN
(1/4-20 UNC)
( 12) DC IN
*(W )
*(Z )
/
.BATT CHECK 1
( 10 )
.()
...
...
% 100 - % 70
% 70 - % 40
% 40 - % 10
% 10 - % 0
(%)
.
.
.
.
.( )
()
( ) ."CHARGE" DC OUT/CHARGE 1
() . () 2
() . CHARGE
.
( ) . % 90 CHARGE
CHARGE * 160 ()
( ) .
*
( 5) DC IN ()
USB USB
.USB
. USB
( )
NP-FZ100 NP-FZ100
480 120 (
)
640 160 (
)
•
. 25
•.
• % 10 - % 0
() CHARGE ( )
. .
•.
( ) ."DC OUT" DC OUT/CHARGE 1
. USB 2
.USB ( ) USB ()
.
(-a) .
.
3
( ) ."USB" "CAMERA" DC OUT B DC OUT A
-b
:DC OUT-
.A2 A1
:DC OUT-
.B2 B1
.
. USB
() B2 A2
. ()
A2/B2 .
.
.
.
.
"InfoLITHIUM"
(W )
.(Z ) 1
(W ) 2
.
(Z )
(W )
.W
3/1
.
• .
.
• .
.
•.
•.
•.(W ) "InfoLITHIUM" (Z )
•. ()
•.
. 240 100
.
. .
. CHARGE
. CHARGE
1.3 :
0.3 :
.CHARGE
CHARGE
. .
.
. CHARGE
. 30 10
CHARGE
. CHARGE
.
. CHARGE
.
. Sony
: CHARGE
.
: CHARGE
.
: CHARGE
CHARGE
.
: CHARGE
CHARGE
.
.
•.
h.
•.
h.
•.(Z ) "InfoLITHIUM"
•.(Z ) "InfoLITHIUM"
•.Sony "InfoLITHIUM"
(NPA-MQZ1)
1.8 12
1.5 5 USB
40 0
60 + 20 –
( / /) 66.2 × 67.8 × 123.4 (
)
410
(AC-UES1230M T/AC-UES1230M/AC-UES1230)
0.4- 0.75 60/ 50 240- 100
3 12
(NP-FZ100)
7.2
.
-
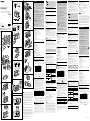 1
1
-
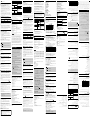 2
2


Sony NPA-MQZ1K Manual de usuario
- Categoría
- Bancos de energía
- Tipo
- Manual de usuario
- Este manual también es adecuado para
en otros idiomas
- français: Sony NPA-MQZ1K Manuel utilisateur
- English: Sony NPA-MQZ1K User manual
- português: Sony NPA-MQZ1K Manual do usuário