
THANK YOU
THANK YOUTHANK YOU
THANK YOU
We appreciate the trust and condence you have placed in Glacier Bay through the purchase of this sink. We strive to
continually create quality products designed to enhance your home. Visit us online to see our full line of products available for your home
improvement needs. Thank you for choosing Glacier Bay!
USE AND CARE GUIDE
Questions, problems, missing parts? Before returning to the store,
call Glacier Bay Customer Service
8 a.m. - 6 p.m., EST, Monday-Friday
1-855-434-5224
HOMEDEPOT.COM
Item #1002 422 182
Model #13-0078-4W
RETRO SQUARE DROP-IN SINK

2
Table of Contents
Table of Contents .............................................................2
Safety Information...................................................
.........
2
Warranty................................................................
.........
2
Pre-Installation ................................................................3
Planning Installation...........................................
.............
3
Tools Required...............................................................4
Package Contents.................................................
..........
4
Installation ..............................................................
....
...5
Care and Cleaning...........................................................6
Safety Information
WARNING: Handle with care. Vitreous chinaware is
glass-like with sharp edges if broken. Do not drop, handle
NOTICE: Observe local plumbing and building codes.
Warranty
Glacier Bay products are manufactured with superior quality standards and workmanship and are backed by our limited lifetime warranty.
Glacier Bay products are warranted to the original consumer purchaser to be free of defects in materials or workmanship. We will replace
FREE OF CHARGE any product or parts that proves defective. Simply, return the product / part to any of The Home Depot retail locations or
call 1-855-HD Glacier (1-855-434-5224) to r
eceive the replacement item. Proof of purchase (original sales receipt) from the original
consumer purchaser must be made available for all Glacier Bay warranty claims.
This warranty excludes incidental/inconsequential damages and failures due to misuse, abuse or normal wear and tear. This warranty
excludes all industrial, commercial & business usage, whose purchasers are hereby, extended a ve year limited warranty from the
date of
purchase, with all other terms of this warranty applying except the duration of warranty.
Some states and provinces do not allow the exclusion or limitation of incidental or consequential damages, so the above limitations may not
apply to you. This warranty gives you specic legal rights and you may also have other rights that vary from state to state and province to
province. Please see a store or contact 1-855-HD G
lacier for more details.
roughly, or overtighten bolts.

3 HOMEDEPOT.COM
Please contact 1-855-434-5224 for further assistance.
Pre-Installation
NOTE:
It is recommended to check the desired location for clearance between
the backsplash, faucet, plumbing, and vanity.
PLANNING INSTALLATION
Before beginning installation of this product, ensure all parts are present. If any part is missing or damaged, do not attempt to assemble,
install, or operate the product. Contact customer service for replacement parts.
If you have a marble or stone countertop that does not have a cutout to accommodate the sink, it is recommended this be done by a professional.
Install so future removal is possible. Do not use adhesives or adhesive sealant. This will avoid damage to the top.
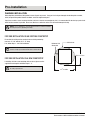
FOR SINK INSTALLATION ON AN EXISTING COUNTERTOP
Ensure that the existing oval or round cut-out on existing countertop
measures 17"- 20" wide by 15 ¾"-17" deep.
If so, follow Steps 3 - 4 for sink installation.
FOR SINK INSTALLATION ON A NEW COUNTERTOP
If installing sink into a new countertop with no cut-out, please use the
supplied cut-out template and follow Steps 1 - 4.
there is enough space underneath the sink to install a faucet
NOTE:
Place the sink into existing cut-out and ensure
be cut by a professional.
NOTE:
It’s recommended that marble or stone countertops
15 ¾
in.
-17
5
⁄8
in.
17
5
⁄8
in.
-20
in.
Bottom of sink
dimensions
Sink cut-out

4
NOTE:
You may require different, more specialized tools to install this lavatory to
countertop materials other than wood or wood composites.
TOOLS REQUIRED
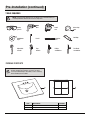
PACKAGE CONTENTS
Part
Description
Quantity
1Sink A
Pre-Installation (continued)
1Template B
NOTE:
The template (B) is to be used as a guide for cutting
the sink opening in the countertop, if one does not exist.
To avoid possible damage to the cabinet, cut the counter top
before installing it to the cabinet.
A
B
Safety
glasses
Adjustable
wrench
Measuring
tape
Caulking
Pencil
Carpenter
level
Phillips
screwdriver
Flat Blade
screwdriver
Pipe
wrench
Drill
Scroll
saw
Cellophane
tape

5
HOMEDEPOT.COM
Please contact 1-855-434-5224 for further assistance.
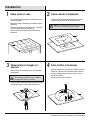
Installation
Installation
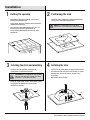
1
Cutting the opening
Afx template (B) to the countertop at the desired
location with cellophane tape.
Using a pencil, mark the guidelines on the countertop
following the template (B).
Drill a clearance hole approximately 1/4 in. to 1/2 in.
inside the perimeter line of the template (B).
Cut the opening following the perimeter line of the
template (B).
2
Positioning the sink
Check the cutout alignment by carefully positioning the
sink (A) in the desired mounting poisiton.
NOTE: It is recommended to practice the proper
placement two or three times before applying caulking.
A
B
3
Installing the sink
Turn the sink (A) upside-down and apply caulking around
the underside of the sink (A) rim near the edge, as shown.
Carefully lower the sink (A) in place, aligning it, and
press rmly.
Wipe off the excess caulking.
4
A
Installing the drain and plumbing
Install the drain (not provided) according to the
manufacturer’s
installation instructions.
Install the waste system, faucet, and the water supply
(not provided) according to the manufacturer’s
installation instructions.
CAUTION: Do not overtighten the drain assembly.
This may cause the bowl to forcefully crack during
installation or at some time in the future.
A

6
Care and Cleaning
For best results in caring for your sink, we suggest the following:
Clean the outside surface with mild soap, warm water, and a soft cloth.
On stubborn stains, use a powdered detergent and damp sponge or nylon scouring pad.
Never use abrasive scouring powders, cleansers, or pads because they will scratch, damage, and dull the surface.

Questions, problems, missing parts? Before returning to the store,
call Glacier Bay Customer Service
8 a.m. - 6 p.m., EST, Monday-Friday
1
11
1-
--
-855
855855
855-
--
-434
434434
434-
--
-5224
52245224
5224
HOMEDEPOT
HOMEDEPOTHOMEDEPOT
HOMEDEPOT.COM
.COM.COM
.COM
Retain this manual for future use.

LAVAMANOS EMPOTRABLE CUADRADO ESTILO RETRO
GRACIAS
Agradecemos la conanza que has depositado en Glacier Bay al comprar este lavamanos. Nos esforzamos para continuamente crear
productos de calidad diseñados para tu hogar. Visítanos en Internet para ver nuestra línea completa de productos disponibles para
las necesidades de mejoras de tu hogar. ¡Gracias por elegir Glacier Bay!
GUÍA DE USO Y MANTENIMIENTO
¿Preguntas, problemas o piezas faltantes? Antes de regresar a la tienda,
llama al servicio al cliente de Glacier Bay de
lunes a viernes entre 8 a.m. y 6 p.m. hora estándar del Este
1-855-434-5224
HOMEDEPOT.COM
Artículo núm. 1002 422 182
Model núm. 13-0078-4W

2
Tabla de contenido
Tabla de contenido...........................................................2
Información de seguridad........................................
..........
2
Garantía.............................................................
..............
2
Preinstalación ..................................................
..
.............
3
Planicar la instalación......................................
..............
3
Herramientas necesarias......................................
..
.........
4
Contenido del paquete....................................................
.
4
Instalación............................................................
..........
5
Mantenimiento y limpieza....................................
............
6
Información de seguridad
ADVERTENCIA: Manipular con cuidado. Cuando la
vitrocerámica se rompe tiene bordes alados como el
vidrio. No lo dejes caer, no lo manipules bruscamente, ni
aprietes los pernos demasiado.
NOTA: Cumple con todas las normas locales de plomería y construcción.
Garantía
Los productos Glacier Bay se fabrican con normas y mano de obra de calidad superior, y están respaldados por nuestra garantía limitada de
por vida. Los productos Glacier Bay están garantizados para el comprador original contra defectos materiales o de fabricación.
Reemplazaremos GRATIS cualquier producto o pieza defectuosa. Simplemente devuelva el producto / pieza a cualquier tienda de The Home
Depot o llame al 1-855-HD Glacier (1-855-434-5224) para recibir el artículo de reemplazo. La prueba de compra (recibo original de ventas)
del comprador original debe estar disponible para cualquier reclamación de garantía de Glacier Bay.
Esta garantía excluye fallas y daños directos/indirectos debido al uso incorrecto, abuso o uso y desgaste normales. Esta garantía excluye
todo uso industrial, comercial y de negocios, a cuyos compradores se les extiende una garantía limitada de cinco años a partir de la fecha
de compra, manteniendo todos los demás términos de la garantía, con excepción de la duración.
Algunos estados y provincias no permiten la exclusión o limitación de daños directos o indirectos, por ello las limitaciones previamente
enunciadas pueden no aplicarse a su caso. Esta garantía le otorga derechos legales especícos y es posible que también goce de otros
derechos que varían de un estado a otro y de una provincia a otra. Por favor, consulte a un asociado de la tienda o comuníquese con el
1-855-HD Glacier para obtener más detalles.

3
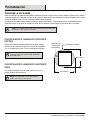
PARA INSTALACIÓN DE LAVAMANOS EN MOSTRADOR
EXISTENTE
Asegura que la abertura ovalada o redonda en el mostrador existente
mida de 43.2 cm a 50.8 de ancho por 40 cm a 43.2 cm de profundidad.
Si es así, continúa con los pasos 3 y 4 de la instalación del lavamanos.
PARA INSTALACIÓN DE LAVAMANOS EN MOSTRADOR
NUEVO
Para instalar el lavamanos en un mostrador nuevo sin vano, usa la
plantilla incluida y sigue los pasos 1-4.
asegura que haya espacio suciente debajo del lavamanos
para instalar el grifo
NOTA:
Coloca el lavamanos dentro del vano existente y
mármol sean cortados por un profesional
NOTA:
Se recomienda que los mostradores de piedra o
40
cm
-44.8
cm
44.8
cm
-50.8
cm
Dimensiones de
la parte inferior
del lavamanos
Vano para lavamanos
HOMEDEPOT.COM
Para obtener asistencia, por favor llama al 1-855-434-5224.
Pre-Installation
NOTA:
Se recomienda vericar la ubicación deseada para que exista espacio entre
el salpicadero, el grifo, la plomería, y el tocador.
Preinstalación
PLANIFICAR LA INSTALACIÓN
Antes de comenzar la instalación de este producto, asegúrate de que todas las piezas estén presentes. Compara las piezas con las secciones
“Contenido del paquete” y “Accesorios incluidos” de este manual. Si alguna pieza falta o está dañada, no intentes ensamblar, instalar u operar
el producto. Comunícate con el servicio al cliente para obtener piezas de repuesto.
Si tu mostrador de mármol o piedra no tiene un corte para acomodar el lavamanos, se recomienda que lo haga un profesional. Instala el
lavamanos de forma tal que pueda ser retirado en el futuro. No uses adhesivos o sellador adhesivo. Esto evitará daños a la cubierta.

4
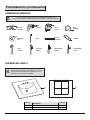
CONTENIDO DEL PAQUETE
1Lavamanos A
Preinstalación (continuación)
1Plantilla B
A
B
Lápiz
Sierra
caladora
Cellophane
tape
NOTA:
La plantilla (B) debe usarse como guía para realizar
la abertura para el lavamanos en el mostrador, en caso de que
no exista. Para evitar posibles daños al gabinete, recorta el
mostrador antes de instalarlo en el gabinete.
NOTA:
Tal vez necesites diferentes herramientas especializadas para instalar este
lavamanos en mostradores de materiales que no sean de madera o compuestos de madera.
HERRAMIENTAS NECESARIAS
Gafas de
seguridad
Llave
ajustable
Sellador
Nivel de
carpintero
Destornillador
Phillips
Destornillador
plano
Llave para
tuberías
Taladro
Cinta
de medir
Pieza
Descripción
Cantidad

5
Installation
Instalación
1
Cómo cortar el vano
Fija la plantilla (B) al mostrador en la ubicación deseada
con cinta de celofán.
Marca con un lápiz el contorno en el mostrador, según la
plantilla (B).
Taladra un oricio de unos {7][8}0.6 cm a 1.3 cm dentro
de la línea del perímetro de la plantilla (B).
Recorta el vano siguiendo la línea de perímetro de la
plantilla (B).
2
Como colocar el lavamanos
Revisa la alineación del vano colocando con cuidado el
lavamanos (A) en la posición de montaje deseada.
NOTA: Se recomienda practicar la colocación adecuada
dos o tres veces antes de aplicar pasta selladora.
A
B
3
Cómo instalar el lavamanos
Voltea el lavamanos (A) y aplica pasta selladora en la parte
inferior de su brida (A) cerca del borde, como se muestra.
Baja con cuidado el lavamanos (A) en su lugar, alinea y
presiona rmemente.
Limpia el exceso de pasta selladora.
4
A
Cómo instalar el desagüe y la
plomería
Instala el desagüe (no incluido) según las instrucciones
del fabricante.
Instala el sistema de desagüe, grifo y suministro de agua
(no incluido) según las instrucciones del fabricante.
PRECAUCIÓN: No aprietes demasiado el conjunto
del desagüe. Esto puede provocar que se agriete la
taza durante la instalación o en el futuro.
A
HOMEDEPOT.COM
Para obtener asistencia, por favor llama al 1-855-434-5224.

6
Mantenimiento y Limpieza
Para obtener mejores resultados en el cuidado de tu lavamanos, recomendamos lo siguiente:
Limpia la supercie exterior con agua tibia, jabón y un paño suave.
Para manchas difíciles, usa un detergente en polvo y una esponja húmeda o una esponjilla de nylon.
Nunca uses polvos, limpiadores o esponjillas abrasivos para pulir porque rayarán, dañarán y opacarán la supercie.

Conserva este manual para usarlo en el futuro.
¿Preguntas, problemas o piezas faltantes? Antes de regresar a la tienda,
llama al servicio al cliente de Glacier Bay de
lunes a viernes entre 8 a.m. y 6 p.m. hora estándar del Este
1-855-434-5224
HOMEDEPOT.COM
-
 1
1
-
 2
2
-
 3
3
-
 4
4
-
 5
5
-
 6
6
-
 7
7
-
 8
8
-
 9
9
-
 10
10
-
 11
11
-
 12
12
-
 13
13
-
 14
14


Glacier Bay 13-0078-4W Manual de usuario
- Tipo
- Manual de usuario
- Este manual también es adecuado para
en otros idiomas
- English: Glacier Bay 13-0078-4W User manual
Artículos relacionados
-
Glacier Bay 13-0093-W-GB Guía del usuario
-
Glacier Bay 924 111 Instrucciones de operación
-
-
-
Glacier Bay 14-027-W Manual de usuario
-
-
-
Glacier Bay HD67771W-6076 Guía de instalación
-
-