JK26A / JK10A / JK12A / JK15A
JK12WA / JK15WA / JK18WA1 / JK18WA2
JK10MA / JK12MA / JK318A
Pol.Ind.Norte-Perpinyà,25
08226 TERRASSA (Barcelona-SPAIN)
All rights reserved www.master-audio.com
Jan 14
User’s manual / Manual usuario

Master Audio
Joker Series (Active). Version 1.4 Jan14 2
ENGLISH
Safety Instructions
1. All safety instructions must be read before using this device.
2. The exclamation mark in the triangle indicates internal components which if
replaced can affect safety.
3. The lightning symbol within the triangle indicates the presence of dangerous
uninsulated voltages.
4. This device must not be exposed to rain or humidity.
5. Only clean the device with a dry cloth.
6. Do not install the device near heat sources such as radiators, heaters or other
heat-emitting elements.
7. The equipment must be repaired by qualified technical service personnel when:
A. The mains supply cable is damaged, or
B. Any object or liquid has damaged the device; or
C. The equipment does not function normally or correctly; or
D. The equipment has been exposed to the rain; or
E. The chassis is damaged
8. Disconnect the device in the case of electric storms or during long periods of
disuse.
9. Never hang the equipment by its handle.
10. Only use manufacturer recommended accessories.
CAUTION
RISK OF ELECTRIC SHOCK
DON’T OPEN
To reduce the risk of fire or electric shock do
not expose this equipment to rain or moisture
WARNING:

Master Audio
Joker Series (Active). Version 1.4 Jan14 3
1. INTRODUCTION
1.1. General
Master Audio would like to thank you for your confidence in our Joker Series. We
suggest you to carefully read the following instructions in order to obtain the best
results in performance.
1.2. Features and presentation
JK26A
- Self-powered acoustic system
- XLR electronically balanced input & XLR parallel output
- AC PowerCon input
- 200 W class D amplifier for low-mid range
- 30 W class AB amplifier for high range
- 24-bit AD/DA converters, 48kHz sampling rate
- Self amplifier diagnostics: output power, clipping
- DSP Controls (delay, volume, polarity, presets and limiters)
- 2x6" neodymium woofers with Kevlar cone and 1.5” voice coil
- 1" neodymium Tweeter with Titanium diaphragm
JK10A
- Self-powered acoustic system
- XLR electronically balanced input & XLR parallel output
- AC PowerCon input
- 600 W class D amplifier for low-mid range
- 100 W class D amplifier for high range
- 24-bit AD/DA converters, 48kHz sampling rate
- Self amplifier diagnostics: output power, temperature, clipping
- DSP Controls (delay, volume, polarity, presets and limiters)
- 10" neodymium woofer with 2.5” voice coil
- 1.4" PETP diaphragm driver
- 50º to 100º (H) x 55º (V) asymmetrical dispersion horn
JK12A
- Self-powered acoustic system
- XLR electronically balanced input & XLR parallel output
- AC PowerCon input
- 600 W class D amplifier for low-mid range
- 100 W class D amplifier for high range
- 24-bit AD/DA converters, 48kHz sampling rate
- Self amplifier diagnostics: output power, temperature, clipping
- DSP Controls (delay, volume, polarity, presets and limiters)
- 12" woofer with 3” voice coil
- 1.75" PETP diaphragm neodymium driver
- 50º to 100º (H) x 55º (V) asymmetrical dispersion horn

Master Audio
Joker Series (Active). Version 1.4 Jan14 4
JK15A
- Self-powered acoustic system
- XLR electronically balanced input & XLR parallel output
- AC PowerCon input
- 600 W class D amplifier for low-mid range
- 100 W class D amplifier for high range
- 24-bit AD/DA converters, 48kHz sampling rate
- Self amplifier diagnostics: output power, temperature, clipping
- DSP Controls (delay, volume, polarity, presets and limiters)
- 15" woofer with 3” voice coil
- 1.75" PETP diaphragm neodymium driver
- 50º to 100º (H) x 55º (V) asymmetrical dispersion horn
JK12WA
- Self-powered acoustic system
- XLR electronically balanced input & XLR parallel output
- AC PowerCon input
- 500 W class D amplifier
- 24-bit AD/DA converters, 48kHz sampling rate
- Self amplifier diagnostics: output power, temperature, clipping
- DSP Controls (delay, volume, polarity, presets and limiters)
- 12" woofer with 3” voice coil
JK15WA
- Self-powered acoustic system
- XLR electronically balanced input & XLR parallel output
- AC PowerCon input
- 1000 W class D amplifier
- 24-bit AD/DA converters, 48kHz sampling rate
- Self amplifier diagnostics: output power, temperature, clipping
- DSP Controls (delay, volume, polarity, presets and limiters)
- 15" woofer with 4” voice coil
JK18WA1
- Self-powered acoustic system
- XLR electronically balanced input & XLR parallel output
- AC PowerCon input
- 1000 W class D amplifier
- 24-bit AD/DA converters, 48kHz sampling rate
- Self amplifier diagnostics: output power, temperature, clipping
- DSP Controls (delay, volume, polarity, presets and limiters)
- 18" woofer with 4” voice coil
JK18WA2
- Self-powered acoustic system
- XLR electronically balanced input & XLR parallel output
- AC PowerCon input

Master Audio
Joker Series (Active). Version 1.4 Jan14 5
- 2000 W class D amplifier
- 24-bit AD/DA converters, 48kHz sampling rate
- Self amplifier diagnostics: output power, temperature, clipping
- DSP Controls (delay, volume, polarity, presets and limiters)
- 18" woofer with 4” voice coil
JK10MA
- Self-powered acoustic system
- XLR electronically balanced input & XLR parallel output
- AC PowerCon input
- 600 W class D amplifier for low-mid range
- 100 W class D amplifier for high range
- 24-bit AD/DA converters, 48kHz sampling rate
- Self amplifier diagnostics: output power, temperature, clipping
- DSP Controls (delay, volume, polarity, presets and limiters)
- 10" coaxial woofer with 2.5” voice coil
- 1.75" polyester diaphragm driver
- 70º x 70º dispersion horn
JK12MA
- Self-powered acoustic system
- XLR electronically balanced input & XLR parallel output
- AC PowerCon input
- 600 W class D amplifier for low-mid range
- 100 W class D amplifier for high range
- 24-bit AD/DA converters, 48kHz sampling rate
- Self amplifier diagnostics: output power, temperature, clipping
- DSP Controls (delay, volume, polarity, presets and limiters)
- 12" coaxial woofer with 3” voice coil
- 3" Titanium diaphragm driver
- 60º x 40º dispersion horn
JK318A
- Self-powered acoustic system
- XLR electronically balanced input & XLR parallel output
- AC PowerCon input
- 2400 W class D amplifier for low range
- 600 W class D amplifier for mid-high range
- 24-bit AD/DA converters, 48kHz sampling rate
- Self amplifier diagnostics: output power, temperature, clipping
- DSP Controls (delay, volume, polarity, presets and limiters)
- 18" neodymium woofer with 4” voice coil
- 12" neodymium woofer with 3” voice coil
- 1.75" PETP diaphragm neodymium driver
- 50º to 100º (H) x 55º (V) asymmetrical dispersion horn

Master Audio
Joker Series (Active). Version 1.4 Jan14 6
1.3. Presets on Full range cabinets
The Joker full range cabinets include several manufacturer presets for different types
of applications.
FLAT
Flat response
• Standard preset
NEARFIELD
-3dB mid
frequencies
(800Hz-3kHz)
• Small venues
• Medium level
• Short-medium
distance
NEARFIELD+
-3dB mid
frequencies
(200Hz-3kHz)
• Small venues
• Medium level
• Short distance
LONGTHROW
+3dB high
frequencies
• Large venues
• High level
• Medium-long
distance
SPEECH
-6dB Low
-6dB High
• Microphone use
• No matter level
or distance

Master Audio
Joker Series (Active). Version 1.4 Jan14 7
XO_POLE
HPF 100Hz +
fixed delay
• Use with Joker
subwoofers
• On pole
mounting
D1
D1 ≠ D2
Fixed delay included in
XO_POLE preset
D2
XO_ALL
HPF 100Hz +
no delay
• Use with Joker
subwoofers
• On any
configuration
• Delay must be
calculated by the
user
D1 D1
D1≠ D2 D1≠ D2
Delay 1 must be calculated Delay 2 must be calculated
with XO_ALL preset with XO_ALL preset
D2 D2

Master Audio
Joker Series (Active). Version 1.4 Jan14 8
1.4. Presets on subwoofer cabinets
The Joker subwoofer cabinets include several manufacturer presets for different
types of applications.
XO_POLE
LPF 100Hz +
+3dB Boost
• Use with Joker
full-range cabinets
• On pole
mounting
LPF90
LPF 90Hz
LPF90+3
LPF 90Hz
+3dB Boost
LPF100
LPF 100Hz
LPF100+3
LPF 100Hz
+3dB Boost

Master Audio
Joker Series (Active). Version 1.4 Jan14 9
LPF110
LPF 110Hz
LPF110+3
LPF 110Hz
+3dB Boost
LPF120
LPF 120Hz
LPF120+3
LPF 120Hz
+3dB Boost
1.5. Presets on JK10MA cabinet
The JK10MA includes several manufacturer presets for different types of applications.

Master Audio
Joker Series (Active). Version 1.4 Jan14 10
FLAT
Flat response
• Stand alone use
on tripod
NEARFIELD
-3dB mid
Frequencies
• Small venues
• Medium level
• Short-medium
distance
NEARFIELD+
-3dB mid
frequencies
(200Hz-3kHz)
• Small venues
• Medium level
• Short distance
SPEECH
-6dB Low
-6dB High
• Microphone use
• No matter level
or distance
MONITOR
Flat response
• On-floor stage
monitor use

Master Audio
Joker Series (Active). Version 1.4 Jan14 11
XO_POLE
HPF 100Hz +
fixed delay
• Use with Joker
subwoofers
• On pole
mounting
D1
D1 ≠ D2
Fixed delay included in
XO_POLE preset
D2
XO_ALL
HPF 100Hz +
no delay
• Use with Joker
subwoofers
• On any
configuration
• Delay must be
calculated by the
user
D1 D1
D1≠ D2 D1≠ D2
Delay 1 must be calculated Delay 2 must be calculated
with XO_ALL preset with XO_ALL preset
D2 D2

Master Audio
Joker Series (Active). Version 1.4 Jan14 12
1.6. Presets on JK12MA stage monitor
The JK12MA stage monitor includes several manufacturer presets for different types
of applications.
MONITOR
Flat response
• On-floor stage
monitor use
FULL RANGE
Flat response
• Stand alone use
on tripod
NEARFIELD
-3dB mid
Frequencies
• Small venues
• Medium level
• Short-medium
distance
SPEECH
-6dB Low
-6dB High
• Microphone use
• No matter level
or distance
XOVER
HPF 100Hz
• Use with Joker
subwoofers

Master Audio
Joker Series (Active). Version 1.4 Jan14 13
1.7. Presets on JK318A
The JK318A includes several manufacturer presets for different types of applications.
FLAT
Flat response
• Standard preset
NEARFIELD
-3dB mid frequencies
(200Hz-3kHz)
• Small venues
• Medium level
• Short-medium
distance
HF-3dB
-3dB high
frequencies
LFBOOST
+3dB low boost
at 45Hz
SPEECH
-6dB Low
-6dB High
• Microphone use
• No matter level
or distance

Master Audio
Joker Series (Active). Version 1.4 Jan14 14
2. CONNECTIONS
2.1. Overview
The power and audio connections are located on the unique Joker back panel, shown
in Fig. 1. The different parts of the panel are explained in detail in the following
sections of the manual.
Control Panel
A) LCD: Displays basic information about the DSP Status. The main screen shows the
following information.
For FULL-RANGE Systems
• Current preset
• Input Level
• Output Level LF Channel
• Output Level HF Channel
• Amplifier temperature
• ECO mode enabled/disabled
• Keypad locked/unlocked
For SUBWOOFER Systems
• Current Preset
• Input Level
• Output Level
• Amplifier temperature
• ECO mode enabled/disabled
• Polarity Positive (+) / Negative (-)
• Keypad locked/unlocked
B) KEYPAD: Allows the user to perform basic operations on the DSP such as Preset
selection, delay adjust and also user preferences. To enter the menu the keypad must
be unlocked by pressing simultaneously the MENU and SELECT keys.
C) GAIN CONTROL: Use the Up and Down arrows to adjust the gain of the system.
The gain can be adjusted between 0 and -20dB. Once -20dB is reached and the Down
key is further pressed, the system will be muted. To unmute it, press the Up key again.
D) PROTECTION LED: This led lights up when the amplifier is in a protection situation
(such as temperature excess, overcurrent, or other situations that can compromise the
amplifier’s integrity).
It will also light up when the amplifier is in standby mode. This happens for a couple fo
seconds at startup.
The Protection led will light off when the amplifier recovers from the abnormal
situation. Shall the Protection led keep up lighted on even after a system restart,
please contact an authorized service.

Master Audio
Joker Series (Active). Version 1.4 Jan14 15
E) LIMITER LEDS: The limiter leds light up to indicate that the amplifier is delivering
the maximum power set by the limiter circuit. The limiter prevents the loudspeaker
from receiving excessive or distorted signal. Continuous lightning of these leds
indicate that the signal is being massively compressed. In this case, the input level
should be reduced in order to get a proper dynamic headroom.
Model Specifications:
F) MODEL DATA: The basic data of the model is found here:
- Model reference
- Amplifier rated power (Watts)
- Maximum Sound Pressure Level delivered by the system (dB SPL)
G) QR CODE: For further information about the specifications of the system, a QR
Code is available on this panel.
To scan the QR code you need a mobile device with camera, a QR Code reader
application(*) and an internet connection. When the QR is scanned, the web surfer of
your mobile device will be redirected to the product page of Master Audio’s web site,
when you can find all the information related to the product.
(*)QR Code reader applications are available for free for the most common
smartphone platforms: iPhone/iPad (App Store), Android Marketplace, Blackberry
AppWorld and Bada App Market.
Connection Plate
H) AC MAINS INPUT: Mains supply connection via PowerCon. Blue connector for AC
in.
Always use mains power cable supplied by manufacturer.
Never connect the Joker cabinets to an unearthed mains supply or by using
an unearthed mains cable.
I) BALANCED INPUT/LINK:
XLR-3 Female balanced signal connector for signal input.
XLR-3 Male connector for parallel connection of various cabinets with the same input
signal.
IMPORTANT: Please always use balanced microphone cable with the following pin
assignment:
1= Shield (Ground) 2= Live (+) 3= Return (-)

Master Audio
Joker Series (Active). Version 1.4 Jan14 16
Fig.1. Joker control and connection panel
A
B
C D
E
F
G
H
CO
NTR
O
L PANEL
M
O
DEL
S
PE
C
IFI
C
ATI
O
N
S
CO
NNE
C
TI
O
N PANEL
I

Master Audio
Joker Series (Active). Version 1.4 Jan14 17
2.2. Configurations
2.2.1. Parallel connection
Connect the signal (mixing desk output) to INPUT on the first unit. Use the LINK
output to transfer the INPUT signal to the second unit and thus sequentially for further
units. All of the units in this chain must be switched on.
For the mains connection use the cable with the blue Neutrik PowerCon NAC3FCA.
Do not connect Joker series units using PowerCon without earth.
Fig.2. Parallel connection for Joker cabinets
2.2.2 Parallel connection with subwoofer
You can connect the Joker subwoofers in parallel with Joker full range cabinets.
Please, follow the same parameters as explained in figure 2.
3. MOUNTING AND PLACEMENT
For a proper installation of the acoustic cabinet systems, it is strongly recommended
to carefully read the following advices.
3.1. Placement
The Full Range cabinets should be located in a high
position (between two or three meters), slightly inclined to
the audience. If the loudspeakers are located too low, the
listeners at the end of the room will not hear a good sound
quality.
Fig.3. Flying placement

Master Audio
Joker Series (Active). Version 1.4 Jan14 18
It is advisable to locate the subwoofer units on the floor as they can take advantage
of the so-called “floor-effect”, thus increasing the response in the low frequencies.
If possible, place the subwoofers under the same acoustic axis used for the satellites.
If the above option can not be carried out, then they should be placed in an
intermediate point between the left and right channels.
3.2. Tripod use
The JK26A, JK10A, JK12A, JK15A, JK10MA and
JK12MA models are equipped with a tripod socket
for use with a standard 35mm tripod.
Do not use the tripod on non-flat floors and be
careful not to raise the cabinet too high on the tripod,
as it may become unstable.
Fig.4. Full range cabinet with tripod
3.3. Full range cabinet with subwoofer
The JK12WA, JK15WA, JK18WA1 and JK18WA2 are
equipped with a M20 Plate for a 35mm distance rod.
You can use it to place over the subwoofer the
models that are equipped with the tripod socket
(JK26A, JK10A, JK12A, JK15A, JK10MA and
JK12MA). Be careful not to use this system on non-
flat surfaces as it may become unstable.
Fig.5. Full range cabinet with subwoofer
3.4. Live applications (mobile)
For a mobile application, whether
it is an outdoor or indoor
installation, the common location
is to place the bass units (one or
two per channel) on each side of
the stage.
Fig.6. Mobile applications

Master Audio
Joker Series (Active). Version 1.4 Jan14 19
To obtain a clear and free-distortion reproduction, it is advisable to place the mid-high
units on top of the low units keeping between them an approximate height of two
meters. If such height cannot be achieved nor maintained, it is advisable to use the
classical tripod for each mid-high cabinet and leave the low units on the floor.
WARNING!!! For installations that suffer from acoustic problems and in which it is
necessary to reinforce the response in the low frequencies, it is advisable to group all
the subwoofers together in the same point. By this way, cancellations will be avoided
and a higher acoustic pressure level will be obtained.
3.5. Asymmetrical and rotatable horns
The JK10A, JK12A, JK15A and JK318A models incorporate an asymmetrical
dispersion horn which will optimise coverage either in horizontal or vertical position.
To rotate the horn, unscrewed the
frontal grille, and then, unscrewed
the four fixing screws of the horn.
Rotate it 90 degrees taking care of
the wires. Screw the horn again
and finally place the frontal grille in
its right position.
Fig.7. Rotatable horn
Good coverage of audiences often is a conflicting combination of:
*wide coverage for the closest audience (short throw)
*narrow coverage for distant areas (long throw)
The asymmetrical dispersion horn coverage varies from "short throw" to "long throw"
along the vertical axis (keeping a constant vertical directivity). In conclusion,
directivity feature of (50º to 100º(H), 55º(V)) can be seen as if the horn itself had "two"
horizontal directivities (audience coverage), which depend on the distance. For short
distances the horn should be used with its "wide" dispersion (100º). For long
distances the horn should be used with its "narrow" dispersion (50º). We suggest you
to pay attention to the following examples.
3.5.1. Vertical-Positioned Cabinets (Flown and aiming to the audience)
We need wide
coverage
(100º) for the
closest
listeners and
narrow
coverage for
the distant
audience.
Fig.8. Vertical position

Master Audio
Joker Series (Active). Version 1.4 Jan14 20
3.5.2. Horizontal-Positioned Cabinets (Flown and aiming to the audience)
We need wide coverage (100º) for the closest listeners and narrow coverage for the
distant audience.
Fig.9. Horizontal position
WARNING: The horns have the
"Nearfield" mark printed on the 100º
horizontal coverage side.
Fig.10. “Near Field” logo
3.6. Stage monitor use
The JK10MA is a trapezoidal-shape
type cabinet so it can be used as floor
monitor without extra accessories.
Fig.11. Stage monitor use
3.7. Rotatable logo
JK26A, JK10A, JK12A, JK15A, JK318A, JK10MA model logos can be rotated.
3.8. Flying
Only experienced people should fly speaker cabinets. Extreme care should be taken
to assure the load bearing capabilities of the structures where the cabinets will be
placed. Hanging hardware (as chains, eyebolts, lock pins...) should be regularly
inspected and replaced if in doubt.
WARNING!!! DO NOT SUSPEND THE CABINETS FROM THE HANDLES!!!!

Master Audio
Joker Series (Active). Version 1.4 Jan14 21
3.8.1. JK26A, JK10A, JK12A, JK15A, JK10MA and JK12MA horizontal flying
with “U” bracket
The JK26A may be wall mounted by the SP26 “U” bracket accessory.
The JK10A and JK10MA may be wall mounted by the SP10 “U” bracket accessory.
The JK12A and JK12MA may be wall mounted by the SP12 “U” bracket accessory
The JK15A may be wall mounted by the SP15 “U” bracket accessory
Fig.12. SPXX bracket
Mounting:
1- Hold the bracket against the mounting surface, so you can mark the locations of
the mounting holes
2- Drill corresponding pilot holes on the wall and attach the bracket with screws
3- Remove the top hat socket from the cabinet and put the M8 round plate (in
JK26A/JK10A/JK12A/JK15A/JK10MA)
4- Set the cabinet on the bracket and fix it through the two M8 bracket knobs
5- Adjust the cabinet for desired position and angle
3.8.2. JK26A, JK10A, JK12A, JK10MA and JK15A flying with SP35 wall stand
These models may be wall mounted by the SP35 wall stand accessory.
Fig.13. SP35 wall stand
Mounting:
1- Hold the wall stand against the mounting surface, so you can mark the locations of
the mounting holes

Master Audio
Joker Series (Active). Version 1.4 Jan14 22
2- Drill corresponding pilot holes on the wall and attach the bracket with screws
3- Set the cabinet on the 35mm pole
4- Adjust the cabinet for desired angle
3.8.3. JK26A, JK10A, JK12A, JK15A, JK10MA, JK12MA and JK318A flying with
ACR-M8 eyebolts (optional accessory)
These models provide several M8
flying points. Their correct use will
permit the flying in horizontal or
vertical position.
Fig.14. JK26A rigging points
Fig.15. JK10A rigging points

Master Audio
Joker Series (Active). Version 1.4 Jan14 23
Fig.16. JK12A rigging points
Fig.17. JK15A rigging points

Master Audio
Joker Series (Active). Version 1.4 Jan14 24
Fig.18. JK10MA rigging points
JK26A JK10A JK10MA JK12A JK15A
Horizontal flying 2&5 or 3&6 or 9&10 or 11&12 (front rigging points)
1&4 or 7&8 (back tilt points)
Vertical Flying 2&3 or 5&6 or 9&11 or 10&12 (front rigging points)
1 or 4 or 7 or 8 (back tilt points)
Fig.19. JK12MA rigging points

Master Audio
Joker Series (Active). Version 1.4 Jan14 25
JK318A
Horizontal flying 1&2 or 3&4 or 5&7 or 6&8 (front rigging points)
9&10 or 11&12 (back tilt points)
Vertical Flying 1&3 or 7&8 (front rigging points)
9&11 or 13&14 (back tilt points)
Fig.20. JK318A rigging points
JK12MA
Vertical Flying 1 (front rigging points)
2 (back tilt points)

Master Audio
Joker Series (Active). Version 1.4 Jan14 26
3.8.4. JK26A, JK10A, JK10MA, JK12A and JK15A vertical flying with “HR” bar
Use HR26 flying bar for JK26A
Use HR10 flying bar for JK10A
Use HR1215 flying bar for JK10MA
Use HR1215 flying bar for JK12A
Use HR1215 flying bar for JK15A
Fig.21. “HR” flying bar for Joker cabinets
3.8.5. JK12WA, JK15WA, JK18WA1, JK18WA2 flying
These models are not prepared for flying.
3.9. Joker grille
To remove the front grille,
first remove the screws
on the left side.
Fig.22. Grille screws
On JK12MA, first remove the
screws on the top side.
Fig.23. Grille screws on JK12MA

Master Audio
Joker Series (Active). Version 1.4 Jan14 27
4. SYSTEM SETUP
Thanks to their internal microcontroller and DSP System, the Joker Active cabinets
can be configured for different applications. This section explains all the possible
configurations.
The LCD and keypad on the cabinet’s back panel are used for the setup.
IMPORTANT: To enter the Menu, the keypad must be unlocked by
simultaneously pressing the keys MENU and SELECT
4.1 Startup and Main Screen
At startup the LCD screen will show the Master Audio and Joker logo. After a few
seconds, the main screen shown in Fig. 24 will be displayed:
Fig. 24: Main screen display
A: Current preset
B: Input and Output levels
C: Gain level
D: Temperature of the power stage
E: Special features
- Eco: when Ecomode is enabled
- Lock: shows when the keypad is locked
- Polarity: positive (Pol+) or negative (Pol-) (only in Subwoofers)
4.2 Selecting a Preset
To change the Preset, follow these steps:
1) If the keypad is locked, unlock it with
MENU + SELECT
2) Press PRESET once. You will enter the
Preset menu, and the current preset will be
shown
3) Press PRESET to browse through the available presets of the system. When you
find the desired one, press SELECT to set it as the current preset. You will be
redirected to the main screen
FLAT
30
0.0dB
Lock
Eco
A
B
C
D
E
FLAT

Master Audio
Joker Series (Active). Version 1.4 Jan14 28
Delay
20.0m
58.8ms
4.3 Gain setting
In order to change the gain, first unlock the
keypad with MUTE + SELECT and then
press UP or DOWN. Then you will enter the
gain setting screen.
The Gain can be adjusted between 0dB and -
20dB. When -20dB level is reached, and the
DOWN key is further pressed, the system will mute and this will be shown in the
screen. To unmute the system, press the UP key at least once.
To accept the gain setting and go back to the main screen, press SELECT. Should
this not happen after 30 seconds, the system will automatically switch to the main
screen.
4.4 Browsing the menus
To browse the menus, the MENU and SELECT keys are used. Always remember to
unlock the keypad to perform an action.
MENU browses the different options on each level. To accept an option, press
SELECT. To enter the main menu, press MENU once. The following options are
available:
Audio Settings Info
Configuration Back
Press SELECT to enter to the submenus.
AUDIO SETTINGS MENU
Using the MENU key, the following options can be browsed. Press SELECT to enter
each of them.
Gain: Access to the Gain slider described in Section 4.3.
Delay: A 40-meter delay line is available. Use
the UP and DOWN arrows to set the desired
delay between 0 and 40m. Press SELECT to
finish.
Mute: Here the system can be muted. Two-
way systems offer also the chance of muting
only one of the ways, useful for check and
service.
Once you are finished, go to “Back” and press
SELECT. Whenever one or more transducers
are muted, the word MUTE will be shown in
the main screen.
Gain
-9.5dB
Mute
OFF .
ALL
LF
HF
Back

Master Audio
Joker Series (Active). Version 1.4 Jan14 29
Limiter
-3.0 dB
Limiter: Adjust the limiter Threshold, using UP
and DOWN arrows. Default setting is 0dB
(maximum power)
Once you are finished, press SELECT.
Polarity (only for Subwoofers): select between
positive and negative polarity (180º
inversion). It provides a very useful feature to
quickly align the subwoofers in one
application.
CONFIGURATION MENU
Entering the configuration menu, the
following options can be set:
ECO Mode: Under this option, the ECO mode
can be disabled or enabled with different sleep
times.
Under the ECO mode, the system will
continuously analyze the input signal. If no
input signal is present after the number of
minutes selected in this option, the system will
go in a low power consumption mode
(standby). This condition will be indicated by a message in the LCD.
When the audio signal is present again, the system will wake up and continue playing
until the input signal is gone the next time.
If the Eco mode is selected, the word Eco will display in the main screen.
IMPORTANT: The system needs about 2
seconds to wake up from the low power
consumption mode. It is not recommended to
use it for time-critical applications.
Front LED: Joker active cabinets are equipped
with a front led, that lights up when the cabinet
is powered on.
The behaviour of the front LED can be changed here:
Off: The front led remains always off
On: The front led remains always on
On when Limiting: The front led is normally off and lights up when either of the
limiters are active.
Off when Limiting: The front led is normally on and turns off when either of the limiters
is active (the default setting):
IMPORTANT: In the default setting, the Font Led will be lit Off when either of the
limiters is active.
Polarity
Positive .
Negative
Back
ECO Mode
Disabled .
Enable in 1m
Enable in 10m
Enable in 30m
Back
Front LED
Off
On
On when Limiting
Off when Limiting .
Back

Master Audio
Joker Series (Active). Version 1.4 Jan14 30
Backlight: Select how the backlight of the LCD
in the back panel will behave. The backlight will
always light up after a key press except when
the option “Always Off” is selected here.
Keypad lock: Choose whether the keypad is
locked or not after no activity (the timeout can
be configured here). Remind that the keypad is
unlocked by pressing MUTE+SELECT keys at
the same time
Language: Select here the user interface
language. Press SELECT to change to the
highlighted option
INFO MENU
This option provides a quick overview of all the current settings of the system. Press
SELECT to get the information displayed. There are three information screens, which
can be switched by pressing SELECT.
In the last screen (Settings), it is also possible to reset the system to the factory
values. To do this, press MENU and then highlight the option Restore with MENU.
Press SELECT to confirm
LCD Backlight
Always On .
Always Off
Off in 30s
Off in 1m
Off in 5m
Off in 10m
Back
Language
English .
Espanol
Back
Keypad Lock
Unlocked
Lock in 30s .
Lock in 1m
Lock in 5m
Lock in 10m
Back
Audio Settings .
Preset: FLAT
Gain: 0.0dB
Delay: 0.0m
Limiter: -3.0dB
Mute: OFF
User Settings .
Front LED: Off when L
LCD: Off in 30s
ECO: Disabled
Keypad: Lock in 30s
Language: English
System Settings .
Model: JK10A
Version: 2.3
Firmware: 3.0
Press MENU to Restore
Factor
y
Settin
g
s
Factory Settings
Back
Restore .

Master Audio
Joker Series (Active). Version 1.4 Jan14 31
The factory default for a Joker system is the following:
Audio Settings
• Preset: FLAT
• Gain: 0.0dB
• Delay: 0m
• Mute: Off
• Polarity: Positive (Pol+) (only in subwoofers)
User settings:
• Front LED: Off when Limiting
• Backlight: Off after 30 seconds of no activity
• ECO Mode: Off
• Keypad Lock: 30s MENU+SELECT
• Language: English
4.6 Special Features
Automatic Temperature Limiter
Under normal operation, Joker amplifiers are able to perform during many hours at
full power. However, should the temperature in the amplifier rise abnormally, the
system will automatically adjust the limiter threshold to try to compensate for the
temperature raise. The system will progressively lower the output gain.
When the temperature lowers again, the system will recover its normal operation.
Should the temperature continue rising and reach 90ºC at the amplifier’s heatsink, the
system will shut down in Protection mode.
Input Overload Protection
Joker systems are equipped with a high range input (+20dBu – 8V), but still there are
sound sources and mixers capable of delivering a higher output voltage.
It must be notice that driving a system continuously over its nominal input level
may drastically decrease the sound quality, normally because of the lack of
headroom (dynamic response). In the long term, it might also produce unnecessary
aging of the transducers.
Also the maximum power of the system is obtained at its nominal input level,
and working above it does not translate into better results.
Joker Systems are equipped with an input monitoring system that will prevent the
cabinet from being continuously operated at excessive input signal levels. After a long
period of exposure to high input levels, the cabinet will enter in Input Overload
Protection mode, meaning that:
- Output signal will be reduced by 20dB
- All limiter leds will be lit
- The front power led will blink
- A message will be shown in the LCD (Input Overload)
To get back to the normal operation mode, the input level should be reduced to
+8dBu (2V), which is the nominal and recommended value.

Master Audio
Joker Series (Active). Version 1.4 Jan14 32
5. TECHNICAL FEATURES
JK26A JK10A JK12A JK15A
Audio Input
Sensitivity +2dBu +8dBu
Impedance 20kΩ
Mains Supply
Type Universal switching power supply 85-265VAC / 45- 65Hz
Heavy duty musical
program
0.3A 0.7A
Standby mode
consumption <5W
Analog converters 24 bit / 48kHz
DSP architecture 48 bit
Built-in delay line 118ms / 40m
Frequency response
Usable bandwidth (-10 dB)
65Hz-20kHz 50Hz-18kHz 48Hz-19kHz 45Hz-19kHz
Maximum output level
(1m/continuous)
118 dB 125 dB 126 dB 127 dB
Amplifier (program) 200 + 30W 600 + 100W
Nominal directivity (-6dB) 90º x 90º 50º to 100º x 55º
Components
LF 2 x 6”
neodymium
woofers
1 x 10”
neodymium
woofer
1 x 12”
woofer
1 x 15”
woofer
HF 1 x 1”
neodymium
tweeter,
titanium
diaphragm
1 x 1.4”
PETP
diaphragm
driver
1 x 1.75” PETP
diaphragm
driver
Cabinet
Type Bass-reflex
Height 532 mm 539 mm 609 mm 689 mm
Width 250 mm 365 mm 410 mm 460 mm
Depth 260 mm 340 mm 405 mm 450 mm
Weight (net) 9,5 Kg 14,6 Kg 22,7 Kg 27,2 Kg
Connectors 1 x AC PowerCon (input, link)
2 x XLR (input, link)
Material Birch plywood, Steel front grille with acoustic foam
Finish Hi-resistance weatherproof Polyurea paint

Master Audio
Joker Series (Active). Version 1.4 Jan14 33
JK12WA JK15WA JK18WA1 JK18WA2
Audio Input
Sensitivity +2dBu
Impedance 20kΩ
Mains Supply
Type Universal switching power supply 85-265VAC / 45- 65Hz
Heavy duty musical
program
0.8A 1A 1A 2A
Standby mode
consumption <5W
Analog converters 24 bit / 48kHz
DSP architecture 48 bit
Built-in delay line 118ms / 40m
Frequency response
Usable bandwidth
(-10 dB)
38Hz-90/100
/110/120Hz 36Hz-
90/100/120Hz
32Hz-
90/100/110Hz 30Hz-
90/100/110Hz
Maximum output
level
1m/continuous)
123 dB 127 dB 128 dB 132 dB
Amplifier (program) 500W 1000W 2000W
Nominal directivity
(-6dB) omnidirectional
Components
LF 1 x 12” woofer
(3” voice coil)
1 x 15” woofer
(4” voice coil)
1 x 18” woofer
(4” voice coil)
HF - - -
Cabinet
Type Band-pass
Height 387 mm 475 mm 552 mm
Width 520 mm 630 mm 740 mm
Depth 530 mm 630 mm 710 mm
Weight (net) 25,6 Kg 41,6 Kg 50,9 Kg 51,9 Kg
Connectors 1 x AC PowerCon (input, link)
2 x XLR (input, link)
Material Birch plywood, Steel front grille with acoustic foam
Finish Hi-resistance weatherproof Polyurea paint

Master Audio
Joker Series (Active). Version 1.4 Jan14 34
JK10MA JK12MA JK318A
Audio Input
Sensitivity +8dBu
Impedance 20kΩ
Mains Supply
Type Universal switching power supply 85-265VAC / 45- 65Hz
Heavy duty musical
program
0.7A
3.9A
Standby mode
consumption <5W
Analog converters 24 bit / 48kHz
DSP architecture 48 bit
Built-in delay line 118ms / 40m
Frequency response
Usable bandwidth
(-10 dB)
50Hz-
18kHz
48Hz-
20kHz
35Hz-19kHz
Maximum output
level (1m/continuous)
124 dB 126 dB 132 dB
Amplifier (program) 600+100W 2400+600W
Nominal directivity
(-6dB) 70º x 70º 60º x 40º 50º to 100º x 55º
Components
LF 1 x 10”
coaxial
woofer
(2.5” voice
coil)
1 x 12”
coaxial
woofer
(3” voice
coil)
1x18” neo. woofer (4” voice coil)
1x12” neo. woofer (3” voice coil)
HF 1 x 1.75”
polyester
driver
1 x 3”
titanium
diaphragm
driver
1 x 1.75” PETP
diaphragm
driver
Cabinet
Type Bass-reflex
Height 539 mm 374 mm 1240 mm
Width 365 mm 600 mm 534 mm
Depth 340 mm 565 mm 524 mm
Weight (net) 15,2 Kg 24,4 Kg 59 Kg
Connectors 1 x AC PowerCon (input, link)
2 x XLR (input, link)
Material Birch plywood, Steel front grille with acoustic foam
Finish Hi-resistance weatherproof Polyurea paint

Master Audio
Joker Series (Active). Version 1.4 Jan14 35
ESPAÑOL
Instrucciones de seguridad
1. Todas las instrucciones de seguridad deben ser leídas antes de utilizar este
aparato.
2. El signo de exclamación dentro de un triángulo indica componentes internos cuyo
reemplazo puede afectar la seguridad.
3. El símbolo del rayo con la punta de la flecha indica la presencia de voltajes
peligrosos no aislados.
4. Este equipo no debe ser expuesto a la lluvia ni a la humedad. No lo use, por
ejemplo, cerca de piscinas, fuentes o cualquier lugar donde pueda ser afectado por
líquidos.
5. Limpie el aparato sólo con paños secos.
6. No instale el aparato cerca de ninguna fuente de calor, como radiadores, estufas u
otros aparatos que emitan calor.
7. Este equipo debe ser reparado por personal cualificado del servicio técnico
cuando:
A. El cable de red esté dañado, ó
B. Algún objeto o liquido haya dañado el aparato; ó
C. El equipo no funcione de una manera normal (correcta); ó
D. El equipo se haya expuesto a la lluvia; ó
E. El chasis esté dañado
8. Desconecte el aparato en caso de tormentas eléctricas o cuando no vaya a
emplearlo durante largos períodos de tiempo.
9. No cuelgue nunca el equipo por el asa.
10. Use sólo accesorios recomendados por el fabricante.
CAUTION
RISK OF ELECTRIC SHOCK
DON’T OPEN
To reduce the risk of fire or electric shock do
not expose this equipment to rain or moisture
WARNING:

Master Audio
Joker Series (Active). Version 1.4 Jan14 36
1. INTRODUCCIÓN
1.1. Generalidades
Master Audio le agradece la confianza depositada en nuestros productos de la Serie
Joker. Le sugerimos lea atentamente las indicaciones que a continuación
exponemos, confiando en que le serán de gran utilidad para obtener sus mejores
resultados.
1.2. Características y presentación
JK26A
- Recinto autoamplificado
- Entrada y salida XLR balanceada
- Entrada AC por PowerCon
- Amplificador en Clase D de 200W para la vía grave-media
- Amplificador en Clase AB de 30W para la vía aguda
- Convertidores AD/DA de 24 bits, frecuencia de muestreo de 48kHz
- Controles DSP (delay, volumen, polaridad, presets y limitadores)
- Autodiagnóstico del sistema: potencia de salida, temperatura, limitadores
- Dos altavoces de 6" de neodimio con cono de Kevlar y bobina de 1,5”
- Tweeter exponencial de 1" de neodimio, con diafragma de Titanio
JK10A
- Recinto autoamplificado
- Entrada y salida XLR balanceada
- Entrada AC por PowerCon
- Amplificador en Clase D de 600W para la vía grave-media
- Amplificador en Clase D de 100W para la vía aguda
- Convertidores AD/DA de 24 bits, frecuencia de muestreo de 48kHz
- Controles DSP (delay, volumen, polaridad, presets y limitadores)
- Autodiagnóstico del sistema: potencia de salida, temperatura, limitadores
- Altavoz de 10" con bobina de 2,5”
- Motor de agudos con diafragma de PETP de 1,4”
- Difusor de dispersión asimétrica 50º a 100º (H) x 55º (V)
JK12A
- Recinto autoamplificado
- Entrada y salida XLR balanceada
- Entrada AC por PowerCon
- Amplificador en Clase D de 600W para la vía grave-media
- Amplificador en Clase D de 100W para la vía aguda
- Convertidores AD/DA de 24 bits, frecuencia de muestreo de 48kHz
- Controles DSP (delay, volumen, polaridad, presets y limitadores)
- Autodiagnóstico del sistema: potencia de salida, temperatura, limitadores
- Altavoz de 12" con bobina de 3”
- Motor de agudos de neodimio con diafragma de PETP de 1,75"
- Difusor de dispersión asimétrica 50º a 100º (H) x 55º (V)

Master Audio
Joker Series (Active). Version 1.4 Jan14 37
JK15A
- Recinto autoamplificado
- Entrada y salida XLR balanceada
- Entrada AC por PowerCon
- Amplificador en Clase D de 600W para la vía grave-media
- Amplificador en Clase D de 100W para la vía aguda
- Convertidores AD/DA de 24 bits, frecuencia de muestreo de 48kHz
- Controles DSP (delay, volumen, polaridad, presets y limitadores)
- Autodiagnóstico del sistema: potencia de salida, temperatura, limitadores
- Altavoz de 15" con bobina de 3”
- Motor de agudos de neodimio con diafragma de PETP de 1,75"
- Difusor de dispersión asimétrica 50º a 100º (H) x 55º (V)
- Filtro divisor pasivo diseñado con precisión para obtener los mejores resultados
JK12WA
- Recinto autoamplificado de bajas frecuencias
- Entrada y salida XLR balanceada
- Entrada AC por PowerCon
- Amplificador en Clase D de 500W
- Convertidores AD/DA de 24 bits, frecuencia de muestreo de 48kHz
- Controles DSP (delay, volumen, polaridad, presets y limitadores)
- Autodiagnóstico del sistema: potencia de salida, temperatura, limitador
- Altavoz de 12" con bobina de 3”
JK15WA
- Recinto autoamplificado de bajas frecuencias
- Entrada y salida XLR balanceada
- Entrada AC por PowerCon
- Amplificador en Clase D de 1000W
- Convertidores AD/DA de 24 bits, frecuencia de muestreo de 48kHz
- Controles DSP (delay, volumen, polaridad, presets y limitadores)
- Autodiagnóstico del sistema: potencia de salida, temperatura, limitador
- Altavoz de 15" con bobina de 4”
JK18WA1
- Recinto autoamplificado de bajas frecuencias
- Entrada y salida XLR balanceada
- Entrada AC por PowerCon
- Amplificador en Clase D de 1000W
- Convertidores AD/DA de 24 bits, frecuencia de muestreo de 48kHz
- Controles DSP (delay, volumen, polaridad, presets y limitadores)
- Autodiagnóstico del sistema: potencia de salida, temperatura, limitador
- Altavoz de 18" con bobina de 4”
JK18WA2
- Recinto autoamplificado de bajas frecuencias
- Entrada y salida XLR balanceada

Master Audio
Joker Series (Active). Version 1.4 Jan14 38
- Entrada AC por PowerCon
- Amplificador en Clase D de 2000W
- Convertidores AD/DA de 24 bits, frecuencia de muestreo de 48kHz
- Controles DSP (delay, volumen, polaridad, presets y limitadores)
- Autodiagnóstico del sistema: potencia de salida, temperatura, limitador
- Altavoz de 18" con bobina de 4”
JK10MA
- Recinto autoamplificado
- Entrada y salida XLR balanceada
- Entrada AC por PowerCon
- Amplificador en Clase D de 600W para la vía grave-media
- Amplificador en Clase D de 100W para la vía aguda
- Convertidores AD/DA de 24 bits, frecuencia de muestreo de 48kHz
- Controles DSP (delay, volumen, polaridad, presets y limitadores)
- Autodiagnóstico del sistema: potencia de salida, temperatura, limitadores
- Altavoz coaxial de 10" con bobina de 2.5”
- Motor de agudos con diafragma de poliéster de 1.75"
- Difusor de 70º x 70º
JK12MA
- Recinto autoamplificado
- Entrada y salida XLR balanceada
- Entrada AC por PowerCon
- Amplificador en Clase D de 600W para la vía grave-media
- Amplificador en Clase D de 100W para la vía aguda
- Convertidores AD/DA de 24 bits, frecuencia de muestreo de 48kHz
- Controles DSP (delay, volumen, polaridad, presets y limitadores)
- Autodiagnóstico del sistema: potencia de salida, temperatura, limitadores
- Altavoz coaxial de 12" con bobina de 3”
- Motor de agudos con diafragma de Titanio de 3"
- Difusor de 60º x 40º
JK318A
- Recinto autoamplificado
- Entrada y salida XLR balanceada
- Entrada AC por PowerCon
- Amplificador en Clase D de 2400W para la vía grave
- Amplificador en Clase D de 600W para la vía media-aguda
- Convertidores AD/DA de 24 bits, frecuencia de muestreo de 48kHz
- Controles DSP (delay, volumen, polaridad, presets y limitador)
- Autodiagnóstico del sistema: potencia de salida, temperatura, limitadores
- Altavoz de neodimio de 18" con bobina de 4”
- Altavoz de 12" de neodimio con bobina de 3”
- Motor de agudos de neodimio con diafragma de PETP de 1,75"
- Difusor de dispersión asimétrica 50º a 100º (H) x 55º (V)

Master Audio
Joker Series (Active). Version 1.4 Jan14 39
1.3. Presets en modelos Full range
Las cajas full range de la serie Joker incluyen varios presets de fábrica, útiles para
diferentes tipos de aplicación.
FLAT
Respuesta plana
• Preset estándar
NEARFIELD
-3dB medias
frecuencias
(800Hz-3kHz)
• Recintos pequeños
• Nivel medio
• Distancias medias-
cortas
NEARFIELD+
-3dB medias
frecuencias
(200Hz-3kHz)
• Recintos pequeños
• Nivel medio
• Distancias cortas
LONGTHROW
+3dB altas
frecuencias
• Recintos grandes
• Nivel alto
• Distancias medias-
largas
SPEECH
-6dB Low
-6dB High
• Uso micrófono
• No importa nivel
o distancia

Master Audio
Joker Series (Active). Version 1.4 Jan14 40
XO_POLE
HPF 100Hz +
Delay fijo
• Uso con Joker
subwoofers
• Con barra
elevación
D1
D1 ≠ D2
Delay fijo incluido en preset
XO_POLE
D2
XO_ALL
HPF 100Hz +
SIN delay
• Uso con Joker
subwoofers
• Cualquier
configuración
• El delay debe
ser calculado
por el usuario
D1 D1
D1≠ D2 D1≠ D2
El delay 1 debe ser calculado El delay 2 debe ser calculado
con el preset XO_ALL con el preset XO_ALL
D2 D2

Master Audio
Joker Series (Active). Version 1.4 Jan14 41
1.4 Presets en subwoofers
Las subwoofers de la serie Joker incluyen varios presets de fábrica, útiles para
diferentes tipos de aplicación.
XO_POLE
LPF 100Hz +
+3dB Boost
• Uso con cajas Joker
full-range
• Con barra
elevación
LPF90
LPF 90Hz
LPF90+3
LPF 90Hz
+3dB Boost
LPF100
LPF 100Hz
LPF100+3
LPF 100Hz
+3dB Boost

Master Audio
Joker Series (Active). Version 1.4 Jan14 42
LPF110
LPF 110Hz
LPF110+3
LPF 110Hz
+3dB Boost
LPF120
LPF 120Hz
LPF120+3
LPF 120Hz
+3dB Boost
1.5. Presets en JK10MA
La JK10MA de la serie Joker incluye varios presets de fábrica, útiles para diferentes
tipos de aplicación.
FLAT
Respuesta plana
• Uso en trípode

Master Audio
Joker Series (Active). Version 1.4 Jan14 43
NEARFIELD
-3dB medias
frecuencias
• Recintos pequeños
• Nivel medio
• Distancias medias-
cortas
NEARFIELD+
-3dB medias
frecuencias
(200Hz-3kHz)
• Recintos pequeños
• Nivel medio
• Distancias cortas
SPEECH
-6dB Low
-6dB High
• Uso micrófono /
palabra
• No importa nivel
o distancia
MONITOR
Respuesta plana
• Uso en suelo
como monitor
XO_POLE
HPF 100Hz +
Delay fijo
• Uso con Joker
subwoofers
• Con barra
elevación

Master Audio
Joker Series (Active). Version 1.4 Jan14 44
D1
D1 ≠ D2
Delay fijo incluido en preset
XO_POLE
D2
XO_ALL
HPF 100Hz +
SIN delay
• Uso con Joker
subwoofers
• Cualquier
configuración
• El delay debe
ser calculado
por el usuario
D1 D1
D1≠ D2 D1≠ D2
El delay 1 debe ser calculado El delay 2 debe ser calculado
con el preset XO_ALL con el preset XO_ALL
D2 D2
1.6. Presets en monitor escenario JK12MA
El JK12MA de la serie Joker incluye varios presets de fábrica, útiles para diferentes
tipos de aplicación.
MONITOR
Respuesta plana
• Uso en suelo
como monitor

Master Audio
Joker Series (Active). Version 1.4 Jan14 45
FULL RANGE
Respuesta plana
• Uso en trípode
NEARFIELD
-3dB medias
frecuencias
• Recintos pequeños
• Nivel medio
• Distancias medias-
cortas
SPEECH
-6dB Low
-6dB High
• Uso micrófono /
palabra
• No importa nivel
o distancia
XOVER
HPF 100Hz
• Uso con subwoofers
Joker
1.7. Presets en JK318A
La JK318A de la serie Joker incluye varios presets de fábrica, útiles para diferentes
tipos de aplicación.

Master Audio
Joker Series (Active). Version 1.4 Jan14 46
FLAT
Respuesta plana
• Preset estándar
NEARFIELD
-3dB medias
frecuencias
(200Hz-3kHz)
• Recintos pequeños
• Nivel medio
• Distancias
medias-cortas
HF-3dB
-3dB altas
frecuencias
LFBOOST
+3dB boost low
a 45Hz
SPEECH
-6dB Low
-6dB High
• Uso micrófono /
palabra
• No importa nivel o
distancia

Master Audio
Joker Series (Active). Version 1.4 Jan14 47
2. CONEXIONES
2.1. Vista general
Las conexiones de audio y de alimentación están situadas en el exclusivo panel de
conexiones Joker, representado en la Fig.1. Las diferentes partes de la que se
compone este panel se detallan a continuación
Panel de Control
A) LCD: Muestra información básica sobre el estado del sistema y del DSP. La
información disponible es a siguiente:
En sistemas FULL-RANGE:
• Preset actual
• Nivel de señal de entrada
• Nivel de salida del amplificador de frecuencias bajas (LF)
• Nivel de salida del amplificador de frecuencias altas(HF)
• Temperatura del amplificador
• Modo ECO activado/desactivado
• Teclado bloqueado/activo
Para sistemas SUBWOOFER
• Preset actual
• Nivel de señal de entrada
• Nivel de salida del amplificador
• Temperatura del amplificador
• Modo ECO activado/desactivado
• Polaridad positiva (+) / negativa (-)
• Teclado bloqueado/activo
B) TECLADO: Permite al usuario realizar cambios en el DSP (selección de Preset,
ajuste de delay) así como configurar las preferencias de usuario. Para entrar en el
menú el teclado debe estar desbloqueado mediante la pulsación simultánea de las
teclas MENU y SELECT
C) CONTROL DE VOLUMEN: Mediante las teclas de flecha Arriba y Abajo es posible
ajustar el volumen del sistema entre 0dB y -20dB. Si se alcanza el valor de -20dB y se
pulsa otra vez la flecha Abajo, el sistema se silenciará (MUTE). Para salir del estado
de MUTE, volver a pulsar la flecha Arriba,
D) LED DE PROTECCIÓN: Este led se ilumina cuando el amplificador entre en una
situación de protección (por exceso de temperatura, exceso de consumo de corriente,
u otras situaciones que comprometan la integridad del módulo).
El led también se ilumina cuando el amplificador se encuentra en modo de reposo
(STANDBY). Esto ocurre también durante unos segundos en la puesta en marcha.
El led de protección se apagará cuando el amplificador se recupera de una situación
anormal. Si este led se mantiene encendido incluso después de reiniciar el sistema,
póngase en contacto con un servicio autorizado.

Master Audio
Joker Series (Active). Version 1.4 Jan14 48
E) INDICADORES DE LIMITADOR: Los leds en la sección del limitador indican que
el amplificador está alcanzando la máxima potencia determinada por el circuito
limitador. El limitador del sistema evita que el altavoz reciba un exceso de potencia o
señal distorsionada. La iluminación continuada de estos indicadores indica que la
señal está siendo comprimida excesivamente. En este caso, se debe reducir el nivel
de entrada para obtener un rango dinámico apropiado
Modelo y Especificaciones
F) DATOS DEL MODELO: La información básica sobre el modelo se detalla aquí:
- Referencia
- Potencia nominal del amplificador (Watts)
- Nivel máximo de presión sonora entregada por el sistema (dB SPL)
G) CÓDIGO QR CODE: Para obtener información detallada sobre las
especificaciones del sistema, se dispone de un código QR en el panel.
Para leer el código QR se necesita un dispositivo móvil con cámara, una aplicación de
lectura de códigos QR (*) y una conexión a Internet. Al escanear el código QR, el
navegador web del dispositivo será redirigido a la página del producto de la web de
Master Audio, donde se encuentra toda la información relacionada al producto.
(*)Las aplicaciones de lectura de códigos QR están disponibles de manera
gratuita para las plataformas de smartphones más habituales: iPhone/iPad
(App Store), Android Marketplace, Blackberry AppWorld y Bada App Market.
Panel de conexionado
H) ENTRADA DE AC: Entrada de alimentación de corriente, vía PowerCon (conector
azul)
Utilice siempre el cable de alimentación suministrado por el fabricante.
Nunca conecte los sistemas Joker a una alimentación no provista de toma
de tierra o usando un cable sin conexión de tierra
I) ENTRADA/SALIDA BALANCEADA:
Conector XLR-3 Hembra para la entrada de señal de audio balanceada.
Conector XLR-3 Macho para el conexionado en paralelo de varios sistemas con la
misma señal de audio.
IMPORTANTE: Utilice siempre cable balanceado de micrófono con el siguiente
conexionado:
1= Malla (Shield) 2= Vivo (+) 3= Retorno (-)

Master Audio
Joker Series (Active). Version 1.4 Jan14 49
Fig.1. Panel de control y de conexiones Joker
A
B
C D
E
F
G
H
PANEL DE
CO
NTR
O
L
M
O
DEL
O
Y E
S
PE
C
IFI
C
A
C
I
O
NE
S
PANEL DE
CO
NEXI
O
NE
S
I

Master Audio
Joker Series (Active). Version 1.4 Jan14 50
2.2. Configuraciones
2.2.1. Conexión paralelo
Conecte la señal (salida de mesa de mezclas) a la entrada INPUT de la primera
unidad. Usar la salida LINK (primera unidad) para transportar la señal a la entrada
INPUT de la segunda unidad y así sucesivamente. Todas las unidades en la cadena
tienen que estar encendidas.
ATENCIÓN: Conexiones de Señal NO-BaLanceadas deben desconsiderarse.
Para la conexión de red use cable con conector azul Neutrik PowerCon NAC3FCA.
No conecte recintos de la serie Joker usando cable PowerCon sin toma
de tierra.
Fig.2. Conexión en paralelo
2.2.2. Conexión combinada Sistemas Full-Range con Subwoofer en paralelo
Es posible conectar en paralelo sistemas full-range con su respectivo refuerzo de
graves. Para ello se procederá de la misma forma descrita en la Fig.2, tanto para las
señales de audio como para la red eléctrica. El orden no es preceptivo ya que todas
las entradas y links de señal son iguales.
3. MONTAJE E INSTALACIÓN
Para la adecuada instalación de los sistemas de cajas acústicas se recomienda lea
atentamente los siguientes consejos.

Master Audio
Joker Series (Active). Version 1.4 Jan14 51
3.1. Posicionamiento
Coloque las unidades "Full Range" siempre
que sea posible en posición elevada (entre
dos y tres metros del suelo), ligeramente
inclinadas hacia la audiencia. Si las cajas se
colocan a una altura cercana al suelo los
oyentes de las últimas filas recibirán un
sonido de baja calidad.
Fig.3. Posicionamiento en formato volado
Para posicionar las unidades de graves, es recomendable que éstas sean colocadas
en el mismo suelo, ya que así se aprovecha, de forma natural, el llamado "efecto-
suelo" incrementando notoriamente la respuesta en bajas frecuencias. Le
aconsejamos coloque, siempre que sea posible, las unidades de graves bajo el
mismo eje acústico de dónde estén ubicados los satélites. Si esto no es posible
deberían situarse en un punto intermedio entre los canales Izquierdo y Derecho.
3.2. Uso con trípode
Los modelos JK26A, JK10A, JK12A, JK15A,
JK10MA y JK12MA incorporan en su parte inferior
un vaso para trípode Standard de 35mm.
No utilice el trípode en superficies con pendiente
ni coloque la caja demasiado alta, pues el sistema
puede ser totalmente inestable.
Fig.4. Posicionamiento con trípode
3.3. Utilización sobre subwoofer
Los modelos JK12WA, JK15WA, JK18WA1 y
JK18WA2 incorporan integrado en su parte
superior una pletina para cilindro de 35mm
(diámetro de un trípode estándar). Así podemos
colocar de forma elevada sistemas acústicos que
vayan provistos del vaso inferior para trípode
(JK26A, JK10A, JK12A, JK15A, JK10MA,
JK12MA). Evite colocar sistemas montados de
esta forma en superficies inclinadas o irregulares.
Fig.5. Posicionamiento sobre subwoofer

Master Audio
Joker Series (Active). Version 1.4 Jan14 52
3.4. Uso en aplicaciones de Directo (móvil)
Para una aplicación móvil, para
Directo o Discoteca, la ubicación
clásica sería la de situar las
unidades de graves (una ó dos por
canal) a cada lado del escenario
(sobre éste).
Fig.6. Aplicaciones de directo
Para conseguir una reproducción libre de obstáculos, se recomienda coloque las
unidades de Medios-Agudos por encima de las unidades de graves a unos dos
metros de altura. Si no se dispone de esta altura es conveniente utilizar el clásico
trípode para cada caja y dejar las cajas de graves en el suelo.
¡ATENCIÓN!!! En recintos con problemas de acústica y en los que es necesario
reforzar la respuesta en bajas frecuencias es recomendable agrupar todos los
subwoofers en un mismo punto. De esta manera evitaremos cancelaciones y
obtendremos un nivel de presión acústica mucho más elevado.
3.5. Difusores asimétricos y giratorios
Los modelos JK10A, JK12A, JK15A y JK318A incorporan difusor de dispersión
asimétrica que permite optimizar la cobertura tanto en posición horizontal como en
vertical.
Para girar el difusor se debe desmontar primero la reja frontal, destornillar el difusor
por sus cuatro puntos de fijación y girarlo 90 grados teniendo cuidado de no
desconectar los cables. Volver a atornillarlo y colocar de nuevo la reja.
Fig.7. Rotación de difusor

Master Audio
Joker Series (Active). Version 1.4 Jan14 53
En una sonorización normalmente se intentará establecer un compromiso entre las
zonas a cubrir. Interesará:
*cobertura amplia para los oyentes más cercanos (short throw)
*cobertura más estrecha para los oyentes más alejados (long throw)
Los difusores con dispersión asimétrica varían su cobertura horizontal, "simulando"
un barrido desde el "short throw" al "long throw" a lo largo del eje vertical (que
mantiene la directividad constante). En resumen, las características de directividad
de nuestros difusores (50º a 100º (H), 55º (V)), pueden interpretarse de la siguiente
manera: existen dos directividades en el plano horizontal (cobertura de la audiencia)
que varían en función de la distancia. Normalmente, a menor distancia
consideraremos como óptimo el ángulo más abierto (100º) mientras que para
distancias grandes, el ángulo apropiado será el de 50º.
Entenderemos mejor la teoría con unos ejemplos prácticos.
3.5.1. Cajas colgadas verticalmente y enfocando al público.
Nos interesa mantener una cobertura máxima (100º) en campo cercano y una
cobertura más estrecha pero direccional (50º) en campo lejano.
Fig.8. Posición vertical
3.5.2. Cajas colgadas horizontalmente y enfocando al público.
Nos interesa mantener una cobertura máxima (100º) en campo cercano y una
cobertura más estrecha pero direccional (50º) en campo lejano.
Fig.9. Posición horizontal

Master Audio
Joker Series (Active). Version 1.4 Jan14 54
ATENCIÓN: Los difusores llevan impreso el
logotipo "Near Field" en el lado donde
consideramos ángulo de cobertura horizontal
máximo (100º).
Fig.10.Logotipo “Near Field”
3.6. Uso como monitor de escenario
LA JK10MA puede utilizarse como monitor
de escenario sin ningún accesorio extra.
Fig.11. Stage monitor use
3.7. Giro del logotipo “Master Audio”
Los logotipos “Master Audio” de los modelos JK26A, JK10A, JK12A, JK15A, JK10MA
y JK318A pueden girarse para adaptarse a la posición de la caja (horizontal o
vertical).
3.8. Volado
Sólo personal especializado debe realizar el volado de sistemas acústicos.
Asegúrese del peso que es capaz de soportar la estructura sobre la cual se va a
colgar la caja. El hardware de volado (cadenas, pasadores, anillas...) debe ser
revisado regularmente y, en caso de cualquier duda, debe ser reemplazado por
material nuevo.
¡ATENCIÓN! ¡NO COLGAR NUNCA LAS CAJAS POR EL ASA!!!!
3.8.1. Volado horizontal JK26A,
JK10A, JK12A, JK15A, JK10MA,
JK12MA mediante accesorio “U”
bracket
La JK26A puede colgarse
horizontalmente en pared o techo
mediante el accesorio SP26, la JK10A
y JK10MA mediante el accesorio
SP10, la JK12A y JK12MA mediante
el accesorio SP12 y la JK15A
mediante el accesorio SP15.
Fig.12. Soporte de pared

Master Audio
Joker Series (Active). Version 1.4 Jan14 55
Colgado:
1- Sitúe el soporte cerca de la pared donde vaya a colgar la caja y marque la
localización de los puntos de soporte
2- Realice los taladros en la pared y cuelgue el soporte con tornillería adecuada y de
alta resistencia.
3- Cambie el soporte inferior para trípode de 35mm de la caja por la pletina ciega con
rosca de M8 (en JK26A/JK10A/JK12A/JK15A).
4- Coloque la caja entre el soporte y fíjela con los dos pomos de M8
5- Ajuste la caja a la posición y ángulo deseado.
3.8.2. Volado horizontal o vertical de la JK26A, JK10A, JK12A, JK15A, JK10MA,
JK12MA y JK318A mediante anillas ACR-M8 y cadena
Estos modelos incorporan varios
puntos de suspensión M8. Su correcta
combinación permite el volado de las
cajas tanto en posición horizontal
como en vertical.
Fig.13. Puntos rigging JK26A
Fig.14. Puntos rigging JK10A

Master Audio
Joker Series (Active). Version 1.4 Jan14 56
Fig.15. Puntos rigging JK12A
Fig.16. Puntos rigging JK15A

Master Audio
Joker Series (Active). Version 1.4 Jan14 57
Fig.17. Puntos rigging JK10MA
JK26A JK10A JK10MA JK12A JK15A
Volado horizontal 2&5 o 3&6 o 9&10 o 11&12 (puntos volado frontales)
1&4 o 7&8 (puntos traseros para angular)
Volado vertical 2&3 o 5&6 o 9&11 o 10&12 (puntos volado frontales)
1 o 4 o 7 o 8 (puntos traseros para angular)
Fig.18. Puntos rigging JK12MA
JK12MA
Volado vertical 1 (puntos volado frontales)
2 (puntos traseros para angular)

Master Audio
Joker Series (Active). Version 1.4 Jan14 58
JK318A
Volado horizontal 1&2 o 3&4 o 5&7 o 6&8 (puntos volado frontales)
9&10 o 11&12 (puntos traseros para angular)
Volado vertical 1&3 o 7&8 (puntos volado frontales)
9&11 o 13&14 (puntos traseros para angular)
Fig.19. Puntos rigging JK318A
3.8.3. Volado vertical de la JK26A, JK10A, JK12A, JK15A, JK10MA mediante
soporte de pared SP35
Estos modelos pueden colgarse verticalmente en pared mediante el accesorio SP35.
El SP35 es un soporte articulado con vaso de 35mm de diámetro.

Master Audio
Joker Series (Active). Version 1.4 Jan14 59
Fig.20. Soporte SP35
Colgado:
1- Sitúe el soporte cerca de la pared donde vaya a colgar la caja y marque la
localización de los puntos de soporte
2- Realice los taladros en la pared y cuelgue el soporte con tornillería adecuada y de
alta resistencia.
3- Coloque la caja en el vaso articulado y gradúe el ángulo deseado.
3.8.4. Volado vertical de la JK26A, JK10A, JK10MA, JK12A y JK15A mediante
barra “HR”
Use la barra HR26 para la JK26A
Use la barra HR10 para la JK10A
Use la barra HR1215 para la JK10MA
Use la barra HR1215 para la JK12A
Use la barra HR1215 para la JK15A
Fig.21. Barra de volado “HR” para cajas Joker
3.8.5. Volado JK12WA, JK15WA, JK18WA1, JK18WA2
Estos modelos no han sido diseñados para ser volados.

Master Audio
Joker Series (Active). Version 1.4 Jan14 60
3.9. Montaje y desmontaje de la reja frontal
Para desmontar la reja frontal, quite
primero los tornillos del lateral izquierdo.
La reja saldrá más fácilmente con la
ayuda de un tornillo de punta plana,
haciendo palanca en unos de los
costados.
Fig.22. Puntos collaje reja
En la JK12MA, quite primero los
tornillos de la parte superior.
Fig.23. Puntos collaje reja JK12MA
4. CONFIGURACIÓN DEL SISTEMA
Gracias al sistema de microcontrolador y DSP incorporados, los recintos
autoamplificados Joker pueden ser configurados para diferentes aplicaciones. Esta
sección detalla cómo realizar esta configuración.
La configuración se realiza mediante la pantalla LCD y el teclado en el panel
posterior del equipo
I
MPORTANTE: Para acceder al Menú, es necesario primero desbloquear el
teclado. Para ello pulsar simultáneamente las telas MENU y SELECT.
4.1 Inicio y pantalla principal
Al iniciar el sistema la pantalla mostrará los logotipos Master Audio y Joker. A
continuación, se mostrará la pantalla principal, como se muestra el la Fig. 24:
Fig. 24: Pantalla principal
FL
AT
30
0.0dB
Lock
Eco
A
B
C
D
E

Master Audio
Joker Series (Active). Version 1.4 Jan14 61
A: Preset actual
B: Niveles de entrada y salida
C: Nivel de volumen
D: Temperatura de la etapa de potencia
E: Características especiales
- Eco: si está activado el modo ECO
- Lock: indica si el teclado está bloqueado
- Polaridad: positiva (Pol+) o negativa (Pol-) (sólo en Subwoofers)
4.2 Seleccionar un Preset
Para cambiar el Preset actual, seguir estos
pasos:
1) Si el teclado está bloqueado, desbloquear
con MENU + SELECT
2) Pulsar PRESET una vez. Entrará en el
menú Presets y se visualizará el actual.
3) Pulsar PRESET para visualizar todos los presets disponibles en el sistema.
Cuando encuentre el deseado, pulsar SELECT para seleccionarlo como actual. El
sistema mostrará a continuación la pantalla principal.
4.3 Cambiar el volumen
Para cambiar el volumen, el teclado debe estar
desbloqueado (MUTE + SELECT) y a
continuación pulsar las flechas Arriba/abajo.
Se entrará en la pantalla de ajuste de volumen.
El volumen se puede ajustar entre 0dB y -
20dB. Si al alcanzarse el valor de -20dB la
flecha Abajo se pulsa nuevamente, el sistema
se silenciará (MUTE), hecho que se mostrará en pantalla. Para salir de este estado,
pulsar nuevamente la flecha Arriba.
Para aceptar el ajuste de volumen, pulsar la tecla SELECT. Si esto no ocurre en 30
segundos, el sistema automáticamente se redirigirá a la pantalla principal.
4.4 Opciones del menú
Para navegar por el menú, pulsar primero MENU+SELECT. Recuerde siempre que
debe desbloquear el teclado antes de entrar a seleccionar una opción.
La tecla MENU muestra las diferentes opciones en cada nivel del menú. Para
aceptar una opción y entrar en ella, pulsar SELECT.
Menú Principal:
Para entrar en el menú principal pulsar MENU una vez. Éstas son las opciones
disponibles:
FLAT
Volumen
-9.5dB

Master Audio
Joker Series (Active). Version 1.4 Jan14 62
Delay
20.0m
58.8ms
Limiter
-3.0 dB
Ajustes de Audio Información
Configuración Volver
Pulsar SELECT para acceder a los submenús.
MENU OPCIONES DE AUDIO
Utilizando la tecla MENU, se pueden visualizar la siguiente opción. Pulsar SELECT
para aceptar.
Volumen: Da acceso al menú descrito en el apartado 4.3
Delay (Retardo): Se dispone de una línea de
retardo de 40 metros. Con las teclas de flecha
Arriba y Abajo, se puede seleccionar el
retardo deseado, entre 0 y 40m.
Pulsar SELECT para aceptar.
Mute: En esta opción se puede silenciar el
sistema. Los recintos de dos vías ofrecen la
opción de silenciar las vías por separado, útil
para comprobaciones.
Para terminar, seleccionar “Volver” y pulsar
SELECT. Cuando alguno de los
transductores se encuentra en MUTE,
quedará indicado en la pantalla principal.
Limitador: Ajuste del umbral del limitador con
las flechas Arriba y Abajo. Por defecto el
umbral es 0dB (máxima potencia).
Para acabar, pulsar SELECT.
Polaridad (sólo en Subwoofers): puede
seleccionar ente polaridad positiva y negativa
(inversión de 180º).
Esta opción facilita mucho la alineación de
subwoofer en aplicaciones con varios
elementos.
MENU CONFIGURACIÓN
En el menú de configuración se pueden ajustar los parámetros descritos a
continuación:
Mute
OFF .
ALL
LF
HF
Atras
Polaridad
Positiva .
Negativa
Atras

Master Audio
Joker Series (Active). Version 1.4 Jan14 63
ECO Mode: En esta opción el modo ECO
puede ser habilitado con diferentes tiempos
de activación.
Si se activa el modo ECO, el sistema
analizará continuamente la señal de entrada.
Si no se detecta señal después del número
de minutos seleccionado (1, 10 ó 30), el
sistema se pondrá en modo de bajo consumo
(standby). Esta condición se indica con un mensaje en la pantalla.
Al detectarse de nuevo señal en la entrada, el sistema volverá al funcionamiento
normal, hasta que la señal de entrada vuelva a desaparecer.
La palabra Eco aparece en la pantalla principal cuando el equipo trabaja en este
modo.
IMPORTANTE: El sistema necesita unos 2 segundos para recuperarse del modo de
bajo consumo. No se recomienda esta
funcionalidad en aplicaciones críticas en
tiempo de respuesta.
LED Frontal: Los recintos activos Joker
disponen de un led frontal que se ilumina
para indicar que el equipo está en
funcionamiento.
Aquí puede cambiarse el comportamiento del led frontal, entre las siguientes
opciones:
Apagar: siempre apagado
Encender: siempre encendido
Encender con Limit.: El led se mantiene apagado y se enciende cuando alguno de
los limitadores se activa.
Apagar con Limit.: El led se mantiene encendido y se apaga cuando alguno de los
limitadores se activa (opción por defecto).
IMPORTANTE: En la opción por defecto el led estará siempre encendido excepto
cuando se activa alguno de los limitadores.
Apagado LCD: Aquí puede configurarse
cómo se comporta la iluminación de la
pantalla LCD. La pantalla se iluminará
siempre tras una pulsación del teclado,
excepto si se selecciona la opción “Siempre
apagada”.
Bloqueo teclado: Esta opción determina si
el teclado se bloquea o no tras no existir
actividad (el tiempo de inactividad se define
aquí). Recuerde que el teclado se
desbloquea pulsando las teclas
MUTE+SELECT simultáneamente
ECO Mode
Desactivado .
Activar en 1m
Activar en 10m
Activar en 30m
Atras
LED Frontal
Apagar
Encender
Encender con Limit.
Apagar con Limit. .
Atras
Apagado LCD
Encender siempre .
Apagar siempre
Apagar en 30s
Apagar en 1m
Apagar en 5m
Apagar en 10m
Atras
Keypad Lock
Siempre Activo
Bloqueo in 30s .
Bloqueo en 1m
Bloqueo en 5m
Bloqueo en 10m
Atras

Master Audio
Joker Series (Active). Version 1.4 Jan14 64
Idioma: Seleccionar aquí el idioma en el que
se muestra la interfaz de usuario. Pulsar
SELECT para cambiar a la opción resaltada.
MENU INFORMACIÓN
Dentro de esta opción se proporciona un resumen rápido de todos los ajustes
realizados en el sistema. Pulsar SELECT para ver la información. Hay tres pantallas
diferentes, que se pueden visualizar presionando SELECT.
En la pantalla de Sistema se puede acceder a la opción de reestablecer la
configuración de fábrica (por defecto). Para ello, pulsar la tecla MENU, y en la
pantalla que aparece, mover el cursor a “Restaurar” (con MENU) y apretar SELECT
para confirmar.
Los ajustes que por defecto se programan en fábrica en un recinto Joker, son los
siguientes:
Ajustes de Audio
• Preset: FLAT
• Volumen: 0.0dB
• Delay: 0m
• Mute: Off
• Polaridad: Positiva (Pol+) (sólo en subwoofers)
Configuración:
• LED Frontal: Encender con Limit.
• Iluminación LCD: Apagar en 30s
• Modo ECO: Desactivado
• Bloqueo teclado: Bloqueo en 30s
• Idioma: Inglés
Language
English .
Espanol
Atras
Configuracion Audio .
.
Preset: FLAT
Volumen: 0.0dB
Delay: 0.0m
Limitador: -3.0dB
Mute: OFF
Configuracion Usuario
.
LED Frontal: Encender
LCD: Apagar en 30s
ECO: Desactivado
Keypad: Bloqueo en 30s
Idioma: Espanol
Sistema .
Modelo: JK10A
Version: 2.3
Firmware: 3.0
Pulse MENU para
Confi
g
uracion Fabrica
Configuracion Fabrica
Atras
Restaurar .

Master Audio
Joker Series (Active). Version 1.4 Jan14 65
4.5 Características Especiales
Limitación Automática por Temperatura
En condiciones normales de operación, los amplificadores de los sistemas Joker
pueden rendir durante muchas horas a máxima potencia. Sin embargo, si se da la
situación en la que la temperatura en el amplificador suba de forma inesperada, el
sistema ajustará automáticamente el nivel del limitador para intentar compensar esta
subida, resultando esto en una disminución progresiva del nivel de salida.
Si la temperatura vuelve a un rango normal, el sistema recuperará su funcionamiento
habitual.
Si, en cambio, la temperatura sigue subiendo hasta un nivel que pueda ser peligroso
para los componentes (90ºC), el sistema se pondrá en Protección.
Protección contra Saturación de señal de entrada
Los sistemas Joker aceptan un elevado rango de señal de entrada (+20dBu – 8V),
pero existen en el mercado fuentes de sonido y mezcladores capaces de entregar
voltajes superiores.
Utilizar un sistema continuamente por encima de su entrada nominal puede
afectar drásticamente a la calidad sonora, normalmente debido a la pérdida de
rango dinámico. A largo plazo, puede suponer un envejecimiento innecesario de los
transductores.
Además, la máxima potencia del sistema se obtiene a su nivel de entrada
nominal, y en ningún caso trabajar por encima proporciona mejores resultados.
Los sistemas Joker están equipados con un sistema de control de la señal de
entrada que evitará que el recinto acústico se sature por una exposición continua a
niveles excesivos de señal de entrada. Si esto ocurre durante un periodo prolongado,
el sistema entrará en modo de protección de saturación de entrada, significando que:
- La señal de salida se reducirá en 20dB
- Todos los leds de limitador se encenderán continuamente
- El led frontal de puesta en marcha parpadeará
- Se mostrará un mensaje en el LCD (Saturación Entrada)
Para retornar al nivel de operación normal, será necesario reducir el nivel de entrada
a un nivel medio de +8dBu (2V), que es el valor nominal y recomendado para el
sistema.

Master Audio
Joker Series (Active). Version 1.4 Jan14 66
5. CARACTERÍSTICAS TÉCNICAS
JK26A JK10A JK12A JK15A
Entrada audio
Sensibilidad +2dBu +8dBu
Impedancia 20kΩ
Red
Tipo Universal switching power supply 85-265VAC / 45- 65Hz
Heavy duty musical
program
0.3A 0.7A
Consumo en Standby <5W
Convertidores analógicos 24 bit / 48kHz
Arquitectura DSP 48 bit
Línea delay 118ms / 40m
Respuesta frecuencia
Banda útil (-10 dB)
65Hz-
20kHz
50Hz-18kHz 48Hz-19kHz 45Hz-19kHz
Máximo nivel salida
(1m/continuo)
118 dB 125 dB 126 dB 127 dB
Amplificador (programa) 200 + 30W 600 + 100W
Directividad nominal (-6dB) 90º x 90º 50º to 100º x 55º
Componentes
LF 2 x 6”
neodymium
woofers
1 x 10”
neodymium
woofer
1 x 12”
woofer
1 x 15”
woofer
HF 1 x 1”
neodymium
tweeter,
titanium
diaphragm
1 x 1.4”
PETP
diaphragm
driver
1 x 1.75” PETP
diaphragm
driver
Recinto
Tipo Bass-reflex
Altura 532 mm 539 mm 609 mm 689 mm
Anchura 250 mm 365 mm 410 mm 460 mm
Profundidad 260 mm 340 mm 405 mm 450 mm
Peso (neto) 9,5 Kg 14,6 Kg 22,7 Kg 27,2 Kg
Conectores 1 x AC PowerCon (input, link)
2 x XLR (input, link)
Material Tablero abedul, reja frontal con espuma
Acabado Pintura Polyurea de alta resistencia

Master Audio
Joker Series (Active). Version 1.4 Jan14 67
JK12WA JK15WA JK18WA1 JK18WA2
Entrada audio
Sensibilidad +2dBu
Impedancia 20kΩ
Red
Tipo Universal switching power supply 85-265VAC / 45- 65Hz
Heavy duty musical
program
0.8A 1A 1A 2A
Consumo en Standby <5W
Convertidores analógico 24 bit / 48kHz
Arquitectura DSP 48 bit
Línea delay 118ms / 40m
Respuesta frecuencia
Banda útil (-10 dB)
38Hz-90/100
/110/120Hz 36Hz-
90/100/120Hz
32Hz-
90/100/110Hz 30Hz-90/100
/110Hz
Máximo nivel salida
(1m/continuo)
123 dB 127 dB 128 dB 132 dB
Amplificador (programa) 500W 1000W 2000W
Directividad nominal
(-6dB) omnidirectional
Componentes
LF 1 x 12” woofer
(3” voice coil)
1 x 15” woofer
(4” voice coil)
1 x 18” woofer
(4” voice coil)
HF - - -
Recinto
Tipo Band-pass
Altura 387 mm 475 mm 552 mm
Anchura 520 mm 630 mm 740 mm
Profundidad 530 mm 630 mm 710 mm
Peso (neto) 25,6 Kg 41,6 Kg 50,9 Kg 51,9 Kg
Conectores 1 x AC PowerCon (input, link)
2 x XLR (input, link)
Material Tablero abedul, reja frontal con espuma
Acabado Pintura Polyurea de alta resistencia

Master Audio
Joker Series (Active). Version 1.4 Jan14 68
JK10MA JK12MA JK318A
Entrada audio
Sensibilidad +8dBu
Impedancia 20kΩ
Red
Tipo
U
niversal switching power supply 85-265VAC / 45- 65Hz
Heavy duty musical
program
0.7A
3.9A
Consumo en Standby <5W
Convertidores analógicos 24 bit / 48kHz
Arquitectura DSP 48 bit
Línea delay 118ms / 40m
Respuesta frecuencia
Banda útil (-10 dB)
50Hz-
18kHz
48Hz-
20kHz
35Hz-19kHz
Máximo nivel salida
(1m/continuo)
124 dB 126 dB 132 dB
Amplificador (programa) 600+100W 2400+600W
Directividad nominal (-6dB) 70º x 70º 60º x 40º 50º to 100º x 55º
Componentes
LF 1 x 10”
coaxial
woofer
(2.5” voice
coil)
1 x 12”
coaxial
woofer
(3” voice coil)
1 x 18” neo. woofer
(4” voice coil)
1 x 12” neo. woofer
(3” voice coil)
HF 1 x 1.75”
polyester
diaphragm
driver
1 x 3”
titanium
diaphragm
driver
1 x 1.75” PETP
diaphragm
driver
Recinto
Tipo Bass-reflex
Altura 539mm 374 mm 1240 mm
Anchura 365 mm 600 mm 534 mm
Profundidad 340 mm 565 mm 524 mm
Peso (neto) 15,2 Kg 24,4 Kg 59 Kg
Conectores 1 x AC PowerCon (input, link)
2 x XLR (input, link)
Material Tablero abedul, reja frontal con espuma
Acabado Pintura Polyurea de alta resistencia
-
 1
1
-
 2
2
-
 3
3
-
 4
4
-
 5
5
-
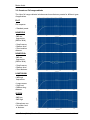 6
6
-
 7
7
-
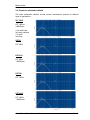 8
8
-
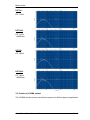 9
9
-
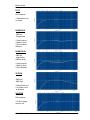 10
10
-
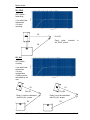 11
11
-
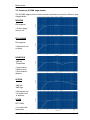 12
12
-
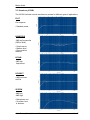 13
13
-
 14
14
-
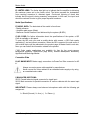 15
15
-
 16
16
-
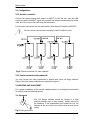 17
17
-
 18
18
-
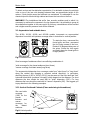 19
19
-
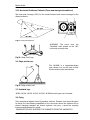 20
20
-
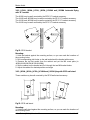 21
21
-
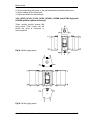 22
22
-
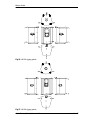 23
23
-
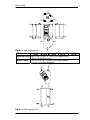 24
24
-
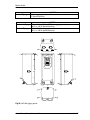 25
25
-
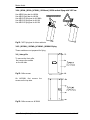 26
26
-
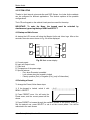 27
27
-
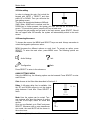 28
28
-
 29
29
-
 30
30
-
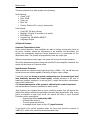 31
31
-
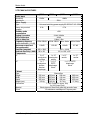 32
32
-
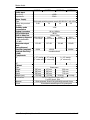 33
33
-
 34
34
-
 35
35
-
 36
36
-
 37
37
-
 38
38
-
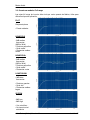 39
39
-
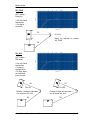 40
40
-
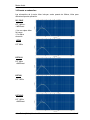 41
41
-
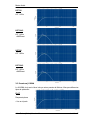 42
42
-
 43
43
-
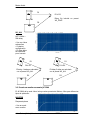 44
44
-
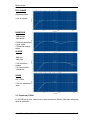 45
45
-
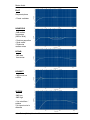 46
46
-
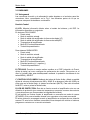 47
47
-
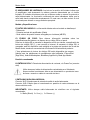 48
48
-
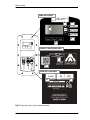 49
49
-
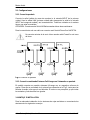 50
50
-
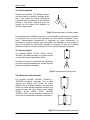 51
51
-
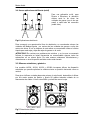 52
52
-
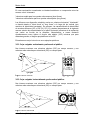 53
53
-
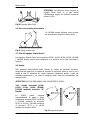 54
54
-
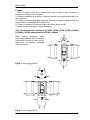 55
55
-
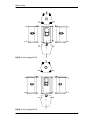 56
56
-
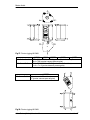 57
57
-
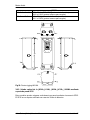 58
58
-
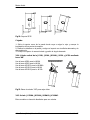 59
59
-
 60
60
-
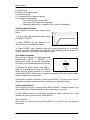 61
61
-
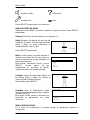 62
62
-
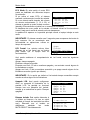 63
63
-
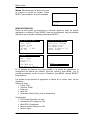 64
64
-
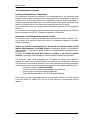 65
65
-
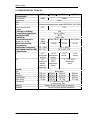 66
66
-
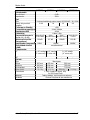 67
67
-
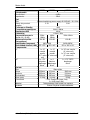 68
68