
1: English
Installation Instructions
OkiLAN
®
7120e
OKI, OkiLAN ® Oki Electric Industry Company, Ltd.
Ethernet ® Xerox Corp.
Notes:
This print server is FCC and IC Class A
compliant.
No Ethernet
®
cable is supplied. Use an
Ethernet cable with two twisted wire pairs
and an RJ45 plug.
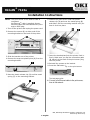
1. Turn off the printer and unplug the power cord.
2. Remove the screws (
1
) at either end of the
mounting bracket on the back of the printer.
3. Slide the bracket out of the printer.
4. Remove the snap-out plastic piece (
1
) from the
mounting bracket.
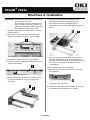
5. Note the plastic release clip (
1
) and the metal
spring (2) on the mounting bracket.
6. Position the print server under the plastic
release clip (
1
) and over the metal spring (
2
)
and slide it into the mounting bracket until you
hear it click into place.
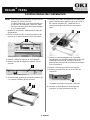
7. Insert the bracket/card into the printer. Push in
firmly. Make sure you feel the connection pads
(
3
, above) at the back of the print server plug
into the printer.
8. Reinstall the screws on the bracket.
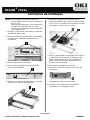
9. Press the SW button (
1
) on the print server.
The test pages print.
10. Connect your Ethernet cable to the print server,
then to the network
.
La página se está cargando...
La página se está cargando...

OkiLAN
®
7120e
4: Português
© 2006 Oki Electric Industry Company, Ltd. 59388301
Instruções de instalação
Notas:
Este servidor de impressão está em
conformidade com as normas de Classe A
da FCC e IC.
Nenhum cabo Ethernet
®
é fornecido com o
servidor de impressão. Use um cabo
Ethernet com dois pares de fios trançados
e um plugue RJ45.
1. Desligue a impressora e desconecte o cabo de
alimentação da tomada.
2. Retire os parafusos (
1
) das duas extremidades
do suporte de instalação situado atrás da
impressora.
3. Retire o suporte da impressora.
4. Retire a peça de plástico removível (
1
) do
suporte de instalação.
5. Observe o encaixe de plástico (
1
) e a mola de
metal (
2
) do suporte de instalação.
6. Posicione o servidor de impressão sob o
encaixe de plástico (
1
) e sobre a mola de metal
(2) e insira-o no suporte de montagem até que
se encaixe no lugar com um clique.
7. Insira o suporte/placa na impressora. Empurre-
o para dentro com firmeza. Certifique-se de
sentir os conectores (
3
, acima) situados na
parte traseira do servidor de impressão se
encaixar na impressora.
8. Recoloque os parafusos no suporte.
9. Pressione o botão de SW (
1
) no servidor da
impressora.
As páginas de teste serão impressas
10. Conecte o cabo Ethernet ao servidor de
impressão e, em seguida, à rede.
Transcripción de documentos
OkiLAN® 7120e Installation Instructions Notes: This print server is FCC and IC Class A compliant. No Ethernet® cable is supplied. Use an Ethernet cable with two twisted wire pairs and an RJ45 plug. 6. Position the print server under the plastic release clip (1) and over the metal spring (2) and slide it into the mounting bracket until you hear it click into place. 1. Turn off the printer and unplug the power cord. 2. Remove the screws (1) at either end of the mounting bracket on the back of the printer. 3. Slide the bracket out of the printer. 4. Remove the snap-out plastic piece (1) from the mounting bracket. 7. Insert the bracket/card into the printer. Push in firmly. Make sure you feel the connection pads (3, above) at the back of the print server plug into the printer. 8. Reinstall the screws on the bracket. 9. Press the SW button (1) on the print server. 5. Note the plastic release clip (1) and the metal spring (2) on the mounting bracket. The test pages print. 10. Connect your Ethernet cable to the print server, then to the network. OKI, OkiLAN ® Oki Electric Industry Company, Ltd. Ethernet ® Xerox Corp. 1: English OkiLAN® 7120e Instruções de instalação Notas: Este servidor de impressão está em conformidade com as normas de Classe A da FCC e IC. Nenhum cabo Ethernet® é fornecido com o servidor de impressão. Use um cabo Ethernet com dois pares de fios trançados e um plugue RJ45. 6. Posicione o servidor de impressão sob o encaixe de plástico (1) e sobre a mola de metal (2) e insira-o no suporte de montagem até que se encaixe no lugar com um clique. 1. Desligue a impressora e desconecte o cabo de alimentação da tomada. 2. Retire os parafusos (1) das duas extremidades do suporte de instalação situado atrás da impressora. 7. Insira o suporte/placa na impressora. Empurreo para dentro com firmeza. Certifique-se de sentir os conectores (3, acima) situados na parte traseira do servidor de impressão se encaixar na impressora. 3. Retire o suporte da impressora. 8. Recoloque os parafusos no suporte. 4. Retire a peça de plástico removível (1) do suporte de instalação. 9. Pressione o botão de SW (1) no servidor da impressora. 5. Observe o encaixe de plástico (1) e a mola de metal (2) do suporte de instalação. As páginas de teste serão impressas 10. Conecte o cabo Ethernet ao servidor de impressão e, em seguida, à rede. 4: Português © 2006 Oki Electric Industry Company, Ltd. 59388301-
 1
1
-
 2
2
-
 3
3
-
 4
4


en otros idiomas
- français: OKI ML 8810N Le manuel du propriétaire
- English: OKI ML 8810N Owner's manual
- português: OKI ML 8810N Manual do proprietário
Artículos relacionados
-
OKI C6150n Manual de usuario
-
OKI C6100DTN El manual del propietario
-
OKI C5800LDN El manual del propietario
-
OKI ML 690 El manual del propietario
-
OKI C 5650n Manual de usuario
-
-
OKI C710n El manual del propietario
-
OKI C711DTN Guía de instalación
-
OKI C9650n El manual del propietario
-
OKI MB470MFP El manual del propietario