
AC4074, AC4072
4222.003.4042.1.indd 1 18-09-09 14:17

2
4222.003.4042.1.indd 2 18-09-09 14:17

3
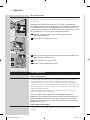
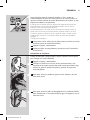
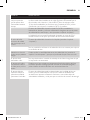
F
K
D
C
A
B
E
G
H
J
I
2 3 4 8 9
10
11
1 5 6 7
L
M
N
O
P
1
4222.003.4042.1.indd 3 18-09-09 14:17

4
4222.003.4042.1.indd 4 18-09-09 14:17

AC4074, AC4072
ENGLISH 6
ESPAÑOL 23
4222.003.4042.1.indd 5 18-09-09 14:17

6
Introduction
Congratulations on your purchase and welcome to Philips! To fully benet
from the support that Philips offers, register your product at www.philips.
com/welcome.
With this new CleanAir System you breathe cleaner air. For the best results,
place the CleanAir System in a room where you spend most of your time,
e.g. the living room or bedroom.
Wherever there are people, plants or pets, there are airborne particles that
can affect your well-being, especially if you suffer from allergies. Because of
these particles, the air inside a room may be more polluted than the air in
a large city.
Normally, particles are invisible and odourless. Nevertheless they can affect
your health. The CleanAir System reduces the amount of animal dander
and industrial pollutants in the air, and therefore improves the air quality.
It also lters out ultrane particles larger than 20 nanometres, including
bacteria and some viruses. According to publications of the World Health
Organization, the avian and human inuenza viruses and the Legionella
bacterium are larger than 20 nanometres.
Filtration in several stages
The air cleaner has a unique multi-stage ltration system that guarantees
the best air quality:
- Stage 1: The pre-lter has been treated with antibacterial substances. It
catches big particles like human hair, pet hair etc.
- Stage 2: The formaldehyde lter (supplied with AC4074) removes
formaldehyde and other volatile organic compounds (VOCs). In
combination with the HEPA lter, the multi-care lter lters out dust,
pollen and ultrane particles larger than 20 nanometres, including
bacteria and some viruses. According to publications of the World
Health Organization, the avian and human inuenza viruses and
Legionella bacterium are larger than 20 nanometres.
Note: The AC4074 and AC4072 are suitable for both the formaldehyde lter
and the multi-care lter. When you replace the lter present in your type, you
can choose the lter (formaldehyde or multi-care) that suits your needs best.
- Stage 3: The activated carbon lter removes odours and harmful gases
effectively.
- Stage 4: The high-performance composite HEPA lter with anti-
bacterial coating effectively removes ne dust and cigarette smoke,
while the antibacterial and anti-mould functions of organic antibacterial
materials eliminate germs and mould.
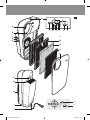
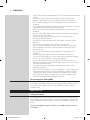
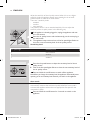
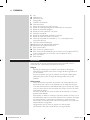
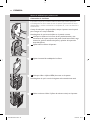
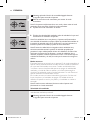
General description (Fig. 1)
A Air quality light ring
B Fan speed indicator (AC4074 only)
C Air quality sensor outlet
D Air quality sensor
E Air quality sensor inlet
F Handle
G Air outlet
H Air inlet
I Cord storage facility
J Mains cord
ENGLISH
4222.003.4042.1.indd 6 18-09-09 14:17

K Control panel
1 Light sensor for night mode
2 Air quality on/off button with light
3 Power on/off button
4 Silent mode button with light
5 Power-on light
6 Fan speed button with light
7 Auto mode button with light
8 Fan speed lights (1, 2, 3 and boost power)/lter replacement lights
9 Replacement/lock light
10 Fan speed indications
11 Filter replacement indications
L Filter 4: HEPA lter
M Filter 3: activated carbon lter
N Filter 2: formaldehyde lter (supplied with AC4074) or multi-care lter
(supplied with AC4072)
O Filter 1: pre-lter
P Front panel
Important
Read this user manual carefully before you use the appliance and save it for
future reference.
Danger
- Do not let water or any other liquid or ammable detergent enter the
appliance to avoid electric shock and/or a re hazard.
- Do not clean the appliance with water or any other liquid or a
(ammable) detergent to avoid electric shock and/or a re hazard.
Warning
- Check if the voltage indicated on the bottom of the appliance
corresponds to the local mains voltage before you connect the
appliance.
- If the mains cord is damaged, you must have it replaced by Philips, a
service centre authorised by Philips or similarly qualied persons in
order to avoid a hazard.
- Do not use the appliance if the plug, the mains cord or the appliance
itself is damaged.
- This appliance is not intended for use by persons (including children)
with reduced physical, sensory or mental capabilities, or lack of
experience and knowledge, unless they have been given supervision or
instruction concerning use of the appliance by a person responsible for
their safety.
- Children should be supervised to ensure that they do not play with the
appliance.
- Do not block the air inlet and outlet, e.g. by placing items on the air
outlet or in front of the air inlet.
Caution
- This appliance is not a substitute for proper ventilation, regular vacuum
cleaning or use of an extractor hood or fan while cooking.
- If the wall socket used to power the appliance has poor connections,
the plug of the appliance becomes hot. Make sure you plug the
appliance into a properly connected wall socket.
ENGLISH 7
4222.003.4042.1.indd 7 18-09-09 14:17

- Always place and use the appliance on a dry, stable, level and horizontal
surface.
- Leave at least 20cm free space behind and on both sides of the
appliance and leave at least 30cm free space above the appliance.
- Do not place anything on top of the appliance and do not sit on the
appliance.
- Do not place the appliance directly below an air conditioner to prevent
condensation from dripping onto the appliance.
- Make sure all lters are properly installed before you switch on the
appliance.
- Only use the original Philips lters specially intended for this appliance.
Do not use any other lters.
- Avoid knocking against the appliance (the air inlet and outlet in
particular) with hard objects.
- Always lift or move the appliance by the handle at the back of the
appliance.
- Do not insert your ngers or objects into the air outlet.
- Do not use this appliance when you have used indoor smoke-type
insect repellents or in places with oily residues, burning incense or
chemical fumes.
- Do not use the appliance near gas appliances, heating devices or
replaces.
- Always unplug the appliance after use and before you clean it.
- Do not use the appliance in a room with major temperature changes,
as this may cause condensation inside the appliance.
- To prevent interference, place the appliance at least 2m away from
electrical appliances that use airborne radio waves such as TVs, radios
and radio-controlled clocks.
- The appliance is only intended for household use under normal
operating conditions.
- Do not use the appliance in wet surroundings or in surroundings with
high ambient temperatures, such as the bathroom, toilet or kitchen.
- The appliance does not remove carbon monoxide (CO) or radon
(Rn). It cannot be used as a safety device in case of accidents with
combustion processes and hazardous chemicals.
Electromagnetic elds (EMF)
This Philips appliance complies with all standards regarding electromagnetic
elds (EMF). If handled properly and according to the instructions in this
user manual, the appliance is safe to use based on scientic evidence
available today.
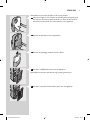
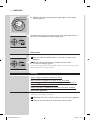
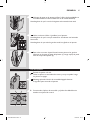
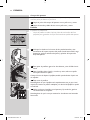
Before rst use
Placing the lters
The appliance comes with all lters tted inside, but you have to remove
the packaging of the lters before you can use the appliance. Remove all
lters, unpack them and place them back into the appliance as described
below.
Tip: Place the appliance against a wall for more stability when you remove or
insert lters.
ENGLISH8
4222.003.4042.1.indd 8 18-09-09 14:17

Note: Make sure you insert the lters in the correct position.
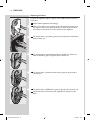
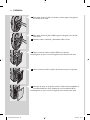
1 Placeyourngersintherecessesofthesidepanelsandgentlypull
thetoppartofthefrontpaneltowardsyou.Thenliftthehooksat
thebottomofthepaneloutofthebottomoftheappliance.
2 Removealltheltersfromtheappliance.
3 Removeallpackagingmaterialfromthelters.
4 Putlter4(HEPAlter)backintotheappliance.
Note: Make sure that the side with the tag is pointing towards you.
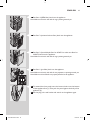
5 Putlter3(activatedcarbonlter)backintotheappliance.
ENGLISH 9
4222.003.4042.1.indd 9 18-09-09 14:17

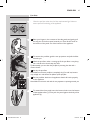
6 Putlter2(formaldehydelterforAC4074ormulti-carelterfor
AC4072)backintotheappliance.
Note: Make sure that the side with the tag is pointing towards you.
7 Placelter1(pre-lter)intheappliance.
Note: Make sure that the side with the two projections is pointing towards you.
Note: Make sure that all hooks are properly attached to the appliance.
8 Toreattachthefrontpanel,insertthebottomhooksintothebottom
oftheappliancerst(1).Thenpushthepanelagainstthebodyofthe
appliance(2).
Using the appliance
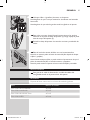
1 Putthepluginthewallsocket
, Alllightsgoontwiceandyouhearabeep.Thenthelightsgoout
again.
2 Pressandholdtheon/offbuttonfor2secondstoswitchonthe
appliance.
, Thepower-onlightandtheairqualitylightonthecontrolpanelgo
on.
1
2
ENGLISH10
4222.003.4042.1.indd 10 18-09-09 14:17

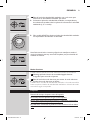
, Theairqualitylightringshowsthequalityoftheair.
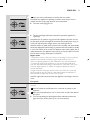
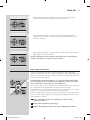
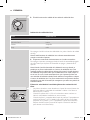
Air quality indication
Colour Airquality
Blue very good
Deep purple good
Purple fair
Red bad
To switch off the air quality light ring, press the air quality button.
Note: The air quality light ring automatically goes on when the appliance is
switched on.
, Theapplianceautomaticallystartsoperatingintheautomode.
To switch off the appliance, press and hold the on/off button again until
the power-on light goes out and unplug the appliance.
Note: When the humidity level in the room is very high, it is possible that
condensation develops on the air quality sensor. As a result, the air quality
light on the control panel and the air quality light ring may indicate that the
air quality is bad even though the air quality is good. In this case, the auto
mode causes the appliance to run at high fan speed. You can solve this by
cleaning the air quality sensor. If condensation develops frequently during
periods of high humidity, we advise you to use one of the manual speed
settings.
Fan speed lights/lter replacement lights
- The lights on the right-hand side of the control panel have a dual
function: they either indicate the fan speed or they indicate that the
lters should be replaced or cleaned.
- When lights 1 to 3/4 light up continuously, they indicate the current fan
speed.
- When light 1 ashes, you have to clean the pre-lter. When lights 2
and/or 3/4 ash, you have to replace these lters. If lights 2 and/or
3/4 ash, the replacement/lock light also ashes (see chapter ‘Filter
replacement’ for more information).
- When lights 2, 3/4 and the replacement/lock light are on continuously,
the appliance is locked (see chapter ‘Filter replacement lock’ for more
information).
Adjusting the air quality sensor sensitivity
People with certain health problems (e.g. allergies or asthma) have a
greater need for healthy air. For this reason, the air cleaner allows you to
ENGLISH 11
4222.003.4042.1.indd 11 18-09-09 14:17

adjust the sensitivity of the air quality sensor. When it is set to a higher
sensitivity level, the appliance already starts cleaning the air at lower
pollution levels to make the air even cleaner.
There are 3 sensitivity levels:
- standard
- sensitive
- extra sensitive
The pollution sensor is set to standard sensitivity. You can adjust the
sensitivity of the air quality sensor in the following way:
1 Iftheapplianceisalreadypluggedin,unplugtheapplianceandwait
forafewminutes.
2 Presstheairqualitybuttonandsimultaneouslyputthemainsplugin
thewallsocket.
, Theappliancebeepstwiceandoneofthefanspeedlightsashesto
showthecurrentsensitivityleveloftheairqualitysensor.
Sensitivity level:
Fanspeedlight Sensitivitylevel
1 extra sensitive
2 sensitive
3 standard
3 Pressthefanspeedbuttontoadjustthesensitivityleveloftheair
qualitysensor.
, Oneofthefanspeedlightsashestoshowthesetsensitivitylevelof
theairqualitysensor.
4 Pressandholdtheon/offbuttontoswitchofftheappliance.
Note: When you change the sensitivity level, the appliance automatically starts
operating at the set sensitivity level whenever you switch on the appliance.
Auto mode
When the appliance is switched on, the built-in air quality sensor
automatically measures the ambient air quality. When the auto mode is
activated, the appliance selects the most appropriate fan speed for the
measured air quality.
1 Pressandholdtheon/offbuttonfor2secondstoswitchonthe
appliance.
ENGLISH12
4222.003.4042.1.indd 12 18-09-09 14:17

2 Presstheautomodebuttontoactivatetheautomode.
Note: When the appliance is operating in another mode and you want to
activate the auto mode, simply press the auto mode button.
, Theautomodelightgoeson.
, Thefanspeedlightindicatesatwhichfanspeedtheapplianceis
operating.
Note: When the air quality is very good and the appliance operates at a very
low fan speed, the fan speed light for the lowest speed setting does not go on.
In this case only the power-on light and the auto mode light are on.
Note: The built-in air quality sensor measures the air quality and automatically
selects the appropriate speed setting to guarantee the best possible air quality
in your room. When the air is clean, the appliance stops running. When the air
quality deteriorates, the appliance starts running at a low fan speed and noise
level so that the energy consumption is minimised.
Night mode
The appliance works in harmony with its surroundings. In auto mode, the
appliance automatically switches to night mode when the room in
which it is operating becomes dark. When the room has been dark for
3 minutes, the lights of the appliance go out, the fan speed and noise
level are reduced and the energy consumption is minimised. If the room
becomes bright again for 5 minutes or longer, the appliance resumes
normal operation.
In night mode, the automatic control is still active. If the air is clean, the
lights and the fan are off. If the air quality deteriorates, the appliance is
activated and the lights and the fan come on again.
Note: The night mode only works when the appliance is operating in the auto
mode.
Fan speed
If you do not use the auto mode, you can select the desired fan speed
yourself.
1 Pressandholdtheon/offbuttonfor2secondstoswitchonthe
appliance.
2 Pressthefanspeedbuttononeormoretimestoselectthedesired
fanspeed.
, Thecorrespondingfanspeedlightandtheindicationsabovethe
lightsshowthesetfanspeed(1,2,3orboostpower).
ENGLISH 13
4222.003.4042.1.indd 13 18-09-09 14:17

, AC4074only:Thecorrespondingfanspeedlightinthefanspeed
indicatorgoeson.
Note: Select boost power if you need an extra strong airow when the air in
the room is very dirty. All three fan speed lights go on.
Silent mode
When you use the appliance in silent mode, it operates very quietly.
1 Pressandholdtheon/offbuttonfor2secondstoswitchonthe
appliance.
2 Pressthesilentmodebuttontoactivatethesilentmode.
, Thesilentmodelightgoeson.
If you want to go back to the fan speed mode or auto mode, simply press
the fan speed or auto mode button.
Cleaning
Alwaysunplugtheappliancebeforeyoucleanit.
Neverimmersetheapplianceinwateroranyotherliquid.
Neveruseaggressiveorammablecleaningagentssuchasbleachor
alcoholtocleananypartoftheappliance.
Onlythepre-lteriswashable.AllotherltersareNOTwashable.
Body of the appliance
Regularly clean the inside and outside of the body to prevent dust from
collecting on the inside and outside.
1 Wipeawaydustwithasoftdryclothfromthebodyoftheappliance.
2 Cleantheairinletandtheairoutletwithasoftdrycloth.
ENGLISH14
4222.003.4042.1.indd 14 18-09-09 14:17

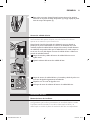
Pre-lter
The pre-lter is washable.
- Clean the pre-lter when the rst lter replacement light ashes to
ensure optimal functioning of the appliance.
1 Placeyourngersintherecessesofthesidepanelsandgentlypull
thetoppartofthefrontpaneltowardsyou.Thenliftthehooksat
thebottomofthepaneloutofthebottomoftheappliance.
2 Toremovethepre-lter,grabthetwoprojectionsandpullthelter
towardsyou.
3 Washthepre-lterunderarunningtap.Ifthepre-lterisverydirty,
useasoftbrushtobrushawaythedust.
Tip: Alternatively, you can clean the pre-lter by removing the dust with a
vacuum cleaner.
4 Air-drythepre-lter.
Note: Make sure that the pre-lter is completely dry. If it is still wet, bacteria
may multiply in it and shorten the lifetime of the pre-lter.
5 Putthepre-lterbackintotheappliance.Attachallhooksproperly
totheappliance.
Note: Make sure that the side with the two projections is pointing towards you.
6 Toreattachthefrontpanel,insertthebottomhooksintothebottom
oftheappliancerst(1).Thenpushthepanelagainstthebodyofthe
appliance(2).
1
2
ENGLISH 15
4222.003.4042.1.indd 15 18-09-09 14:17

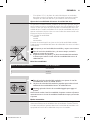
Air quality sensor
Clean the air quality sensor every 2 months for optimal functioning of
the appliance. Clean it more frequently if you use the appliance in a dusty
environment.
Note: When the humidity level in the room is very high, it is possible that
condensation develops on the air quality sensor. As a result, the air quality light
on the control panel and the air quality light ring may indicate that the air
quality is bad even though the air quality is good. In this case you have to clean
the air quality sensor or use one of the manual speed settings.
1 Cleantheairqualitysensorinletandtheairqualitysensor
outletwithasoftbrush.
2 Removetheairqualitysensorcover.
3 Cleantheairqualitysensor,thedustinletandthedustoutletwitha
lightlymoistenedcottonswab.
4 Drythemwithadrycottonswab.
5 Reattachtheairqualitysensorcover.
Filter replacement
Filter maintenance
This air cleaner is equipped with the HealthyAirProtect Lock feature to
ensure that the lters are in optimal condition when the appliance is
operating. When one of the lters is almost full and has to be cleaned or
replaced, the appropriate lter replacement light starts to ash. When you
do not replace lter 2, lter 3 and/or lter 4, the appliance stops operating
and the appliance is locked.
When the appliance is locked, the lter replacement light of the lter
concerned lights up on continuously.
Note: Only replace a lter when the corresponding lter replacement
light ashes. If you replace the lter before the lter replacement light starts
ashing, the lifetime counter will not be reset but will continue counting the
lifetime of the previous lter. As a result, the lter replacement light will start
ashing much too soon.
Filter replacement lights
The lter replacement lights indicate which lter has to be cleaned or
replaced.
ENGLISH16
4222.003.4042.1.indd 16 18-09-09 14:17

- Filter replacement light 1 ashes: lter 1 (the pre-lter) has to be
cleaned. See chapter ‘Cleaning’ for further instructions.
- Filter replacement light 2 ashes: lter 2 (the formaldehyde lter
(supplied with AC4074) or multi-care lter (supplied with AC4072))
has to be replaced.
- Filter replacement light 3/4 ashes: the activated carbon lter and the
HEPA lter have to be replaced.
Note: The HEPA lter and the activated carbon lter have a similar lifetime.
Therefore they have to be replaced at the same time.
Filter replacement lock
If you do not replace the lter in time, the appliance stops operating
approx. 2 weeks after the lter replacement light started ashing.When the
appliance is locked, it does not operate until you have replaced the full lter
and pressed the reset button.
Note: When lter replacement lights 2 or 3/4 and the replacement/lock light
on the control panel are on continuously, the appliance is locked (see section
‘Filter maintenance’ in this chapter for more information).
How long it takes before the appliance is locked depends on the operating
time and speed level selected after the lter replacement alert.
Approximately 1 day before the appliance locks, it beeps every 30 minutes
to inform you that one of the lters needs to be replaced.
When the appliance is locked, you hear a beep when you press any button.
You can switch off the appliance by pressing and holding the on/off button.
If the appliance is locked:
1 Checkwhichlterneedstobereplaced(seesection‘Filter
replacementalerts’).
2 Switchofftheapplianceandunplugit.
3 Replacetheappropriatelter(seesection‘Replacingthelters’).
ENGLISH 17
4222.003.4042.1.indd 17 18-09-09 14:17

Replacing the lters
Tip: Place the appliance against a wall for more stability when you remove or
insert lters.
1 Switchofftheapplianceandunplugit.
2 Placeyourngersintherecessesofthesidepanelsandgentlypull
thetoppartofthefrontpaneltowardsyou.Thenliftthehooksat
thebottomofthepaneloutofthebottomoftheappliance.
3 Toremovelter1(pre-lter),grabthetwoprojectionsandpullthe
ltertowardsyou.
4 Toremovelter2(formaldehydelterforAC4074ormulti-care
lterforAC4072),grabitstagandpullittowardsyou.
5 Toremovelter3(activatedcarbonlter),grabitstagandpullit
towardsyou.
6 Toremovelter4(HEPAlter),grabitstagandpullittowardsyou.
7 Discardthelterthatneedstobereplacedandunpackthenew
lter.
ENGLISH18
4222.003.4042.1.indd 18 18-09-09 14:17

8 Putlter4(HEPAlter)backintotheappliance.
Note: Make sure that the side with the tag is pointing towards you.
9 Putlter3(activatedcarbonlter)backintotheappliance.
10Putlter2(formaldehydelterforAC4074ormulti-carelterfor
AC4072)backintotheappliance.
Note: Make sure that the side with the tag is pointing towards you.
11 Putlter1(pre-lter)backintotheappliance.
Note: Make sure that the side with the two projections is pointing towards you.
Note: Make sure that all hooks are properly attached to the appliance.
12 Toreattachthefrontpanel,insertthebottomhooksintothebottom
oftheappliancerst(1).Thenpushthepanelagainstthebodyofthe
appliance(2).
13 Putthepluginthewallsocketandswitchontheapplianceagain.
1
2
ENGLISH 19
4222.003.4042.1.indd 19 18-09-09 14:17

14 Pressthelterresetbuttonwithathintool.
Note: You do not need to press the lter reset button after cleaning lter 1
(pre-lter).
Note: You cannot reset the appliance when you replace a lter before its lter
replacement light starts ashing.
Note: You cannot reset the appliance if it is not plugged in and switched on.
Storage
1 Tostorethemainscord,winditroundthecordstoragefacilityat
thebottomoftheappliance.
Accessories
New lters are available under the following type numbers:
Filter Typenumber
Filter 2: Formaldehyde lter AC4142
Filter 2: Multi-care lter AC4141
Filter 3: Activated carbon lter AC4143
Filter 4: HEPA lter AC4144
Environment
- Do not throw away the appliance with the normal household waste
at the end of its life, but hand it in at an ofcial collection point for
recycling. By doing this, you help to preserve the environment.
Guarantee and service
If you need information or if you have a problem, please visit the Philips
website at www.philips.com or contact the Philips Consumer Care Centre
in your country (you nd its phone number in the worldwide guarantee
leaet). If there is no Consumer Care Centre in your country, go to your
local Philips dealer.
ENGLISH20
4222.003.4042.1.indd 20 18-09-09 14:17

Troubleshooting
This chapter summarises the most common problems you could
encounter with the appliance. If you are unable to solve the problem with
the information below, contact the Consumer Care Centre in your country.
Problem Possiblesolution
The appliance doesn’t
work.
You ignored the lter replacement alerts. You did not replace the lter
when the lter replacement light started ashing and did not respond when
the appliance started to beep every 30 minutes after approx. 2 weeks. As
a result, the appliance is now locked and you have to replace the lter and
reset the appliance (see chapter ‘Filter replacement’) so that the appliance
can operate again.
No air comes out of the
air outlet
The appliance is not switched on. Put the plug in the wall socket and switch
on the appliance.
The air quality is good and the auto mode is activated. In this case, the
appliance switches off automatically when the air is clean to save electricity.
The fan speed does not
change when the auto
mode is activated.
When the room becomes dark, the night mode is activated automatically
when the appliance is in auto mode. In this case, the fan speed is set to a
very low level. If you want to change the fan speed, press the fan speed
button one or more times to set the desired fan speed.
The airow that comes
out of the air outlet is
signicantly weaker than
before.
The pre-lter is dirty. Clean the pre-lter (see chapter ‘Cleaning’).
You haven’t removed all packaging material from the lters. Make sure that
you have removed all packaging material.
The air quality does not
improve, even though
the appliance has been
operating for a long time.
One of the lters has not been placed in the appliance. Make sure that
all lters are properly installed in the following order, starting with the
innermost lter: 1) HEPA lter, 2) activated carbon lter, 3) formaldehyde
lter (supplied with AC4074) or multi-care lter (supplied with AC4072), 4)
pre-lter.
The air quality sensor is wet. The humidity level in your room is high and
causes condensation. Make sure that the air quality sensor is clean and dry
(see chapter ‘Cleaning’).
The room in which you run the appliance is larger than 55m², which is the
maximum size at which this air cleaner can operate effectively.
The colour of the air
quality light ring and the
air quality light always
stays the same.
The air quality sensor is dirty. Clean the air quality sensor (see
chapter ‘Cleaning’).
There is not enough ventilation in the room. Open a window, to improve
the air circulation.
I need cleaner air because
I have an allergy.
You can change the air quality sensor sensitivity (see chapter ‘Using the
appliance’) to make the air cleaner clean the air even better.
ENGLISH 21
4222.003.4042.1.indd 21 18-09-09 14:17

Problem Possiblesolution
The appliance is extra
loud.
You haven’t removed all packaging material from the lters. Make sure that
you have removed all packaging material.
The appliance still
indicates that I need
to replace a lter, but I
already did.
Perhaps you did not press the lter reset button properly. Plug in the
appliance, press and hold the on/off button and press the lter reset button
with a at tool.
The appliance stops
operating, although the
power-on light is still on.
The built in quality sensor has determined that the air quality is good and
that the air does not need to be cleaned anymore. When the air quality
deteriorates, the appliance starts running at a low fan speed and noise level
so that the energy consumption is minimised.
ENGLISH22
4222.003.4042.1.indd 22 18-09-09 14:17

23
Introducción
Enhorabuena por la compra de este producto y bienvenido a Philips. Para
sacar el mayor partido de la asistencia que Philips le ofrece, registre su
producto en www.philips.com/welcome.
Con este nuevo sistema CleanAir respirará un aire más limpio. Para
obtener los mejores resultados, coloque el sistema CleanAir en una
habitación donde pase la mayor parte del tiempo, por ejemplo, el salón o
el dormitorio.
En cualquier lugar con gente, plantas o mascotas, hay partículas en el aire
que pueden afectar a su bienestar, especialmente si padece alergias. Debido
a estas partículas, el aire de una habitación puede estar más contaminado
que el de las grandes ciudades.
Normalmente, las partículas son invisibles e inodoras. Sin embargo,
pueden afectar a la salud. El sistema CleanAir reduce la cantidad de
pelos de animales y contaminantes industriales del aire, lo que mejora
la calidad del mismo. También ltra partículas ultranas con un tamaño
superior a 20 nanómetros, incluidos las bacterias y algunos virus. Según
publicaciones de la Organización Mundial de la Salud, los virus de gripe
aviar y humana, así como la bacteria Legionella, tienen un tamaño superior
a 20 nanómetros.
Filtrado en varias etapas
El puricador de aire cuenta con un exclusivo sistema de ltrado en varias
etapas que garantiza una calidad del aire óptima:
- Etapa 1: el preltro, que se ha tratado con sustancias antibacterias,
atrapa las partículas más grandes, como el pelo humano o de mascotas,
etc.
- Etapa 2: el ltro de formaldehído (se suministra con el modelo
AC4074) elimina el formaldehído y otros compuestos orgánicos
volátiles. El ltro HEPA junto con el ltro multifunción se encargan
de ltrar el polvo, el polen y las partículas ultranas con un tamaño
superior a 20 nanómetros, incluidos las bacterias y algunos virus. Según
publicaciones de la Organización Mundial de la Salud, los virus de
gripe aviar y humana, así como la bacteria Legionella, tienen un tamaño
superior a 20 nanómetros.
Nota: Los modelos AC4074 y AC4072 admiten tanto el ltro de formaldehído
como el ltro multifunción. Al sustituir el ltro que se incluya en el modelo en
cuestión, podrá elegir el ltro (de formaldehído o multifunción) que mejor se
adapte a sus necesidades.
- Etapa 3: el ltro de carbono activo elimina ecazmente los olores y los
gases nocivos.
- Etapa 4: el ltro HEPA compuesto de alto rendimiento con
revestimiento antibacterias elimina ecazmente el polvo no y el humo
del tabaco, mientras que las propiedades antibacterias y antimoho de
los materiales orgánicos antibacterias eliminan los gérmenes y el moho.
Descripción general (g. 1)
A Anillo luminoso de calidad del aire
B Indicador de velocidad del ventilador (sólo modelo AC4074)
C Salida del sensor de calidad del aire
D Sensor de calidad del aire
E Entrada del sensor de calidad del aire
ESPAÑOL
4222.003.4042.1.indd 23 18-09-09 14:17

F Asa
G Salida de aire
H Entrada de aire
I Recogecable
J Cable de alimentación
K Panel de control
1 Sensor de luz para el modo nocturno
2 Botón de encendido/apagado de calidad del aire con piloto
3 Botón de encendido/apagado
4 Botón de modo silencioso con piloto
5 Piloto de encendido
6 Botón de velocidad del ventilador con piloto
7 Botón de modo automático con piloto
8 Pilotos de velocidad del ventilador (1, 2, 3 y turbo)/pilotos de
sustitución del ltro
9 Piloto de sustitución/bloqueo
10 Indicaciones de velocidad del ventilador
11 Indicadores de sustitución del ltro
L Filtro 4: ltro HEPA
M Filtro 3: ltro de carbono activo
N Filtro 2: ltro de formaldehído (se suministra con el modelo AC4074)
o ltro multifunción (se suministra con el modelo AC4072)
O Filtro 1: preltro
P Panel frontal
Importante
Antes de usar el aparato, lea atentamente este manual del usuario y
consérvelo por si necesitara consultarlo en el futuro.
Peligro
- No deje que entre agua ni cualquier otro líquido o detergente
inamable en el aparato para evitar el riesgo de descargas eléctricas
y/o de incendio.
- No lave el aparato con agua ni cualquier otro líquido o detergente
(inamable) para evitar el riesgo de descargas eléctricas y/o de
incendio.
Advertencia
- Antes de enchufar el aparato, compruebe si el voltaje indicado en la
parte inferior del mismo se corresponde con el voltaje de red local.
- Si el cable de alimentación está dañado, debe ser sustituido por Philips
o por un centro de servicio autorizado por Philips, con el n de evitar
situaciones de peligro.
- No utilice el aparato si la clavija, el cable de alimentación o el propio
aparato están dañados.
- Este aparato no debe ser usado por personas (adultos o niños) con su
capacidad física, psíquica o sensorial reducida, ni por quienes no tengan
los conocimientos y la experiencia necesarios, a menos que sean
supervisados o instruidos acerca del uso del aparato por una persona
responsable de su seguridad.
- Asegúrese de que los niños no jueguen con este aparato.
- No bloquee la entrada y salida de aire con ningún objeto.
ESPAÑOL24
4222.003.4042.1.indd 24 18-09-09 14:17

Precaución
- Este aparato en ningún caso sustituye la ventilación adecuada, la
limpieza regular con aspirador o el uso de una campana extractora
cuando cocine.
- Si la toma de corriente donde se enchufa el aparato tiene una
conexión defectuosa, la clavija del aparato se calentará. Asegúrese de
enchufar el aparato en una toma de corriente con buena conexión.
- Ponga y utilice siempre el aparato sobre una supercie seca, estable,
plana y horizontal.
- Deje al menos 20 cm de espacio libre por detrás y a ambos lados del
aparato, y al menos 30 cm por encima del aparato.
- No coloque nada sobre el aparato ni se siente sobre el mismo.
- No coloque el aparato justo debajo de un sistema de aire
acondicionado para evitar la condensación que se forma a partir del
goteo en el aparato.
- Antes de encender el aparato, asegúrese de que todos los ltros estén
bien montados.
- Utilice únicamente los ltros originales de Philips especialmente
diseñados para este aparato. No utilice ningún otro ltro.
- Evite golpear el aparato (sobre todo la entrada y salida de aire) con
objetos duros.
- Levante o mueva siempre el aparato con el asa situada en la parte
posterior del mismo.
- No inserte los dedos ni ningún objeto en la salida de aire.
- No utilice el aparato si ha utilizado insecticidas domésticos a base de
humos, ni en lugares donde haya residuos de aceite, donde se esté
quemando incienso o haya residuos de gases químicos.
- No utilice el aparato cerca de calentadores de gas, calefacciones o
chimeneas.
- Desenchufe siempre el aparato después de usarlo y antes de limpiarlo.
- No utilice el aparato en habitaciones con grandes cambios de
temperatura, ya que podría producir condensación dentro del aparato.
- Para evitar interferencias, sitúe el aparato al menos a 2 m de distancia
de otros aparatos eléctricos que utilicen ondas de radio aéreas como,
por ejemplo, televisores, radios y relojes con radio.
- El aparato está diseñado sólo para uso doméstico en condiciones de
funcionamiento normales.
- No utilice el aparato en ambientes húmedos o con altas temperaturas,
como el baño, el aseo o la cocina.
- El aparato no elimina el monóxido de carbono (CO) ni el radón
(Rn). No se puede usar como dispositivo de seguridad en caso de
accidentes relacionados con procesos de combustión y compuestos
químicos.
Campos electromagnéticos (CEM)
Este aparato Philips cumple todos los estándares sobre campos
electromagnéticos (CEM). Si se utiliza correctamente y de acuerdo con las
instrucciones de este manual, el aparato se puede usar de forma segura
según los conocimientos cientícos disponibles hoy en día.
ESPAÑOL 25
4222.003.4042.1.indd 25 18-09-09 14:17

Antes de utilizarlo por primera vez
Colocación de los ltros
El aparato incluye en su interior todos los ltros, pero tiene que quitar
el embalaje de los ltros antes de usar el aparato. Quite todos los ltros,
desembálelos y vuelva a colocarlos en el aparato tal y como se describe a
continuación.
Consejo: Cuando quite o ponga los ltros, coloque el aparato contra la pared
para conseguir una mayor estabilidad.
Nota: Asegúrese de que inserta los ltros en la posición correcta.
1 Coloquelosdedosenloshuecosdelospaneleslateralesytire
suavementedelapartesuperiordelpanelfrontalhaciausted.Luego
levantelosganchosinferioresdelpanelyquítelosdelapartede
abajodelaparato.
2 Quitetodoslosltrosdelaparato.
3 Quiteelmaterialdeembalajedelosltros.
4 Coloqueelltro4(ltroHEPA)denuevoenelaparato.
Nota: Asegúrese de que la cara de la lengüeta esté orientada hacia usted.
5 Vuelvaacolocarelltro3(ltrodecarbonoactivo)enelaparato.
ESPAÑOL26
4222.003.4042.1.indd 26 18-09-09 14:17

6 Coloquedenuevoenelaparatoelltro2(ltrodeformaldehídoen
elmodeloAC4074oltromultifunciónenelmodeloAC4072).
Nota: Asegúrese de que la cara de la lengüeta esté orientada hacia usted.
7 Vuelvaacolocarelltro1(preltro)enelaparato.
Nota: Asegúrese de que la cara que contiene los dos salientes esté orientada
hacia usted.
Nota: Asegúrese de que todos los ganchos estén bien jados en el aparato.
8 Paravolveramontarelpanelfrontal,inserteprimerolosganchos
inferioresenlapartedeabajodelaparato(1).Luegoempujeelpanel
haciaelcuerpodelaparato(2).
Uso del aparato
1 Enchufeelaparatoalared.
, Todoslospilotosseenciendendosvecesyseoyeunpitido.Luego
lospilotosseapagan.
2 Mantengapulsadoelbotóndeencendido/apagadodurante
2segundosparaencenderelaparato.
, Seenciendenelpilotodeencendidoyelpilotodecalidaddeaire
situadosenelpaneldecontrol.
1
2
ESPAÑOL 27
4222.003.4042.1.indd 27 18-09-09 14:17

, Elanilloluminosodecalidaddelaireindicalacalidaddeéste.
Indicación de calidad del aire
Color Calidaddelaire
Azul muy buena
Morado fuerte buena
Violeta aceptable
Rojo mala
Para apagar el anillo luminoso de calidad del aire, pulse el botón de calidad
del aire.
Nota: El anillo luminoso de calidad del aire se ilumina automáticamente
cuando se enciende el aparato.
, Elaparatocomienzaelfuncionamientoenelmodoautomático.
Para apagar el aparato, mantenga pulsado el botón de encendido/apagado
de nuevo hasta que el piloto de encendido se apague, y desenchufe el
aparato.
Nota: Cuando el nivel de humedad de la habitación sea muy elevado, es
posible que se forme condensación en el sensor de calidad del aire. Como
resultado, el piloto de calidad del aire del panel de control y el anillo luminoso
de calidad del aire pueden indicar que la calidad del aire es mala, aunque no
sea el caso. Si es así, el modo automático hace que el aparato funcione con
una velocidad del ventilador elevada. Puede solucionar este problema si limpia
el sensor de calidad del aire. Si se forma condensación con frecuencia durante
periodos de gran nivel de humedad, le aconsejamos que utilice una posición de
velocidad manual.
Pilotos de velocidad del ventilador/pilotos de sustitución del
ltro
- Los pilotos situados a mano derecha en el panel de control tienen dos
funciones: indicar la velocidad del ventilador e indicar si los ltros se
deben limpiar o sustituir.
- Cuando los pilotos del 1 al 3/4 se iluminan de manera continua, se
indica la velocidad del ventilador en ese momento.
- Cuando el piloto 1 parpadea, debe limpiar el preltro. Si parpadean en
cambio los pilotos 2 y/o 3/4, tendrá que sustituir el ltro cuyo piloto
parpadee. Si los pilotos 2 y/o 3/4 parpadean, el piloto de sustitución/
bloqueo también lo hará (consulte el capítulo “Sustitución del ltro”
para obtener más información).
ESPAÑOL28
4222.003.4042.1.indd 28 18-09-09 14:17

- Si los pilotos 2, 3/4 y el piloto de sustitución/bloqueo se encienden
de manera continua, el aparato se ha bloqueado (consulte el capítulo
“Bloqueo de sustitución del ltro” para obtener más información).
Ajuste de la sensibilidad del sensor de calidad del aire
Las personas con determinados problemas de salud (por ejemplo, alergia o
asma) tienen una mayor necesidad de respirar aire más saludable. Por este
motivo, un aire más limpio le permite ajustar la sensibilidad del sensor de
calidad del aire. Cuando se establece en el nivel de sensibilidad más alto, el
aparato comienza a limpiar el aire con unos índices de contaminación más
bajos para limpiar aún más el aire.
Hay 3 niveles de sensibilidad:
- estándar
- sensible
- extrasensible
El sensor de contaminación se ajusta en el nivel de sensibilidad estándar.
Puede ajustar la sensibilidad del sensor de calidad del aire como se indica a
continuación:
1 Sielaparatoyaestáenchufado,desenchúfeloyespereunosminutos.
2 Pulseelbotóndecalidaddelairey,almismotiempo,enchufela
clavijaenlatomadecorriente.
, Elaparatoemitedospitidosyunpilotodevelocidaddelventilador
seiluminaparaindicarelnivelactualdesensibilidaddelsensorde
calidaddelaire.
Nivel de sensibilidad:
Pilotodevelocidaddelventilador Niveldesensibilidad
1 extrasensible
2 sensible
3 estándar
3 Pulseelbotóndevelocidaddelventiladorparaajustarelnivelde
sensibilidaddelsensordecalidaddelaire.
, Unpilotodevelocidaddelventiladorparpadeaparaindicarelnivel
establecidodesensibilidaddelsensordecalidaddelaire.
4 Mantengapulsadoelbotóndeencendido/apagadoparaapagarel
aparato.
Nota: Cuando cambie el nivel de sensibilidad, el aparato comienza a funcionar
automáticamente en el nivel de sensibilidad establecido siempre que encienda
el aparato.
Modo automático
Cuando el aparato se enciende, el sensor de calidad del aire integrado
mide automáticamente la calidad del aire del ambiente. Cuando se activa
el modo automático, el aparato selecciona la velocidad del ventilador más
apropiada en función de la calidad del aire que se ha medido.
ESPAÑOL 29
4222.003.4042.1.indd 29 18-09-09 14:17

1 Mantengapulsadoelbotóndeencendido/apagadodurante
2segundosparaencenderelaparato.
2 Pulseelbotóndemodoautomáticoparaactivarelmodo
automático.
Nota: Si el aparato está funcionando en otro modo y desea activar el modo
automático, basta con pulsar el botón de modo automático.
, Elpilotodemodoautomáticoseilumina.
, Elpilotodevelocidaddelventiladorindicalavelocidadalaqueestá
funcionandoelventiladordelaparato.
Nota: Si la calidad del aire es muy buena y el aparato está funcionando a
una velocidad del ventilador muy baja, el piloto de velocidad del ventilador de
la posición de velocidad más baja no se ilumina. En ese caso, solamente se
iluminan el piloto de encendido y el piloto de modo automático.
Nota: El sensor de calidad del aire integrado mide la calidad del aire y
selecciona automáticamente la posición de velocidad apropiada para
garantizar la mejor calidad posible del aire de la habitación. Cuando el aire
esté limpio, el aparato deja de funcionar y, cuando la calidad del aire se
deteriora, el aparato comienza a funcionar de nuevo a unos niveles bajos de
velocidad del ventilador y de ruido, de modo que el consumo de energía sea
mínimo.
Modo nocturno
El aparato funciona en armonía con su entorno. En el modo automático, el
aparato cambia automáticamente al modo nocturno cuando la habitación
en la que está funcionando se oscurece. Cuando una habitación lleva
3 minutos a oscuras, los pilotos del aparato se apagan, la velocidad del
ventilador y el nivel de ruido se reducen y el consumo de energía se
minimiza.Si la habitación vuelve a iluminarse durante 5 o más minutos, el
aparato reanuda el funcionamiento normal.
En el modo nocturno, el control automático sigue activo. Si el aire está
limpio, los pilotos y el ventilador se apagan. Si la calidad del aire se
deteriora, el aparato se activa y los pilotos y el ventilador se vuelven a
encender.
Nota: El modo nocturno solamente funciona cuando el aparato está
funcionando en el modo automático.
Velocidad del ventilador
Si no utiliza el modo automático, puede seleccionar manualmente la
velocidad del ventilador que desee.
1 Mantengapulsadoelbotóndeencendido/apagadodurante
2segundosparaencenderelaparato.
ESPAÑOL30
4222.003.4042.1.indd 30 18-09-09 14:17

2 Pulseelbotóndevelocidaddelventiladorunaomásvecespara
seleccionarlavelocidaddelventiladorquedesee.
, Seiluminaelpilotodevelocidaddelventiladorcorrespondientey
lasindicacionessituadassobrelospilotosleinformandelavelocidad
establecida(1,2,3oturbo).
, SólomodeloAC4074:seiluminaelpilotodevelocidaddelventilador
correspondientedelindicadordevelocidad.
Nota: Seleccione el turbo si necesita un ujo de aire extrafuerte cuando el
aire de la habitación esté muy sucio. Todos los pilotos (tres) de velocidad del
ventilador se iluminan.
Modo silencioso
Cuando utiliza el aparato en modo silencioso, funciona casi en silencio.
1 Mantengapulsadoelbotóndeencendido/apagadodurante
2segundosparaencenderelaparato.
2 Pulseelbotóndemodosilenciosoparaactivarelmodosilencioso.
, Elpilotodemodosilenciososeilumina.
Si desea volver al modo de velocidad del ventilador o al modo automático,
basta con pulsar el botón de velocidad del ventilador o el botón de modo
automático, según corresponda.
Limpieza
Desenchufesiempreelaparatoantesdelimpiarlo.
Nosumerjanuncaelaparatoenaguauotroslíquidos.
Nuncautiliceagentesdelimpiezaagresivosoinamables,comolejíao
alcohol,paralimpiarcualquierpartedelaparato.
Sepuedelavarúnicamenteelpreltro.ElrestodeltrosNOsedeben
lavar.
ESPAÑOL 31
4222.003.4042.1.indd 31 18-09-09 14:17

Cuerpo del aparato
Limpie a menudo el interior y el exterior del aparato para que no se
acumule polvo por dentro ni por fuera.
1 Limpieelpolvodelcuerpodelaparatoconunpañosecoysuave.
2 Limpielaentradaysalidadeaireconunpañosecoysuave.
Preltro
El preltro se puede lavar.
- Limpie el preltro cuando el primer piloto de sustitución del ltro
parpadee para garantizar el mejor funcionamiento posible del aparato.
1 Coloquelosdedosenloshuecosdelospaneleslateralesytire
suavementedelapartesuperiordelpanelfrontalhaciausted.Luego
levantelosganchosinferioresdelpanelyquítelosdelapartede
abajodelaparato.
2 Paraquitarelpreltro,agarrelosdossalientesytiredelltrohacia
usted.
3 Laveelpreltrobajoelgrifoy,siestámuysucio,utiliceuncepillo
suaveparaeliminarelpolvo.
Consejo: A la hora de limpiar el preltro, también puede eliminar el polvo con
un aspirador.
4 Dejesecarelpreltro.
Nota: Asegúrese de que el preltro esté completamente seco, ya que, si está
mojado, las bacterias se podrían multiplicar y la vida útil del preltro se podría
ver reducida.
5 Vuelvaacolocarelpreltroenelaparatoyjetodoslosganchos
correctamenteenelaparato.
Nota: Asegúrese de que la cara que contiene los dos salientes esté orientada
hacia usted.
ESPAÑOL32
4222.003.4042.1.indd 32 18-09-09 14:17

6 Paravolveramontarelpanelfrontal,inserteprimerolosganchos
inferioresenlapartedeabajodelaparato(1).Luegoempujeelpanel
haciaelcuerpodelaparato(2).
Sensor de calidad del aire
Limpie el sensor de calidad del aire cada 2 meses para optimizar el
funcionamiento del aparato. Límpielo con más frecuencia si utiliza el
aparato en un entorno cuyo aire está sucio.
Nota: Cuando el nivel de humedad de la habitación sea muy elevado, es
posible que se forme condensación en el sensor de calidad del aire. Como
resultado, el piloto de calidad del aire del panel de control y el anillo luminoso
de calidad del aire pueden indicar que la calidad del aire es mala, aunque no
sea el caso. Si es así, debe limpiar el sensor de calidad del aire o utilizar una
posición de velocidad manual.
1 Limpielaentradaysalidadelsensordecalidaddelaireconun
cepillosuave.
2 Quitelacubiertadelsensordecalidaddelaire.
3 Limpieelsensordecalidaddelaireylaentradaysalidadepolvocon
untrozodealgodónligeramentehumedecido.
4 Séquelosconuntrozodealgodónseco.
5 Coloquedenuevolacubiertadelsensordecalidaddelaire.
Sustitución del ltro
Mantenimiento de los ltros
Este puricador de aire cuenta con la función HealthyAirProtect Lock
para garantizar que los ltros permanecen en una estado óptimo cuando
el aparato esté funcionando. Si uno de los ltros está casi lleno y se
debe limpiar o sustituir, el piloto de sustitución del ltro correspondiente
1
2
ESPAÑOL 33
4222.003.4042.1.indd 33 18-09-09 14:17

comienza a parpadear. Si no sustituye el ltro 2, 3 y/o 4, el aparato deja de
funcionar y se bloquea.
Cuando el aparato se bloquea, el piloto de sustitución del ltro en cuestión
se ilumina de manera continua.
Nota: Sustituya un ltro únicamente cuando parpadee su piloto de sustitución
del ltro correspondiente. Si sustituye el ltro antes de que el piloto comience
a parpadear, el contador de vida útil no se reiniciará, sino que seguirá
contabilizando la vida útil continuando a partir de los valores del ltro anterior,
por lo que el piloto de sustitución del ltro comenzará a parpadear mucho
antes la próxima vez.
Pilotos de sustitución del ltro
Los pilotos de sustitución del ltro indican qué ltro se debe limpiar o
sustituir.
- El piloto de sustitución del ltro 1 parpadea: debe limpiar el ltro 1
(el preltro). Consulte el capítulo “Limpieza” para obtener más
información.
- El piloto de sustitución del ltro 2 parpadea: debe sustituir el ltro 2 (el
ltro de formaldehído, que se suministra con el modelo AC4074, o el
ltro multifunción, que se incluye con el modelo AC4072).
- El piloto de sustitución del ltro 3/4 parpadea: debe sustituir el ltro de
carbono activo y el ltro HEPA.
Nota: El ltro HEPA y el ltro de carbono activo tienen una vida útil similar, por
lo que se sustituyen a la vez.
Bloqueo de sustitución del ltro
Si no sustituye el ltro en su debido momento, el aparato deja de funcionar
aproximadamente 2 semanas después de que el piloto de sustitución del
ltro comenzara a parpadear. Cuando el aparato se bloquea, no vuelve a
funcionar hasta que sustituye el ltro lleno y pulsa el botón de reinicio.
ESPAÑOL34
4222.003.4042.1.indd 34 18-09-09 14:17

Nota: Cuando los pilotos de sustitución del ltro 2 ó 3/4 y el piloto de
sustitución/bloqueo del panel de control se iluminan de manera continua, el
aparato se bloquea (consulte la sección “Mantenimiento de los ltros” en este
capítulo para obtener más información).
El tiempo que el aparato tarda en bloquearse depende del tiempo de
funcionamiento y el nivel de velocidad seleccionado una vez que se
produce la alerta de sustitución del ltro.
Aproximadamente 1 día antes de que se bloquee el aparato, emite un
pitido cada 30 minutos para informarle de que debe sustituir un ltro.
Cuando el aparato se bloquee, oirá un pitido al pulsar cualquier botón.
Puede apagar el aparato si mantiene pulsado el botón de encendido/
apagado.
Si el aparato se bloquea:
1 Compruebecuáleselltroquesedebesustituir(consultelasección
sobrelasalertasdesustitucióndelltro).
2 Apagueelaparatoydesenchúfelo.
3 Sustituyaelltrocorrespondiente(consultelasección“Sustitución
delosltros”).
Sustitución de los ltros
Consejo: Cuando quite o ponga los ltros, coloque el aparato contra la pared
para conseguir una mayor estabilidad.
1 Apagueelaparatoydesenchúfelo.
2 Coloquelosdedosenloshuecosdelospaneleslateralesytire
suavementedelapartesuperiordelpanelfrontalhaciausted.Luego
levantelosganchosinferioresdelpanelyquítelosdelapartede
abajodelaparato.
3 Paraquitarelltro1(preltro),agarrelosdossalientesytiredel
ltrohaciausted.
4 Paraquitarelltro2(ltrodeformaldehídoenelmodeloAC4074o
ltromultifunciónenelmodeloAC4072),agarrelalengüetaytirede
ellahaciausted.
ESPAÑOL 35
4222.003.4042.1.indd 35 18-09-09 14:17

5 Paraquitarelltro3(ltrodecarbonoactivo),agarrelalengüetay
tiredeellahaciausted.
6 Paraquitarelltro4(ltroHEPA),agarrelalengüetaytiredeella
haciausted.
7 Desecheelltrosustituidoydesembaleelltronuevo.
8 Vuelvaacolocarelltro4(ltroHEPA)enelaparato.
Nota: Asegúrese de que la cara de la lengüeta esté orientada hacia usted.
9 Vuelvaacolocarelltro3(ltrodecarbonoactivo)enelaparato.
10Coloquedenuevoenelaparatoelltro2(ltrodeformaldehídoen
elmodeloAC4074,oltromultifunciónenelmodeloAC4072).
Nota: Asegúrese de que la cara de la lengüeta esté orientada hacia usted.
ESPAÑOL36
4222.003.4042.1.indd 36 18-09-09 14:17

11 Coloqueelltro1(preltro)denuevoenelaparato.
Nota: Asegúrese de que la cara que contiene los dos salientes esté orientada
hacia usted.
Nota: Asegúrese de que todos los ganchos estén bien jados en el aparato.
12 Paravolveramontarelpanelfrontal,inserteprimerolosganchos
inferioresenlapartedeabajodelaparato(1).Luegoempujeelpanel
haciaelcuerpodelaparato(2).
13 Enchufelaclavijadelaparatoalatomadecorrienteyenciéndalode
nuevo.
14 Pulseelbotóndereiniciodelltroconunaherramientana.
Nota: No es necesario pulsar el botón de reinicio del ltro después de limpiar
el ltro 1 (preltro).
Nota: Cuando sustituya un ltro, no puede reiniciar el aparato antes de que el
piloto de sustitución del ltro en cuestión comience a parpadear.
Nota: No puede reiniciar el aparato si éste no está enchufado y encendido.
Almacenamiento
1 Paraguardarelcabledealimentación,enrólleloalrededordel
recogecablesituadoenlaparteinferiordelaparato.
Accesorios
Dispone de ltros nuevos con los números de modelo siguientes:
Filtro Númerodemodelo
Filtro 2: ltro de formaldehído AC4142
Filtro 2: ltro multifunción AC4141
Filtro 3: ltro de carbono activo AC4143
Filtro 4: ltro HEPA AC4144
1
2
ESPAÑOL 37
4222.003.4042.1.indd 37 18-09-09 14:17

Medio ambiente
- Al nal de su vida útil, no tire el aparato junto con la basura normal del
hogar. Llévelo a un punto de recogida ocial para su reciclado. De esta
manera ayudará a conservar el medio ambiente.
Garantía y servicio
Si necesita información o si tiene algún problema, visite la página Web de
Philips en www.philips.com, o póngase en contacto con el Servicio de
Atención al Cliente de Philips en su país (hallará el número de teléfono en
el folleto de la garantía mundial). Si no hay Servicio de Atención al Cliente
de Philips en su país, diríjase a su distribuidor local Philips.
Guía de resolución de problemas
En este capítulo se resumen los problemas más frecuentes que pueden
surgir. Si no puede resolver el problema con la siguiente información,
póngase en contacto con el Servicio de Atención al Cliente de su país.
Problema Posiblesolución
El aparato no funciona. Ha ignorado las alertas de sustitución del ltro. No ha sustituido el ltro
cuando el piloto de sustitución correspondiente comenzó a parpadear ni
ha tomado medidas cuando el aparato comenzó a emitir un pitido cada 30
minutos después de aproximadamente 2 semanas. Por ese motivo, el aparato
está bloqueado y debe sustituir el ltro y reiniciar el aparato (consulte el
capítulo “Sustitución del ltro”) para que el aparato vuelva a funcionar.
No sale aire por la salida
de aire
El aparato no está encendido. Enchufe la clavija del aparato en la toma de
corriente y enciéndalo.
La calidad del aire es buena y el modo automático está activado. En ese caso,
el aparato se apaga automáticamente cuando el aire está limpio para ahorrar
electricidad.
La velocidad del
ventilador no cambia
cuando el modo
automático está activado.
Cuando la habitación se oscurece, si el aparato está en modo automático,
se activa automáticamente el modo nocturno. En tal caso, la velocidad del
ventilador se establece en un nivel muy bajo. Si desea cambiar la velocidad
del ventilador, pulse el botón de velocidad del ventilador una o varias veces
para ajustar la velocidad del ventilador que desee.
El ujo de aire
procedente de la salida
de aire es mucho más
débil que anteriormente.
El preltro está sucio. Límpielo (consulte el capítulo “Limpieza”).
No ha quitado todo el material de embalaje de los ltros. Asegúrese de que
lo haya hecho correctamente.
ESPAÑOL38
4222.003.4042.1.indd 38 18-09-09 14:17

Problema Posiblesolución
La calidad del aire no
mejora a pesar de
que el aparato lleva
funcionando bastante
tiempo.
Uno de los ltros no se ha colocado en el aparato. Asegúrese de que todos
los ltros estén bien instalados en el orden siguiente, comenzando por el
ltro situado más al interior: 1) ltro HEPA; 2) ltro de carbono activo;
3) ltro de formaldehído (se suministra con el modelo AC4074) o ltro
multifunción (se incluye en el modelo AC4072); 4) preltro.
El sensor de calidad del aire está mojado. El nivel de humedad de la
habitación es elevado y se forma condensación. Asegúrese de que el sensor
de calidad del aire esté limpio y seco (consulte el capítulo “Limpieza”).
La habitación en la que está funcionando el aparato es mayor de 55 m²,
tamaño máximo en el que el puricador de aire funciona ecazmente.
El color del anillo
luminoso de calidad
del aire siempre es el
mismo.
El sensor de calidad del aire está sucio. Límpielo (consulte el capítulo
“Limpieza”).
No hay ventilación suciente en la habitación. Abra una ventana para mejorar
la circulación del aire.
Necesito un aire más
limpio porque padezco
alergia.
Puede cambiar la sensibilidad del sensor de calidad del aire (consulte el
capítulo “Uso del aparato”) para que el puricador limpie el aire aún más.
El aparato hace
demasiado ruido.
No ha quitado todo el material de embalaje de los ltros. Asegúrese de que
lo haya hecho correctamente.
El aparato aún indica
que necesito sustituir
un ltro, pero ya lo he
hecho.
Puede que no haya pulsado correctamente el botón de reinicio del ltro.
Enchufe el aparato, mantenga pulsado el botón de encendido/apagado y
pulse el botón de reinicio del ltro con una herramienta na.
El aparato deja de
funcionar aunque el
piloto de encendido
permanece iluminado.
El sensor de calidad integrado ha determinado que la calidad del aire es
buena y que no se debe limpiar más el aire. Cuando la calidad del aire
se deteriore, el aparato comenzará a funcionar a unos niveles bajos de
velocidad del ventilador y ruido para que se minimice el consumo de energía.
ESPAÑOL 39
4222.003.4042.1.indd 39 18-09-09 14:17

40
4222.003.4042.1.indd 40 18-09-09 14:17

41
4222.003.4042.1.indd 41 18-09-09 14:17

4222.003.4042.1
4222.003.4042.1.indd 42 18-09-09 14:17
-
 1
1
-
 2
2
-
 3
3
-
 4
4
-
 5
5
-
 6
6
-
 7
7
-
 8
8
-
 9
9
-
 10
10
-
 11
11
-
 12
12
-
 13
13
-
 14
14
-
 15
15
-
 16
16
-
 17
17
-
 18
18
-
 19
19
-
 20
20
-
 21
21
-
 22
22
-
 23
23
-
 24
24
-
 25
25
-
 26
26
-
 27
27
-
 28
28
-
 29
29
-
 30
30
-
 31
31
-
 32
32
-
 33
33
-
 34
34
-
 35
35
-
 36
36
-
 37
37
-
 38
38
-
 39
39
-
 40
40
-
 41
41
-
 42
42


Philips AC4072/00 Manual de usuario
- Tipo
- Manual de usuario
- Este manual también es adecuado para
en otros idiomas
- English: Philips AC4072/00 User manual